
UPDATE 27 Oct 2021 — Fixed the images for the extended ConHex boards (they were missing corner spaces), and removed the links and images of the Nestor Games ConHex boards, which are sadly no longer available.
ConHex is a unique connection game invented by Michail Antonow in 2002. You may remember that Hex was inspired by Piet Hein’s interest in the four-colour problem, which is related to map-colouring; ConHex makes this inspiration much more explicit.
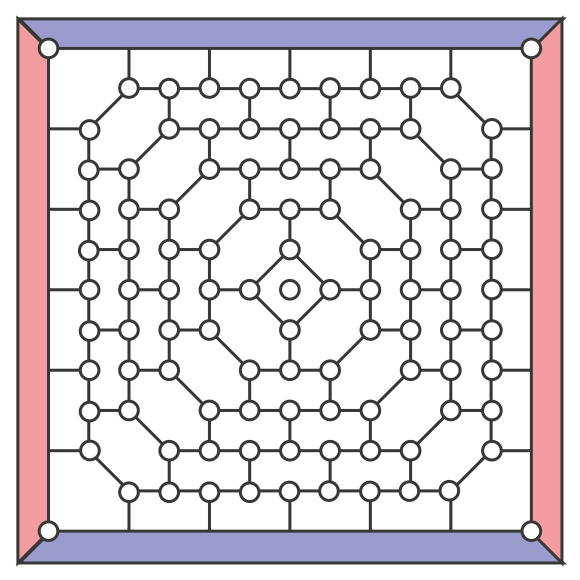
In ConHex, players compete to claim the corners of spaces on the board until they gain control of half or more on a given space, at which point that space becomes their colour. The first player to connect their colour’s sides of the board with coloured-in spaces is the winner. The ConHex board has 41 spaces consisting of a mix of rectangles and hexagons, with 69 playable nodes:

The standard ConHex board, as depicted on Little Golem
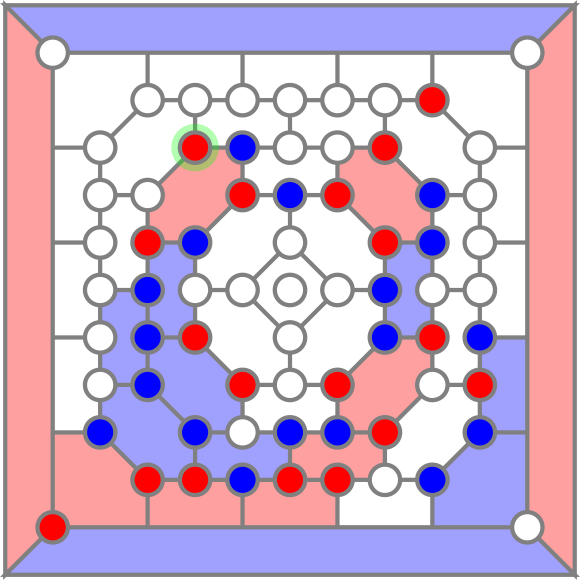
ConHex games tend to twist and writhe their way across the whole board, covering much more of the available space than the average connection game. While there’s a definite lean toward tactics over strategy on the standard-size board, there’s still plenty of intricacy on offer, as we can see in this sample final position:
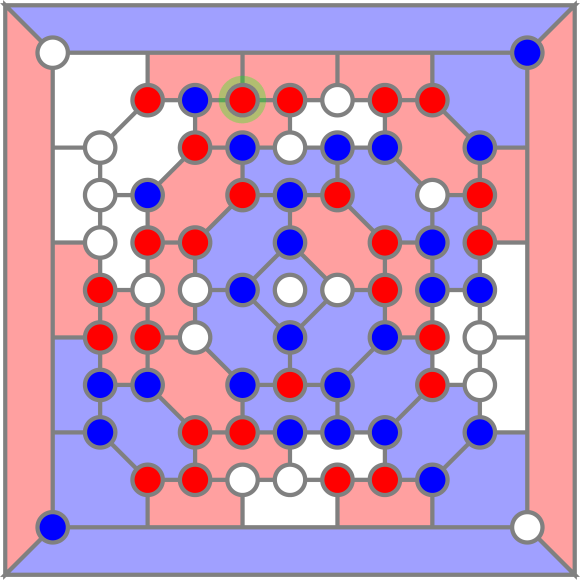
Red wins this game after 52 moves, having connected the two red sides of the board.
How to play ConHex
ConHex offers an interesting twist on the usual pure-placement connection game vibe by adding the additional sub-game of claiming nodes to conquer board spaces. Rather than simply claiming a space with a stone, a player must vie for control of every space; this adds some intriguing tactics to the game. In effect, you’re playing the game on two layers: the node-claiming ‘undergame’, and the connection game ‘overgame’ as spaces are gradually claimed.
Here’s how to play:
- Two players, Blue and Red in this formulation, vie to be the first to connect the sides of the board marked with their colour with an unbroken chain of spaces under their control.
- Blue makes the first move; the swap/pie rule is in effect for the first move of the game.
- Players take it in turns to place one counter of their colour on any unclaimed node on the board. One placed, nodes are never moved and cannot be removed.
- If, by placing a node, a player has claimed half of the nodes connected to any adjacent space, then those spaces are then under the control of that player, and a marker piece of their colour is placed with that space. Once claimed for a given colour a space remains that colour for the rest of the game.
- Note that not all spaces on the board have the same number of nodes: edge and corner spaces require 2 out of 3 nodes to be claimed for that space to be claimed by a player; hexagonal and rectangular spaces elsewhere require 3 out of 6 nodes to be claimed; and the central square requires 3 out of 5 nodes to be claimed.
- The first player to connect the two sides of the board marked in their colour with claimed spaces wins the game. Draws are impossible in ConHex.
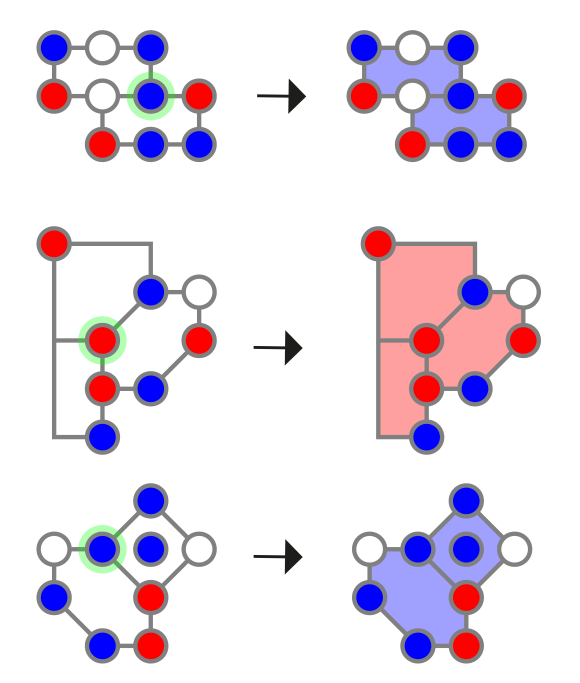
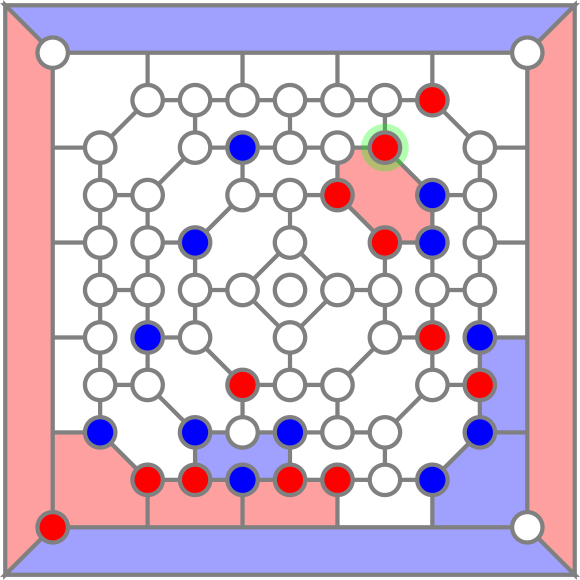
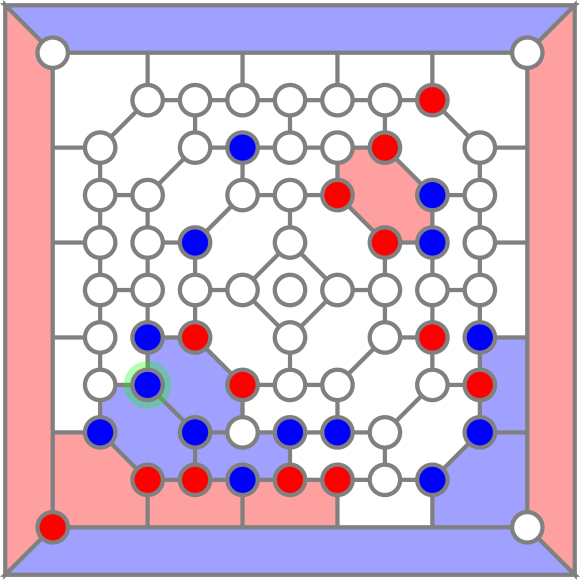
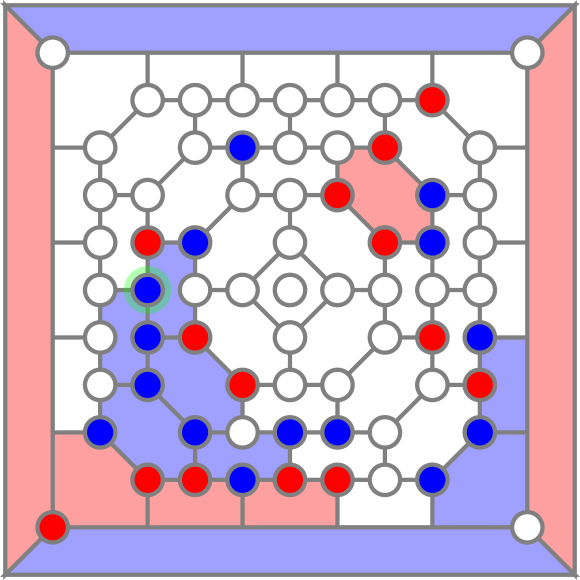
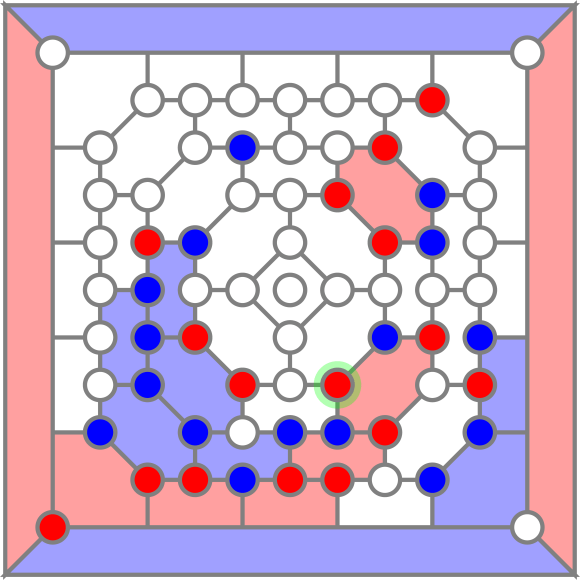
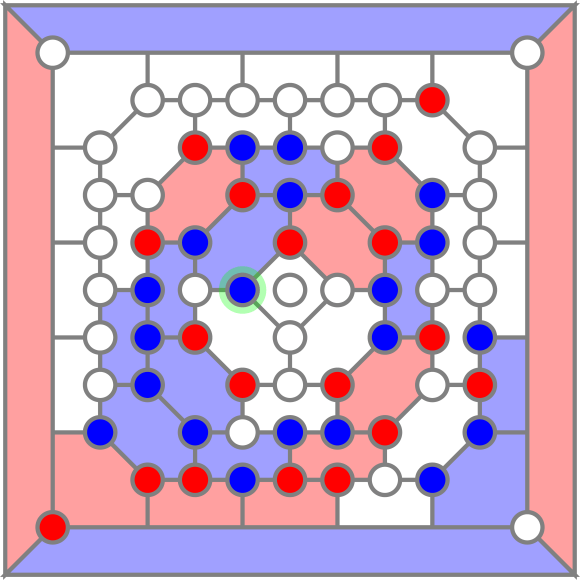
Here’s some examples of how claiming nodes leads to claiming spaces:
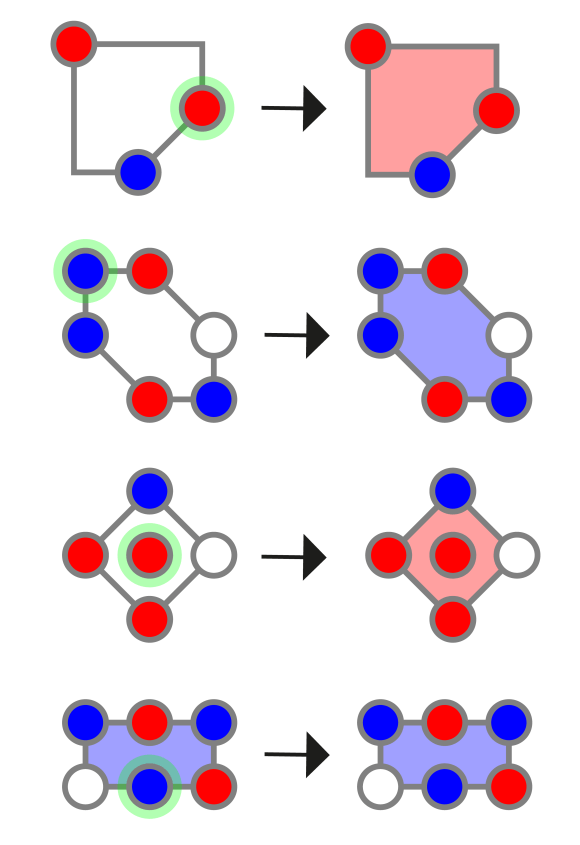
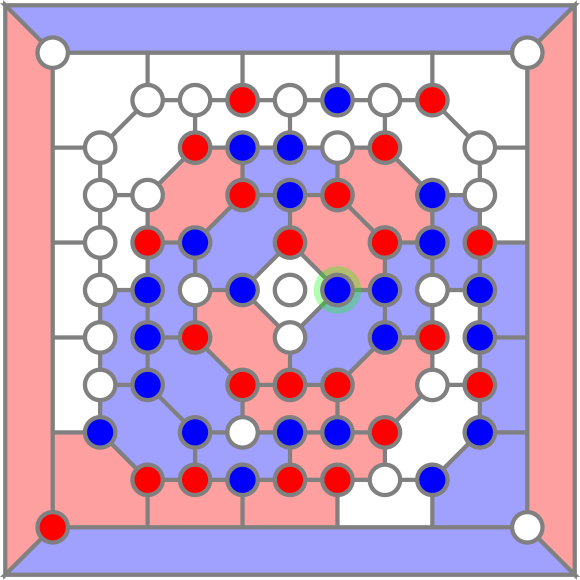
Note that claiming a single node can influence several spaces, and lead to claiming more than one space in a single move:
Tips for beginners
ConHex packs a lot of action into a small space, and the first few plays can feel daunting as you get into pitched battles over every space on the board. Here are some basic tips to help you get started and get a feel for the game:
- Especially in the early game, spread your influence around the board. Remember that each node influences three neighbouring cells, so try to claim nodes so that you maximise your impact on those cells. If a neighbouring cell is already claimed by the opponent, think about grabbing a different node that influences still-open cells.
- Don’t be a prisoner to your plan! Once you and your opponent have staked claims around different parts of the board and tactical battles start kicking off, you may find that your initial strategic plan starts to fall apart. Don’t panic — try to find alternative paths to connect your nodes. There’s no shame in abandoning your carefully-prepared plan if another path has more promise! Try to prepare for this possibility early — if you follow (1) above, a nice wide territory can afford you multiple possible paths of connection if one doesn’t end up resolving in your favour.
- Use forcing moves to gain tempo. In turn-based games, when you force your opponent to forget whatever they wanted to do and respond to your move instead, that’s called gaining tempo — gaining time. In ConHex, the edge and corner cells can be claimed with only two nodes, so these cells can be a good resource for forcing a response from your opponent. If they see you advancing scarily along the side of the board, they will feel the need to intervene, giving you an opportunity to attack elsewhere and gain the initiative. You’ll see examples of this in the annotated game below.
Phil Bordelon, creator of the Caeth/Noc/Noeth meta-rules that will be the focus of the second part of this entry in the series, sent me some great strategic tips that should help any budding ConHex (or Caeth/Noc/Noeth) player:
- Defend at a distance. Nodes have a surprisingly large influence on the board in this game, so when your opponent threatens to advance, try to interpose yourself at a distance between them and their connective goal. Defending directly on cells where your opponent already holds an advantage just lets them gain tempo while not actually containing their advance.
- Don’t be afraid to mix it up. Cells will eventually need resolving as the game goes on, and while you will want to spread your influence wide across the board, you also want to pressure your opponent to commit themselves. Getting involved in tactical fights will clarify the board situation and push your opponent to reveal their plan, so don’t be afraid to get in there.
- Don’t forget the goal. While resolving cells, remember that the ultimate goal of the game is connection, not just winning control of cells. If your opponent is threatening cells that you don’t need, let them! While they’re rejoicing over their new territory, you can be building methodically toward your connective goal.
Note that there’s some tension between these goals — you can’t just claim influence, or fight local battles, you need to balance these elements throughout the game. Cells can’t be won without tactics, but without a strong connective framework there won’t be anything to fight for in the first place! These tensions between strategic goals and complex local fights are what make ConHex — and Phil’s meta-games — really interesting.
Annotated Game — Jos Dekker vs mmKALLL
To give you a peek at the strategy and tactics of ConHex, let’s take a look at a game between two high-rated players on Little Golem. This particular game was played between Jos Dekker and mmKALLL, and was quite a back-and-forth contest that lasted 49 moves, which is quite a long haul when you consider the small size of the standard ConHex board.
A quick note on notation: I’ll be using move notation as on Little Golem, where specific nodes are identified by the letter of the appropriate file and the number of the appropriate rank, as indicated below — but I’ve elected not to leave the notation on the subsequent diagrams, because I couldn’t find an aesthetically pleasing board/font combo:

With that out of the way, let’s pick up the game after four opening moves:
Position after 1. I2 2. H7 3. D7 4. E4
Blue opens in the bottom-right with 1. I2, and in subsequent moves both players stake claims around the centre of the board. Note that since the edge and corner cells in ConHex require just two nodes to claim rather than three, and the centre cell requires 3 nodes but has lower connectivity than the hexagonal cells, in this game there’s a better balance between central and corner/edge cells than in other connection games.
Note too that while each node may not feel like a big move, each node in fact influences three neighbouring cells. With that in mind you should try to claim nodes that influence as many cells as possible — claiming nodes on spaces already claimed by the opponent is potentially wasting an opportunity to exert more influence elsewhere.

Position after 5. I7 6. I5 7. J5 8. J4
In the next little sequence, Blue seizes the initiative and jumps in behind Red with 5. I7. Red would prefer Blue not hold several cells along the edge where Red needs to establish a connection, so this leads to Red responding as Blue marches closer to the lower-right…

Position after 9. J3
…Sadly this leads to Blue claiming two cells at once in the corner, thanks to Blue’s earlier opening move at I2. This already makes Red’s life a bit more difficult. Red does have a node advantage on the two rectangles between the centre and the right side, but Blue now has an annoying foothold in the corner.

Position after 10. I10 11. E9 12. G8 13. C5 14. C2 15. D3 16. F2 17. B3 18. A1
Red responds with due caution by claiming a node at the top-right corner, to make absolutely sure Blue cannot block off the whole right side. Blue responds by starting a framework of nodes cascading down the left side, while Red bolsters their strength in the centre, eventually running all the way down to the bottom-left corner and claiming it.
The stage appears to be set for the coming battle: Blue appears poised to attempt to cut across the board diagonally across the centre, while Red perhaps will look to connect the top-right and bottom-left corners.

Position after 19. E2 20. D2 21. F3 22. G2
Blue now immediately starts a battle along the bottom edge, building on the earlier node at D3, claiming a new cell and pushing Red to commit to more nodes along the edge. Red appears stronger down here, but Blue remains in a position to claim the two other spaces incident to D3.
Position after 23. I8 24. H9
Before pursuing that advantage, however, Blue jumps north toward Red’s upper-right corner, forcing them to respond at H9 to avoid further Blue cells getting in the way of Red’s plan to connect across the centre.
Position after 25. G3 26. D5 27. C4
Now Blue jumps back south, evening up the score 2-2 on a second rectangle along the bottom edge. Red responds in kind with 26. D5, forcing Blue finally to claim the two lower-left cells with 27. C4.
Position after 28. C7 29. C6
Red again jumps into a Blue-majority cell with 28. C7, and again Blue responds by taking two cells in one with 29. C6. After these tactical scuffles, Blue appears more robust for the time being, with seven cells claimed compared to Red’s four. But Red may still try to move north from the southern edge, and retains control of the upper-right corner.
Position after 30. H3 31. H5 32. G4
Indeed Red does push northward, curling around Blue’s outpost of five squares in the lower-left quadrant of the board. Red is threatening to connect to the upper-right corner — a play at H6 or I6 would do the trick, but Blue can defend.
Position after 33. H6 34. E8 35. F8 36. D9
Blue of course spots this threat and responds at H6 without hesitation, preventing the north-south connection for Red. Red then moves to shore up their defences, claiming a cell just above Blue’s lower-left cluster to make their job a bit tougher, and threatening to connect horizontally to the upper-right corner.
Position after 37. F9 38. F7 39. E6
Blue responds by blocking the possible Red claim with 37. F9, and Red begins to move toward the centre. Blue’s response at E6 leaves Red’s upper-left cell somewhat isolated. Clearly at some point a battle will rage over these last few central cells….

Position after 40. E10 41. G10 42. J7 43. J6
For now, though, Red jumps north to attempt to bring their upper-left cell back into the game, and to constrain Blue’s options. If Blue wants to connect their rightward cells to the central and leftward ones, they will need to either snake through the centre or sneak around Red’s upper-right corner, but Red still holds an advantage there. Red follows this up with 42. J7, which forces Blue to respond at J6; Blue may now hold two more cells around J6, but Red remains strong in the corner and is now ahead one node in cell incident to J7. Blue’s only path to connection is now through the centre of the board.
Position after 44. F4 45. G6
Red now makes a move on the centre first, claiming two central cells with 44. F4 and building on their chain of cells leading from the lower-left corner. Blue moves in as well with 45. G6, and now the central cell finally comes into play.

Position after 46. F6 and 47. F5
Blue however is a tempo ahead in the centre, so Red’s attempt to claim is immediately short-circuited by 47. F5. Blue is now connected from the bottom-right corner all the way through the centre, and is only two cells away from a winning connection to the northern edge.

Position after 48. F10 49. H10 (1-0)
Red makes a last-ditch effort to get in the way with a play at F10, but Blue simply claims two cells at once with H10 and wins immediately.
So there we have it — a good example, I think, of what an exciting game of ConHex looks like. By the end the players had fought for dominance in nearly every part of the board, and each individual node caused a cascade of tactical complications.
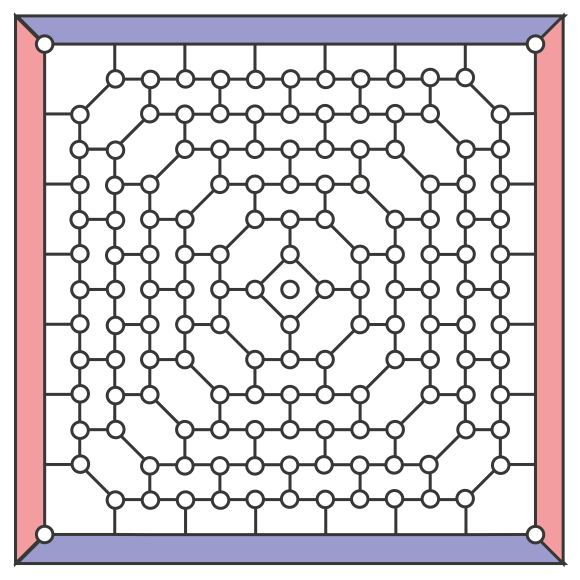
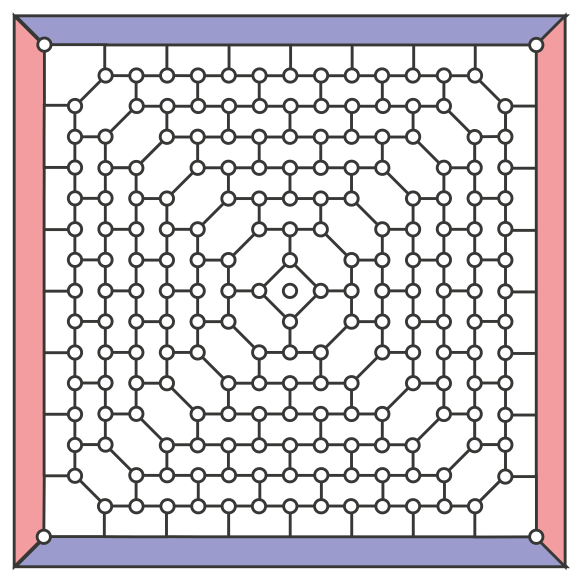
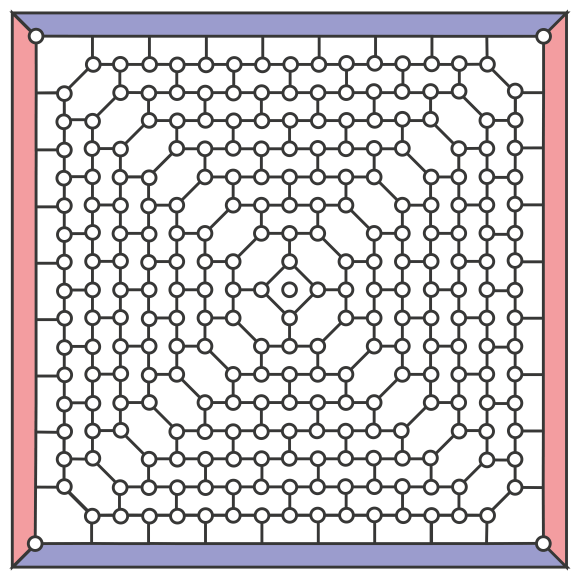
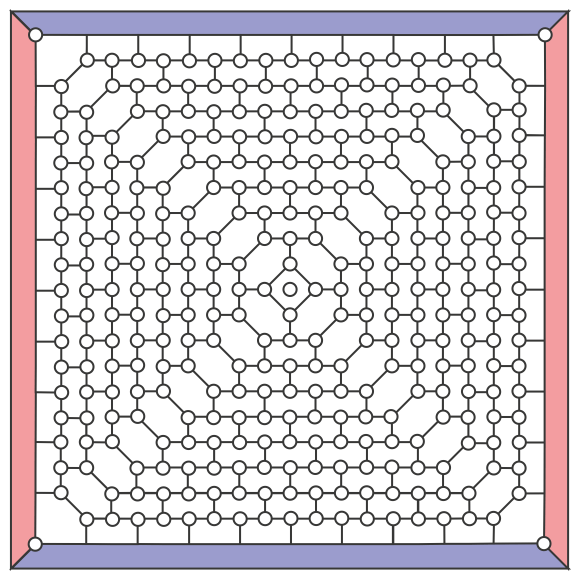
Super-Sized ConHex
As you can see, ConHex manages to pack quite a lot of excitement into a small board, but as you probably have noticed by now I’m a fan of playing on larger boards in general. As it turns out, several people expressed a desire for larger ConHex boards on BoardGameGeek too, so I jumped at the chance to construct these monsters (also available in PDF):
-
- ConHex+1
-
- ConHex+2
-
- ConHex+3
-
- ConHex+4
-
- ConHex+5
Click on the images to retrieve larger images of these boards, if you prefer that to the PDFs at the BGG link. To give you a sense of scale — if you print ConHex+5 so that each node is 22mm in diameter (same size as a standard Go stone), you’ll need a mat about 77cm on a side (a bit over 30 inches). Soon I’ll be adding black and white versions of the boards to the filepage as well, in case you do prefer to use Go stones.
Each of the plusses represents an additional outer ring of perimeter cells. I’ve maintained the basic geometry of the regular board, so the edge and corner cells are still quicker to claim, but offer less connective options than central cells.
If you do try using any of these, please let me know whether you enjoyed the experience! I’d like to find out which board sizes lead to greater strategic sophistication without making the play experience too overwhelmingly complicated.
Playing ConHex online
ConHex is fairly well-known, as far as connection games go, so there are several good options for online play. Compared to some of the more obscure connection games you should be more than able to find some opponents.
For correspondence play, Little Golem of course is popular — in fact all my diagrams and expanded boards here are based on their version of the ConHex board, which I find the most visually appealing and practical. Richard’s PBEM Server is another popular place to play, and ConHex can be played using the server’s graphical web interface.
For real-time play, I’d recommend igGameCenter. This site is usually pretty active, and if you jump into the chat on the main page you can normally find someone willing to play their large selection of connection games. Yucata.de is another option — I haven’t personally used this site before, but the ConHex page shows a number of players who’ve played hundreds of games of ConHex, so presumably finding an opponent wouldn’t be too difficult!
I should note that as far as I can tell, every site uses the standard board only — I seem to be the only oddball who created some larger ones. However if anyone out there wants to try playing on the larger board(s), do give me a shout!
Buying ConHex
If you prefer physical games over virtual, luckily ConHex is one of the relatively small number of connection games popular enough to actually have been published in official form. The game was published for the first time in 2005 and has been continuously available ever since, including in this gorgeous wooden edition by Gerhards Spiel und Design:

The origins of ConHex
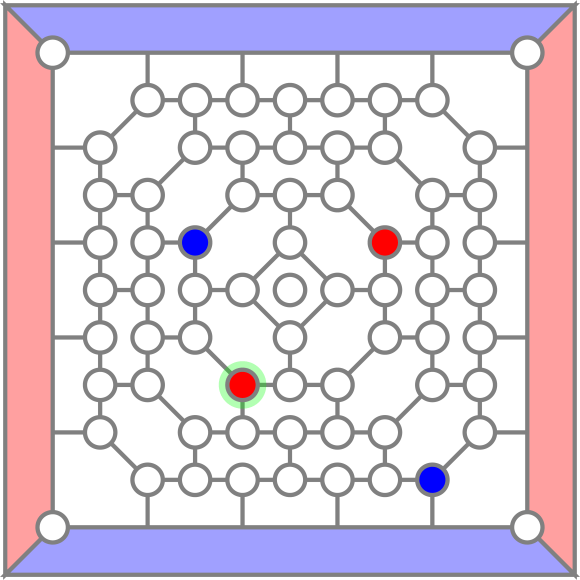
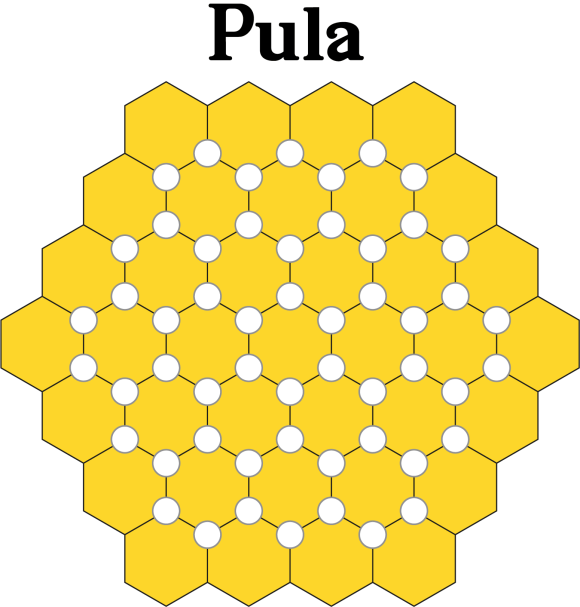
According to Cameron Browne in Connection Games: Variations on a Theme, ConHex is derived from Michail Antonow’s earlier game called Pula. Pula is played on a hexhex-4 board — I’ve mocked up a quick example below — where players claim vertices of the hexagons in order to claim spaces, as in ConHex. Rather than aiming for connection across the board, however, players simply vie to control the most hexagons on the board.
Apparently Antonow also developed a follow-up game called Pula 2, where players instead aim to gain the most points according to this scoring system:
- 1 point for connecting adjacent sides of the board with a chain of hexagons in their colour
- 3 points for connecting non-adjacent sides
- 5 points for connecting opposite sides
Pula 2 sounds like it might be quite interesting — I’m generally a fan of point-scoring connection games, and the multiple possible connection types could lead to some complex tactical considerations. However I expect it would shine more on a somewhat larger board than hexhex-4.
More importantly, what Pula shows us is that the vertex-claiming mechanic of ConHex is actually pretty flexible — it can function very well in other games too. Lucky for us, Phil Bordelon independently discovered this fact in 2004 and invented the Caeth and Noc meta-rules — rules that can be used to modify nearly any connection game. In Noc games, players claim spaces by claiming vertices as in ConHex, whereas in Caeth games players claim edges of spaces. Fifteen years later he also gave us Noeth, where players have to claim a half of the vertices and the edges of a space in order to claim it — and the 12* move protocol is used as well. With these meta-rules, any connection game can gain an additional ‘undergame’ like we see in ConHex — and Phil’s rules significantly extend the undergame concept.
In part II of this post, and in collaboration with Phil, I’ll focus on these meta-rules and discuss how they can inject some new life into our favourite connection games.
