Tag Archives: Chu Shogi

Shogi and some variants now available in Ai Ai — play against AI or online!

UPDATE (12 April): Stephen has updated Ai Ai to fix a bug with Chu Shogi’s Lion, and we also added several new variants including Goro Goro Shogi, Goro Goro Plus and Wa Shogi!  Grab the updated version here.

——-

For the last few weeks, Stephen Tavener and I have been collaborating to bring Shogi and several of its variants to his amazing Ai Ai software, a general game-playing program that lets you play hundreds of abstract strategy games against strong AI, or against human opposition online.

Last year Stephen added a general Chess-playing engine to Ai Ai, and has been steadily adding lots of great Chess variants to it such as Capablanca Chess, Chess960 and Grand Chess.  I had been embarking on a project to playtest some of the more promising large Chess variants — on 10×8 boards and larger — and so Stephen added a huge array of new piece types into Ai Ai so that these variants could be added in (more on these games in a future post).  Then we got started on Shogi, which turned into quite a project — Stephen had to cope with some incredible coding challenges throughout, from implementing drops to Chu Shogi’s complex Lion-trading rules.  On top of that there was lots of design work to do, because we wanted to offer multiple piece graphic sets to help people who have trouble learning Japanese kanji characters.

In the end we went with three sets of pieces: traditional pieces using a single kanji character for each piece; mnemonic pieces that combine the kanji with mnemonic diagrams designed by HG Muller; and diagrammatic pieces, where each piece is a simple square shape with a diagram of the piece’s move on it.  With these three options in place, these games should be accessible to a larger audience.

Modern Shogi

First and foremost in Ai Ai’s new Shogi assortment we have modern Shogi, played on a 9×9 board with ten different types of pieces.  For those who aren’t familiar with Shogi, it has several major differences from Western Chess:

  1. Pieces that are captured are truly captured — they become the property of the capturing side, and are placed on the side of the board under their control.  At any time, a player may ‘drop’ a captured piece to any empty square on the board in lieu of a normal move (with some restrictions).  Drops make Shogi a very dynamic and aggressive game, and drastically change the feel in comparison to Chess.  Because pieces keep coming back to life, the board stays mostly full of pieces throughout the game; endgames are often an exciting race to checkmate as both sides’ defences break down and they start launching brutal attacks back and forth.
  2. Nearly all pieces can promote — unlike in Chess, where only Pawns may promote upon reaching the opponent’s back rank, in Shogi nearly all pieces can promote when they reach the opponent’s starting area.  Pieces promote by flipping over and revealing a new piece on the opposite side, which is more powerful than the original.  Promoted pieces are demoted again once captured, though.
  3. Shogi is a bigger game than Chess, taking place on a 9×9 board with 81 squares as opposed to Chess’ 8×8 board with 64 squares.  Shogi also has ten types of pieces, significantly more than the six types present in Chess.

There’s a lot more to it than that, of course, but these three changes alone make Shogi stand out among the modern variants of Chess played around the world.  It’s a vibrant and exciting game and well worth trying if you’ve ever enjoyed a game of Chess.

Shogi games tend to take a bit longer than Chess; a typical Chess game lasts about 80 moves in total, whereas a Shogi game generally lasts around 120 moves.  Some small variants of Shogi have been designed to generate some quick-playing games that still capture the feel of the full game, and that serve as useful introductions for new players or children.  In Ai Ai we’ve added a couple of these:

In Minishogi, Shogi gets shrunken down to a tiny 5×5 board with just six pieces per player.  Surprisingly the game is still remarkably deep at this size, thanks to the complexities of drops.  Judkins Shogi is similar, but uses a 6×6 board with seven pieces per player, adding the Knight back into the mix.

Sho Shogi, Chu Shogi and Dai Shogi

As readers of this blog will know, I have a certain fascination with the ancient variations of Shogi, particularly the ambitious and gigantic ones.  I’m delighted to say that Stephen has implemented some of these variants in Ai Ai as well!

Back in the early days of Shogi, from the 13th-16th centuries or so, the game came in three sizes —  Sho Shogi on a 9×9 board (Small Shogi, which became modern Shogi), Chu Shogi (Middle Shogi) on a 12×12 board, and Dai Shogi (Large Shogi) on a 15×15 board.   At this time drops were not in the game, so pieces that are captured are removed from the game permanently.  Sho Shogi was considered a quick game, often played with children, while Chu Shogi was the most popular form and the enormous Dai Shogi was for a time the most prestigious variation.

Eventually drops entered the game sometime in the late 16th century, and this innovation suddenly catapulted Sho Shogi to the forefront of the Shogi world.  Today Chu Shogi still survives, and is considered by some to be the best large Chess game ever invented, whereas Dai Shogi is still played as well but much less frequently than Chu.

All three of Shogi’s closest ancestors are now playable in Ai Ai:

The eagle-eyed among you will notice that Sho Shogi sports an additional piece sat in front of the King.  This is the Drunk Elephant, a powerful defender that promotes to a Crown Prince, which functions as a second King!  If you manage to make a Crown Prince, your opponent must capture both your Prince and your King to win the game.  Both Chu and Dai Shogi have Drunk Elephants as well, and numerous other new pieces; Chu Shogi has 28 piece types, and Dai Shogi has 36!  As you might expect, the larger games are challenging for the AI to play well, so be sure to set the AI’s thinking times quite high if you’d like a challenge.

I highly recommend trying these historical variants, particularly Chu Shogi and Dai Shogi, which I’ve written about extensively before.  Chu and Dai are wonderful games, richly strategic and packed full of variety, and I hope some of you out there may try your hand at them now that they’re available in Ai Ai.

Tori Shogi

For those who prefer quicker and tighter gameplay, we also added a more recent historical variant of Shogi — Tori Shogi, or Bird Shogi.  Tori Shogi gets its name from the fact that all the pieces have names related to birds — even the Pawns are changed to Swallows.  Tori Shogi was invented by Toyota Genryu in 1799, and has the unique distinction of being one of only two historical variants for which we have recorded games played by professional players (the other being Chu Shogi).  Tori Shogi has gained a certain amount of popularity in the West, and there’s even a fine English-language book available on the game for those who want to learn to play well.

Tori Shogi is played on a 7×7 board with eight different types of pieces, two of which only appear by promotion.  The small 49-square board starts packed with 16 pieces for each player, making the early game quite claustrophobic!  The game uses drops as in modern Shogi, but with one major difference: in modern Shogi, you may never drop a Pawn to a file that already contains one of your Pawns, but in Tori Shogi you may have two Pawns on the same file at a time.  This small change hugely alters the game’s tactics and gives it a very different feel from standard Shogi.

Below you can see the initial position of the game, and a sample game in animated GIF form.

Next Moves

We are forging ahead with some additional variants for the next release.  First up we have Goro Goro Shogi, a modern small variant developed in 2012 as a way to help young kids in Japan to learn modern Shogi.  This game is played on a 5×6 board with a limited selection of pieces, but unlike Minishogi and Judkins Shogi, there are three Pawns per side instead of just one.  In my opinion this makes Goro Goro a much better introduction to Shogi, as the use of Pawns is essential in the full game (much as in Chess).

We have also added Goro Goro Plus, a fantastic little variant that takes Goro Goro and gives each player a Lance and Knight in hand at the start of the game, available for drops.  This addition really spices up the game and makes Goro Goro more than just a Shogi learning tool, and turns it into an exciting game in its own right.

On the historical variants side of things, we have Wa Shogi, an 11×11 game that shares with Tori Shogi a certain flair for exotic, animal-based piece names.  Unusually for a Shogi variant, Wa is playable both with and without drops, and is a great game either way!  I slightly prefer playing with drops, which gives the game an exciting pace and added tactical sharpness.  Without drops Wa Shogi becomes a delicate strategic affair, where players often try to establish coordinated invading legions that can escort the weaker pieces to the promotion zone (the weakest pieces in Wa have strong promotions).  The two faces of Wa play really differently, so it’s like having two games in one.

I highly recommend Wa Shogi for fans of modern Shogi; particularly when played with drops, it feels like a clever expansion of Shogi with a distinct feel due to its asymmetric starting position and unusual pieces.  I firmly believe that if a concerned effort were made to promote this game it could achieve a decent level of popularity!

So that’s a quick roundup of all the Shogi goodness now available in Ai Ai, and a little preview of what’s to come — please go give the games a try, and of course give me a shout if any of you out there fancy a game!

Sometime down the line I’ll be back with another roundup, in which we’ll be taking a look at the large Chess variants available in Ai Ai as well.  I’m also nearly done with an in-depth analysis of a Chu Shogi game, and an introduction to Tenjiku Shogi, so look out for those posts coming soon (-ish).

Tagged , , , , , , , , ,

Chu Shogi, Part II: Attack and Defence

“Despite this complexity, after playing [Chu Shogi] a few times, one begins to feel that each piece has its own personality, and that not one of the pieces could have been left out without harming the character and charm of the game.  A game as large as Chu could easily have been dull and ponderous; instead, it is rich in tactics, deep in strategy, and exciting to play.”

–R. Wayne Schmittberger, Shogi Magazine, October 1986

Following on from my previous article on Chu Shogi, this time I’d like to get into a bit more detail about attack and defence strategies.  My main vehicle for this will be a discussion of building defensive castles, then attacking and utilising your pieces’ strengths, and finally some instructive checkmate puzzles (tsumeshogi) that demonstrate the powers of the unique Chu Shogi pieces in the endgame.

Before we get started, two quick clarifications:

  • Notation: in the diagrams below I’ll be using Western-style notation, as described on the Wikipedia page.  This system is pretty easy to understand — Chess players please note, however,  that a ‘+’ at the end of a move means the piece was promoted, not that it gave check.  Also I’m used to Japanese notation, so I may not get it right all the time — if I make any mistakes, please shout and I’ll fix them.
  • Move numbering:  Most Western sources use Chess-style move counting, where each numbered ‘move’ is actually a move pair, one from Black and one from White.  I find this confusing when dealing with tsumeshogi puzzles, so I’m sticking with Shogi/Go-style move counting, where a move is simply a move from one player.

Building Castles in Chu Shogi

For us Chess players, building defensive structures for the King is made substantially easier by the presence of the castling move, which enables us to tuck the King safely behind one of the Rooks in a single stroke.  For Shogi players, castling is not a move, but a process; players spend quite a few moves re-arranging their pieces to build fortresses around their King.  Often these castles require substantial material investment and cover quite a bit of board space; Shogi castles need to be solid, given that the ability to drop captured pieces anywhere means that deadly attacks can occur very suddenly.

Chu Shogi of course is closer to the latter than the former — there is no specific castling move, and instead players must construct castles themselves.  In Chu Shogi there are no drops, but the Lion Power pieces do present significant dangers; they can deliver mate even when pieces block their direct path to the King!

Below are some example castle formations that you may encounter in a Chu Shogi game:

The Basic Castle is very commonly seen in Chu Shogi games, and is easily built: simply bring the Drunk Elephant in front of the King, flank it with your Blind Tigers, and keep your Gold Generals on either side of the King.  The Golds are somewhat better placed one square out from the King, as in the centre of the top row in Diagram 1.  The Basic Castle may be basic, but when combined with Side-Movers parked on the 3rd and 4th ranks and some patrolling Rooks as well, this formation can provide a decent amount of safety.

However, this castle has some weak points that become apparent if an attacking Lion breaks through and has the support of a long-range piece.  The long-range piece pins the Drunk Elephant to the King, preventing it from capturing the attacking Lion (since that would expose the King to immediate capture):

The immobile Drunk Elephant can’t defend the two red points in the blind spots of the Blind Tigers, so these squares become convenient places for the Lion to give immediate checkmate.  The Enhanced Basic Castle, developed by Colin Adams, reduces this problem to only one weak square by swapping the Drunk Elephant and the right-side Blind Tiger.  The Enhanced Basic Castle takes an additional move to build, but reducing these key weaknesses by half seems like a reasonable return on that tempo investment.

The bottom-left of Diagram 1 shows the Hanshin Tigers castle, which is also fairly easily formed but requires a greater material investment than the Basic or Enhanced Basic.  In this formation, once the Phoenix and Kirin move away, the Blind Tigers are brought together in their place, allowing the Tigers to cover one another’s blind spots.  Both Dragon Horses are then brought down over the Golds and backed up by the Silver Generals.  A variant of the Hanshin Tigers moves the Silvers up over the Golds instead of the Horses.  Either version creates a strong protective barrier, but requires keeping the Dragon Horses or Silvers locked down in defence of the King:

chu-shogi-tigers-detail-01

Diagram 3: Hanshin Tigers variations.

This castle comes recommended by the old Lucky Dog Games website.  They give as a sample opening sequence for the Hanshin Tigers with Silvers as 1. Ln-6h  2. P-8h  3. P-5h  4. P-7h  5. Ky-7i 6. Ph-8i  7. BT-7k  8. BT5k-6k  9. S-8k  10. S-5k; a similar sequence would work for the Dragon Horse version, just leave the Silvers in place and shift the Dragon Horses one space inward instead.

In the bottom-centre of Diagram 1 you can find the Anaguma Castle.  This castle is inspired by the Anaguma Castle of modern Shogi; the name means ‘Bear in the hole’ and it has a reputation as a very strong castle.  The Chu Shogi version is certainly strong against frontal attacks, but requires a large material commitment, just like the modern Shogi version.  The Anaguma also has the side effect of shifting your King closer to the left side of the board and reducing potential avenues for flight if the castle should collapse.  On the positive side, the Anaguma does not tie down your Dragon Kings, which can then join your Free King to contribute to attacks elsewhere on the board.

Finally, in the bottom-right of Diagram 1 we have the Two Dragons formation.  In this castle the two Dragon Kings occupy the spaces left by the Kirin and Phoenix once they are moved away.  The placement of the Dragon Kings is ideal to support an attack in the centre.  Since the powerful long-range pieces tend to be held back in early- and middlegame positions anyway, placing them in the centre of the castle is relatively convenient.  However, committing early on to an attack in the centre can be risky — that can leave the wings more open to counter-attack from the opponent.  In any case, this particular castle apparently was popular during the Edo Period in Japan, so it may be worth having in your arsenal.  If you want to see a historical example of this castle in action, do check out this famous game between Mori and Fukui.

So, what castle should you use?  There’s no single answer to this, I think — as in modern Shogi, your choice of defence will depend on the board situation and your own particular style.  In a fast-moving, attacking game, the quicker castles like the Basic may be appropriate; whereas in slower, positional games, you may be want to take time to set up a robust defence.  In any case, I’d recommend going through Chu Shogi games on Richard’s PBEM Server and observing how strong players adapt their defences to different board situations.

Attacking Principles in the Middlegame

As described in Part I, Chu Shogi is a fundamentally strategic game.  The size of the board and of each player’s army means that precise forward calculation of tactical variations is often not practical; instead, aiming for good strategic positions and solid arrangements of your pieces is more important.  Generally you will find it very difficult to imagine where your opponent’s piece may end up in 50 moves by just looking ahead move by move, as there are simply too many possible moves on each turn; but if you have a sense for what type of offensive or defensive shape he is going for, then you will be able to place your pieces properly to cope with that.

After the opening, the Chu Shogi board will have some clearly defined battle fronts where each player is attempting to make gains.  Each side will have advanced phalanxes of short-range pieces to protect their pawn lines, with long-range pieces on the back ranks providing further support.  The Lions will often be placed high in the centre of the board, both sides searching for opportunities to start a Lion invasion of the other’s camp.  Both sides will aim to push their attack forward on one of the flanks, cramping their opponent’s defences, and cascades of piece exchanges may happen as one or both sides start attacking.

While going through my collected Chu Shogi materials I found this interesting exemplar early-middlegame position from Shogi Magazine:

chu-shogi-sample-midgame-position-01

Diagram 4: target middlegame position.

This position is by no means meant to be prescriptive — your positions should be constructed in accordance with what the game requires, not any specific target — but it can be useful to look at the key features of this position and why elements of it may be desirable.

First of all, in the diagram we can see that a Basic Castle has been built, albeit in this case with the Phoenix next to the King.  The King is flanked by the two Golds, and ready to defend to the front are his Blind Tigers, Drunk Elephant, and Dragon Horses.  The Lion is placed high and centrally, in front of the pawn line.  Note that every single short-range piece on the back rank has been brought straight to the front lines, backing up the advancing Pawns.  The 4th rank is defended by two Side-Movers, and the 3rd by two Rooks.  On both flanks we have lined up long-range pieces, backing up the generals on the front line.  Note that the Free King, the second-strongest piece on the board, is tucked away safely on 2L; just like the Queen in Chess, it doesn’t pay to bring your Free King out too early!

Now, I’ve no doubt that some choices made in this position would not stand up to current Chu Shogi theory, but nonetheless I believe it’s an instructive example.  Leaving aside the specifics, we should be aiming for similar cohesion in our own games and applying appropriate core principles as we aim for a robust post-opening posture:

  • Bring the King to safety
  • Keep the Lion centrally placed, restricting the opponent’s Lion and looking for opportunities to invade
  • Bring the Free King to a safe spot on or near the back ranks
  • Advance most or all of your short-range generals to the pawn line to press an attack
  • Use long-range orthogonally-moving pieces to defend the 3rd and 4th ranks — Side-Movers and Rooks are good choices
  • Position your long-range attacking pieces to defend the advancing generals and Pawns, and drive out the enemy Lion if it attempts to invade

Keeping these principles in mind can help you navigate the opening and develop an early middlegame position that sees you ready to launch a coordinated attack.  As you gain experience you will develop a greater sense for the positional requirements of each game situation, and you will get more comfortable experimenting with these principles and finding strategic setups that fit your personal style of attack and defence.

Tips for Specific Pieces

Chu Shogi has a diverse range of pieces at the players’ disposal, and each of them has a role to play in the battles to come.  Here are some tips on how to put your soldiers to good use, gathered together from my archive of Chu Shogi materials.

  • The King: Often the King will stay in the centre of the back rank for most of the game.  Try to set up a castle around him and cover the 3rd and 4th ranks to prevent the Lion getting too close too early.  If you and your opponent are locked in a mutual mating attack situation, then it can pay to retreat your King toward a safer side of the board, but think carefully about when to spend your moves on a retreat; sometimes the best option is to regain the initiative and counterattack instead.
  • Pawns/Go-Betweens:  In a game with so many powerhouse pieces, it’s easy to forget about the lowly Pawns and Go-Betweens.  But both these pieces are essential to Chu Shogi play, and they should never be advanced thoughtlessly.  A strong Pawn line backed up by short-range pieces provides an essential barrier against the opposing Lion, and letting your opponent break down that wall could be fatal.  As the game develops and you continue to gain space, your Pawns and Go-Betweens can promote as well, so it’s worth carrying Pawns forward with you as you advance.
  • Phoenix/Kirin:  These two pieces have the strongest promotions in the game (Phoenix promotes to Free King, Kirin promotes to Lion), so don’t advance them too early.  In the endgame these pieces may have space to advance and promote, so until then keep them well back from the action.
  • Gold Generals:  These pieces have the strongest promotion of any of the Generals (they promote to Rook), so they’re best kept away from the action to leave open that option in the endgame.  They’re excellent on defence as part of your castle; in unpromoted form they cover very useful squares in your defensive formation.  When the game opens up they can then be advanced if needed to bolster your attacking forces.
  • Silver Generals:  The Silvers are useful attacking pieces, as in Shogi, but in a pinch they work well as defensive pieces too; as you saw above, some castle formations use Silvers to defend the King.  Optimal placement and use of the Silvers may depend on what defensive formation you choose to adopt.
  • Ferocious Leopards/Copper Generals:  These pieces should be on the front lines, backing up your Pawns.  When advancing your Pawns and attempting to gain space, try to build up numerical superiority with short-range pieces like these.  Above all, be patient — hold back on launching an attack until all your short-range generals are in place behind the pawns, and you know you’ll be able to continue pressing your attack even after your opponent starts exchanging pieces to slow you down.
  • Lances/Reverse Chariots:  These pieces can’t move off their file anyway, so I advise keeping it simple: leave them in place defending their edge of the board!  Opportunities may arise to promote them in the endgame, but for the most part these pieces tend to stay fairly static unless defending or attacking along the edge of the board, or if promotion opportunities open up later in the game.
  •  Side-Movers:  I’ve said this a few times already, so probably you got the message, but the Side-Movers are very important defensive pieces and should generally be patrolling your own 3rd and 4th ranks.  An invading Lion is extremely dangerous and with even one supporting piece can probably demolish your castle, but Lions can only step twice on a turn — so with your Side-Movers covering two ranks, your opponent will need to work harder to approach your King with their Lion.
  • Vertical Movers:  These pieces can sit together with your Dragon Kings and other long-range pieces, providing support to your front-line attackers and standing ready to harass the enemy Lion away should it be necessary.  Once you gain sufficient space on one side or the other, try to promote your Vertical Mover to a Flying Ox.  The Flying Ox is a strong attacking piece and will be a valuable addition to your forces once the board opens up.
  • Drunk Elephants/Tigers:  These are paired together because they are prime defensive pieces — they both can cover 7 of 8 adjacent squares.  Blind Tigers are easily moved into a Basic Castle early in the game, and they are very awkward to advance anyway due to being unable to move directly forward, so keeping them on defence is usually the best role for them.  The Drunk Elephant should also be kept back to hold the line, but they serve a valuable extra purpose in the endgame.  If enough lines open up for the Drunk Elephant to potentially promote, and you’re deep into the endgame, its potential to become a Crown Prince can be very useful.  If you do get a Crown Prince, this is insurance against checkmate; even if your opponent succeeds in preventing the promotion, they will have spent valuable time doing so.
  • Rooks:  Along with the Side-Movers, Rooks are key allies in the defence of your King.  They can patrol the 3rd and 4th ranks very well, so try to keep these ranks clear so they can readily switch sides depending on your offensive and defensive requirements.  As in Chess and Shogi, Rooks can play a valuable attacking role in the endgame, too.
  • Bishops:  The Bishop, like your other long-range pieces, works well sniping from the back of your position and harassing the enemy Lion.  Their diagonal movement can often provide opportunities for sneaky discovered attacks — where a move of another piece opens up a line from the Bishop to an opposing piece.  On such a large board these opportunities can be easy to miss, so try not to forget your Bishops!
  • Dragon Horses/Dragon Kings:  These pieces are strong ranged attackers, and can work well backing up your attacking generals on the front lines from the safety of the back ranks.  As we saw above, both pieces can also strengthen your castle defences if needed or help prosecute a central offensive.  In general, don’t be tempted to sacrifice these pieces for short-term positional or material gains — better to build a solid, well-supported attack, winning them the space to eventually promote and become very powerful Soaring Eagles and Horned Falcons.  As attractive as those promotions are, don’t rush it; once the board thins out later in the game these pieces can dash across the board and promote pretty easily, and often safely.  Rushing them to promotion may just give your opponent chances to gain tempo by harassing them with their long-range pieces.
  • The Free King:  This piece is extremely strong, second only to the mighty Lion.  In the early game, keep it far away from the front — a tactical mistake leading to a captured Free King would leave you at a huge disadvantage!  Your opponent can also take advantage of a poorly-placed Free King and harass it from range, forcing you to retreat it and lose tempi.  In the endgame, let the Free King run wild — its very high mobility is a valuable asset when harrying the enemy King.
  • The Lion:   Your Lion is the most important piece in your army other than the King, but its unique capabilities mean it doesn’t need to hide away in the early game like the Free King.  Most players advance the Lion over the Pawns very early in the game, attempting to stake a claim to the centre and probe for weaknesses in the enemy lines.  Middlegame Lion invasions are a major feature of Chu Shogi, but don’t be tempted to attempt one too early; without backup your Lion could be easily driven back by your opponent’s long-range pieces, or even forced into a dangerous position if you haven’t opened up enough lines for it.  Be aware too that the Lion loses some of its power as the board opens up, since then the opponent has an easier time targeting it with long-range pieces.
    In the endgame, the Lion is absolutely devastating.  Your goal here should be to advance your Lion as close to the enemy King as possible.  To achieve this, bring forward your short-range pieces to interfere with or exchange off your opponent’s defending Side-Movers and Rooks; this will enable your Lion to break through.  In combination with long-range pieces pinning down your opponent’s defensive line, Lions can create some spectacular checkmate opportunities once they get in range of the enemy castle.  When paired with even a single short-range piece, the Lion can work methodically with it to compromise the enemy’s defenses.  If need be, don’t be afraid to sacrifice powerful pieces to force your opponent’s King into the open — in those situations the Lion is often able to achieve a brutal checkmate all on its own!

The Endgame

The endgame is characterised by a much more open board, and this is often where the remaining long-range pieces become very important attacking pieces.  Your long-range pieces held in the back ranks can dash forward and promote, and the Lions must advance a bit more carefully given their limited range and susceptibility to attacks from a distance.

To help simplify matters in this stage of the game, look for opportunities to exchange off long-range pieces if you have material superiority.  A clever opponent can still mount a stout defence against greater numbers if they have some nimble long-range pieces roaming about the board, so exchanging them off the board so you have the only remaining long-range pieces can be much better for you.  Meanwhile, be sure to promote whatever unpromoted pieces you have remaining, assuming you can do so safely, and if you have a Drunk Elephant in a position to become a Prince, try and do so.  That leaves you with an extra royal piece which will force your opponent to split their attention.

Remember that Chu Shogi’s endgame is by nature very different from Chess and Shogi, so in certain situations you’ll need to be mindful of some of the special rules of Chu:

  • No stalemate: In Chess, stalemate — where a King is not in check but has no legal moves — is a draw.  In Chu, stalemate is a loss, as there’s no prohibition on moving into check — so the weaker side must do so eventually, and hence loses.
  • No perpetual check:  Repetition is illegal in Chu Shogi, so escaping from a losing situation via perpetual check is impossible.
  • Bare King loses:  Under the Chu Shogi Renmei rules, as soon as one side loses all pieces besides the King or Crown Prince, they lose the game.  Often this won’t happen as the losing side will resign first anyway, but in certain situations you may want to take this into account when planning your approach to an endgame with only a few pieces left on the board.

In addition to these differences in rules, Chu Shogi’s unique pieces add many interesting tactical possibilities to the endgame.  The super-powered Lion and the late-game appearance of the other Lion Power pieces create some exciting possibilities for pretty checkmates.  Probably the best way to get to grips with these possibilities is to try solving some tsumeshogi.

Tsumeshogi

Tsumeshogi are Shogi checkmate puzzles, and are perhaps my favourite Shogi-related activity.  I’ve gone to a lot of effort in recent years to acquire tsumeshogi books from Japan, and I never cease to be amazed at the level of artistry in some of these puzzles.  Chu Shogi has tsumeshogi too, although of course there aren’t nearly so many of them compared to modern Shogi.  Having said that, there are some excellent ones to be found on the Japanese web, including historical 17th-century puzzles from Chu Shogi Renmei available here and here, or some modern creations here.

In this section I’ve picked out a few puzzles that illustrate some of the interesting endgame situations that can occur with Chu Shogi’s unique pieces.  As with modern Shogi, solving puzzles like this is hugely helpful for your endgame attack technique, and for increasing your accuracy.  The more tsumeshogi you solve, the quicker you’ll be able to spot strong continuations in your own endgames.

Before we start, I’ll summarise the rules of tsumeshogi:

  • The solver is always Black (moving up the board), and always has the first move.
  • Black’s King is not on the board in normal tsumeshogi; it’s assumed that Black’s King is going to be mated on the next move if the opponent gets a chance to counterattack.
  • Due to the above, every move from Black in a tsumeshogi must be check (a forcing move attacking the enemy King).
  • After each check, White must make the move that most prolongs the mate.
  • Some tsumeshogi are sou-gyoku tsumeshogi: two-king puzzles, where Black’s King is on the board and gets involved in the mate.
  • Hisshi tsumeshogi problems have at least one move that is not check.
  • A well-constructed tsumeshogi problem should have only one solution.

Tsumeshogi for the modern 9×9 game have additional rules relating to pieces in hand and drops, but that’s obviously not relevant here; I do love these kinds of puzzles a great deal, so at some point I’ll try to do a post about the many awesome varieties of tsumeshogi puzzles available for Shogi fans.

Now, below are several Chu tsumeshogi, each more difficult than the last.  Try to find the solution by visualising the moves in your head, as you would during a game.  Remember that all your moves must be checks (no hisshi puzzles here), and White’s response will always be the reply that keeps them alive the longest.  I’ll also put a hint for each puzzle in the caption.  The solutions will appear at the bottom of this article.

chu-shogi-puzzle-3-start-01

Hint: Black has both a King and a Prince — use them!

chu-shogi-puzzle-4-start-01

Hint: Free King takes one for the team.

chu-shogi-puzzle-5-start-01

Hint: Find a way to free the Falcon.

chu-shogi-puzzle-6-start-01

Hint: The ultimate sacrifice.

An interesting quirk in the Lion-trading rules

Now, while you’re mulling those problems over, I want to share with you something I discovered while picking which problems to diagram for this post.  While searching through shorter problems for an introductory example, I found this puzzle:

chu-shogi-puzzle-2-start-01

At first glance this is a fairly simple three-move puzzle, but the solution turns out to be rather confusing.  You can see the solution below; do you notice anything strange about the solution?

chu-shogi-puzzle-2-01

The final position has Black’s Lion protected by a Pawn.  In theory, at least according to the Lion-trading rules on English Wikipedia, this is not checkmate — White’s Lion can legally take the Pawn, then the Black Lion, and then there’s no longer a threat to the King!  But that being the case, why does this Japanese site present this as a correct tsumeshogi?

As it turns out, this specific situation — a non-adjacent Lion protected by a Pawn or a Go-Between alone — is covered by an addition to the Lion-trading rules adopted by Chu Shogi Renmei in 2004.  They received a question asking whether the Lion’s double-capture in this situation should be viewed here as a single action, in which case the Pawn cannot be taken, because when viewing the board state as a whole the Lion is both non-adjacent and protected.  Alternatively the double-capture could be seen as two separate actions, in which case the Lion can take the Pawn first, then the Lion is adjacent and can be taken freely.

Ultimately, Chu Shogi Renmei adopted the single-move interpretation, meaning that the above puzzle does have a checkmate.  The Lion cannot be taken, because it is considered to be protected by the Pawn even though the Pawn could be taken and the Lion would have no further protection afterward.

The reasoning behind this, as I understand it, is that in certain situations ruling the Lion’s double-capture as a double move can lead to contradictions in the trading rules.  Let’s use the same puzzle, but just shift the Bishop slightly so it protects the Lion:

chu-shogi-lion-trade-pawn-01

So under the two-move interpretation, in this situation White effectively ends up trading away their Lion and only nets a Pawn, which is exactly the sort of thing the trading rules are supposed to prevent.  As a consequence Chu Shogi Renmei ruled that we should view the Lion’s proposed double-capture as a single move, so that effectively when the Lion is taken the Pawn is still in place, threatening recapture.  That in turn means the double-capture cannot be made, and so in the original puzzle, we do have a checkmate.

At first this seems complicated, but in practical terms it’s just reinforcing the aim of the Lion-trading rules, and ensuring that there are no situations where trading off the Lion for only a Pawn in compensation is allowed.  A Lion may still take a Lion one space away protected by a different piece, by  taking the protecting piece and then the Lion on the same turn — the protecting piece just cannot be a Pawn or a Go-Between.  If you can read Japanese, you can see Chu Shogi Renmei’s discussion of this precise situation here (see Case 4 on that page).

Having learned all this, I felt that using a problem relying on a very specific rules quirk as an introductory puzzle would be far too confusing, and selected the other three-move problem above instead.

Tsumeshogi Solutions

Now then, hopefully you’ve set some time aside and worked out the solutions to the four tsumeshogi above?  If so, well done!  If not, we’ll go through the solutions so you can see where you went wrong.  First, the three-move puzzle:

chu-shogi-puzzle-3-01  Since Black has a Crown Prince as well as a King, the King can finish off the other King personally!  I was very pleased with this as an introductory Chu puzzle, since the solution highlights the unusual consequences of having an extra King, which is a very new concept if you are more accustomed to modern Shogi or Chess.

Now the five-move puzzle:

chu-shogi-puzzle4-01

Here we have a lovely example of a Lion checkmate, enabled by the valiant sacrifice of the Free King.  As mentioned in the endgame section above, sacrificing material to bring the King in range of the Lion often pays off — the Lion can very frequently chase down the enemy King and give mate on its own.

Next, the nine-mover:

chu-shogi-puzzle-5-solution-01

For one of the puzzles I wanted to showcase a different Lion Power piece, and in this puzzle we get an instructive example of how the Horned Falcon can very effectively trap the enemy King even in a seemingly well-defended corner.  The Falcon’s forward Lion Power allows it to jump or double-capture its way to the King, and conveniently it can also cover both potential escape squares.  The setup is nice too — once we figure out that the Horned Falcon can deliver mate in the corner, opening the line to the King for the Whale pops out as an elegant way to drive the King toward his doom.

This puzzle also reinforces a very useful rule of thumb for tsumeshogi — every piece on the board is there for a reason!  If a problem could be remade without a given piece and not change the solution, then it’s not a well-constructed problem.  So when you’re stuck for a solution, have a think about what every single piece is doing on the board, and see if that shakes loose any clues.

Finally, the mammoth eleven-mover:

chu-shogi-puzzle-6-solution-01

Yes, it’s another problem playing with Chu Shogi’s multiple royal pieces, but this one was too good to pass up.  Sacrificing a King is an outrageous way to start a checkmating combination!  I feel the puzzle would be even a bit more impactful if the King sacrifice came directly before the checkmating move, but even so it’s a fairly jaw-dropping thing to see for a Chess or Shogi player.

From here, I’d suggest checking out the other tsumeshogi I linked earlier, and try some of the other audacious puzzles available to test your Chu instincts to the limit.  Solving puzzles like this is a huge help to one’s endgame technique, generally speaking, and some of these puzzles are very cleverly made artistic works, as well.  If you eventually become able to solve the really long puzzles lasting a hundred moves or more, you’re well on your way to being an extremely strong Chu player.  The real test, however, is whether you can solve the infamous Skyscraper, the longest tsumeshogi ever created, which lasts a staggering 3,257 moves.

For those who can’t read Japanese: you can view the solution to any of the puzzles on the linked sites by selecting it from the drop-down menu on the puzzle’s page, then scroll through the moves using the buttons underneath.  There are two rows of buttons; the second row of six is the one you need to use.  Going from left to right, the buttons are [Go to first move][Go back ten moves][Go back one move][Go forward one move][Go forward ten moves][Go to last move].

The final installment

The third and final part of my Chu Shogi coverage — for now, at least — will be an annotated Chu Shogi game.  I will be presenting a game from the Chu Shogi Renmei website that, to my knowledge, has not been analysed in English before.  I’m by no means a master of Chu Shogi, but I know enough to explain the basic ideas behind key moves in the game, so hopefully that will give you a clearer sense of how to evaluate positions in Chu Shogi and how a typical game might flow.

Also, in the near future I’ll be covering Chu Shogi’s big brother: Dai Shogi.  My materials for the Dai Shogi introductory article are already almost finished, so this may get posted before the Chu Shogi game.  Either way, I hope you’re enjoying my Shogi variant coverage — please do post comments below or send me an email if you have any feedback, corrections, or suggestions.

Tagged , , ,

Chu Shogi, Part I: How to Play

As some of you out there already know, I’m a huge fan of Shogi, the Japanese version of Chess, and its many variants.  Shogi is a dynamic, attacking game enjoyed by millions of players around the world, and in my view is the most exciting of the major Chess variants played today.  Chu Shogi is my favourite of the many larger variants of Shogi, and in my estimation is the best-designed game of the lot.  I hope that by the end of this very long post you might be inspired to give this unique and fascinating game a try.

I have to admit that, as much as I love Chu Shogi, it is substantially more difficult to learn than modern Shogi or Chess.  The board is large — 144 squares, as compared to 64 in Chess or 81 in modern Shogi — and each player starts with 46 pieces in their army.  In Chess you need to learn the moves of six different types of pieces, whereas in Chu Shogi there are 28 different moves to remember!

However, once you get a game or two under your belt, all that complexity will melt away — you’ll be surprised how quickly the rules will become second nature.  In this post I’m aiming to help you on that journey, by providing a complete reference to all the rules and piece movements you need to know to get started with this fantastic game.

I’ll start first with a brief look at the origins of the game, then I’ll describe the rules in detail, then I’ll show off the moves of all the pieces, and finally I’ll offer some basic tips for new players.  Note that given the detailed kanji characters on the pieces and the complexity of some of the diagrams below, I’ve made this post so that each image links directly to a much larger version — please do click through to the larger images if any of the diagrams look a bit cramped on your device.

What is Chu Shogi?

Back in the 14th and 15th centuries, before modern Shogi existed, the Japanese were playing not just one, but three main variations of Shogi: Sho Shogi, Chu Shogi and Dai Shogi.  These names mean, respectively, Small Shogi, Middle Shogi, and Large Shogi, and refer to the different board sizes used by each game: Sho Shogi is the direct predecessor to modern Shogi and is played on a 9×9 board; Chu Shogi uses a 12×12 board; and Dai Shogi is played on a 15×15 board.  There were many other Shogi variants being developed in Japan around this time, but these three games were by far the most popular.

Chu Shogi is one of the most popular variants of Shogi played today, chiefly because of its finely balanced armies and the dominating presence of the Lion, a spectacularly powerful piece that shapes the entire game.  A game of Chu Shogi is substantially more strategically and tactically complex than the smaller Chess-type games we’re used to, and offers the dedicated player limitless variety and challenge.  Learning how to coordinate one’s army of 46 pieces on this large board can help us achieve greater strategic heights in our Shogi and Chess games, too.

Thanks to its fantastic play experience, Chu Shogi is the only ancient ancestor of modern Shogi that remains officially alive today.  The Chu Shogi Renmei in Japan is the governing body for the game, and there are still regular tournaments happening.  Here in the West, Chu Shogi has a small but die-hard following, and many Chu players consider it perhaps the best Chess-type game ever invented (I agree with this assessment).  Nowadays Chu Shogi can be played online in real-time or correspondence forms, in domestic and international tournaments (albeit with only a few players), and solo against strong computer opponents.  Chu Shogi is more accessible than ever, so why not give it a go?

The Origin of Chu Shogi

Chu Shogi’s immediate ancestor is Dai Shogi, which first appeared in the form of Heian Dai Shogi, a rather ponderous game played with 34 pieces per player on a 13×13 board.  This game is first described in the diary of Fujiwara no Yoninaga, a high-ranking general, which was written between 1135 and 1155.  Various other diaries throughout the 14th and 15th centuries make reference to Dai Shogi and present it as the most enjoyable form of Shogi, which suggests by this time it had reached its later form of a 15×15 game with 65 pieces per player (which is enormously better than Heian Dai Shogi).

The first reference I’ve found to a much larger form of Shogi comes in a mid-14th century text called Isei Teikin Orai.  The book refers cryptically to a form of Shogi with 36 pieces on the board and a ‘dense’ form of Shogi with, apparently, 360 pieces.  Unfortunately there are no further details in this book about this mysterious form of large Shogi, although perhaps it is a very early reference to some form of Tai Shogi with its 25×25 board and 354 pieces?  Recent research by Professor Tomoyuku Takami proposes that, based on late Heian and Muromachi period documents, the first large Shogi may in fact have been Maka Dai Dai Shogi, which was then reduced in size to form the other large variants including Chu Shogi.  More on this to come when I cover Maka Dai Dai Shogi in a future post.

The first detailed presentation of Chu Shogi’s board and rules comes in an Edo Period text titled Shōgi Rokushu no Zushiki (象棋六種之図式), which itself has a tangled history.  The book was previously published by 16th-century Shogi craftsman Minase Kanenari as Shogi Zu (Illustrations of Shogi) in 1591, and he said it is a copy of a text he borrowed from a Kyoto Temple that originated in 1443.  Allegedly that text is itself a copy of an even more ancient document, but we don’t know anything about that original source.

Below you can see scanned pages of the Shōgi Rokushu no Zushiki that show the Chu Shogi board, promoted pieces, and the movement powers of the pieces:

Thanks to this book we know that Chu Shogi existed in essentially its current form all the way back in 1443, and possibly significantly earlier.  There are two other Edo-era sources, the Sho Shogi Zushiki  and Shogi Zushiki from the late 17th century, which also describe the rules of Chu Shogi and numerous other variations of Shogi.  In most cases they agree on the rules, but some of the very large games have some inconsistencies across these three volumes — more on that when I cover those games in future posts.

Regardless of some of the inconsistencies here and there, Shogi historians generally agree that Chu Shogi was a reduced form of Dai Shogi, which may have been the first large Shogi game or itself derived from larger games.  Chu Shogi was then reduced further to Sho Shogi on the 9×9 board, and in the 16th century the drop rule was introduced, giving rise to the modern form of Shogi.  Subsequently this rejuvenated version of Sho Shogi became by far the most popular form of the game.  Prior to that, Dai Shogi was considered the most prestigious form of Shogi, followed by Chu Shogi, whereas Sho Shogi was thought to be a short and easy game more suitable for children (!).

After modern Shogi took over, Chu Shogi still remained mildly popular all the way into the 20th century.  Unfortunately the game suffered a significant drop in popularity following World War II, and even strong support for Chu Shogi from some professional Shogi players failed to revive it to its former glory.  In the 1970s and 1980s, an Englishman called George Hodges collaborated with Japanese Shogi scholars to bring Chu Shogi, Dai Shogi, and many other Shogi variants to Western audiences.  George Hodges is largely responsible for popularising these games in the West, and he even produced physical sets for large Shogi variants all the way up to the gigantic Tai Shogi.  Unfortunately George died in 2010, but his widow Angela Hodges continues producing his Shogi variant sets to this day.

The rules I’ll be presenting here are the rules used by the Japanese Chu Shogi Association, the Chu Shogi Renmei.  While these differ in some respects from the rules generally used in the West, particularly in the promotion rules and King-baring rules, the textual evidence we have such as Chu Shogi checkmate puzzles indicates that the Chu Shogi Renmei rules are the same ones used in medieval Japan.  For that reason I encourage you to use these rules, as they seem to be historically correct and also have less ambiguity in certain board situations.

The Rules

At the beginning of a Chu Shogi game, each player starts with 46 pieces of 21 different types.  The initial board position looks like this:

chu-shogi-initial-position

Diagram 1: Chu Shogi initial position

Just for clarity, for the rest of this post I’ll refer to the two sides as Black and White — Black on the bottom of the board heading up, White at the top heading down.  Note that some game records from a long time ago have Black at the top rather than the bottom, but this is always noted somewhere if that’s the case.

Winning the game

As in any Chess variant, the goal of Chu Shogi is to eliminate your opponent’s King.  However, unlike Chess, in Chu Shogi you must capture the King, rather than checkmate it — and it’s possible to have two royal pieces at once in Chu Shogi, the King and a Crown Prince.  If a player has both a King and a Crown Prince in their army, then the opposing player must capture both of those pieces in order to win.

The nature of Chu Shogi’s win condition means that there’s no stalemate as in Chess, and there’s no prohibition against moving a royal piece into check or checkmate.  Obviously this is normally a pretty bad idea.

The Bare King Rule

The Chu Shogi Renmei adopts an additional rule where baring the enemy King is also a win; in other words, if you eliminate an opponent’s entire army except a King or Prince, then you win.  However, if your opponent could on their next move bare your King as well, this is a draw, or if they could capture it on the next move,  they win instead.

The rule further specifies that any endgame of King + some pieces versus a bare King is a win for the baring side, except when they only have a King + Pawn or King + Go-Between, in which case they have to promote the piece in question first in order to claim the win.

In practice the Bare King Rule isn’t hugely important, as most players would resign anyway as soon as the game seems hopeless, but nevertheless the rule has some interesting consequences for certain endgame situations.

Taking a turn

Once the game starts, Black moves first.  The players alternate moving one piece on the board according to the specific movement powers of that piece.  If that piece lands on a space occupied by an enemy piece, that piece is captured and permanently removed from the game (there are no modern-Shogi-style drops in Chu Shogi).  Pieces cannot capture or move through friendly pieces.  If a capture occurs then the move ends at that point — unless the capturing piece has ‘Lion Power’ (explained below), in which case a second capture can be performed.  If the captured piece is the opponent’s last remaining royal piece (King or Prince), then the game ends immediately and the capturing player wins.

Normally a player must move a piece somewhere on their turn, but certain pieces with ‘Lion Power’ can ‘move’ without actually changing the board position — this means that player effectively passes their turn.  This may be relevant in certain tight endgame situations where not moving can be preferable to moving.

Repeating positions

Sometimes during the course of play, players may enter into a cycle of repeating positions — for example, if a player is threatening their opponent’s King repeatedly with the same piece.

Chu Shogi Renmei’s rules have comprehensive guidelines for dealing with repeated positions:

  • If the board position is repeating due to one player repeatedly checking the opponent’s King or Prince (placing them under immediate threat of capture), then they must change their move before the 4th repetition of the same position or lose the game.
  • If one side is repeatedly attacking the opponent’s non-royal pieces during the repetitions, the attacking side must change their move before the 4th repetition of the same position or lose the game.
  • If the position is repeating due to both players passing using ‘Lion Power’ pieces, then the first player who passed must change their move before the 4th repetition of the same position or lose the game.
  • If the position is repeating and neither side is attacking, then a draw can be claimed.
  • In cases not covered specifically by the above rules, then whichever side causes the 4th repetition of a board position will lose the game.

Generally speaking, due to the lack of stalemate and perpetual check thanks to the above rules, draws are rather rare in Chu Shogi.

Promoting pieces

Both players have a promotion zone on the board that consists of the four end rows of the board from their perspective (the rows that contain the bulk of their opponent’s army at the start of the game).  So, Black’s promotion zone is rows A through D in the above diagram, and White’s is rows I through L.

If a player advances one of their pieces into their promotion zone, they may choose to promote that piece by flipping it over; the other side will have different characters written in red that show the name of the promoted piece.  Promoted pieces are more powerful than the starting version of the piece — often significantly more powerful.  Once a piece is promoted, it remains promoted until the end of the game.  Promotion happens for each piece only once.

Here’s the starting position of Chu Shogi with all the pieces flipped to show their promoted sides:

chu-shogi-initial-position-promotions

Diagram 2: Chu Shogi initial position with pieces flipped to their promoted sides

Note that three of the pieces still have black characters on them — these are the King, Lion and Free King, none of which can promote.  I’ve left them in these diagrams just as a reminder of their position in the starting array.

When a piece moves into the promotion zone, promotion is optional — this may sound pointless, but there are situations where promotion may not be advantageous, at least not right away.  Some pieces have promoted forms with very different movement abilities, so you may wish to defer promotion if you could make better use out of the original movement pattern.

If you want to promote the piece later after deferring when you first entered the promotion zone, you have to either A) move the piece out of the promotion zone, then re-enter the zone and promote on that move, or B) capture something in the promotion zone.

Note that some pieces that cannot move backward — Pawns and Lances — could theoretically get to the last row on the board and never be able to move again.  If an unpromoted Pawn is about to reach the last rank, you can promote it even on a non-capturing move; if any other piece gets stuck unpromoted on the last rank, it just sits there unable to move until it gets captured.

NB: I’m using the Chu Shogi Renmei promotion rules here, which are more strict than the rules on Wikipedia or in the Middle Shogi Manual.  In those rules, you can promote any piece after a non-capturing move when already within the promotion zone.  However, this makes a lot of Chu Shogi board positions a bit more ambiguous and can cause some rules questions, so I recommend the Chu Shogi Renmei rules.

The Pieces

Remembering all the different moves of the Chu Shogi pieces is a bit challenging at first, but you’ll soon see that there’s a certain logic and pattern to them.  The vast majority of pieces can move in a few directions one square at a time, or over any number of squares in some directions, or some combination of the two.  A few pieces can jump over some squares, even if those squares contain friendly or enemy pieces.  A few others have ‘Lion Power’ and effectively move twice in a turn; this is explained further below.

I’ve made some handy diagrams to illustrate the moves of all the pieces.  The diagrams show you the pieces in a rough order, starting from the top row of your army down to the last row.  Each piece’s promoted form is shown below its initial form.  Remember that the King, Free King and Lion don’t promote.

In the diagrams below, orange squares indicate squares a piece can step to during a move; squares with stars indicate squares pieces can jump to, passing over intervening pieces; arrows indicate directions in which the piece can move an unlimited number of squares; and finally, exclamation marks indicate the piece can perform igui capture on that square (see ‘Lion Power’ below).  As always, click each picture to see a massive huge version of the diagrams.

You’ll notice a certain pattern to the distribution of piece movements in the starting position.  The back rank contains the King, the Drunk Elephant (both a strong defensive piece and capable of promoting into a royal Crown Prince), and a large crew of short-range Generals.  The second and third ranks contain mostly longer-ranged pieces, with the most powerful pieces sitting in front of the King.  The fourth rank consists of 12 Pawns, and finally in the fifth rank we have two Go-Betweens, the spearhead of our advancing army.

Note that to help you remember the piece names in full, I’ve used two-character pieces in the above diagrams, but for some subsequent diagrams (and in future Chu Shogi articles) I’ll mostly use abbreviated, one-character pieces to aid visibility.  Here is a zoomed-in view of one player’s army with one-character pieces; the first diagram shows the starting position again, and the second has all the pieces flipped to show their promoted sides:

For players of modern Shogi, you’ll see that that in general there are many more powerful pieces in Chu Shogi.  In Shogi the most powerful pieces are the Dragon King and Dragon Horse; in Chu, you have two of each these on the board at the start of the game, and when they promote they become much more devastating.  In Chu you also have the Free King, sometimes called the Queen, which moves as far as it likes in eight directions just like a Chess Queen (but Chu Shogi invented this piece 250 years earlier!).  Finally you have the Lion, a piece so flexible, powerful and exciting to use that it inspired me to write a whole article about powerful pieces in Chess variants.

Print versions: I’ve also produced two single-page reference sheets for all the Chu Shogi moves, one version with 2-kanji pieces and another with 1-kanji pieces.  The pieces are paired up with their promoted forms and again mostly follow the order of the diagrams below.  Hopefully these will help you out if you bring a Chu Shogi set to a games night or your Chess or Shogi club.

Lion Power

To understand how strong the Lion is, you need to understand its special movement rules, referred to as ‘Lion Power’.  As you can see in the diagram above, the Lion can jump over one square in any direction, bypassing any friendly or enemy piece on that square.  However, it can also do something uniquely powerful — it can perform two single-square moves in any direction in a row, on one turn, and one or both of these moves may be a capture.

This has some interesting side effects — for one, the Lion may appear to capture an adjacent piece without moving, by moving to its square, capturing it, then moving back to its starting square.  This is called igui — Japanese for ‘stationary eating’ — and in the diagrams above the squares where igui is possible are marked by exclamation marks in the Lion’s diagram.  The Lion may also move to an adjacent empty square and then back, appearing not to move at all; this is how one may ‘pass’ their turn, as mentioned above.  Finally, the Lion may capture two pieces in one move.

Here are a couple of examples of the Lion’s unique powers:

chu-shogi-lion-moves-01

Diagram 3: Examples of ‘Lion Power’

As you can see, these powers make the Lion far more flexible and powerful than any other piece on the board.  No enemy piece can sit adjacent to it, as it will just be instantly gobbled up igui-style.  The Lion can easily escape threats by leaping away or by taking two nimble steps around interposing pieces.  Finally, if an opponent leaves multiple pieces undefended, the Lion will eagerly devour them all.  So, even without long-range movement abilities, the Lion dominates the board — and when you use it yourself, you’ll see how exciting the game becomes thanks to this magnificent beast.

Lion-trading rules

Chess players out there will be familiar with the Queen trade — when two players mutually agree to simplify the board position by exchanging Queens.  In a Queen trade a player will offer their Queen for capture by the other Queen, with their pieces in position to immediately recapture the opposing Queen.  The end result is both players lose their Queen but nothing else of consequence, leaving behind a less tactically complex and usually more boring game.

However, the wise inventors of Chu Shogi knew they had a hit on their hands with the Lion, and wanted to discourage players from trading them off to simplify the game.  To achieve this they included several anti-trading rules that forbid players from capturing or re-capturing opposing Lions in certain situations.  These rules ensure that the Lions often stay on the board for a long time during a typical Chu Shogi game, and that gives this remarkable piece a chance to truly shine.

I’ve created a few diagrams here that summarise the main points of the Lion-trading rules:

chu-shogi-lion-rules-01

Diagram 4: Lion Trading Rules

These rules seem a bit complicated at first, but as you can see in the diagrams above, there’s really just a few points to remember:

  1. A Lion can always capture an adjacent Lion.
  2. A Lion may not capture a non-adjacent Lion protected by an enemy piece — this prevents a mutual Lion trade, where the Lions are off the board but the position doesn’t change much otherwise.
  3. If a non-Lion piece captures a Lion, then the opponent can’t do the same thing on the next turn.  This means that if your opponent has just taken your Lion with a non-Lion piece, you can’t take theirs right away, even if it’s unprotected!  This prevents trades making use of non-Lion pieces.
  4. A Lion can capture an opposing Lion protected by another piece, but only if it may capture another piece at the same time — and as long as that extra piece is not a Pawn or a Go-Between.  This means that if both Lions are going off the board in this kind of position, the Lion that initiates the exchange has to take an additional piece of at least some value with them; again this discourages Lion trades, since trades won’t be possible on even terms.

There are some interesting tactical situations that can arise out of the Lion-trading rules, but don’t worry about those for now — when you’re just starting Chu Shogi, focus on simply exploring the Lion’s capabilities and getting used to these rules.  In subsequent posts I’ll talk some more about these rules and how they impact Chu Shogi tactics.

Other pieces with Lion Power

Two other pieces in Chu Shogi have a limited form of Lion Power — the Horned Falcon and the Soaring Eagle.  The Horned Falcon can use Lion Power only directly forward — so it may jump two squares forward, or make one or two forward steps, or make an igui capture or a double capture forward.  The Soaring Eagle can do the same except on the two forward diagonals only.

The Lion-trading rules do not apply to the Horned Falcon or Soaring Eagle.

Note also that the Kirin (sometimes written Kylin in some Western sources) promotes to a Lion.  Once the Kirin promotes to Lion, all Lion Power and Lion-trading rules now apply to that piece.

Beginner Chu Shogi Tips

Chu Shogi can seem daunting at first — just look at all those pieces! — but here I’ll give you a few key tips that can help direct your play in the first few games.  I’ll write some additional Chu Shogi articles in the future, including detailed discussion of the opening, middlegame and endgame, and a fully-annotated game (this will take some time — the game I’ve chosen to annotate is 327 moves long!).

For now, here are some key tips for each stage of the game:

The opening

Chu Shogi games are long — expect a typical game to last about 300 moves (compared to an average Chess game at about 80 moves, or a modern Shogi game at about 120 moves).  With that in mind, take your time in the opening — Chu Shogi games tend to build gradually, with each player re-arranging their pieces within their own ranks in preparation for launching a coordinated attack.  Take your time, follow the tips below and you should be able to keep yourself out of trouble in the opening.

  • Don’t neglect your short-range pieces!  Chu Shogi has a lot of powerful long-range pieces, so it’s easy to forget about your short-range pieces in the back ranks.  However, if you advance these pieces early on, they serve a valuable role in protecting your front-line Pawns from an enemy Lion invasion.  Later in the game you’ll also have a much easier time promoting these short-range pieces if you’ve already advanced them early, and many of the short-range pieces have useful promotions.  Finally, a coordinated march of Generals on the enemy position can enable you to shift the enemy’s long-range pieces into disadvantageous positions, disrupting their attacks or even exposing them to capture.
  • Set up a solid defence around your King.  Even with the many rows of pieces in front of your King, you still should spend extra effort to protect him right from the start of the game.  In particular, keep the Drunk Elephant, Blind Tigers and Gold Generals close at hand — all three of these pieces can cover a lot of squares around your King.  The Drunk Elephant becomes extra valuable if kept alive in the endgame, since it can promote to a Crown Prince and make your opponent have to capture two royals to win the game.  Similarly, the Gold Generals promote to Rooks, which are extremely useful pieces to have around in the endgame when many other long-range pieces may have been swept off the board.
  • Use your Lion to claim the centre.  Jumping the Lion over your Pawn line early on to cover the centre of the board is very useful — it deters the enemy Lion from making opportunistic attacks on your vulnerable Pawns, while threatening to do the same to them.  If your opponent starts harassing your Lion with capturing threats, you can easily retreat it back over the Pawn line to safety.  The Lion controls a lot of space and is very hard to pin down, so use that to your advantage!

The Middlegame

The middlegame of Chu Shogi starts once both players have developed their short-range pieces behind the Pawns, lined up strong long-range pieces behind them, and are starting to attack the enemy’s position, often along one of the flanks of the board.  Succeeding in the middlegame requires strong strategic acumen — tactics are important, but there are so many possible moves on any given turn that it’s often very difficult to anticipate the opponent’s replies to each of your moves.  Solid strategic principles can guide you better over the longer term.

  • Advance methodically.  Concentrate your attacking forces along the side of the board where your opponent looks weakest.  Back up Pawn advances with your short-range pieces, and keep long-range pieces behind them to snipe at any invading enemy Generals or to deter Lion incursions.  Try to keep your pieces moving in lockstep — retreating weak pieces is slow and will lose you time, and time is a key resource in Chu Shogi.
  • Avoid pointless material losses.  At this stage of the game, try to amass your forces on weak points in the enemy camp, allowing for a mass assault later on, rather than impatiently trying to punch through with just a few strong pieces.  Early material losses can mount up, and sacrifices can fail to significantly damage your opponent’s defences given the size of each player’s army; whatever hole you’ve punched in the enemy lines with your powerful piece sacrifice will soon be plugged by another piece.
  • Don’t rush toward promotion.  Your short-range pieces will take time to breach enemy lines and hit the promotion zone — don’t rush this, they serve a valuable role in the meantime defending your pawns and discouraging Lion invasions!  Your long-range pieces can promote very easily once the board opens up after a few battles break out, so don’t fling them headlong into danger to seek promotion — soon enough you’ll be able to promote your long-range pieces essentially at will.  Once you do start to make headway on the enemy position, try to make it a goal to promote a Vertical Mover to a Flying Ox — the Flying Ox is a strong attacking piece.
  • Keep your Lion centralised and patrolling.  Keeping your Lion in the centre will help restrict your opponent’s advance to one flank or the other, and will keep their Lion contained.  While managing your own advance, don’t forget to keep an eye out for the enemy Lion, and look for opportunities to drive it away temporarily; this can open up opportunities to make a dent with your short-range pieces, which can then open up lines for your Lion to do some serious damage.  Your opponent will be looking to do the same, of course, so don’t let their advancing army set up a beachhead for their Lion!
  • Don’t forget about defence!  While hunting the enemy King and/or Prince, don’t forget to maintain suitable defences around your King position.  Many players keep their Side Movers on the third and fourth ranks — this sets up a two-rank barrier that even the Lion finds difficult to cross.  Leaving a couple of Rooks behind those pieces provides a further deterrent for invading enemy forces.

The Endgame

The endgame of Chu Shogi is a much more open affair than the middlegame — both players’ defences have given way to some extent, and many pieces have been swept off the board.  Long-range pieces are flitting dangerously around the more open board, many more pieces are able to promote safely, and victory might be in sight for one of the players.

  • Make use of your Gold Generals and Drunk Elephant.  Gold Generals can now be advanced in the endgame, preparing to promote to much more dangerous Rooks.  Your Drunk Elephant, if needed, can advance into the promotion zone to become a Crown Prince, giving you another bit of insurance in case your King comes under threat.
  • Advance your Lion on the enemy King.  Your Lion is absolutely devastating in the endgame when backed up with some other pieces.  Even if your opponent has created a strong defensive castle structure — to be covered in the next article — a few sacrificed pieces can open up holes in that structure that your Lion can exploit.  In your hunger for victory, just be careful not to leave your Lion too exposed, or your opponent may harass it away or even capture it!
  • Take advantage of strong promotions.  If you’ve managed to keep your Phoenix and Kirin alive, now’s the time to bring them forward!  They move a bit awkwardly, but they promote to Free King and Lion, and having extras of those pieces is always extremely useful.  You may also have Horned Falcons and Soaring Eagles or other strong pieces available through promotions, which can do severe damage to your opponent’s remaining defences.

With these basic tips in mind, you should be able to get a handle on the general flow of a Chu Shogi battle once you have a few games under your belt.  There’s some good information out there online if you want to take your game further — get in touch with Angela Hodges to buy PDF copies of the Middle Shogi Manual and the back issues of Shogi Magazine, which contain a series of useful articles on the game by R. Wayne Schmittberger.  Even if you can’t read Japanese, Google Translating the Chu Shogi Renmei website may be useful — there are a number of instructive articles there, as well as checkmate puzzles and complete game records for both historical and recent high-level matches.

Why should I play Chu Shogi?

You may have looked through this article and thought to yourself — why learn all this?  Isn’t this game just a more complicated, slower version of Shogi?  Why not just learn Shogi instead, a game with millions of players around the globe?

Ultimately, yes, it’s a complex game, and there’s quite a bit to learn at first.  But Chu Shogi offers a very different experience from the typical Chess/Shogi game — whereas those games feel like very abstracted skirmishes between two squadrons of troops, Chu Shogi feels like a war.  A strategic approach is vital, because right from the start you’ll be making very consequential decisions about where to concentrate your strength, where and when to attack, and how best to execute your devious plans.  All the while, the Lions are stalking the board, scaring other pieces into submission, and offering new tactical situations you can’t find in any game of Chess or Shogi.

Even if you’re not a Chess or Shogi player, I recommend trying Chu Shogi at least once or twice — it’s an incredibly rich game, and could easily turn out to be your ‘lifestyle’ game.  If you’re a Chess player, Chu Shogi will be like entering a totally different universe — the balance between tactics and strategy is massively shifted toward strategy, the board is filled with pieces that behave very differently from anything in Chess, and the board is so large that it feels like playing three games of Chess at once.  If you’re a Go player — well, Go is hard, so you’ve already got a lot on your plate, but as a fan of a highly strategic game you may find Chu Shogi a particularly compelling take on the Chess genre.

Finally, for you Shogi players, I certainly recommend you keep playing Shogi, as it’s a fantastic game.  But playing Chu Shogi can certainly pay dividends for your Shogi game, as well as being extremely good fun on its own terms.  If you don’t believe me, then at least you should believe Oyama Yasuharu, legendary Shogi player and 15th Meijin, who was an outspoken advocate for Chu Shogi:

“Ever since I was small I have often played Chu Shogi. My cautious and tenacious Shogi style is probably due to the influence it has had. I believe the reason I think, above all, about improving the cohesion of my pieces, is that I have played Chu Shogi.”

Next steps

So, in closing, I hope this post encourages a few of you out there to give Chu Shogi a try.  You can play in live games via the 81Dojo client linked on the Chu Shogi Renmei website, via PBEM on Richard’s PBEM Server or Game Courier, or with physical sets produced by Angela Hodges.

If you’d rather practice against AI opponents, you can play in your web browser via the Dagaz Project — scroll down to ‘Shogi Family’ and you’ll see Chu Shogi, Dai Shogi, and loads of other variants too.  If you want a really strong opponent, you can download the WinBoard Shogi Variants Package, which includes HaChu, a computer engine designed specifically to play Chu Shogi (it also plays a mean game of Sho Shogi and Dai Shogi).  Apparently HaChu can play a pretty great game of Tenjiku Shogi nowadays too, although this version is not yet released — when it is, you’ll want to download WinBoard Alien Edition to play the larger Shogi variants.

Anyway, please pick one of those options and give Chu Shogi a go — it may take a game or two to sink in, but if nothing else I’m sure you’ll understand how this game managed to survive for 600 years, even in the face of the massive popularity of modern Shogi.  You may even find it becomes an all-time favourite, as it has for me.

Even better, once you learn Chu Shogi you can easily pick up the larger Shogi variants — you could learn Dai Shogi in a few minutes, and Tenjiku Shogi in an afternoon.  I’ll be covering both these games in later posts, too, including a little piece on why Dai Shogi is more than just Chu Shogi’s older, slower big brother.  Tenjiku will speak for itself — that game is like nothing else out there and has a deservedly strong reputation.

In future instalments of this Chu Shogi series I’ll cover more detailed tips for Chu Shogi, including building castles for defense and developing checkmating attacks.  I’ll also fully annotate a game of Chu Shogi, talking through the moves and hopefully giving you more insight into the strategic depths this game has to offer.

Tagged , , , , ,

Powerful pieces in Chess games

In preparation for writing up some detailed articles about my favourite Shogi variants in the future, I spent a bunch of my insomniac hours making Shogi diagrams in Illustrator recently.  I thought I might give these a trial run before the main event, so here’s a more off-the-cuff opinion piece of sorts, about the dominant ‘power pieces’ in Chess and Chess-like games.

UPDATE:  I hadn’t realised my sources on the Tai Shogi pieces didn’t indicate that the power-pieces in fact have slightly different moves!  This then led to the same error popping up in the Long-Nosed Goblin diagram for Dai Dai Shogi.  I’ve now updated the diagrams and text to fix the error.


The Queen as a Power Piece

Abstract game designer Christian Freeling, whom I’ve praised extensively in this blog for his invention of Havannah and Starweb, two world-class strategic games, also invented numerous Chess variants over the years.  Of particular interest is Grand Chess, an enlarged game on a 10×10 board which includes two additional pieces: the Marshall, which has the combined movement powers of a Rook and a Knight; and the Cardinal, which moves as a Bishop or a Knight.  The larger board and larger armies make for a fine game full of strategic and tactical complexity, even more so than standard Chess.

Part of Christian Freeling’s motivation for Grand Chess was his desire to logically ‘complete’ the Chess lineup.  He has spoken in the past about the Queen in Chess, the presence of which he calls ‘defendable but arbitrary’, and the lack of other powerful combination pieces:

There are two more combinations, the ‘marshall’ and the ‘cardinal’. They combine the powers of rook & knight and bishop & knight respectively.  They should not have been excluded because of an arbitrary boardsize, but they were. Chess became a great game where it should have become an even greater game.

My new pet theory is that the exclusion of these other hybrid pieces has actually been a good thing for Chess — not in terms of rule elegance or logic, but in terms of the play experience, and the subsequent success of Chess games with communities of players.  This is not to say that Grand Chess is bad by comparison — far from it, you should definitely give it a try.  Though I do think there’s a reason Mad Queen Chess eventually just became standard Chess — the enormous power gap between the Queen and the other major and minor pieces gives the game additional tension, pace and urgency.   The Queen is a power piece — a singular, dominant force that gives direction and narrative emphasis to Chess play.

Let’s look at an example of the impact of the Queen in high-level Chess — the famous ‘Gold Coin Game’ between Stefan Levitsky and Frank James Marshall in 1912.  Marshall, playing Black, finds himself in this position, with his Queen threatened by capture via Levitsky’s Rook:

marshall-1

23. Rc5 — Black to play.

The next move allegedly ignited so much excitement from the spectators that they tossed gold coins all over the board.  Marshall threw his Queen directly into danger with a surprising and deadly manoeuvre:

marshall-2

23… Qg3!!

White resigned immediately.  White can’t take the Queen — there’s no variation that works for Levitsky.  To give some examples — if White takes with the pawn on h2:

marshall-v1

24. hxg3 Ne2#

Immediate checkmate!  White is trapped by the Knight and the Rook.  If White takes with the Queen:

marshall-v2

24. Qxg3 Ne2+ 25. Kh1 Nxg3+

Black immediately gives the same check with the Knight on e2, takes White’s Queen with check, and will take the Rook on the next move.  White is down a full Rook and completely doomed.  Finally, if White takes with the pawn on f2:

marshall-v3

24. fxg3 Ne2+ 25. Kh1 Rxf1#

Forced mate.  Black gives check with the Knight again, the King must go to h1 due to Black’s Rook, then that same Rook gives mate on f1.  Any other try by White is equally hopeless.

So why is this move so famous?  Of course it’s effective, dispatching White in one fell swoop and eliminating any attempts at a defence.  The move is certainly hard to find, because long lateral moves are notoriously difficult for even strong players to spot.  But we must admit that White was already in trouble here, and it’s not hard to find other, simpler moves that lead to a win as well.

I’d suggest that this move is famous, and by extension all the other notorious Queen sacrifices throughout Chess history, because the Queen is so much more powerful than any other piece that our innate desire is to protect it — the Queen can be a threat from almost anywhere on the board, so every fibre of our being tells us not to throw it away.  The Queen is so important that incredible numbers of Chess problems, studies, and books focus on using it, capturing it, and protecting it.  The Queen towers over the other pieces, so when someone seemingly goes against all good sense and throws her life away, it’s a thrilling moment.  A great Knight sacrifice can be pretty, too, but it doesn’t have the same oomph of a daring Queen sac.

That oomph comes from the Queen’s status as a power piece — a piece that stands alone in each player’s army, capable of dictating the pace and rhythm of the game.  Entire games, and indeed tournaments, can rest on the fate of the Queen.

At this point you might say “OK sure — the Queen is badass, I get it.  But isn’t that just a quirk of Chess?  Is it actually necessary for a great Chess-like game to have power pieces?”  I’m willing to concede that a great Chess game may not need a power piece as a prerequisite for being great.  But the more I thought about this, the more I noticed that every Chess-like game I play has a piece (sometimes two) vastly more powerful and influential than the others on the board.

Since I know the Shogi family very well, let’s take a look at some of Shogi’s power pieces (note that I won’t be looking at promoted pieces generally, since it would just take more time while making no real difference to the overall pattern).  I’m not going to cover every major variant, but a representative slice of six of them — enough to demonstrate that the power piece is not just a fluke of Chess, but a feature common to many games in the King-capture family.

Power Pieces in Shogi

Modern Shogi is well-known for consisting mostly of short-range pieces.  Since captured pieces come back to life all the time in Shogi, the game is less chaotic and more balanced thanks to having predominantly short-range pieces.  However, Shogi still has the Rook and Bishop — two pieces vastly more powerful than everything else, pieces that can devastate your opponent on their own, or devastate you if you lose one or both of them.

In Chess-like games one way of quantifying piece strength is via exchange values.  If we consider the value of a pawn to be 1 point, then we can calculate over many many games the approximate worth of other pieces in terms of pawns.  In Chess, for example, Knights and Bishops are worth about 3 pawns, Rooks 5 pawns, and Queens 10 pawns.  In modern Shogi we see a similar gap between the power pieces and the rest:

shogi-power-pieces-modern-01

The next-strongest pieces behind the Rook and the Bishop are the Gold and Silver Generals, both worth vastly less.  The difference in the mobility of the Rook and Bishop compared to the Generals is particularly striking — on a 9×9 board, with most other pieces being single-step movers or otherwise very constrained, being able to move unlimited distances is seriously powerful.

The Lion in Chu Shogi

Chu Shogi is modern Shogi’s larger ancestor, played on a 12×12 board with 46 pieces per player.  Chu Shogi is an incredibly well-balanced game, and widely regarded by its fans (including me) as possibly the greatest Chess game ever invented.  Chu Shogi is particularly famous for its incredible power piece, the Lion:

shogi-power-pieces-chu-01

Chu Shogi’s Lion is a slice of pure game design genius.  The Lion can move like a King twice in one turn, with all the options that implies — capturing an adjacent piece, then moving back to its starting point (indicated by the ‘!’ in the diagram above); moving any which way in the 5×5 square area around itself, and so on.  The Lion can also jump two squares in any direction (indicated by the stars in the diagram).  It’s agile, powerful, and adaptable beyond any other piece on the board.  The nearest competitor to the Lion is the Queen, which moves exactly like the Queen in Chess (but was invented 300 years earlier); despite the Queen’s massive mobility, it simply can’t compete with the incredible flexibility and brutality of the Lion.

Logically we might think the Lion unbalances the game, but nothing could be further from the truth.  In fact the Lion is so enjoyable and challenging to use that the wise inventors of Chu Shogi included special Lion-trading rules, specifically to ensure that players don’t simply trade Lions on even terms early on to simplify the game.  The Lion in a sense defines the game — Chu Shogi probably would have faded away like so many other Chess variants, were it not for the Lion.

I want to take a moment here to mention Chu Shogi’s big brother, Dai Shogi.  Dai Shogi actually came before Chu Shogi, and includes all the same pieces plus eight more single-step-movers on a 15×15 board (65 pieces per player).  Dai Shogi is often cited as Chu’s slower, less exciting predecessor — I personally disagree with this characterisation, for reasons I’ll get into in a future post, but I believe part of the reason for this is the significantly decreased influence of the Lion on the larger board.  The Lion is still powerful in Dai, but it no longer drives the game — in fact Dai Shogi does not use any special rules to protect the Lion from exchanges, because of its less central role.  This fits as well with my power-piece theory; without the pace and energy of the Lion taking centre stage, Dai Shogi can feel slower, more methodical, and less thrilling than its younger sibling.

Tenjiku Shogi’s Explosive Demons

As we step up to even larger Shogi games, we find that Japan’s ancient game designers were never short of ideas for new power pieces.  On larger boards individual pieces have less influence in general, so to construct power pieces on that scale you have to really get crazy with it.  Fortunately they were up to the challenge.  Tenjiku Shogi is a massive game played on a 16×16 board with 78 pieces per player, and yet again we have a clear standout power piece even on this massive field of battle:

shogi-power-pieces-tenjiku-01

Yes, you are reading that correctly — the Fire Demon in Tenjiku Shogi is worth 83 pawns.  The Fire Demon is also one of the most powerful Chess pieces ever invented.  This beast can move as far as it likes in six directions, or step any which way in a 7×7 square around itself — and whichever way it moves, once it stops every enemy piece adjacent to it is removed from the board.  If the opponent moves a piece next to the Fire Demon on their turn, that piece gets burned away too.

So instead of Tenjiku Shogi being a bigger, slower version of Chu, the Fire Demon turns it into a sort of supercharged extended edition.  Pieces die violently and in large numbers, and games can be over in surprisingly short amounts of time.  Note that the next two most powerful pieces in the game, the Great General and Vice General, are also staggeringly strong, able to jump over any number of friendly or opposing pieces in order to perform a capture.  Even with that significant power these pieces still are only half as strong as the mighty Fire Demon.  Like the Lion and the Chess Queen, the Fire Demon is in a class by itself.

Dai Dai Shogi’s Hook Movers

Dai Dai Shogi — literally translated that means ‘Big Big Shogi’ — is an extremely sizeable game, played on a 17×17 board with 96 pieces per player.  Once again the sheer enormity of the board didn’t deter our intrepid designers from producing yet another power piece:

shogi-power-pieces-dai dai-updated-01

Our friend the Lion is back, but this time as only the third-most powerful piece on the board.  Towering above him are the hook-moving pieces; these monsters can move as far as they like in one direction as a Rook or Bishop, then turn 90 degrees and do it again, all in one turn (although they may only capture once).  In the case of the Hook Mover — worth a ridiculous 114 pawns — that means on an empty board it can reach any square in a single move.  That single piece is considered to be worth more than five Lions.

R. Wayne Schmittberger in a 1981 issue of Shogi Magazine had this to say about the power of the Long-Nosed Goblins and Hook Movers in Dai Dai Shogi:

The dominant piece in the middle game is the Long-Nosed Goblin, and in the endgame the supremely powerful Hook Mover, which not only attacks every square on an empty board but gives double-check by itself!!  This makes interposition against it impossible in many cases.  Generally a game will end quickly if a player is able to get the deadly combination of a Hook Mover and a Furious Fiend near the enemy King, where they will simply run amok and eventually combine for an elegant tsume [mate].

This power piece isn’t just a random addition, it’s carefully integrated into the fabric of the game.  Dai Dai Shogi is notable for having a very asymmetric initial position; there are 64 different types of pieces in each player’s 96-piece starting army.  The Hook-Mover and the Long-Nosed Goblin are tucked snugly away in the back ranks, waiting to be unleashed when the board is open and starting to empty of other pieces — precisely when they’re at their deadliest.  As R. Wayne Schmittberger says, the middle- and endgame of Dai Dai Shogi is heavily influenced by these pieces, and the tactical complexities they introduce alongside the huge menagerie of different pieces gives the game a unique flavour.  Thanks to this tactical and strategic richness, Dai Dai Shogi stands out even in the crazy world of Shogi variants.

Hook Movers in Maka Dai Dai Shogi

Next up is Maka Dai Dai Shogi, one of my favourite Shogi variants.  Maka Dai Dai is an immense game, played on a 19×19 board with 96 pieces per player, and is notable for its strange pieces named after mythical spirits, and for the fact that the King promotes into the near-omnipotent Emperor that can jump instantly to anywhere on the board.  Even on this larger board, the Hook Mover still works perfectly as a power piece:

shogi-power-pieces-maka dai dai-01

Once again the Hook Mover towers over the rest, worth more than double its nearest competitor.  The Buddhist Spirit, which moves as both a Lion and a Queen and has special rules that make it essentially immortal, still pales in comparison.  In fairness, one could say  in this case that the ultimate power piece in Maka Dai Dai Shogi is the Emperor, which is so unbelievably strong that the entire game changes completely when a King promotes.  But the Emperor doesn’t always appear, while the Hook Mover is always lurking, ready to cause trouble — so in that sense I consider the Hook Mover the real power piece here, because it always will impact on the game.

Tai Shogi: on the biggest boards, mobility is King

Our last stop on the Large Shogi Express is Tai Shogi, a monstrosity of a game played on a 25×25 board with 177 pieces per player.  Here once again the Hook Movers reign supreme, and in practice are even more powerful with the extra room to manoeuvre on such a gargantuan board:

shogi-power-pieces-tai-updated-01

In Tai Shogi all the strongest pieces are hook-movers of some description, but the double-Rook Hook Mover still rules the roost, and it’s not a close competition.  On this massive board rich with weak targets, the Hook Mover’s value jumps up to a preposterous 232 pawns, well over twice the value of its double-Bishop brethren.

Note that the Capricorn and Long-Nosed Goblin have slightly different piece values; the Long-Nosed Goblin is able to move one square orthogonally, as well as having the double-Bishop move, so it is slightly more powerful.  This option to spend a turn to switch diagonals means the Goblin can actually reach every square on the board, instead of half the squares.  However, spending a whole turn on this when you have 177 pieces to move is rather costly, so this does not create a huge difference in piece value.  Also, the Capricorn promotes to Gold General, whereas the Long-Nosed Goblin does not promote; since the Capricorn’s promotion is actually a demotion, this means it has to be used more cautiously.  That being said, before demotion the Capricorn remains a deadly threat and incredibly mobile.

R. Wayne Schmittberger, noted Shogi variant expert, underlines the importance of the hook-moving pieces in all these titanically large games:

Tai Shogi is the ultimate marathon game in the Chess family.  In terms of the number of pieces and playing time, Tai Shogi is to Dai Dai Shogi what Dai Dai Shogi is to Chu Shogi.  A serious game will require several long playing sessions to complete and will usually require more than 1,000 moves per player.   Like Dai Dai and Maka Dai Dai, Tai has hook-moving pieces that dominate the board in much the same way that a Lion does in Chu Shogi.

Tori Shogi’s Menagerie

Now to allay any fears that only huge and ridiculous Chess-type games fit my theory, let’s take a moment to look at Shogi’s elegant little sibling, Tori Shogi:

shogi-power-pieces-tori-01

Tori Shogi is a diminutive game, particularly in comparison to the others we just looked at — the board is only 7×7, and each player starts with a mere 16 pieces.  Yet even here we see a similar dynamic — only one piece, the Eagle (a promoted Falcon), has unlimited movement range of any kind.  As a result, the Falcon’s value is nearly double that of its ancestor.  Granted, in this case the Eagle isn’t present from the start, but the action in Tori Shogi is frenetic enough and the Eagle powerful enough that it often has a strong influence on the game.

Stepping away from Shogi for a moment, we can see that the same properties appear in other popular Chess games too — like Xiangqi and Janggi (Chinese and Korean Chess, respectively), where the Chariot is about twice as strong as its nearest competitor (the Cannon):

Janggi-Xiangqi-power-pieces-01

Xiangqi is frequently cited as the most popular traditional board game in the world, and Janggi has a robust professional scene in Korea and a growing international player base, so once again we see that power-piece Chess games tend to attract a robust following.  Incidentally, both these games are very different from Chess and Shogi, and well worth your time — I’ll be discussing them in detail in future posts.

I admit that my knowledge of Chess variants is by no means encyclopaedic, but I argue that the prevalence of power pieces in notable Chess variants suggests that the seemingly unbalanced starting setup of many games in this family is actually an asset, not a weakness.  The Chess variants that have survived the centuries and retain a following today seem to share a predilection for the power piece.

I can certainly understand that having a single dominant piece type might strike a game designer’s mind as distasteful, but from the perspective of the player, power pieces give these games an exciting dynamic.  In the case of the large Shogi games,  they stay playable and interesting largely because of these power pieces — without them, these games would drag on forever, and with so many slow-moving targets plodding around there’d be far fewer thrills in any particular capture or sneaky tactical sequence.  But a nuclear Fire Demon sacrifice destroying eight pieces in one go?  Yes, please!

So, in contrast to Christian’s view, I’d say that Chess and its many cousins has achieved cultural-icon status partially because the starting position is illogical and lopsided in its distribution of power amongst the pieces.  The ubiquity and popularity of the power piece across the games profiled here suggests that this dynamic appeals to players across the centuries and across cultures, and that it translates equally well to large and small boards and starting arrays.

Mitrofanov’s Deflection

Before I leave you, I want to showcase another famous Queen sacrifice in Chess.  This example comes from an endgame study.  Chess endgame studies are carefully composed endgame problems where one side must win or draw, and a properly-composed study must have one, and only one, correct solution.

This particular problem was composed by Leopold Mitrofanov at an endgame study competition in 1967.  The problem opens with Black pushed into a corner, but armed with two Knights and a Bishop, and threatening to promote a pawn any second:

mitrofanov-1

White to play and win.

White can win here, presumably via one of those pawns on the right side of the board.  However, those pawns are less advanced than Black’s, so the first question for White is: how to delay that dangerous pawn?  First, White can push back the opposing King by pushing the b-pawn, then offer a Rook sacrifice:

mitrofanov-2

1. b7+ Ka8 2. Re1!

Black must take the Rook to get his pawn through, which gives White a chance to sneak in an advance of the g-pawn.  Both sides end up promoting their pawns to Queen shortly thereafter, and Black retreats the Bishop to protect the King:

mitrofanov-3

2… Nxe1 3. g7 h1=Q 4. g8=Q+ Bb8

Now things get a bit heated.  First, White pushes the a-pawn, cramping Black’s King, and Black retaliates with a Knight check.  White takes the Knight, but then Black’s Queen jumps into the action and takes White’s h-pawn:

mitrofanov-4

5. a7 Nc6+ 6. dxc6 Qxh5+

This looks really bad for White!  Black’s King is protected in the corner, the White Queen is off in the other corner, and Black’s Queen now has free reign to chase down White’s King.  There’s nowhere for the King to go.

Luckily there’s another option other than a King move:

mitrofanov-5

7. Qg5!!

Outrageous.  White plants the Queen directly in front of Black’s Queen, blocking the check — but then Black can take it for free, and White’s in check again!  What’s the point?

The point is to deflect the Black Queen.  Black must take the Queen, and in so doing takes his own Queen off a key diagonal.  Now when White retreats his King to a6, Black can’t immediately give check:

mitrofanov-10

7… Qxg5+ 8. Ka6

Suddenly, Black is in terrible trouble!  His Knight is out of play on the bottom of the board, and the Queen has the White King trapped but can’t do anything with it.  White, despite having only a few pawns left, has the upper hand.  Black captures the a-pawn with his Bishop, hoping to whittle down the advancing horde, then sacrifices his own Queen to draw the King away from the defence of the pawns:

mitrofanov-7

8… Bxa7 9. c7 Qa5+

Unfortunately these desperate tactics lead nowhere.  Black’s Knight is useless, and his King can’t capture both pawns at once, so one promotes to Queen:

mitrofanov-9

10. Kxa5 Kb7 11. bxa7 Kxa7 12. c8=Q (1-0)

It’s over!  White has a Queen and Black is completely out of options.  White can easily drive Black’s King into the corner and force mate in a couple of moves.

Mitrofanov’s ingenious study has all the hallmarks of a classic — a clever solution, a glorious and counterintuitive Queen sacrifice, and a Rook sacrifice too.  No wonder it’s been called ‘the study of the millenium’.  For me, it’s another example of the powerful psychological impact of the Queen sacrifice; the winning move 7. Qg5!! strikes us as so absurd that the solution seems even more creative and beautiful.


Tagged , , , , , , , , , , , ,

An Introduction to Shogi

ANNOUNCEMENT:  There will be a special event at my workplace, the MRC/CSO Social and Public Health Sciences Unit, running at 5PM on 7 February 2020.  Dr Shuzo Sakata of the University of Strathclyde, Shogi player and teacher, will be showing us all how to play Shogi!  Sets will be provided — please RSVP to me directly if you plan to come, to ensure we have enough sets.  

What is Shogi?

Shogi is the Japanese form of Chess, the ‘royal game’, in which two players vie to be the first to checkmate their opponent’s King — meaning their King is unable to escape capture on the next move.  Many centuries ago, when the ancient ancestor of Chess called Chaturanga was developed in India, the game spread across Asia and Europe, spawning new variations in every region that embraced the game.  Shogi is first recorded in the Heisei Era in ancient Japan — around the 11th century — where it rapidly developed into its own, unique take on the royal game.

shogi-set-cropped

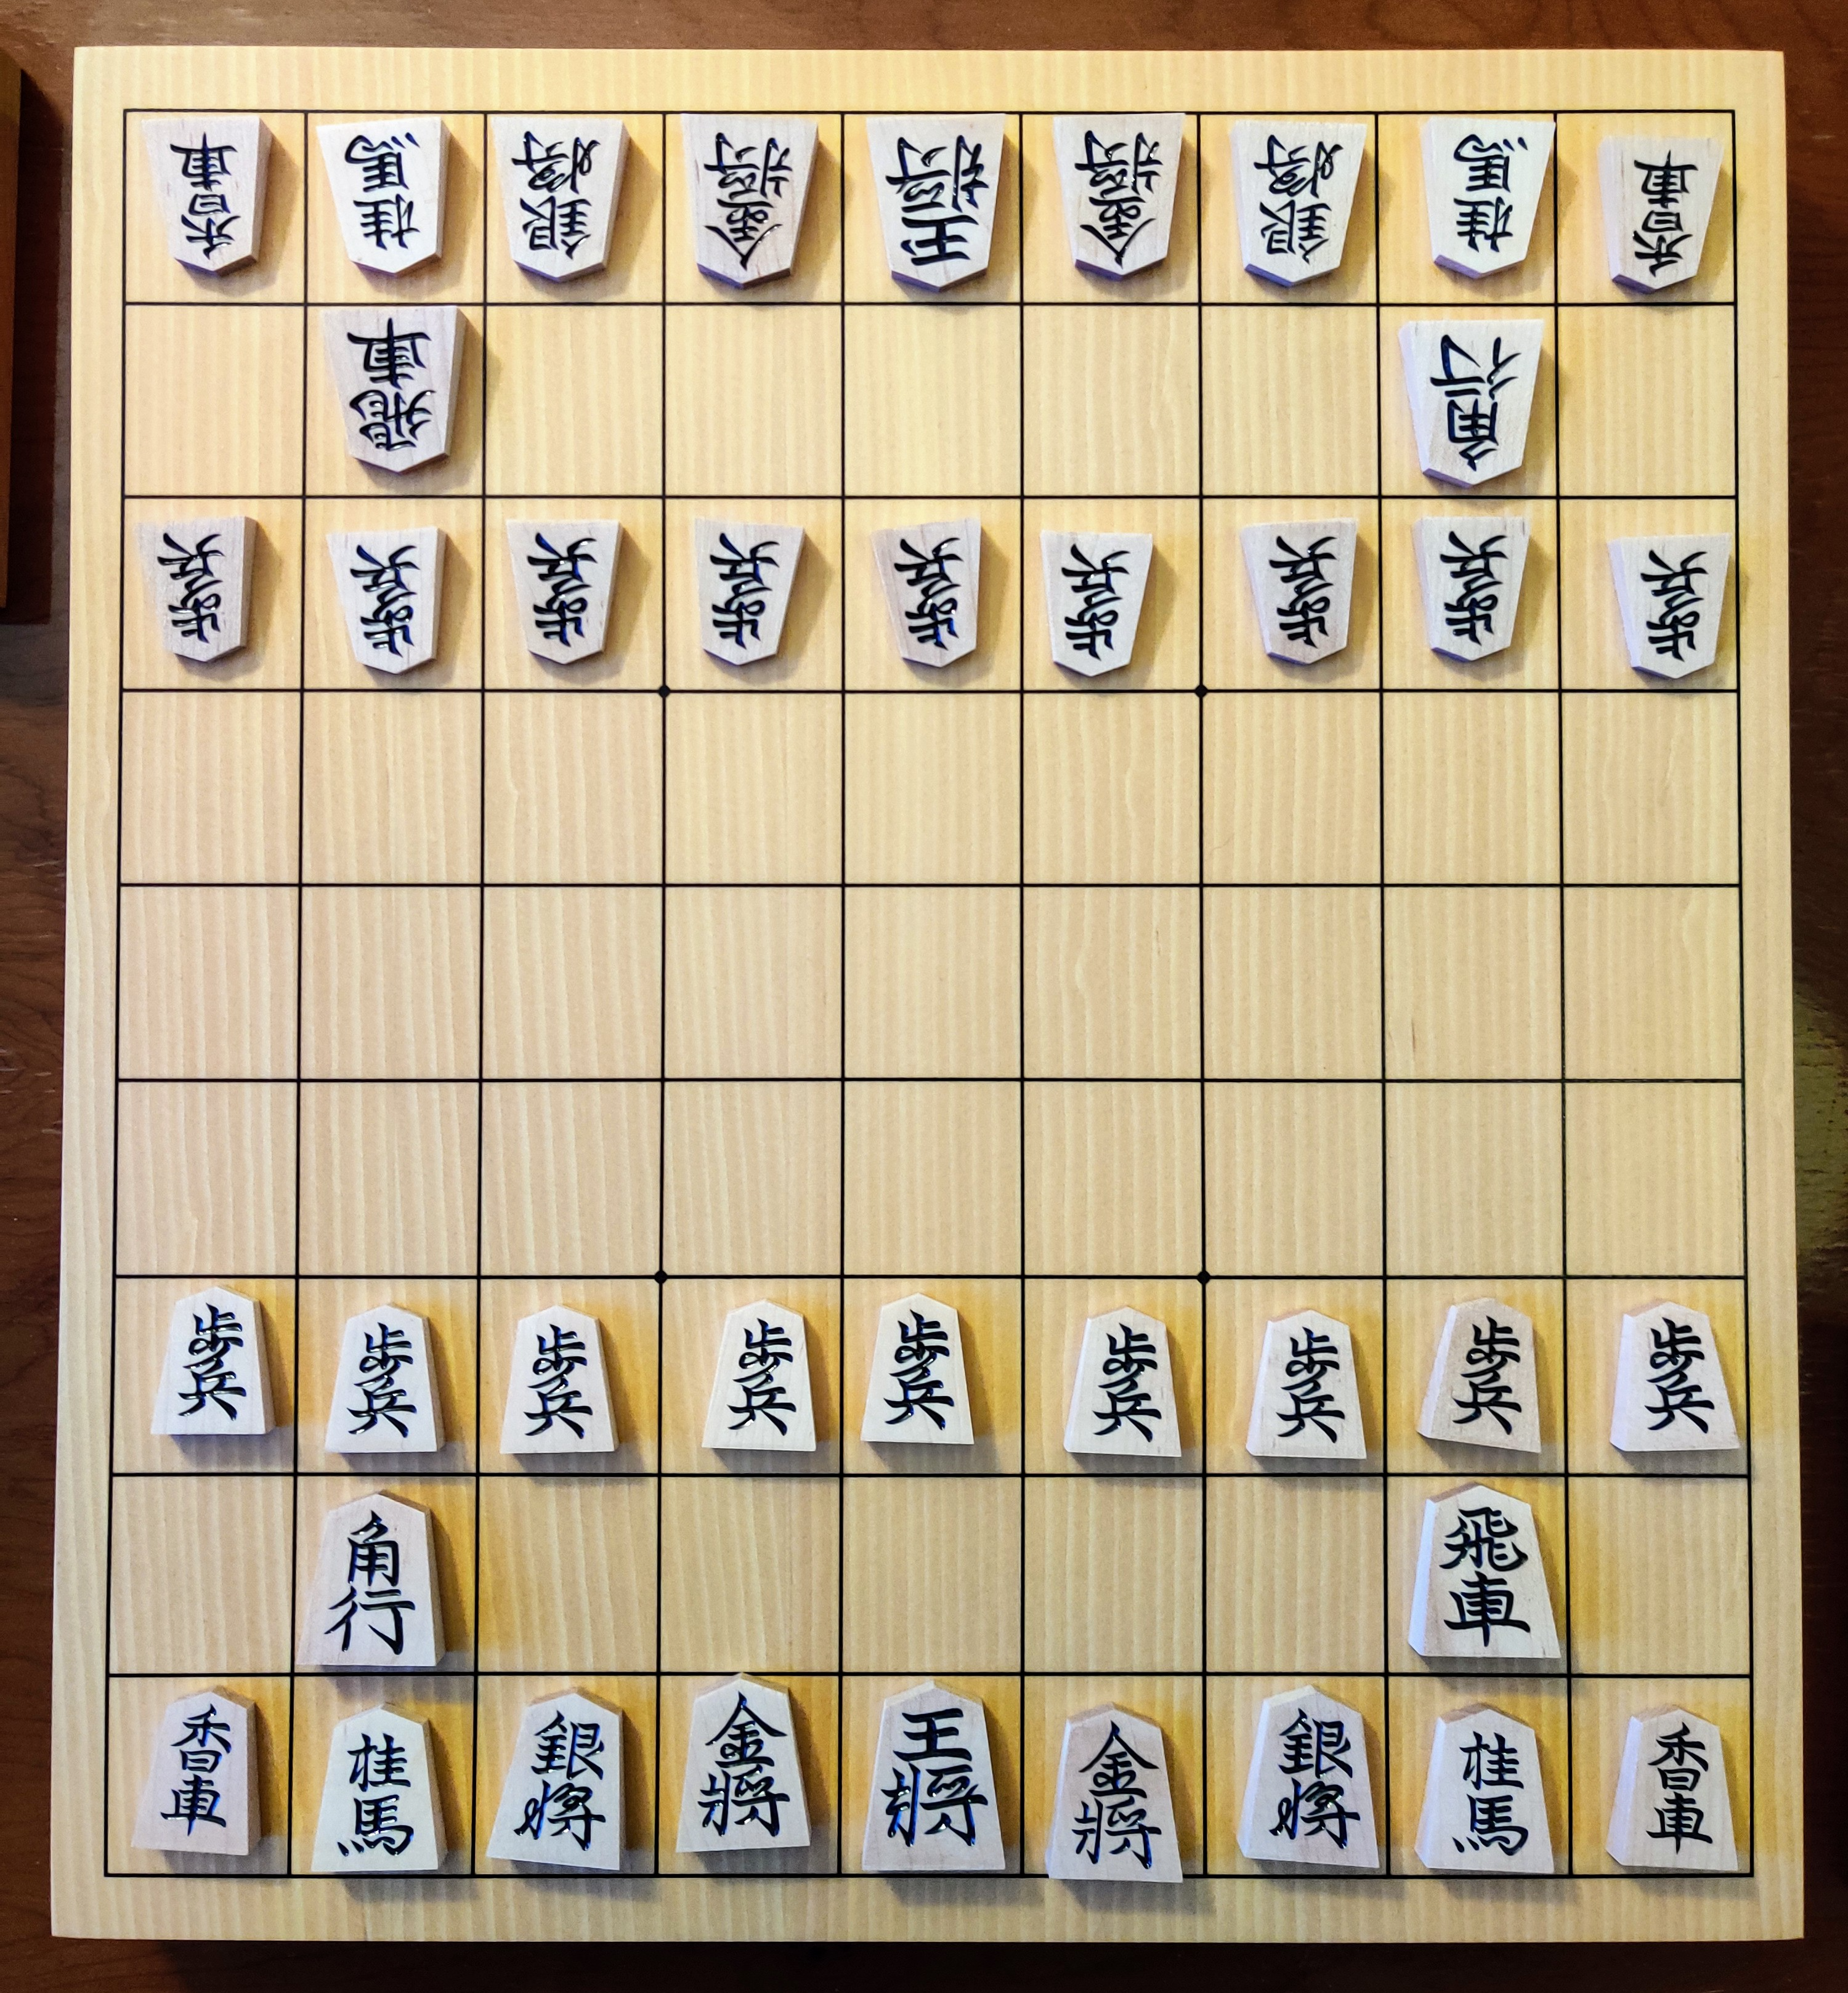
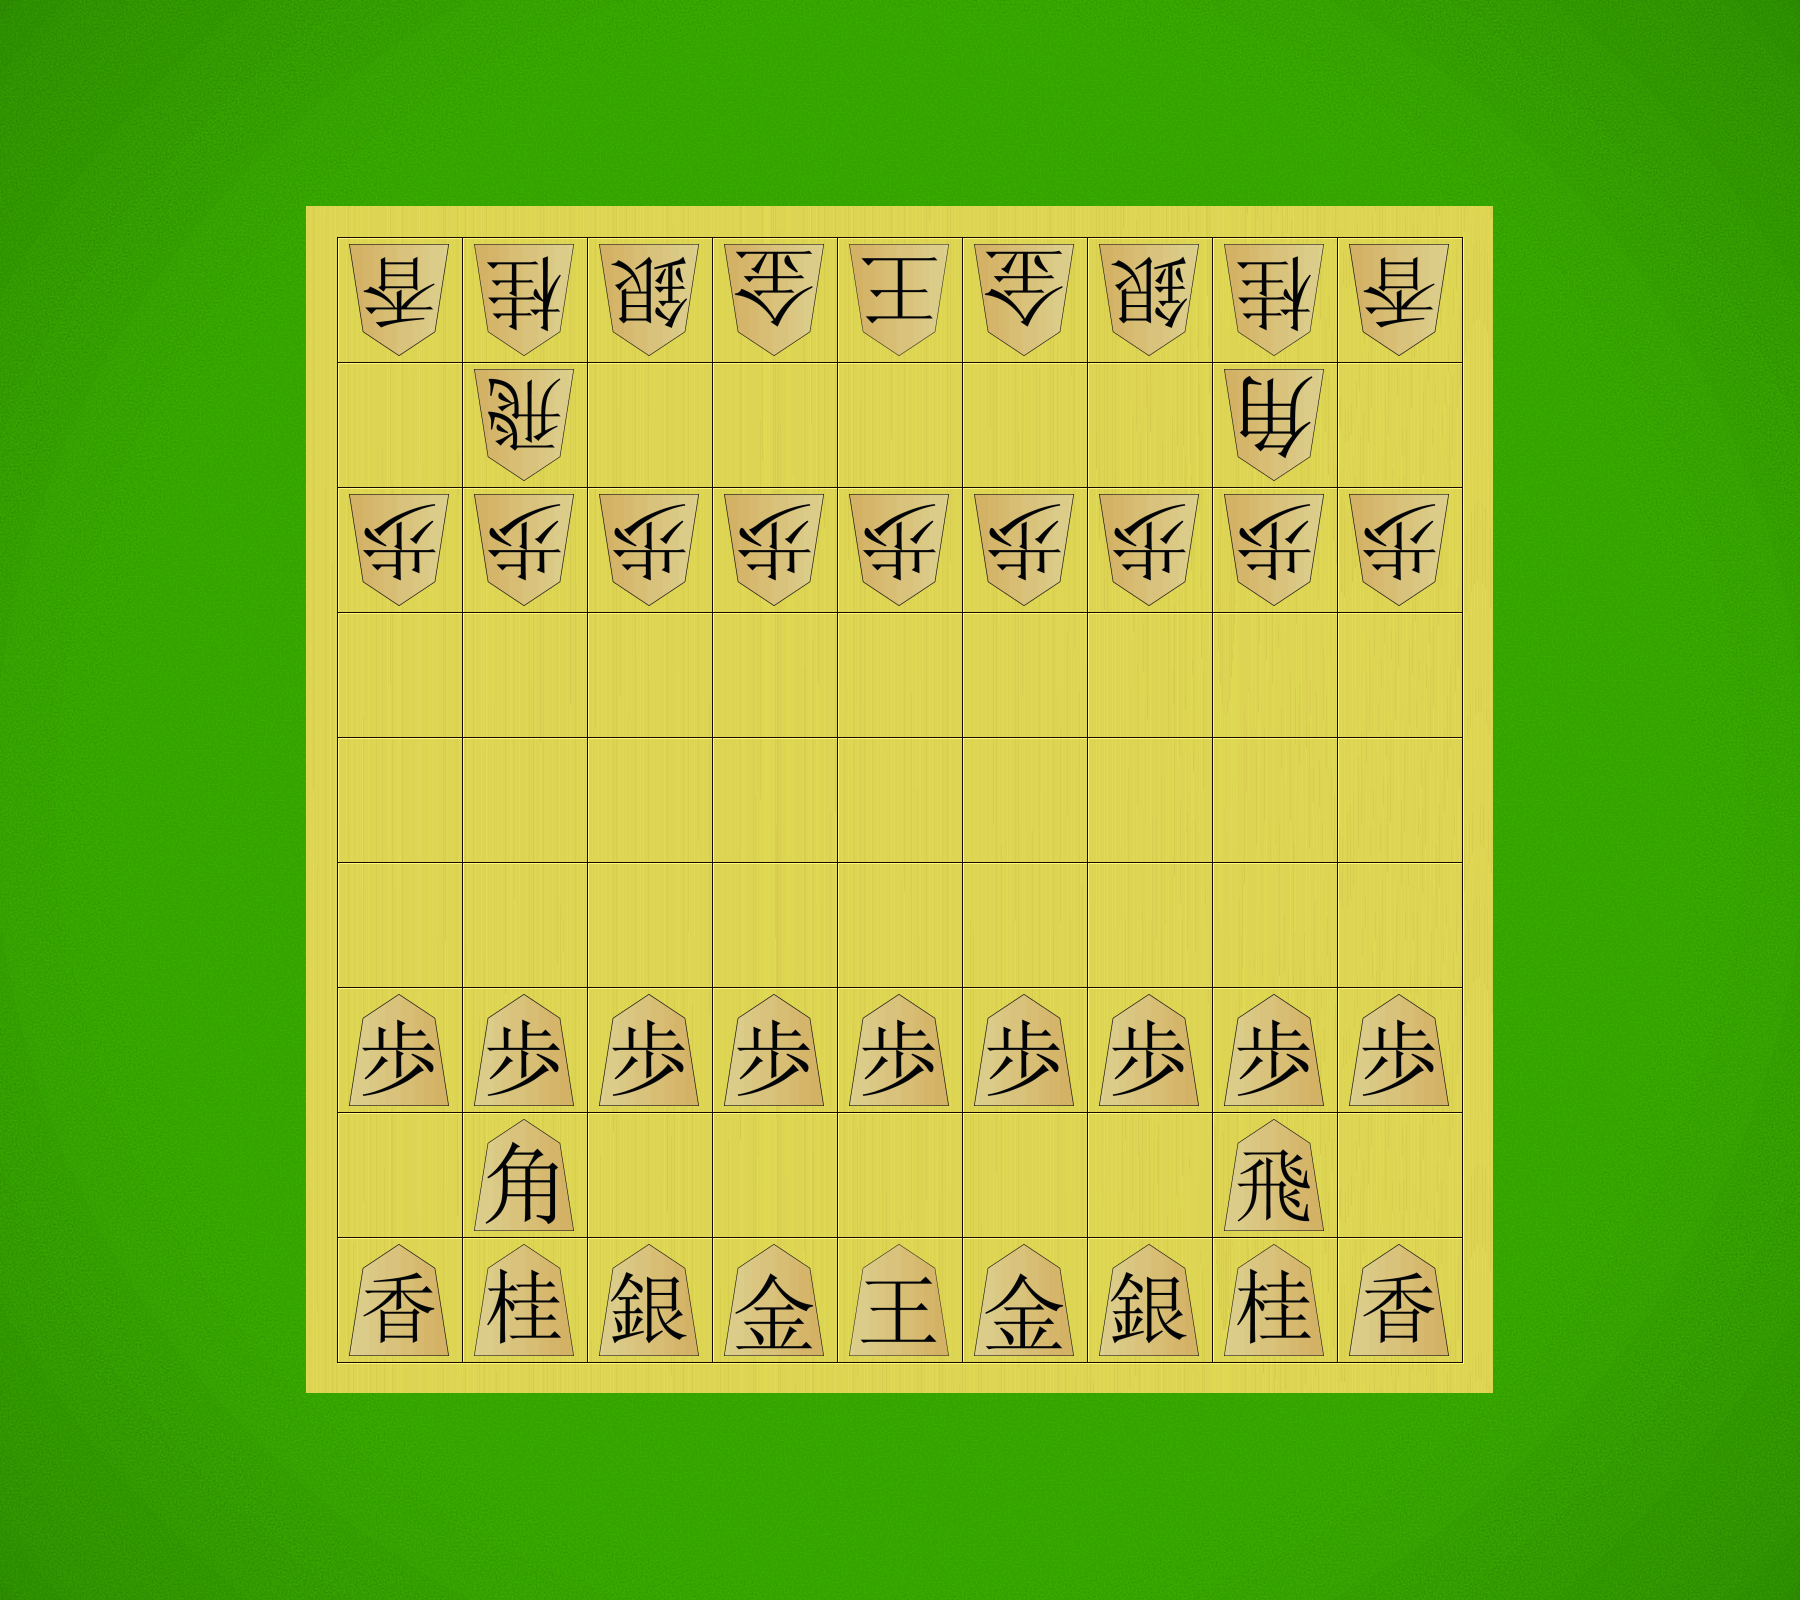
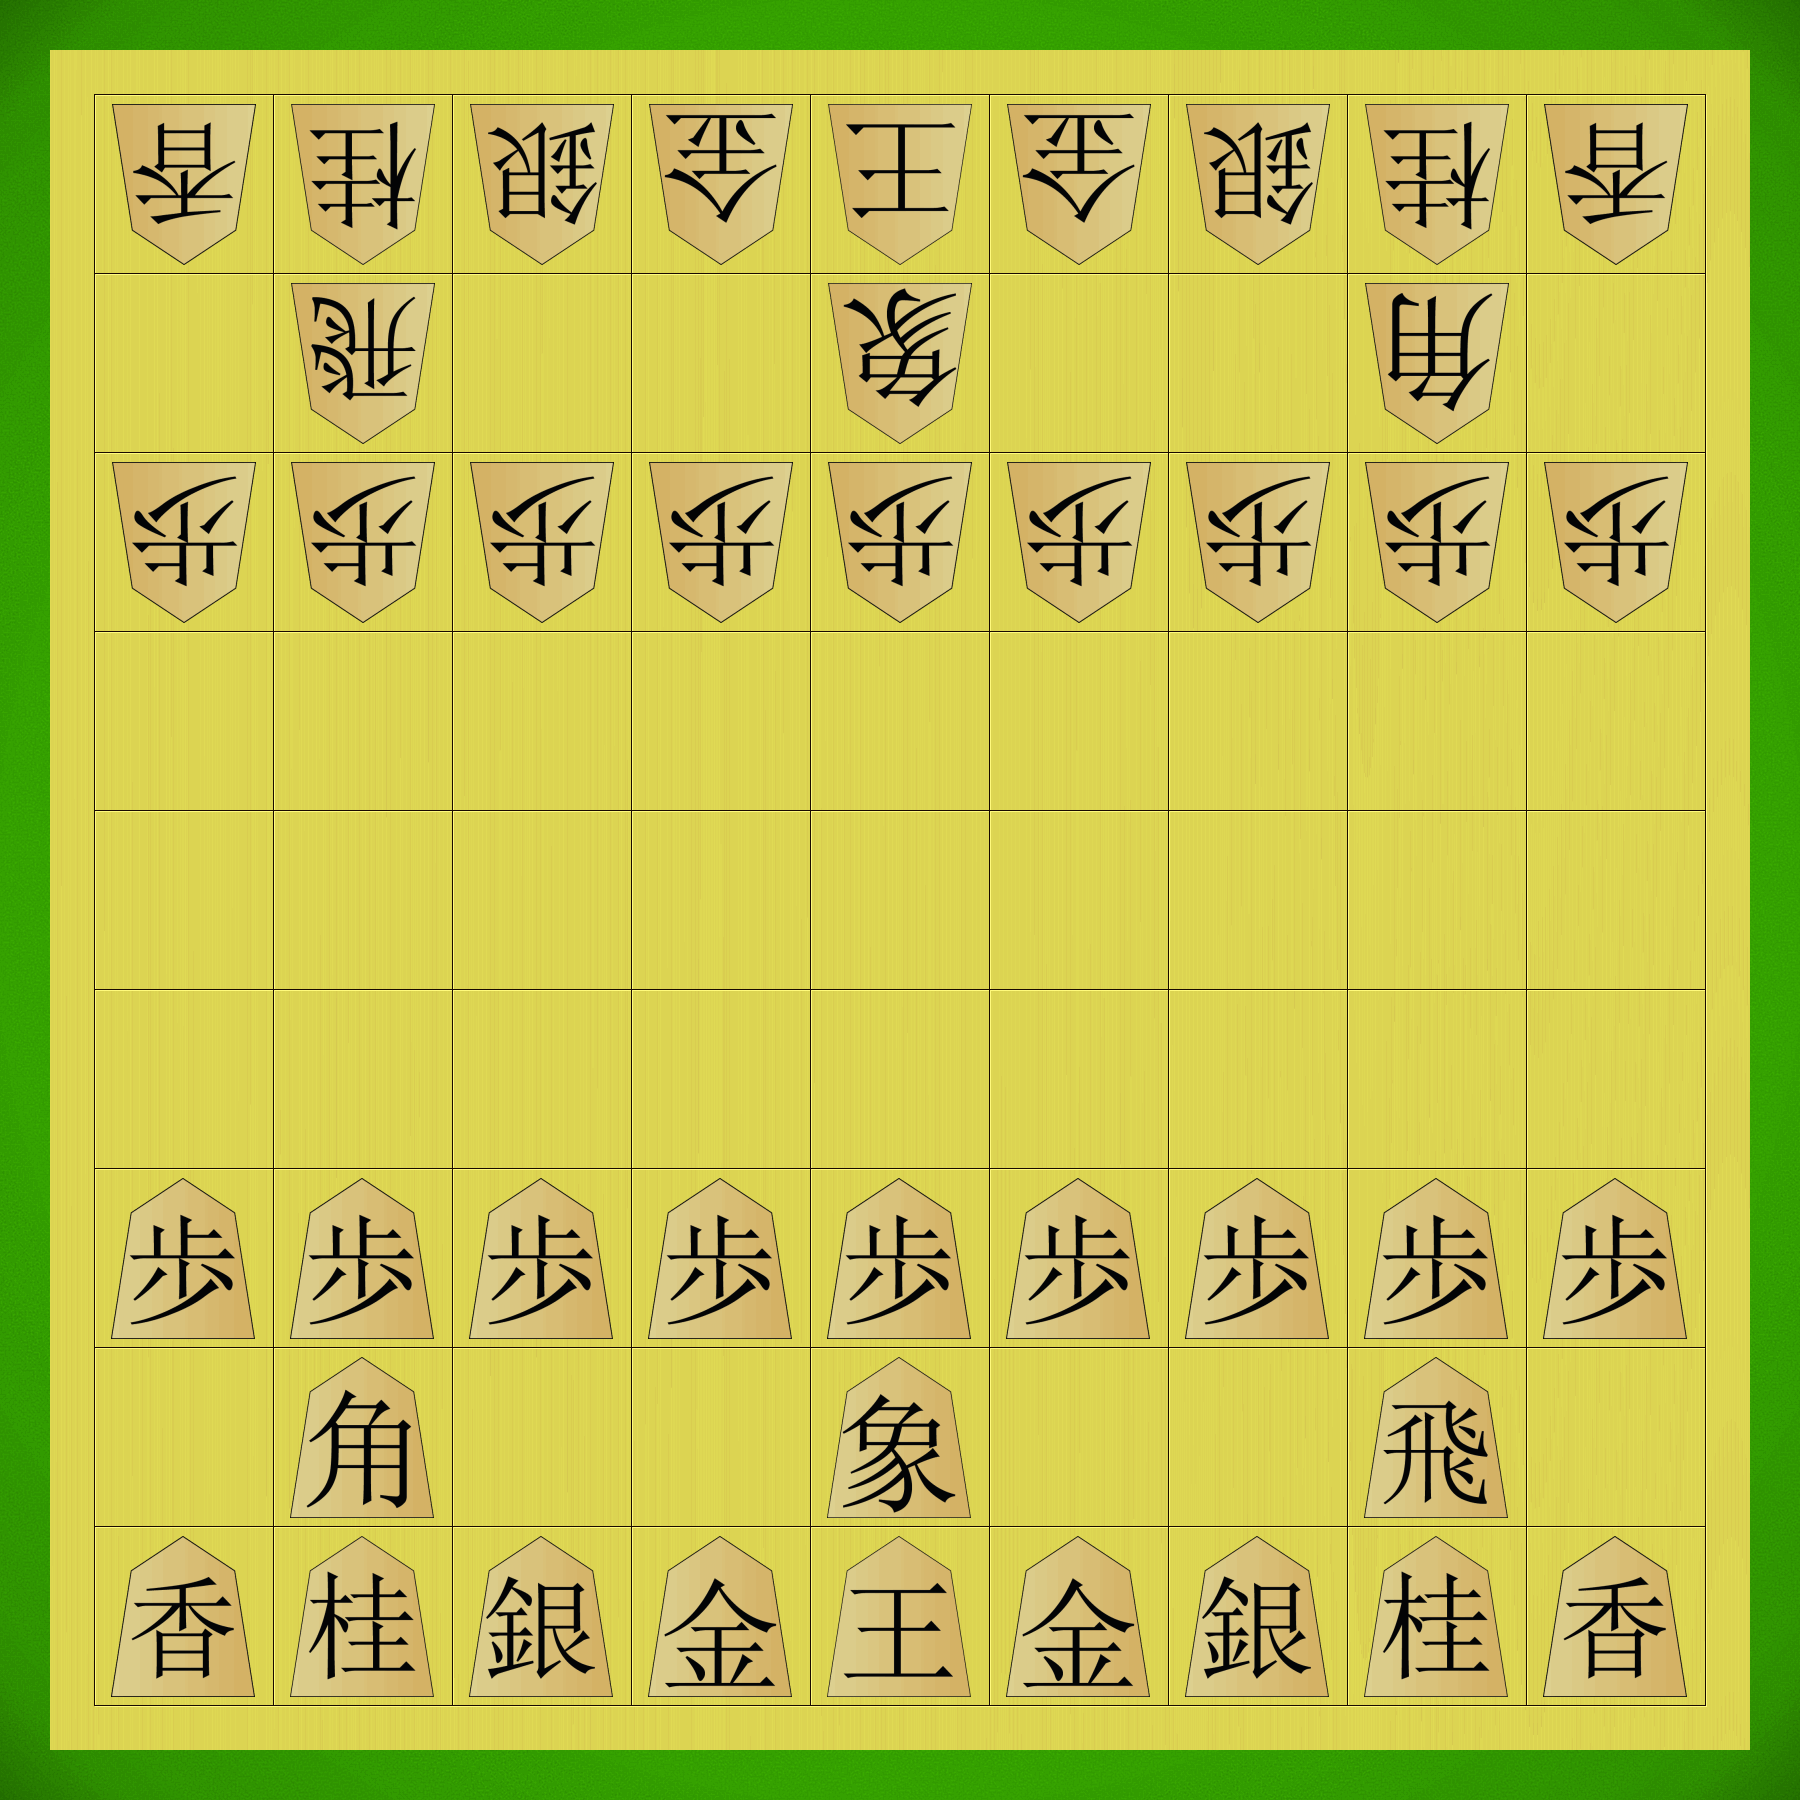
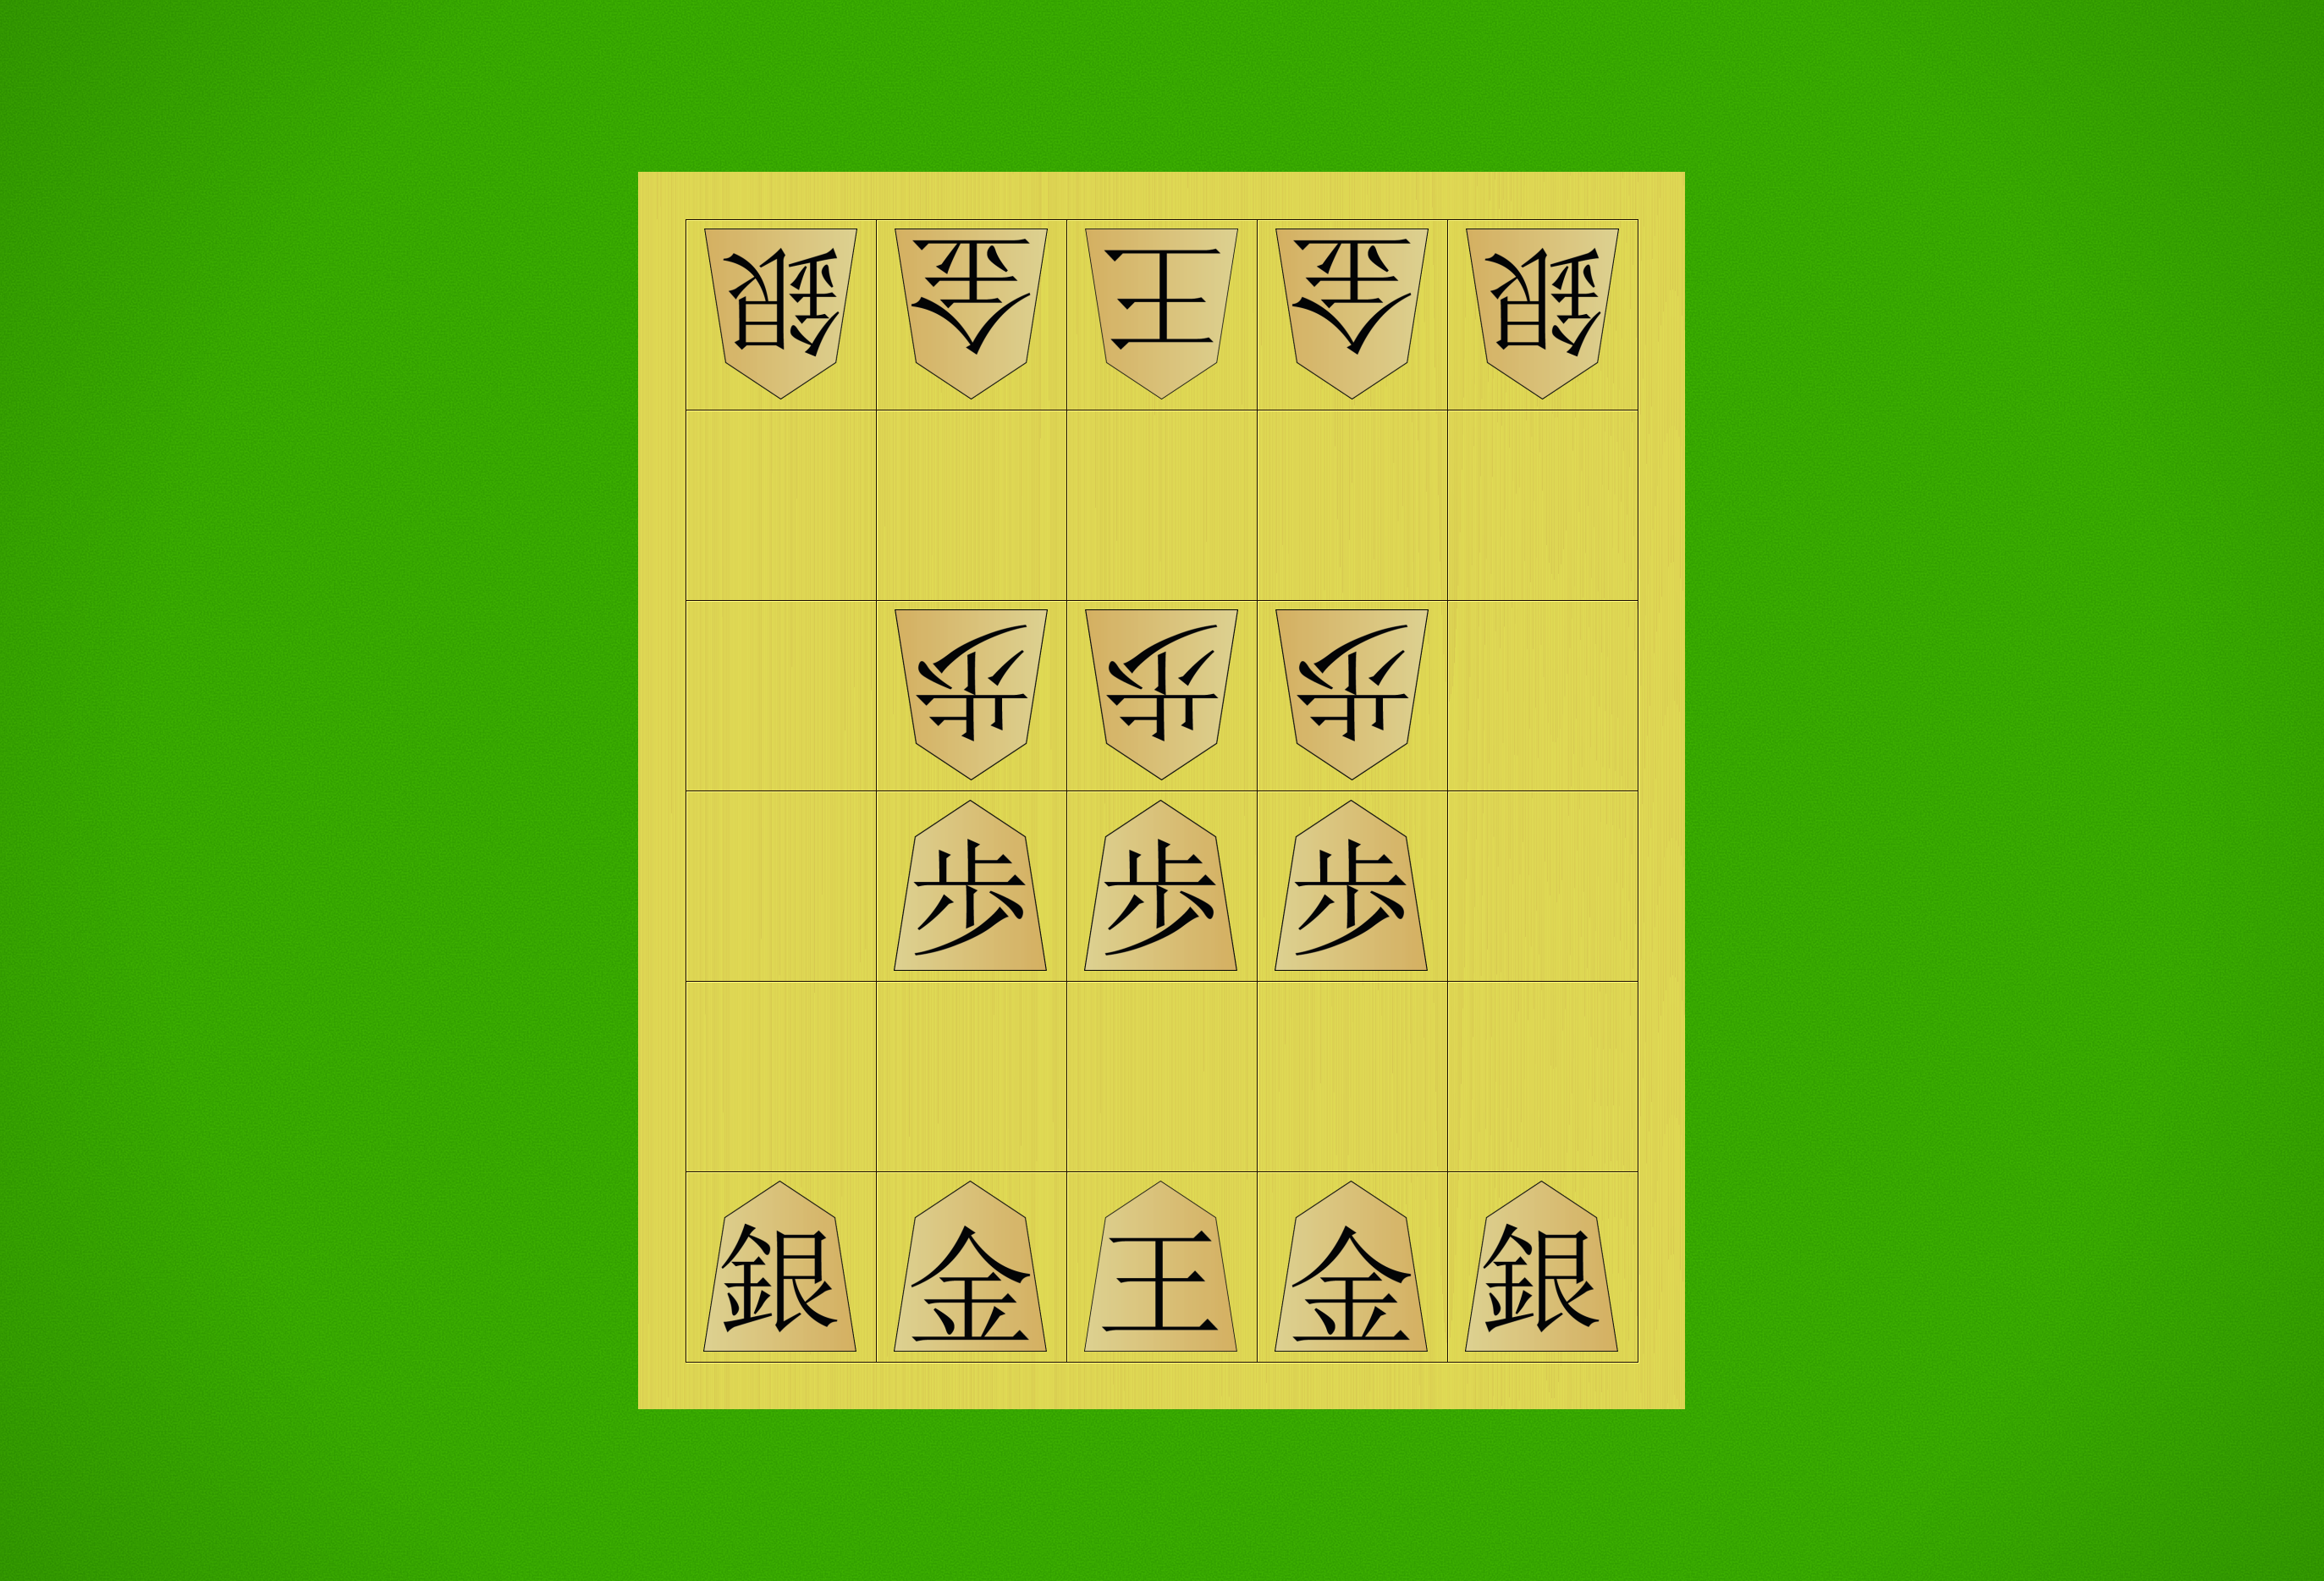
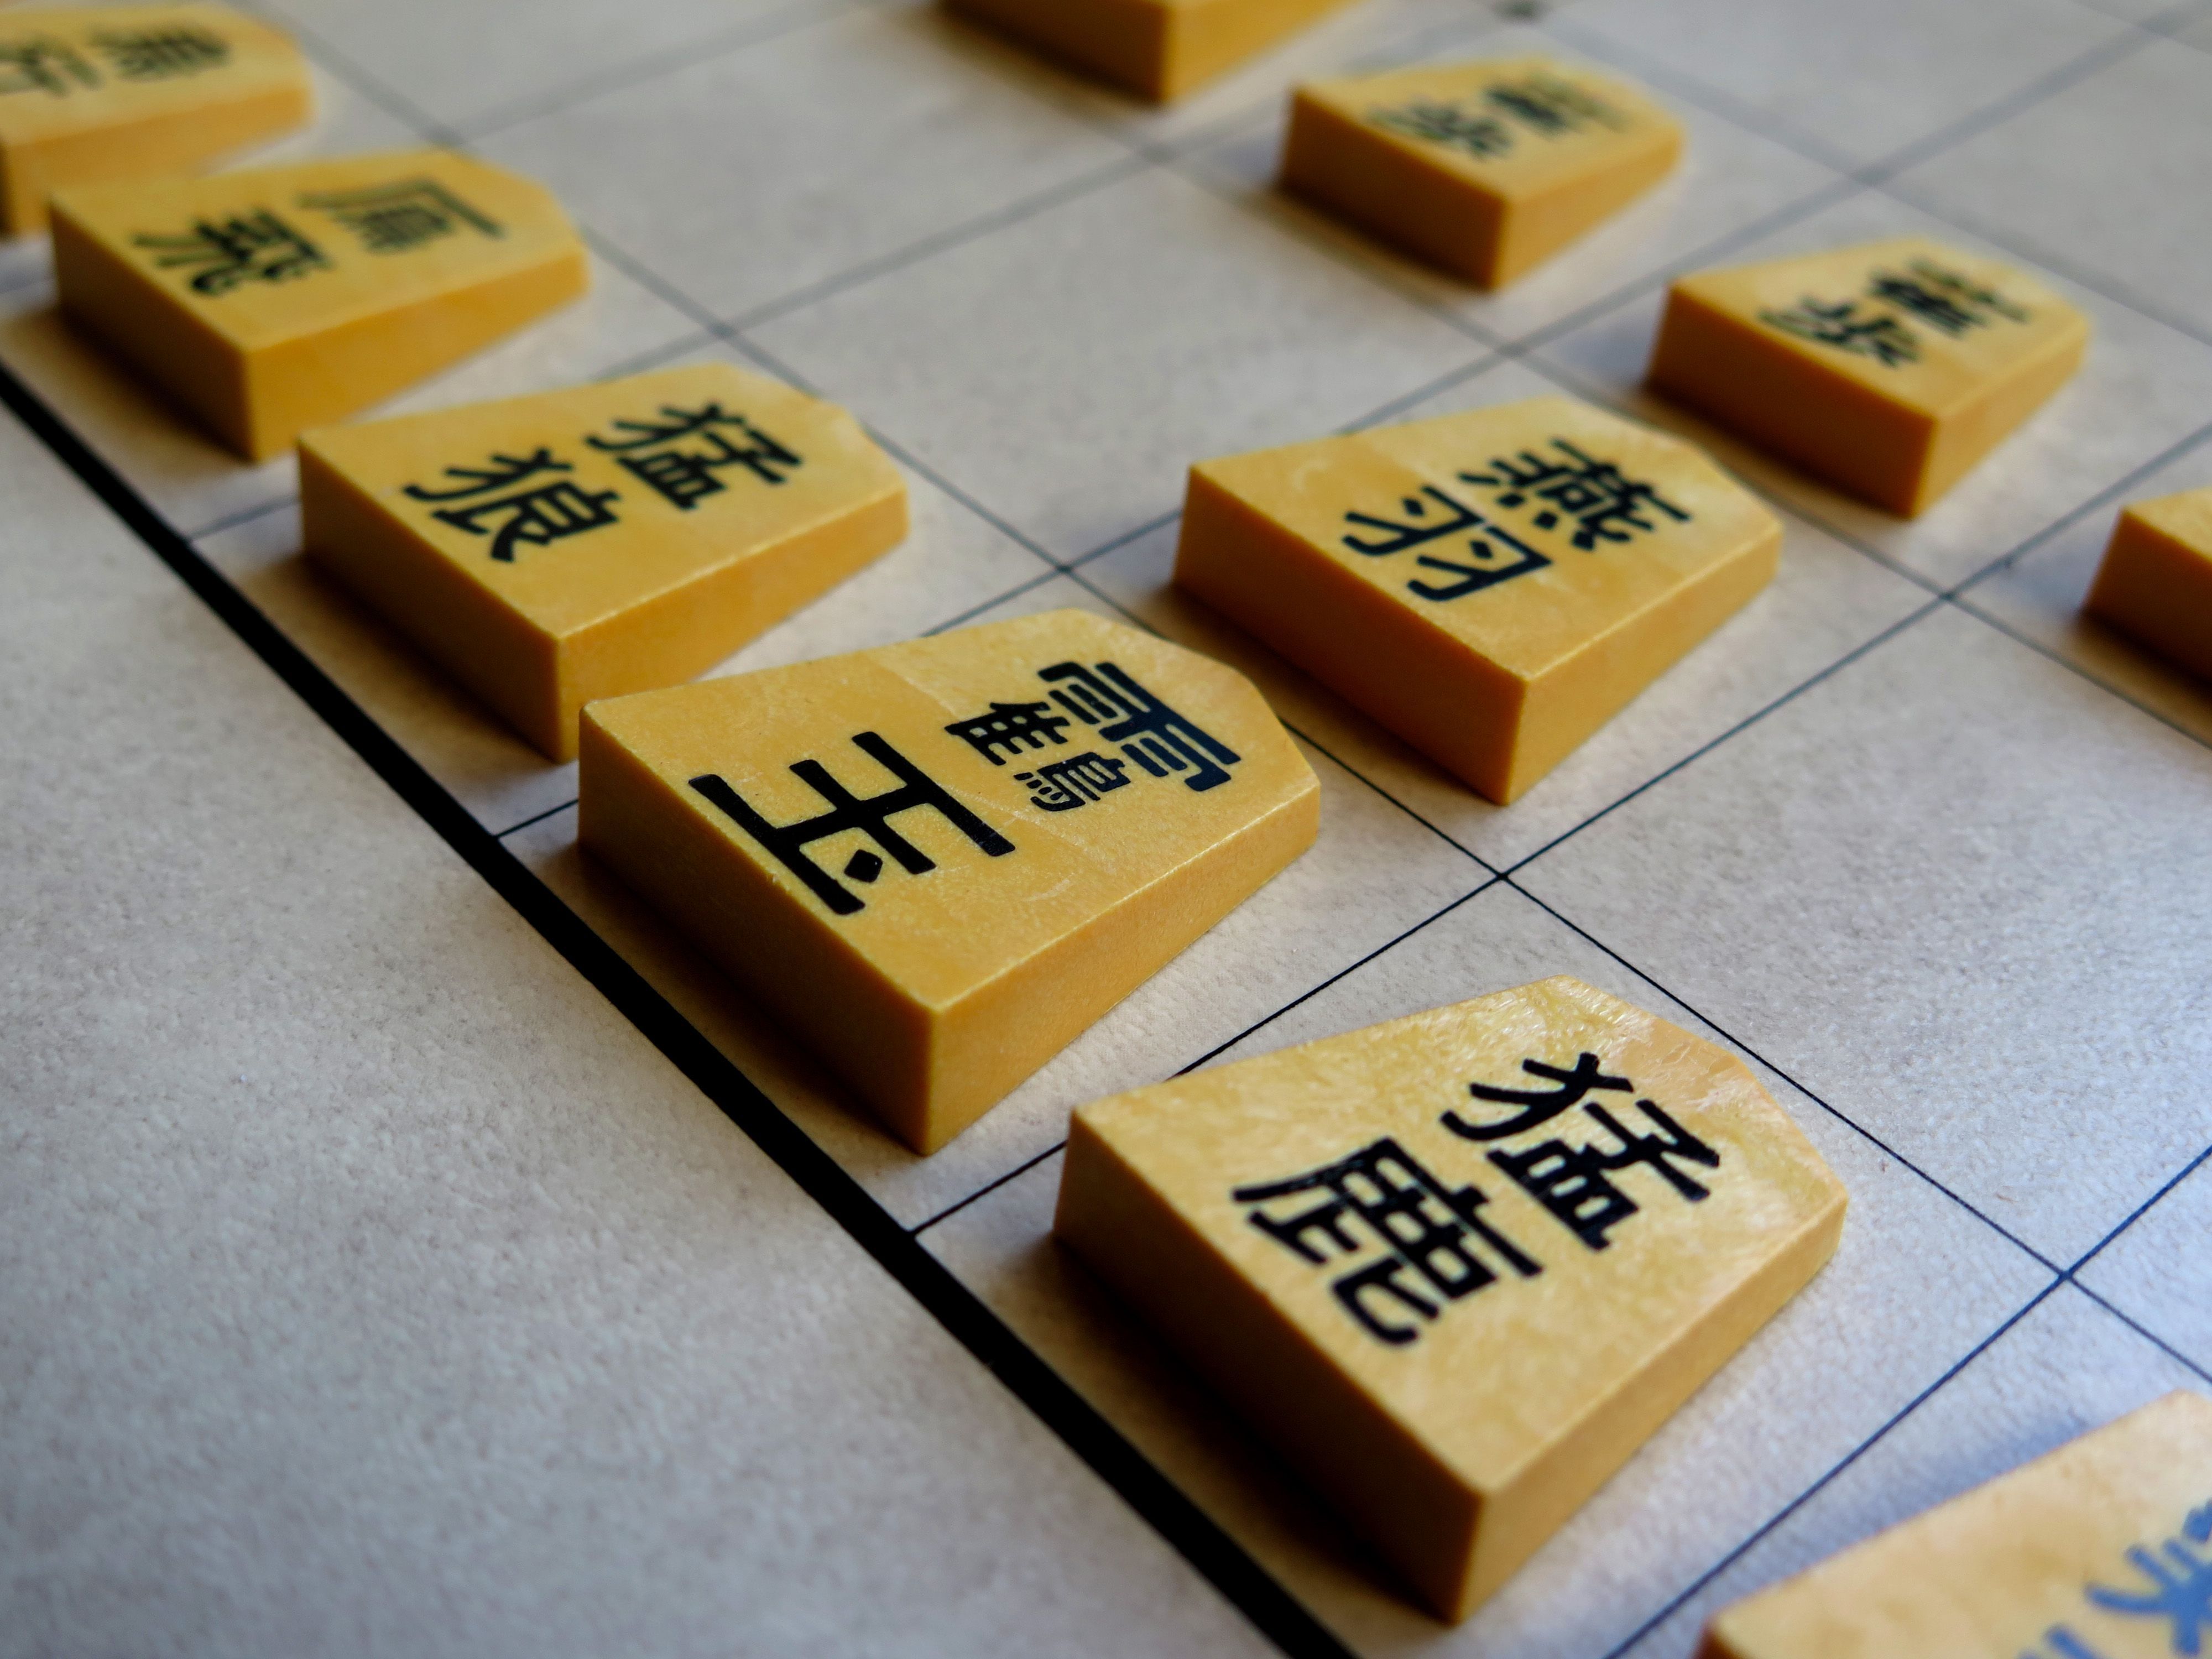
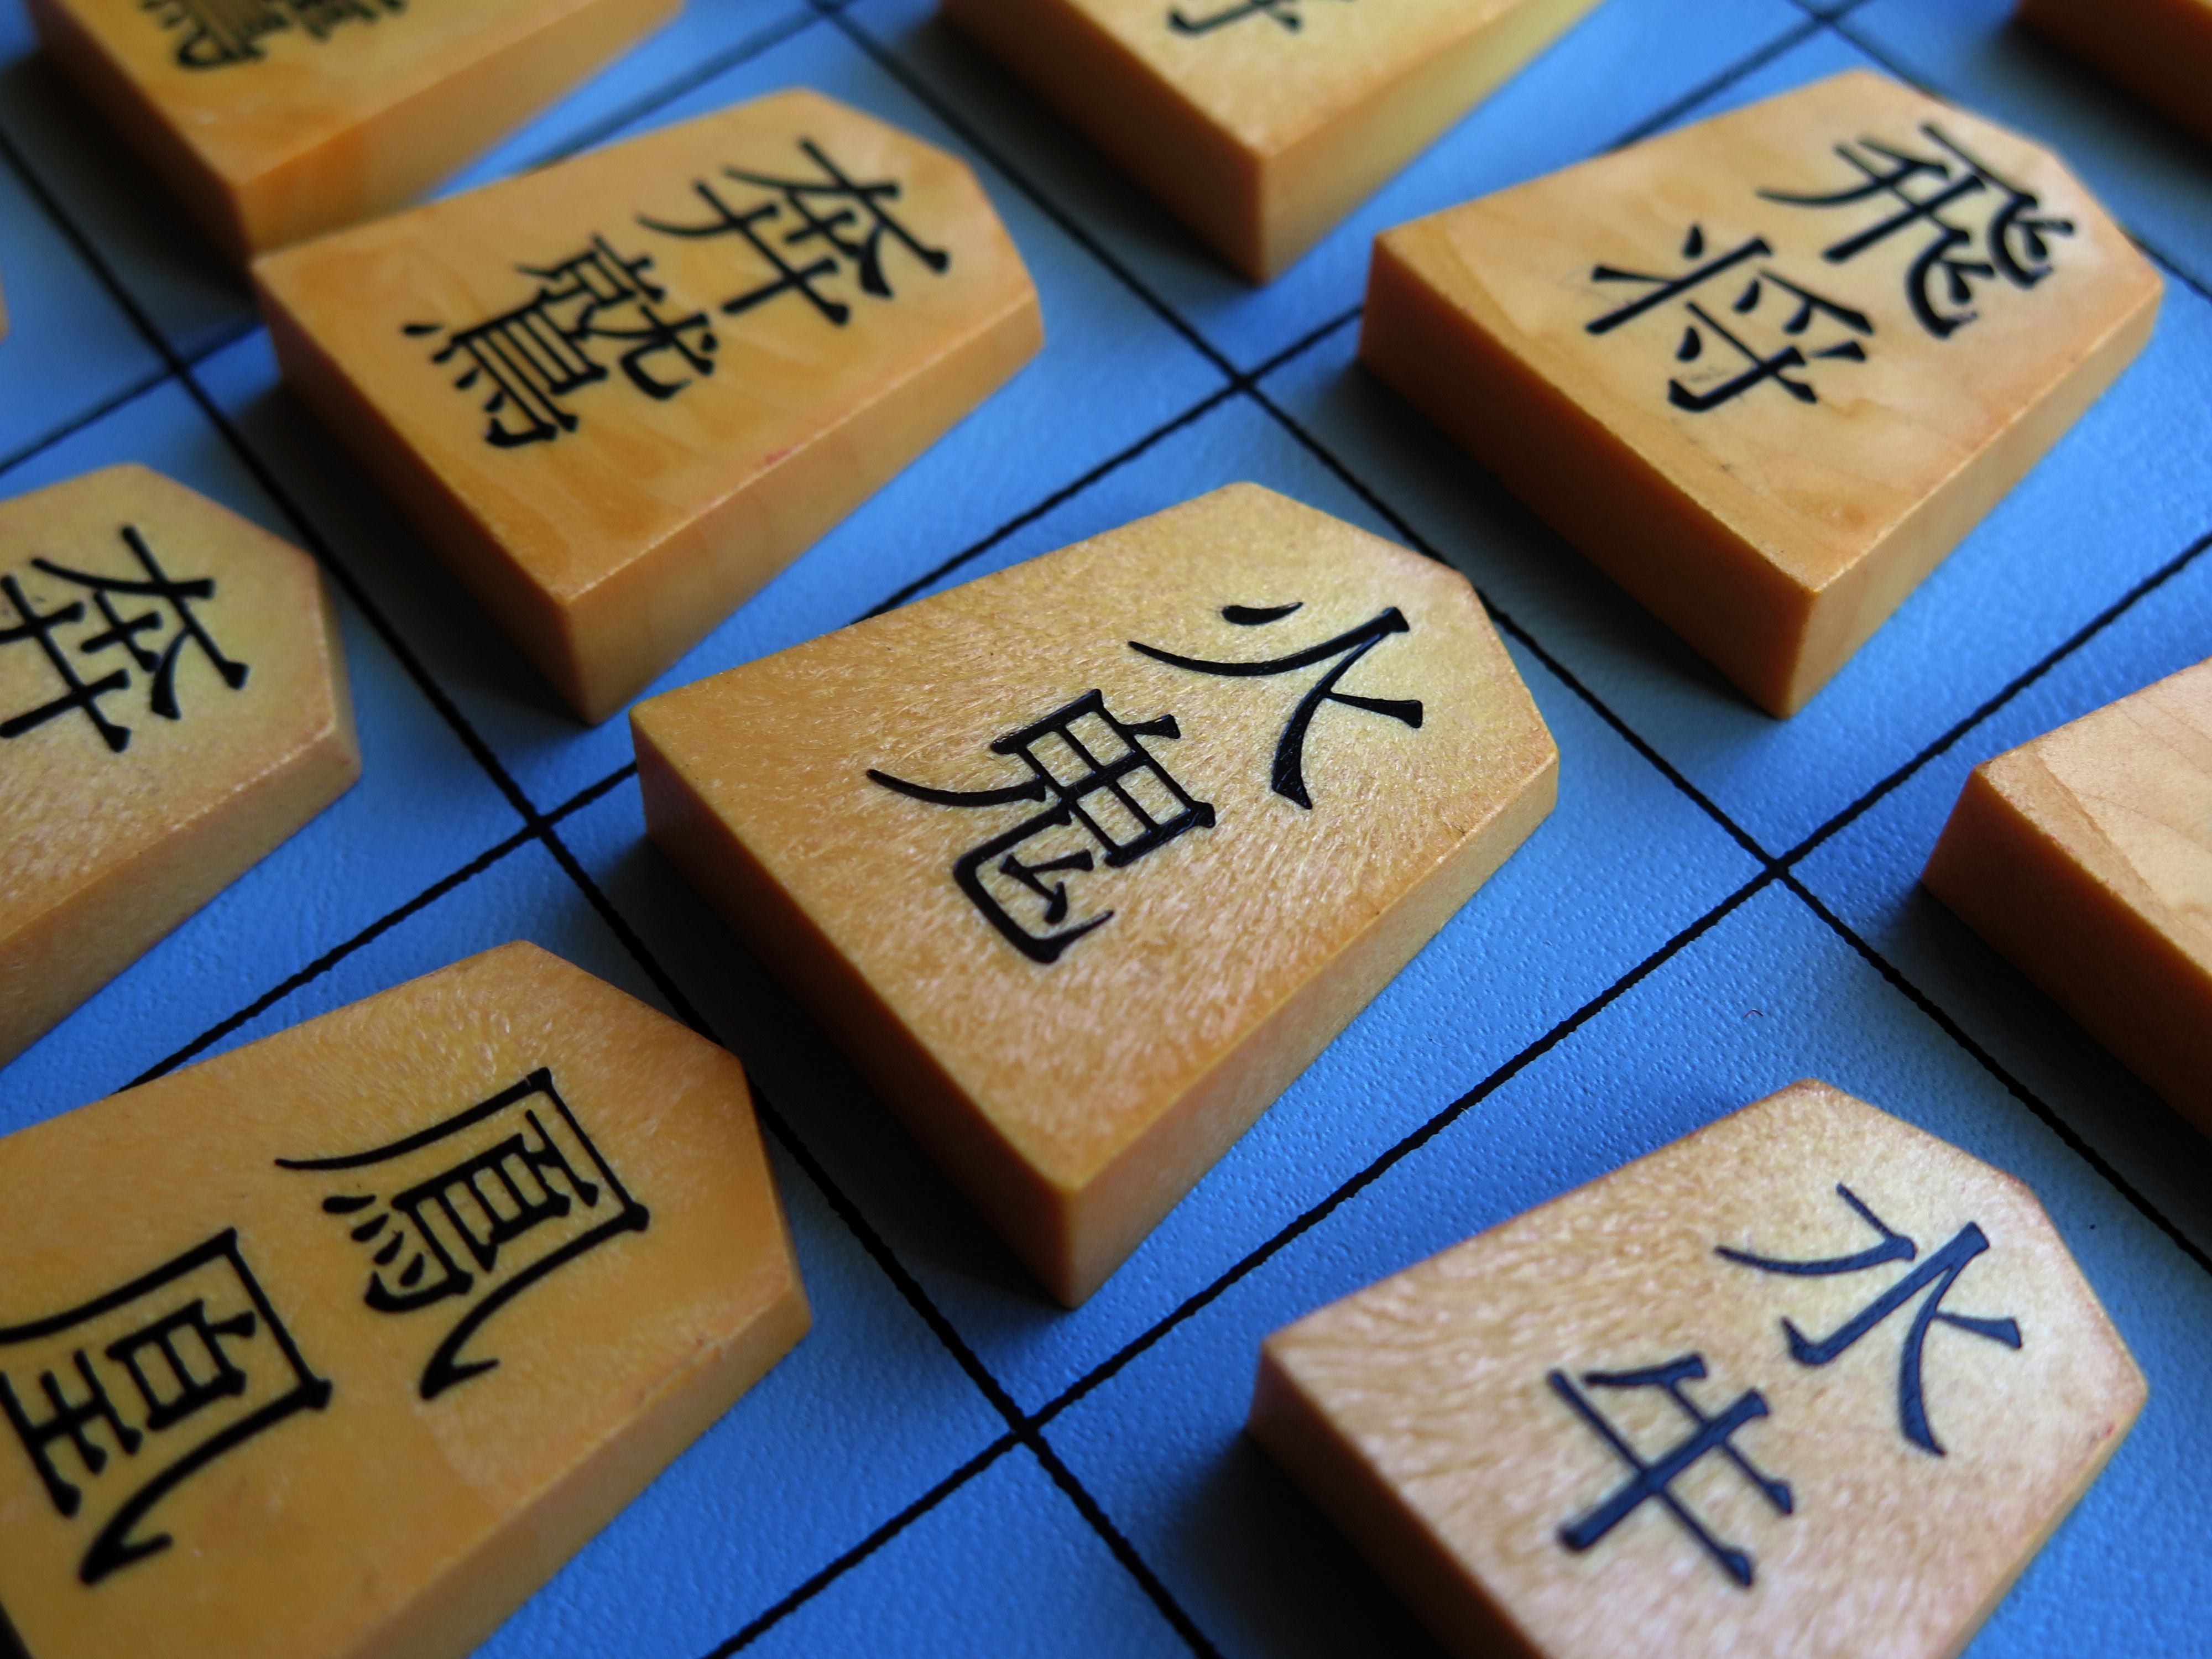
My traditional Shogi set — a Shin-Kaya board, with hand-carved pieces made from Japanese maple, with the kanji (Japanese characters) carved in the Minase calligraphy style in lacquer

How is Shogi different from Chess?

Shogi does share the same goals as Chess — checkmating the enemy King — and shares some of the same pieces.  However, many of the fundamentals are quite different:

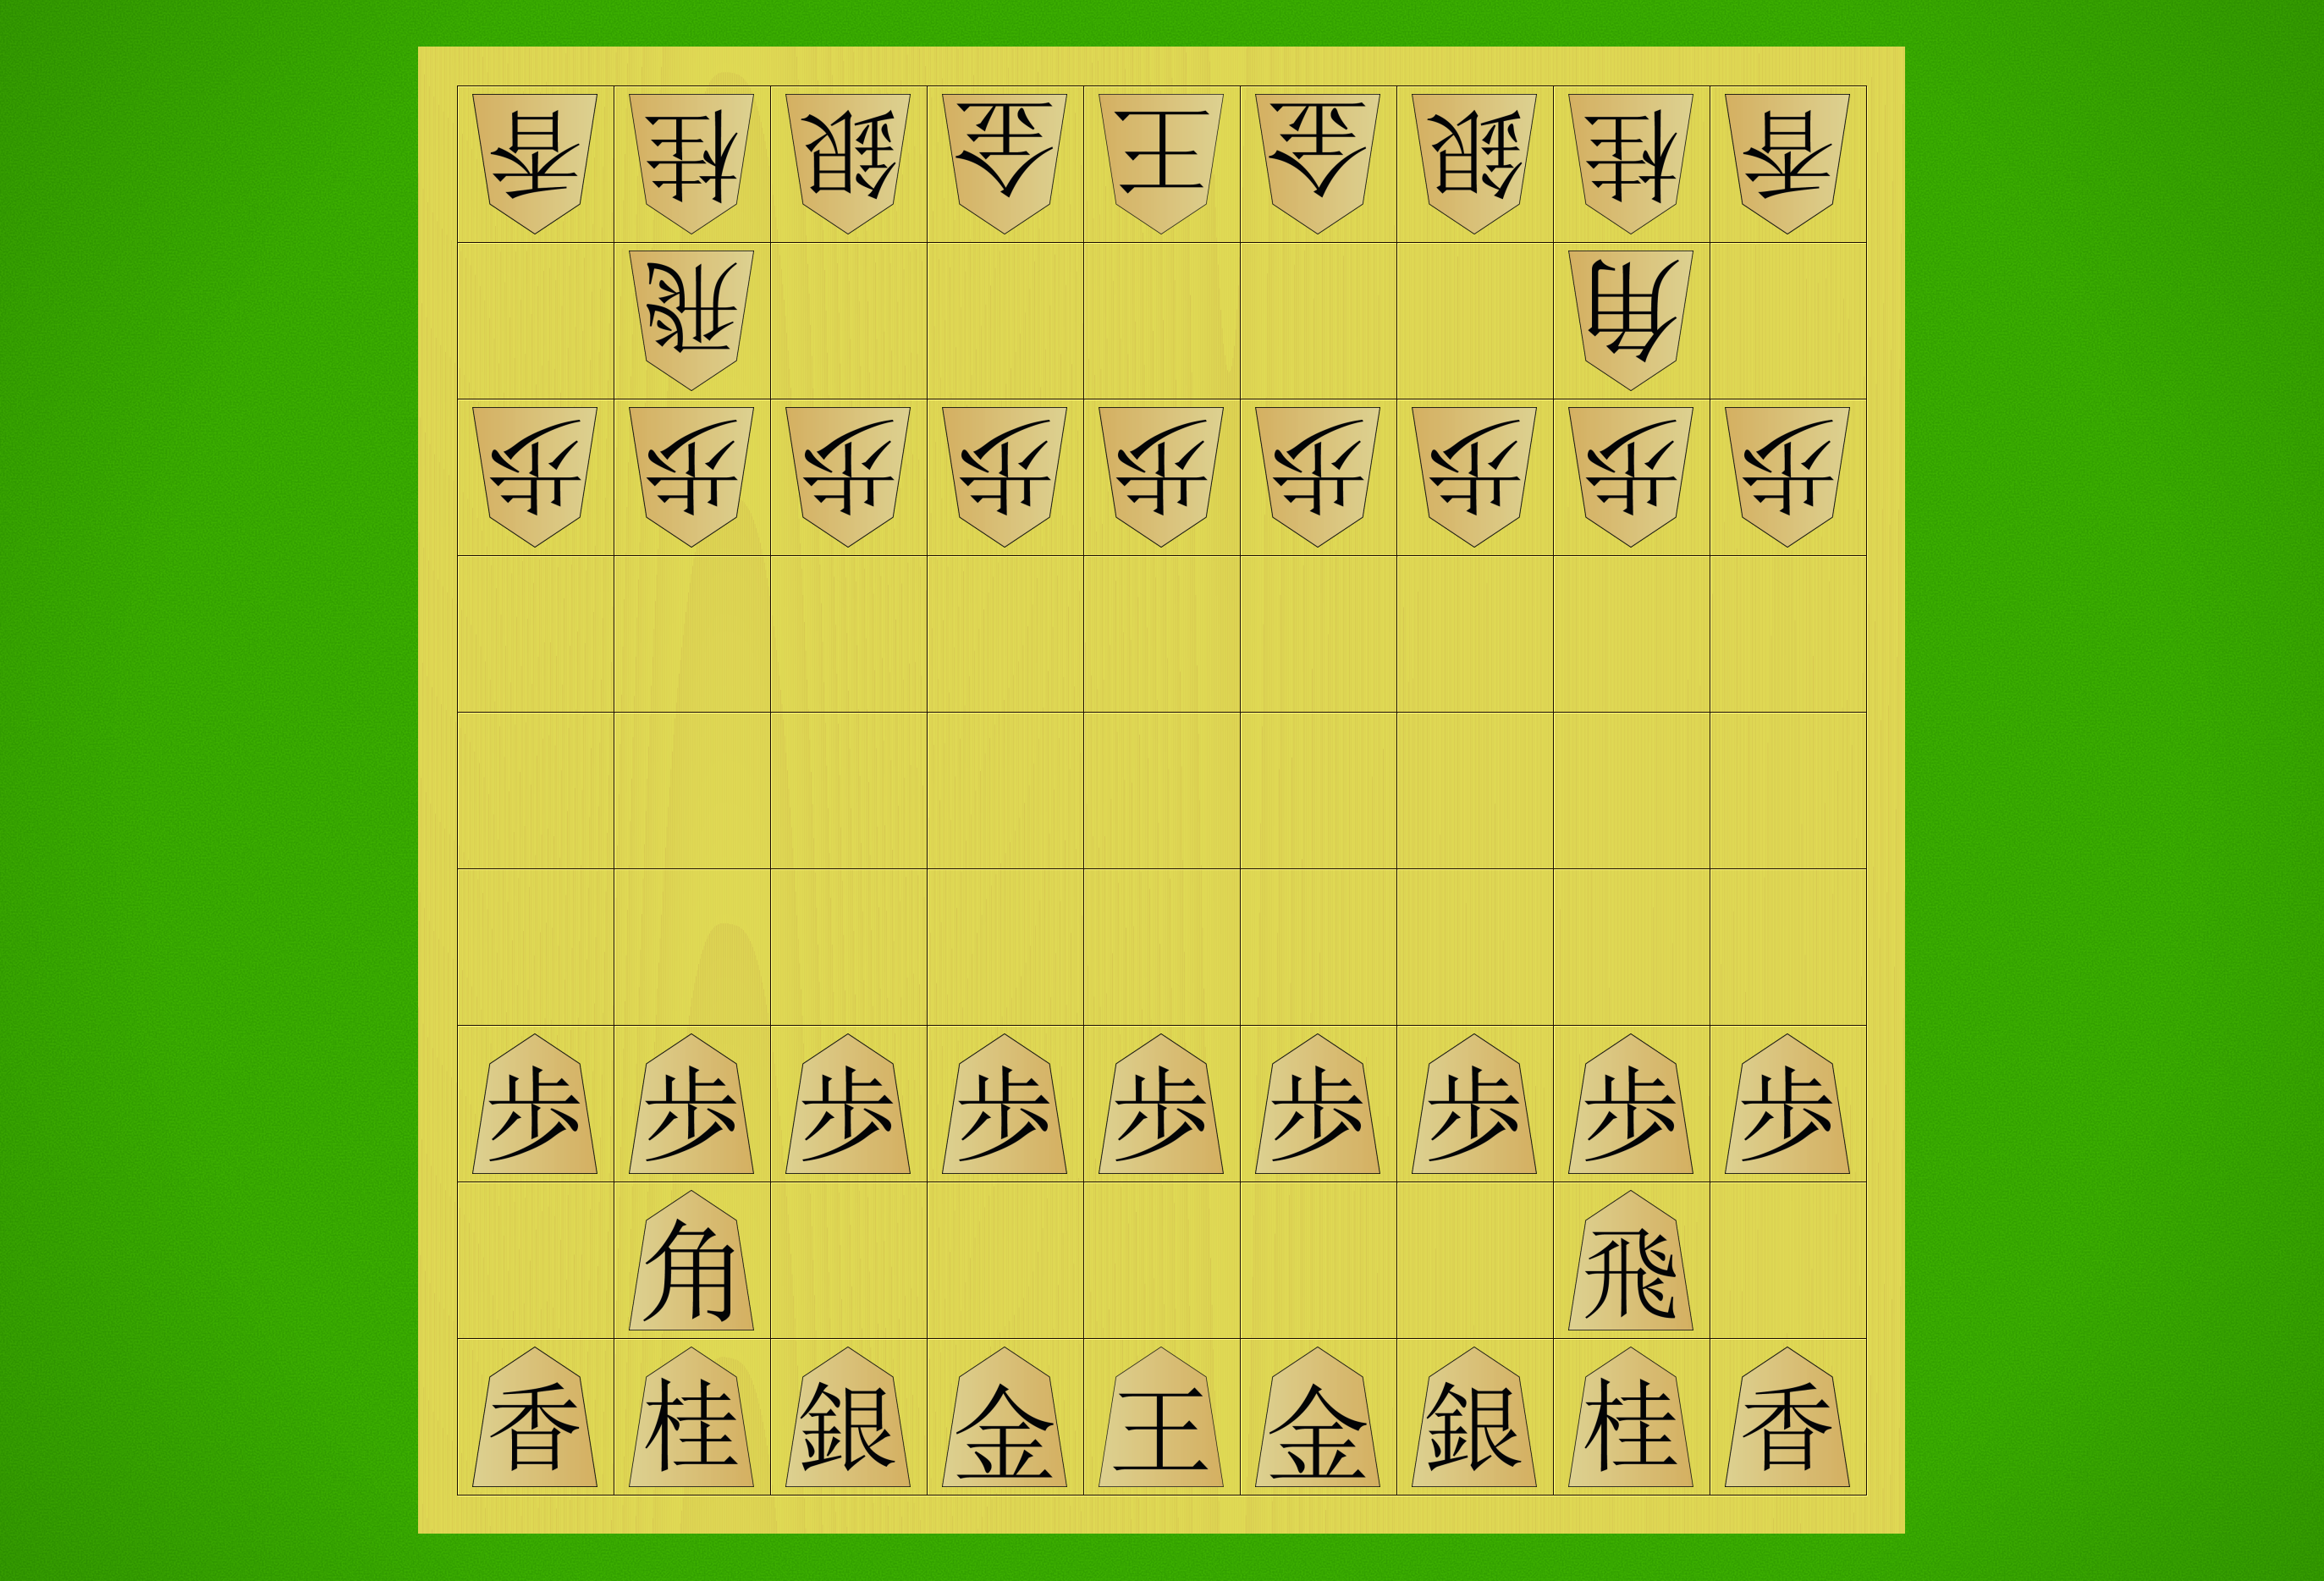
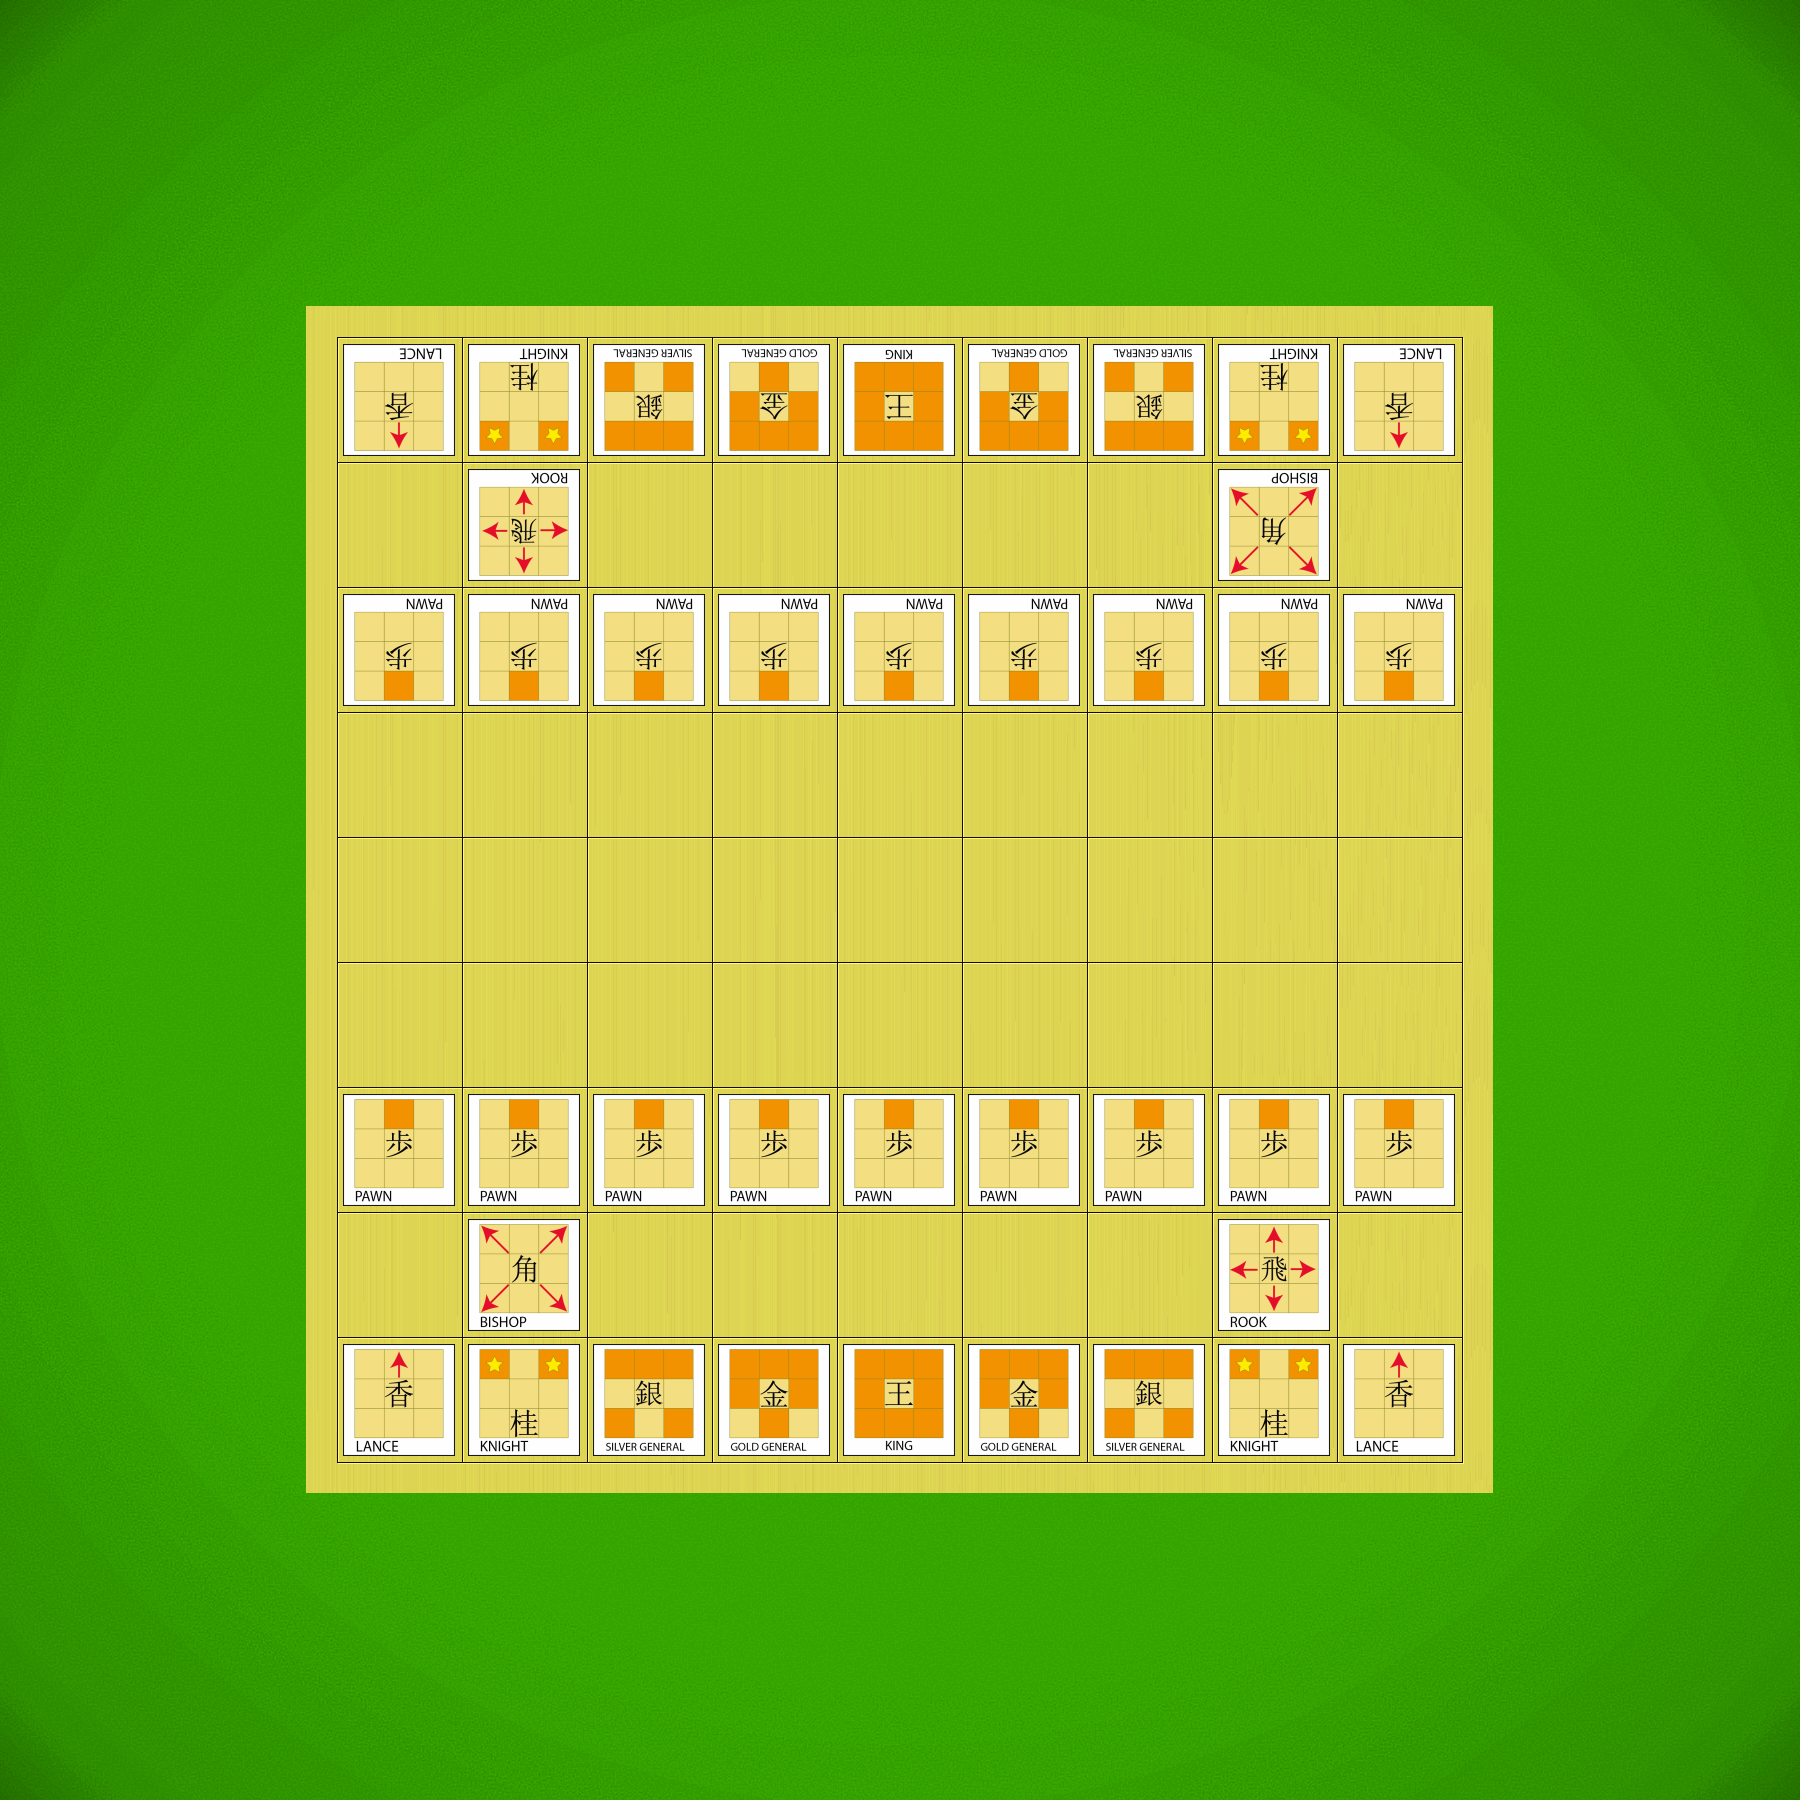
  • The Board: a Shogi board is a 9×9 playing area of 81 squares, compared to the 64 squares of the chessboard.  The board is not chequered either.
  • The Pieces: Chess has six types of pieces: Pawns, Knights, Bishops, Rooks, Queens, and Kings.  Shogi has ten: Pawns, Knights, Silver Generals, Gold Generals, Lances, Rooks, Bishops, Dragons (Promoted Rooks), Horses (Promoted Bishops), and Kings.  Some of the shared pieces move differently, too: Knights make the same L-shaped jump but only forward; and Pawns move and capture only directly forward.
  • Promoting Pieces: In Chess, pawns that reach the enemy’s back rank can promote to become a Knight, Bishop, Rook, or Queen.  In Shogi, any piece that reaches the enemy camp (the three rows where their pieces begin the game) can promote.  A promoted piece flips over, and the other side of the piece indicates their promoted form.  Promoted Bishops (Horses) and promoted Rooks (Dragons) are the most powerful pieces in the game.

Shogi’s Ingenious Addition: Drops

There’s one major rule change that was added to Shogi in the 16th century and has come to define the game ever since: drops.

In Shogi, when a piece is captured, it is truly captured — it becomes the property of the capturing player.  The capturer places the piece on a small side-board called a komadai (piece stand) and holds it in reserve.  At any point from then on, they may forgo a normal move and instead drop a captured piece to any empty square on the board!  

However, an important point to remember: promoted pieces, when captured, are demoted.  Any dropped piece must be moved into the promotion zone again to be promoted.  Two other key exceptions: Pawns cannot be dropped so that you have more than one of your pawns on a single vertical line; and pieces cannot be dropped in a space where they have no legal moves.

Drops make Shogi play and feel very different from Western Chess.  Since captured pieces come back to life throughout the game, the number of pieces on the board stays roughly the same throughout — there are no endgame situations with near-empty boards, as in Chess.  The constant back-and-forth of captures and drops makes a Shogi game dynamic, aggressive and fierce — attacks are frequent, and giving up the initiative to play defensively is risky.

Thanks to drops, Shogi is also much more decisive than Chess — less than 2% of professional Shogi games end in a draw, a staggering difference from the ~60% draw rate of professional chess!

Is Shogi hard to learn?

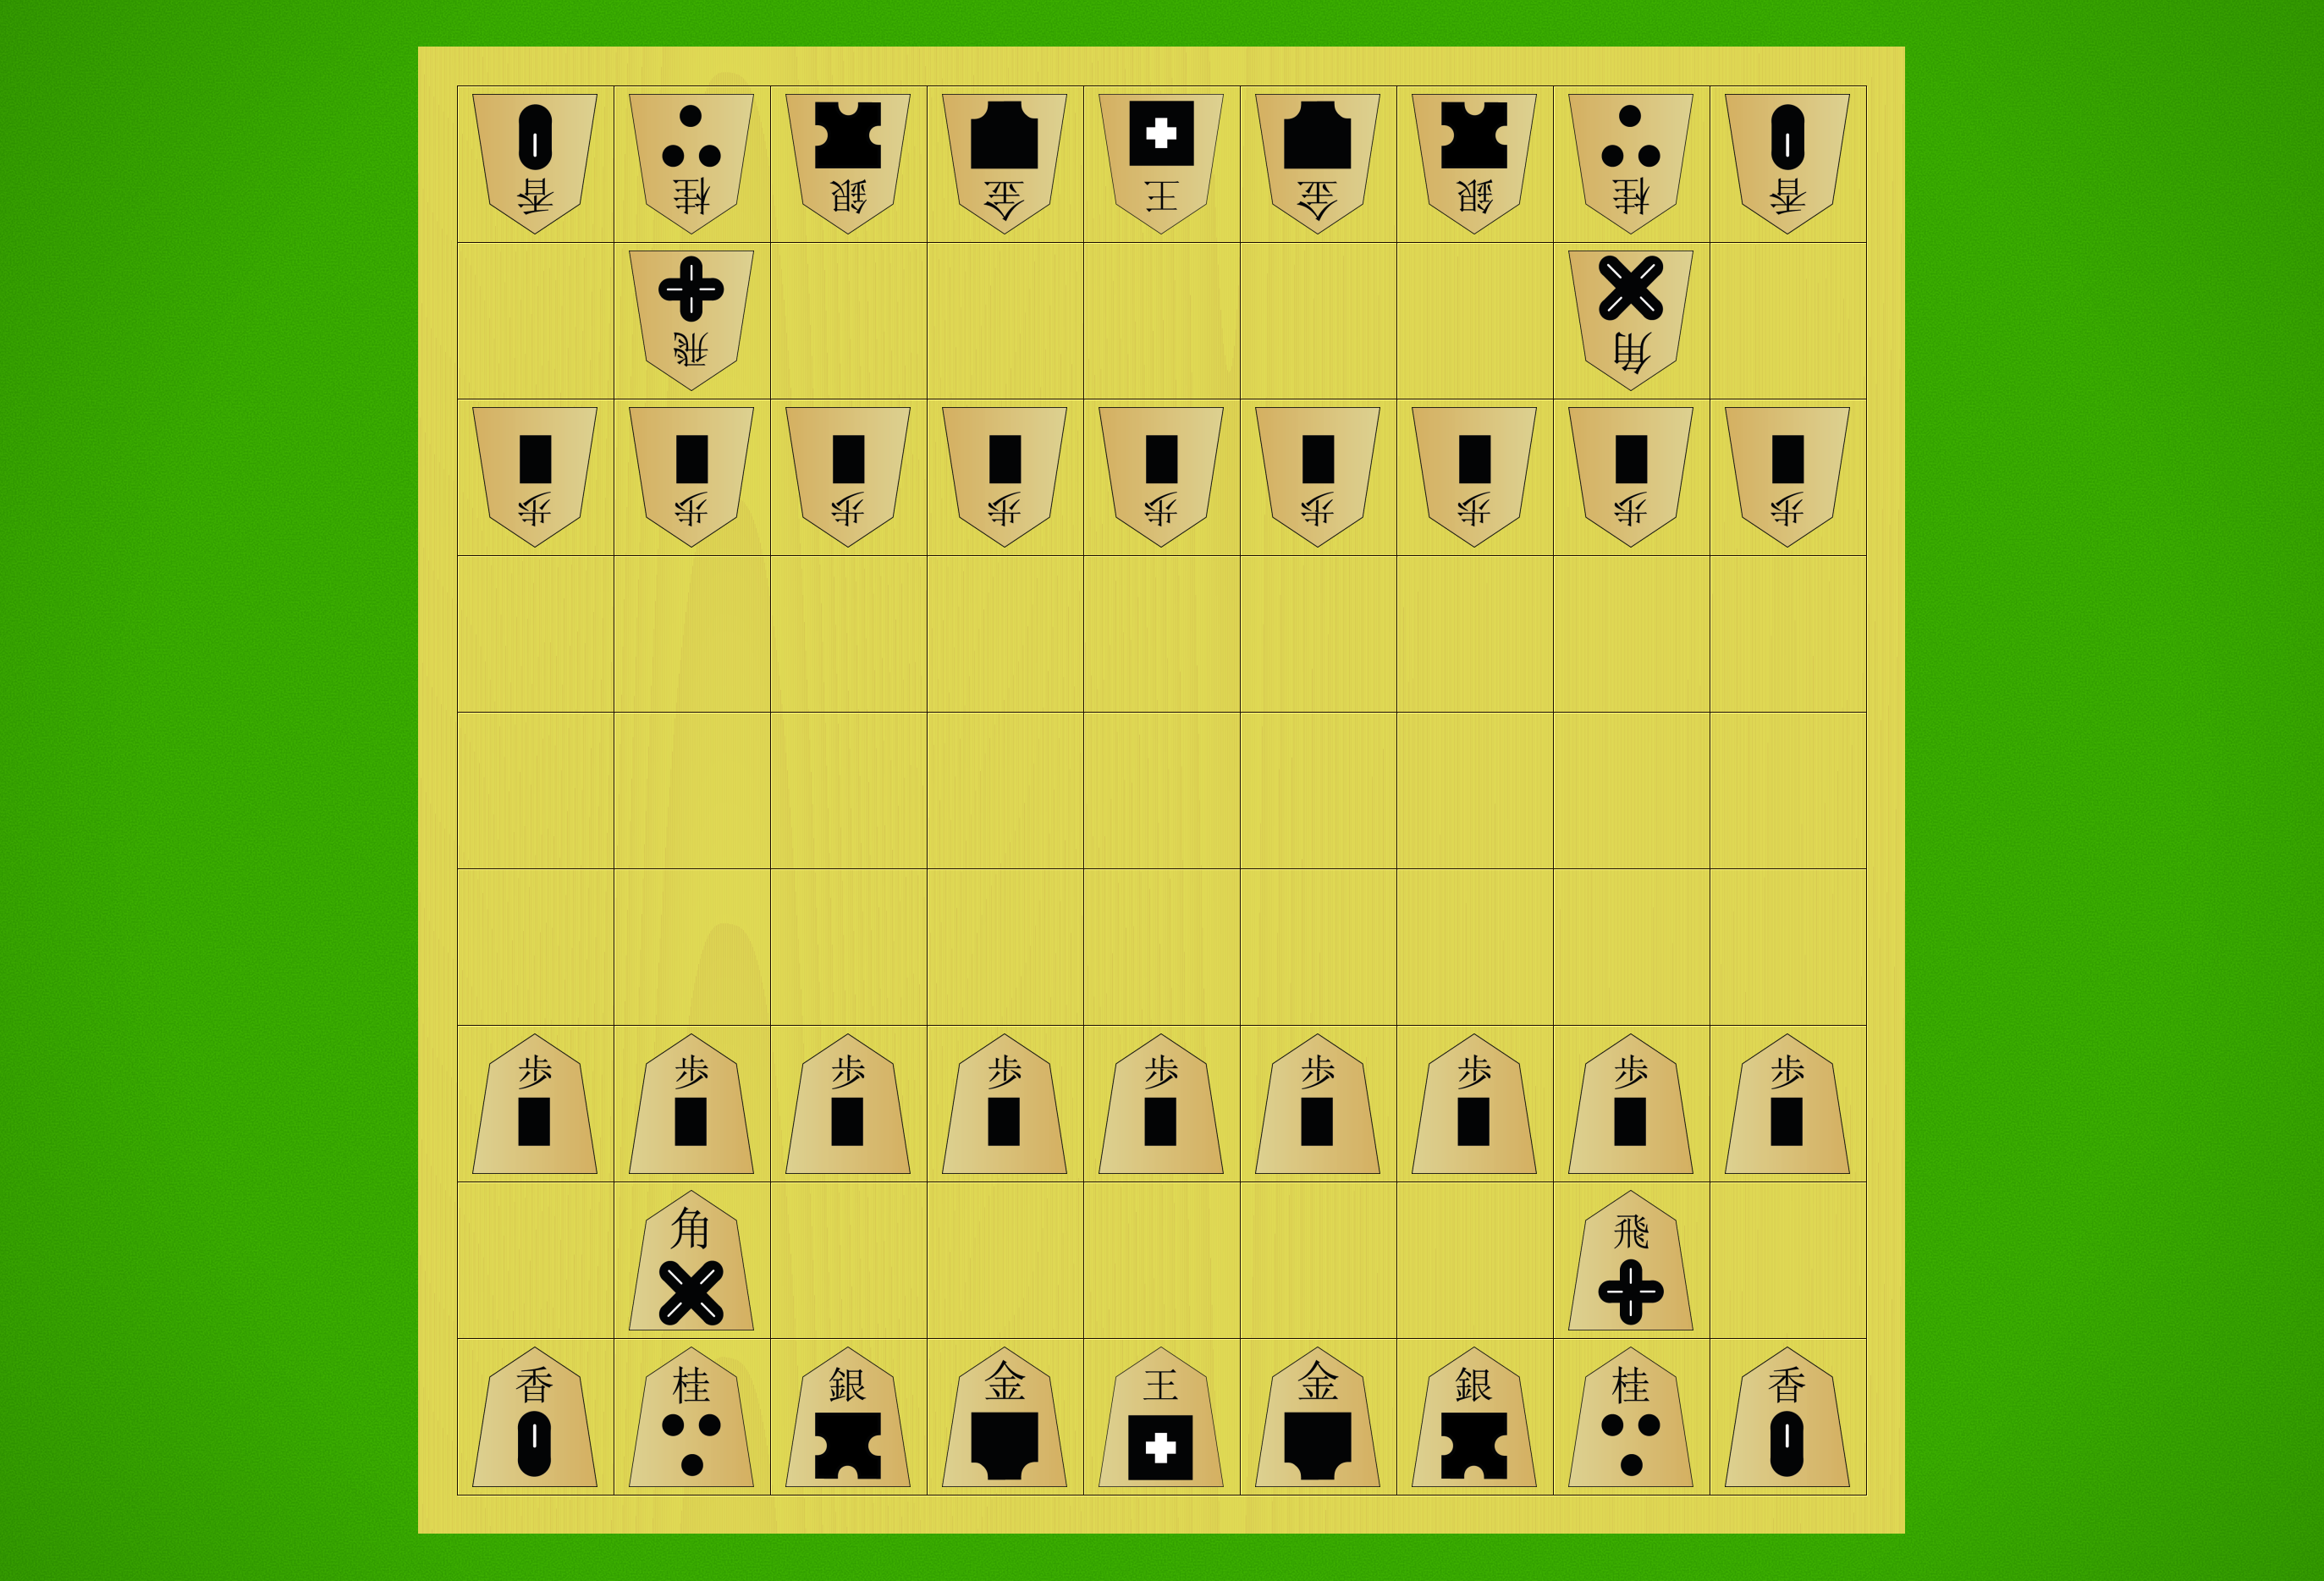
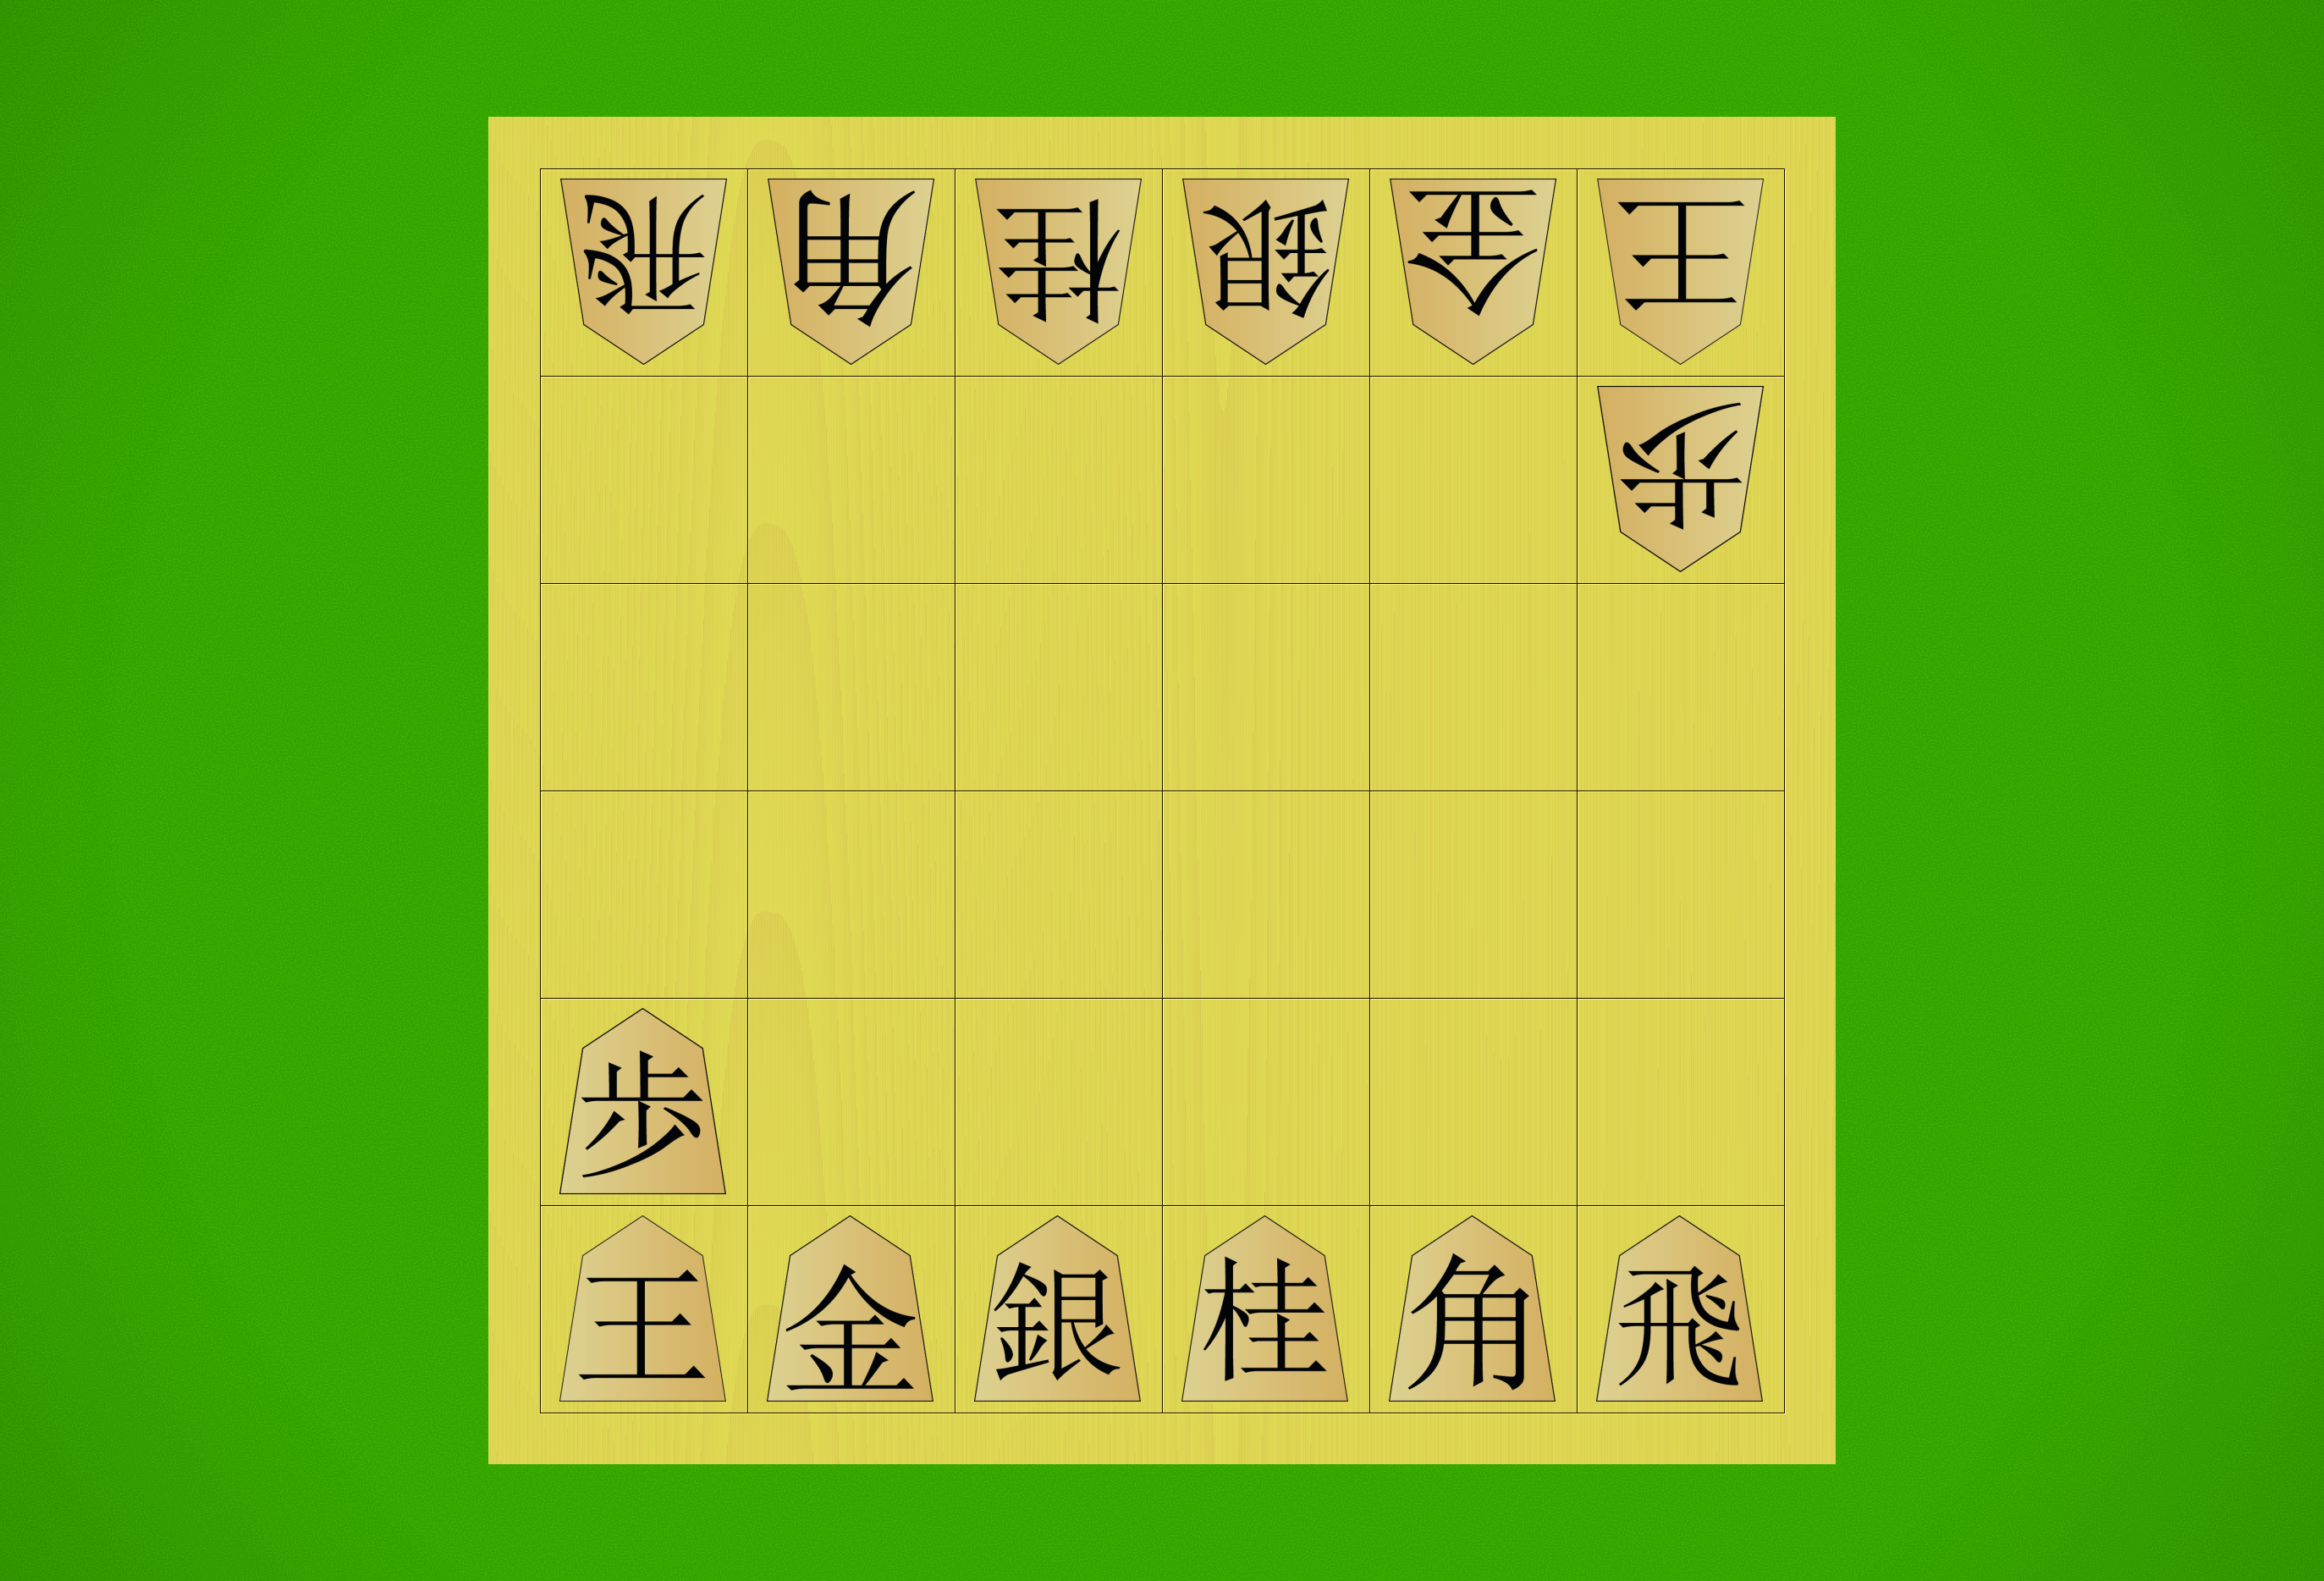
Not really!  The biggest obstacle for most new players is learning the pieces — as you can see in the photo of my Shogi set above, all Shogi pieces are the same shape and colour, and the two players’ armies are distinguished by the pieces’ orientation (aim pointy bits at the enemy!).  The different pieces have their names written on them in Japanese kanji characters, which are not so easy to learn for people who don’t speak Japanese.

However, the best way to learn is to simply dive in — after a game or two, the kanji fade away and are easy enough to recognise.  I find it helps beginners to forget they are letters — this tends to prime us to try to divine their meaning, which makes them more intimidating.

Instead, just think of them the same way as you think of the shapes of Western Chess pieces — both are abstract shapes, and neither really relates to what the piece does or how it moves.  The kanji are effectively just symbols, just like the odd shapes of Chess pieces.  Also, you only really need to recognise the top characters on each piece — that’s enough to distinguish all the pieces from each other.

Other than that, it’s just a bigger version of Chess!  The steepest part of the learning curve after that is getting comfortable with the powerful impact of drops — this is especially strange for seasoned Chess players, who will be accustomed to captured pieces playing no further role in the game.  But again, given a few games, you’ll soon start to see the exciting, combative play allowed by the drop rule, and you’ll be chucking Gold Generals at your opponent like a pro.

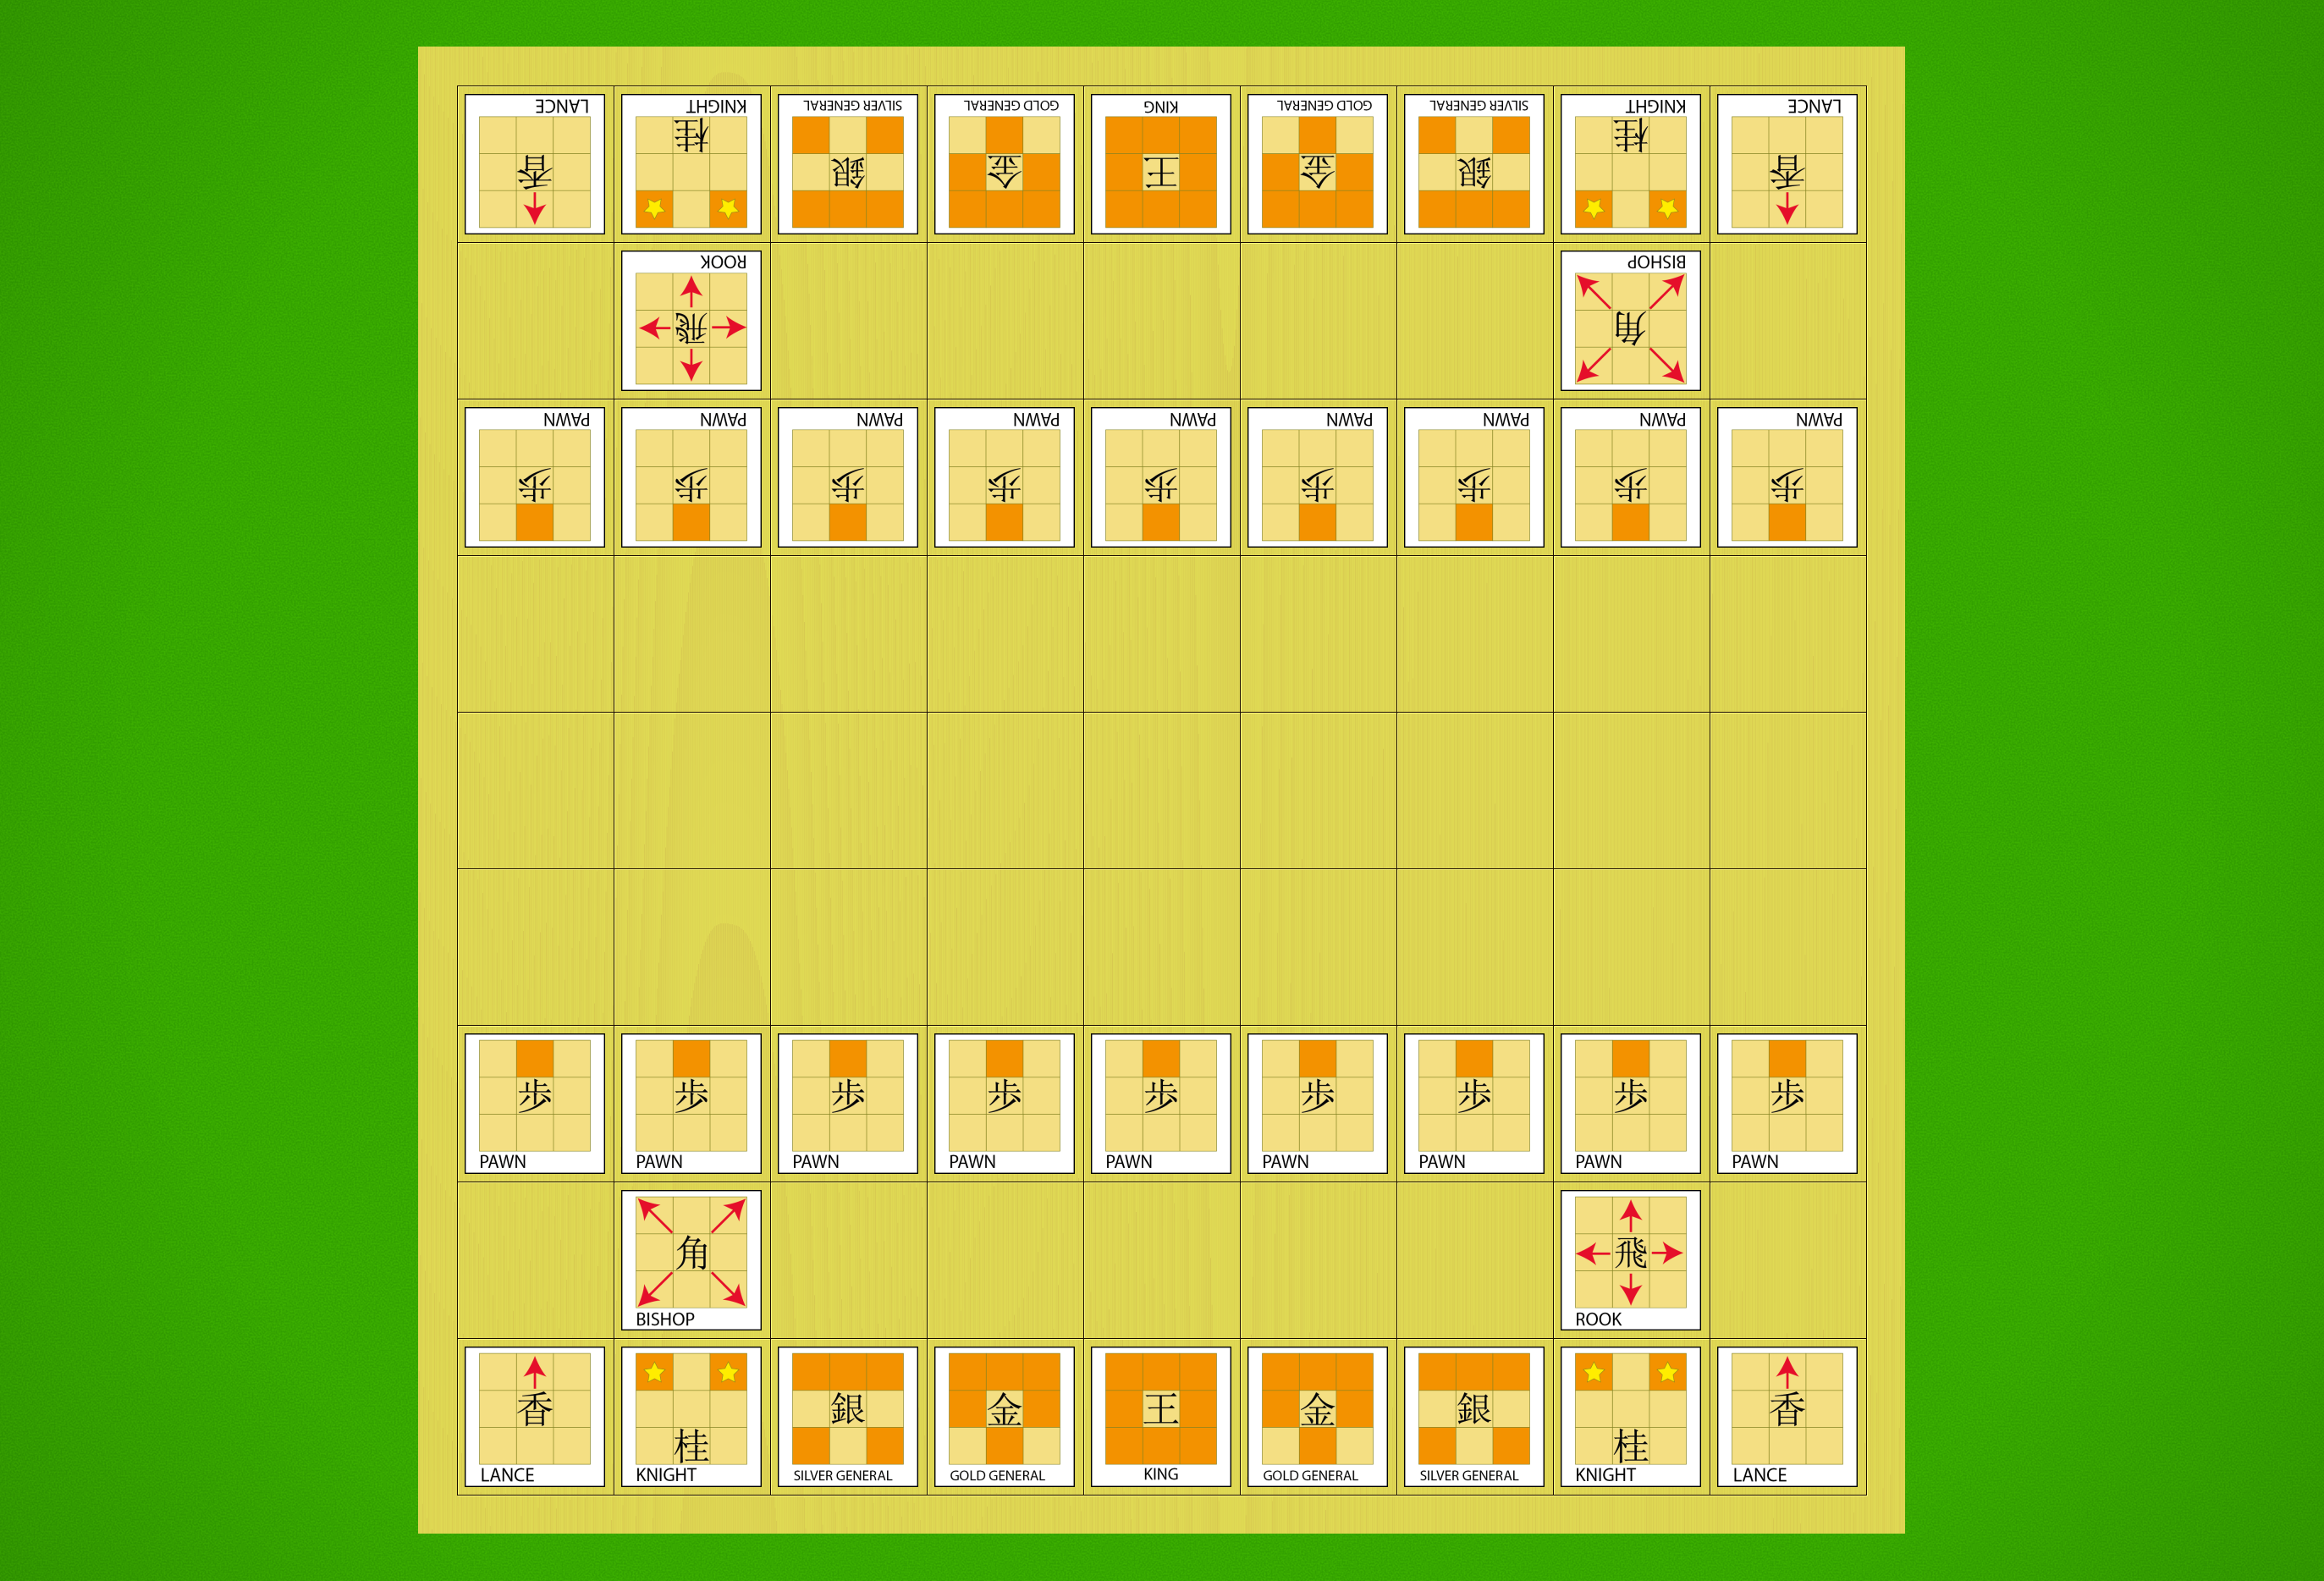
How the Shogi Pieces Move:

Here’s a quick reference to the moves of the Shogi pieces:

evans-shogi-move

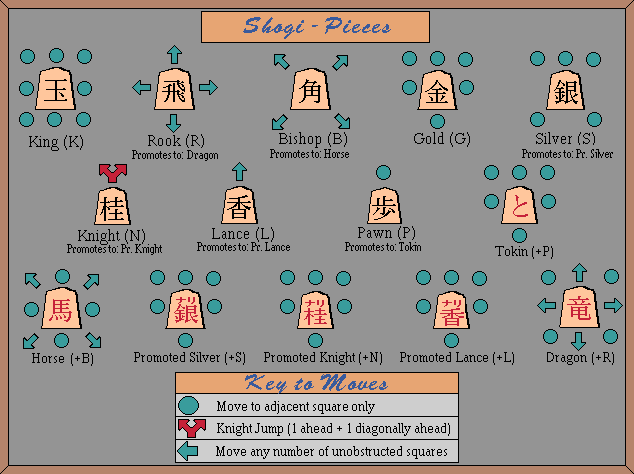
As you can see, the King, Rook and Bishop move the same as in Chess.  The Knight moves the same as in Chess too, but can only jump forward.  The Pawn moves forward and captures forward — no diagonal capturing like in Chess.  The Gold General moves one space in any direction except diagonally backward, while the Silver General can move one space diagonally in any direction or one space directly forward.

The promoted pieces are easy to remember — all promoted pieces move the same as the Gold General, with the exception of the Horse and Dragon.  The Horse moves like a Bishop, but can also choose to move one square orthogonally; the Dragon moves like a Rook but can also move one square diagonally in any direction.

You might notice that the Shogi pieces have a general forward bias in their movement patterns, and most are short-range movers.  This works very well with the drop rule — the combination of forward movement and drops favours attacking play, and the short-range movements prevent the game from becoming too chaotic, as it might be with powerful pieces appearing wherever they like on the board.

The flip side to this is that you can very occasionally have a condition called entering Kings, where both players’ Kings have moved into each others’ promotion zones.  This makes it very difficult for anyone to win, as most of the pieces attack forward rather than backward.  This is one of the few ways you can have a draw in Shogi.  In practice this rarely happens, especially between beginners, who normally dive heedlessly into battle and neglect King safety entirely!

Note that the Horse provides a good reason for the Shogi board to not be chequered.  In Chess your Bishops are confined forever to half of the board — either the black diagonals or the white ones.  The Horse however can spend a move to shift from one set of diagonals to the other, so it’s less useful to have the chequers to indicate where the Bishops go — once promoted they can go anywhere.

Shogi: A whole family of amazing games

One of the things I love about Shogi is that, in a sense, it’s part of a whole game system rather than a single game.

To unpack that a little bit — you may be aware that there are many hundreds of Chess variants out there, variations on the game with different boards, pieces and rules.  Shogi has these too, but unlike in Chess, many of the Shogi variants are hundreds of years old, and were refined over the centuries into fantastic games in their own right!  Shogi variants are well-designed, well-balanced, and offer just as much intrigue and fascination as the traditional form of the game.

In fact, before the introduction of the drop rule made the modern game dominant, there used to be three variants of Shogi that were commonly played: Sho Shogi, or ‘Small Shogi’, which added drops later and become modern Shogi; Chu Shogi, or ‘Middle Shogi’, a much bigger game played on a 12×12 board of 144 squares; and Dai Shogi, or ‘Large Shogi’, played on an even bigger 15×15 board of 225 squares.  Shogi used to come in Small/Medium/Large sizes!  Alongside these main variations, there were numerous other variants of Shogi developed over the centuries, some of which I’ll describe below.

Today, besides Sho Shogi only Chu Shogi maintains a small presence — the Chu Shogi Renmei in Japan is the official governing body, and holds regular tournaments.  This is unfortunate, really, as the Shogi variants are quite unique — particularly the larger variants, which are far larger than any commonly-played Chess variants, and offer hugely creative pieces and styles of play.

Thankfully, the efforts of one George Hodges in the late 20th century led to the revival of these ancient forms of Chess, and remarkably he even manufactured affordable sets for most of the large variants.  Sadly George left us a few years ago, but his wife carries on that business, and she remains the only source on the planet for physical sets of most of the Shogi variants.  I of course have bought several of them myself 🙂

Without further ado, here’s a brief intro to a few of the more spectacular Shogi variants — several of which I will bring with me to the Shogi event in a few weeks time!
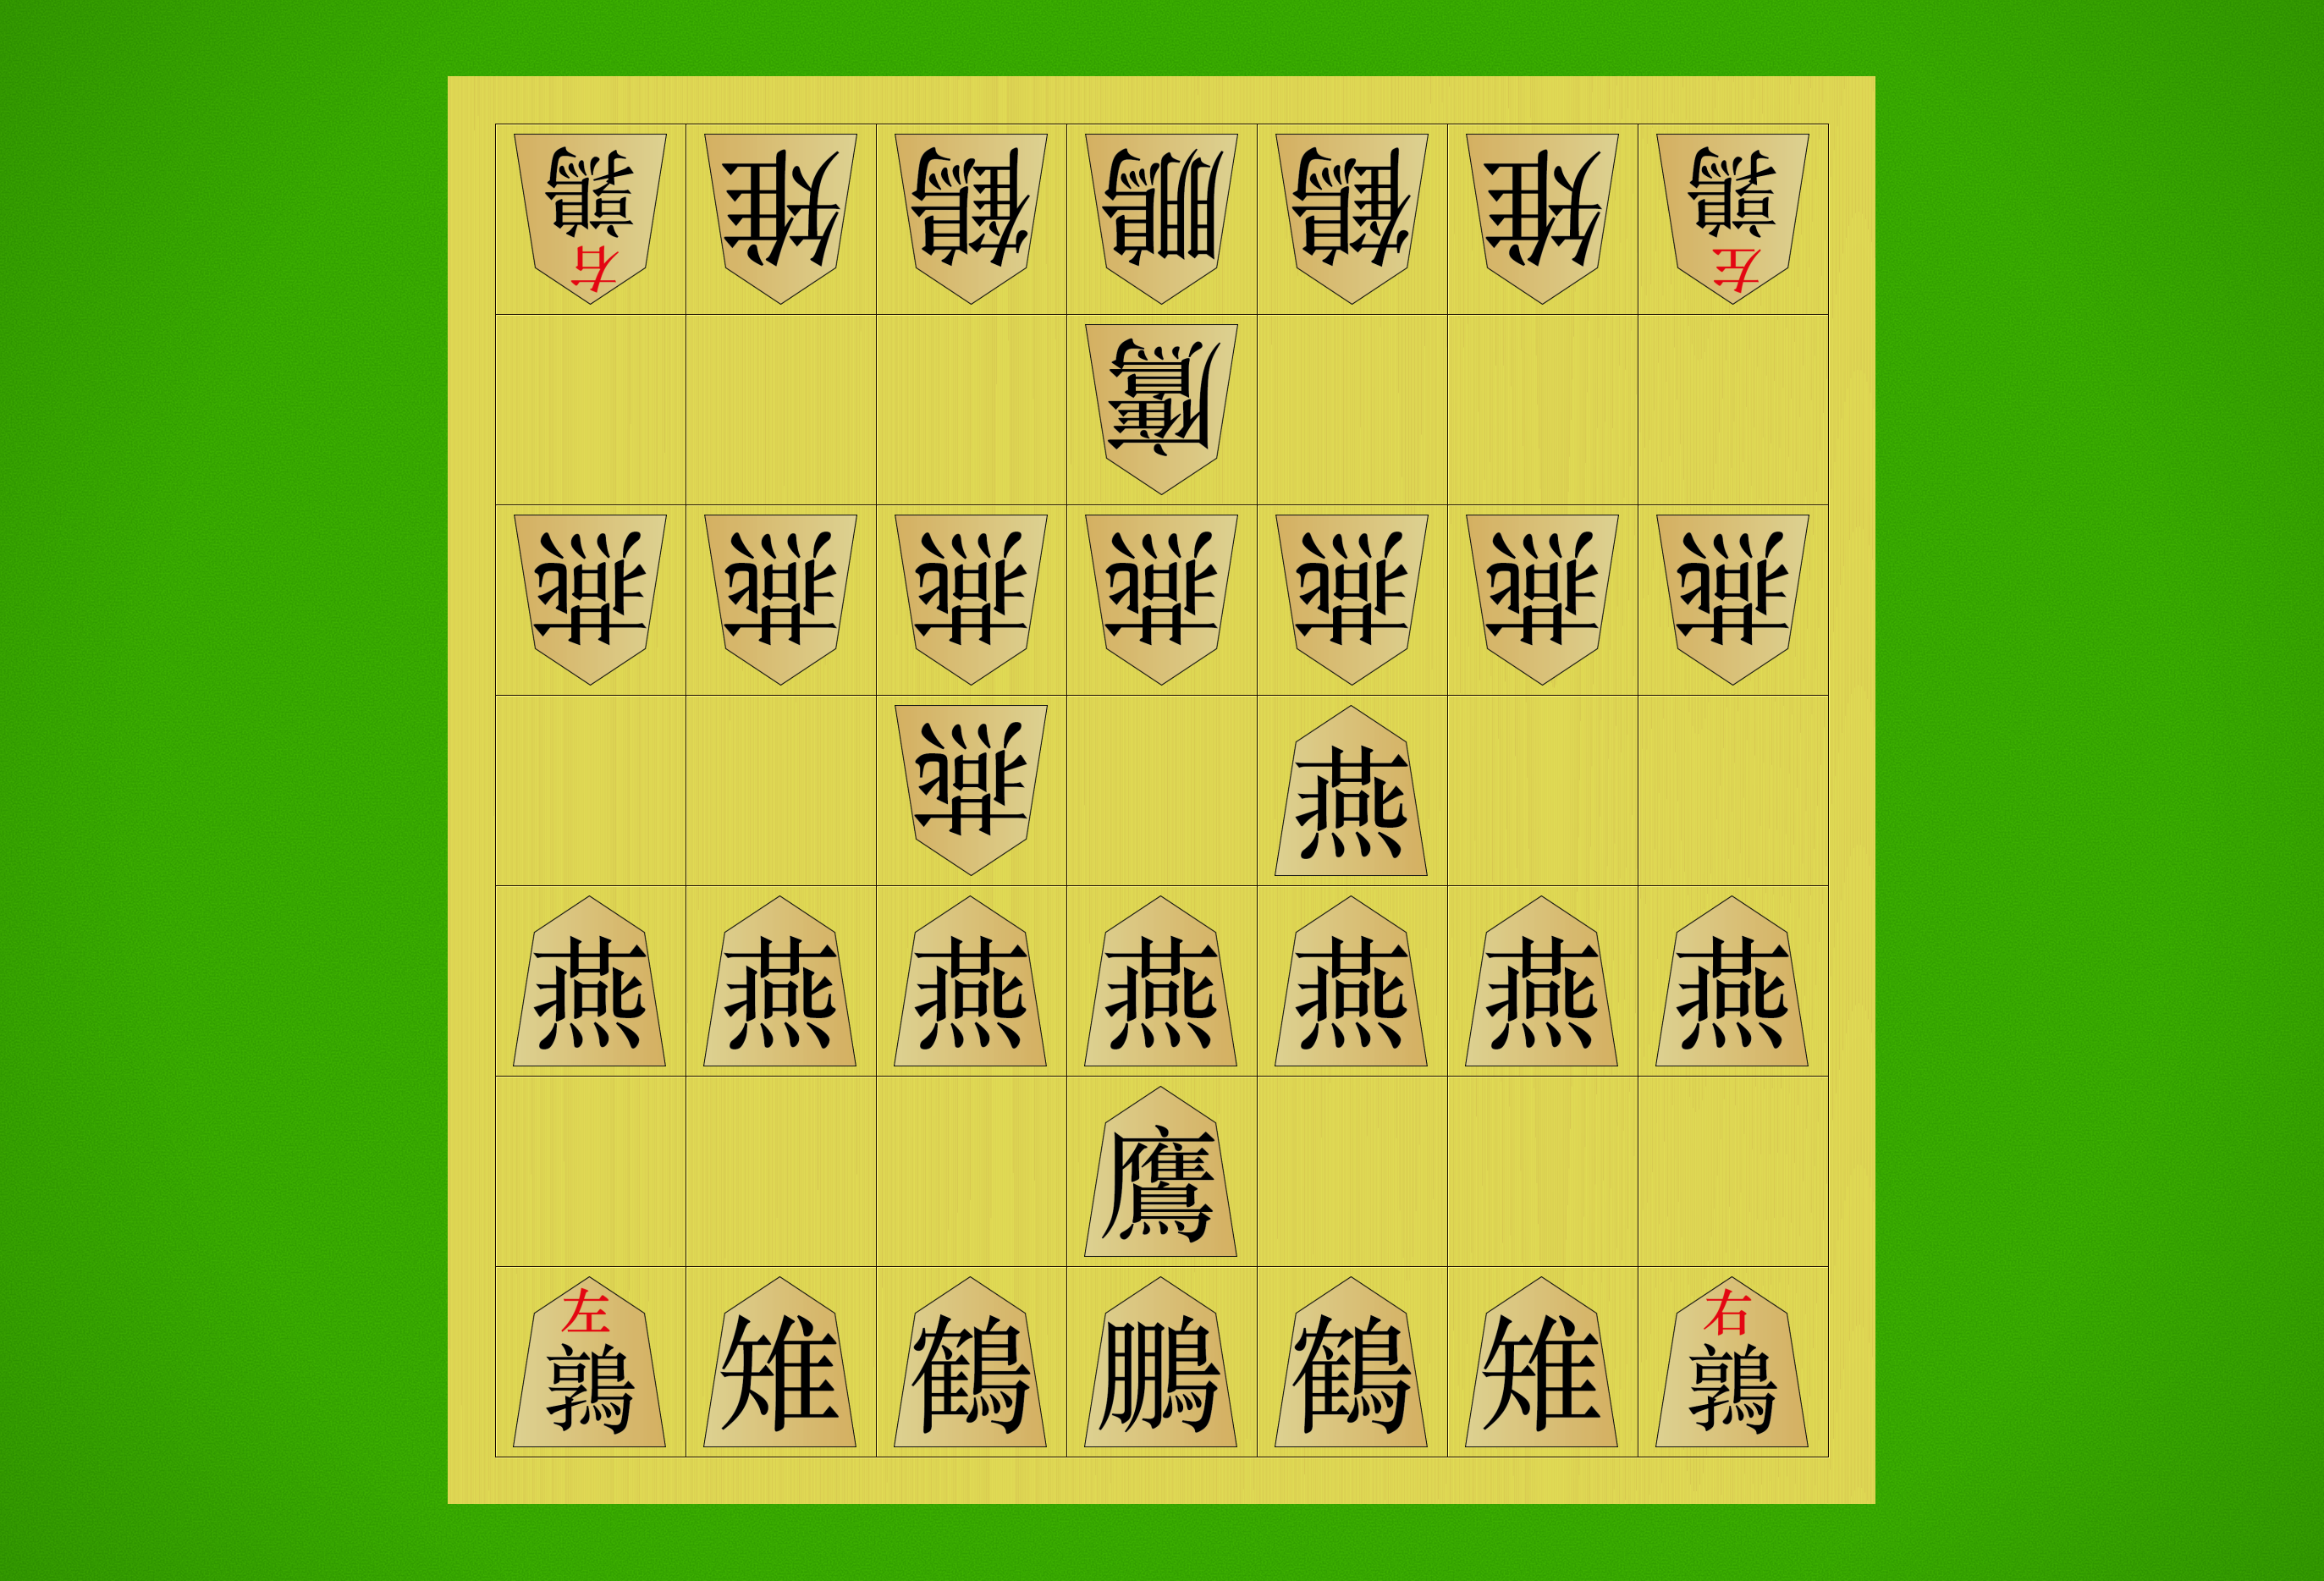
Tori Shogi

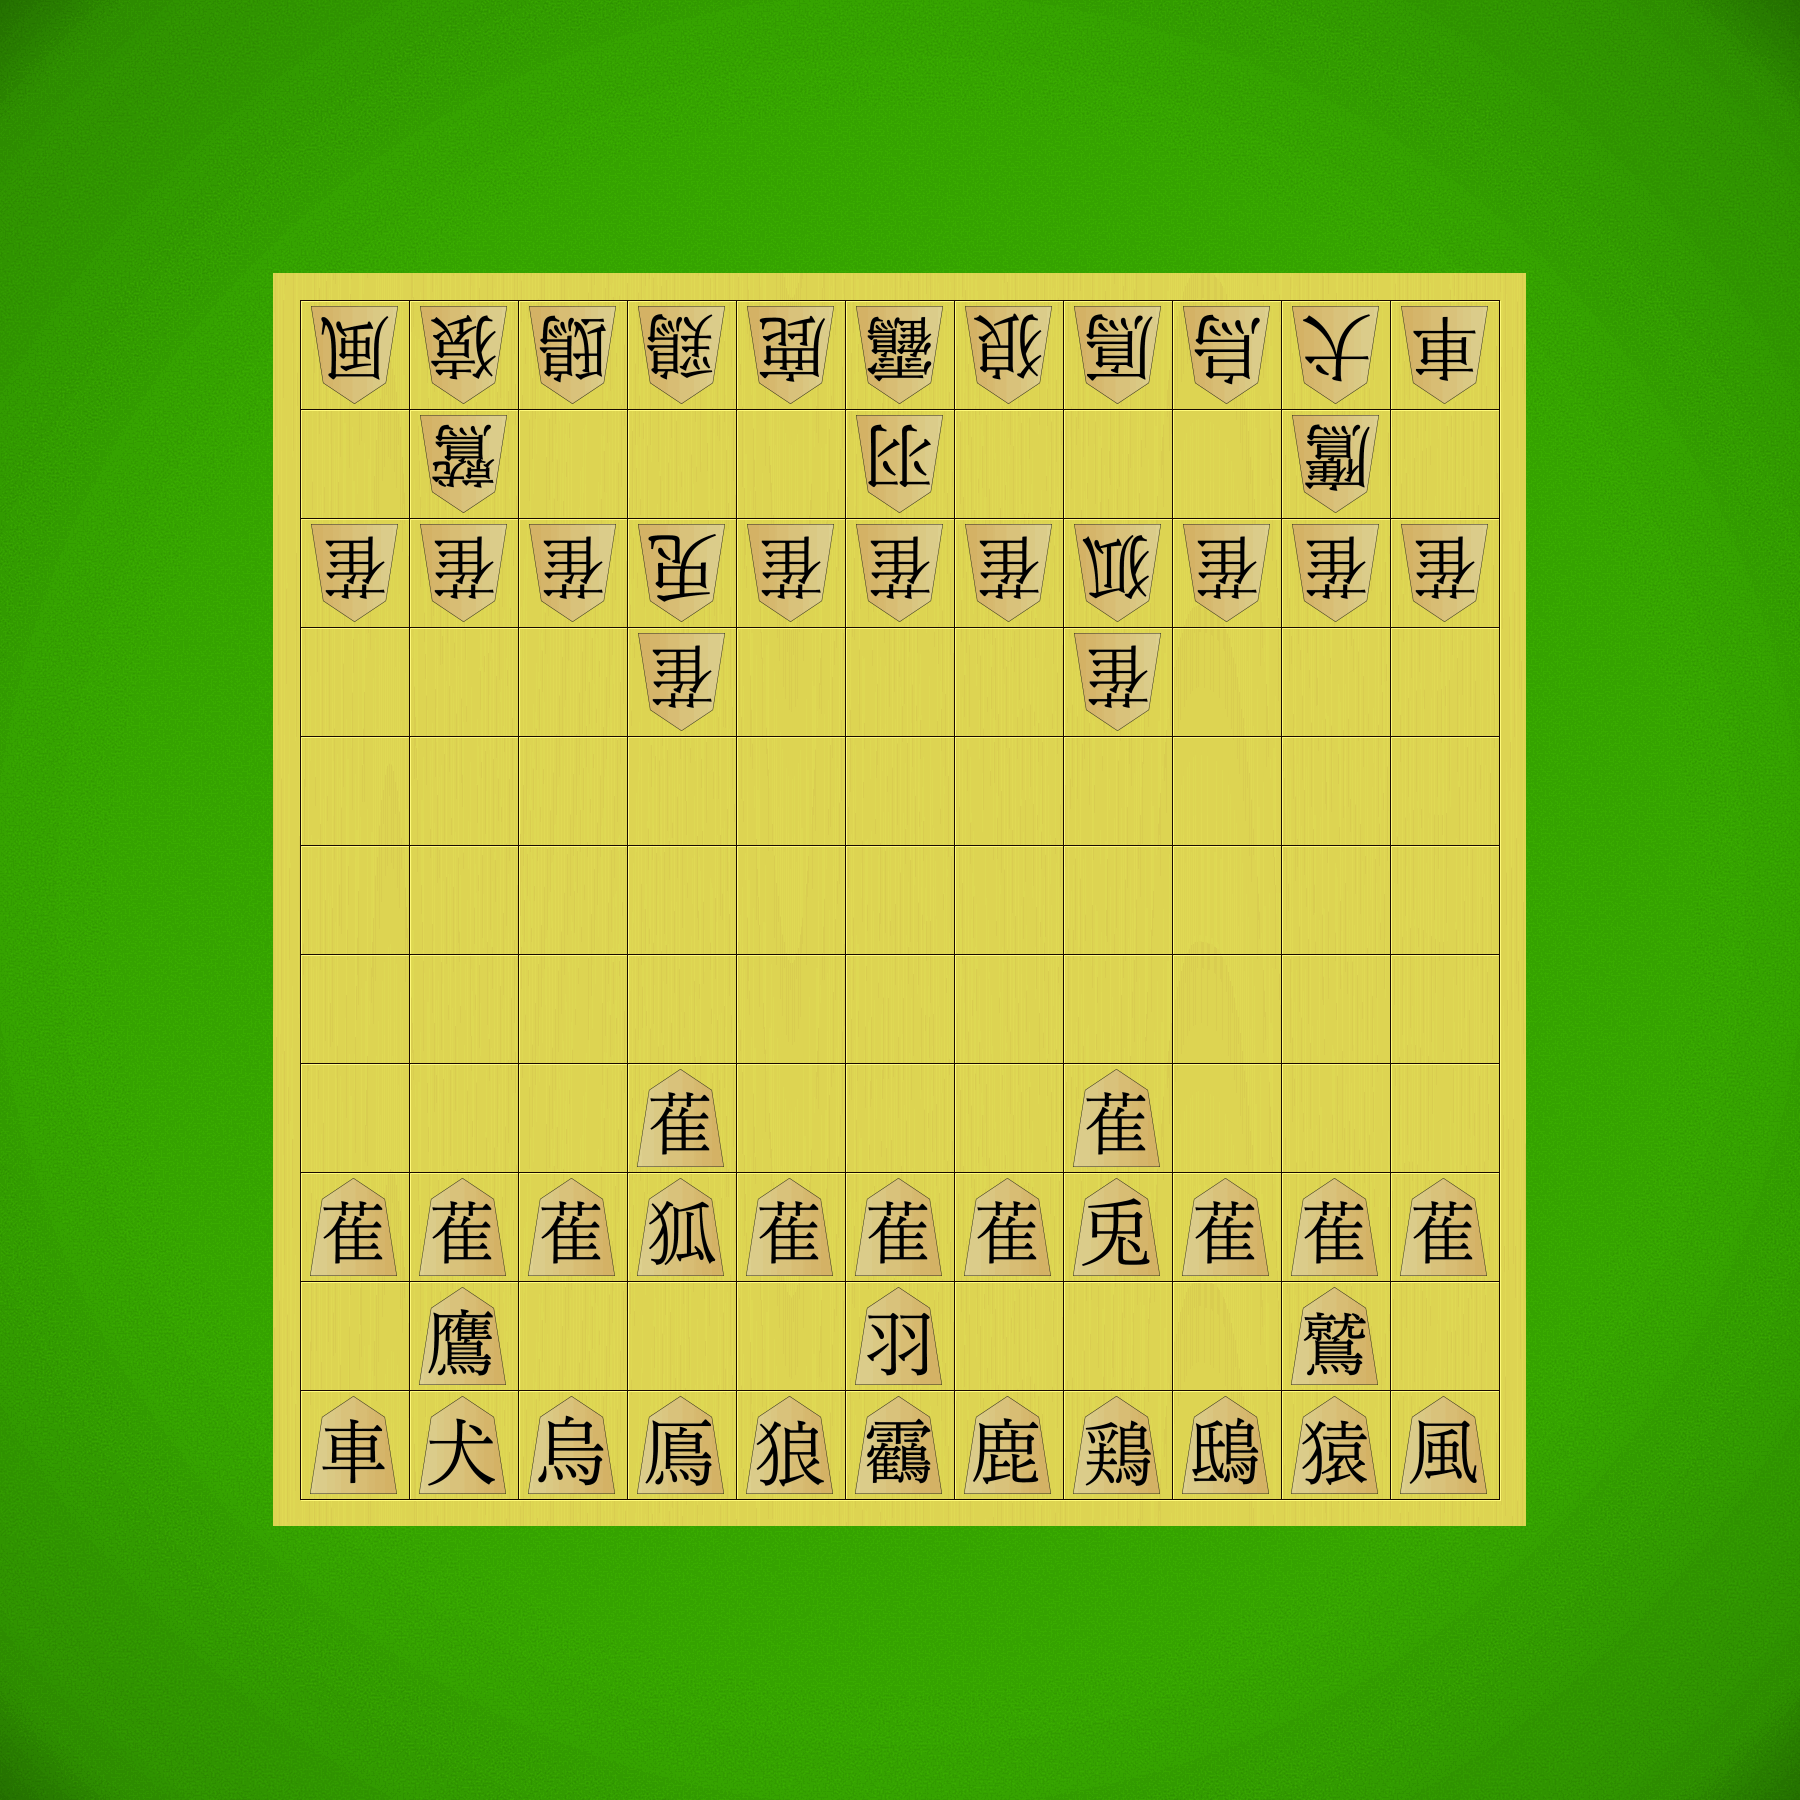
Tori Shogi, or ‘Bird Shogi’, is an action-packed small variant of Shogi that packs a lot of action into its 7×7 board of 49 squares.  At the start of the game, each player has 16 pieces in their camp — the board is more dense with pieces than in any other Shogi variant.  To play you need to remember nine distinct piece movements, one less than normal Shogi.

Unlike most Shogi variants, which build on a common foundation of pieces that generally behave the same across many games, Tori Shogi uses an entirely new set of pieces named after birds (hence ‘Bird Shogi’).  Instead of Pawns we have Swallows, we have Quails that move differently depending on which side of the board they start on, the King is now a Phoenix, and so on.

Like modern Shogi the game uses the drop rule, but with one major modification — in Tori Shogi you can drop a second pawn (Swallow) on a file where you already have one.  In fact this is already happening in the start position, as you can see below!  This rule heavily impacts Tori tactics, and also helps the board to not feel too constrained despite having so many pieces everywhere.

Tori-shogi-board1

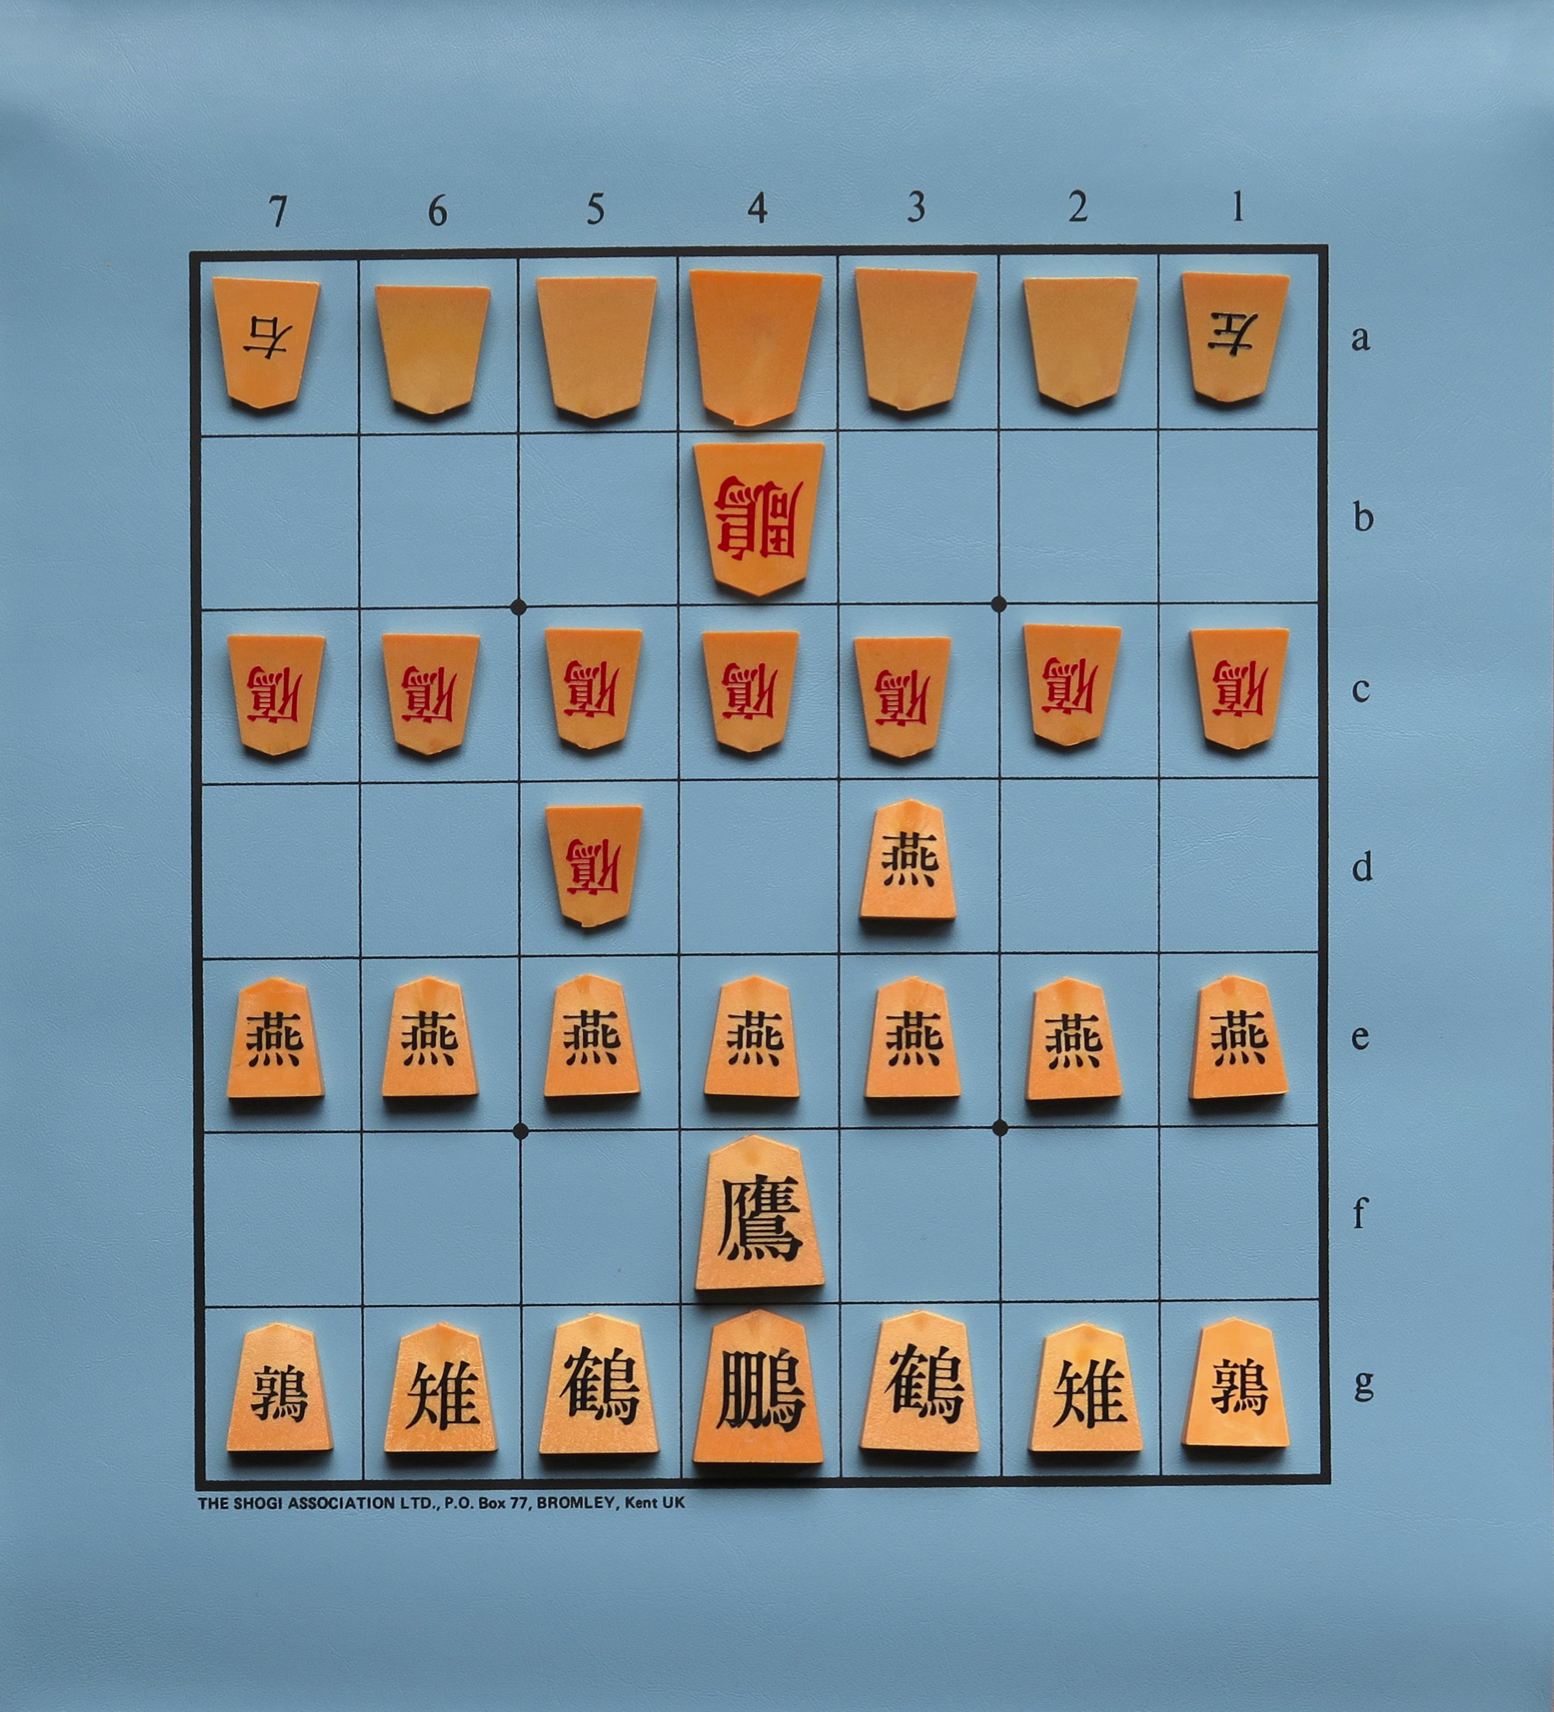
A Tori Shogi set from Angela/George Hodges — the top pieces have been flipped to show off their promoted forms.  In this game only Swallows and Falcons promote.  Note that the Swallows are in conflict right from the start of the game!

Tori Shogi is somewhat unusual among Shogi variants in that it was invented more recently — in 1799 to be precise.  This means we have a fair bit more information on high-level play in this game than some of the others, where unfortunately top players’ games are lost in the mists of time.  For Tori Shogi we have a few games from a tournament played between top-level Shogi professionals, some clever tsumeshogi (checkmate puzzles), and even a recently-updated English book on the game, The Way of Tori Shogi!

Tori plays in a very unique way, not just because of the small board and two-pawn drop rule, but also because the pieces are somewhat strange.  The movements themselves are odd, but also the promoted Swallow turns into a Goose that moves in a bizarrely useless way (jumping one square diagonally forward left or right, or one square backward).  Promotion is manda-Tori (sorry) in this game, so you have to have some clever plans afoot to use these weird pieces to achieve checkmate.

In any case, Tori Shogi is an exciting and unique game, and unlike some of the other variants there’s some good information out there on how to play well.  I recommend picking up a set and a copy of The Way of Tori Shogi and giving it a go!  Or just play with me, I already have a set 🙂

Tori-shogi-moves

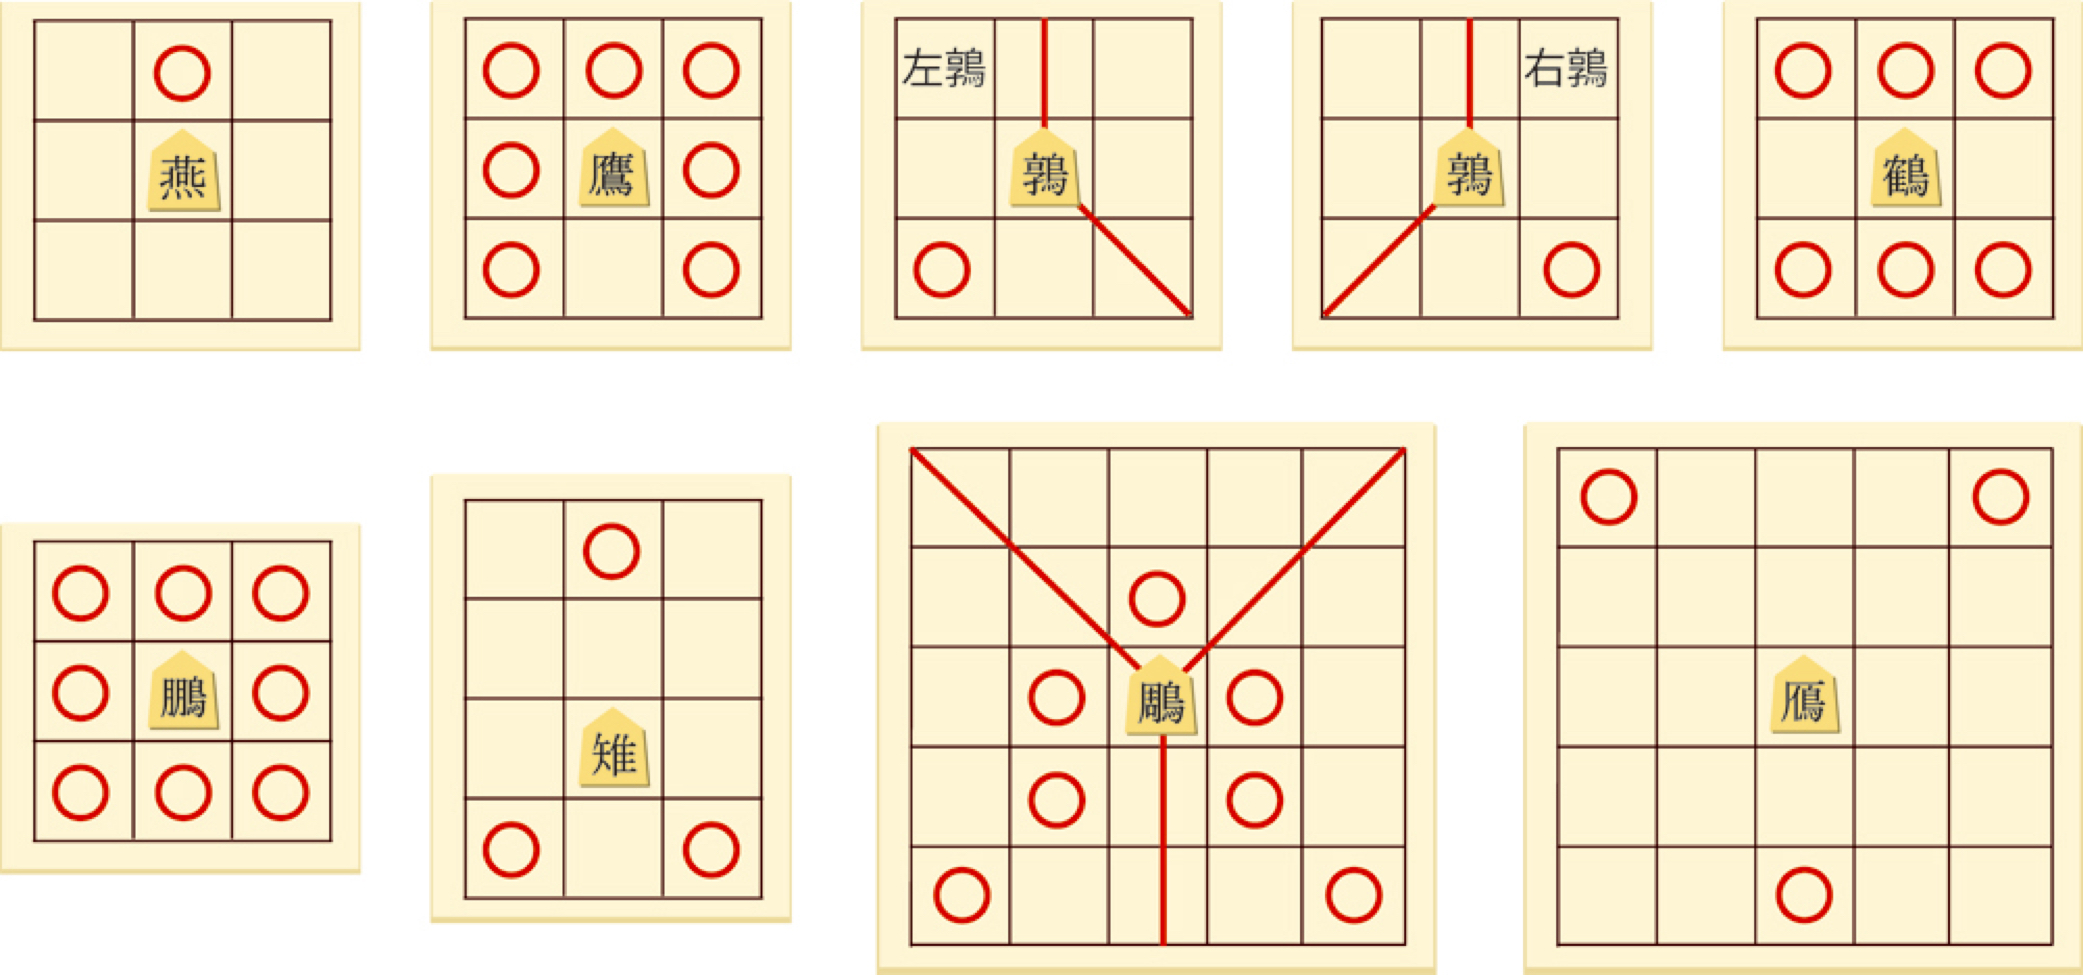
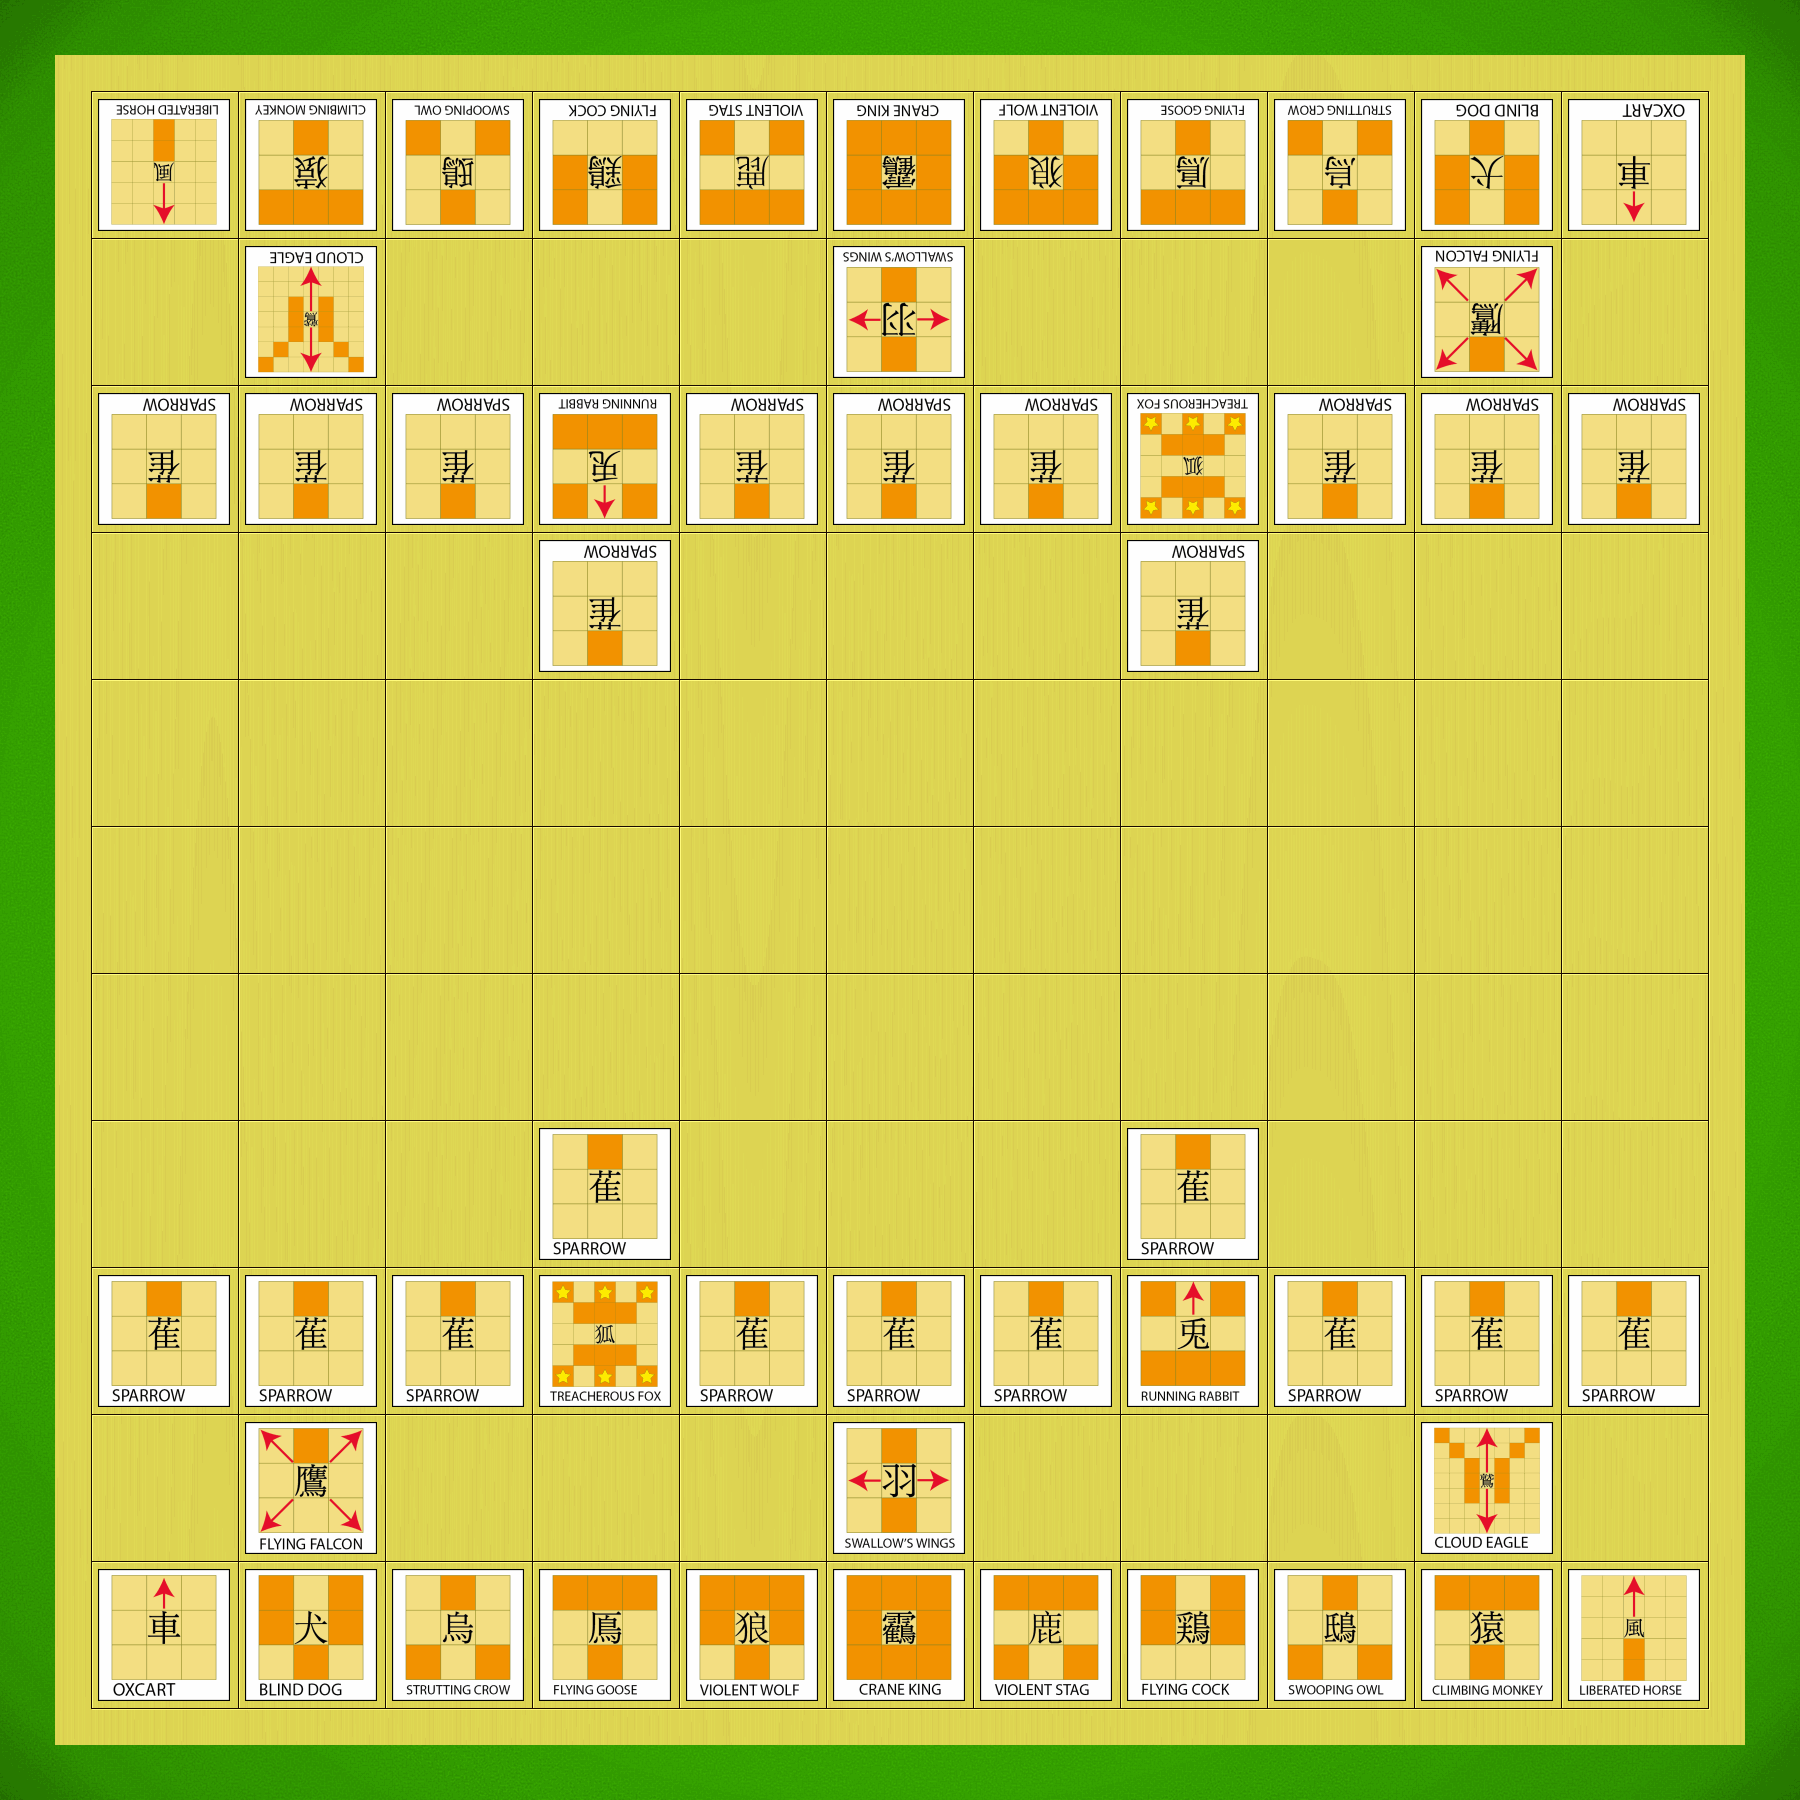
The moves of the Tori Shogi pieces.  Clockwise from top left: Swallow, Falcon, Left Quail, Right Quail, Crane, Goose, Eagle, Pheasant, Phoenix.
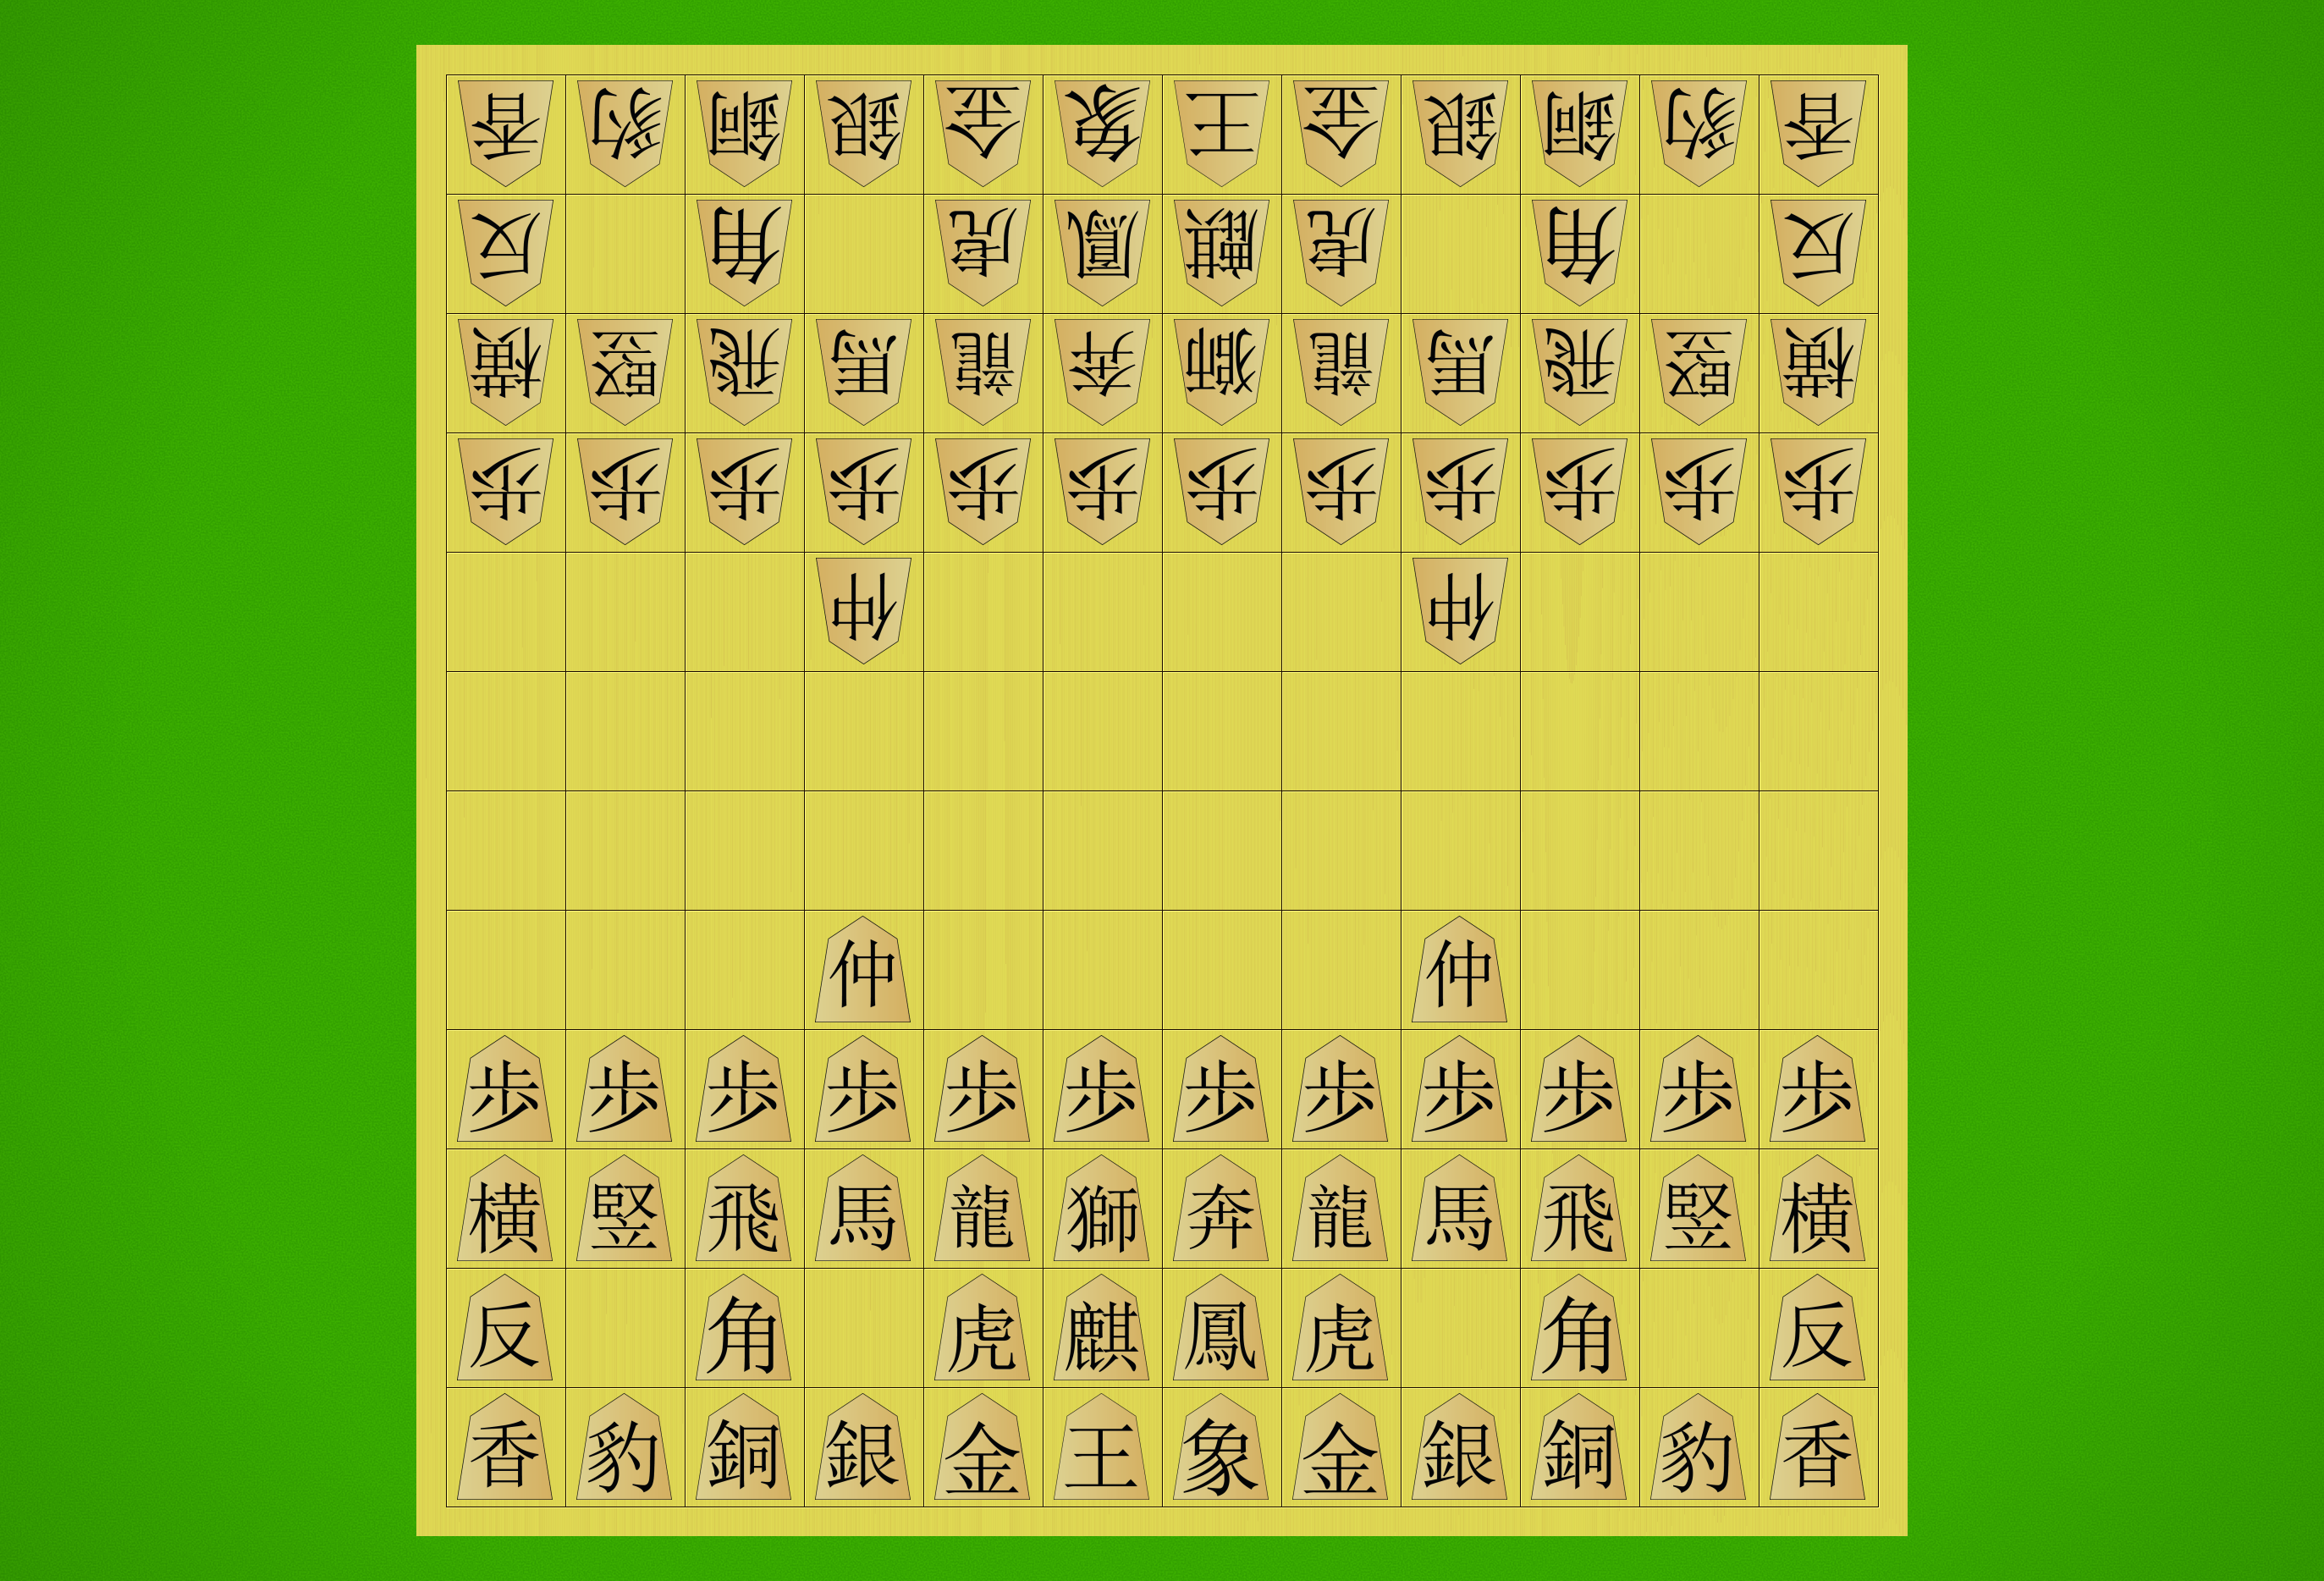
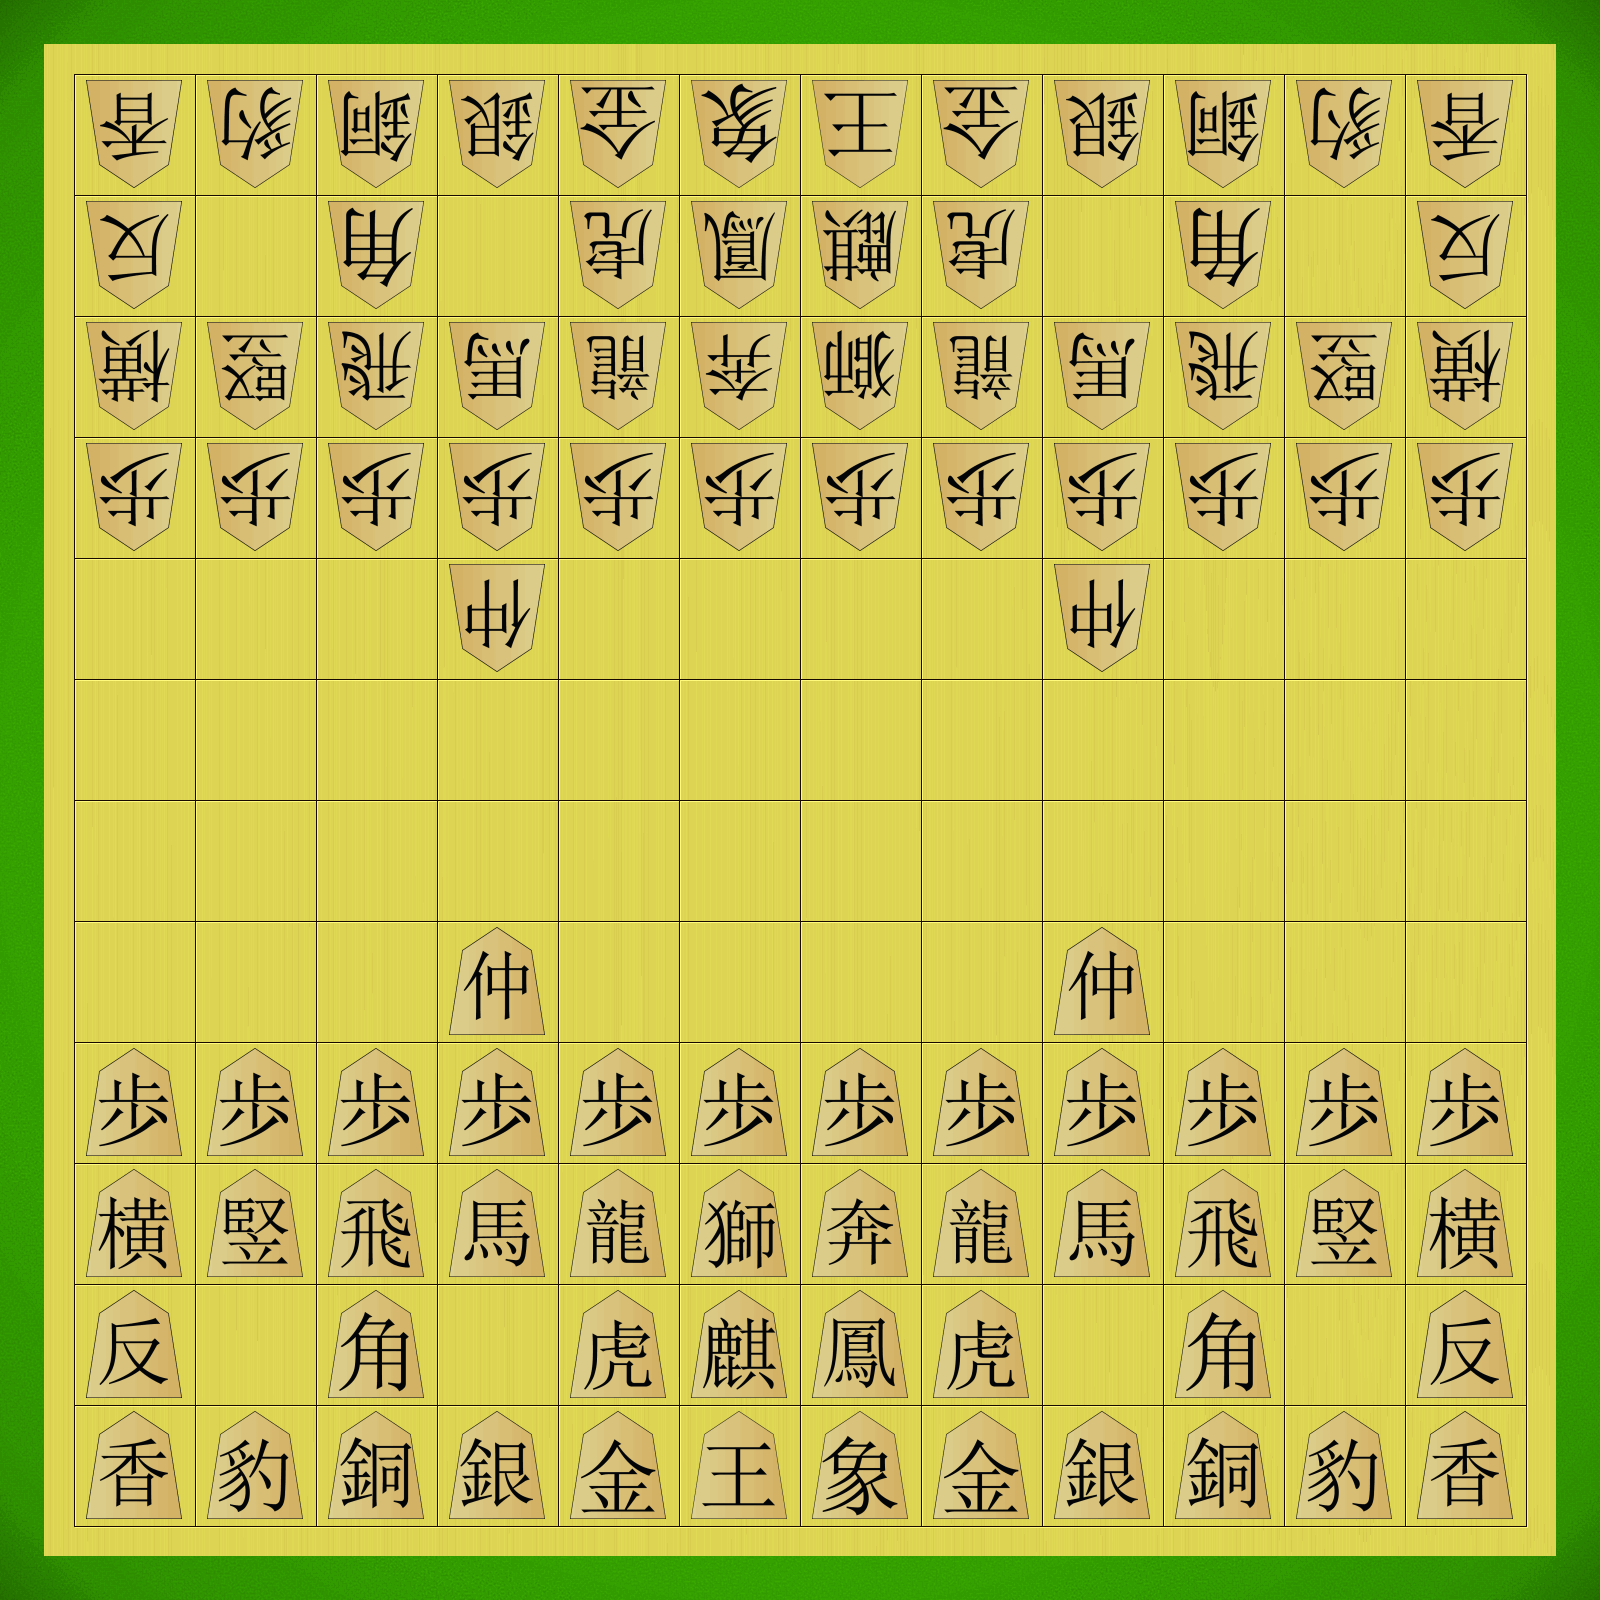
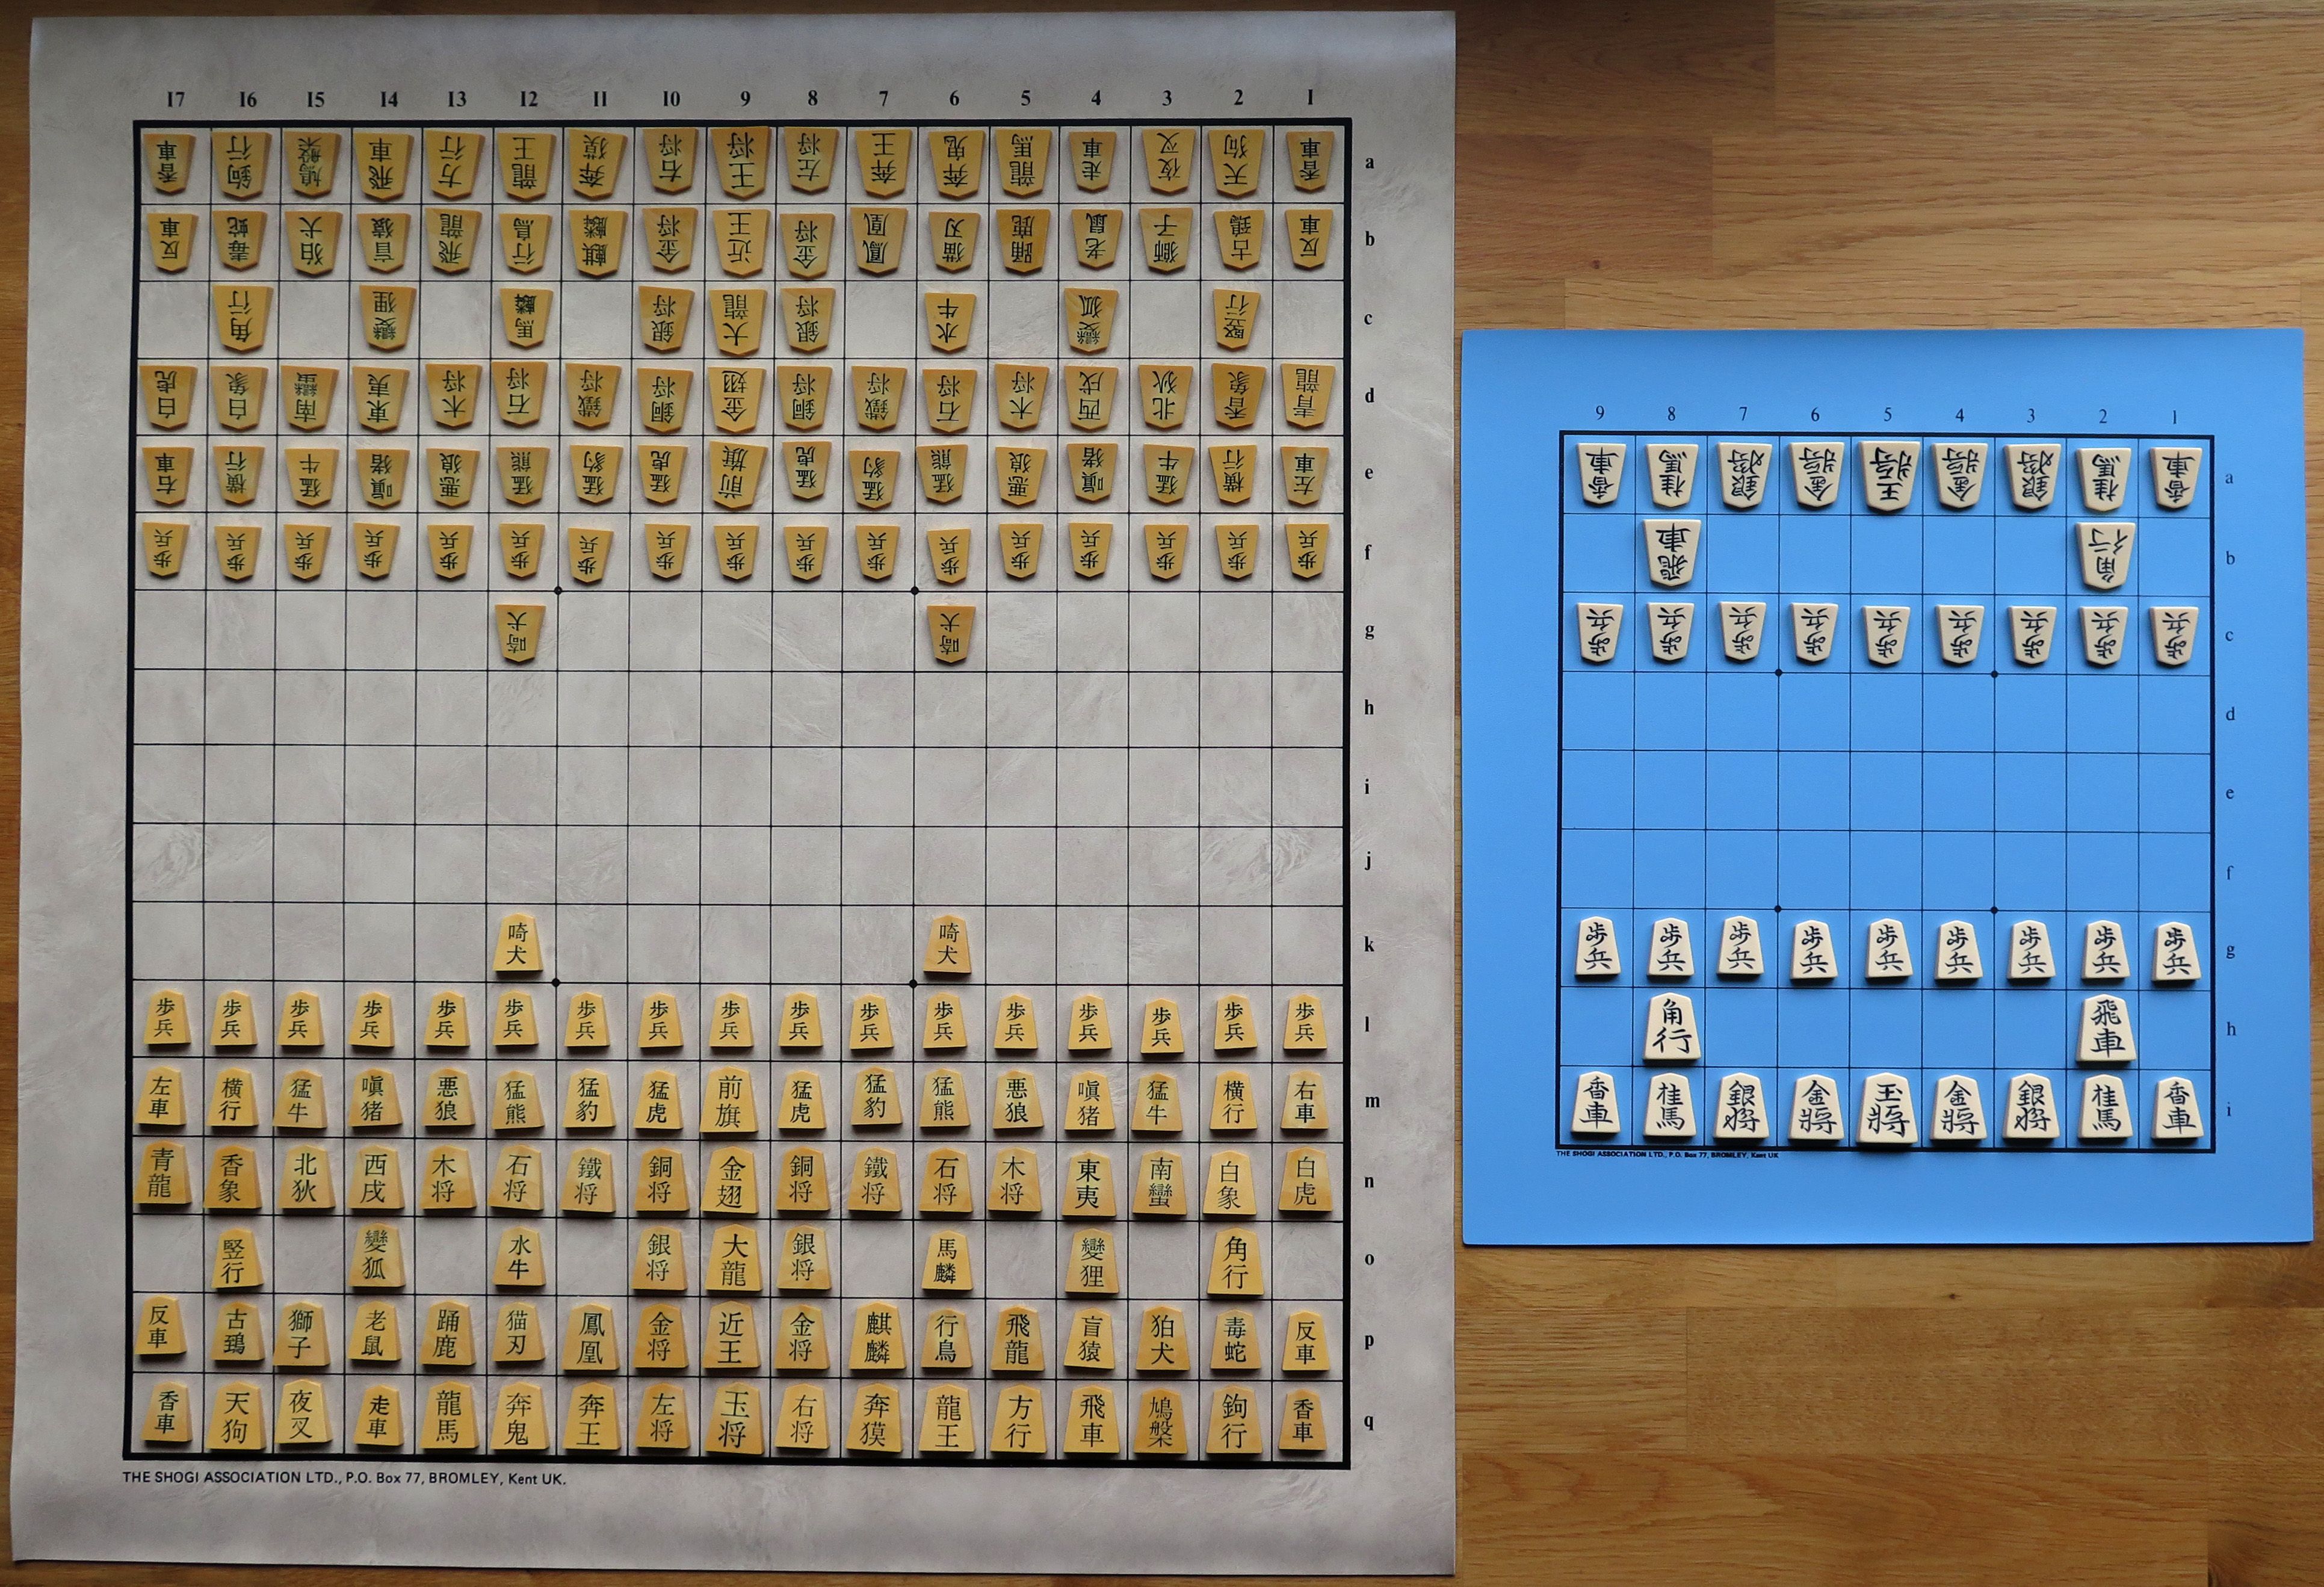
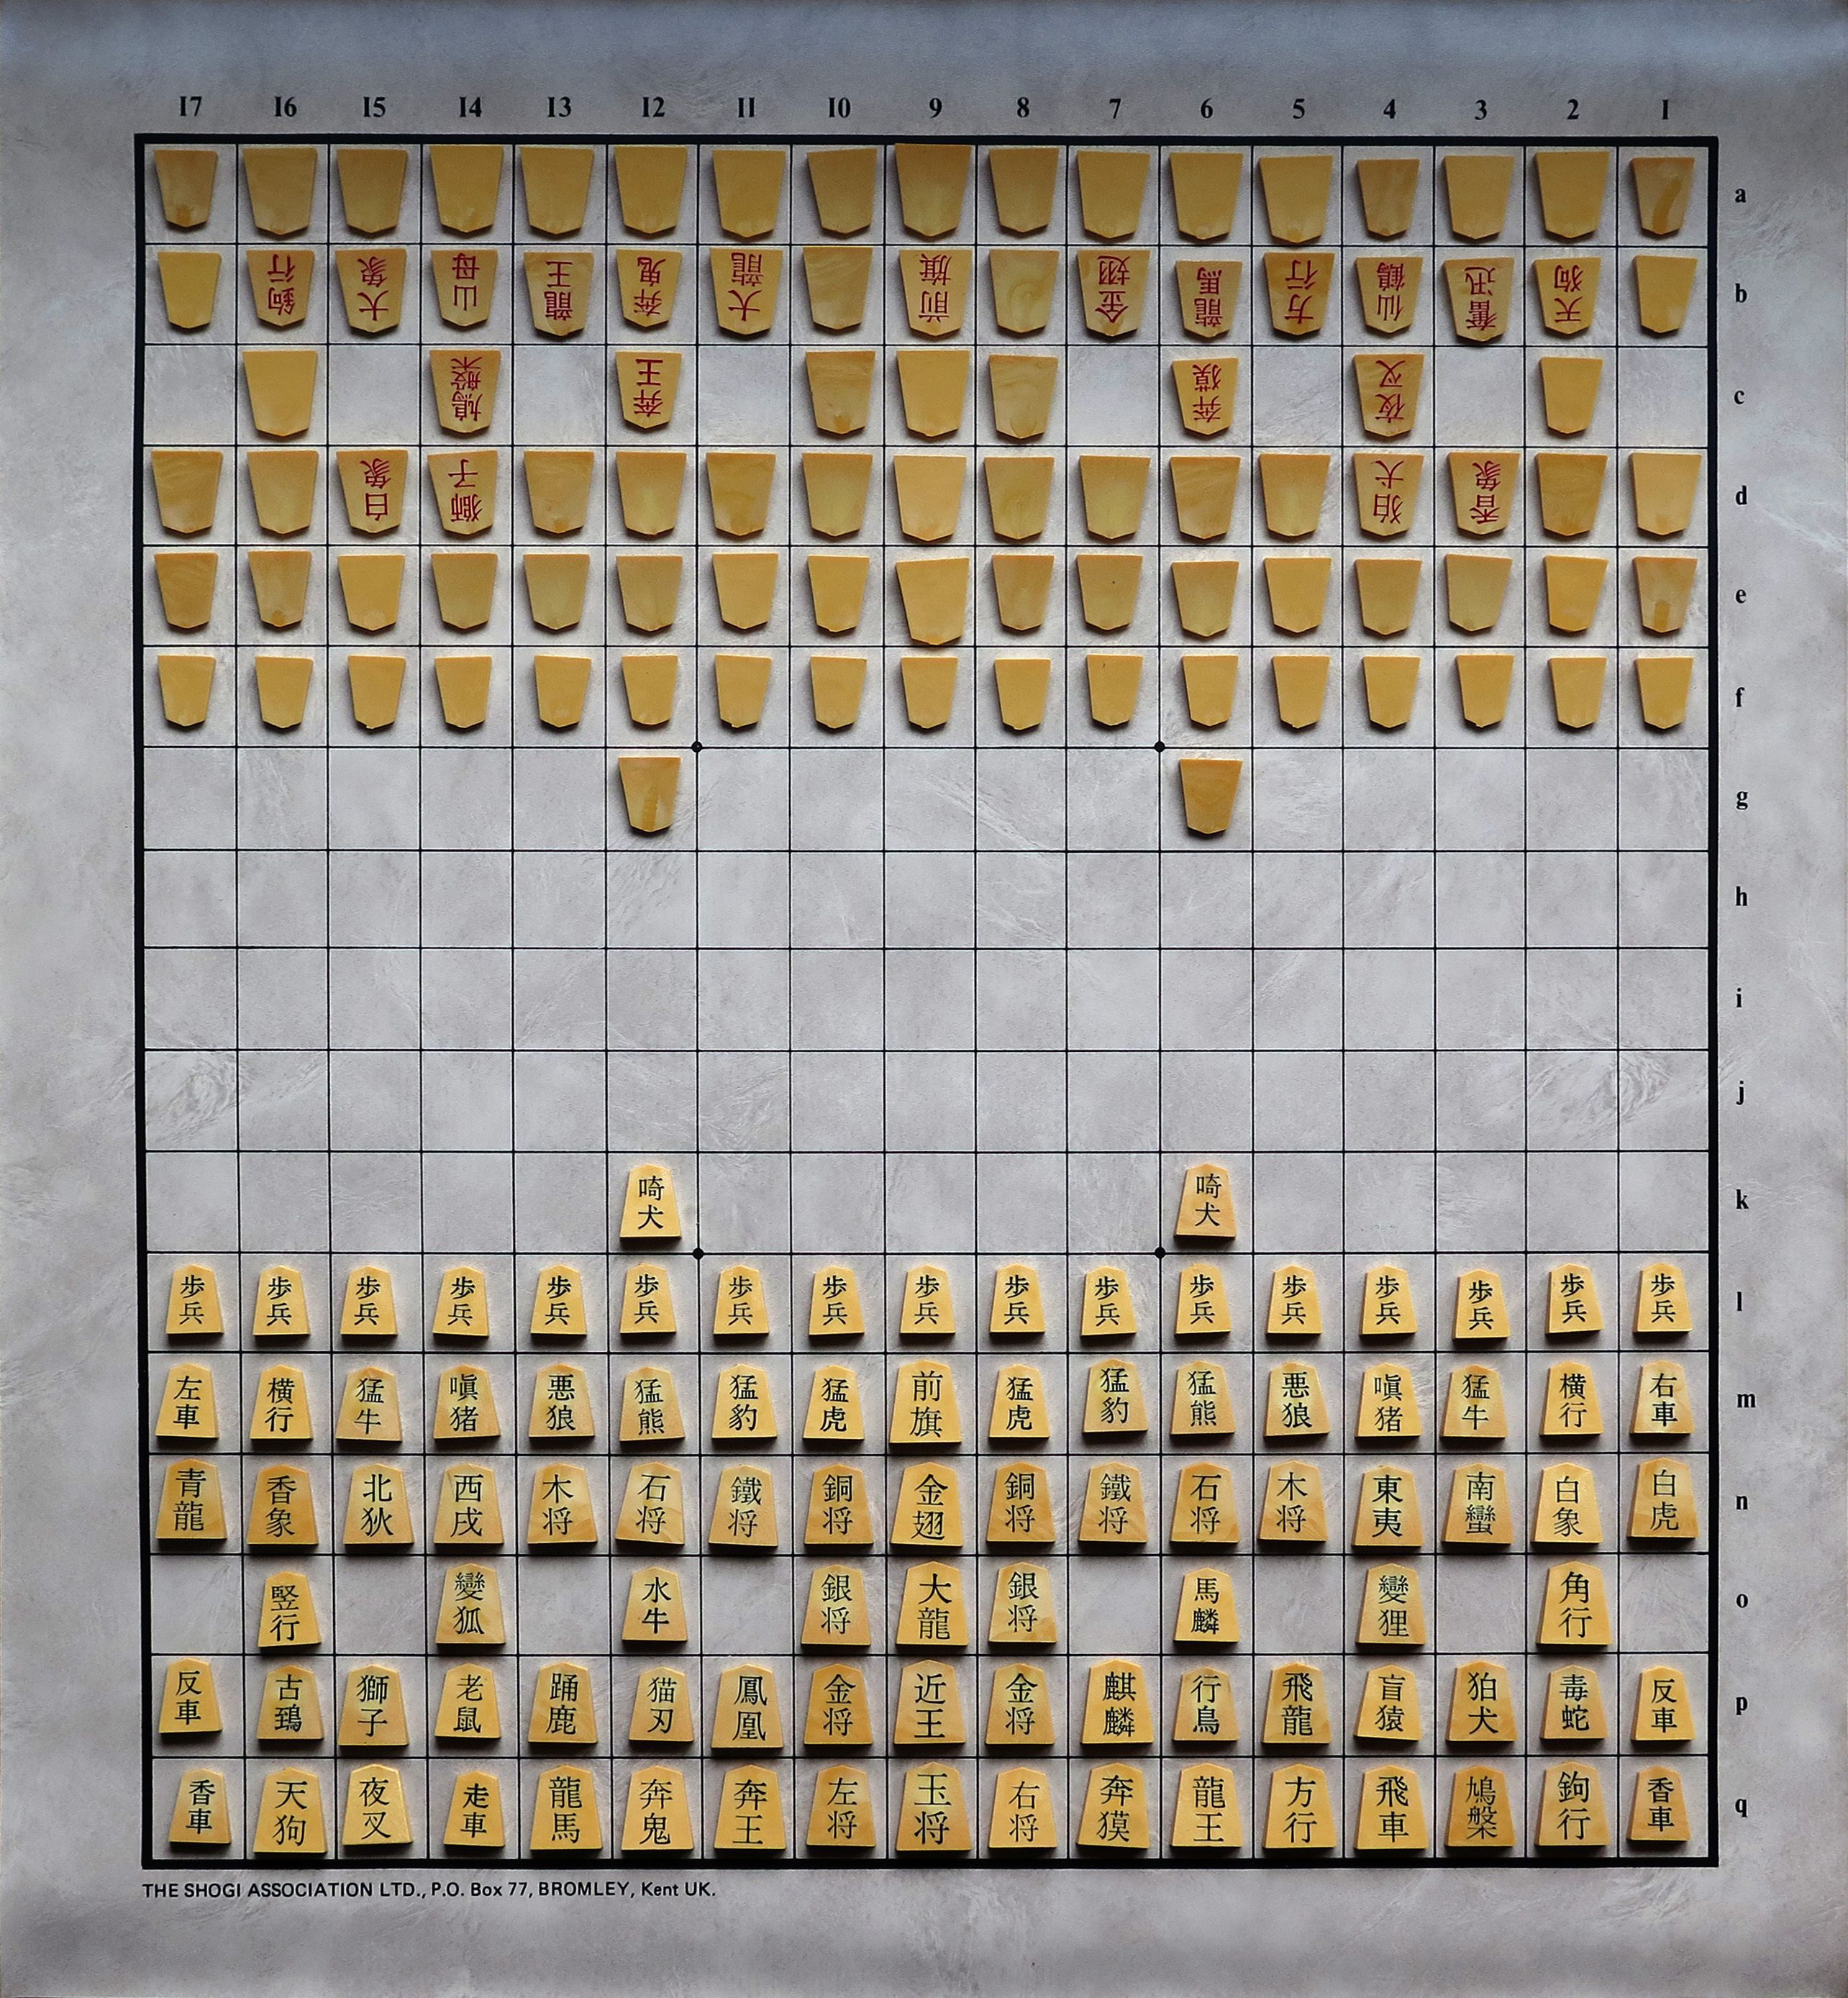
Wa Shogi

Wa Shogi, or ‘Harmony Shogi’, marks our first step into the world of the larger Shogi variants played on boards bigger than the standard 9×9 grid.  This game is played on an 11×11 grid of 121 squares, with each player having 27 pieces at the start of the game (compared to 20 in Shogi).  To play, you have to remember 20 distinct movement patterns for your pieces (compared to 10 in Shogi).

Wa Shogi is an interesting beast — similar to Tori Shogi, Wa Shogi uses all non-standard pieces, and none of the pieces share their names with the standard Shogi pieces.  Some do have equivalent moves to the standard pieces, but most are different.  The pieces in Wa Shogi are named after animals — moving beyond just birds, as in Tori Shogi, we have fun stuff here like the Violent Wolf and the Climbing Monkey.

Not only that, but out of the initial starting setup for each player, there are only multiples of the Sparrows (pawns) — all the other pieces are different.  That means there’s quite a few interesting tactical options in this game.

Wa Shogi is also unusual in that, unlike the other large Shogi variants, Wa Shogi was quite possibly played with drops.  The game was invented after the drop rule became popular in 9×9 Shogi, and the Edo Era sources we have on Wa Shogi mention additional tactical options over the other variants, without specifying precisely what they mean; this could indicate the use of the drop rule.  Additionally, some promoted pieces have identical moves, but are named differently and come from different unpromoted pieces; some suggest this indicates the use of drops, as dropped pieces are unpromoted so these cases would benefit from differentiating the promoted forms for ease of play.

Most modern players play Wa with drops, and the general consensus is that the game plays very well this way, so I definitely recommend using them.  Wa Shogi is a fun change of pace from the traditional game, with the odd new pieces with weird moves and cool names, and the increased freedom of the larger board with drops adds a fun dynamic.

wa-shogi-tsa-1

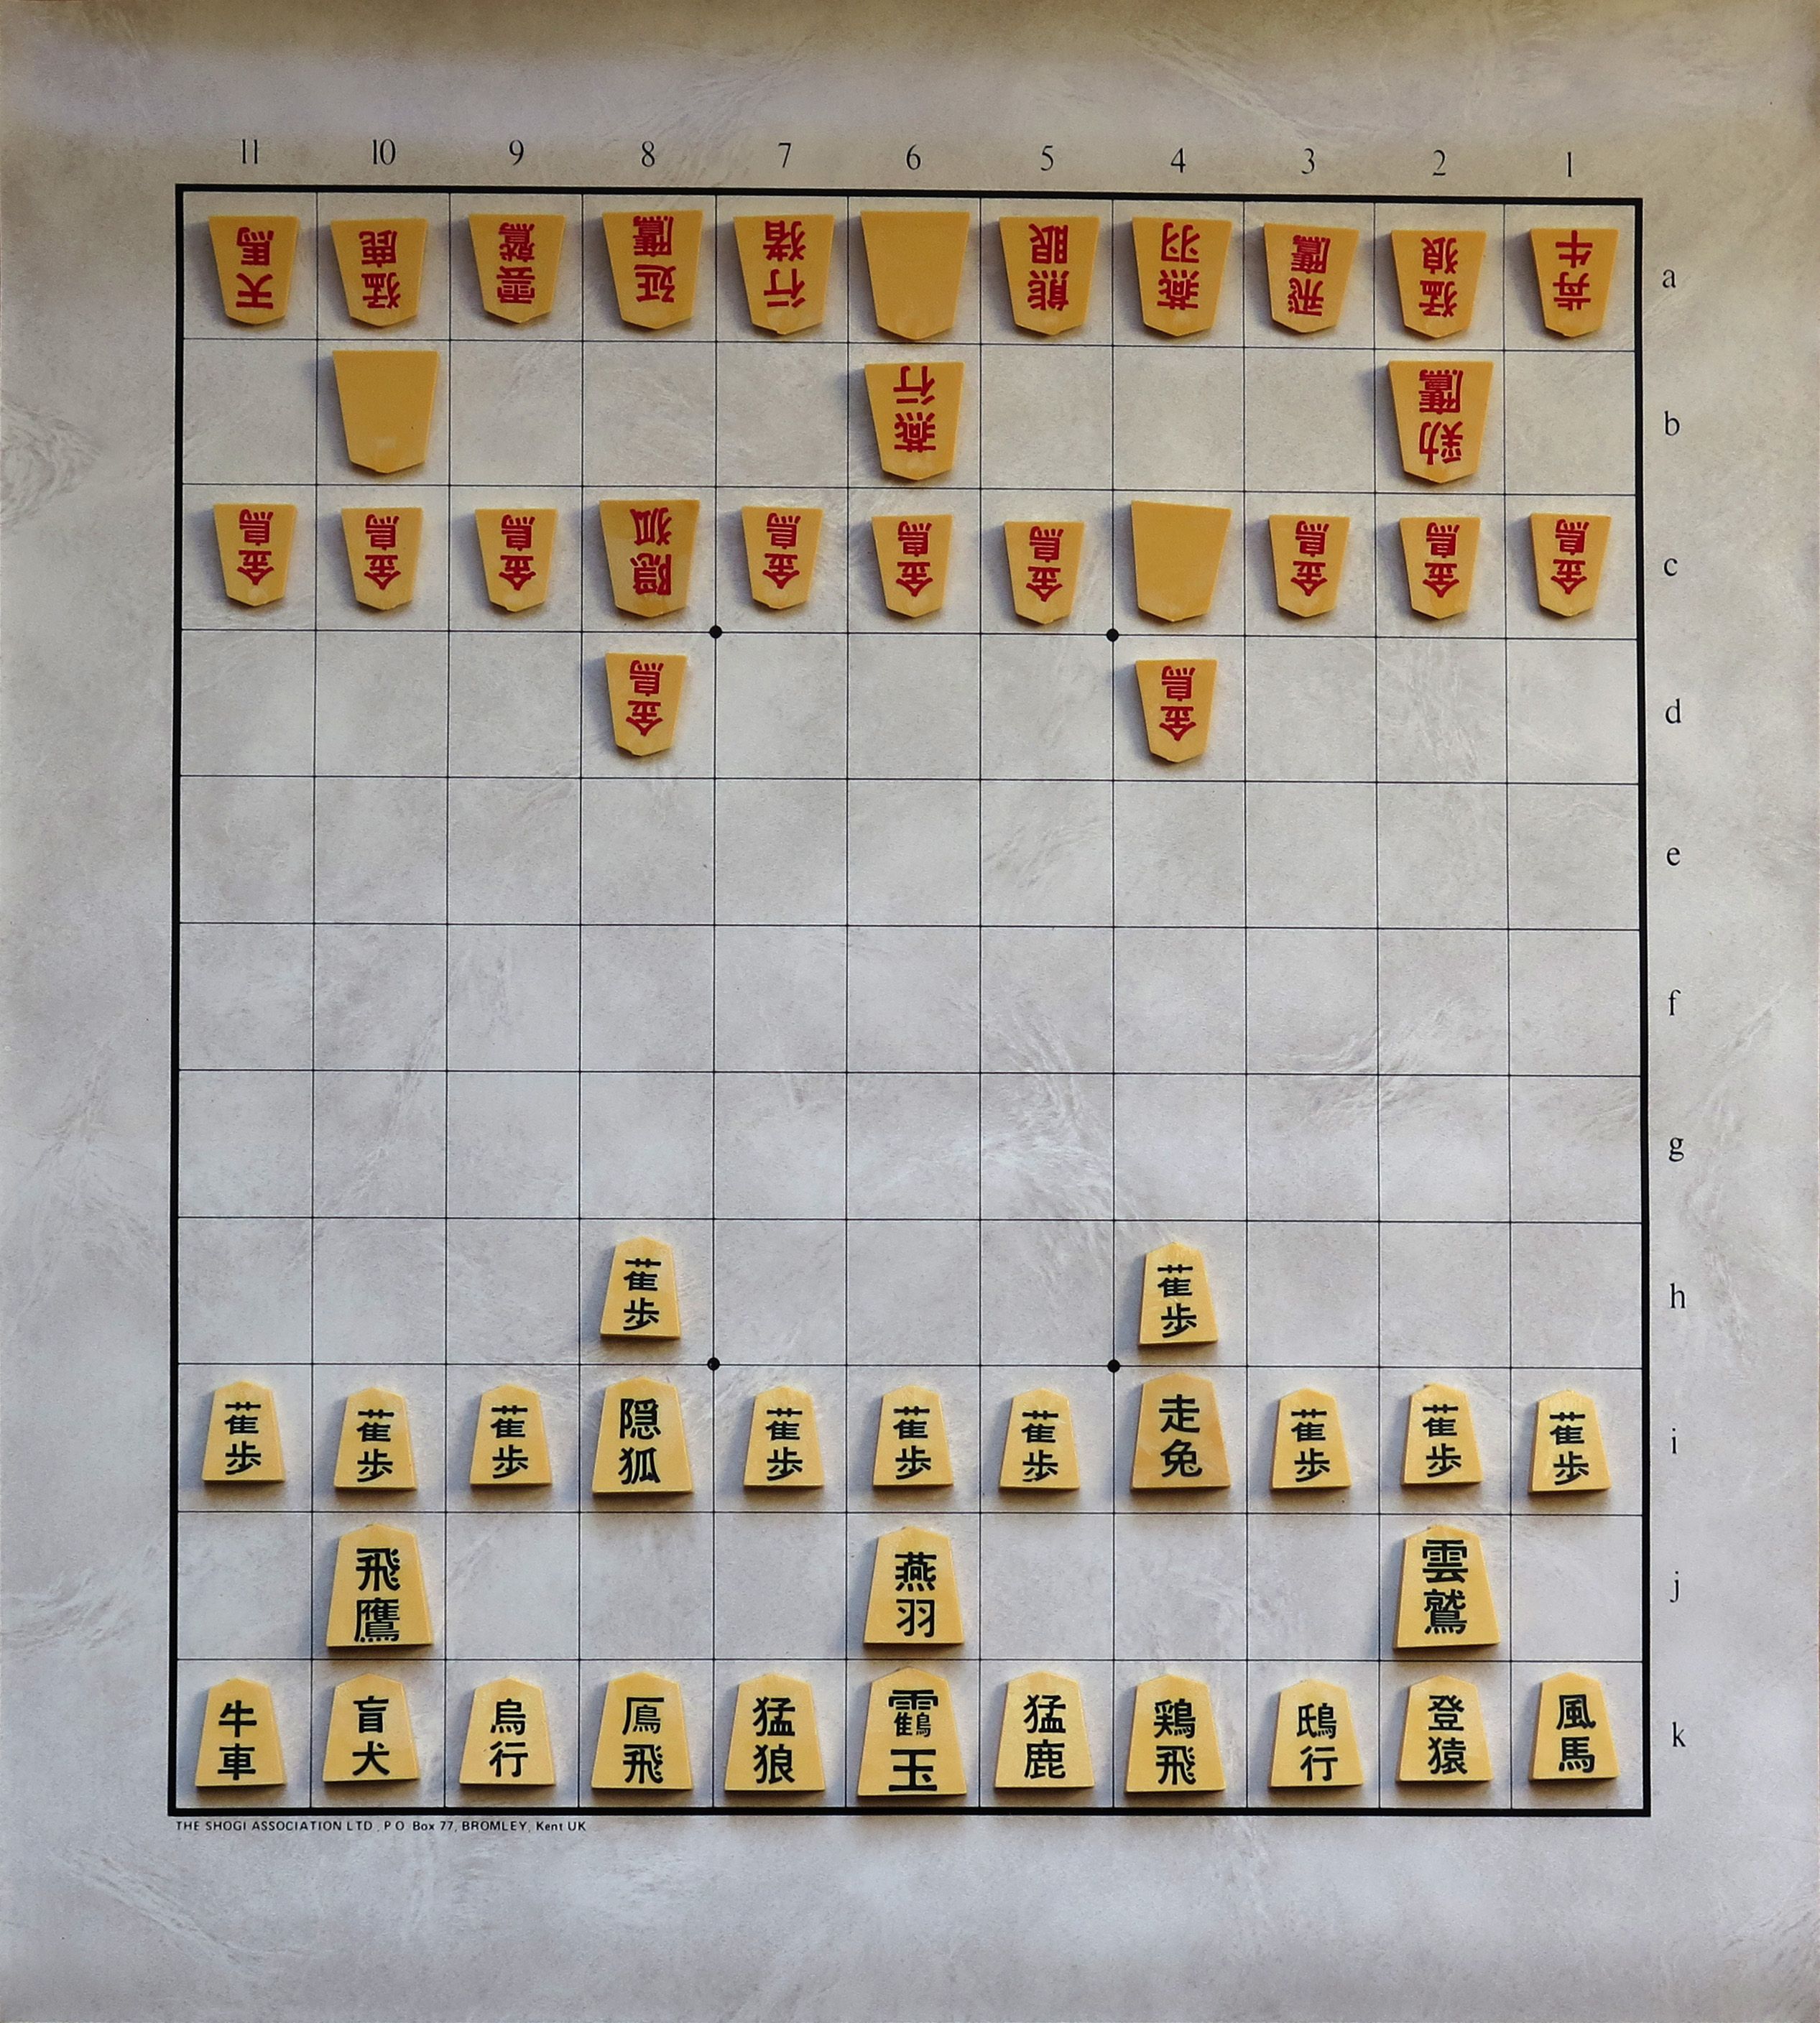
The starting setup for Wa Shogi, with the second player’s pieces flipped to show their promoted sides.  Only three pieces don’t promote in Wa.

wa-shogi-closeup

A closeup of the Crane King — in the centre of the bottom row — protected on either side by a Violent Stag (left) and Violent Wolf (right).  Lot of violence going down in this game.

wa-shogi-moves-1

wa-shogi-moves-2

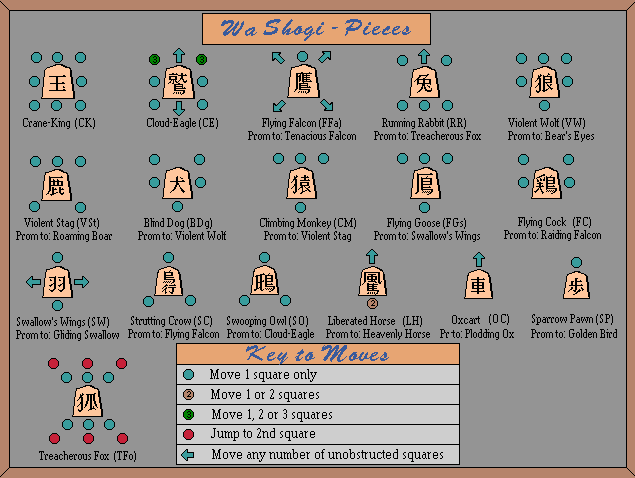
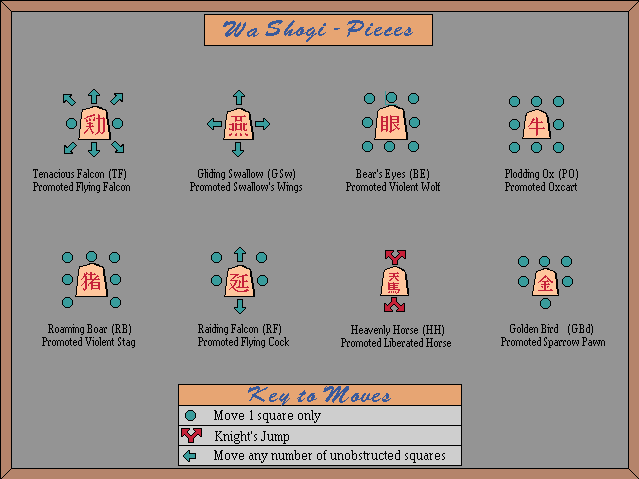
A move reference for Wa Shogi, included here mainly to show off the cool names for the pieces!
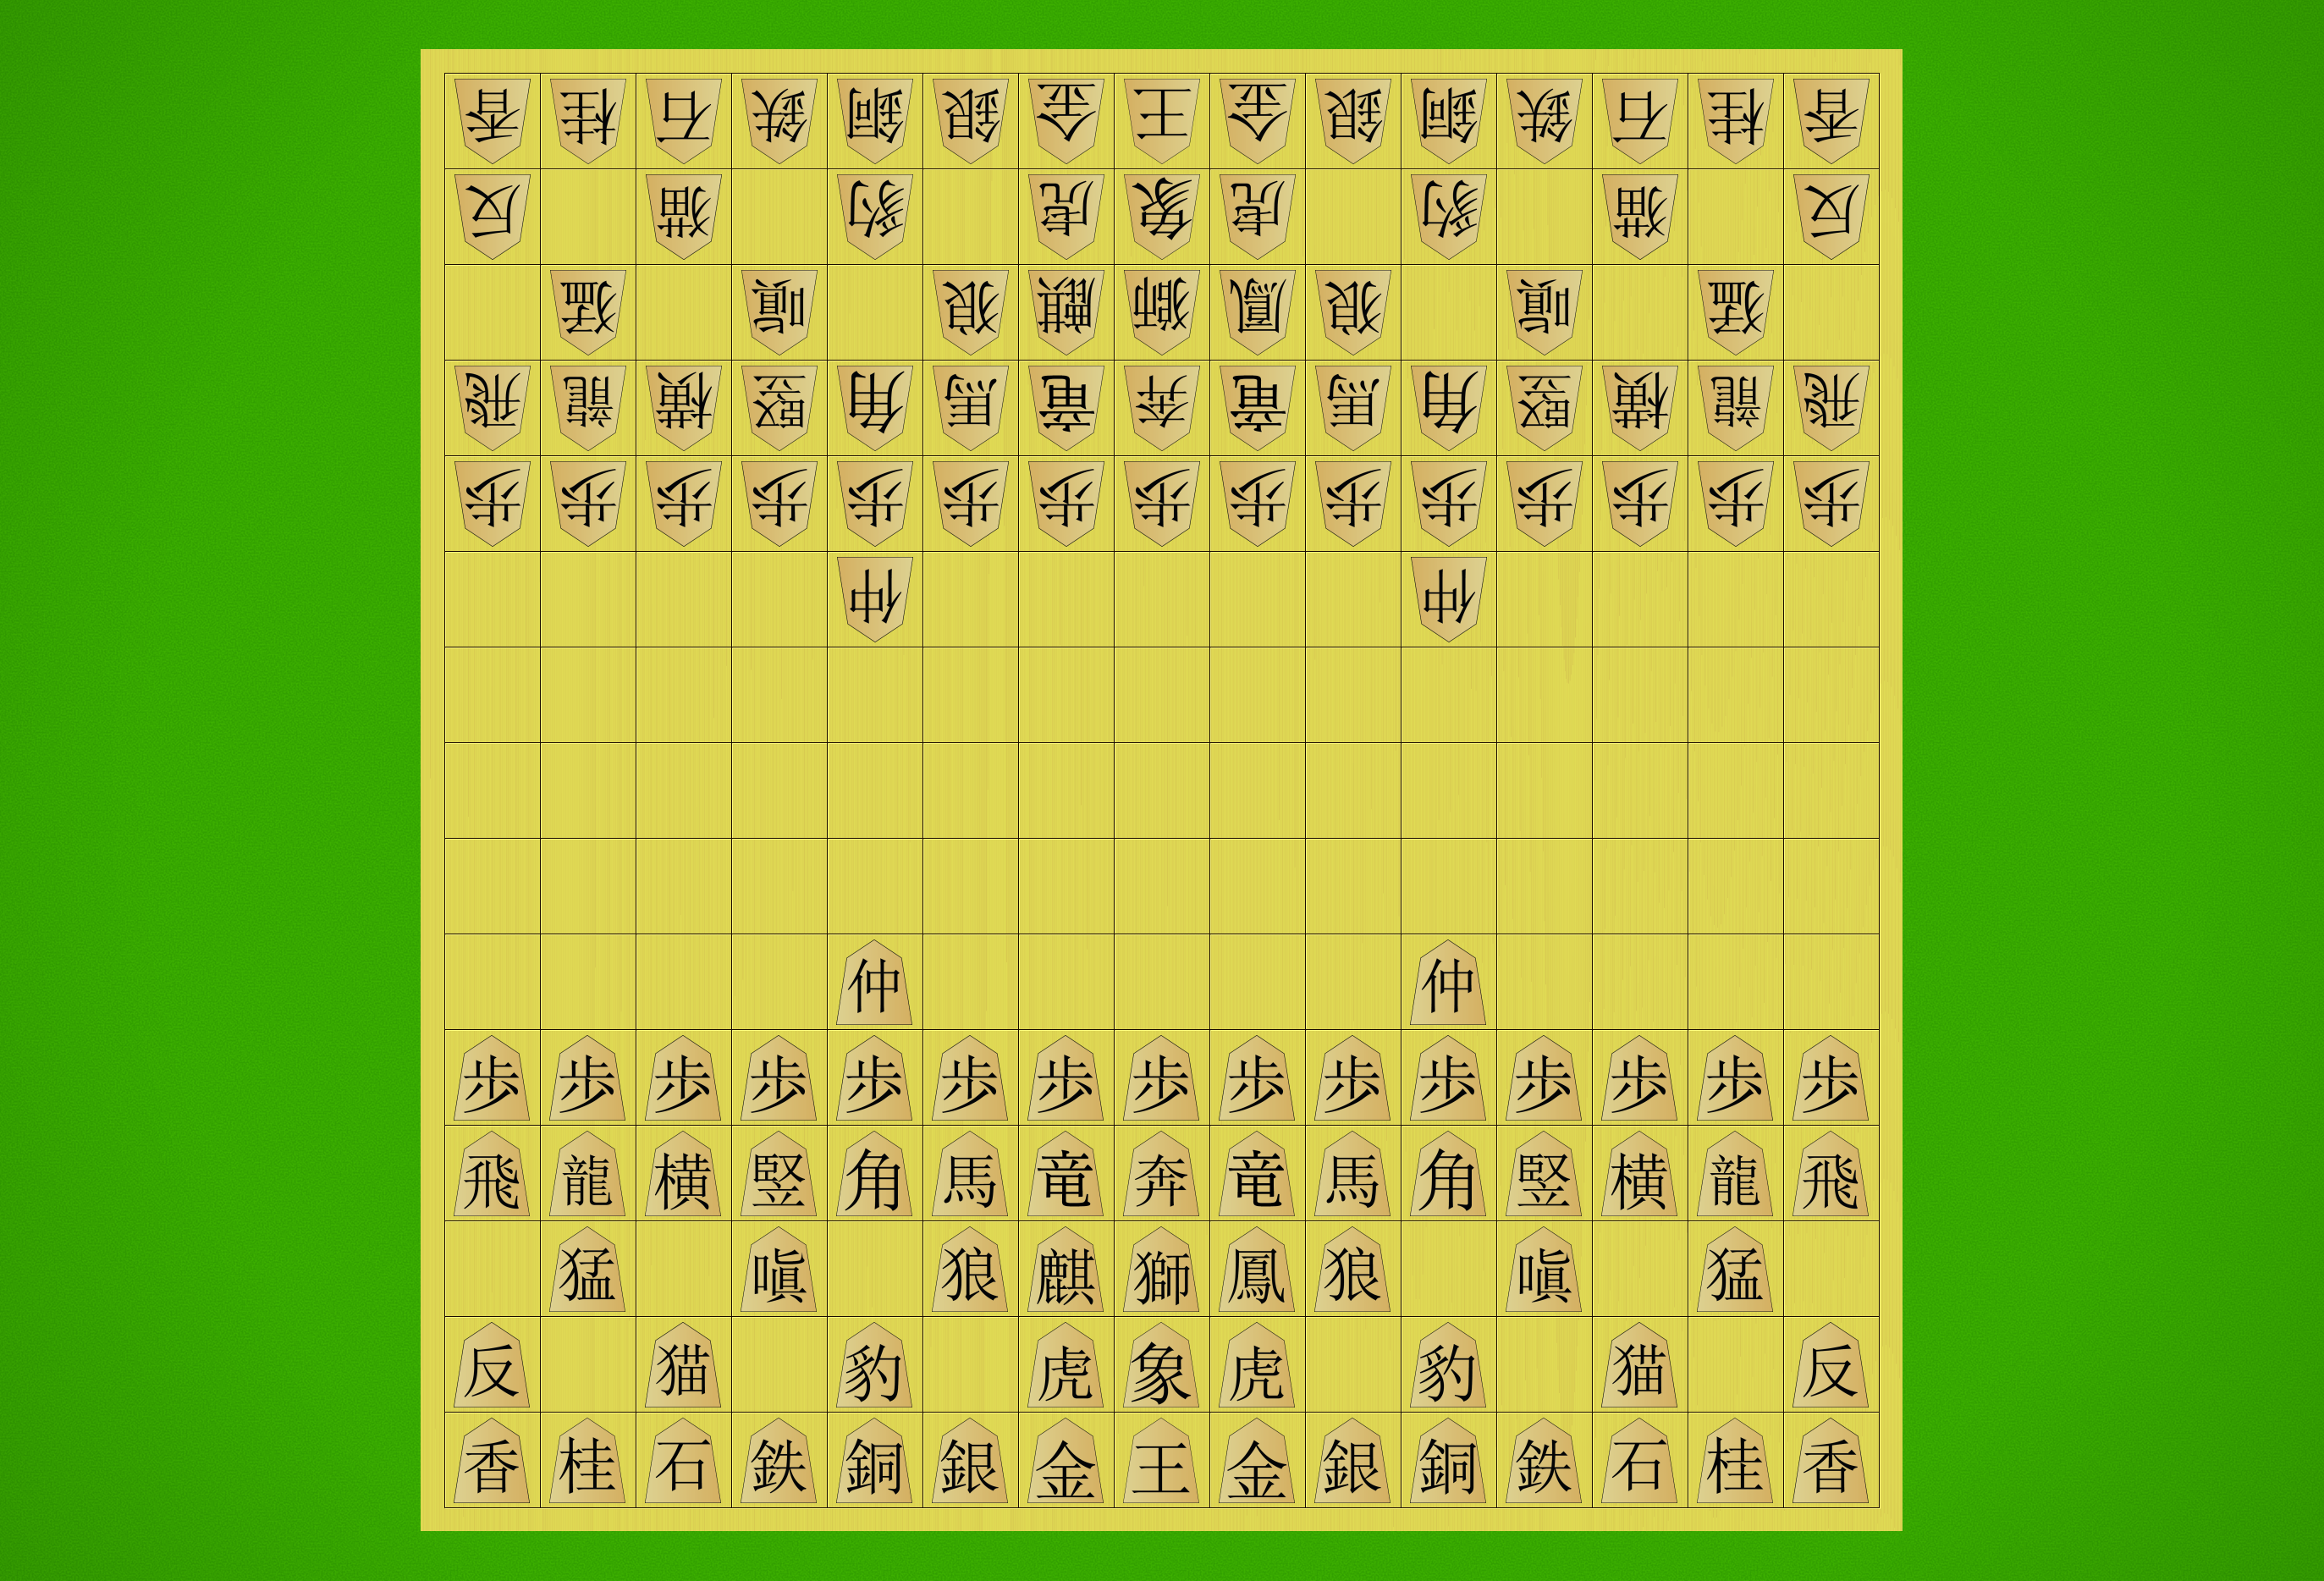
Chu Shogi

Chu Shogi is a spectacular game.   Those lucky few who have played it frequently class it as one of the finest Chess games ever invented — and I thoroughly agree.  The game is thought to have been invented in the 13th century and is one of the oldest forms of Shogi.

The game is not super accessible at first — the board is much larger than in Shogi (144 squares vs 81), and there are far more pieces on the board (46 pieces per player, compared to 20 each in Shogi).  All told, you’ll have to remember 28 different piece movements instead of 10 like in Shogi!  But the rewards are very much worth it.

Chu Shogi, like the other larger Shogi variants, does not use the drop rule — otherwise the games would go on far too long!  Instead captured pieces are lost permanently, as in Chess.

Despite the large board and huge armies, Chu Shogi maintains a pretty swift pace.  Each player starts with powerful pieces on the board from the beginning — including multiple Dragons and Horses, and the Free King which moves as a Queen in Chess.  Interesting to note here that the Queen in Chess was invented three centuries later — Chu was an extremely innovative game for the time.

The most powerful piece, and the piece that defines Chu Shogi, is the Lion.  The Lion effectively moves twice in one turn — it can make two consecutive King moves in any direction, with all that implies: it can capture twice; capture once and return to its starting square, appearing to capture without moving; or it can move once then return to its starting point, effectively passing its turn.  All of these abilities are staggeringly powerful for different reasons.  The Lion is so important and so engaging that the Chu community wisely added some rules to prevent players trading them off early in the game — it’s a bit complicated, but essentially you can’t sacrifice your Lion for your opponent to recapture unless you captured a sufficiently powerful enemy piece in the process.

Notably, Chu Shogi includes a piece called a Drunk Elephant, which moves like a King except it can’t move directly backward.  This piece promotes to Crown Prince, which is a second King — and both Kings and Princes must be captured to win the game!  Because of this, Chu and the other large variants with Drunk Elephants (most of them) don’t actually have a checkmate rule — any royal pieces must be actually captured to win the game.  This allows you to sacrifice a Prince or King for tactical reasons — although honestly that’s rarely advisable!

At any rate, it’s a fabulous game, definitely worth your time if you’ve ever enjoyed a game of Shogi or Chess.  It’s also the root of many of the larger Shogi games, meaning if you can play Chu it’s easier to jump up to the larger games afterward.

chu-shogi-set

My Chu Shogi set, in the initial position.  Board purchased from Aoyama Gobanten in Tokyo, pieces from Angela/George Hodges in the UK.  The powerhouse Lion is two squares above the King, if you’re wondering.

chu-shogi-end

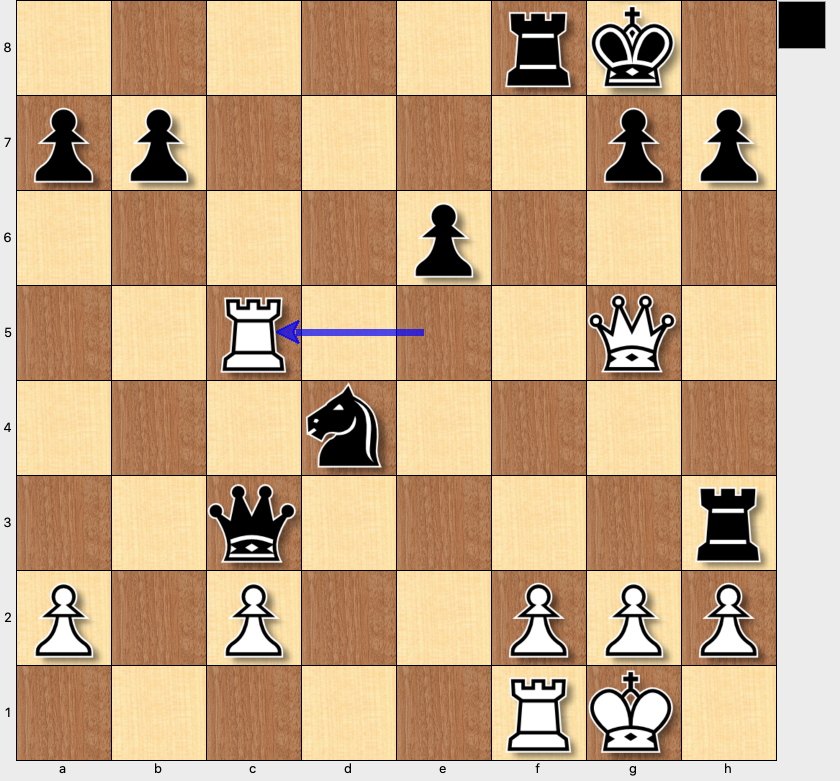
The end of a Chu Shogi game — White wins after 288 moves (!), fittingly enough with a Lion checkmate.  Check out the huge piles of dead pieces on the side of the board!

chu-shogi-mega-tsume1

A rather spectacular Chu Shogi checkmate puzzle I found online — Black (bottom) to win in 3,257 moves!  The puzzle is well-formed, meaning there’s only one possible solution.  Good luck finding that one!
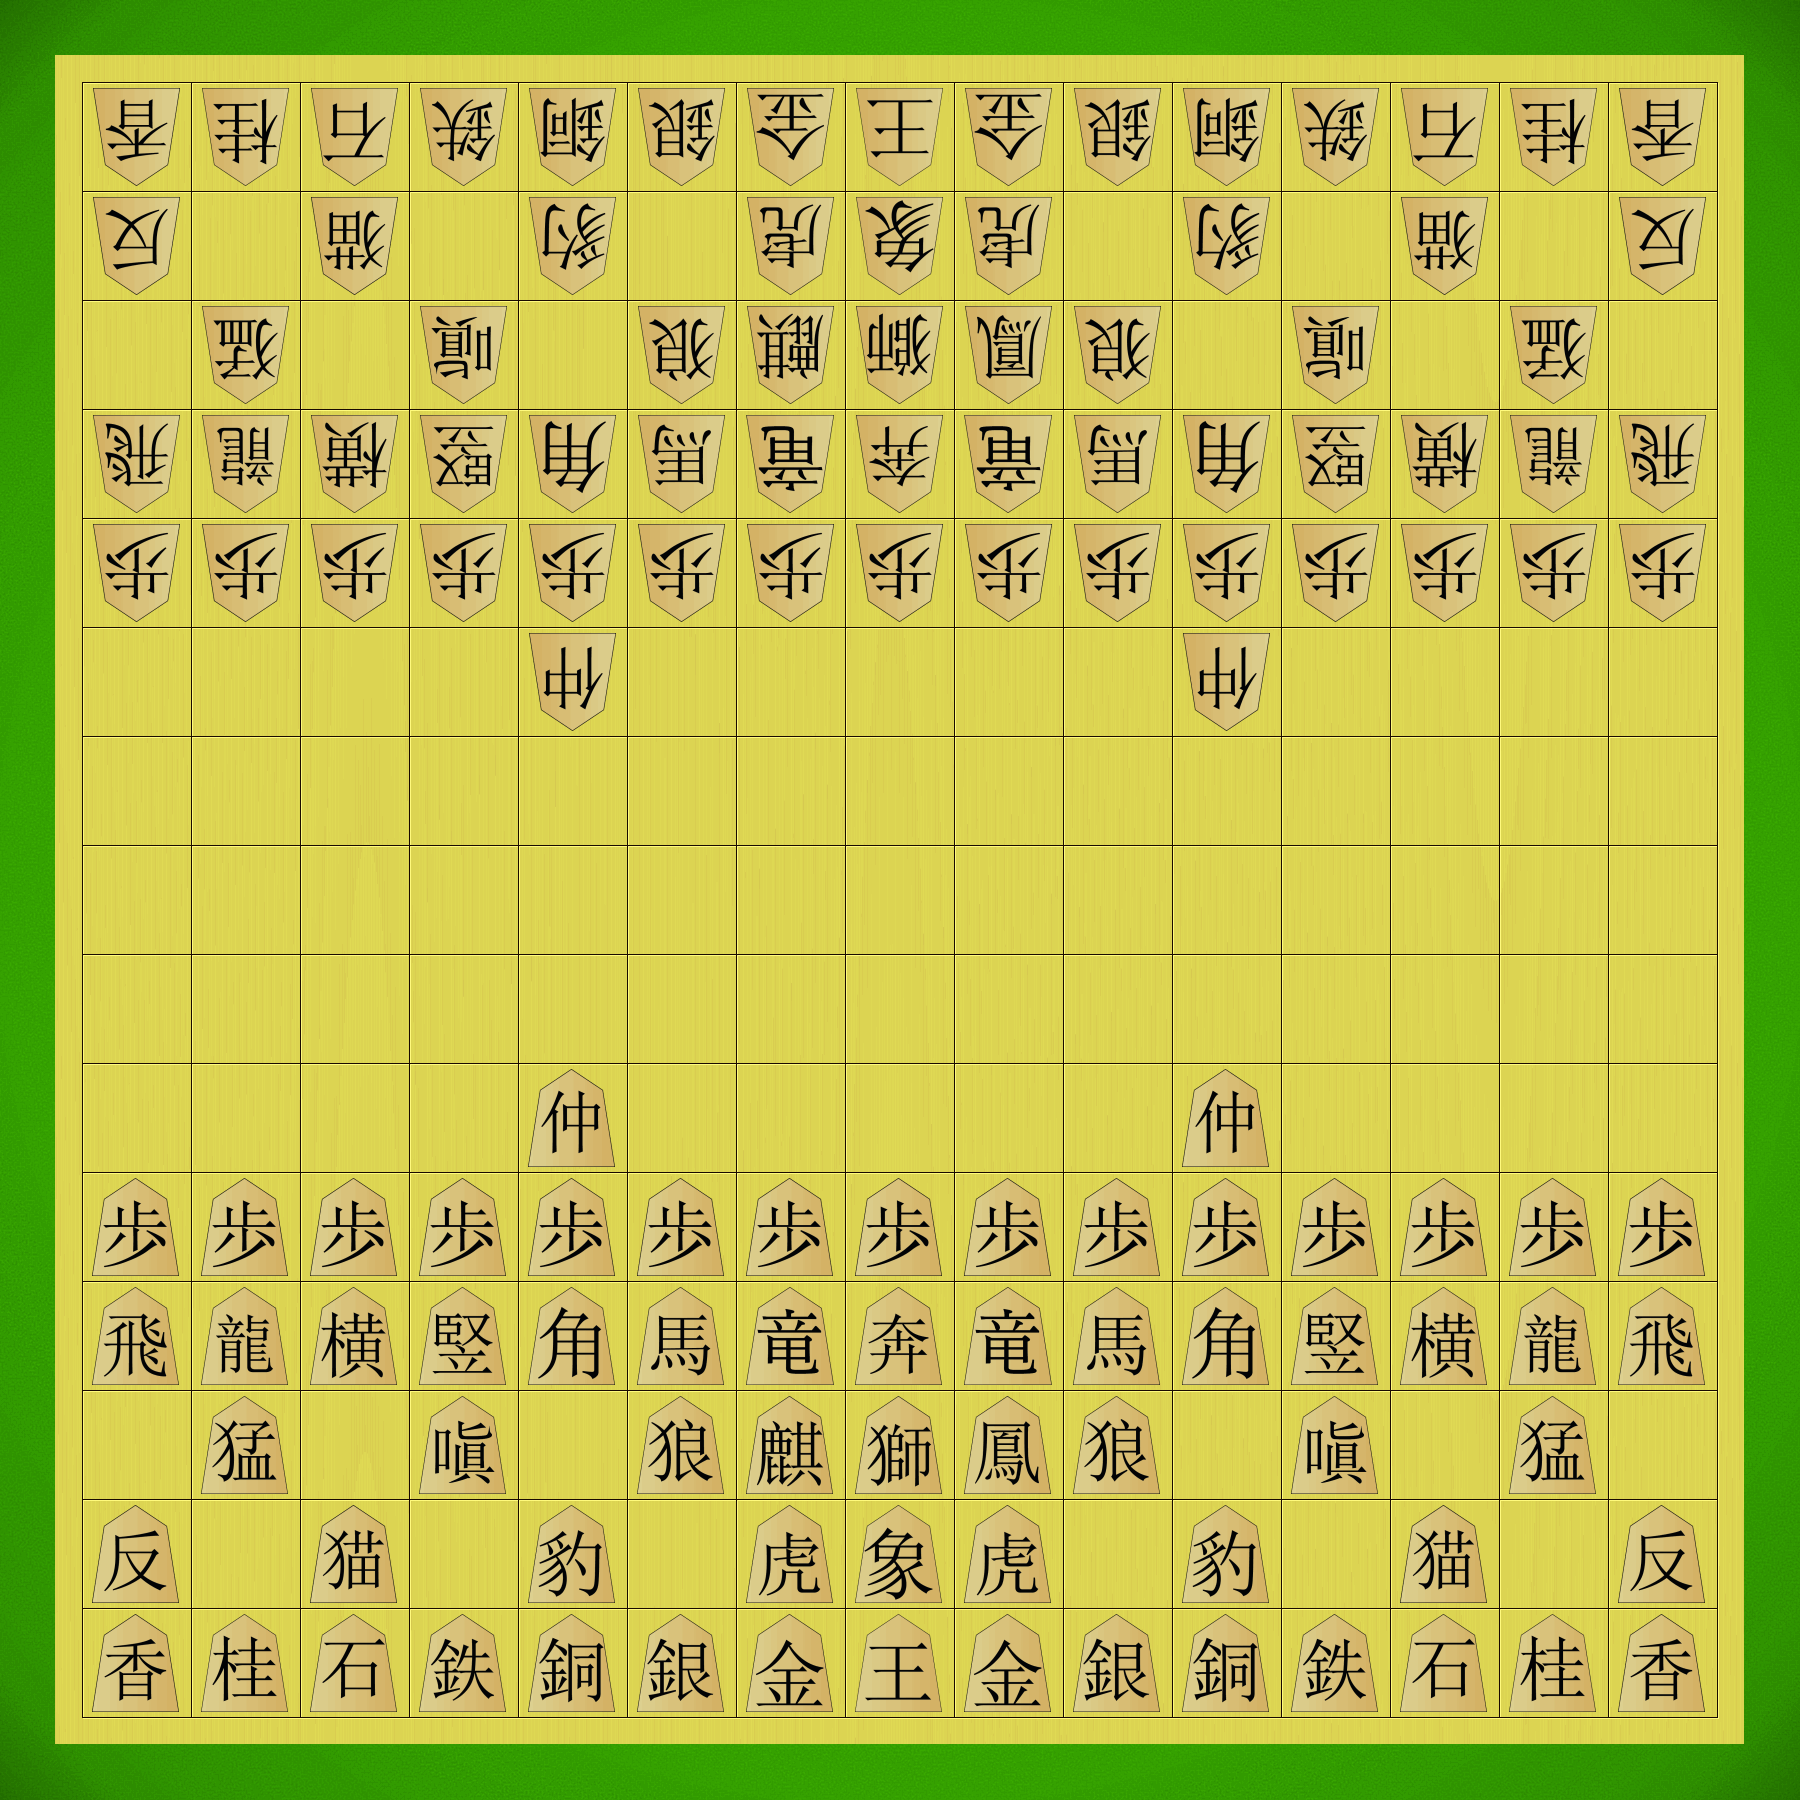
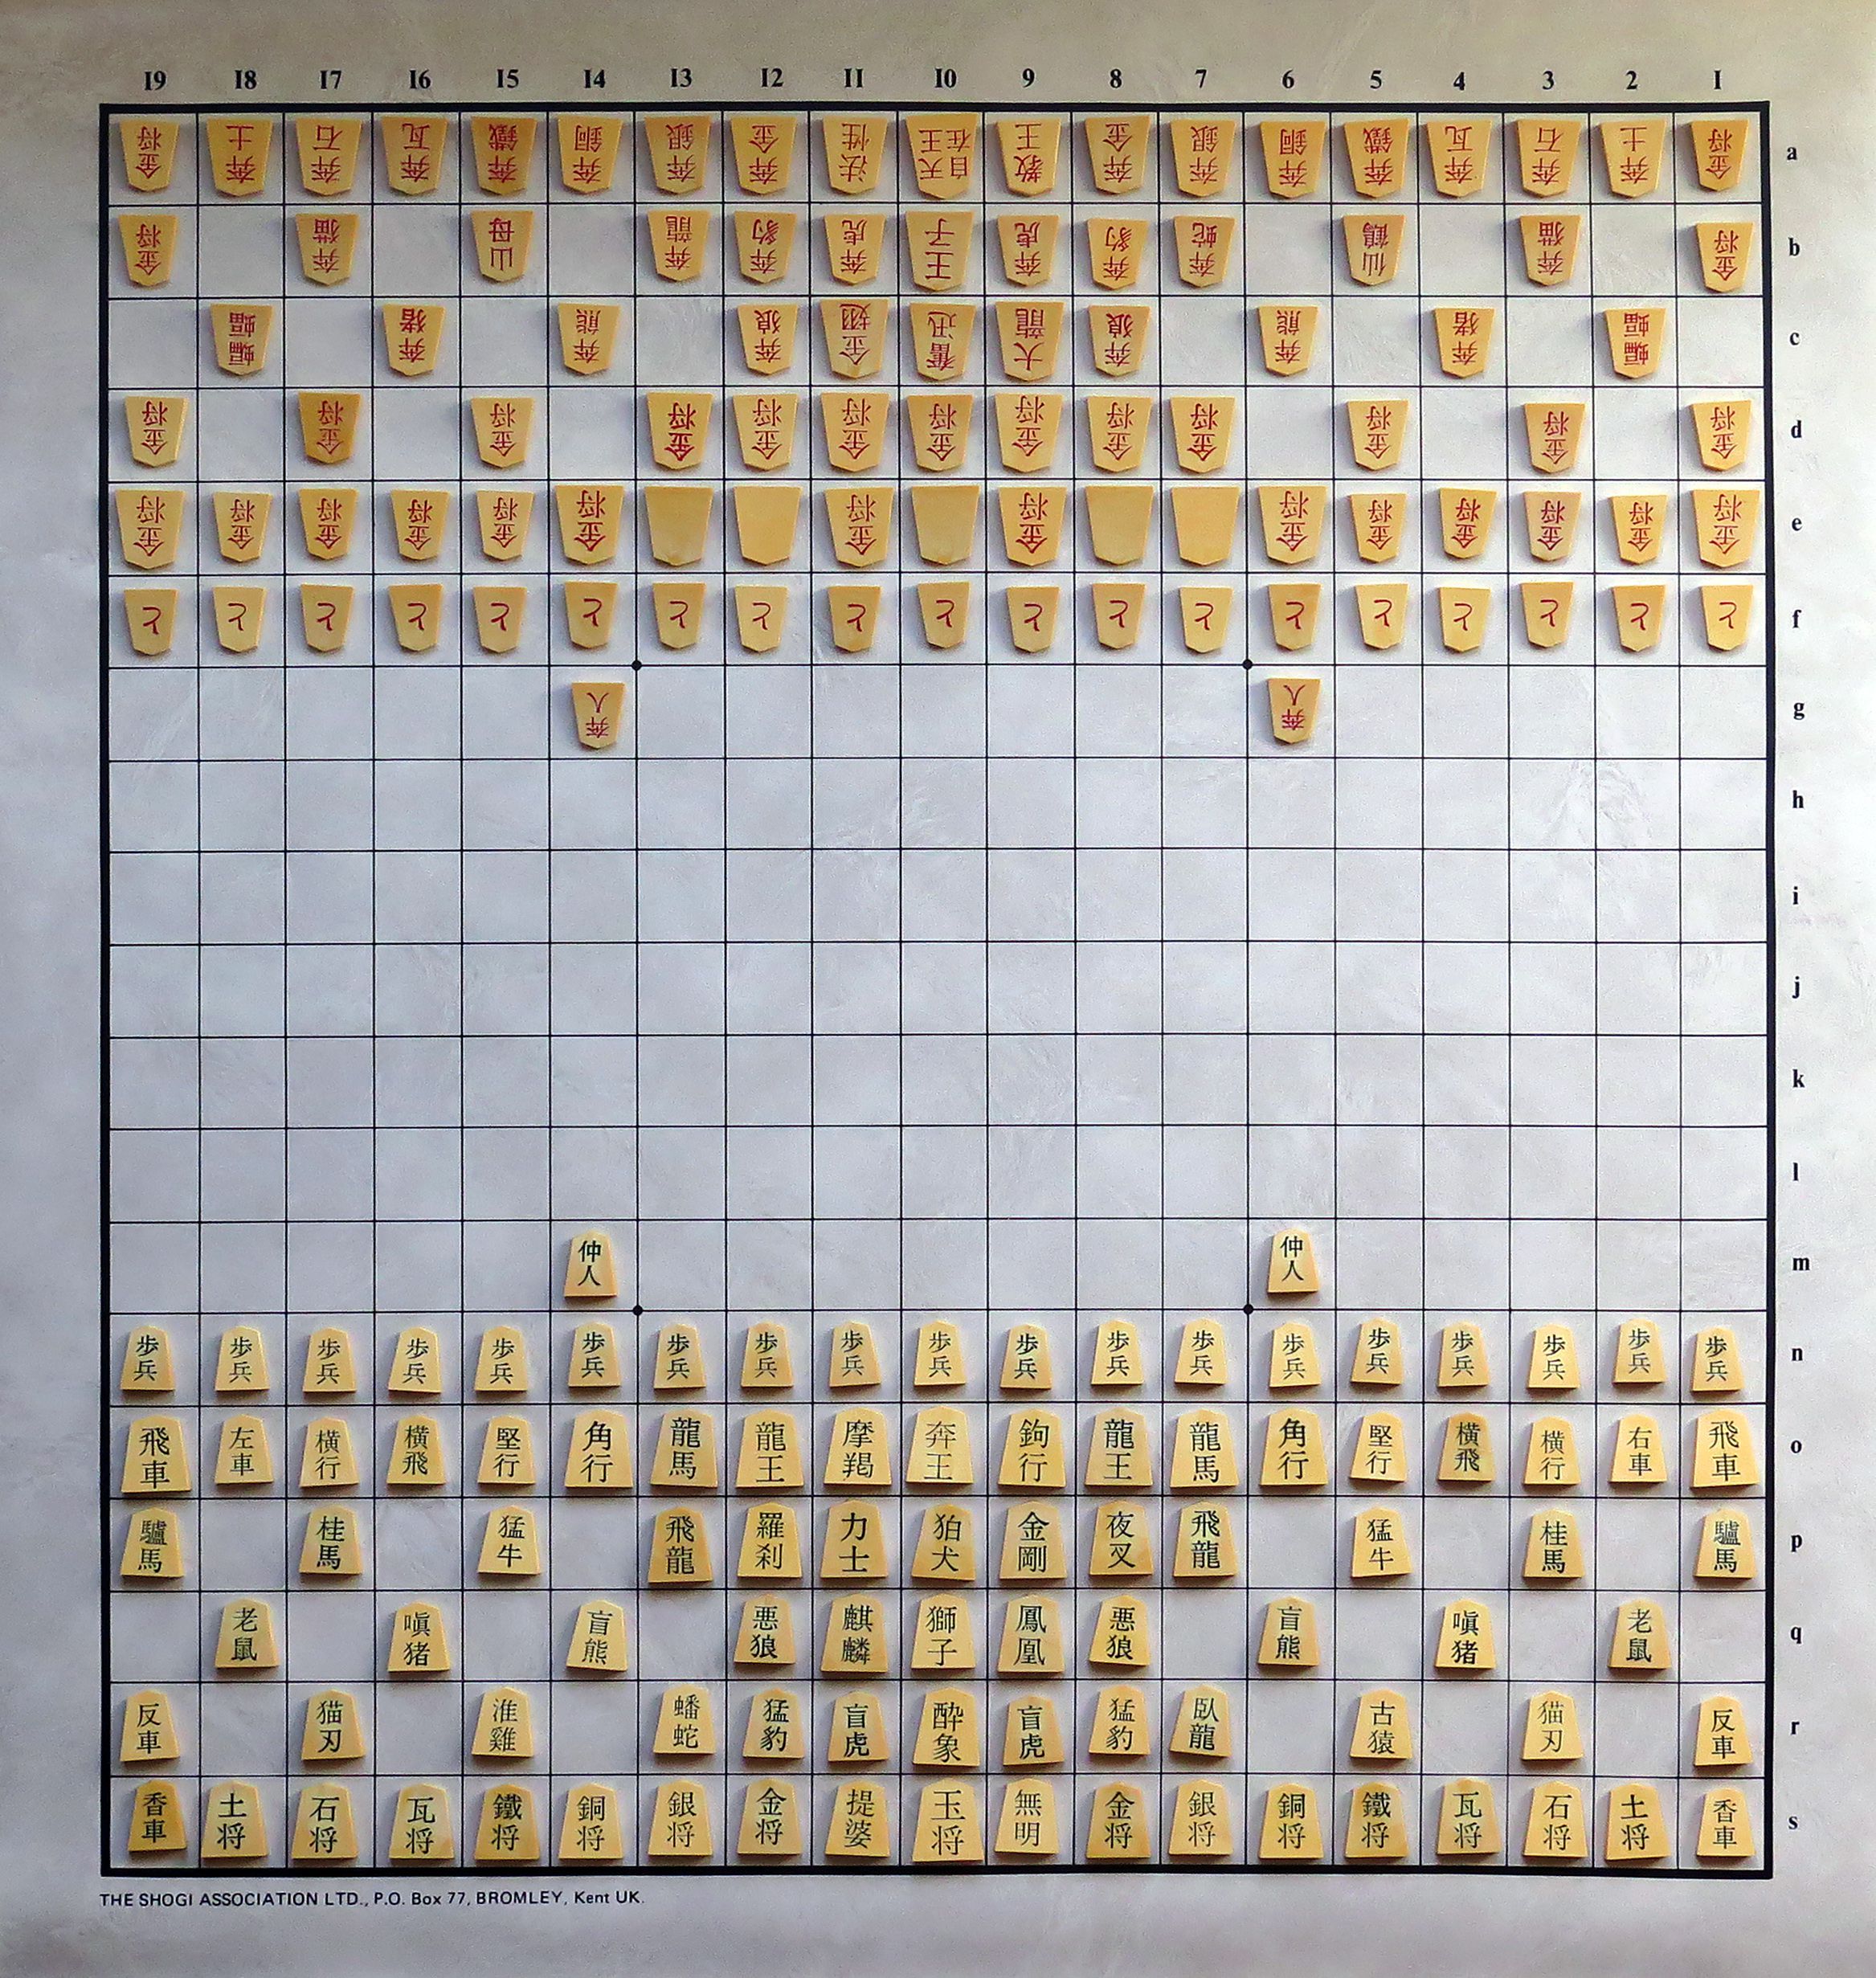
Dai Shogi

Dai Shogi, big brother to Chu, is much bigger than its sibling but not that much more complicated to learn.  Essentially, take Chu, add eight more piece types with fairly easy-to-remember short-range moves, all of which promote to Gold General, and you have Dai!

Some criticise Dai as being too slow or not exciting enough, given that it’s essentially a scaled-up version of Chu with more pieces and a bigger board.  But I strongly disagree — the larger board significantly expands the options available to players, the larger armies make the game more forgiving given the lower importance of material losses, and the powerhouse Lion is less dominating on the larger playing area.  The game is indeed slower, but it’s also strategic, intriguing, and a great introduction to the larger Shogi variants given it’s easy to pick up once you know Chu.

dai dai vs shogi comparison

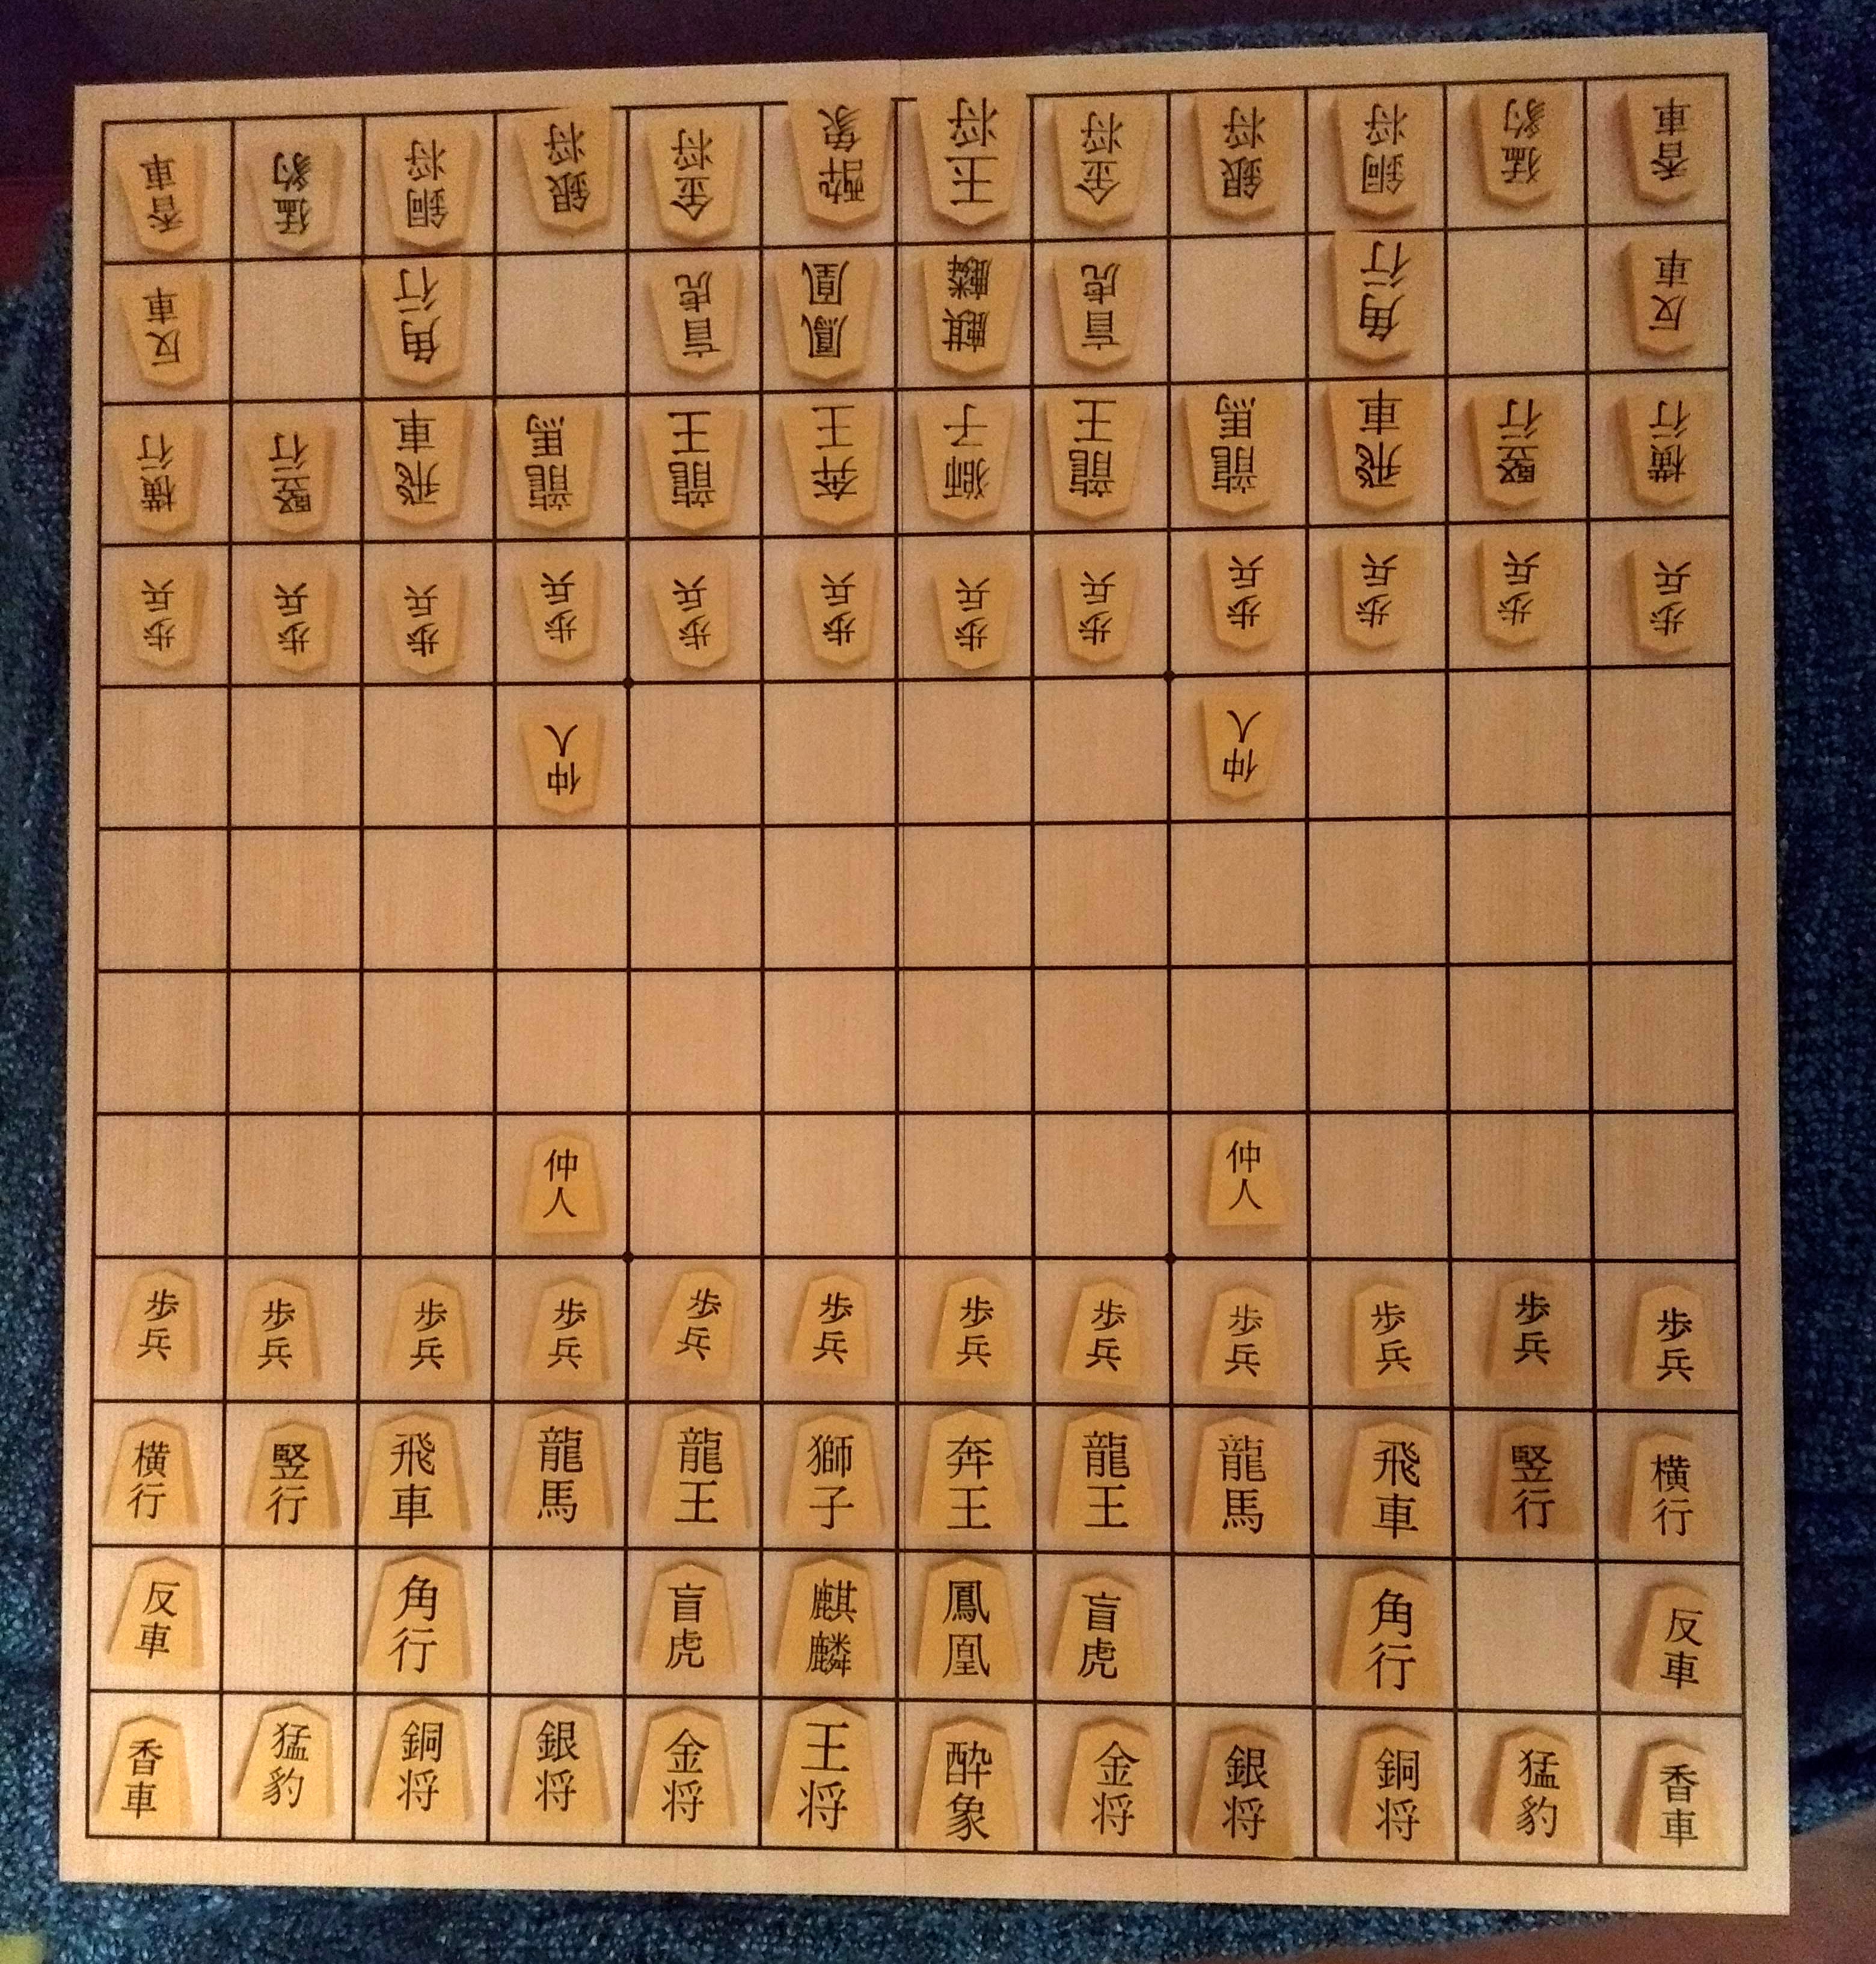
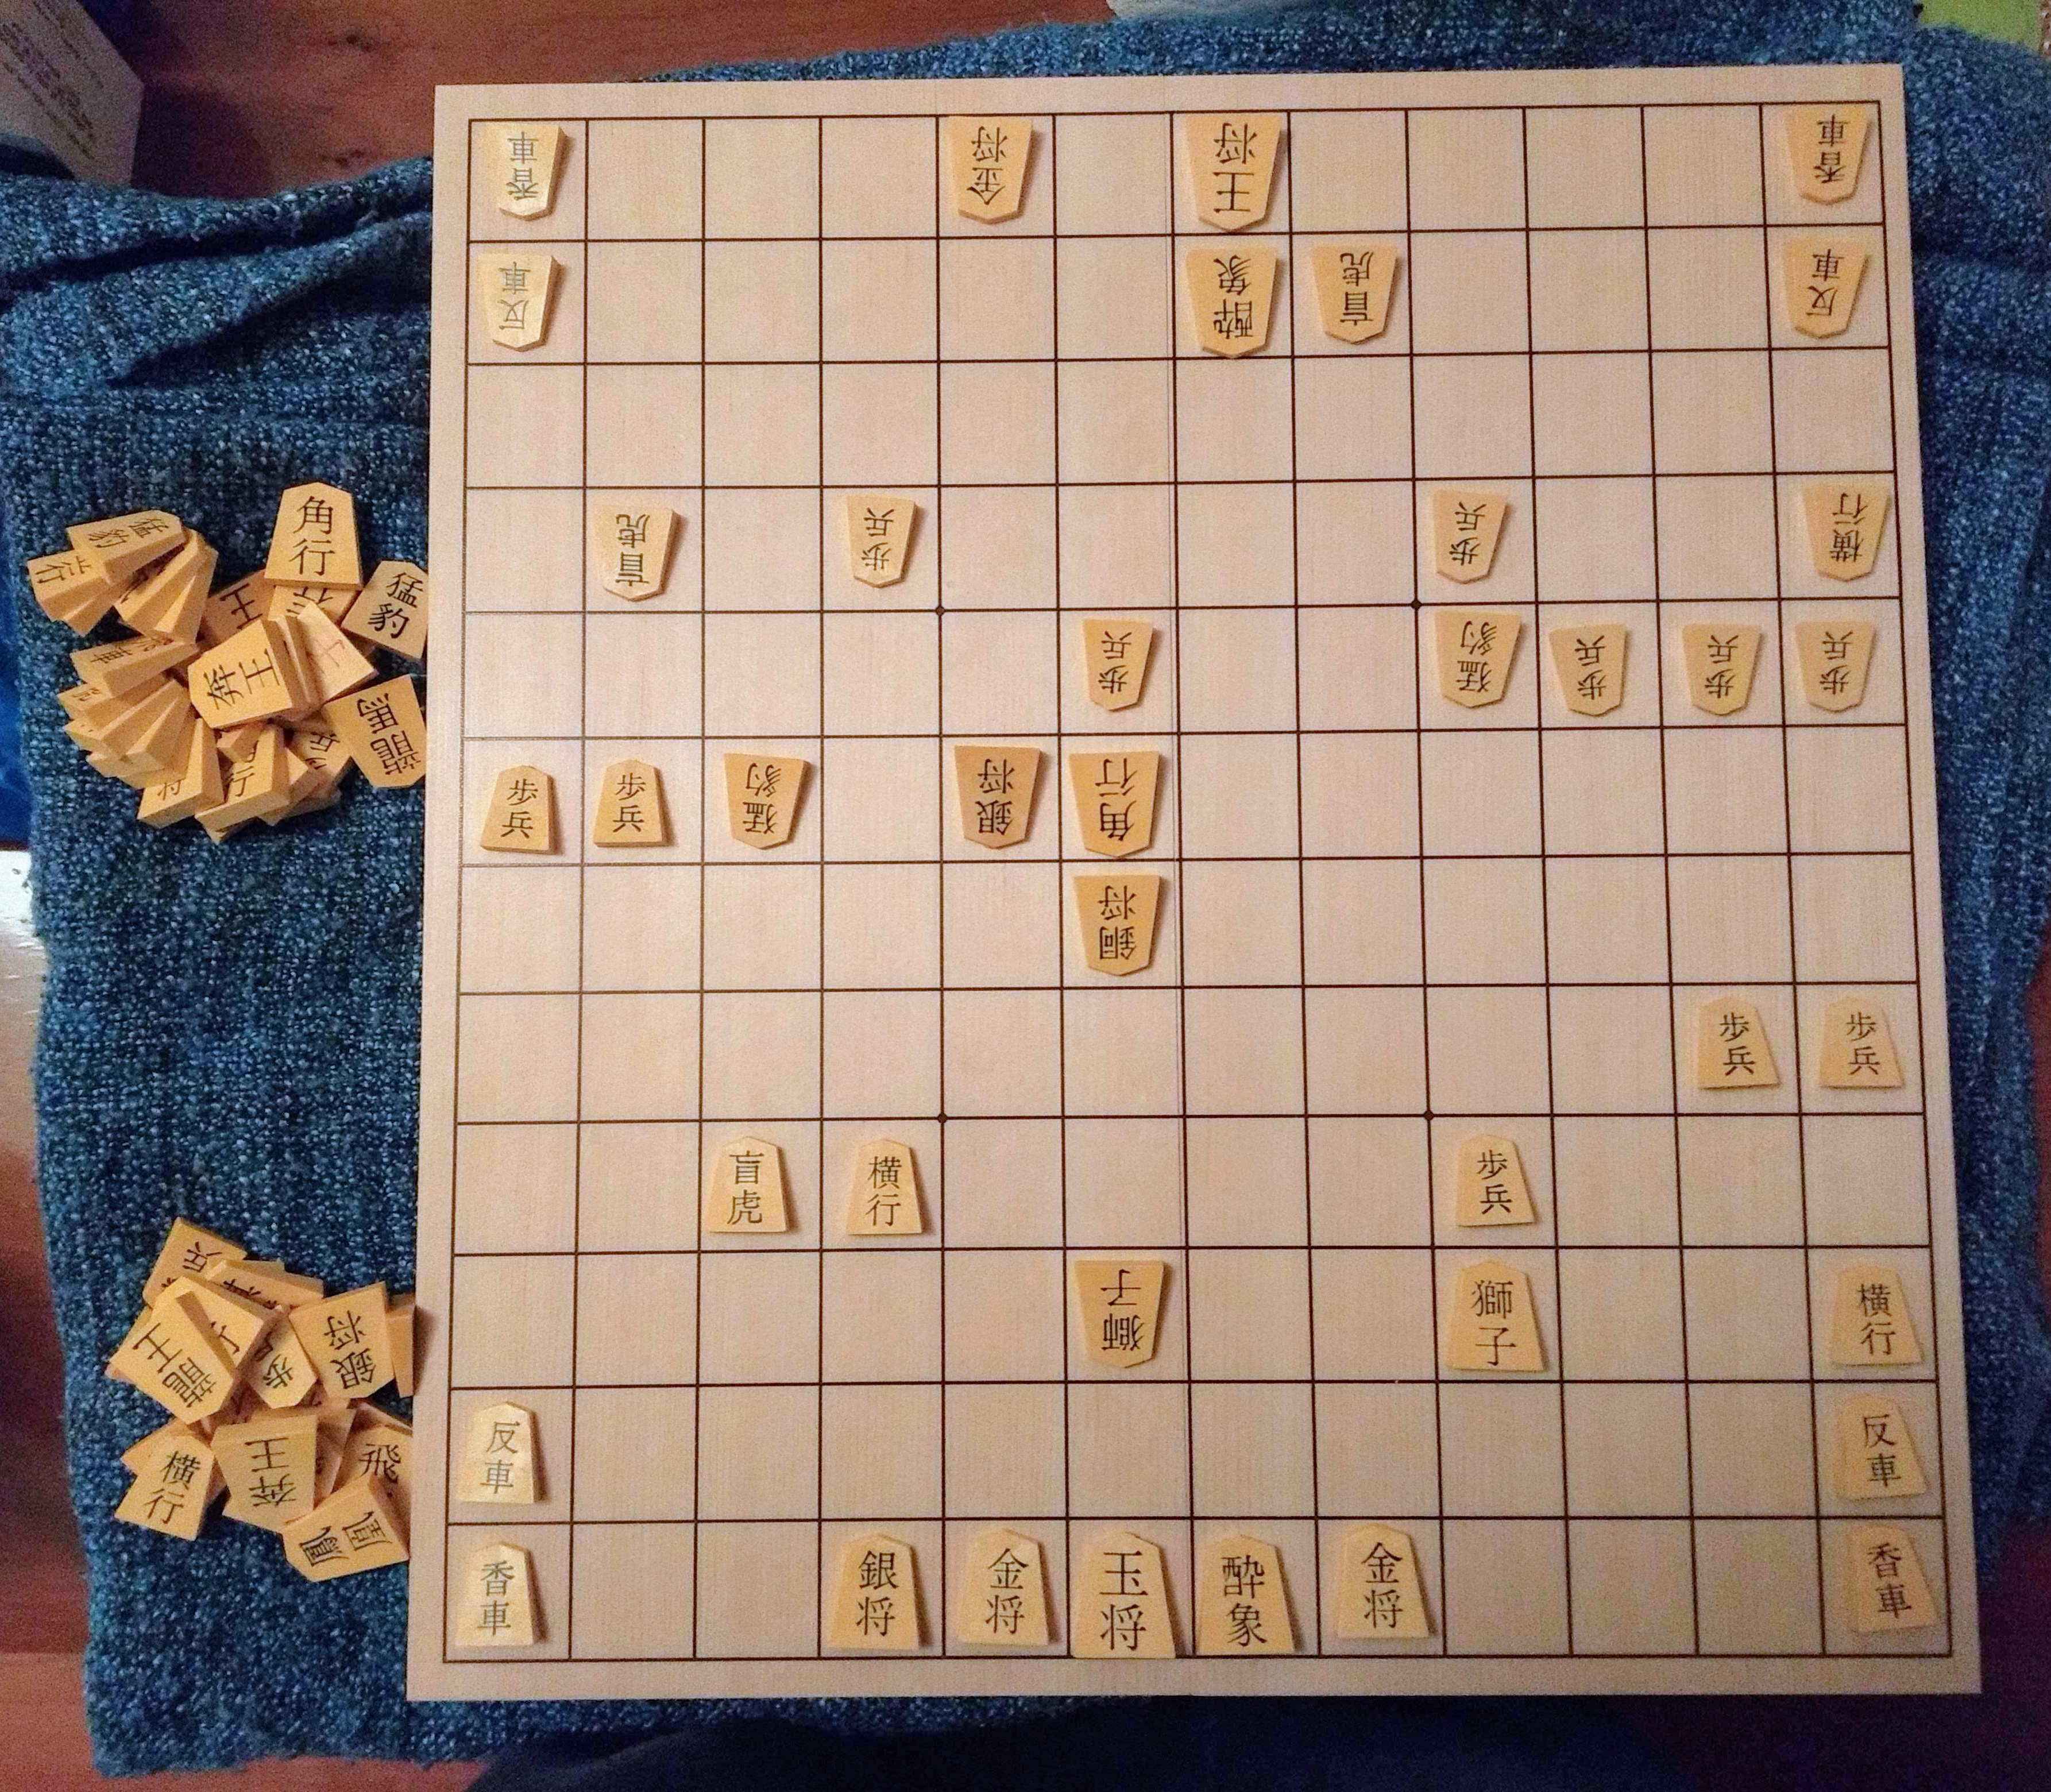
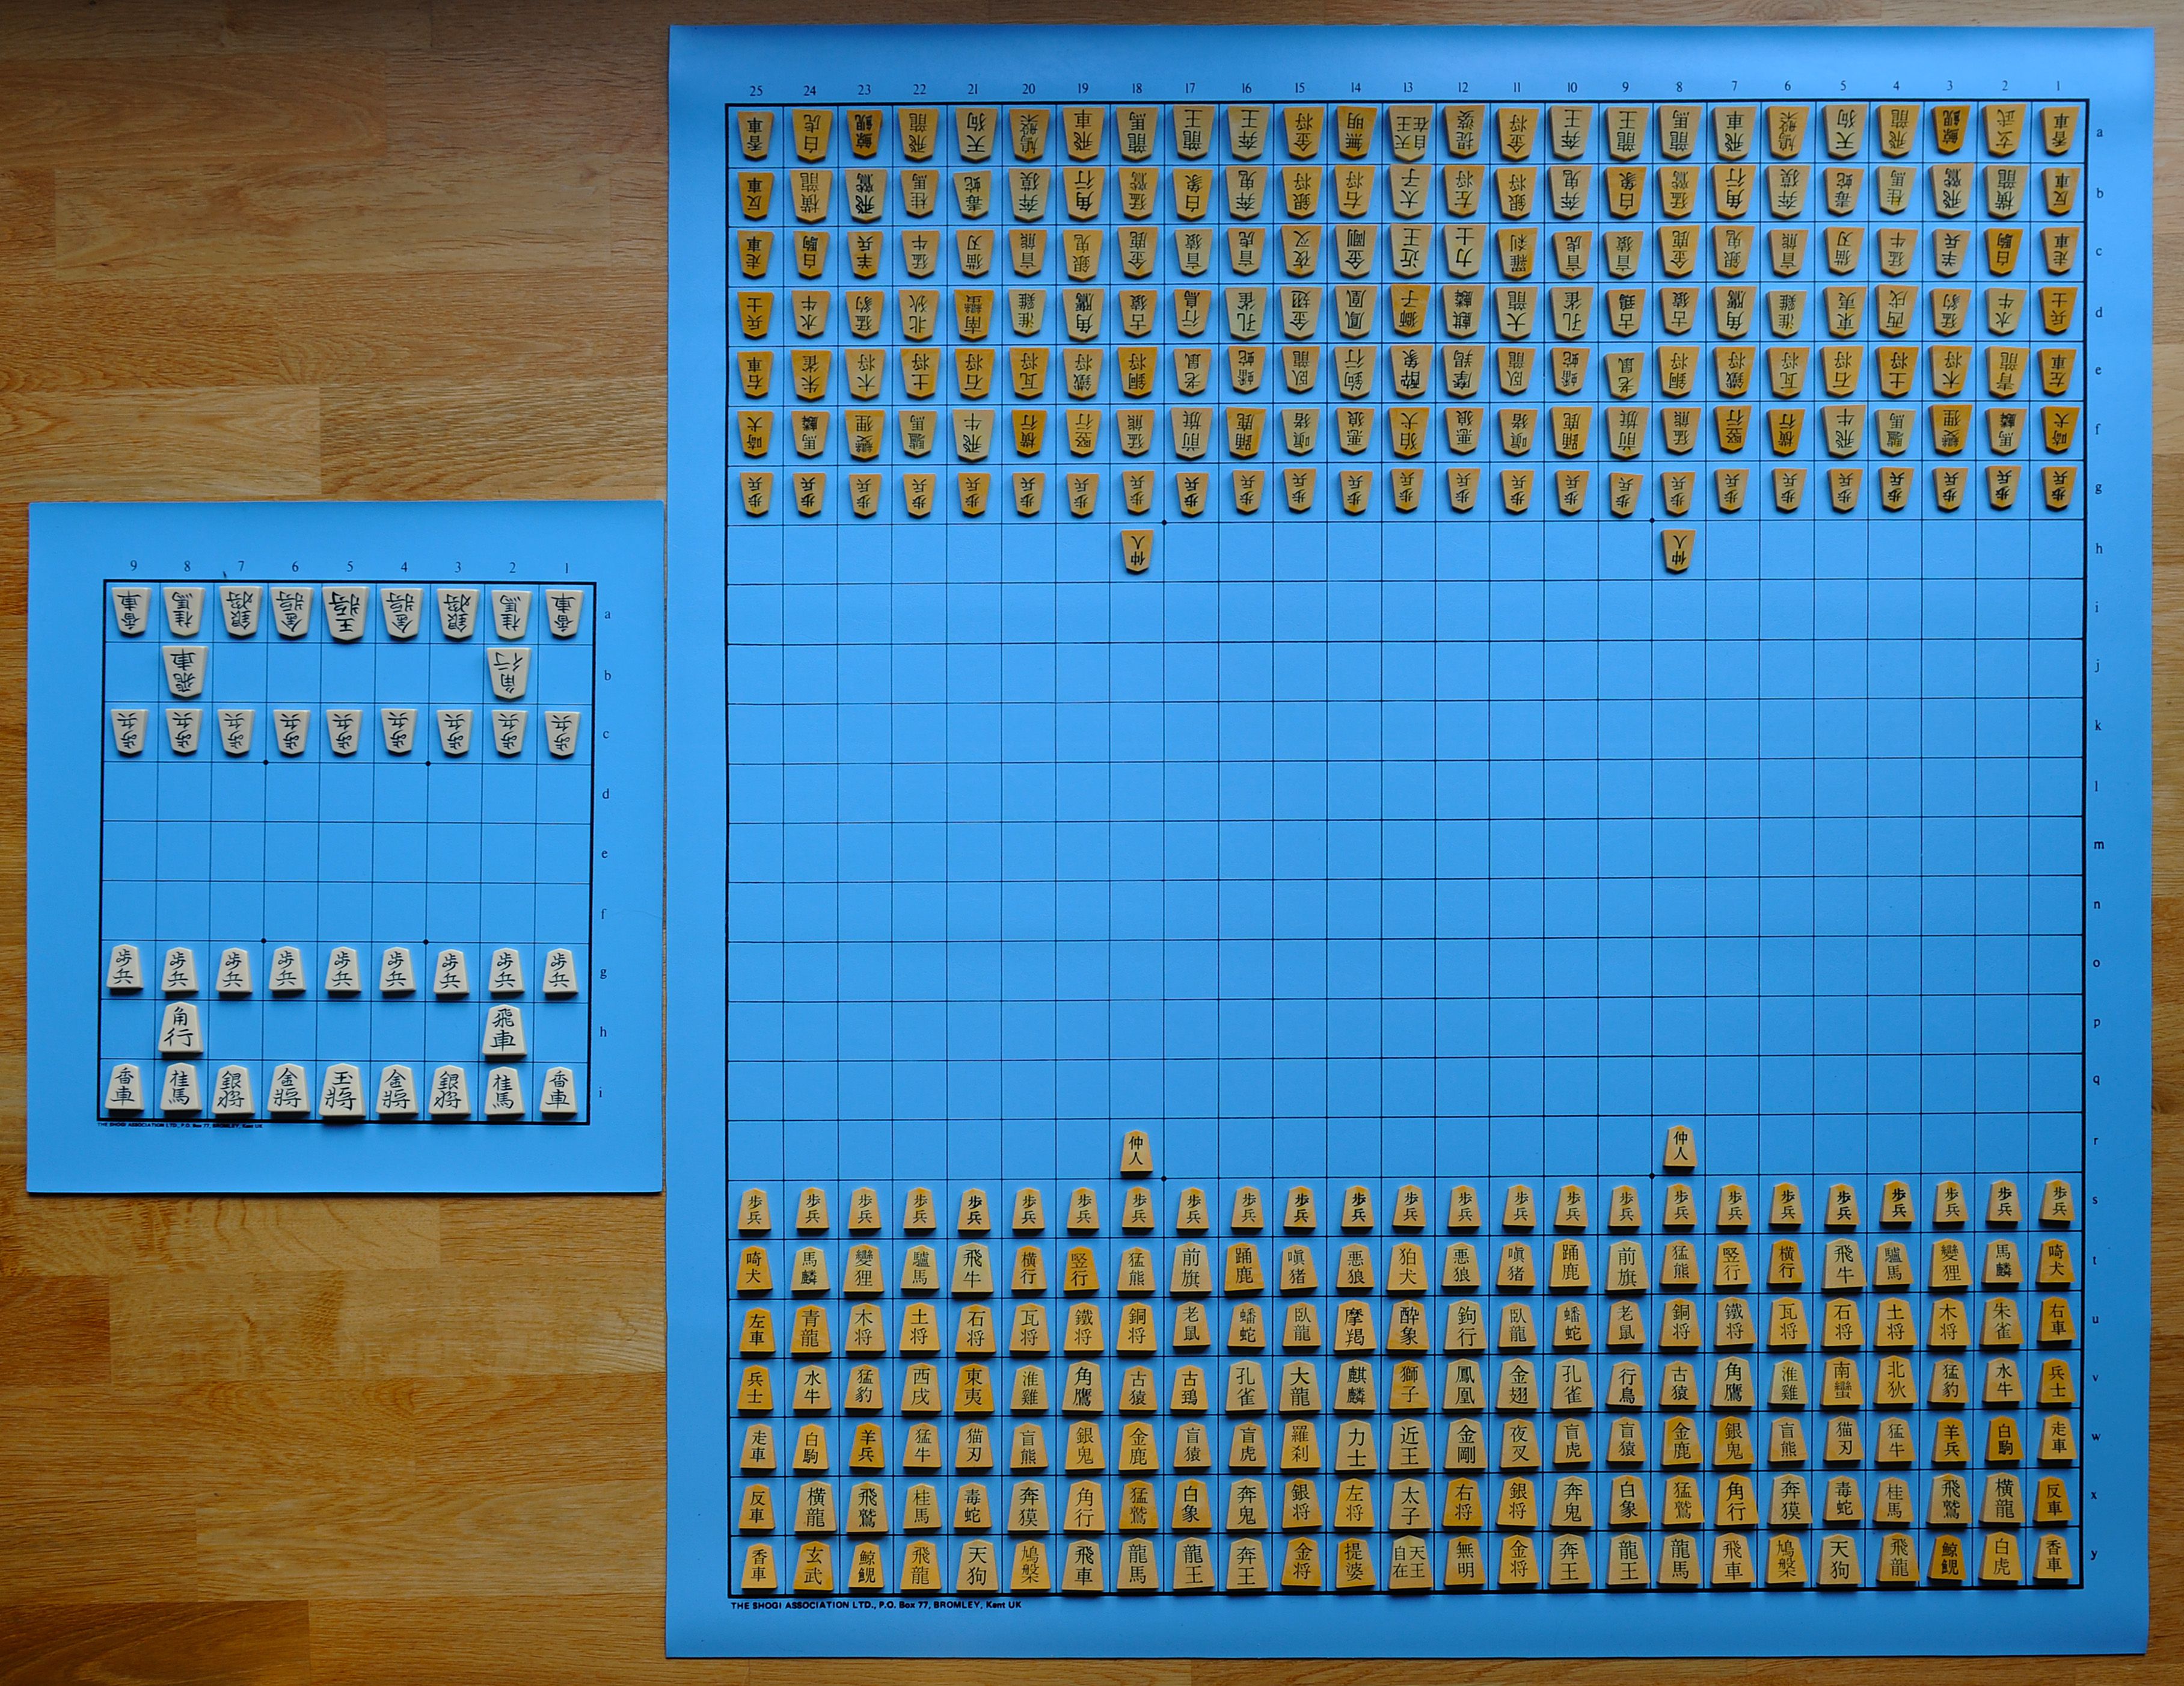
A comparison of Dai Shogi (left) vs modern Shogi (right) — turns out that Large Shogi is, in fact, large

dai shogi closeup

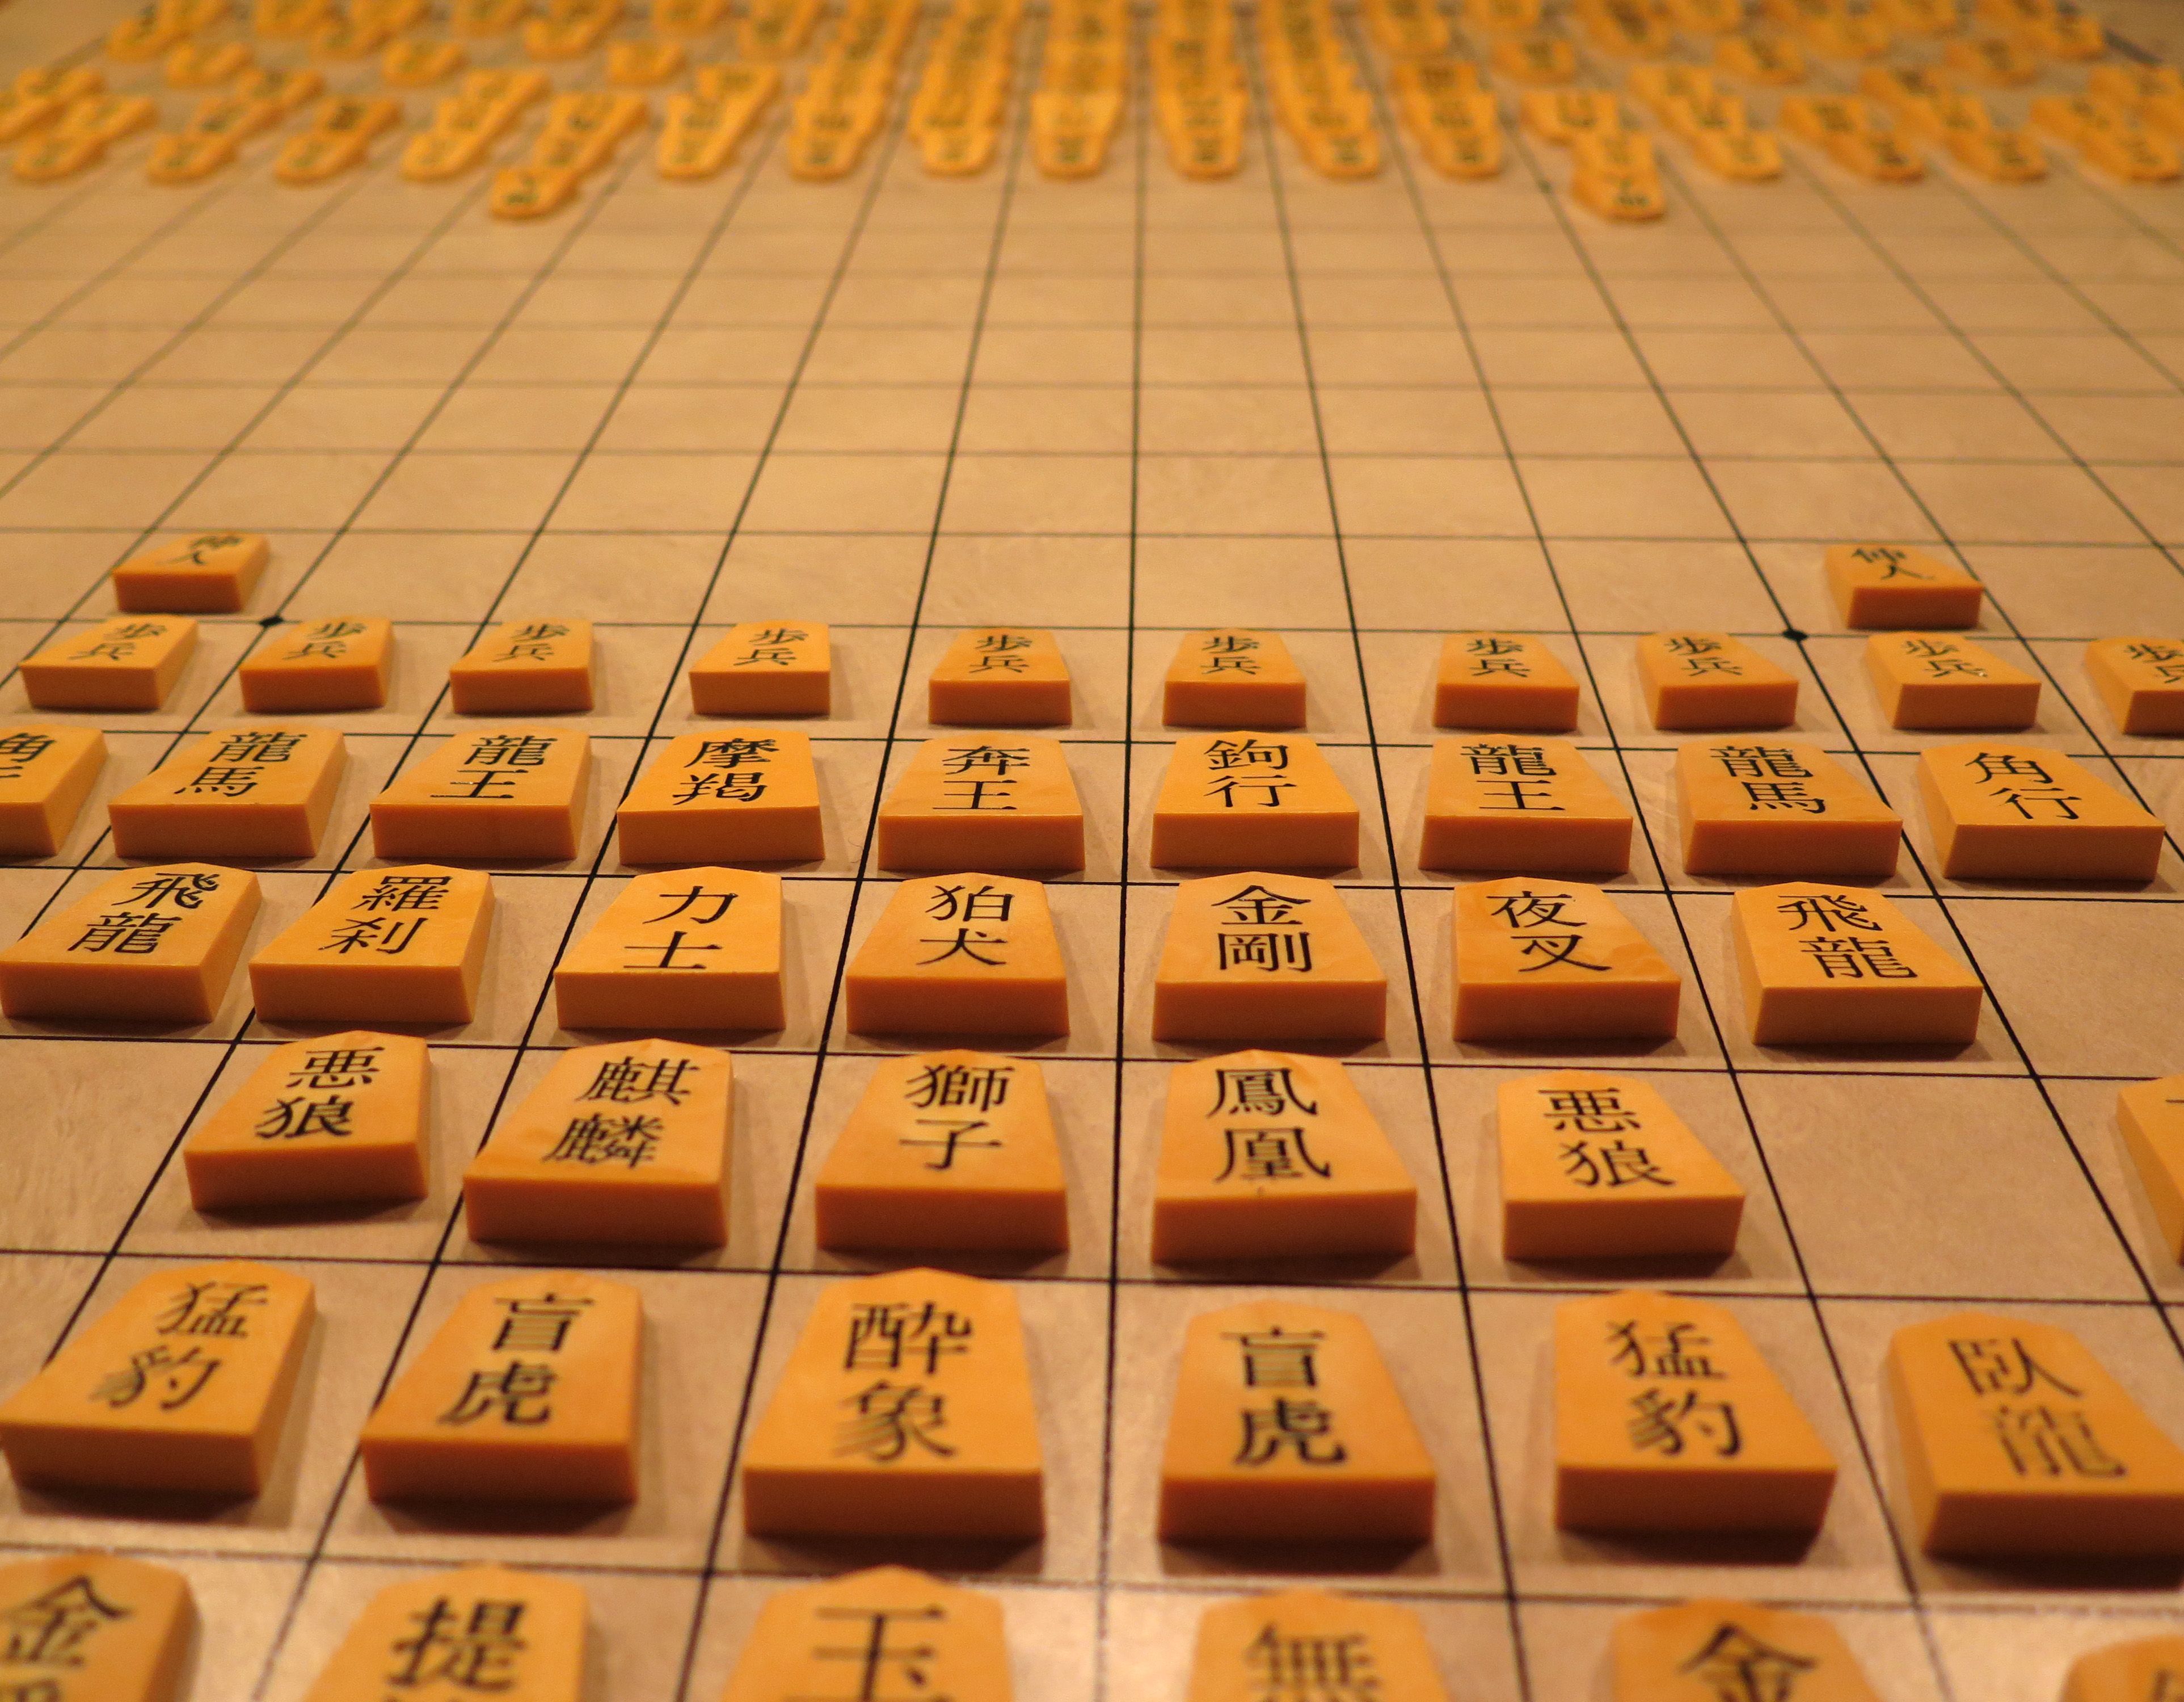
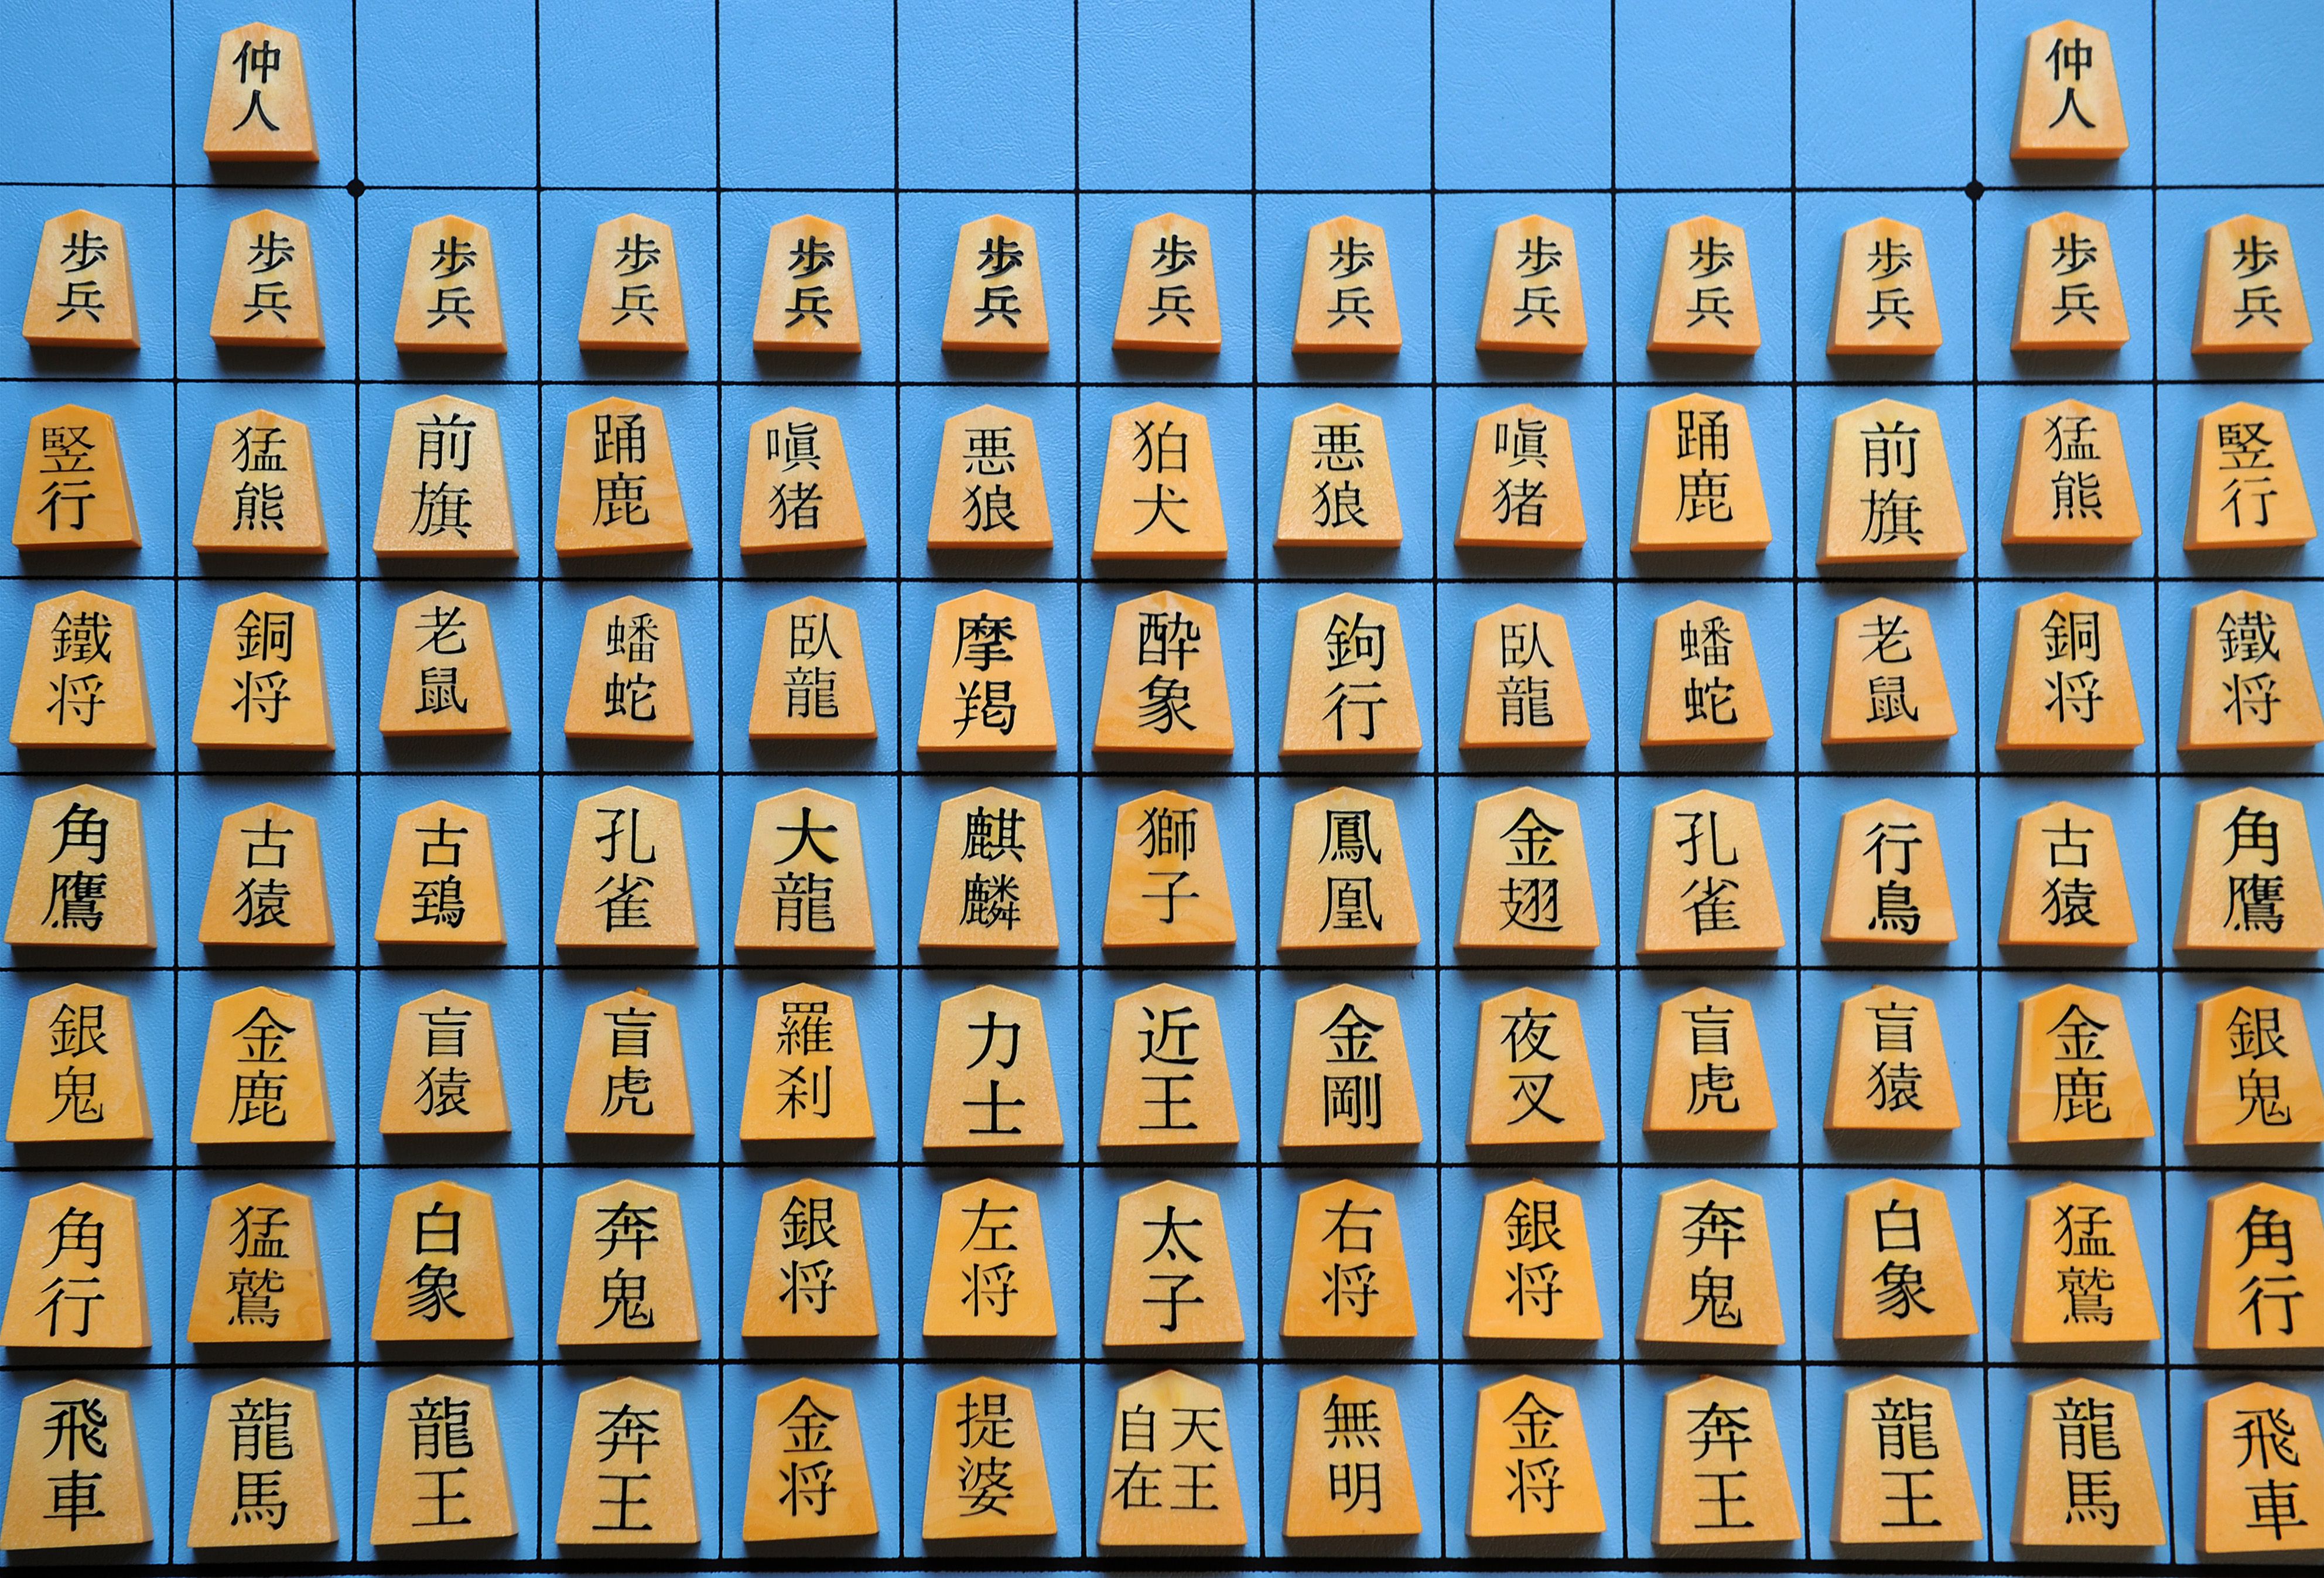
A close-up view of the King’s vast entourage in Dai Shogi.  To either side he’s flanked by his faithful Gold  and Silver Generals; to the front a Drunk Elephant and two Blind Tigers; then in front of those, dangerous beasts like the Lion, Kirin, Phoenix, Evil Wolves, Dragon Kings and more.

dai-shogi-aftermath-568moves copy

A Dai Shogi game I won online — after a mere 568 moves.  Note my opponent threw a ‘spite check’ at me when he knew he was done for — even if I didn’t have checkmate on my next move, my Cat Sword (cool piece name) would’ve instantly recaptured his attacker anyway.

Tenjiku Shogi

Tenjiku Shogi — sometimes translated as ‘Exotic Shogi’ — is one of the most unique and dynamic games of Chess ever devised.  The game is played on a massive 16×16 board (256 squares), and each player starts with 78 pieces in their army — and yet, the pieces are so powerful that the game can be over in less moves than a game of regular Shogi!

Like Chu Shogi is defined by the Lion, Tenjiku is defined by the Fire Demon.  Each player starts with two of these.  The Fire Demon can move as far as it wants in six directions — already extremely powerful by Shogi standards.  Not only that, it can make a three-step area move — three consecutive King moves in any directions (but only one capture, for reasons that will soon become obvious).  But on top of that, it burns everything it touches!

In other words, the Fire Demon instantly kills any piece adjacent to it when it finishes moving, meaning it can capture up to eight pieces in one move.  Not only that, but if the opponent isn’t thinking and moves a piece next to it on his turn, that piece is also instantly captured — and that doesn’t count as your turn!

In addition to the two Fire Demons, your army also contains a Lion, five other pieces that can capture multiple times in a turn, two pieces called Water Buffaloes that promote to Fire Demons, and a number of range-capturing Generals — these are pieces that can jump over any number of enemy pieces in order to make a capture (each player has six of these).  The upshot of all this is that, right from the opening, Tenjiku is a dynamic and dangerous game — attacks start immediately, and your huge 78-piece army starts dwindling very quickly.  No other Chess variant plays like this, and it’s an absolute blast.

tsa tenjiku1

A Tenjiku Shogi set from Angela/George Hodges — the top player’s pieces have been flipped to show off their promoted sides.  Of course I also own one of these sets.

tenjiku vs shogi comparison

Traditional Shogi lined up beside Tenjiku — just think how much damage one Fire Demon could do in that Shogi game!

tenjiku firedemon

A closeup of the deadly Fire Demon, ready to wreak havoc

Dai Dai Shogi

Dai Dai Shogi — or, literally translated, ‘Big Big Shogi’ — definitely fits its name.  The game is played on a 17×17 board of 289 squares, with each player leading an army of 96 pieces!  The starting setup, unlike most Shogi variants, is highly asymmetric — amongst the 96 pieces in your army, there are 64 different types of pieces, so many of your army are unique single pieces.  All told, you need to remember 68 different piece moves — again unlike most variants, only 20 pieces promote in this game, and none of those promotions are to Gold General.

Dai Dai is quite a fascinating game, with a style of play all its own.  This is the first large Shogi game to introduce promotion by capture — pieces promote as soon as they capture any enemy piece, and don’t have to wait until they reach the promotion zone.  Promotion is also mandatory, whereas it’s optional in standard Shogi.  This creates some intriguing tactical decisions, as some pieces effectively demote, becoming weaker when they make a capture — so you’d better make that capture count!

Dai Dai also introduces two powerful hook-moving pieces: the Tengu, or long-nosed goblin, that can make two consecutive Bishop moves at right angles to each other; and the aptly-named Hook Mover, which makes two consecutive Rook moves at right angles to each other.  If that doesn’t sound so amazing, consider that a Hook-Mover on an empty board can reach any square in one move — hard to keep your King safe from that!

Dai Dai Shogi is well worth a try if you’re interested in a unique twist on Shogi — the asymmetric setup, huge piece variety and powerful hook-movers make for a surprisingly aggressive game, considering the size of the board.

dai dai vs shogi comparison

Big Big Shogi indeed!  Board and pieces from Angela/George Hodges once again.

tsa dai dai shogi1

Dai Dai Shogi set with the second players’ pieces flipped to show the promoted sides.  Note how few of the pieces promote — not even the pawns!

dai-dai-king-closeup

The King’s entourage grows ever larger, and more diverse.  Out of the 64 starting pieces, a full 47 of them are solo pieces, making for a complex and asymmetric starting position.

Maka Dai Dai Shogi

Maka Dai Dai Shogi is yet another step up in size from Tenjiku, played on a 19×19 board of 361 squares, with each player starting with an army of 96 pieces.  The name is a bit interesting — ‘Dai’ means big or large, as we know, and ‘Maka’ is a word derived from Sanskrit that means something like ‘Superior’.  So ‘Maka Dai Dai Shogi’ means basically ‘Superior Large Large Shogi’, or less awkwardly, ‘Superior Ultra-Large Shogi’.  I would argue this is pretty accurate — it’s definitely ultra-large, and has a number of superior qualities.

One of the standout qualities of Shogi as compared to Chess is that most of the pieces can promote, and the large variants for the most part carry on this tradition.  Maka Dai Dai, however, takes it to the next level, and allows the King himself to promote!  A promoted King becomes an Emperor, the most powerful piece to exist in any variant of Chess: the Emperor can instantly teleport to any unprotected square on the board, including squares occupied by enemy pieces.  In other words, the Emperor can instantly go anywhere and capture anything, so long as that square isn’t directly threatened with recapture by an enemy piece.

Alongside this, in Maka Dai Dai promotions occur by capture, as in Dai Dai Shogi — however here the promotion is optional, unless the captured piece is a promoted piece, in which case promotion is mandatory!  This helps to speed up the pace of the game, as on such a large board reaching the promotion zone would take forever.  Hook-moving pieces appear again in this game, but here they demote to Gold General on capture, so they’re effectively one-shot nuclear weapons if used to take out a promoted piece — use them wisely.

Promotion-by-capture also makes attacking the enemy King a risky proposition — if you mess it up, the King might capture an attacking piece, thereby immediately becoming an Emperor, which is both extremely powerful and desperately hard to checkmate!

“If you come at the King, you best not miss.”

–Omar Little

Maka Dai Dai, like most of the large Shogi variants, was invented by Buddhist monks — after all they have lots of time on their hands.  This is more apparent in Maka Dai Dai than the other variants, as it includes pieces drawn from Buddhist mythology that behave in unusual ways.  The Deva and Dark Spirit, for example, promote to Buddhist Spirit and Teaching King respectively — and any piece that captures them becomes a Buddhist Spirit or Teaching King, so these immortal creatures effectively never leave the board.

Substantial research has been done on this game by Professor Tomoyuki Takami, who states that Heian-Era sources suggest that Maka Dai Dai was actually one of the earliest forms of Shogi to exist, dating from as early as the 10th century.  He says that the pieces of the game are inspired by Chinese astrology and traditional masked dances and festivals of the early Heian era, and that in the early days the game was played as a form of ritual rather than entertainment.  Over the centuries, the game was reduced down to smaller forms, like Dai Dai Shogi, Dai Shogi and Chu Shogi, once they discovered that this ritual game was actually quite fun to play, but pretty long….

How long, you ask?  Well, George Hodges once compared the lengths of various versions of Shogi — this is the number of total moves in an average game for each variant:

  • Chess: 80
  • Shogi: 110
  • Dai Shogi: 400
  • Dai Dai Shogi: 800
  • Maka Dai Dai Shogi: 1100
  • Tai Shogi: 2000

Wow, that’s long.  If you start up a game of Maka Dai Dai Shogi, make sure you have the weekend free 🙂  I should say that I, of course, own a physical set for this game and would happily play it with anyone who asks.  The board is too big for my table, however, so we’d have to find a place big enough!

tsa maka set1

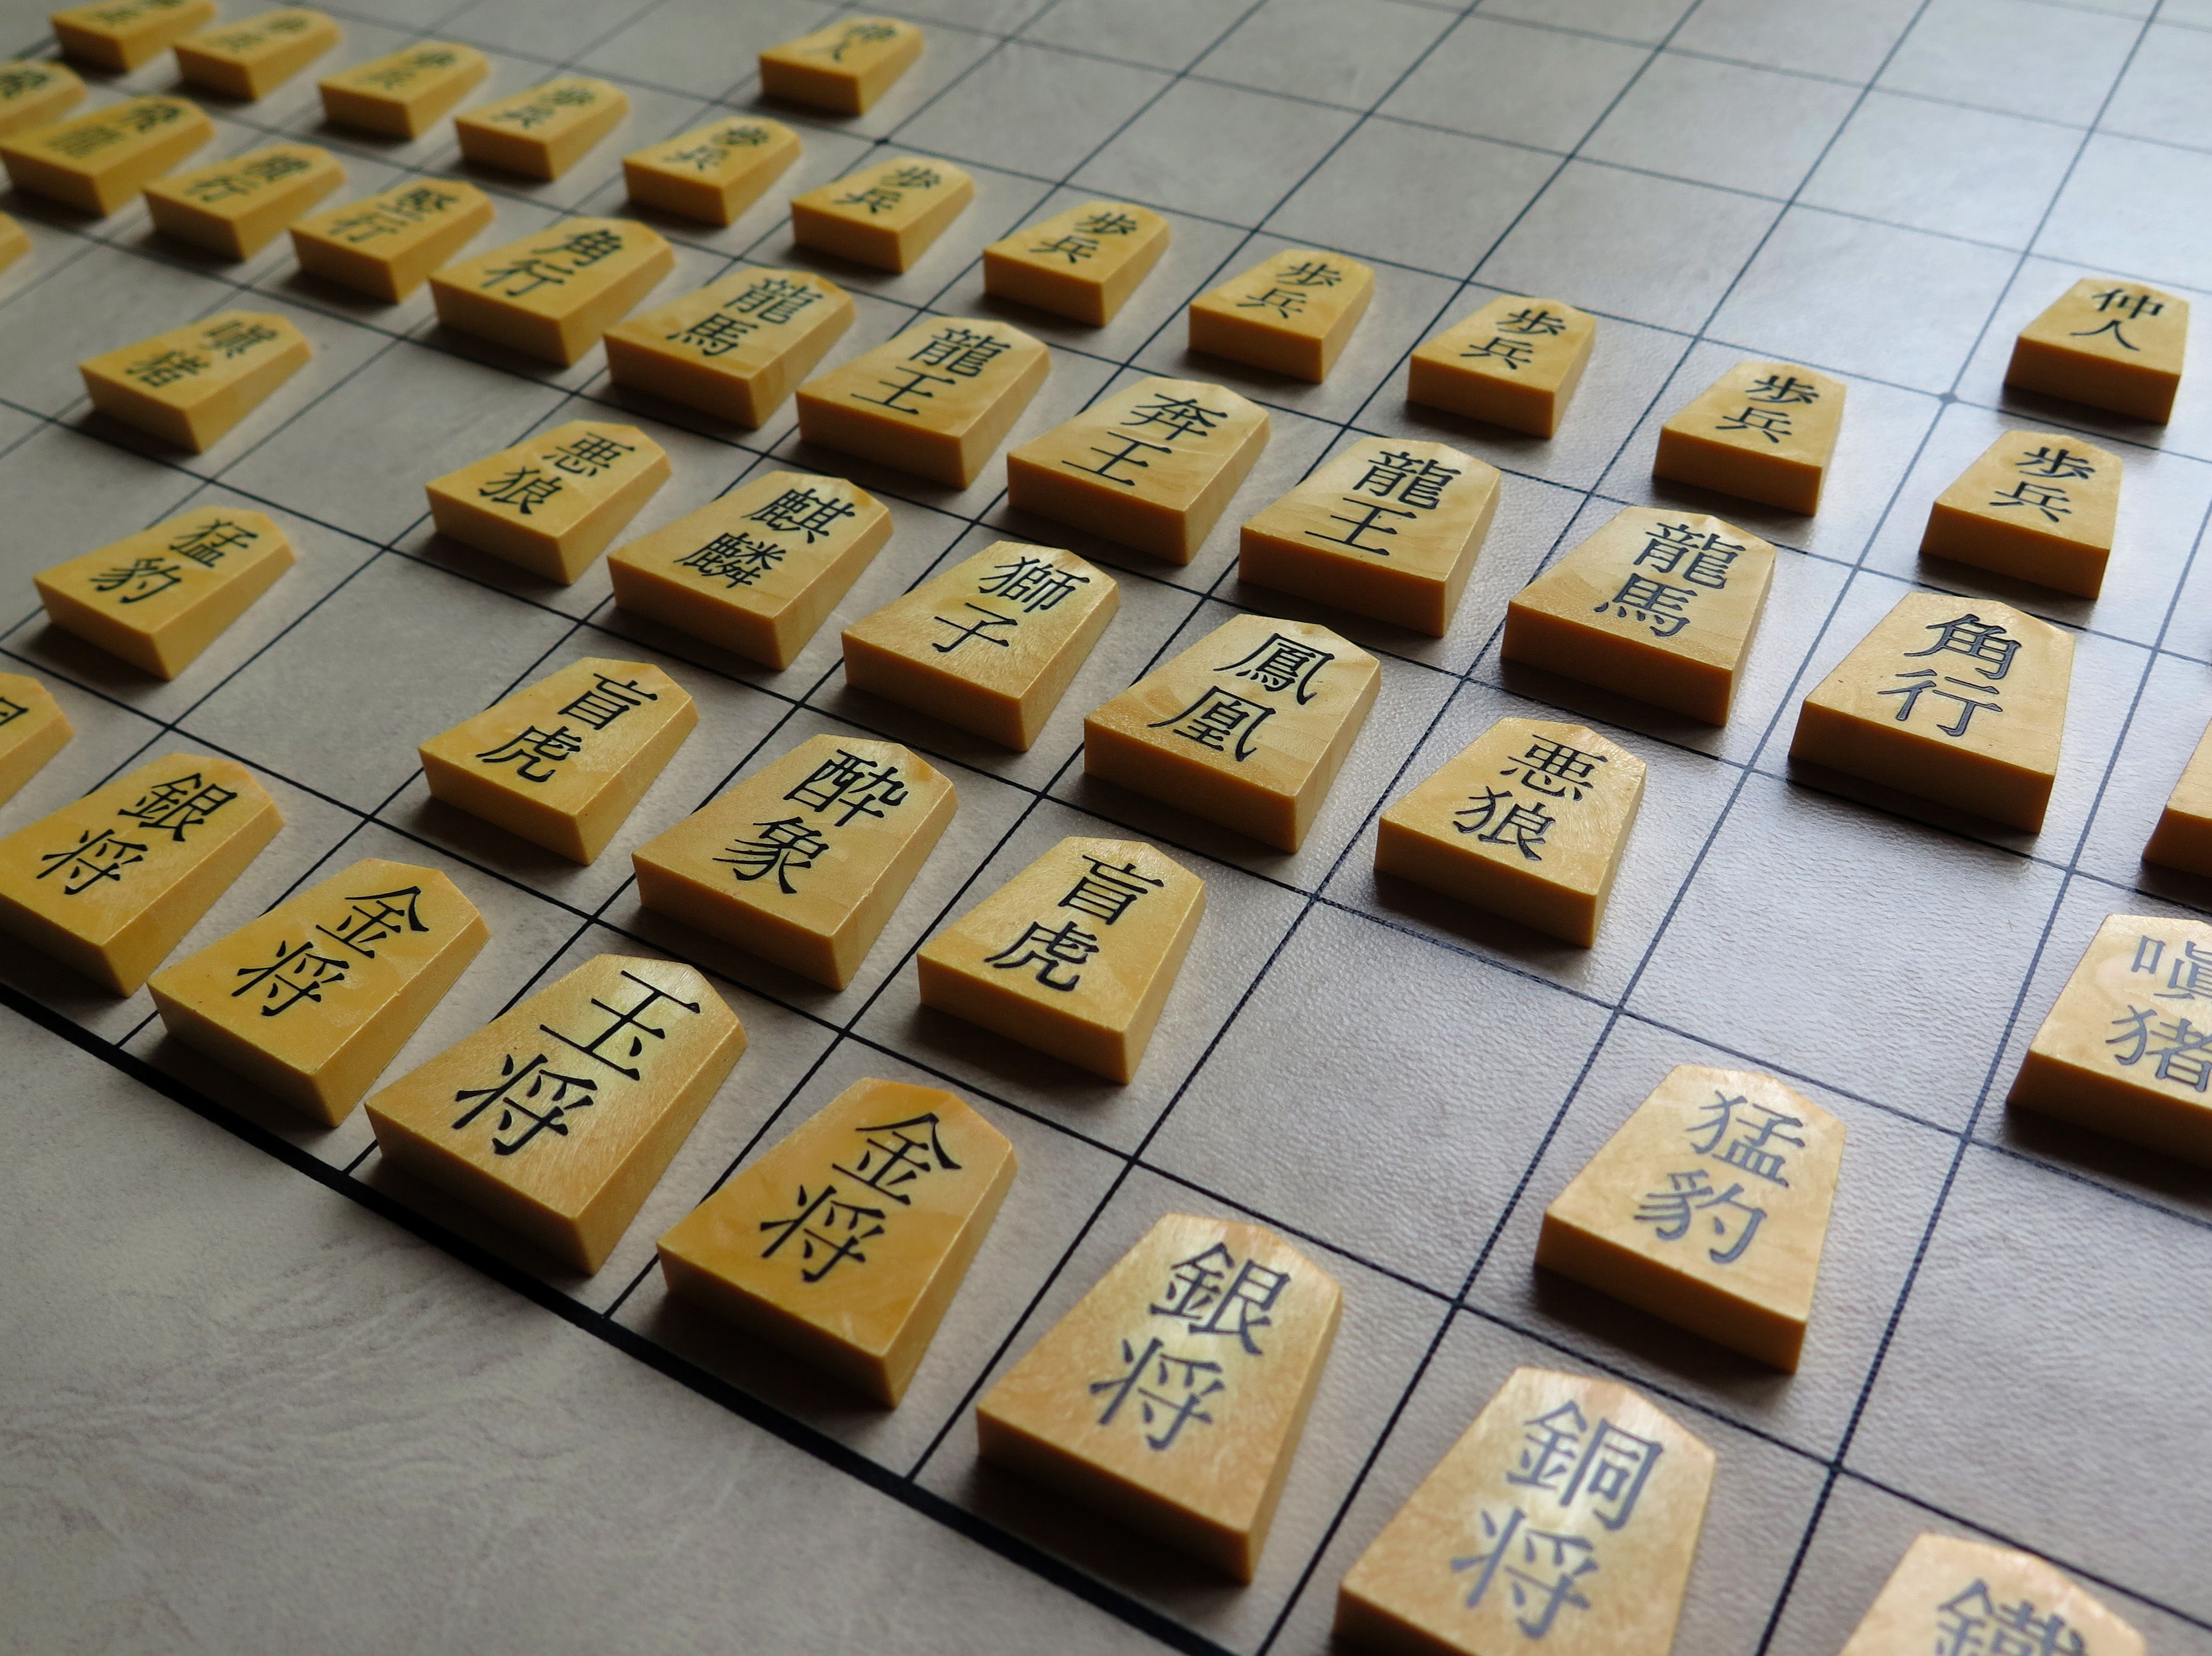
A Maka Dai Dai set by Angela/George Hodges — promoted pieces on top.

maka dai dai closeup1

Maka Dai Dai is such a large game that it can be quite intimidating — staring across the board at your opponent’s massive army lurking across the horizon feels quite different from more normal-sized Chess games.

maka dai dai emperor

The Mighty Emperor


Tai Shogi

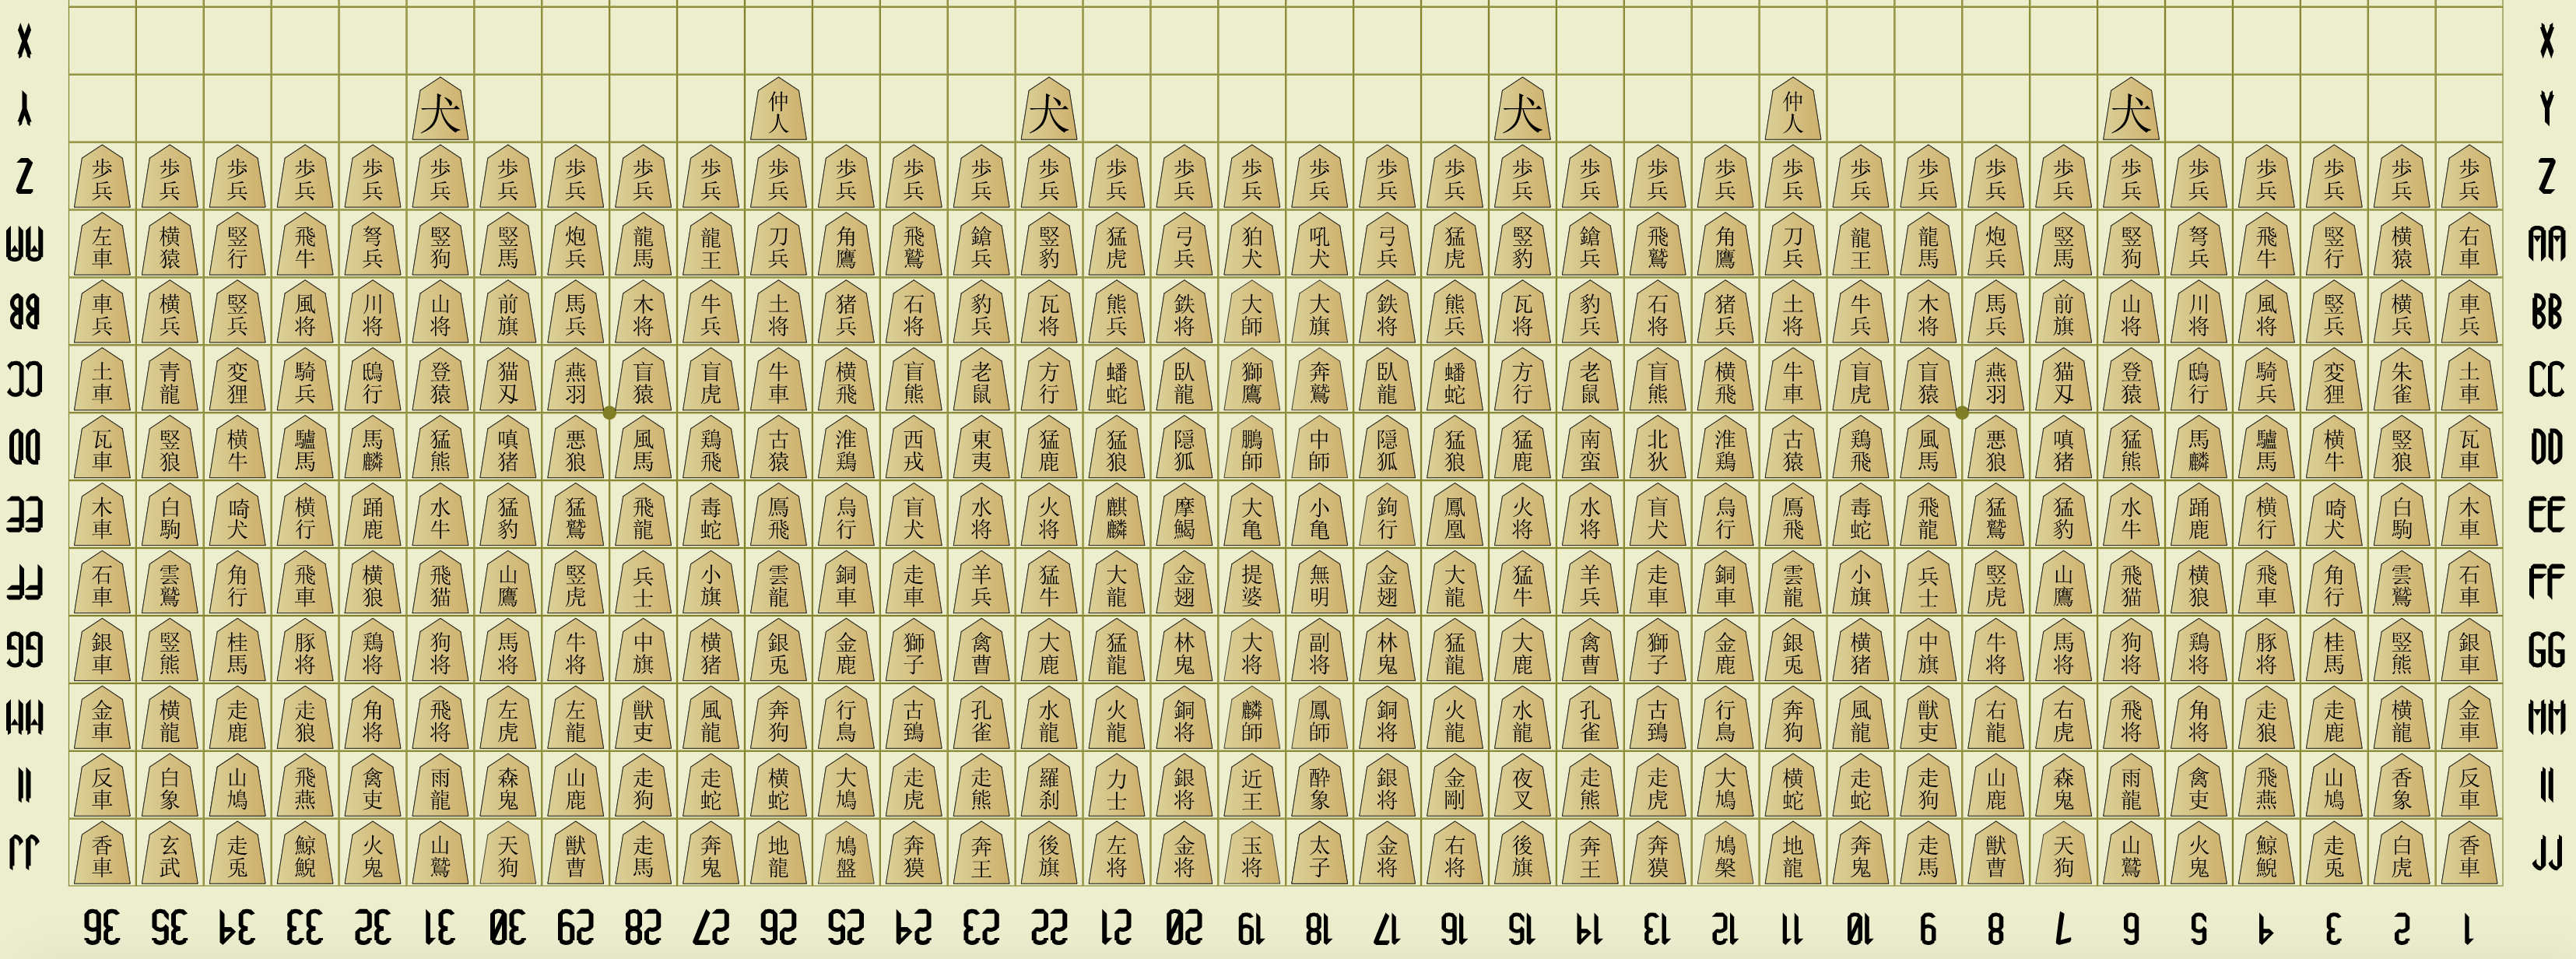
OK, now this is getting ridiculous — Tai Shogi, or ‘Supreme Shogi’, is a spectacularly huge game played on a 25×25 board of 625 squares, invented in the 15th century by Buddhist monks (of course).  Each player marches into battle with an army of 177 pieces each, and in order to play you need to remember 99 distinct piece movements.

I’ve never personally played this, but remarkably, you can actually buy a set of this from Angela Hodges here in the UK.  The board is more than a metre square!  Even experienced players take upwards of two hours to set up the pieces in their initial position.  As you can see below, each players’ starting ranks are absolutely chock full of pieces — in fact the opening phase is a bit like a sliding-block puzzle as you try to free up lines for your pieces to get into the action.

Notably, there are actually no Kings on the board — each player starts with an Emperor in play (!), and a Crown Prince that moves like a King.  Both must be captured to win the game.  Many of the other pieces have strong promotions, which occur by capture as in Dai Dai and Maka Dai Dai rather than by entering the promotion zone — so carelessly leaving pieces out to be gobbled up can rapidly turn the game against you!

Those who’ve played Tai say it’s an extremely challenging game, because it’s very hard to formulate any kind of sensible whole-board strategy in a game this large.  As a result the game plays more like a wargame, with intensely tactical local skirmishes of great complexity breaking out across the board.  Meanwhile, the everpresent Emperors make each move feel consequential — leave anything hanging and you may give the Emperor a chance to start some carnage.  Given how old this game is, the creativity of all this is astounding — it’s kind of like an ancient version of Warhammer or something.

I don’t yet own this game but certainly plan to at some point — consider this a standing challenge to all!  Once I get a set for this, I’m happy to give it a go with anyone who’s interested.

tai shogi vs shogi comparison

Regular Shogi just looks tiny compared to Tai Shogi!  Without a doubt you could play an entire Shogi tournament in the time it takes to play one game of Tai Shogi.

tai shogi central files

A closeup of the Emperor’s immediate surroundings — quite a dense wall of protectors he has!  The Emperor is at the centre of the bottom row, the Crown Prince (taishi)  is directly above him, and the Drunk Elephant three pieces above the Prince.
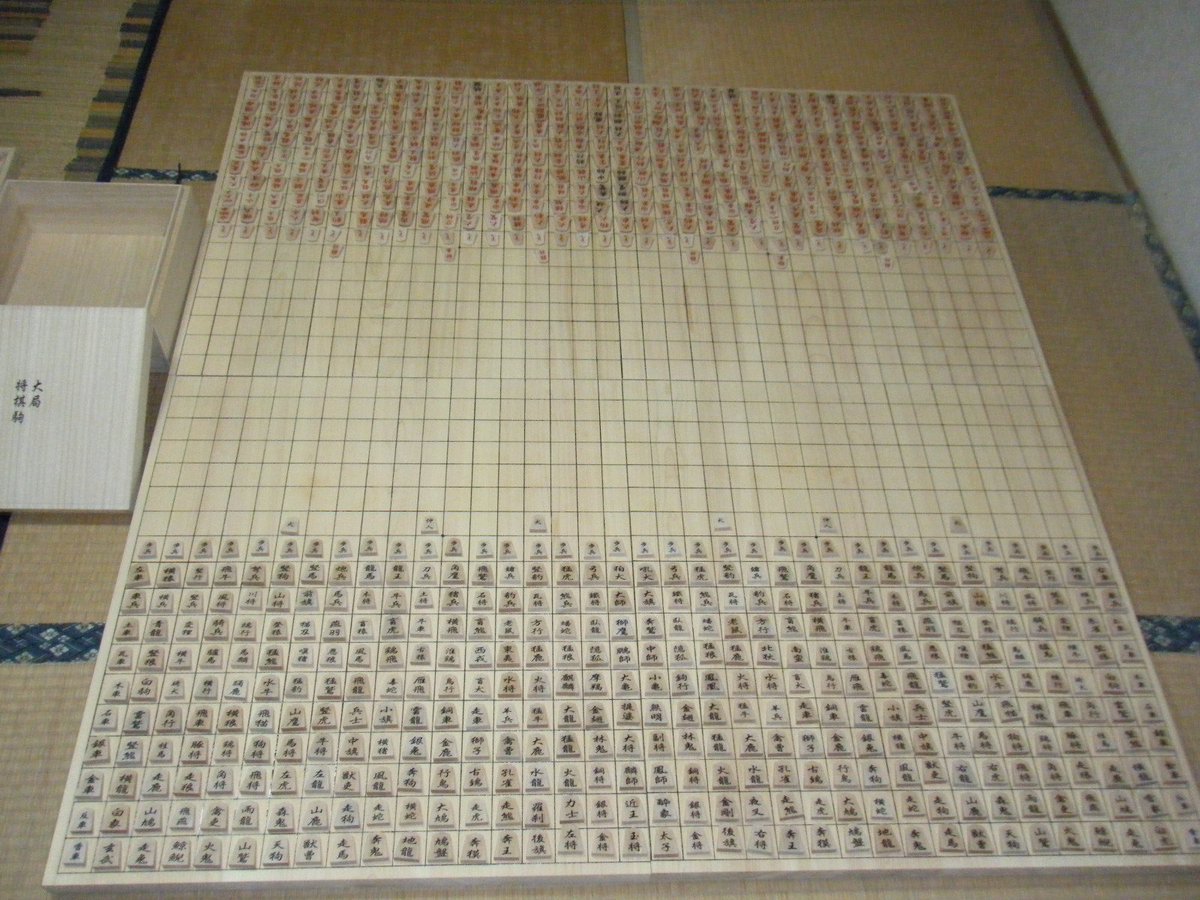
Taikyoku Shogi

Unbelievably, Tai Shogi is not the biggest Chess game to ever exist.  It used to be, until some documents were uncovered in 1997 with rules for a 16th-century Shogi variant called Taikyoku Shogi, or ‘Ultimate Shogi’.

This preposterous game is played on a 36×36 board of 1,296 squares.  Each player has an army of 402 pieces, and to play you must remember 253 distinct movement patterns.  Each side starts with a King and Crown Prince on the board, and a Drunk Elephant who can promote to Crown Prince — meaning you may have to capture three royal pieces to eventually win.

Unlike the other huge variants, in Tai Shogi promotion is once again by entering the enemy camp rather than by capture.  Each army contains a huge variety of pieces with whimsical names like the Running Bear, Vermillion Sparrow, Violent Ox, Enchanted Badger, and — my favourite — the Vertical Puppy.  If I ever play this game somehow, I’m going to devote my entire strategy toward devising a way to checkmate my opponent using the Vertical Puppy.

Amazingly, a real-life wooden set for Taikyoku Shogi was carved and used for a special segment on the Japanese variety show Fountain of Trivia back in 2004.  Two Shogi pros faced off in a game of Taikyoku Shogi, using a little reference book to help them remember how the pieces moved.  The game lasted 32 hours and 41 minutes, and ended in checkmate for the first player after 3,805 moves!

There’s a clip of the match on YouTube, unfortunately the quality isn’t great but the whole segment is there: https://www.youtube.com/watch?v=_c0Y26iTPSM

At the end of the match, the winning player says ‘I don’t want to do that again’; the loser says something hard to translate, but it’s kind of like ‘I have no regrets’, conveying the impression he doesn’t mind losing something so bizarre, and is mostly glad it’s over.

taikyoku-shogi-setup

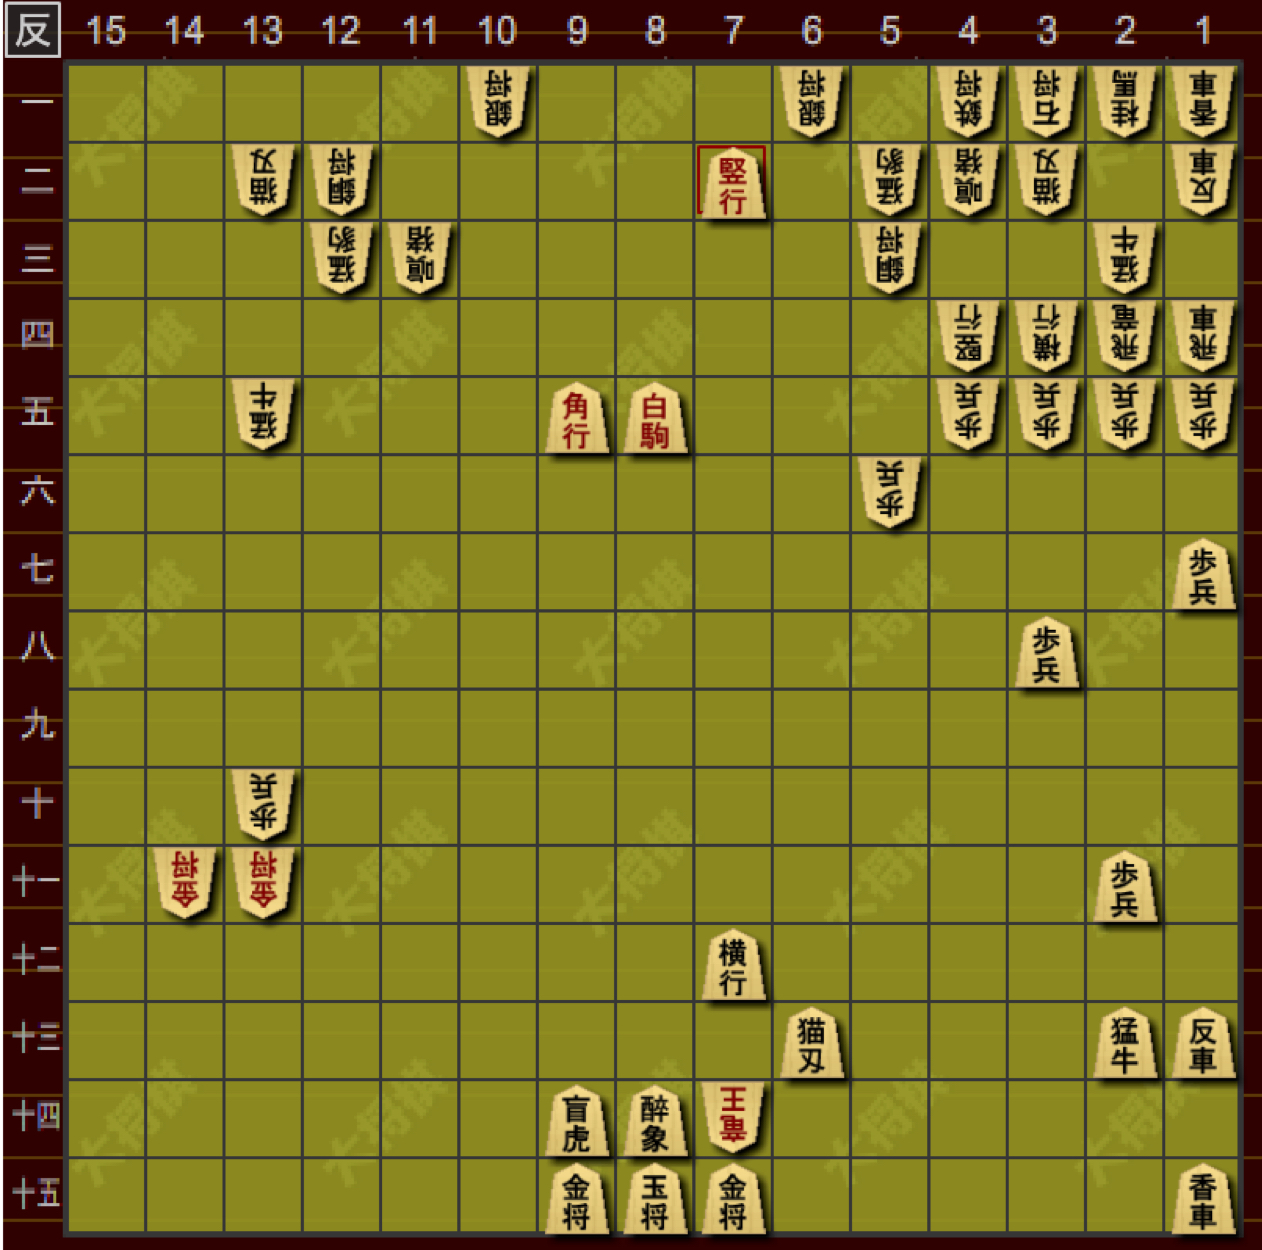
A closer look at one player’s setup in Taikyoku Shogi — imagine trying to remember all 402 of these pieces!

taikyoku-real1

A fanmade version of Taikyoku Shogi — quite impressive!


Notes on the large Shogi variants

For much more detail on the Shogi variants, I recommend checking out this GeekList on Boardgamegeek.com from Shogi enthusiast The Player of Games that describes a large number of them.  Numerous resources are linked there, and I borrowed a bunch of the images in this post from there as the photos the author took of his sets are far better than any others I could find.  Many thanks to TPoG for taking the time to produce such crisp and high-resolution images of these great games!

Most importantly, TPoG’s list includes a detailed discussion of some discrepancies in the moves for certain pieces — the three main Edo Era sources for the larger games differ slightly in how they describe some moves.  For the most part these differences are very minor, and in games this size aren’t really going to have any influence at all on the overall play.

However, the recommended changes in that list for the upgraded forms of the Lion make much more sense than the currently-available moves in the English versions of these games.  They actually build on the Lion’s powers rather than weakening them.  For reasons of consistency I highly recommend using the updated moves suggested in that list when playing Dai Dai Shogi, Maka Dai Dai Shogi or Tai Shogi.

Where do I go from here?

Well, as you can see, Shogi offers a whole world of interesting games.  I wrote far too much here, and yet still didn’t cover anywhere near all the variants — there’s a number of smaller ones too, but I just love the big monster games.  If you fancy trying a variant of Shogi, and want to pick just one, I’d recommend Chu Shogi — it’s monstrous without being ponderous, and the Lion is such a creative and beautifully-balanced addition to the game.  Leaving aside my nerdy fascination with all things Shogi, it’s a genuinely delightful game.  Tori Shogi is also a great choice, as it’s small and easy to learn but still has tons of depth.

If you want to dive headfirst into one of the monster games, I highly recommend Maka Dai Dai Shogi.  It’s a fascinating game not just in terms of its unique play style and unusual pieces, but also because of its intriguing history and cultural relevance.  When playing this game you can feel that it could have been a ritual experience, a rumination on Buddhist thought as well as a battle playing out on a (huge) chessboard.  Sure, it’ll take awhile, and will require patience and dedication to get through a game — but those are quite Buddhist qualities, are they not?

Your best bet of course is to play modern Shogi — in my opinion it’s the finest version of Chess by quite some distance, and can easily support a lifetime of play and study.  There are numerous places these days to play online, like 81dojo  which is free, available in English and supports several variants as well.  Obviously modern Shogi has by far the largest playing community of any version of Shogi, and rightfully so — it strikes a balance between complexity and simplicity that’s hard to beat.

For a taste of Shogi, come on down to our Shogi event next month and get acquainted with the modern game!  I’m sure you’ll enjoy it, even if just as a peek into a corner of Japanese culture most of us never see.  For those of you who really take a fancy to the game, you’re welcome to join Shuzo and myself in our soon-to-be-launched Shogi club, which will meet regularly in Glasgow to play Shogi and learn about the game.

And, if you’re a weirdo like me who can easily spend all day playing games, join me for a game of Tori, Chu, Dai, Tenjiku or Maka Dai Dai Shogi!  Just make sure you free up your schedule first 🙂


Tagged , , , , , , , , ,