Some time ago I introduced you all to my game, Permute — an abstract strategy game inspired by the Rubik’s Cube. Since then, the game was implemented on Christian Freeling’s MindSports — an essential site for any fan of the genre — and in Stephen Tavener’s wonderful Ai Ai software. Hopefully some of you may have tried the game since then, and have discovered that the game has a unique feel in play and supports some unusual strategies and tactics.
Since developing the idea I’ve played a great deal of Permute, mostly against Ai Ai’s stiff opposition, but also some games against human opponents. In this post I’ll walk you through a game I played against Simon R on MindSports, and explain some basic tactical and strategic considerations to keep in mind while playing Permute. This sample game contains a few instructive moments that should be enlightening for any new player.
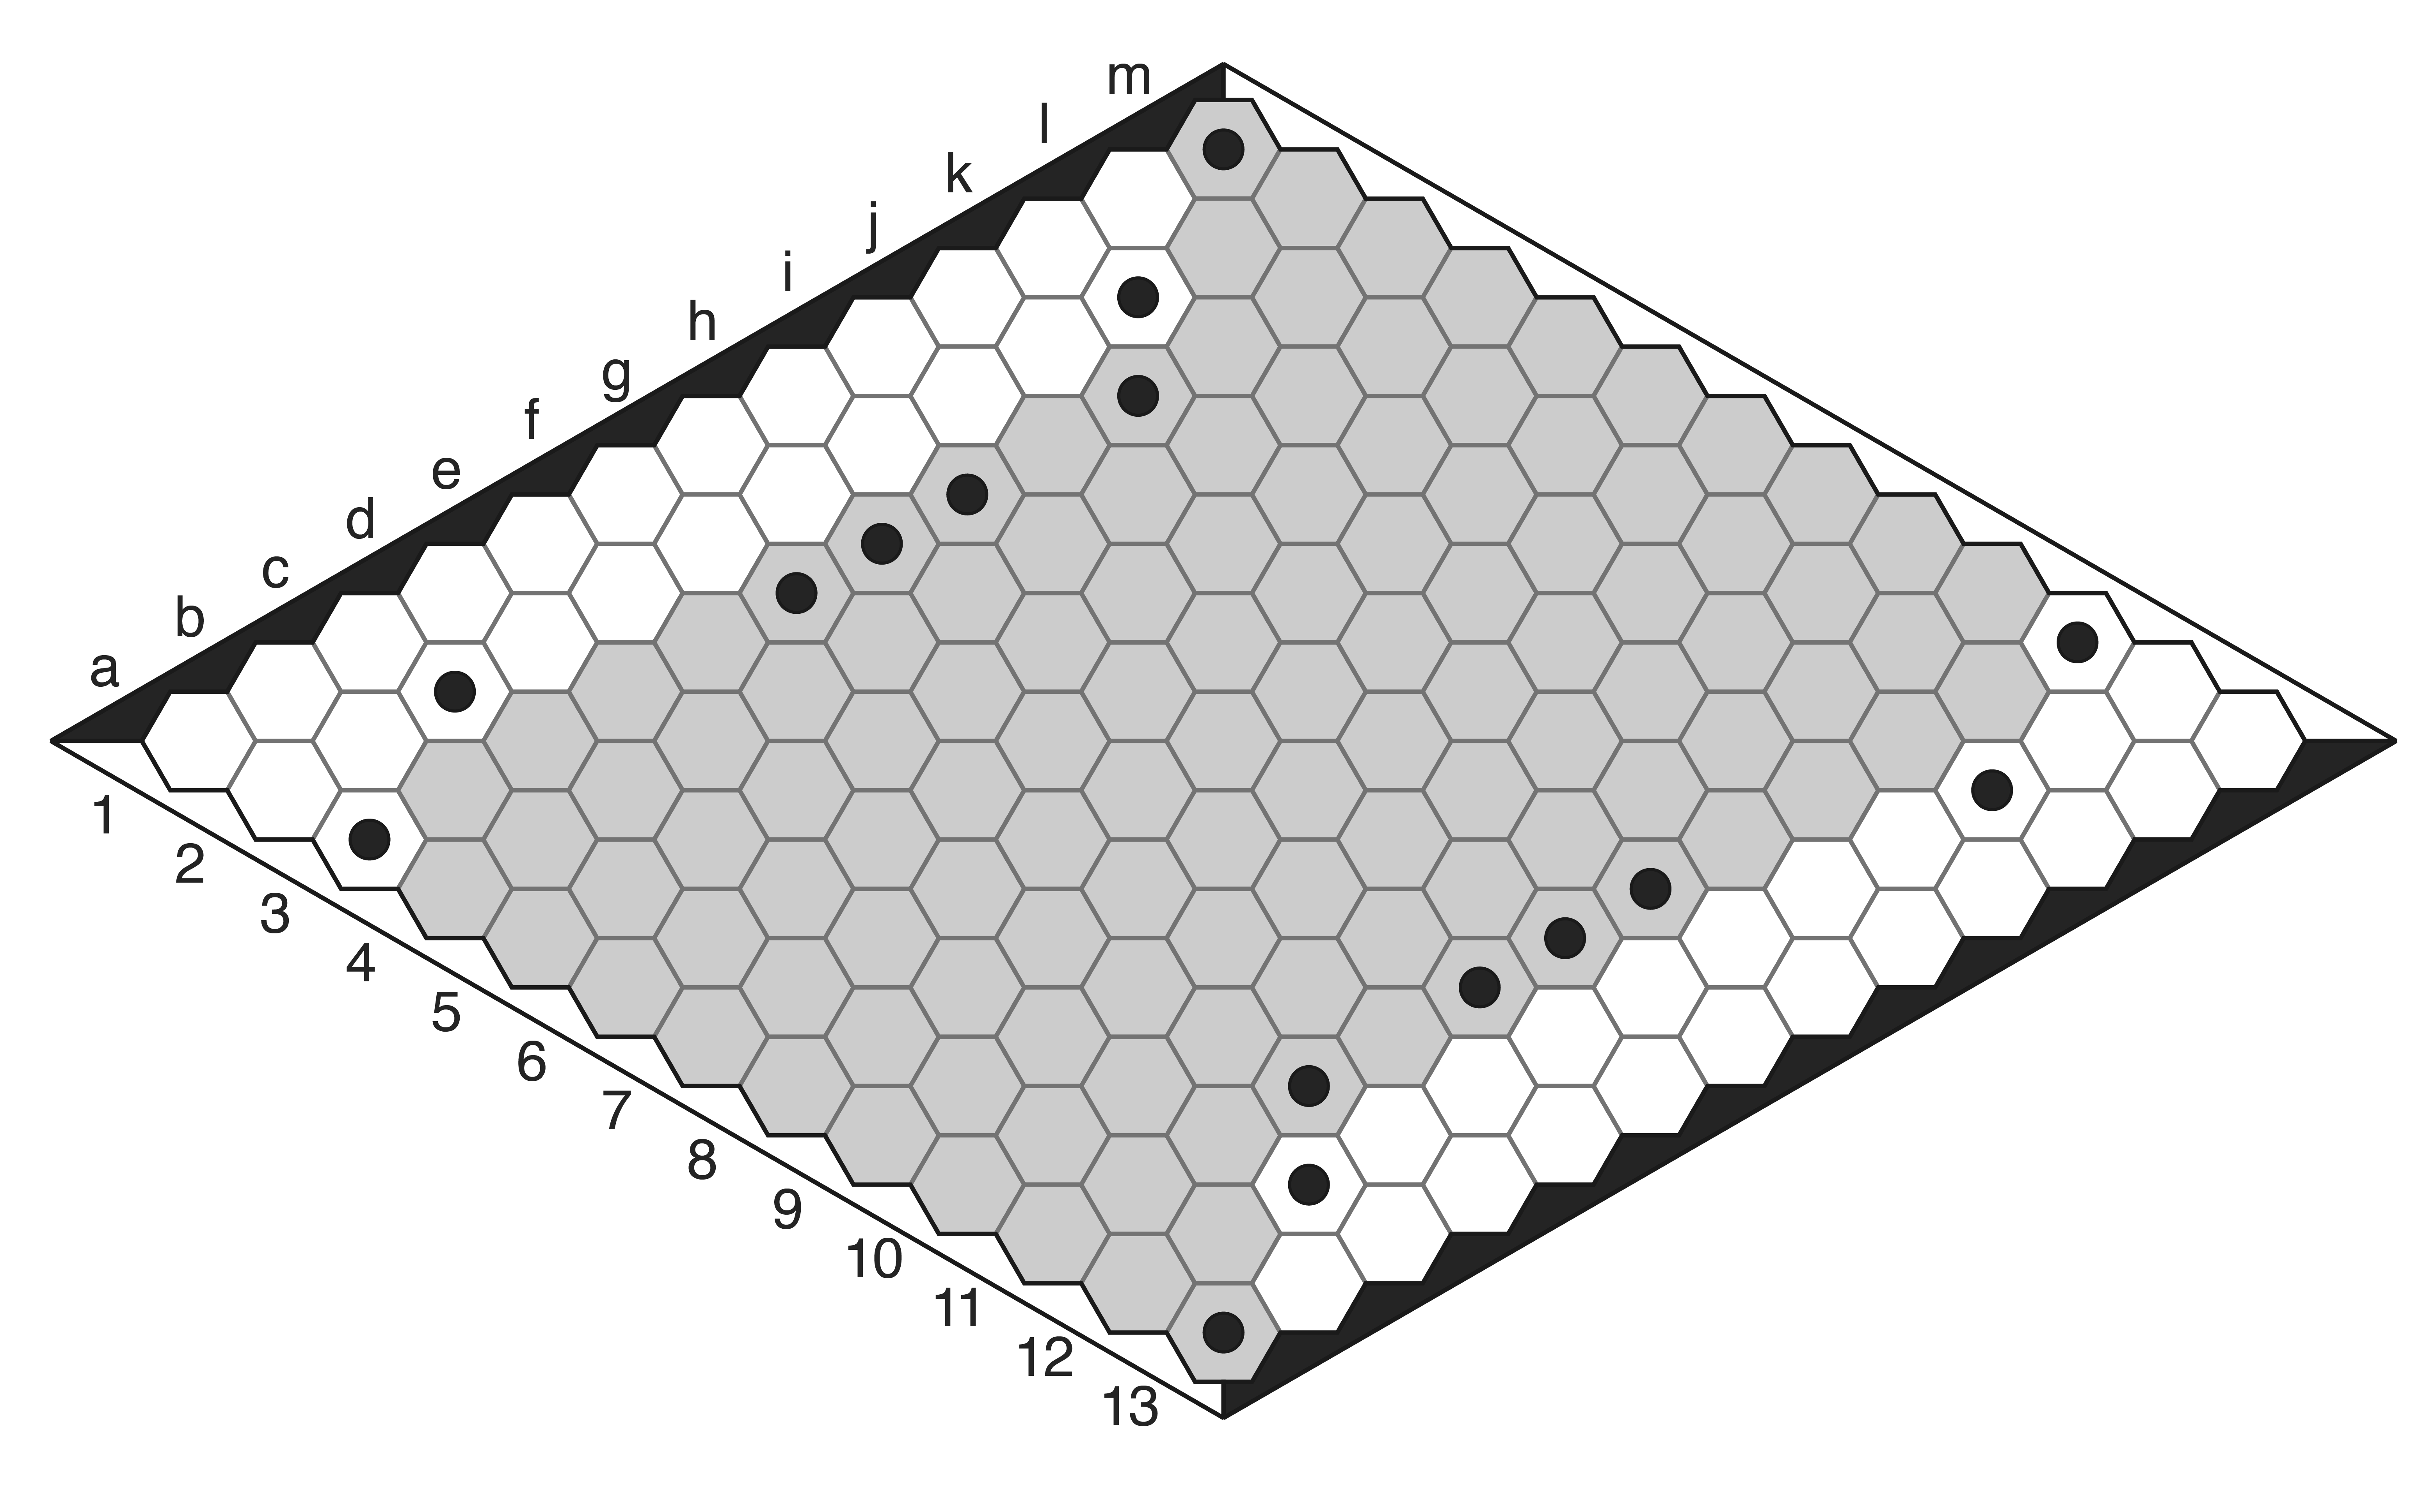
Here’s an animation of the full game, courtesy of Ai Ai:

Full game — Simon was Orange, I was Yellow. Final score — Orange 16, Yellow 43.
The game is also viewable on MindSports, if you want to step through it move by move yourself.
Permute Move Notation
In order to record games of Permute and replicate them later, we need some form of notation to keep track of what moves have been played. Ed van Zon of MindSports came up with a simple notation system that is very easy to learn:
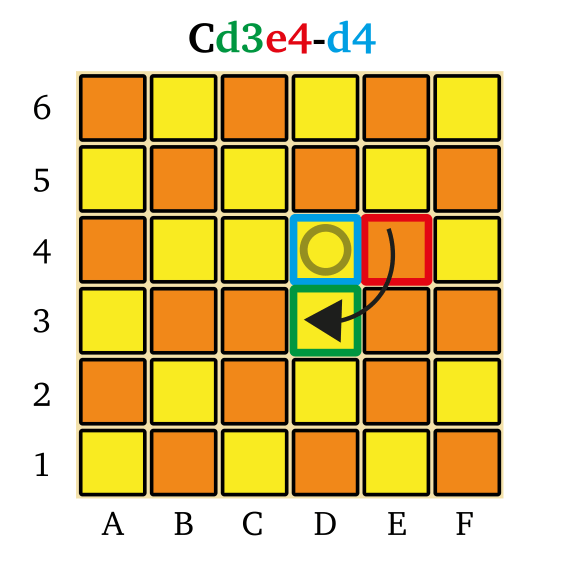
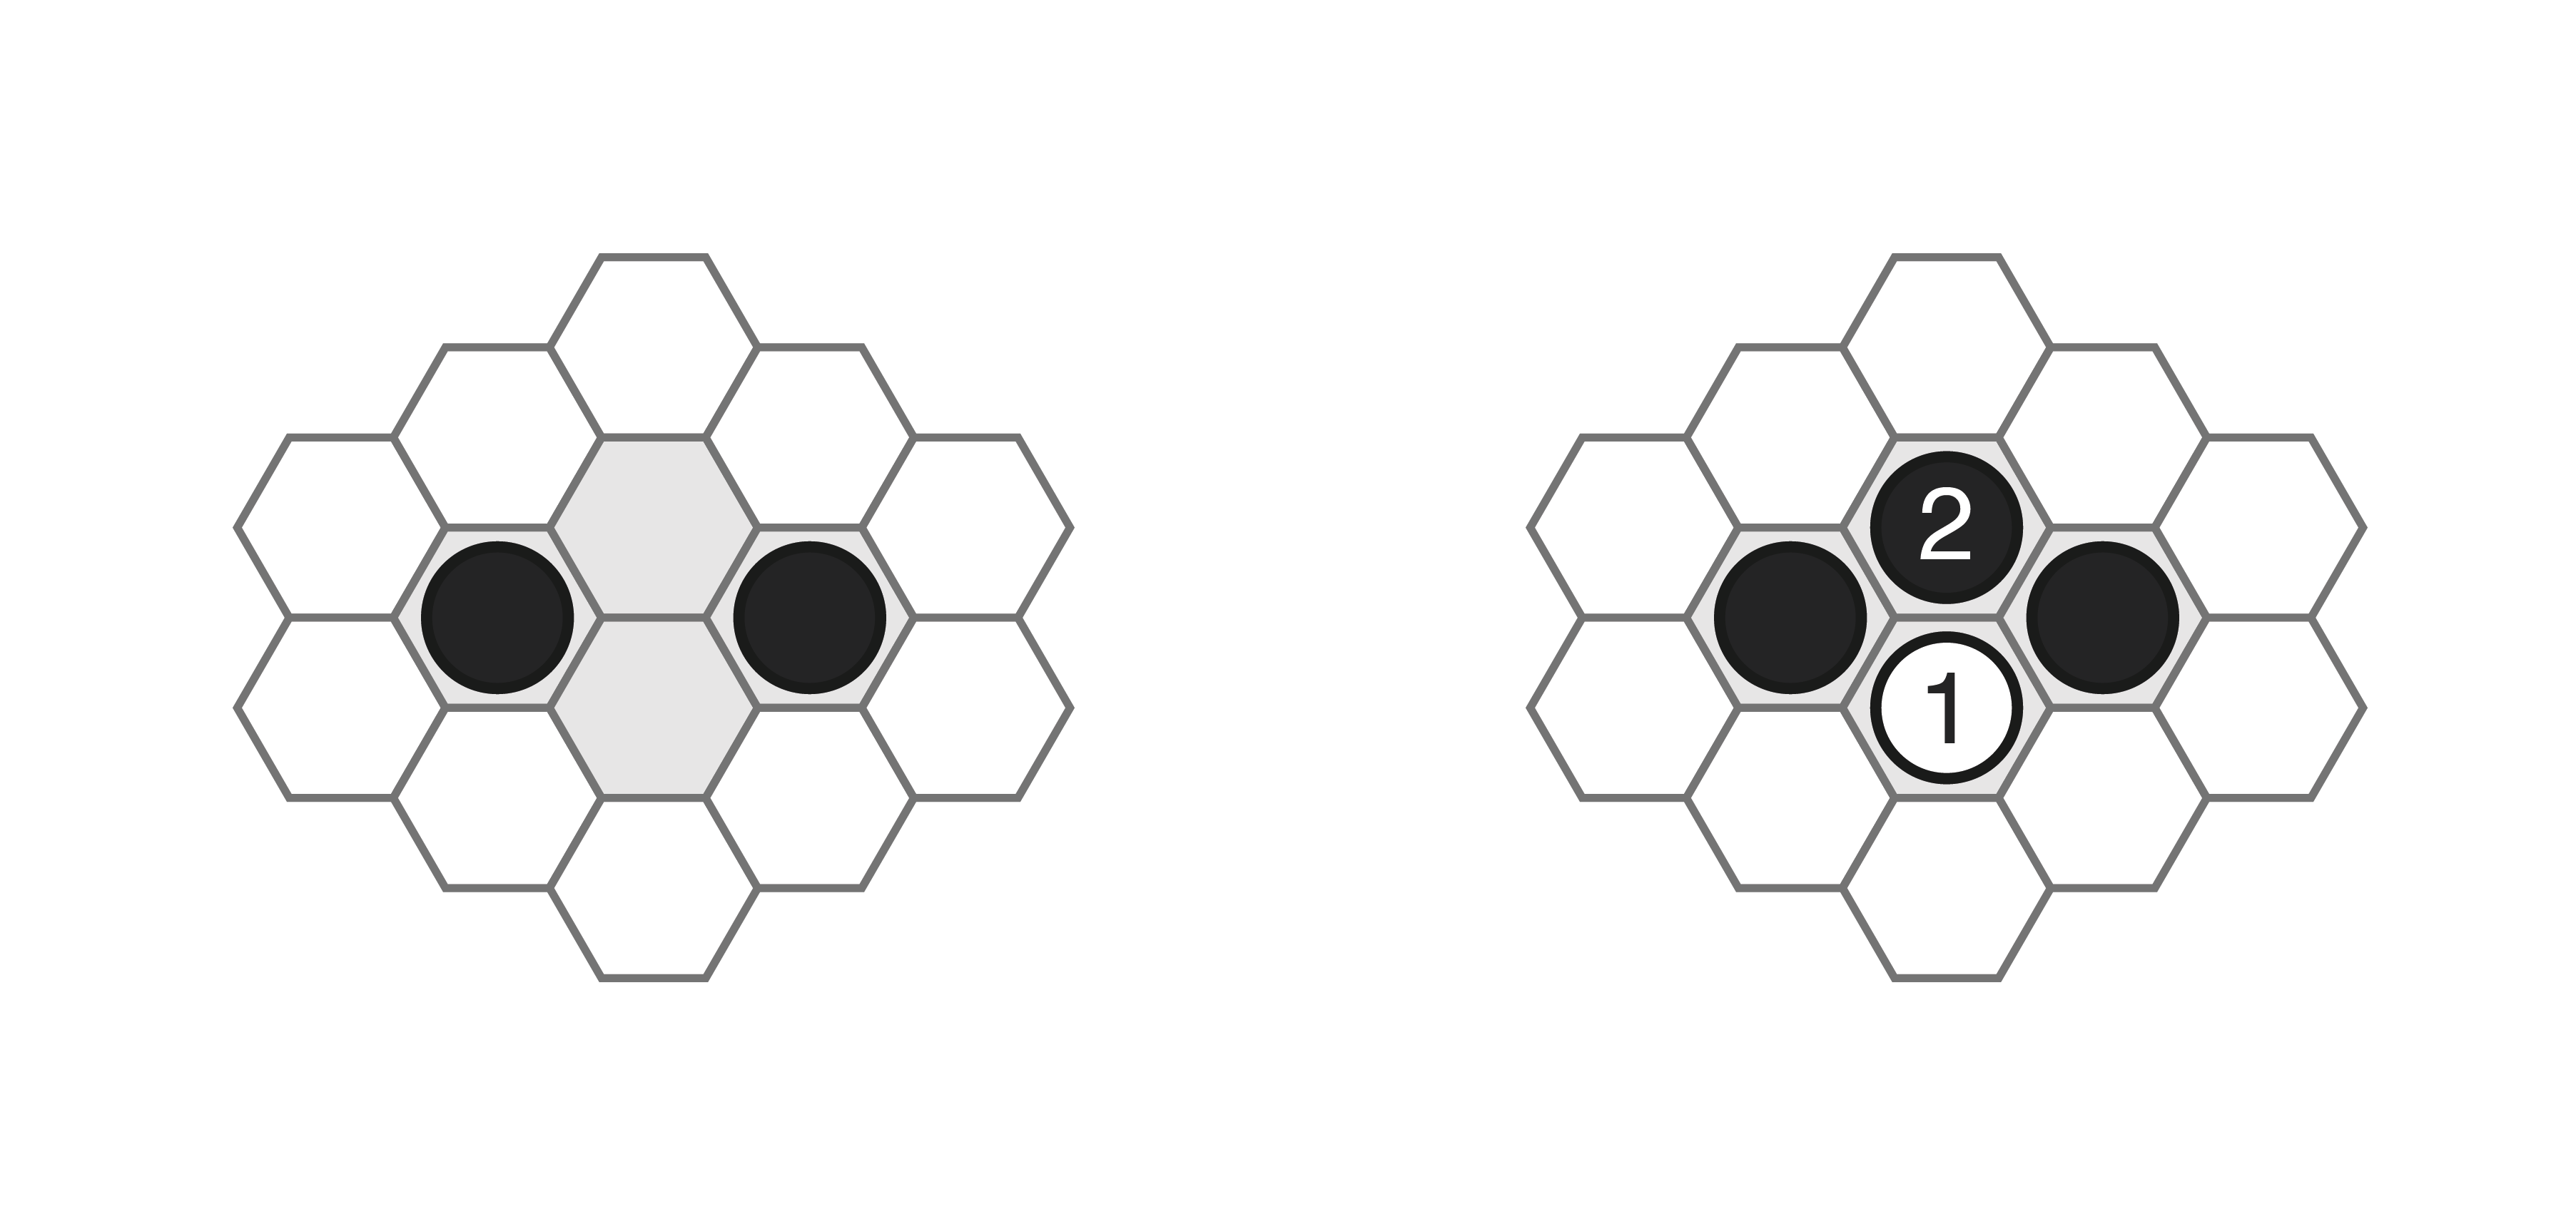
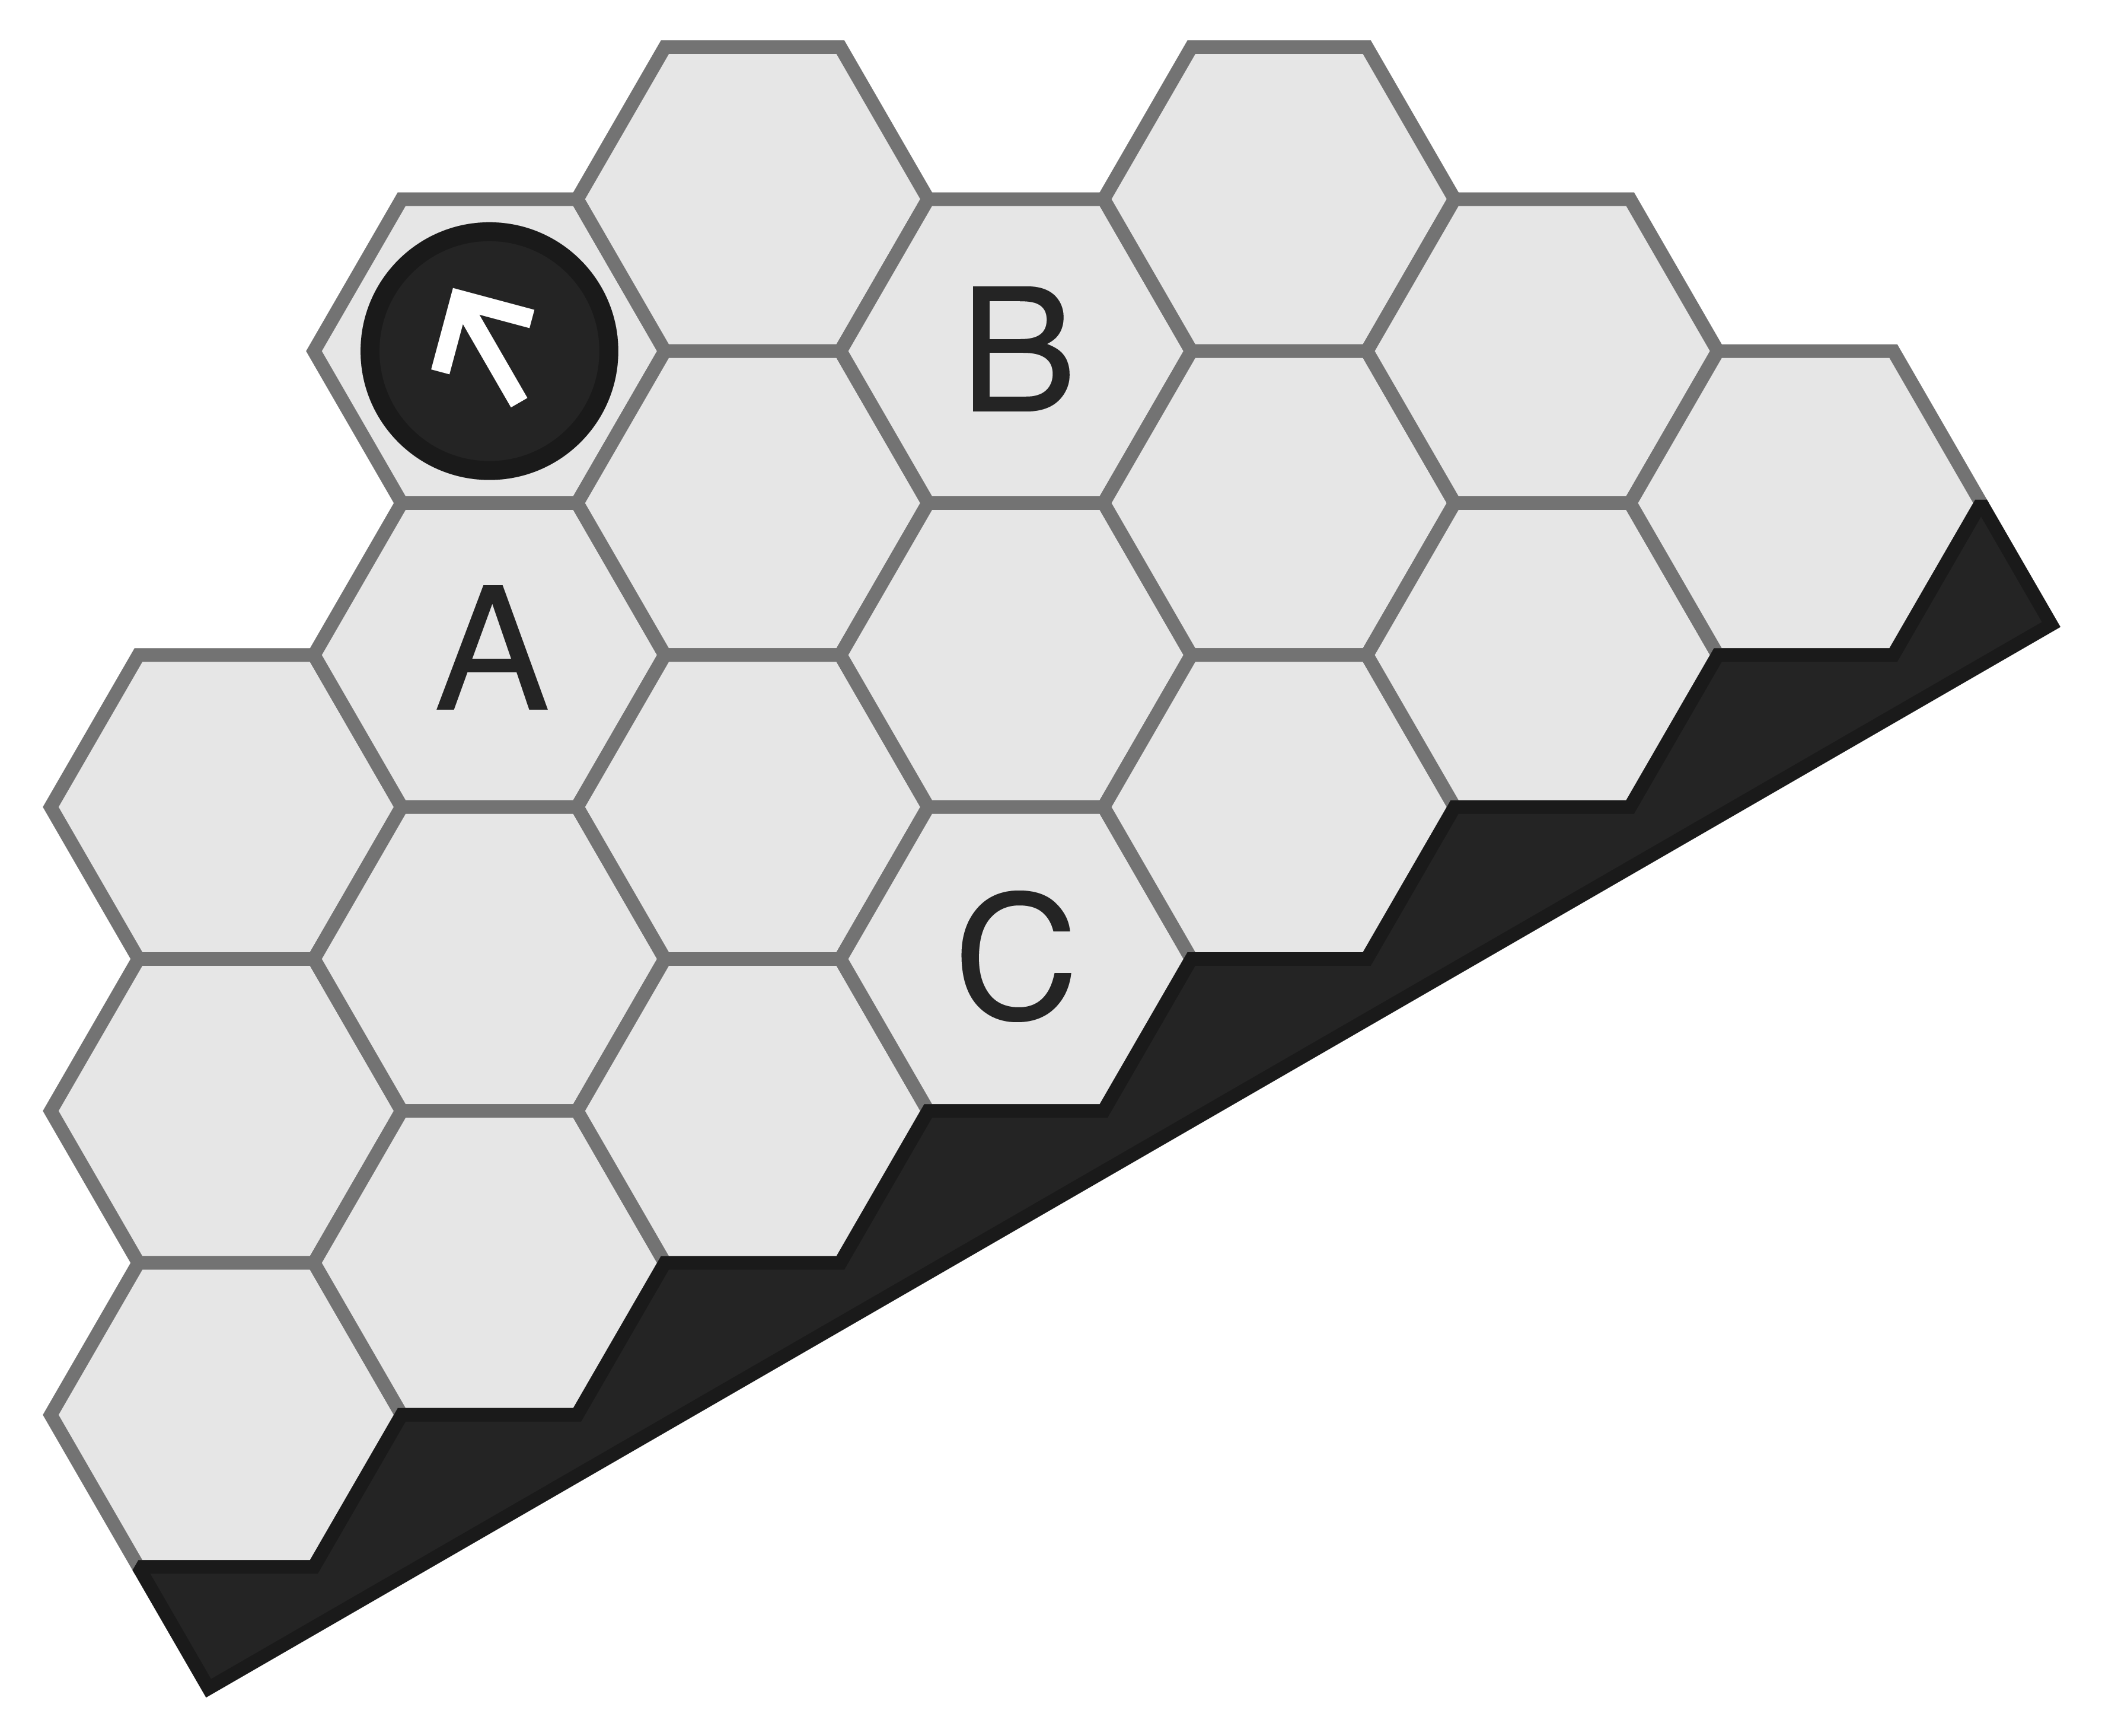
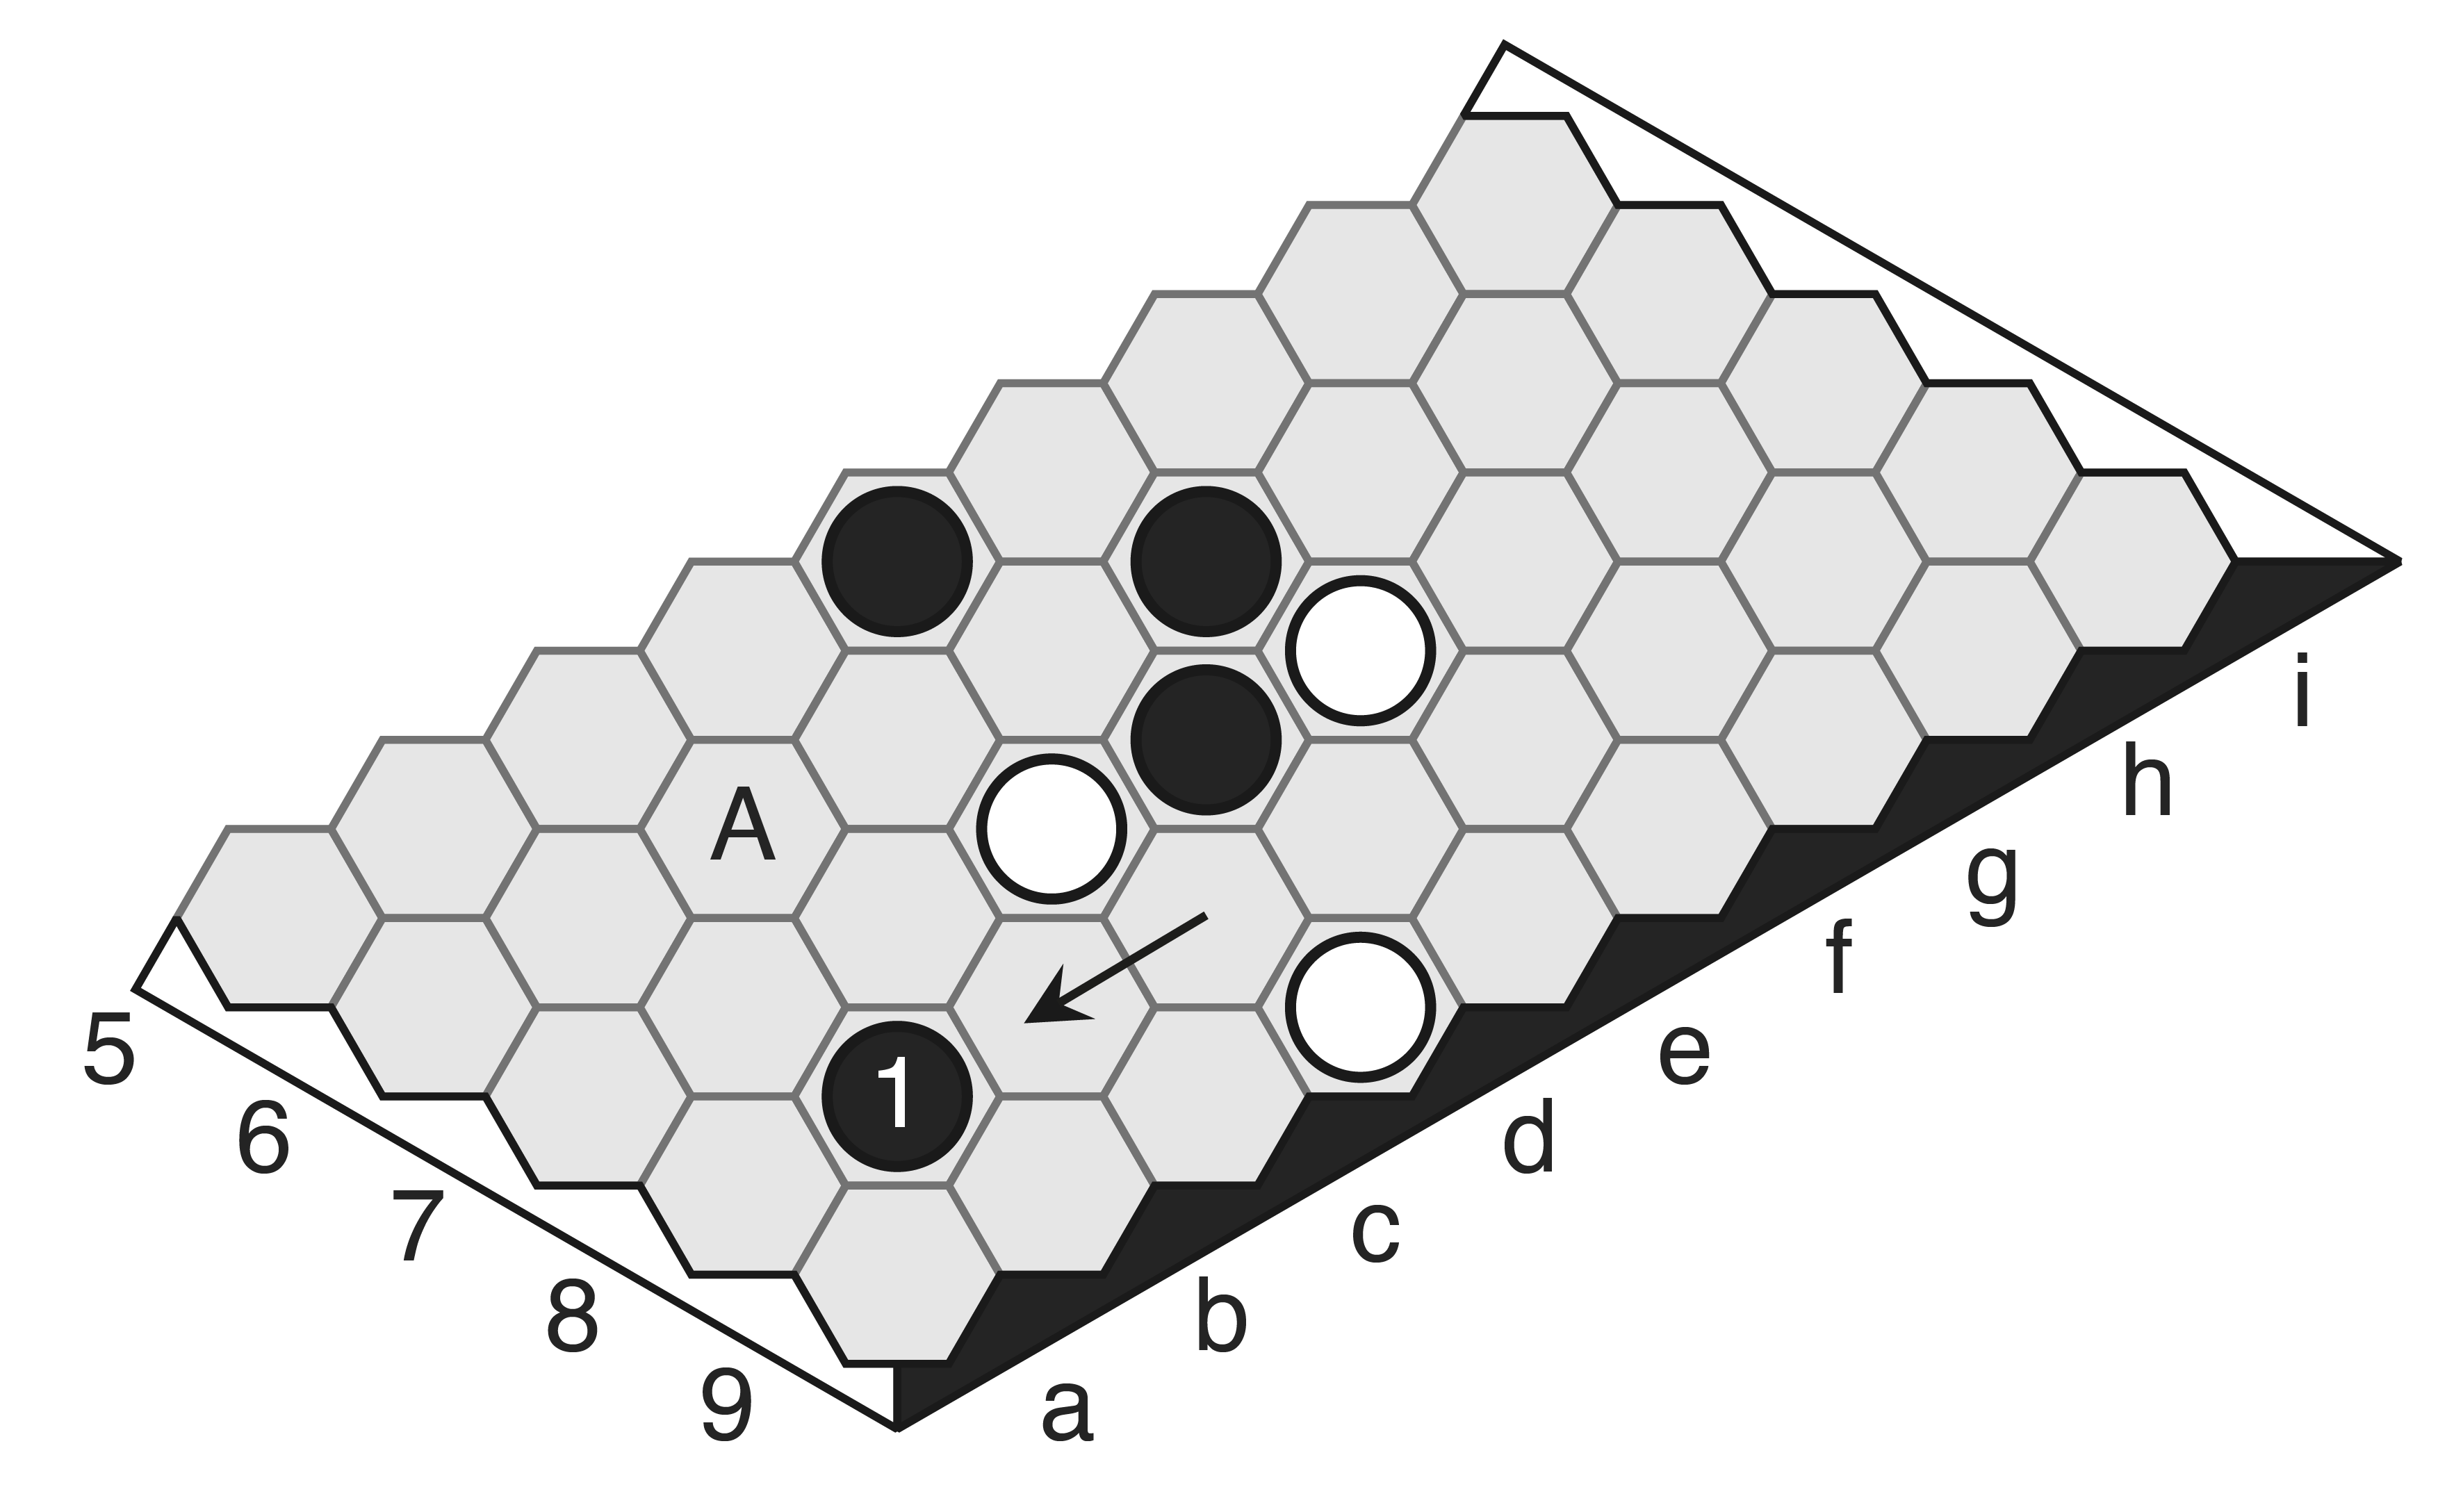
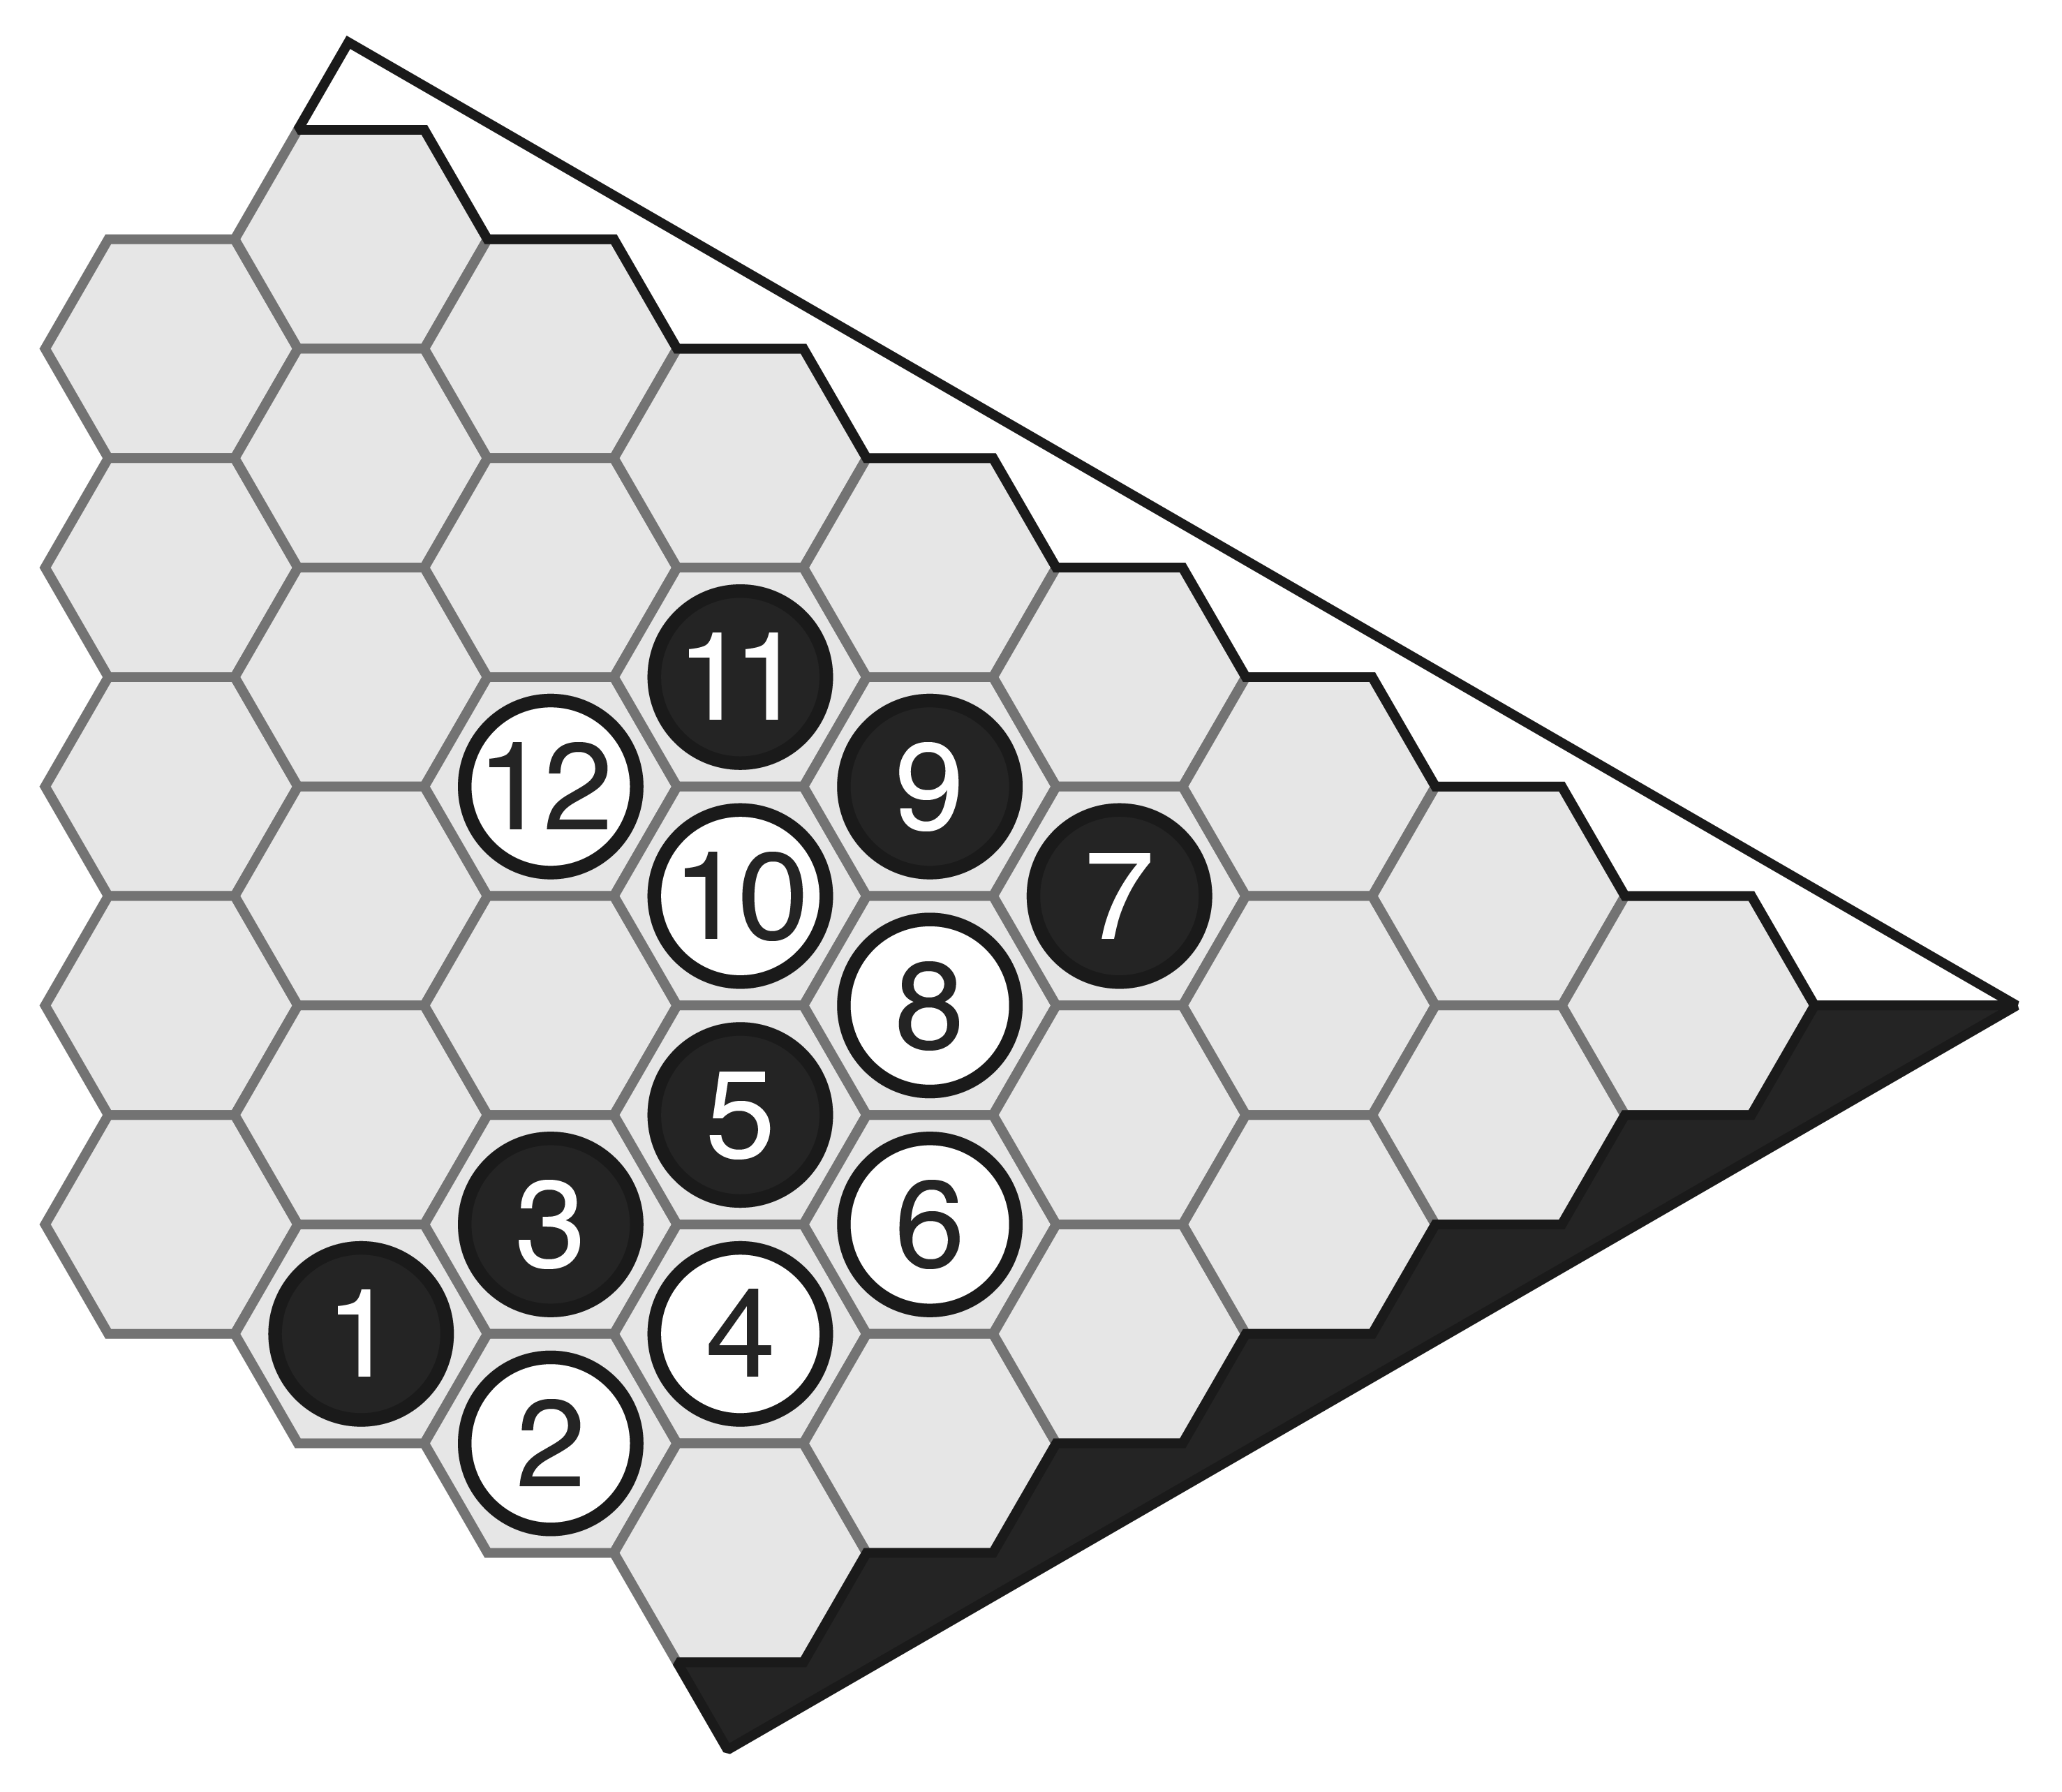
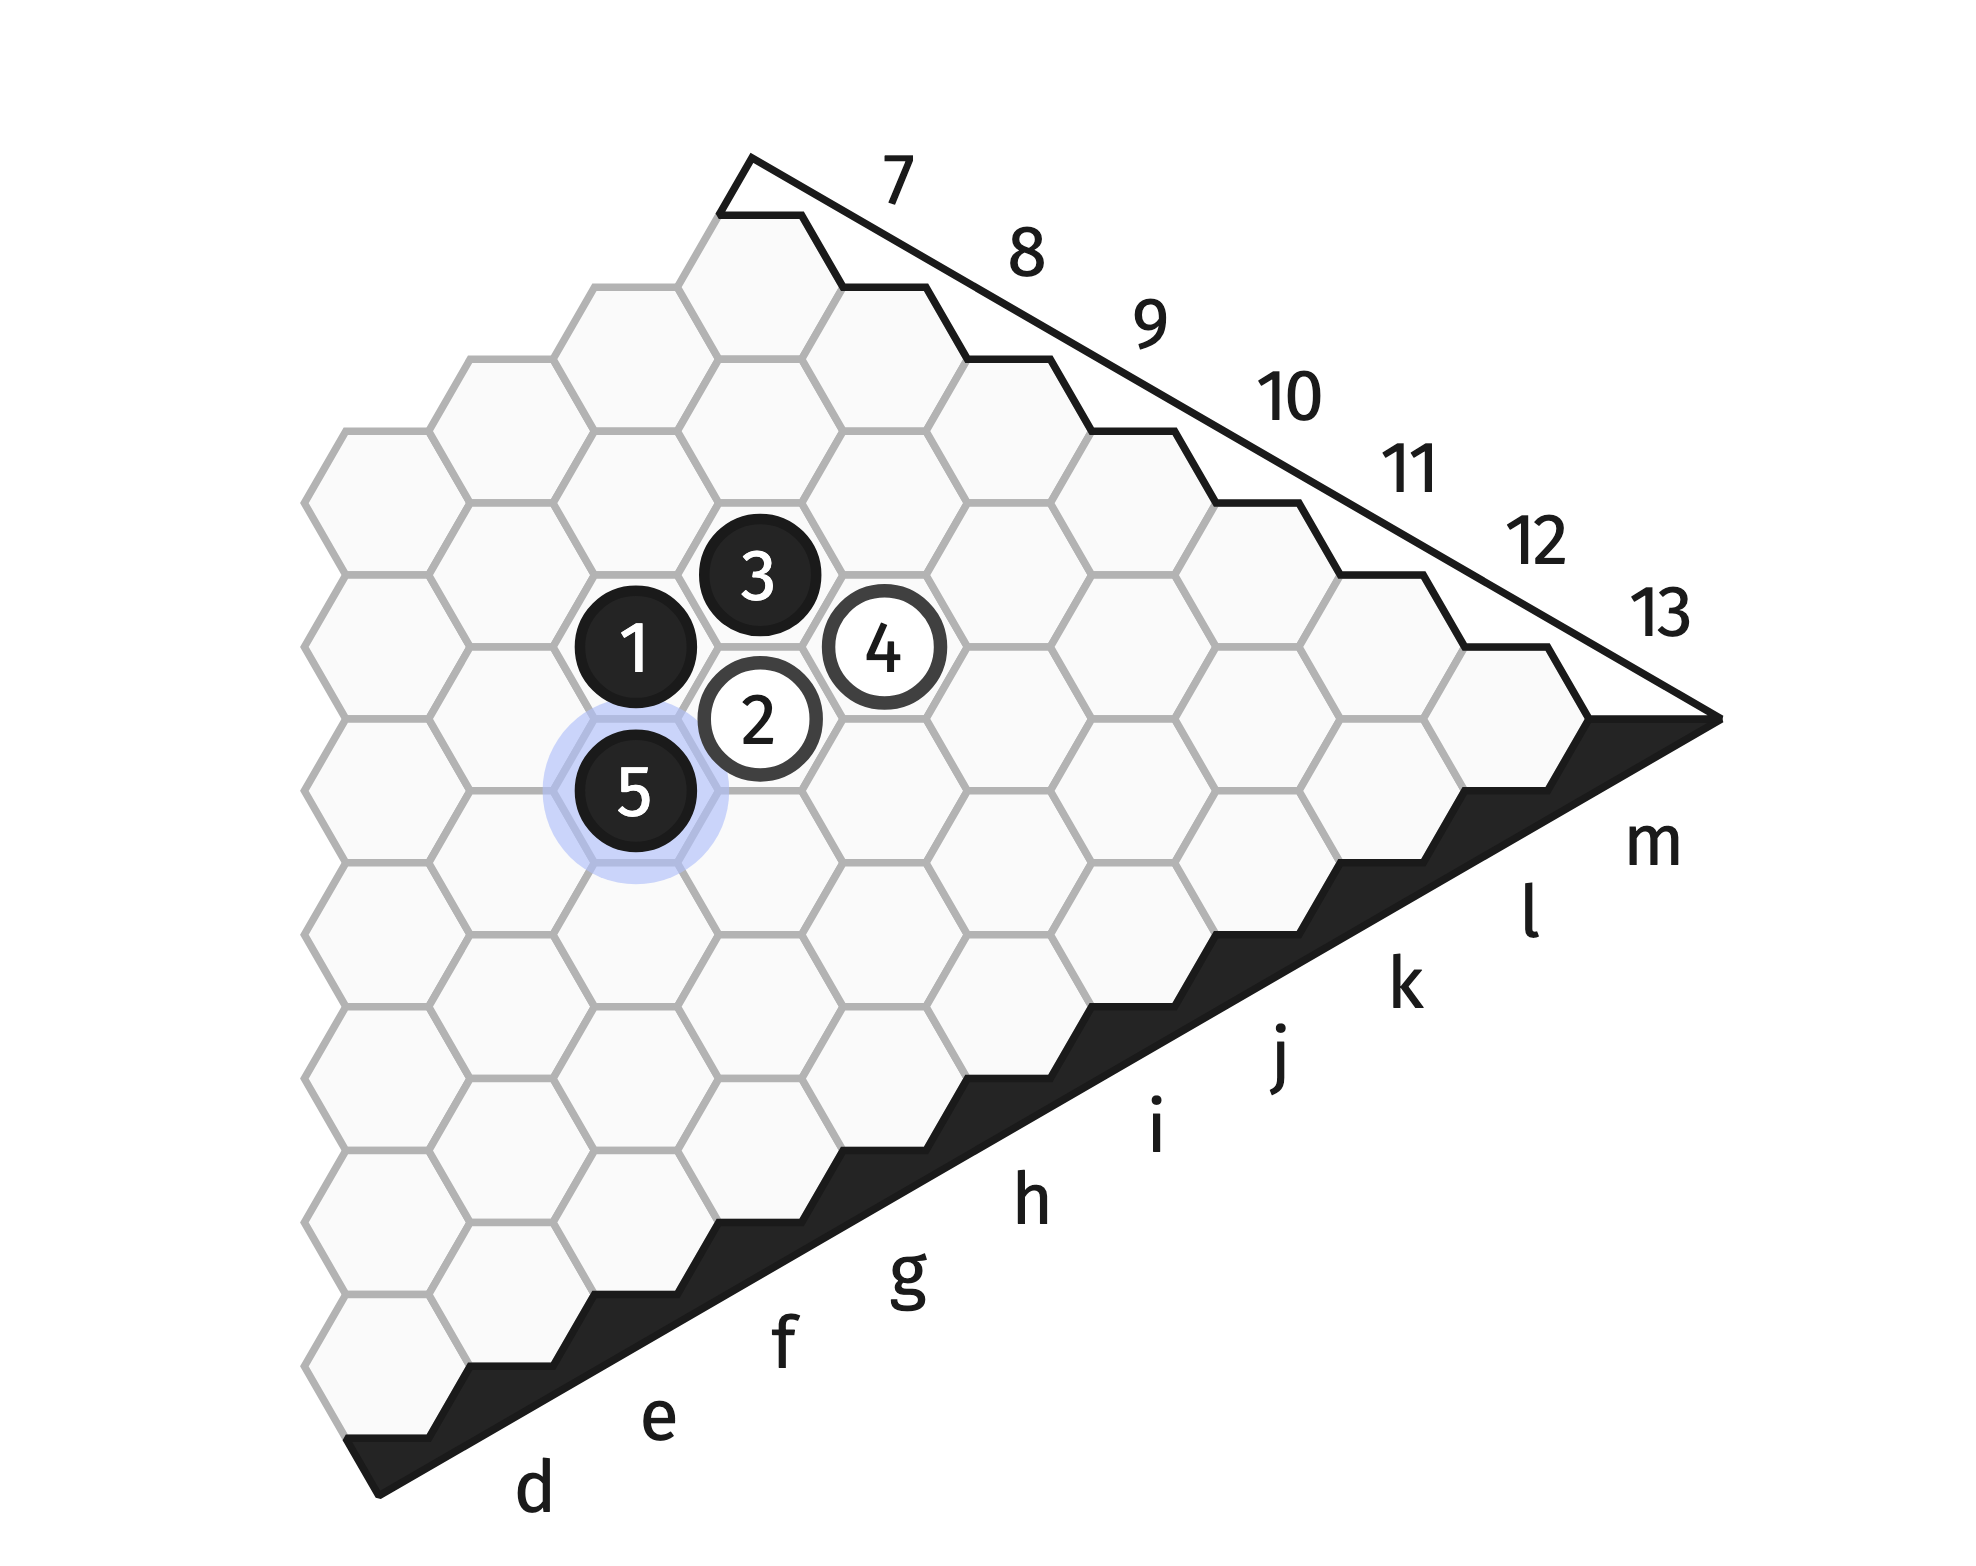
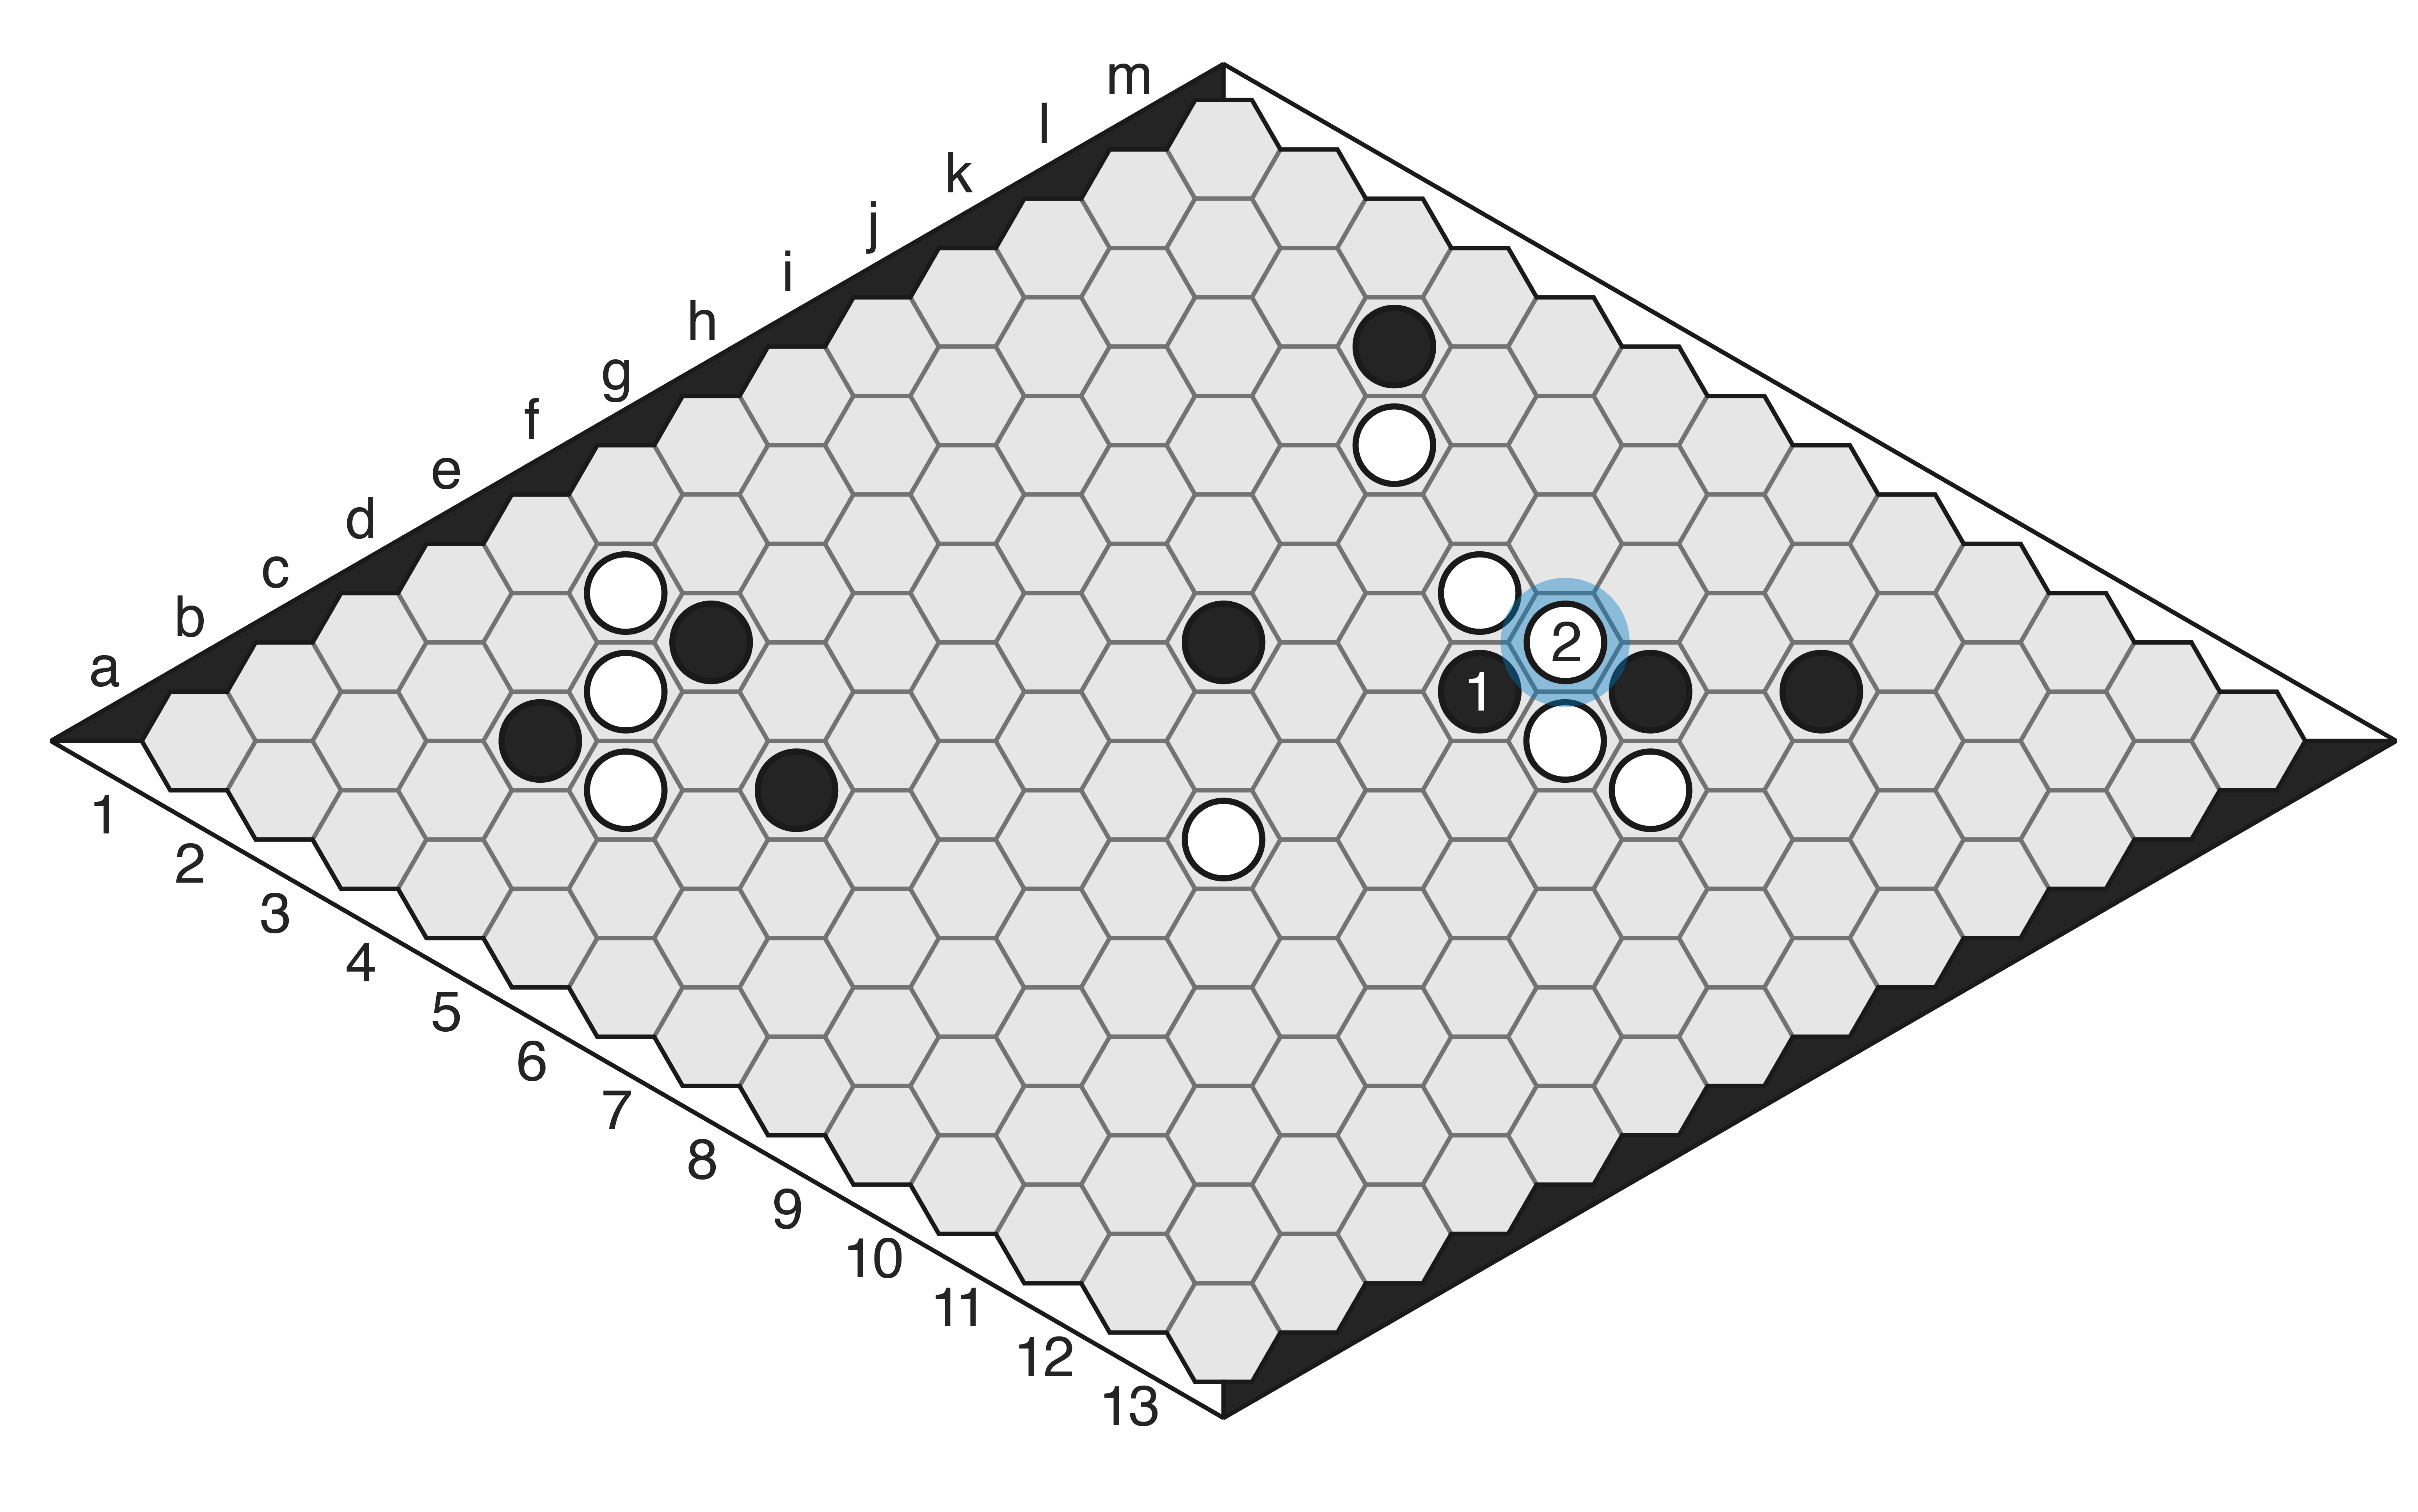
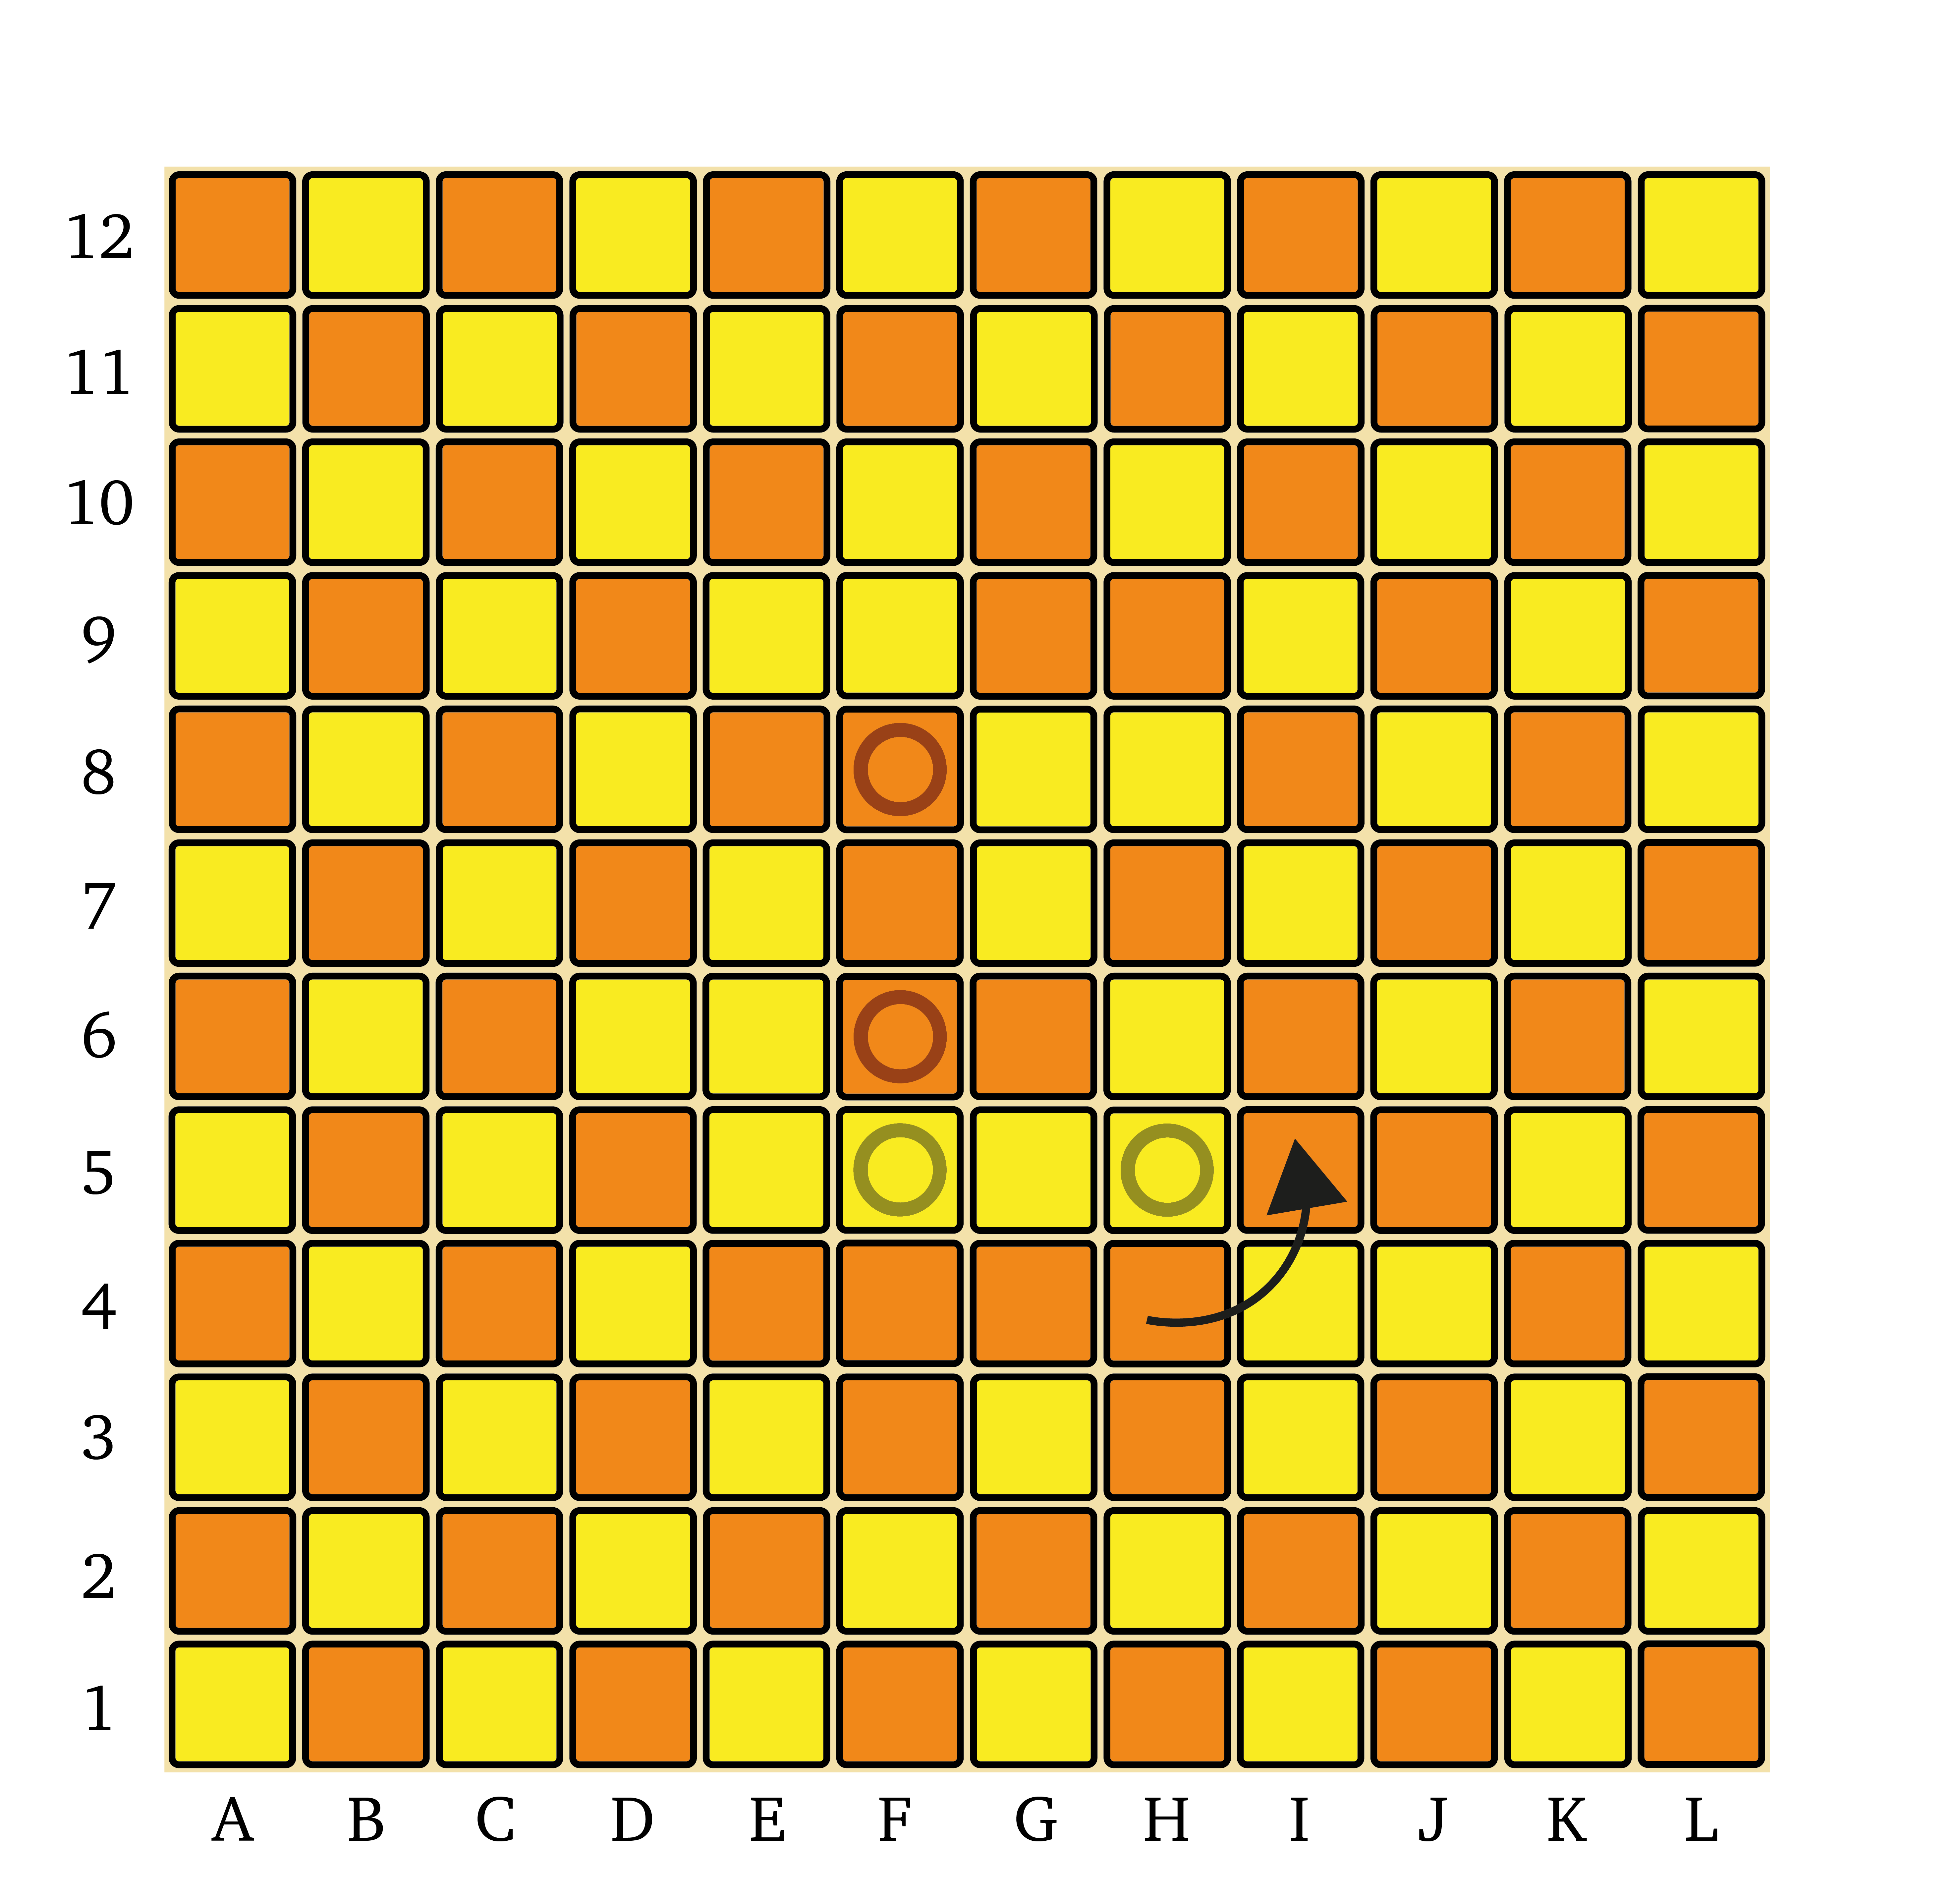
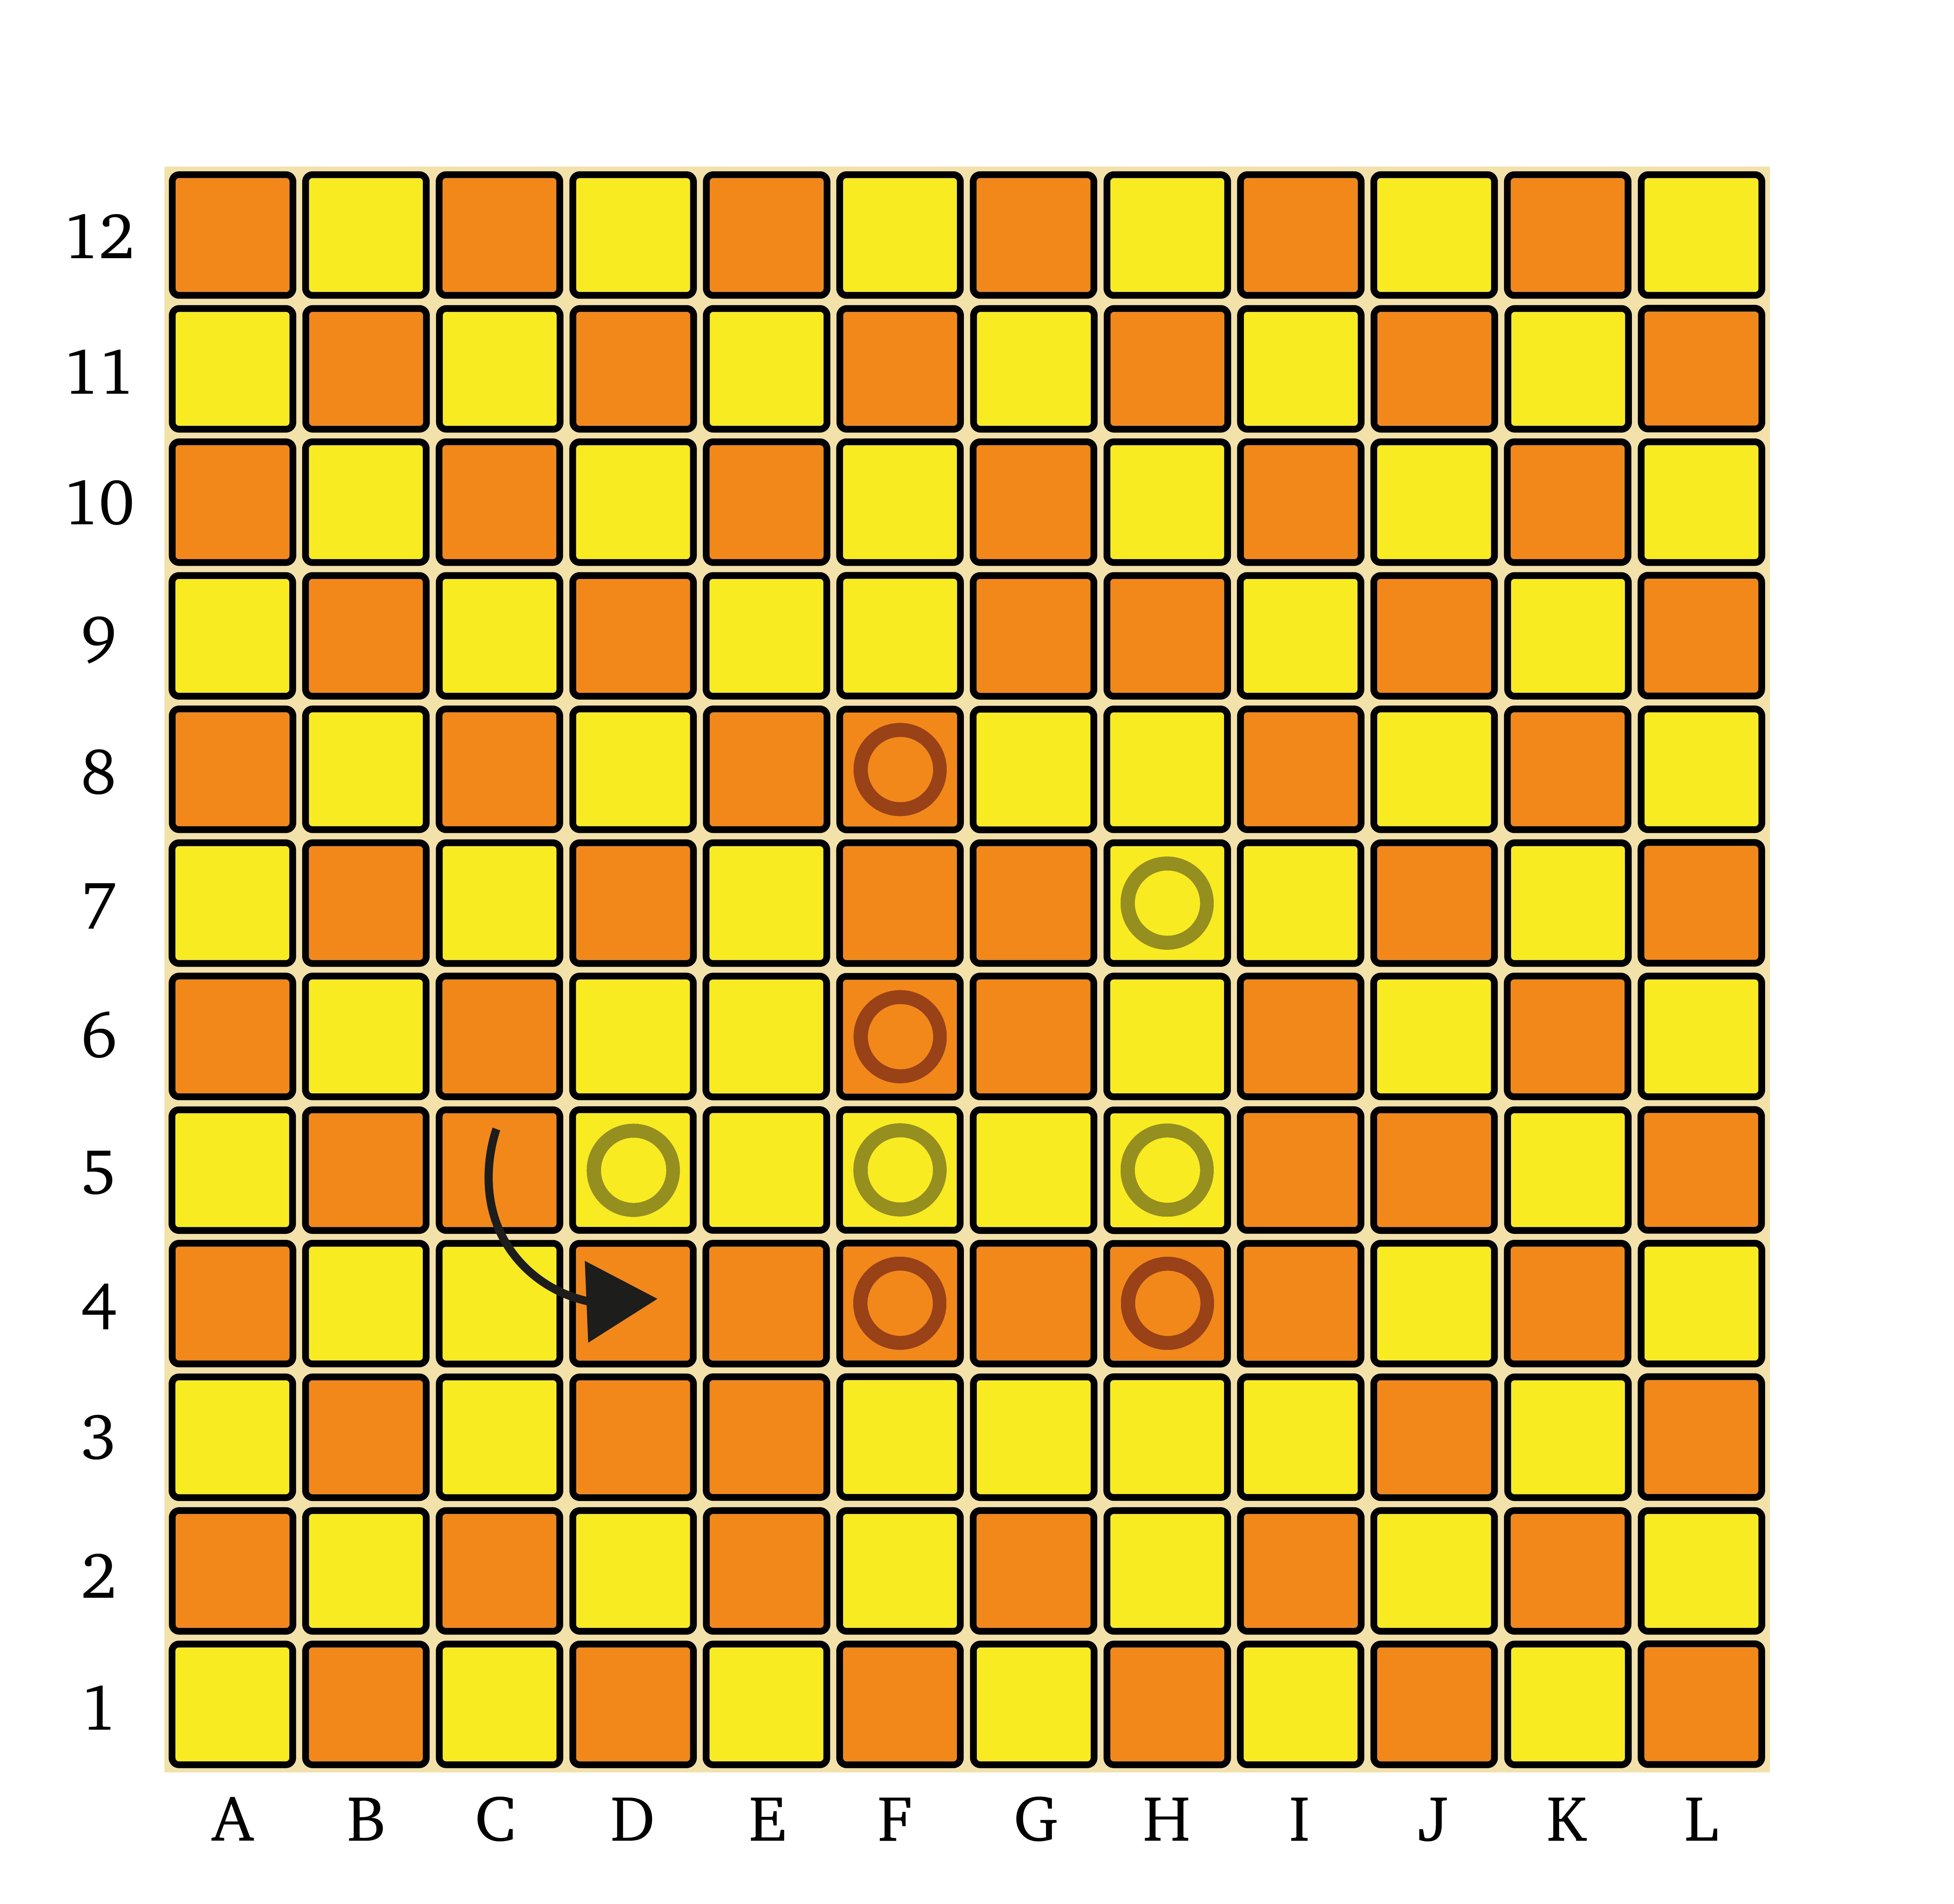
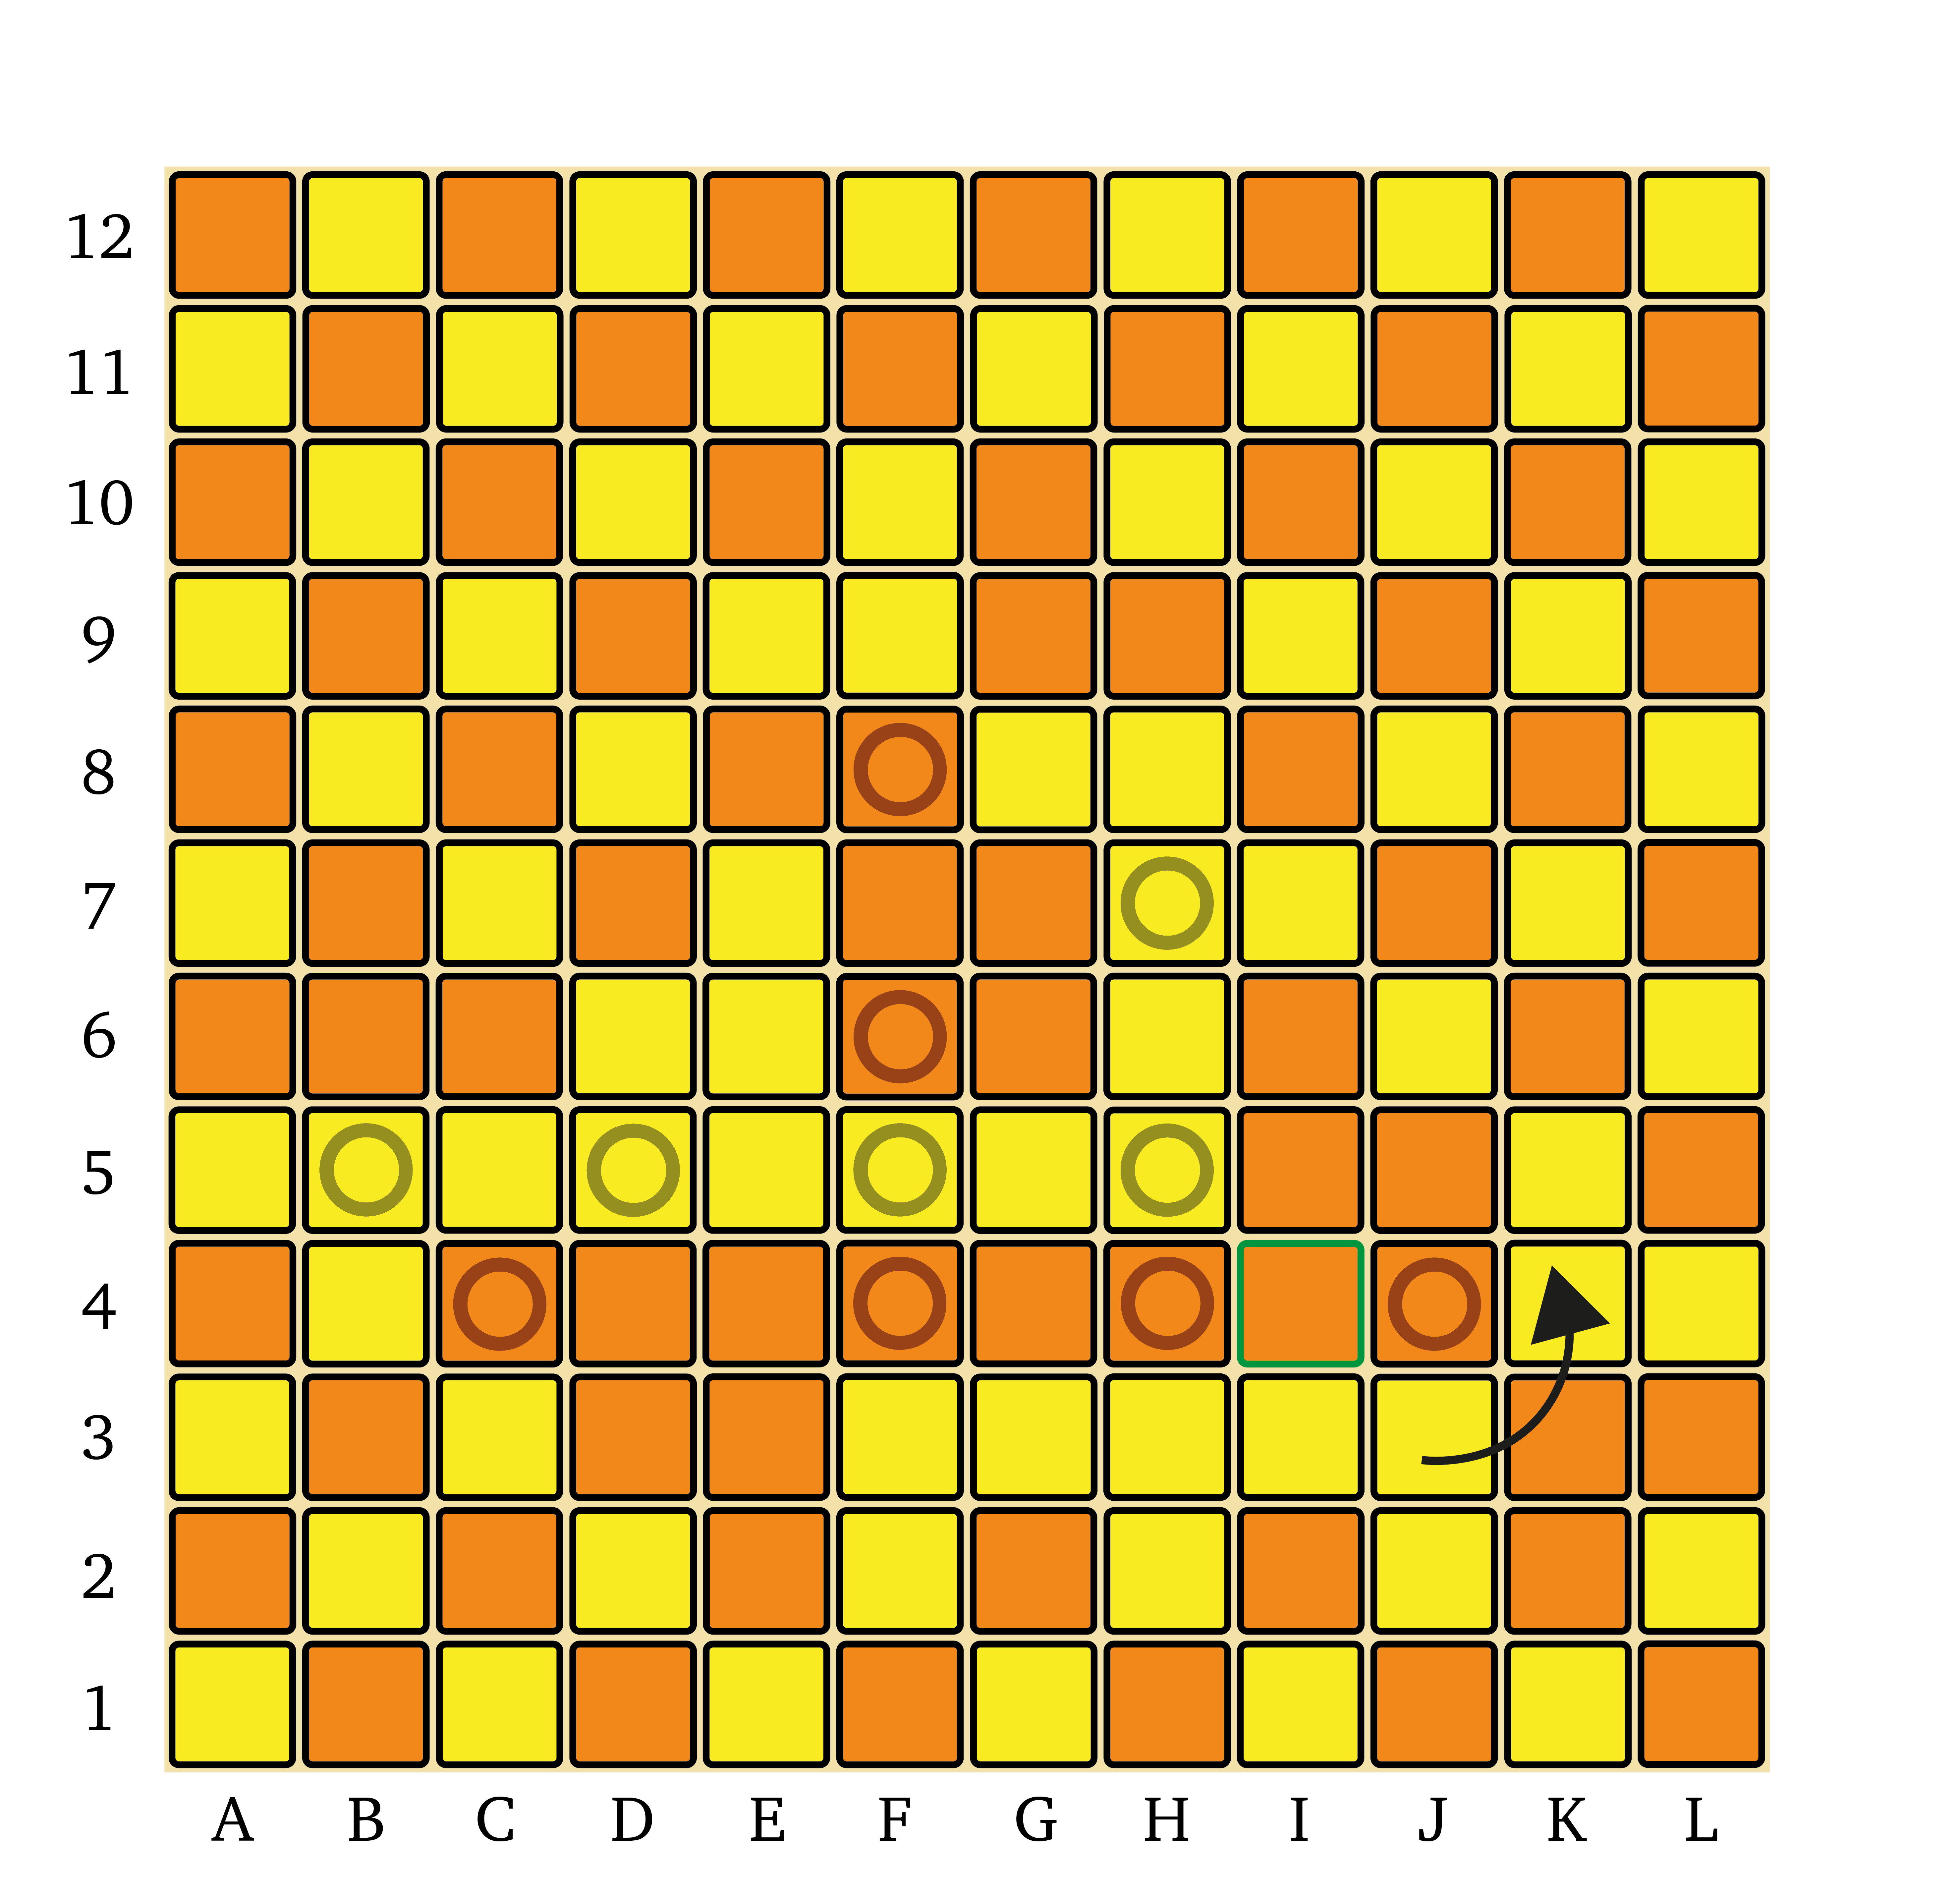
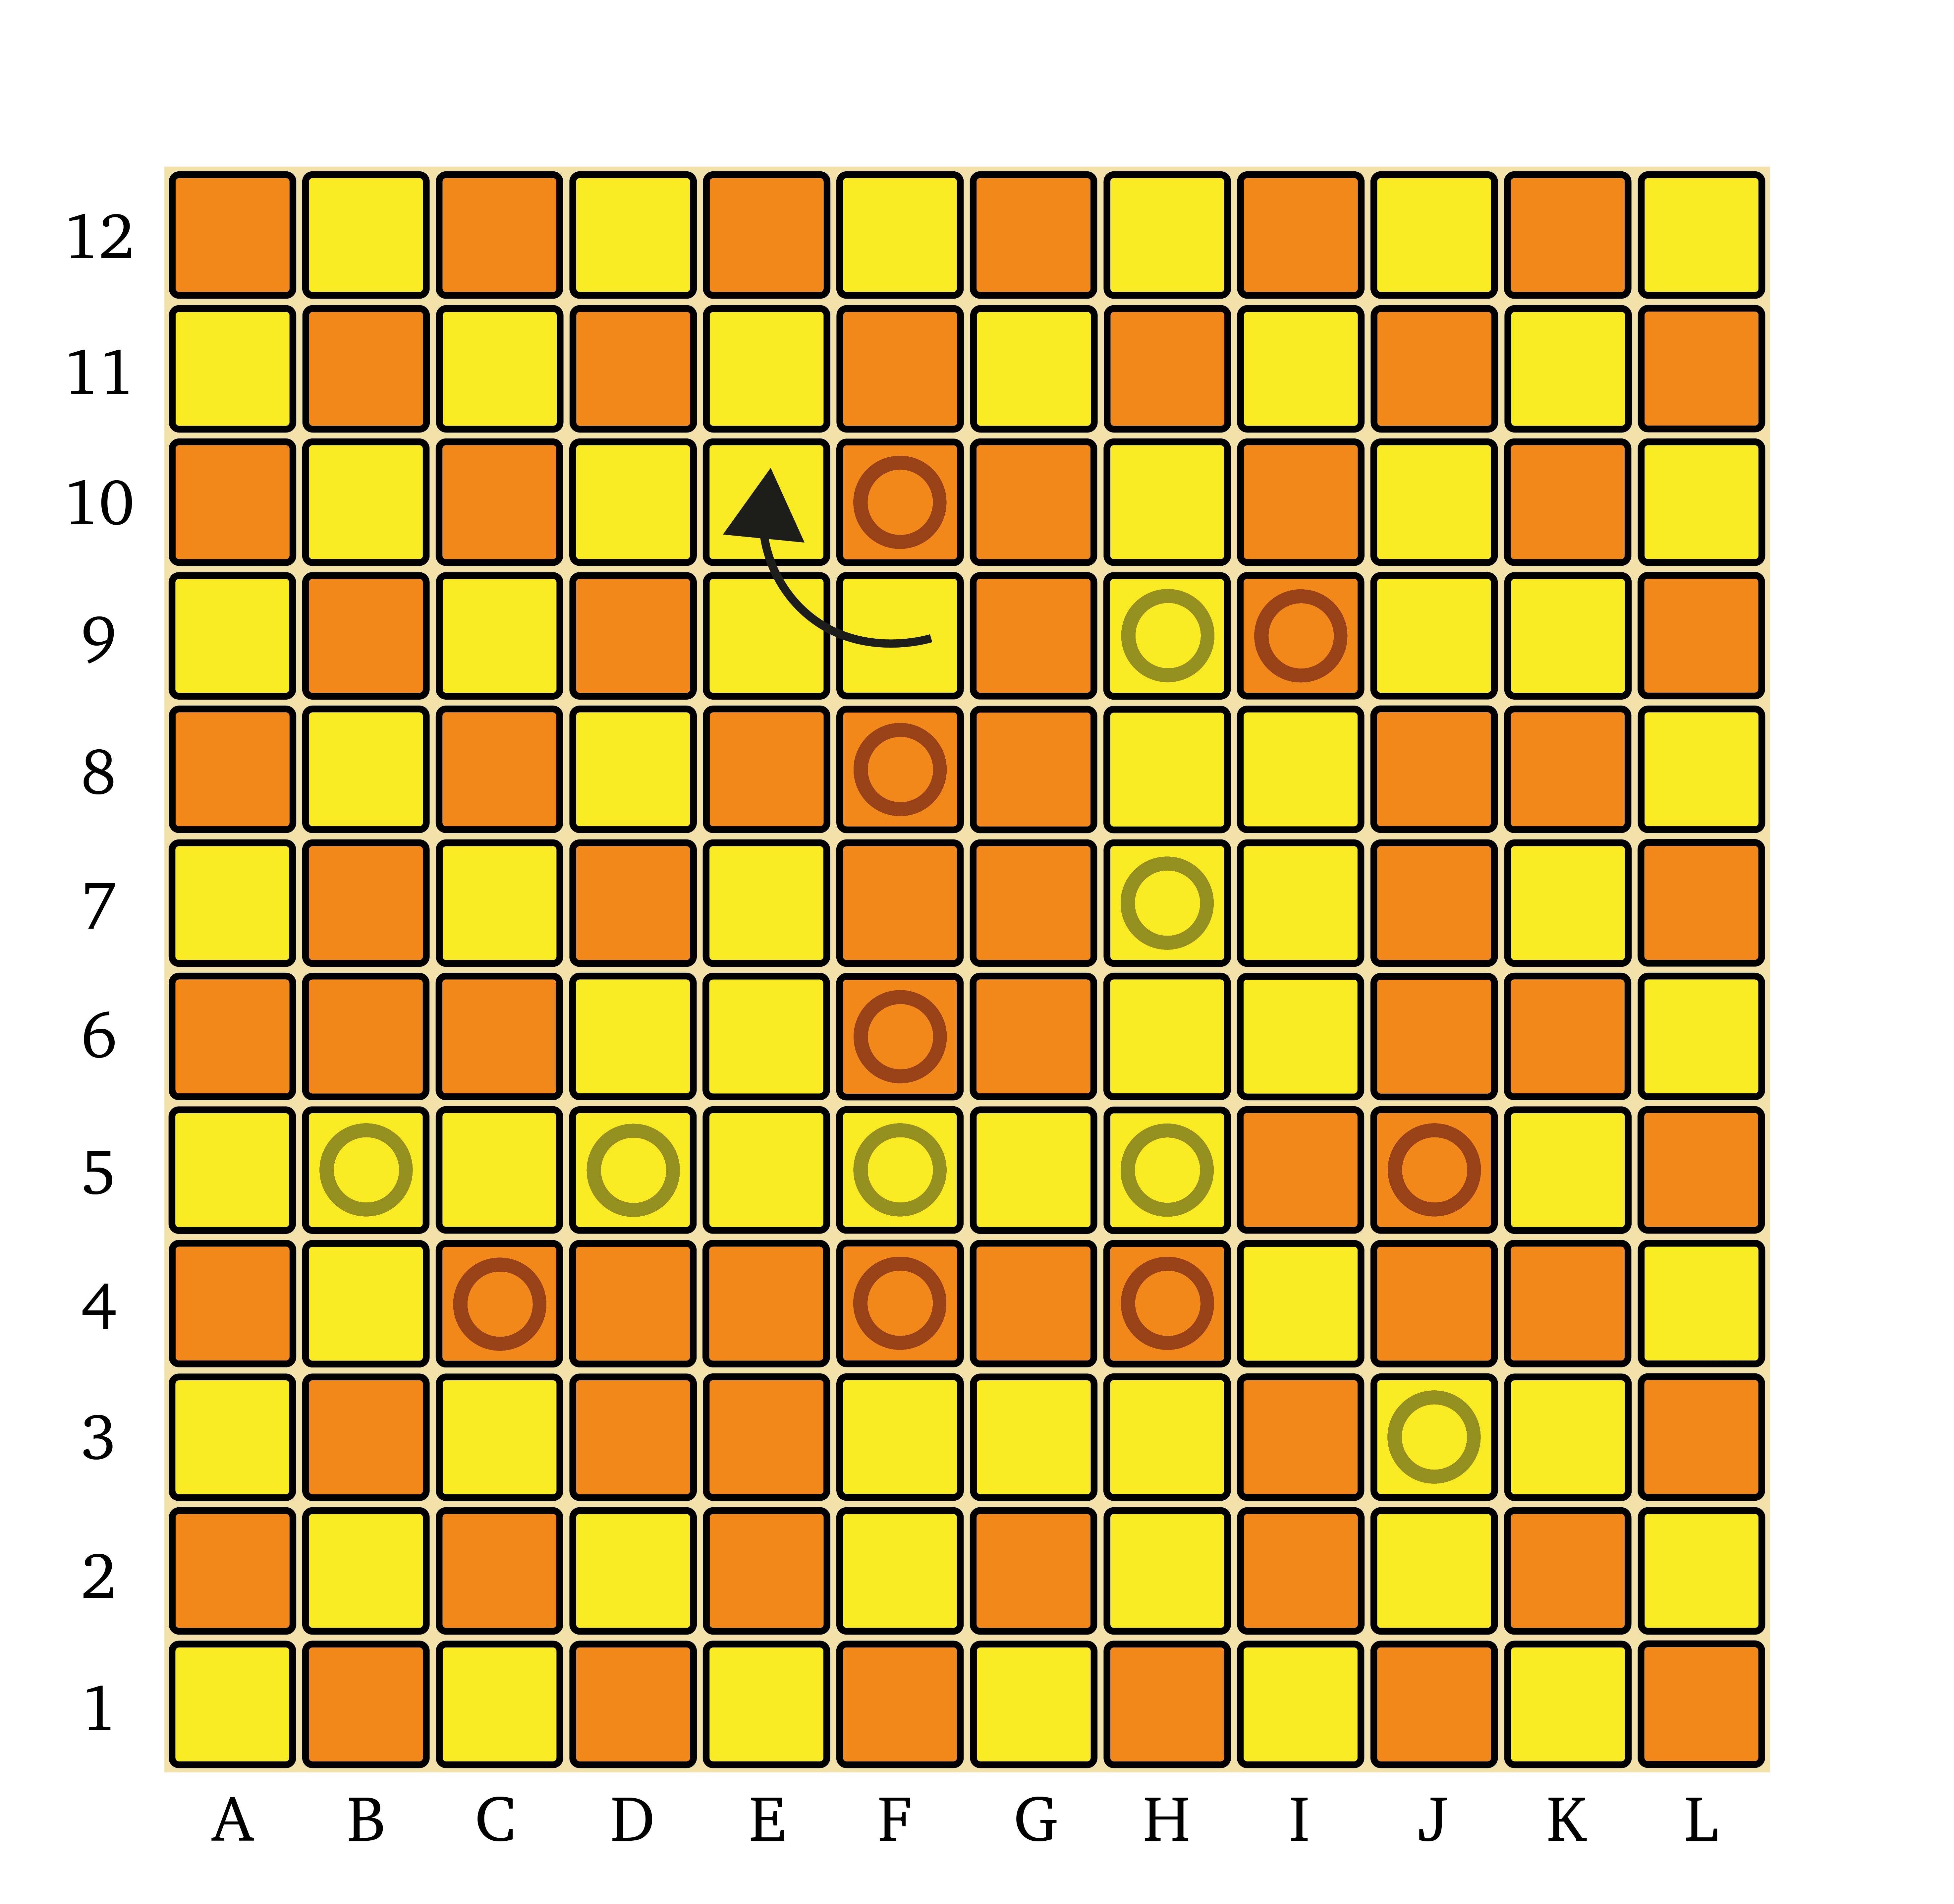
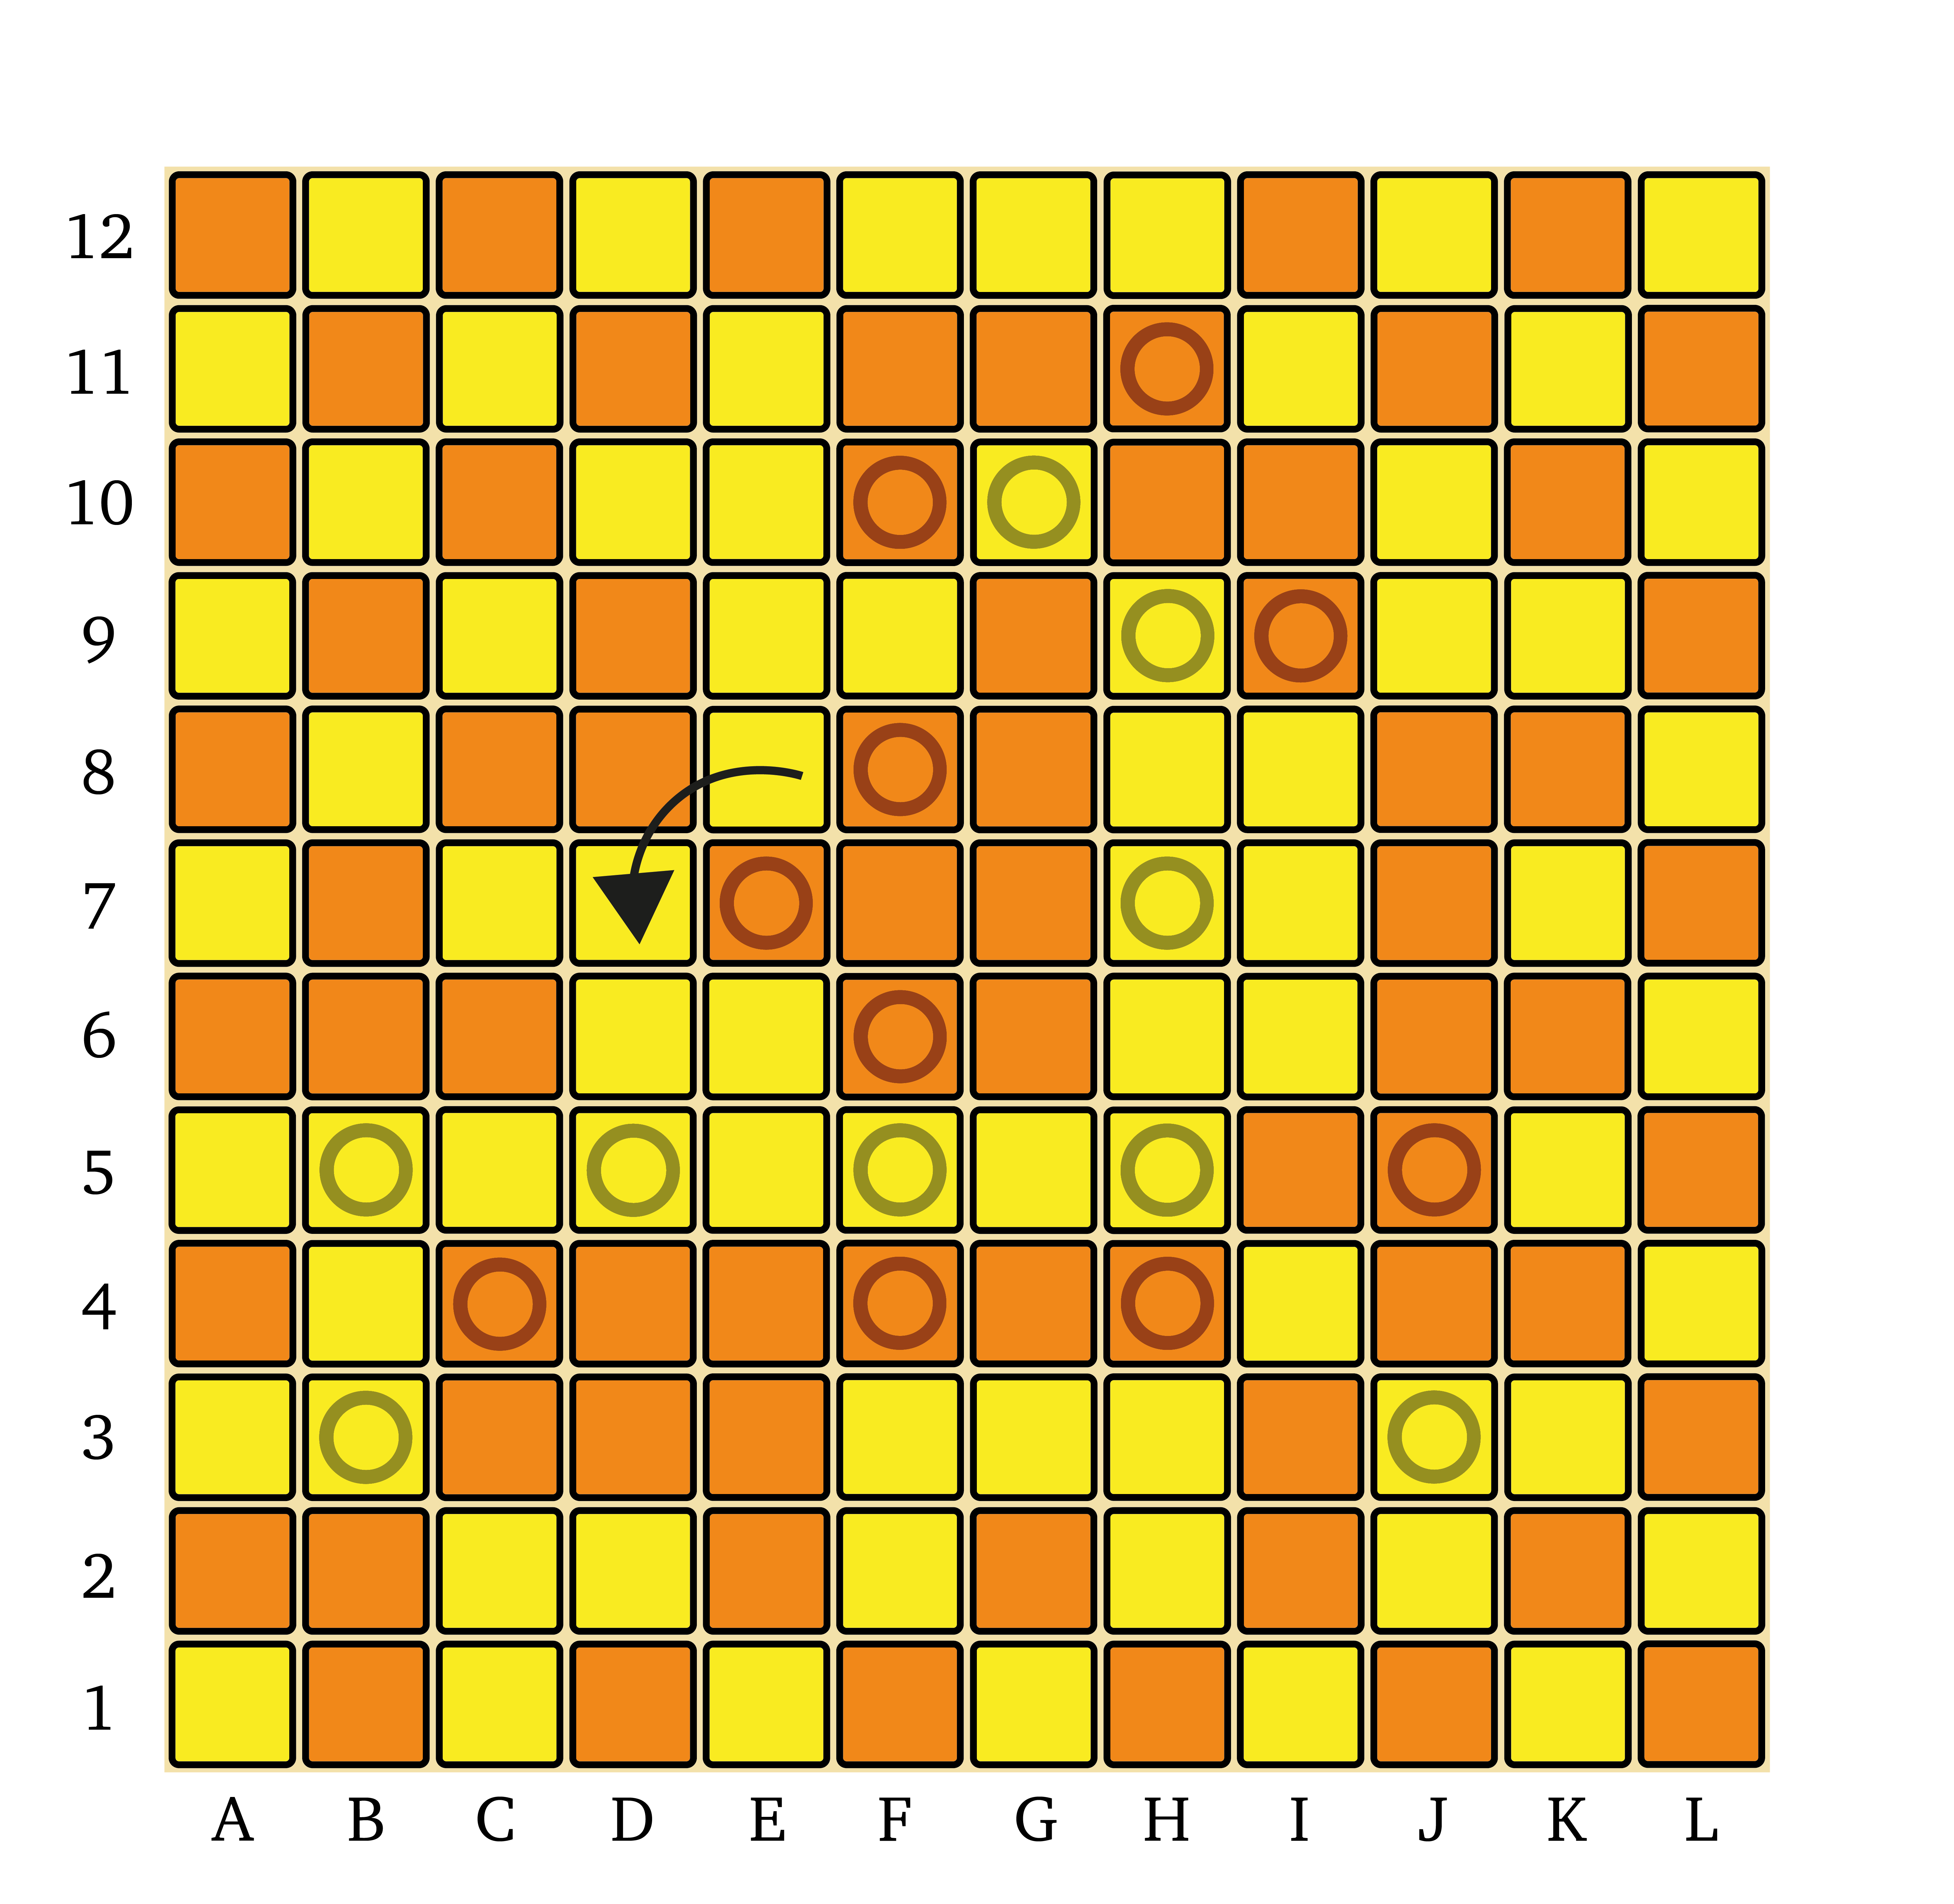
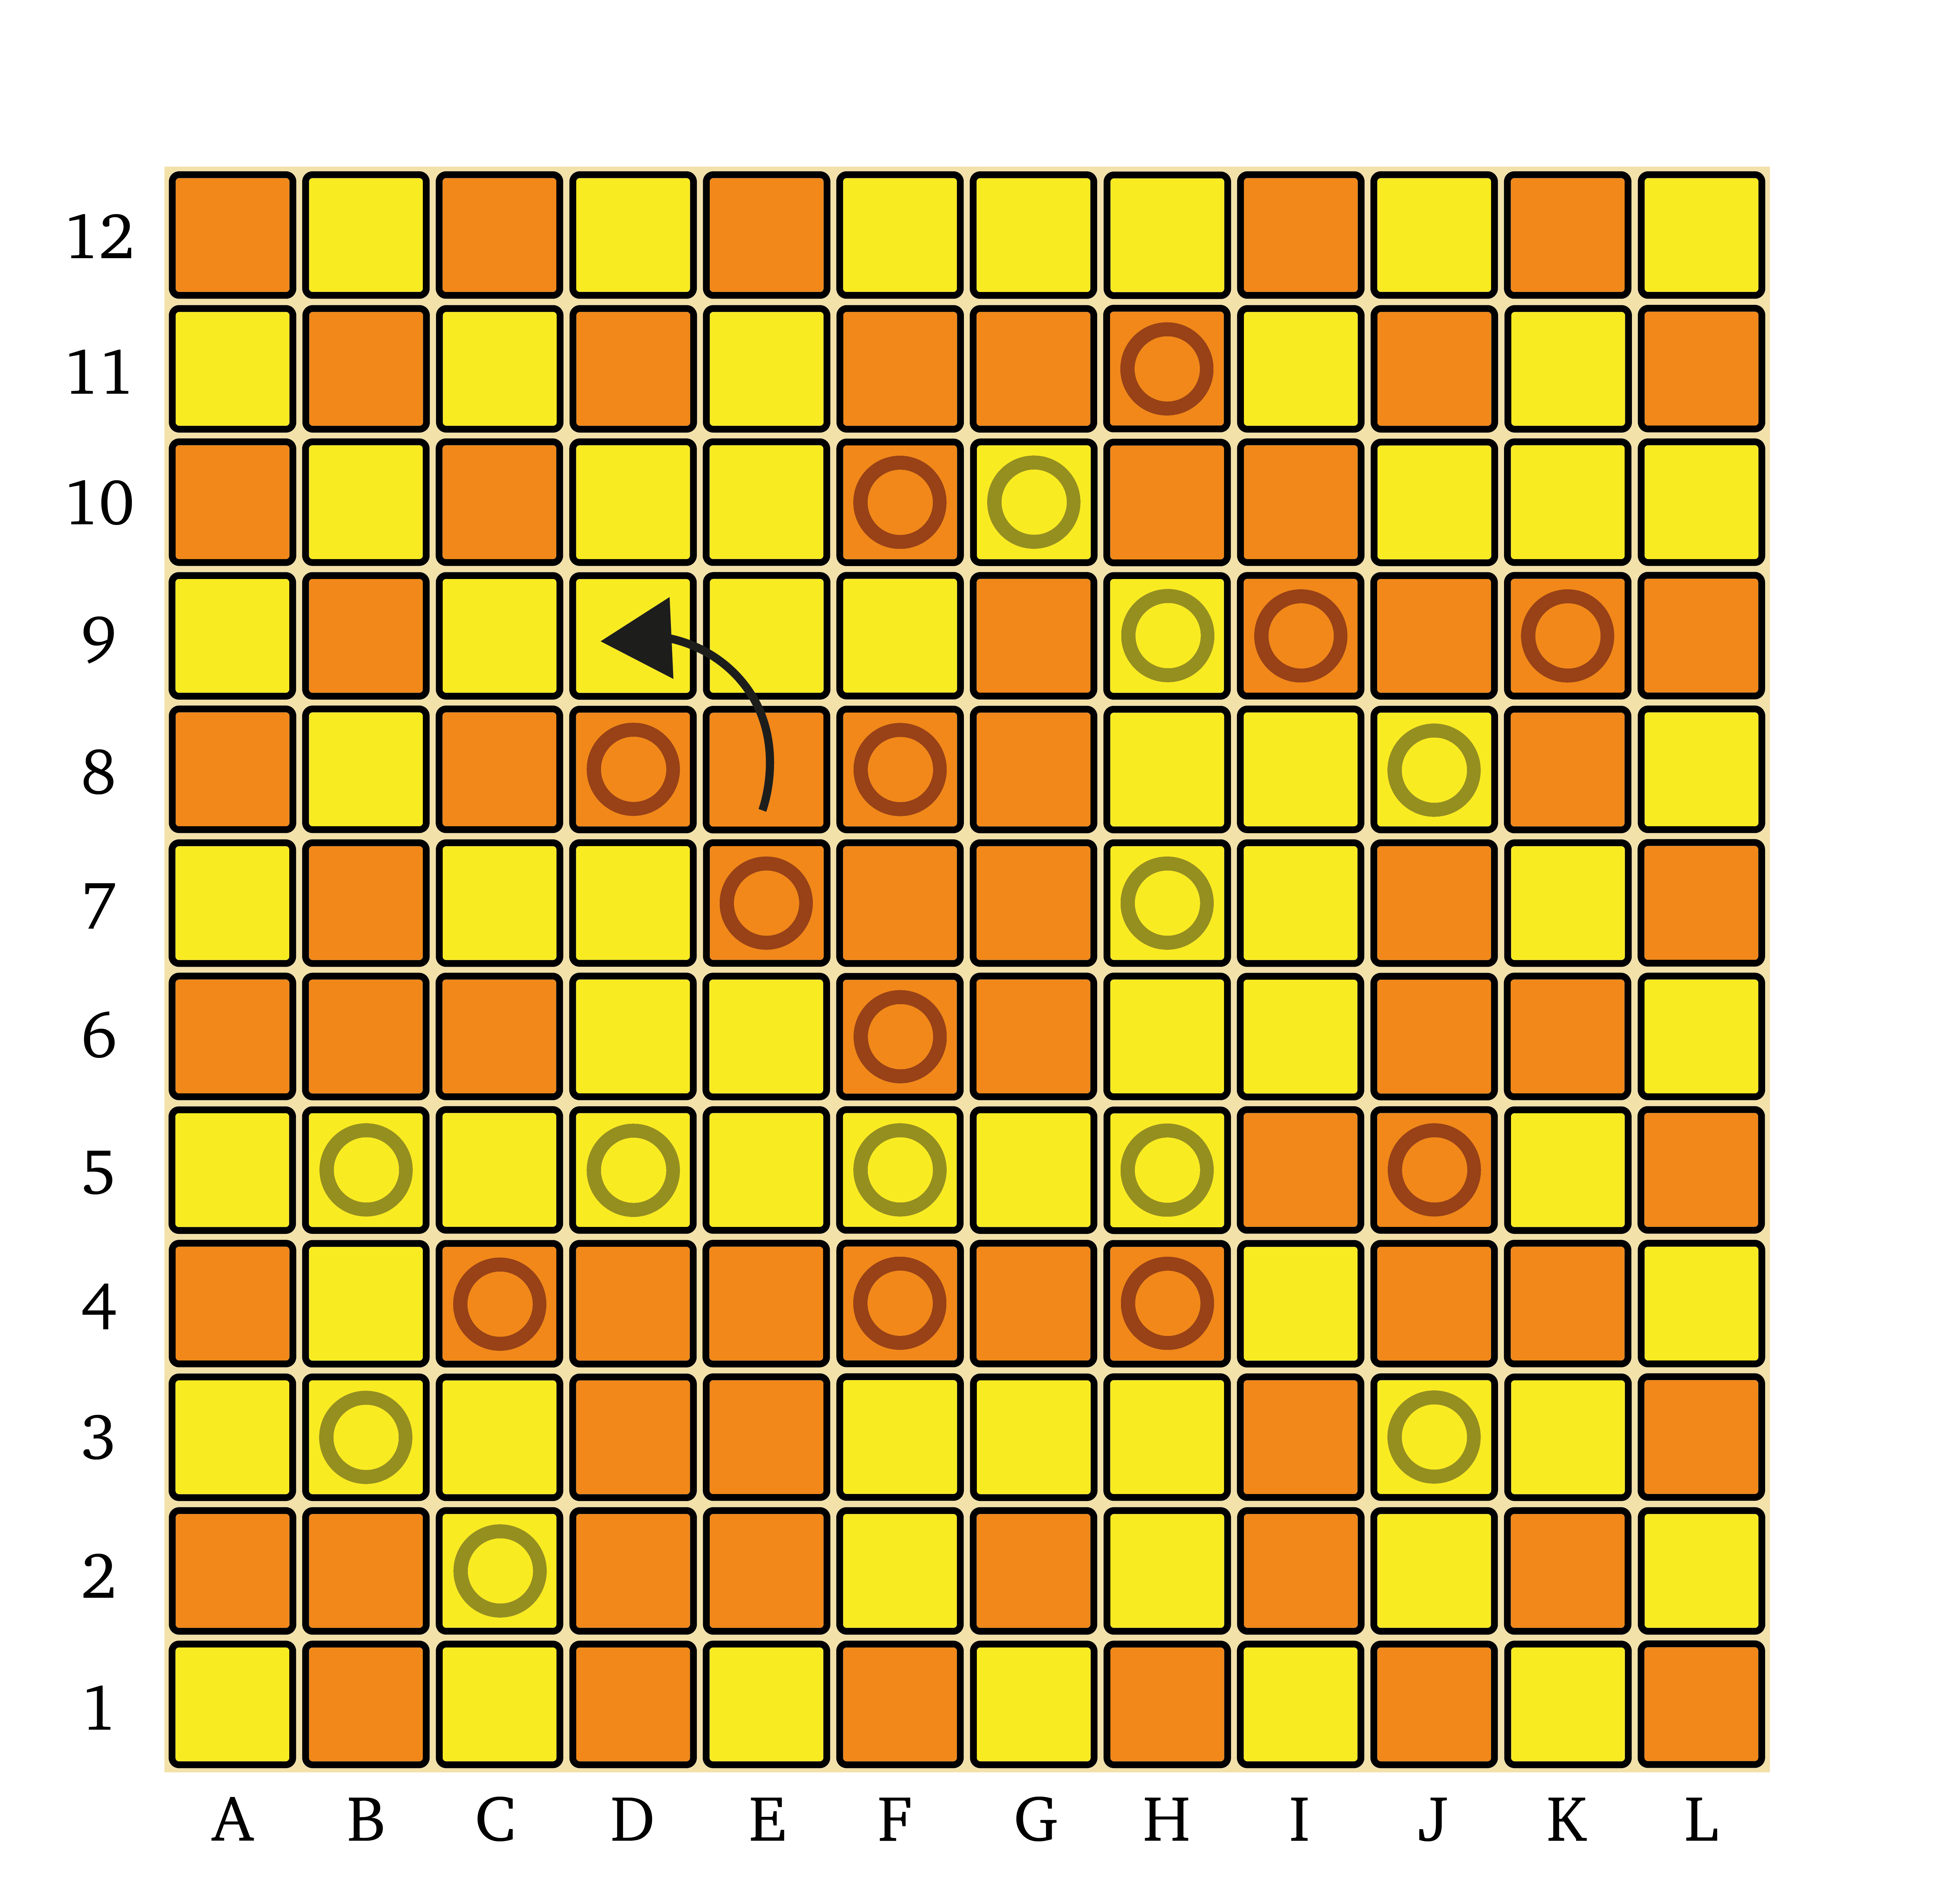
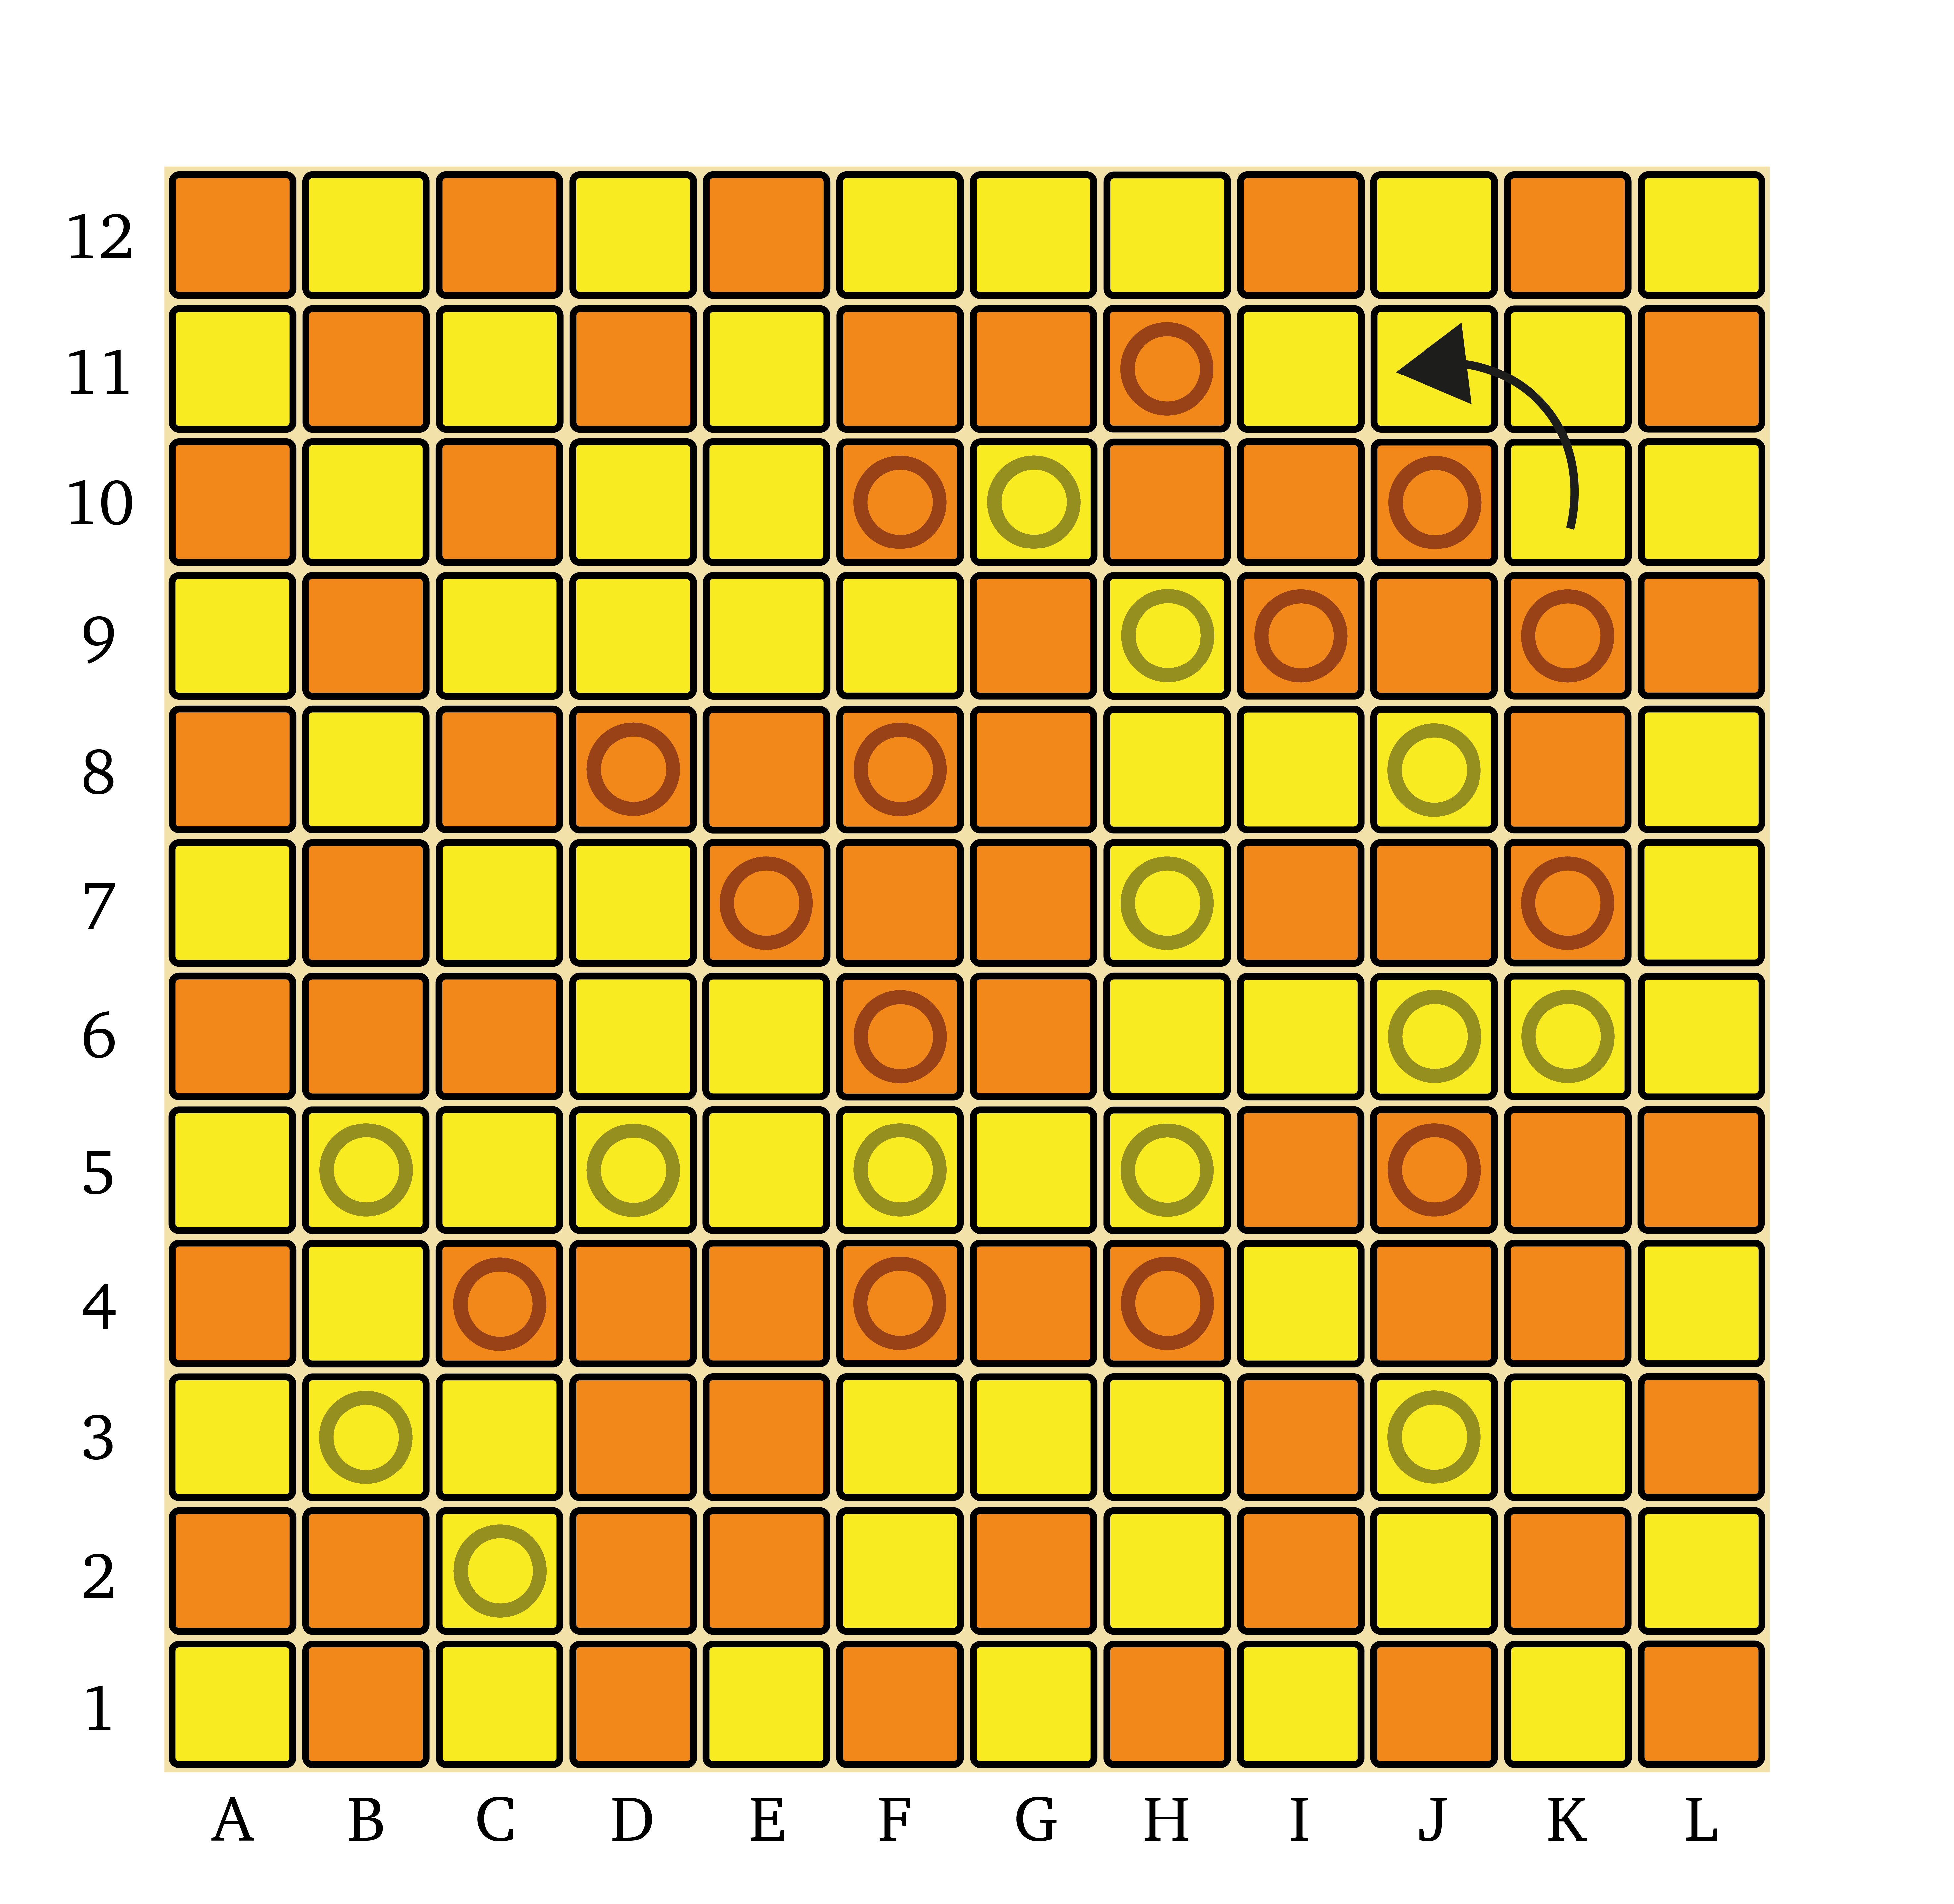
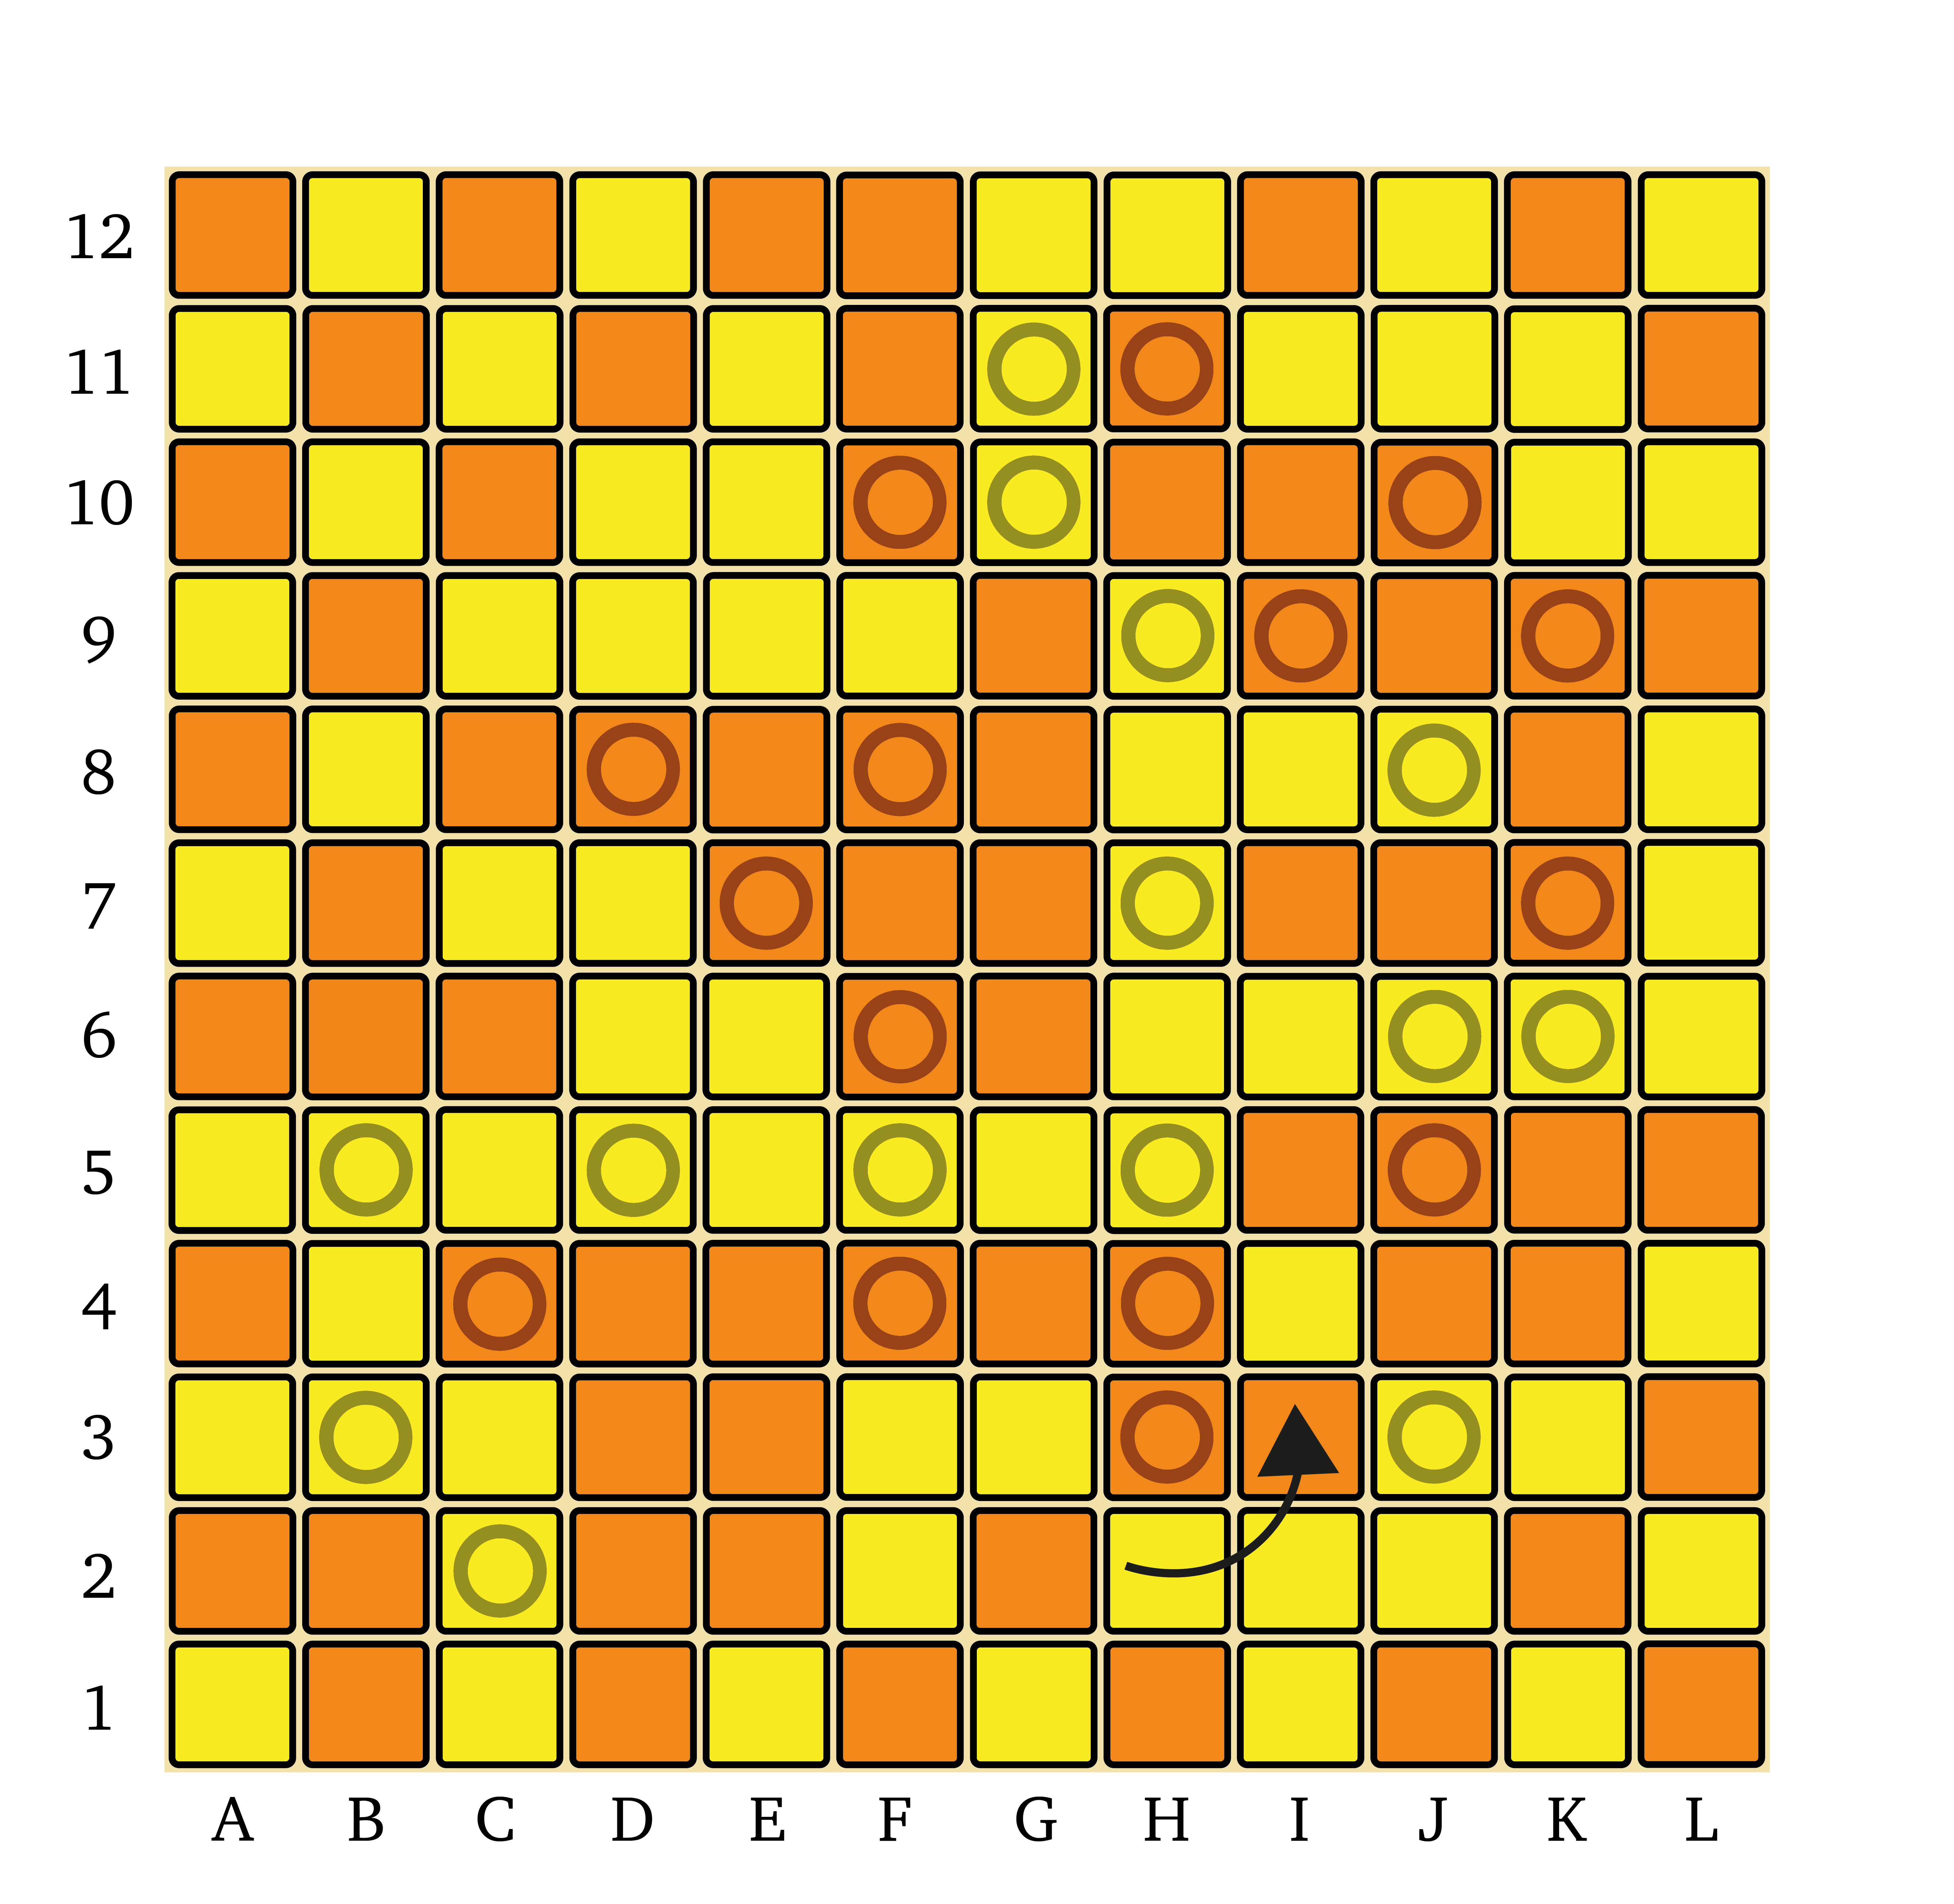
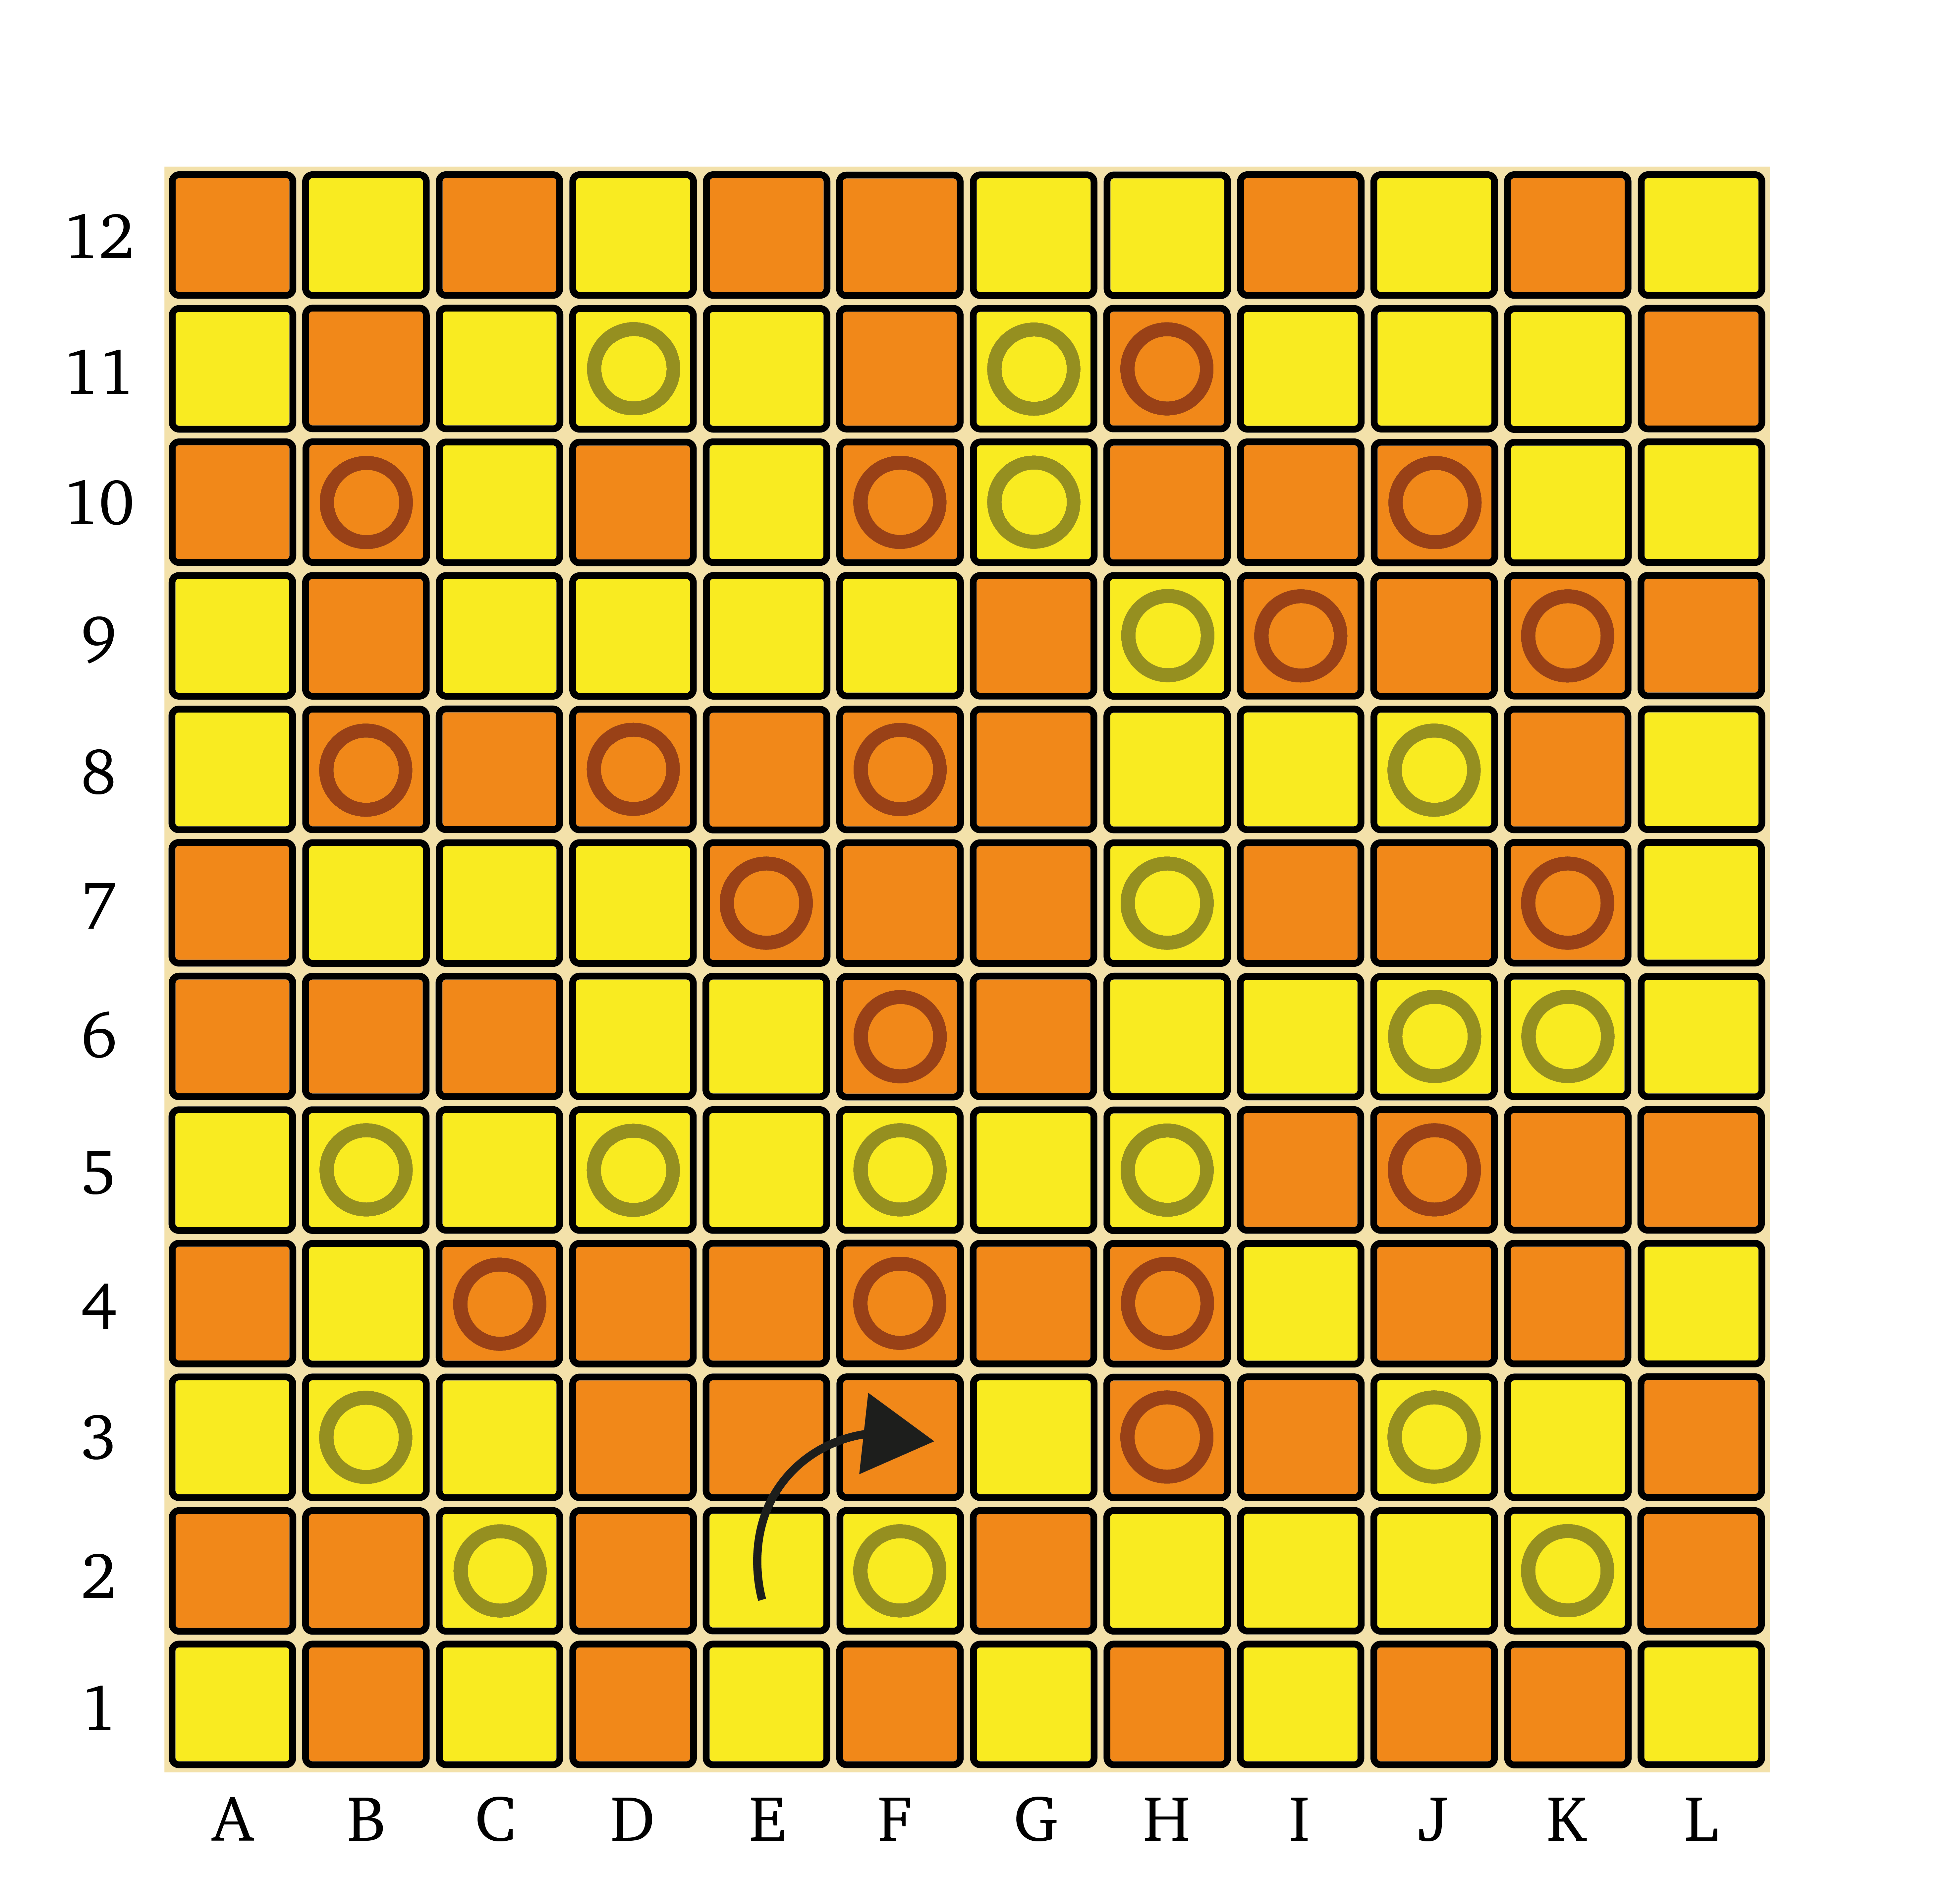
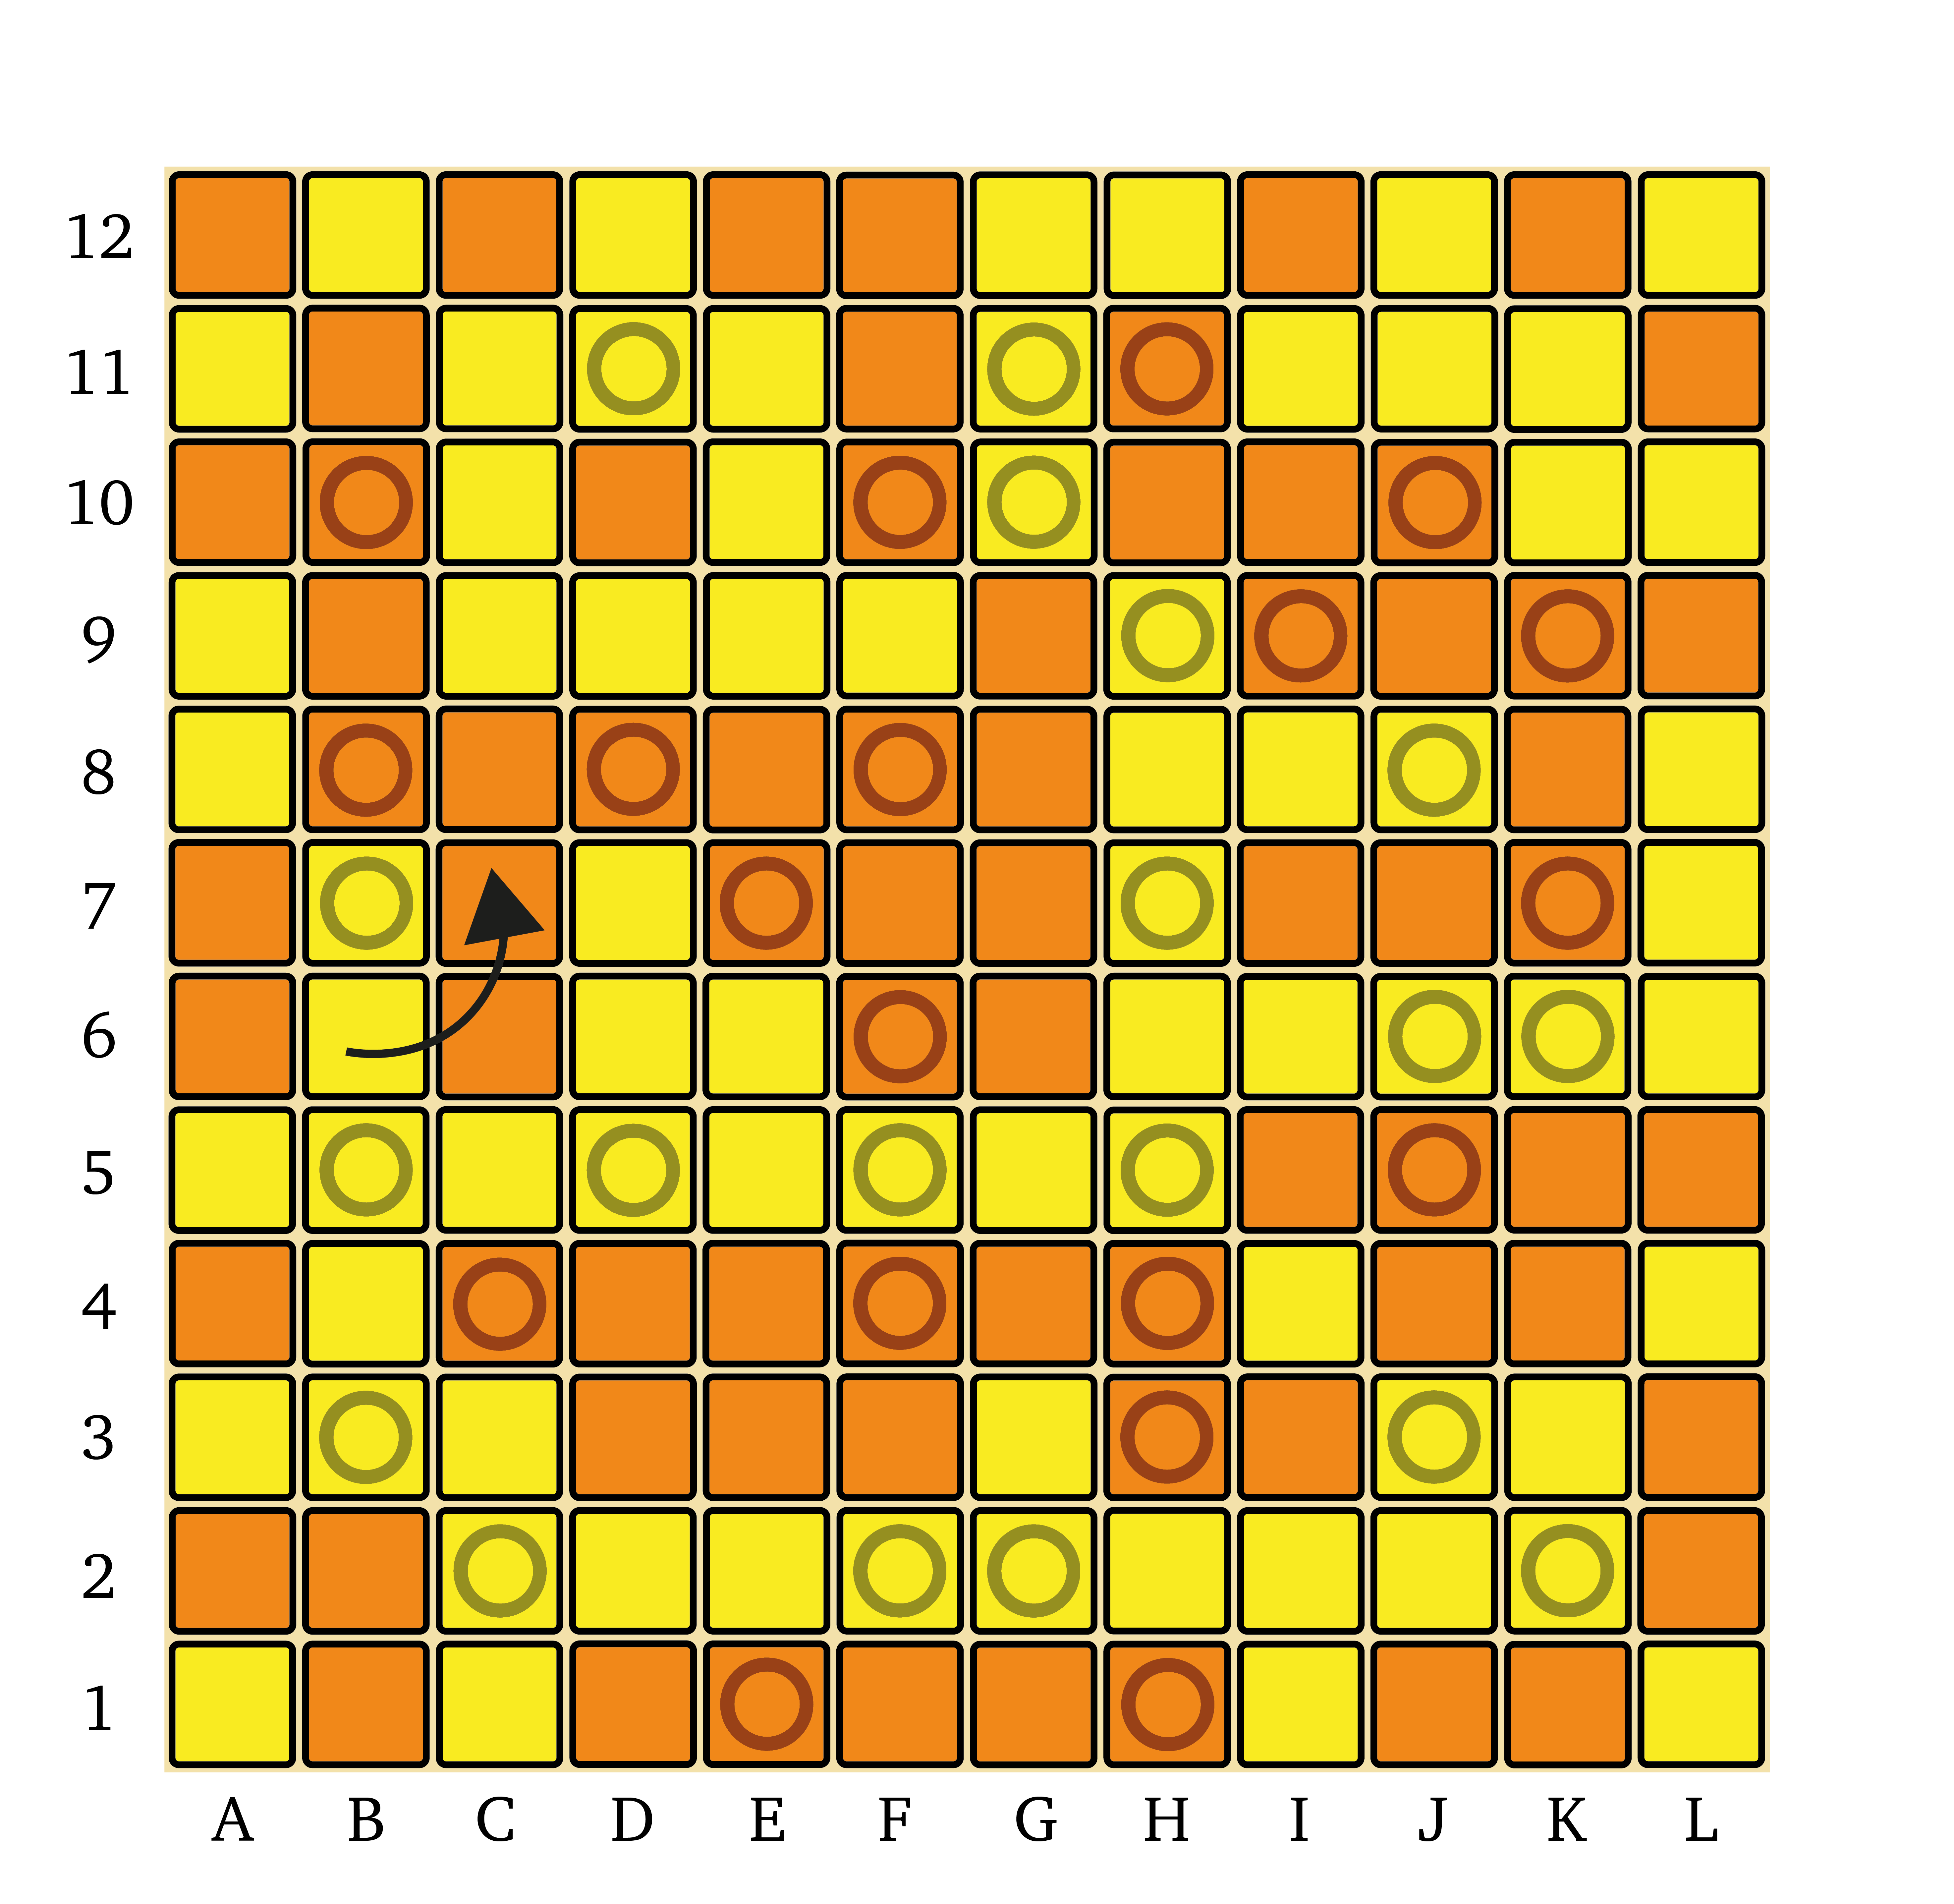
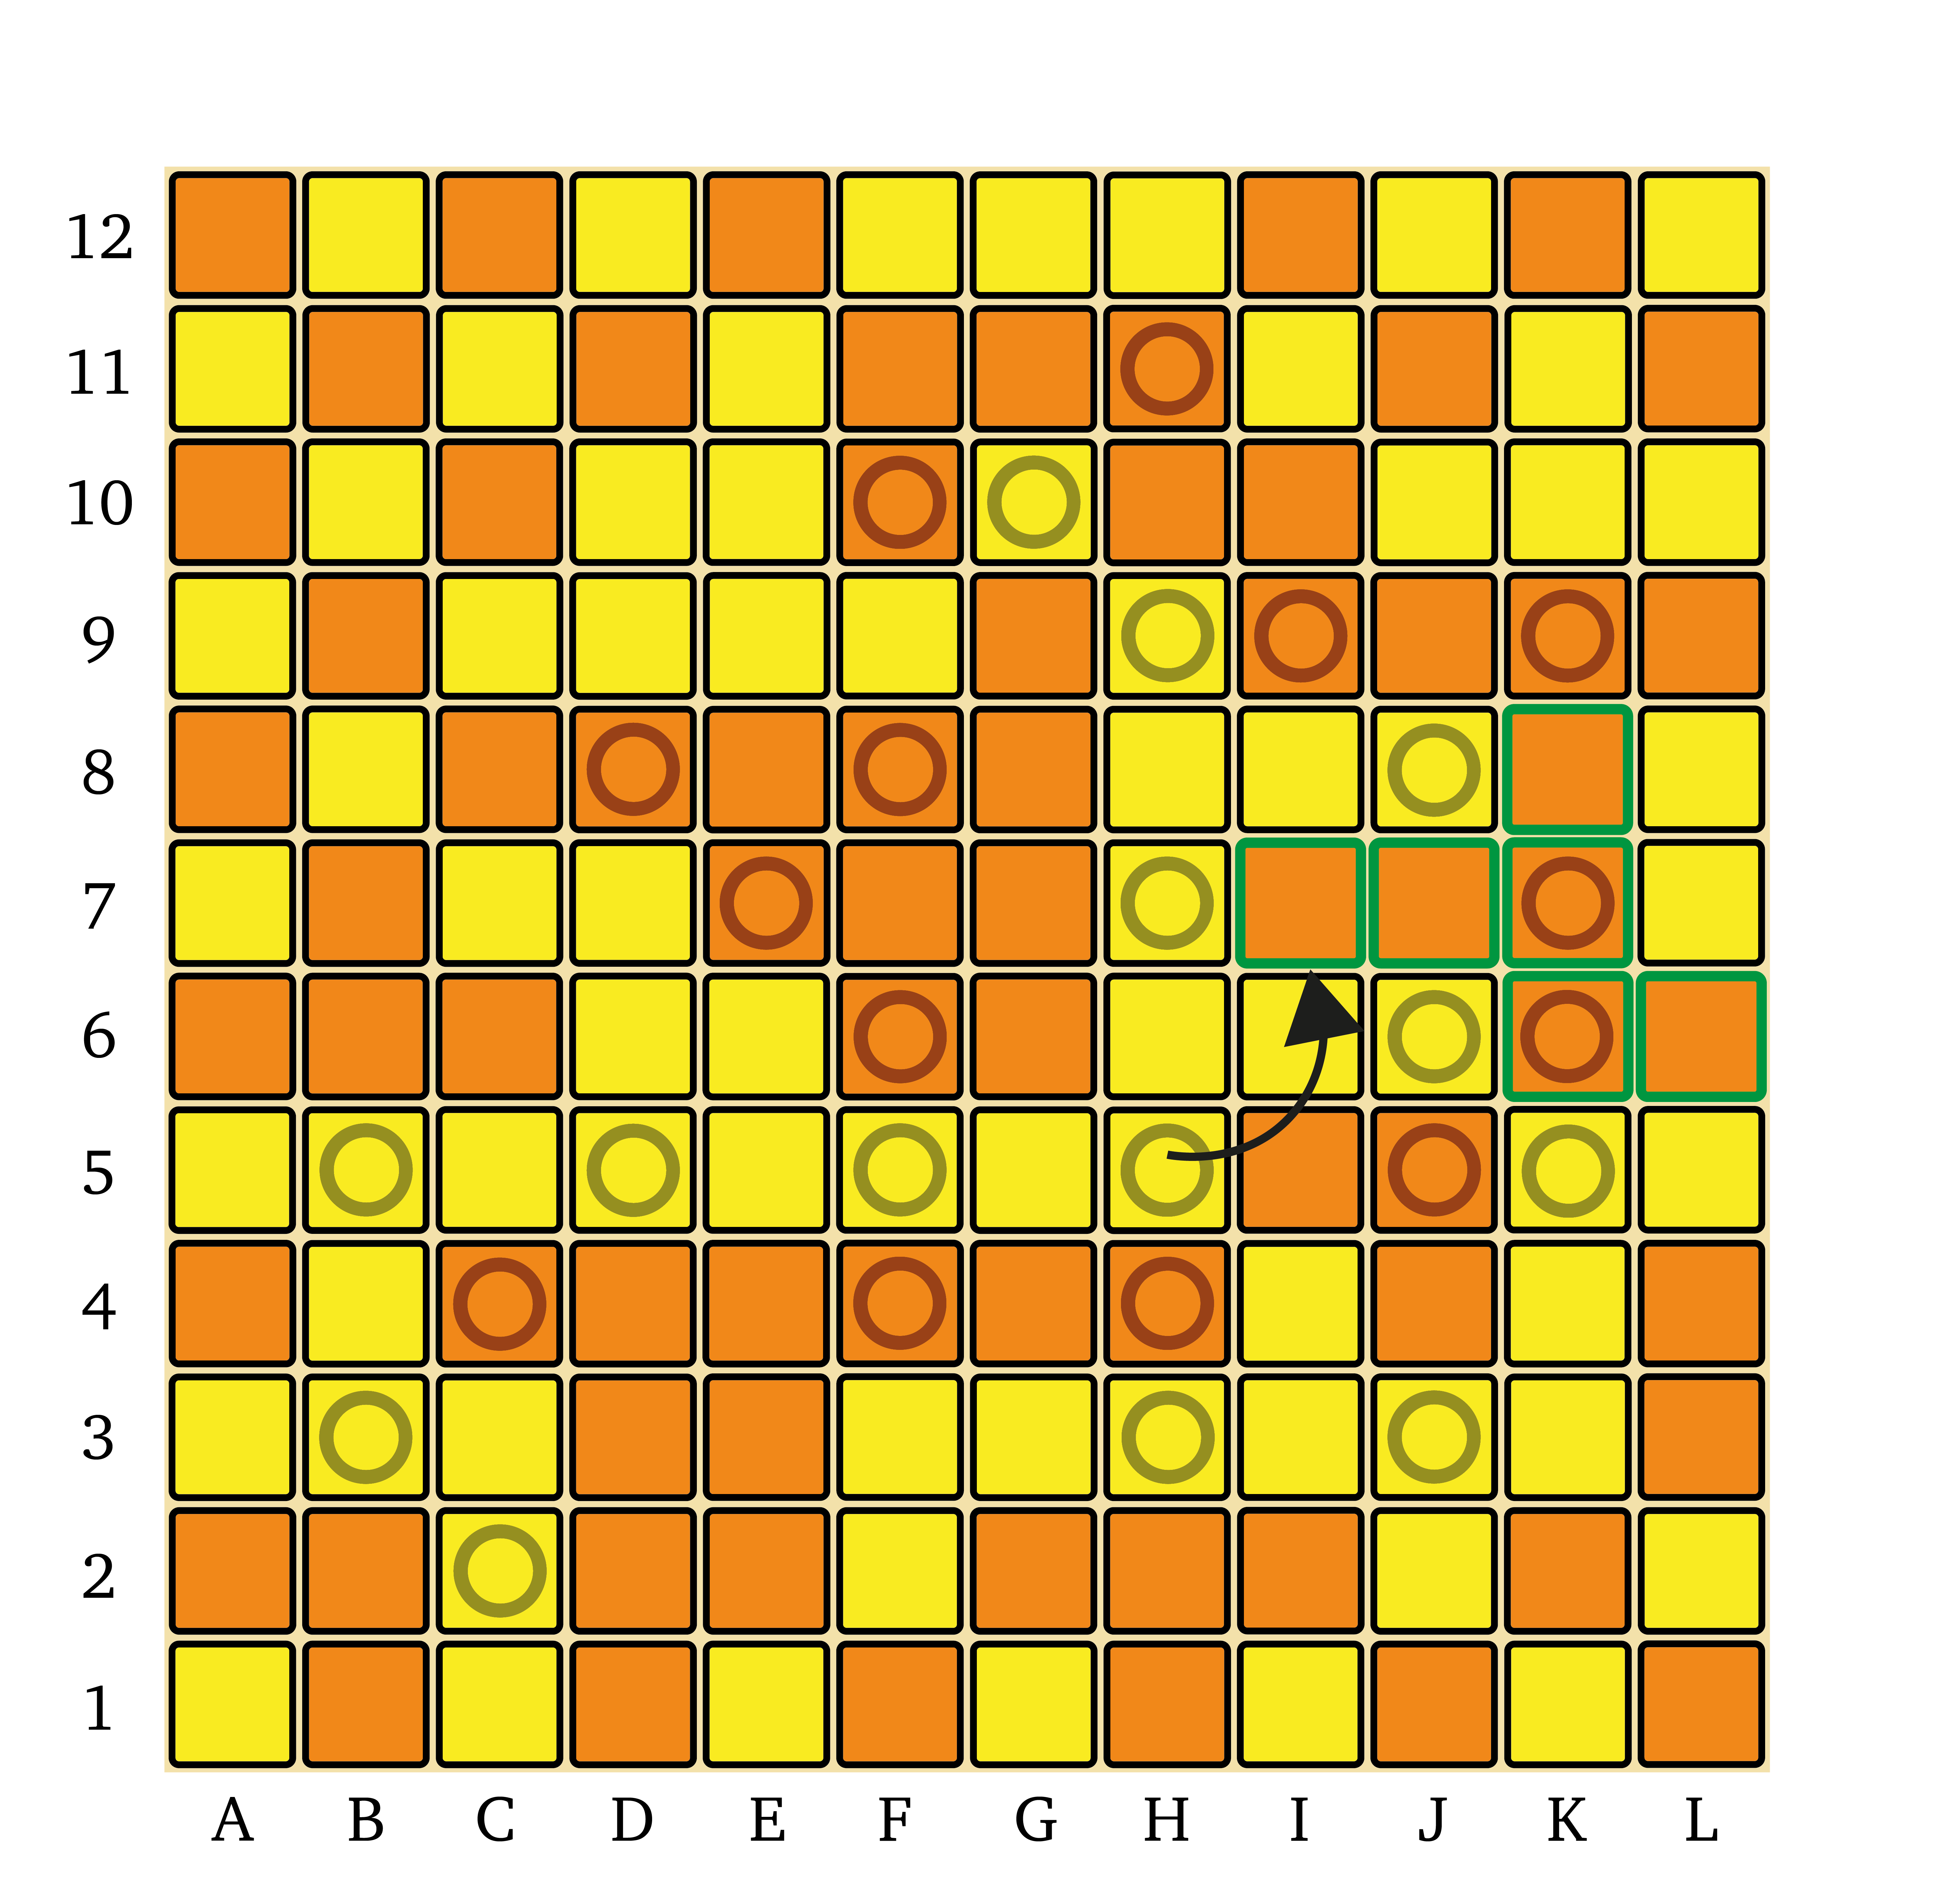
This small sample board illustrates how the notation works. In this case, Yellow has made a move, rotating a 2×2 face clockwise. We can translate this move into notation easily:
- We start by noting the direction of the twist, with a capital C for a clockwise twist, or A for anti-clockwise.
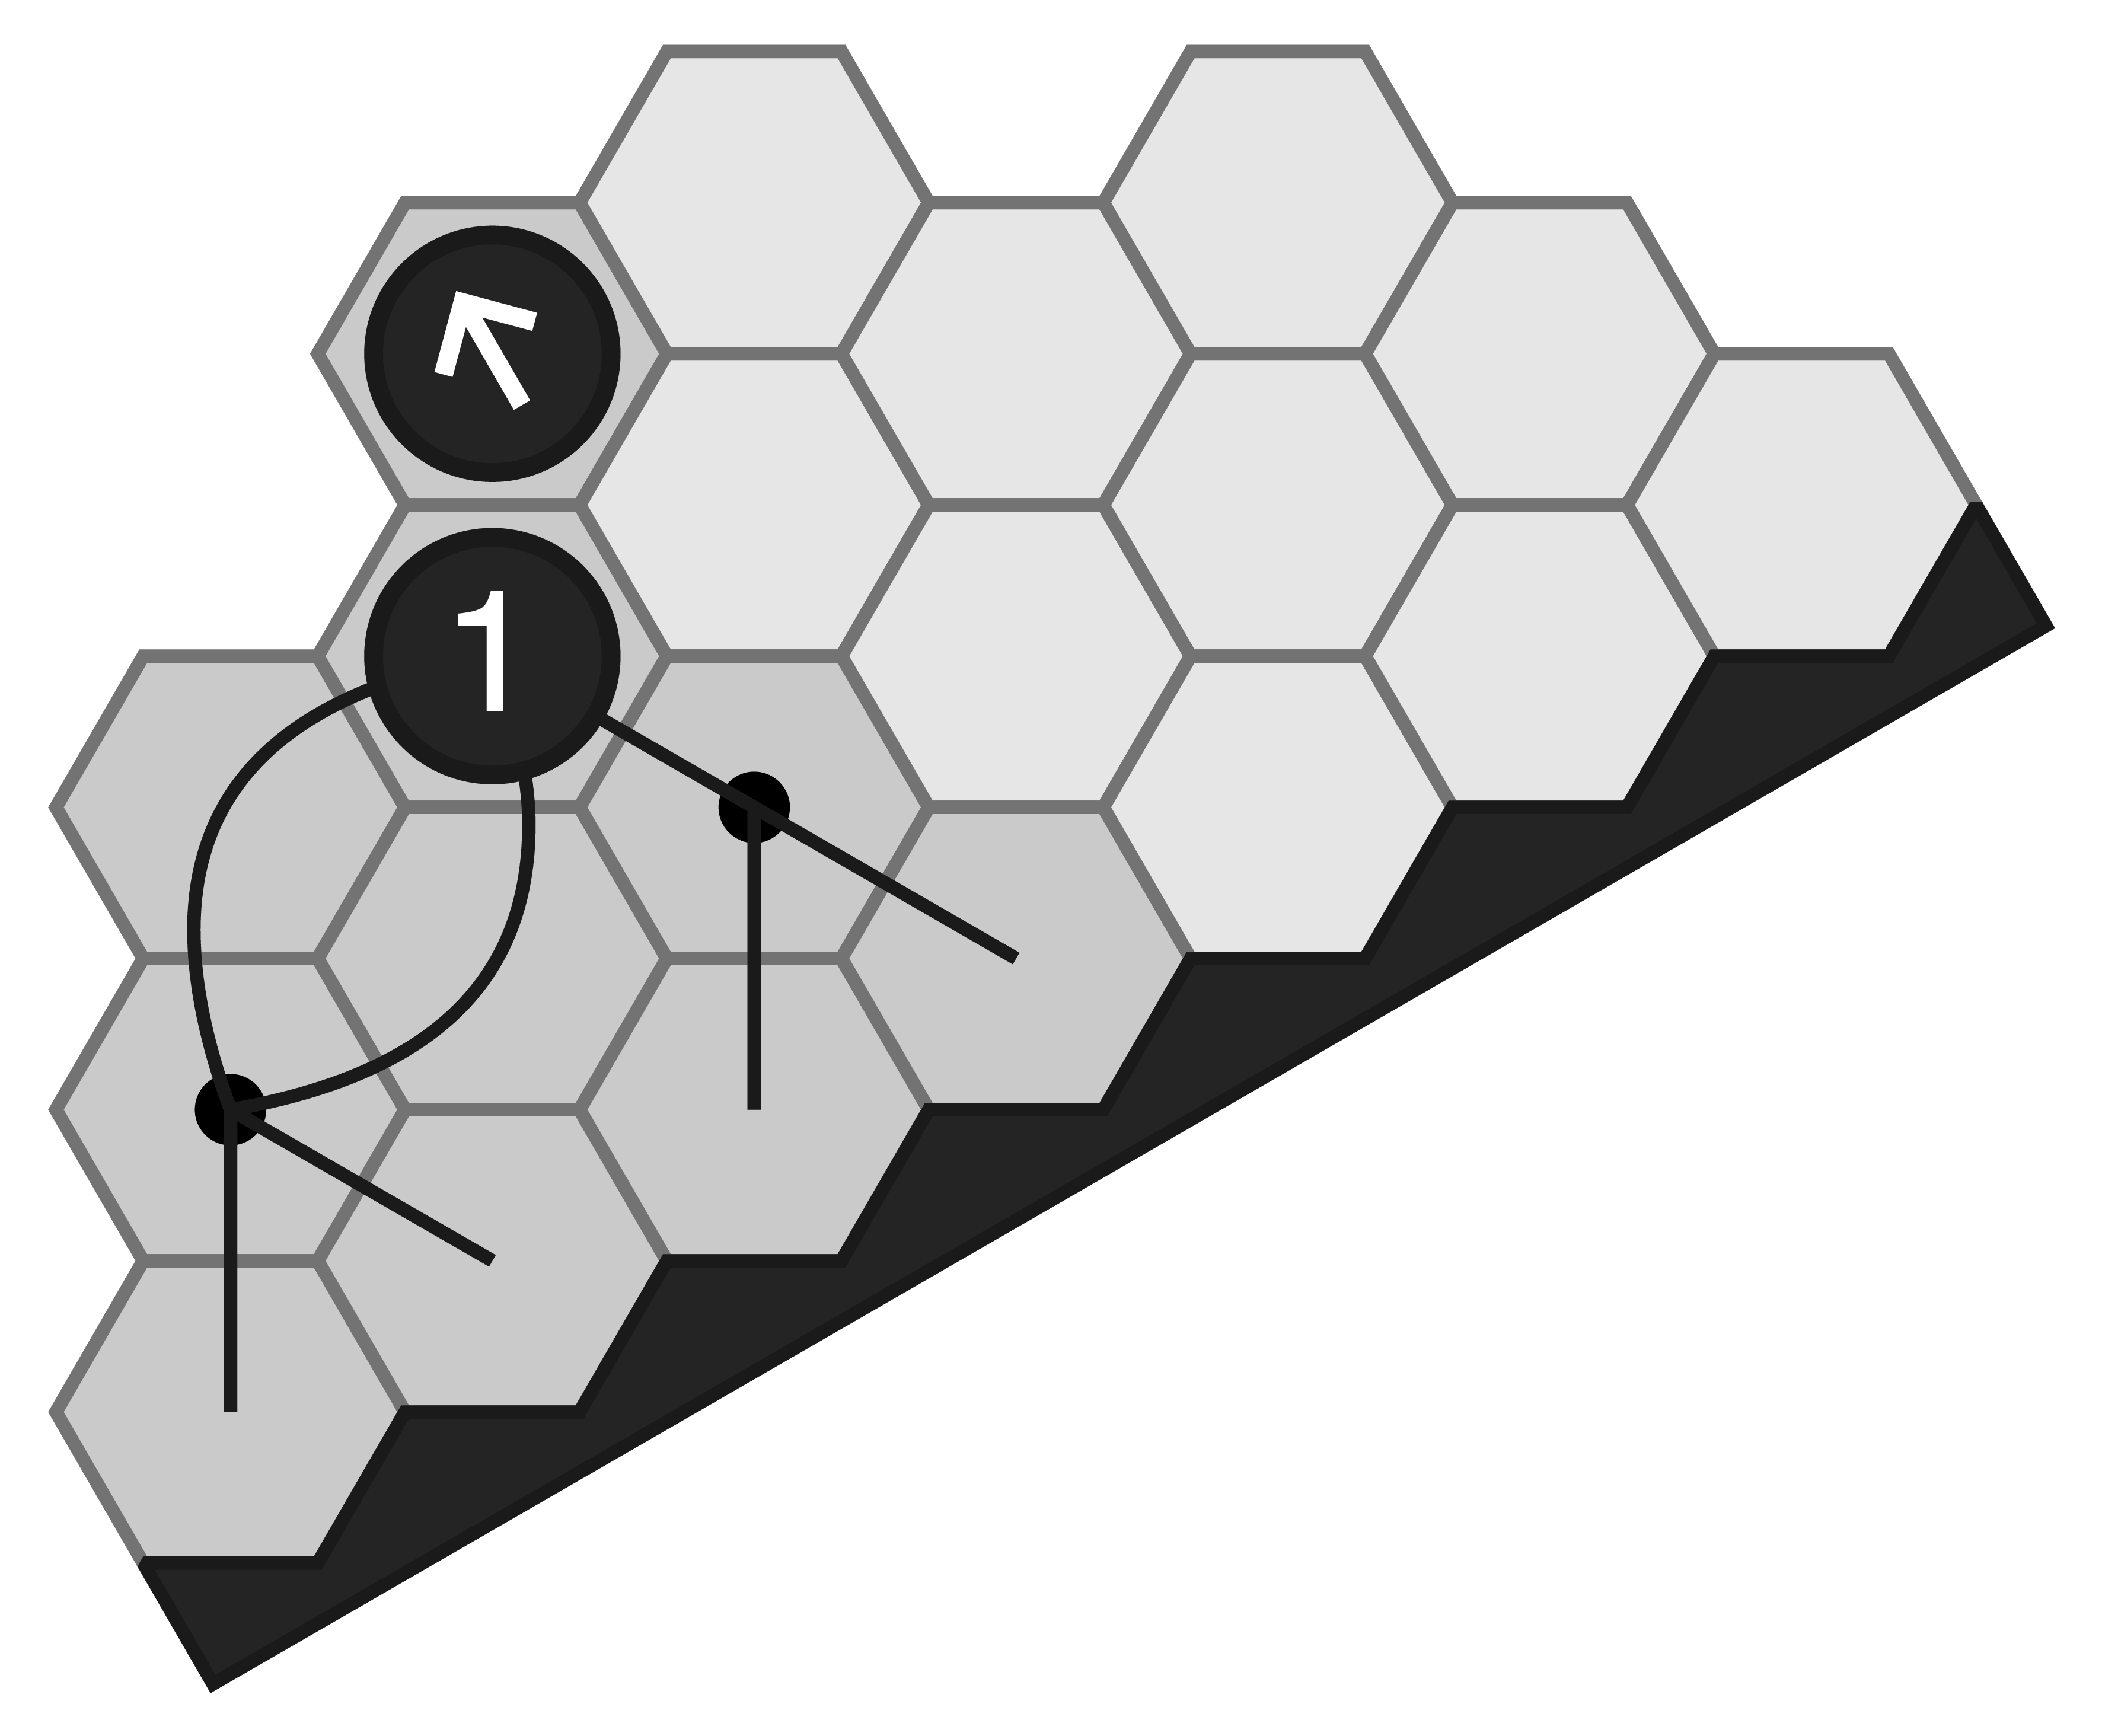
- Then we note the square on the board that is in the bottom-left corner of the 2×2 face we twisted, in this case d3 (indicated by the green square in the diagram). So our move so far is Cd3
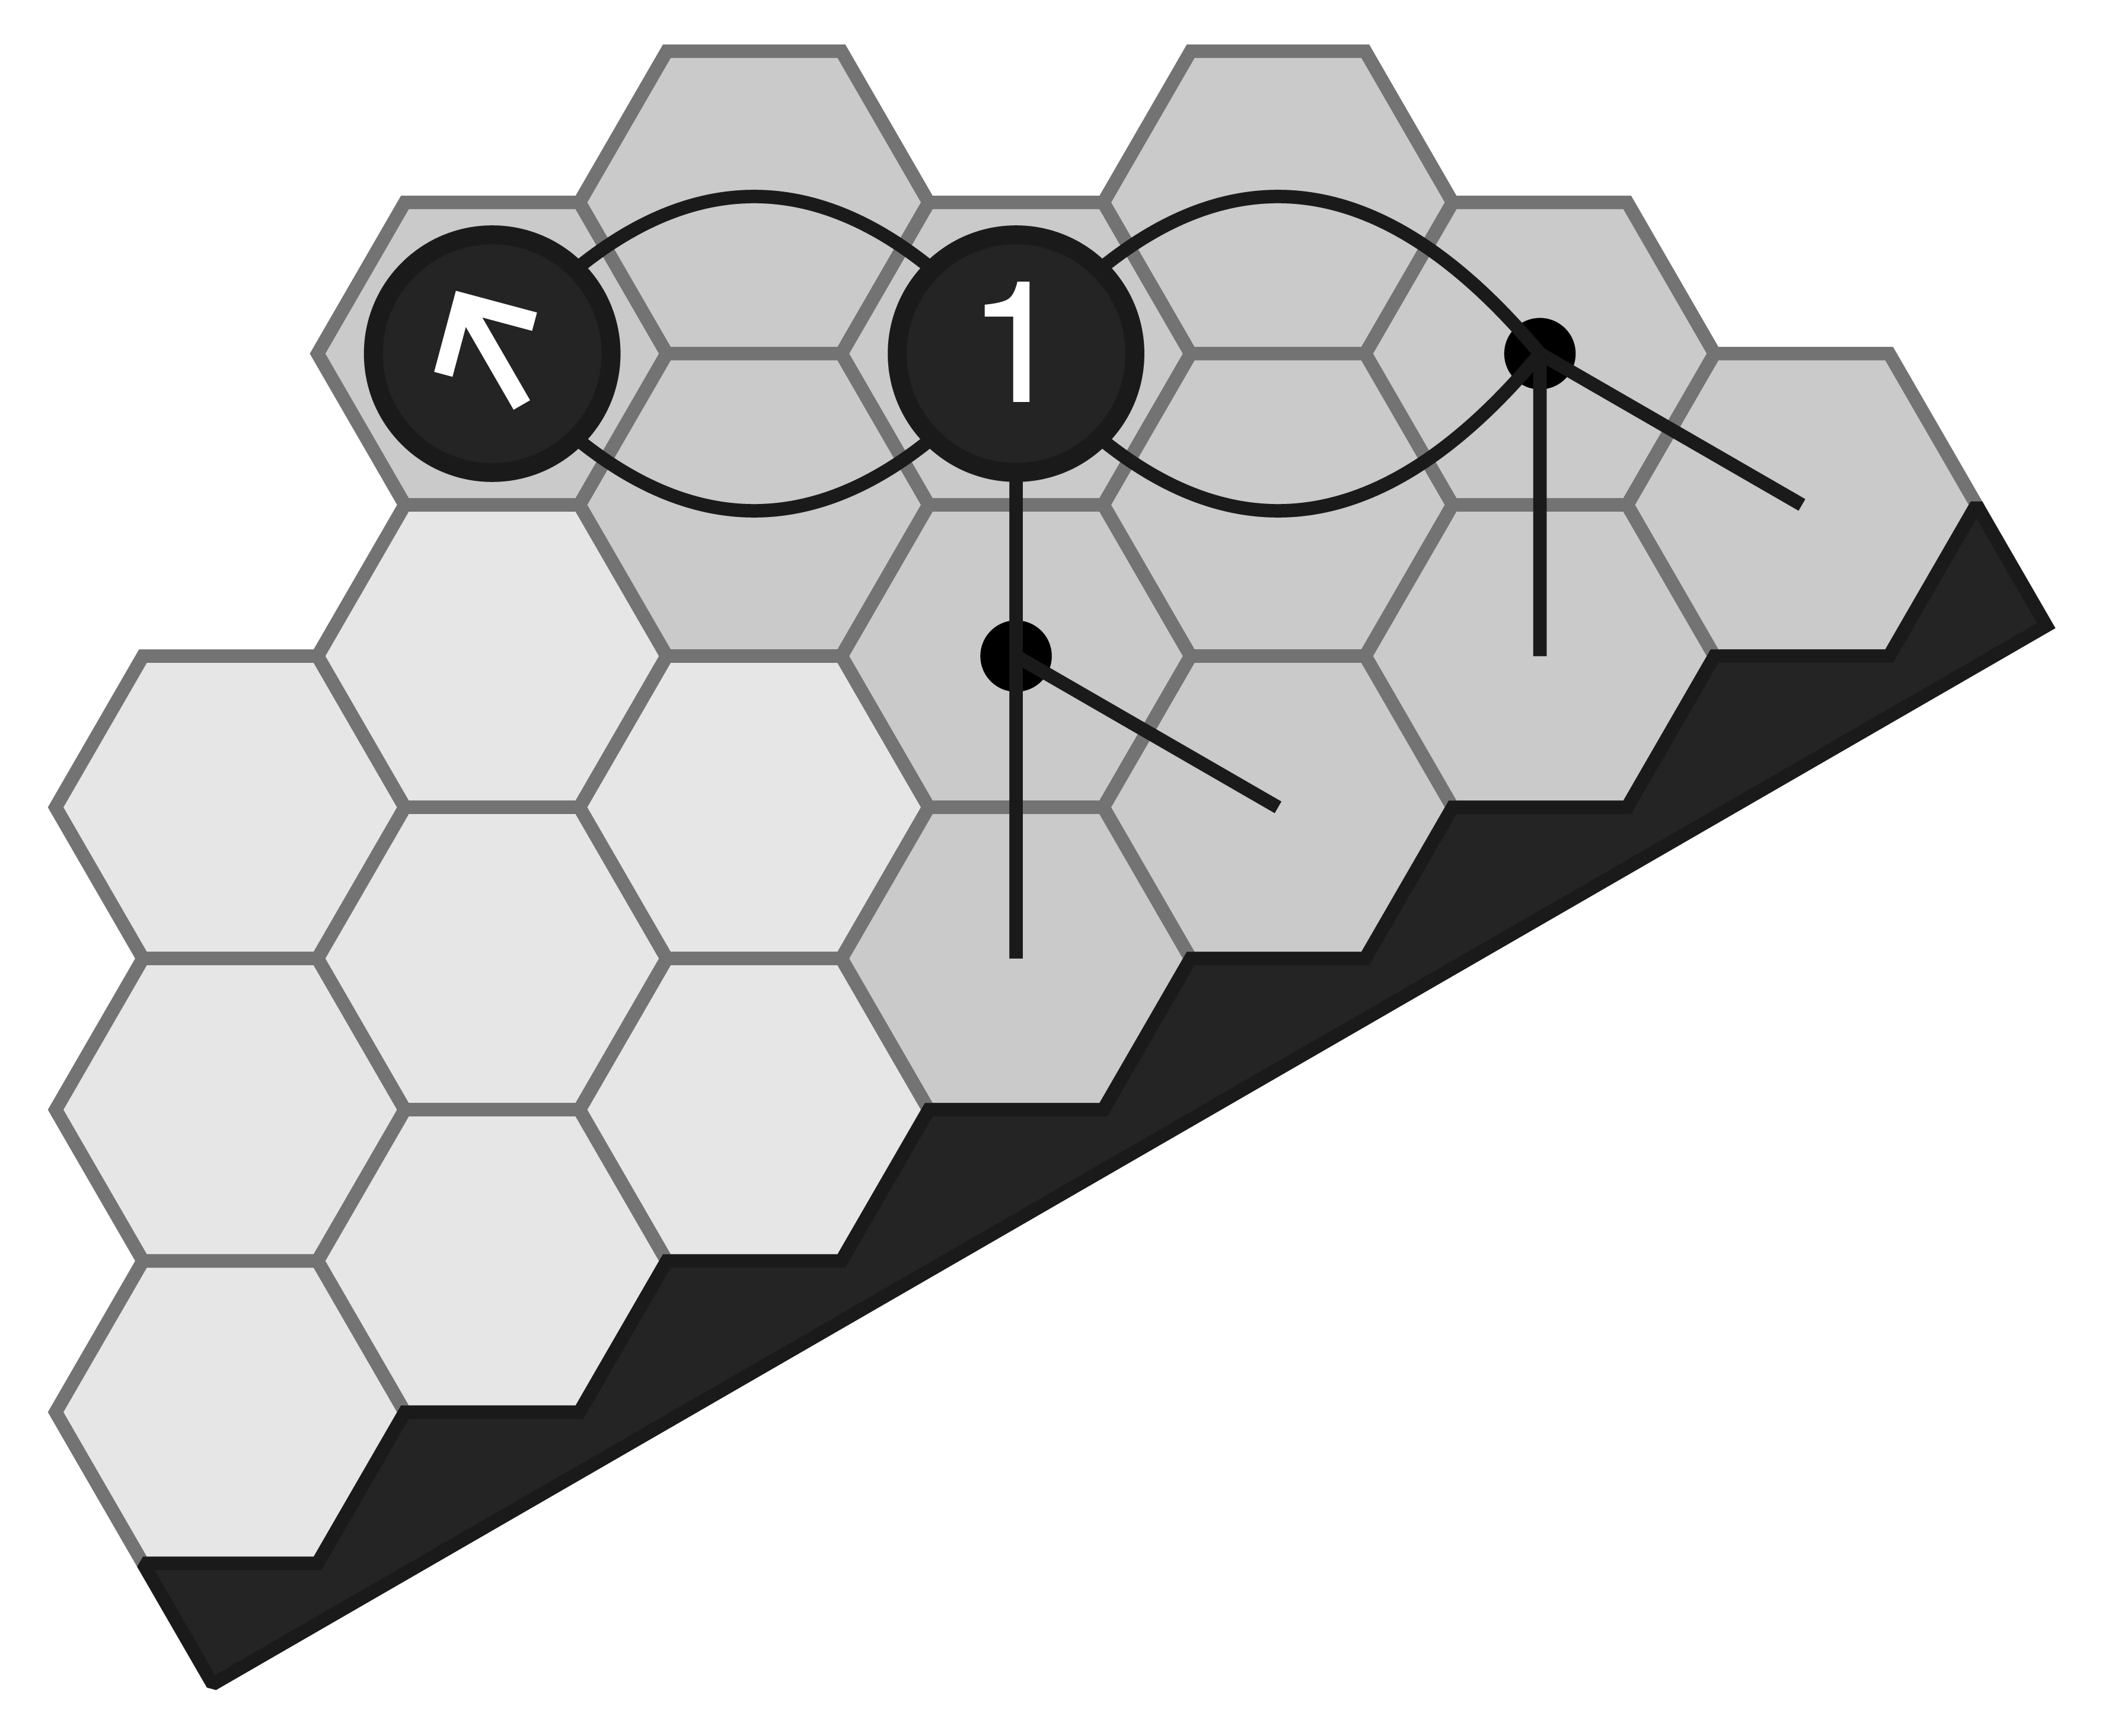
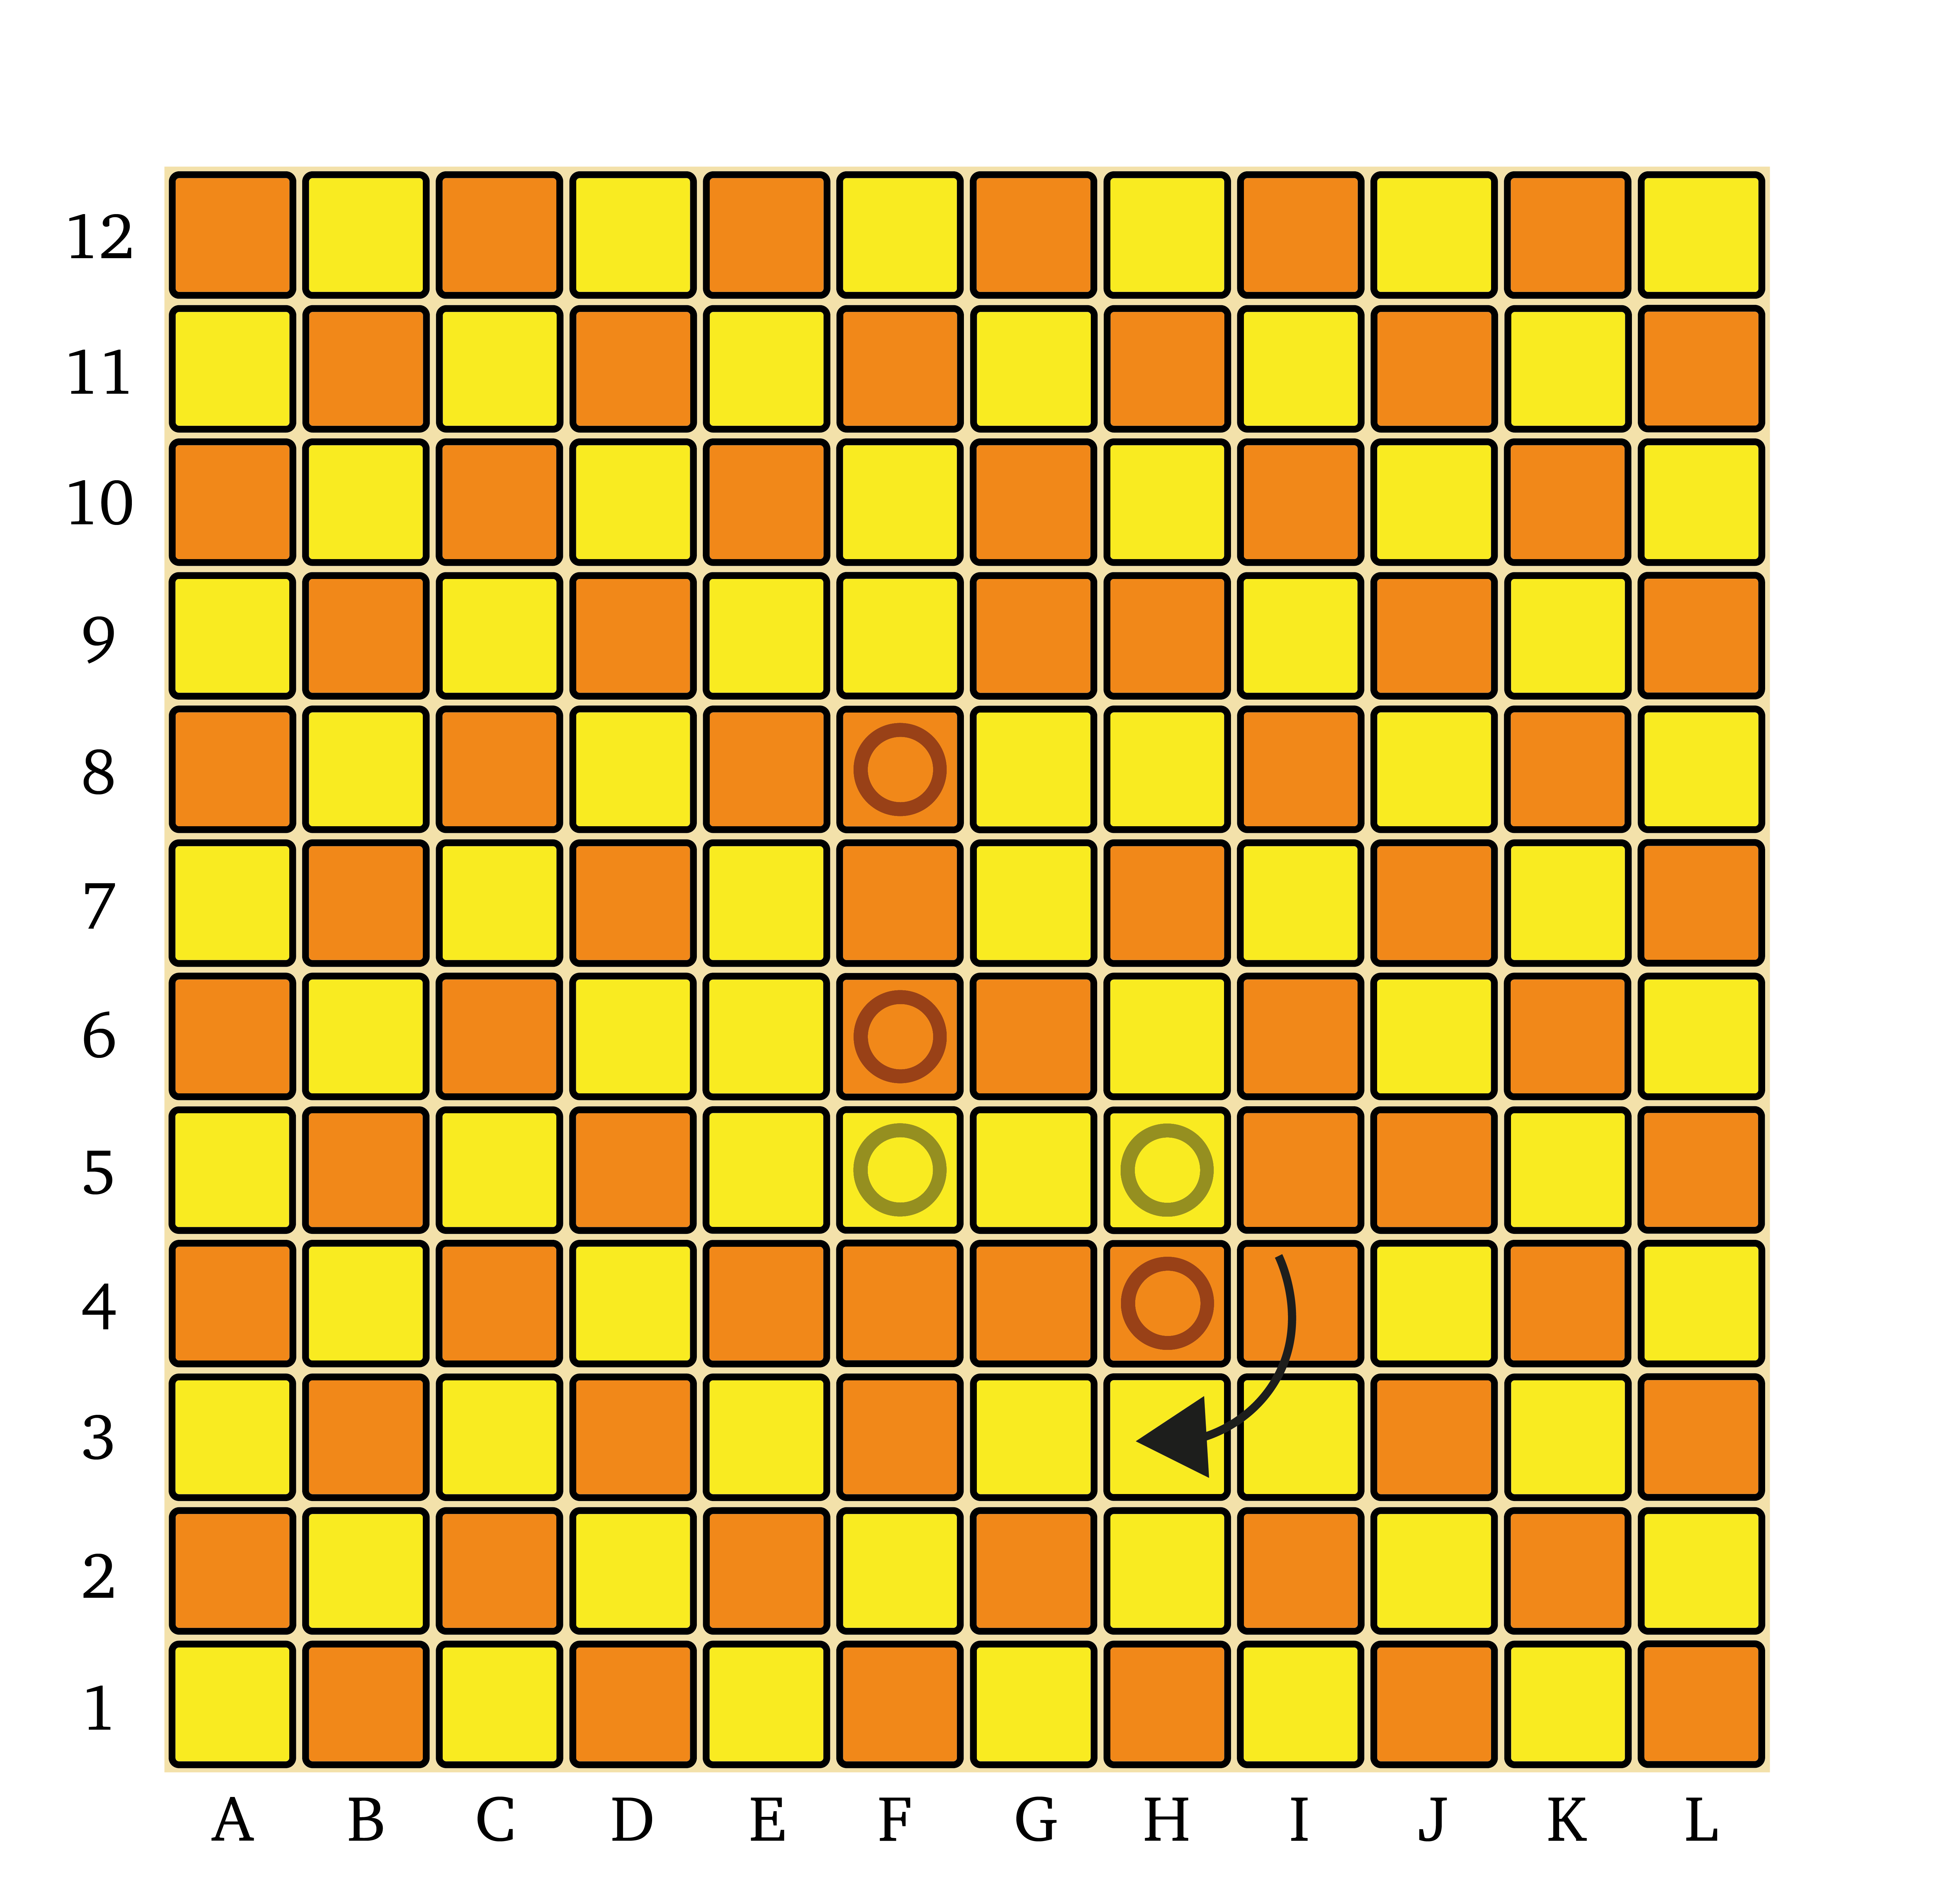
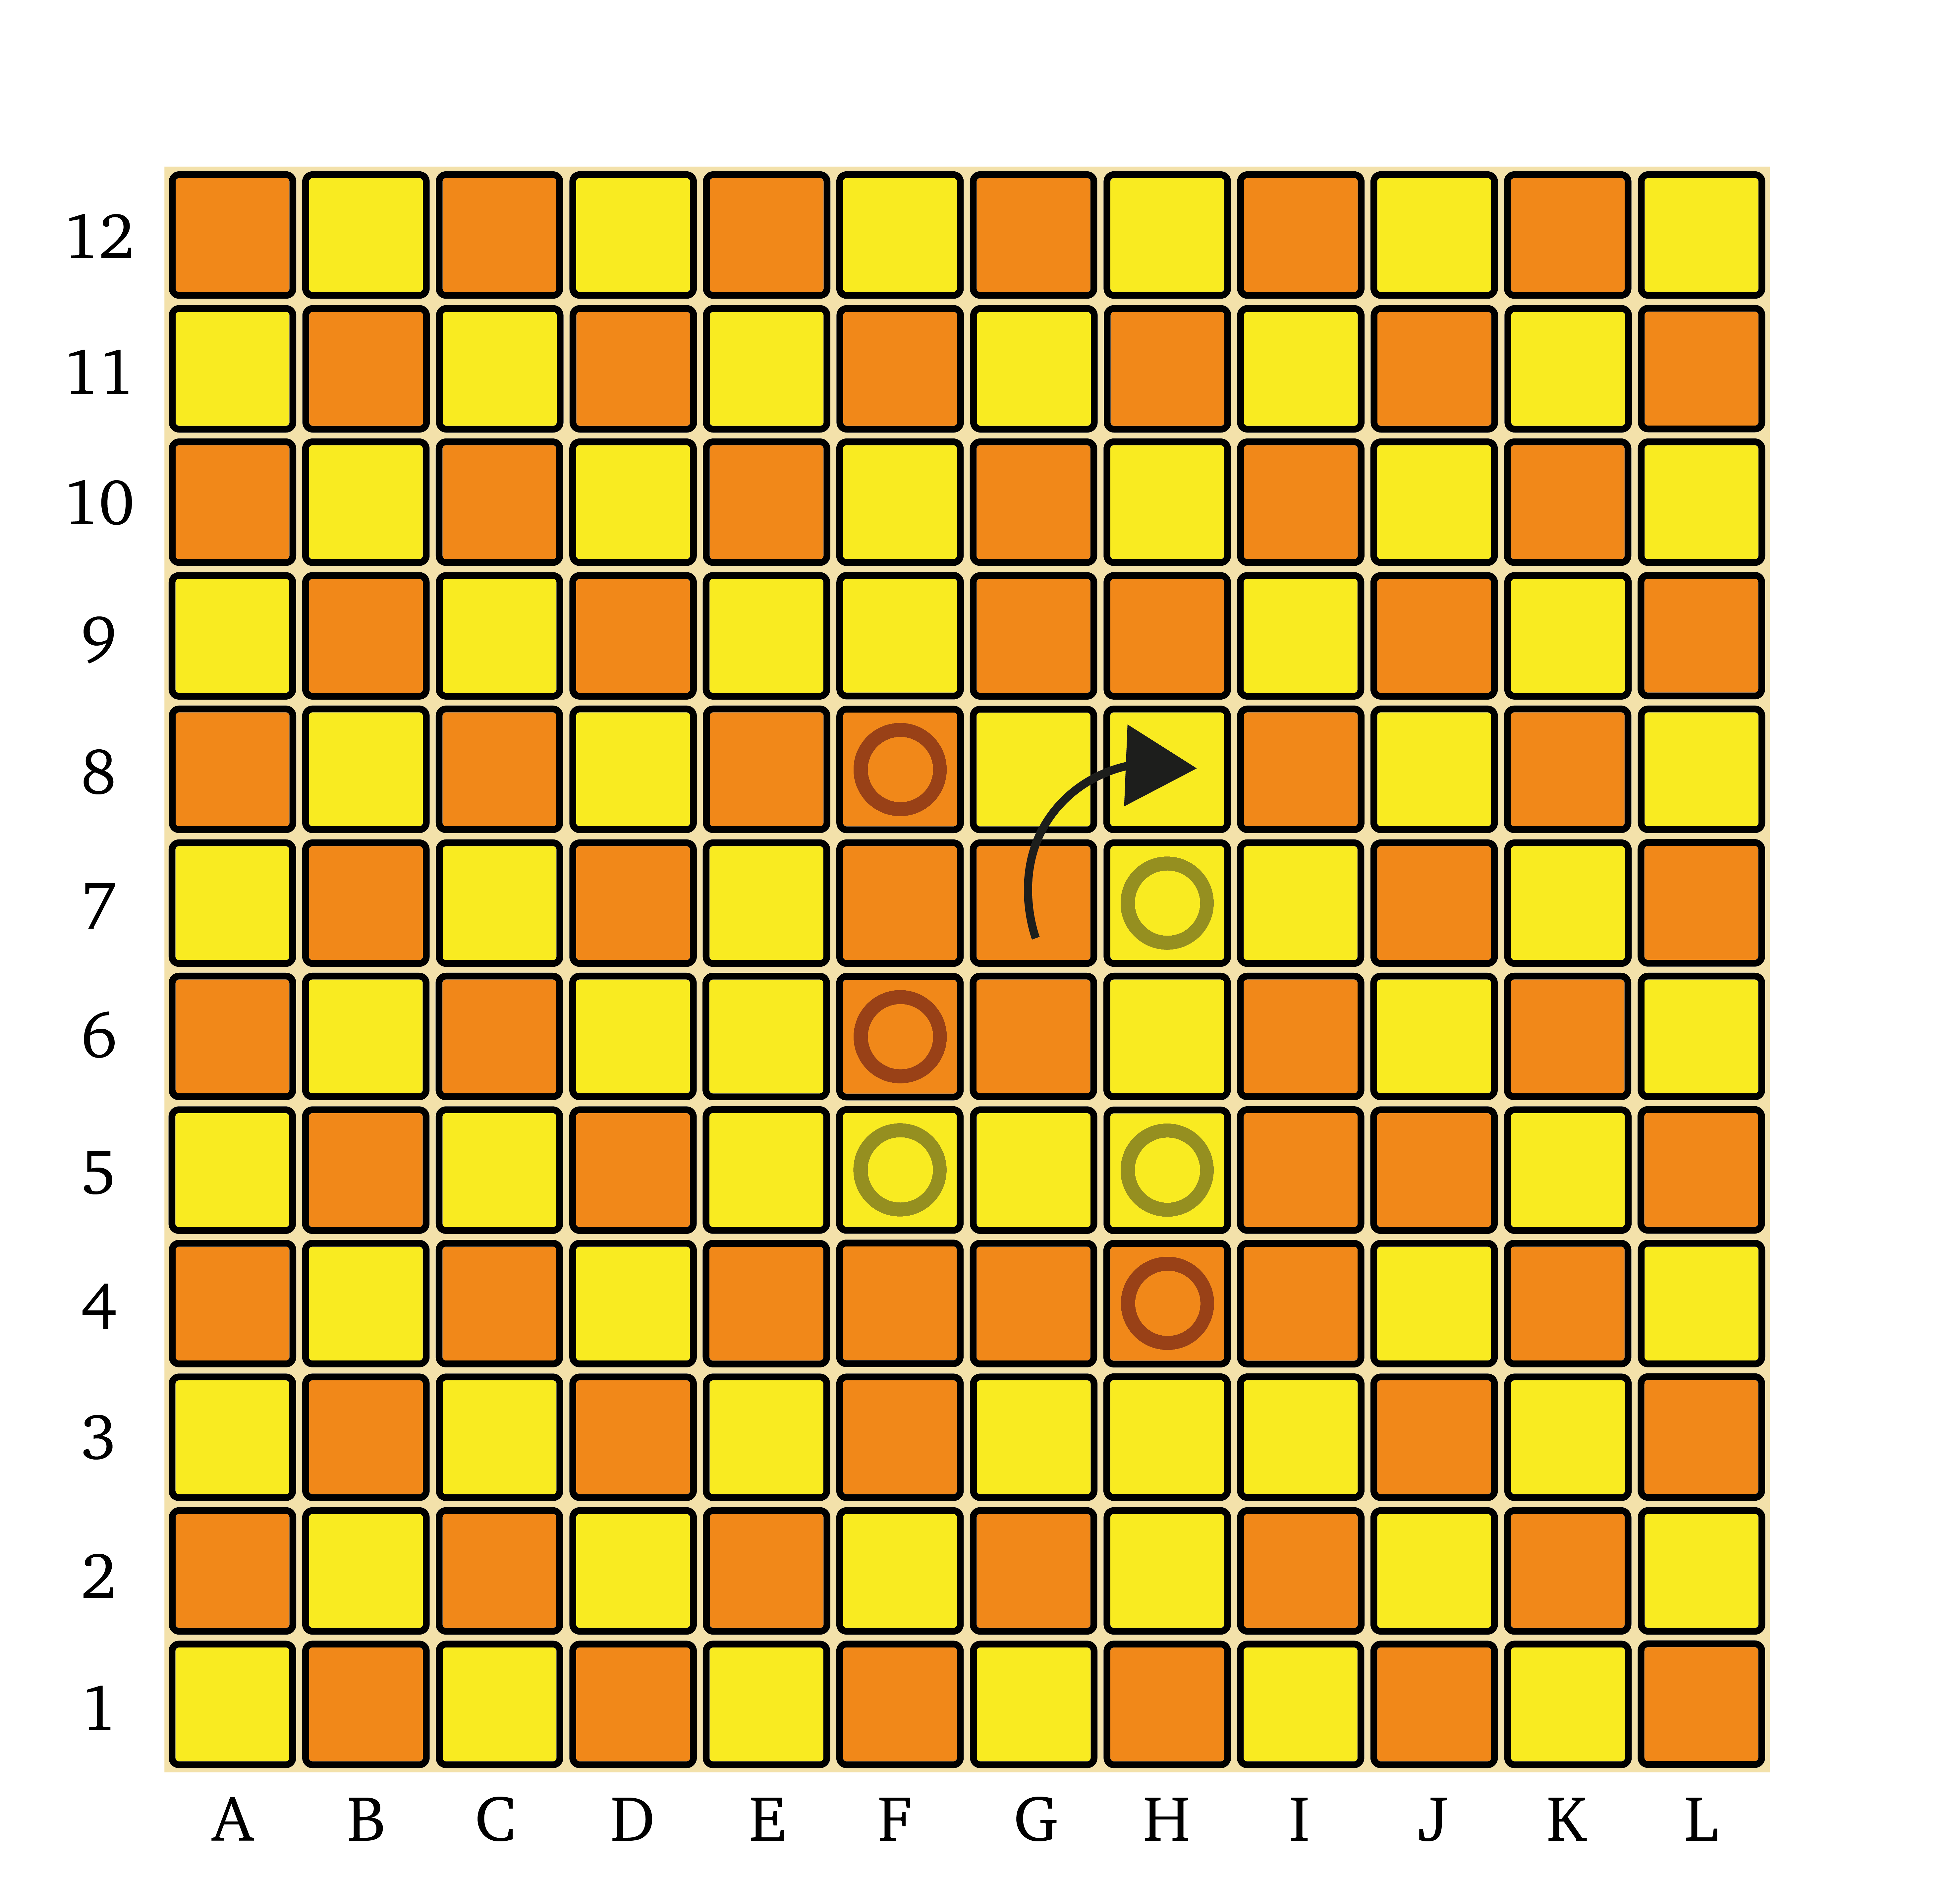
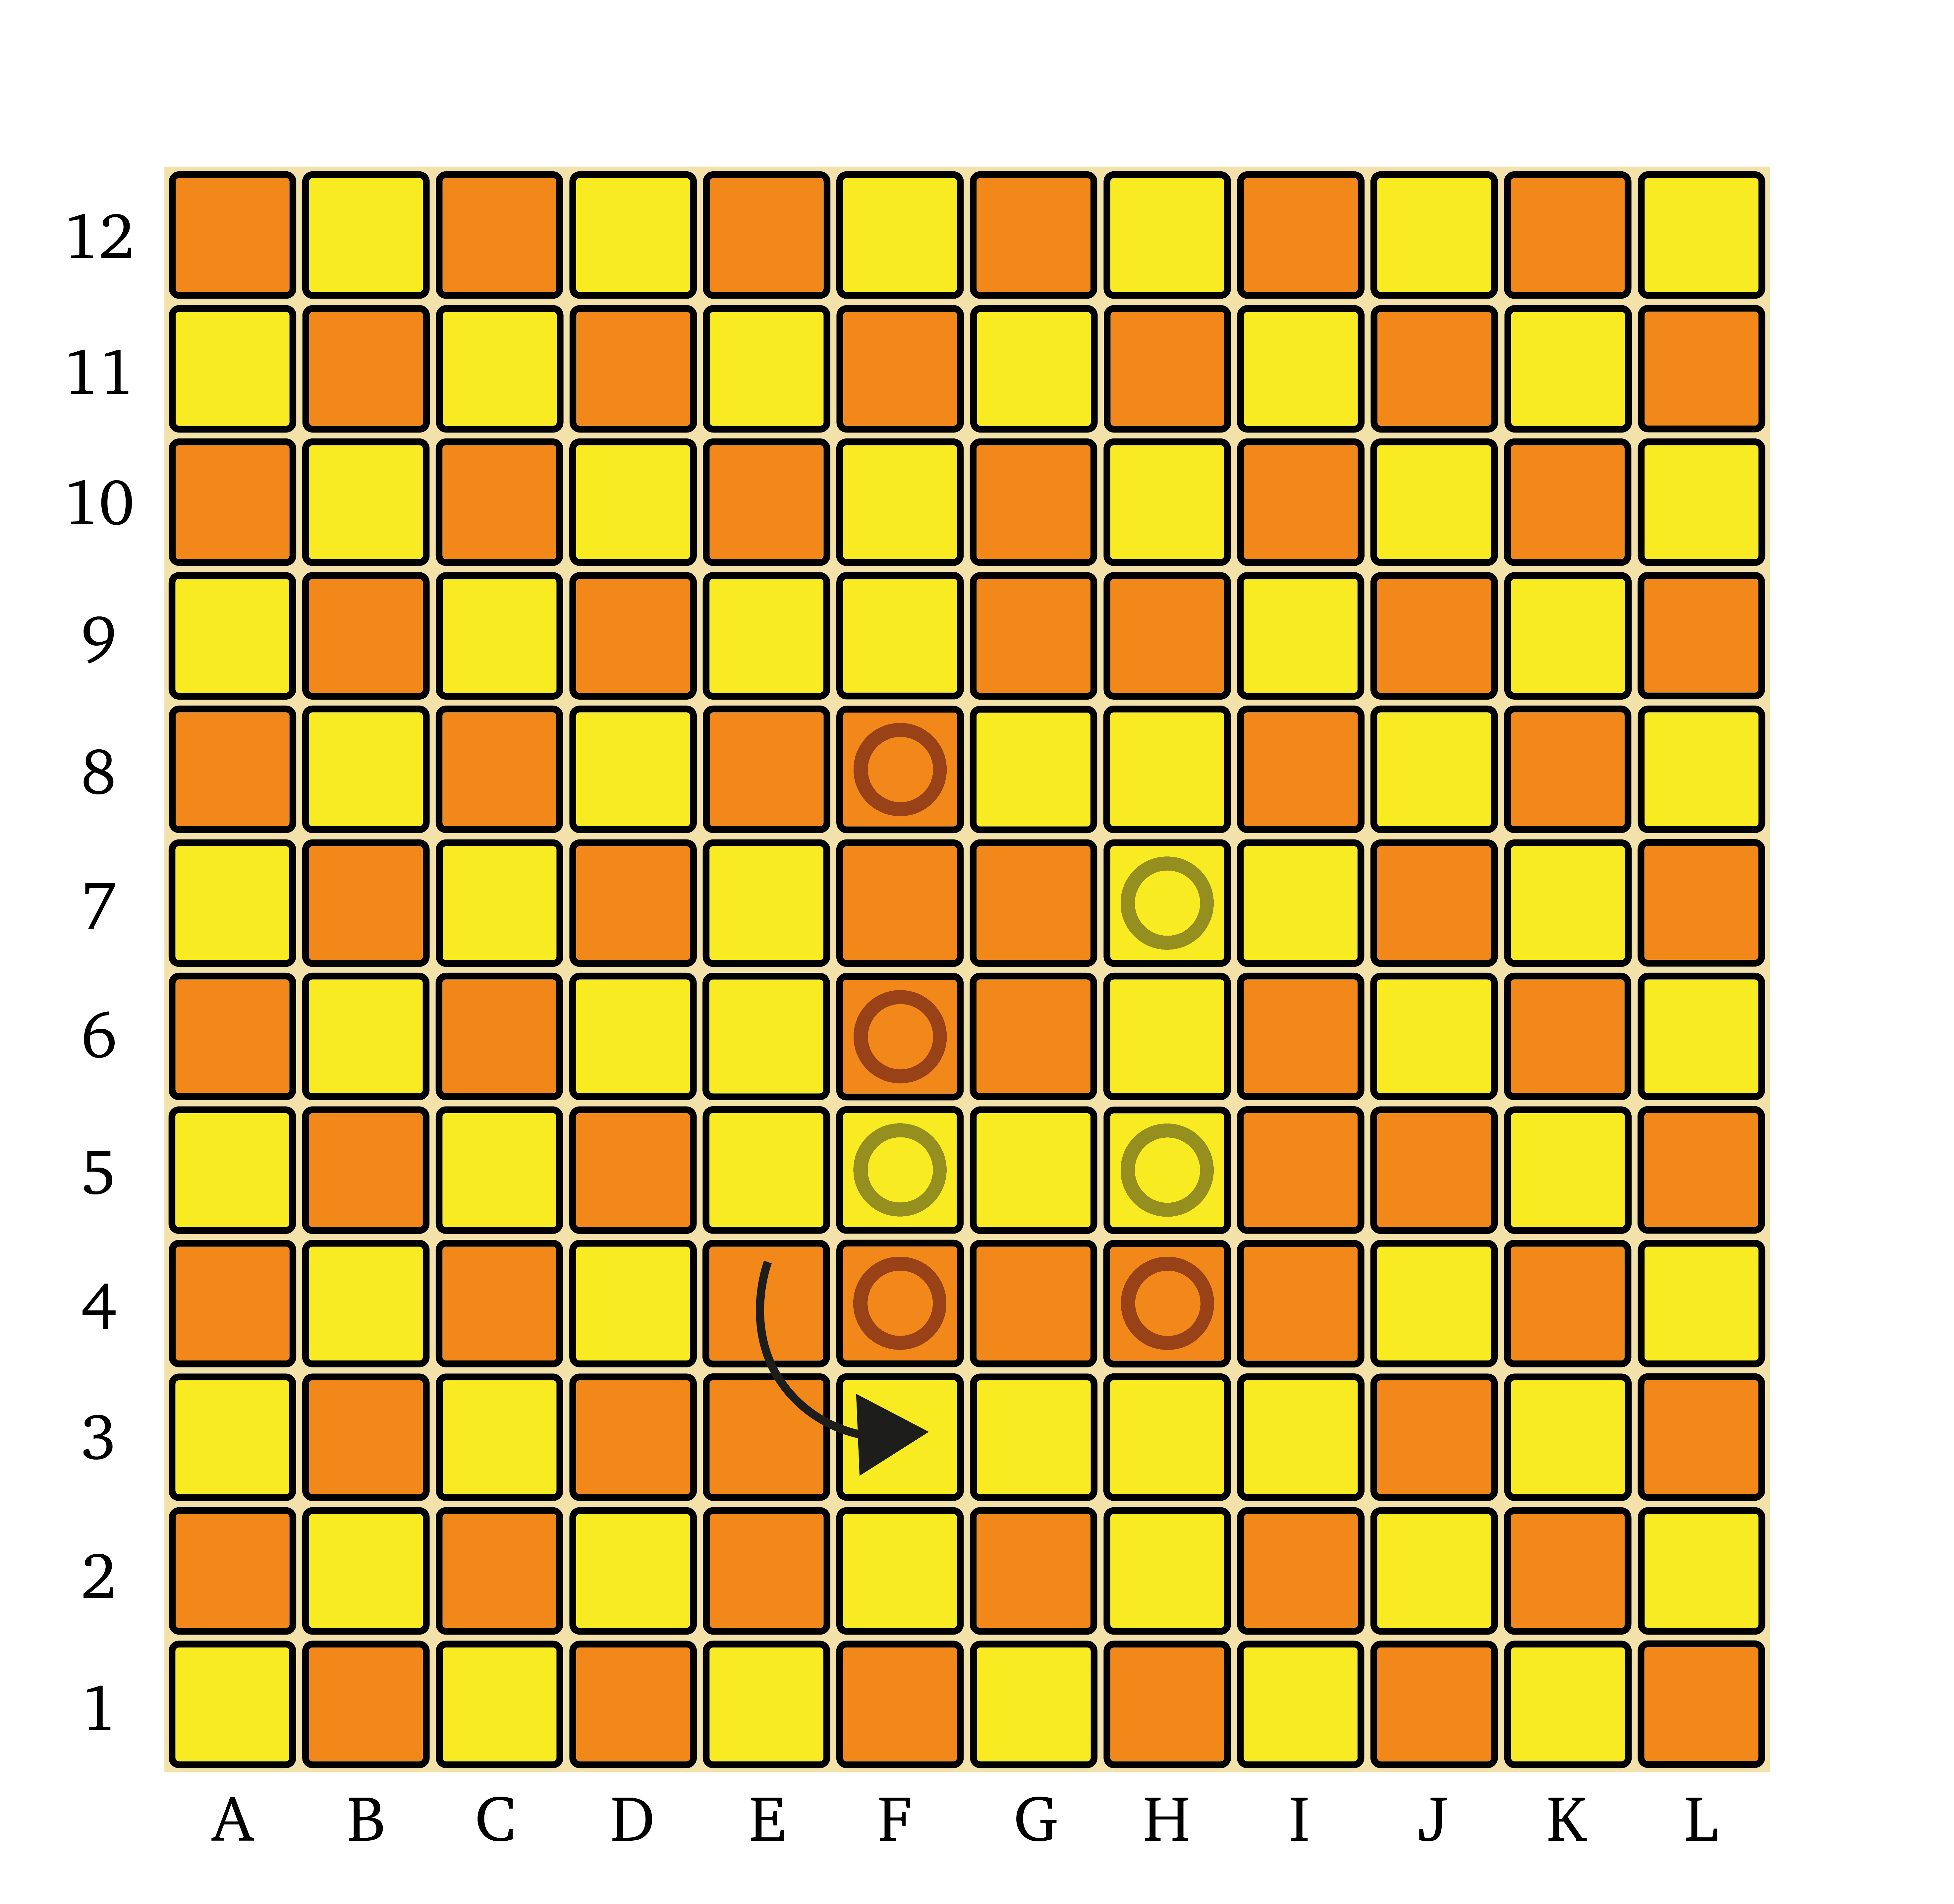
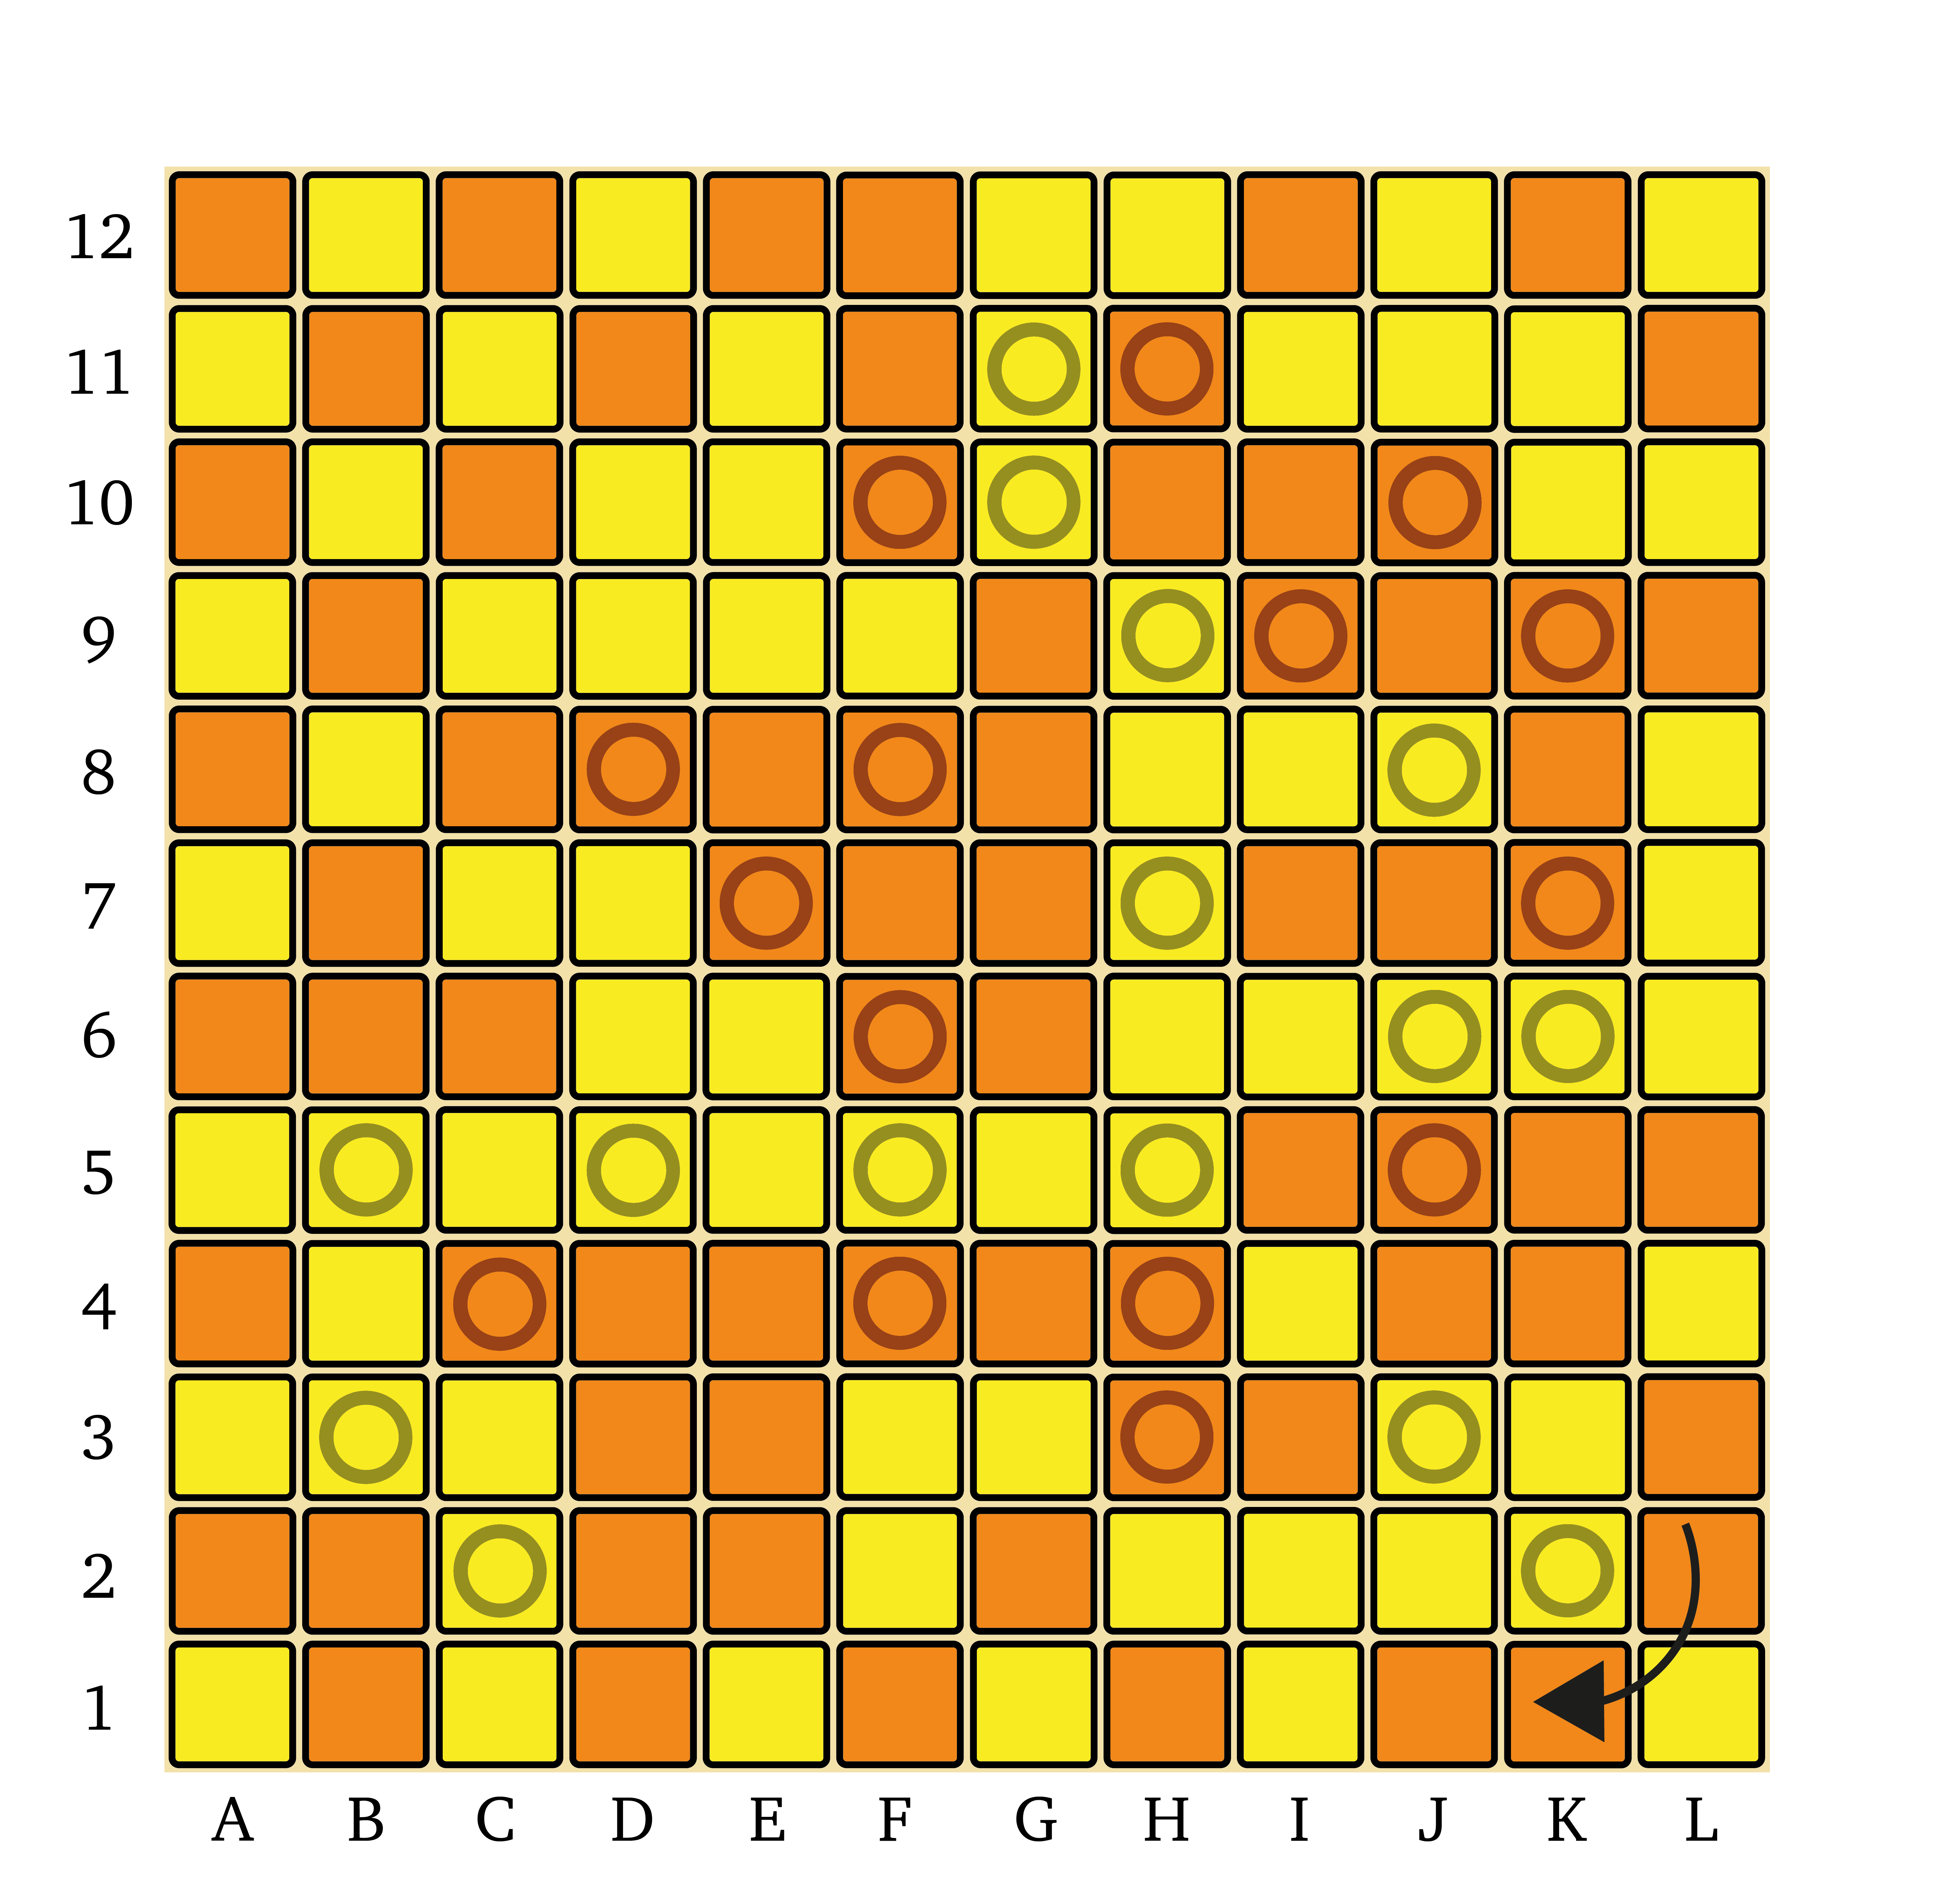
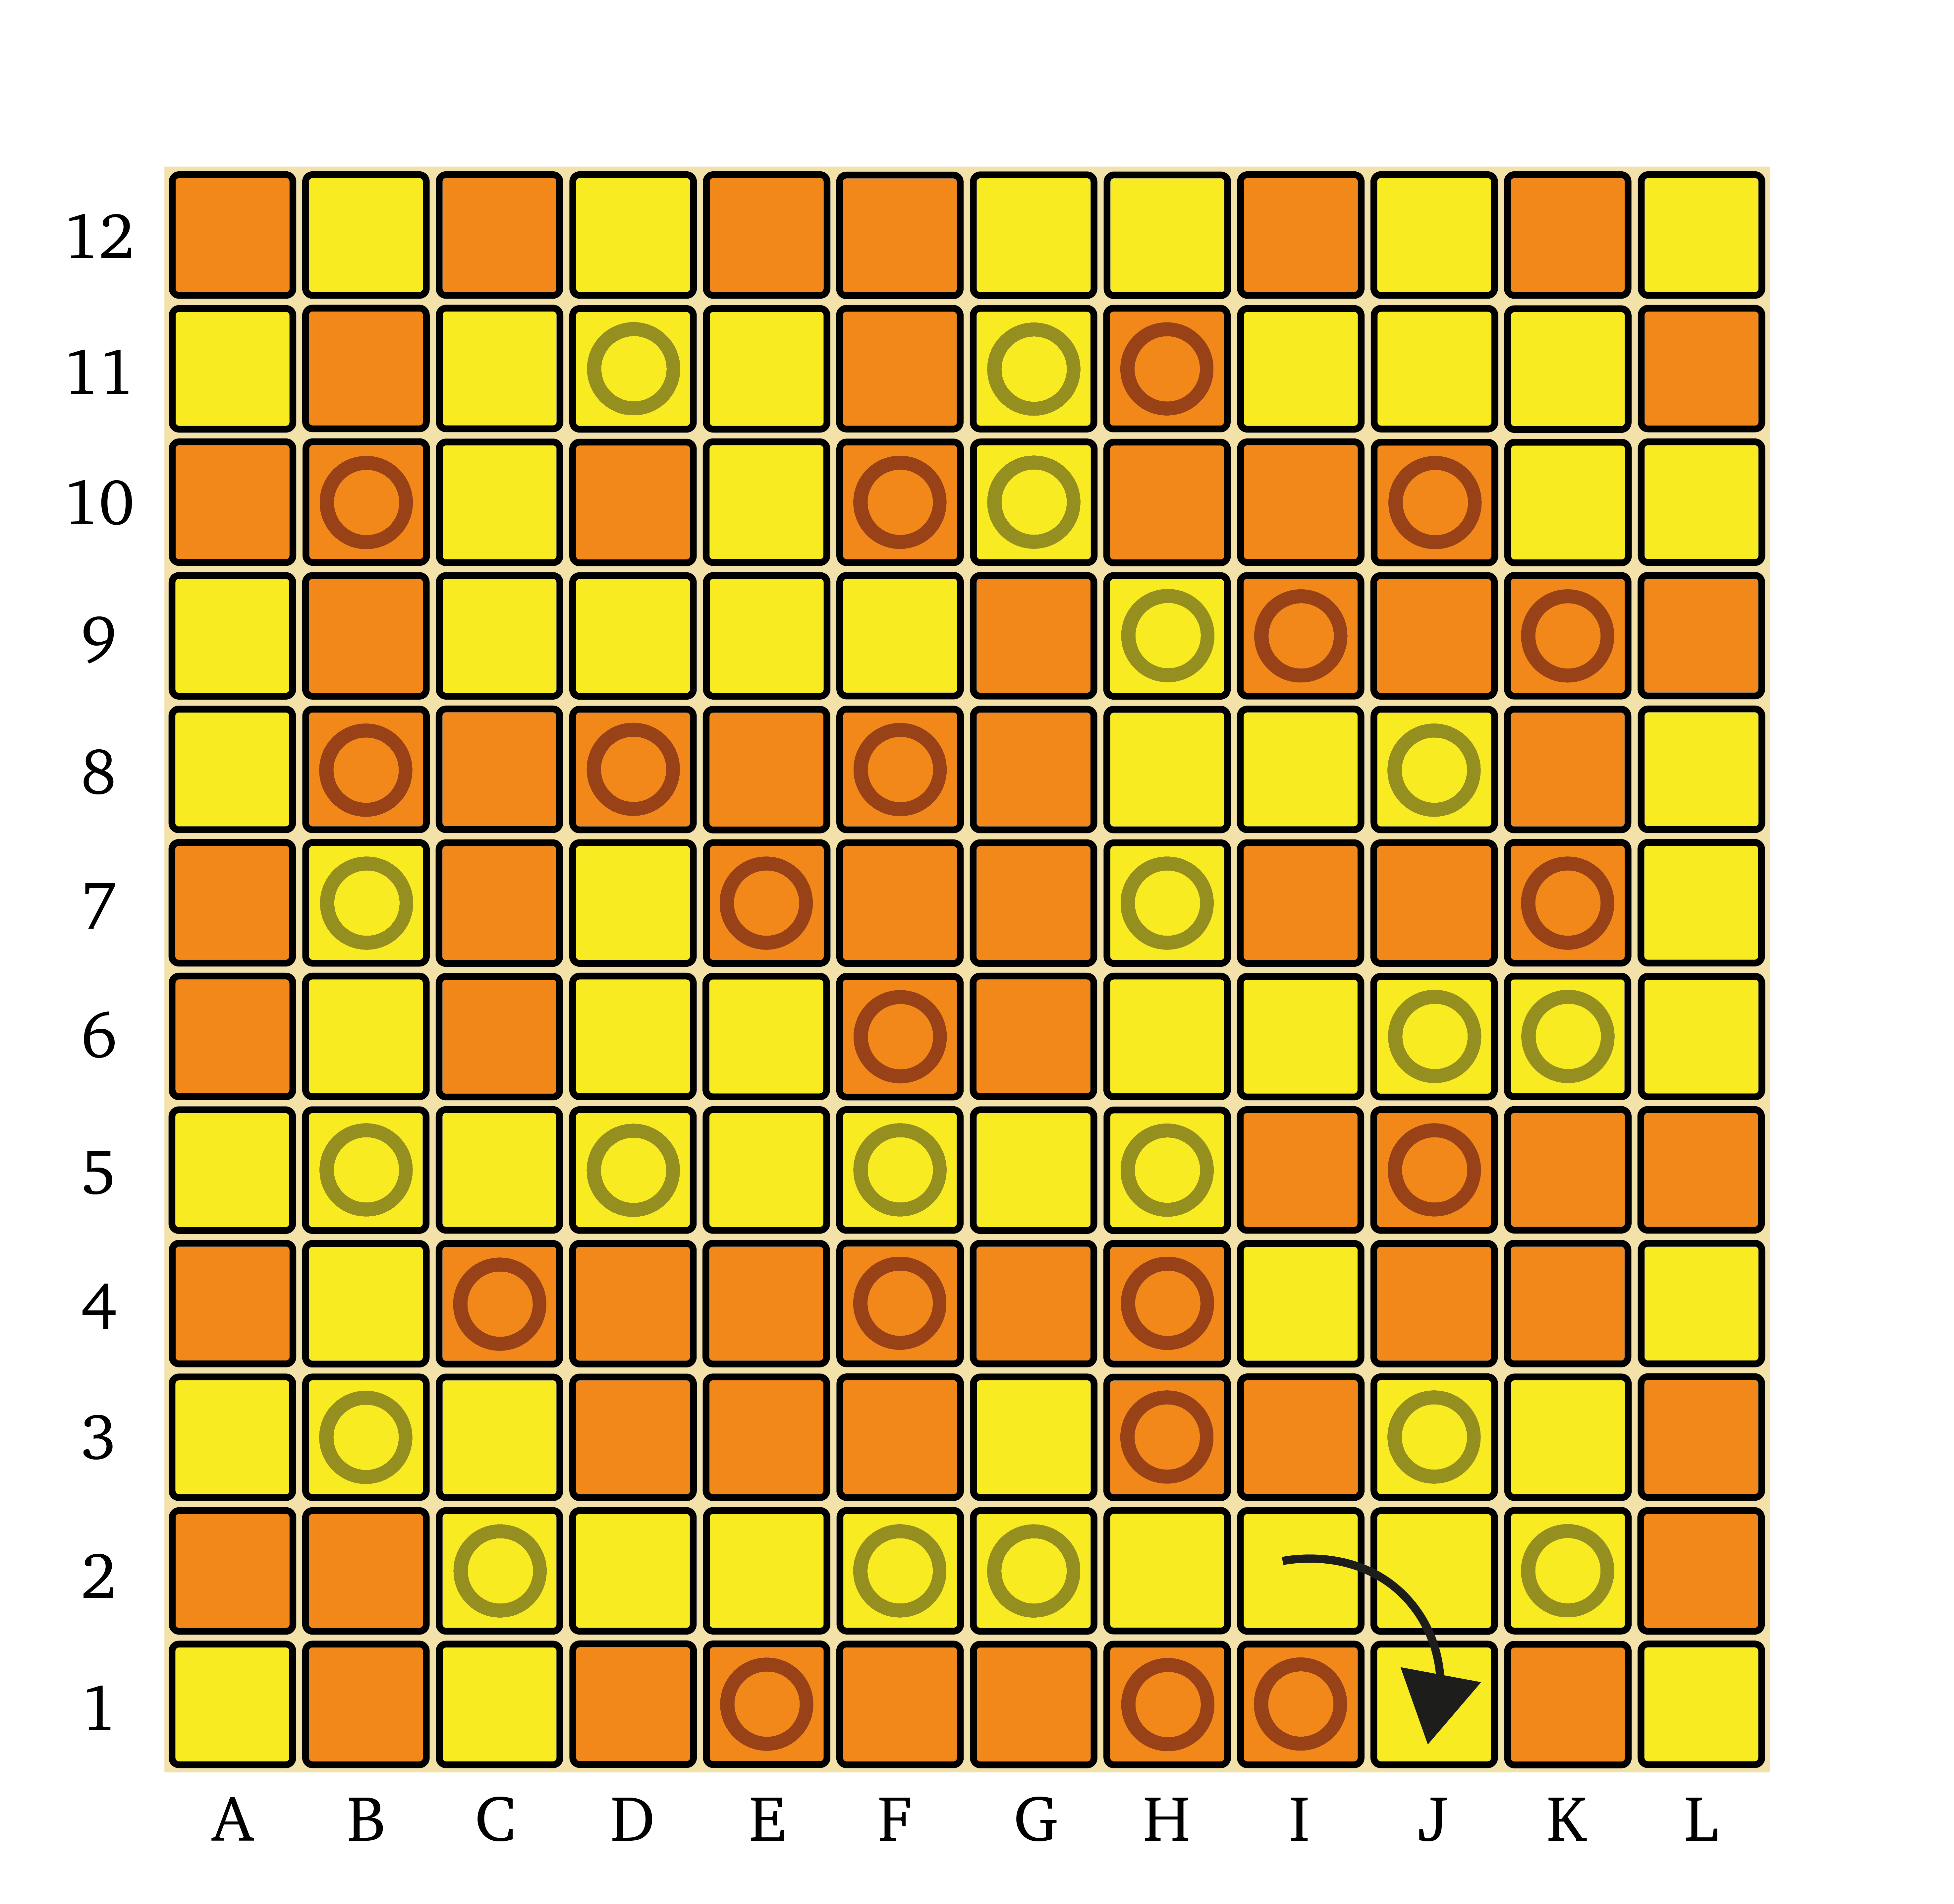
- Next we add in the square marking the top-right of the twisted face, in this case e4 (the red square in the diagram). Our move is now Cd3e4
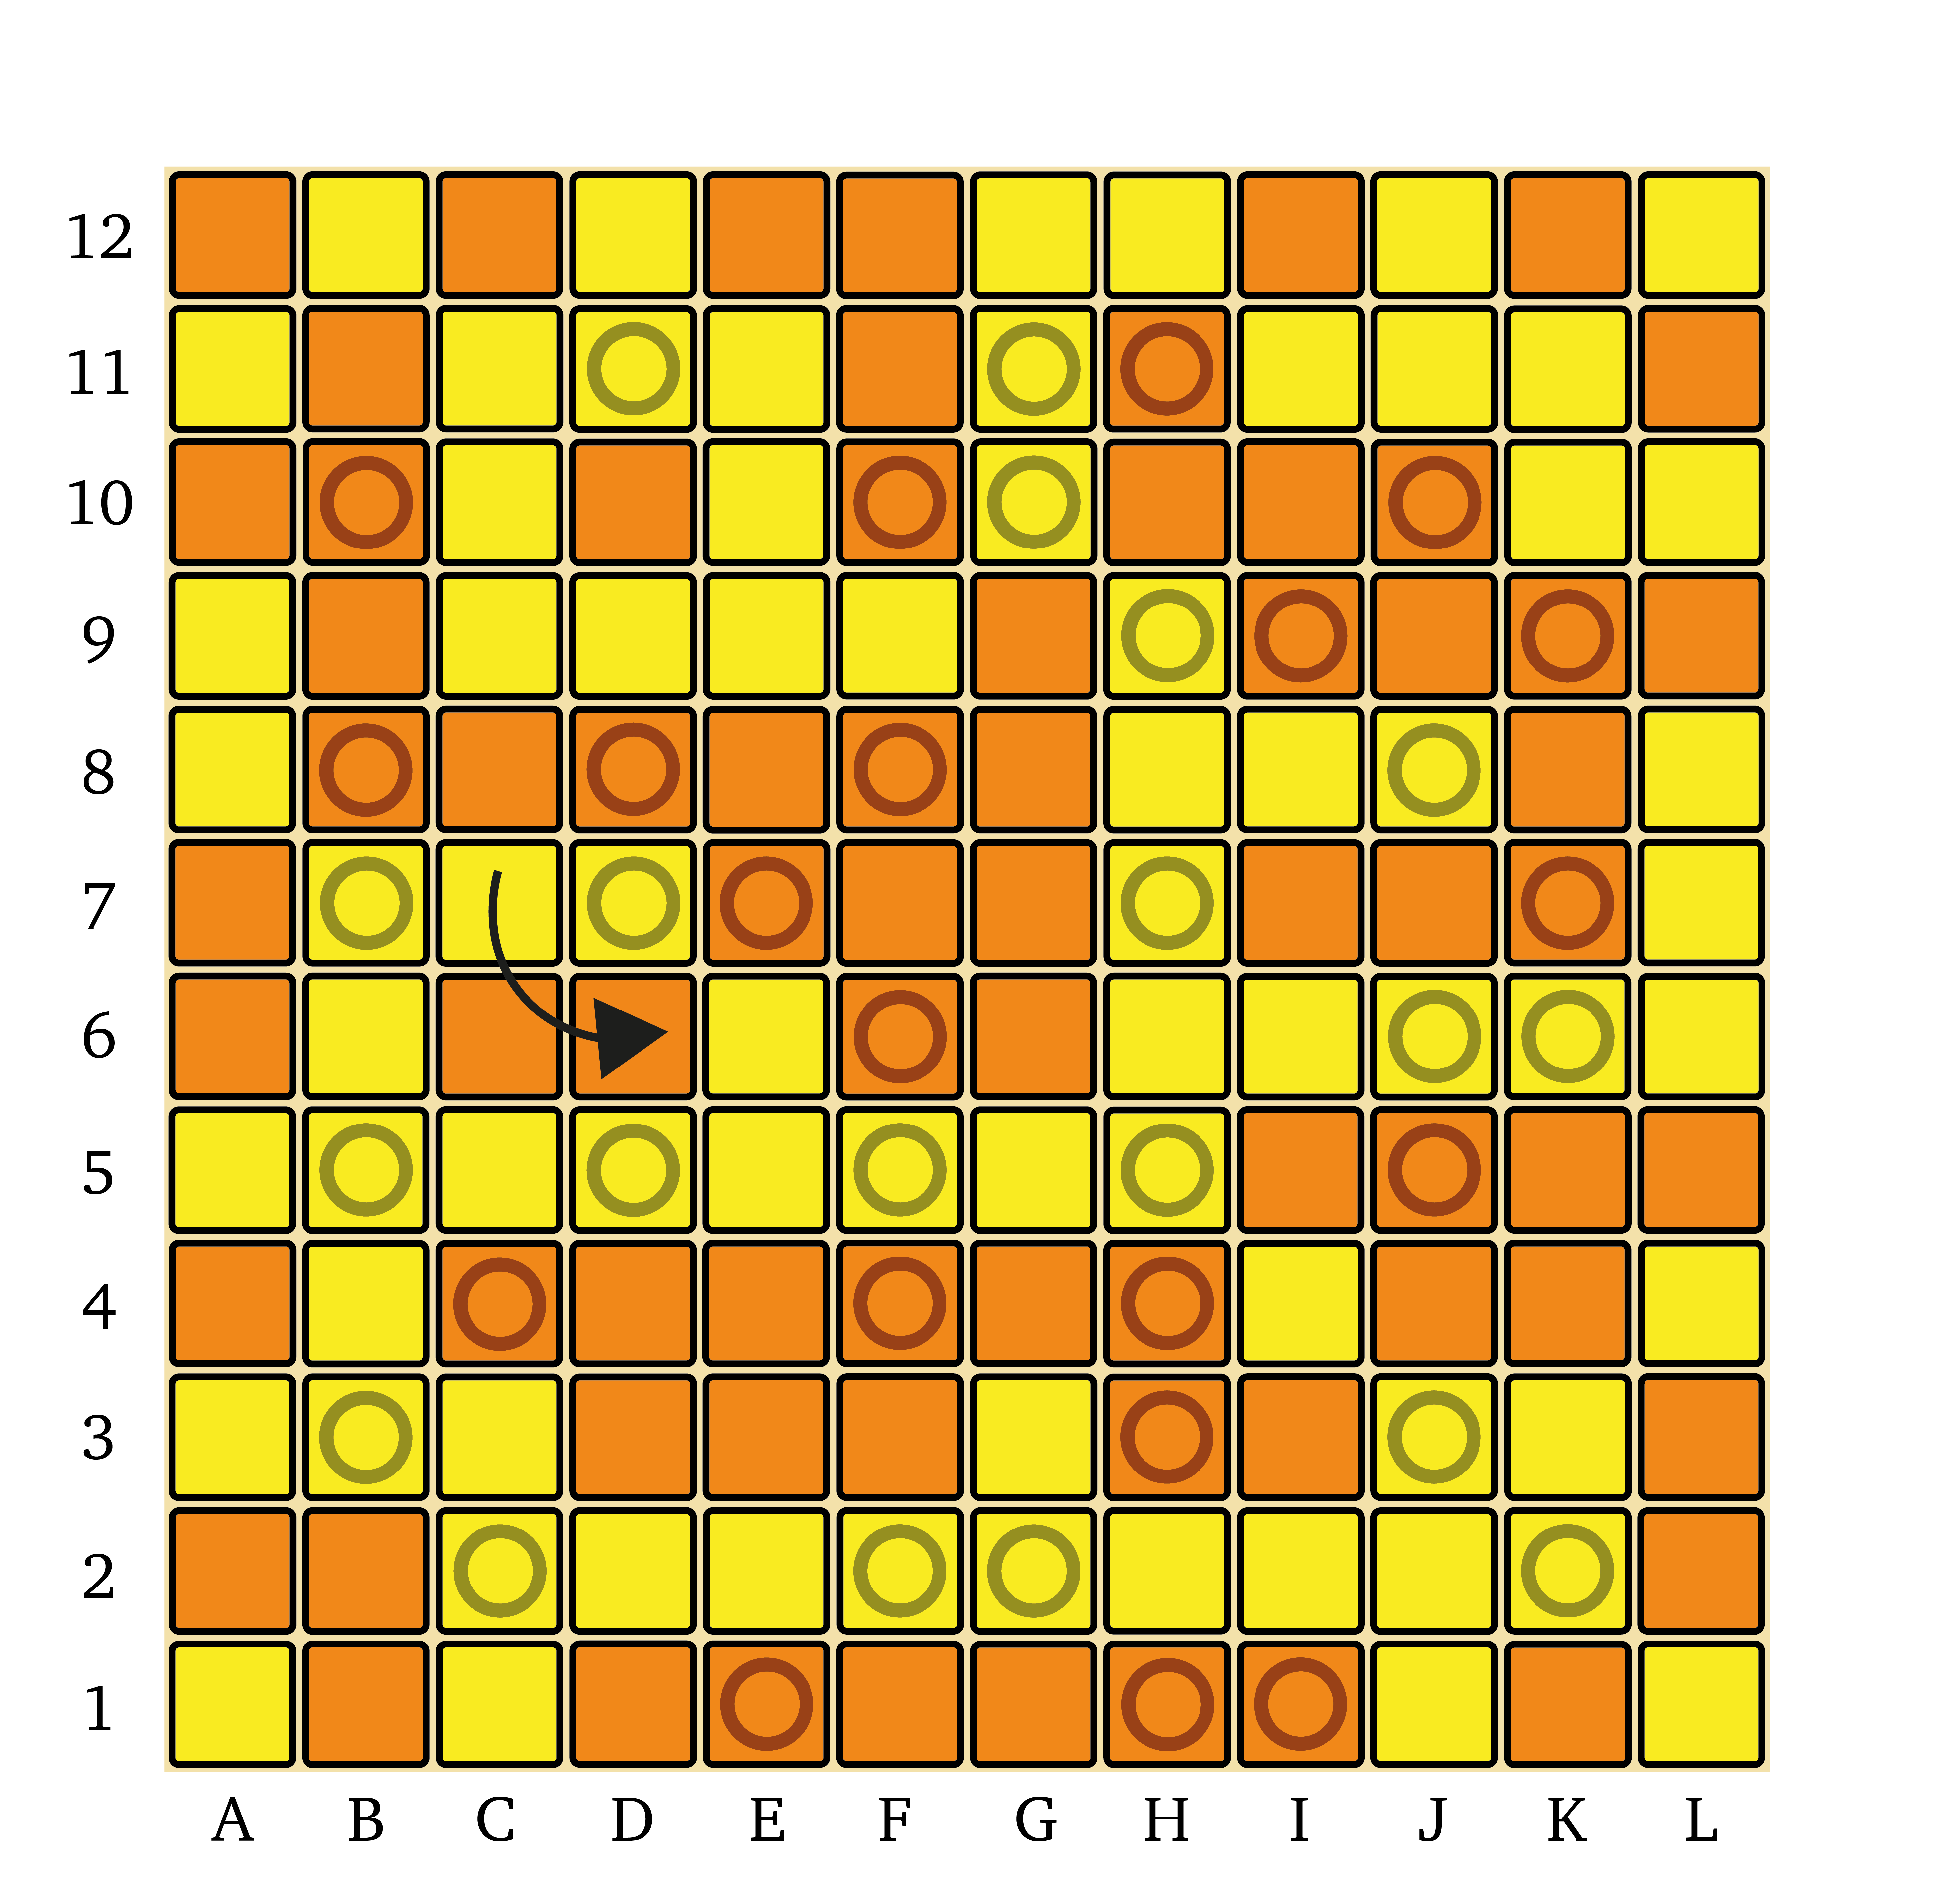
- Finally, we add a hyphen for readability, then add the square we chose to bandage, which is d4 in this case (the blue square in the diagram). So our complete move can be written as Cd3e4-d4.
That’s it! If we note down every move in this way, in proper sequence, we can easily reconstruct a game later for analysis. In Ai Ai the notation works basically the same, except moves are written with the word Clockwise for clockwise twists and Widdershins for anti-clockwise twists.
Preliminaries
This post is very long, so I will not recap the rules here; if you are totally new to the game, please read my previous introductory post and follow-up about the Ai Ai implementation so that you can learn how the game plays, and get yourself set up to play it.
This particular game was played on a 12×12 board, which is the standard size available at MindSports. A board that size contains 144 pieces, which seems like a large amount, but each move in Permute directly moves a set of four pieces and also locks down a portion of the board afterward, so games on 12×12 are surprisingly fast and brutal. Typically a full game will last between 20-25 moves per player (note I’m counting a twist + bandage as a single ‘move’).
The board size has a strong impact on play in Permute, as it does in other territory games like Go. Playing Permute on 12×12 is similar to playing Go on a 9×9 board — fighting starts immediately, and tactics are a major focus of the game. Controlling the centre of the board early is very important, as this offers great opportunities both for expanding your own groups and blocking your opponent’s growth.
For a deeper, more strategic battle, I recommend playing on a 16×16 board. At this size, games will last between 40-50 moves per player, about the same length as a typical game of Chess. Opening play on this board size will tend to focus more around the corners and edges of the board, with the centre becoming more important once territories have been settled around the sides. If you want the territorial aspect of the game to really dominate, then you can play on a 20×20 or even 24×24 board; on 24×24 a game will last about as long as a game of 19×19 Go (generally somewhat shorter). Ai Ai supports Permute play on all these sizes.
The Ai Ai implementation also allows numerous variants of the game to be played. The most notable of these is the option for a 1[1]2[2]* move protocol. This means the first player on their first turn twists and bandages once, and from then on players alternate twisting two faces, then bandaging a stone of their colour in the second face they twisted. I highly recommend trying this variant, which allows some very clever manoeuvring, and also lengthens the game on smaller boards. For serious strategic play however I still advocate 16×16/20×20 single-twist rules as the best option; the two-twist variant makes useful tactics substantially harder to see, because two twists can cause so many changes to the board state in a single turn.
In any case, 12×12 with single twists is the ideal introduction to the game, and that will be our focus in this article. In a future article, I will cover strategic tips and techniques for play on the larger boards, aimed at advanced players.
Permute 12×12 — Simon R vs Eric S
-
- 1. Ce5f6-f6
-
- …Ae4f5-f5
The opening begins! Simon was playing Orange, meaning he gets to move first. He strikes out for the centre immediately, which is a sensible play on the 12×12 board. After just that single move, both of us now have two 3-groups each — each move in Permute substantially changes the local group composition, particularly in the early game, where few pieces have been bandaged.
I respond with an anti-clockwise twist at e4f5, aiming to contain any ideas of Orange extending to the western or southern edges. In the process I connect my two 3-groups into a single 6-group.
-
- 2. Af8g9-f8
-
- …Ah4i5-h5
Orange responds by growing their own 3-group by twisting f8g9. Expansion is never a bad thing, but this move is a bit passive; the resulting group is still smaller than my largest, and this move does not really hamper my expansion. In response, I twist h4i5, connecting two more pieces to the 6-group by rotating a piece into the connecting corner on h5. From there, I can extend by adding to the piece attached to the north of h5 — I like to call these one-square extensions from bandaged friendly pieces anchors, as they are good bases for expansion — or I can connect two more pieces on the eastern edge of the group in two different ways, thanks to the 3-group covering i3-i4-j4.
-
- 3. Ch3i4-h4
-
- …Cg7h8-h7
Orange spots the threat of more pieces connecting to my group, so he instead connects his own pieces beneath and around my group by twisting h3i4. This is a good move, in that it serves two purposes — it instantly gives him a nice-sized group, and it actively blocks my group from expanding to the south. I was prepared for this, though, thanks to the anchor on h6, so I connect three more pieces with a twist at g7h8. Note that my group is quite secure; each extension has bandaged pieces one space apart, which cannot be separated by any opposing twists. When building your groups, one-space extensions are the safest way to connect new pieces.
-
- 4. Ae3f4-f4
-
- …Ac4d5-d5
We’re very early in the game, but the centre is already taking shape. Here Orange decides to secure some more pieces for their southern group by twisting e3f4. Again this move is a bit passive; Orange has the opportunity to sandwich my centre group between their upper and lower groups, and my hopes of extension rest on me being able to protect the corner of my group at e5, or the northern extension at g8-h8. Better would have been Ae5d6-e5 — that would have severed my corner at e5, blocking expansion to the west, while further securing Orange’s biggest group.
Having been spared a squeeze on e5 from Orange, I twist c4d5 and bandage d5 to secure that vulnerable corner and gain space on the west side, with ambitions of connecting to the western edge and cutting off the bottom of the board, so that Orange cannot connect their upper and lower groups on that side.
-
- 5. Cb4c5-c4
-
- …Ab5c6-b5
Orange takes action to prevent my group heading west, but in actuality this move only delays me very briefly. My group is also still expandable to the east and north, thanks to the anchors on h8 and i7. This move does give Orange a large group in a commanding position over the southern reaches of the board, but at this stage of the game, exerting influence and securing areas for future growth is more important. A nice move here would have been Cg8h9-h8, which would have blocked off any northern expansion for my group.
I respond by moving forward with my plan to connect to the western edge, which restricts Orange’s growth opportunities and gives me an anchor on b4. At this point I also notice Orange’s vulnerable corner on i8, which is an important weakness now that Orange has invested several moves in growing this southern group.
-
- 6. Ai5j6-j5
-
- Aj3k4-j4 (alt1)
-
- Cg8h9-h8 (alt2)
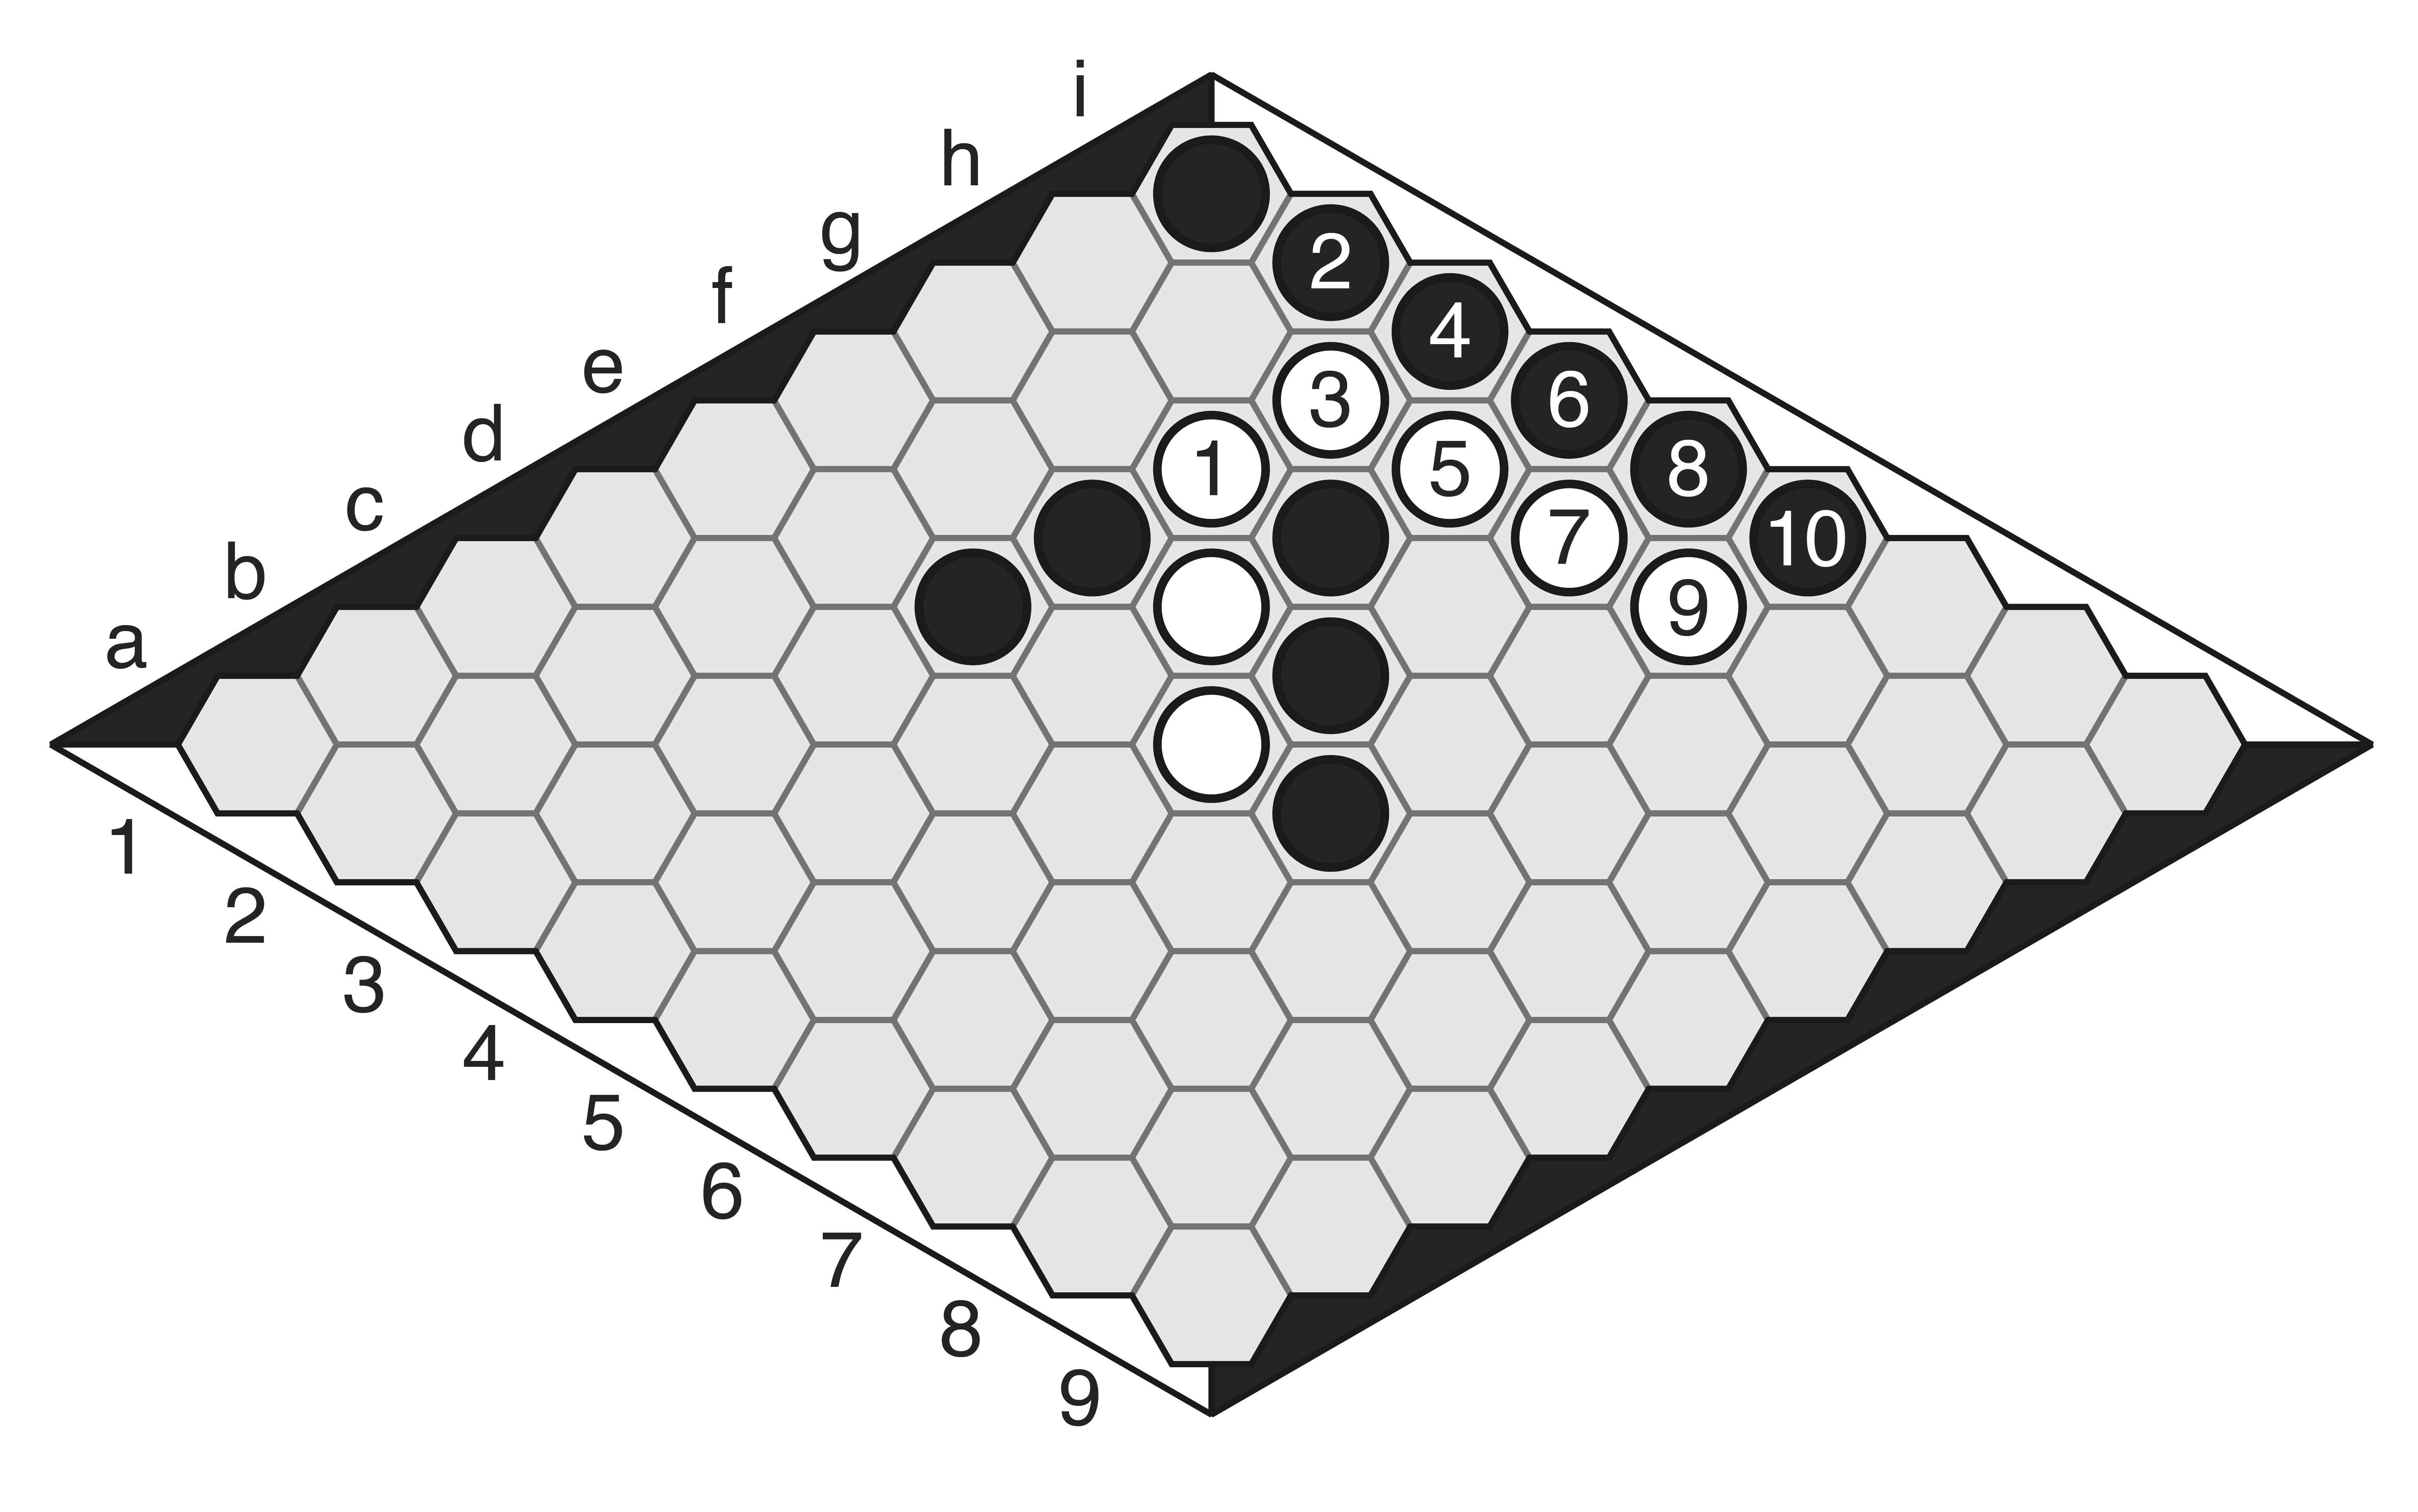
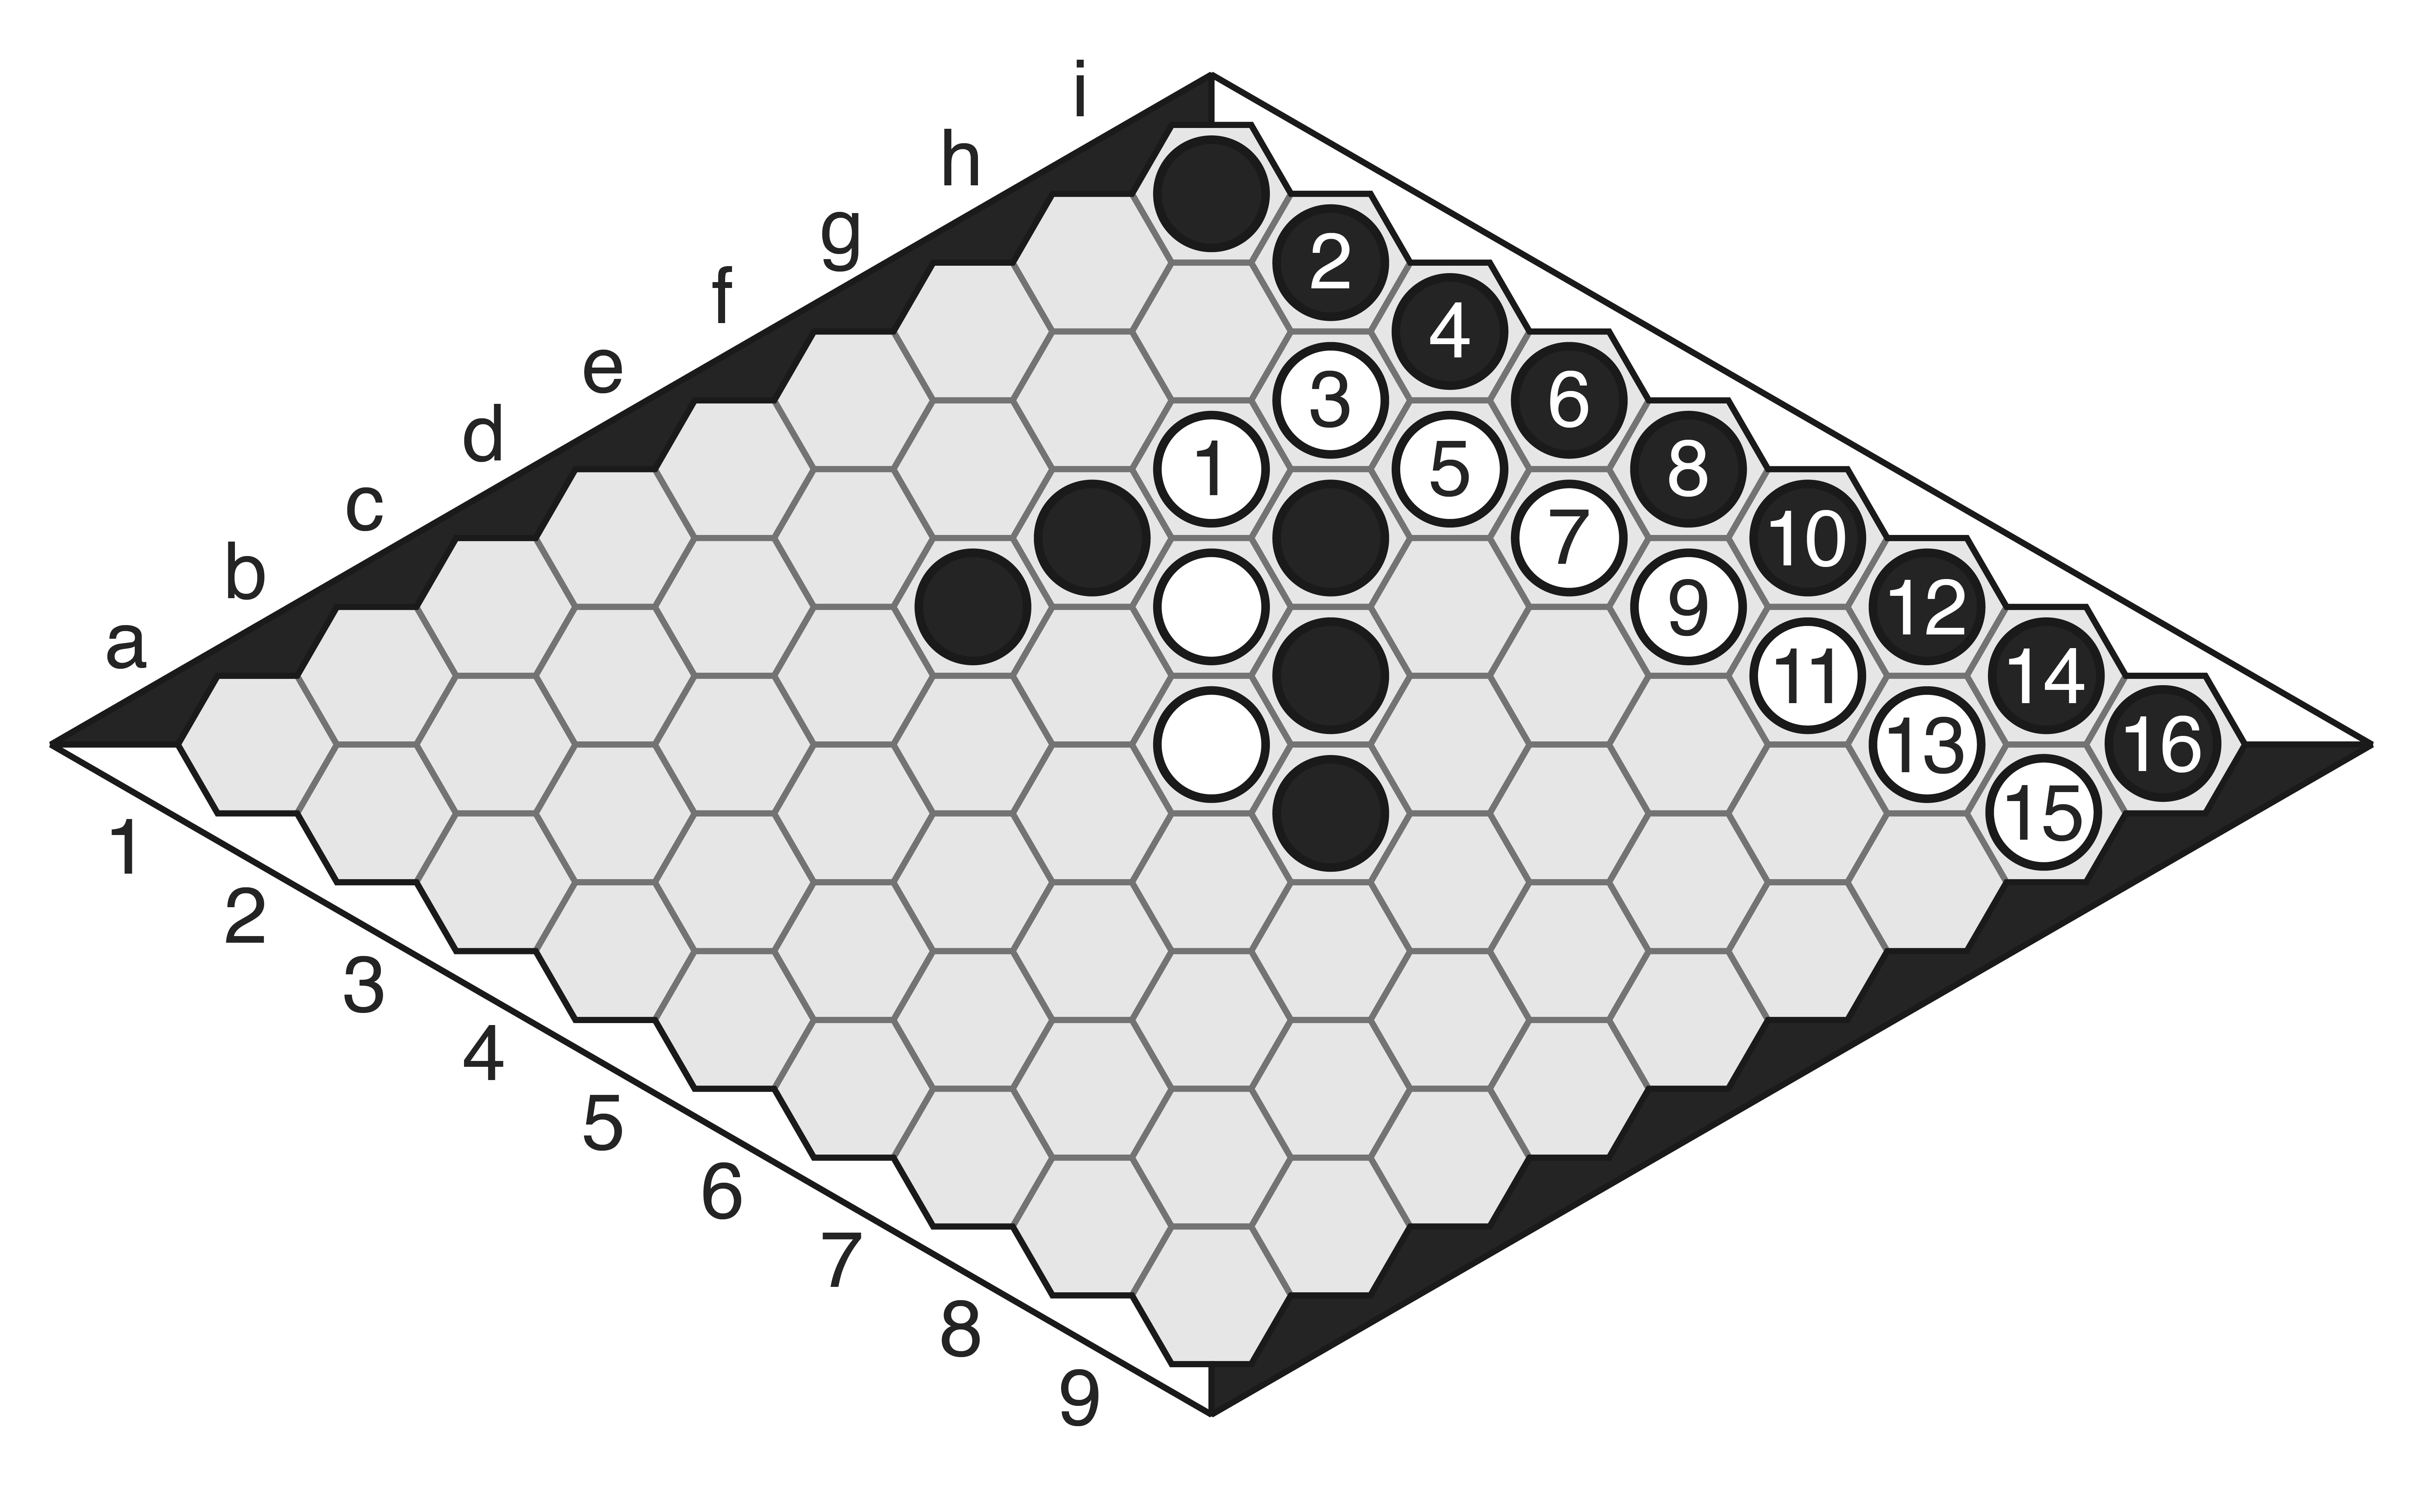
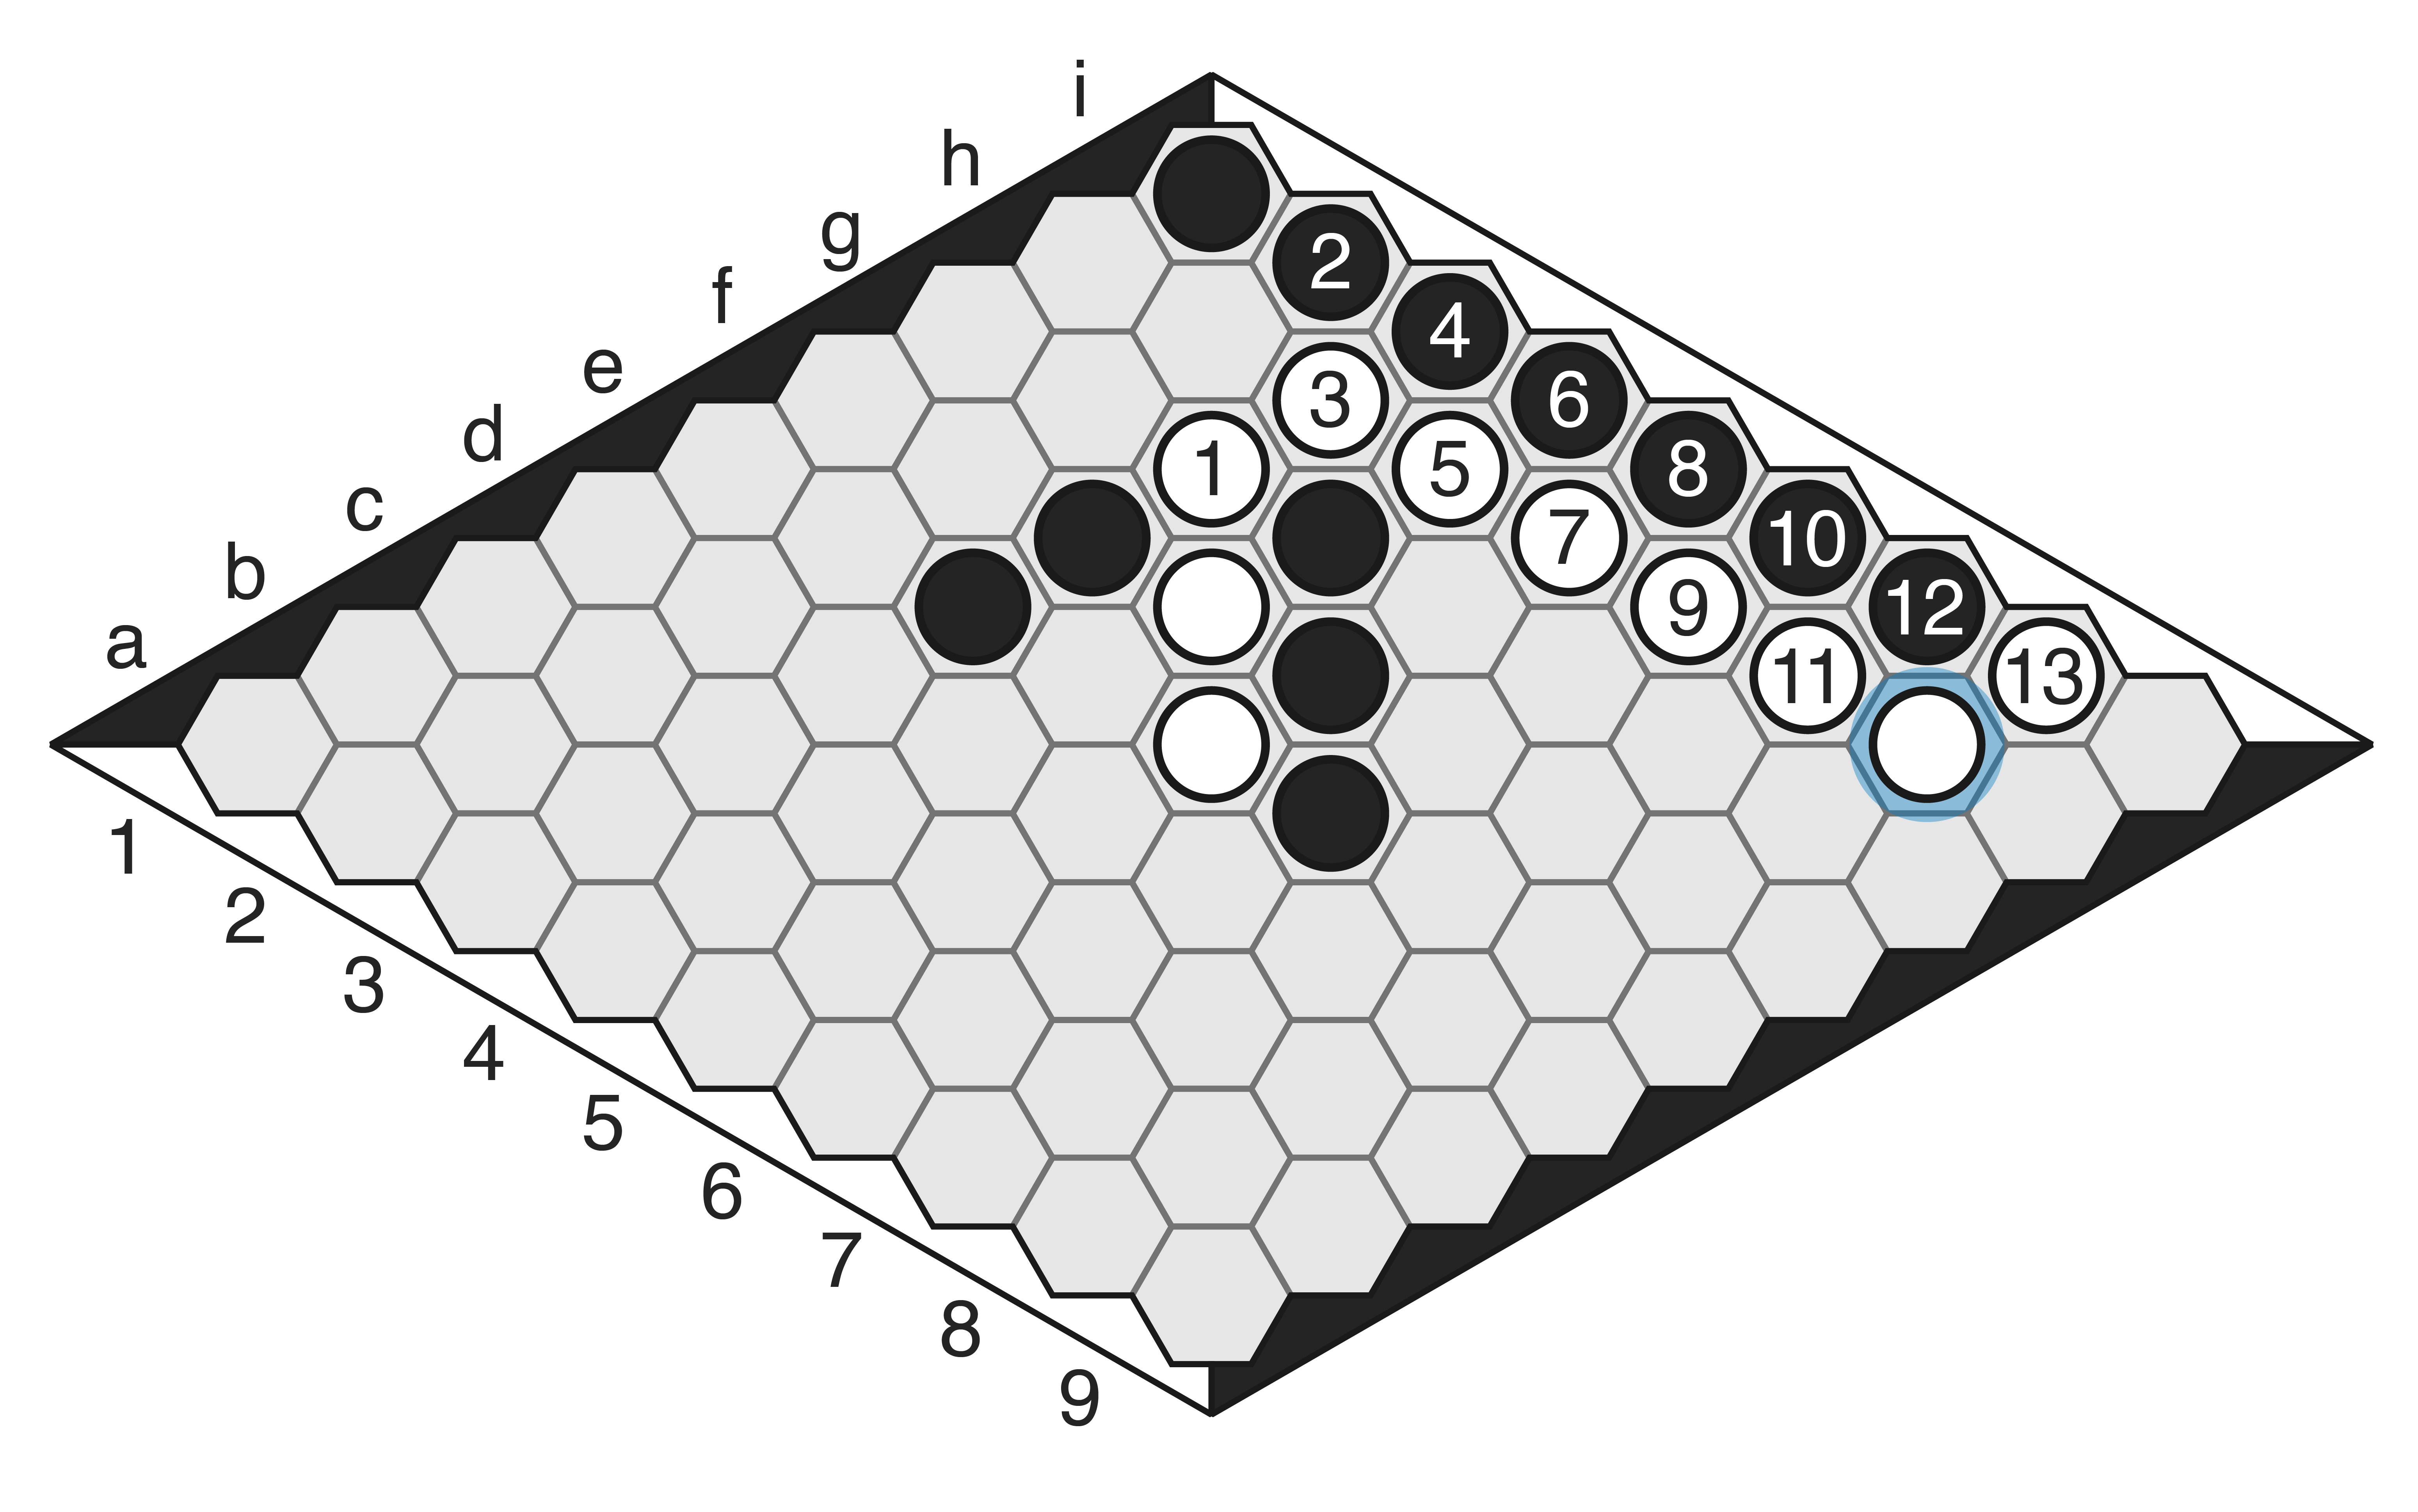
We will take a close look at Orange’s next move, which is a crucial moment in the game. Orange elected to twist i5j6, extending their group closer to the eastern edge while interfering with my group’s potential expansion on that side. Unfortunately this move does not protect the vulnerable corner at i4, which gives me a huge attacking opportunity.
The middle diagram shows one potential alternative — securing the corner at i5 increases Orange’s hold on the bottom of the board, but it also further cramps their space for extension, confining their largest group mostly to the bottom. A better alternative would have been the block at h8 I recommended previously — this move is still effective now, forcing a response from Yellow and adding some tactical complications. However, at this point Ai Ai estimates Orange’s winning chances at just 36% even if they had chosen to block at h8.
-
- 6… Ci3j4-j3
-
- 7. Ai8j9-i9
Seeing that Orange has not protected the corner at i5, I launch my attack and twist out Orange’s piece on i5 (marked with an X in the diagram). In one stroke this slices Orange’s largest group in half. Bandaging at j5 ensures Orange cannot easily repair this damage, and claims further space toward the lower-right corner, making it very hard for Orange to even attempt to connect around this new blockage at i5.
At this point, Ai Ai estimates my winning chances at 88%. Orange had invested a lot of moves in this group, and now the bottom portion has been entirely cut off from the section on the right, and is unlikely to form the basis of a winning group. I have control over the centre and plenty of expansion options on the northern and eastern edges of my largest group.
Orange can see they are in trouble, so they respond with a twist at i8j9, in an attempt to constrict my expansion options to the north. Orange now has to defend perfectly to have a hope of victory; when forced to play moves like this which do not extend one’s own groups, the opponent is often free to build up their advantage further.
This exchange gives us perhaps the most important message to take away from this game: protect your corners! In Permute you will often need to bend your group around to connect pieces in various directions, and any corner piece in your group left unbandaged is a potential weakness. One twist can potentially slice your group to ribbons and leave you struggling.
-

- 7… Ag8h9-h9
-
- 8. Ce9f10-f10
Now that Orange is on the defensive, I decide to aim for connection to the northern edge. When ahead and in command of a large group, a useful strategic sub-goal is to try to split the board. The group doing the splitting is then unassailable, assuming you have bandaged it well, and your opponent is heavily constricted in any attempts to connect large chunks of pieces.
Orange responds by constraining my group’s northern expansion, squeezing it from the west. This does secure the northwestern section of the board for Orange, which could allow them to build a decent-sized group, and their current group stretching down to f6 is currently pretty secure. However, this move still gives me the chance to connect to the north or east sides. Ai Ai recommends moves that either disrupt the unbandaged, unsecured Yellow pieces at i6-i8, or blocking Yellow’s anchor at h10 and preventing the northern connection attempt. In either case, though, Ai Ai pegs Orange’s winning chances now at only about 3.5%.
-
- 8… Cg10h11-g10
-
- 9. Ag11h12-h11
As it happens, I elected not to complete the northern connection, and instead disrupt Orange’s newest largest group. My Yellow piece at f9 makes connection for Orange’s group quite awkward, so my hope is that further incursion into Orange’s northwestern territory will further decrease their chances to build a competitive group in that area.
Orange hits back by disrupting my 3-group around h11, ensuring that my bandaged piece at h9 remains isolated for the time being. However, this leaves me with an opening to cut off three Orange pieces from potential connection via a later twist at f11g12.
-
- 9… Ab2c3-b3
-
- 10. Ad7e8-e7
At this point I can see that my central group is very strong, so I decide to continue my plan to disrupt Orange’s opportunities for expansion while securing my position. By extending down from my anchor at b4, I further constrict Orange in the south, while adding a couple more pieces to my central group.
Orange elects to start enlarging their group in the northwest, establishing a bandaged piece at e7 that also prevents further extension of the Yellow group from e6.
-
- 10… Aj8k9-j8
-
- 11. Cj9k10-k9
I estimate at this stage that Orange’s northwestern group could not grow large enough to challenge my lead, but just in case I decide to extend my group and bandage at j8, in the process securing the vulnerable piece at i8. Orange fights back by twisting my pieces at j9-j10 into the corner and firmly blocking them off from my group. This also builds a nice group connecting through to the northwestern section, but those Orange pieces at f11-g11 remain vulnerable.
-
- 11… Cc2d3-c2
-
- 12. Ad8e9-d8
My first impulse here was to cut off Orange’s group on the top with Cf11g12-g12, but then I spot a move that looks bigger. The clockwise twist at c2d3 grows my own largest group by three while simultaneously blocking out three Orange pieces permanently, which seems like a favourable exchange.
Orange responds sensibly, forgetting about the unfortunate southern group for now and further building on their central group. Orange knows that at some point I will be forced to respond if I want to restrict Orange’s growth there.
-
- 12… Ai6j7-j6
-
- 13. Ak6l7-k7
Now that Orange’s southern group is well contained, I believe that their only chance to win is to connect their central and northern groups, then extend far down the eastern edge to pick up sufficient additional pieces. I decide to try to connect to the east to completely cut off any ideas of expansion down that edge for Orange.
Orange sees an opportunity to place a secure bandaged corner at k7, extending their northern group a bit further.
-
- 13… Ck5l6-k6
-
- 14. Aj10k11-j10
Orange was able to extend that northern group a bit, but I could immediately follow up with Ck5l6-k6, completing my goal of connecting to the eastern edge. Now Orange has no way to connect to the bottom groups, and the bottom groups themselves are cut off from each other thanks to the bandaged piece at j3.
Orange follows up with a prudent move, securing their vulnerable corner at i10 with a bandaged piece at j10. Unfortunately, at this point the game is fully out of each; Ai Ai sees no future for Orange, giving them a winning percentage of a flat 0%. There is no way for Orange to make a larger group at this stage.
-
- 14… Cf11g12-g11
-
- 15. Ah2i3-h3
My goal at this point is to firmly block off any remaining threats Orange has to increase their score substantially. Having cut off the bottom with my last two moves, now I close the door along the top as well with Cf11g12-g11, splitting the top group and ensuring it cannot connect to Orange’s central group.
Orange has seen the writing on the wall by this time, but is valiantly fighting to the end. He extends the southern group with two more pieces, and generates a possible threat of winding around the blockage at j3, though this would require several additional moves to achieve.
-
- 15… Ck1l2-k2
-

- 16. Aa7b8-b8
I can see that Orange may be hoping to connect around j3, so I close that door as well by placing another bandaged piece at k2. Now there is no way through on the bottom.
Orange now pursues the last viable option for building a good-sized group, which is to extend their central group as much as possible. I have almost no presence in the northwestern part of the board, so Orange has some chances to build up a score here potentially.
-
- 16… Cc10d11-d11
-
- 17. Ab10c11-b10
Finally I respond to the threats in the northwest, and place a bandaged piece at d11, which seems a suitably annoying placement. The idea is to blockade the 4-group extending from f10 from the Orange pieces in the top-left corner, reducing Orange’s potential for growth. Orange is still able to grow their central group by connecting two more pieces at b10, but those four pieces around f10 are now isolated. At best Orange could attach the piece at d10, turning the 4-group into a 5-group, but there’s no way to connect those pieces to the larger group below.
-
- 17… Ce2f3-f2
-
- 18. Ad1e2-e1
Here I get greedy, and try to connect my central group across the 2nd row along the bottom. The plan is to construct a pair of pieces that I can then bridge between the bandaged pieces at c2 and f2, but I actually made a mistake. By choosing the twist at e2f3, I actually ensured that I would be unable to connect my newly-formed pair.
Orange makes precisely the right reply here, placing the Yellow pair where I want it, but unbandaged. Now I have no chance to connect across the bottom, because in order to secure those pieces I would need to bandage one of them, which means a twist must be made. But, given that the pair is already in the right position, any twist I make will only move them out of position!
This sort of problem comes up fairly often in Permute, and I was annoyed at myself for not seeing it. When you have set up your pieces properly, you should have them placed so that they are ready to be twisted into place, but crucially, are not already in place and unbandaged. That means you can make a move at that location, twist the pieces into place and secure a bandaged piece in the right spot. If you try a setup for connecting a few pieces but misjudge your plan, as I did, then your pieces may be prematurely placed, and your opponent is then able to prevent your plan at any time by twisting your pieces out of position and locking them down with a bandage.
In truth, this move sequence was overly optimistic anyway; given the two-space gap between c2 and f2 and my lack of well-placed pieces nearby, the only way my attempt to connect would work is if my opponent chose to allow me to make that final twist of the free pair. I had no way to force that connection in the first place, and Orange had no intention of allowing it, so effectively that was a wasted move. In a tight endgame, throwing away a move like that could cost me the game!
-
- 18… Ag1h2-g2
-
- 19. Ah1i2-h1
I cannot secure the connected pair between c2 and f2, so instead I opt to insert another bandage at g2, trapping another Orange piece on the bottom edge at the same time. Orange then extends that bottom edge group further, but this also connects my pieces to the bottom-right corner group.
-
- 19… Ab6c7-b7
-
- 20. Ci1j2-i1
-
- 20… Ac6d7-d7
I still cannot secure the extension in the south, so instead I opt to harass Orange’s central group some more by blocking two pieces in on the western edge. This has no effect on the size of my Yellow group, so it is a safe move that still causes some trouble for my opponent. Orange extends the bottom edge group once more, after which I lock out two more Orange pieces from their central group, and at this point Orange resigns.
If we remove the bandaged pieces we can get a clear picture of the final position:
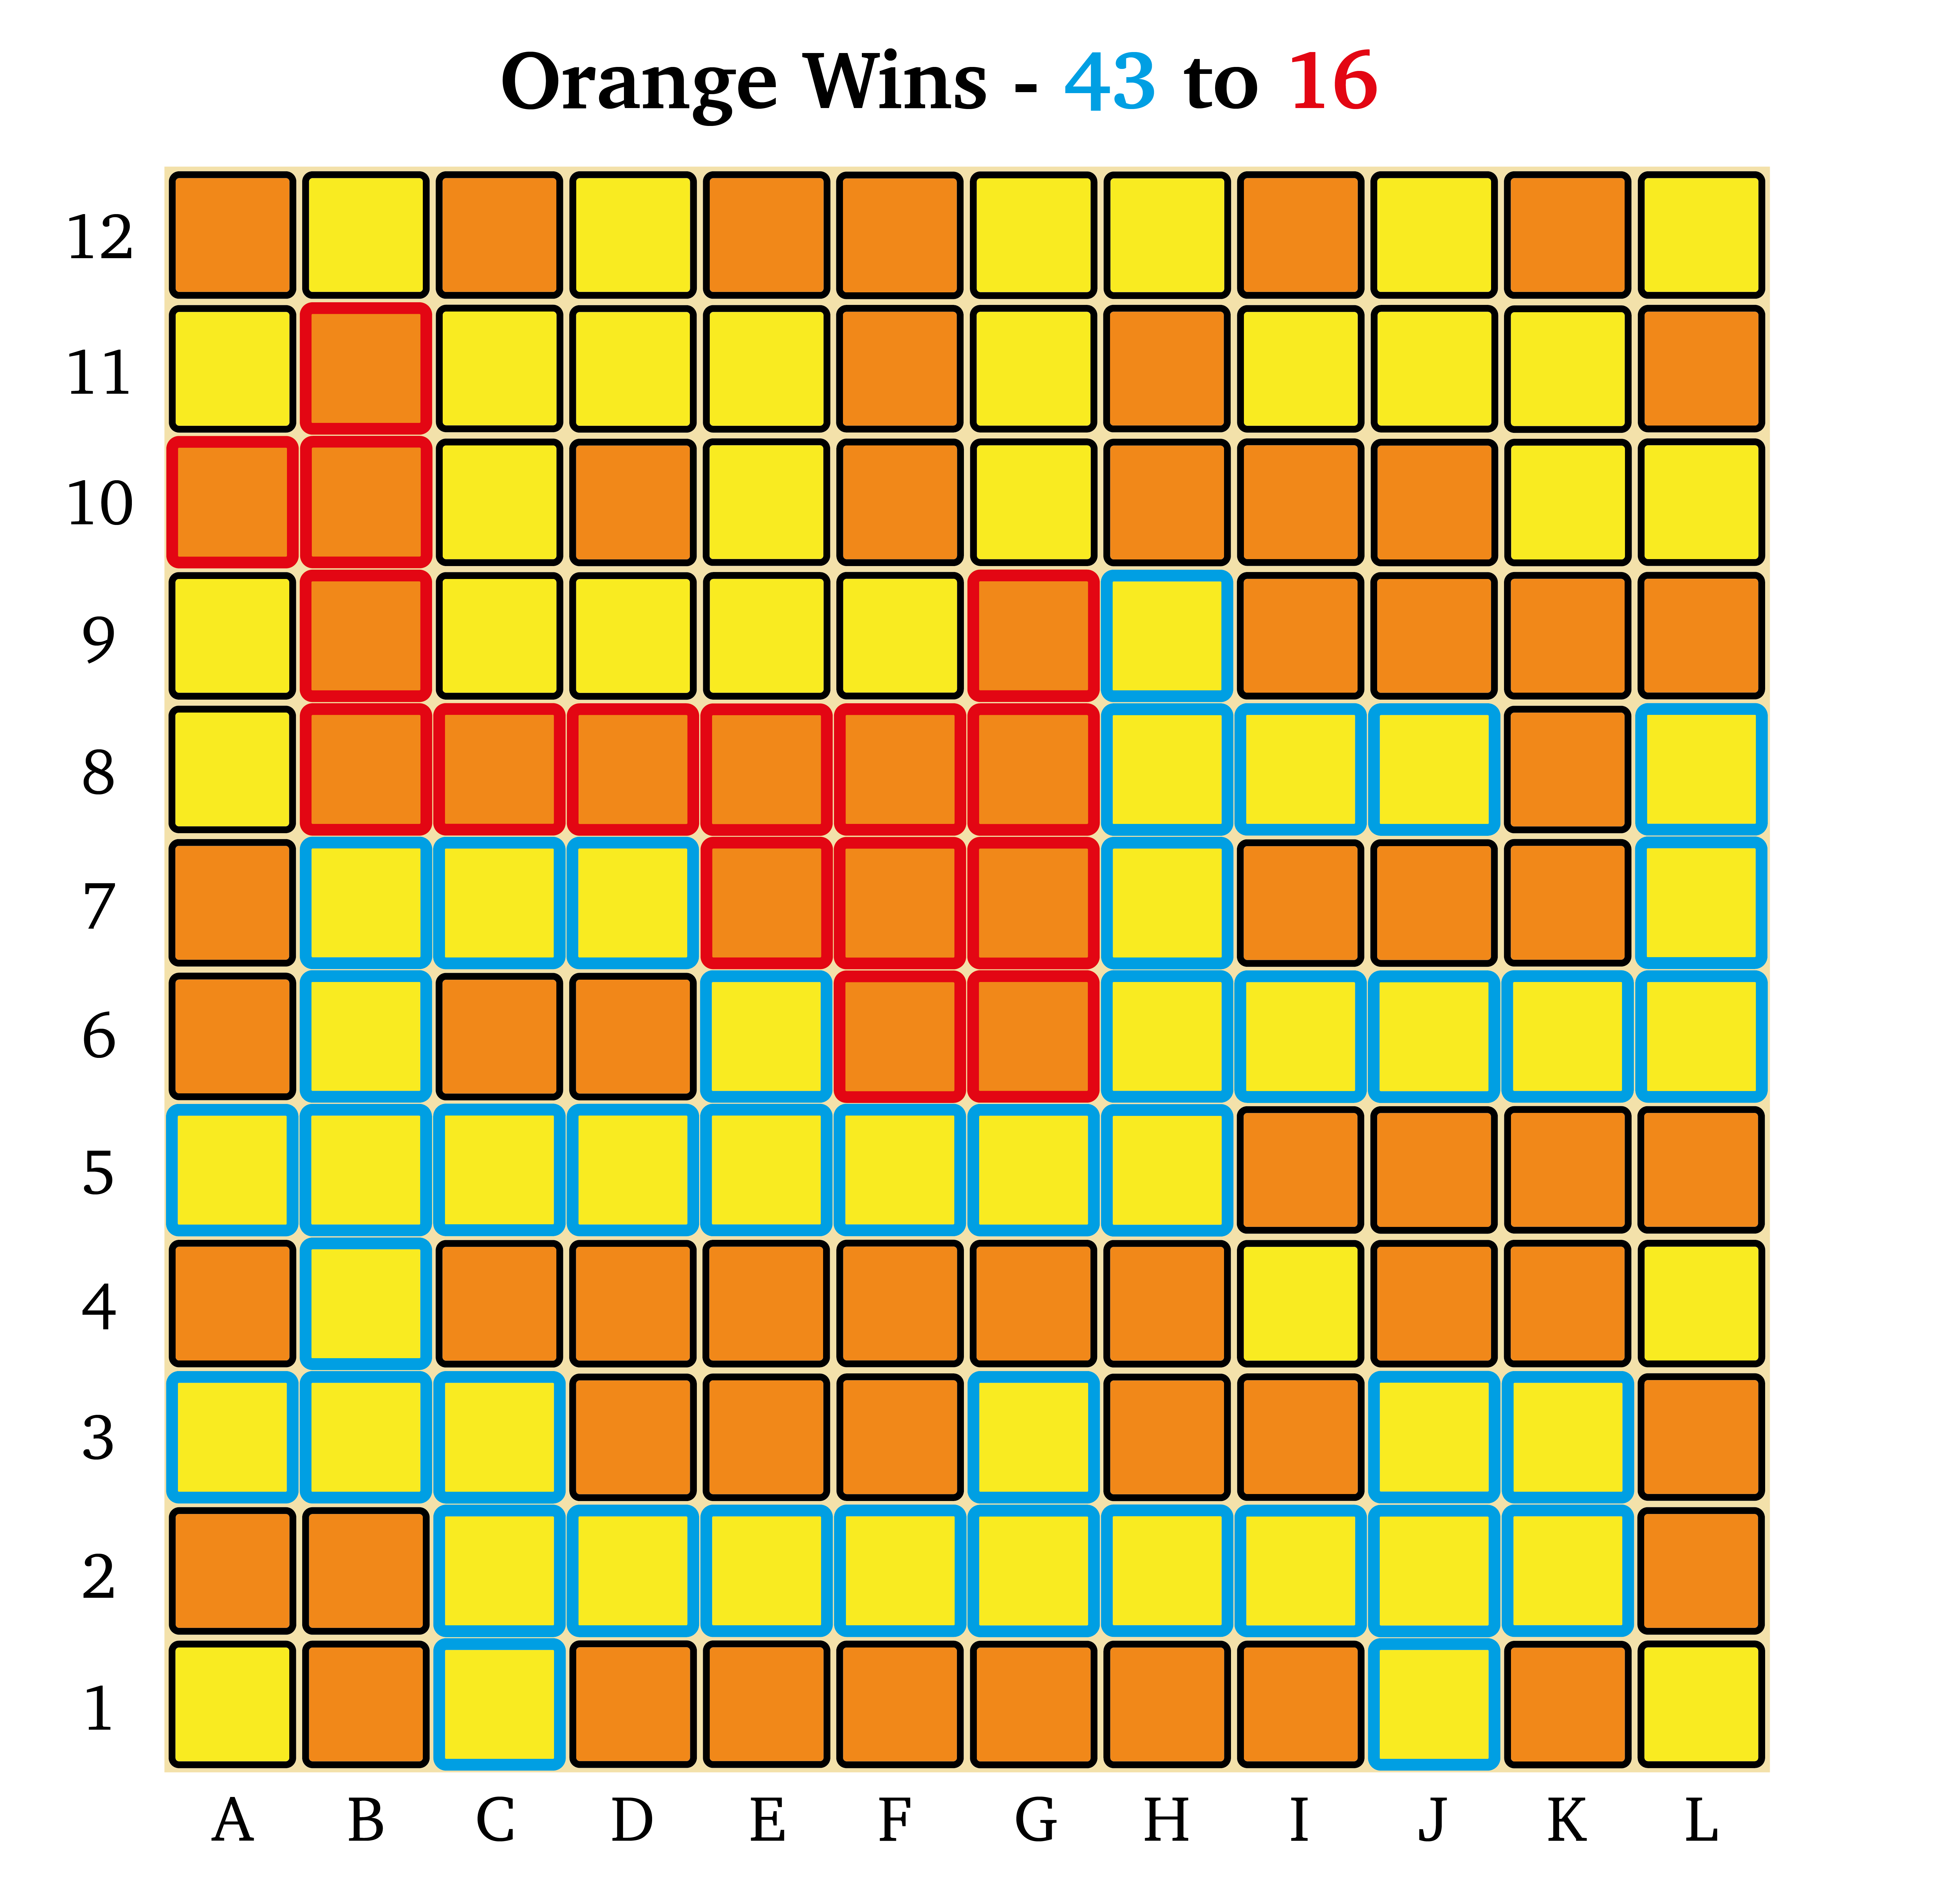
There we have it — a final score of Orange 16 to Yellow 43. Had we played to the bitter end, my final score would have been significantly lower of course, as Orange could disrupt my connecting pair at d2-e2 at any time. But even then the score would still be convincingly in Yellow’s favour.
Permutation Principles
As you can see, the 12×12 game is intense right from the start, and opening moves are very consequential. AI testing shows though that between strong players, the outcome is usually decided about 60-70% through the game (during these tests I did not allow the AI to resign). So, while the opening is very important, most games will be decided during the middlegame. Our goal in the early stretches of a 12×12 game should be to come out of the opening with a stable central position, with some viable options for future extensions of our largest groups; during the middlegame we want to extend our groups effectively and safely, while denying opportunities for our opponent to attack our groups or build their own.
Of course, if we want to reach that point in our games, we need some guiding principles to help us along in our efforts to become stronger players. Here I will outline some basic principles of Permute play that will help you play more effectively.
Make multipurpose moves
This general principle applies to many games, of course, but in Permute every move is inherently multifaceted and directly affects both players. Every twist we make moves opposing pieces as well as ours, since faces consisting of only one colour cannot be twisted. This means that every single move has the potential to grow or shrink our opponent’s groups as well as our own.
When I am choosing a move in Permute, I tend to evaluate it on a few dimensions to see how it measures up against other candidate moves, and I aim for the moves that can accomplish more than one of these general objectives at once:
- How much does it add to my groups? All else being equal, a move that grows my groups more is of course preferable to one that grows them less.
- How much does it disrupt enemy groups? If I have a choice of two moves, both of which grow my group by 3 pieces, but one shrinks an enemy group by two while the other doesn’t, then the first move is a better choice.
- Does this move gain space? Gaining useful space on the board and restricting the opponent’s growth options is really important, especially in the early game. If a move grows my groups less than another move, but allows me to connect a group to an edge and block enemy expansion for the longer term, that move may well be the more sound strategic choice.
- Does this move have follow-up options? A useful beginner’s metric to judge this is whether a move leaves you anchors — single pieces extending from a bandaged piece that can serve as a launchpad for further expansion. Again this is more of a strategic consideration; sometimes a move that adds fewer pieces can still be stronger, if it produces anchors that allow for a bigger extension later. Anchors also create threats for your opponent, as they must keep an eye on those anchors and consider which may need to be blocked, which in turn may disrupt their own expansion plans.
Like any complex strategy game, all of these guidelines will have exceptions, and there are many other ways we might judge the effectiveness of a move as we get stronger. However, I believe that keeping these principles in mind is very valuable as you are learning the game, because each of them focusses on the longer-term consequences of our moves.
In Permute we have to fight against the impulse to play reactively, and start twisting purely in response to local threats from your opponent; each move in Permute can be so destructive that we often will feel the need to react to every attack, leaving ourselves with no chances to attack in return or to build a coherent plan for expanding our groups. If we instead train ourselves to evaluate each move in terms of its impact on both the groups local to that move and the wider strategic situation, by considering space gains and anchors, then we are more likely to choose moves that not only protect our groups in the short term but also create longer-term challenges for the opponent.
Protect Your Corners!
This is a straightforward tip, but definitely worth emphasising! In this game we saw the consequences of leaving a vulnerable corner on your largest group — the opponent gets an opportunity to slice the group in two, and if the group is already contained and there is no alternate path to reconstruct the connection, then that one move is enough to ensure your group cannot be saved. However, we may not want to develop a habit of taking time to protect every corner in every group; instead, we must judge when a group has enough prospects for future expansion that we need to secure its position.
Stronger players may experiment here and there with group sacrifices, where they lure the opponent to spend moves on disrupting a vulnerable corner when their actual growth ambitions lie elsewhere on the board. However given the high price for getting this kind of sacrifice wrong, this is a tactic that should only be used very carefully! Generally speaking, if you spot a weak corner in one of your important groups, you should act immediately to protect it.
Bandaging is just as important as twisting
Each move we make in Permute is, to some extent, irreversible. In Chess, if we move a Knight to the wrong place, we can potentially reverse that move in the future to recover our position, but if we make a bad twist in Permute, the bandaging ensures that at least some of the damage is permanent. Because of this, we need to be sure that when we bandage a piece as part of an effort to grow a group, we protect as many of our pieces as possible:
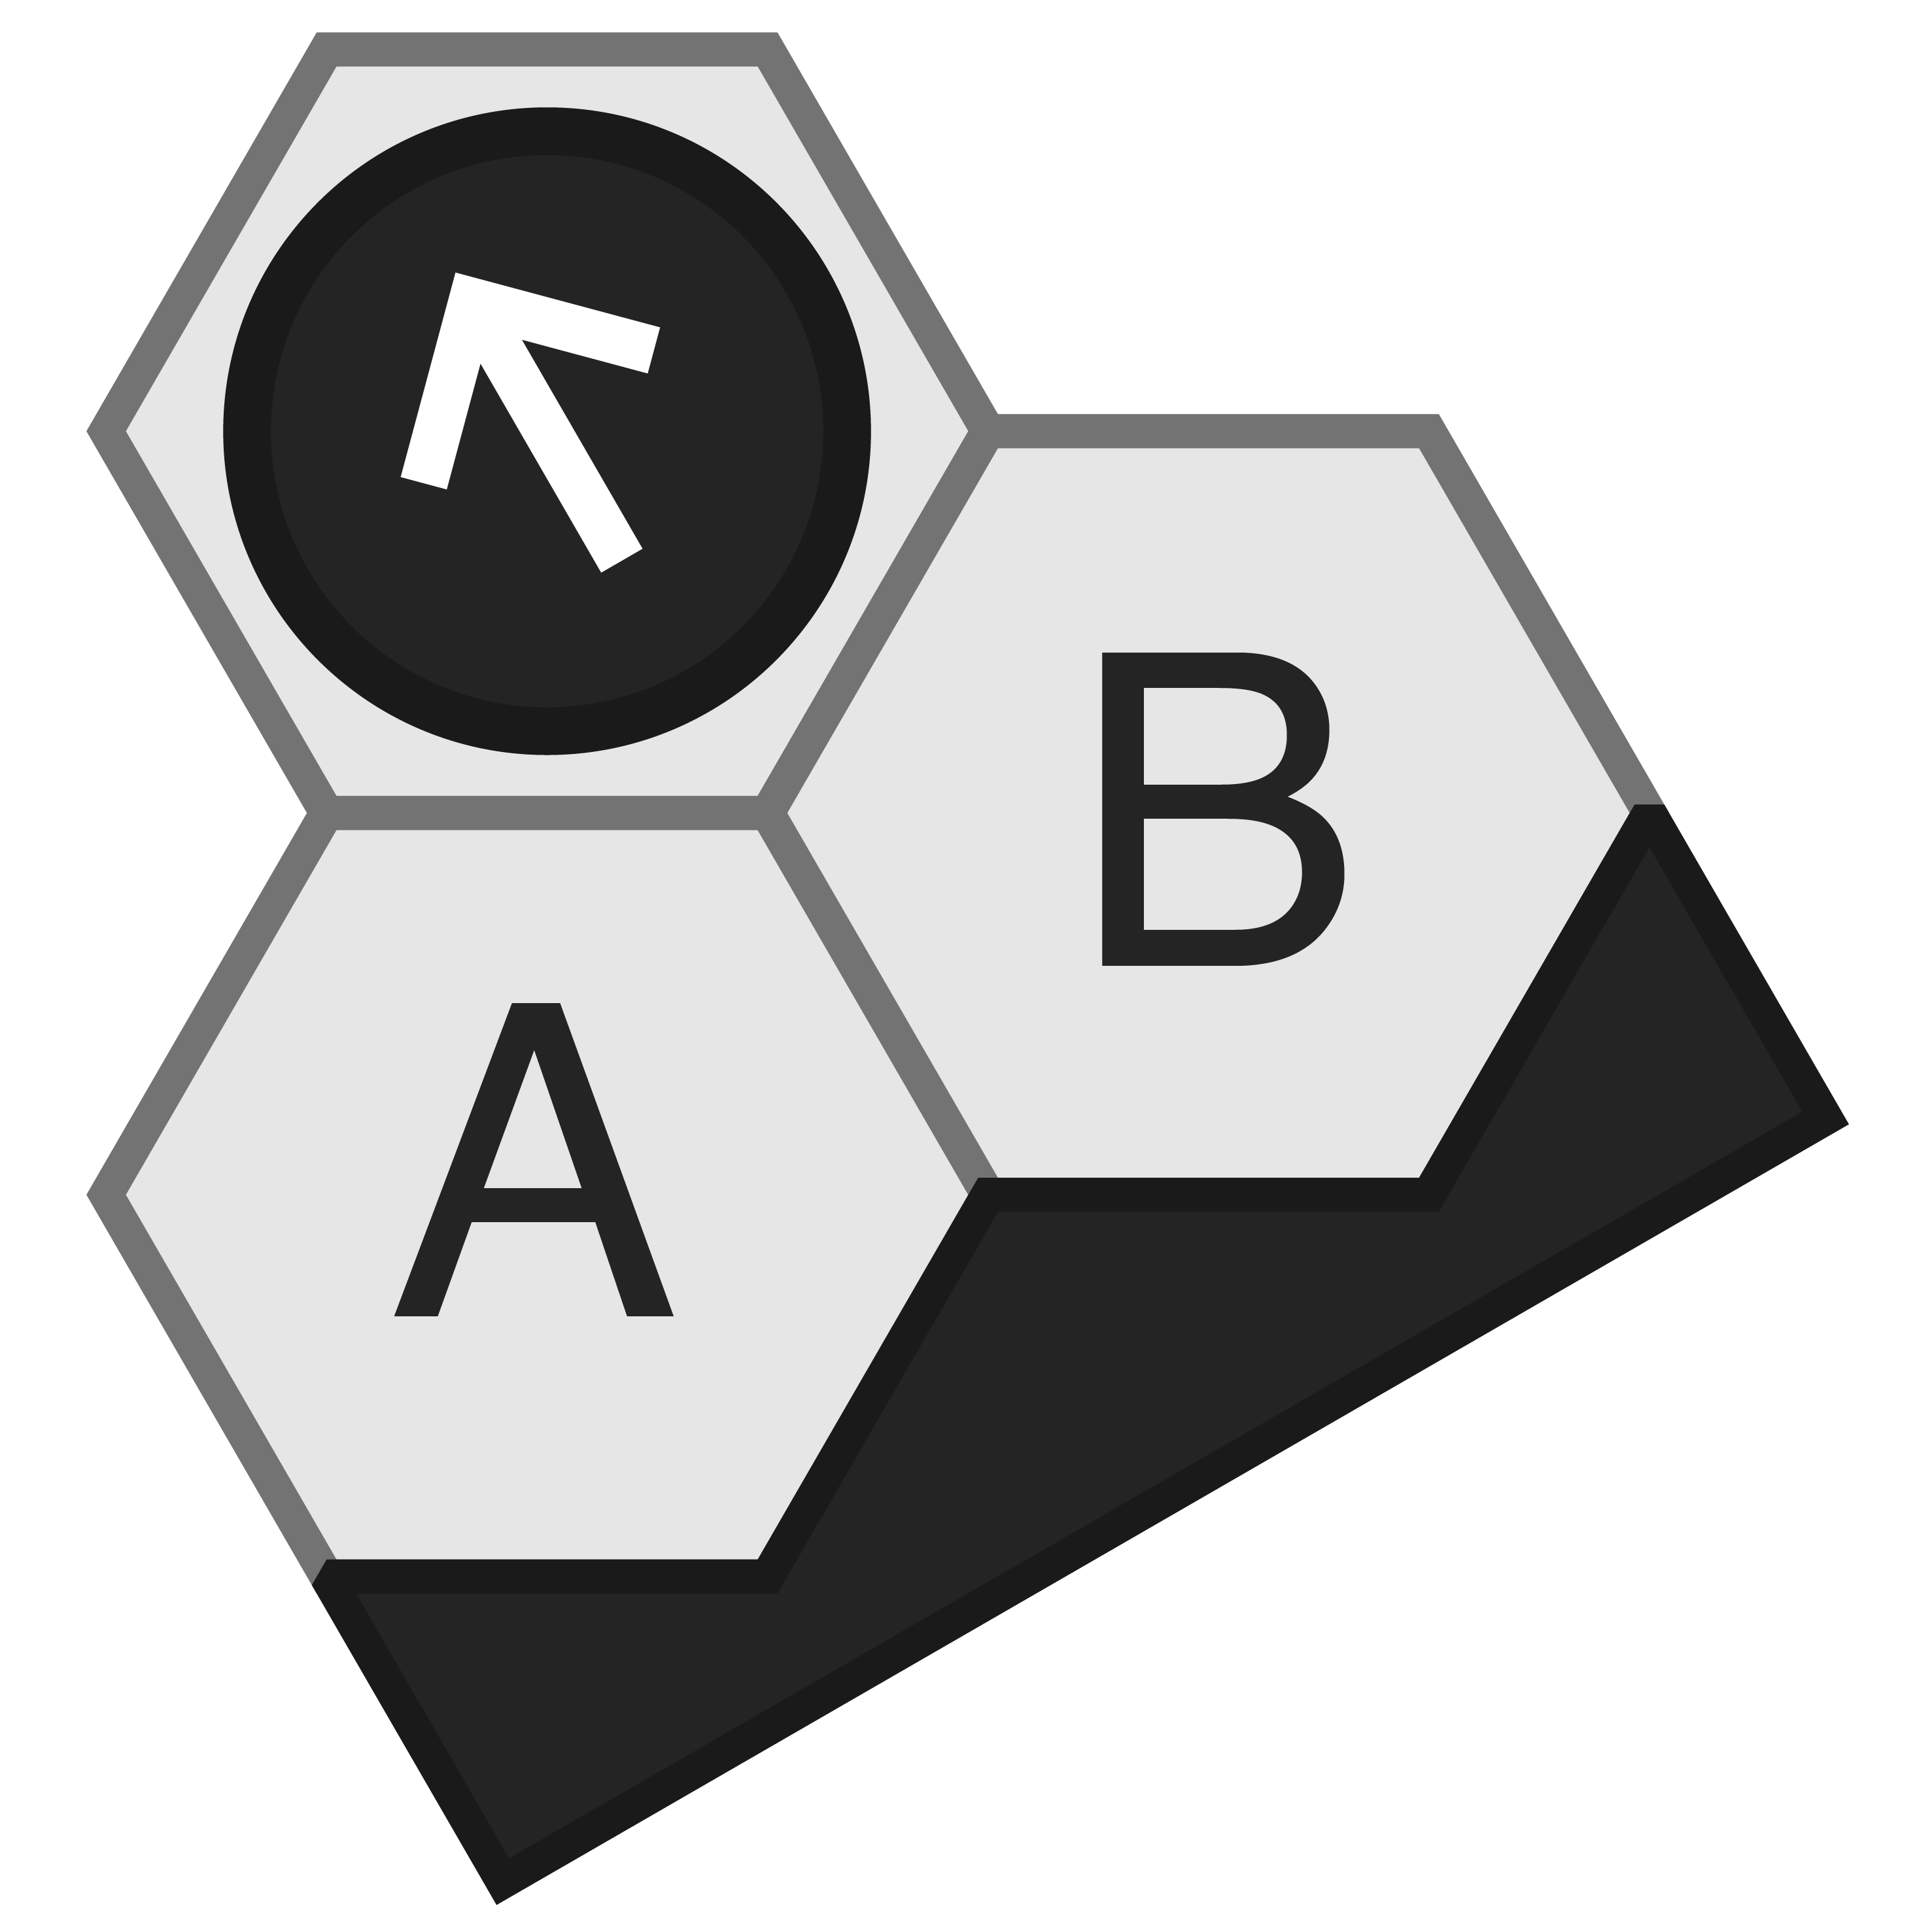
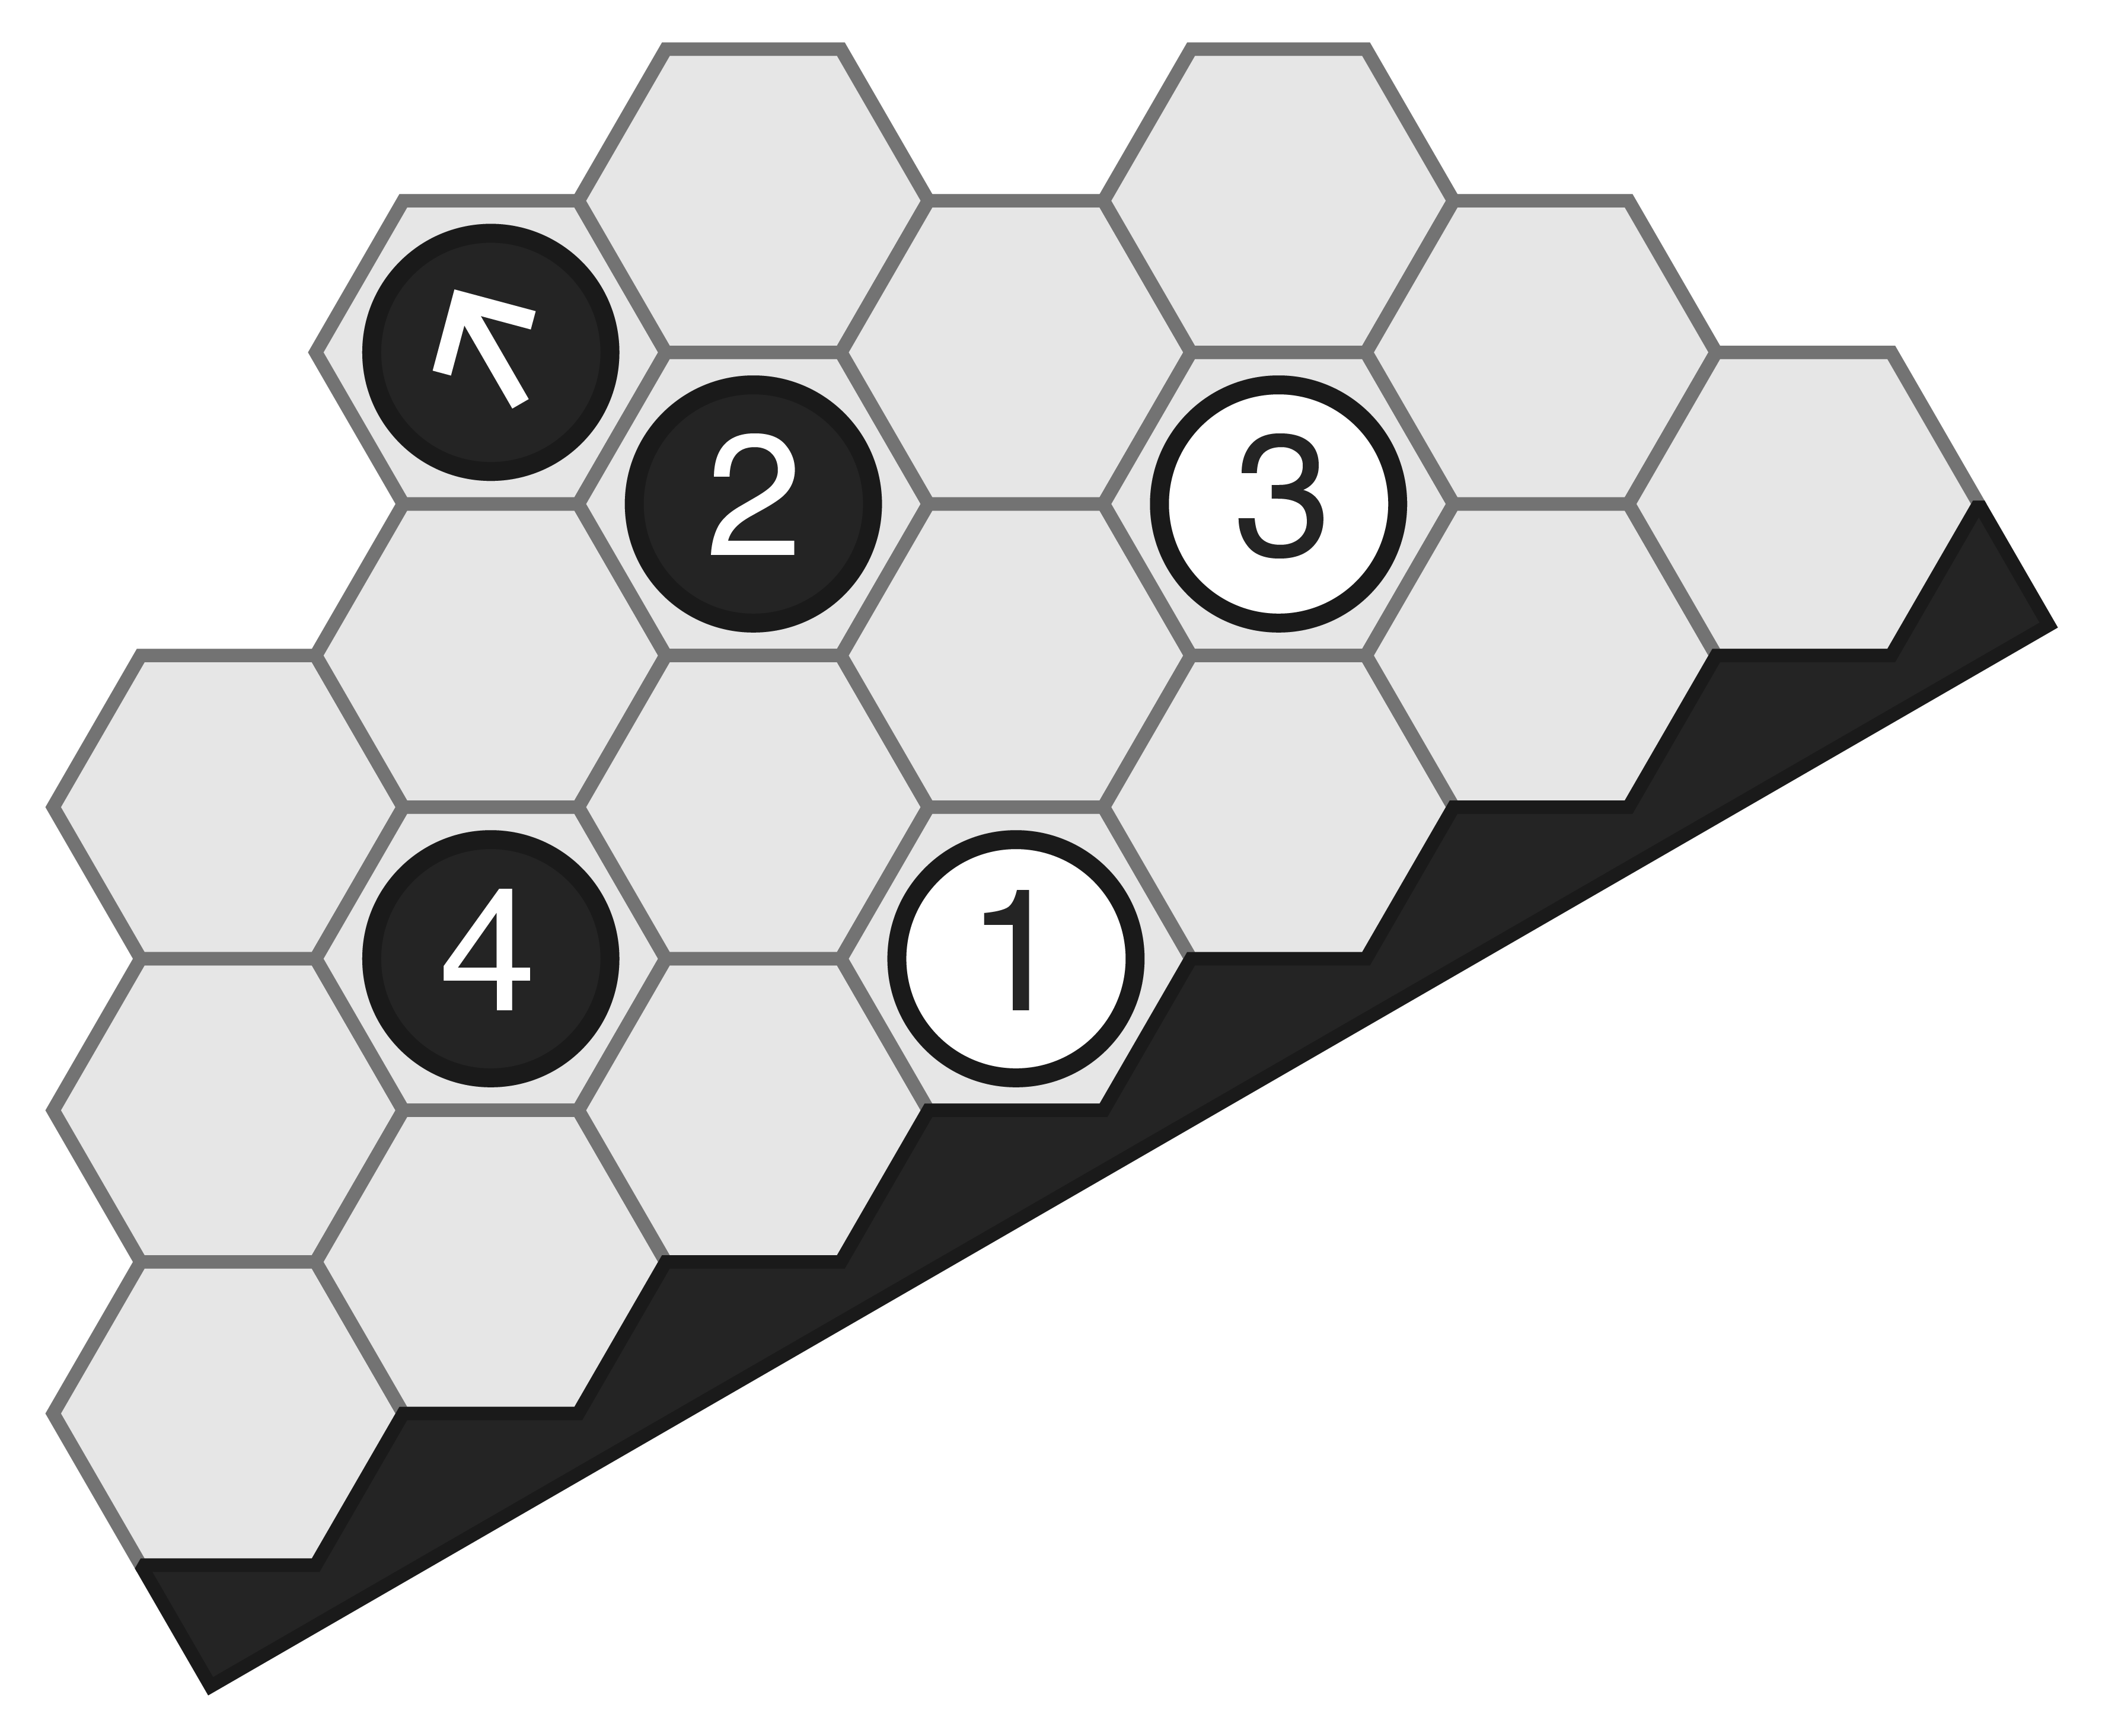
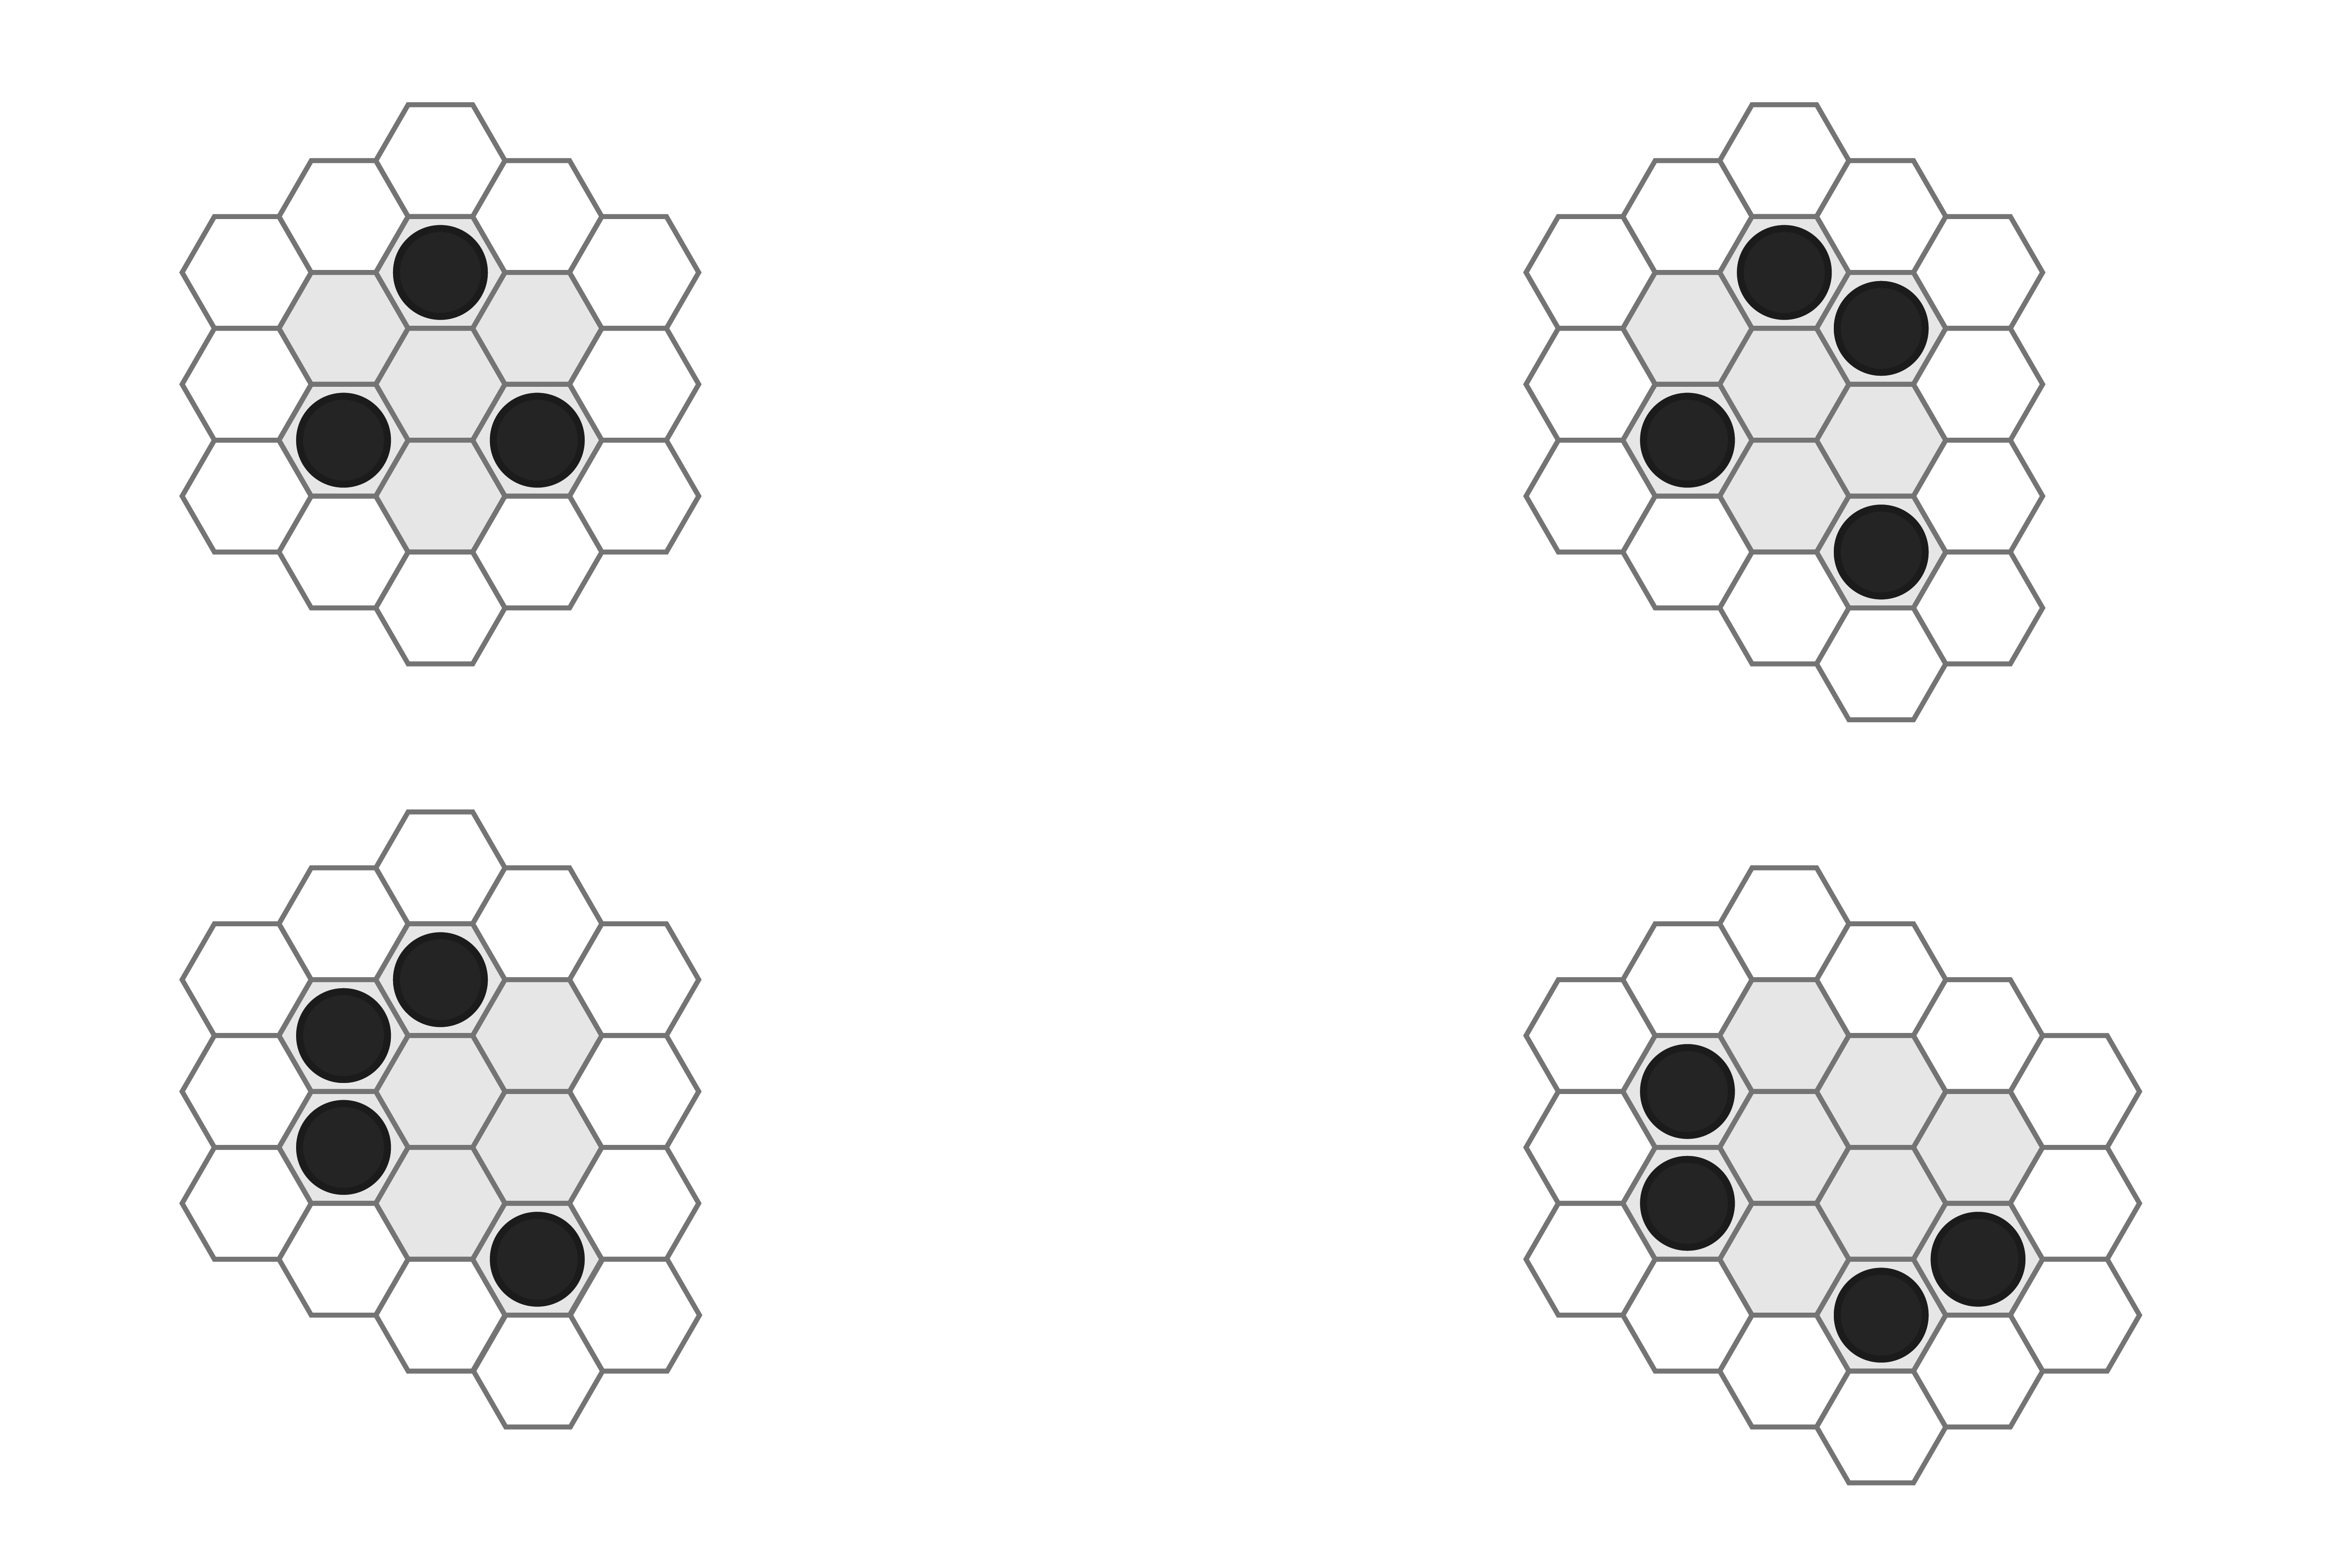
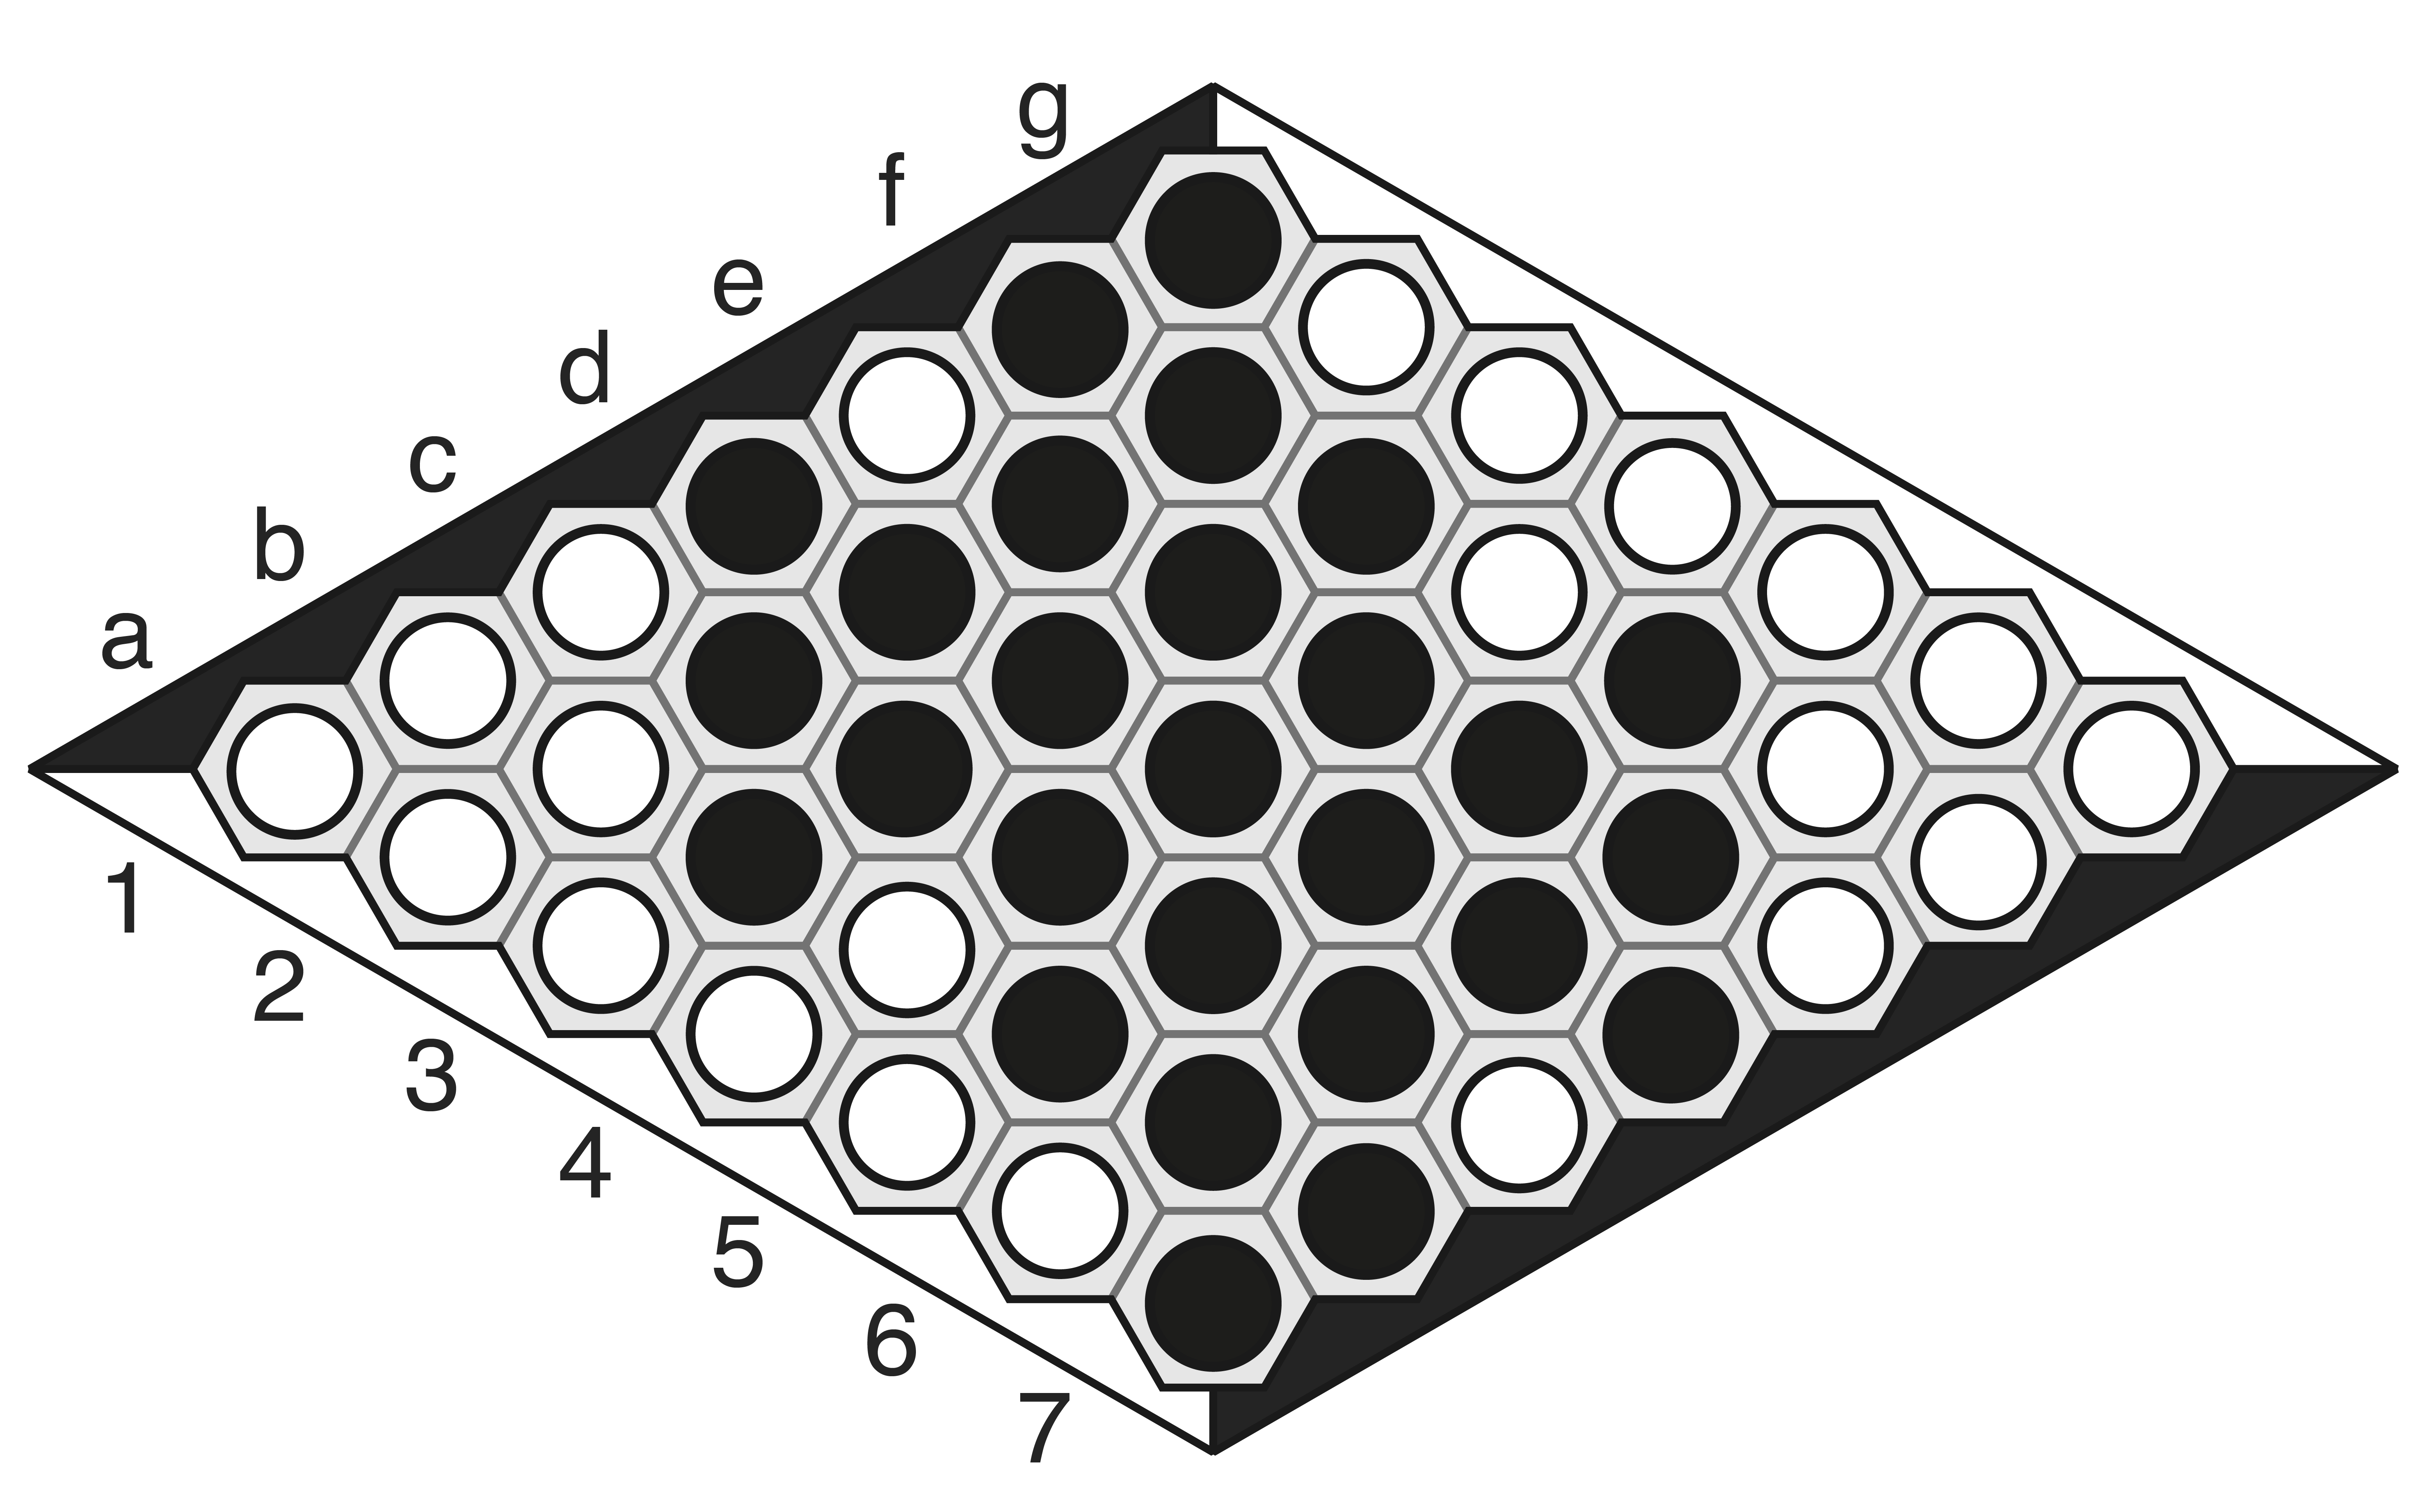
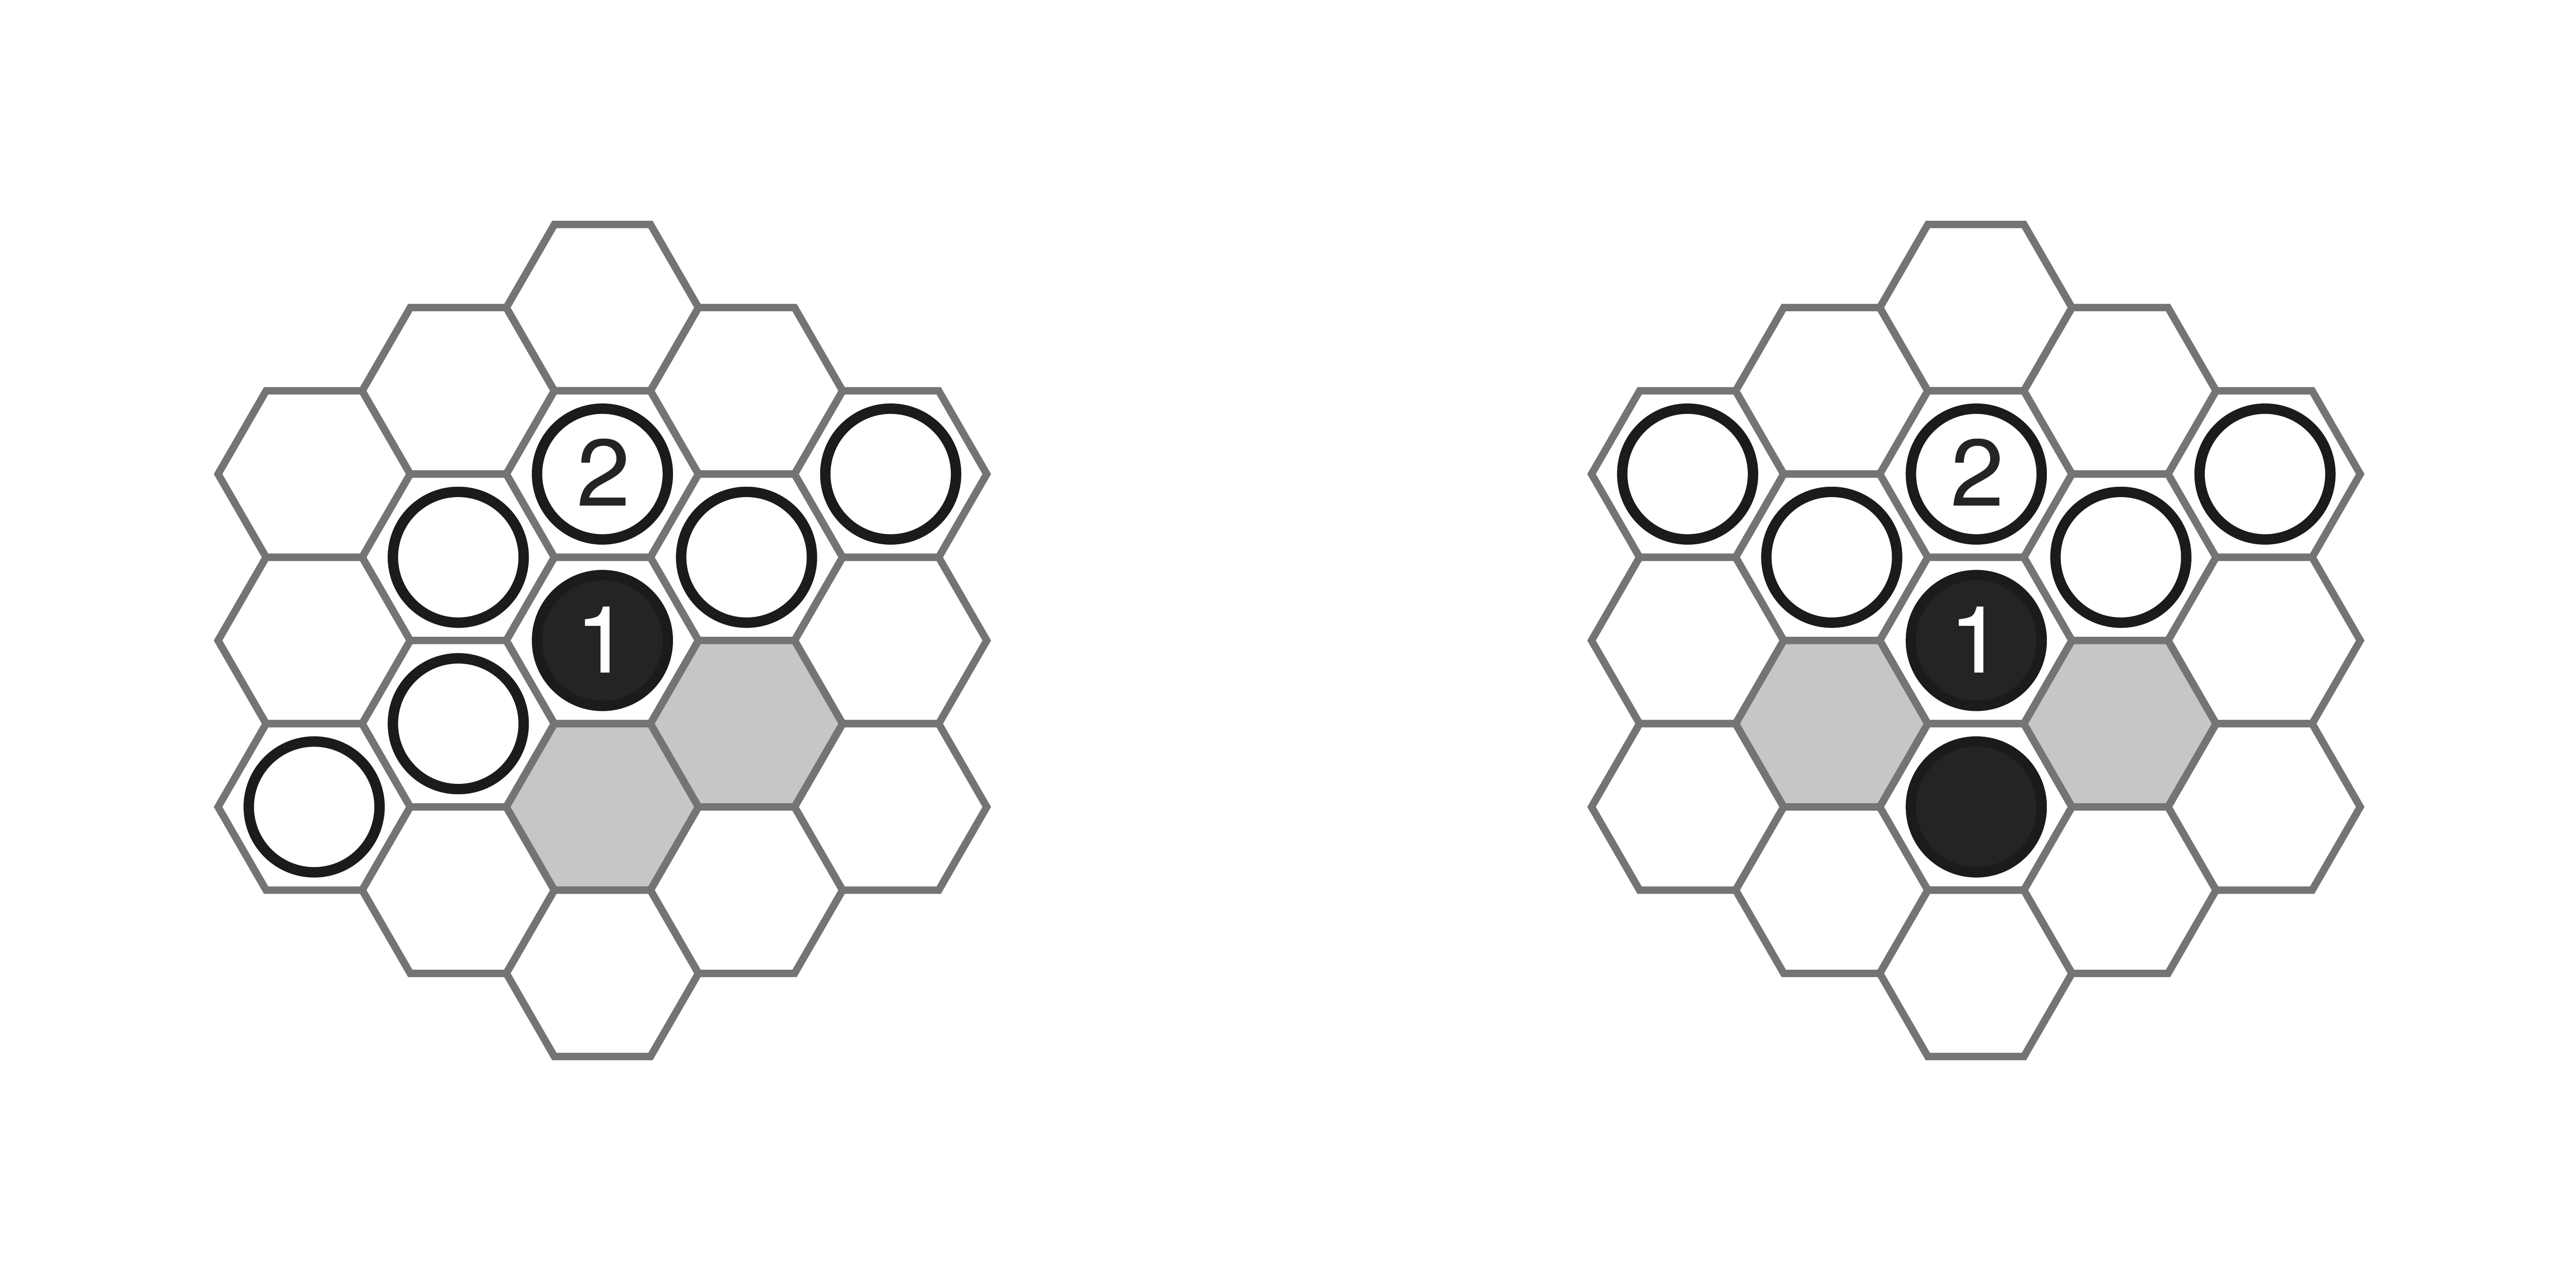
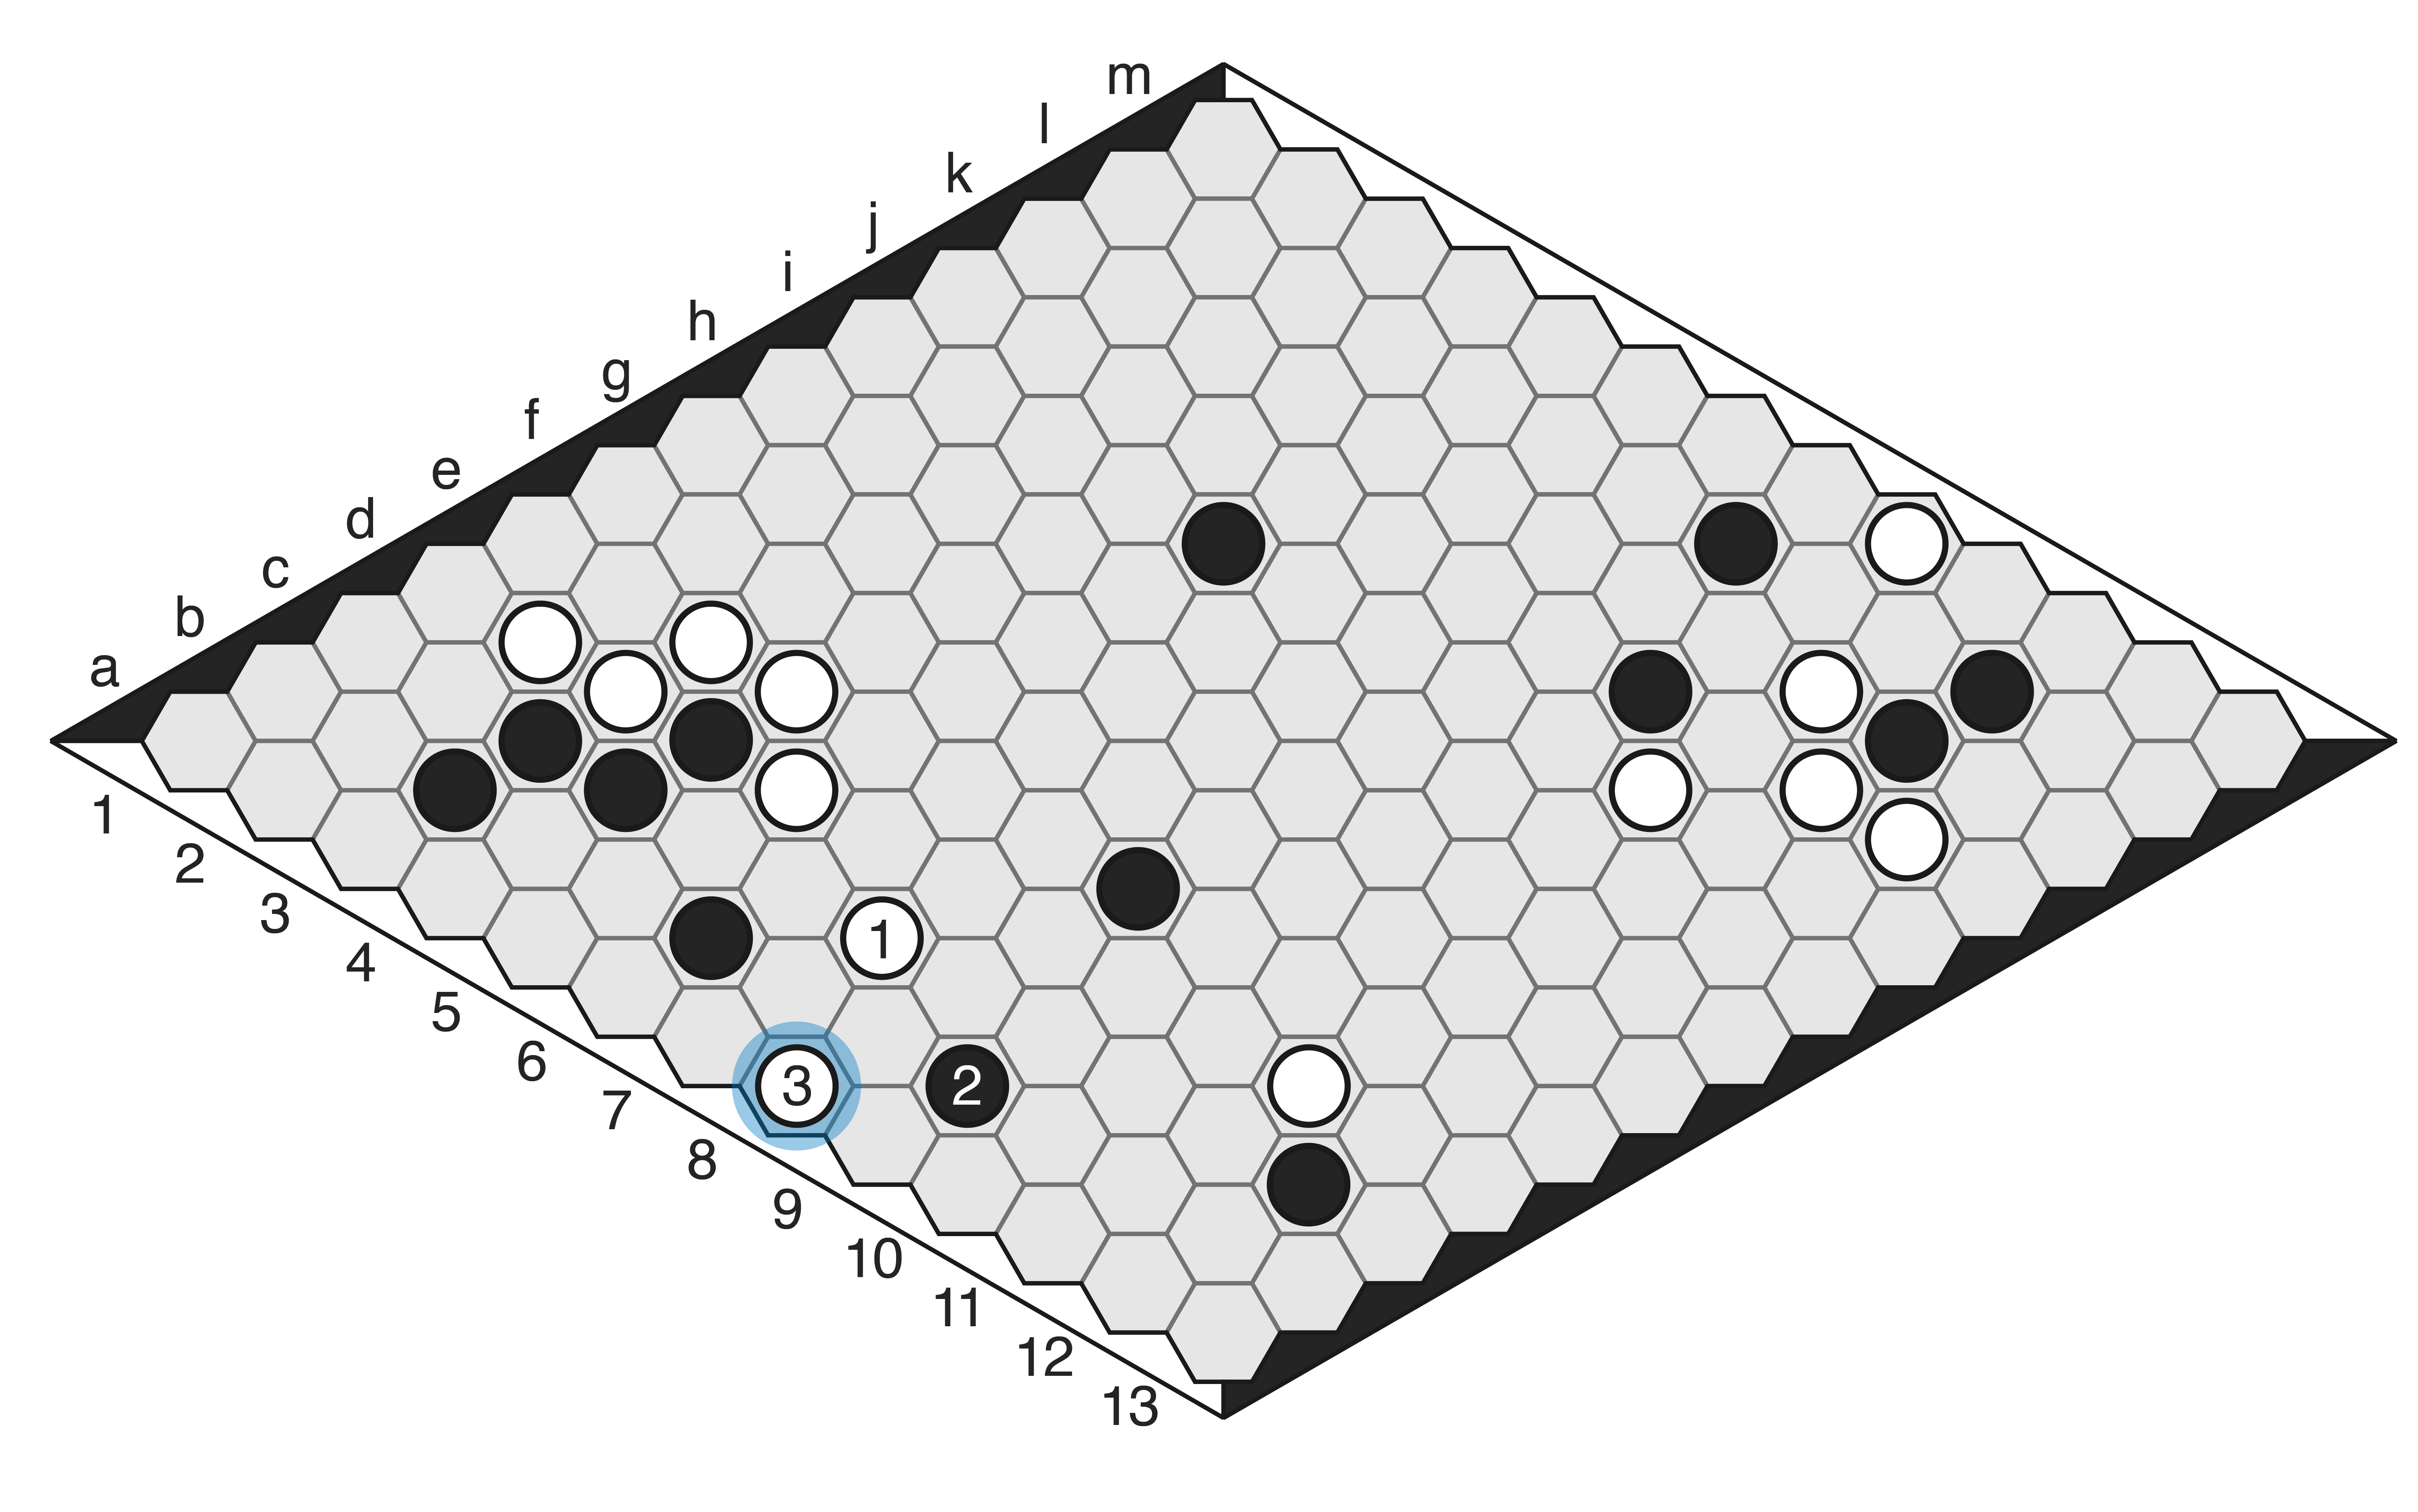
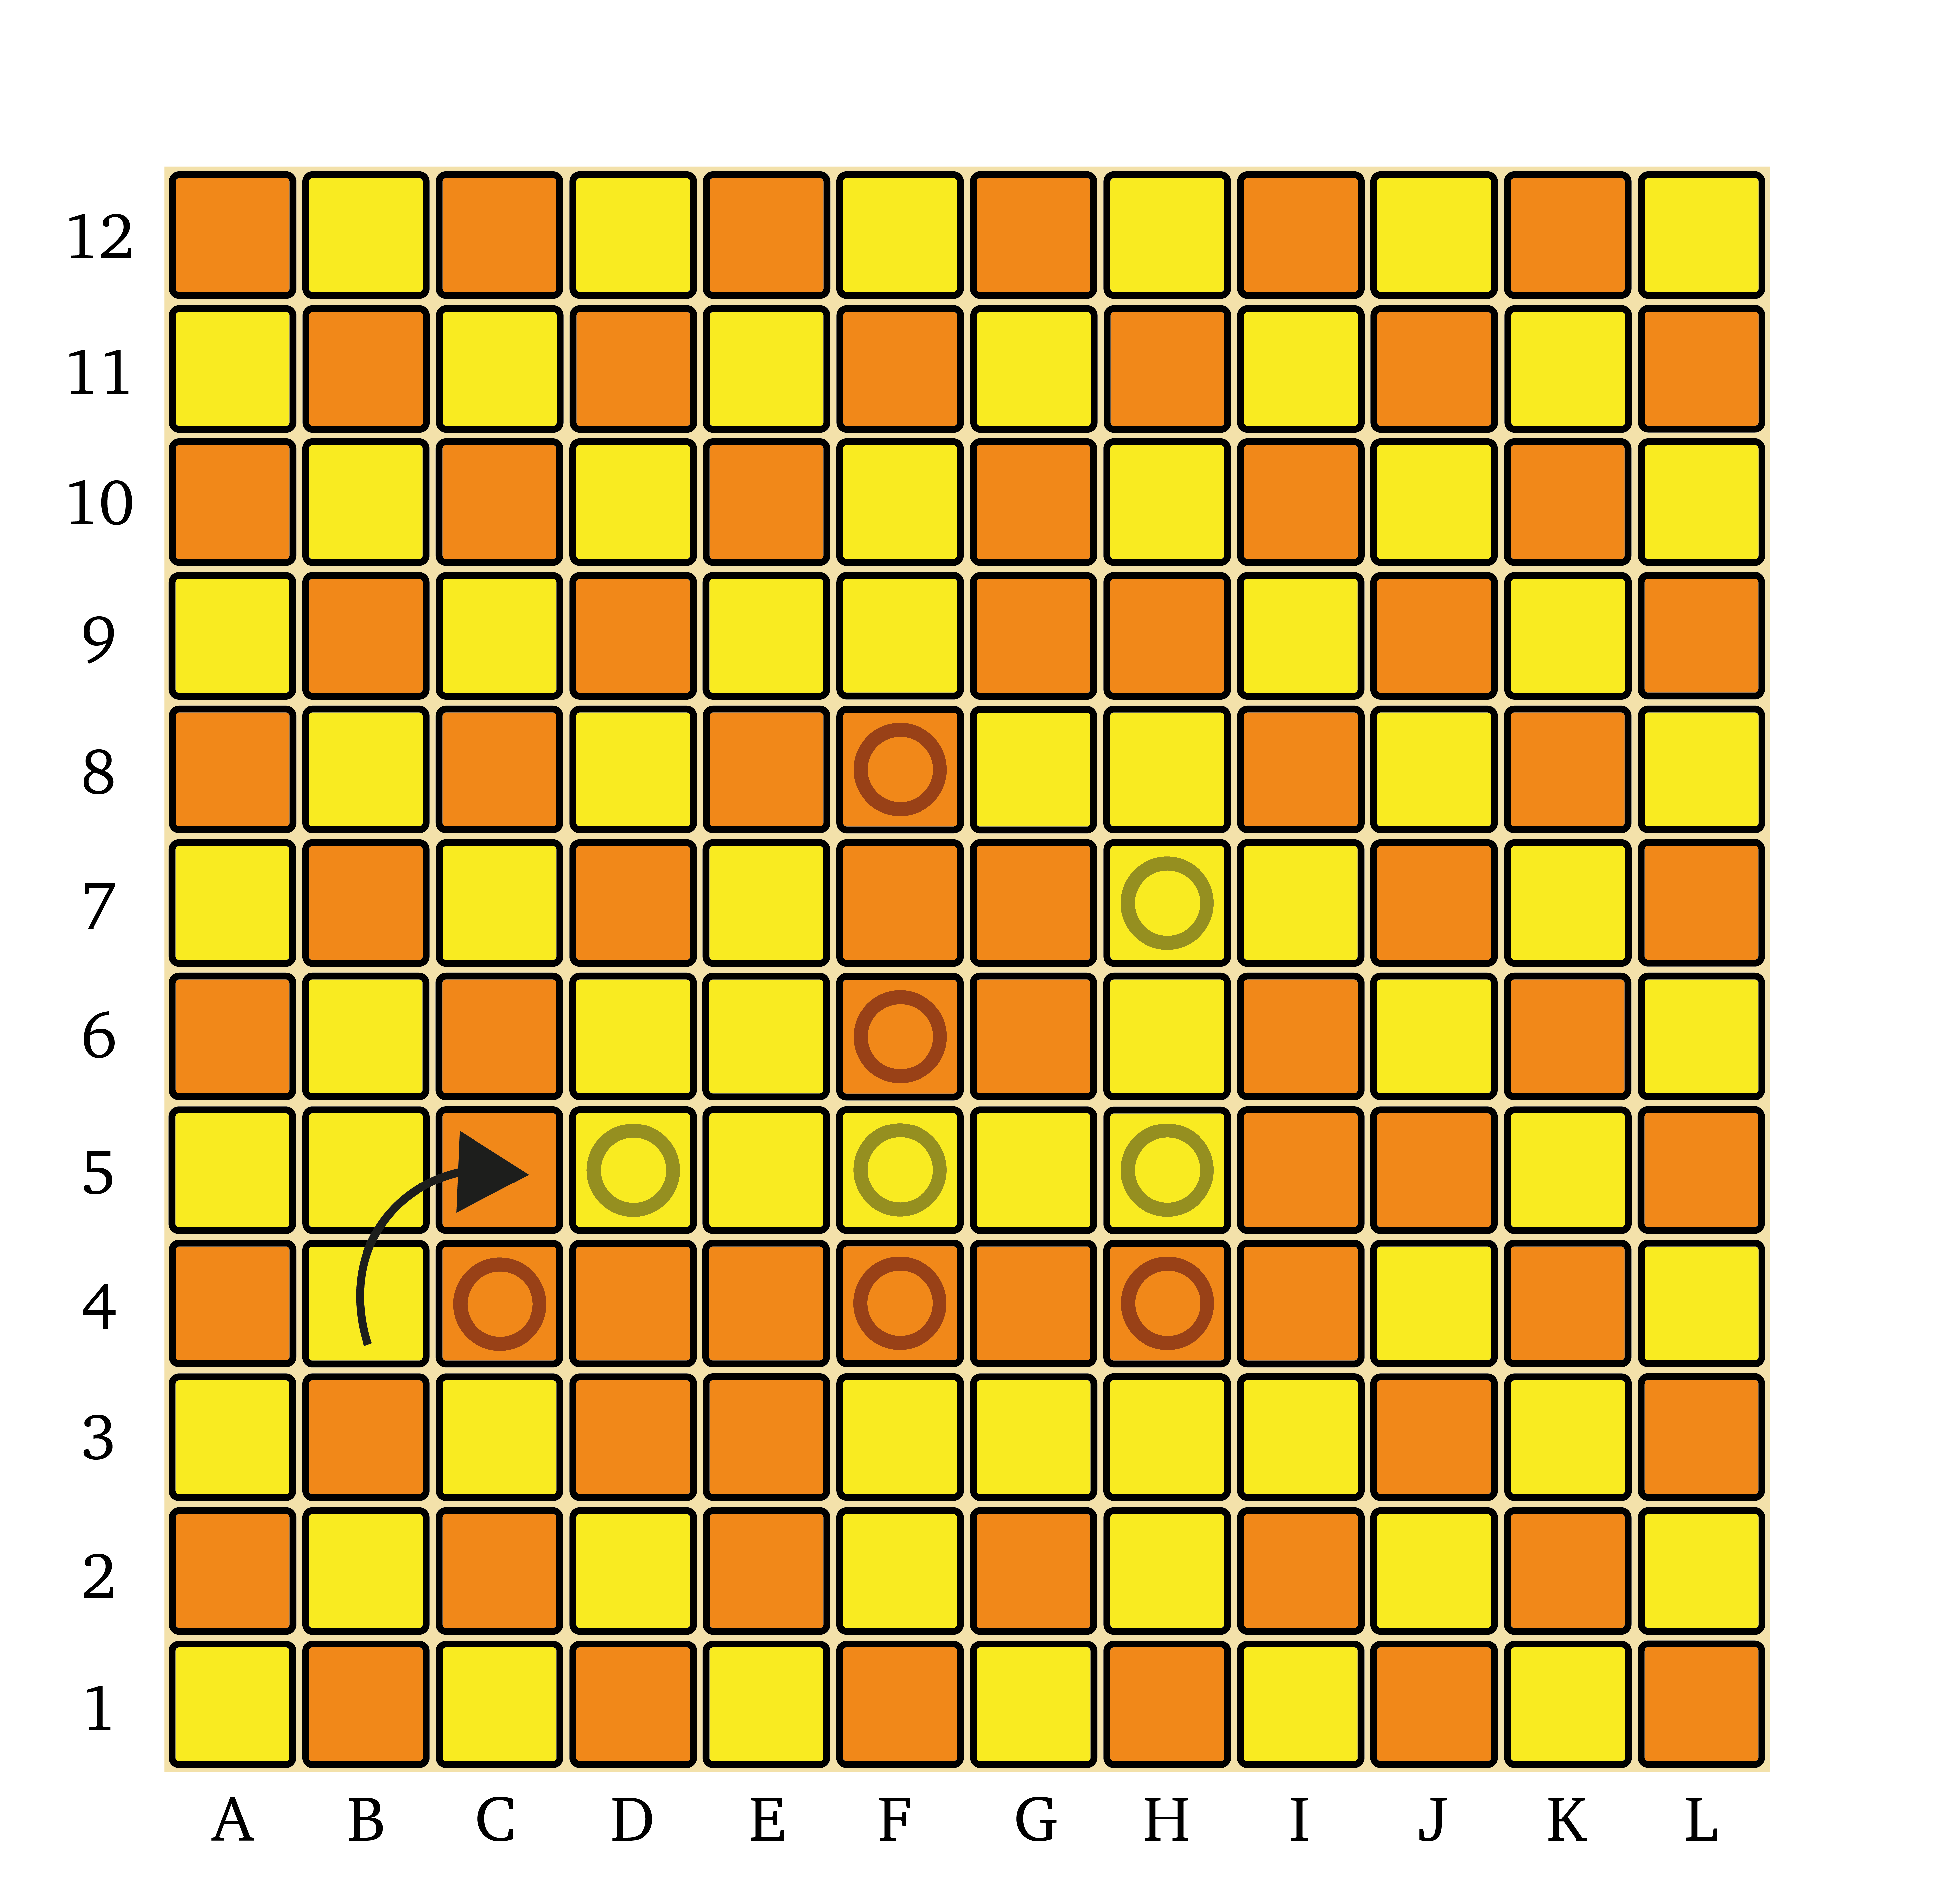
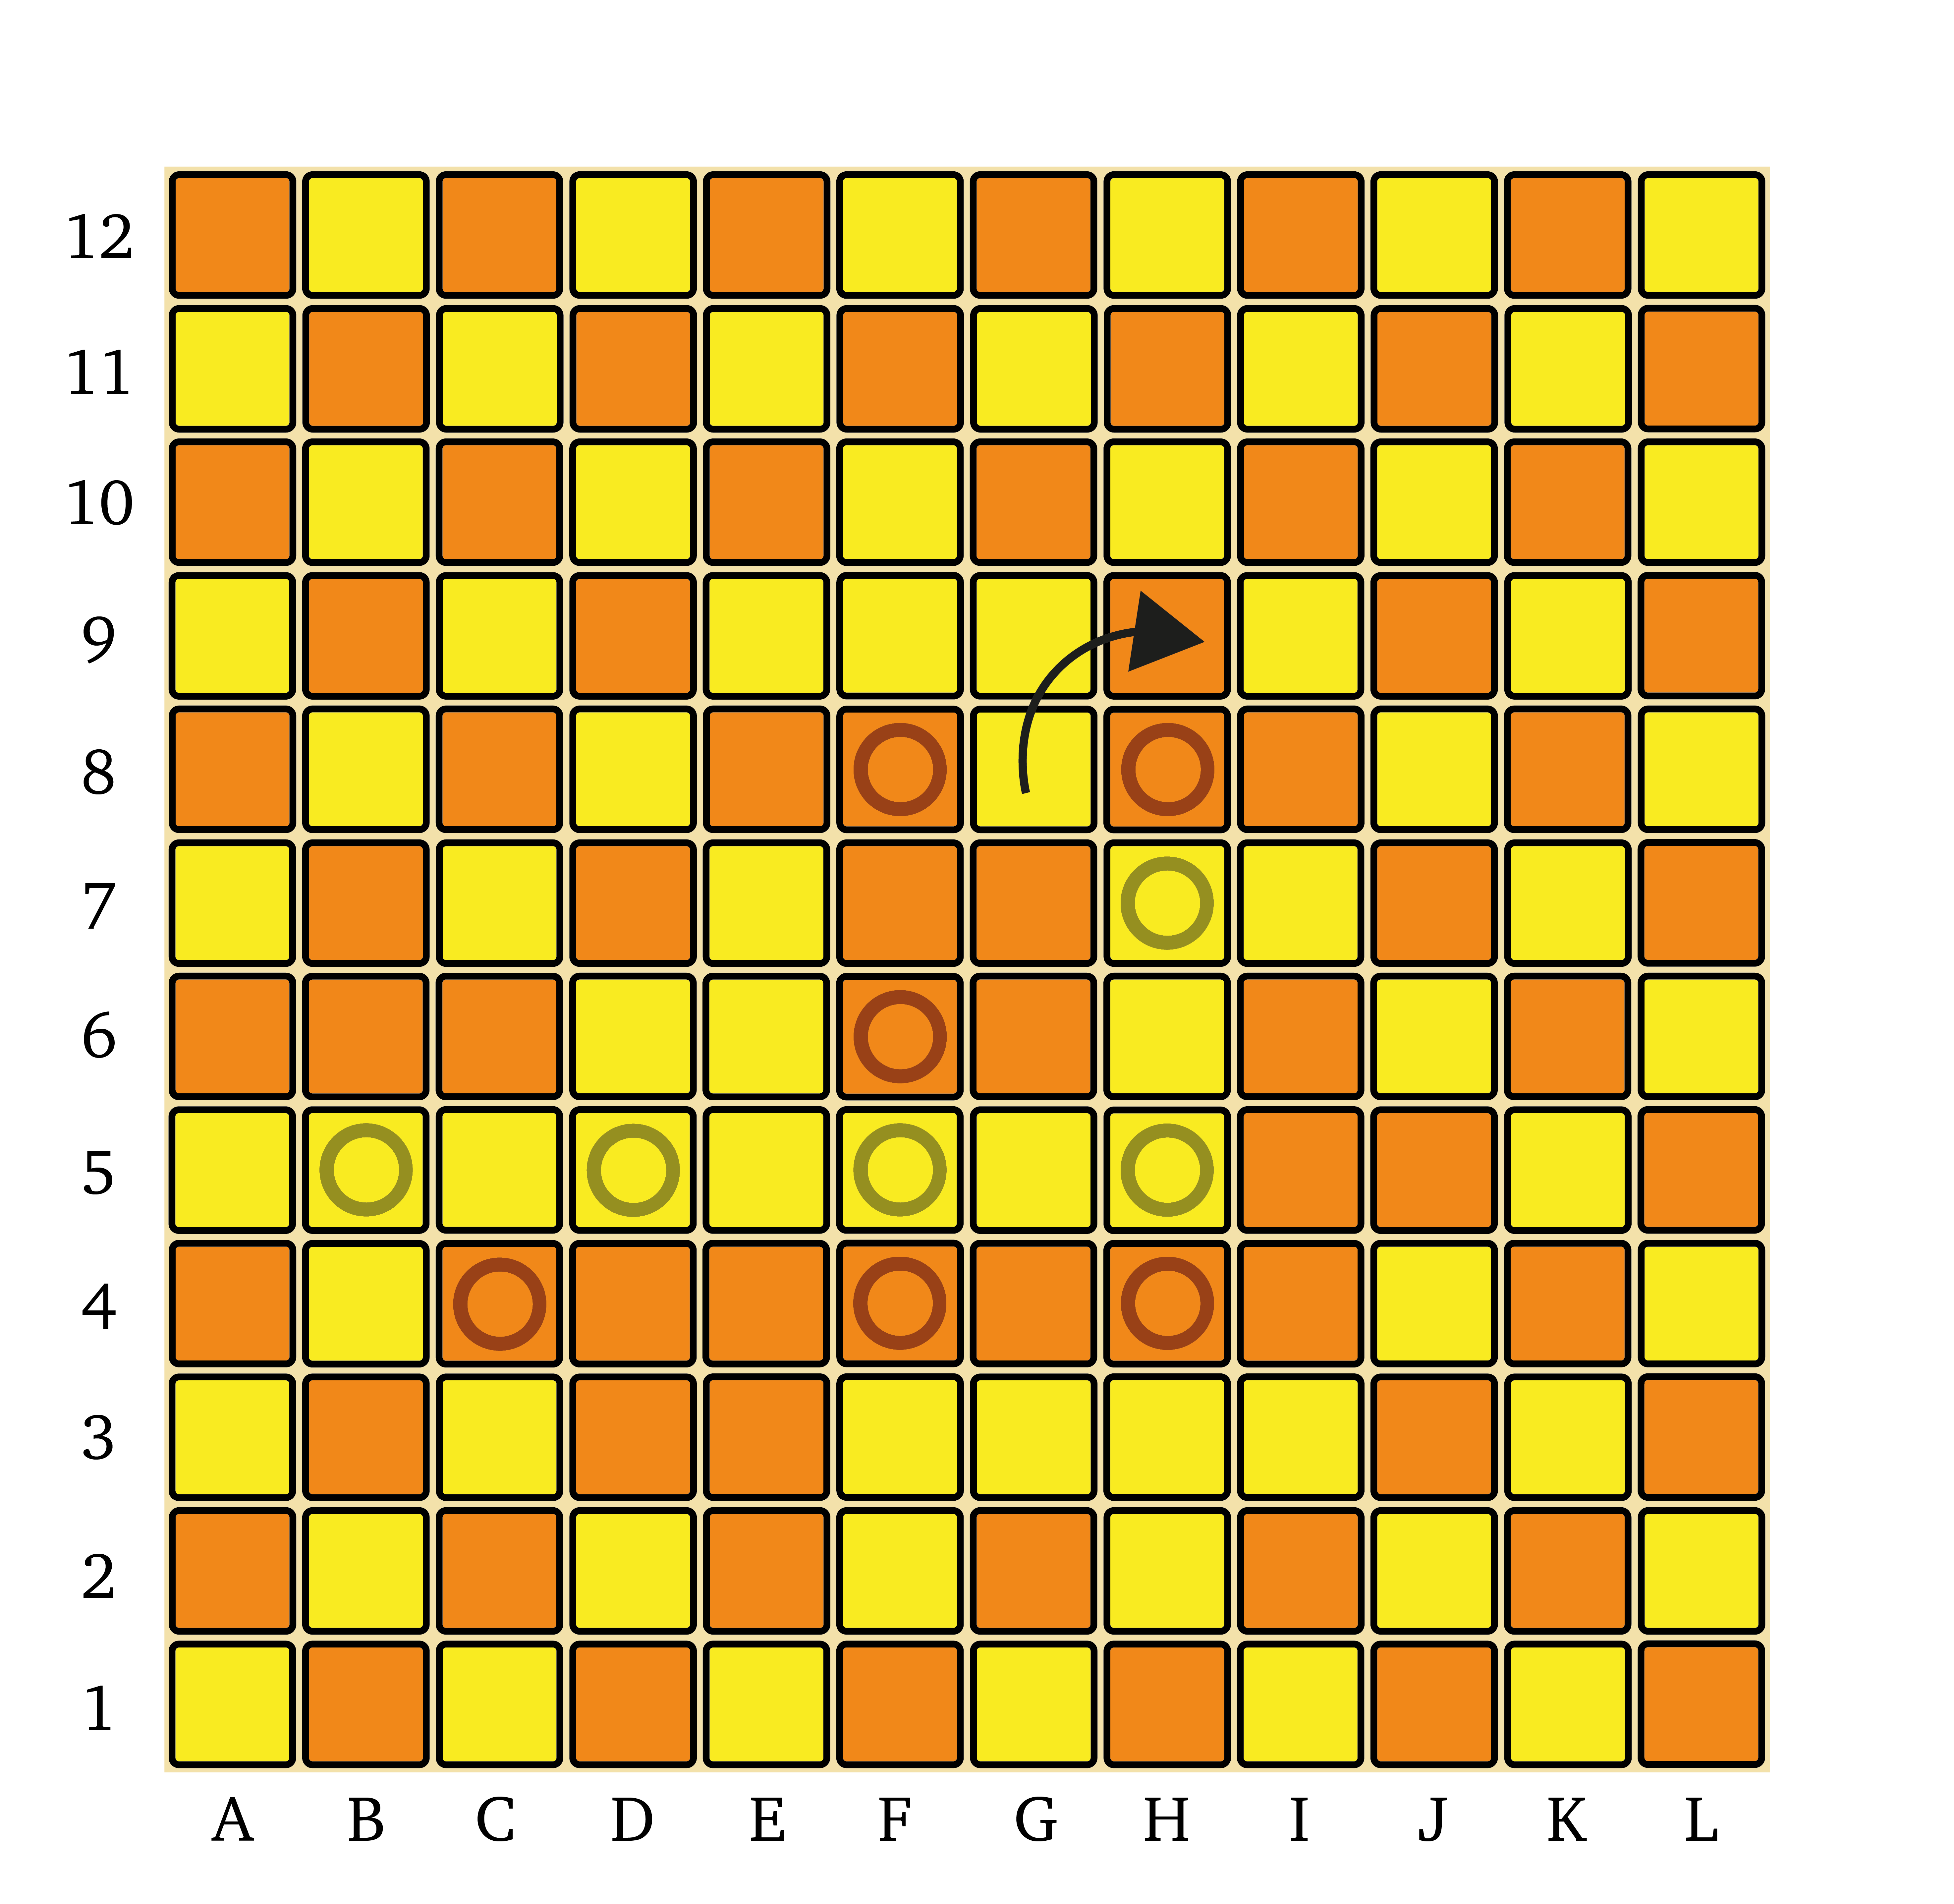
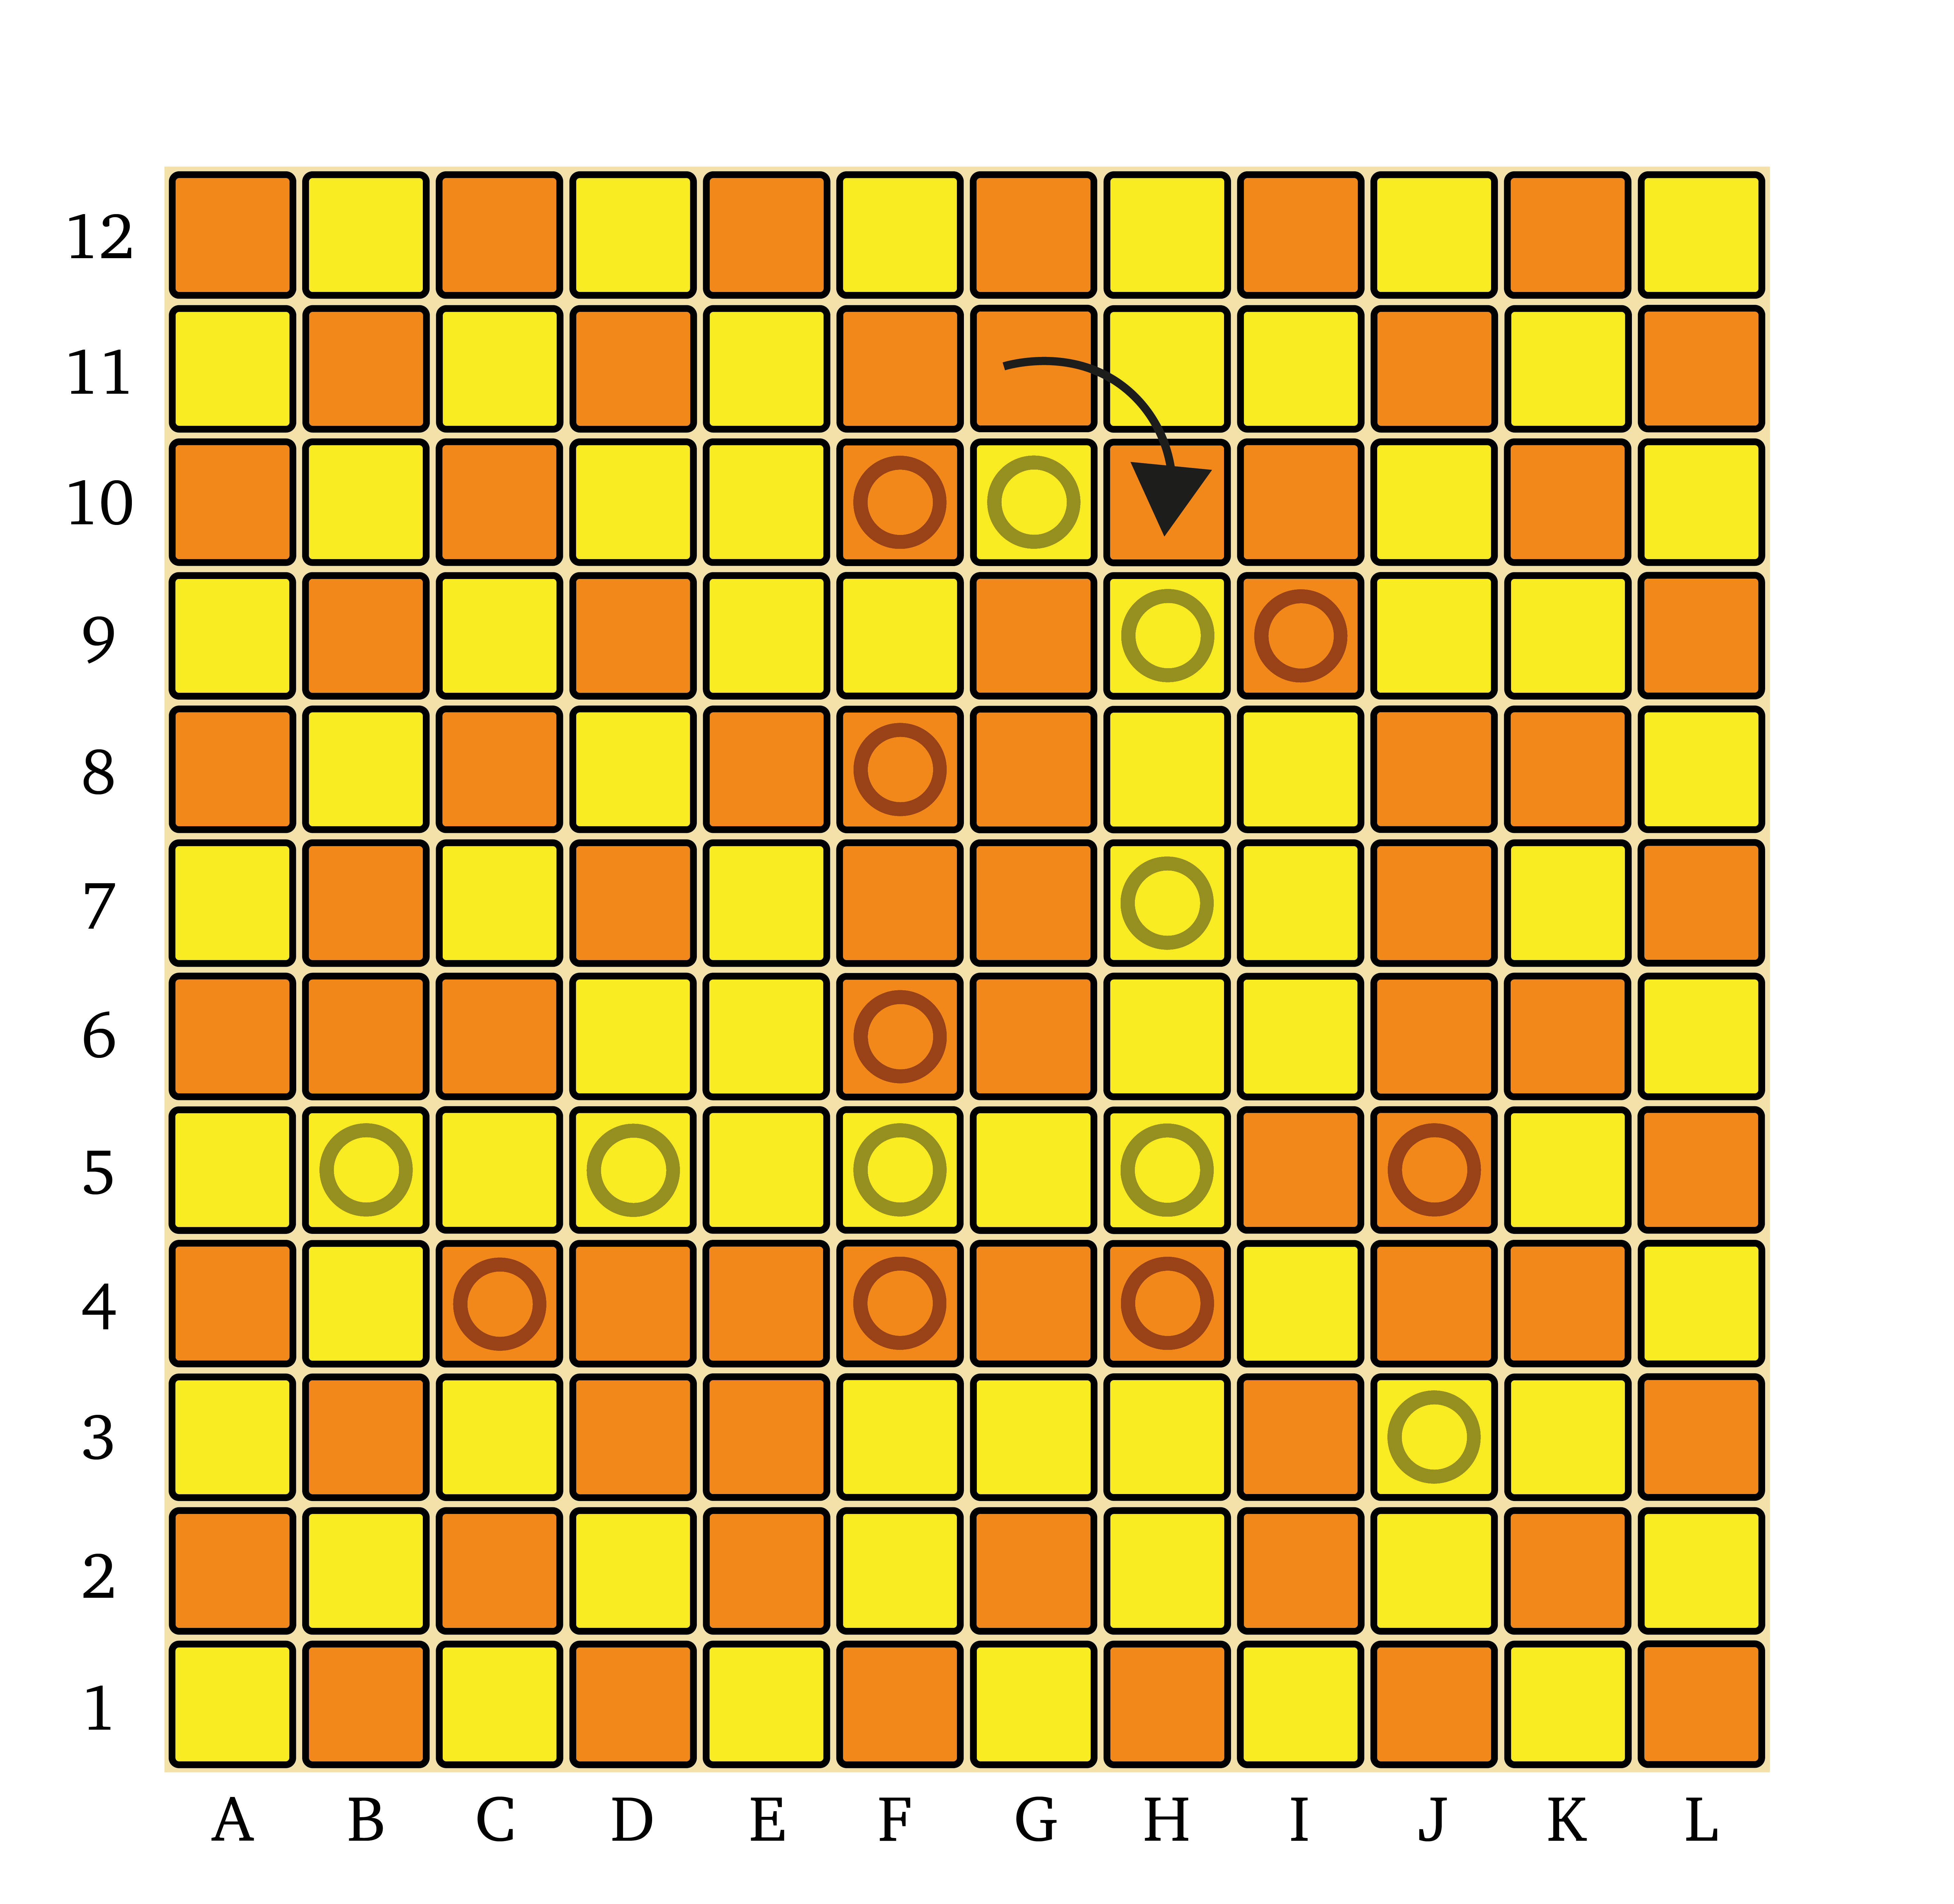
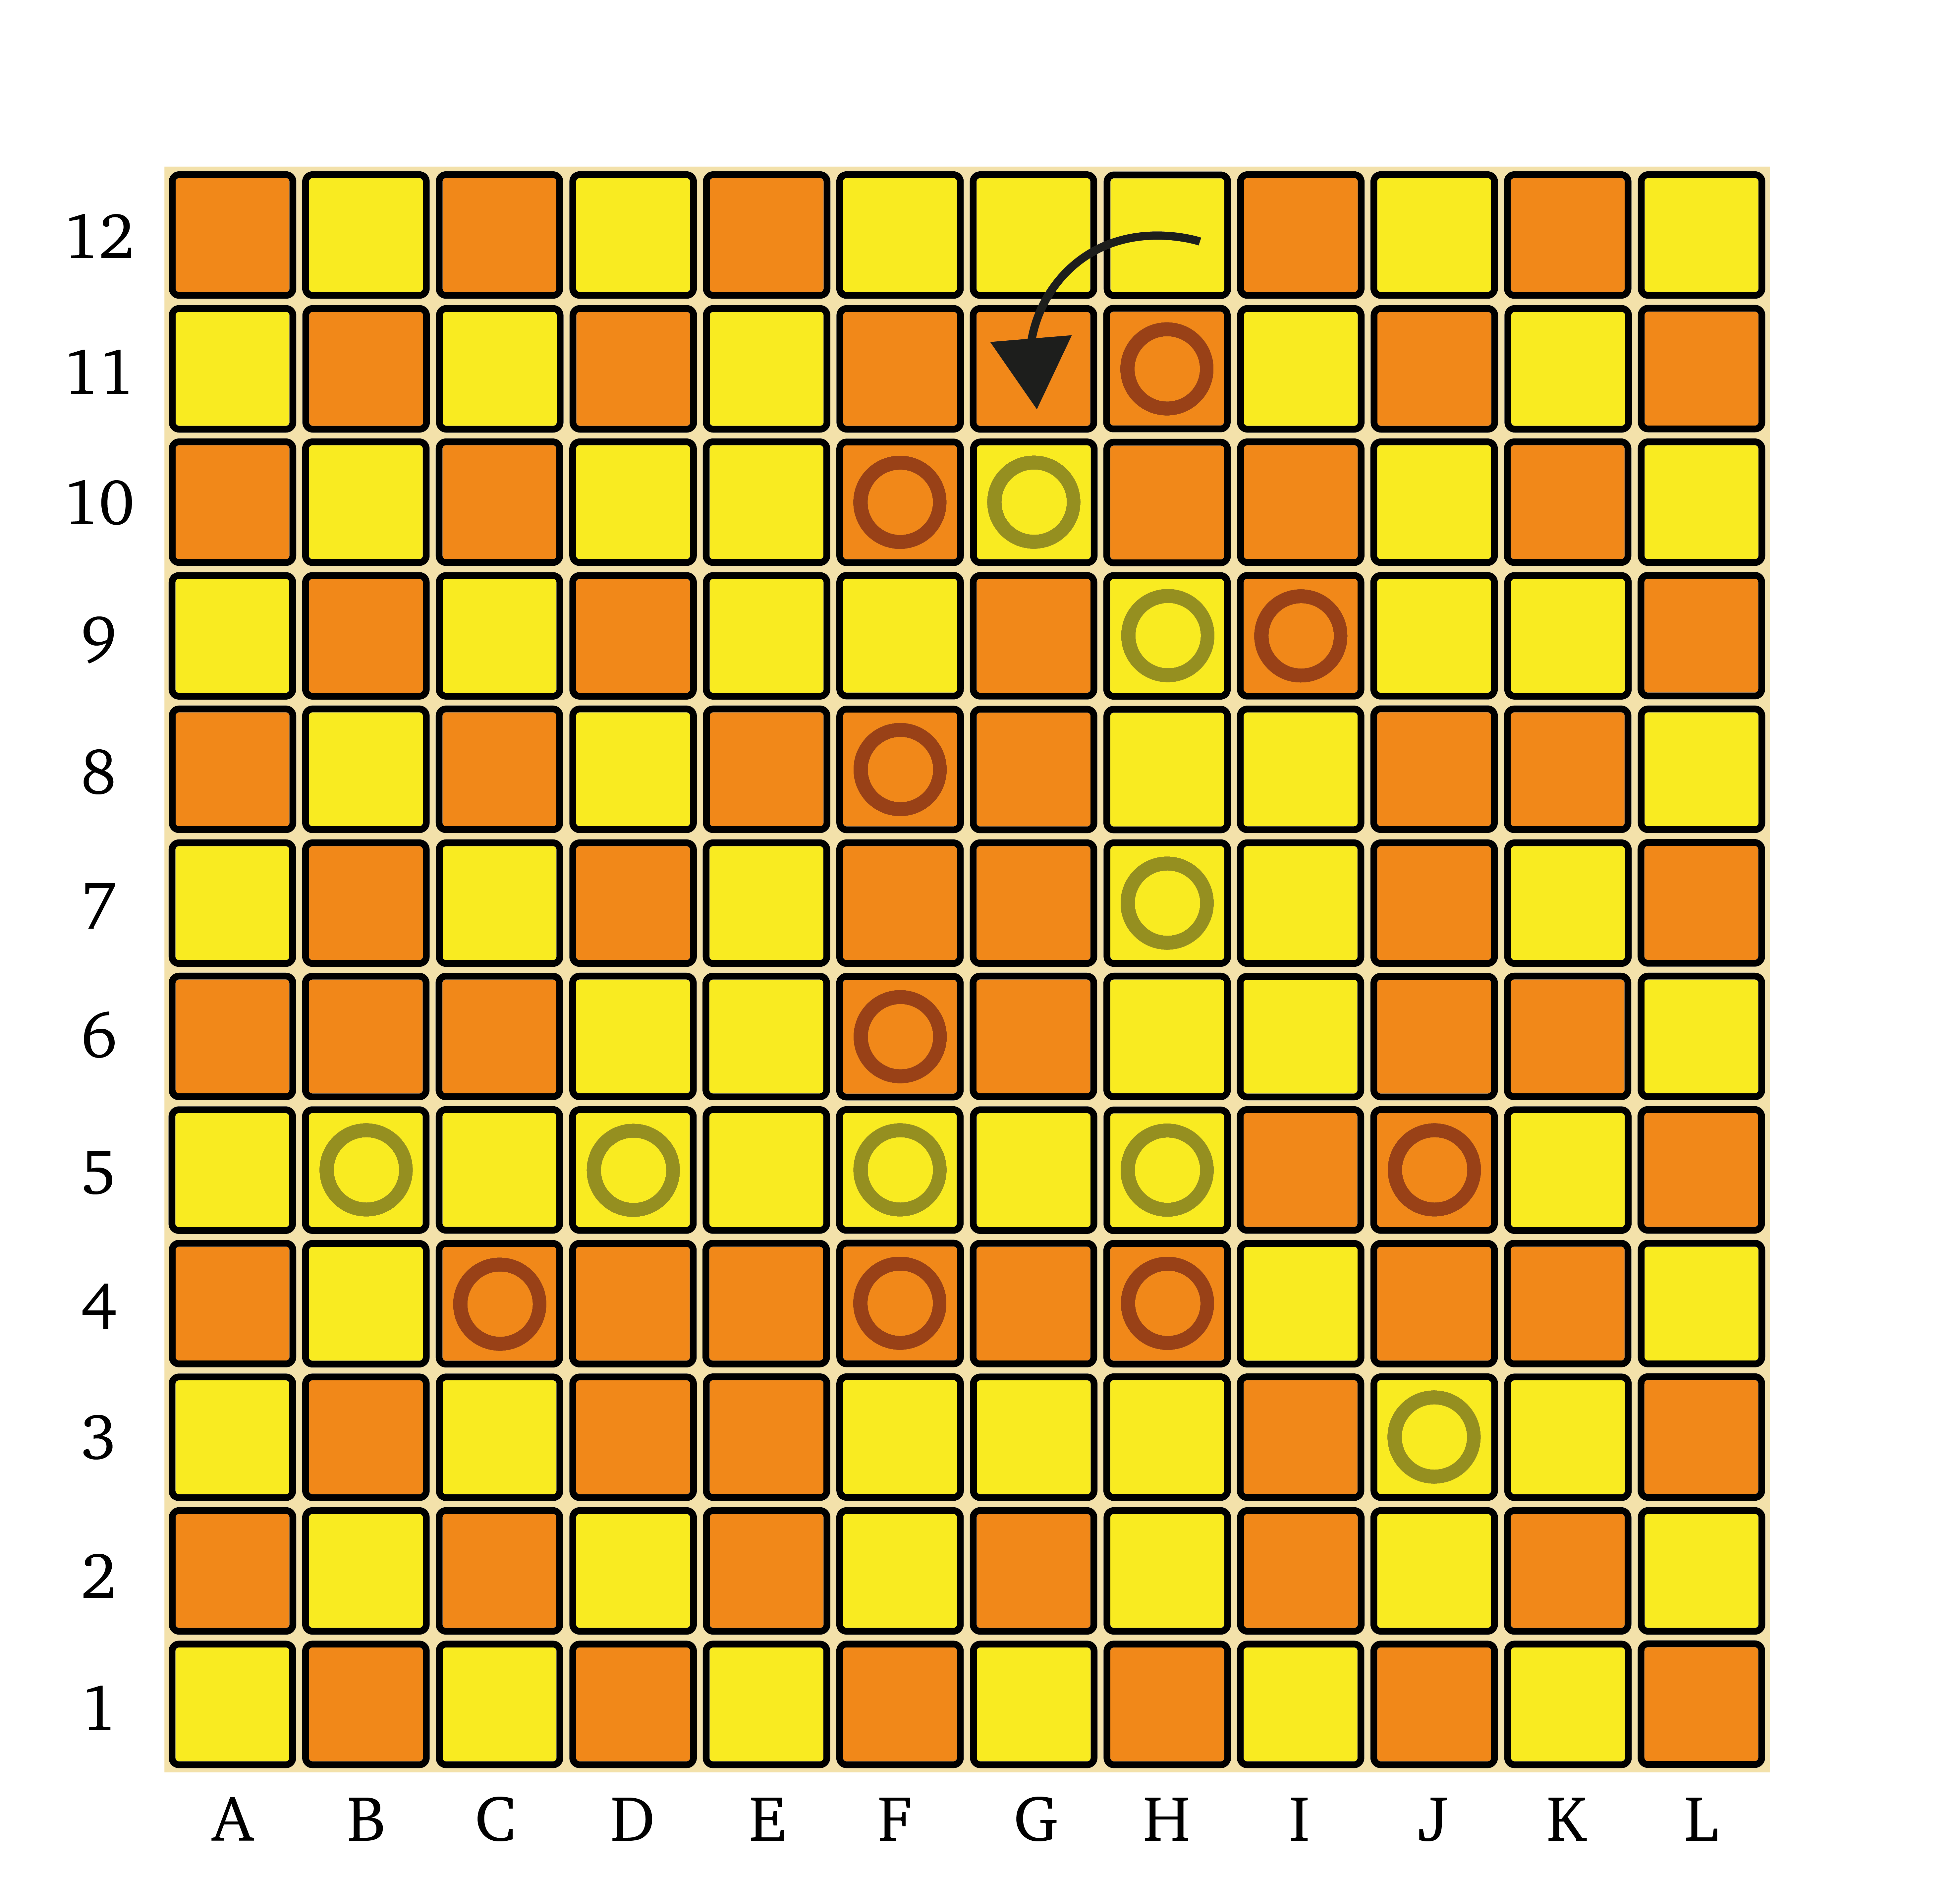
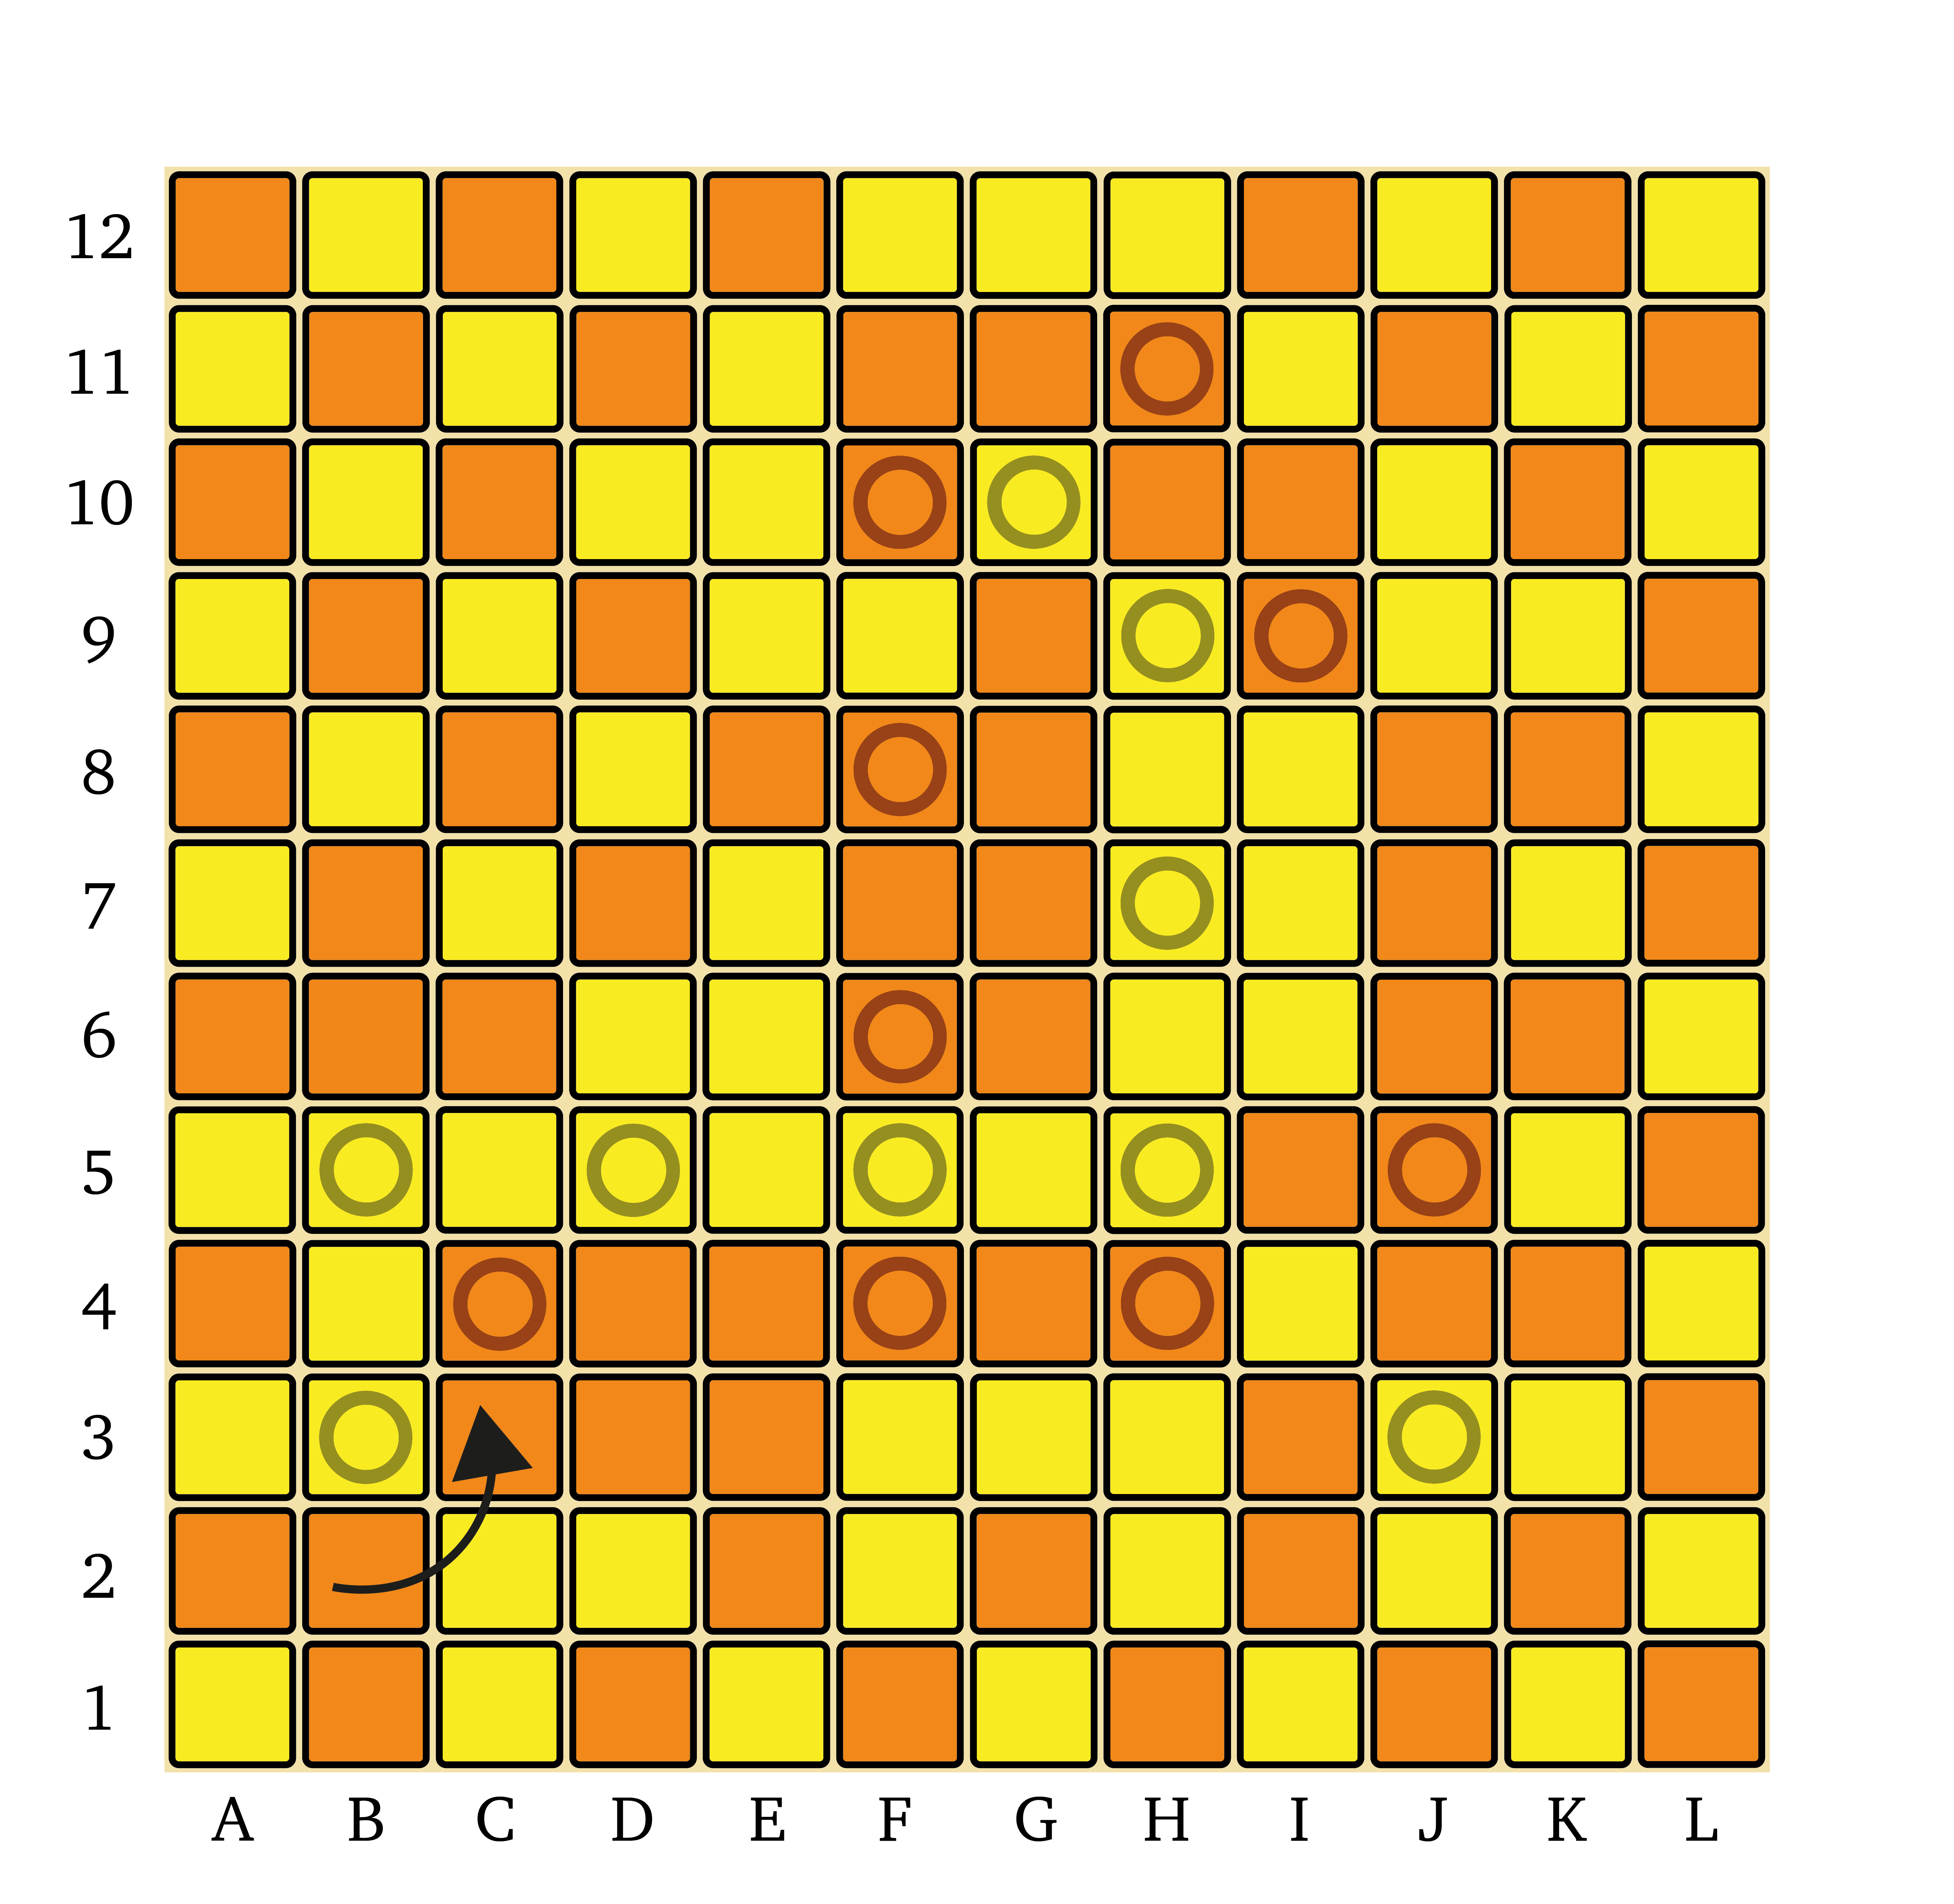
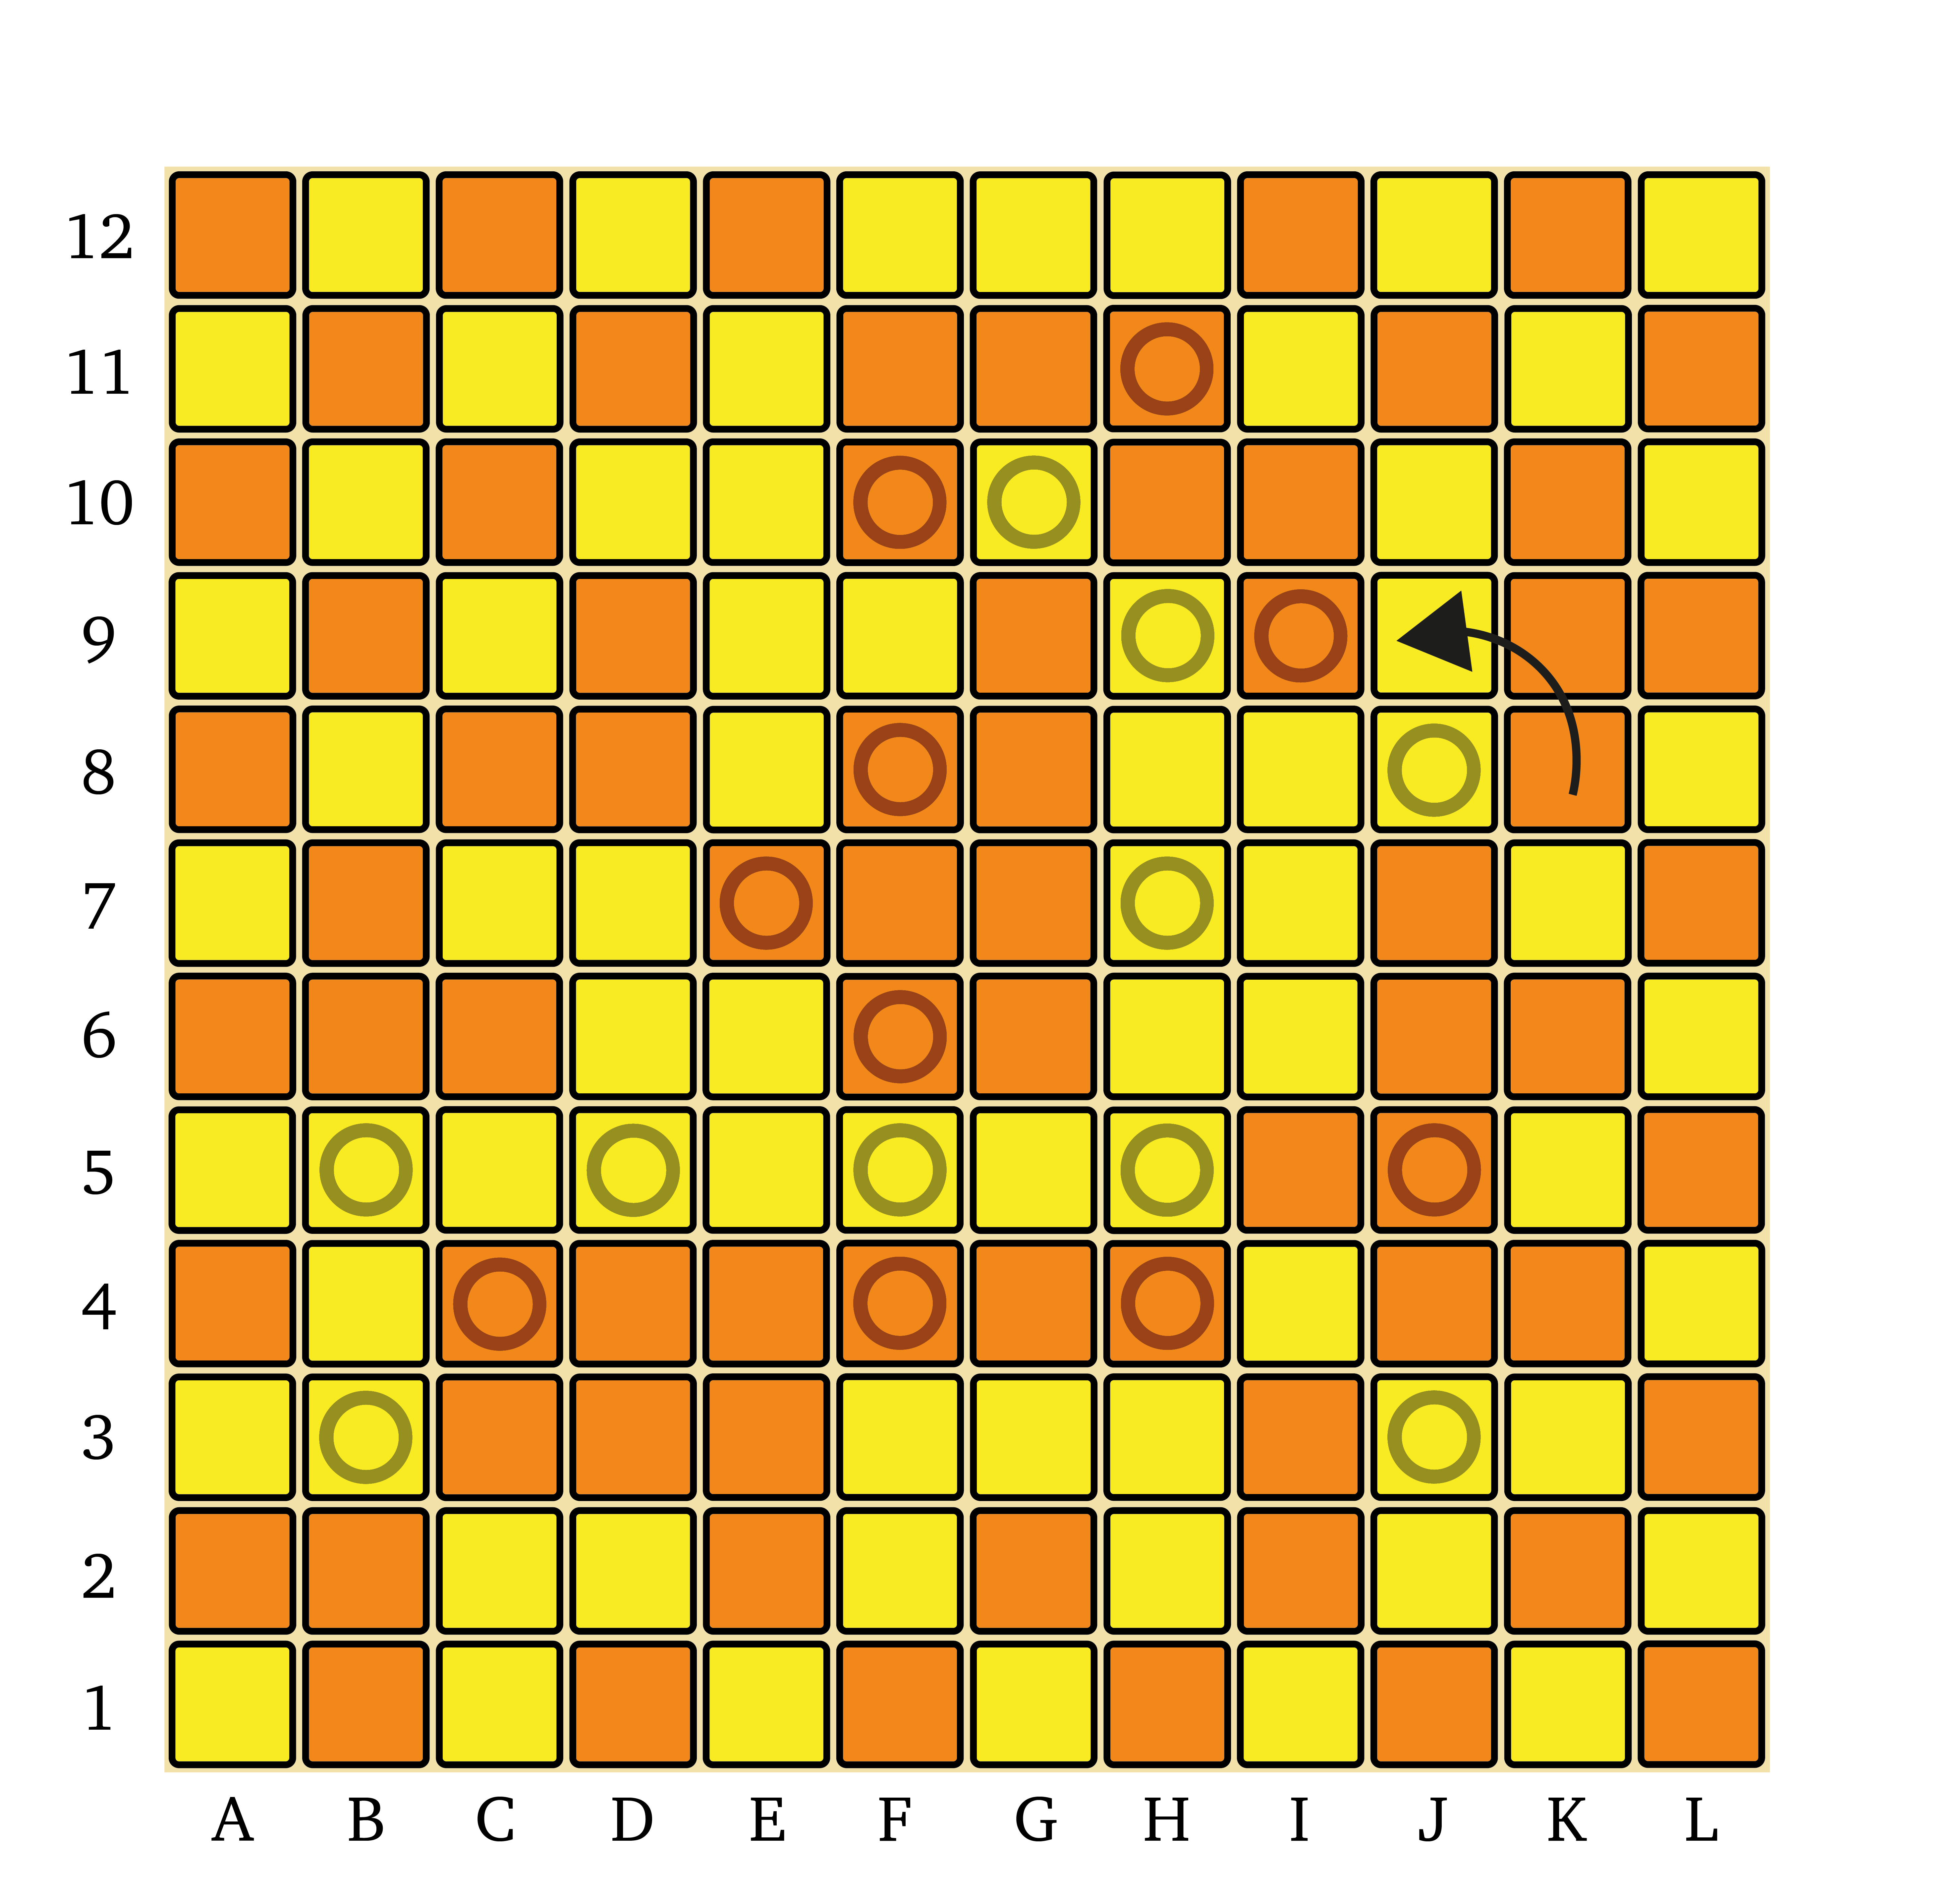
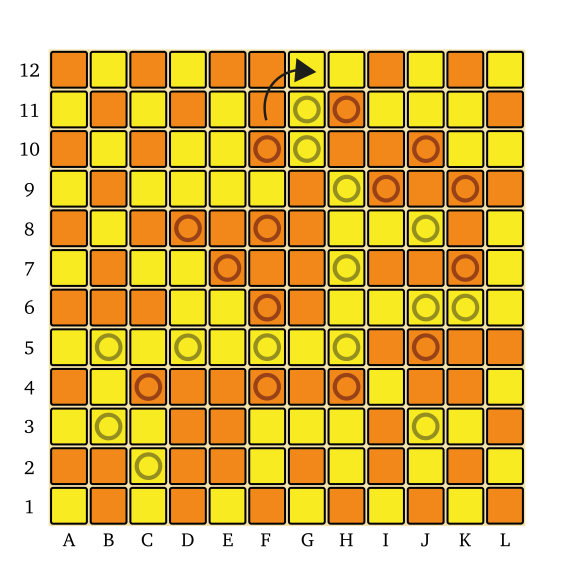
Here we can see some basic examples of this principle. In the leftmost diagram, Yellow has created a secure L-shaped group — the bandage on d4 protects the corner, and ensures the pieces on d2 and c4 are fully protected as well. In the middle diagram, Yellow’s misplaced bandage on d5 has protected none of the pieces in the middle of this group! On the right, this T-junction formation is also safe, giving Yellow three potential avenues of expansion with the bandages on b4, d3 and d5. Our objective when setting up our groups should be to maximise our reach, while always being careful not to leave weak points that can be twisted out of position. One-space extensions, T-junctions, and secure corners are important ingredients in any effort to build a large group.
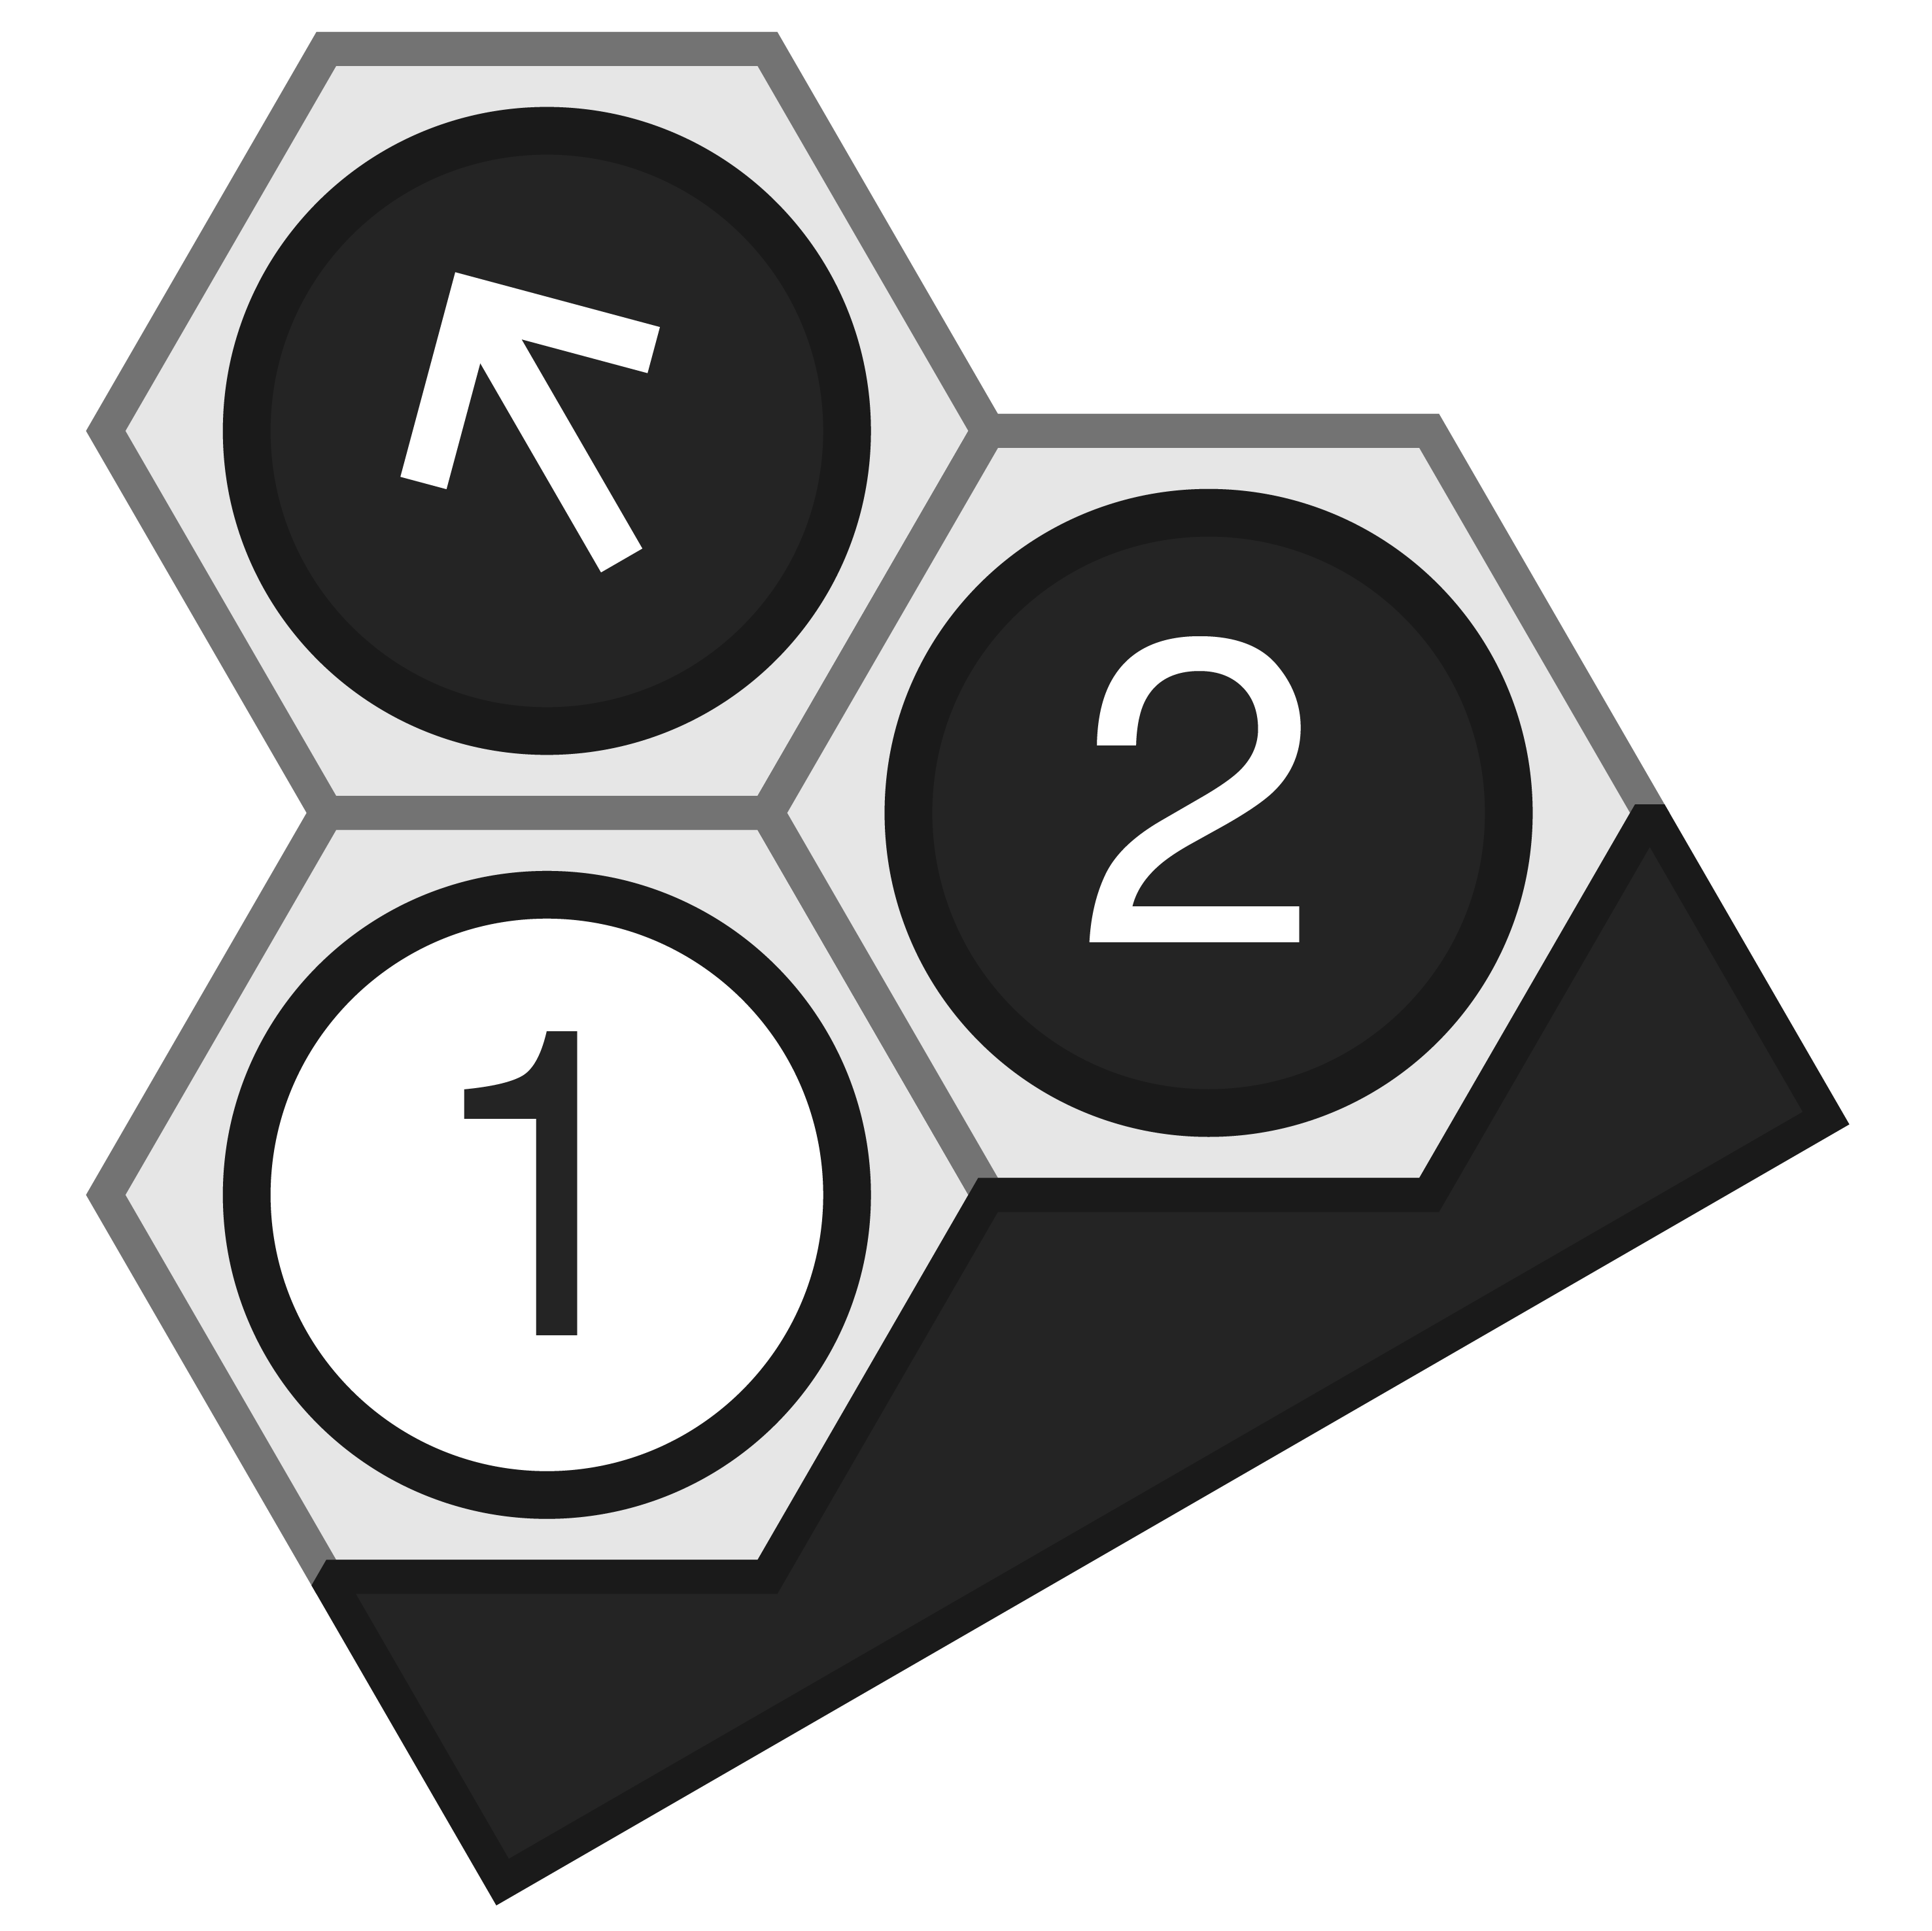
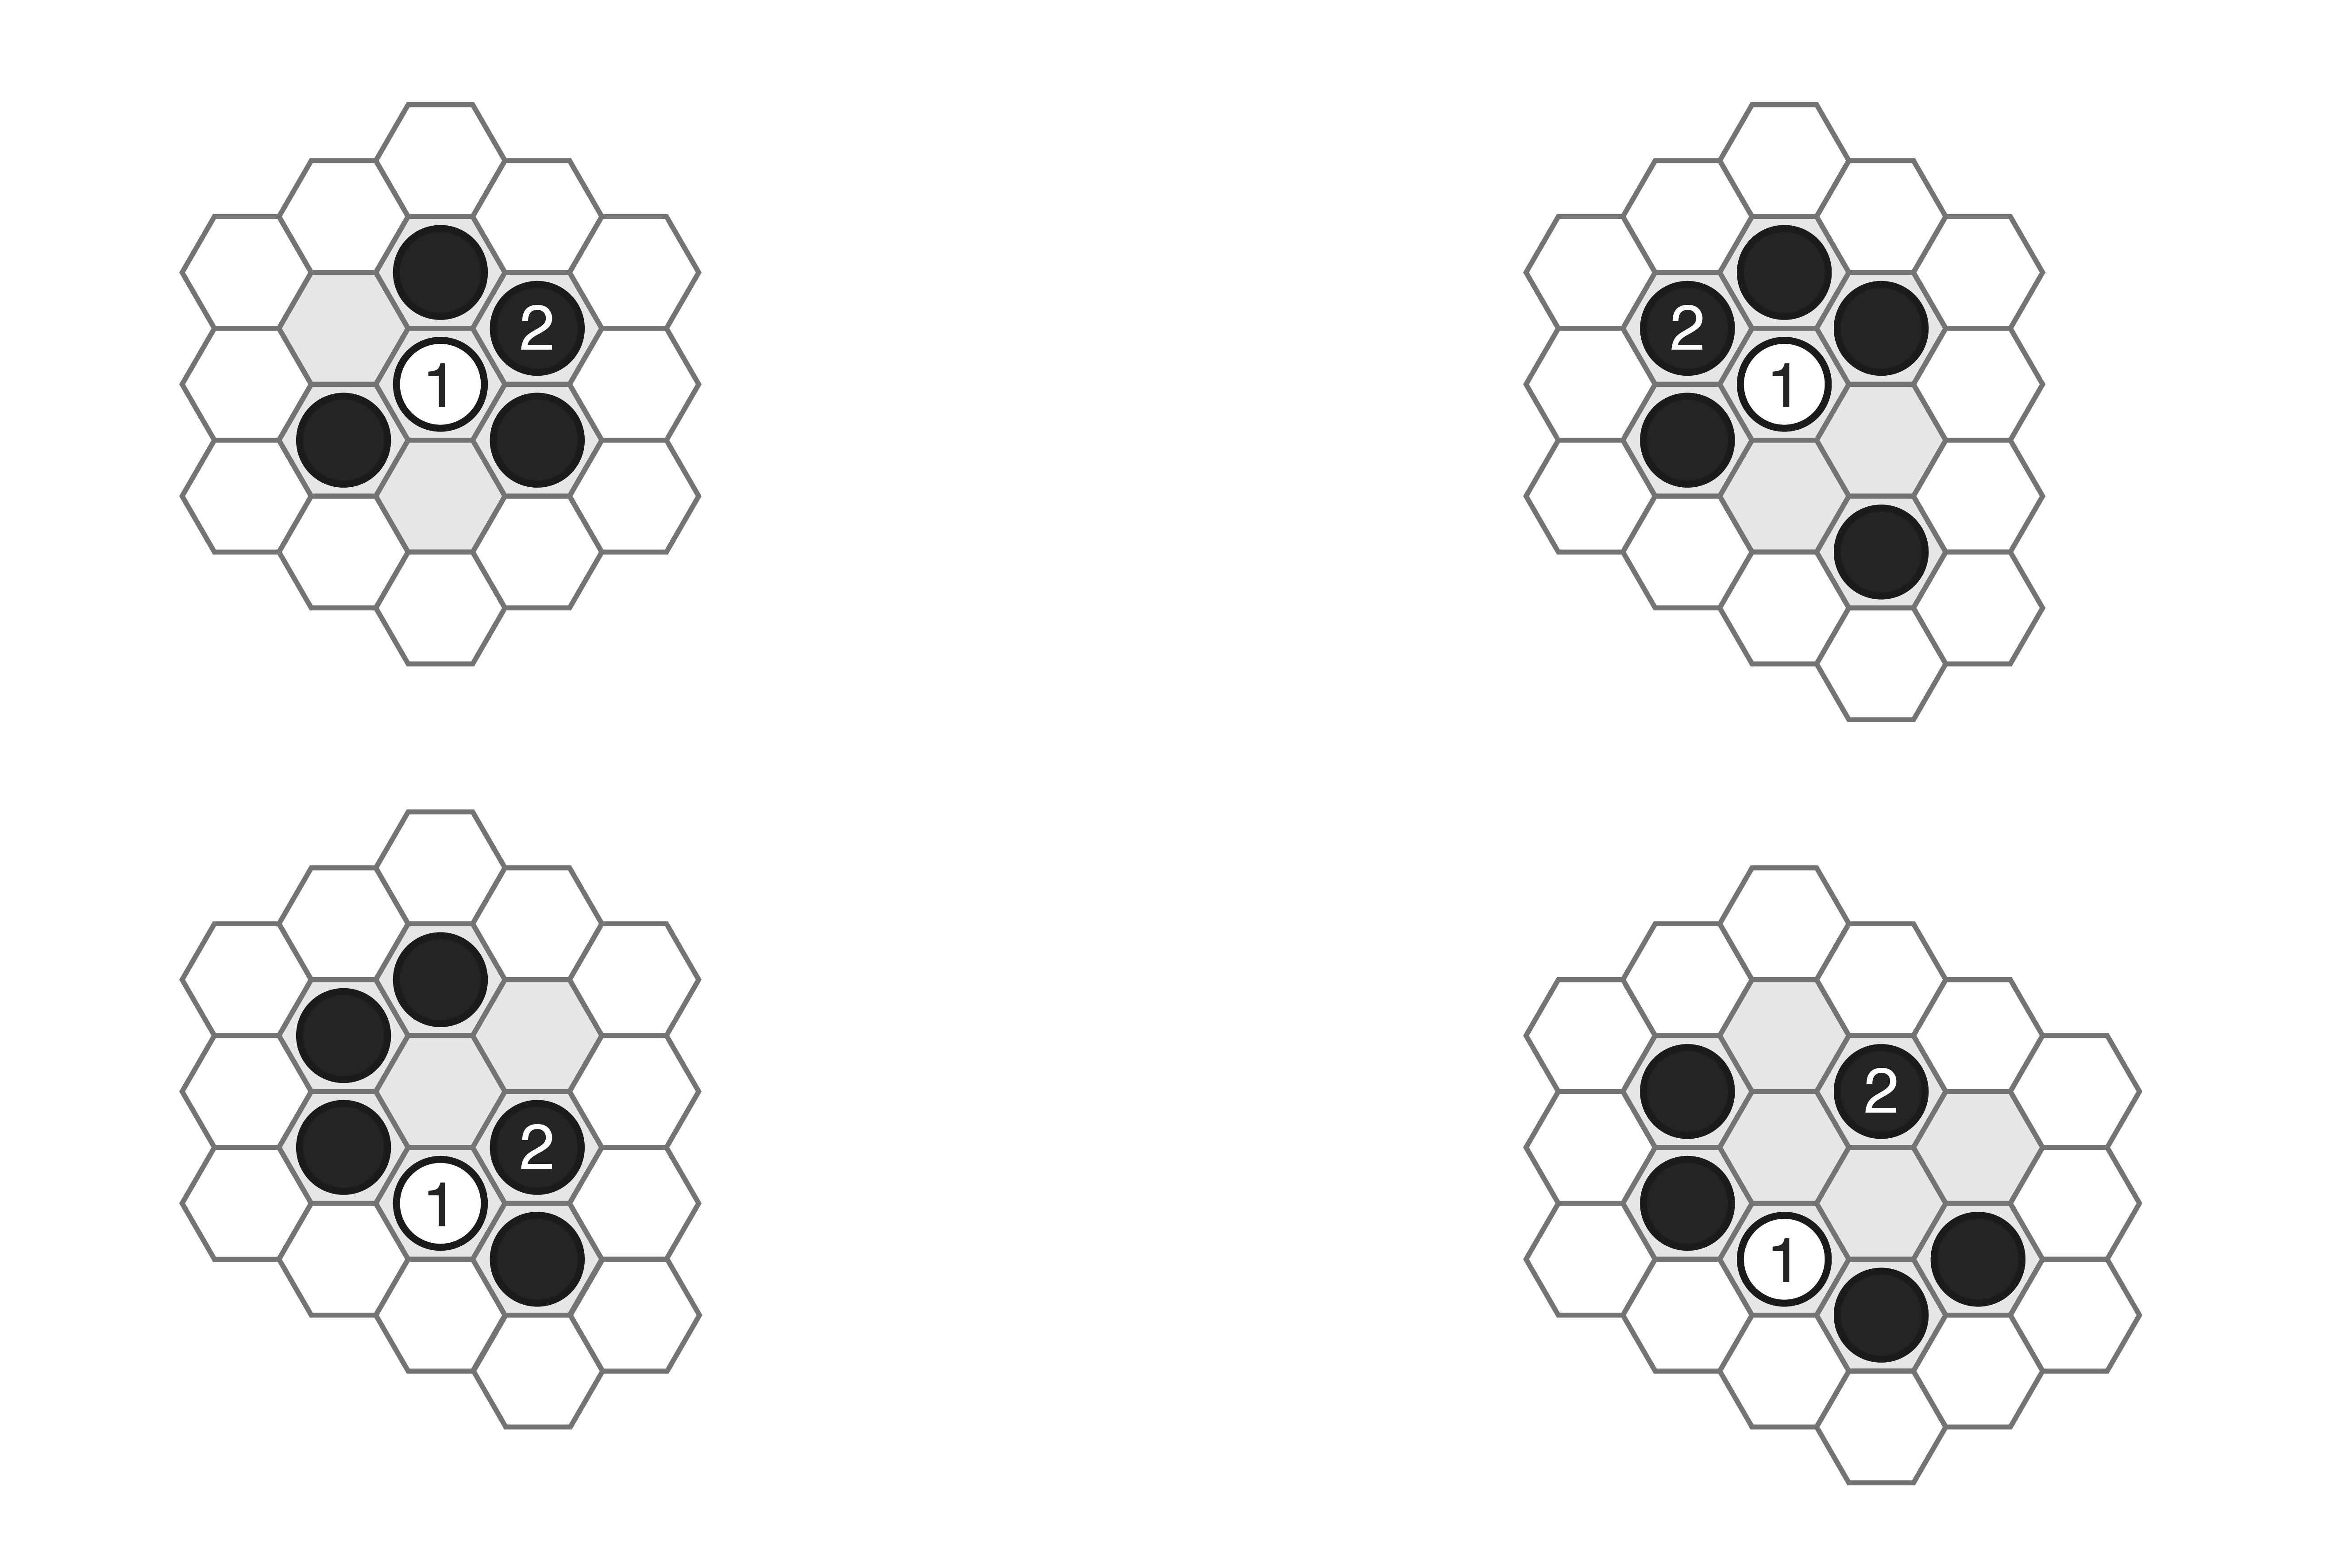
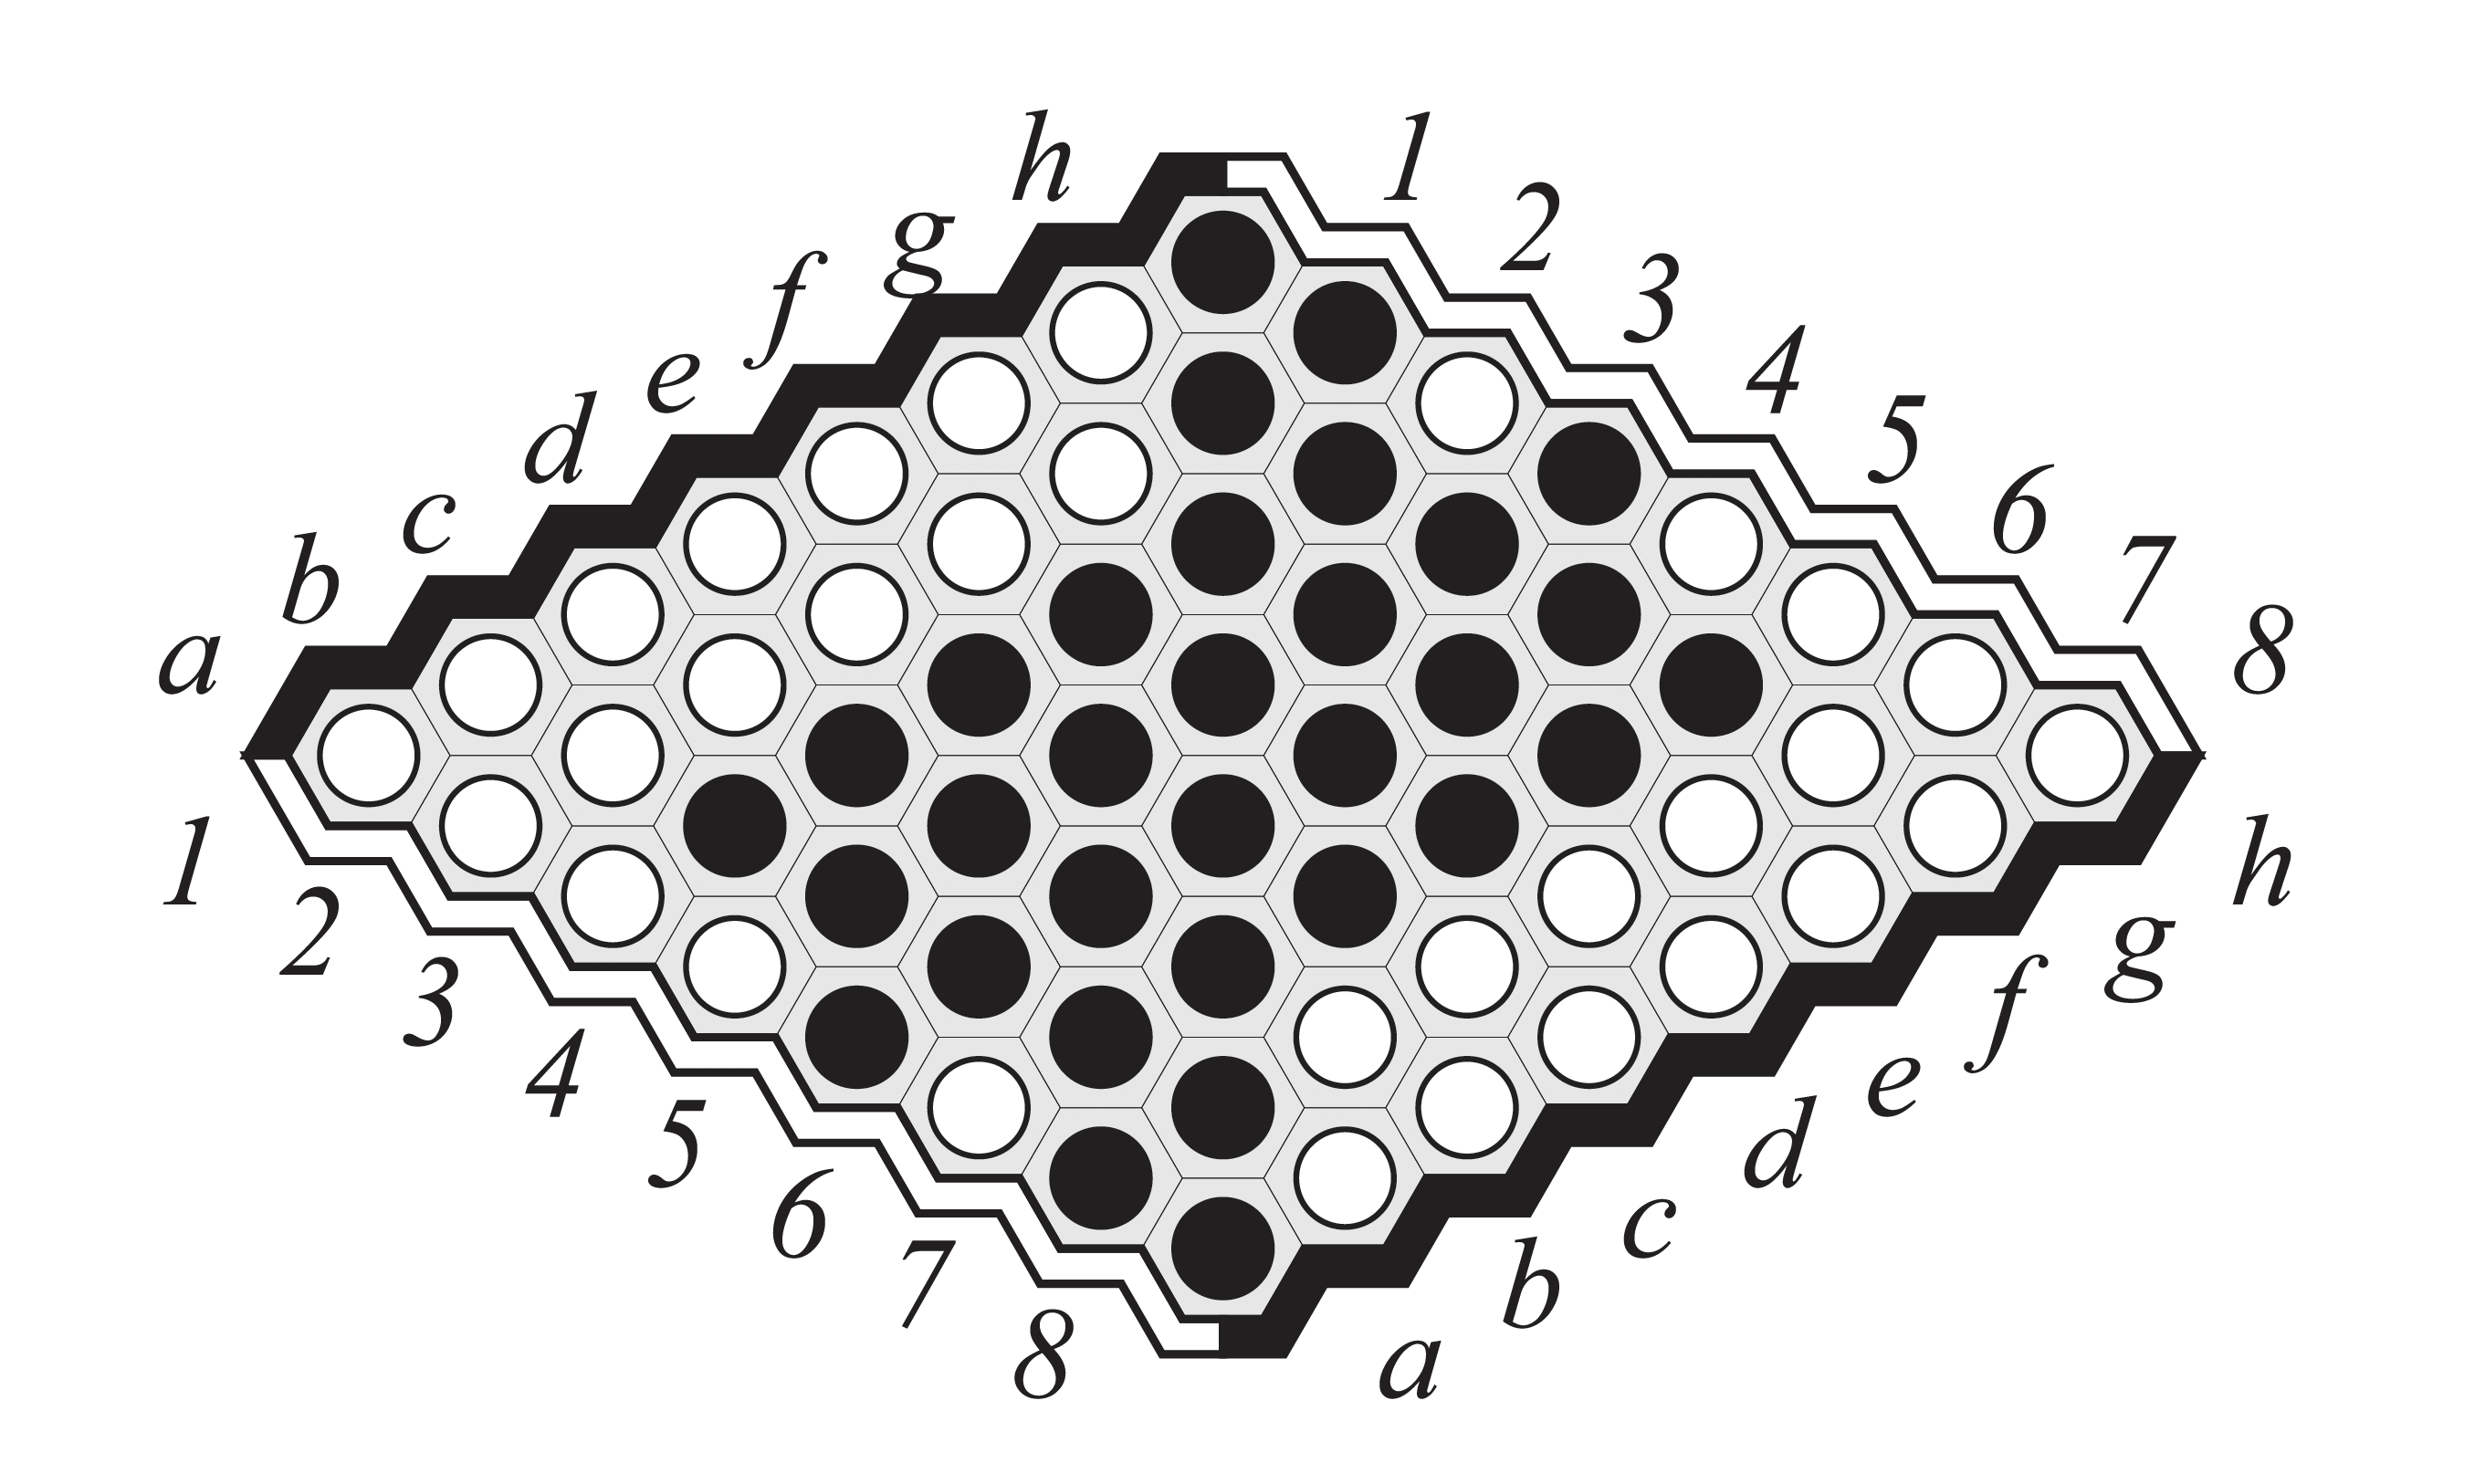
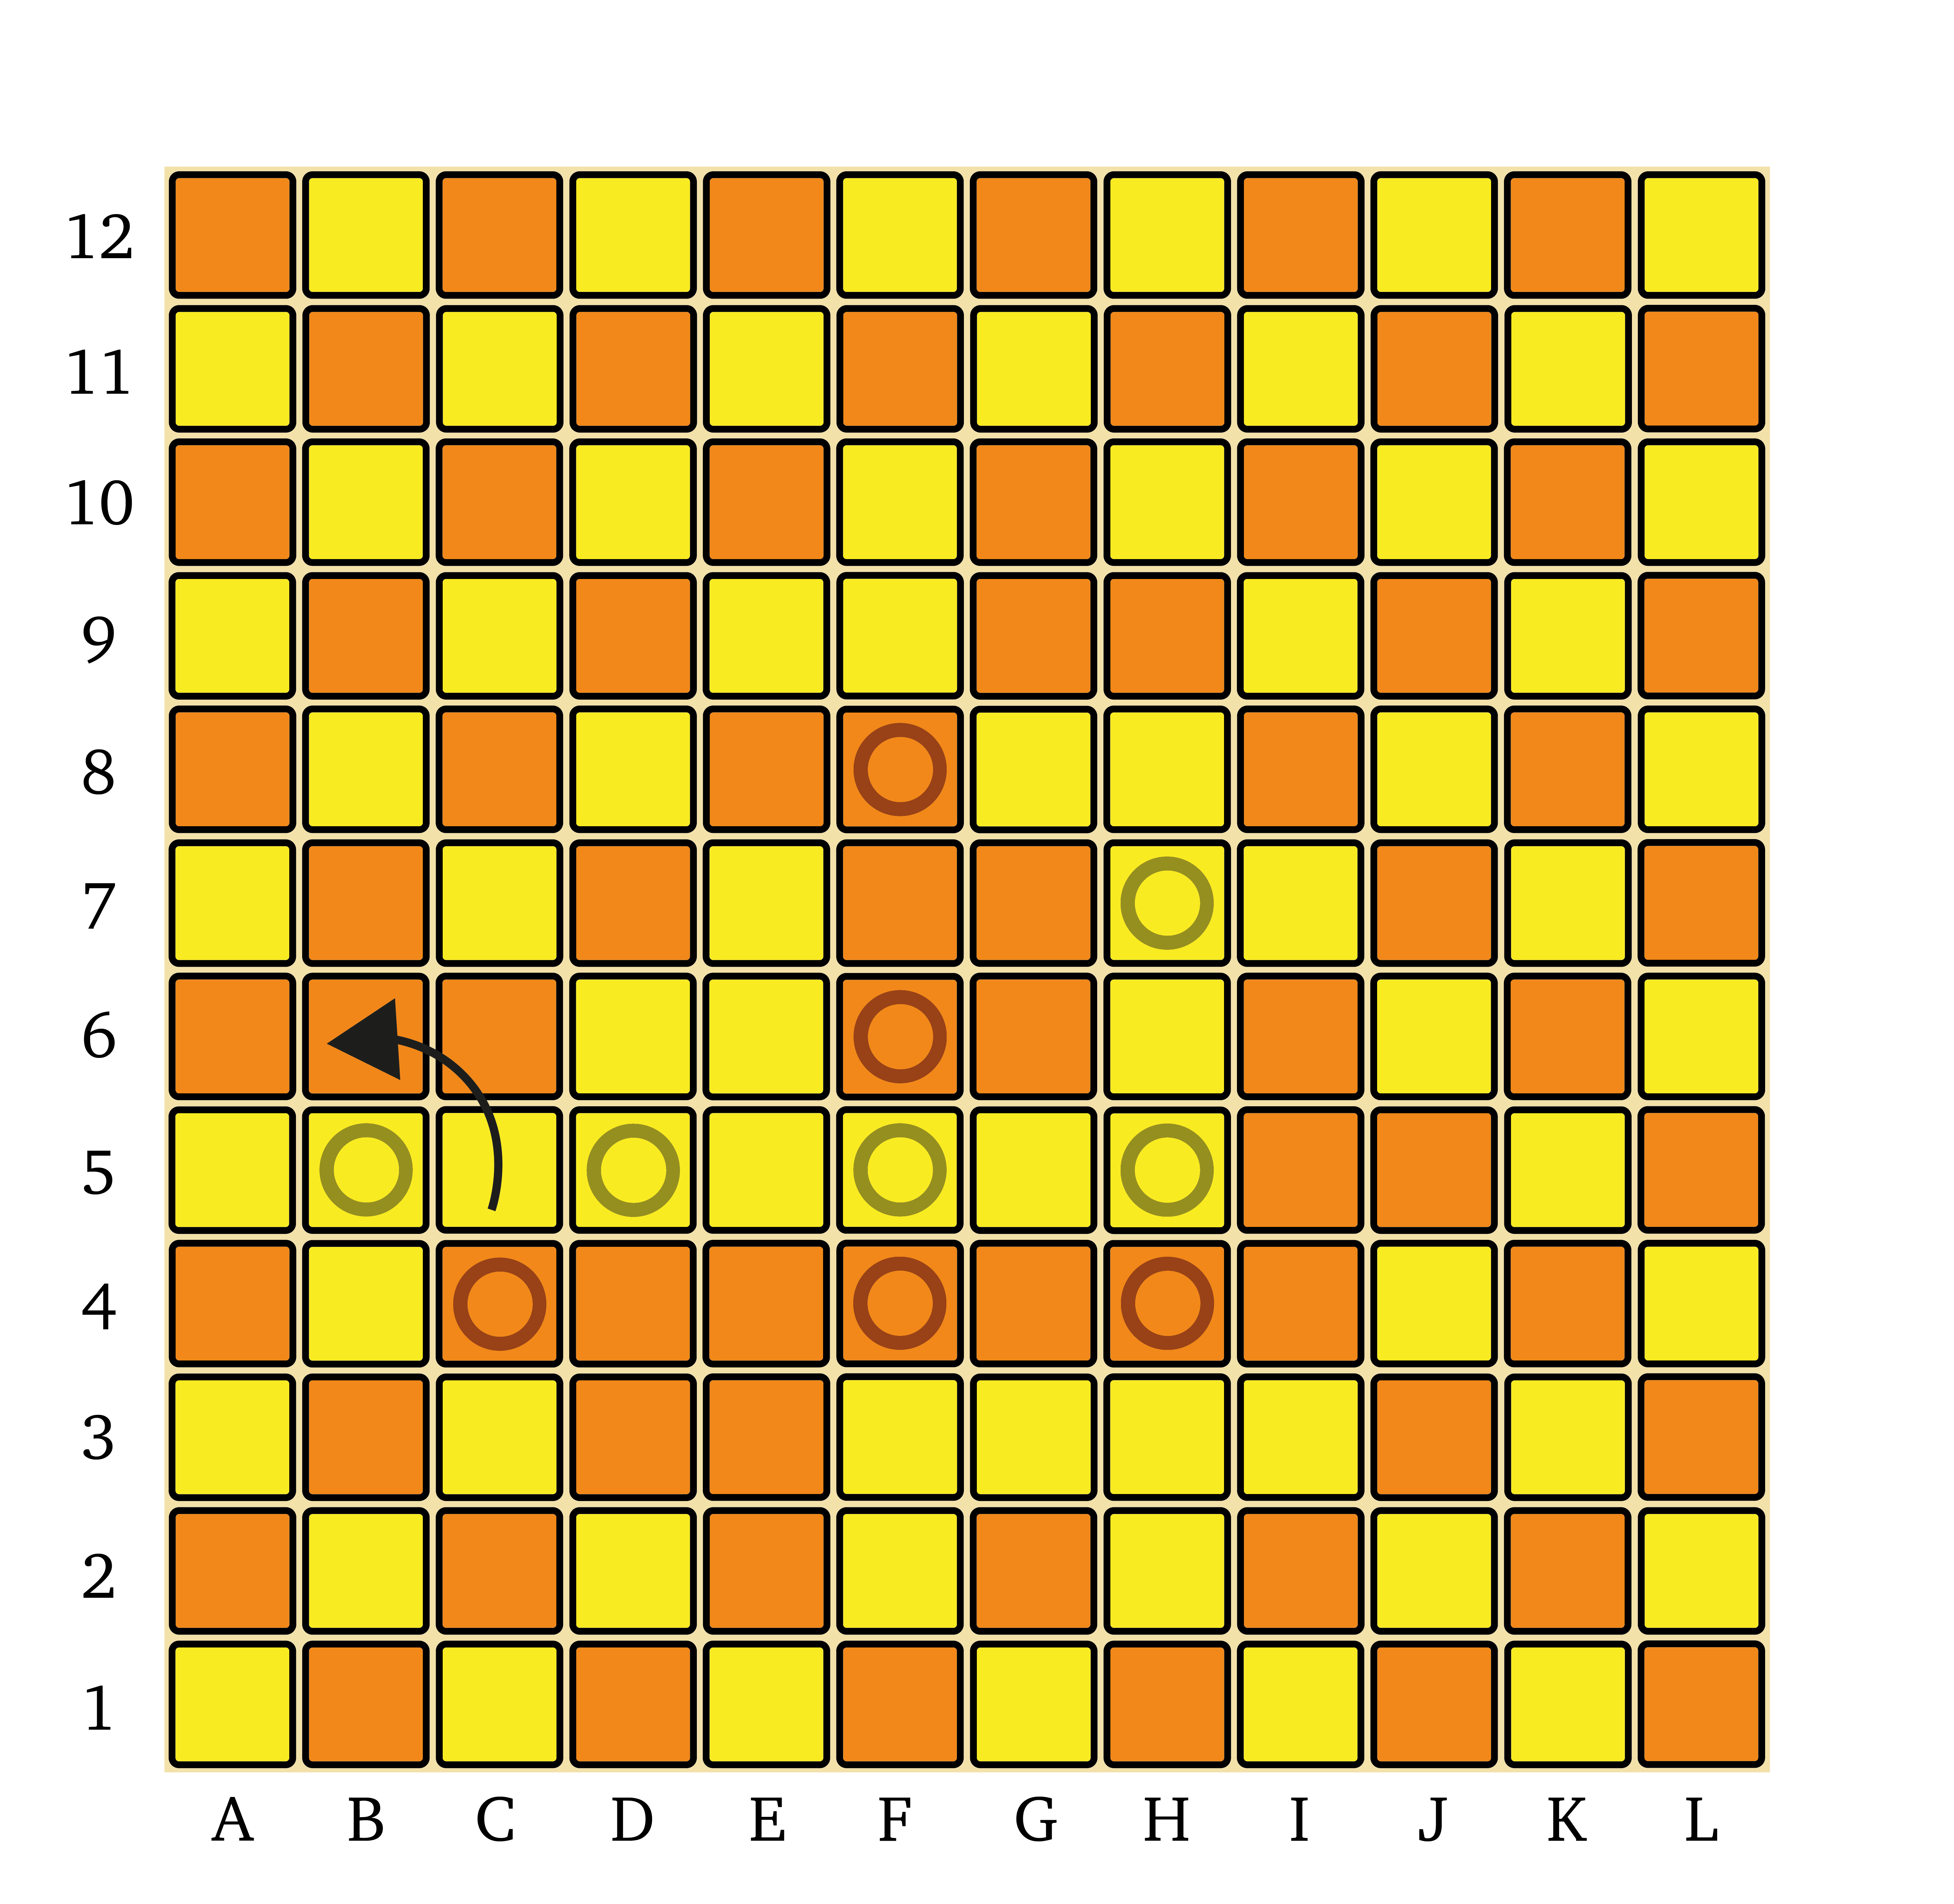
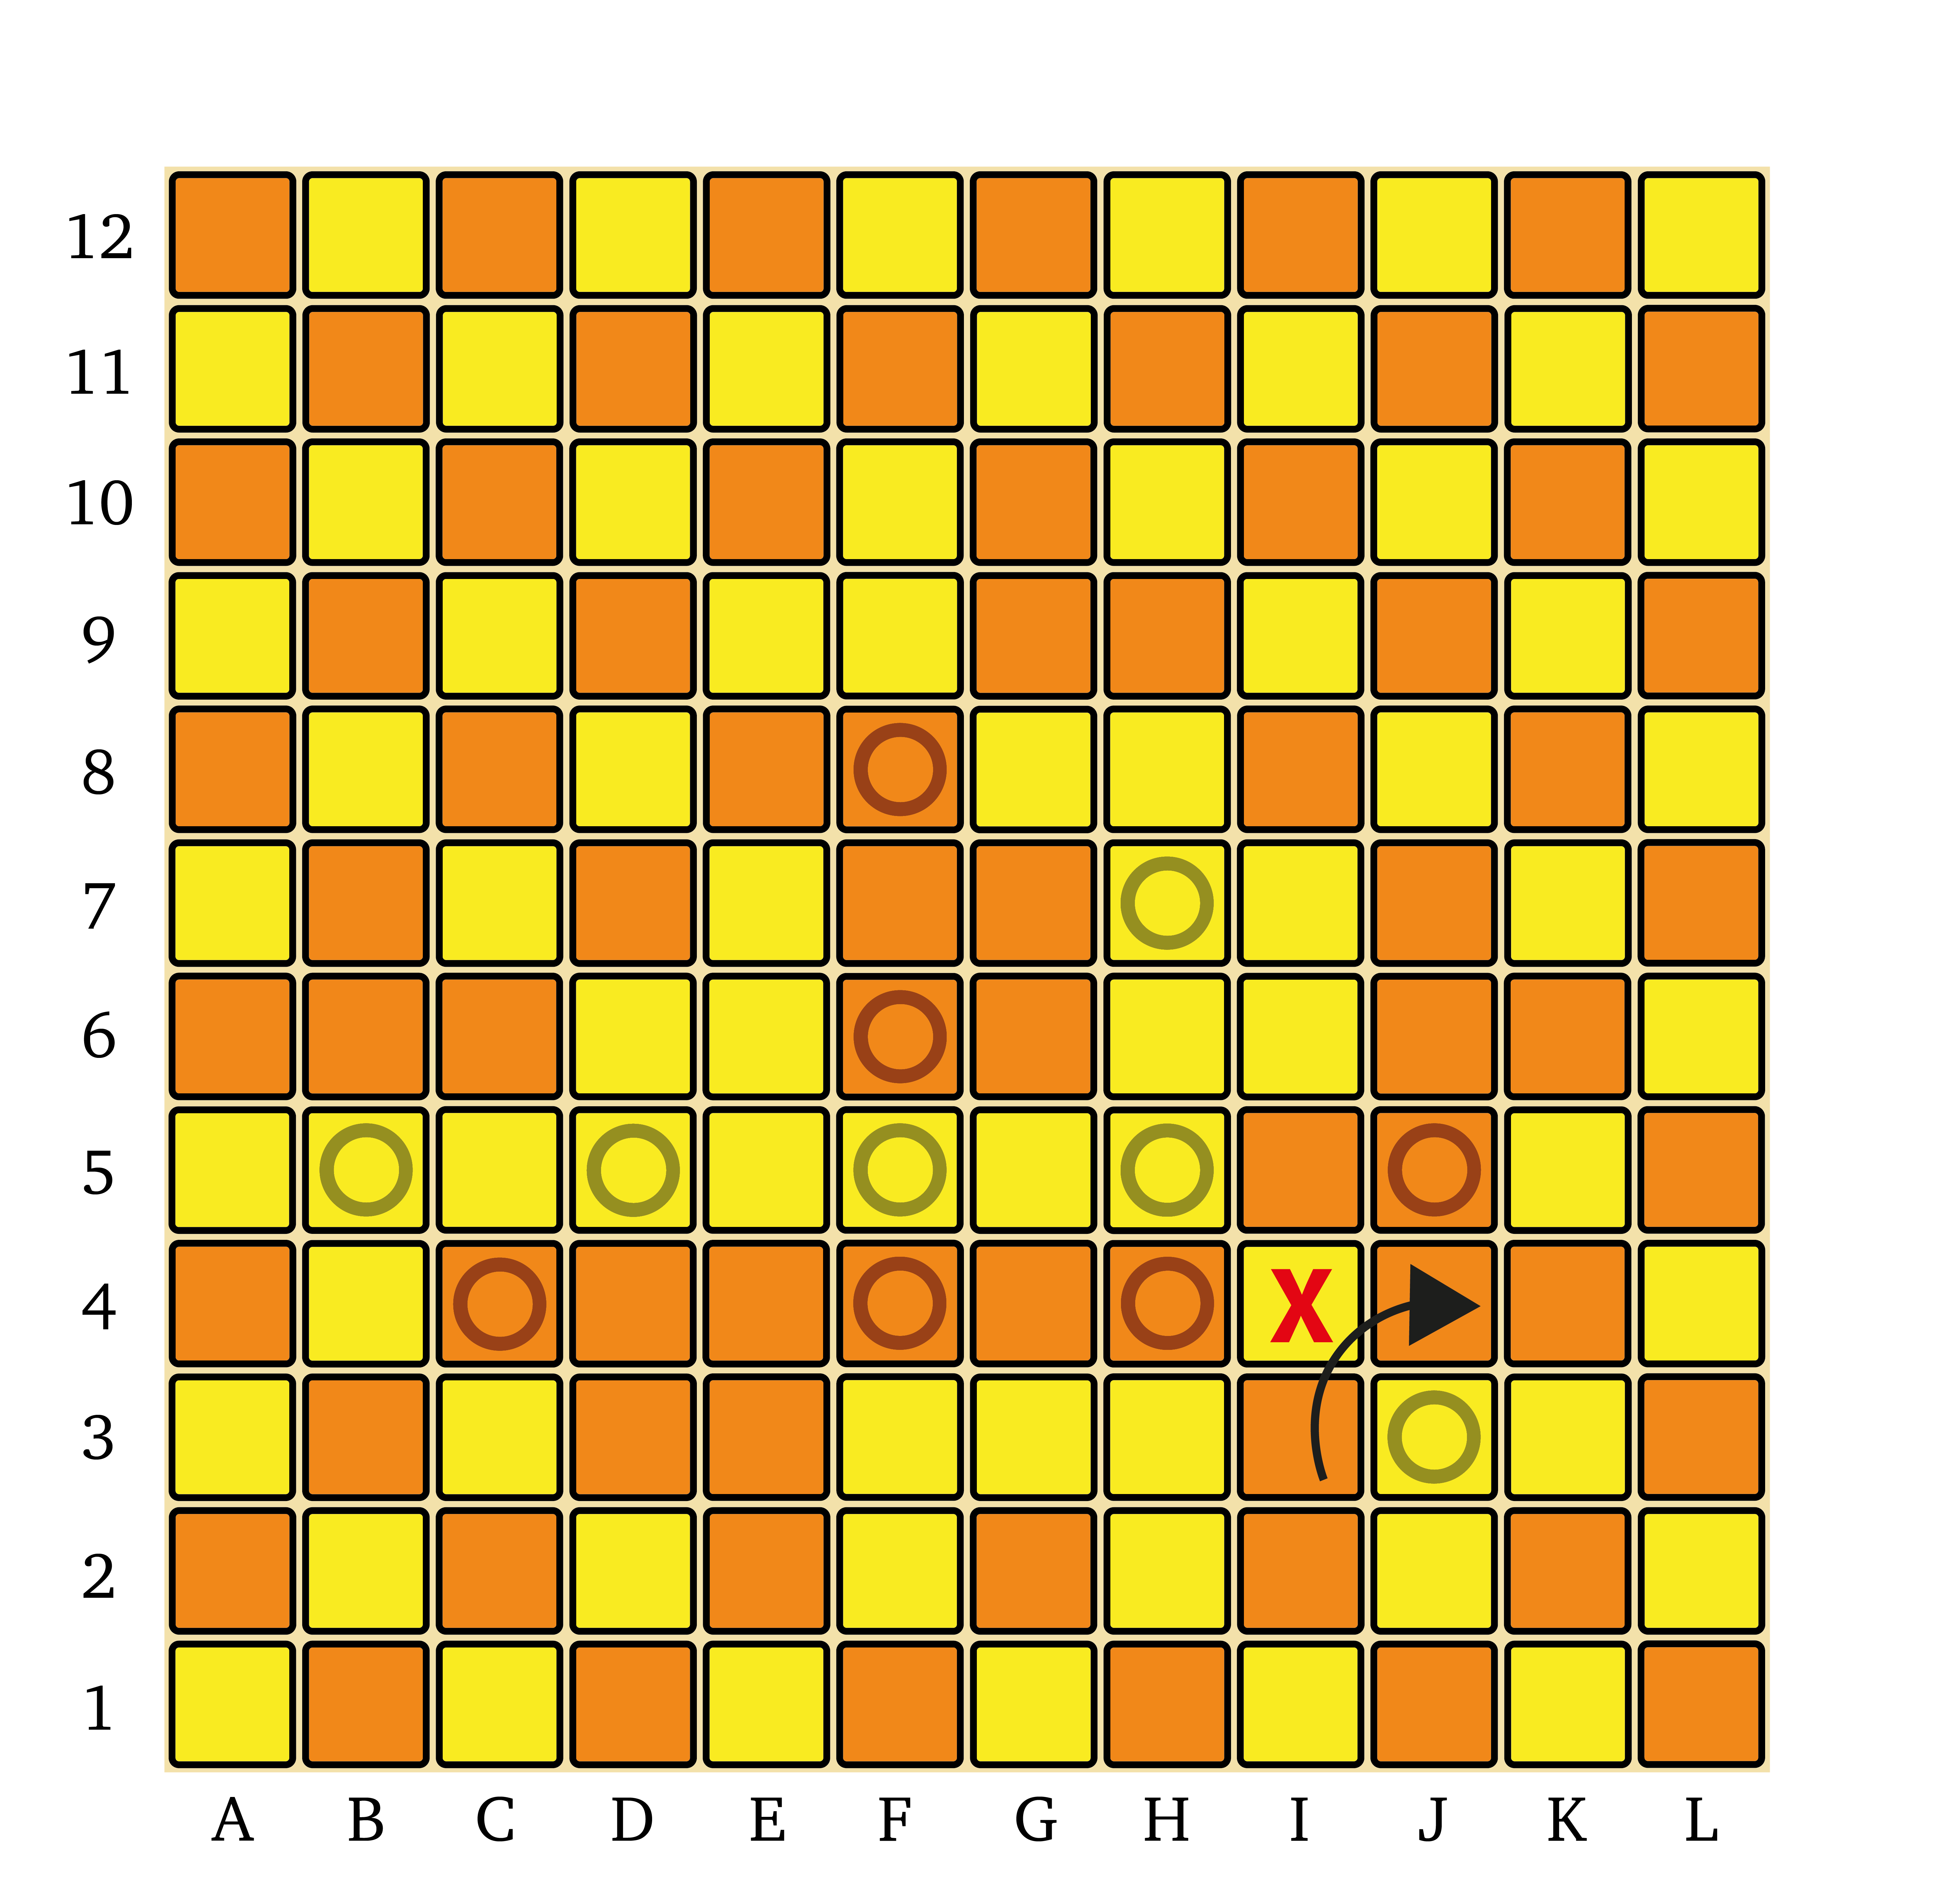
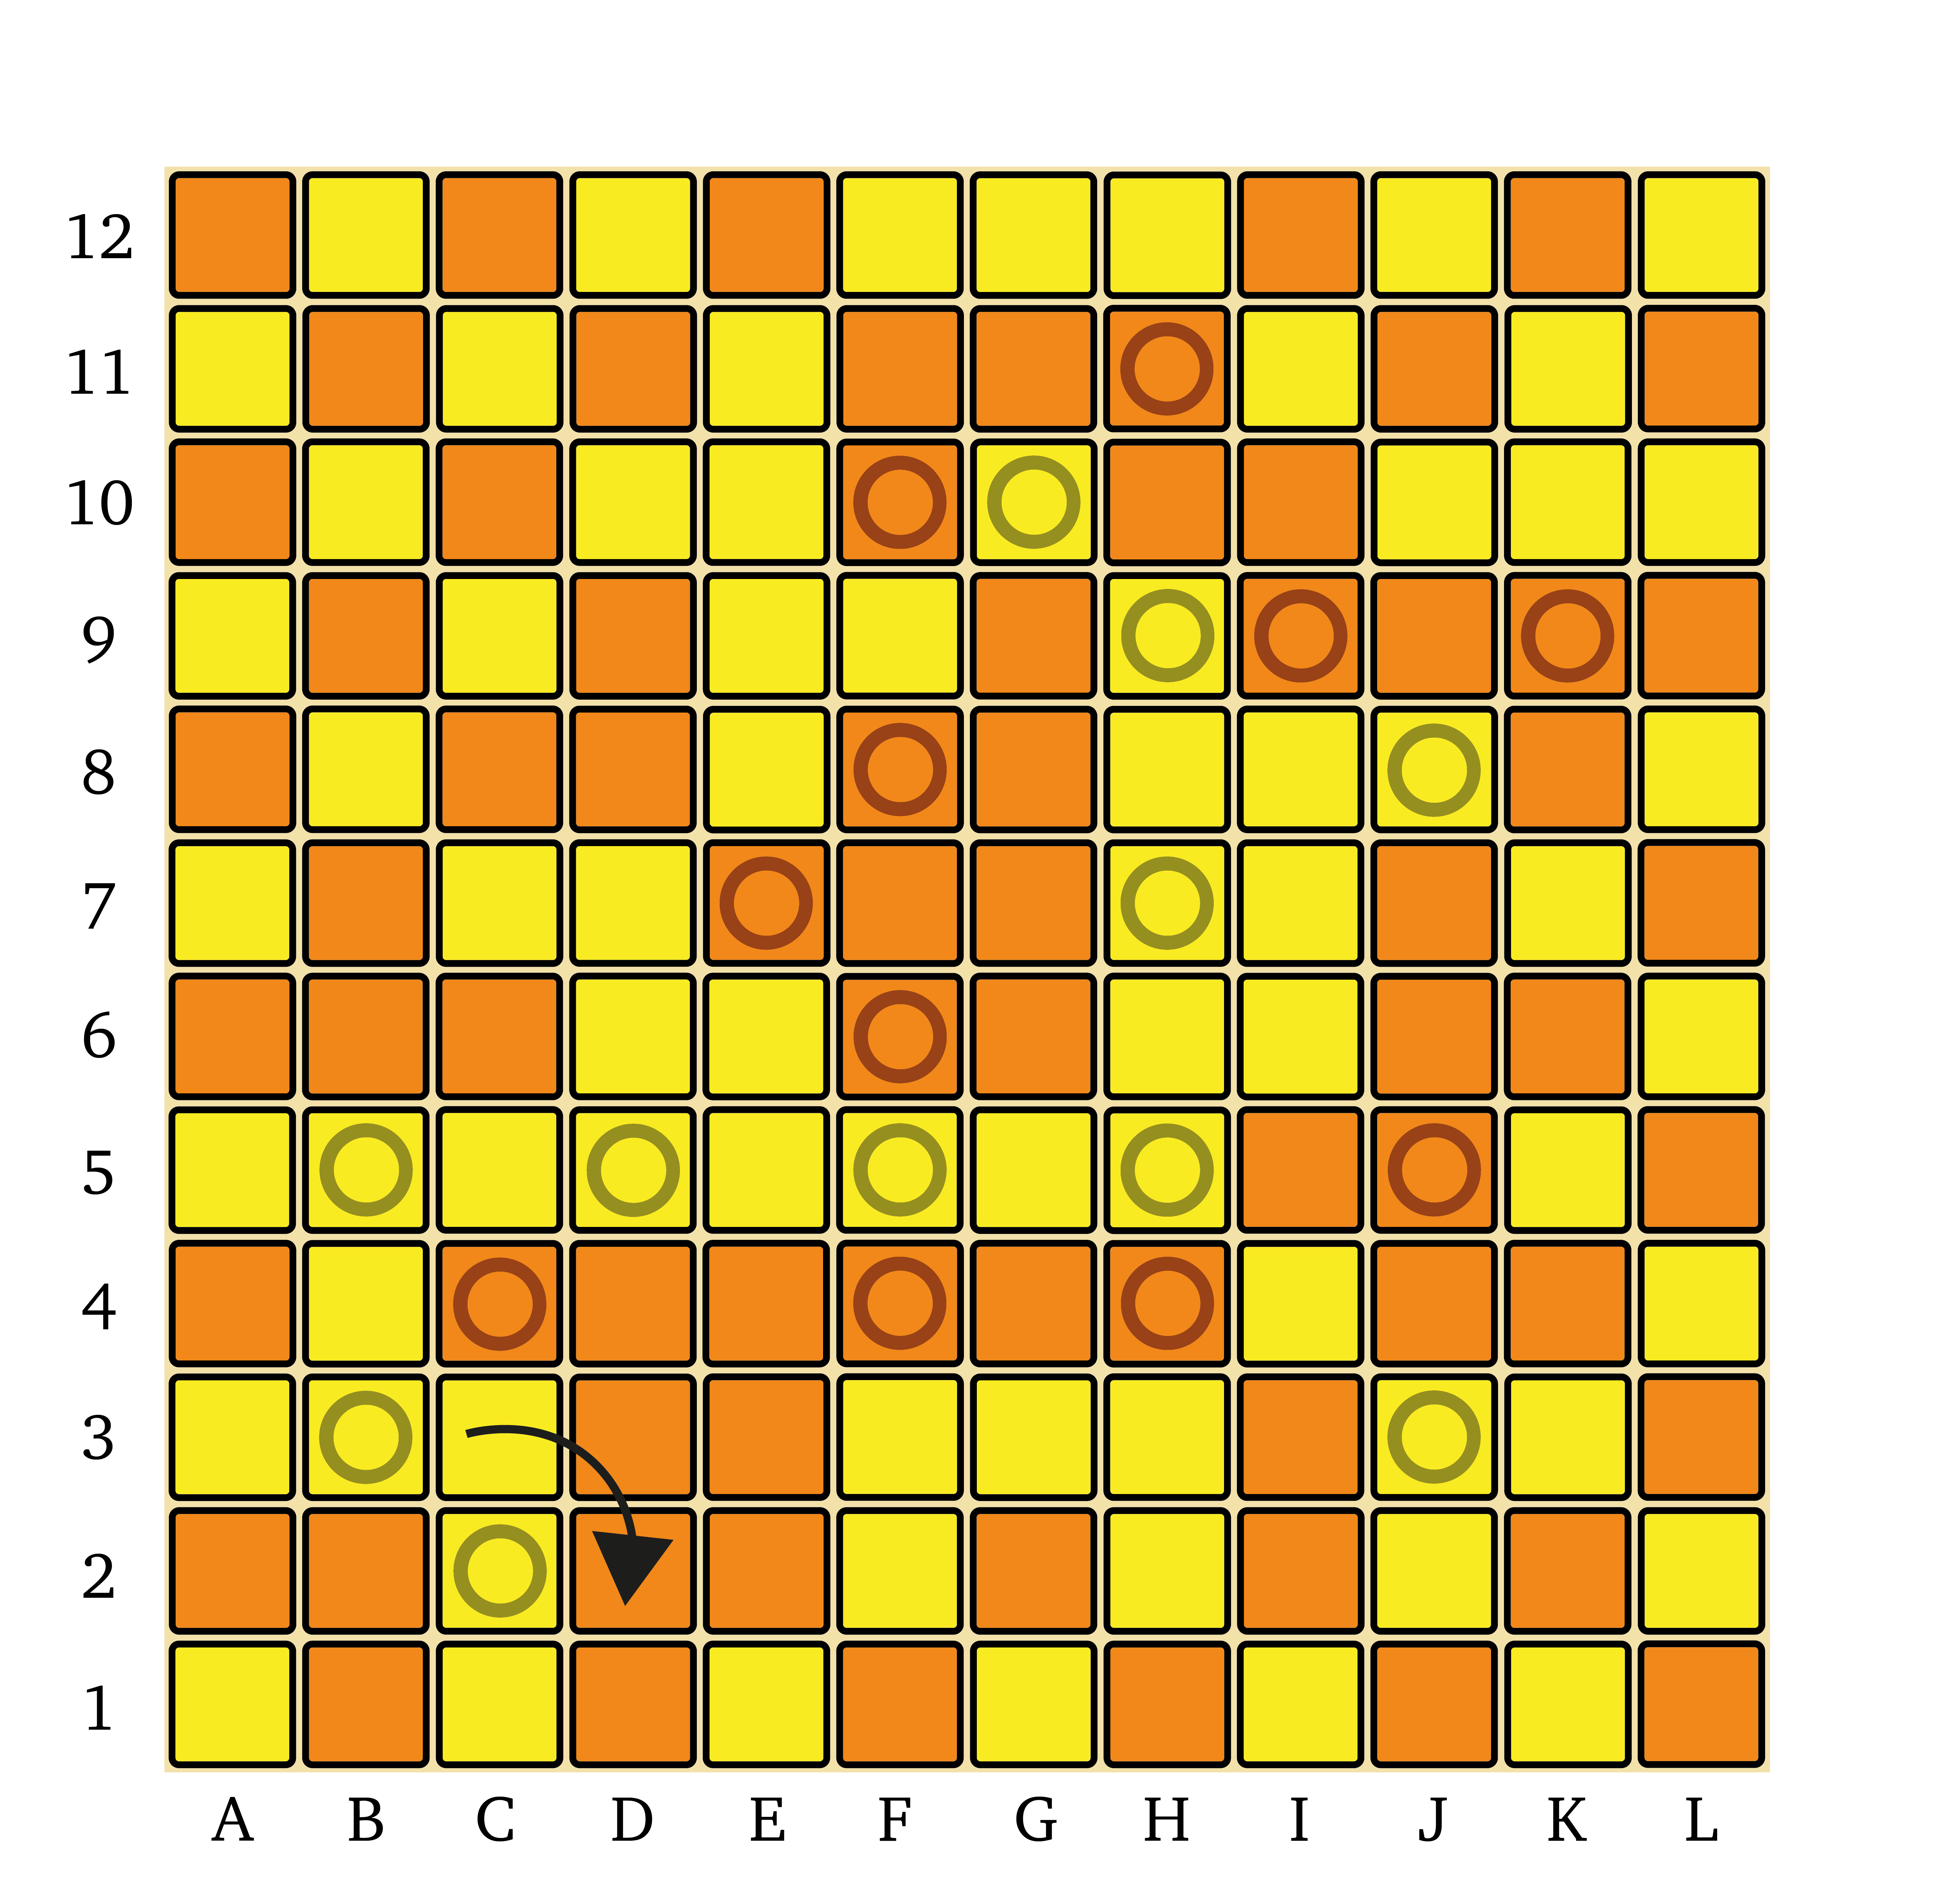
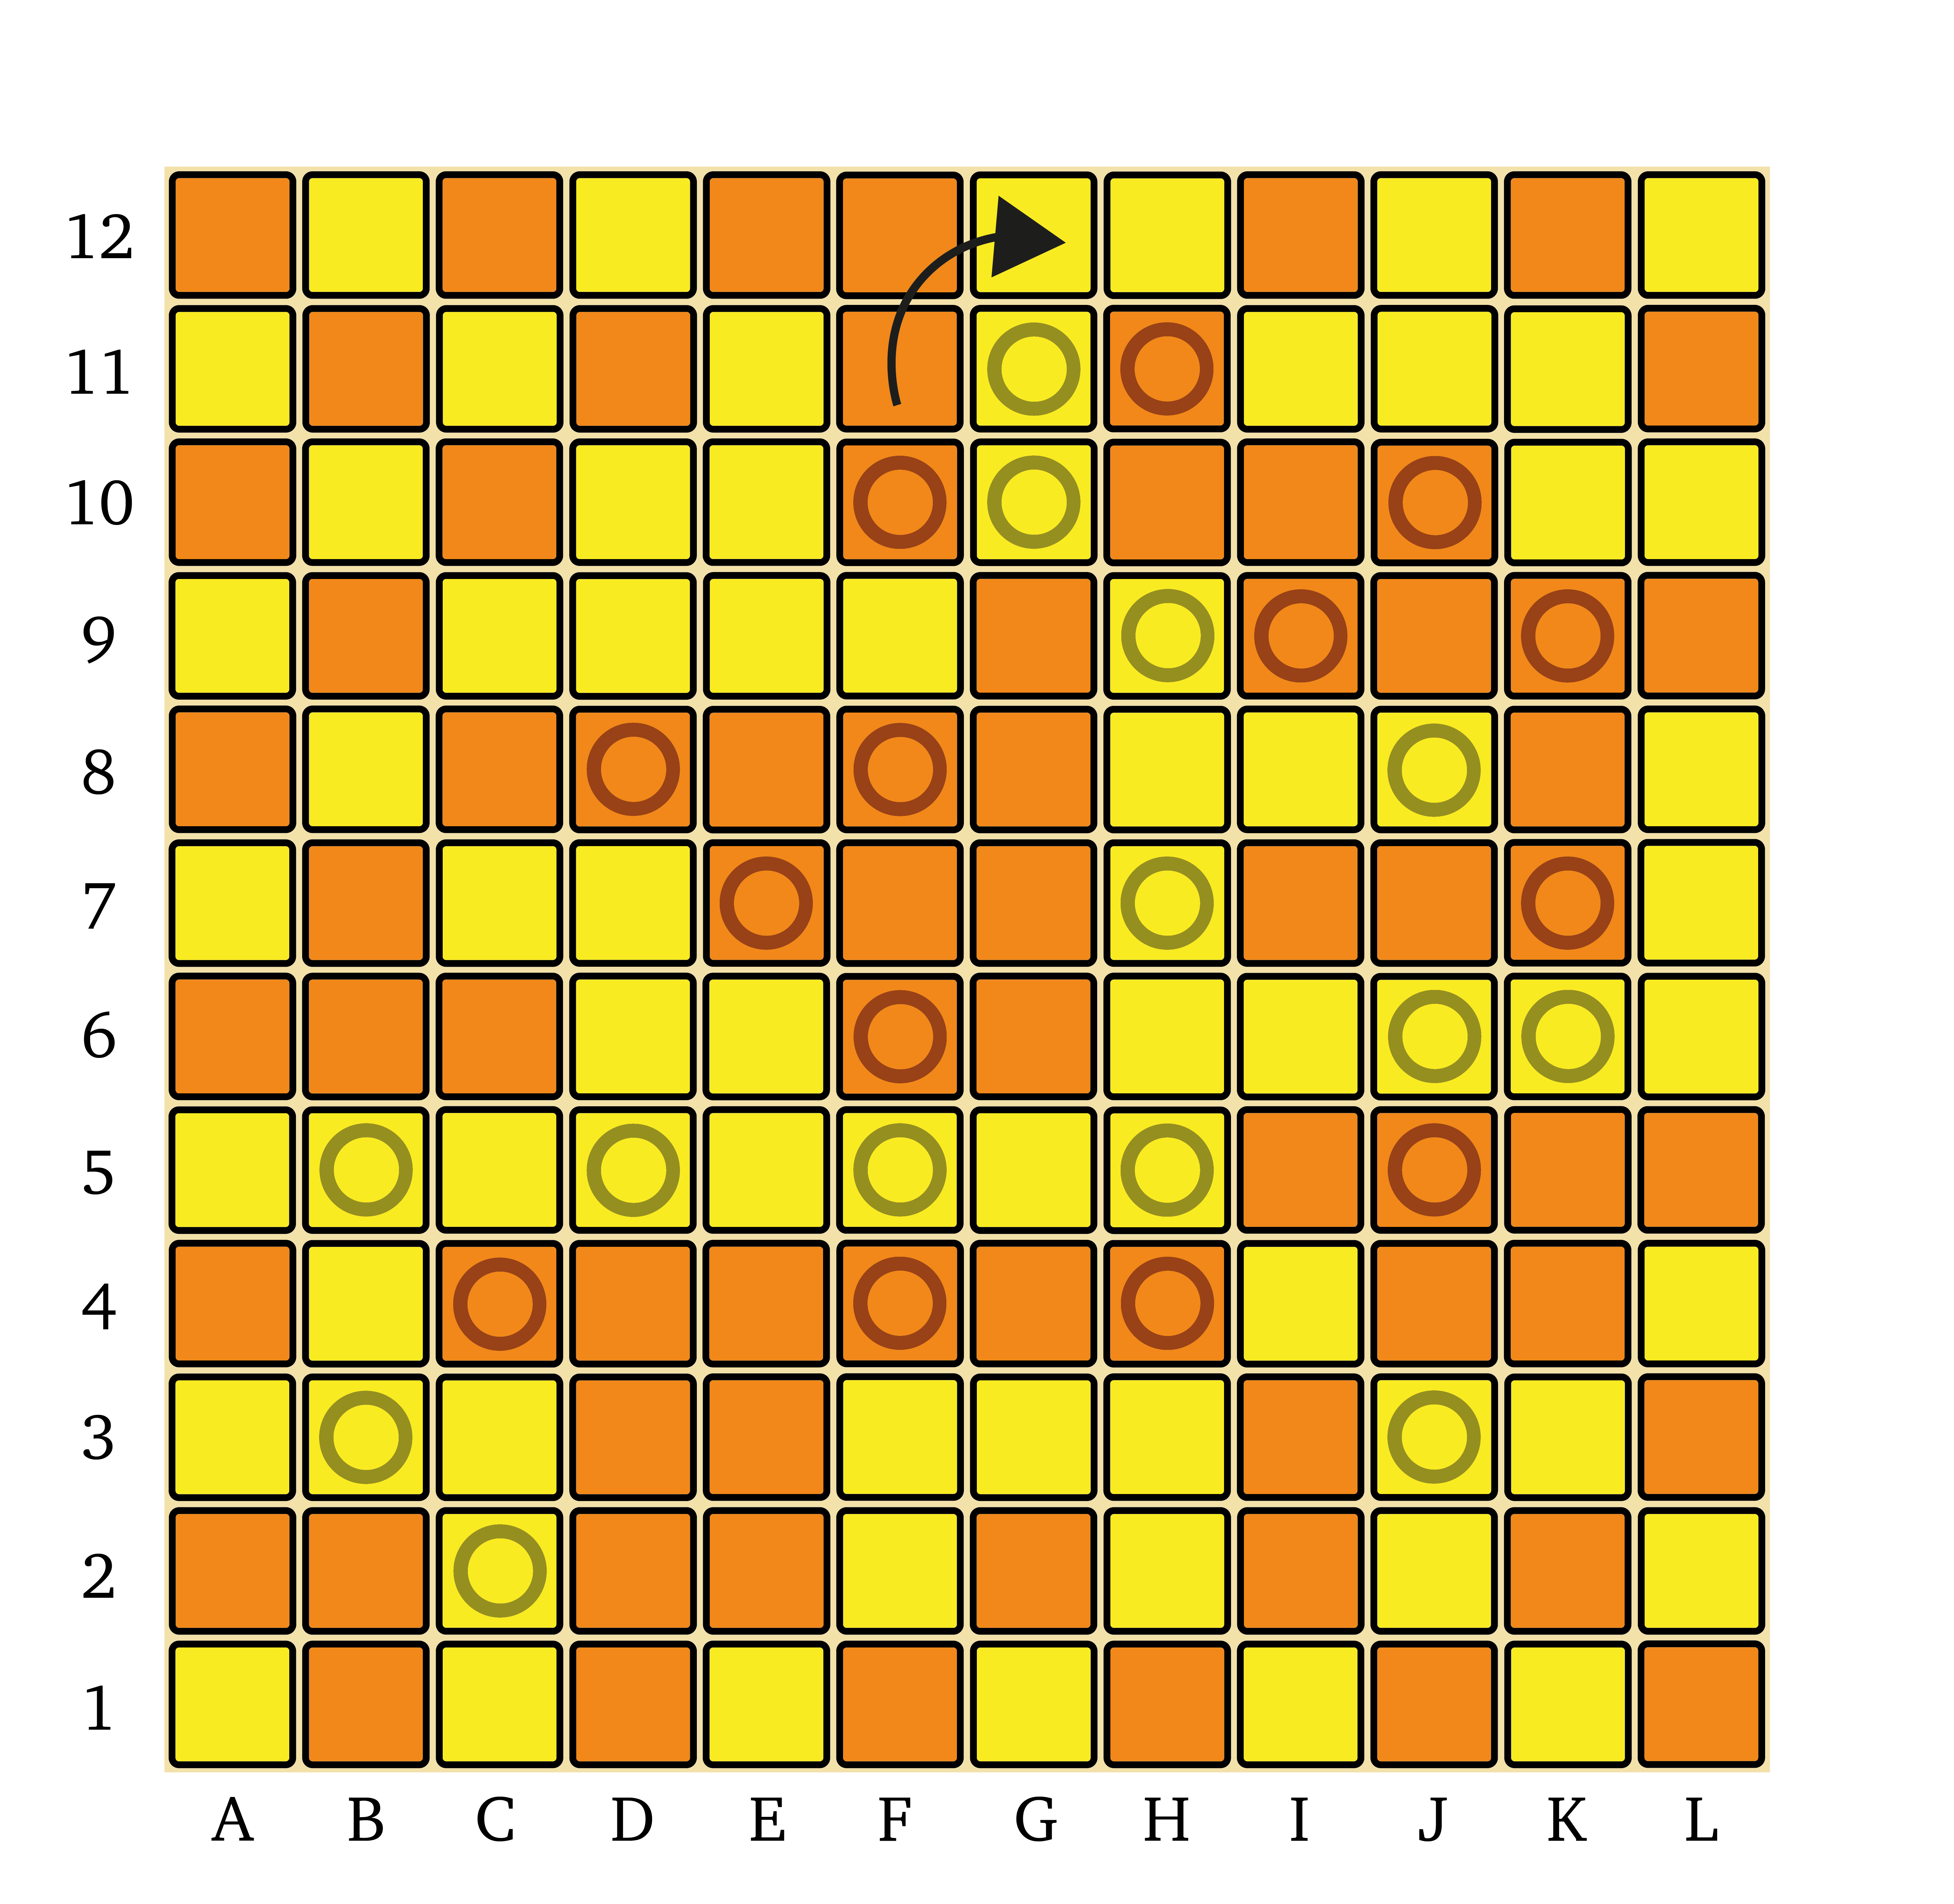
Conversely, if we are attacking the opponent, we should place our bandages so as to create maximum disruption. Let’s go back to that fateful 12th move in the game, where I was able to split Orange’s group via the vulnerable corner, and zoom in a bit:
On the left is the move I made. When twisting at c2d3, I placed my bandage at d2, a diagonal step away from the diagonal corner I had just disrupted. This ensures that not only is the vulnerable corner at c3 permanently cut, but also the Orange piece at d3 is blocked in, preventing Orange from twisting around the obstruction to continue building the group. The Orange pair at c1-c2 is still twistable, but cannot get around the bandage at d2.
In the middle diagram, we see the position if I had bandaged at c3 instead — note that Orange now has two pairs at c1-c2 and d3-e3 that can potentially be brought to bear, expanding the group around my obstructing piece. On the right we see a potential result of this mistake: Orange twists Ad2e3-d2, completely isolating my piece at c3 and building the group southwards with a secure connection.
The lesson here is to always observe the local patterns of bandaged pieces when attacking an enemy group, and think not just about the immediate damage you can do, but also whether you can potentially block off any more pieces by setting up your bandages differently. Make sure your attack has as much lasting impact as possible, and then you can make advances elsewhere while your opponent scrambles to repair what damage they can!
Split the board when ahead
At several points in the game above, you saw me aim to split the board into sections by connecting my main group across the whole board. When you have a decent-sized lead and the opportunity, connecting securely can be very beneficial; by cutting across the board, you prevent the opponent making board-spanning connections of their own, and restrict their options for catching up to your lead.
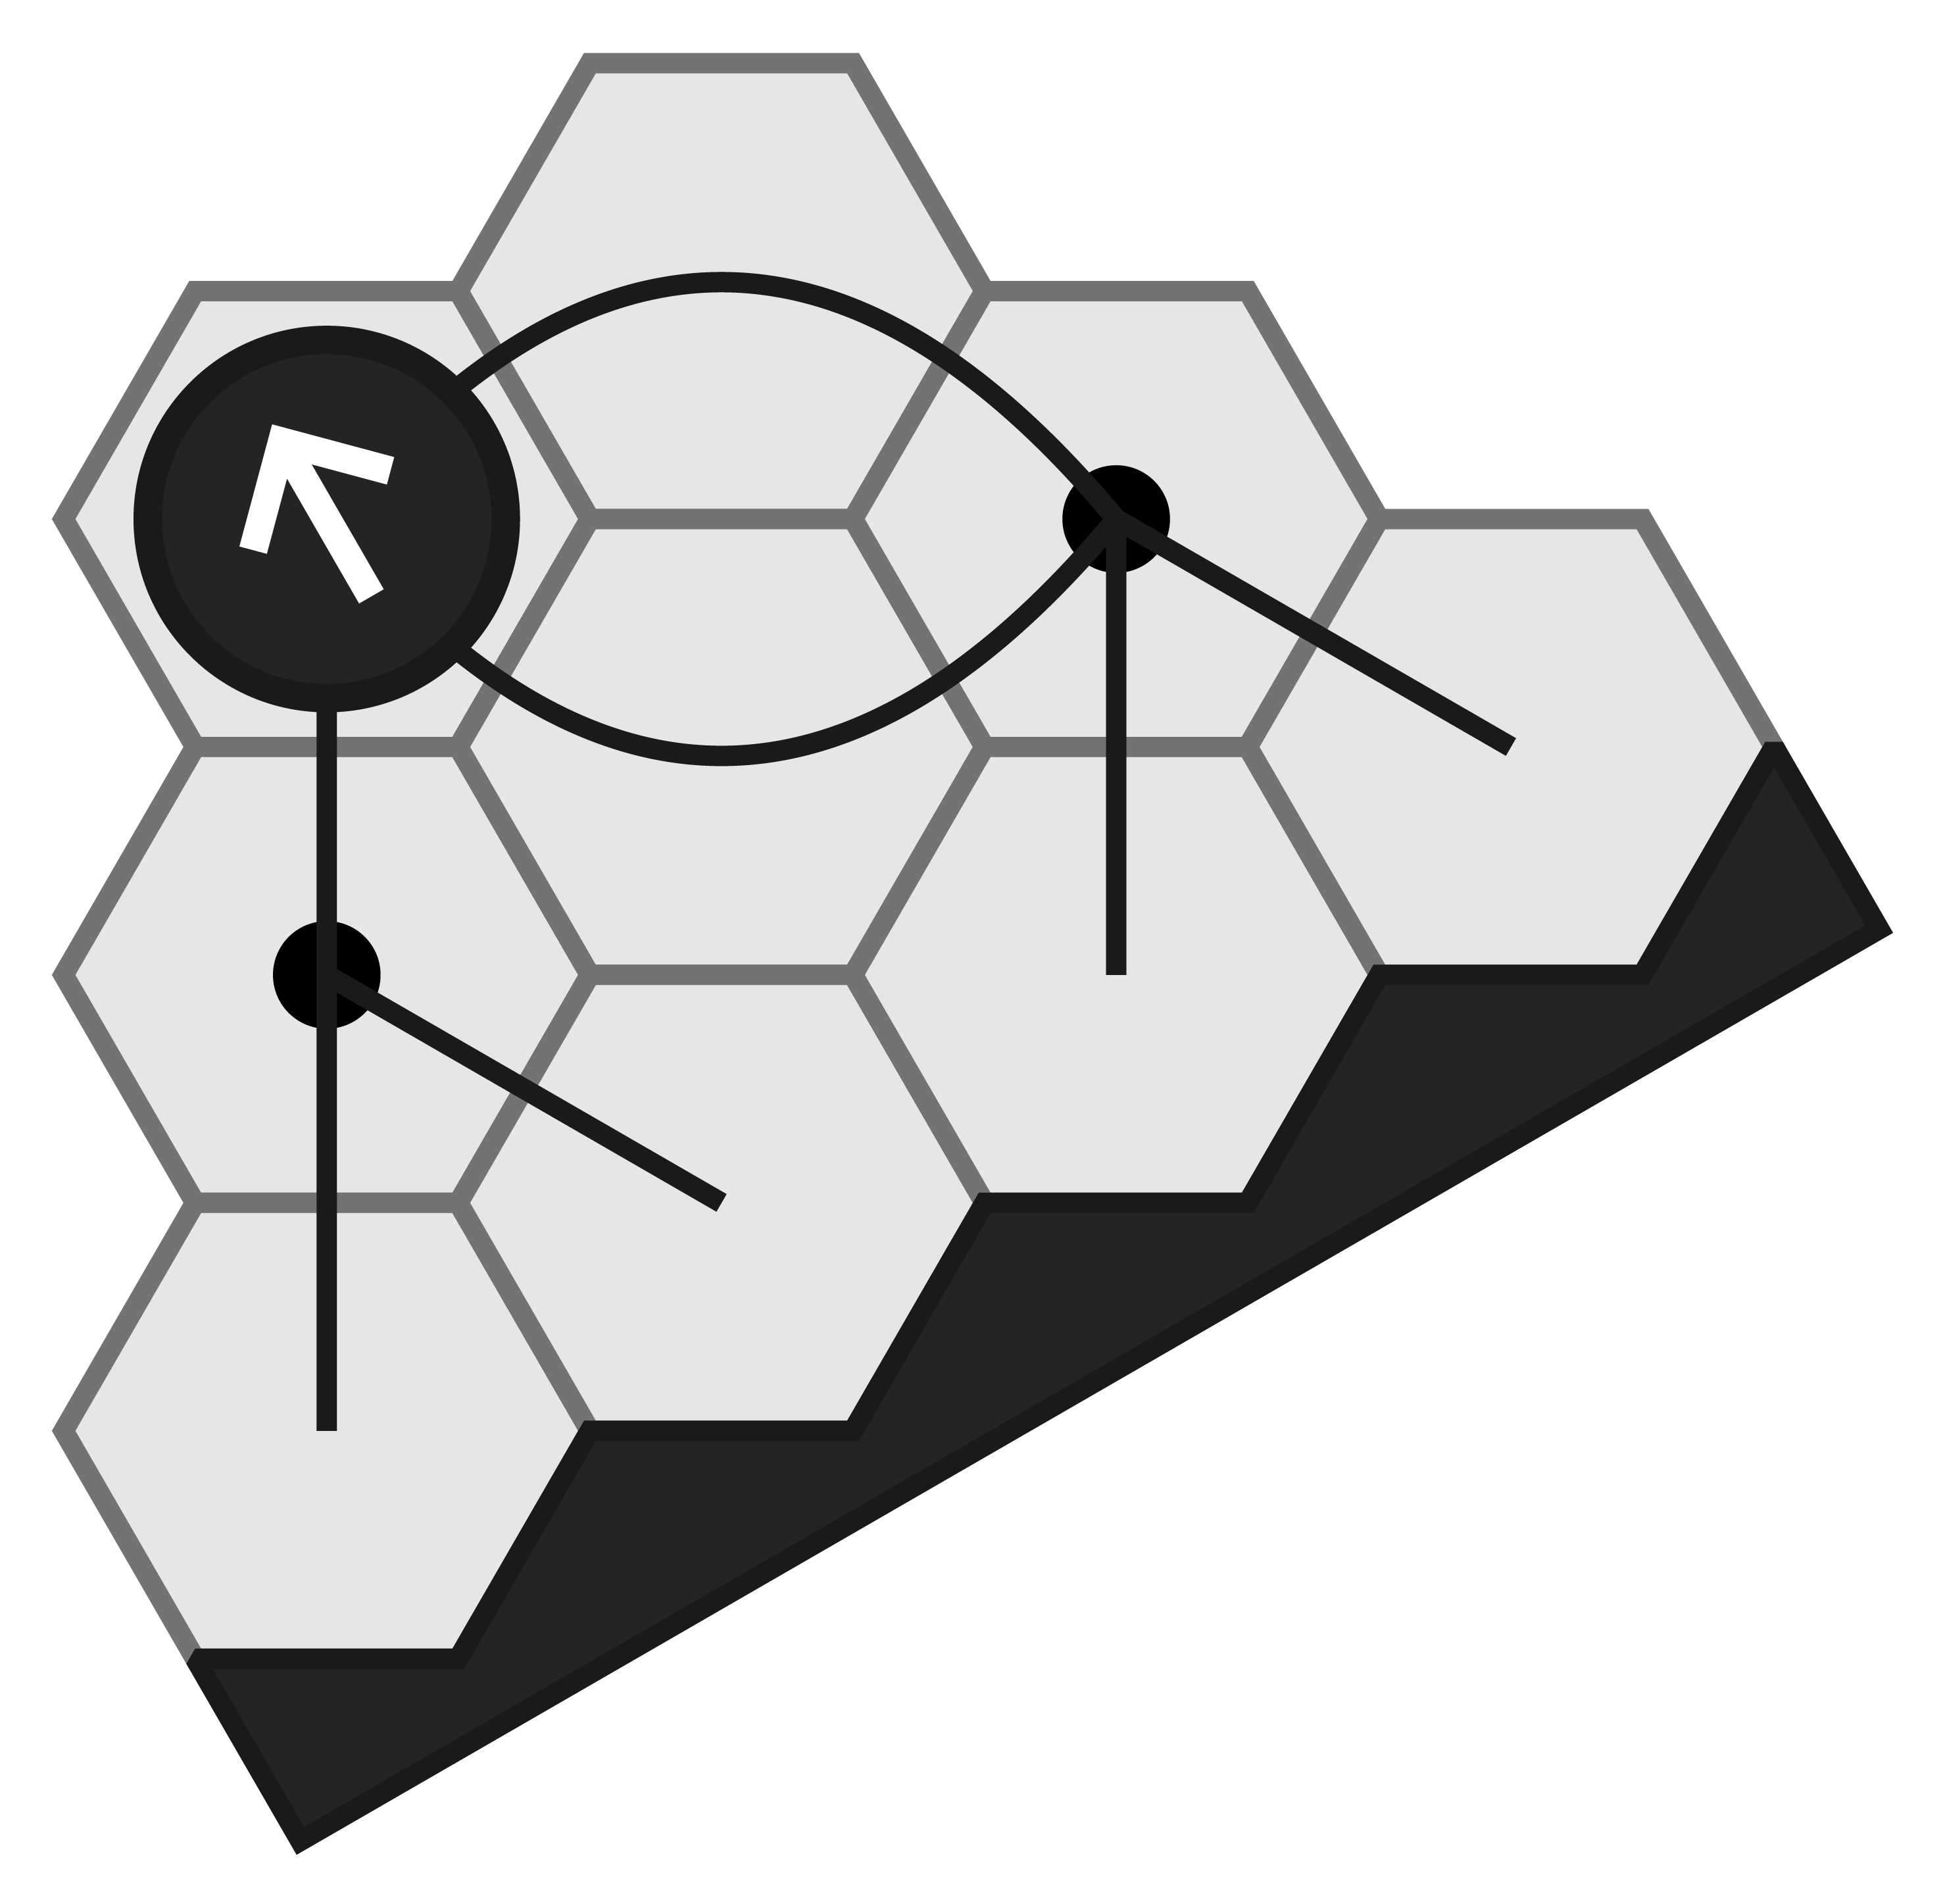
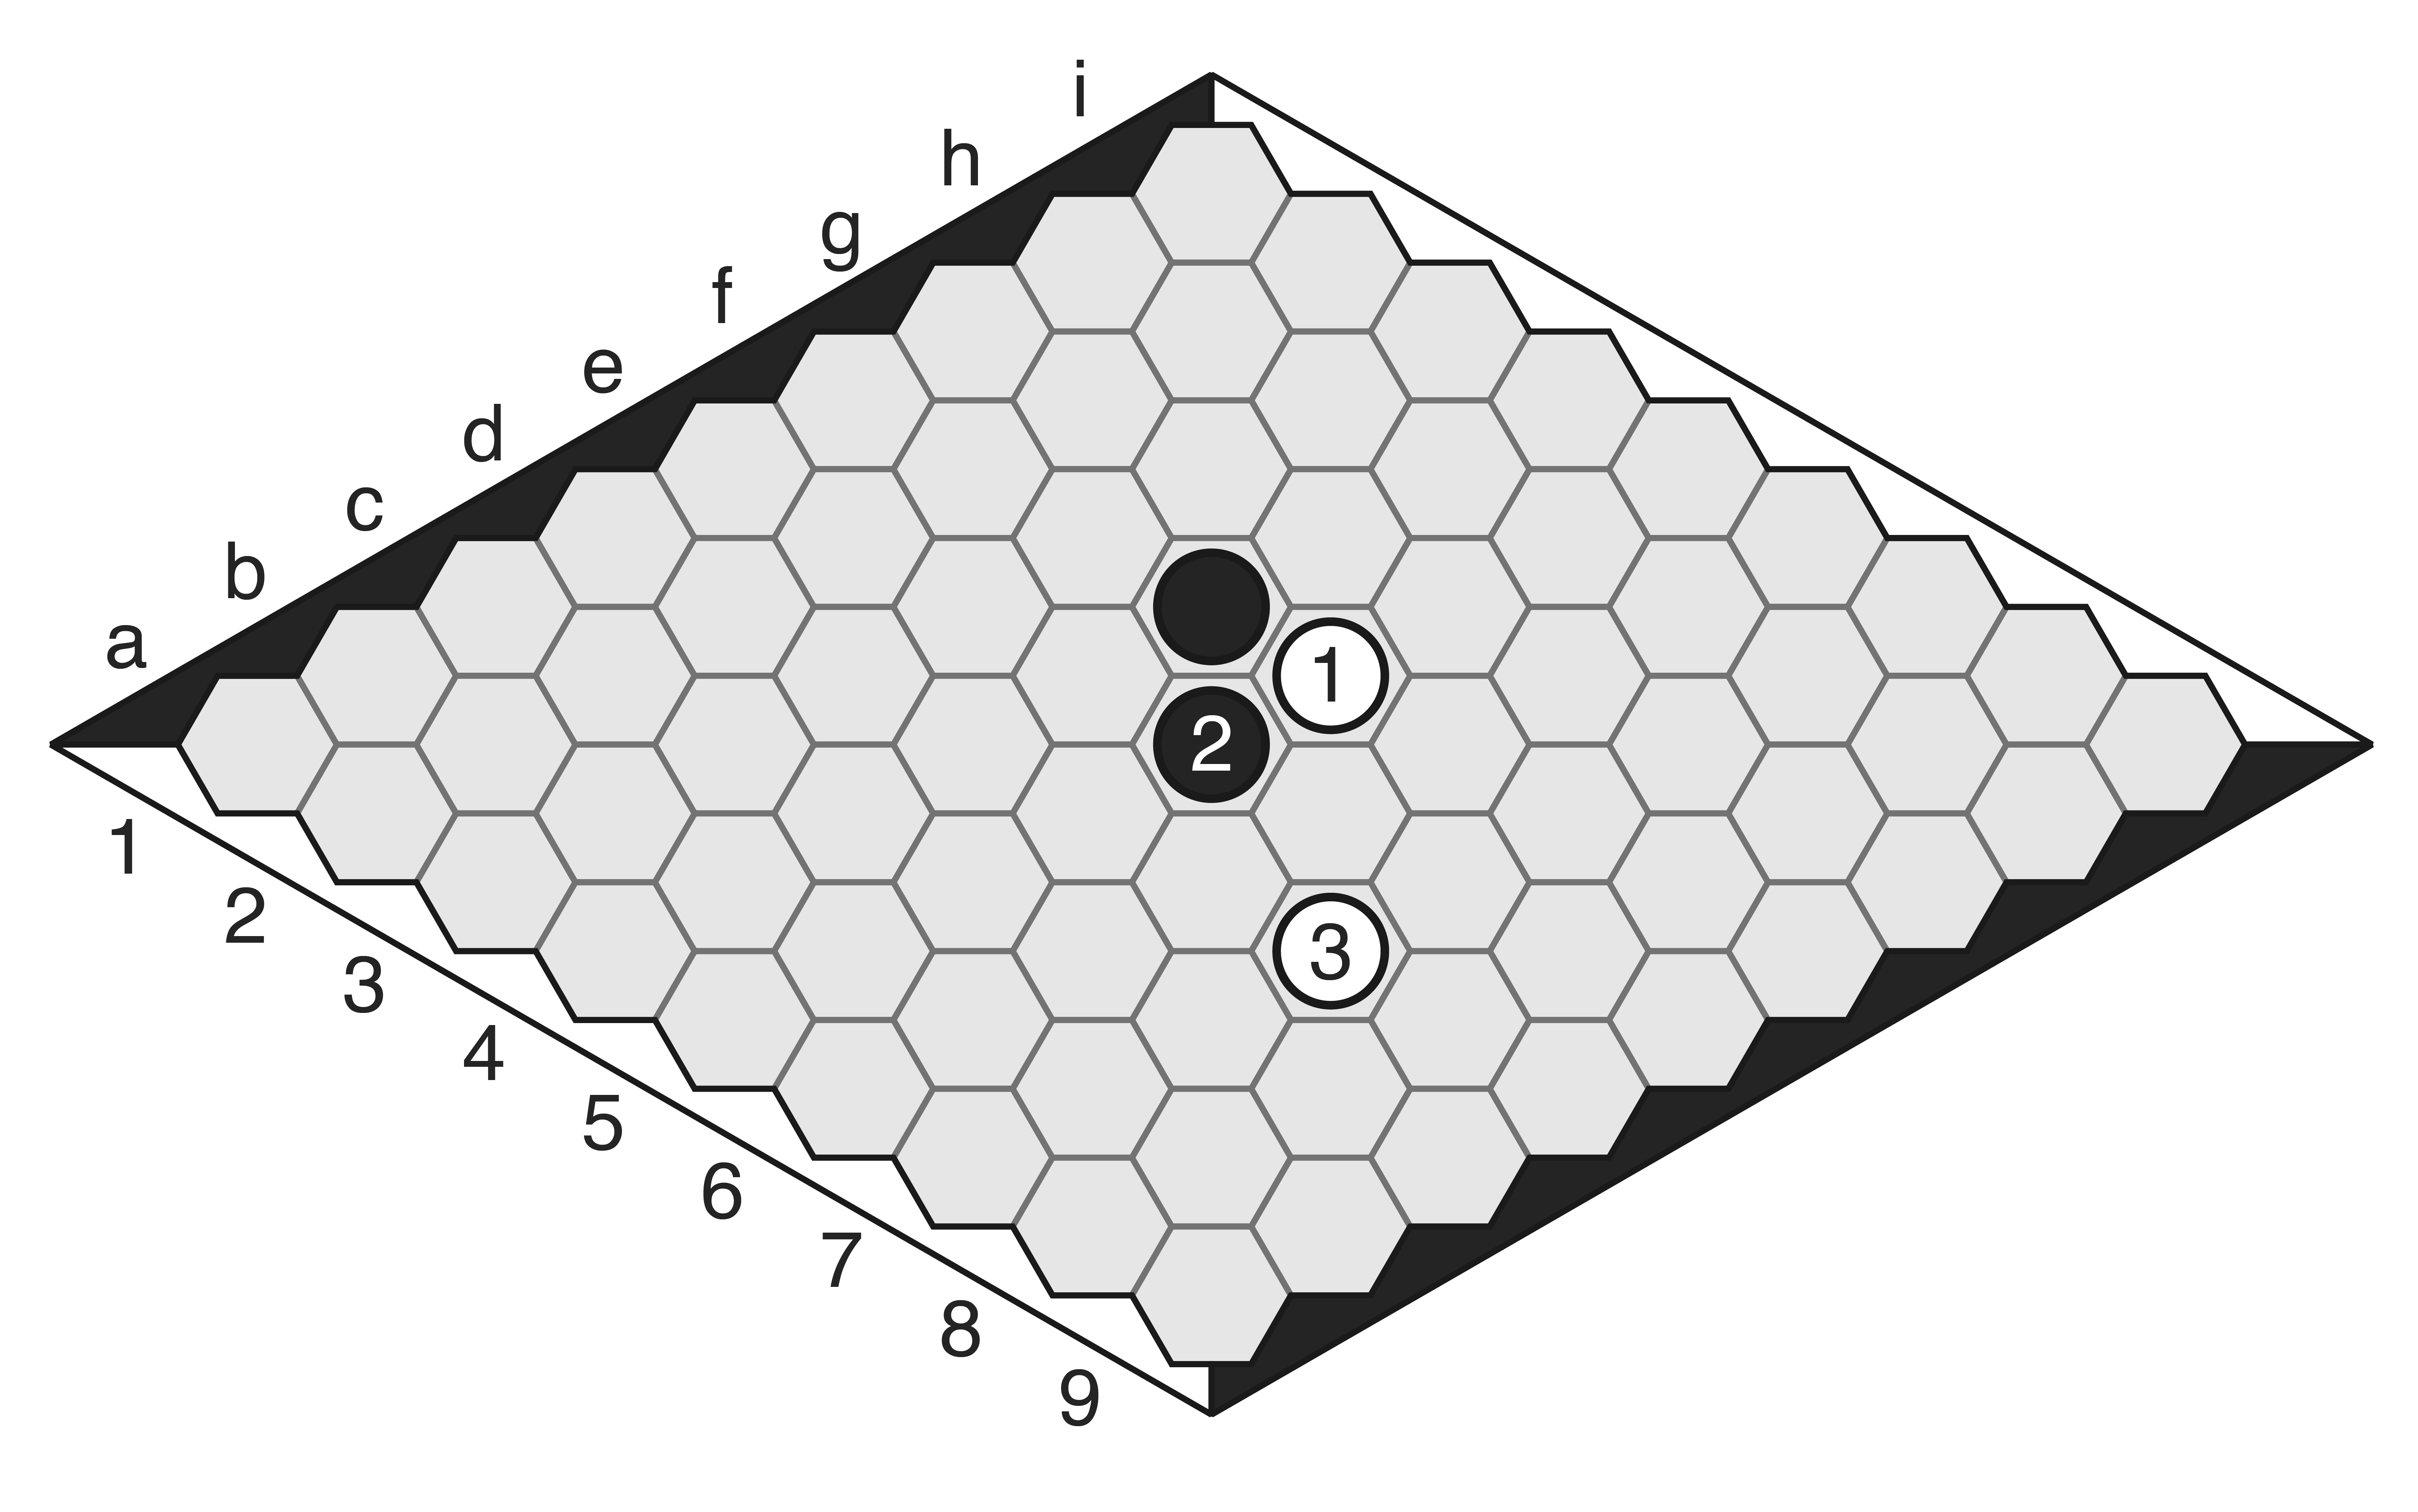
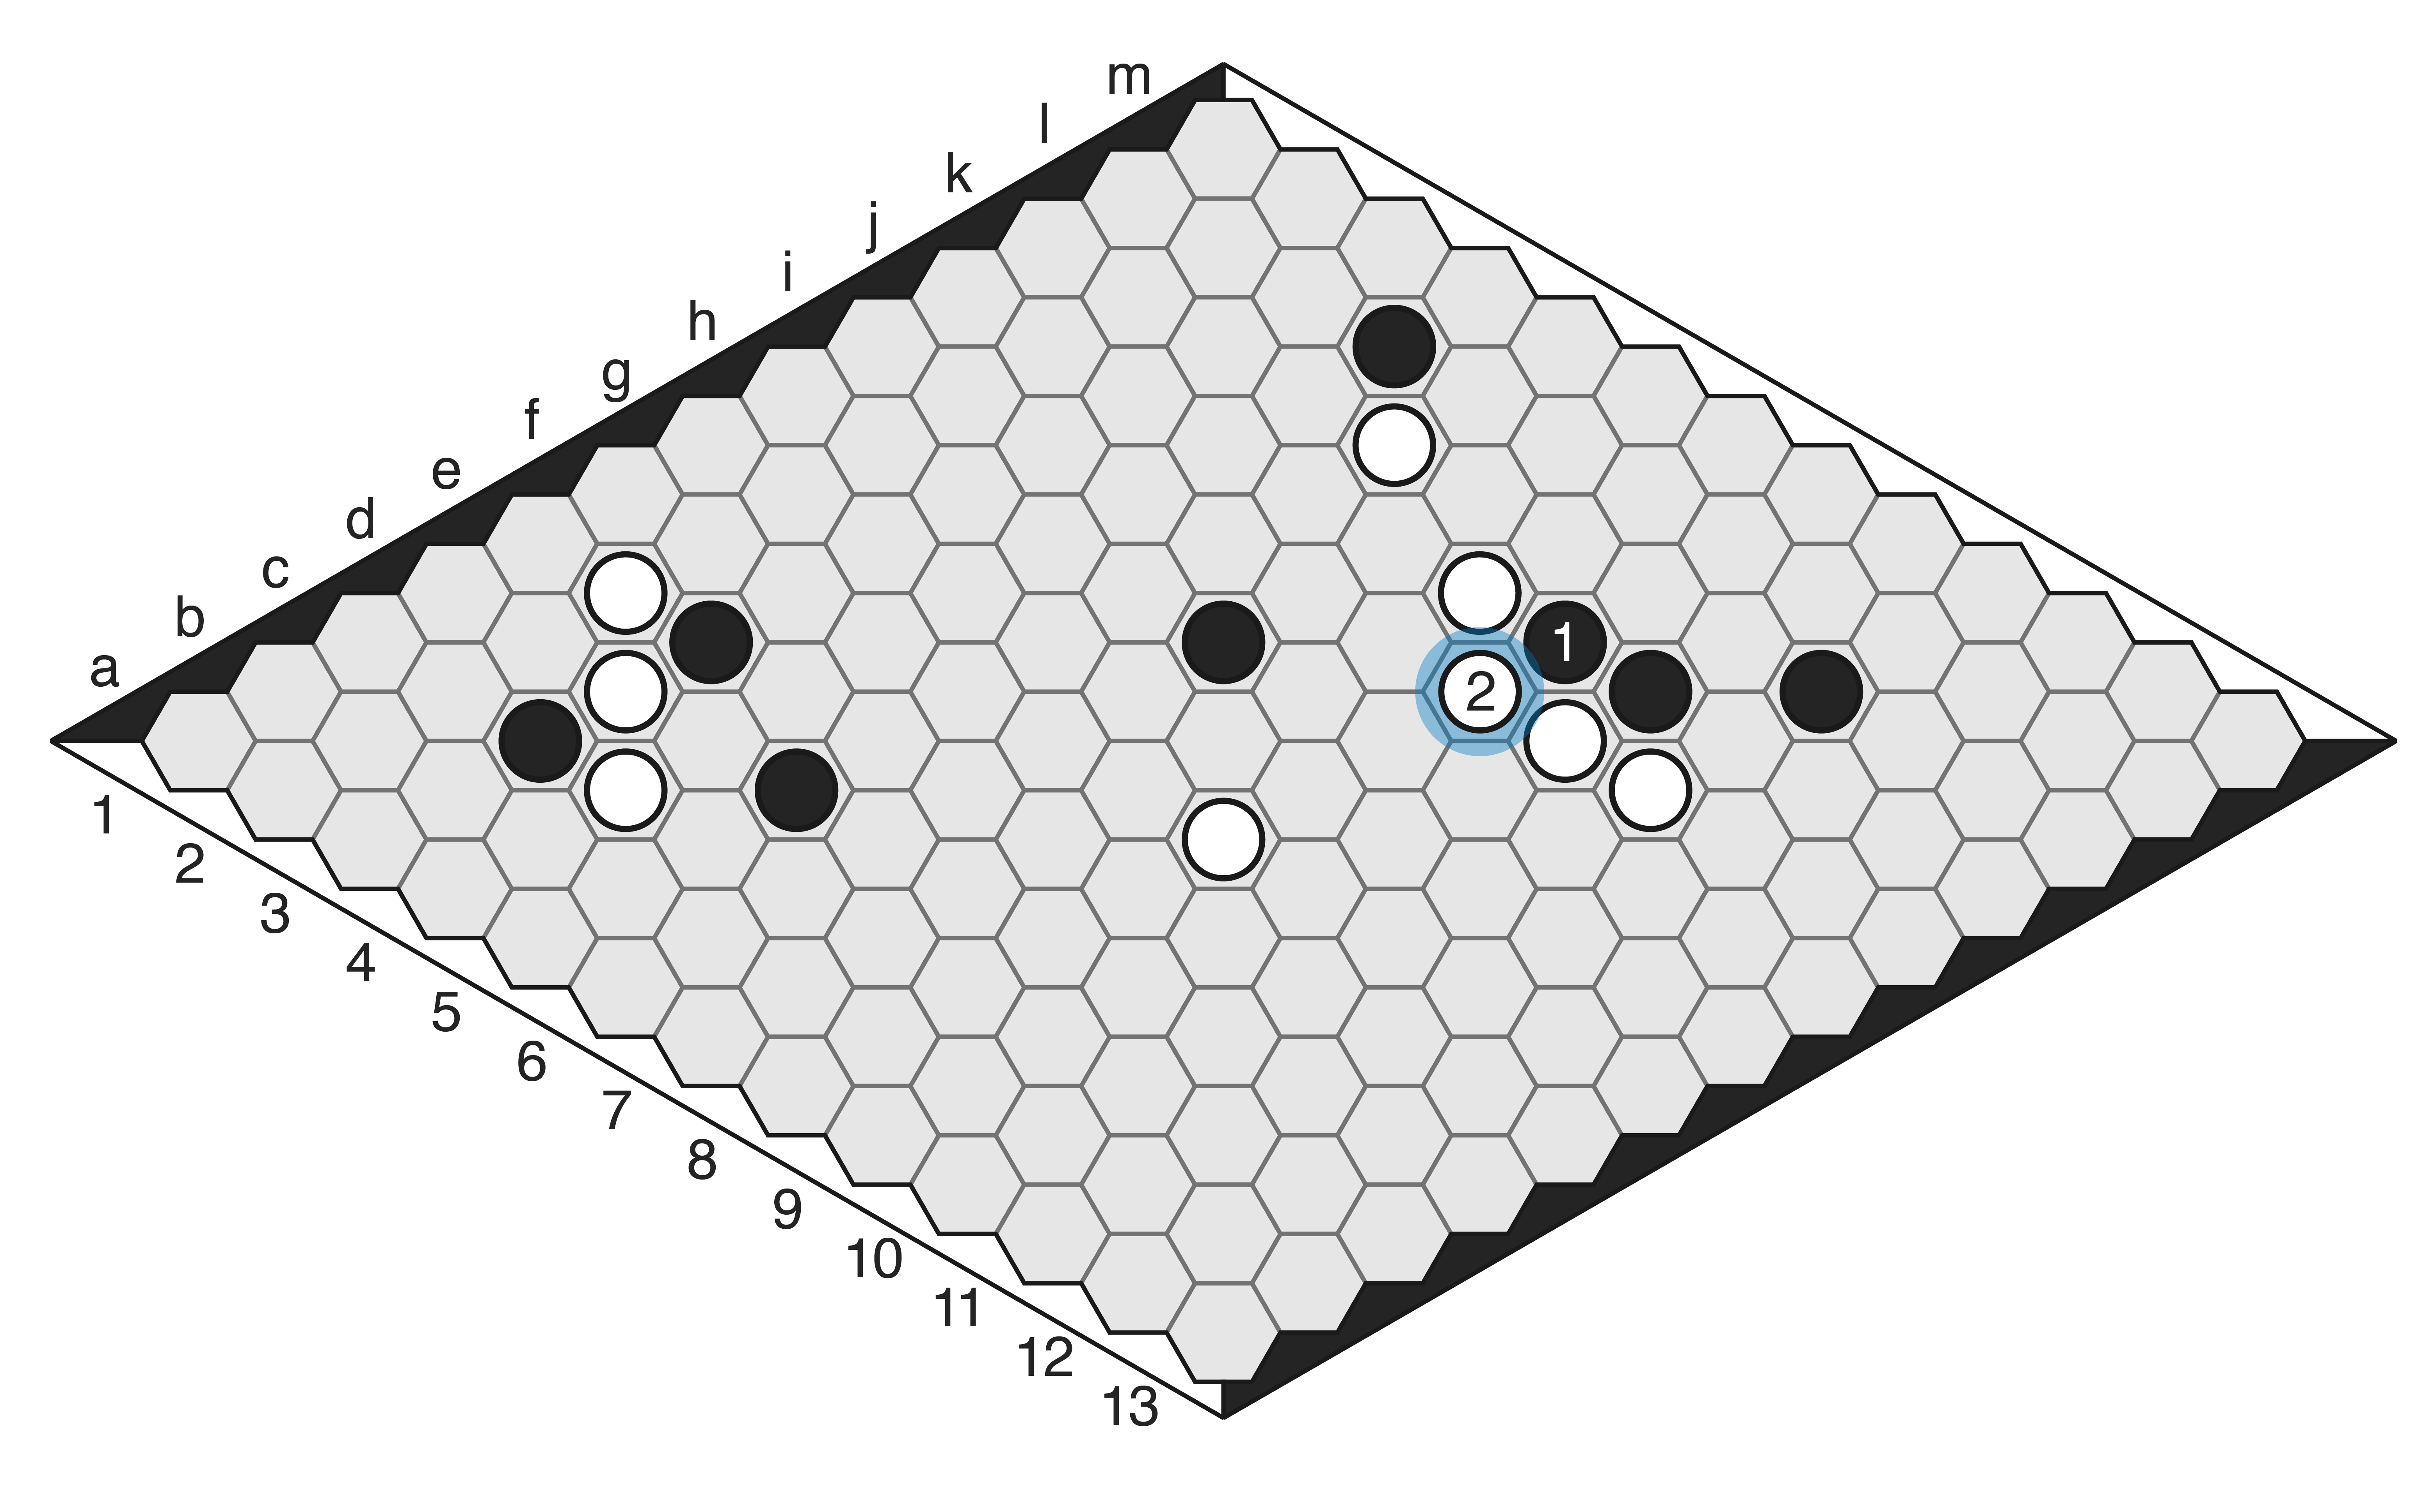
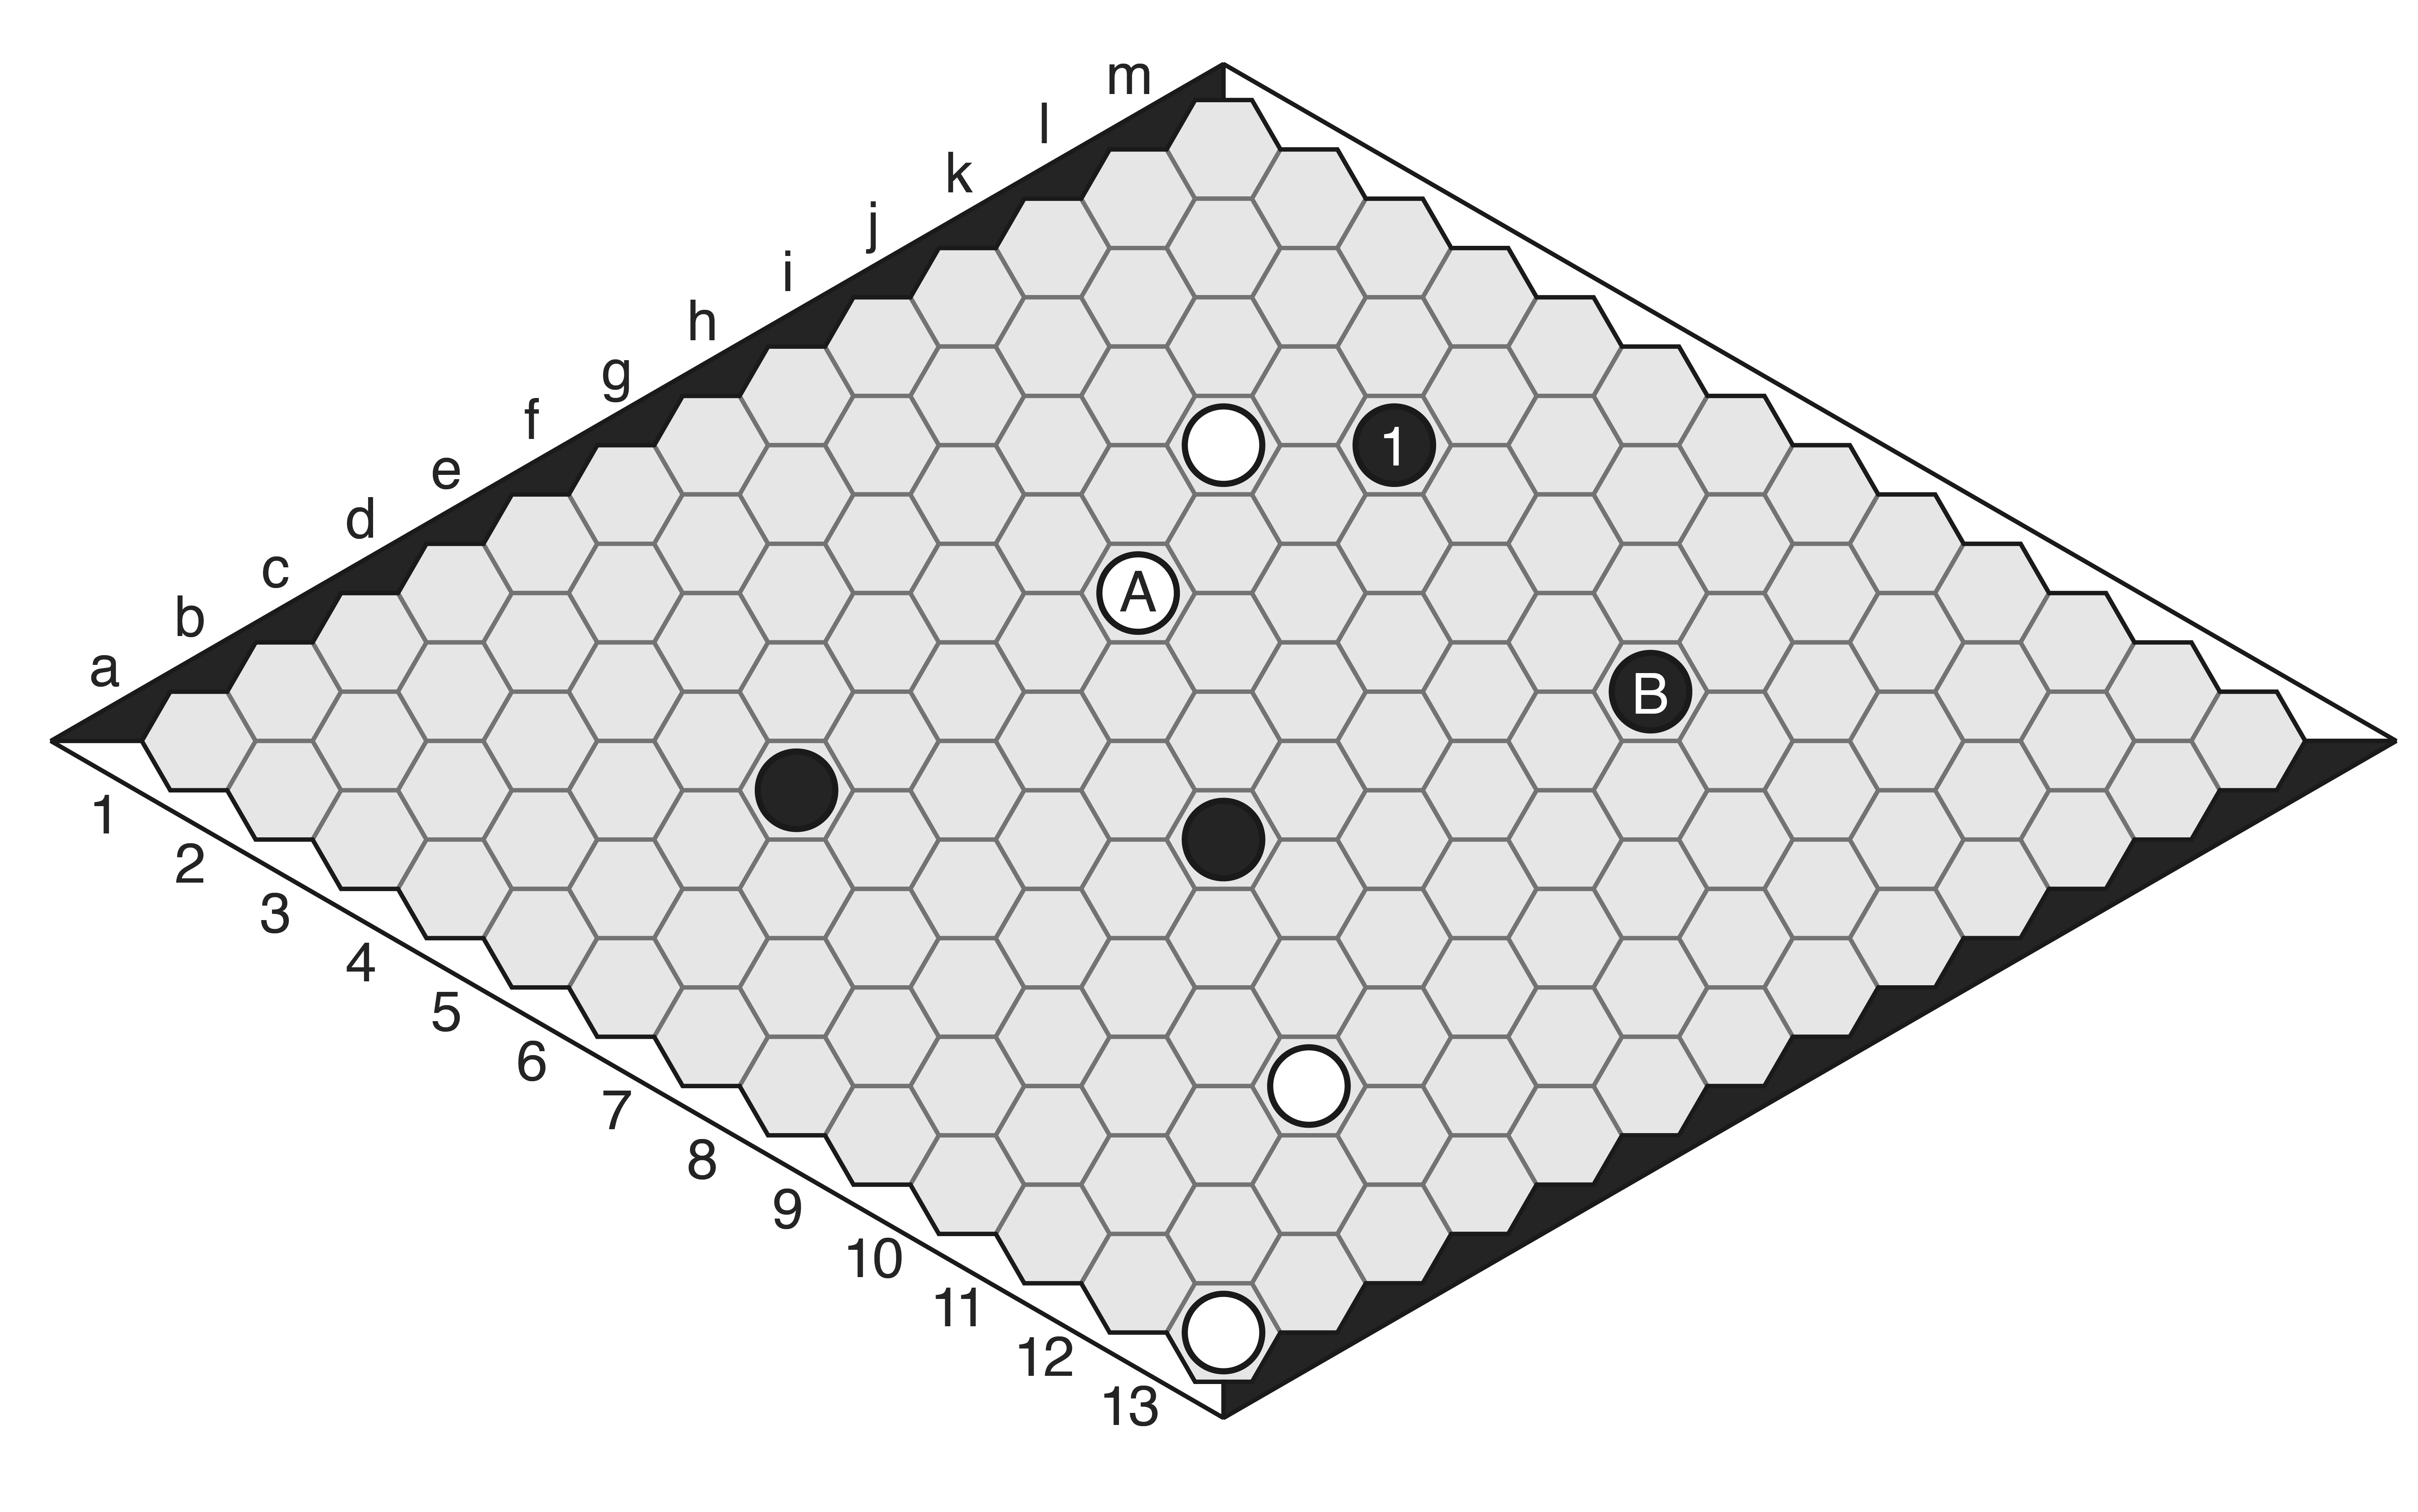
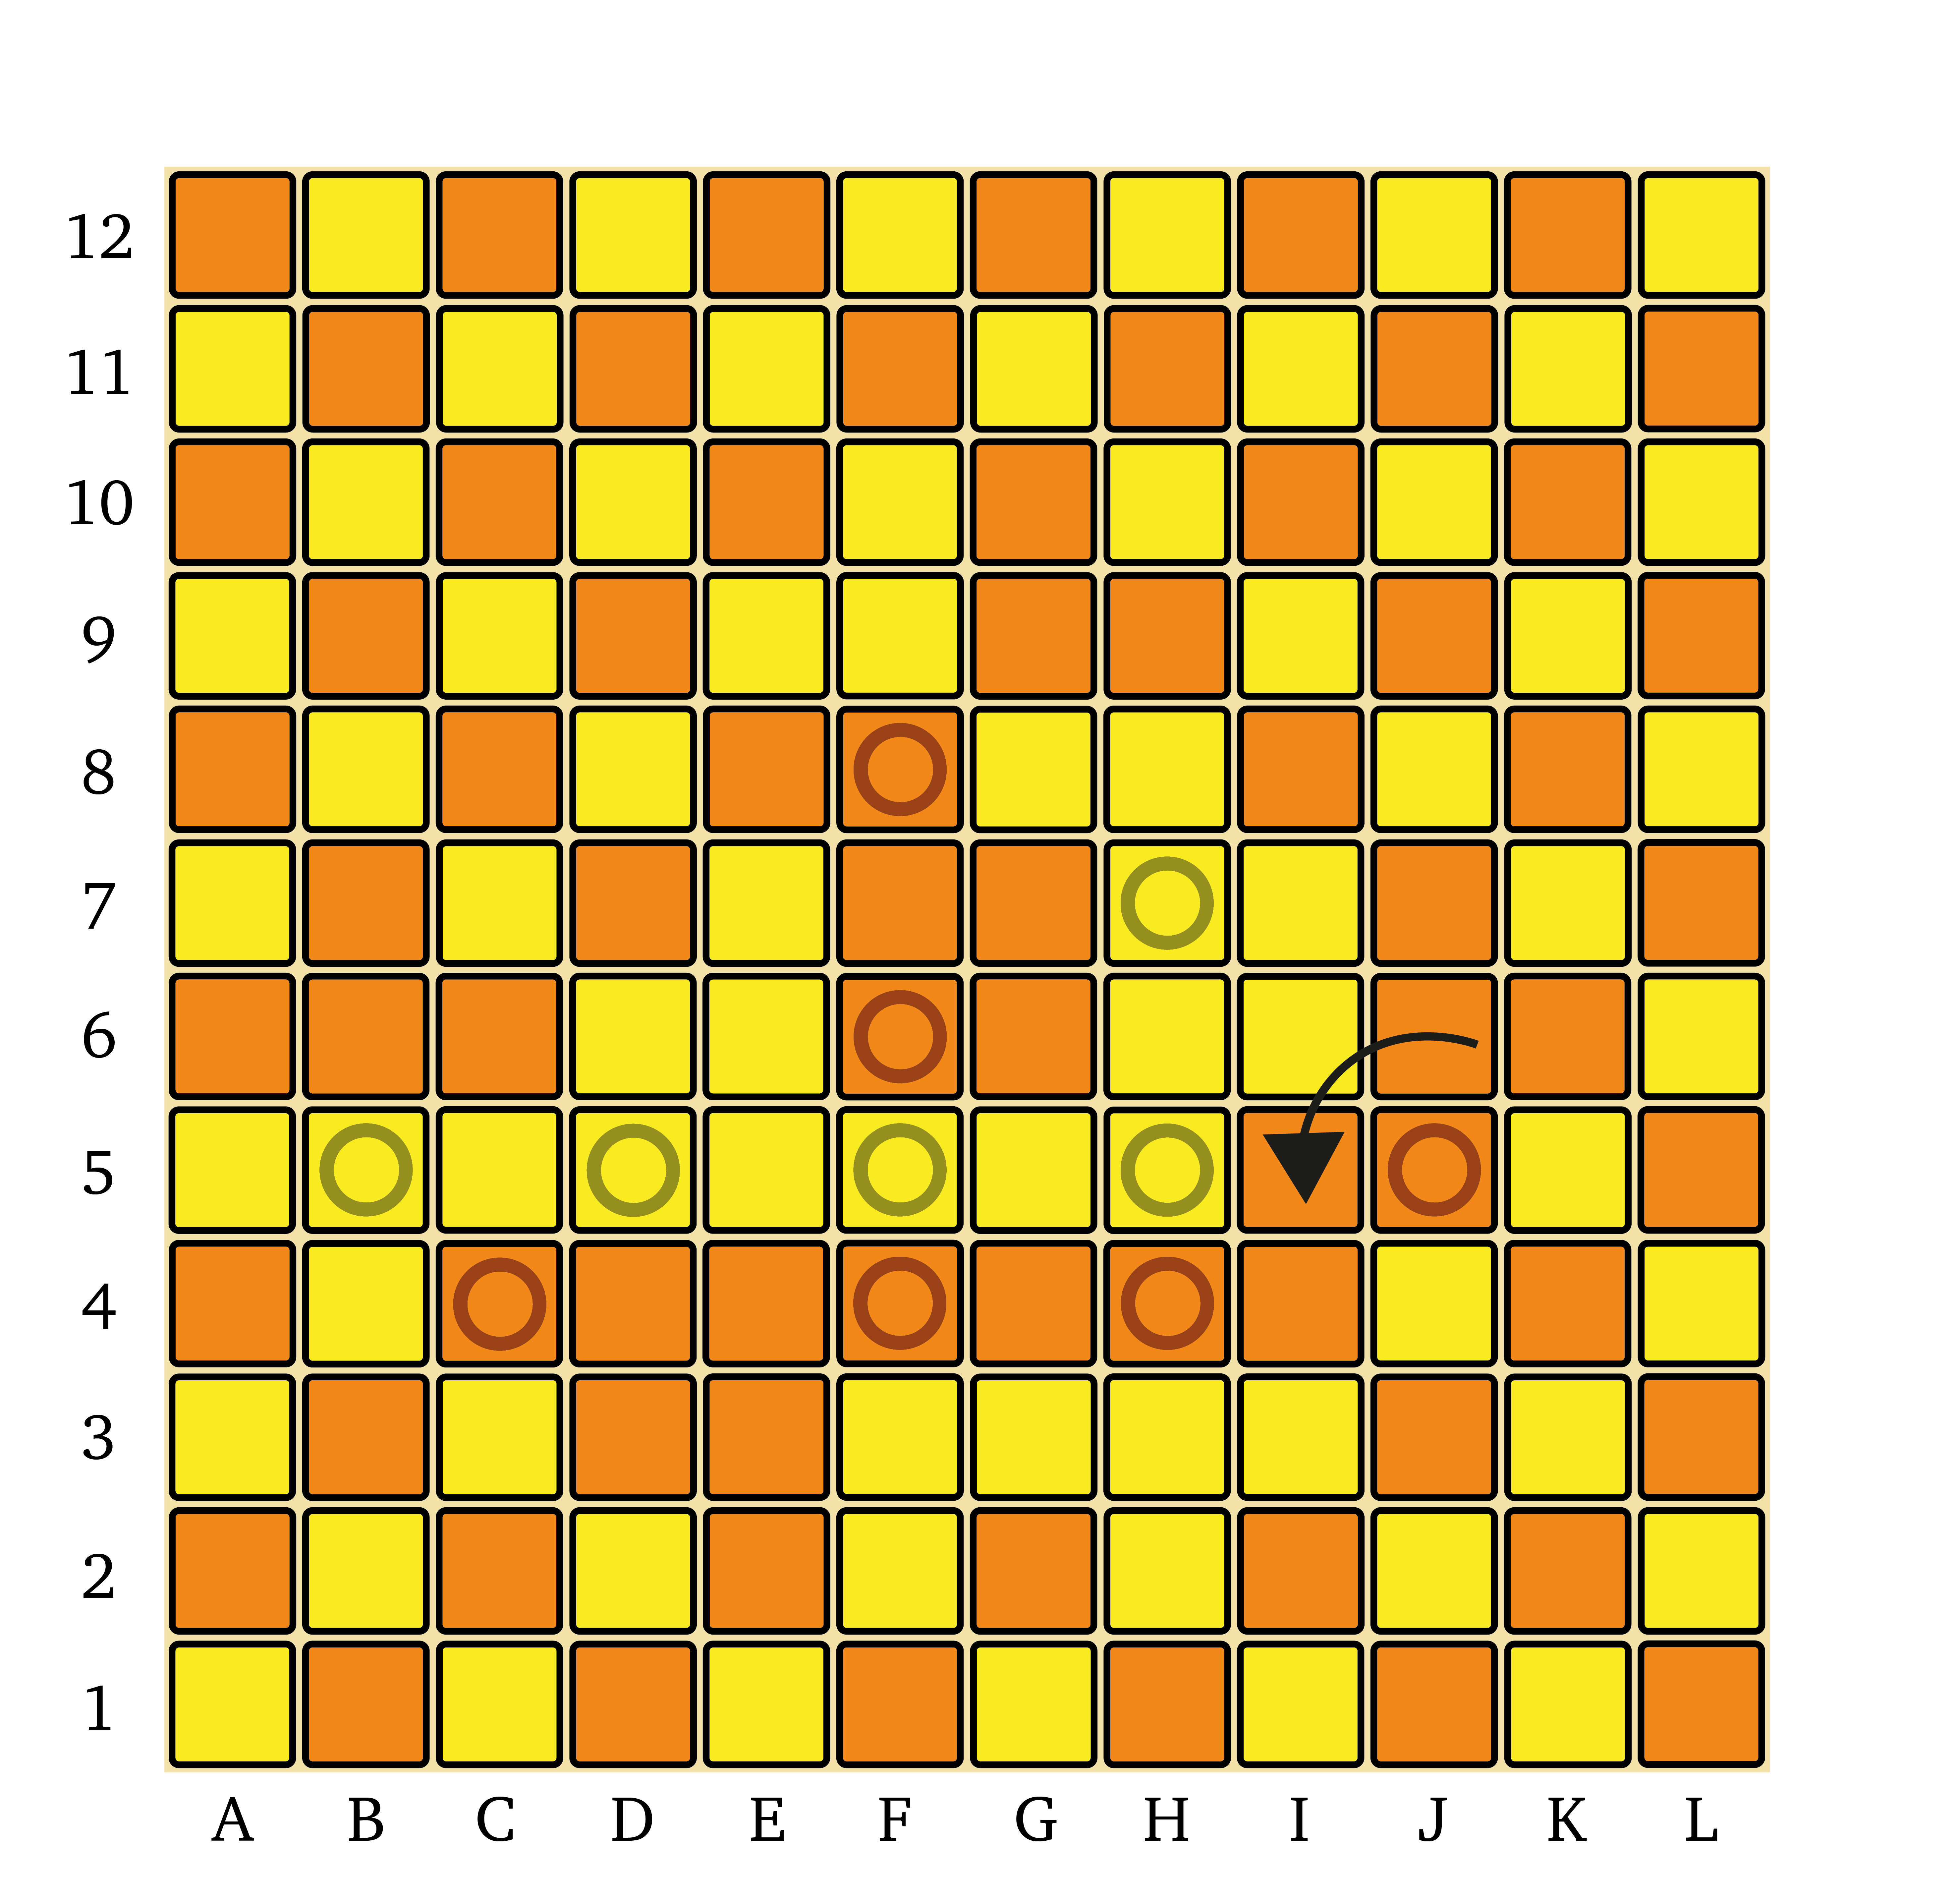
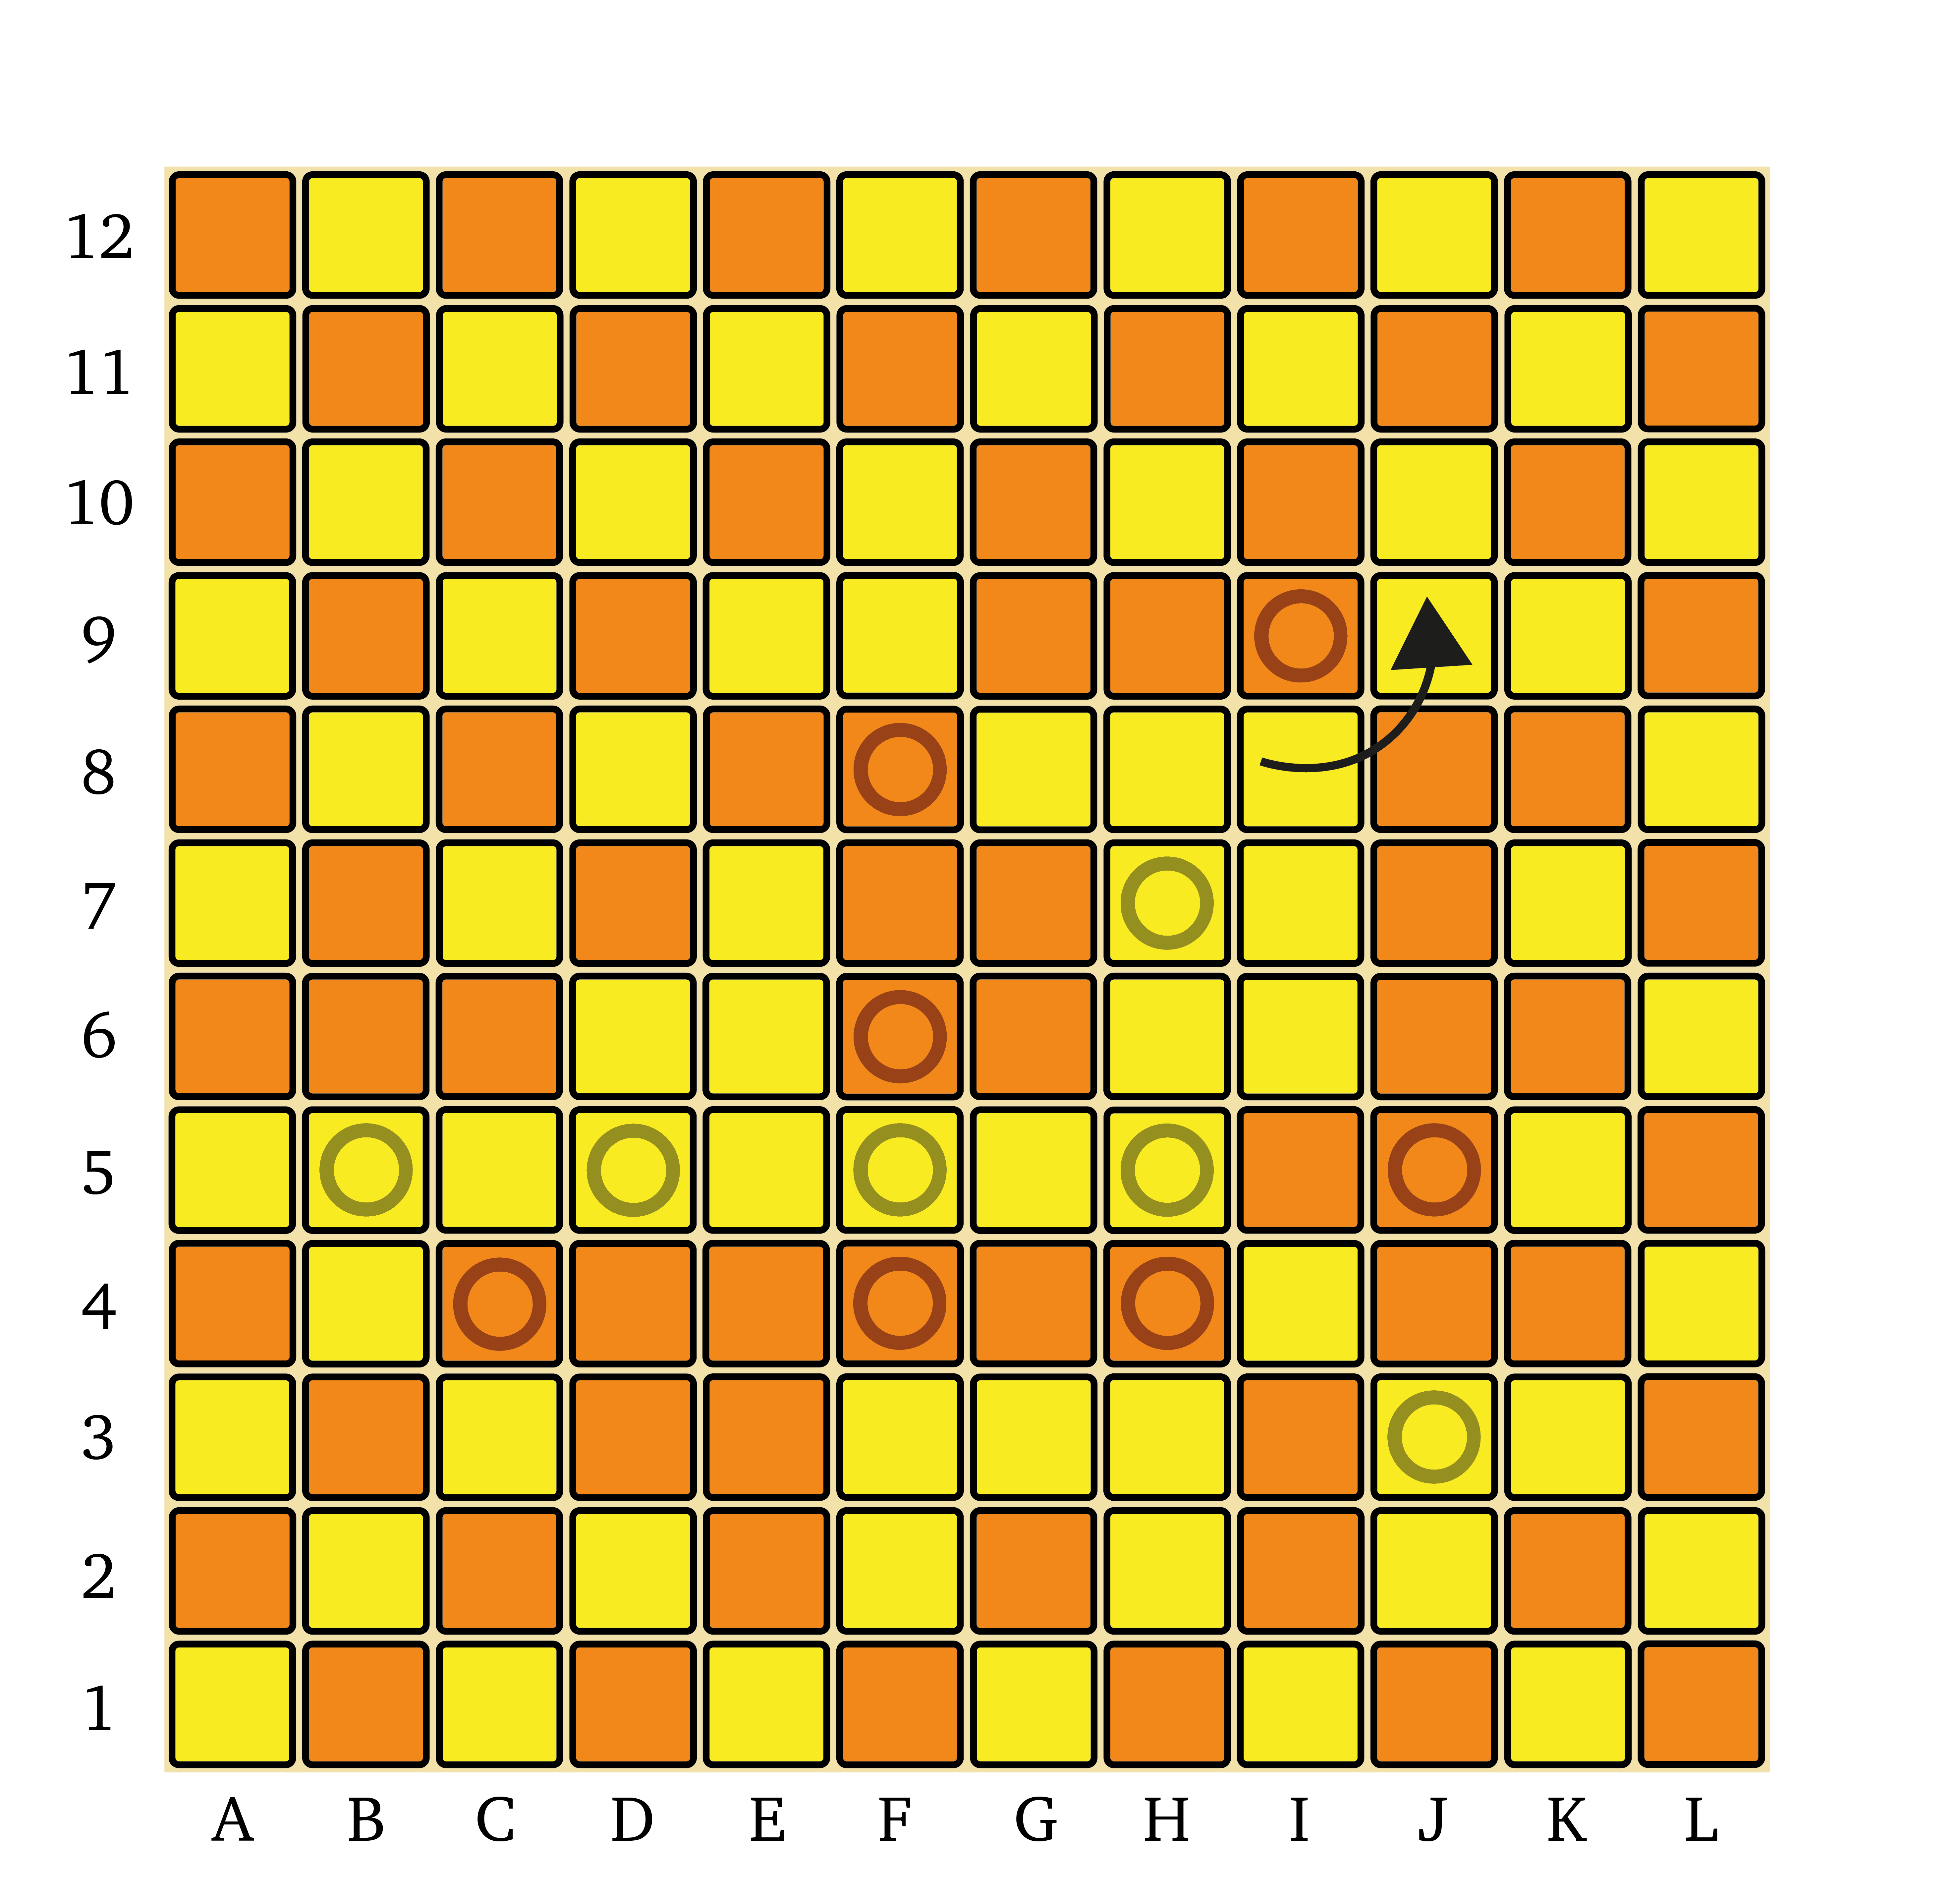
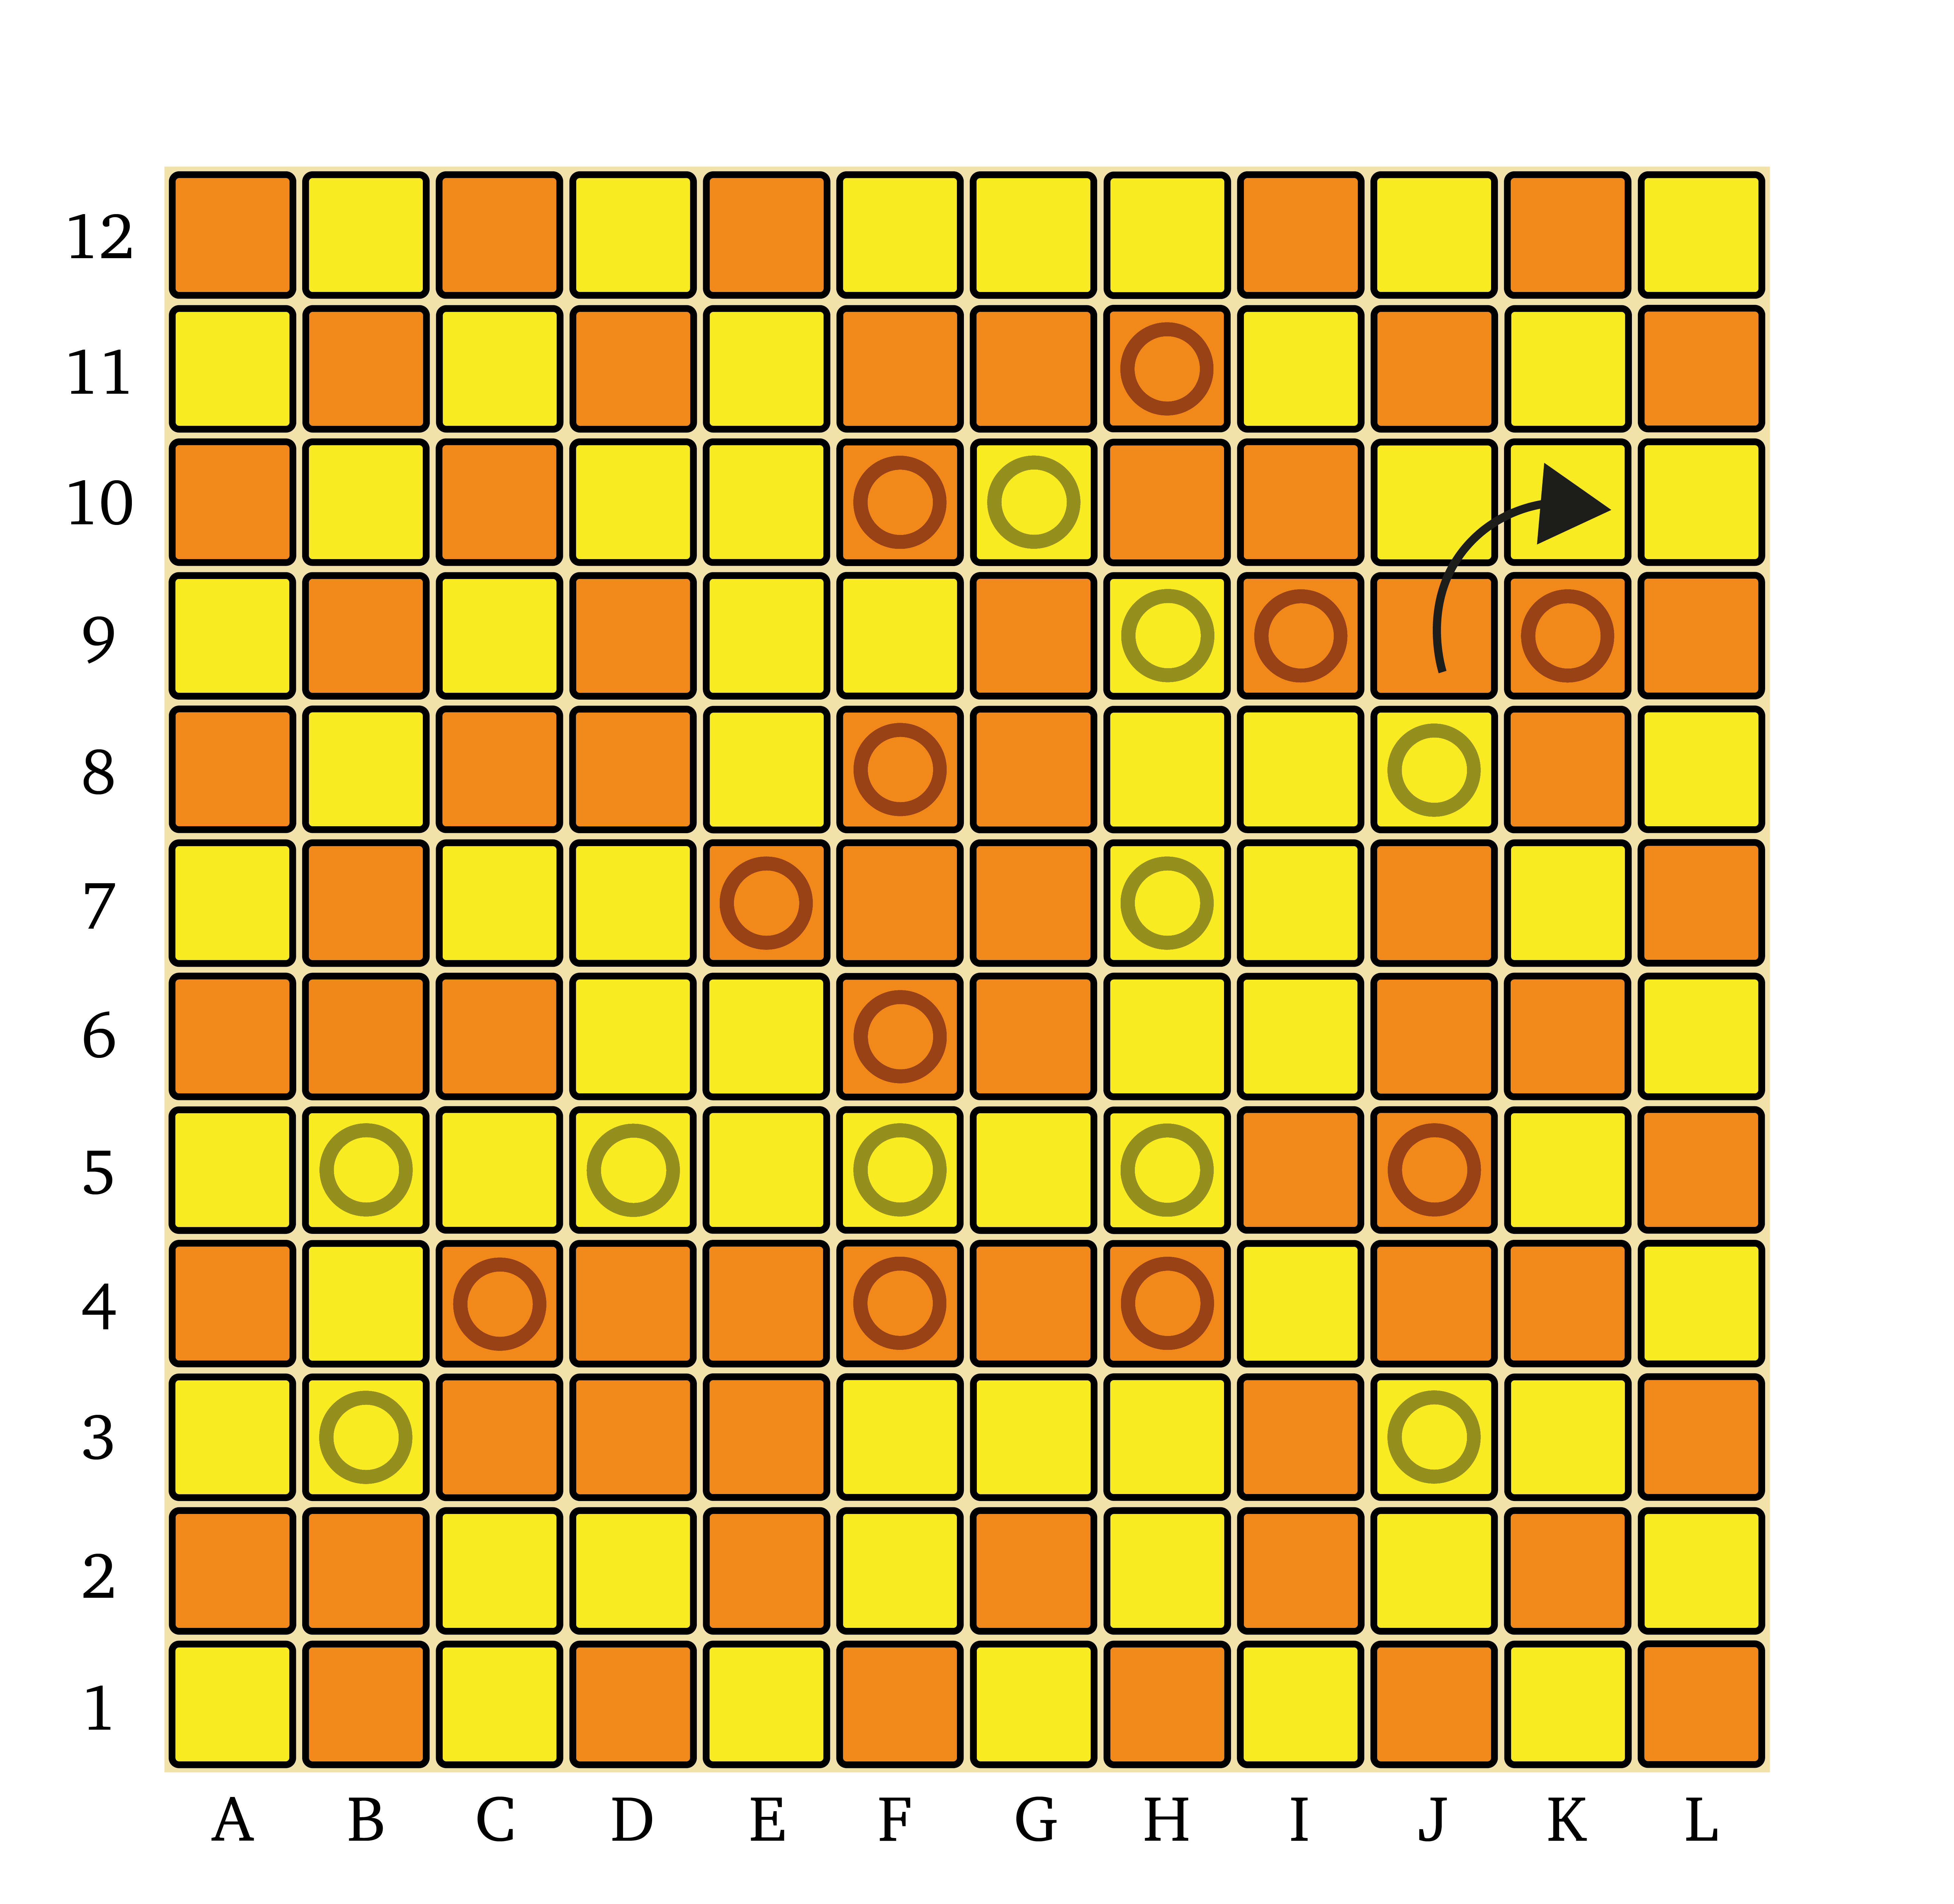
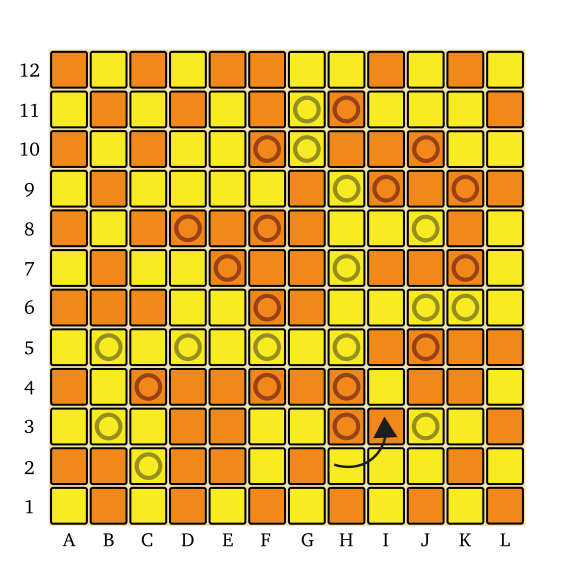
Let us go back to the game for a moment and look more closely at my middlegame connection to the eastern edge of the board:
On the left is the move I played in the game, which connected my largest group to the eastern edge. Orange is now firmly cut off from connecting their upper group to the bottom half of the board, and their attempt to move south has been contained.
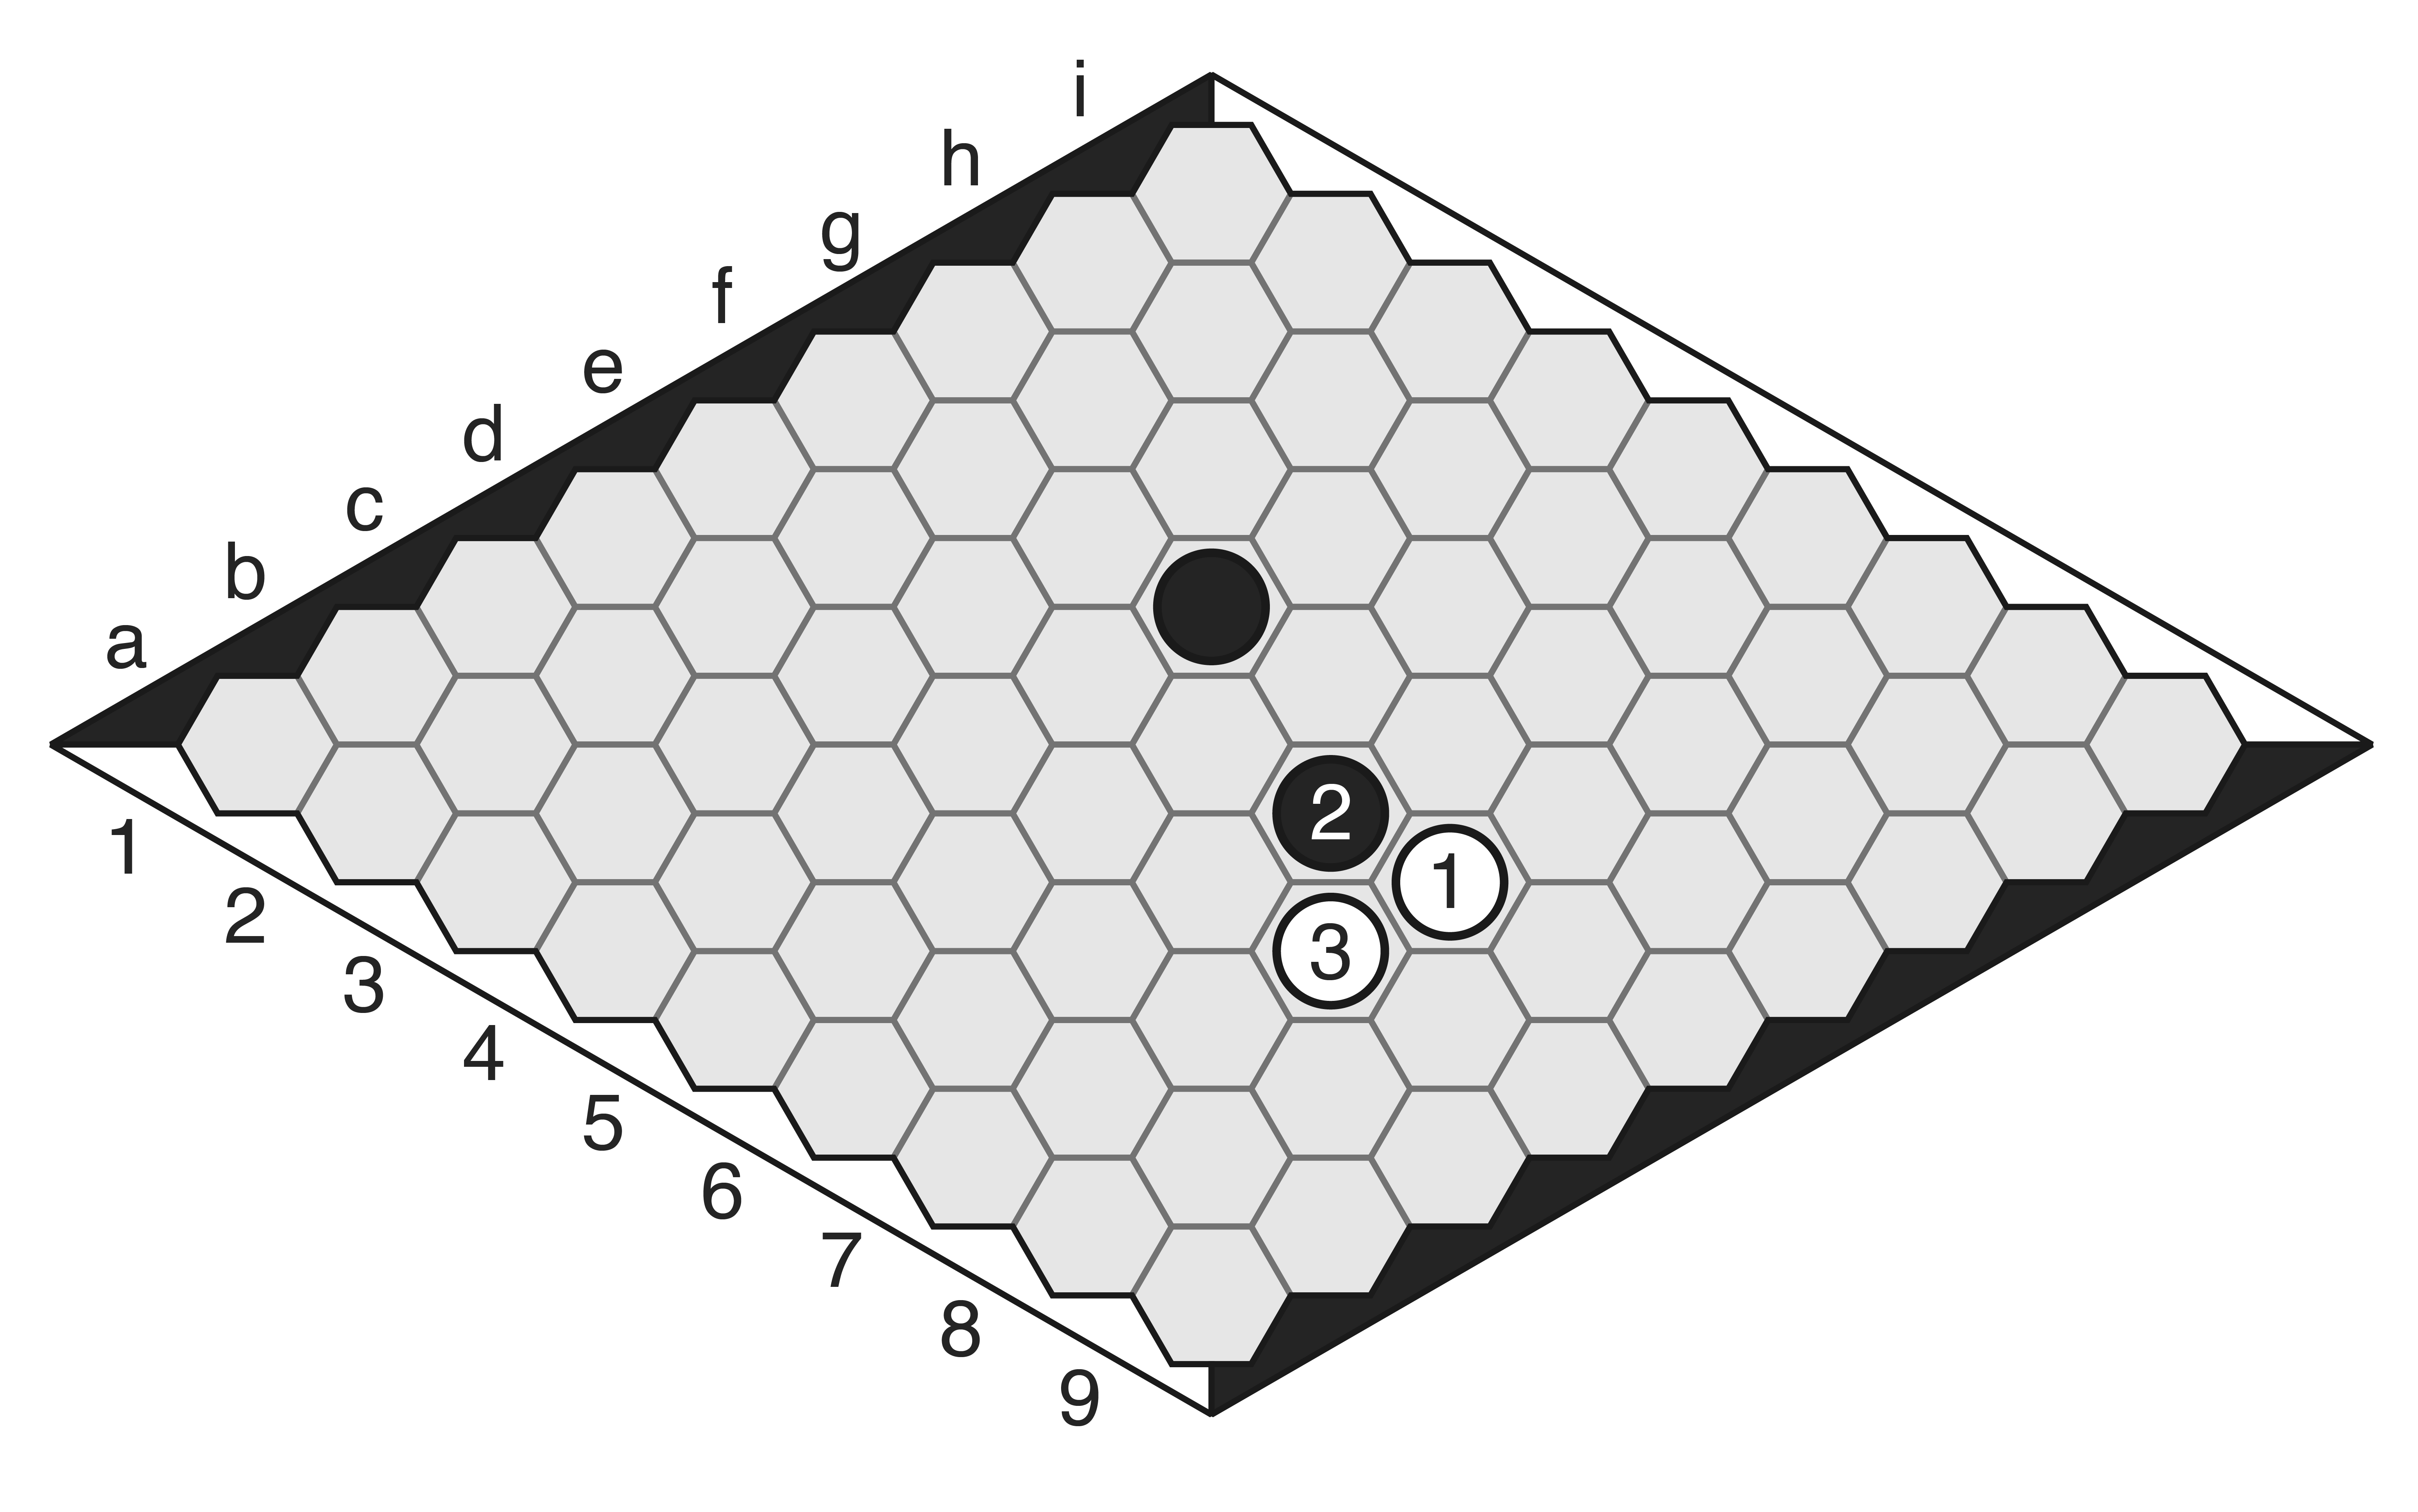
On the right, we see what could have happened if I had not attempted to reach the edge, but instead had played elsewhere (in this case, bolstering my group in the bottom-right with Ch2i3-h3). Orange is then able to generate threats by connecting significantly more pieces down that right side.
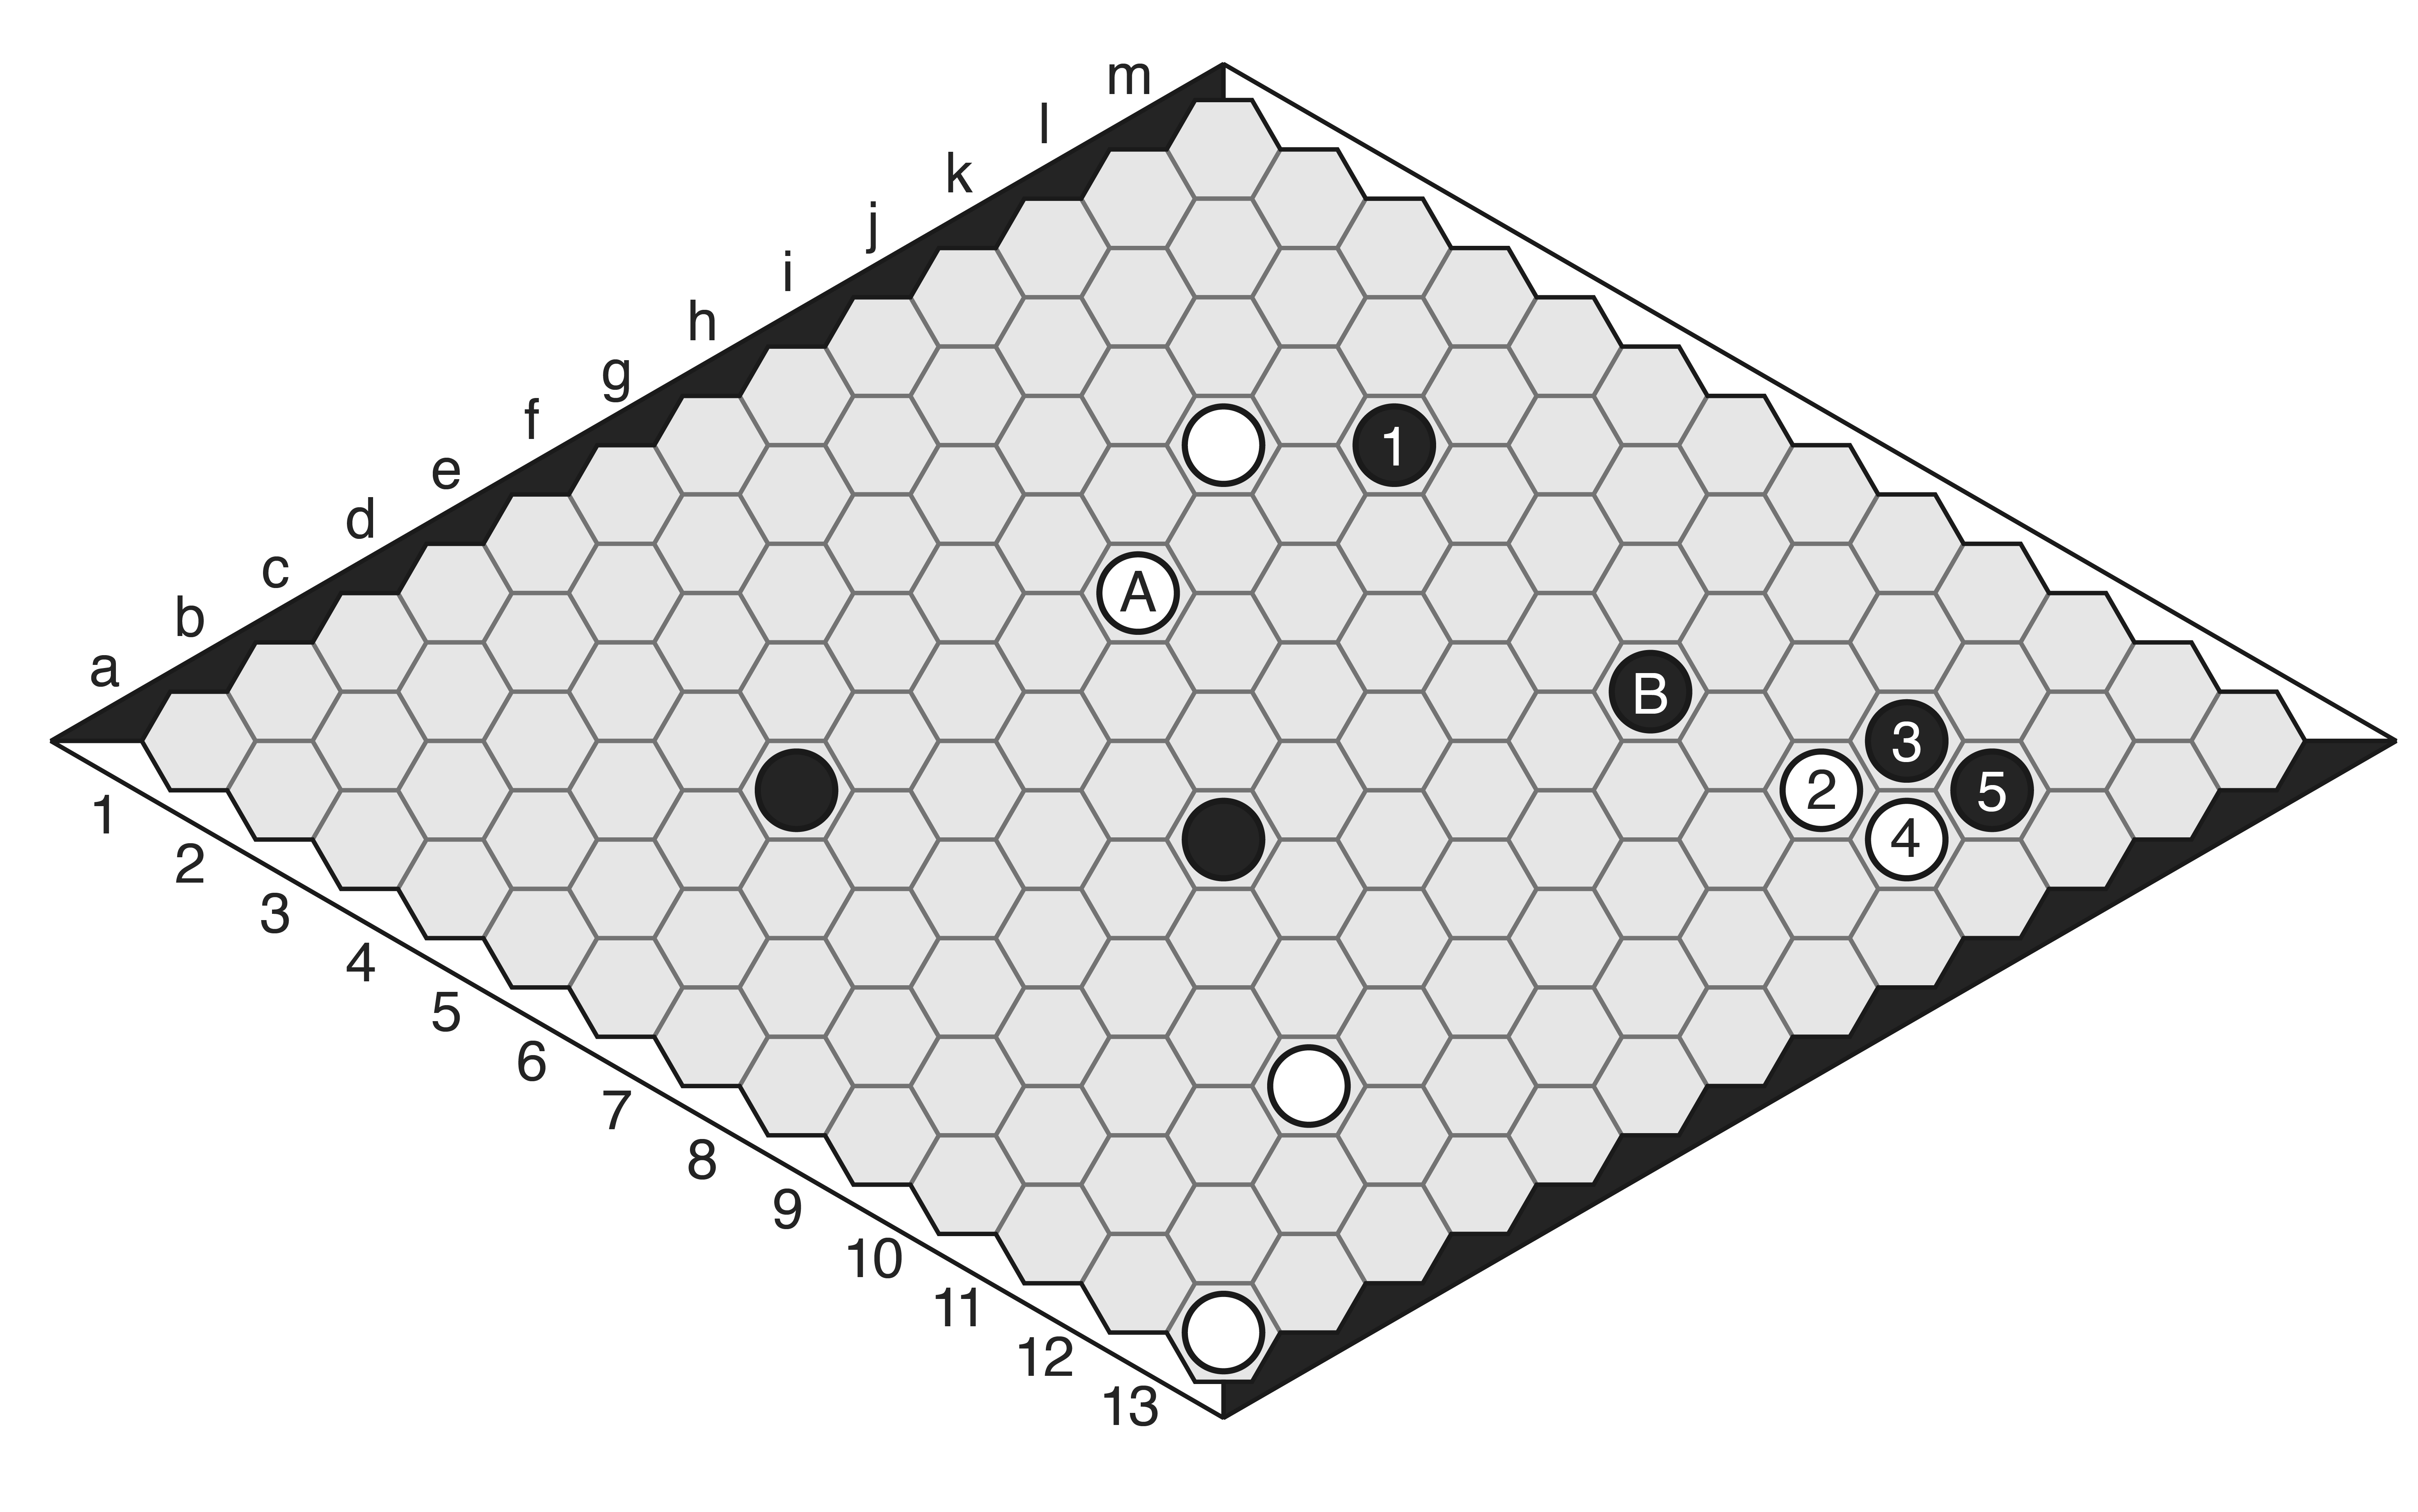
In this particular position Orange cannot make massive gains this way; on the right we see that after a couple more moves, Yellow is able to contain the advance once again. But Orange did manage to gain two more pieces even in this constrained position, and in a close game two pieces may make all the difference.
So, when the opportunity to cut off your opponent presents itself, taking advantage of that opportunity is often a good way to consolidate your advantage and deny your opponent chances to create more threats.
Twists are local, scores are global
Finally, an important reminder — Permute is a game full of complex tactics, but the ultimate goal of the game is inherently global in nature. When fighting for your groups to stay live, never forget that all moves should be in service of the larger goal: building the biggest group of pieces on the board. If you get deep into a tactical battle and realise you will not be able to make any more profitable exchanges, do not be afraid to abandon your group and seek a bigger move elsewhere!
Similarly, we can easily get tied down defending only our largest group, and forget that the group scores in Permute are cascading — this means that if the two players tie for the largest group, then we compare the second-largest, then the third-largest if those are tied, and so on. So if a game is close, remember to nurture a secondary group in addition to your largest one. Tight games between equally-skilled opponents will most certainly have games go to the second-largest group, and occasionally the third-largest (though this is rare).
Remember too that playing strategically and planning your group-building effectively will also help you tactically; the more secure your groups are, the better-placed you are to defend them, and the more you constrict your opponent’s growth options with well-planned extensions, the more vulnerable they are to attack.
Next moves
At this point, hopefully you have a clearer picture of how a game of Permute flows, and you have picked up some useful tools in your toolbox for your next twisty battle. Permute feels quite odd at first if you are used to something like Go or Chess, given the fact that the board starts full and every move directly affects both players’ pieces. But once we spend some time getting acquainted with the properties of the game, these unusual aspects will start to feel natural, and you can focus on increasing your playing strength.
From here, I recommend having a bunch of games on the 12×12 board, and focussing on developing plans for each of your groups as you play. Always keep an eye on the score, and check that each move is advancing your own groups while hindering your opponent’s. Once you become confident navigating the sharp openings of the 12×12 board, then you can try moving up to 16×16, where you have an even more dizzying array of opening options, and the game opens out to become even more strategically interesting.
I have a large backlog of posts to work on at the moment, but at some point down the line I will come back with some more Permute tips, shown off through a fully-analysed 16×16 game. If any of you out there are interested in a game on the larger board, let me know in the comments; I am always happy to find new opponents!
Some of you may have noticed too that Ai Ai lets you play Permute with four colours, which makes the game feel even more like a twisty puzzle. I am still in the process of getting acquainted with the nuances of the four-colour game — which works very well with the 1[1]2[2]* move protocol — but I will cover this at some point as well.
In the meantime, I hope you will give Permute a try — Permute is my game so I naturally will have some bias towards it, but at least I can say that after many, many games of Permute so far, I have yet to get bored with it. I hope some of you out there will have as much fun with it as I have!
Until next time, here’s a little preview of what’s to come — a tense game of 16×16 Permute that came down to a single point: