In Part I of our Beginner’s Guide to Hex, we covered some critical tactical and strategic concepts that will help you get a flying start in your journey to become a strong Hex player. This time, we’ll look at a full game played on the 15×15 board between two strong players, so you can get a sense of how those principles manifest during actual play. After that, we’ll take a look at another game, this time from the Game of Y, to see how Hex principles can apply in other connection games as well.
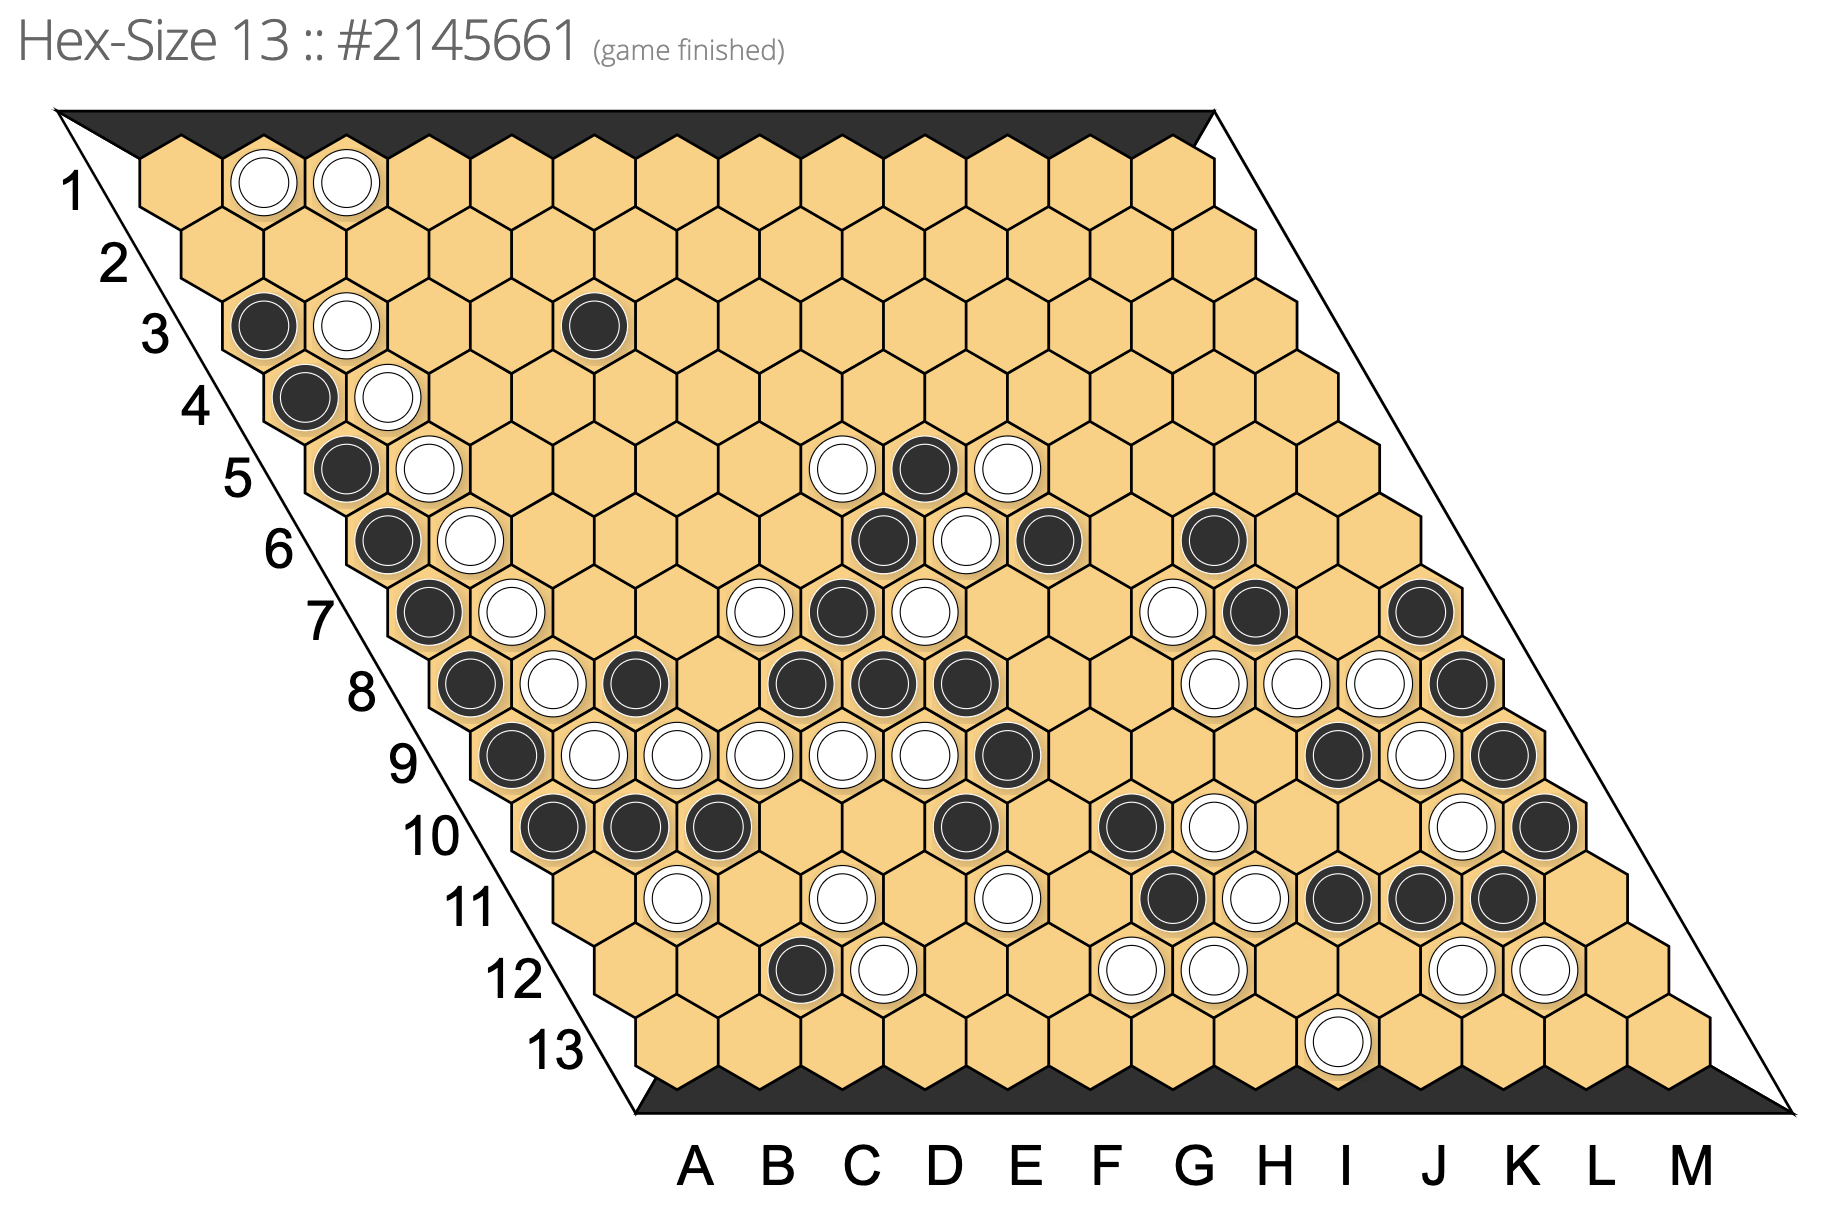
Commented Hex Game: LG #2195354, kspttw vs Arek Kulczycki
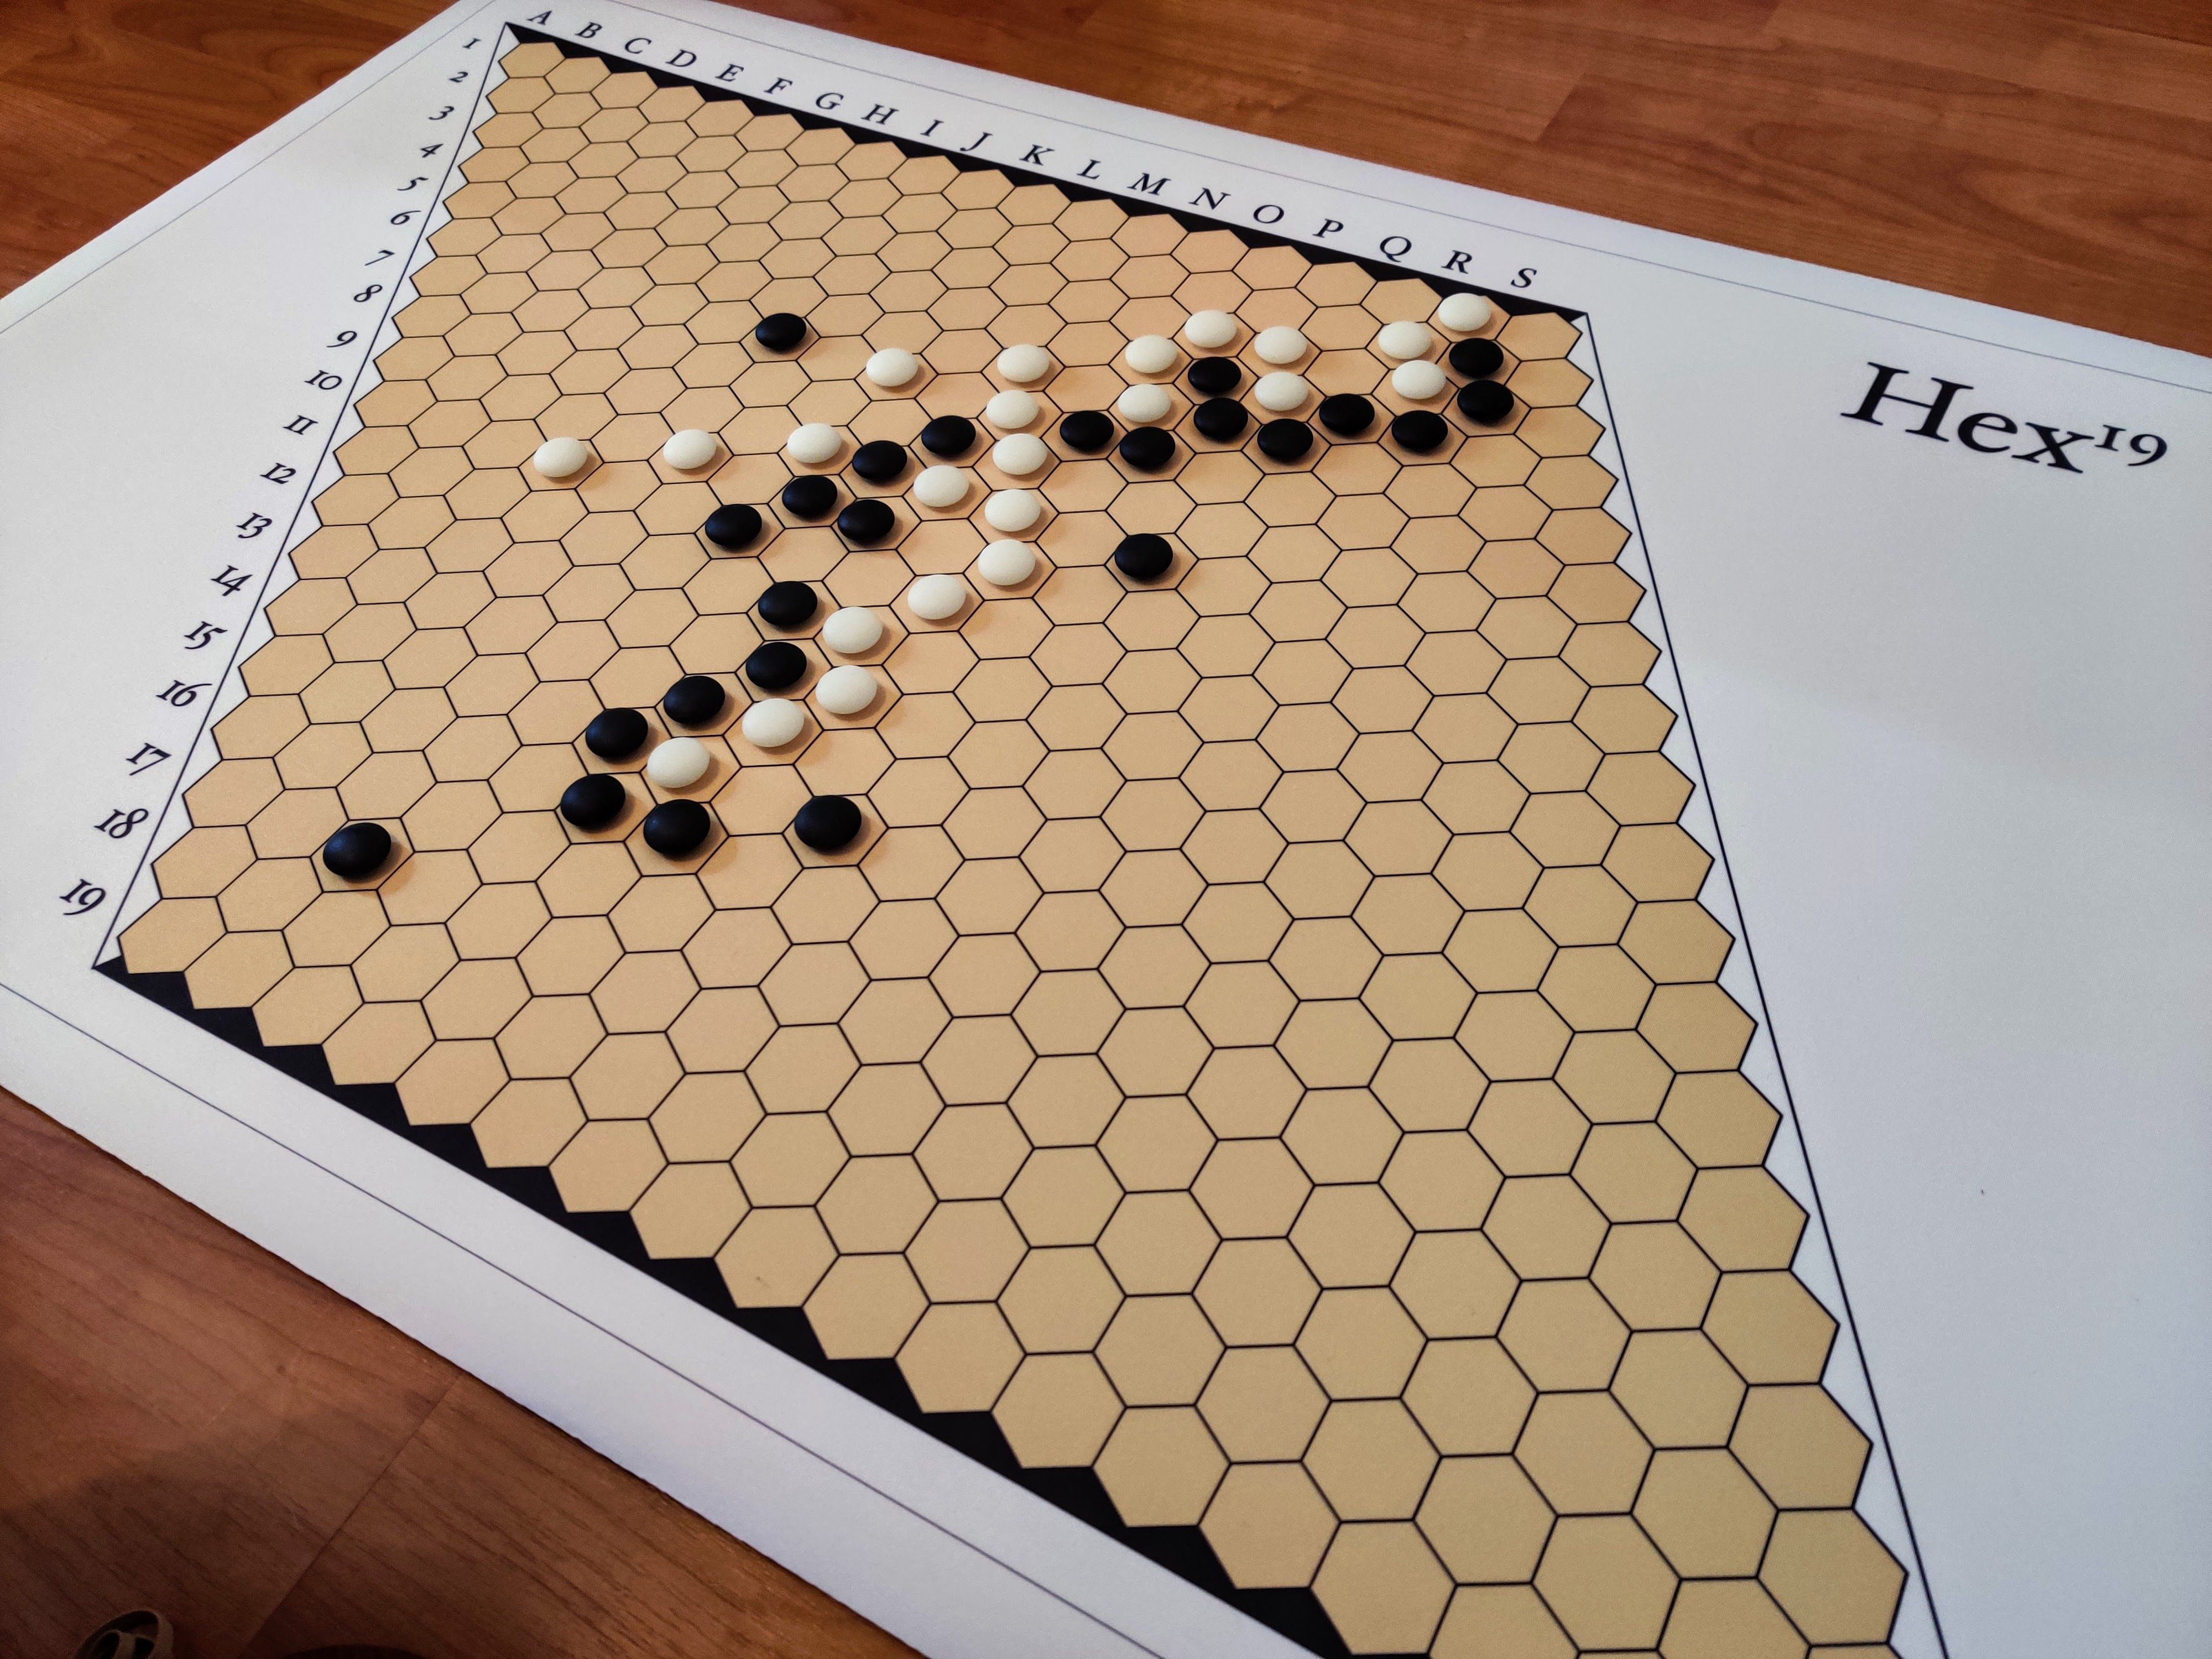
This game was played on a 15×15 board on LittleGolem.net, the most popular place to play Hex in correspondence style. 15×15 Hex is a relatively recent addition to Little Golem, but is already proving popular. Other board sizes are also available on LG: 11×11 for quicker, more tactical games; 13×13, which is the most popular size (and is the focus of Matthew’s brilliant Hex strategy guide); and 19×19 for deeply strategic contests.
If you’d like to follow along with the game and investigate the variations Matthew recommends, you can do so via the online Hex board on MinorTriad; this site allow you to go through the game step-by-step and experiment with different moves at any point.

Move 1: Black opens at c2. This is a popular opening on the 13×13 board, but here I would classify it as being likely on the losing side. All Hex openings are either winning or losing, there are no neutral ones; the best openings are right on the border between clearly winning and clearly losing openings, in that they may give some advantage but likely won’t immediately provoke a swap. On 15×15 c2 is probably weaker than on 13×13, since on larger boards we expect that winning openings will be a bit more centralised than on smaller boards. As a consequence, White elects to not swap sides.
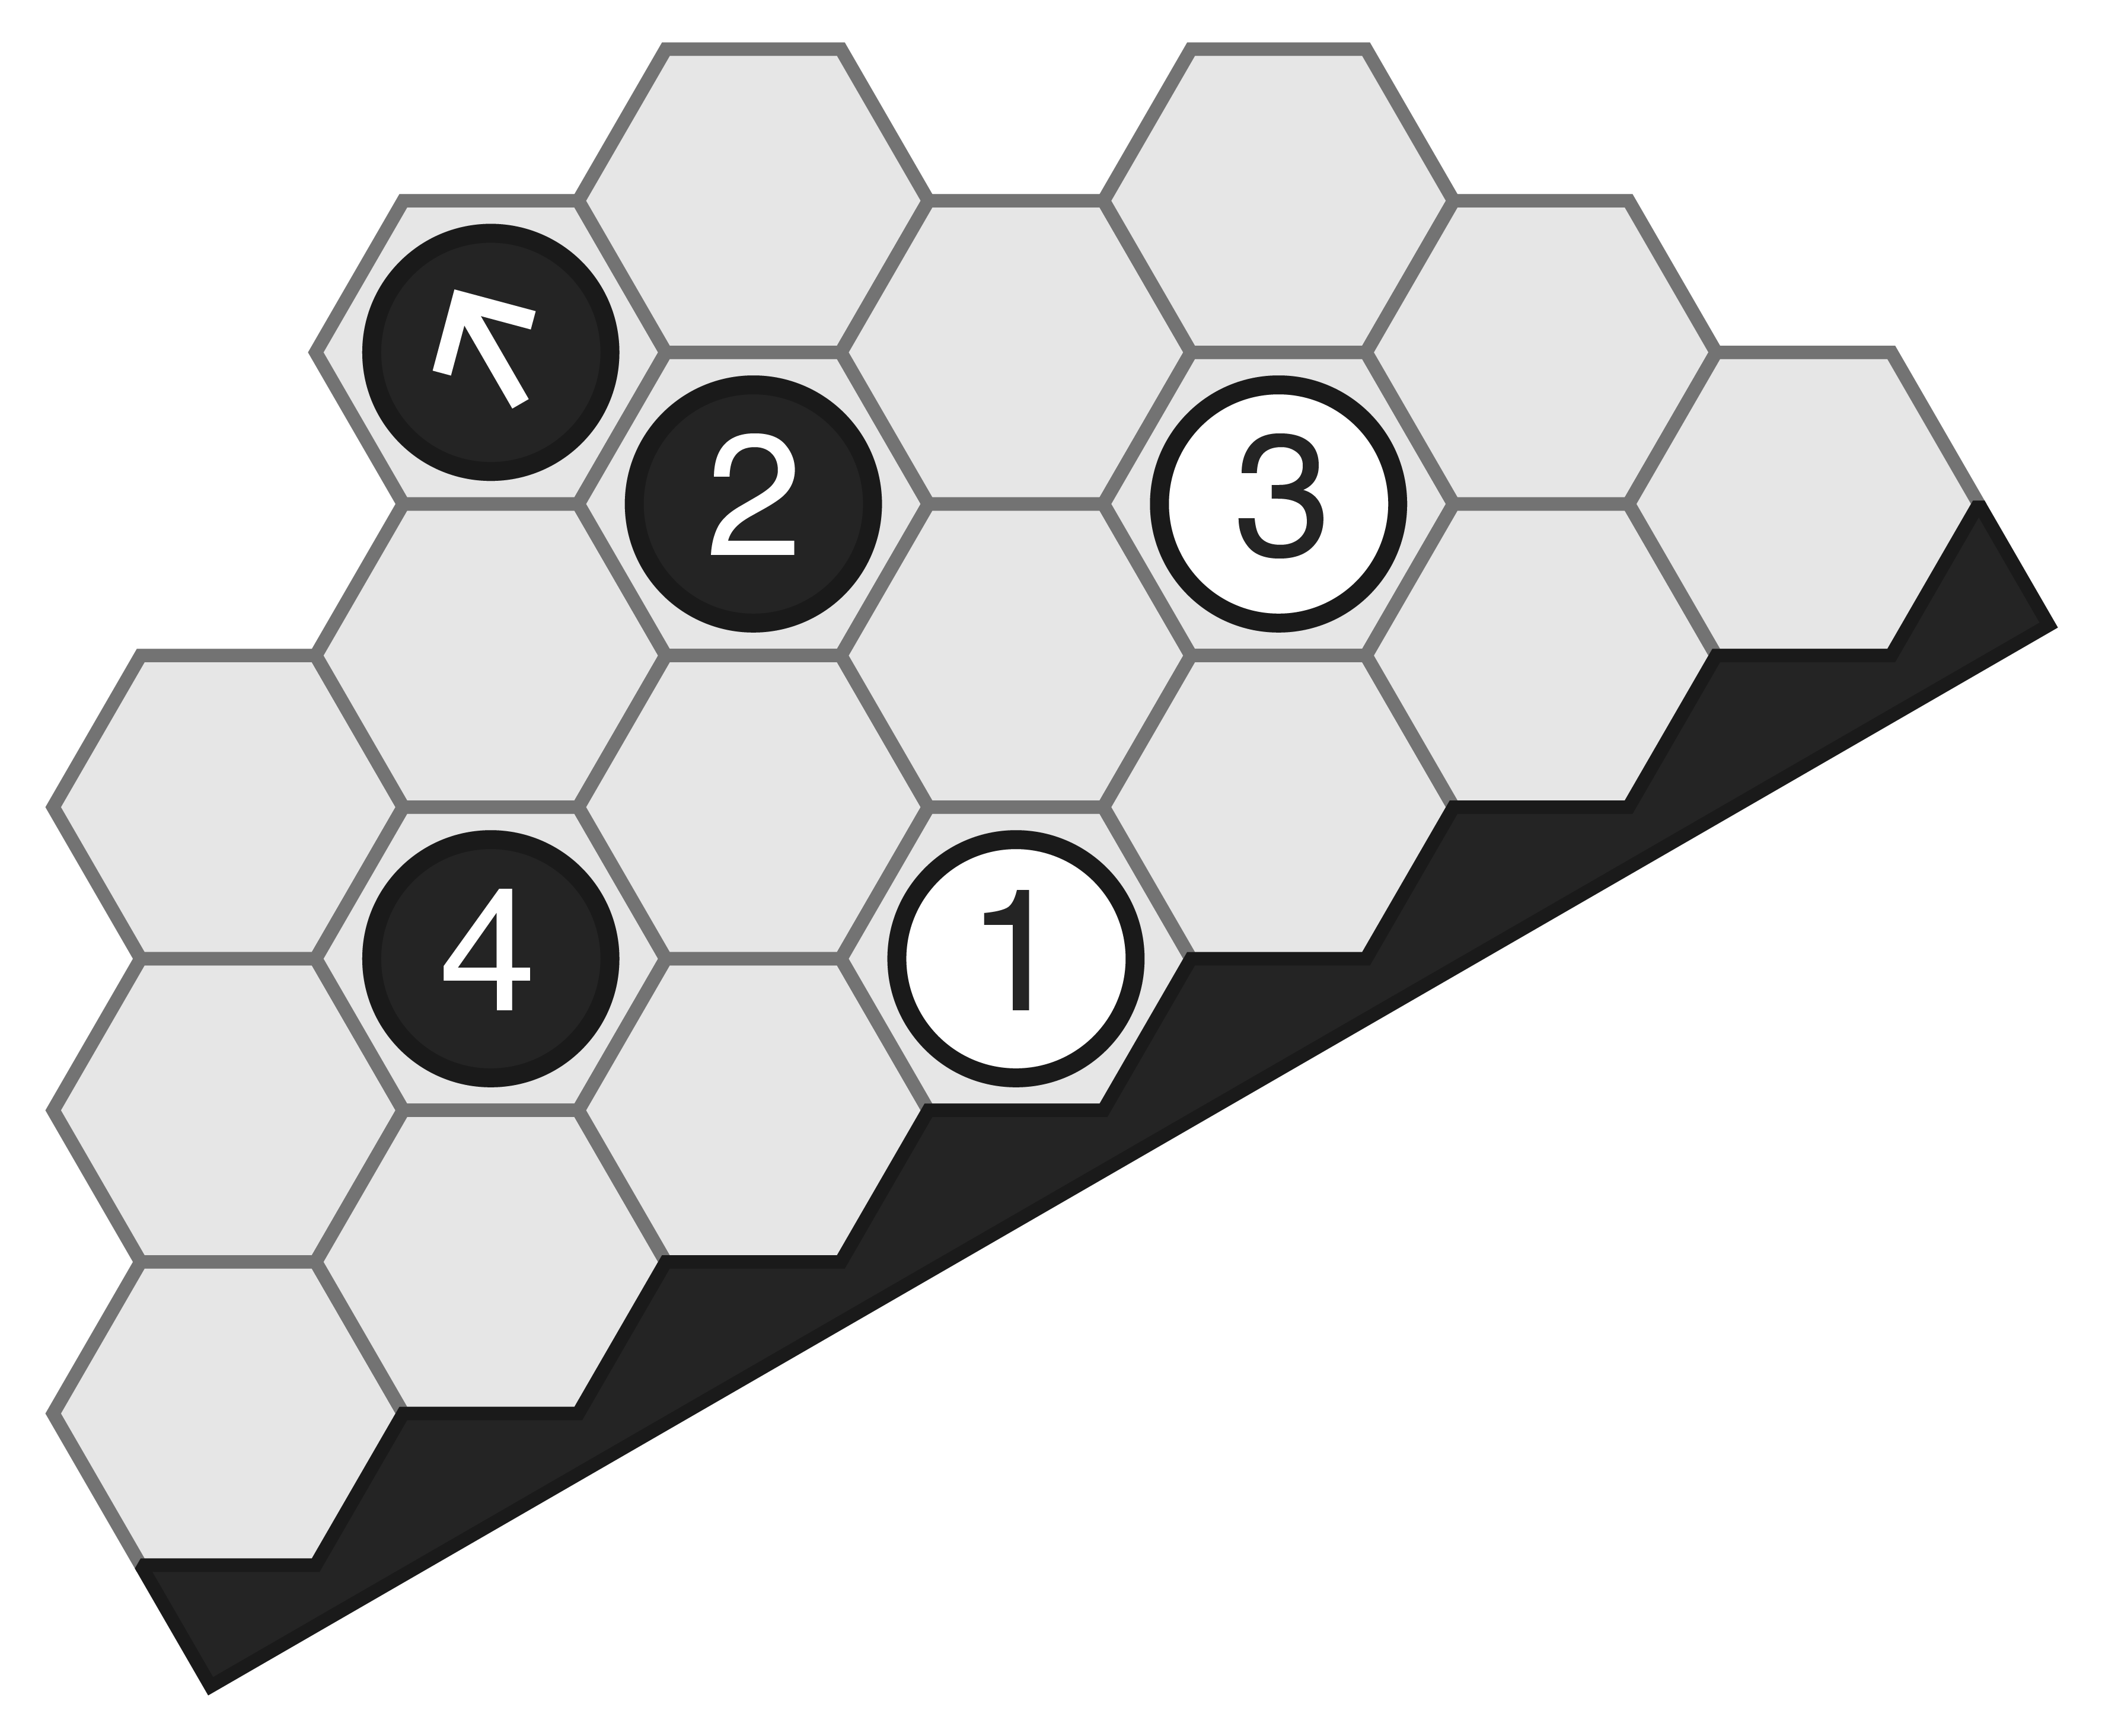
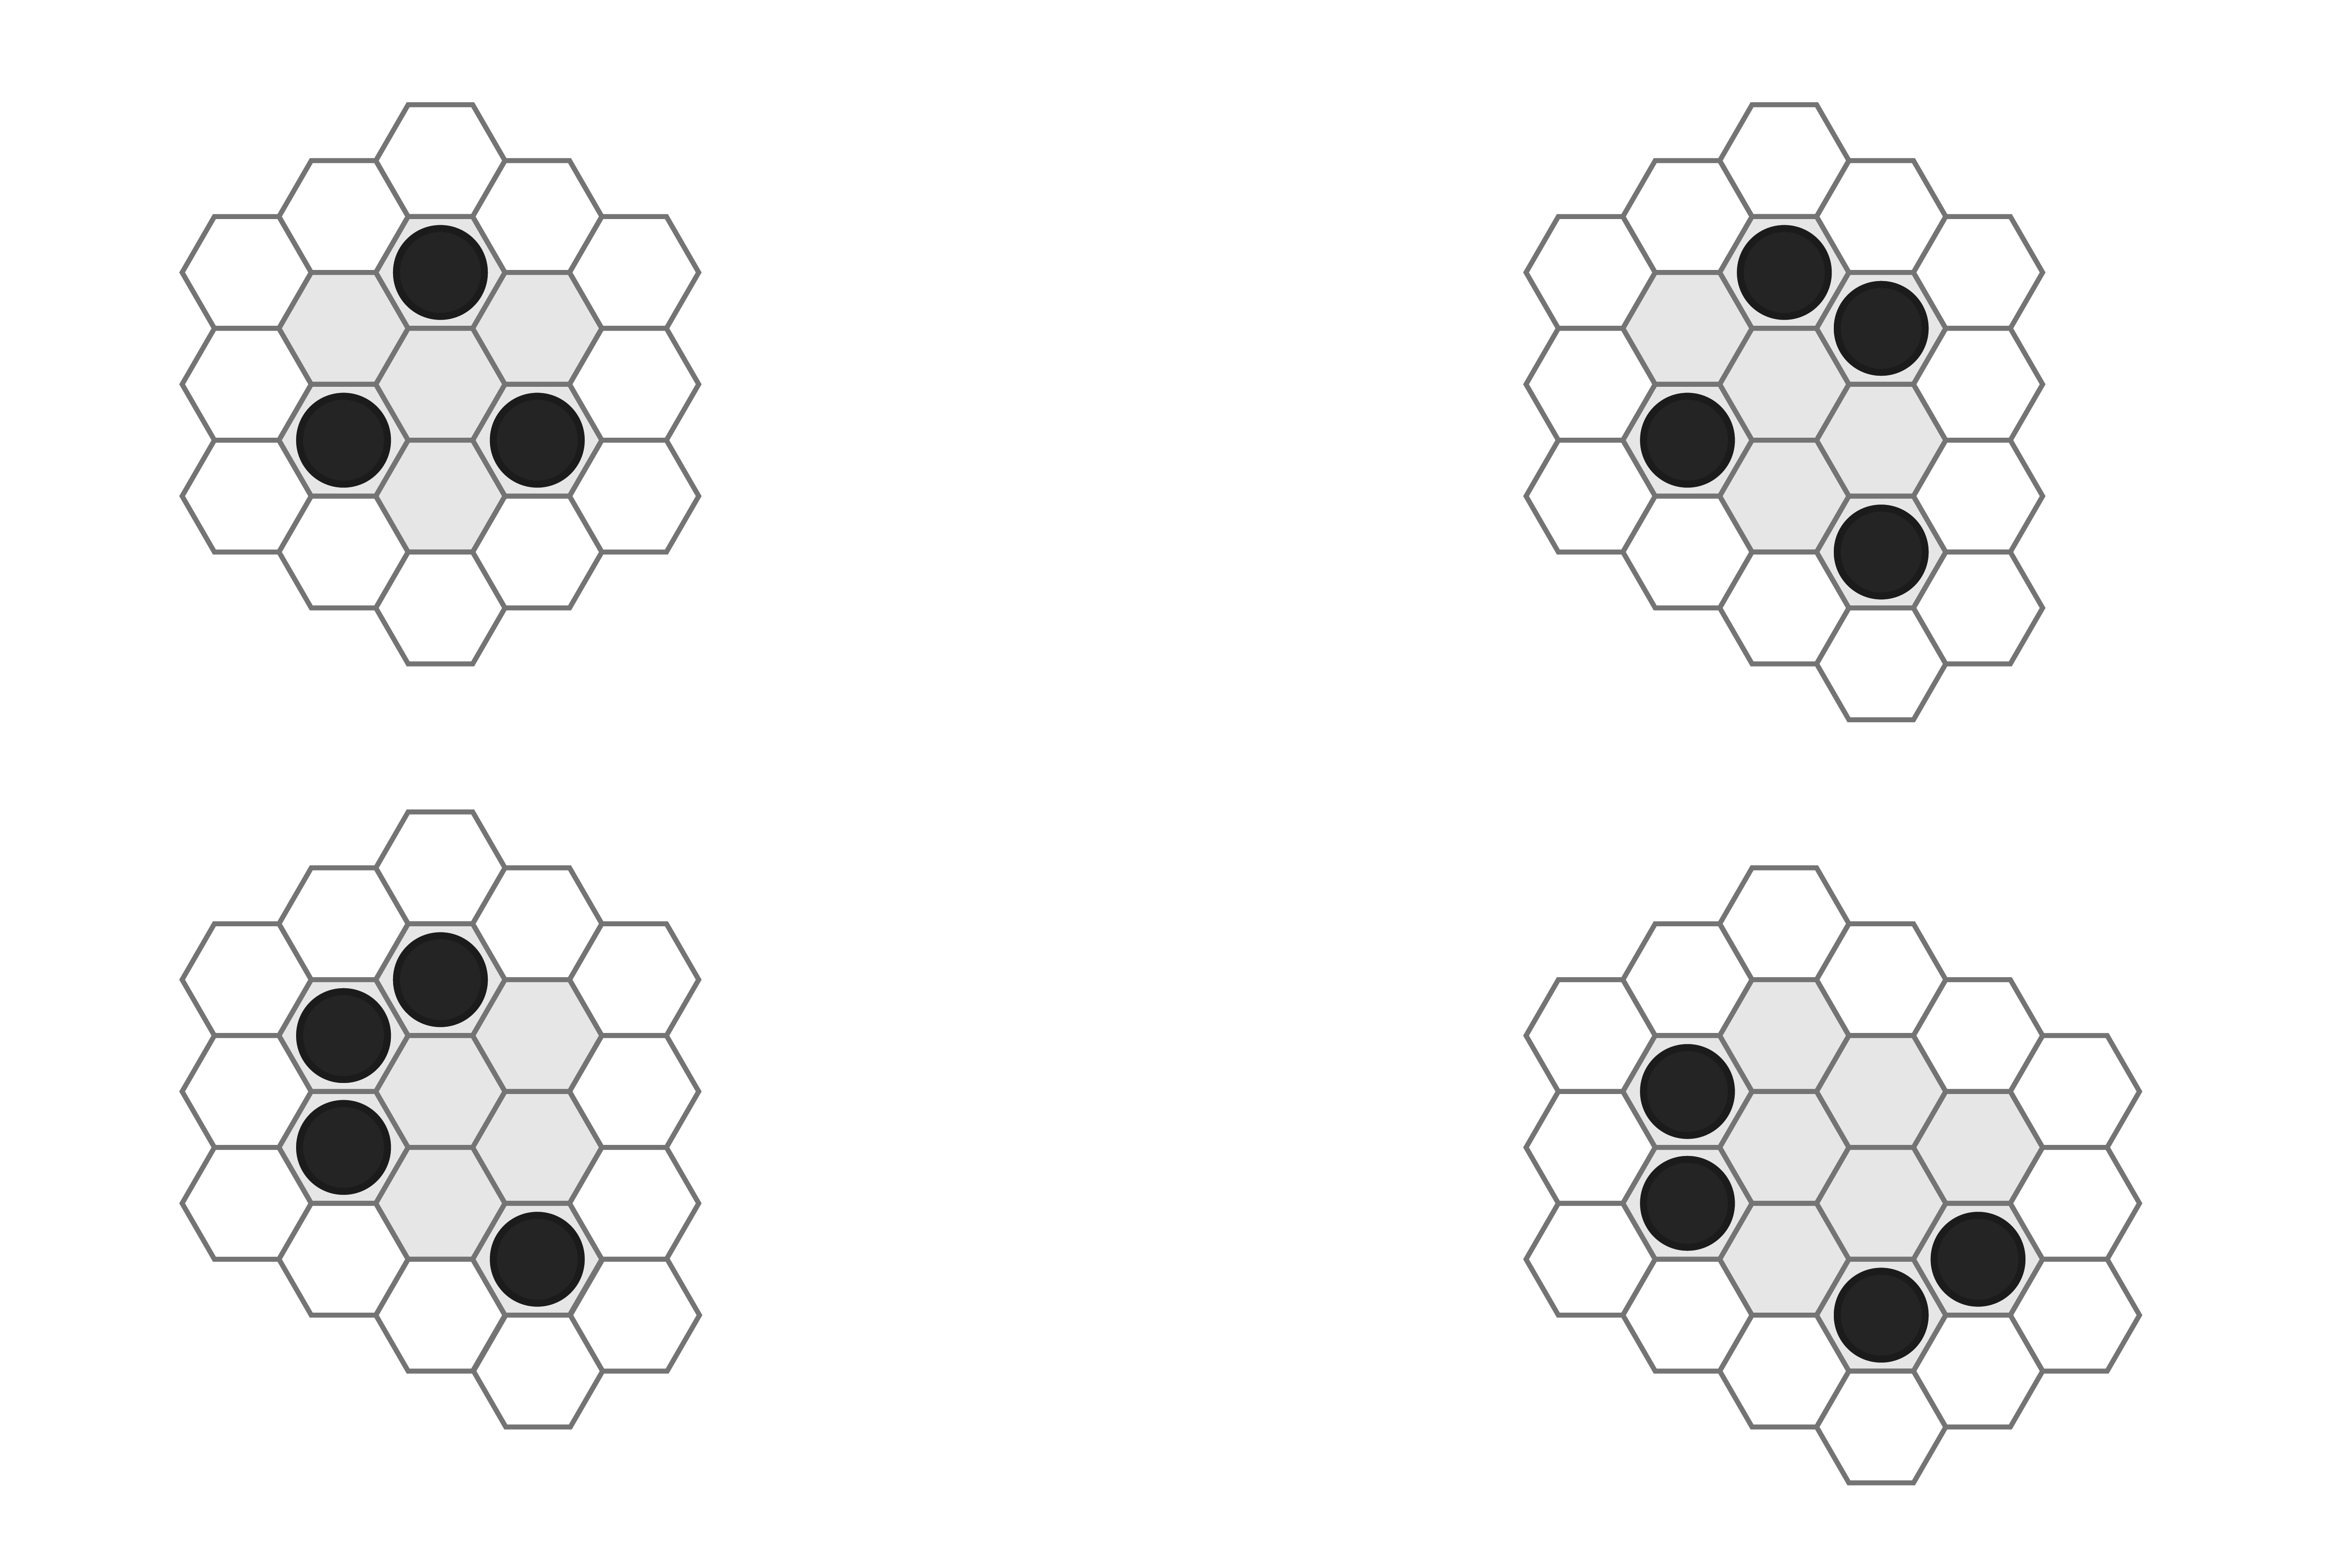
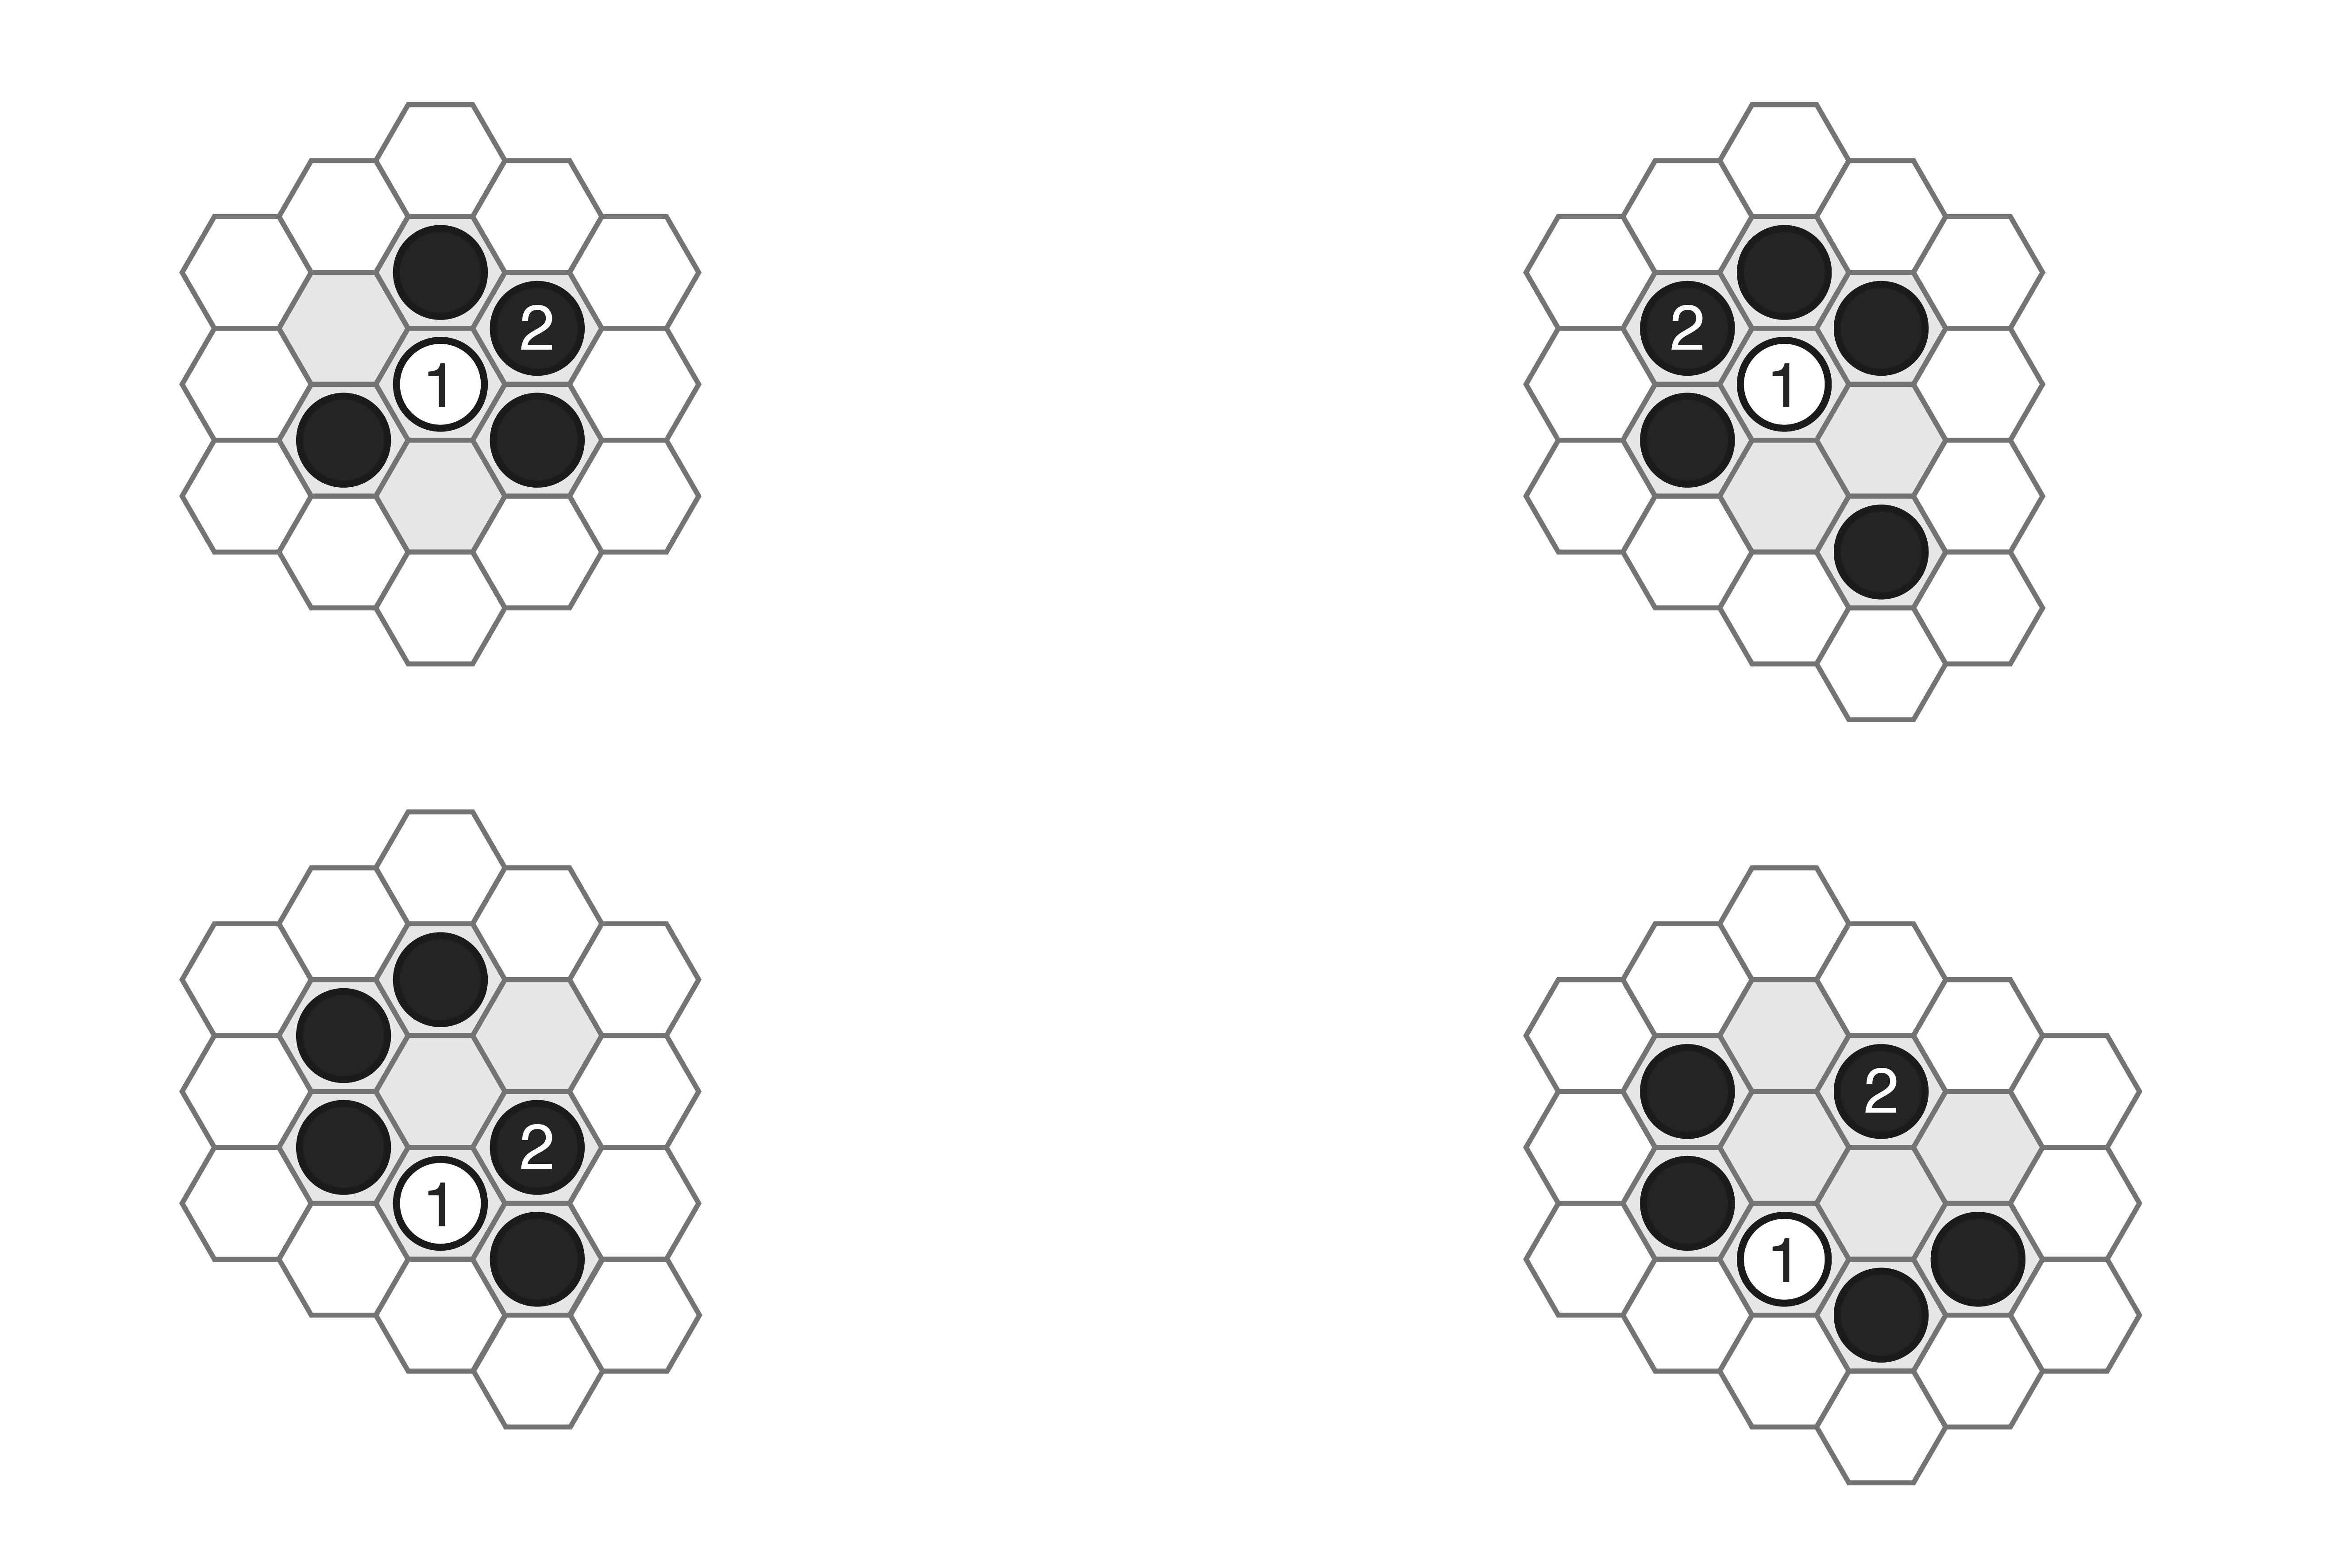
Move 2: The 5-4 point (five rows from your own edge, four rows from your opponent’s edge) is by far the most popular acute corner opening. This move is connected by Template A-5, and it escapes second- and third-row ladders.
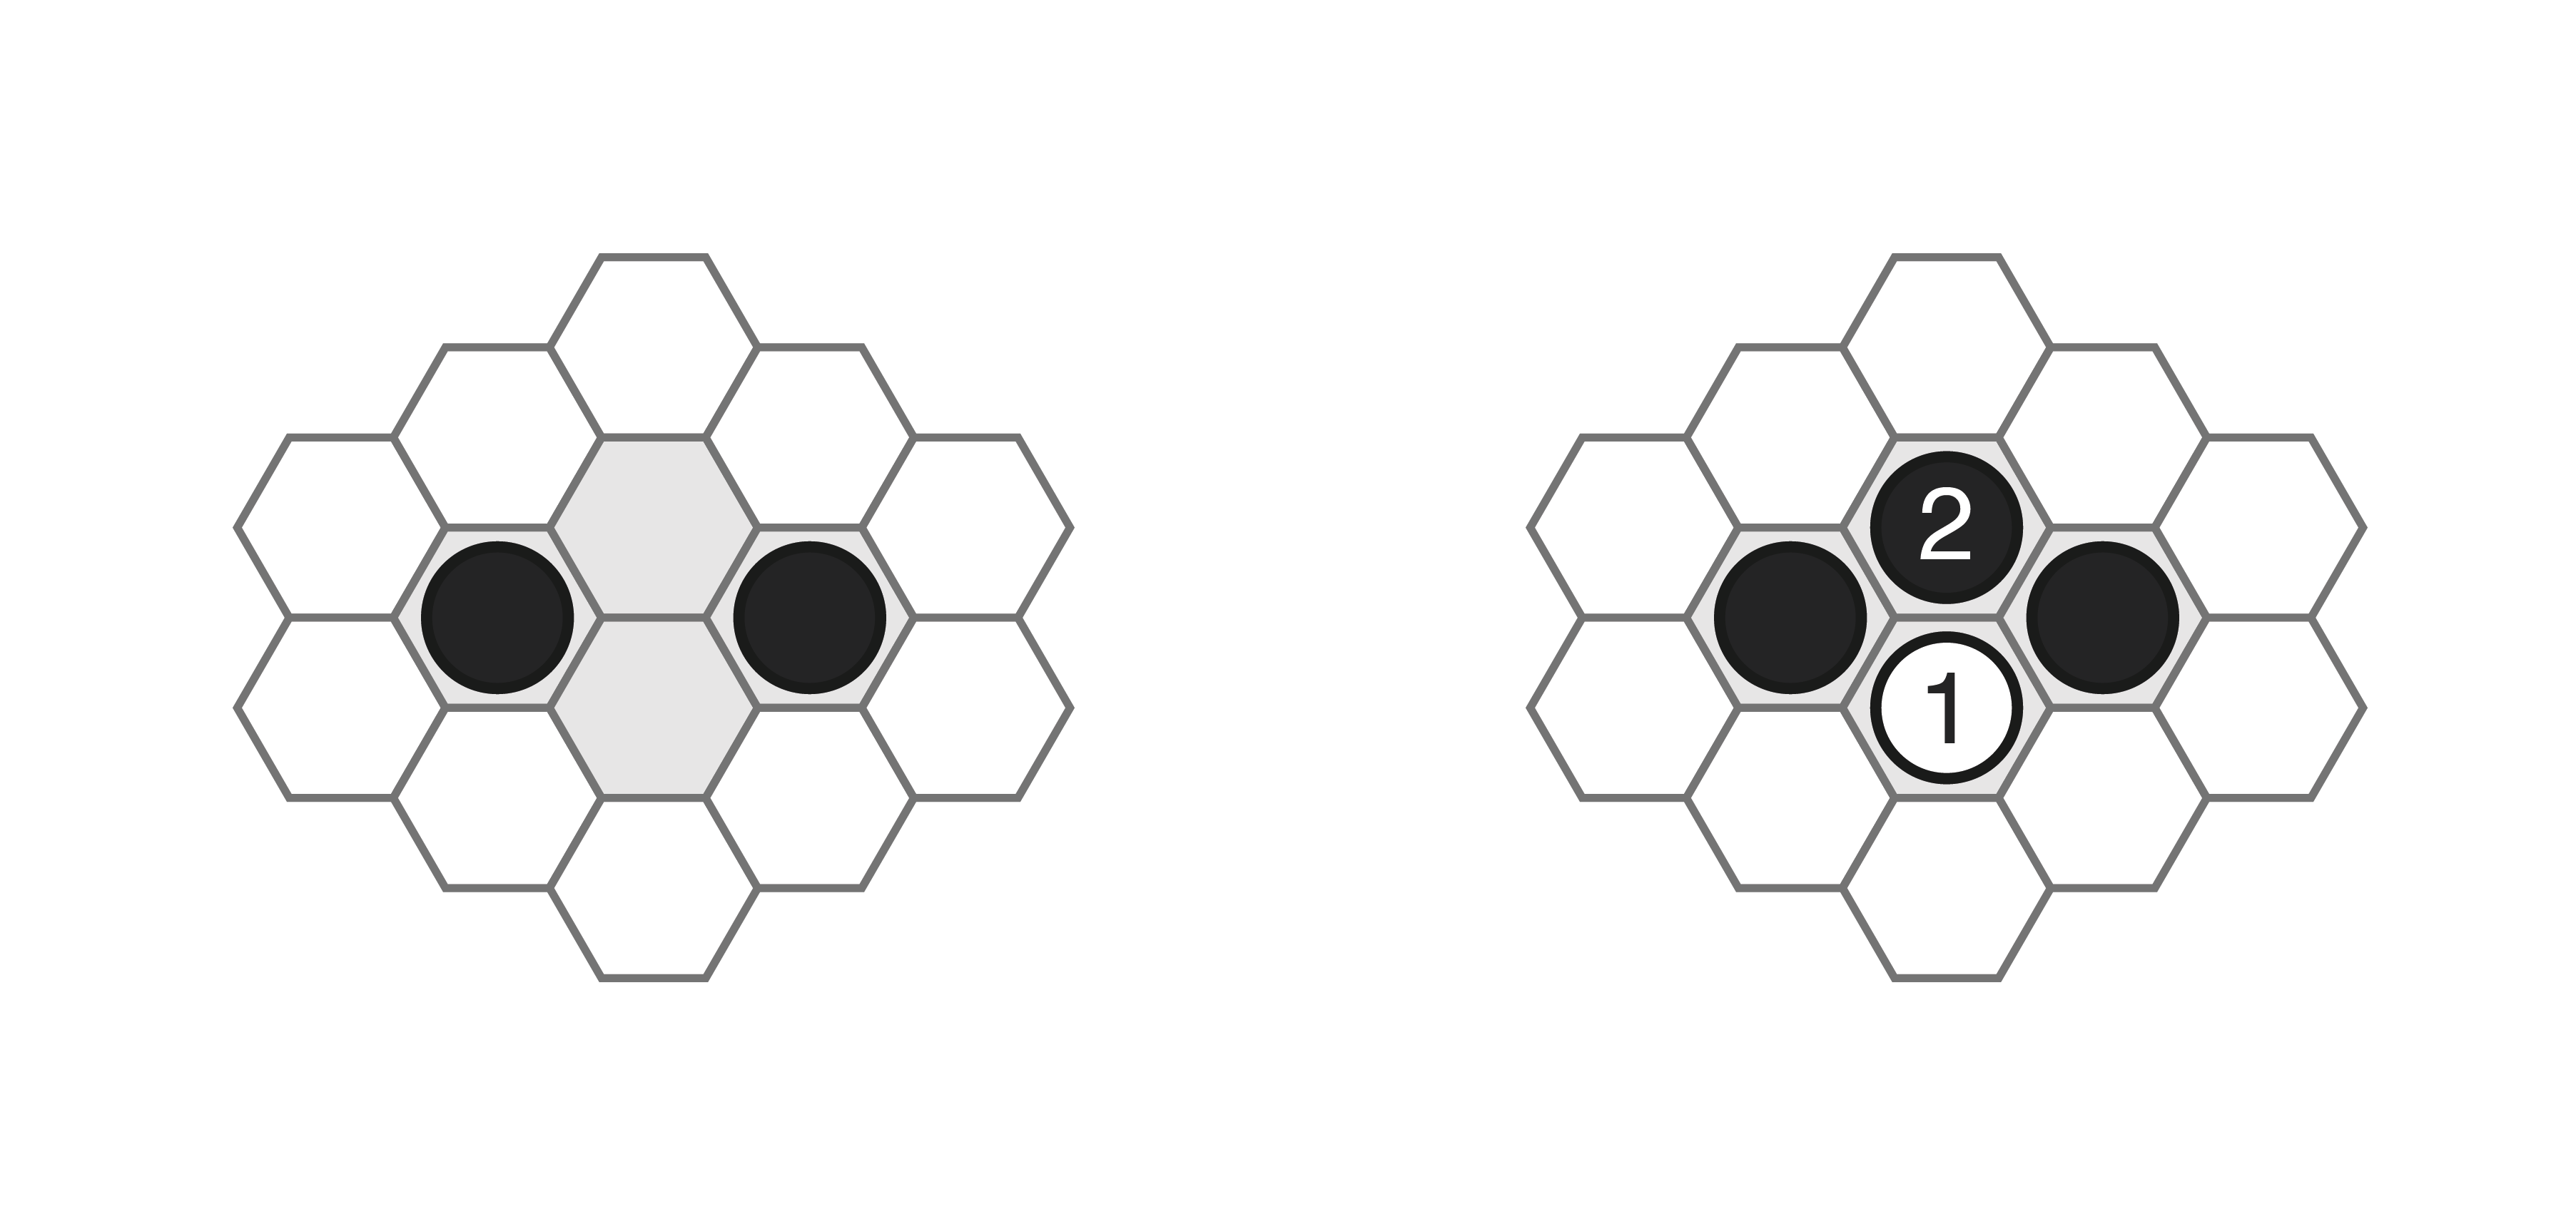
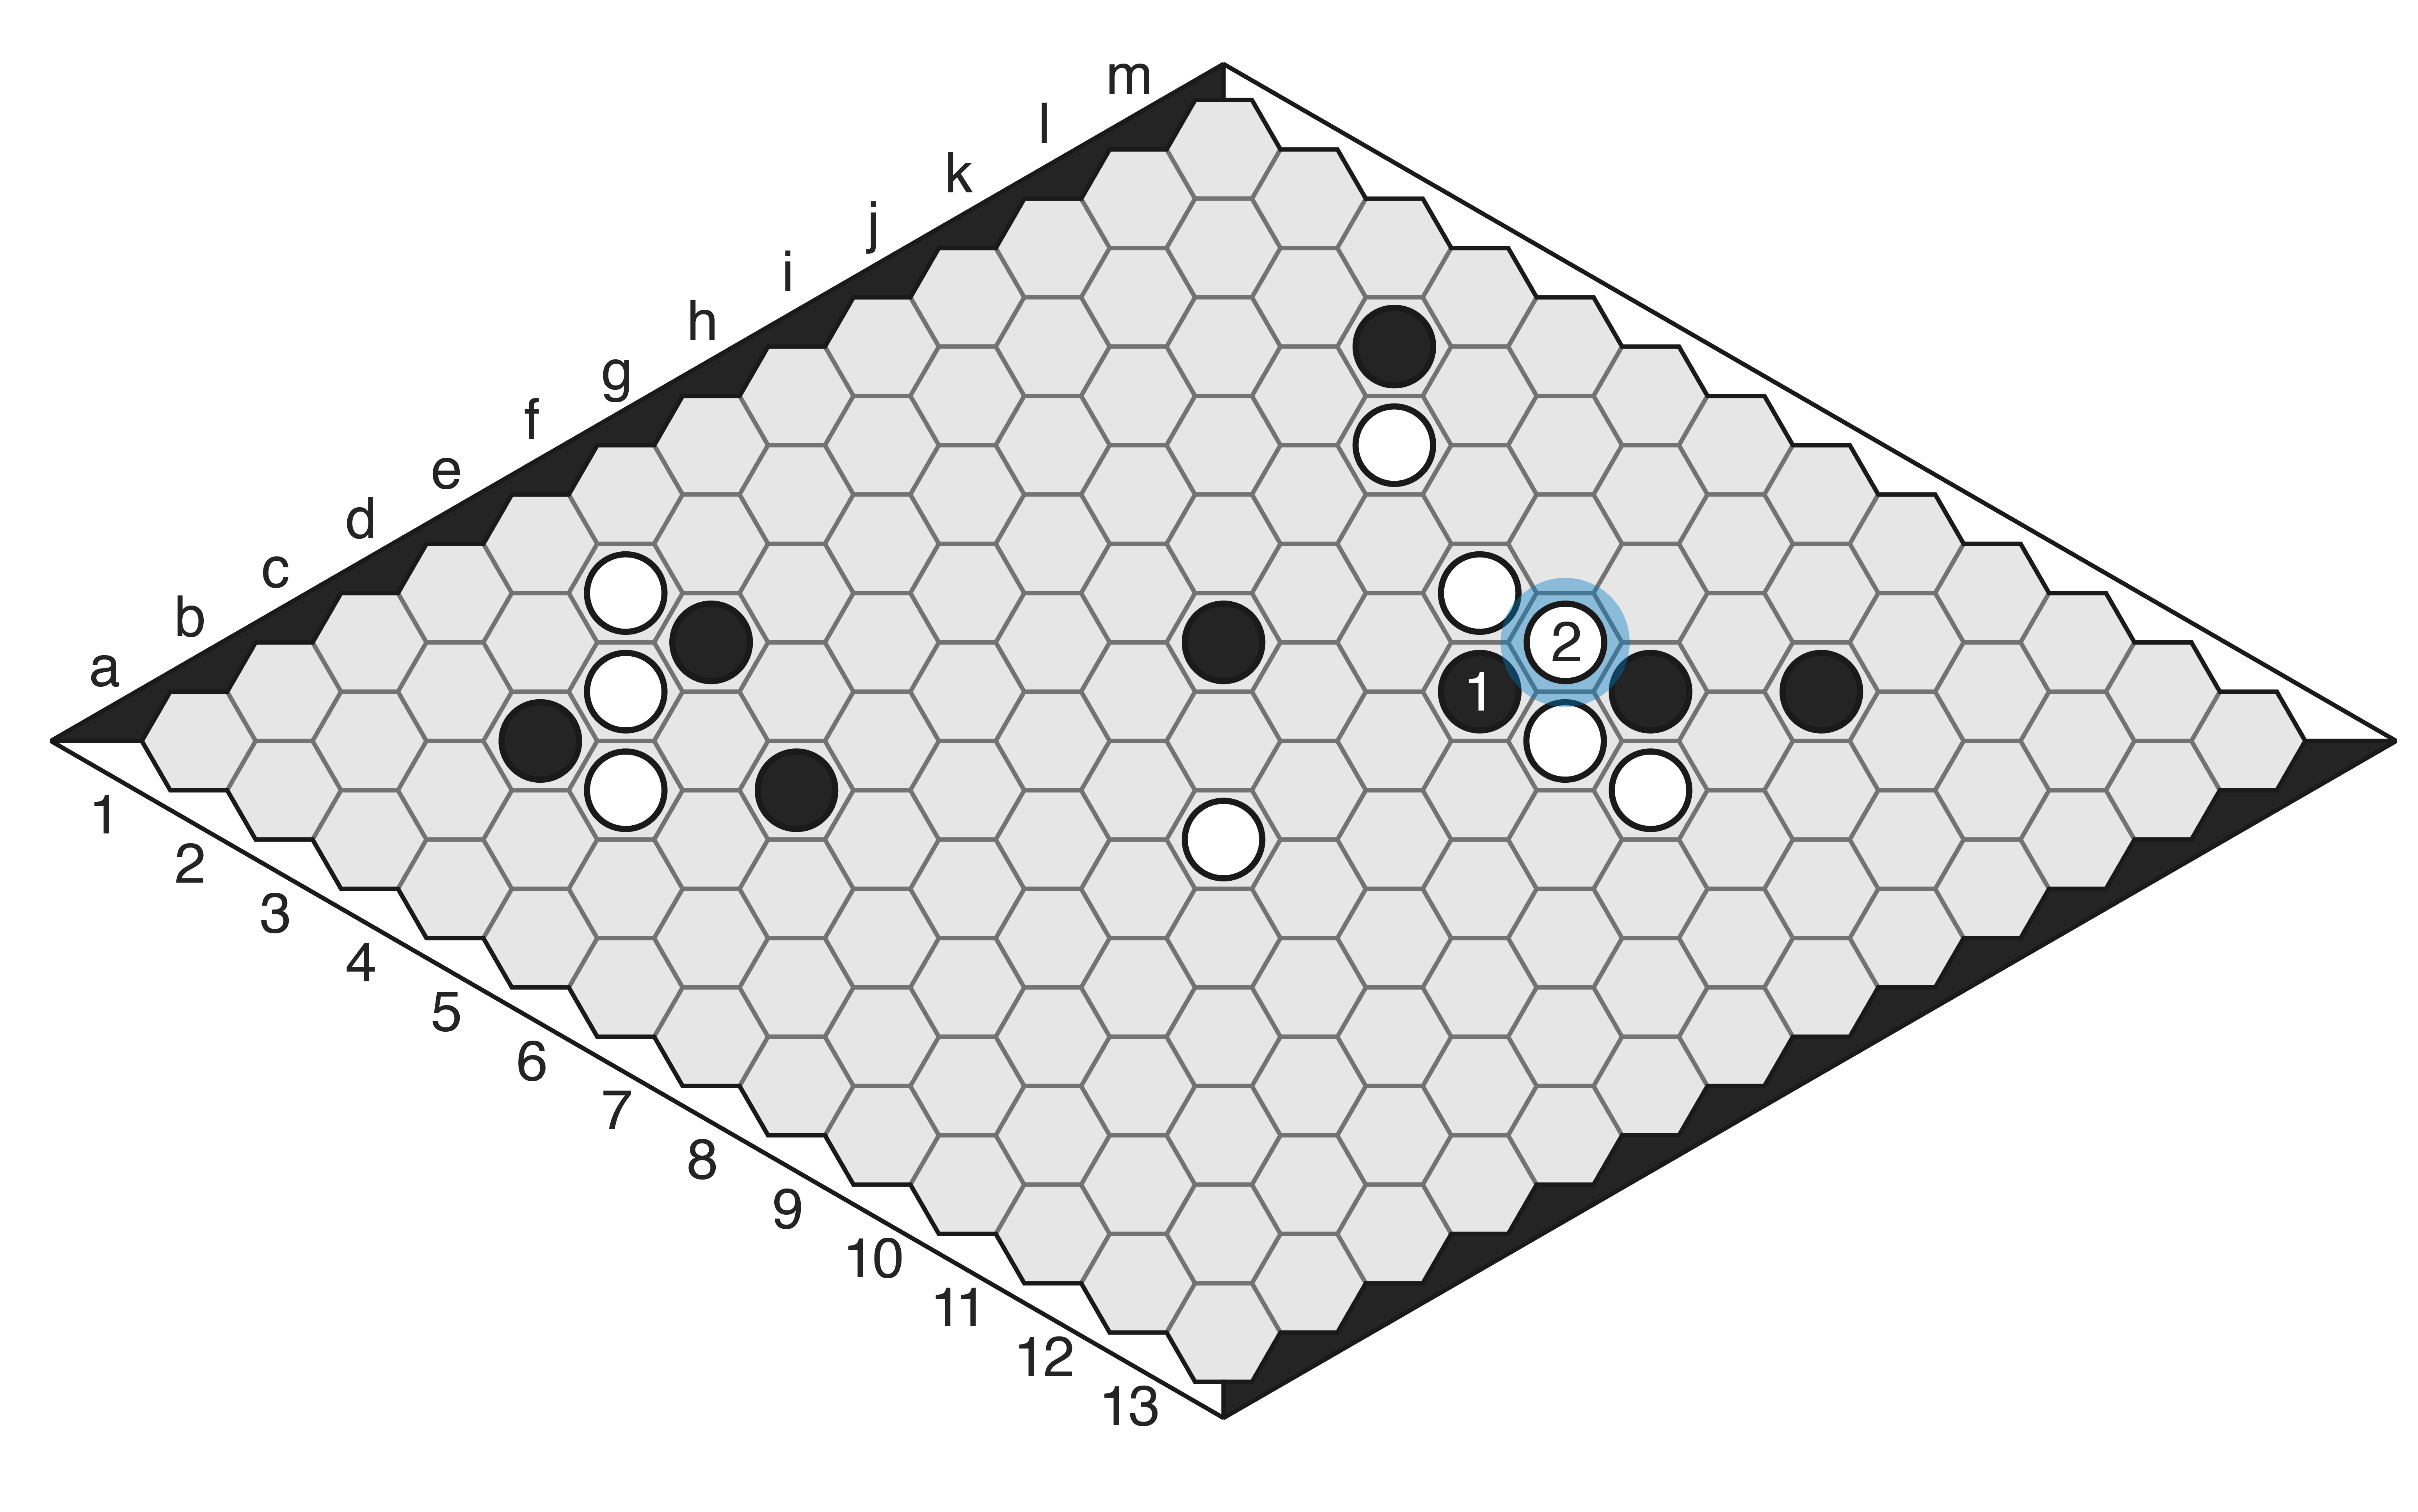
Move 3-4: This is a common joseki. Black’s (3) is connected by Template A-4, and escapes second-row ladders while threatening White (2). White’s response connects back to the edge with Template A-4, while restoring their ladder escapes.
Move 5: The 5-5 point is a popular opening in the obtuse corner. Lately, 4-4 has become more popular on the 13×13 board, a development spurred by the play of very strong AlphaGo-style bots. On the larger 15×15 board, it’s an open question whether 4-4 or 5-5 is stronger.
Whether on the 4th or 5th row, having a stone in your obtuse corner is always a plus. These corners are almost always taken early in the game.
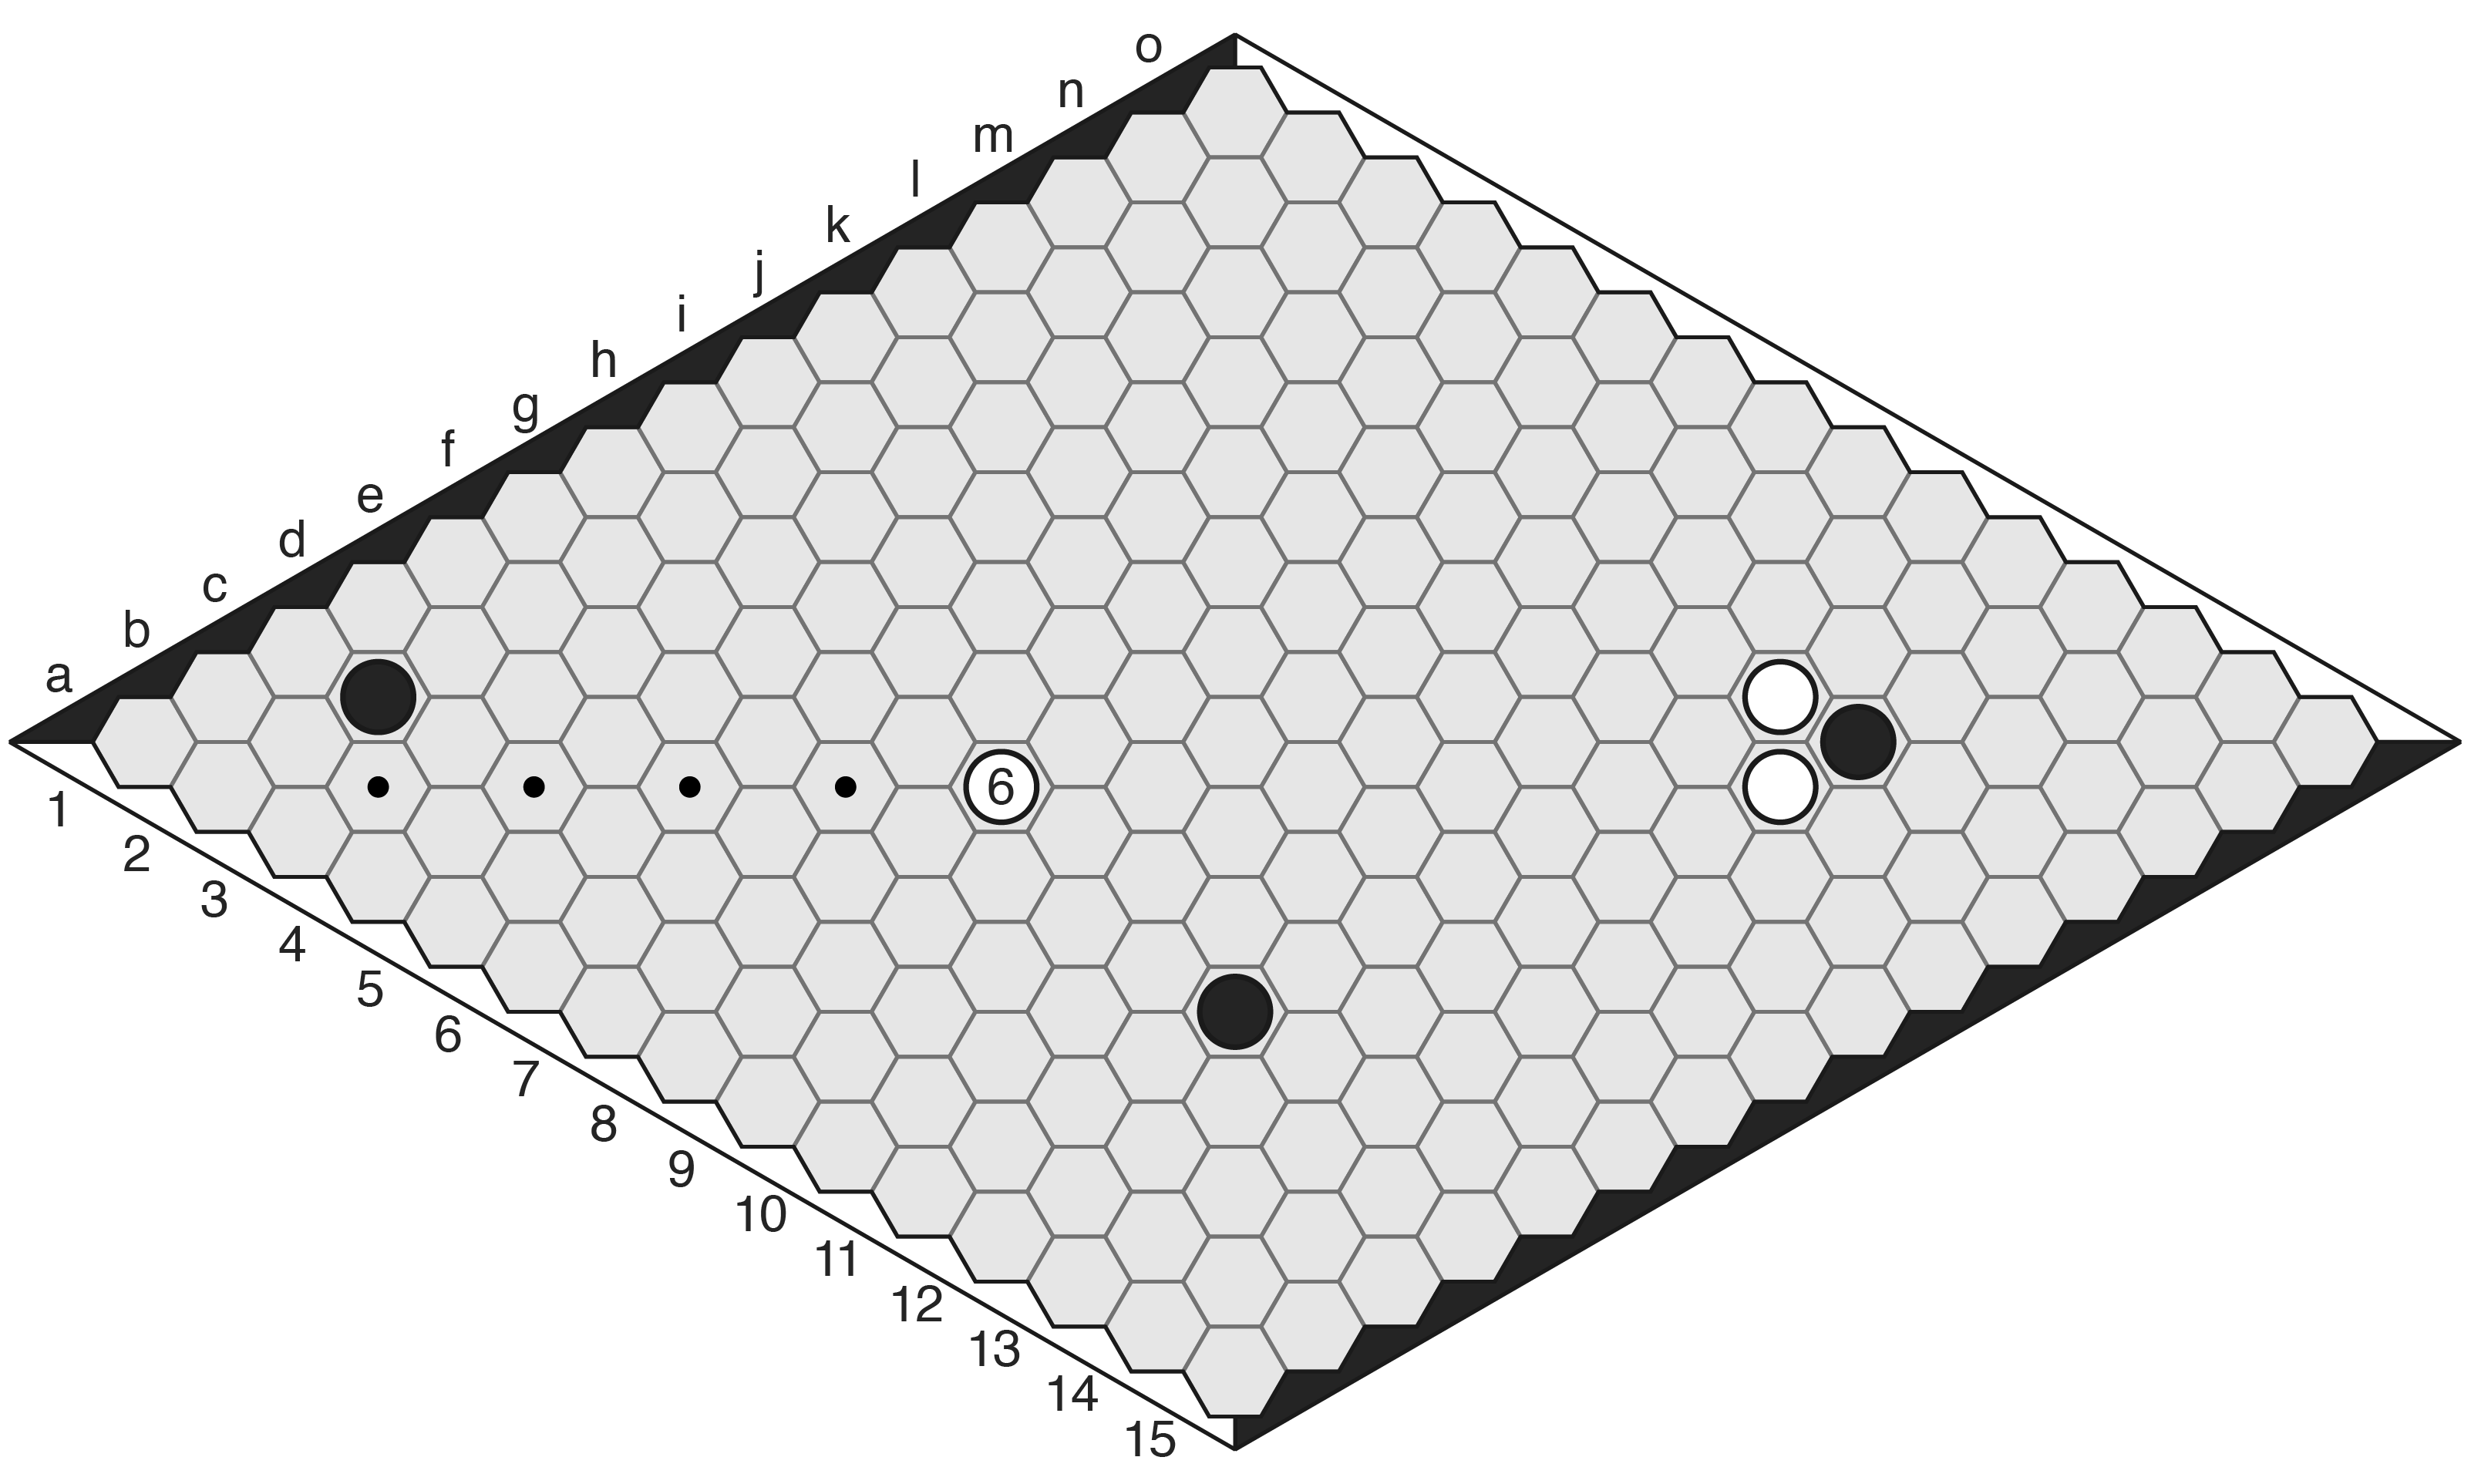
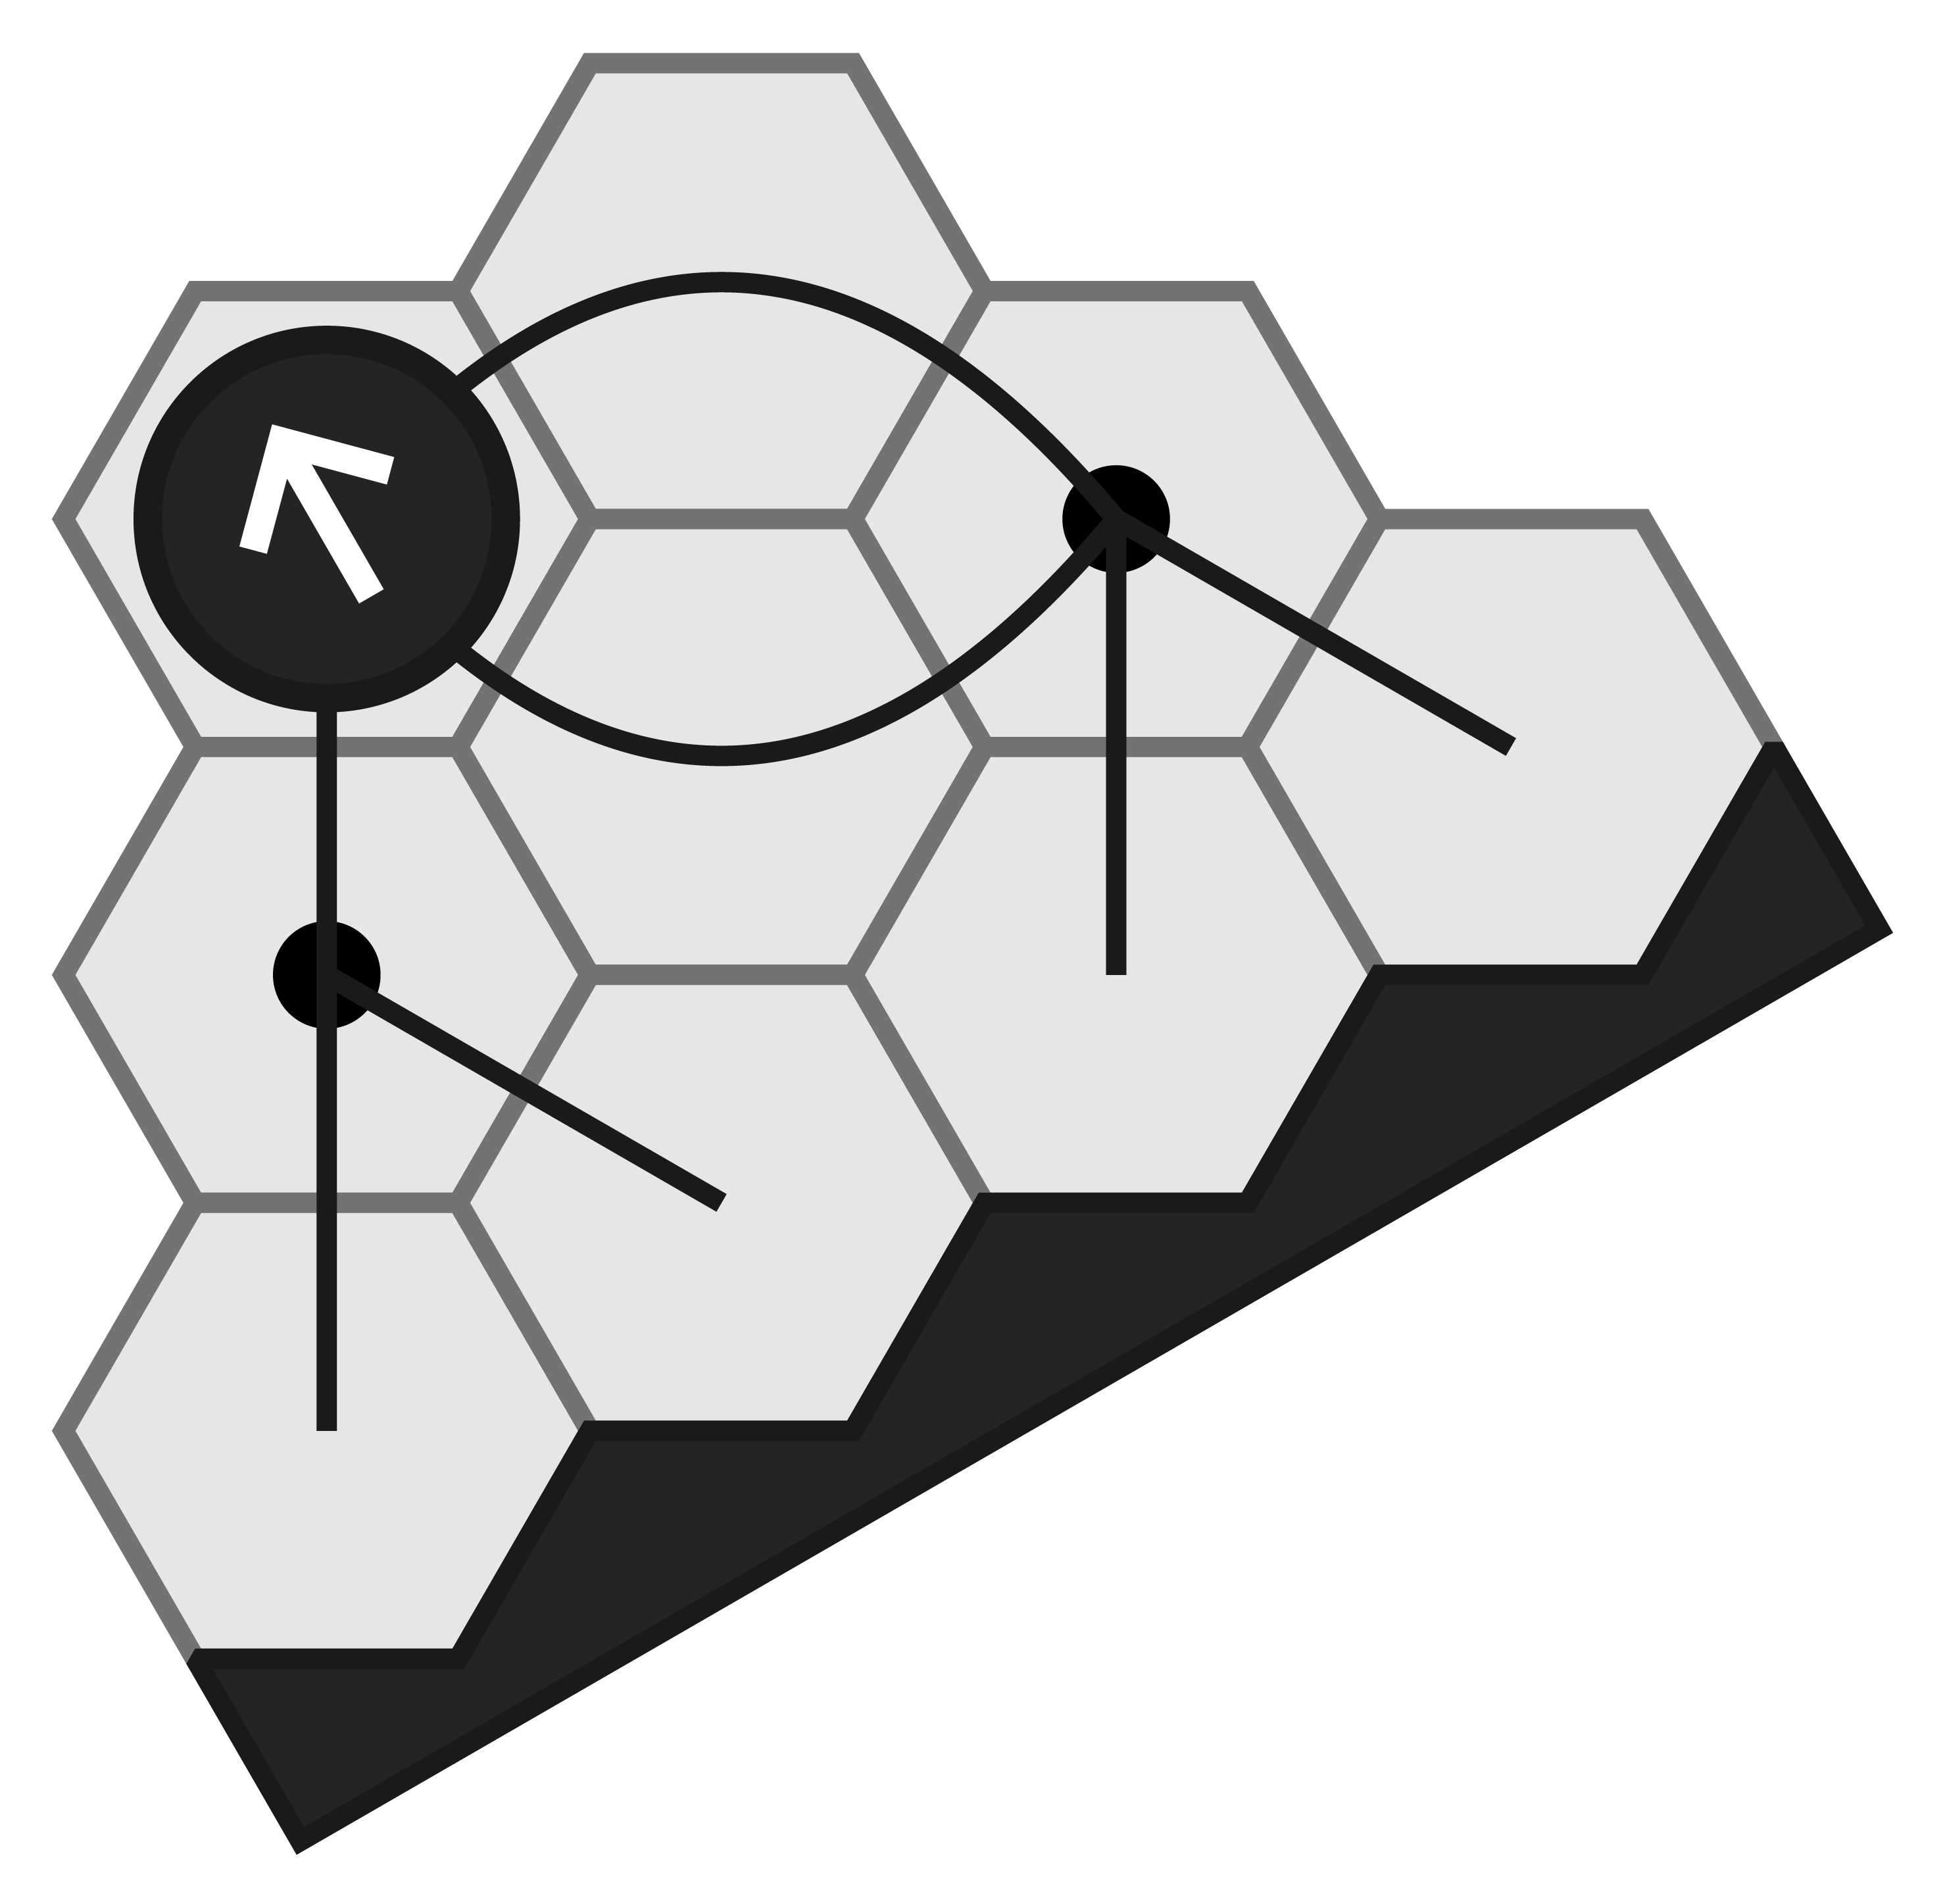
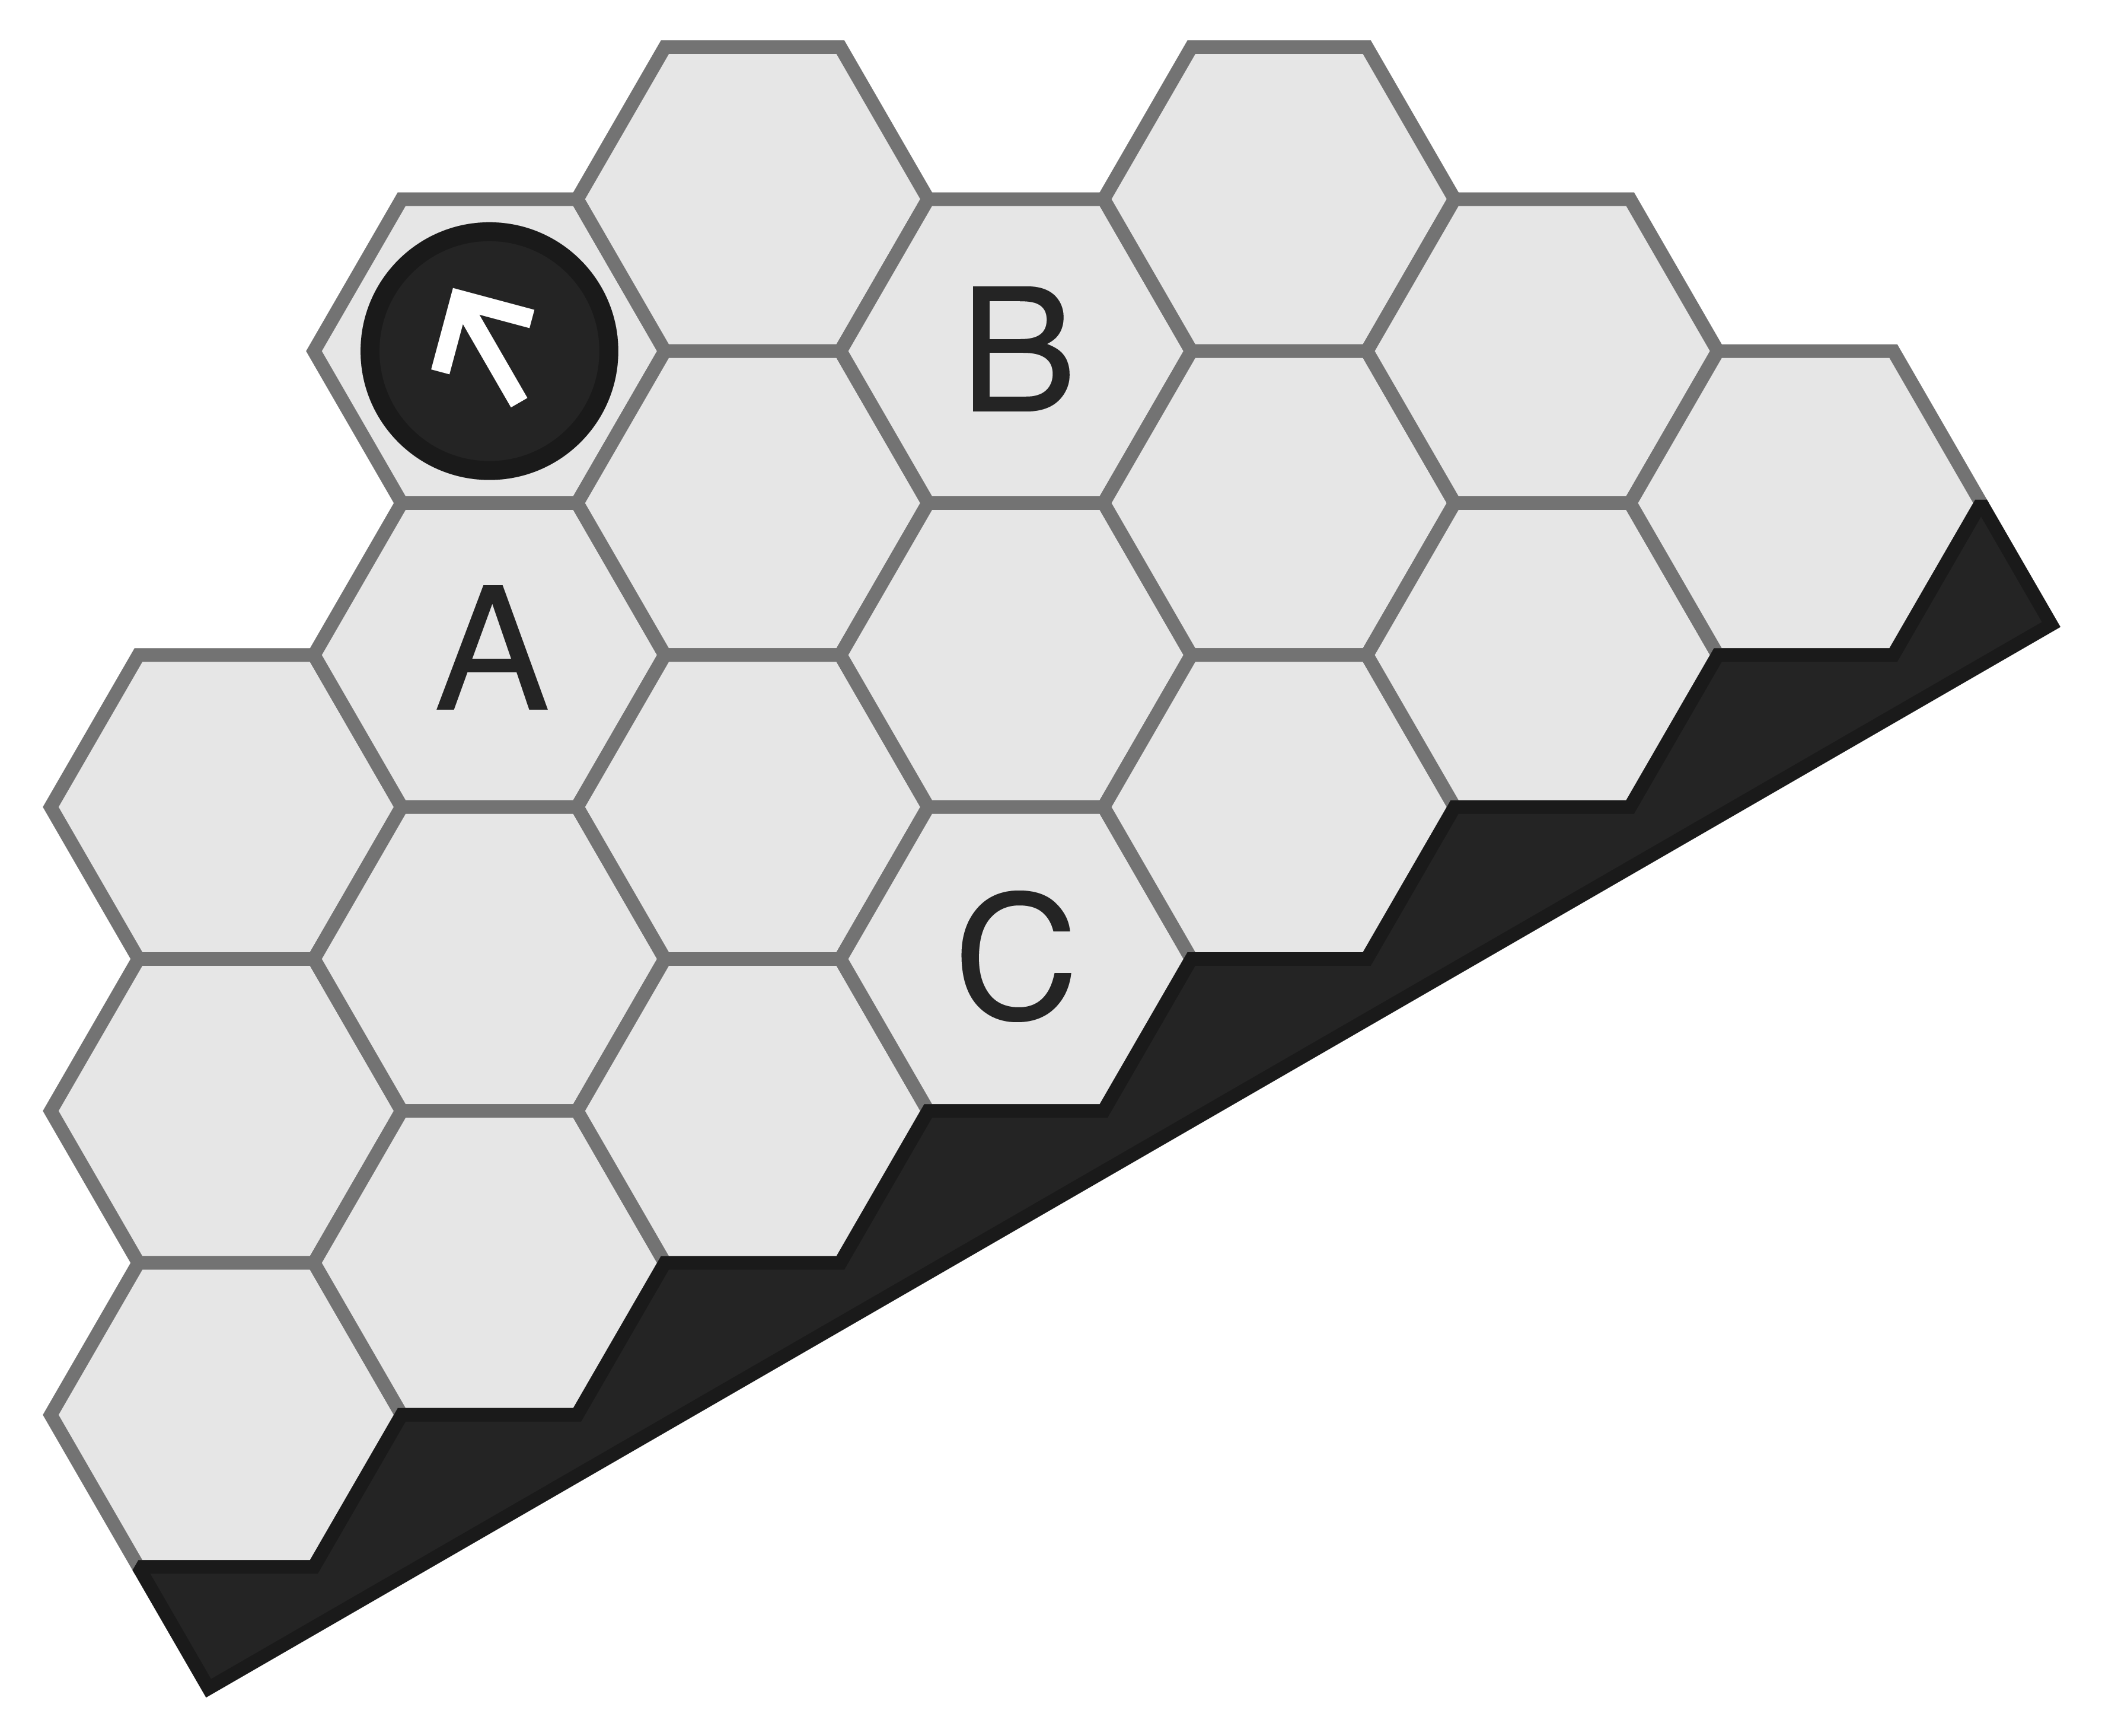
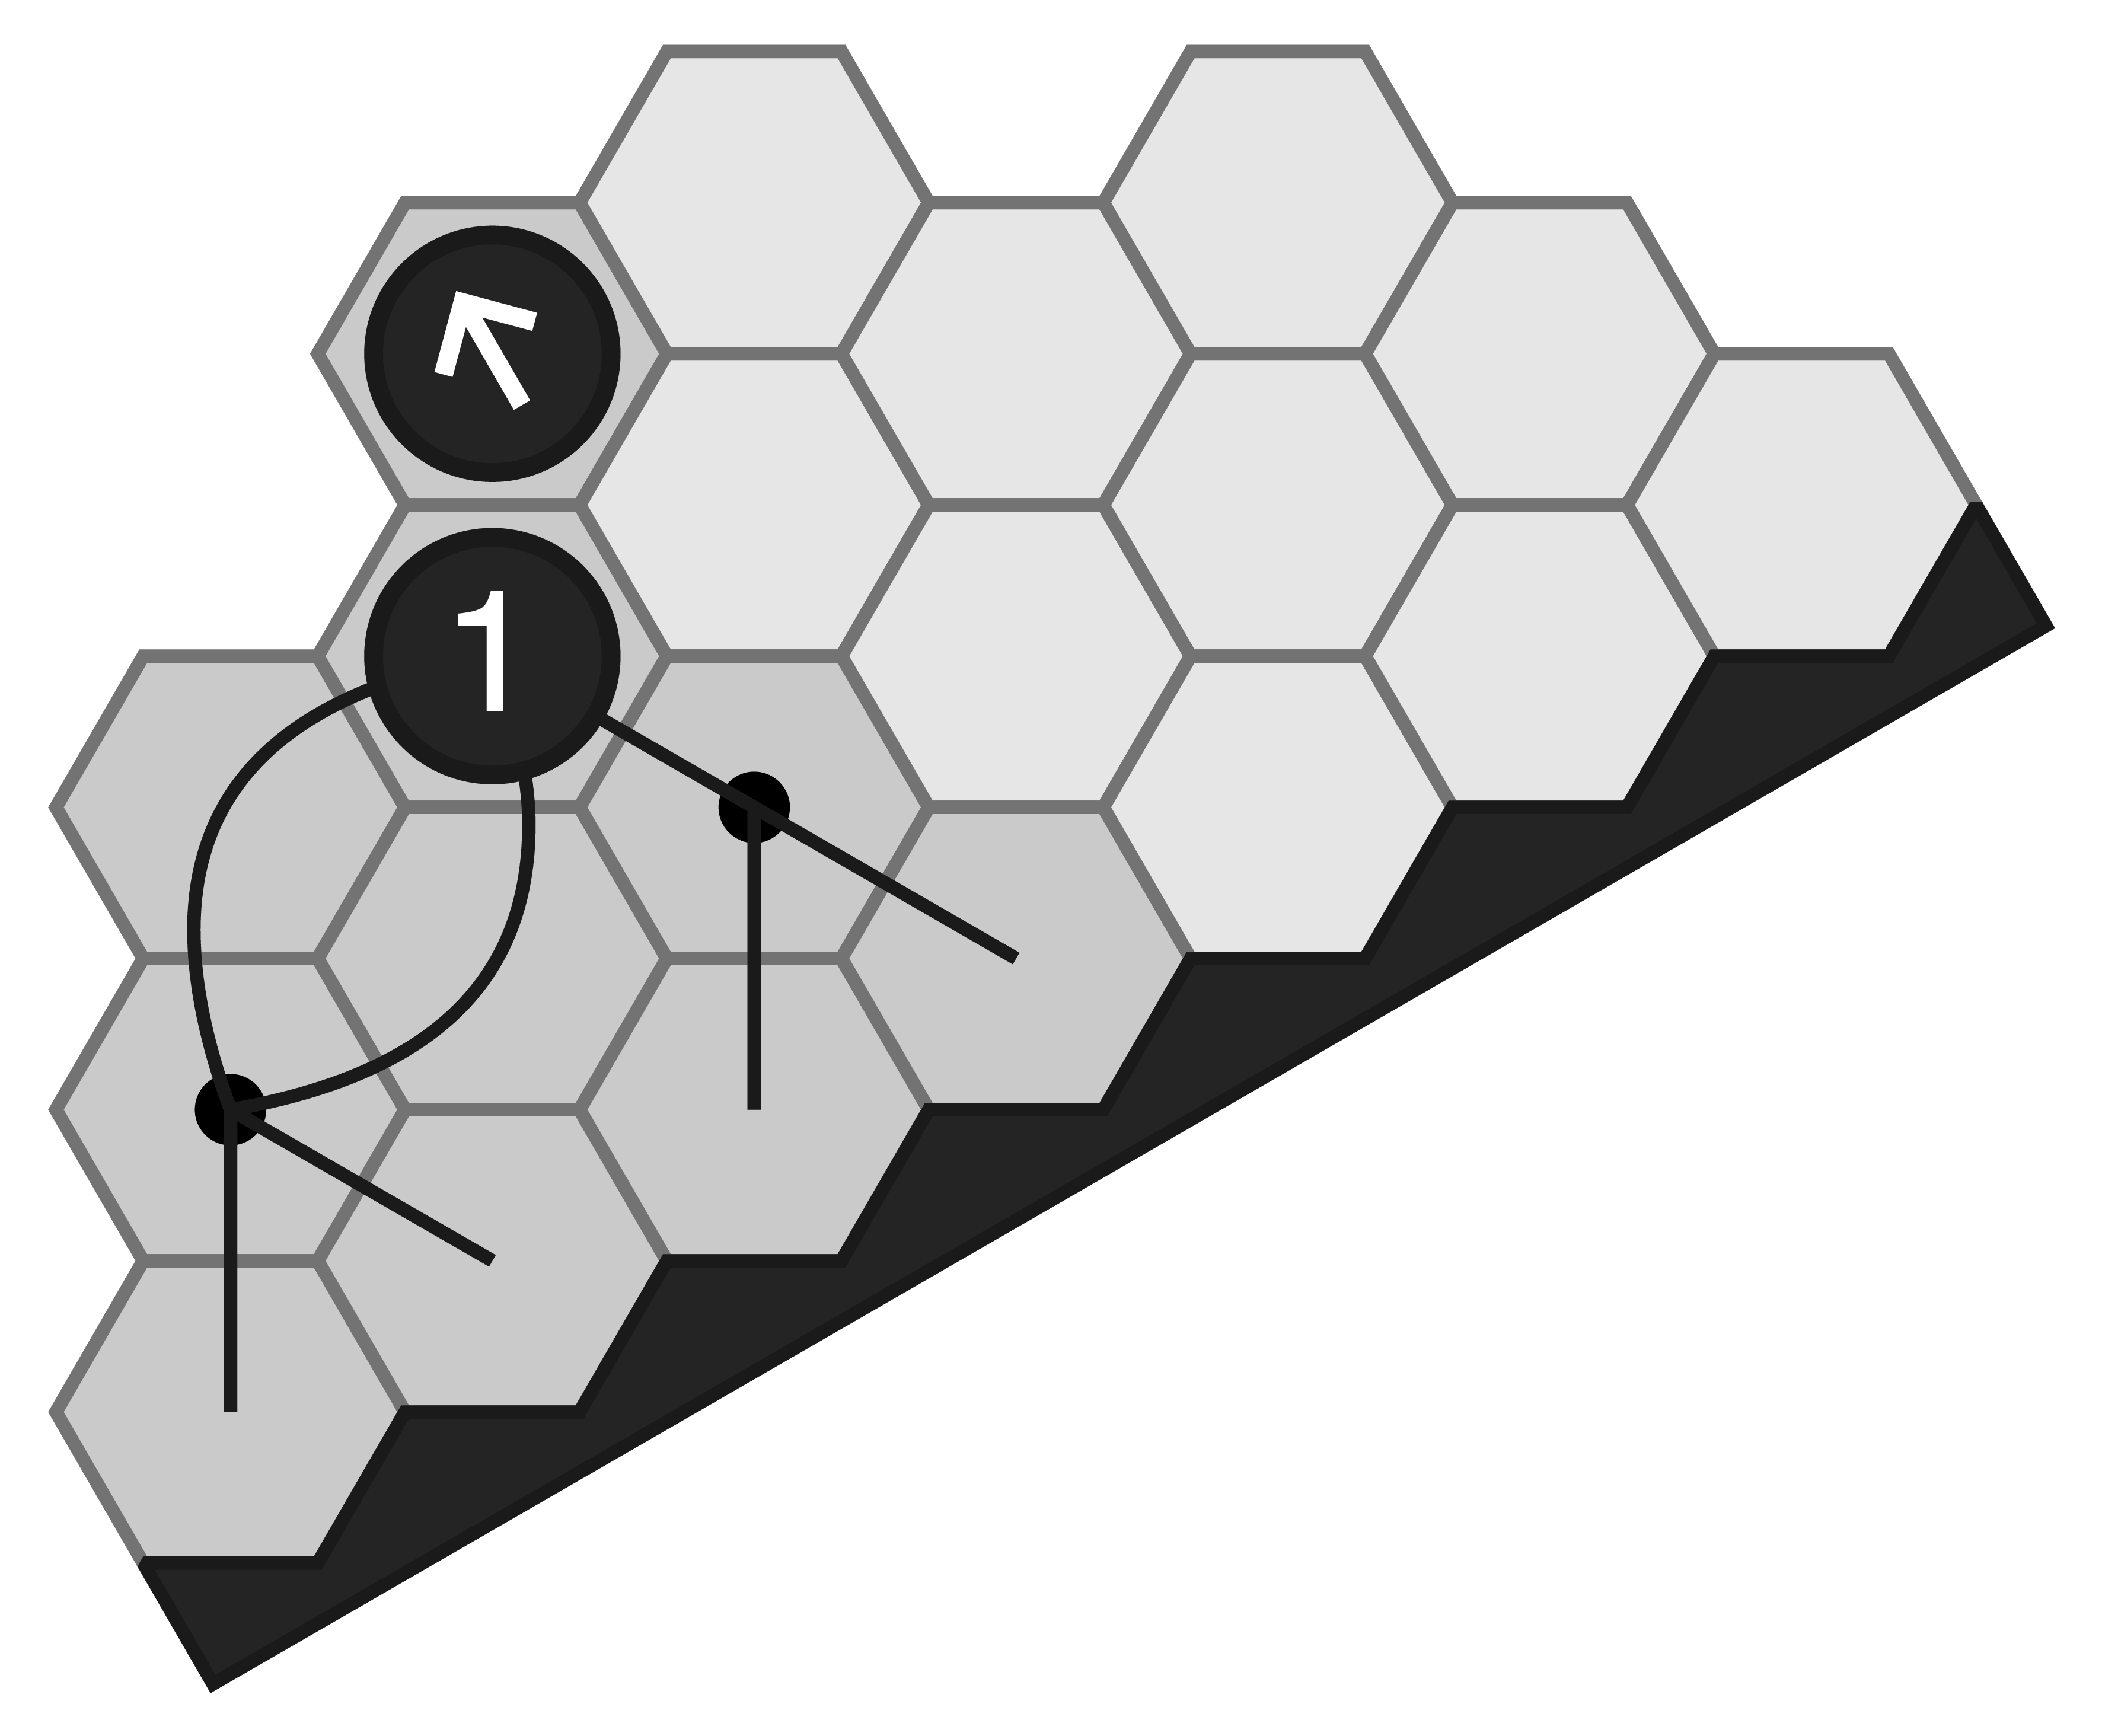
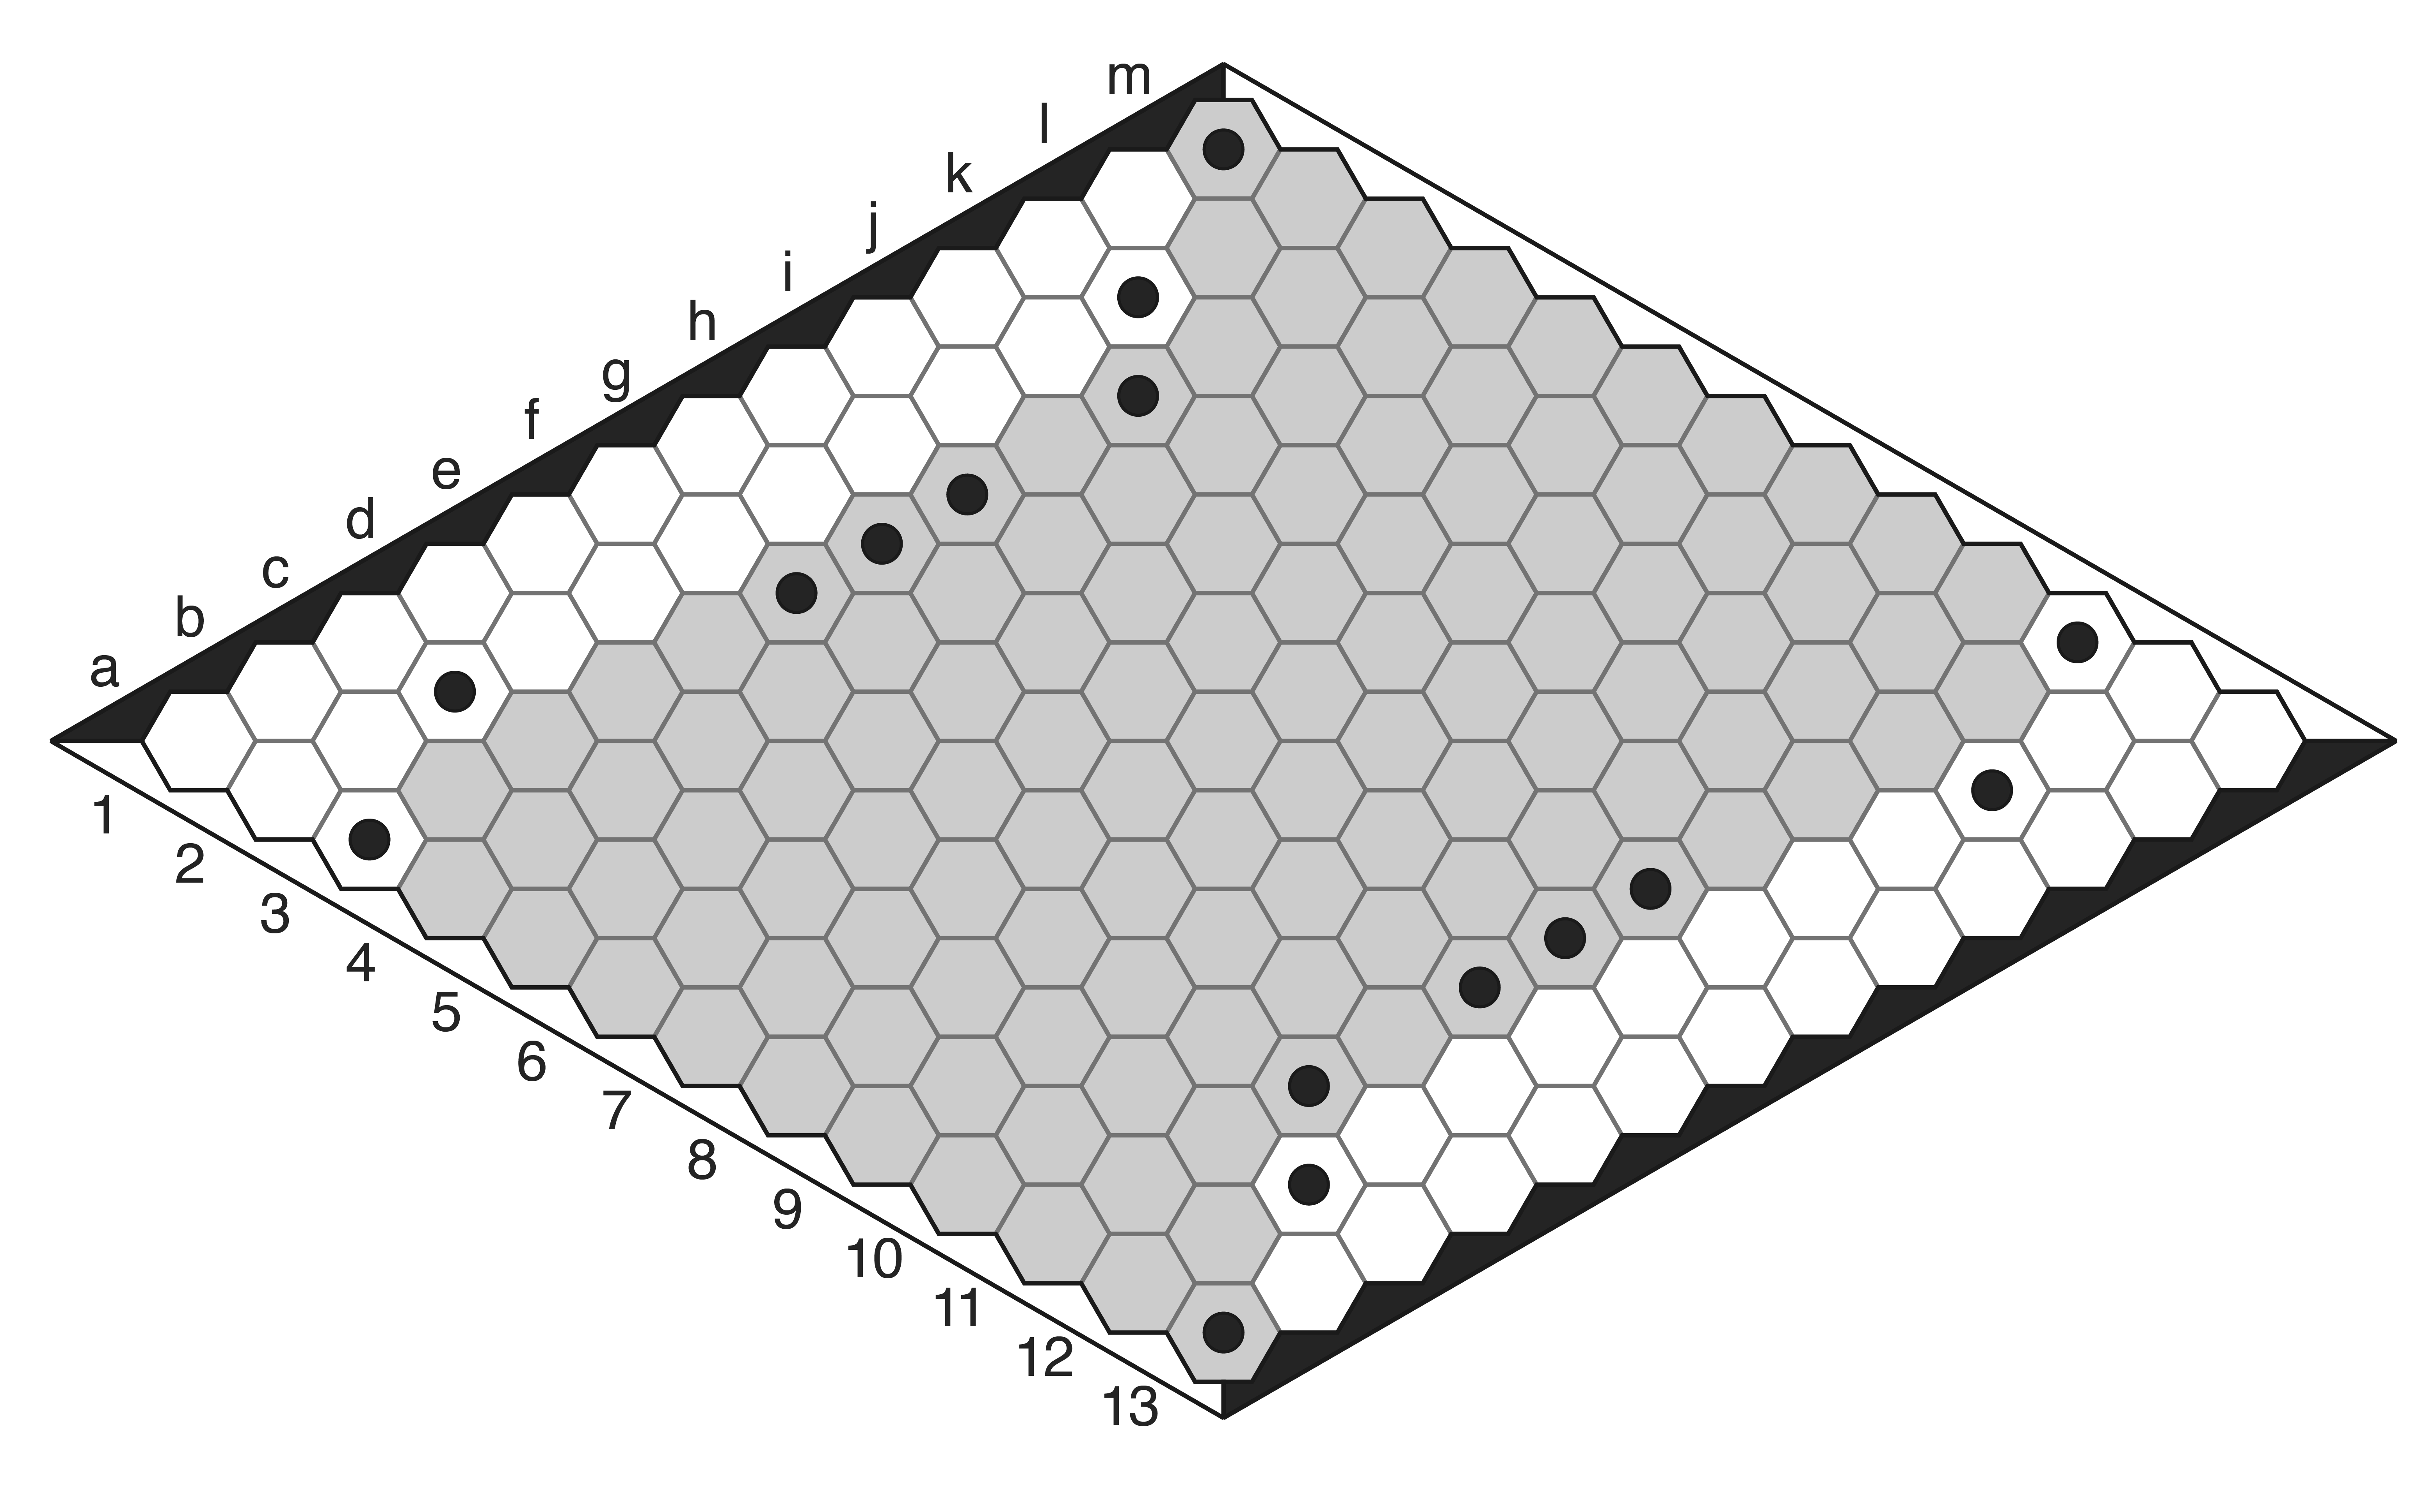
Move 6: White needs something on his southwest edge. You may be wondering why this of all spots was chosen. One principle is that you want stones that are “attacking,” in the sense that they can reach the edge through bridge moves to the side (see the dots in the diagram). Stones like this are harder to block. This is the closest a stone on the sixth row can get to the acute corner and still be attacking. If not for the black stone on c2, White would likely have played this move at f5. You want your stone as close to the corner as possible because it does more to disrupt your opponent.
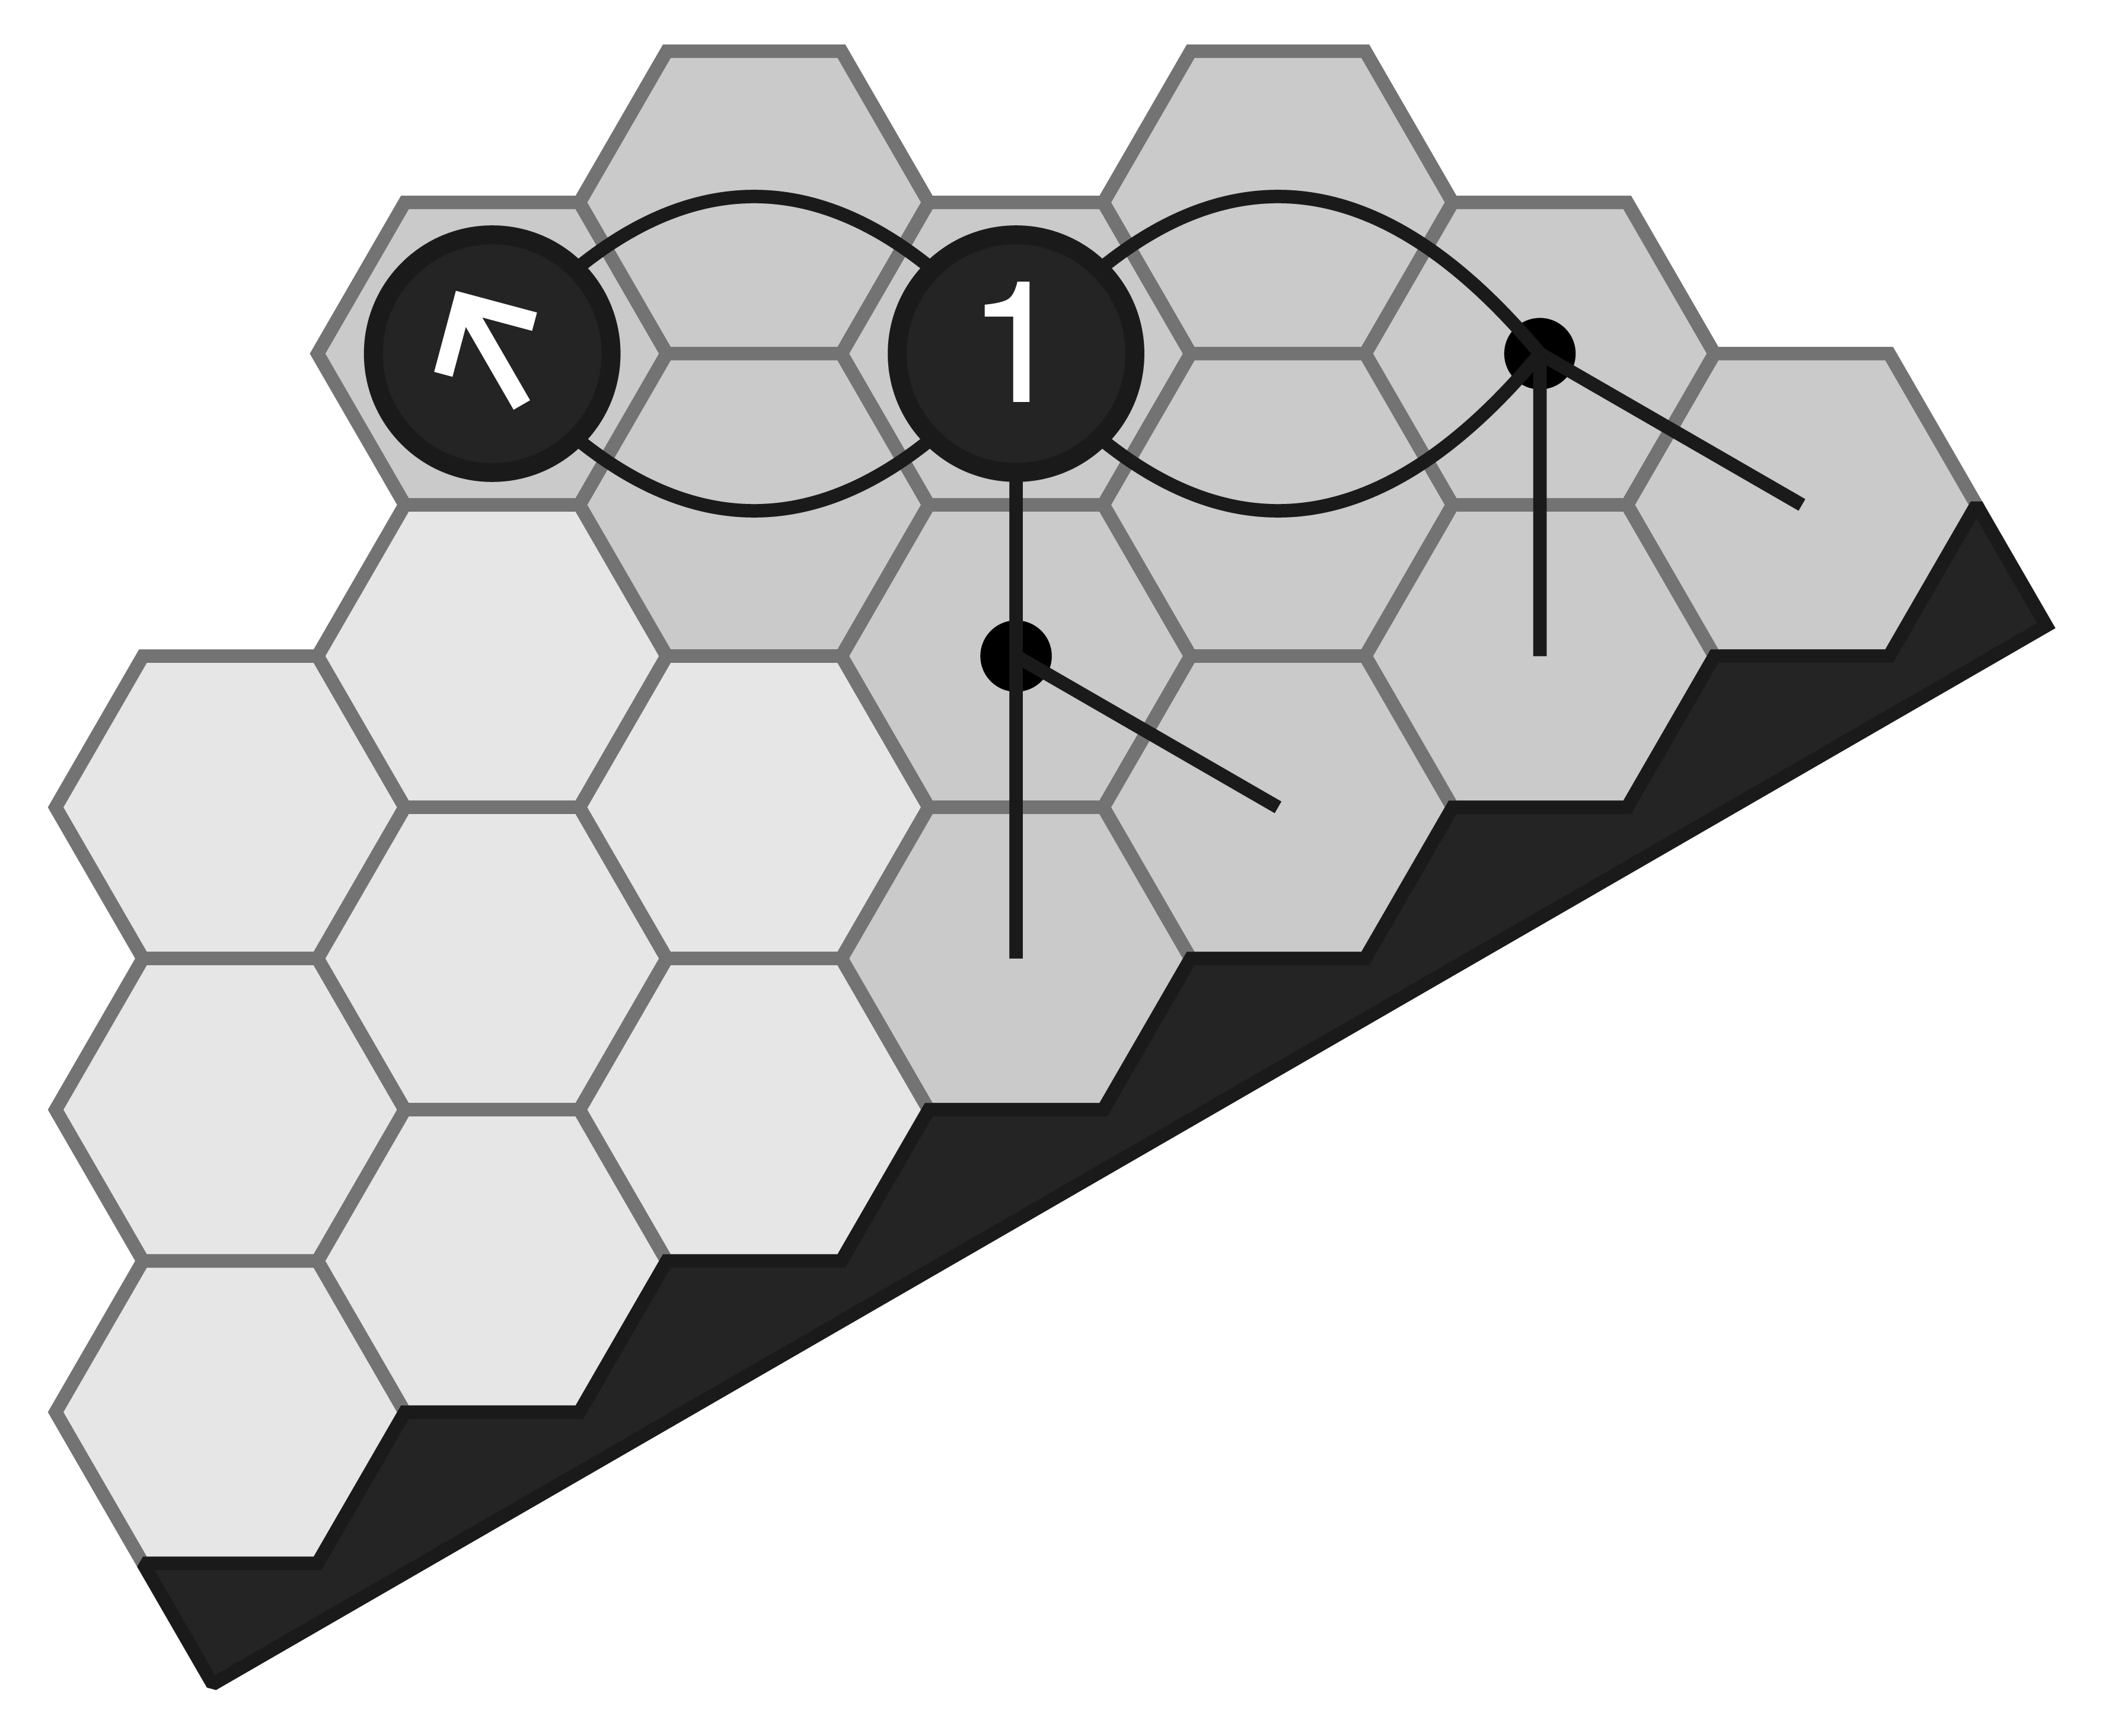
Note also that (2) was “attacking” in this sense in the east corner. This is part of why the 5-4 point is so popular.
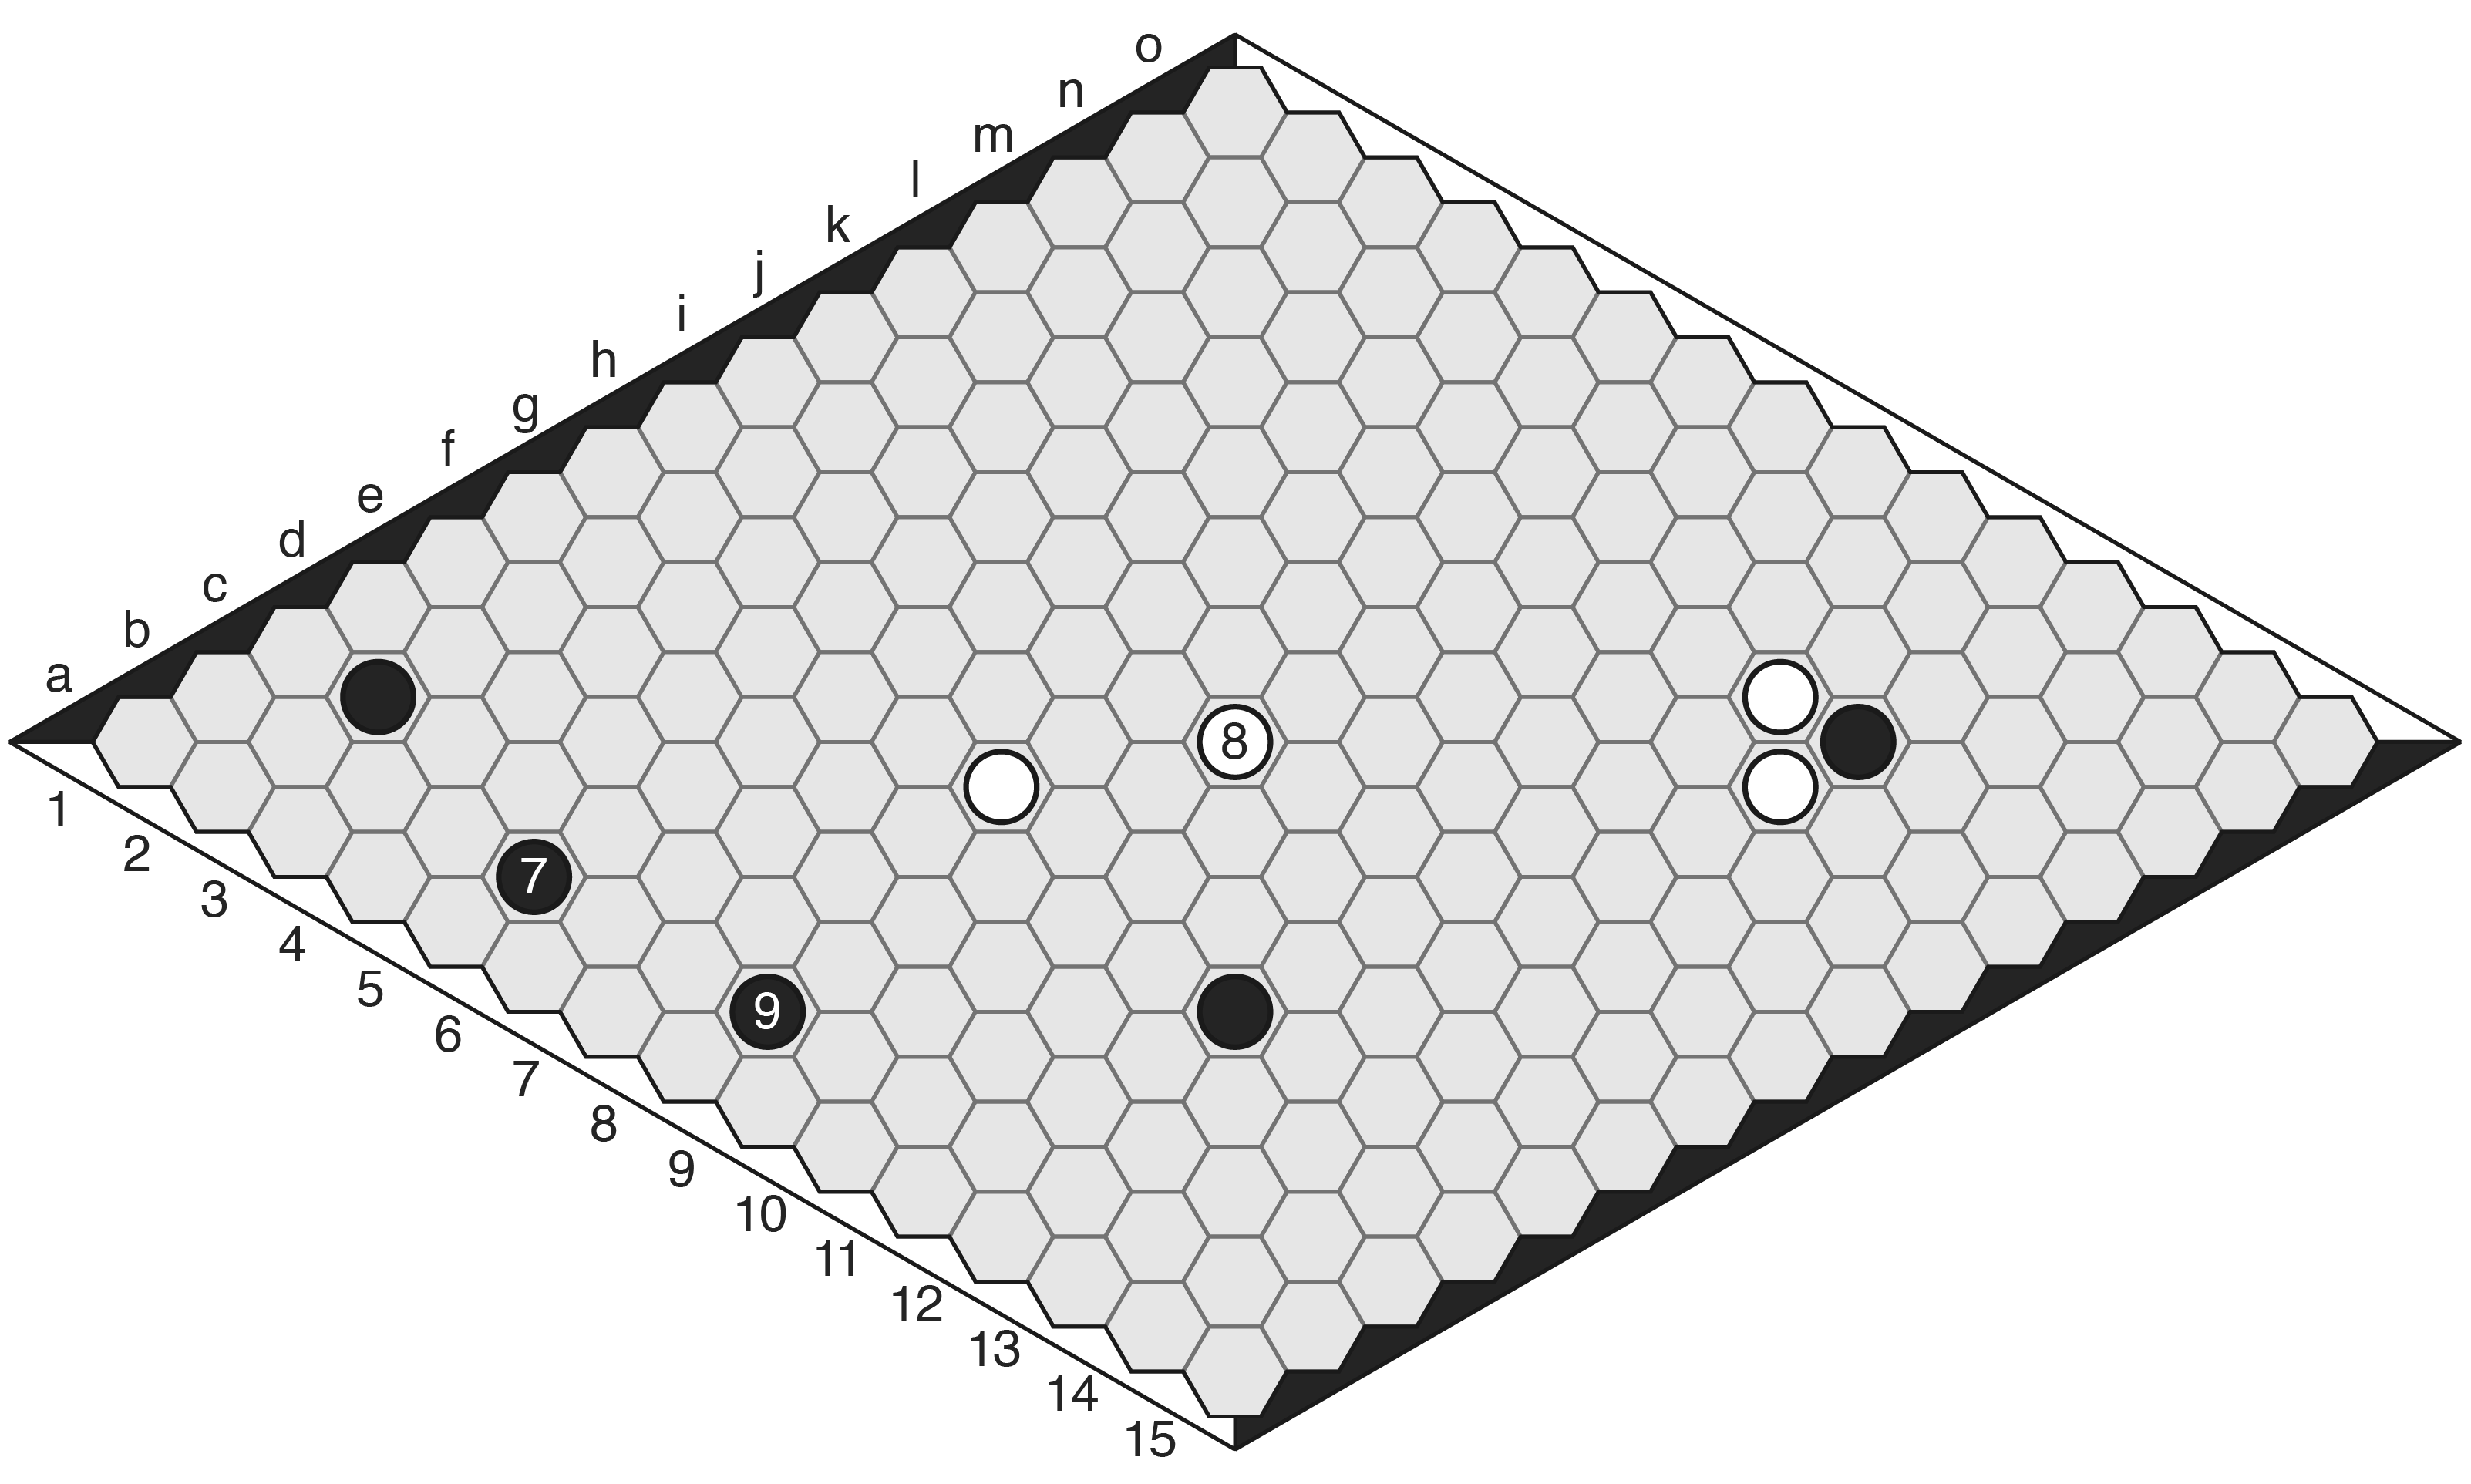
Move 7: This is a popular combination with c2. Together, these stones form Template I-5, and they can escape just about any ladder from the second to sixth row along this edge. This Template is rather difficult to attack. Note also that this move invades the “attacking zone” of White’s f7 stone.
Move 8: White plays here at the center of the board. This move is somewhat of a distant response to (7). With (7) invading the attacking zone of the f7 stone, Black could potentially block that stone now. But White doesn’t want to overcommit to this area — it’s important to spread influence around the board, especially early in the game when the potential lines of play are so fluid. This stone can support the f7 stone while also increasing White’s influence over the centre of the board and towards the northeast edge.
Move 9: Counterintuitively, in Hex it’s often stronger to play on your opponent’s edge than on your own. Having stones separated by two empty hexes on the opponent’s second row can be quite strong. Notice how White is unable to fit Template A-3 in between (7) and (9) (nor in between (7) and c2). This stone (9) is basically connected to Black’s northwest edge now, because White’s only reasonable blocks (such as at b6 or b7) allow Black to go around to the north (at c6 or c7, respectively). Ultimately, White will need to connect to the southwest edge in the area between (9) and the obtuse corner.

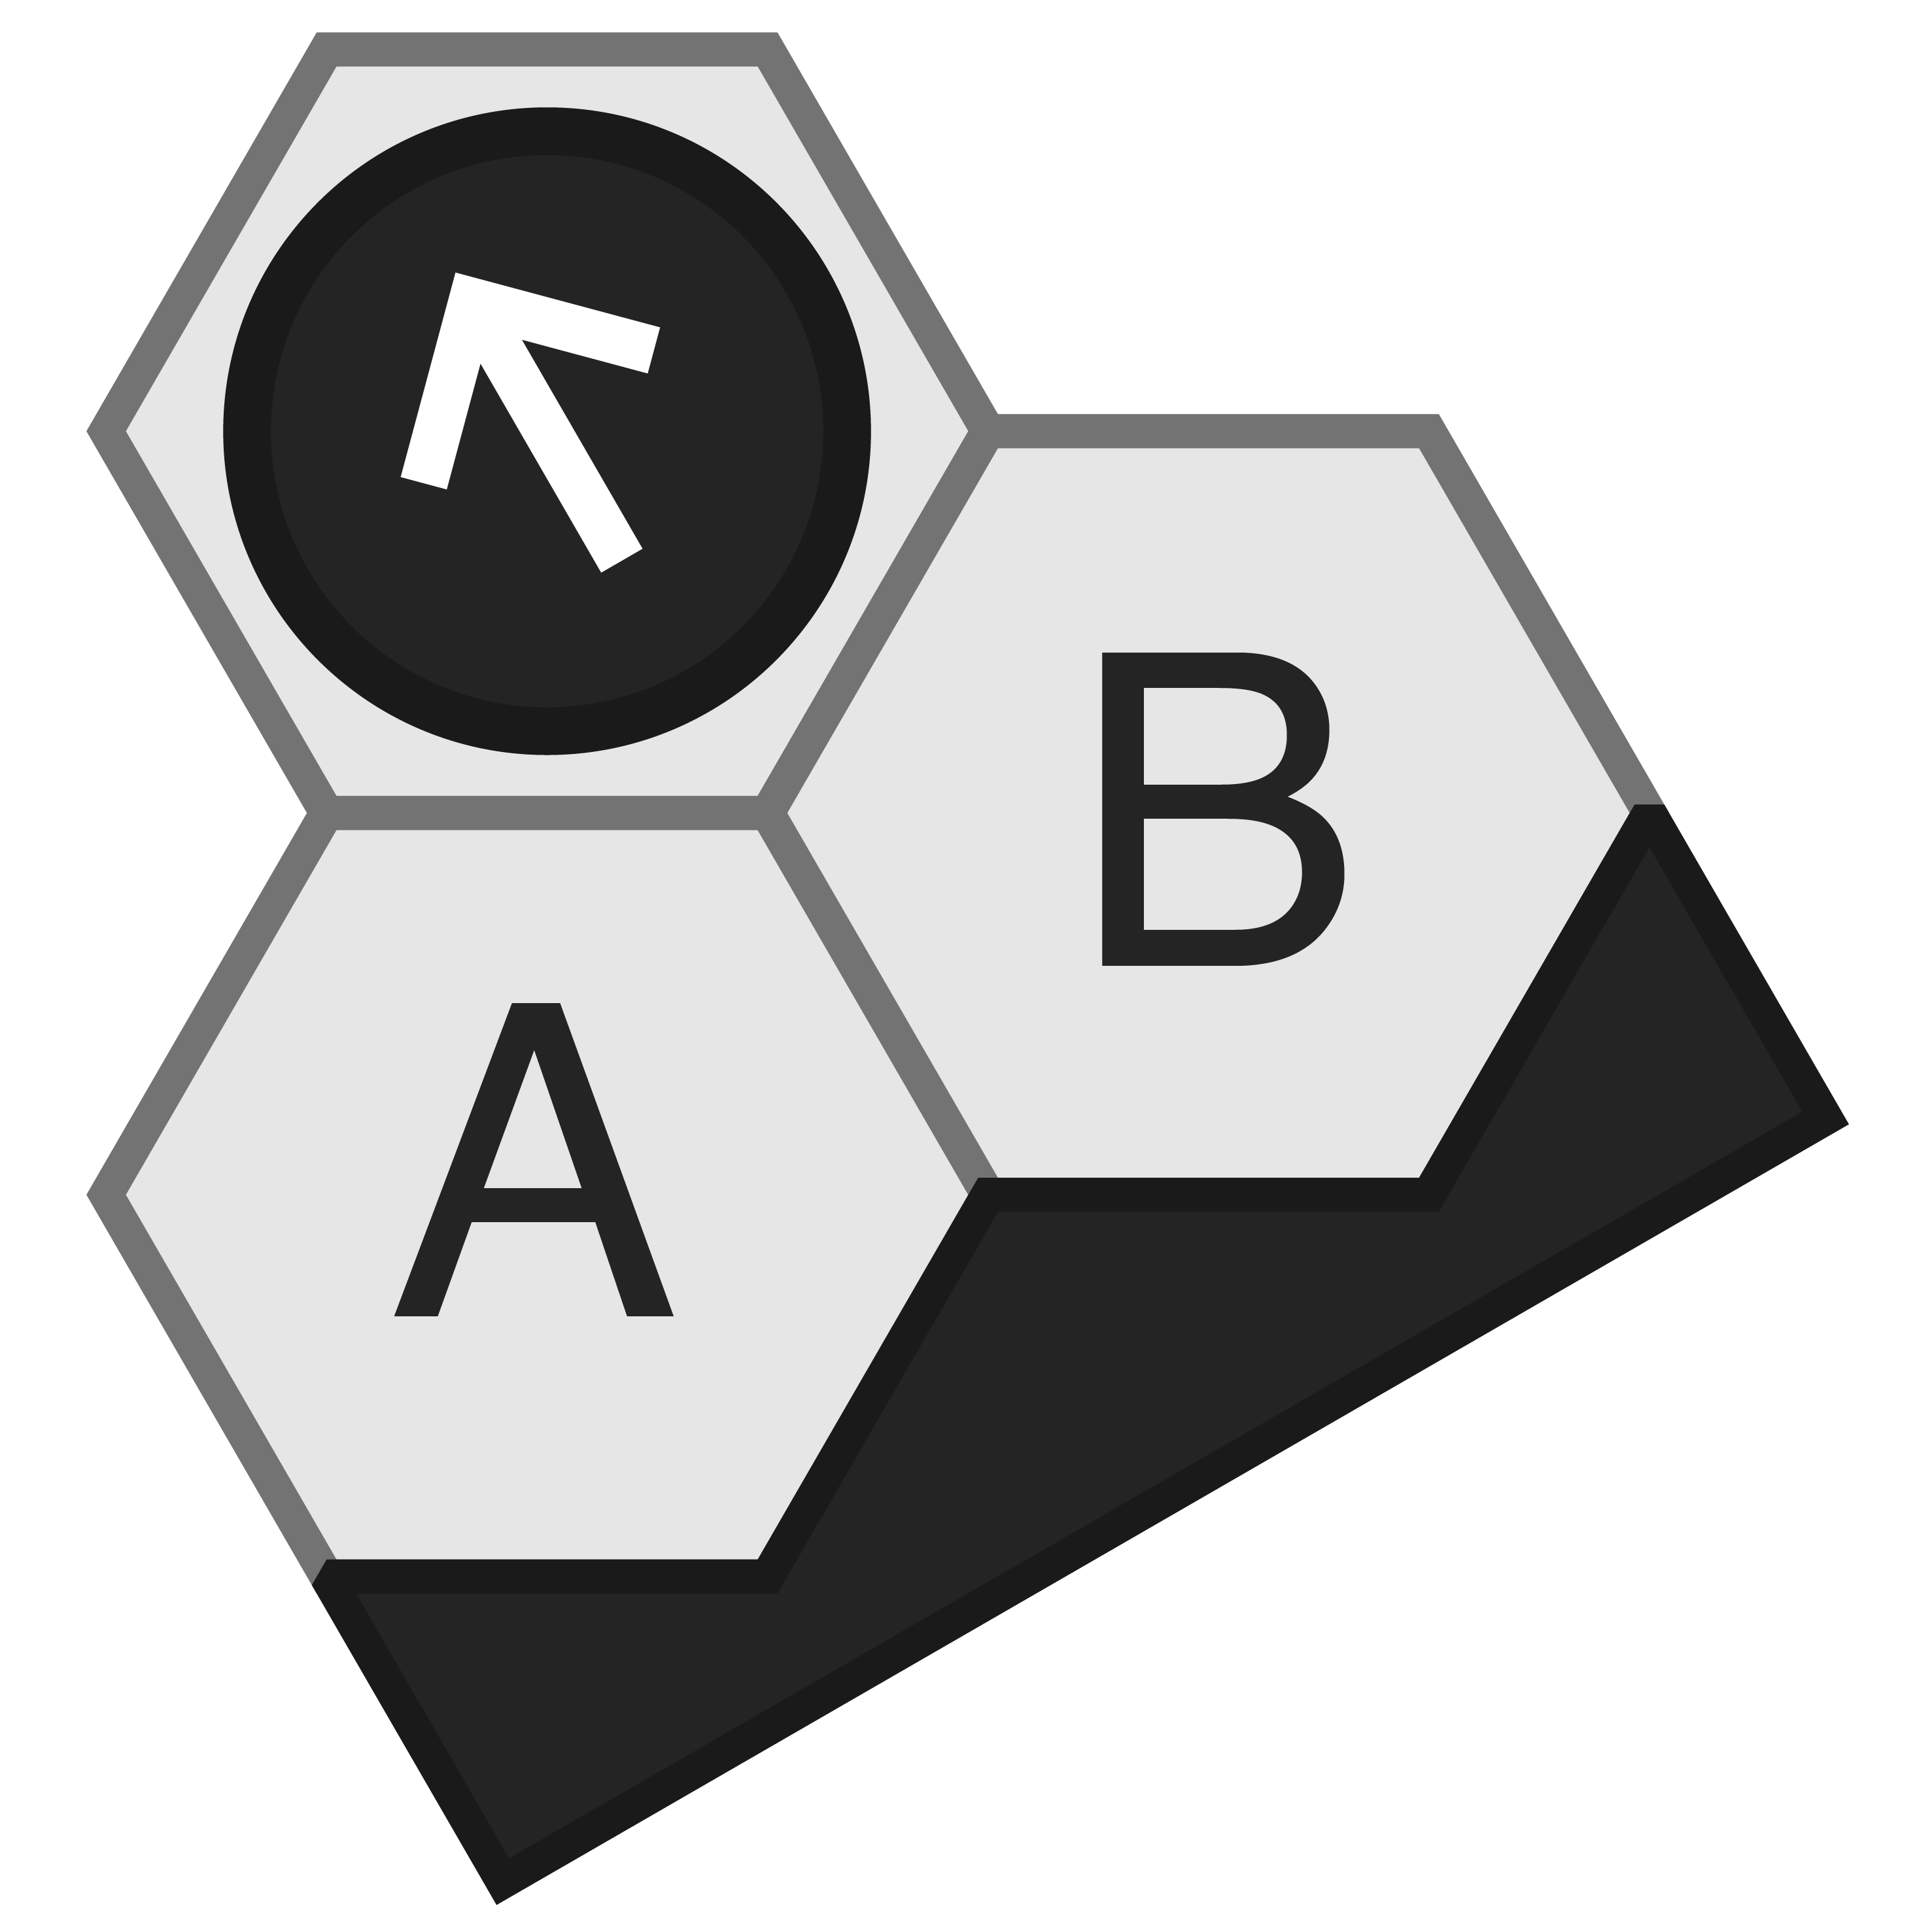
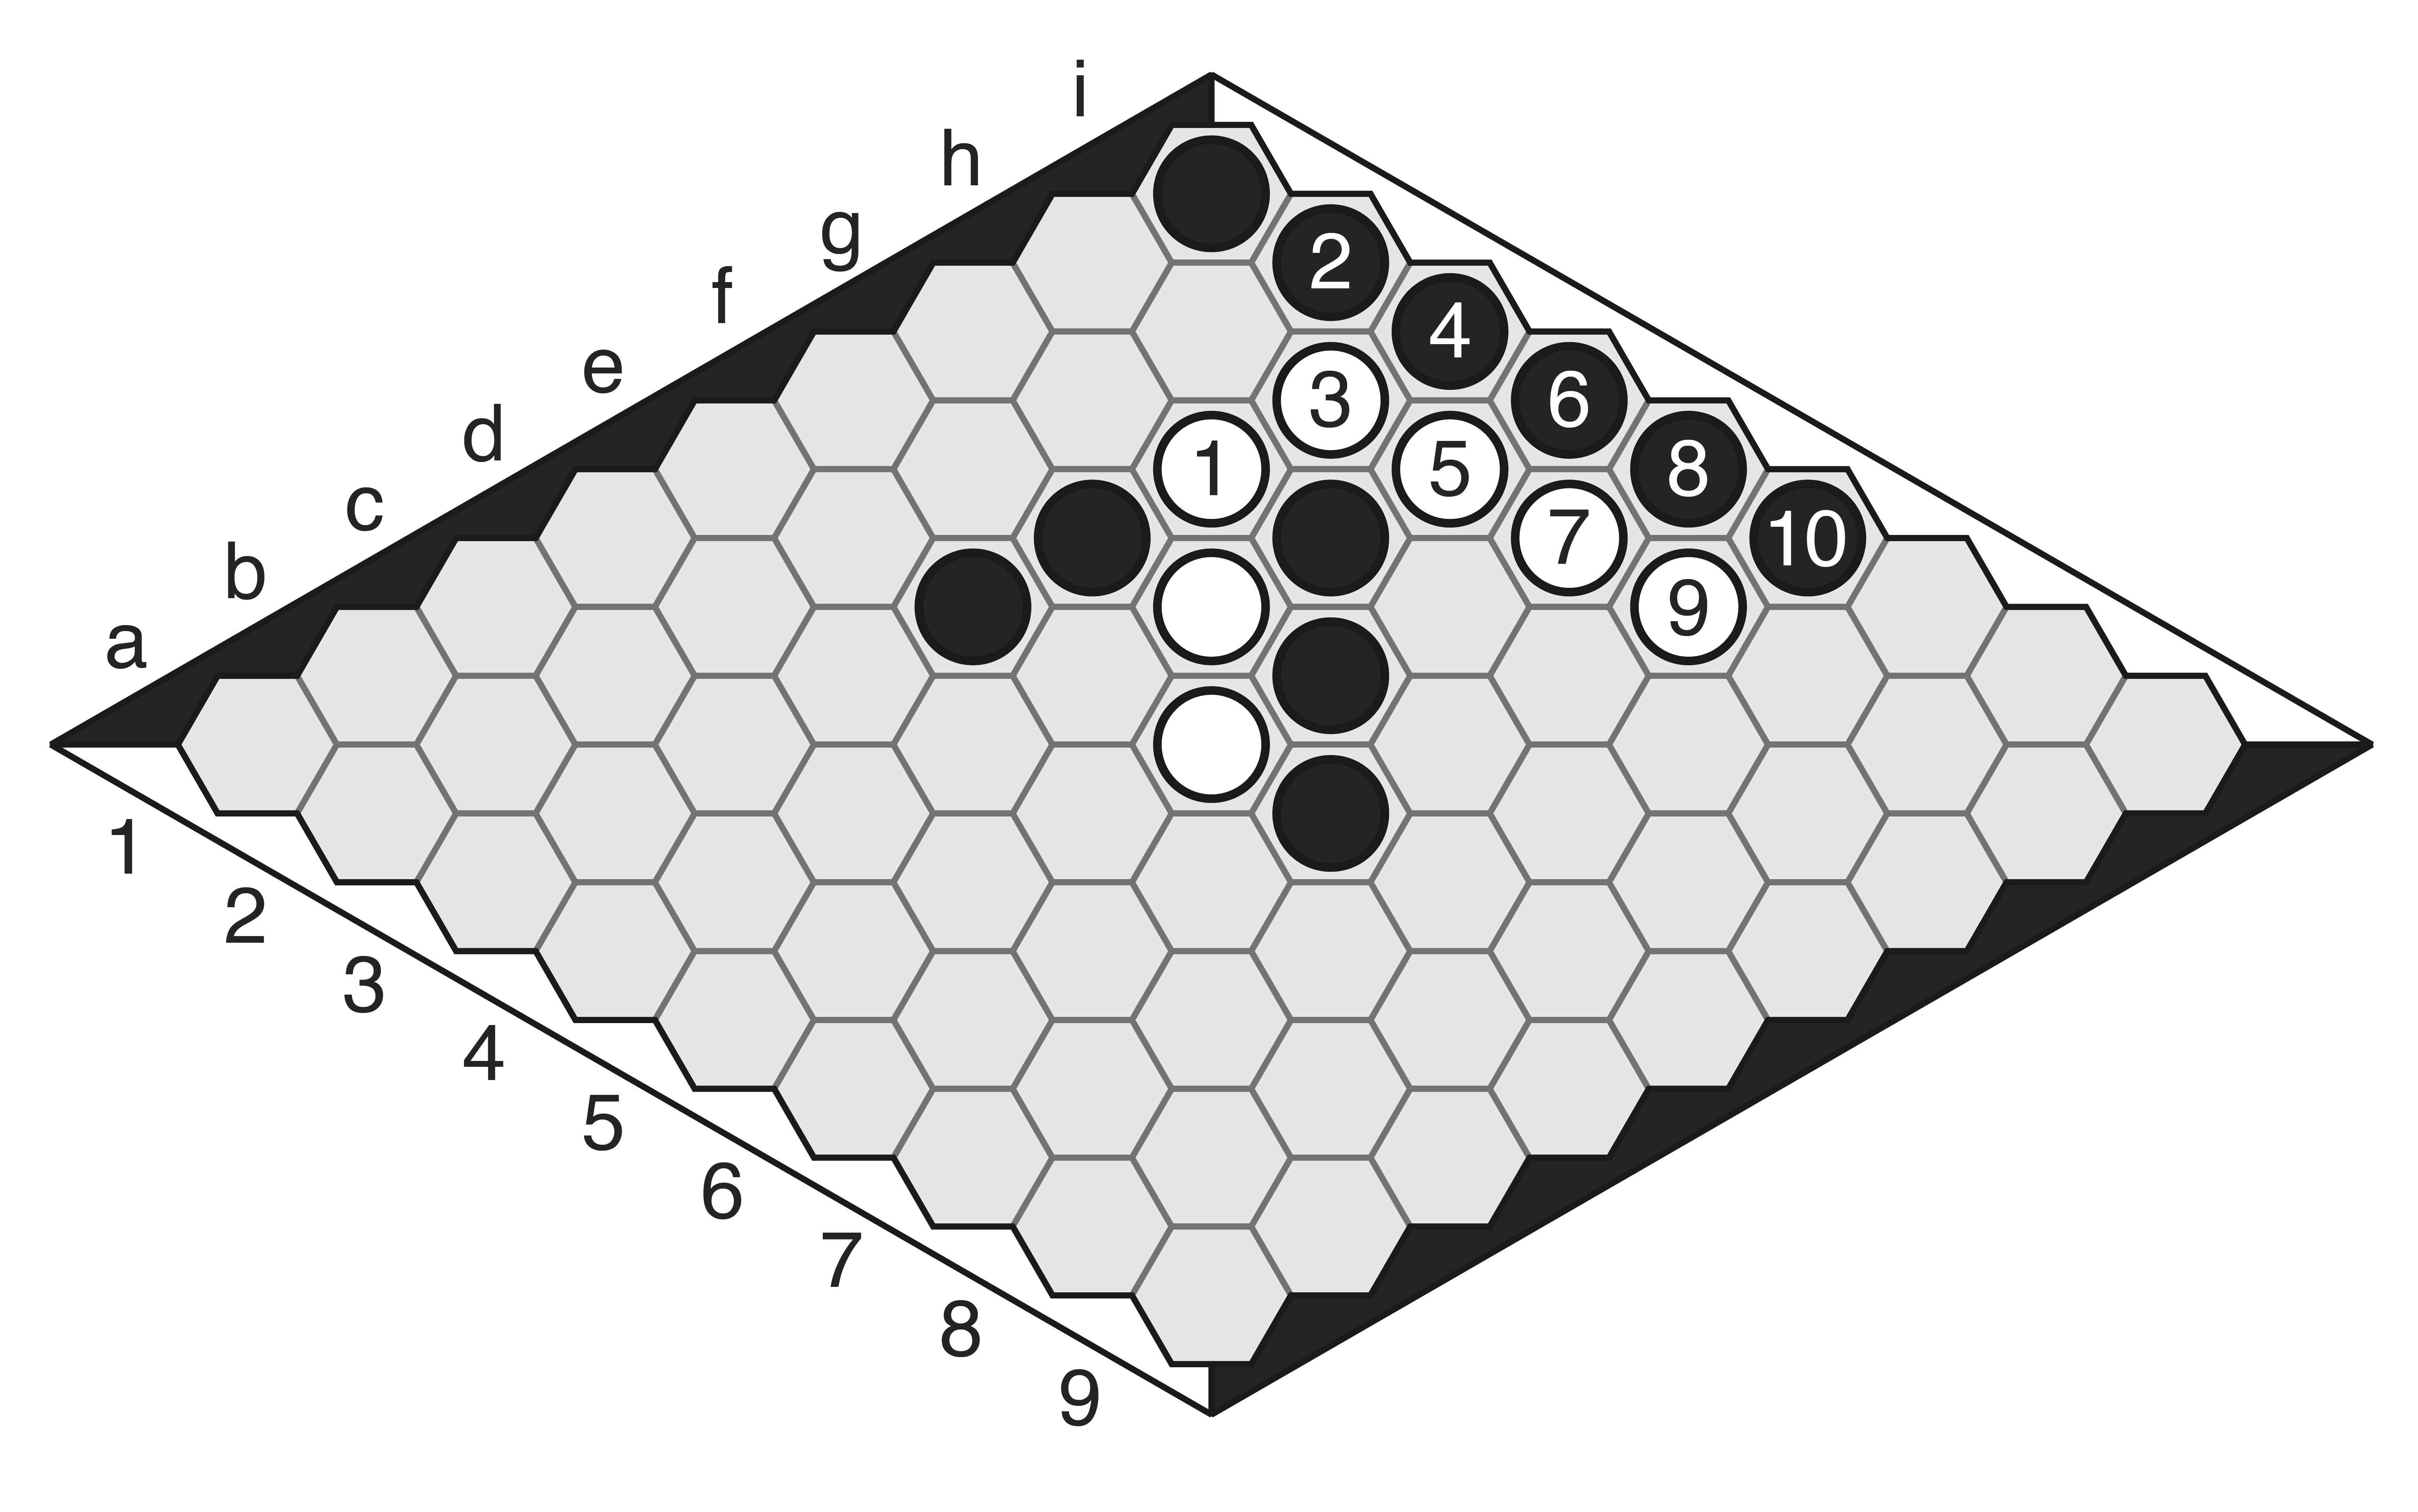
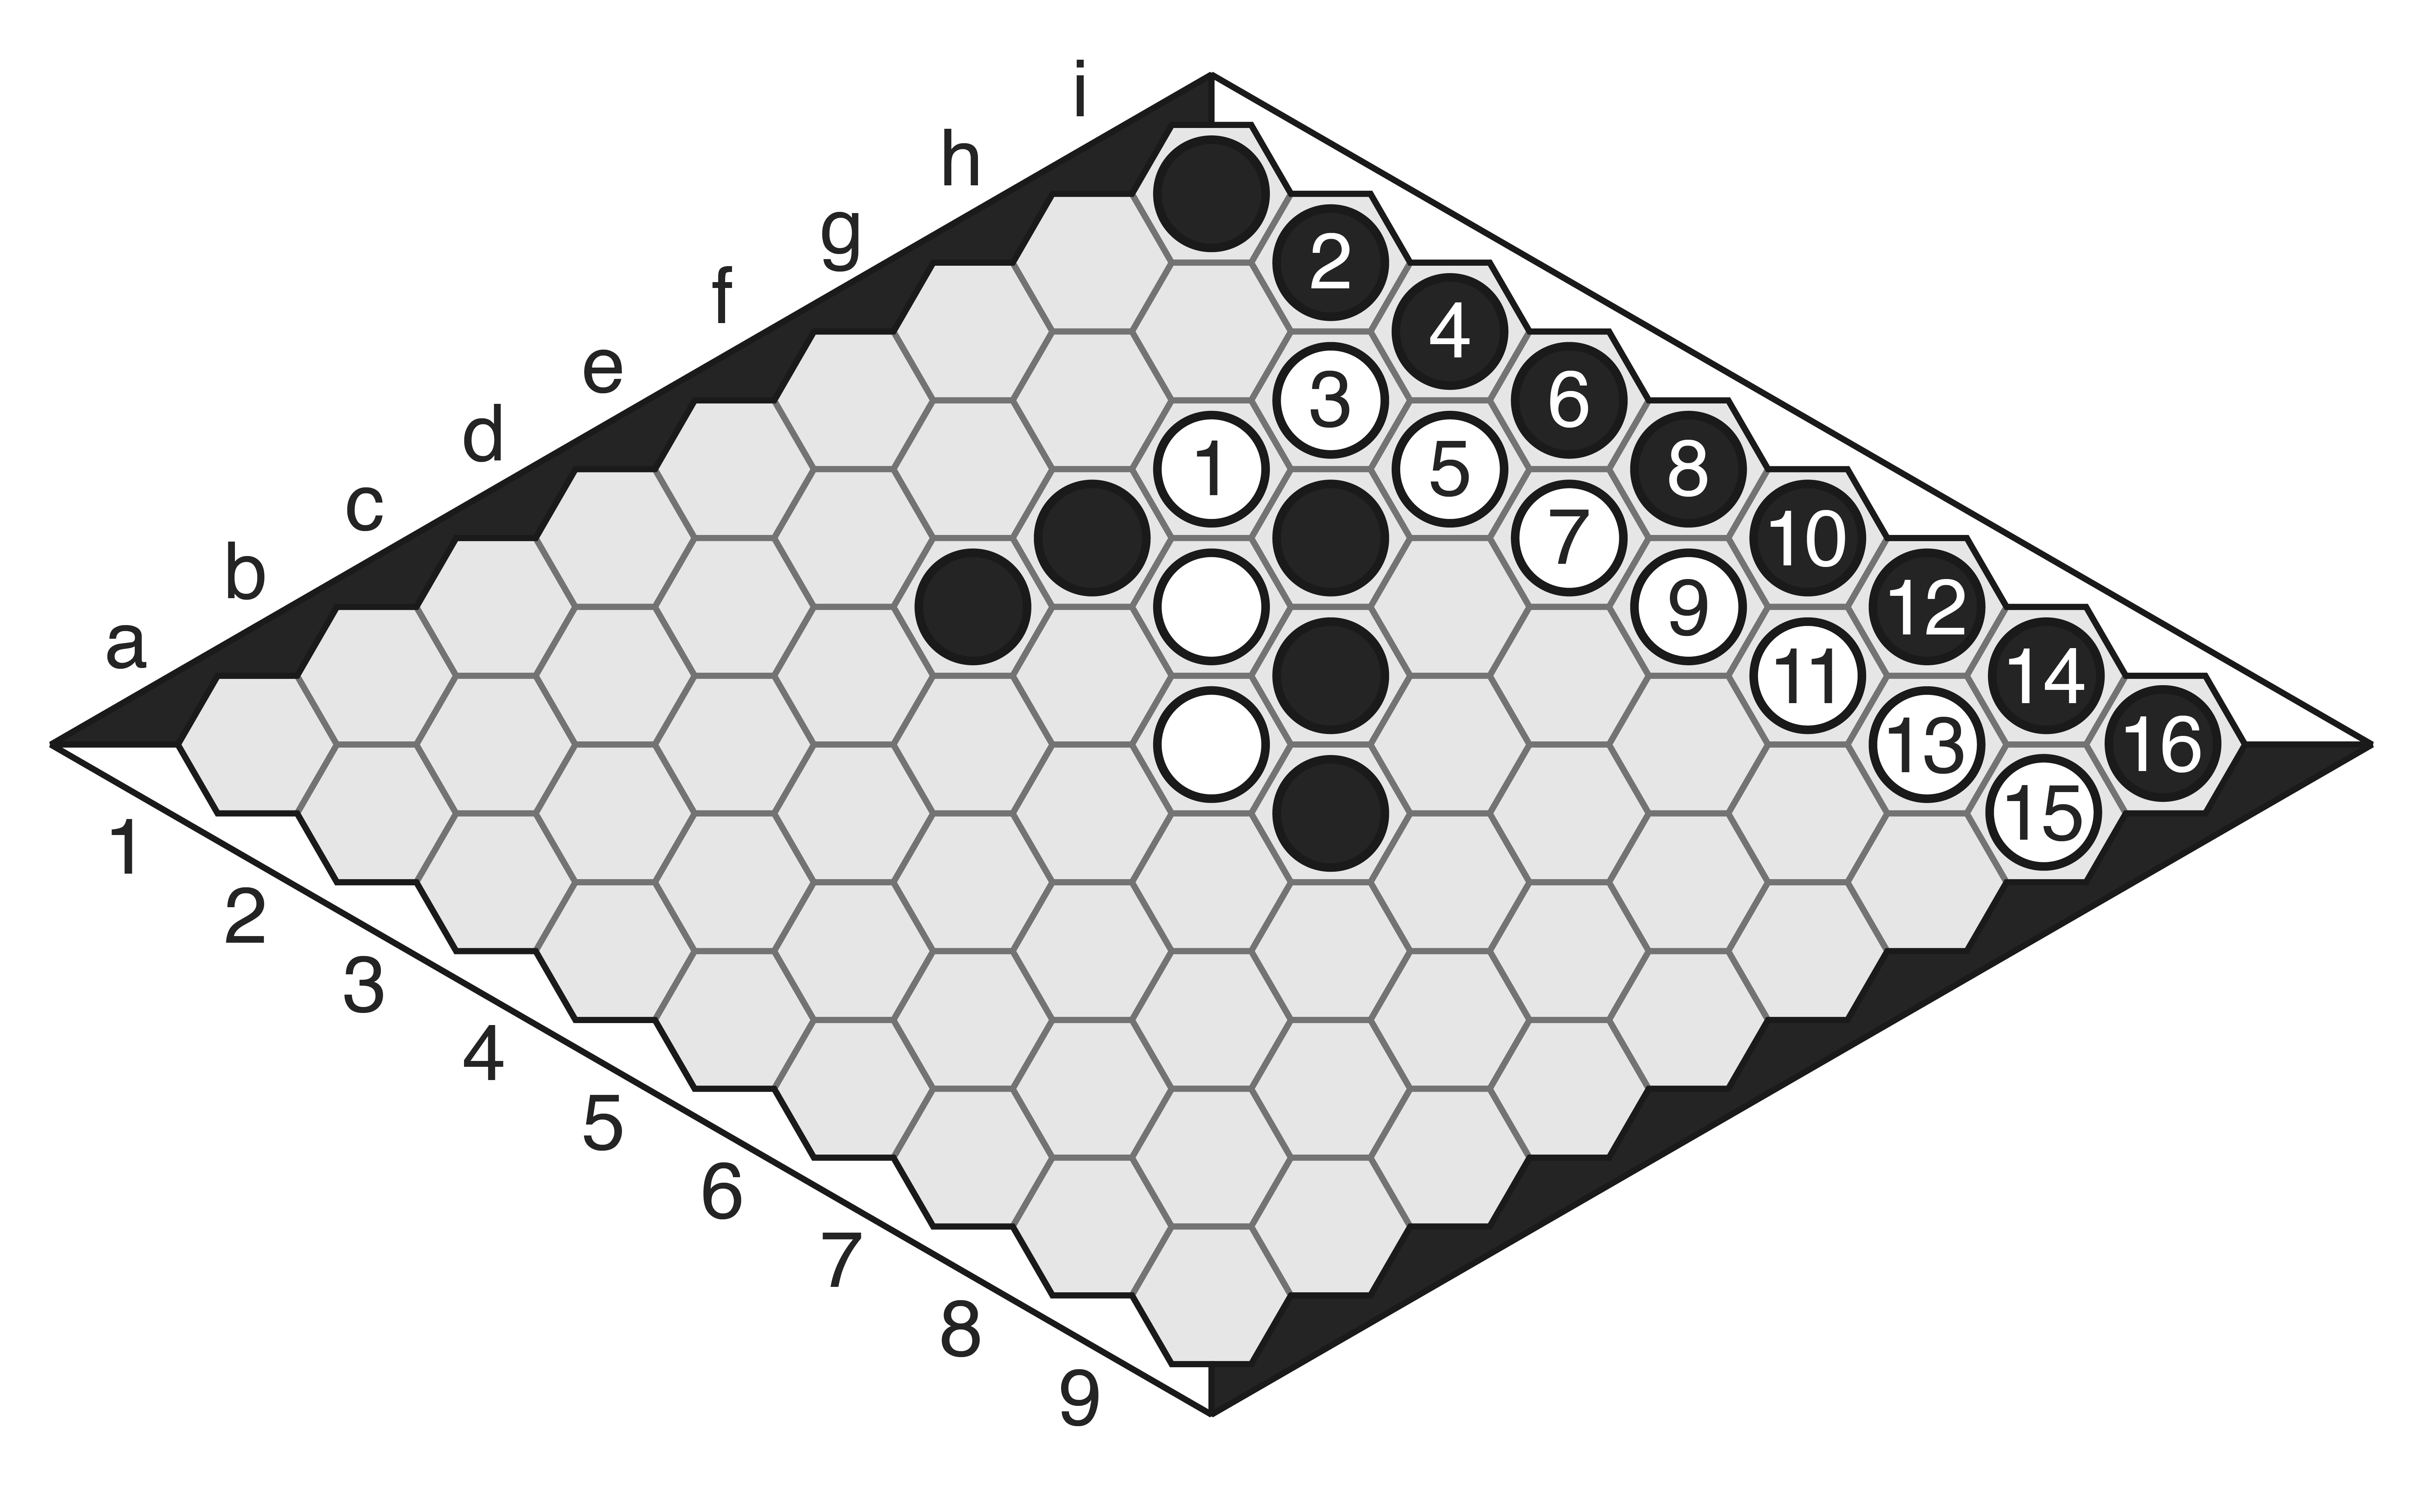
Moves 10-19: White can’t break the connection of b8 to the northwest edge. Instead, White allows Black to connect. But how does this help White? This is an attack I call “undermining.” Note first that the 10-12 group is connected to White’s edge (White can connect at either A or B; Black cannot block both). Because of this, the points D and C are vulnerable for Black. If White intrudes into these bridges, they threaten to connect to the edge through 10/12, so Black is forced to reply. White can therefore invade these points for valuable territory. Additionally, towards the end of the sequence, White obtained the stone (18), gaining more territory and forcing the reply (19). Lastly, the point E is also vulnerable for Black, if they want to keep b9 connected to the edge.
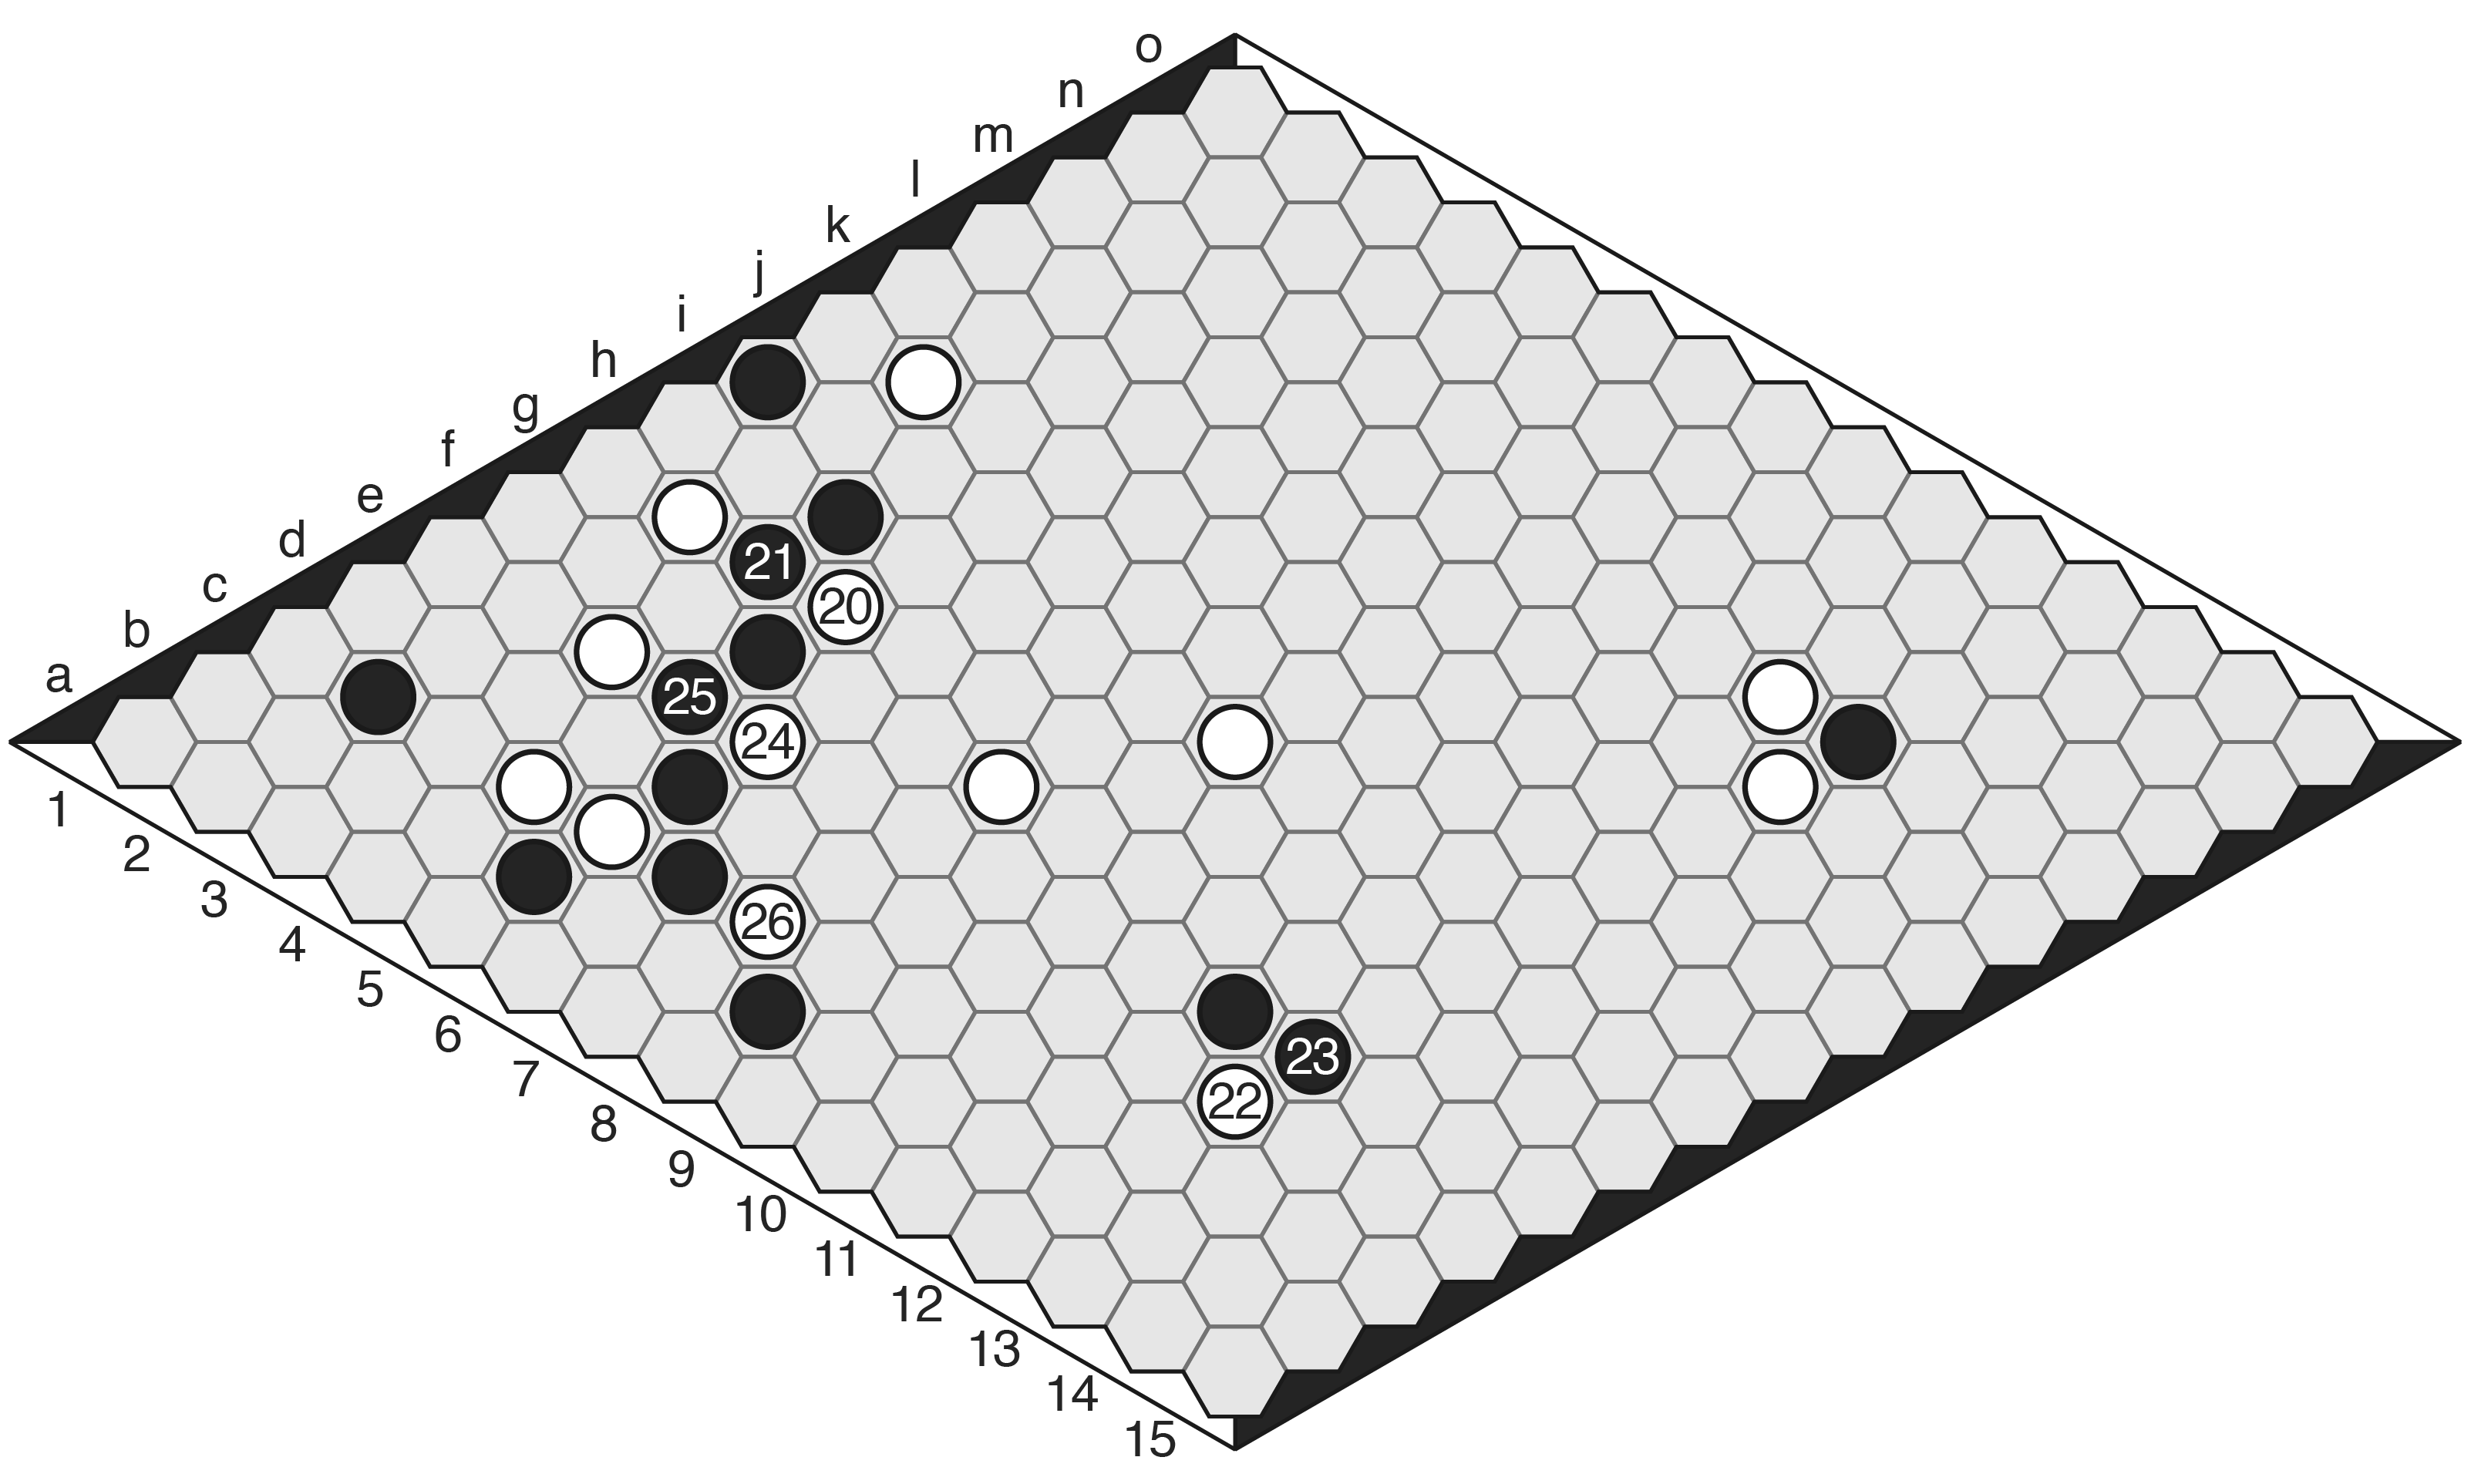
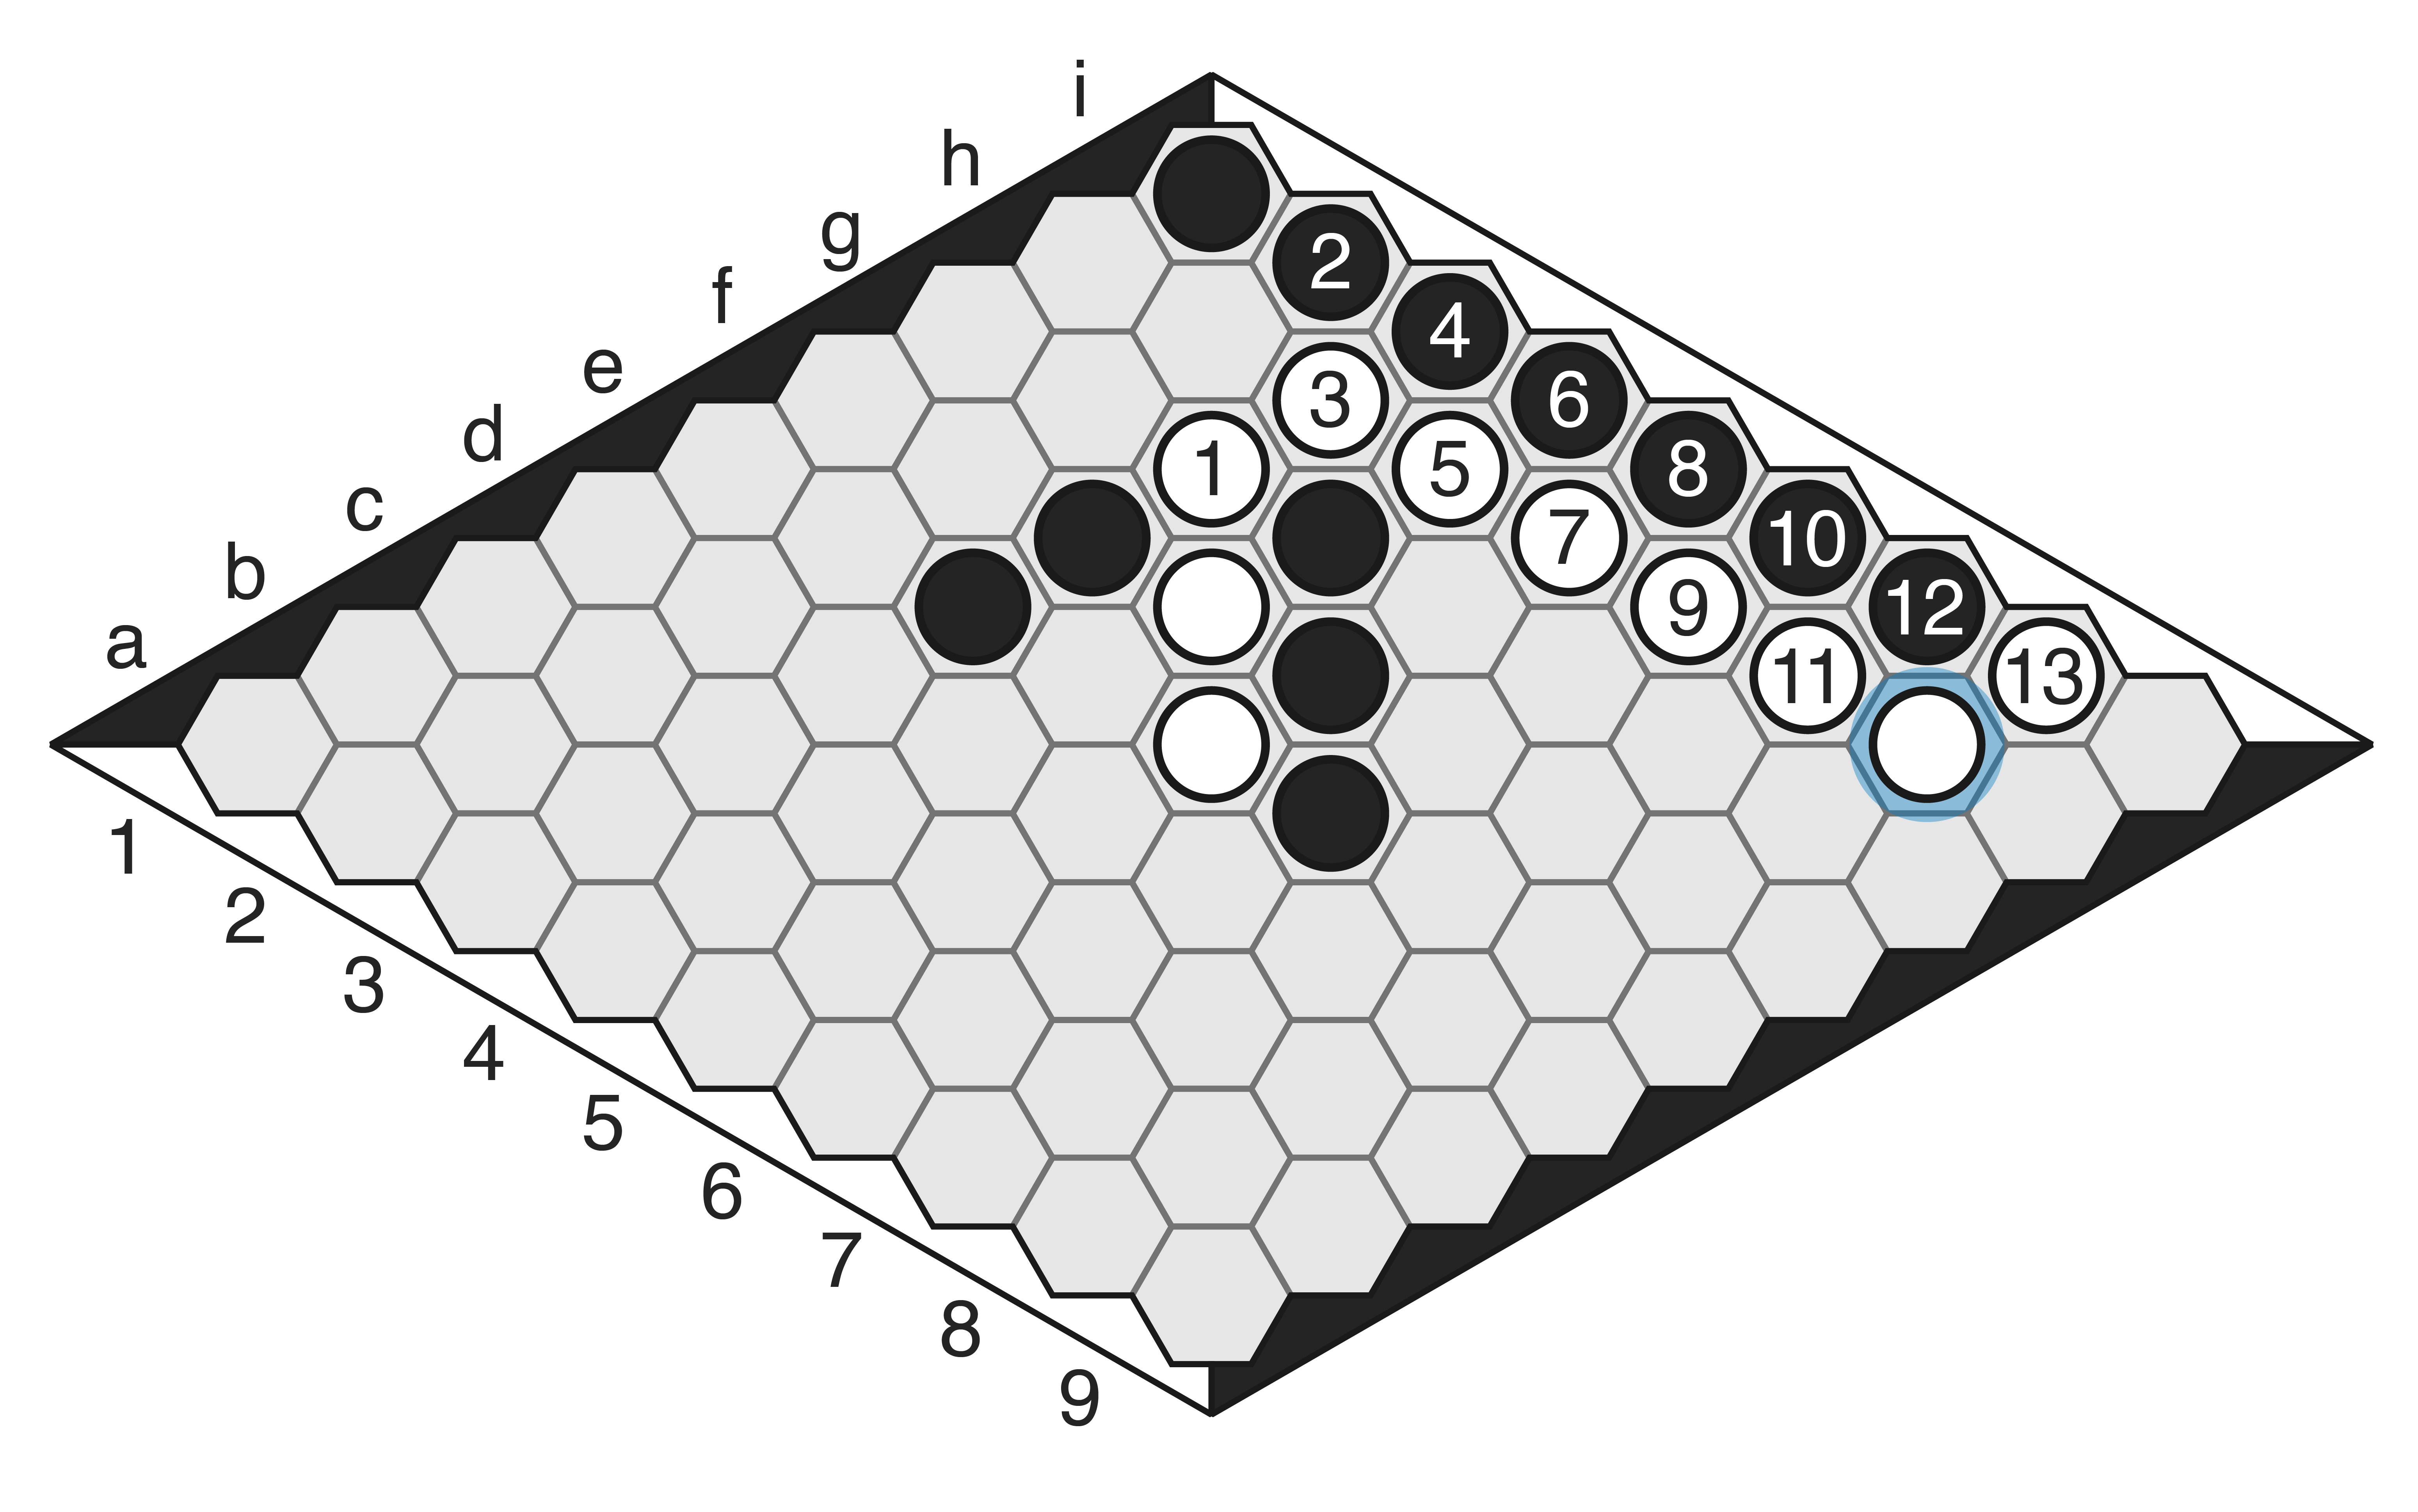
Moves 20-26: Now White begins attacking the vulnerable points, starting at (20). After Black saves the connection, White moves to the other end to attack Black’s 5-5 stone in the obtuse corner, forcing a response there. White knows that after taking the territory at the vulnerable points, they will ultimately need to connect to their southwest edge somewhere in the lower half of it, so having 22 available strengthens this area to White’s advantage. With this secured, White returns to attacking Black in the west corner with moves 24 and 26.
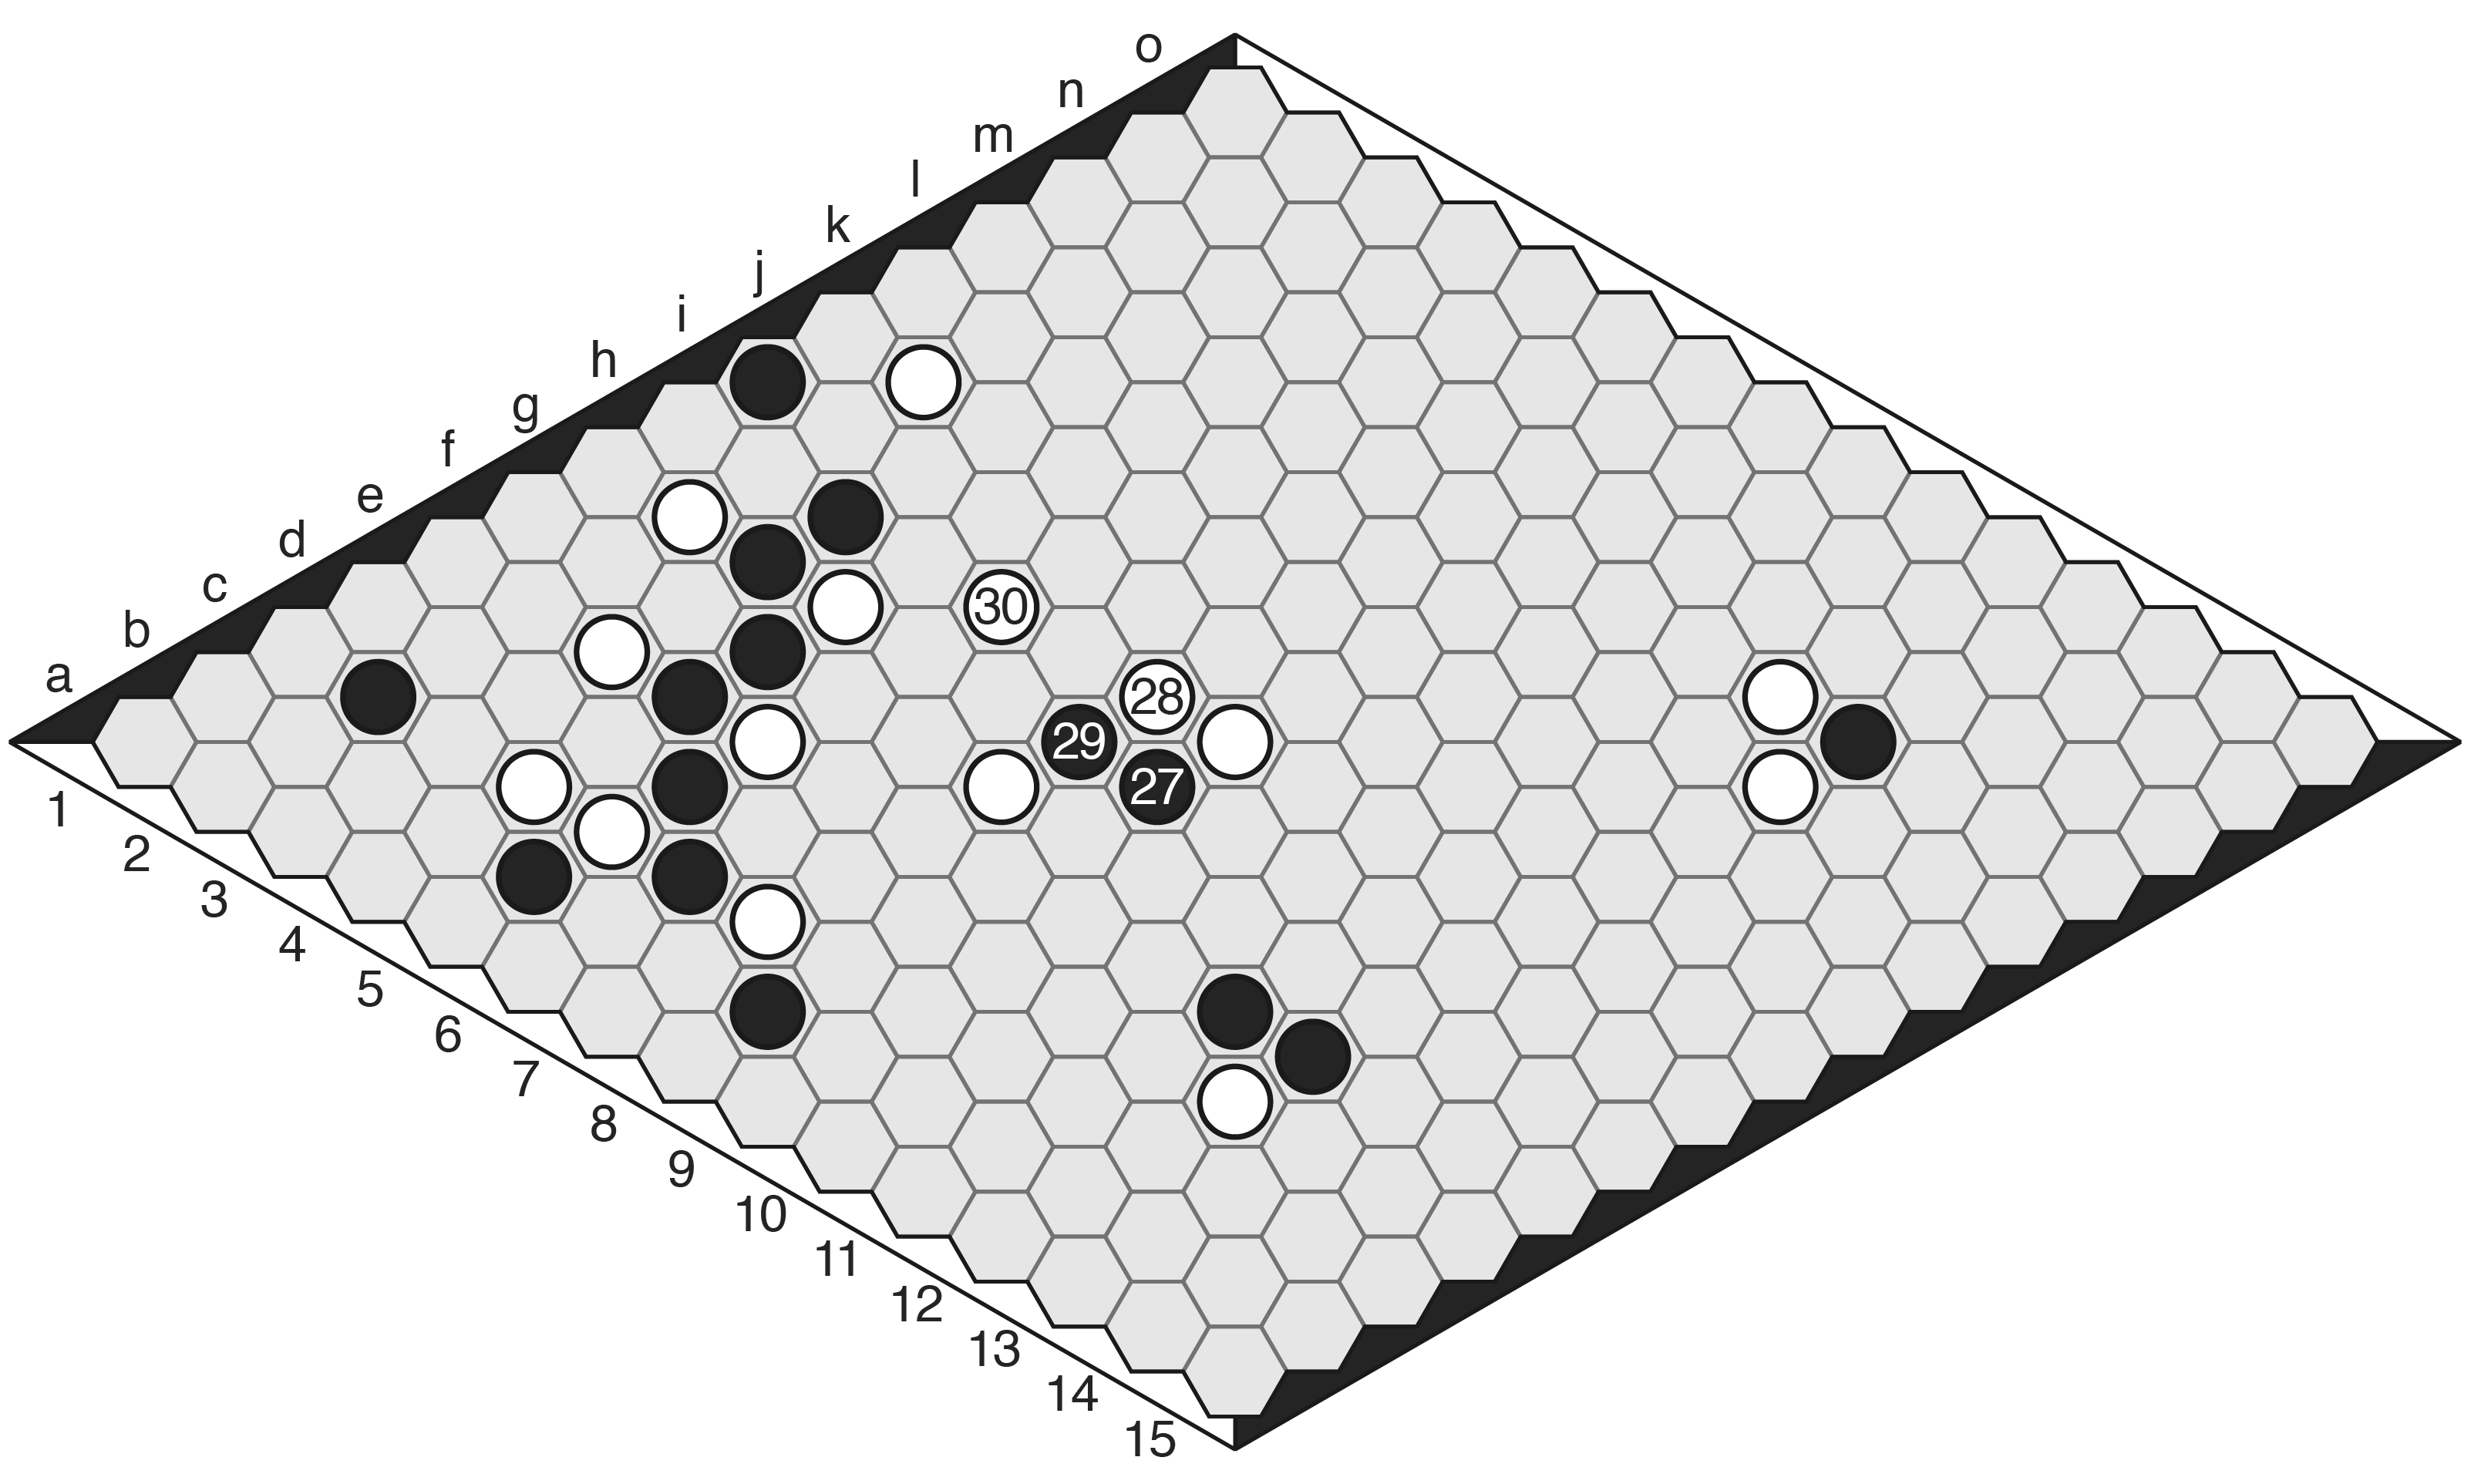
Moves 27-30: Clearly, White has been playing in sente for a while, dictating the direction of play ever since the attack that began on move 10. Black seems to have had enough, and rather than respond at b7 (and handing play back to White), Black tries here to take the initiative back with a block against the h8 stone. Here the play suddenly becomes a tactical affair. White first plays (28), because having these two stones parallel to the northeast edge will virtually guarantee their connection (thanks to the help of the white stones in the east acute corner). Next White plays (30).
Here White begins to utilise that territory they gained through undermining. Since move 30 is connected to g4, White’s approaches have expanded considerably. (30) threatens to connect to f7, and g4 threatens to connect to e5. Before we look at Black’s response, it would be instructive to see what happens if Black tries to block the former with 31.g6. White might then respond at 32.f5. From here, a few lines to consider:
33. d6 e7 d8 d7 b7 (forced) c8 b9 and then c10 is a ladder escape fork for White, connected to the edge with Template A-3, and back to the main group by either c9 or e9.
33. b7 d8 (connected back by either f6 or d7) c9 d10 (d10 + d12 make for the edge template L-4, hence d10 is connected to the edge) d9 and now f9 is connected to the edge and threatens to connect to either h8 via g9, or to h5 via f8.
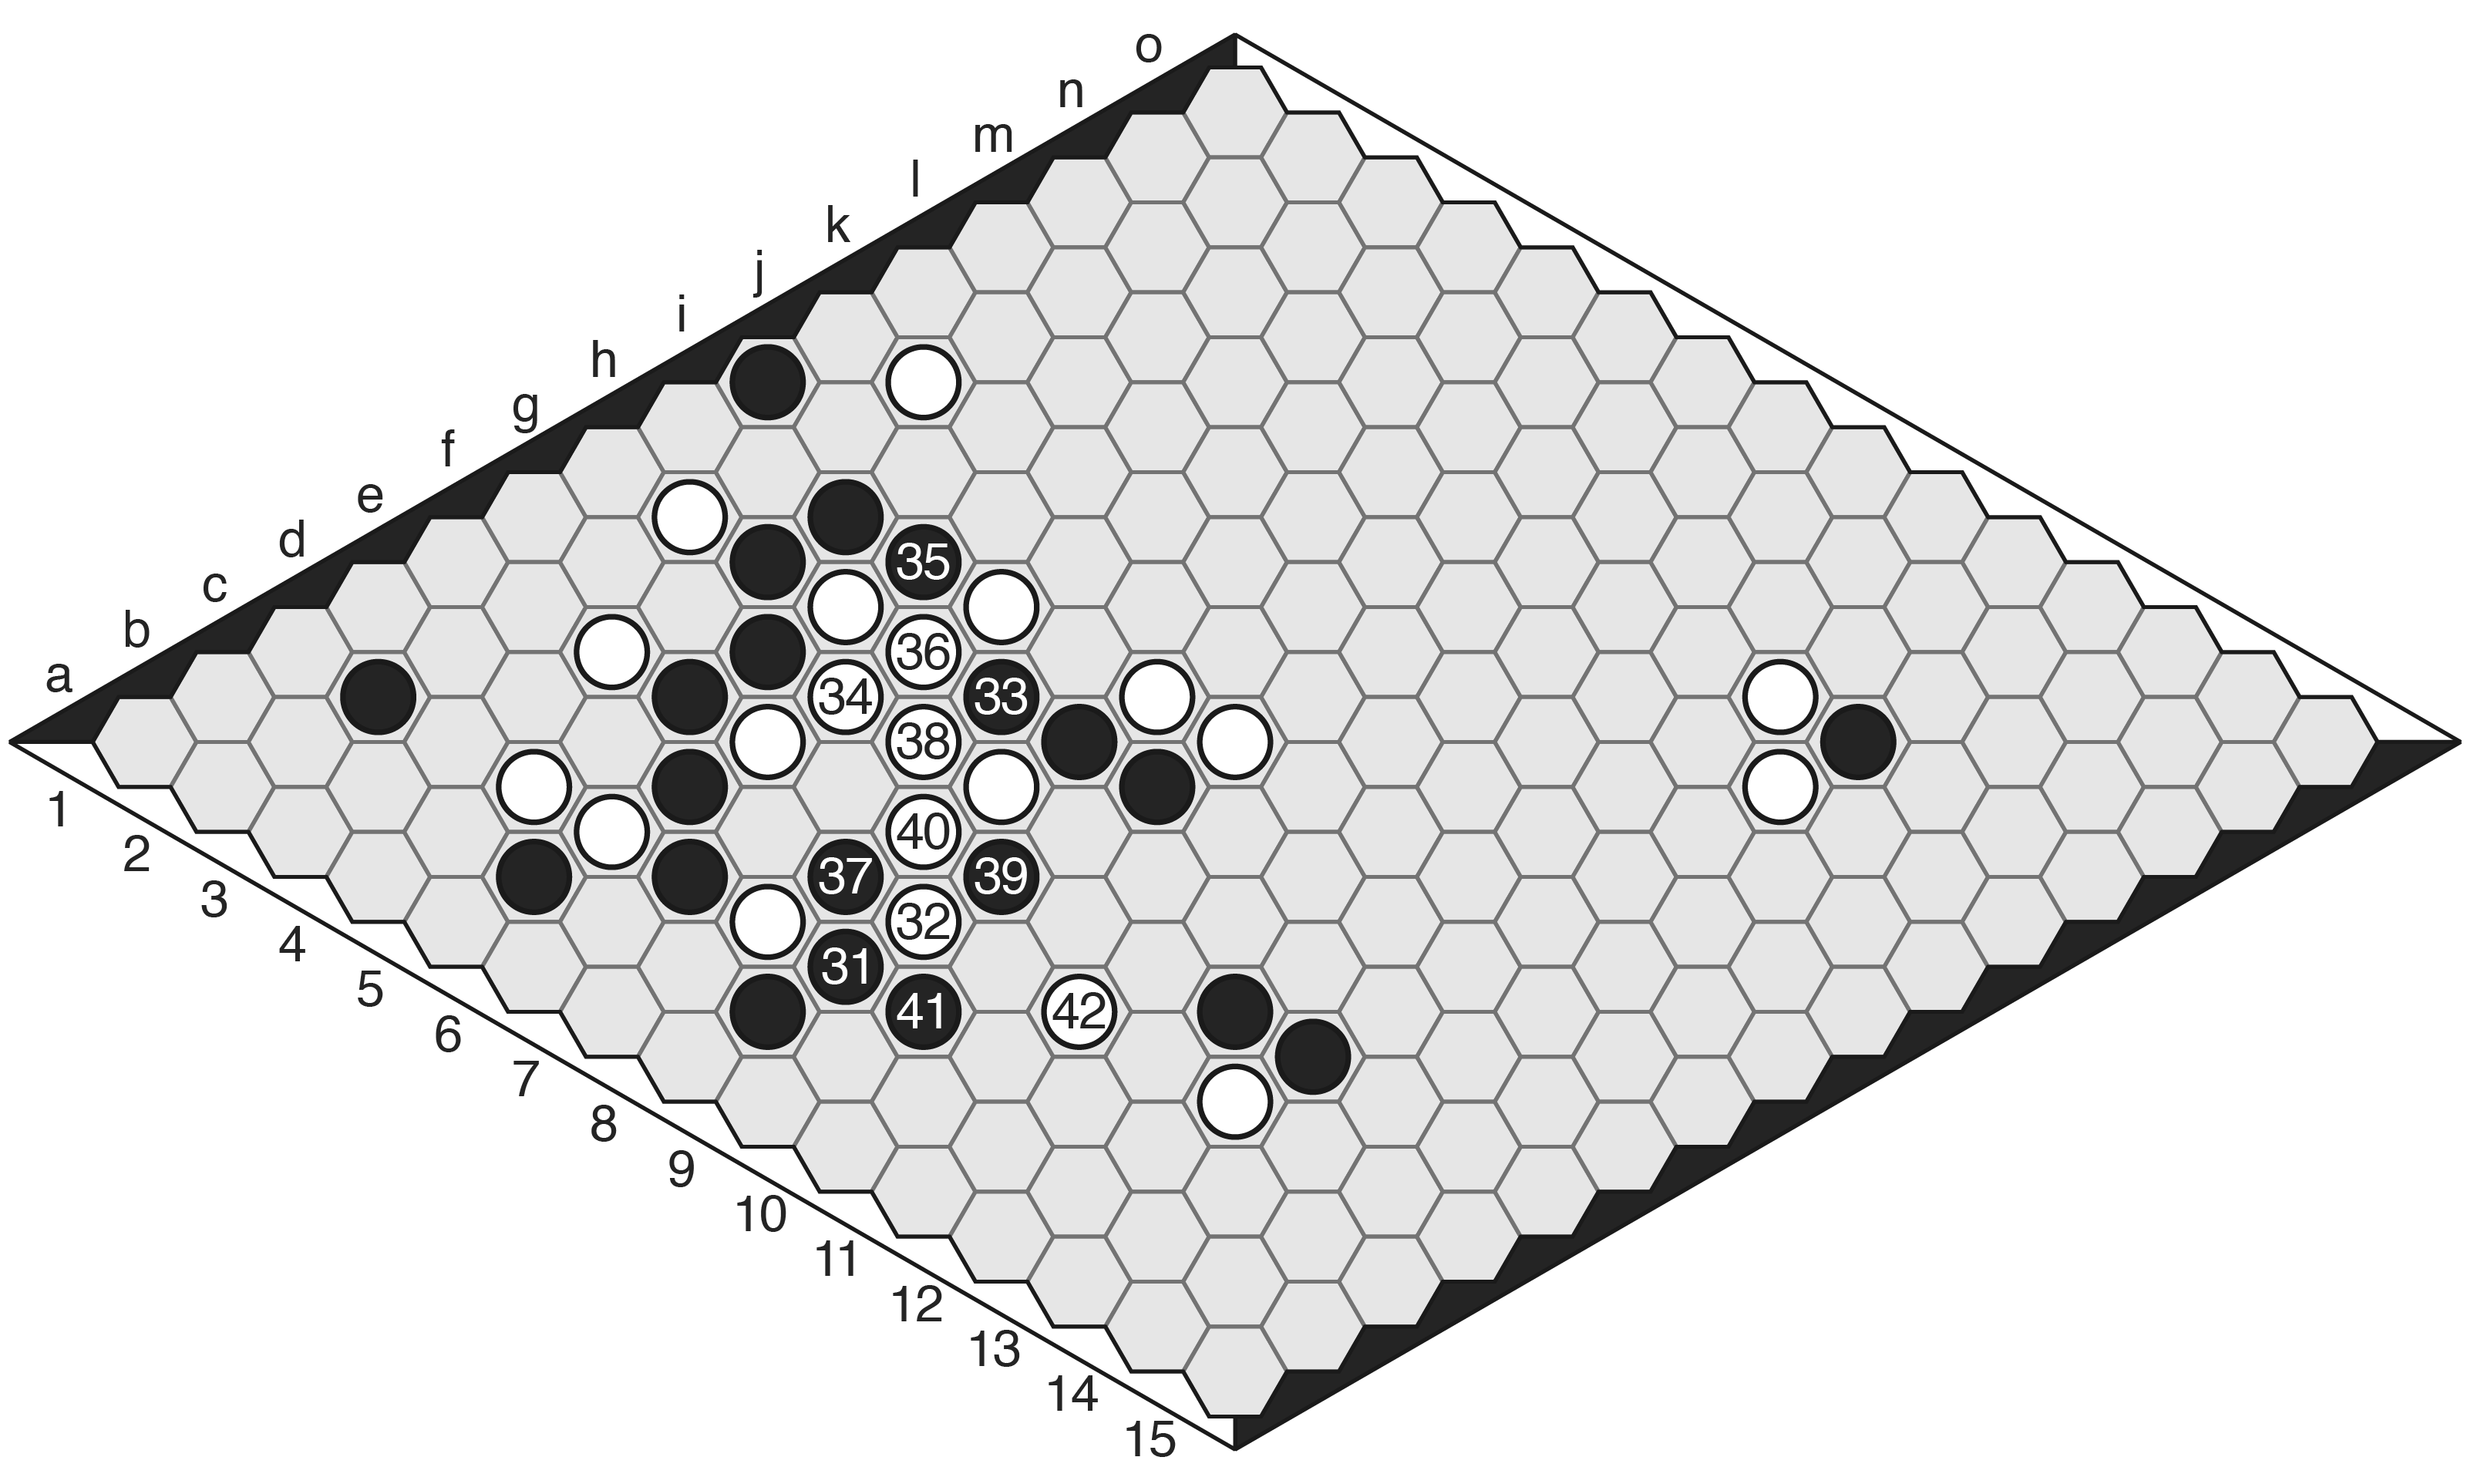
Moves 31-42: Black attempted to block at (31) instead. The situation that follows is highly tactical. White first plays 32. d8. After Black blocks at 33. g6, White links up g4 to e5 with 33. f5. Black gains some free territory with a bridge intrusion (35-36). At this point, e5/f5 are connected to d8/f7 by either d7 or f6. If Black blocks at 37. f6, White’s connection is assured by 38. d7 (White can connect by either b7 with Template A-2 or c9 with Template A-3), so Black plays 37. d7. White connects up with f6 (although e7 would have been better, offering no intrusion points). Black takes a little more territory with move 39, but after move 41 White’s responds with 42. d10. As mentioned in the second variation above, this move (along with the stone on d12) is connected to the edge via edge Template L-4. If Black blocks at 43. d9, White plays 44. f9, which threatens either g9 or f8.
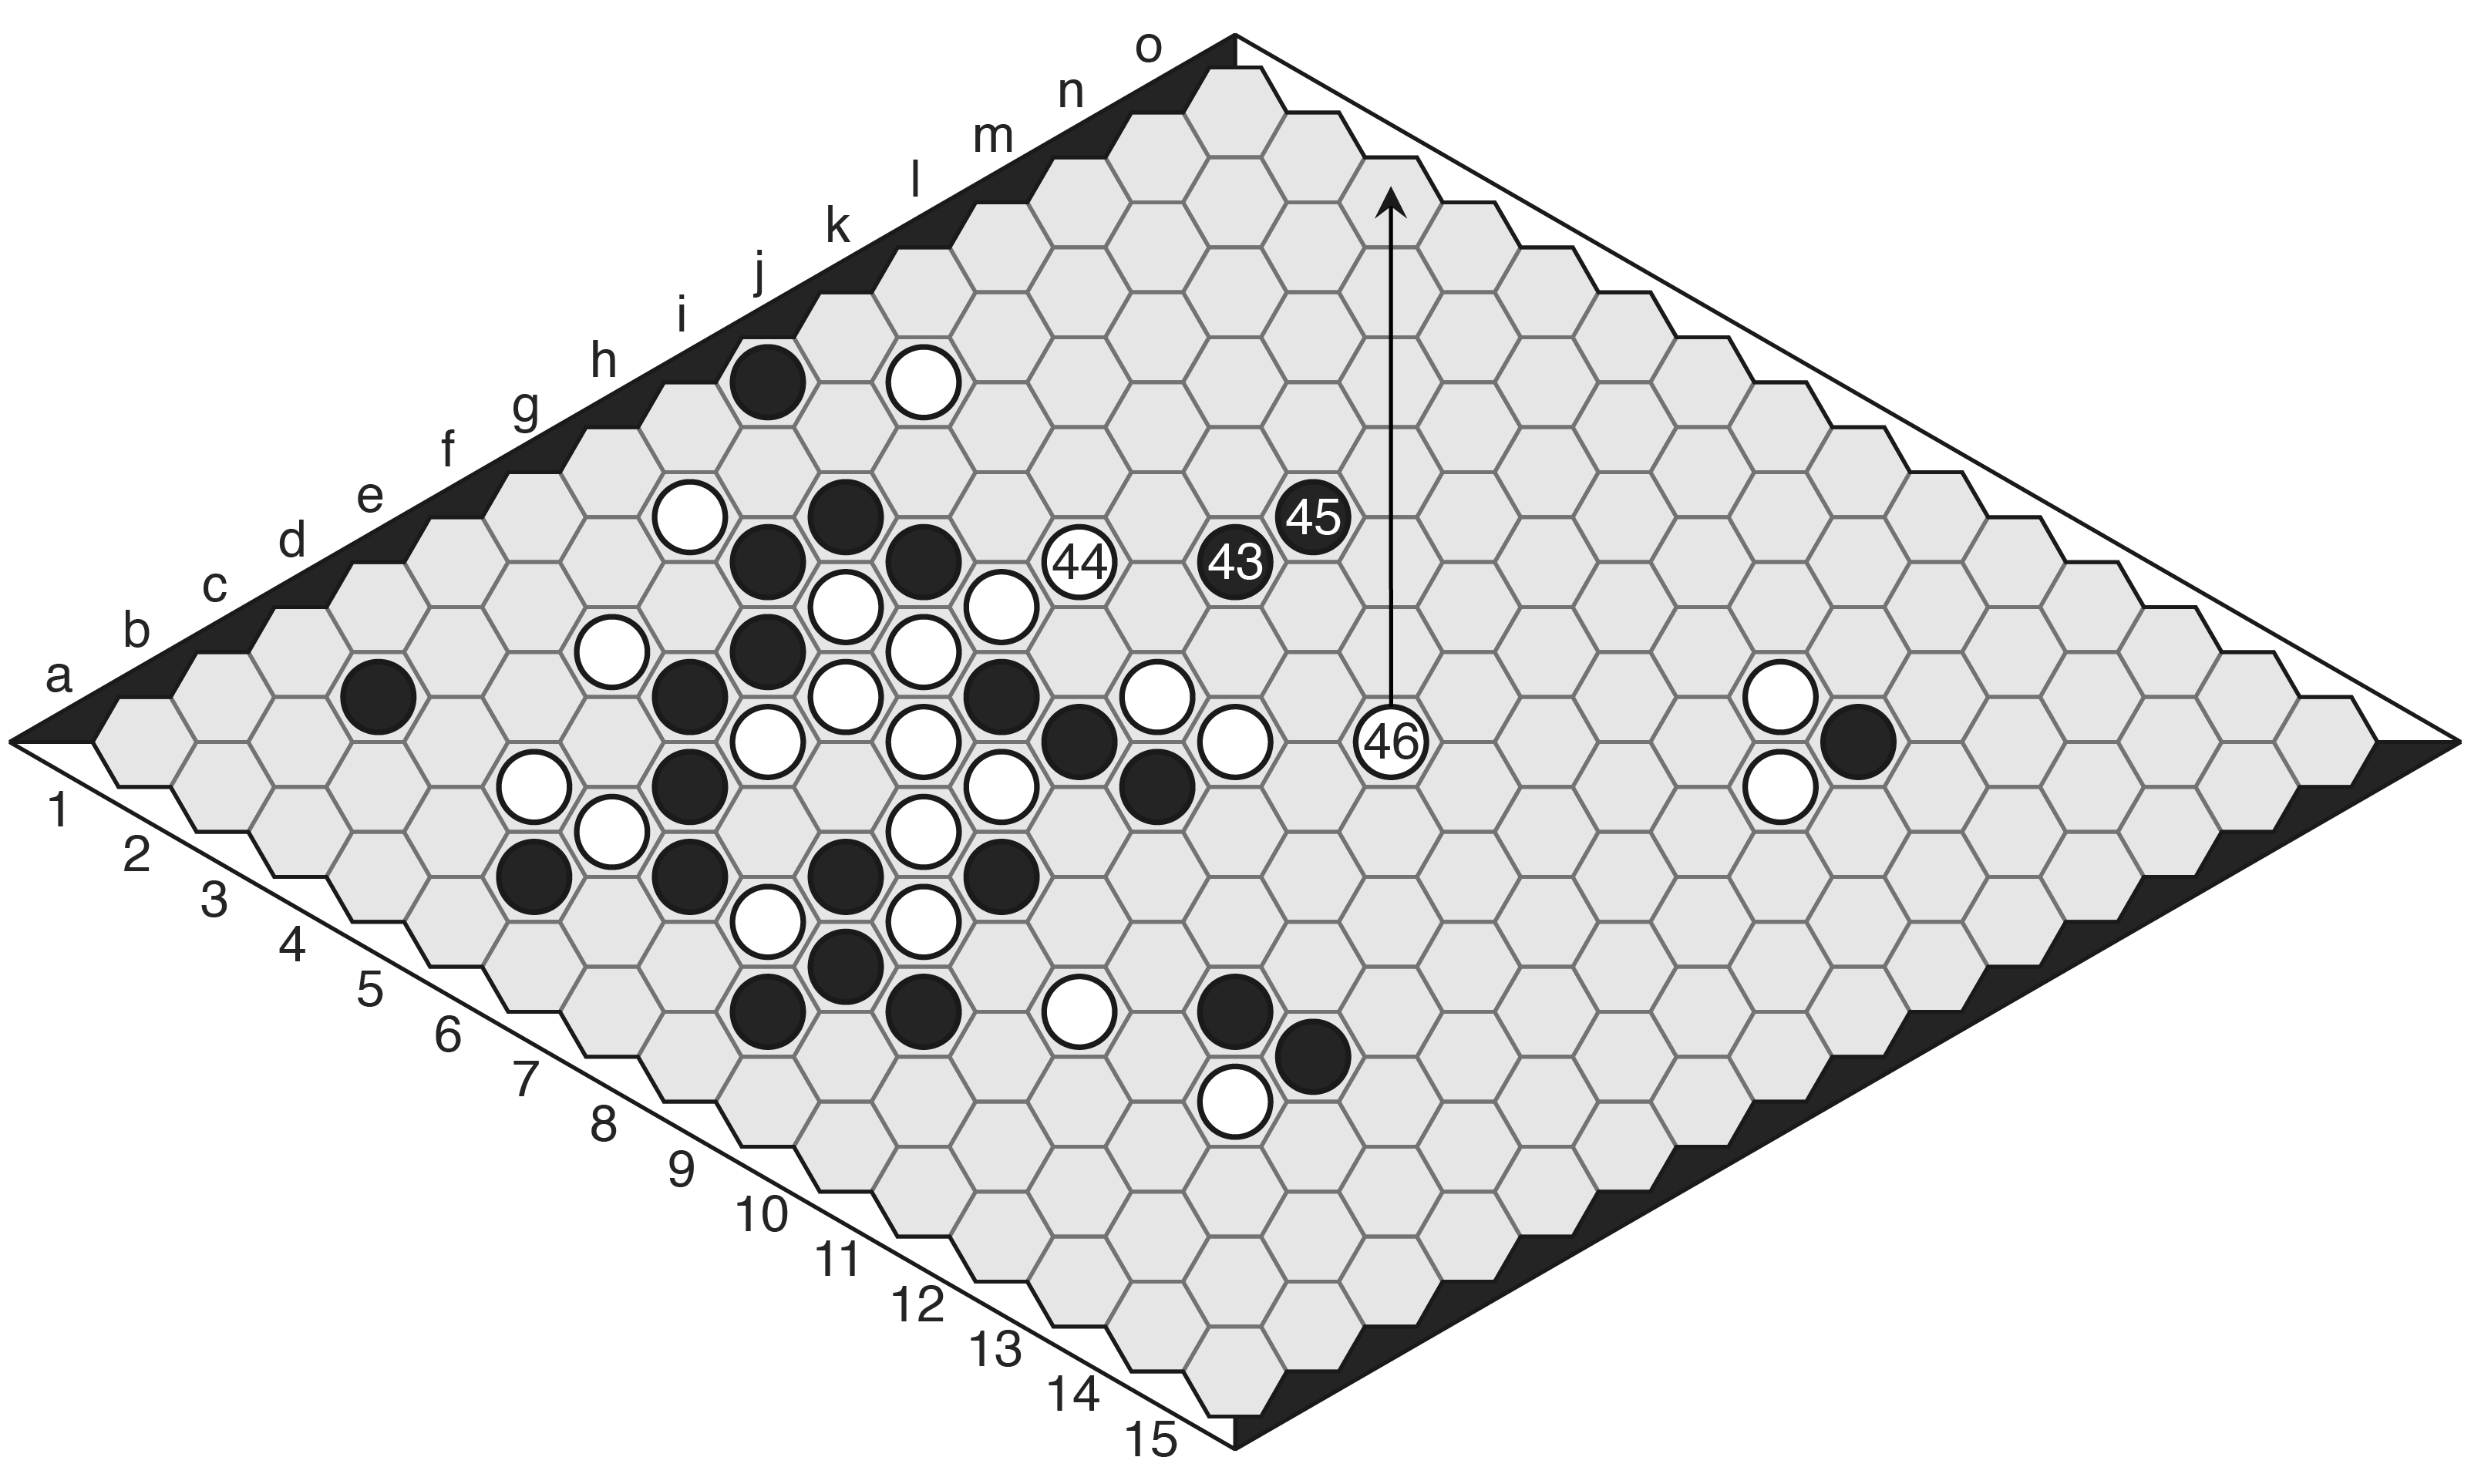
Moves 43-45: With the southwest edge lost, Black must attempt to block the northeast edge. The odds aren’t good however. Presumably Black went all in on blocking White from the southwest because Black felt the chances were better there. Black didn’t gain much in the way of territory during that sequence that could help on this side of the board, with the possible exception of the stone on h4.
The White stone on h5 isn’t yet connected to h7, but trying to block between them will just make things worse for Black (43. h6 i5 i6 and k4 can at best be held to a fifth-row ladder, heading towards the White stones in the east corner). So Black plays 43. j6. White connects up the smart way, at 44. i5. Unlike connecting via h6, this threatens the followup k4, which would start a fifth-row ladder, as well as the potential threats from the h7/h8 group. Black is forced to attempt to block both directions at once, with 45. k6. This cleanly blocks the potential of k4, but as we shall see, can’t hold off a White attack from h8.
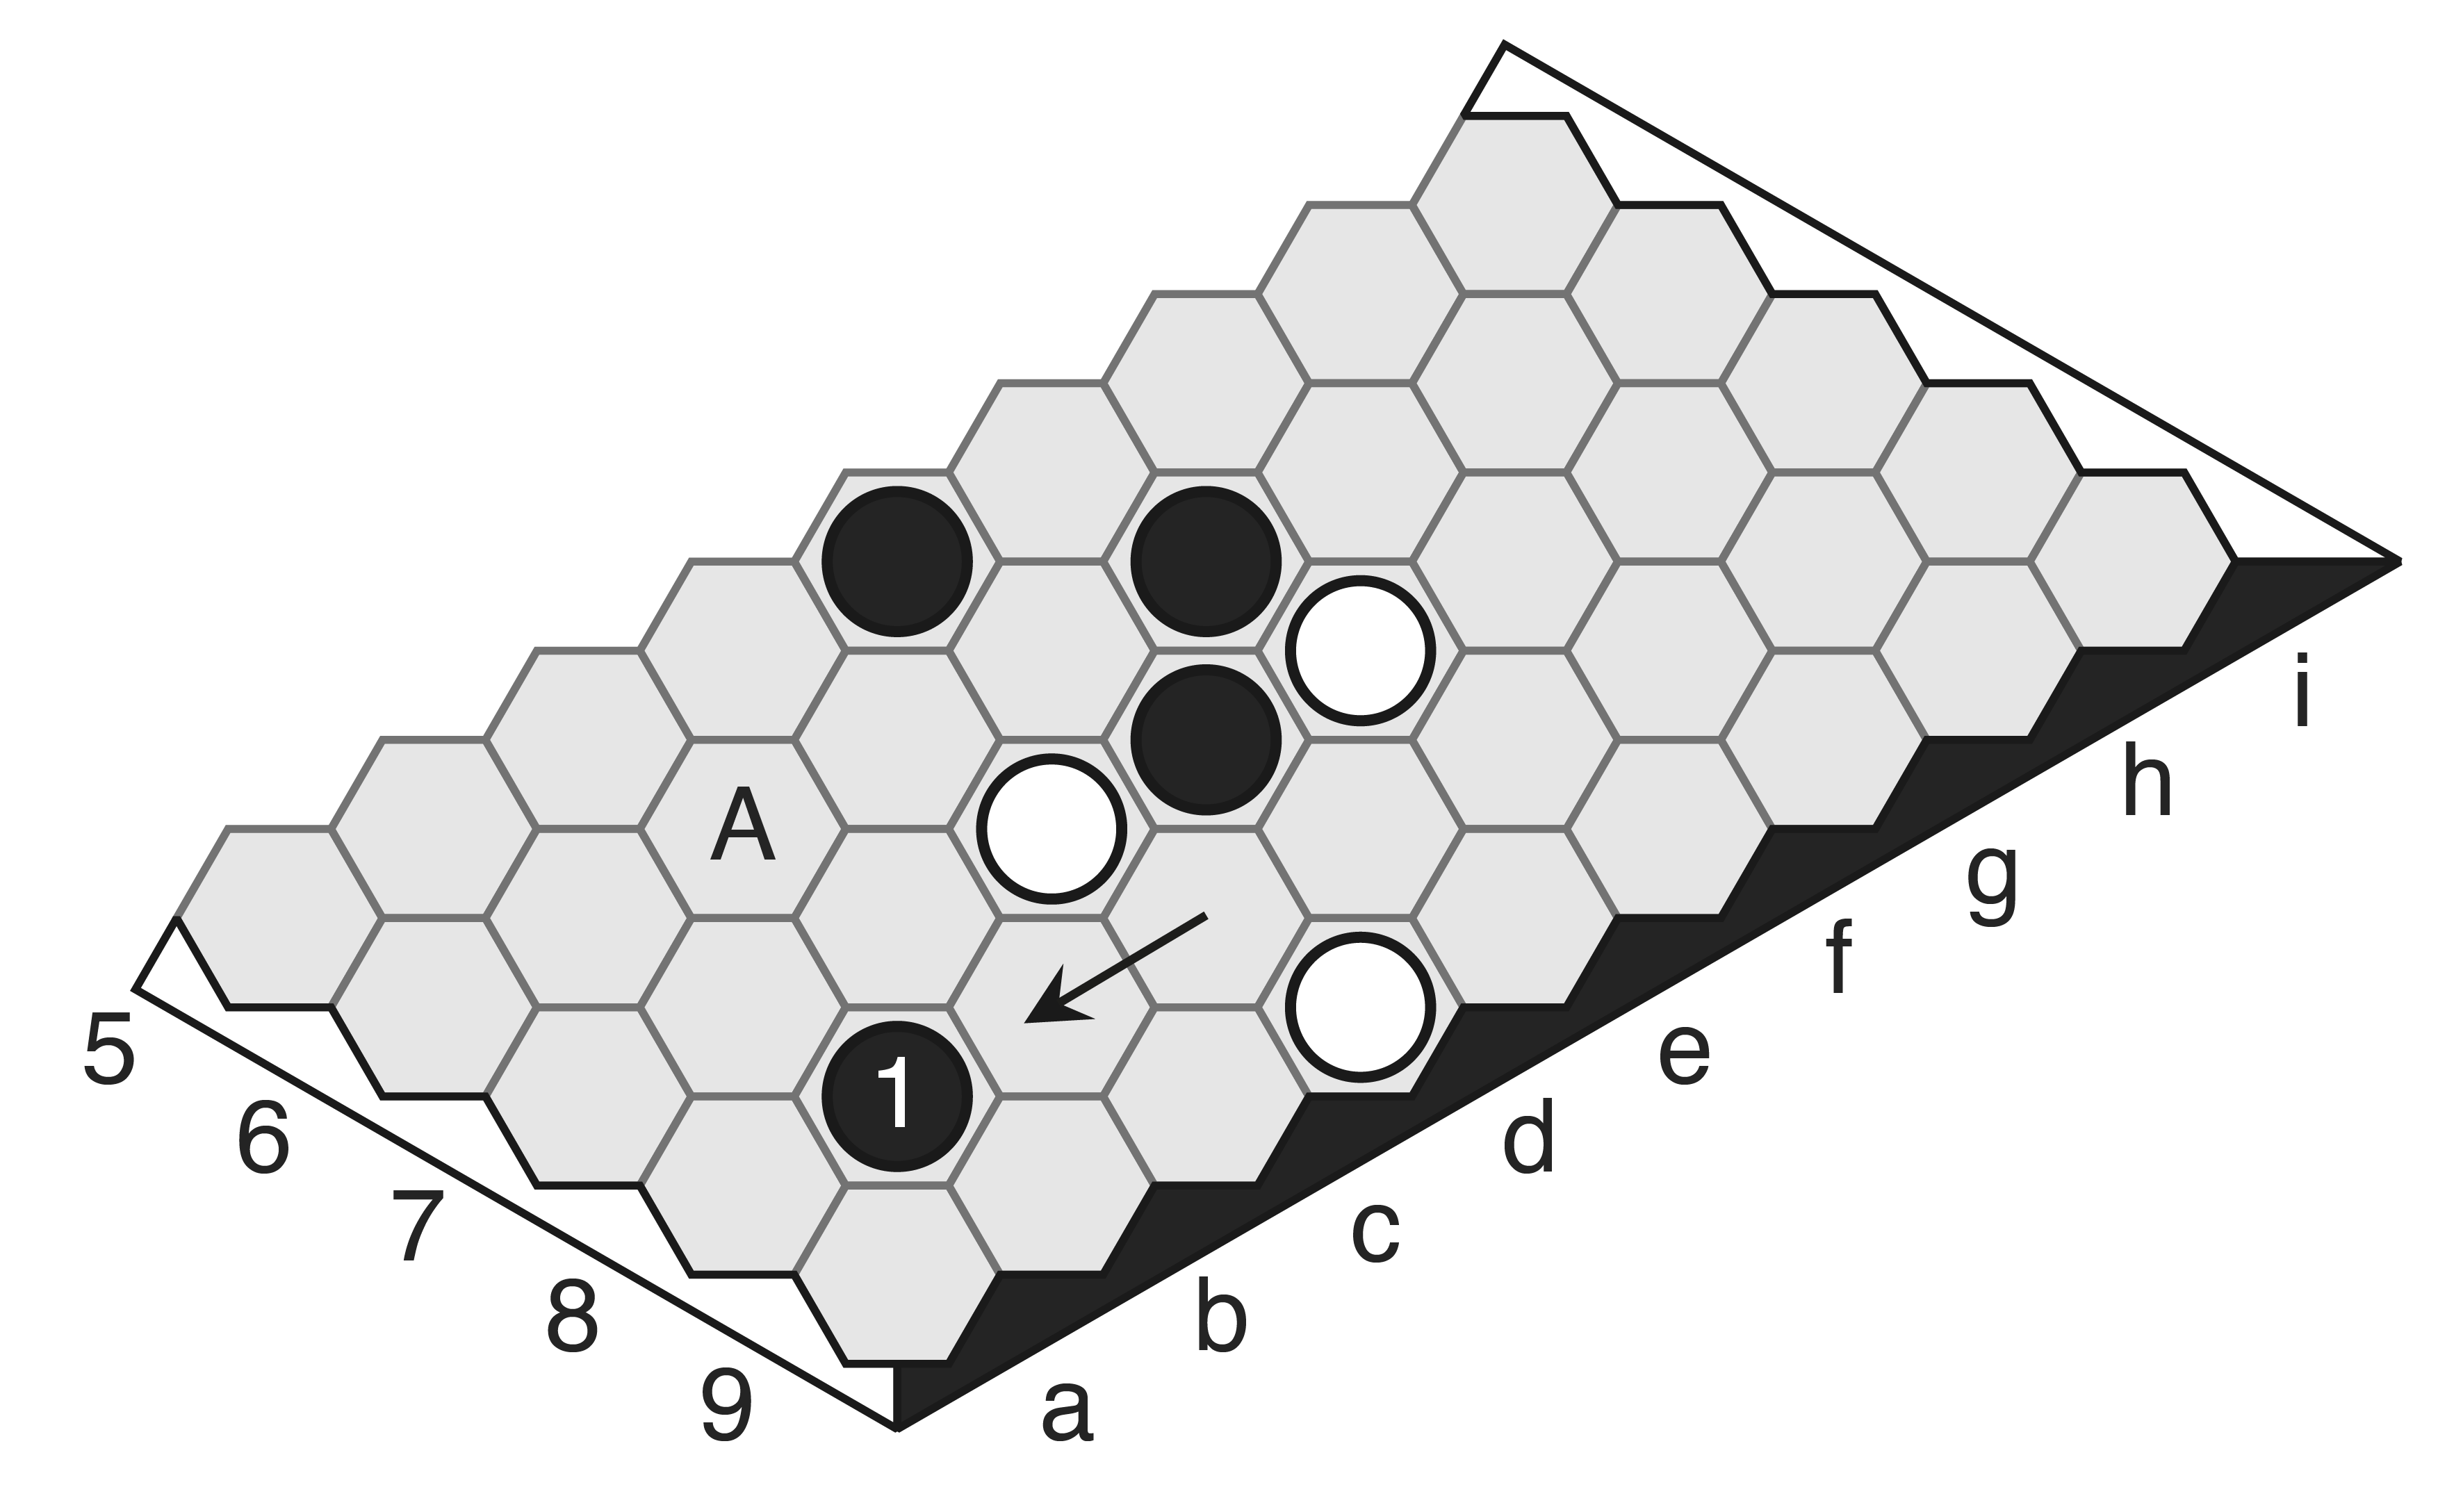
Move 46: White bridges away from h8. This move is based on a simple concept: note that by placing the stone out so that there’s a clear line to the edge (shown by the arrows) it can’t be stopped with simple adjacent blocks (j9 j8 k8 k7 … ). This means Black will have to block this stone to a ladder, and that’s where those two white stones on l11 and k12 will come into play.
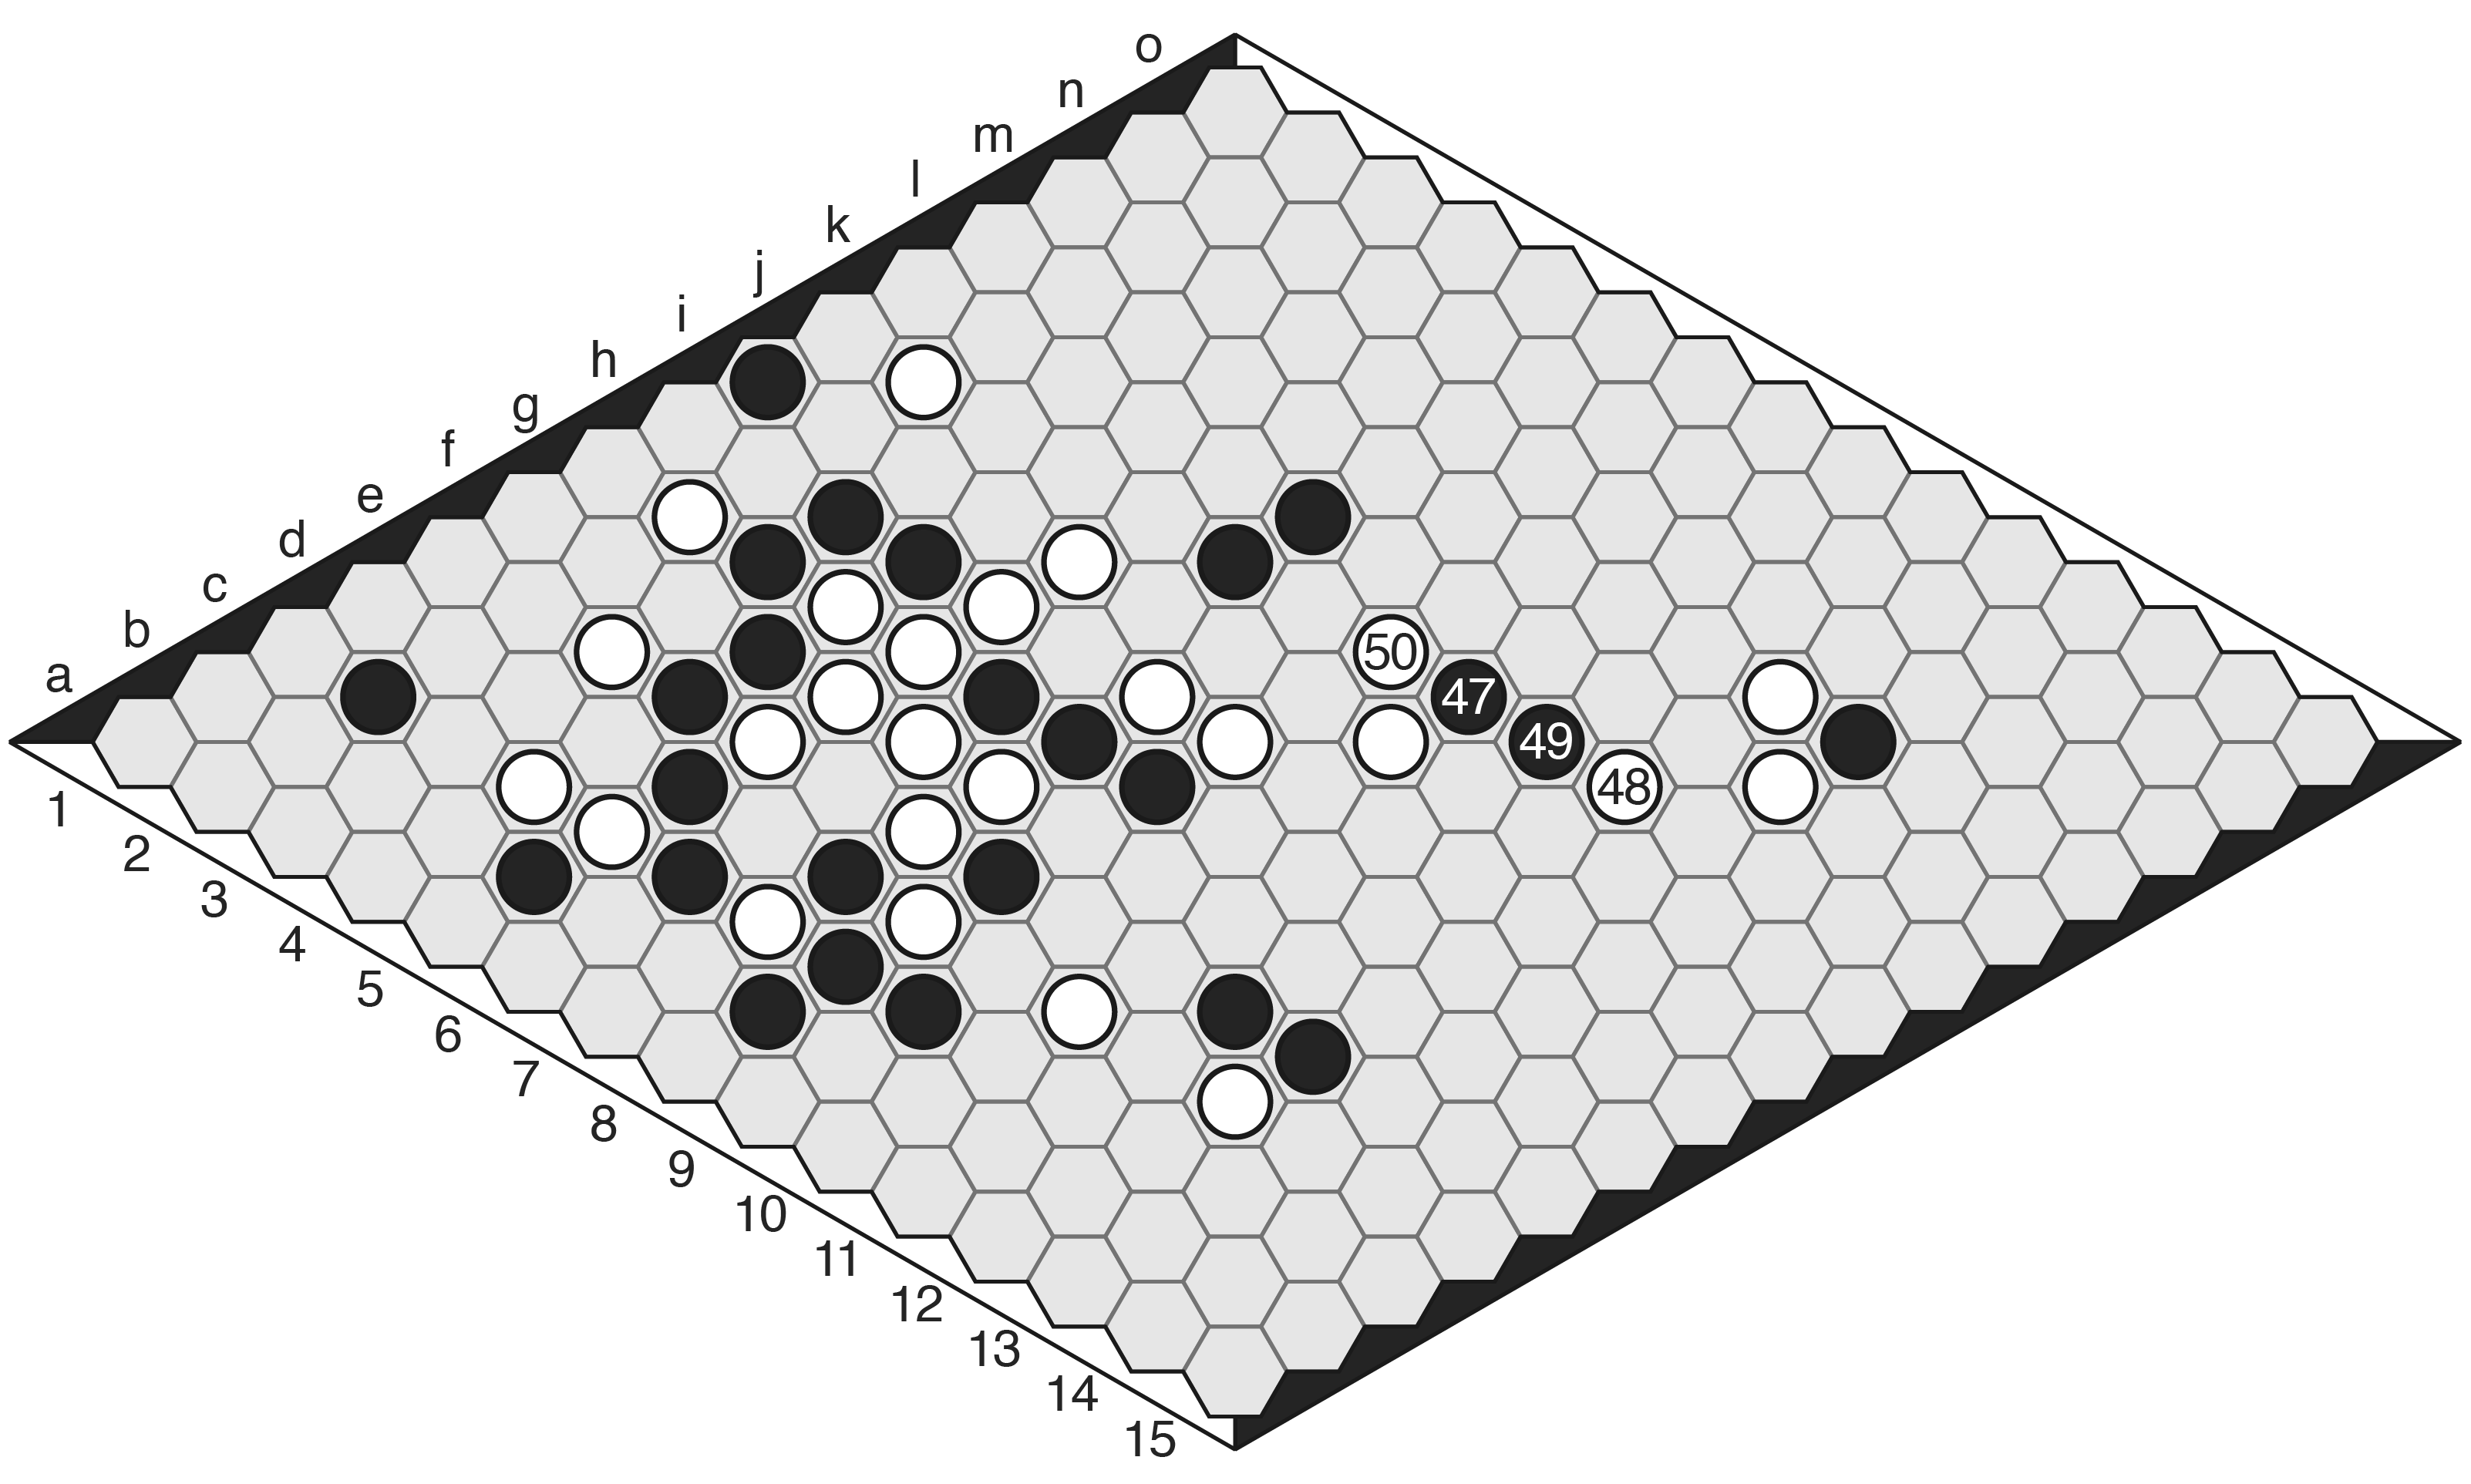
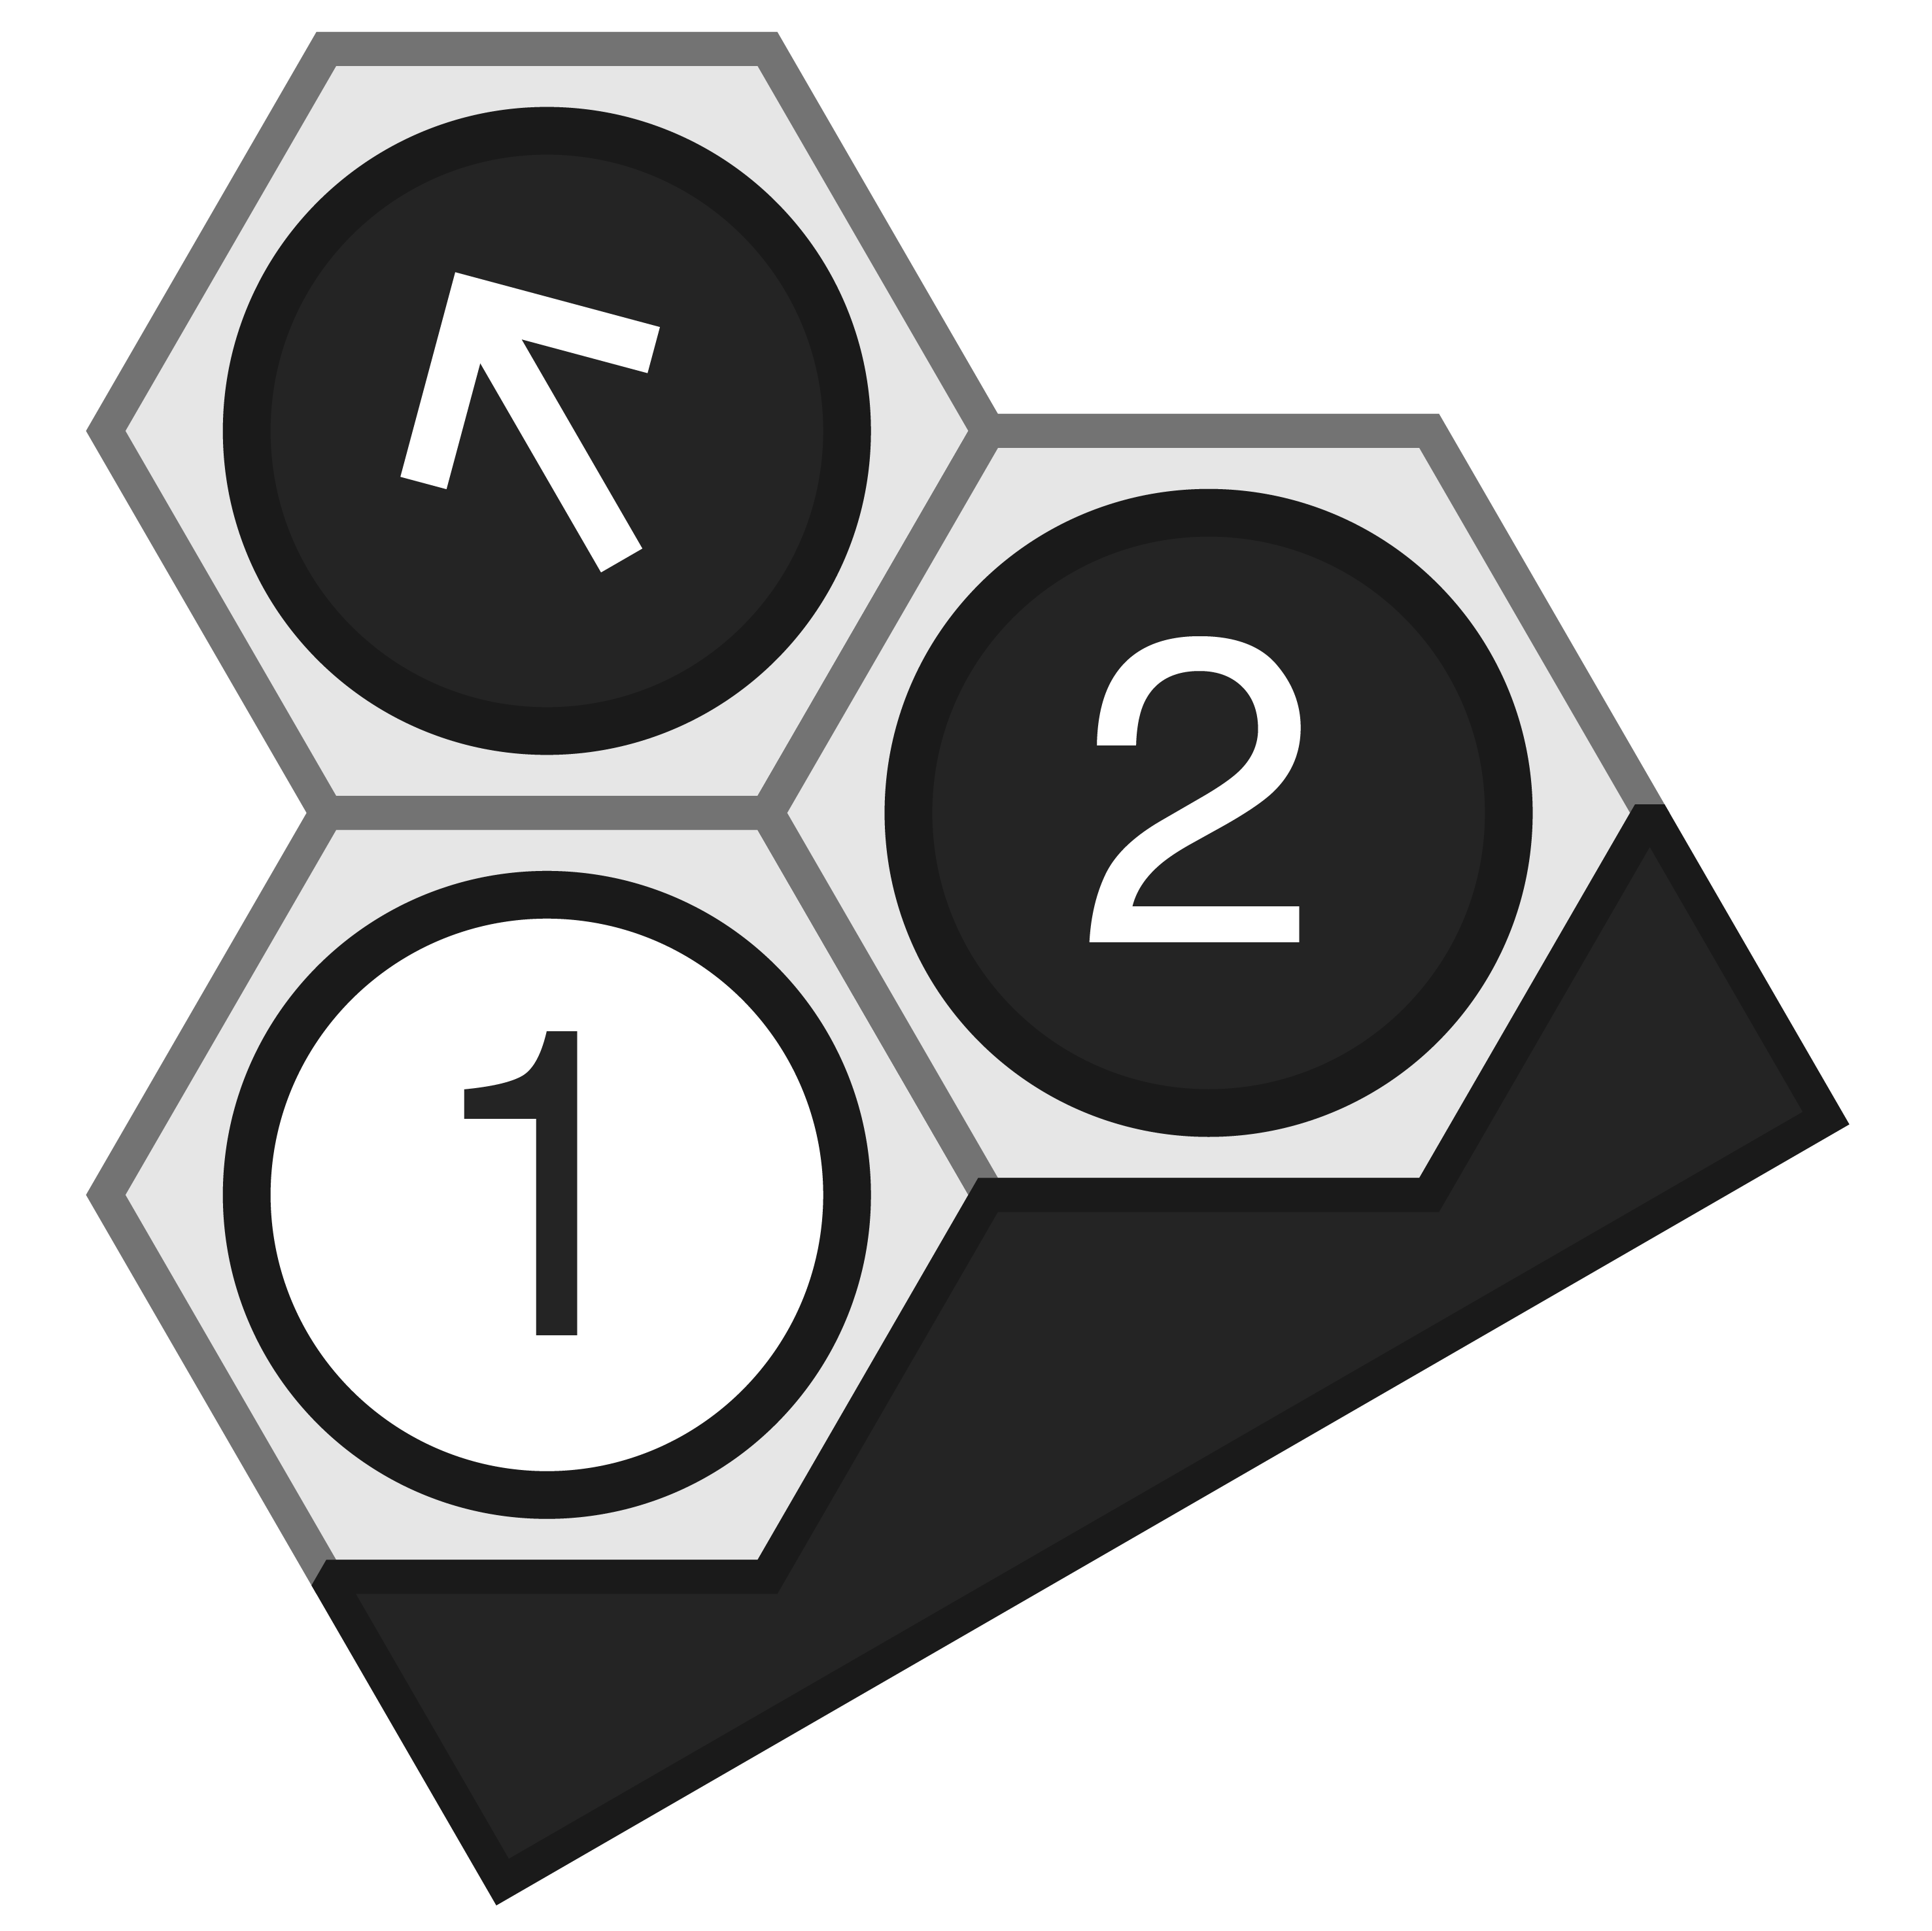
Moves 47-50: All that remains is for White to finish off the connection. After 47. j9, White will ultimately play j8, after which a fifth-row ladder will begin (Black could hold White to either a fifth- or fourth-row ladder; generally you want to hold a player to the higher row). Before that, though, White sets up the ladder escape with move 48, which threatens to connect back via a bridge to the stone on i9. Black is forced to block (Black’s choice to play 49 at j10 as opposed to i10, is the stronger block since it leaves White with slightly less space underneath). Now White plays 50. j8, and the game is over. Although the final sequence wasn’t played, let’s quickly look at how it might have played out.
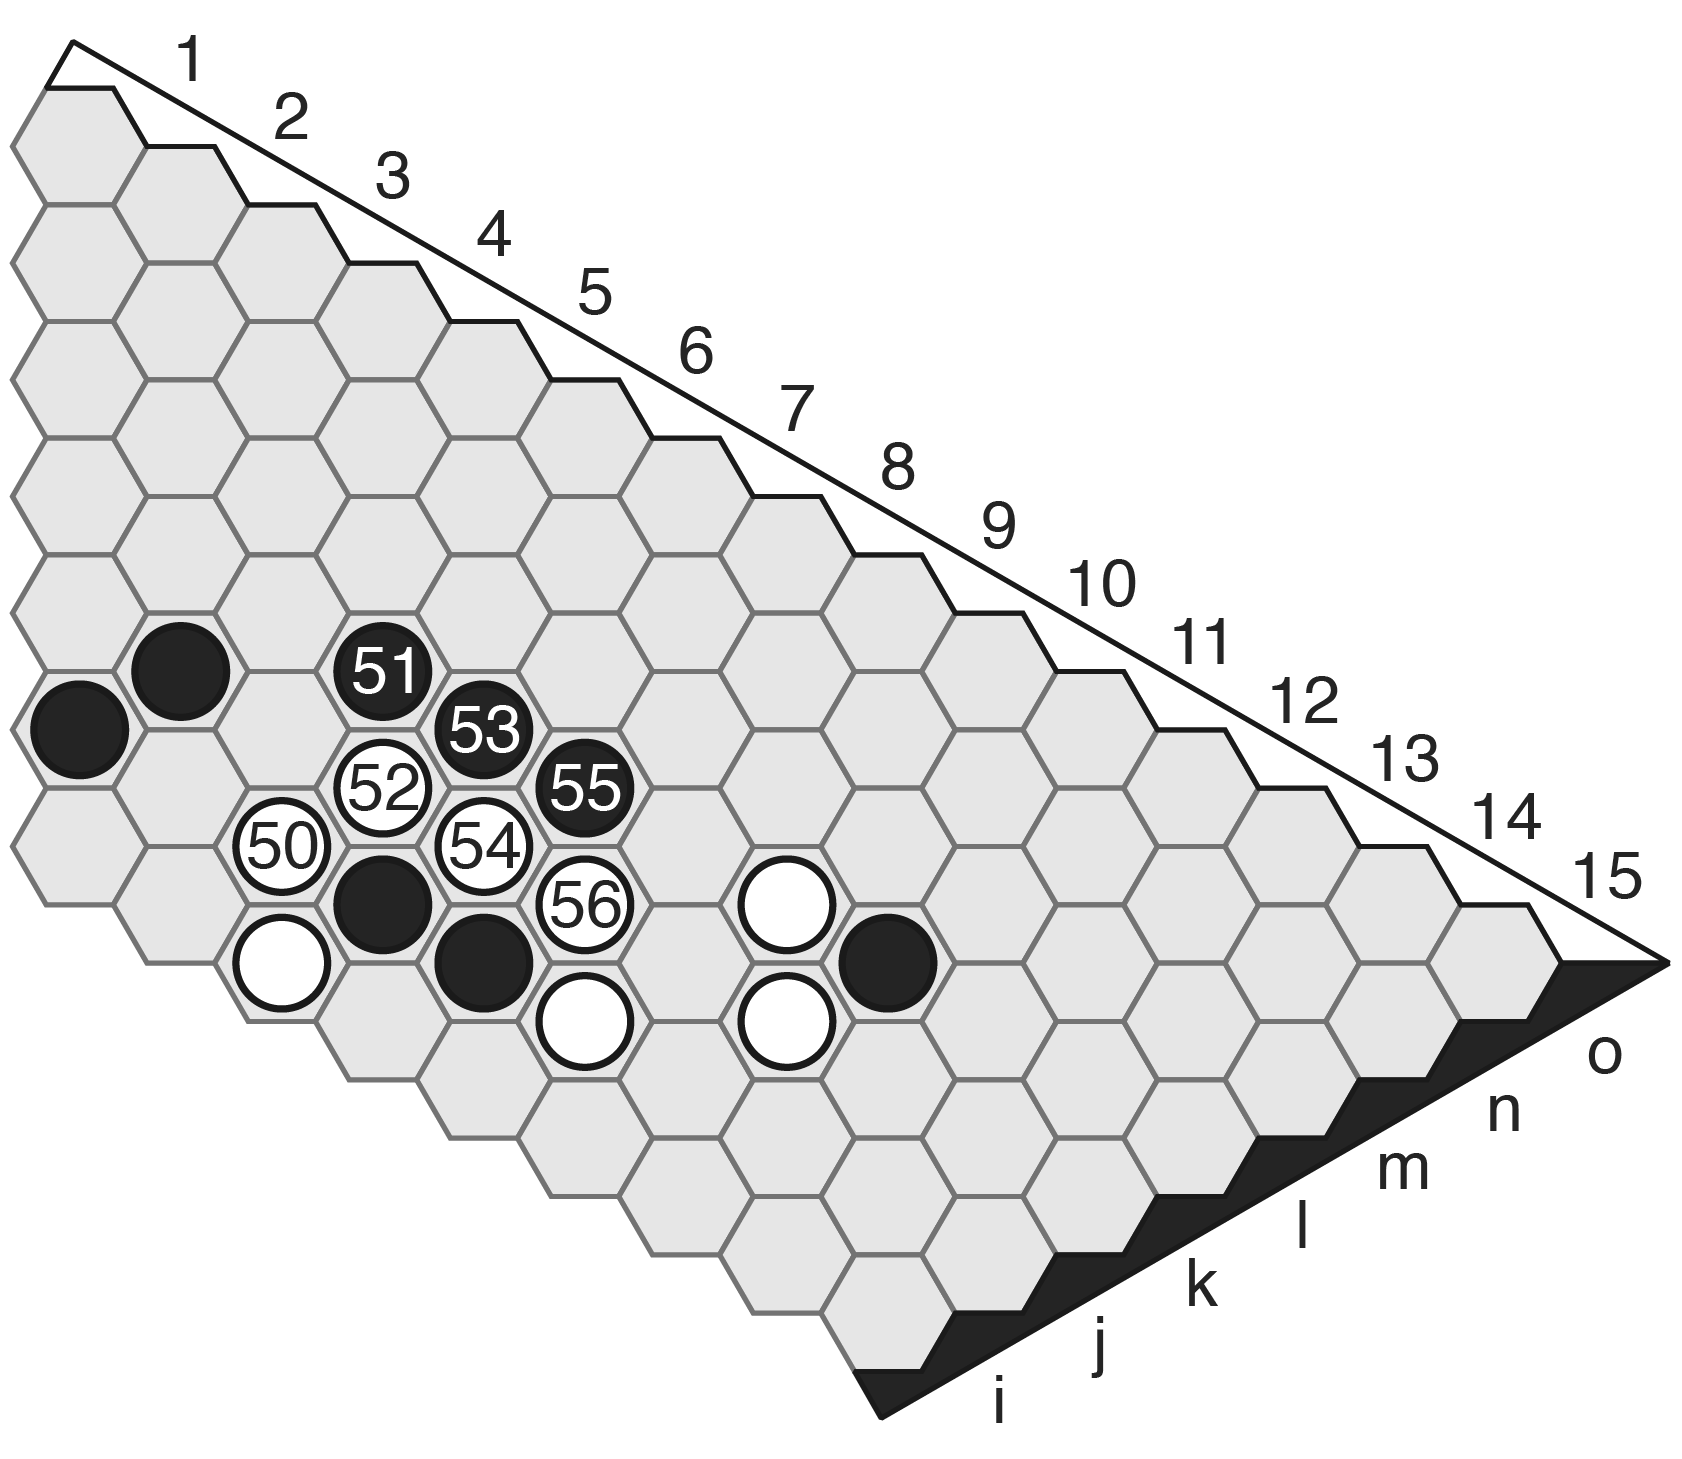
The naive approach is just hold White to the fifth-row ladder. White easily connects with Template A-4.

Black might instead jump ahead with move 55 and force a bottleneck, but after move 58 White connects to the bottom with Template A-3 and back to (50) via either A or B.
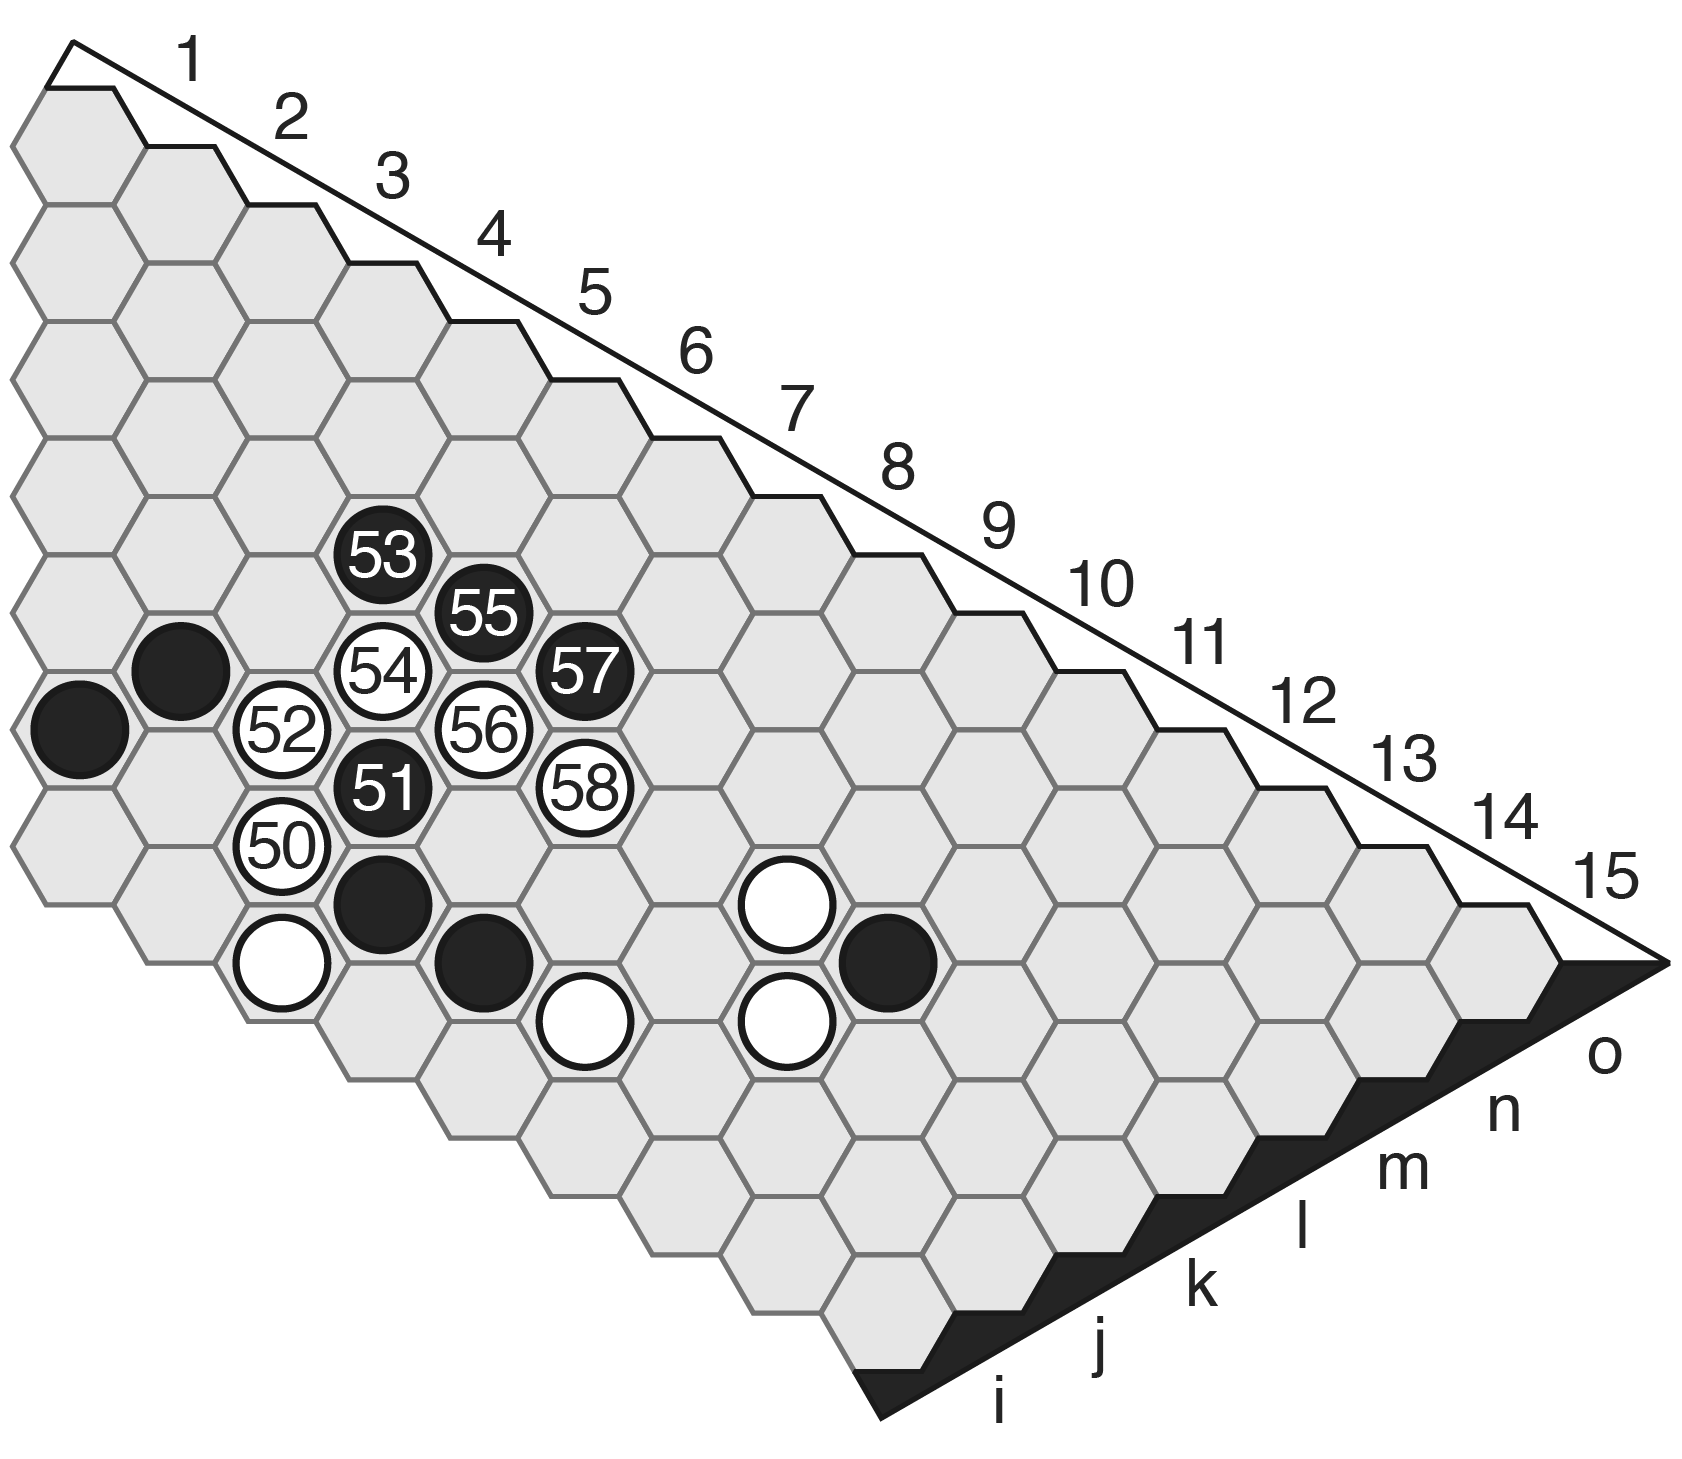
Finally, Black might try to hold White to a fourth-row ladder instead, but after move 58 White’s stones are connected in the Trapezoid template, and Black has no means of blocking White from the edge.
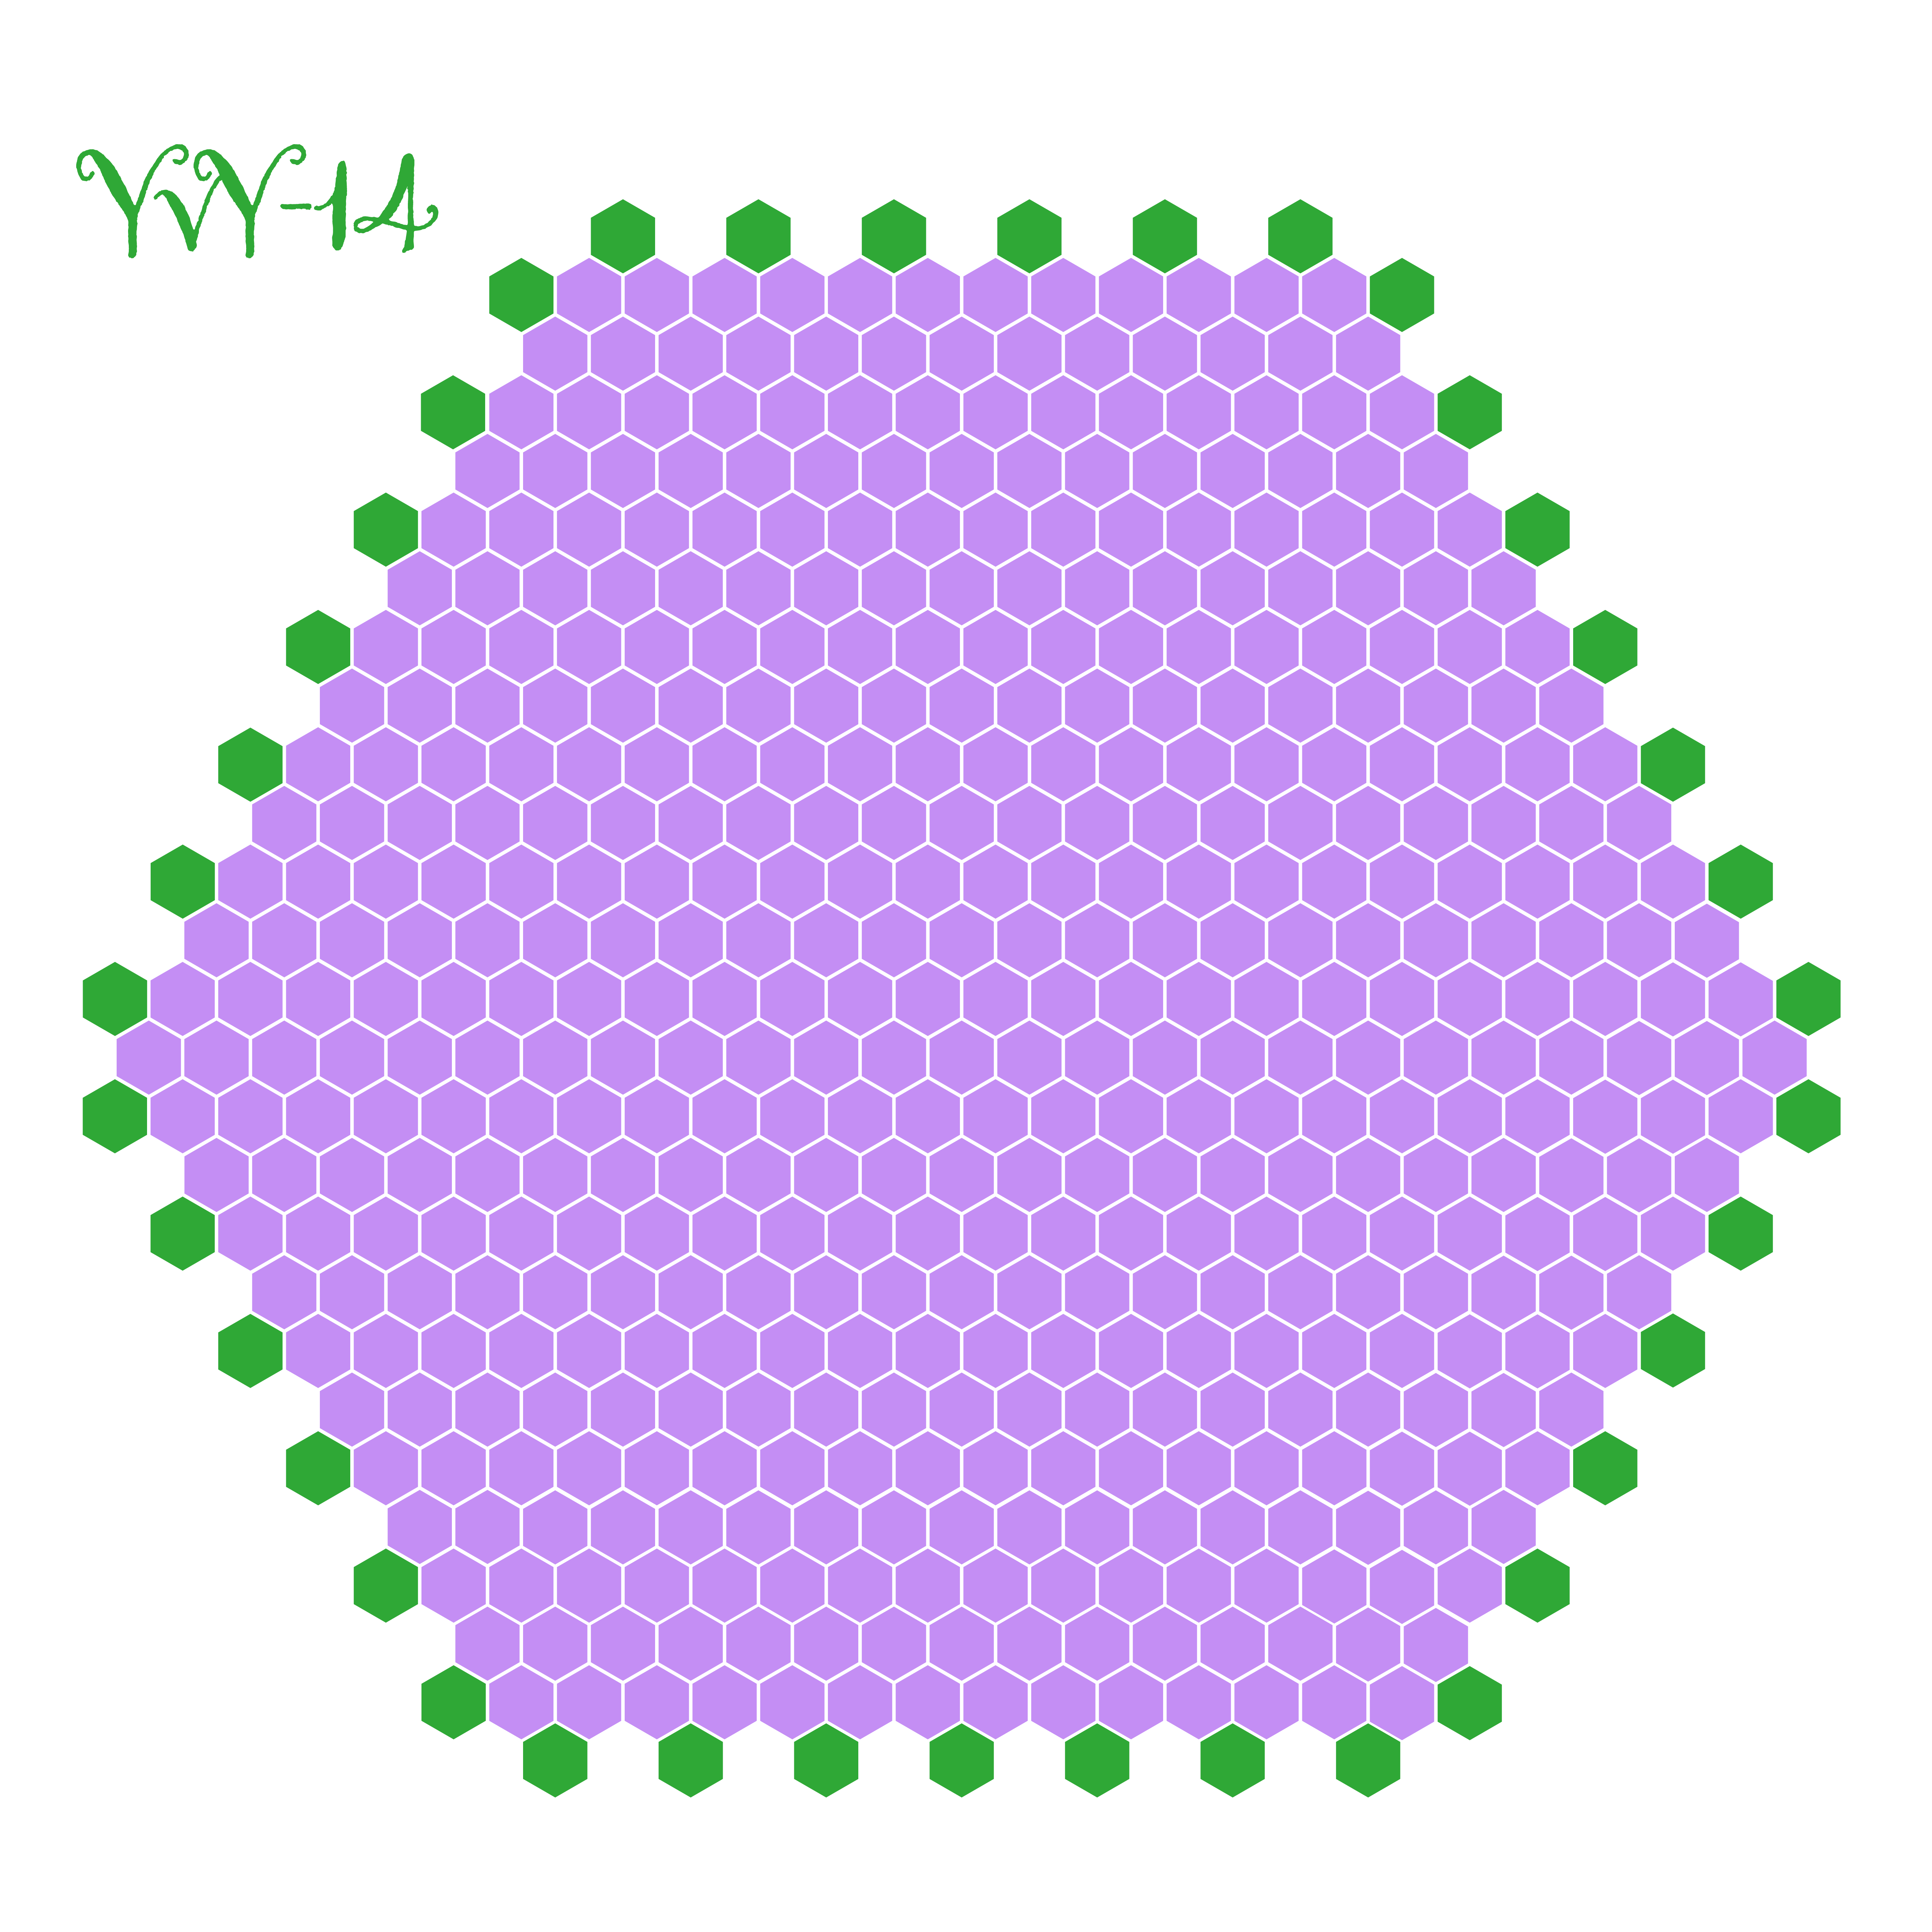
Y Sample Game: PCM vs Matthew Seymour
Next up we have a sample game of the Game of Y. For those of you who don’t know Y, it’s actually even easier to learn than Hex:
- Two players, Black and White, compete to connect all three sides of a triangular board of hexagons.
- Players take it in turns to place one stone of their colour on any empty square on the board. The first player to connect all three sides of the board with a single connected group of stones wins the game.
That’s it! In Hex, players must connect two specific sides of the board that share their colour, while in Y all three sides are relevant to both players. As we shall see, that fact can alter some of the tactics and strategies you may have learned from Hex, but broadly speaking your Hex knowledge is a great help in Y as well.
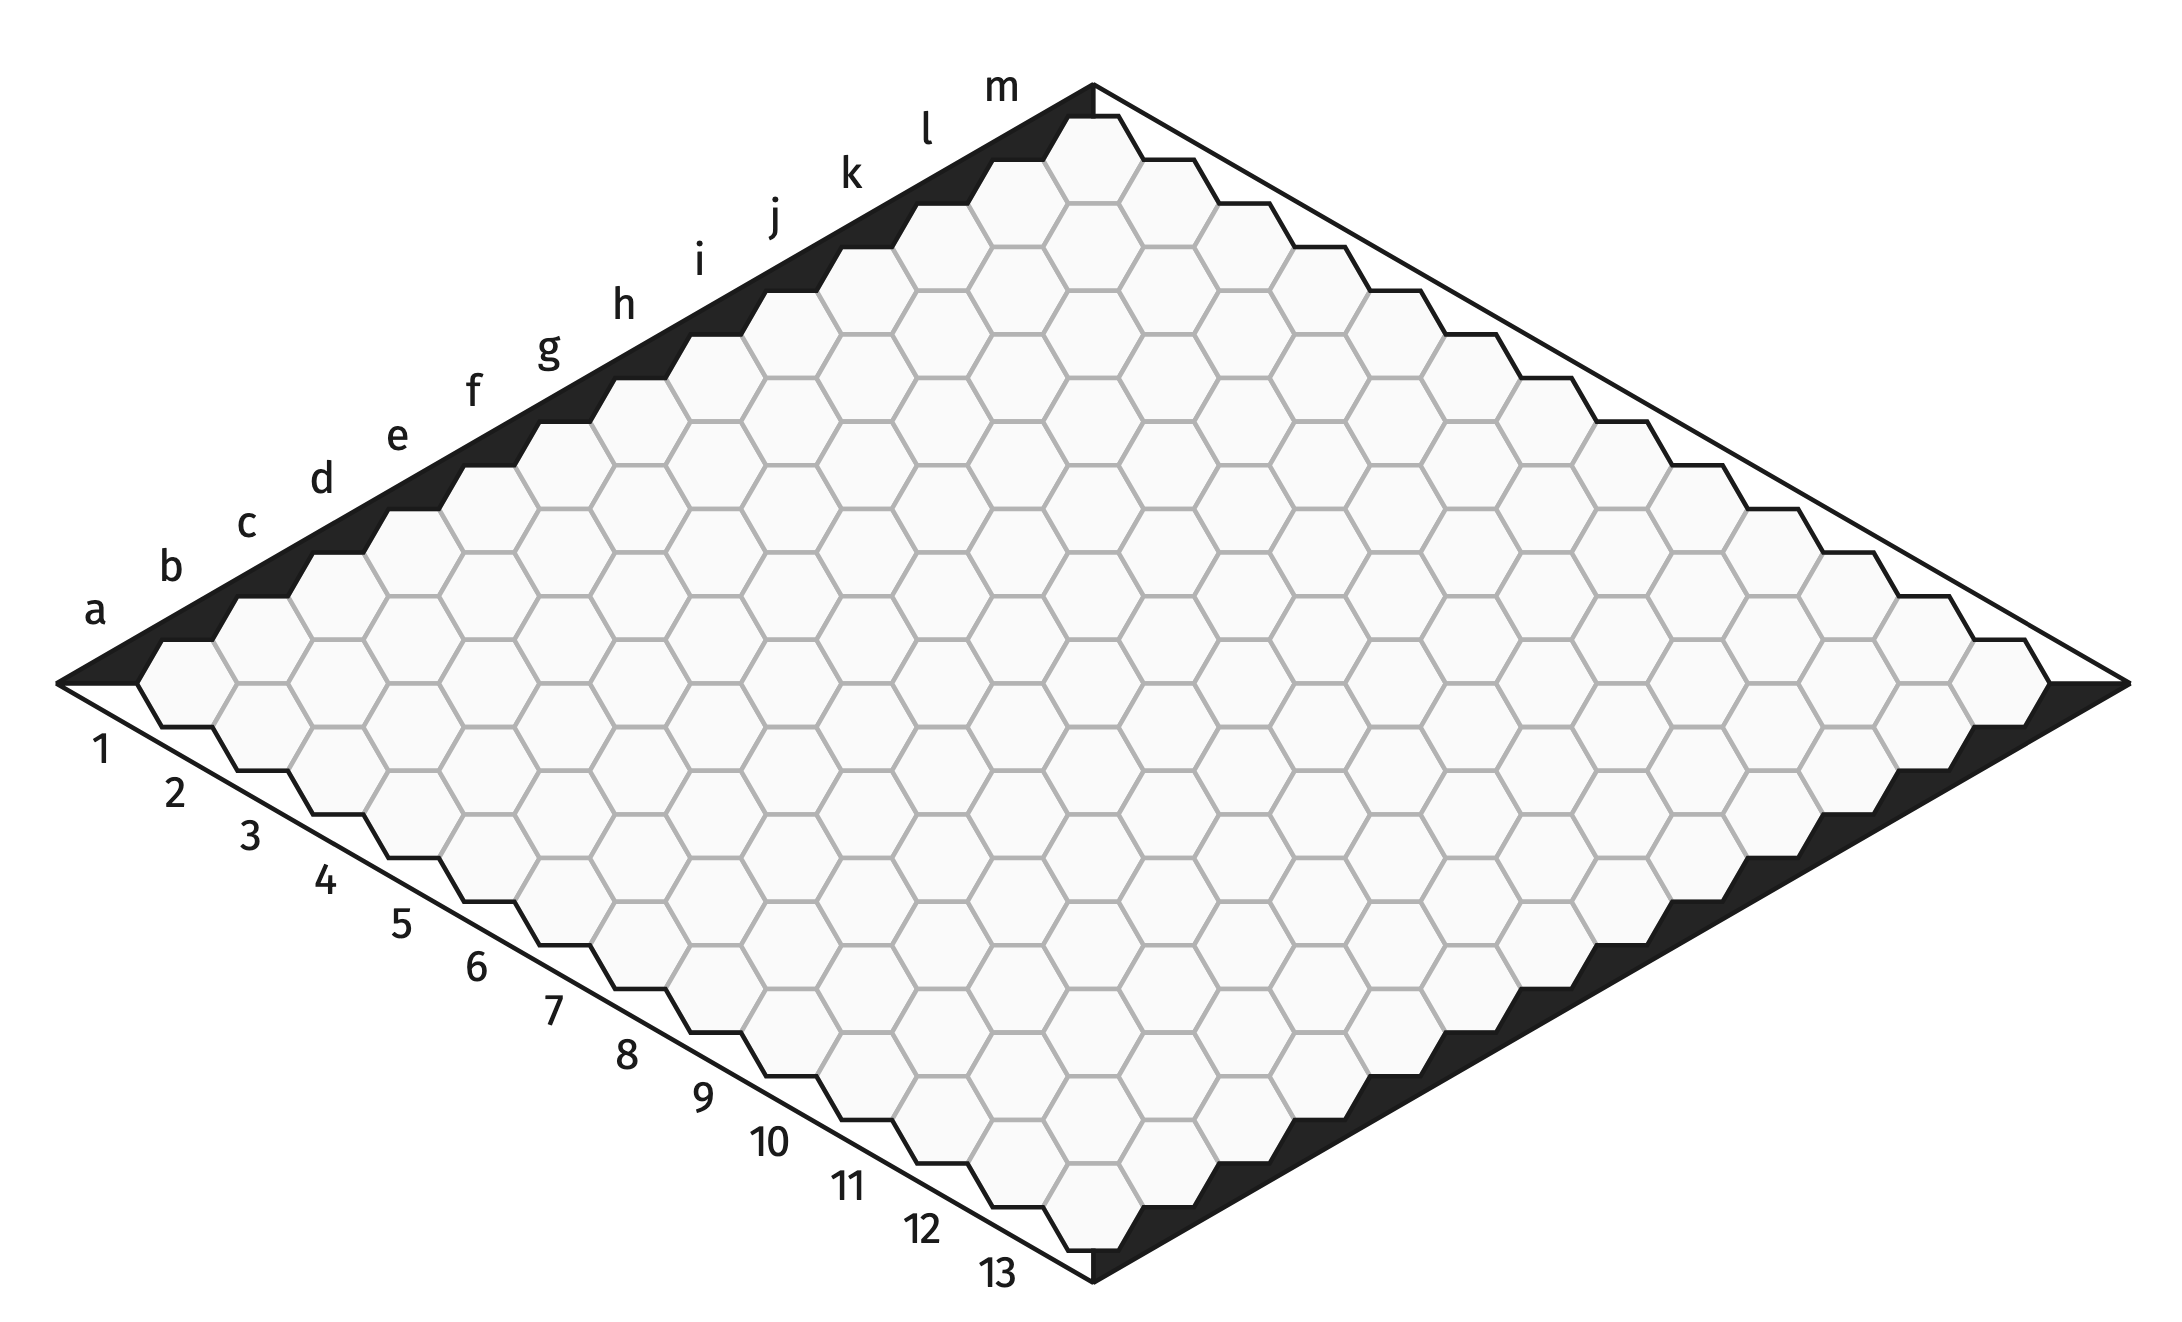
This game was played between PCM (Black) and Matthew Seymour (White) on iggamecenter. The board is size-14, which is relatively small for Y but still big enough for a challenging game. Matthew has annotated the game for us below:
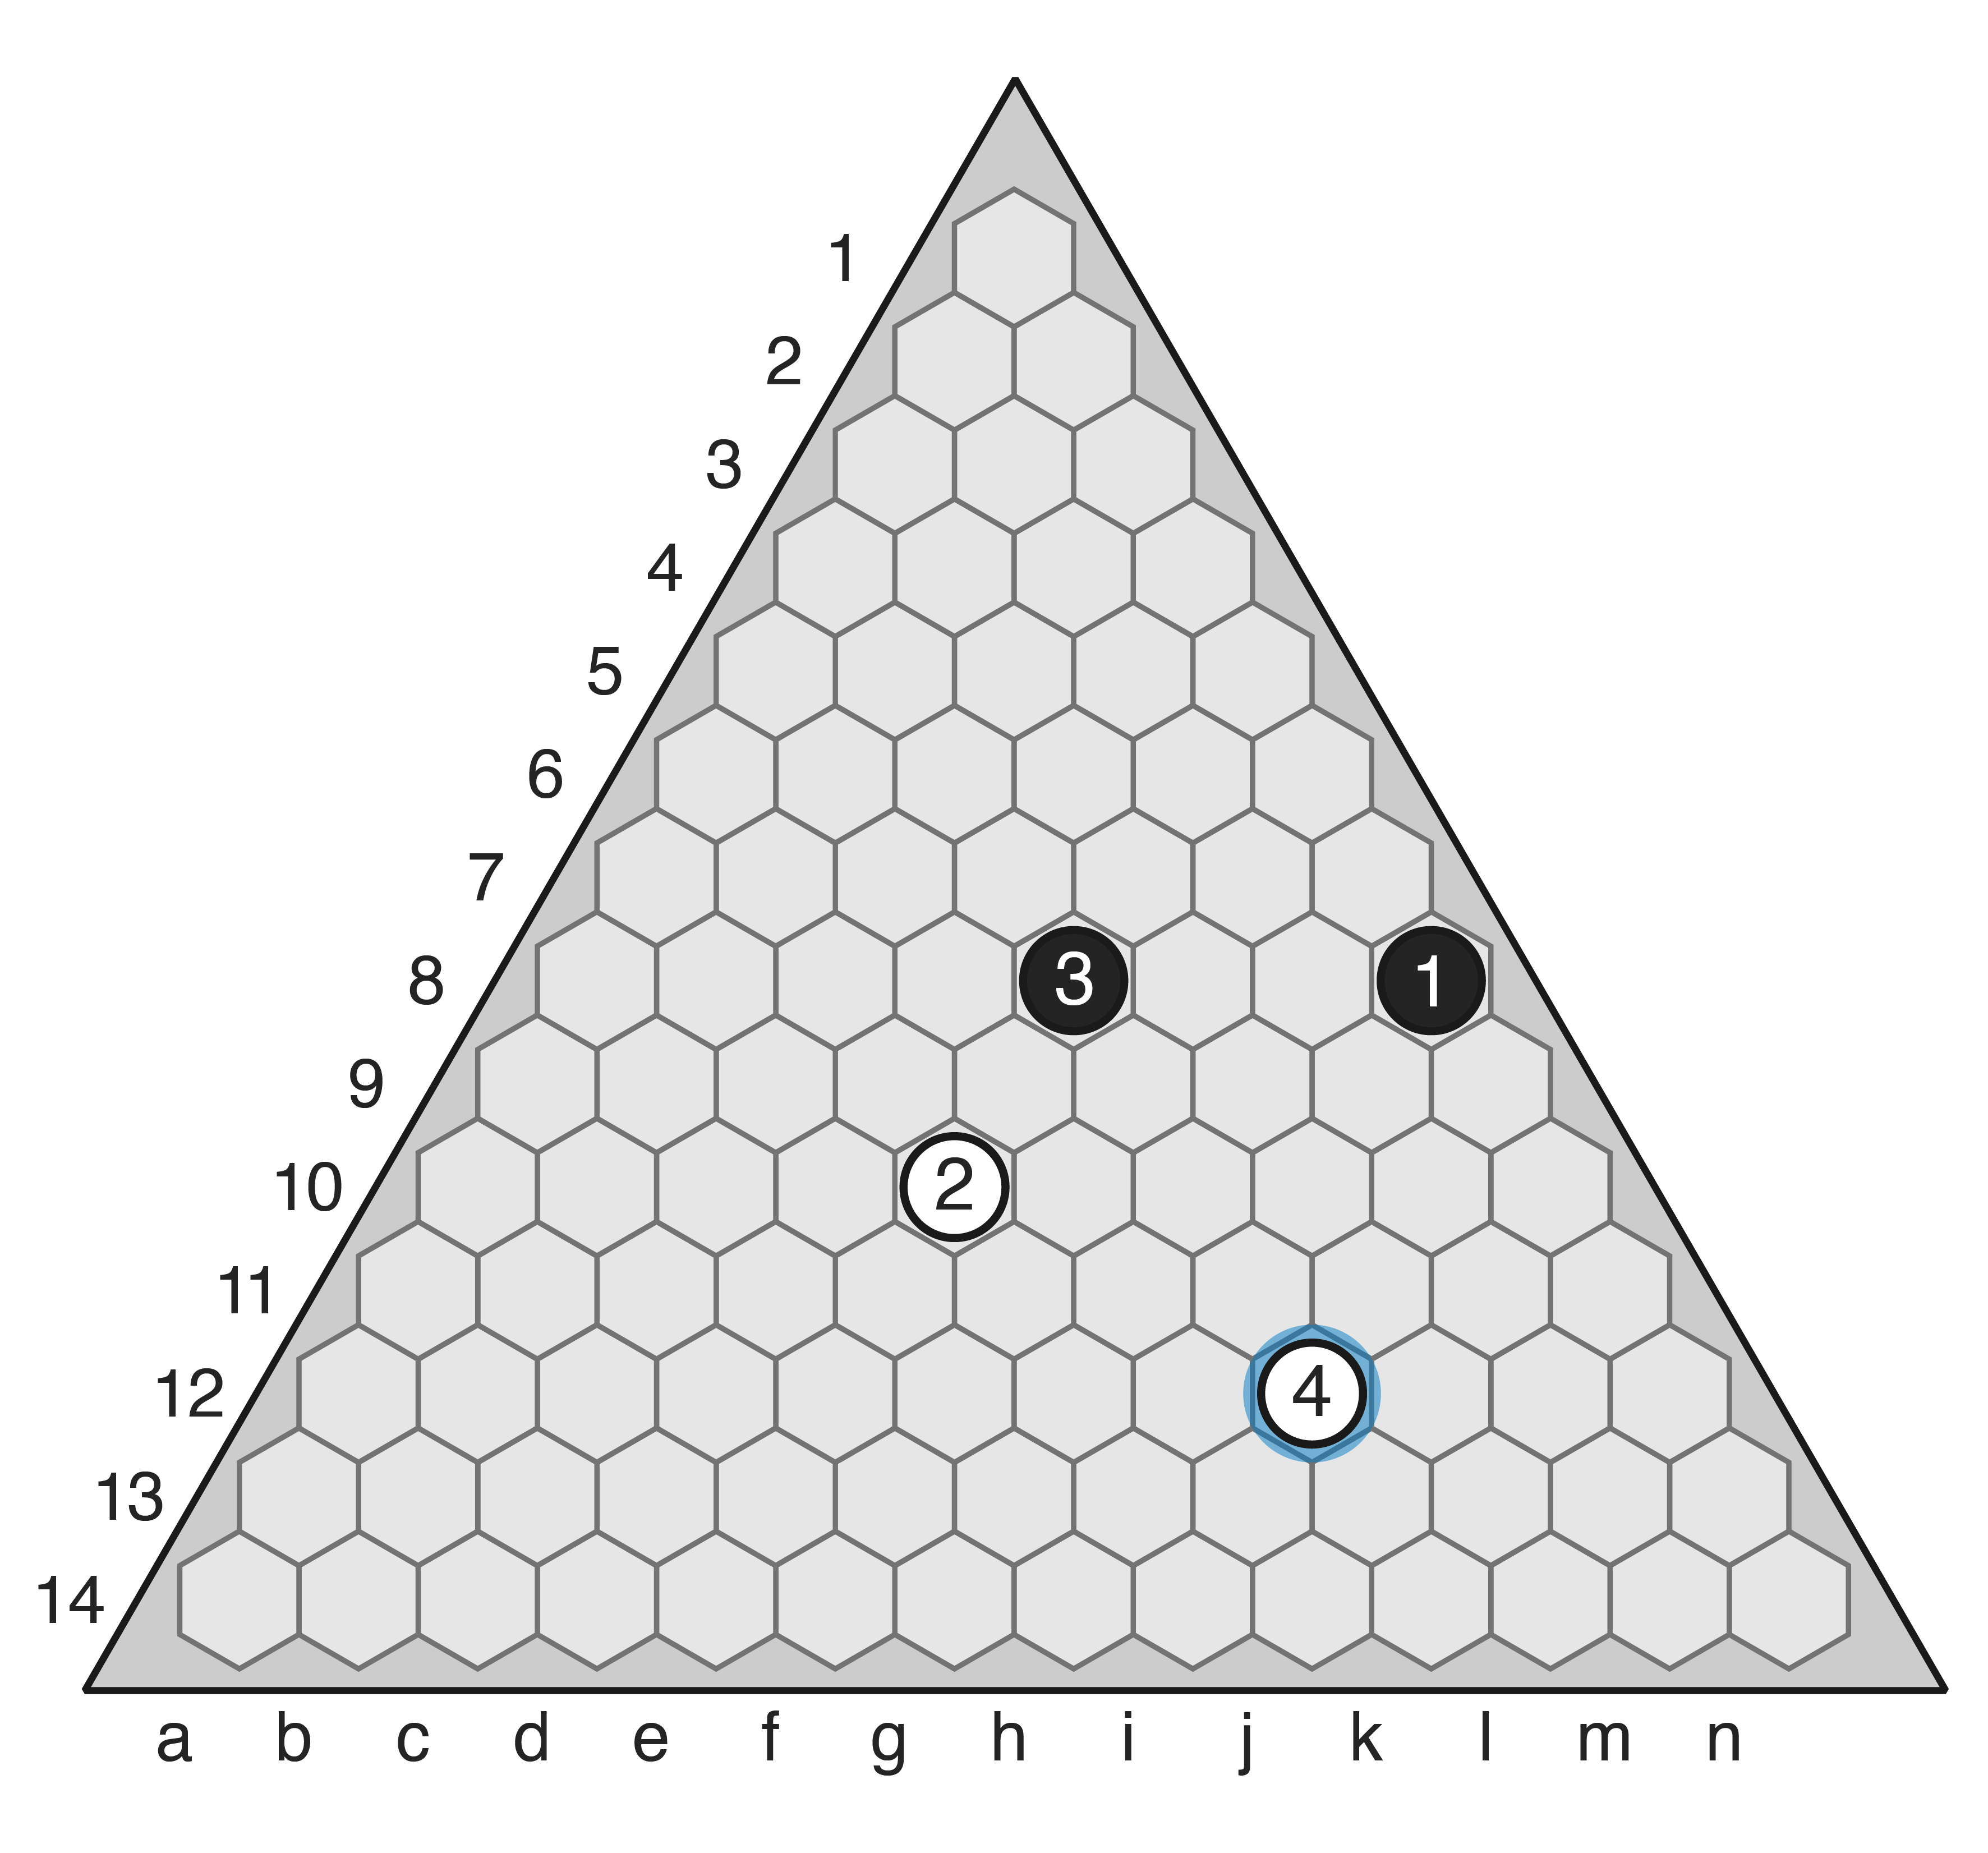
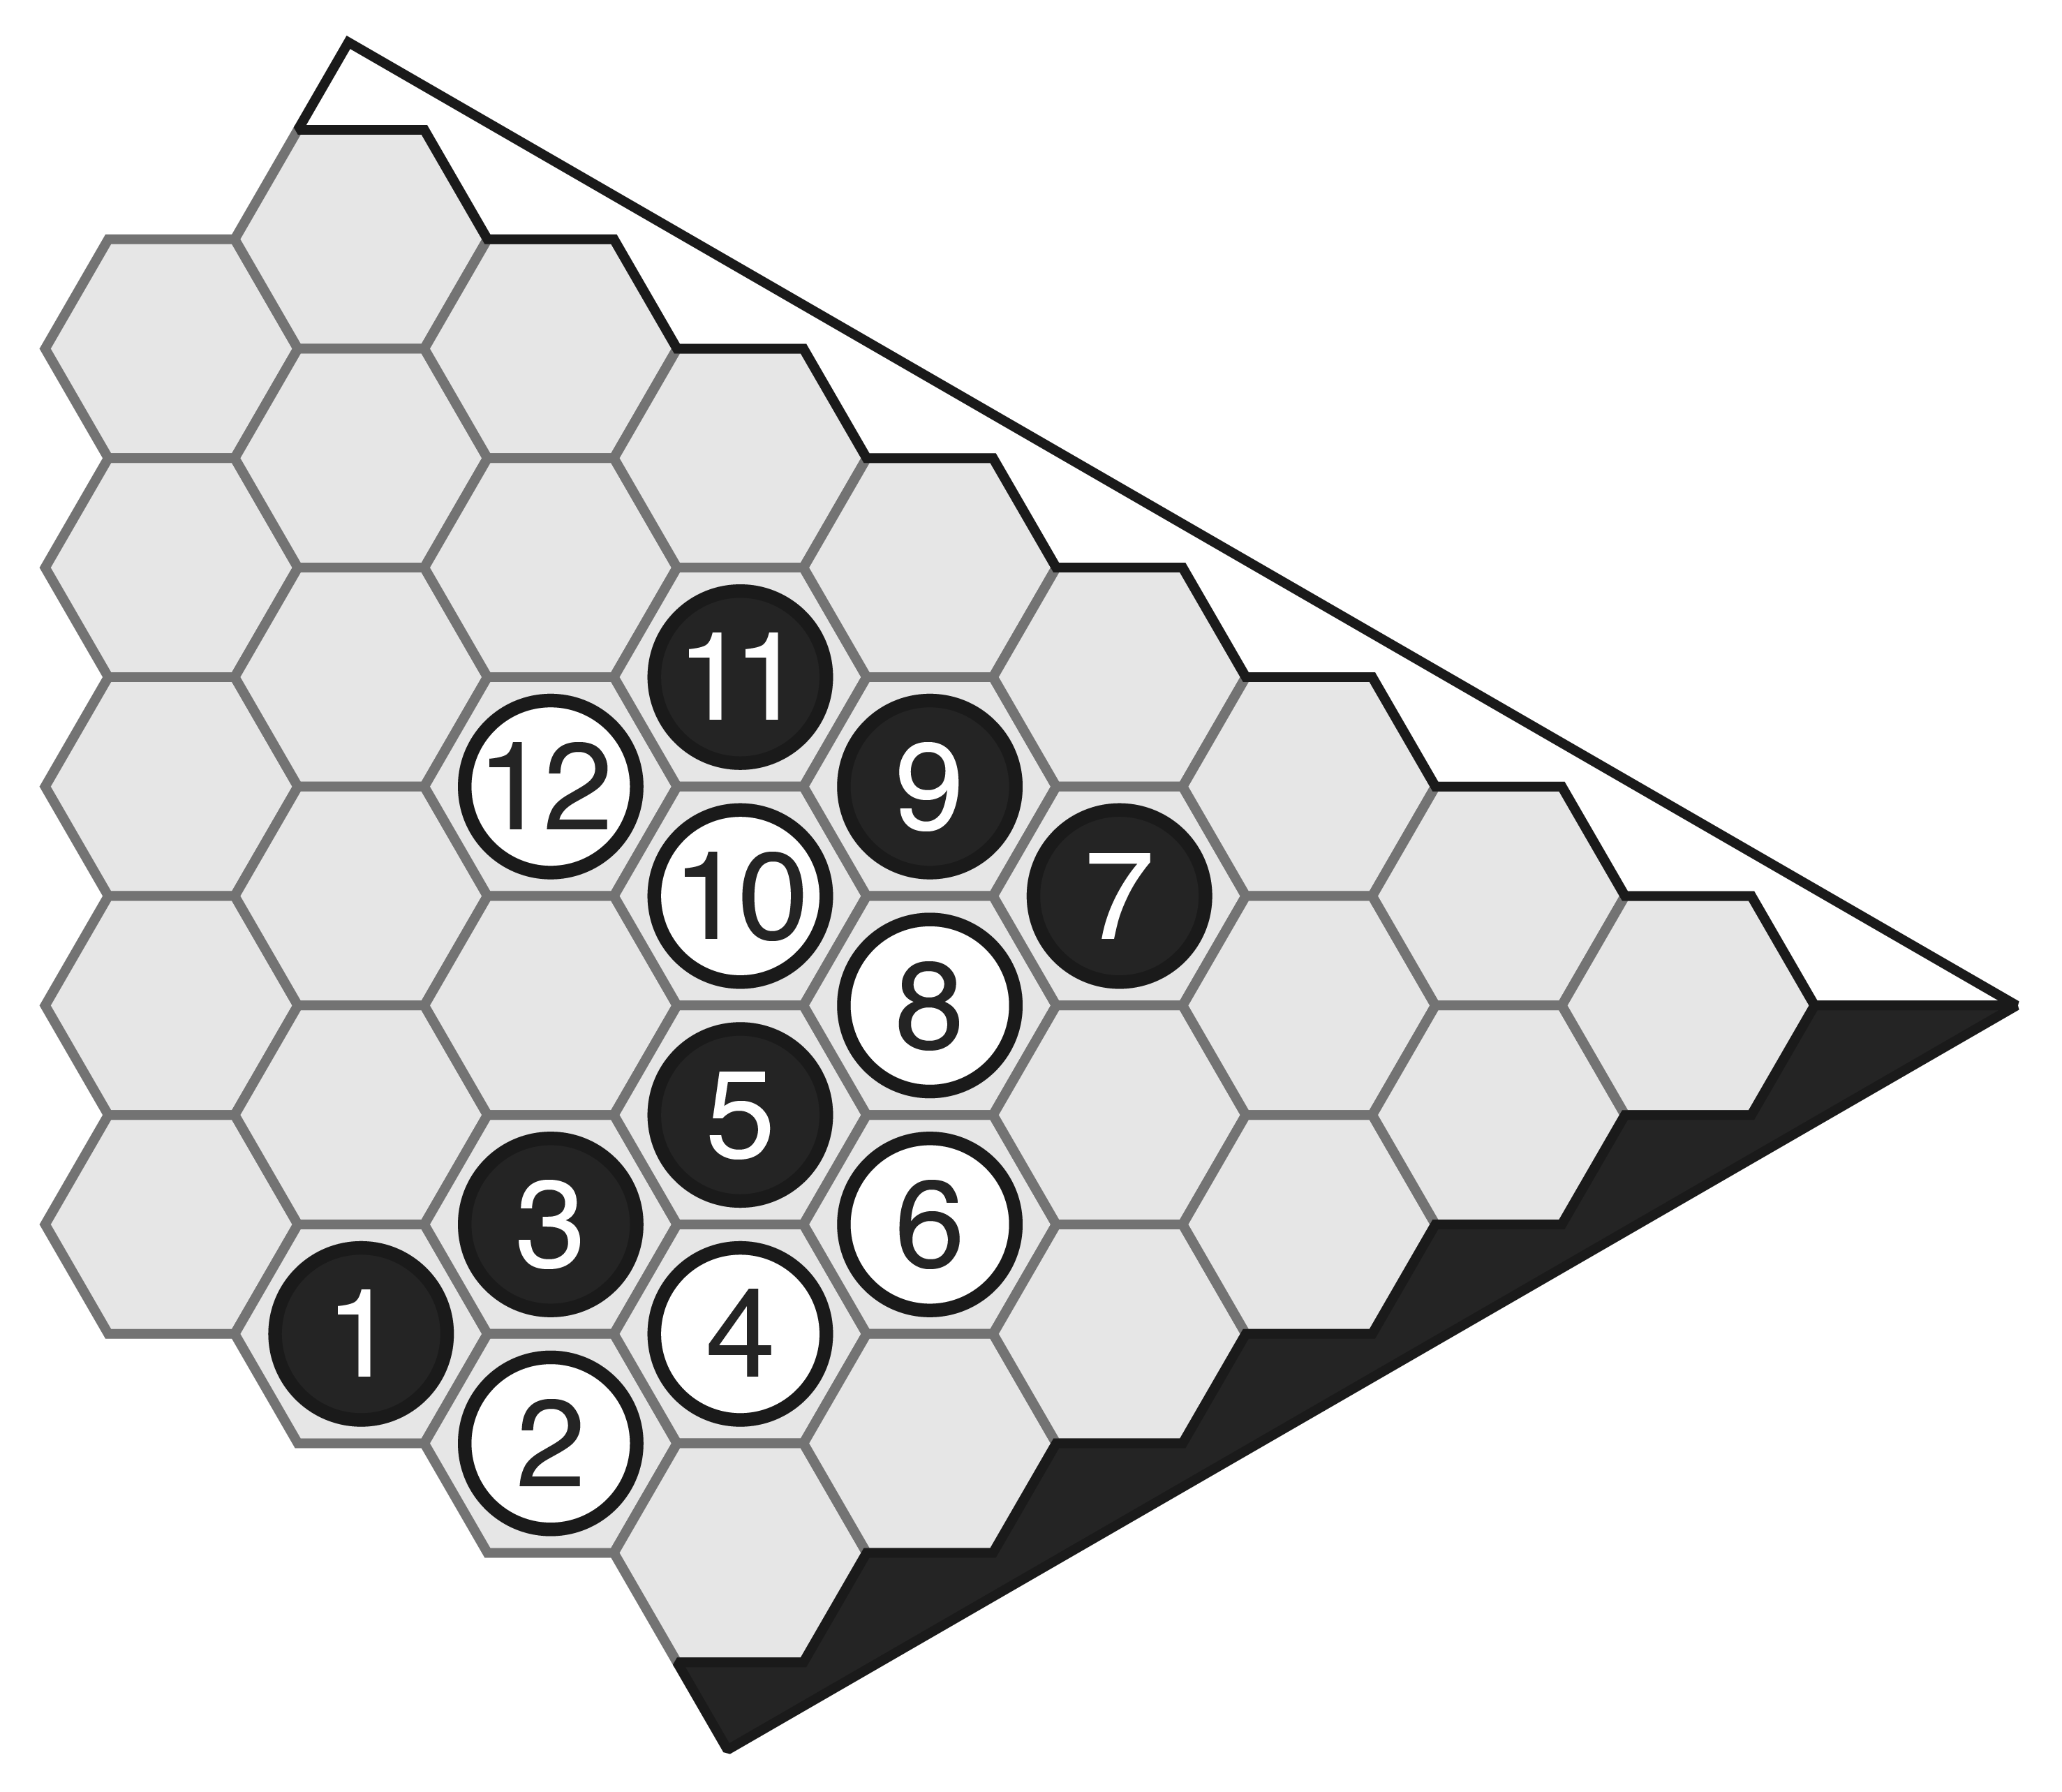
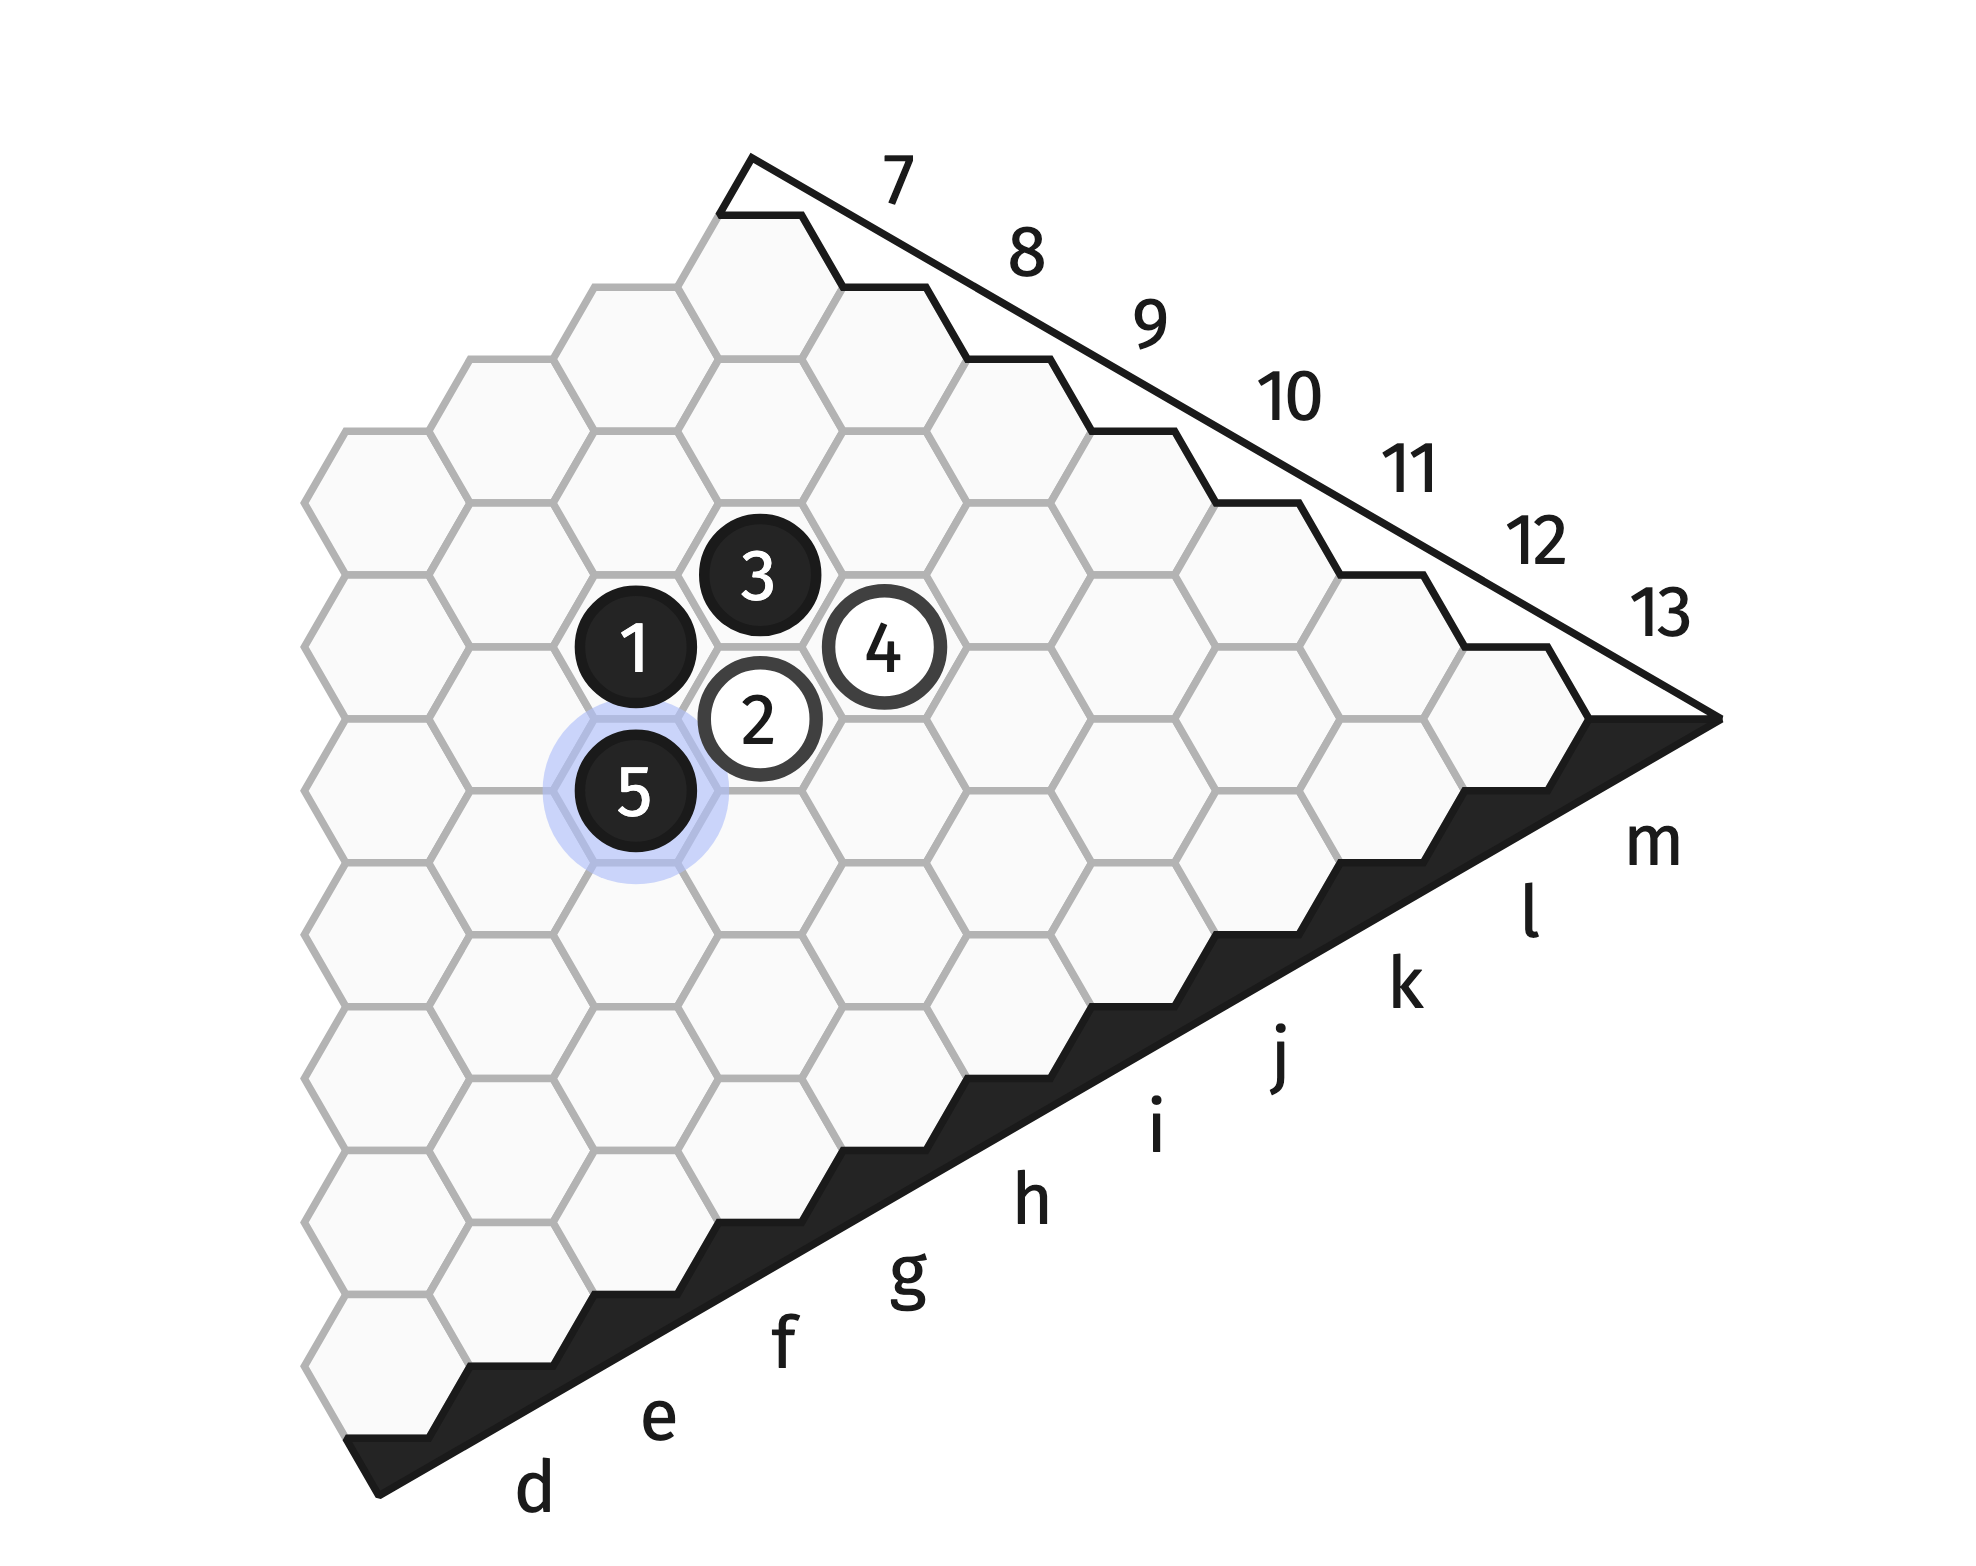
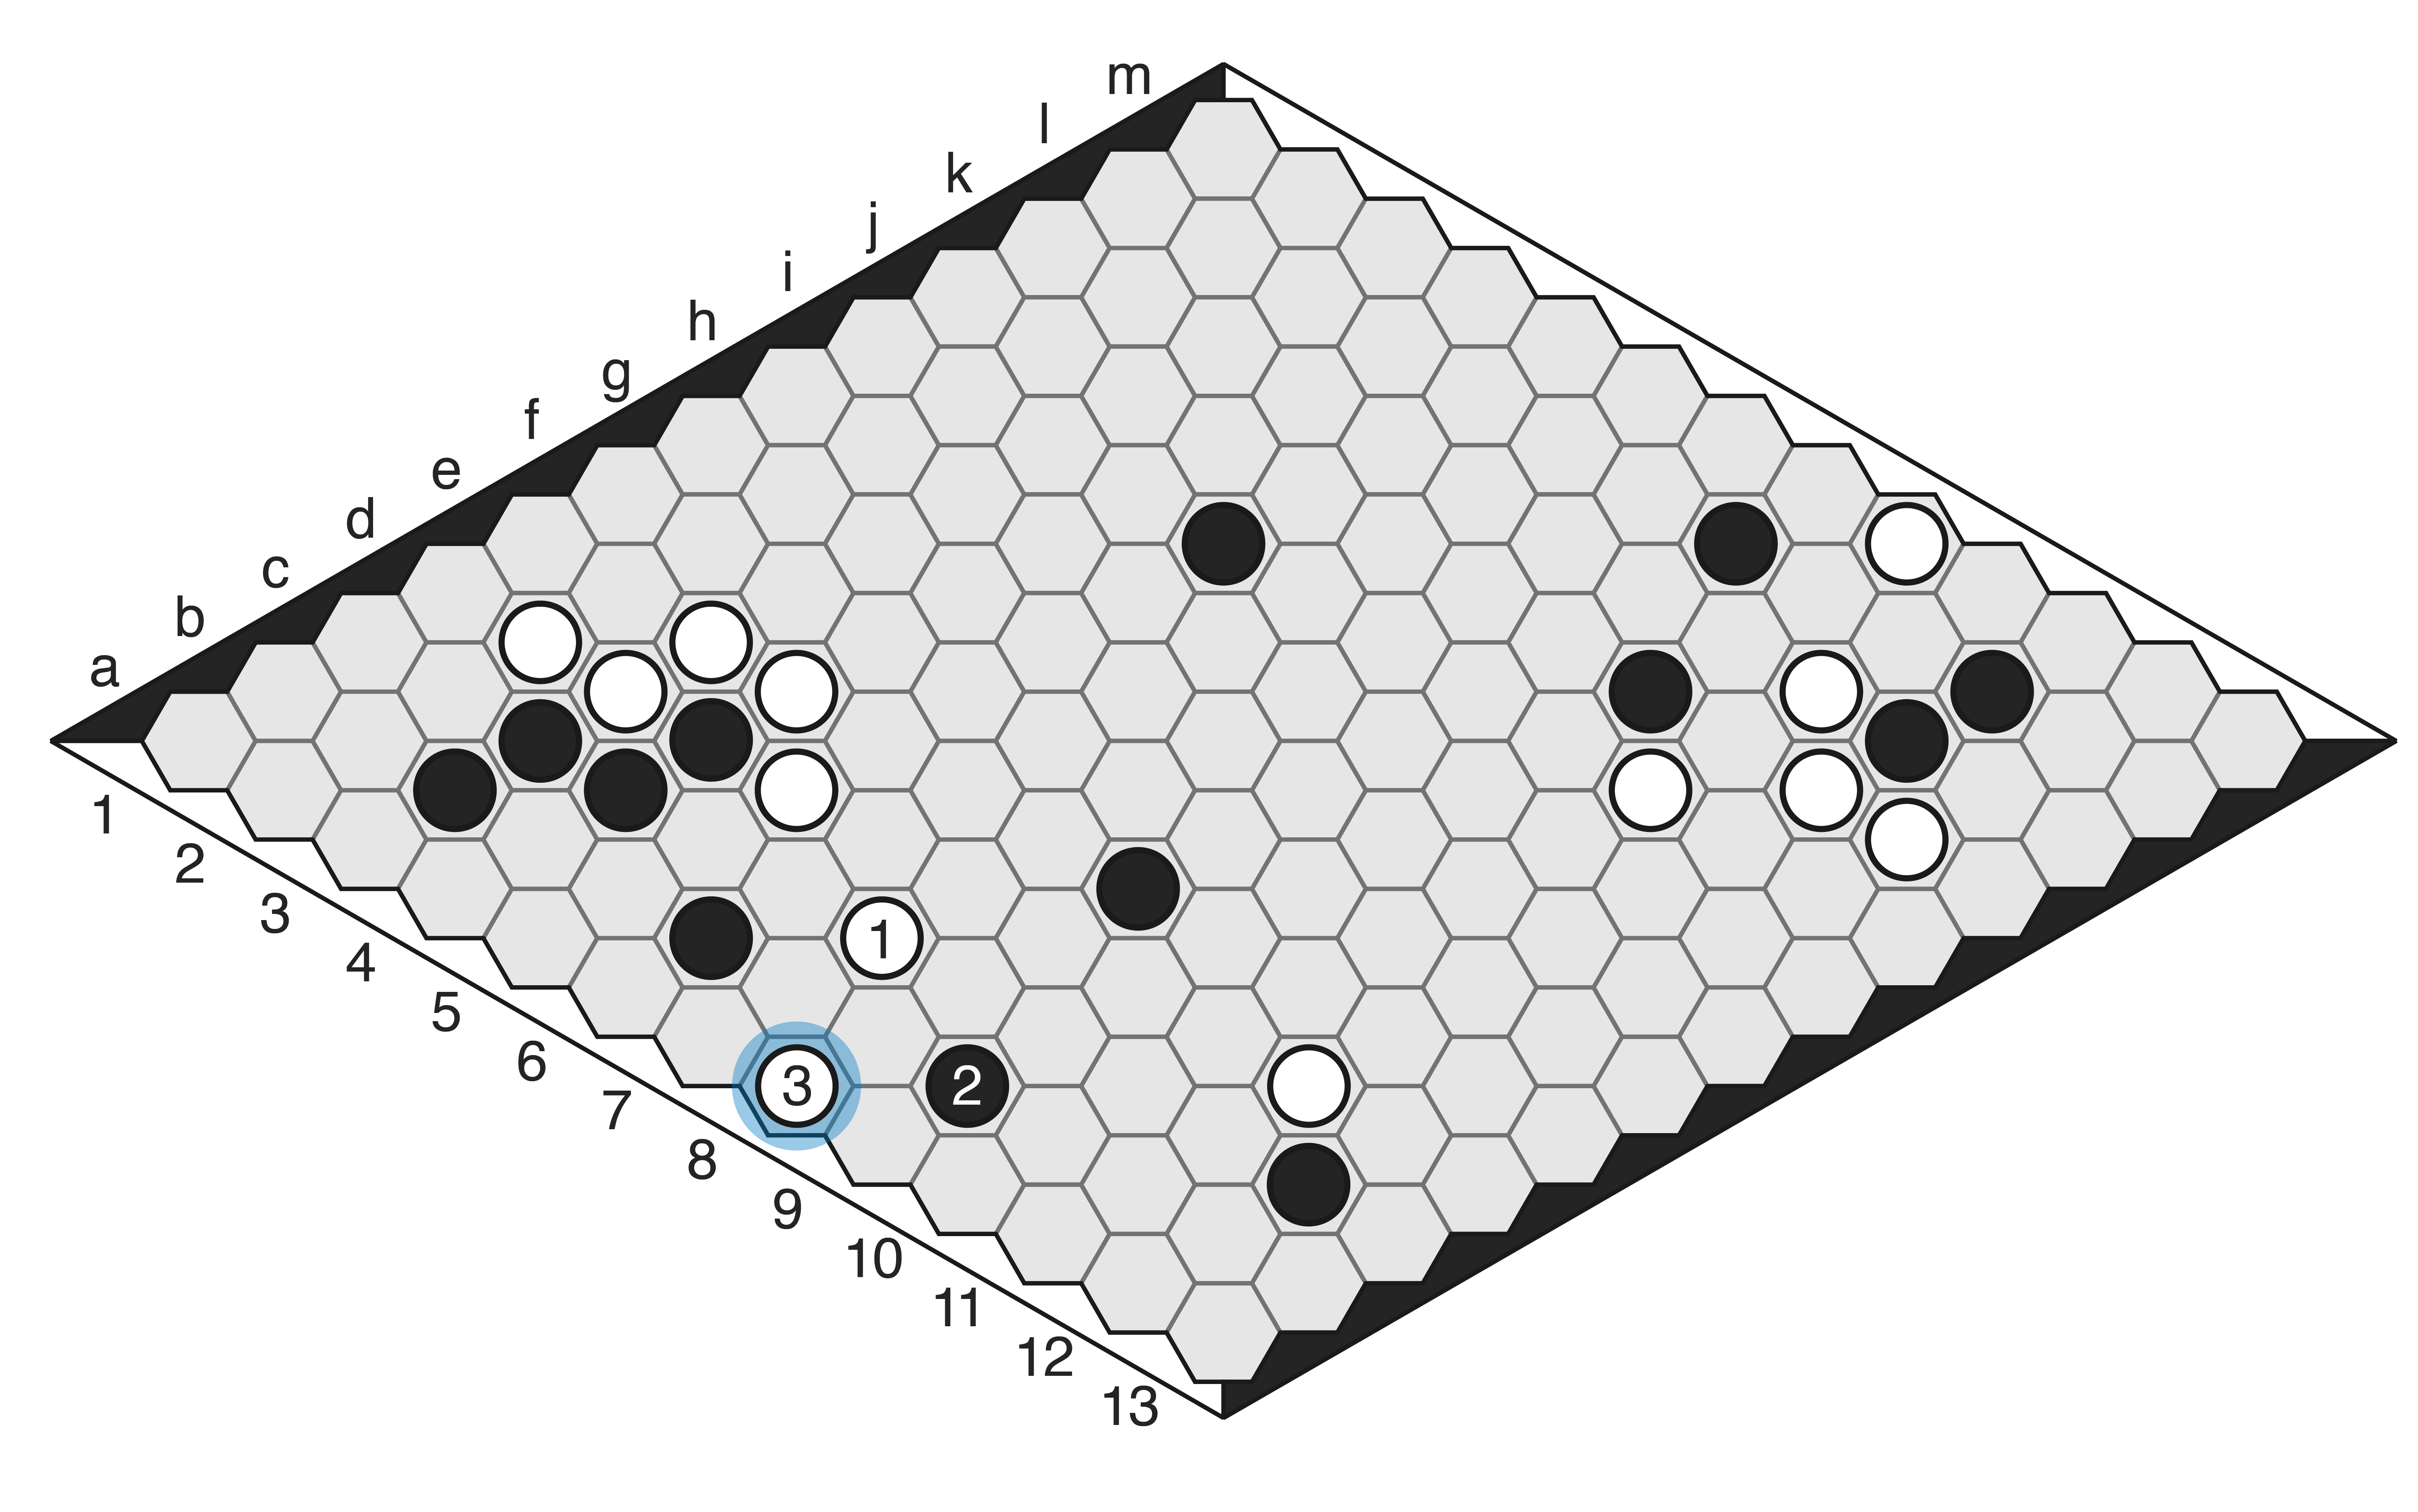
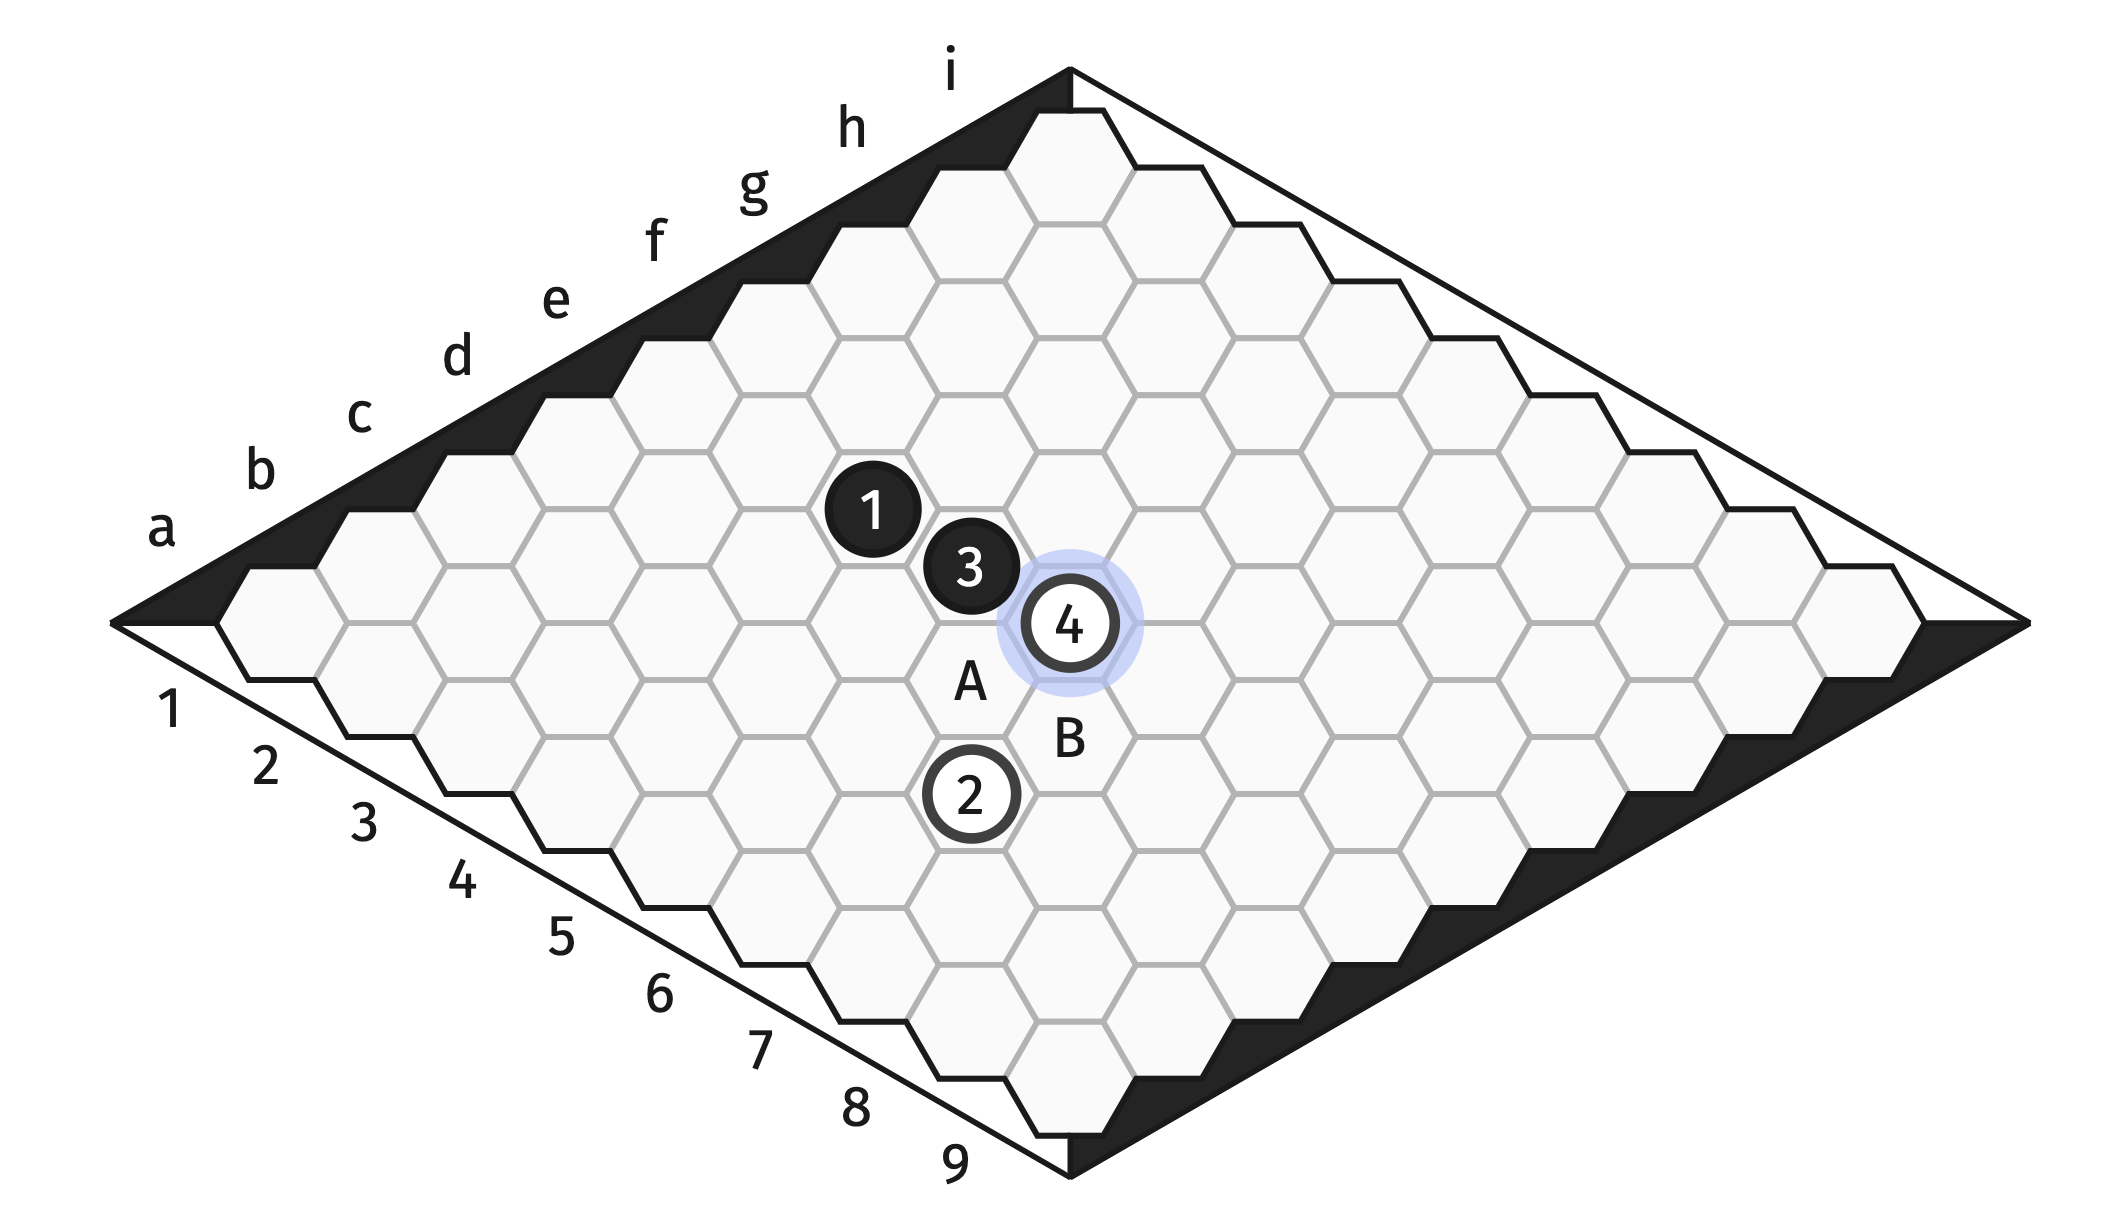
Move 1: We’re playing with the swap rule, so Black (PCM) opens along the edge.
Move 2: White (Matthew) responds with a more central move.
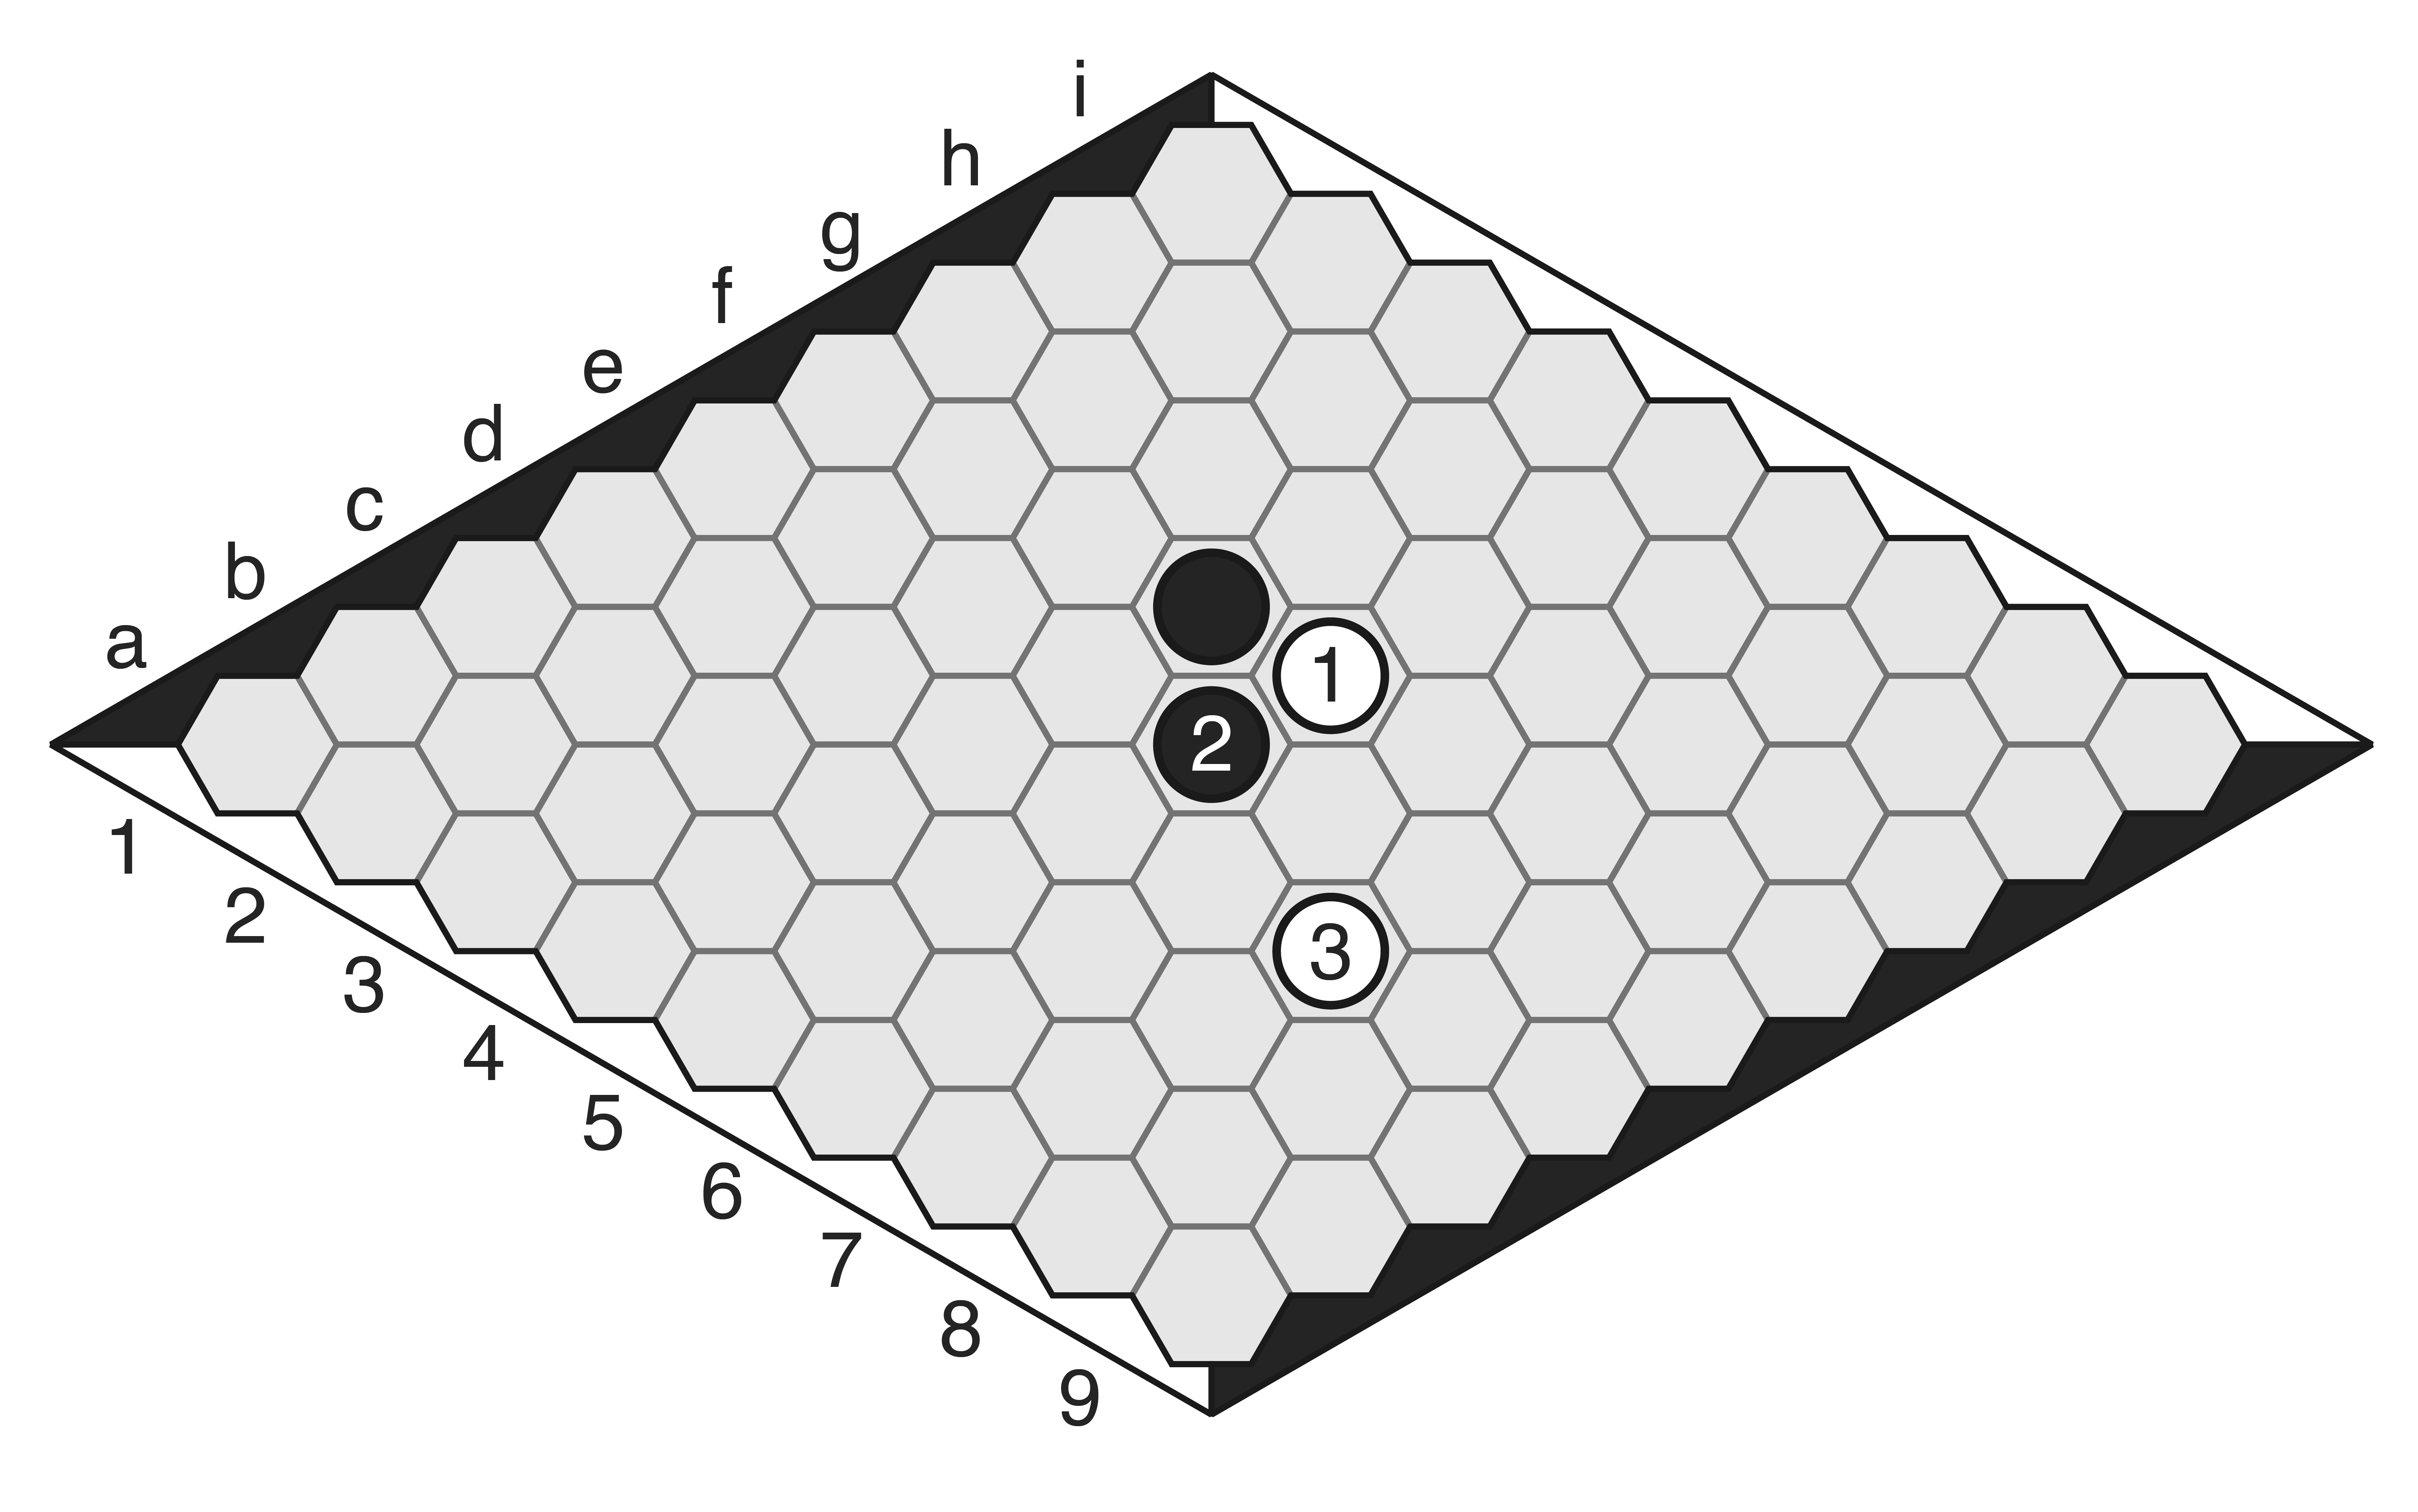
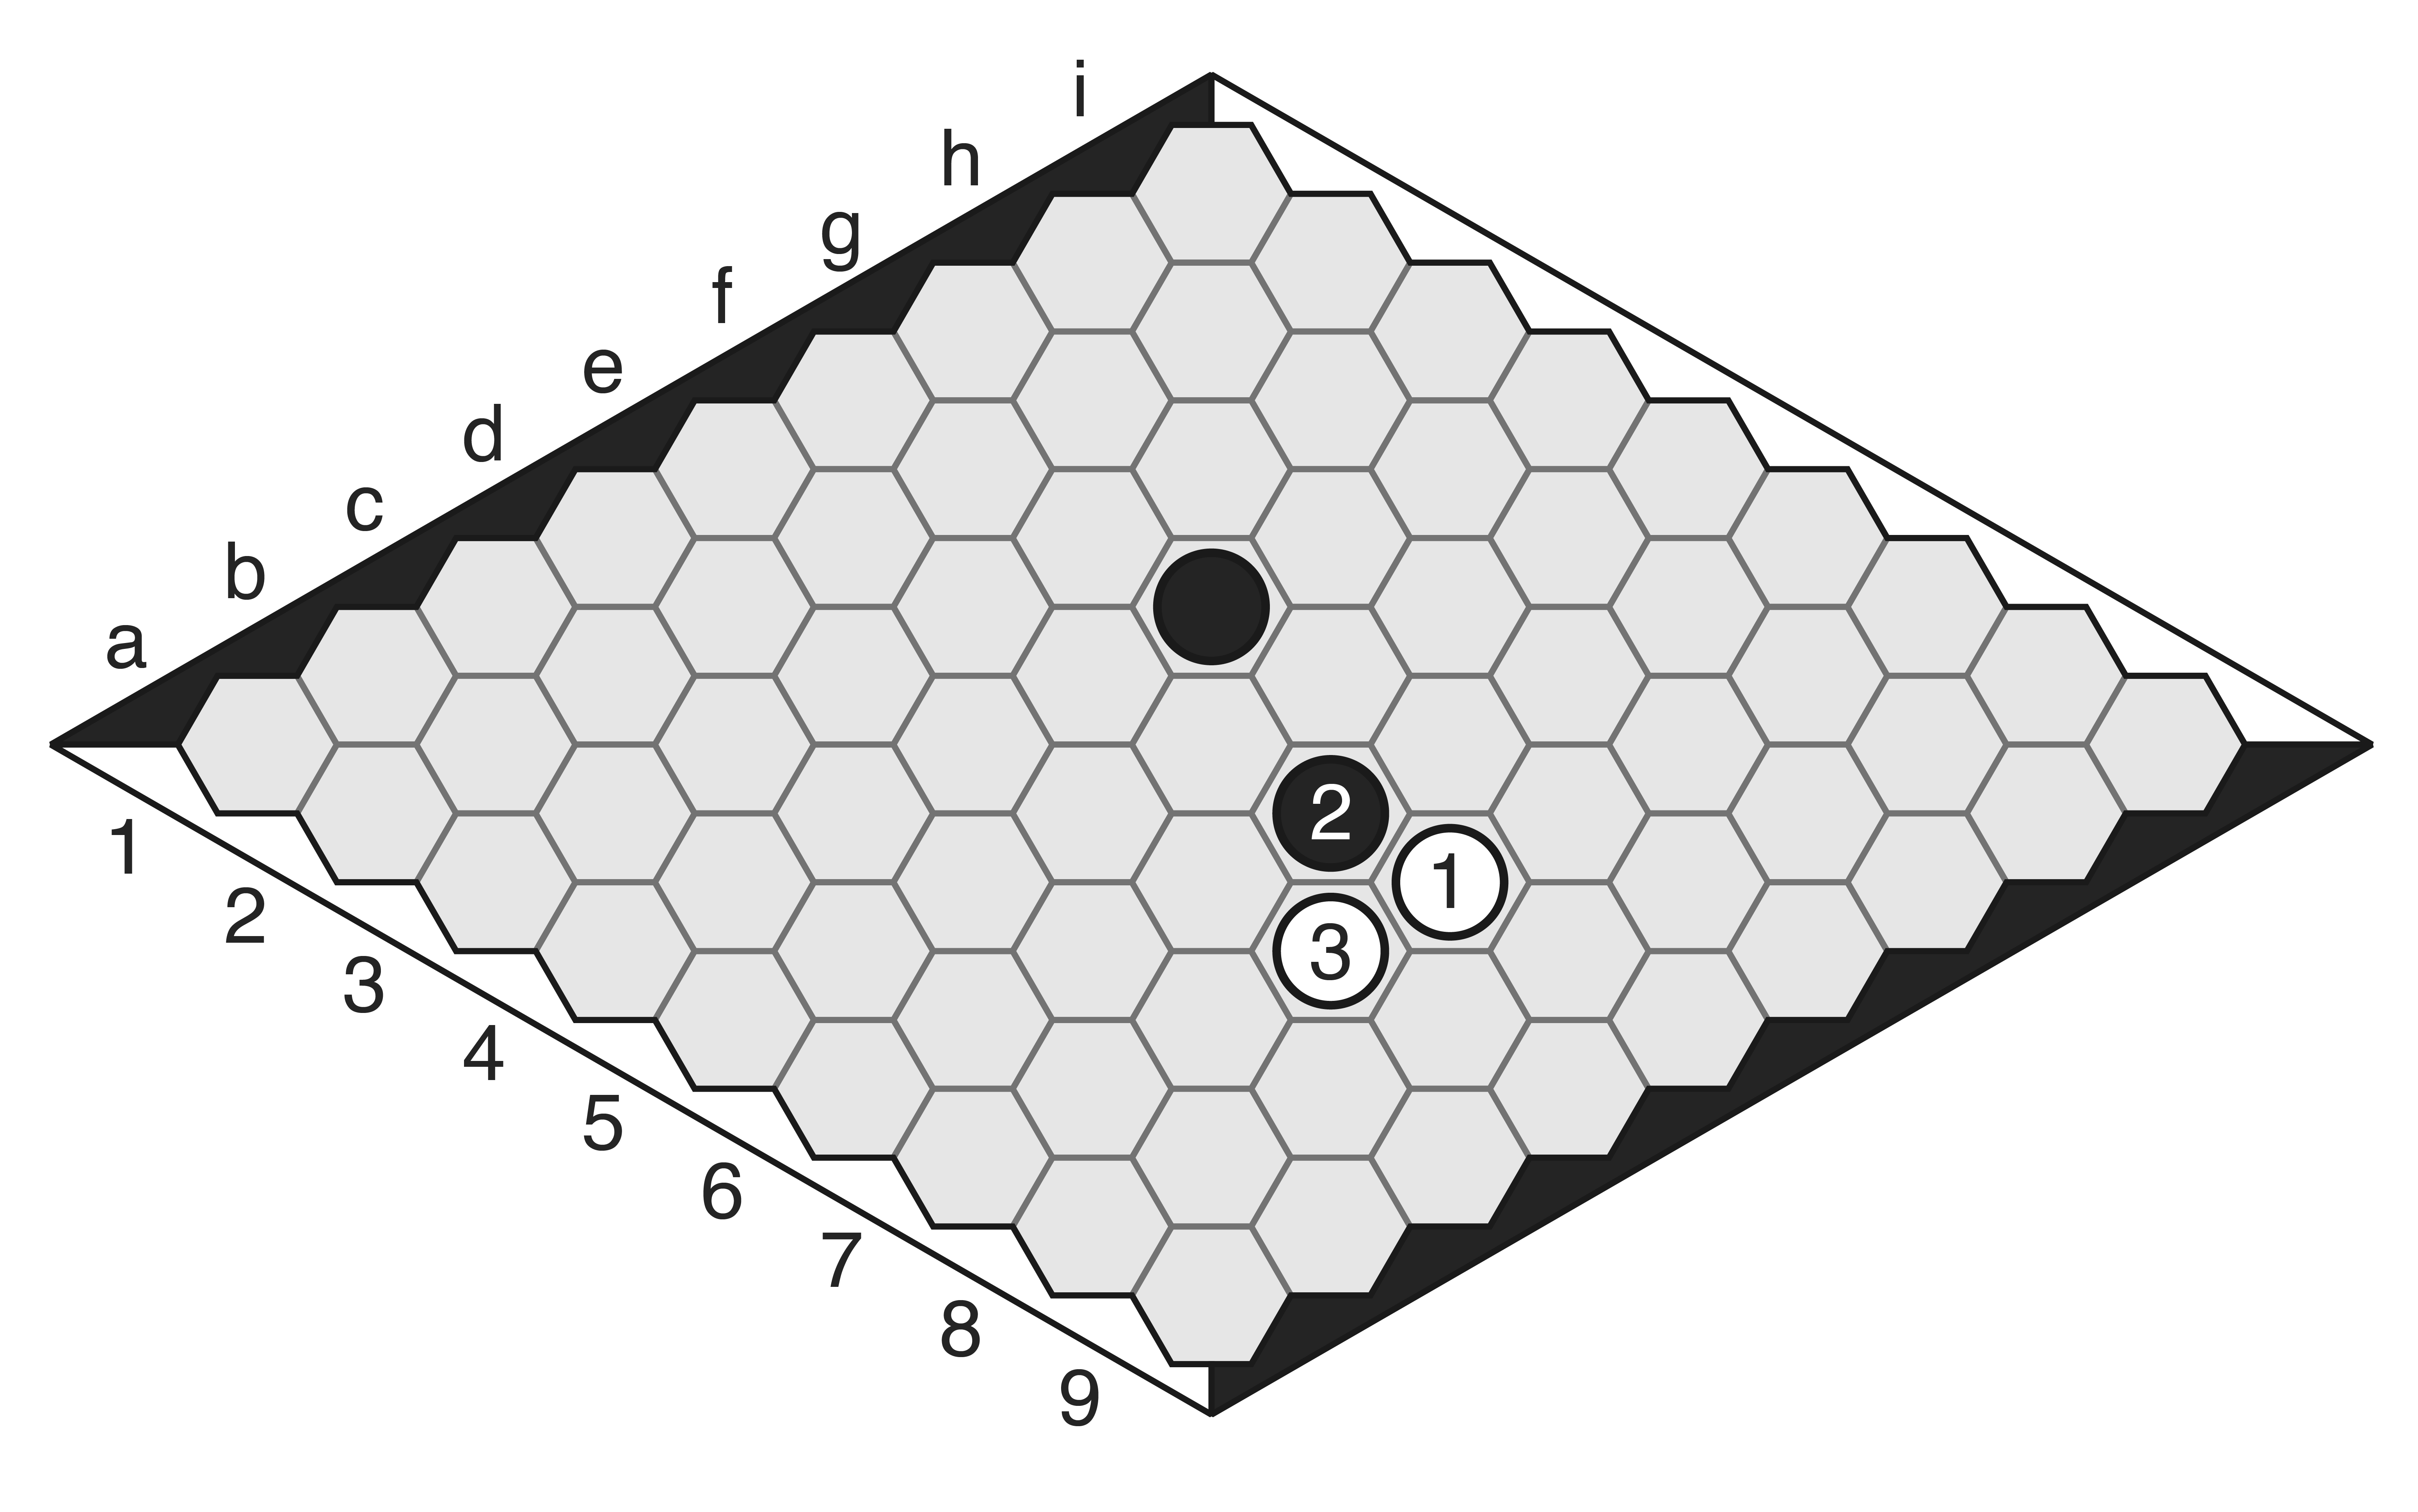
Move 3: Connected left via the A-5 edge template, but the difficulty will be connecting to the bottom.
Move 4: Blocking Black’s stones from the bottom edge.

Move 8: Connected with the B-3 template.
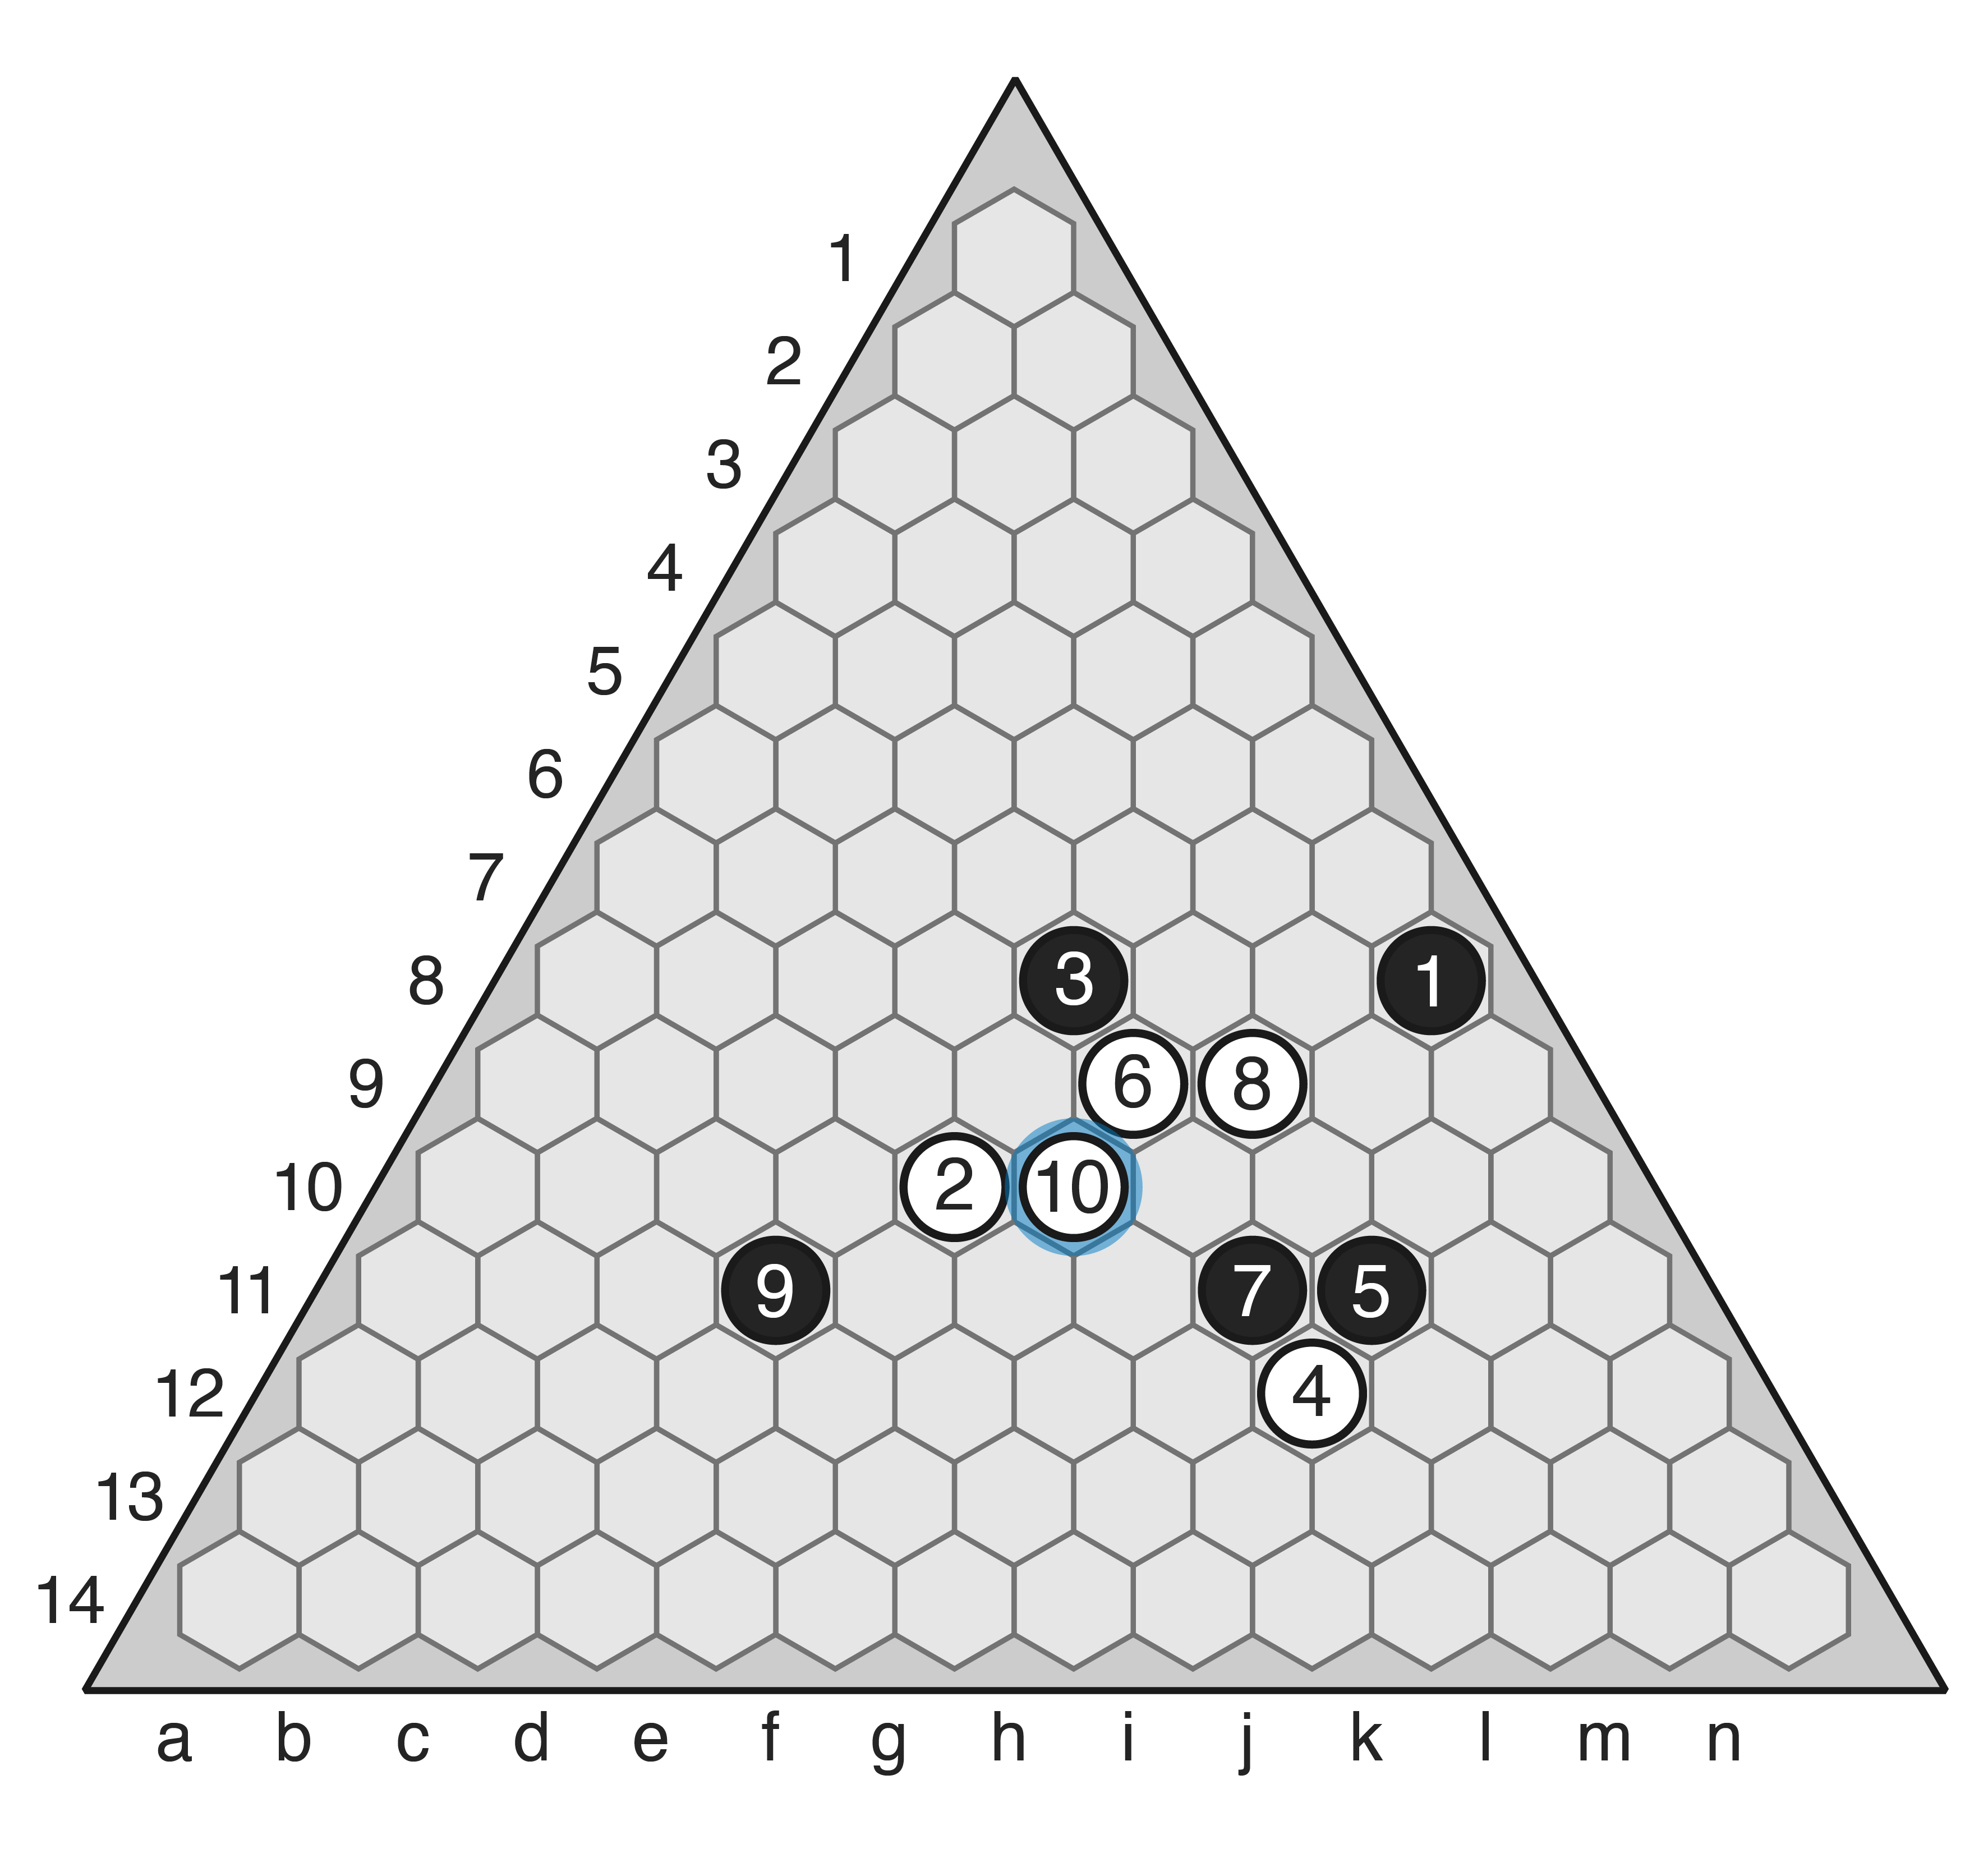
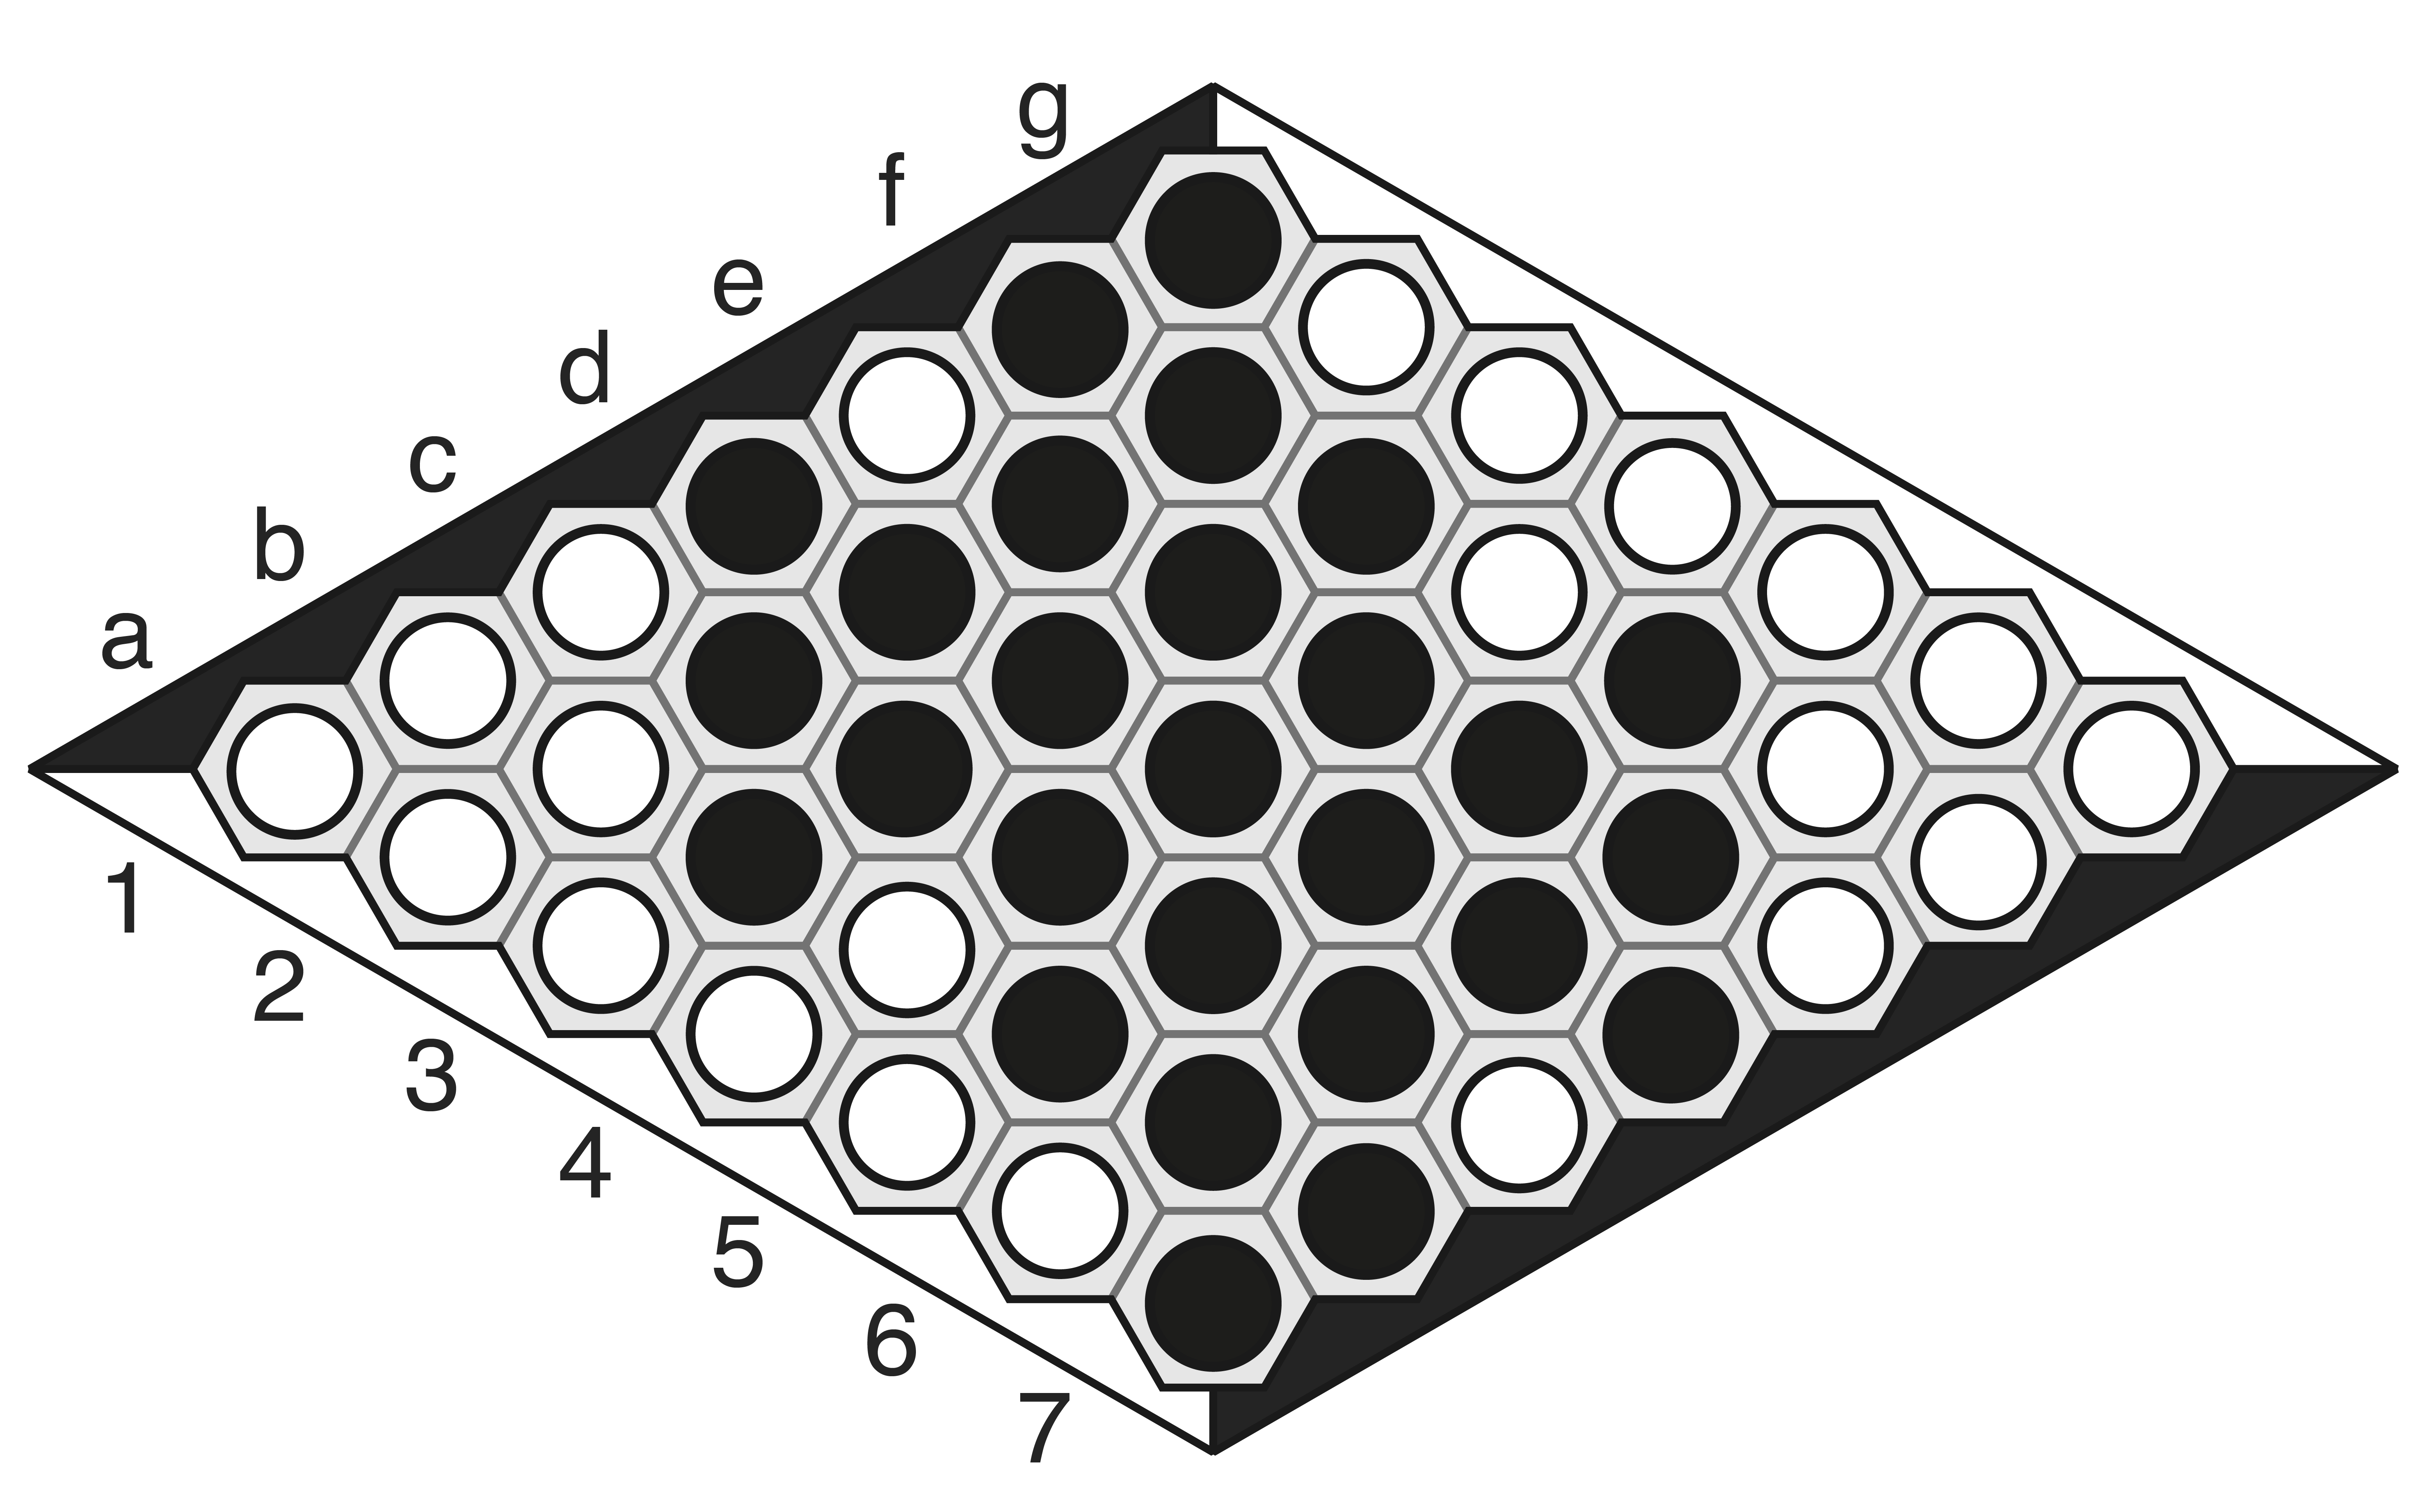
Move 10: A blunder! e9 would have been better (winning I think) than f10, with template C-5 facing the left edge and move 4 helping guarantee the 8-2 group’s connection to the south. As it stands, 2-10 is connected south with C-5 and 2 isn’t fully connected to the left.
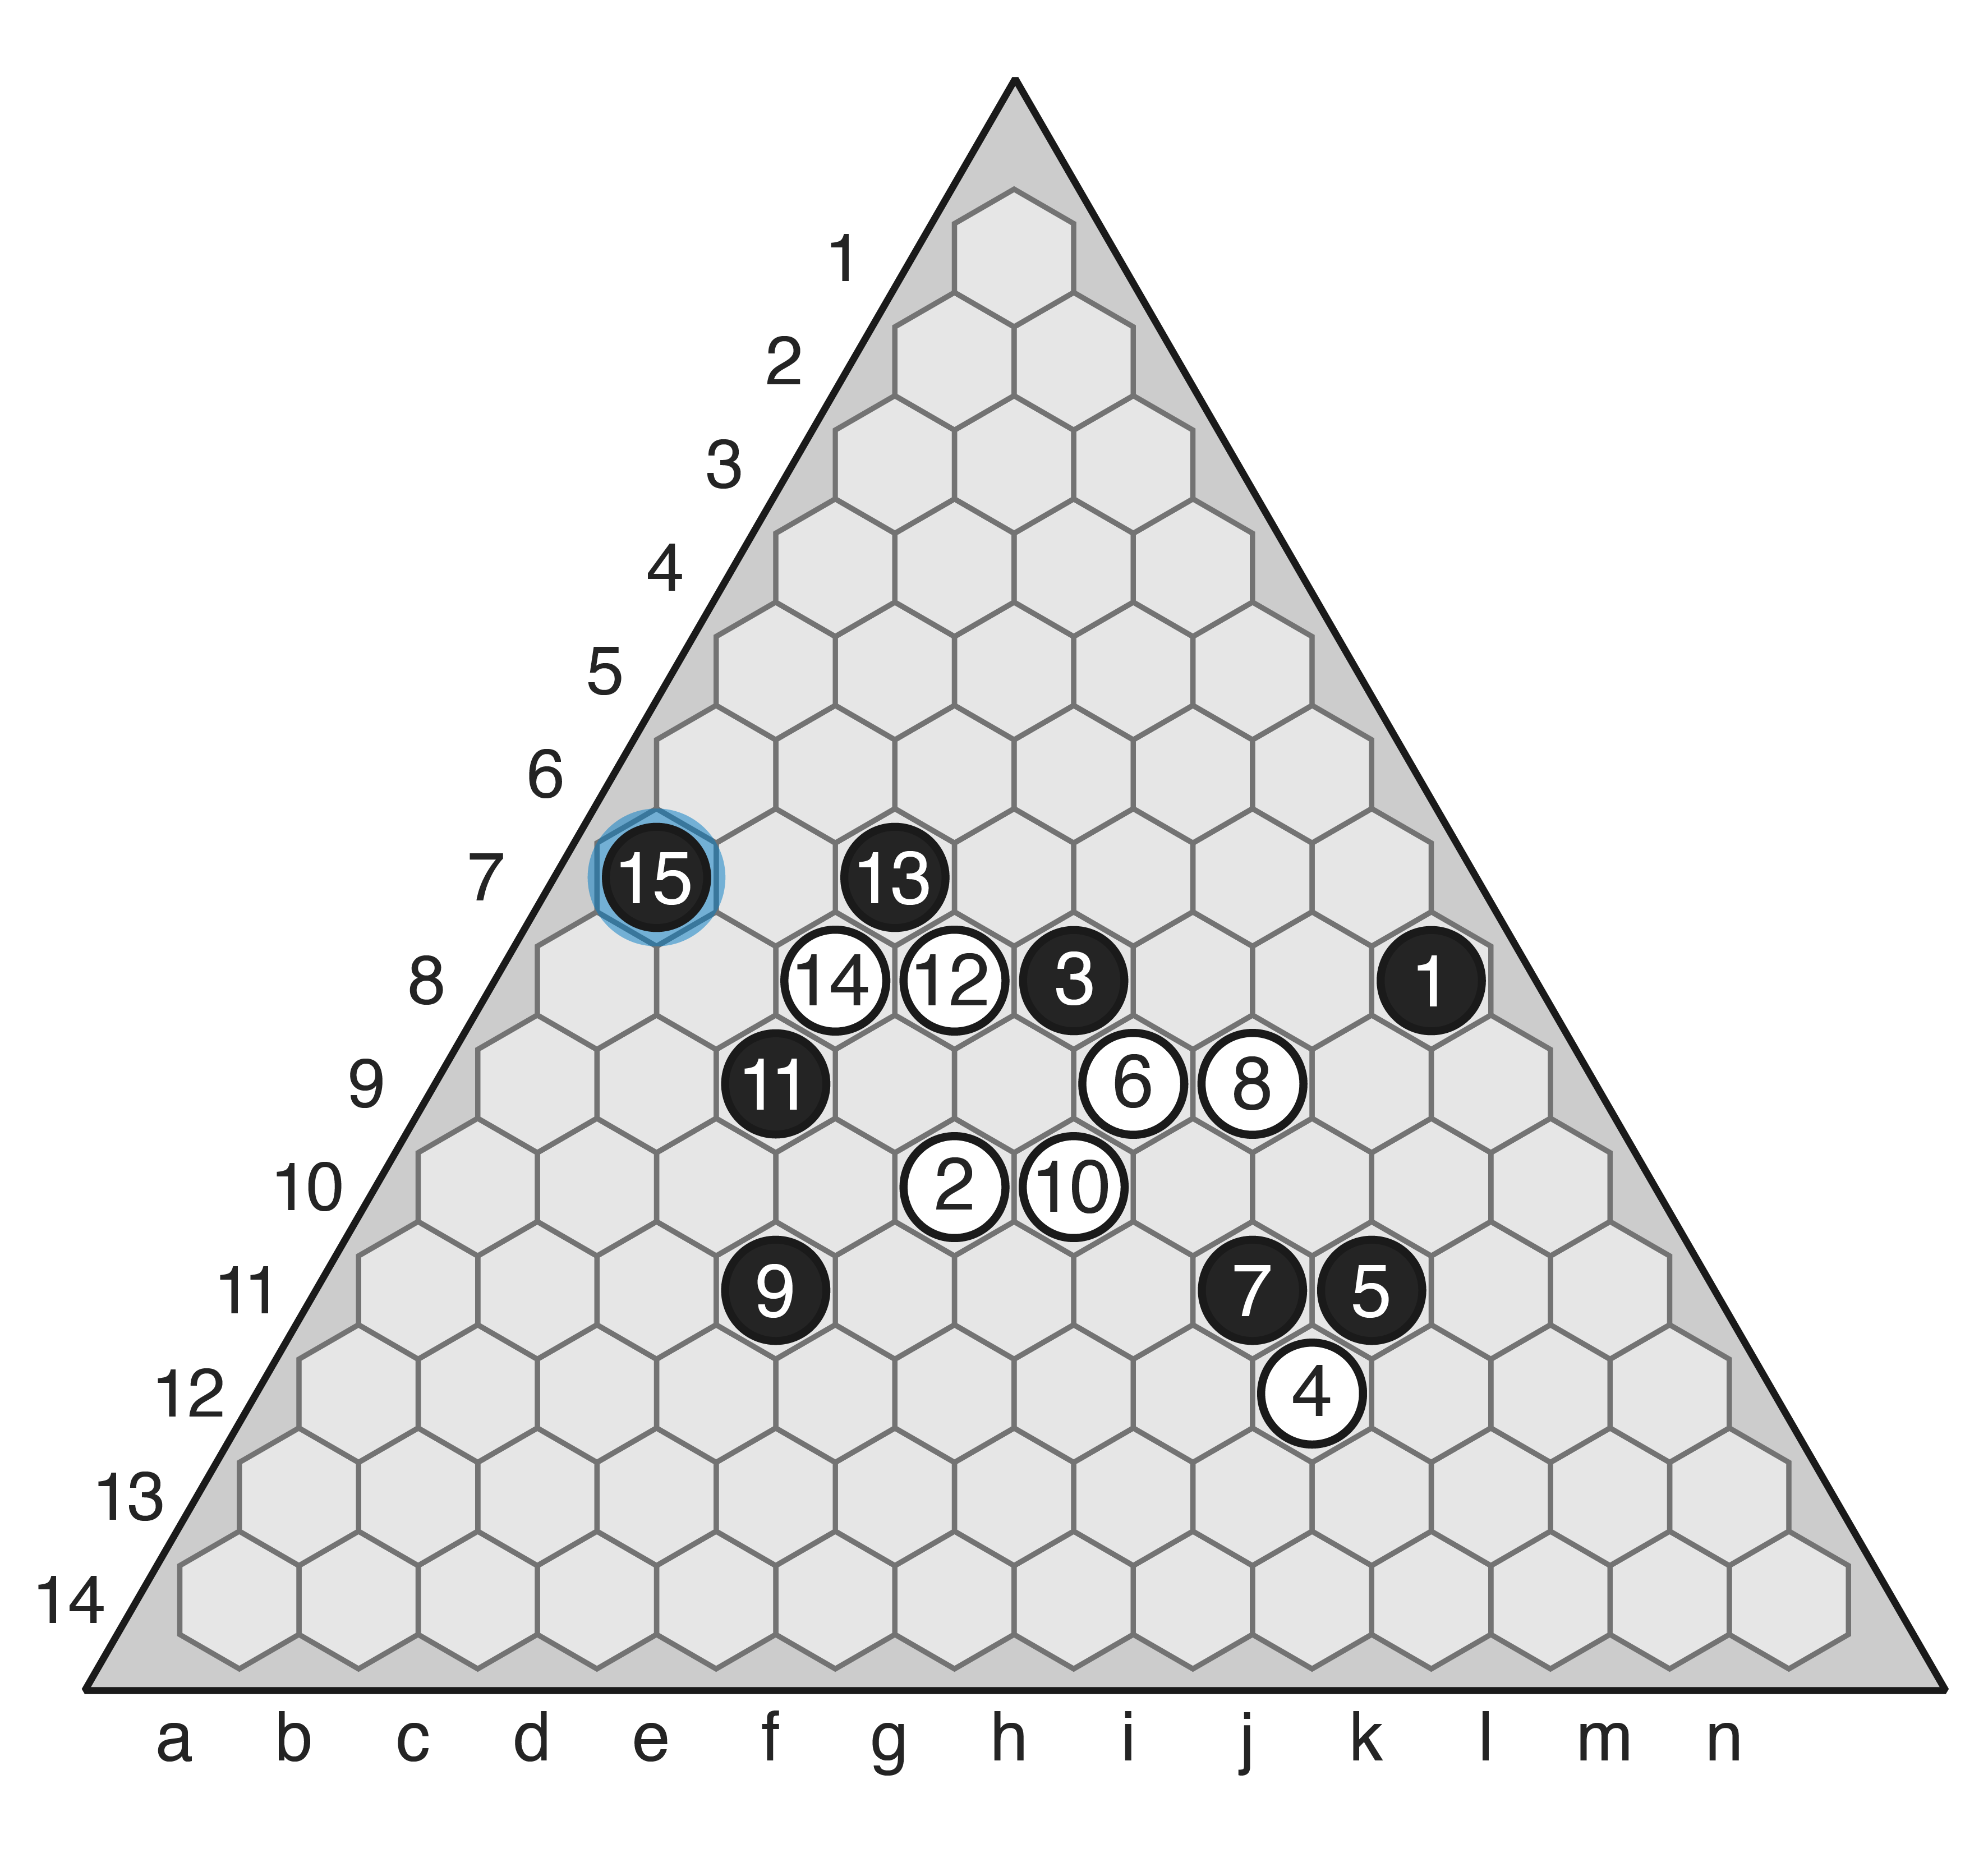
Moves 11-15: This block sets up a ladder with the bottleneck formation.
-
- Move 16.
-
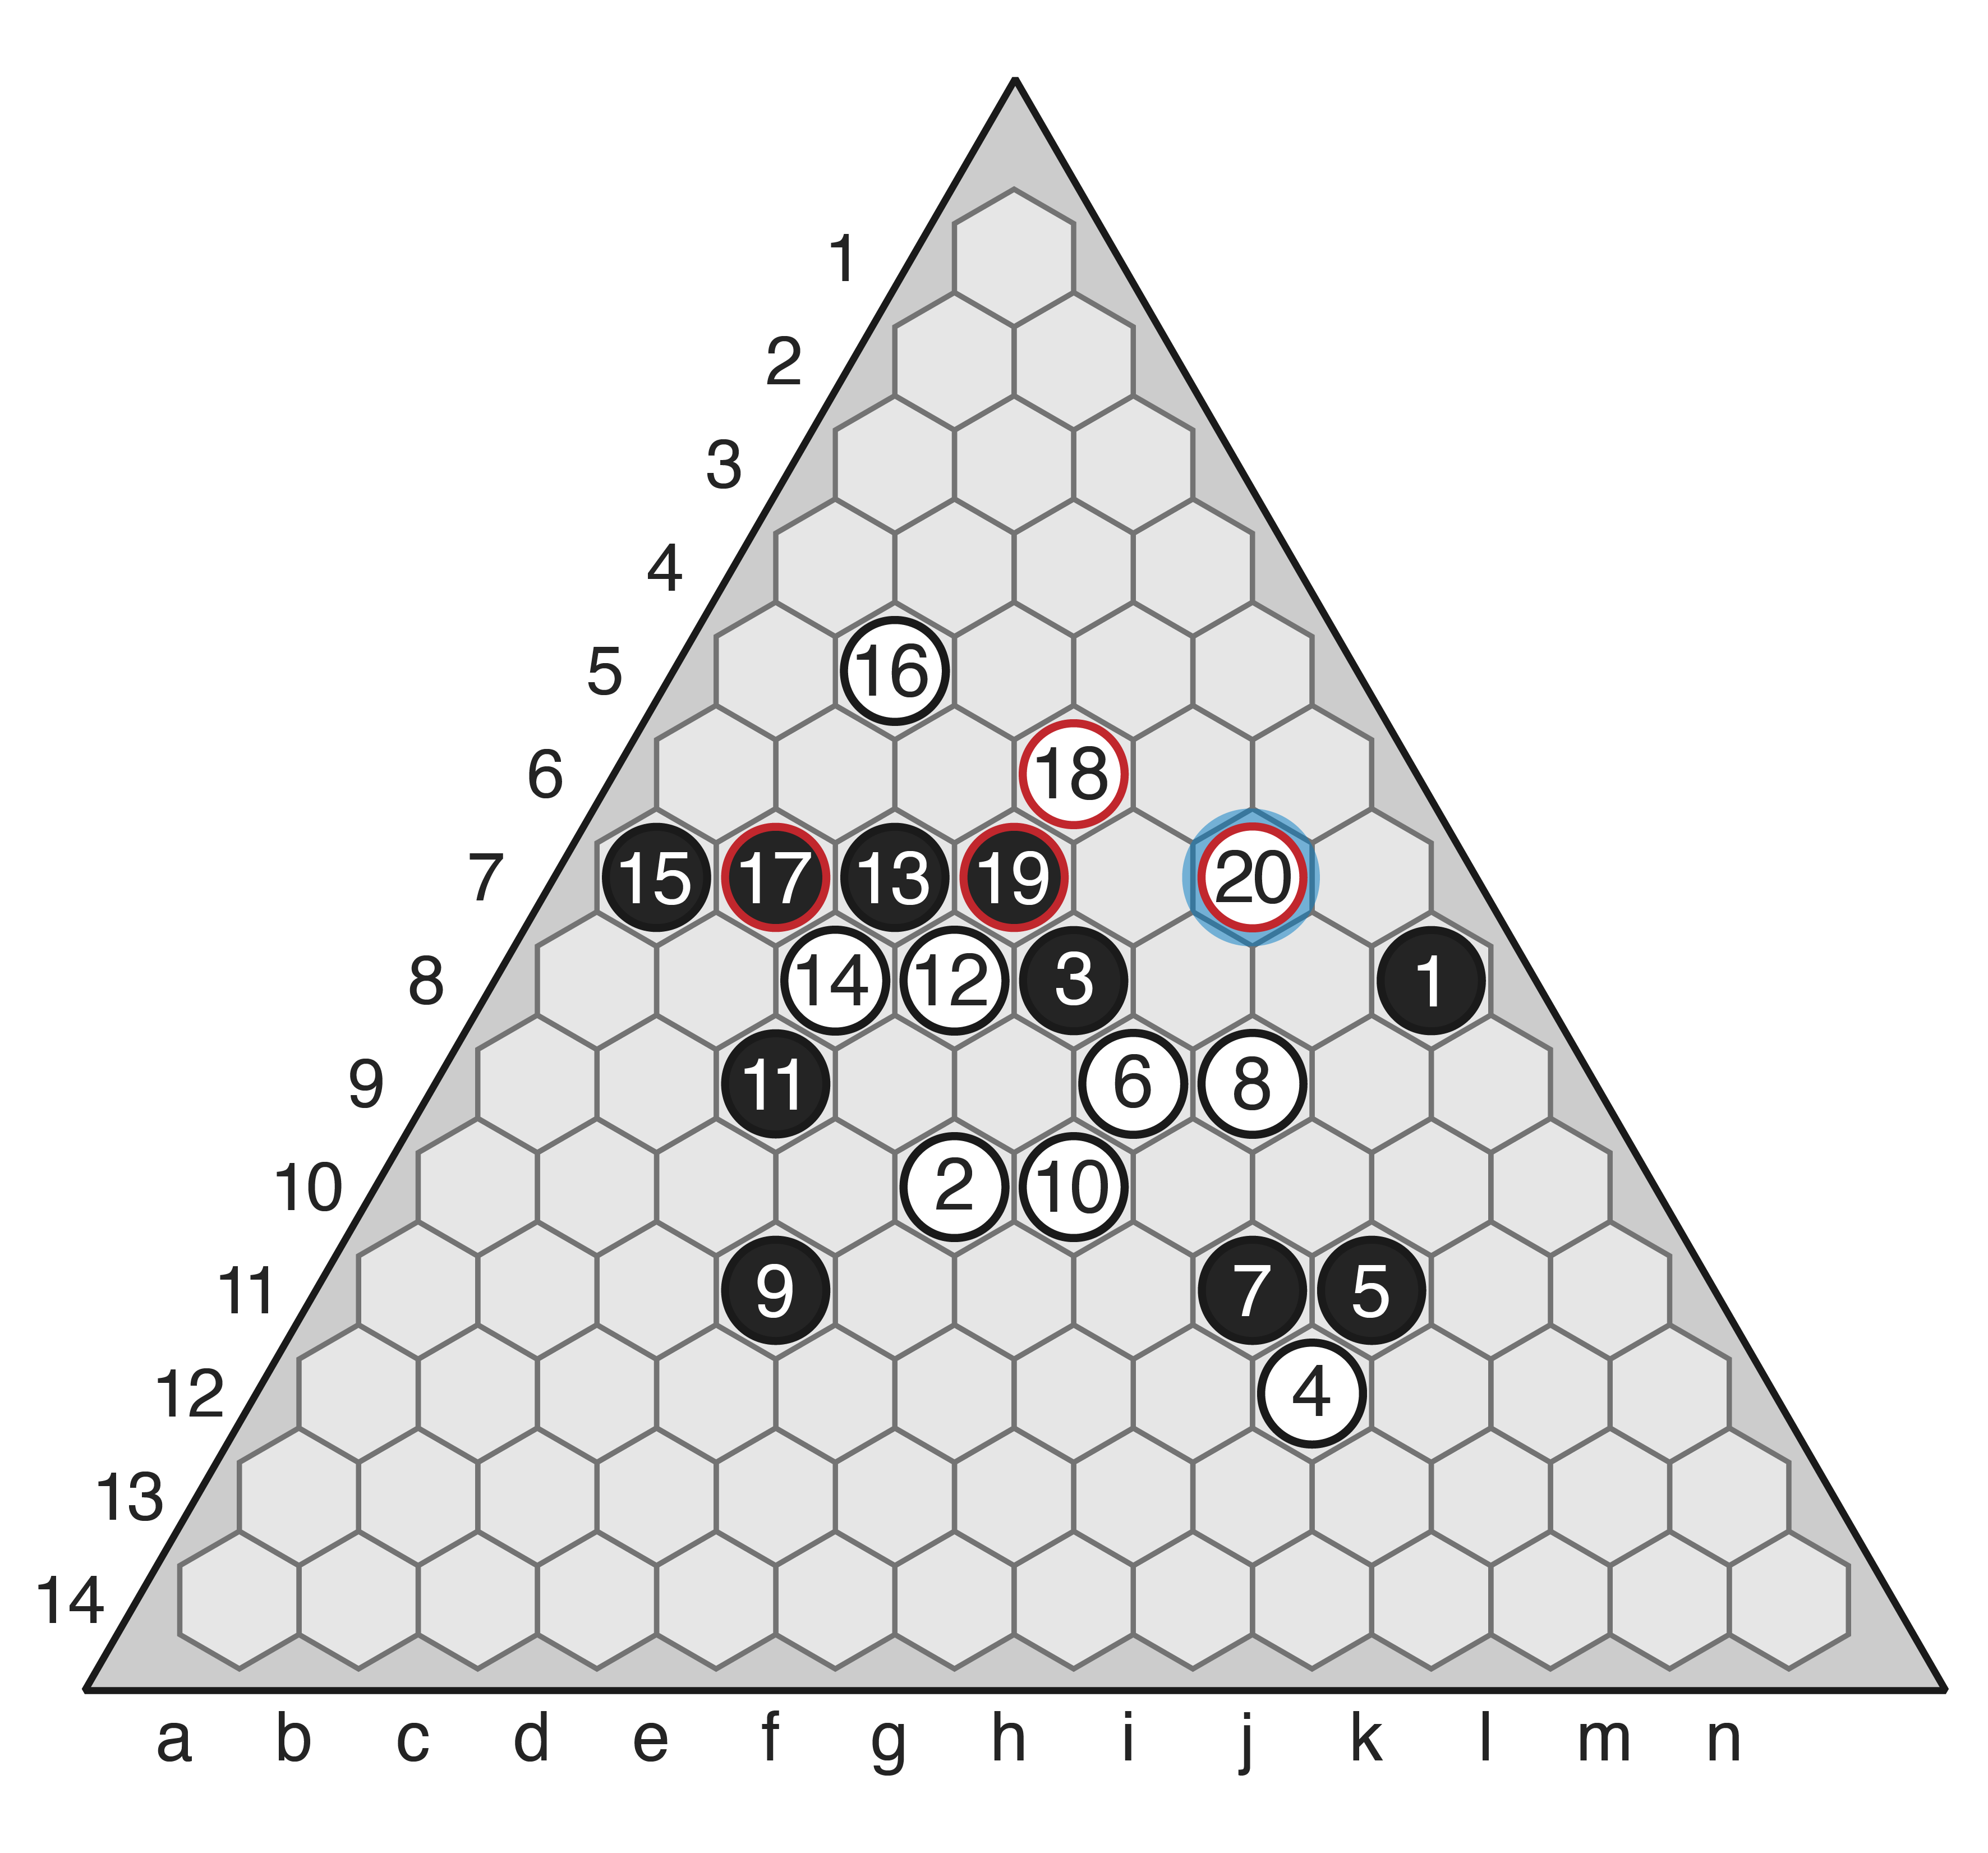
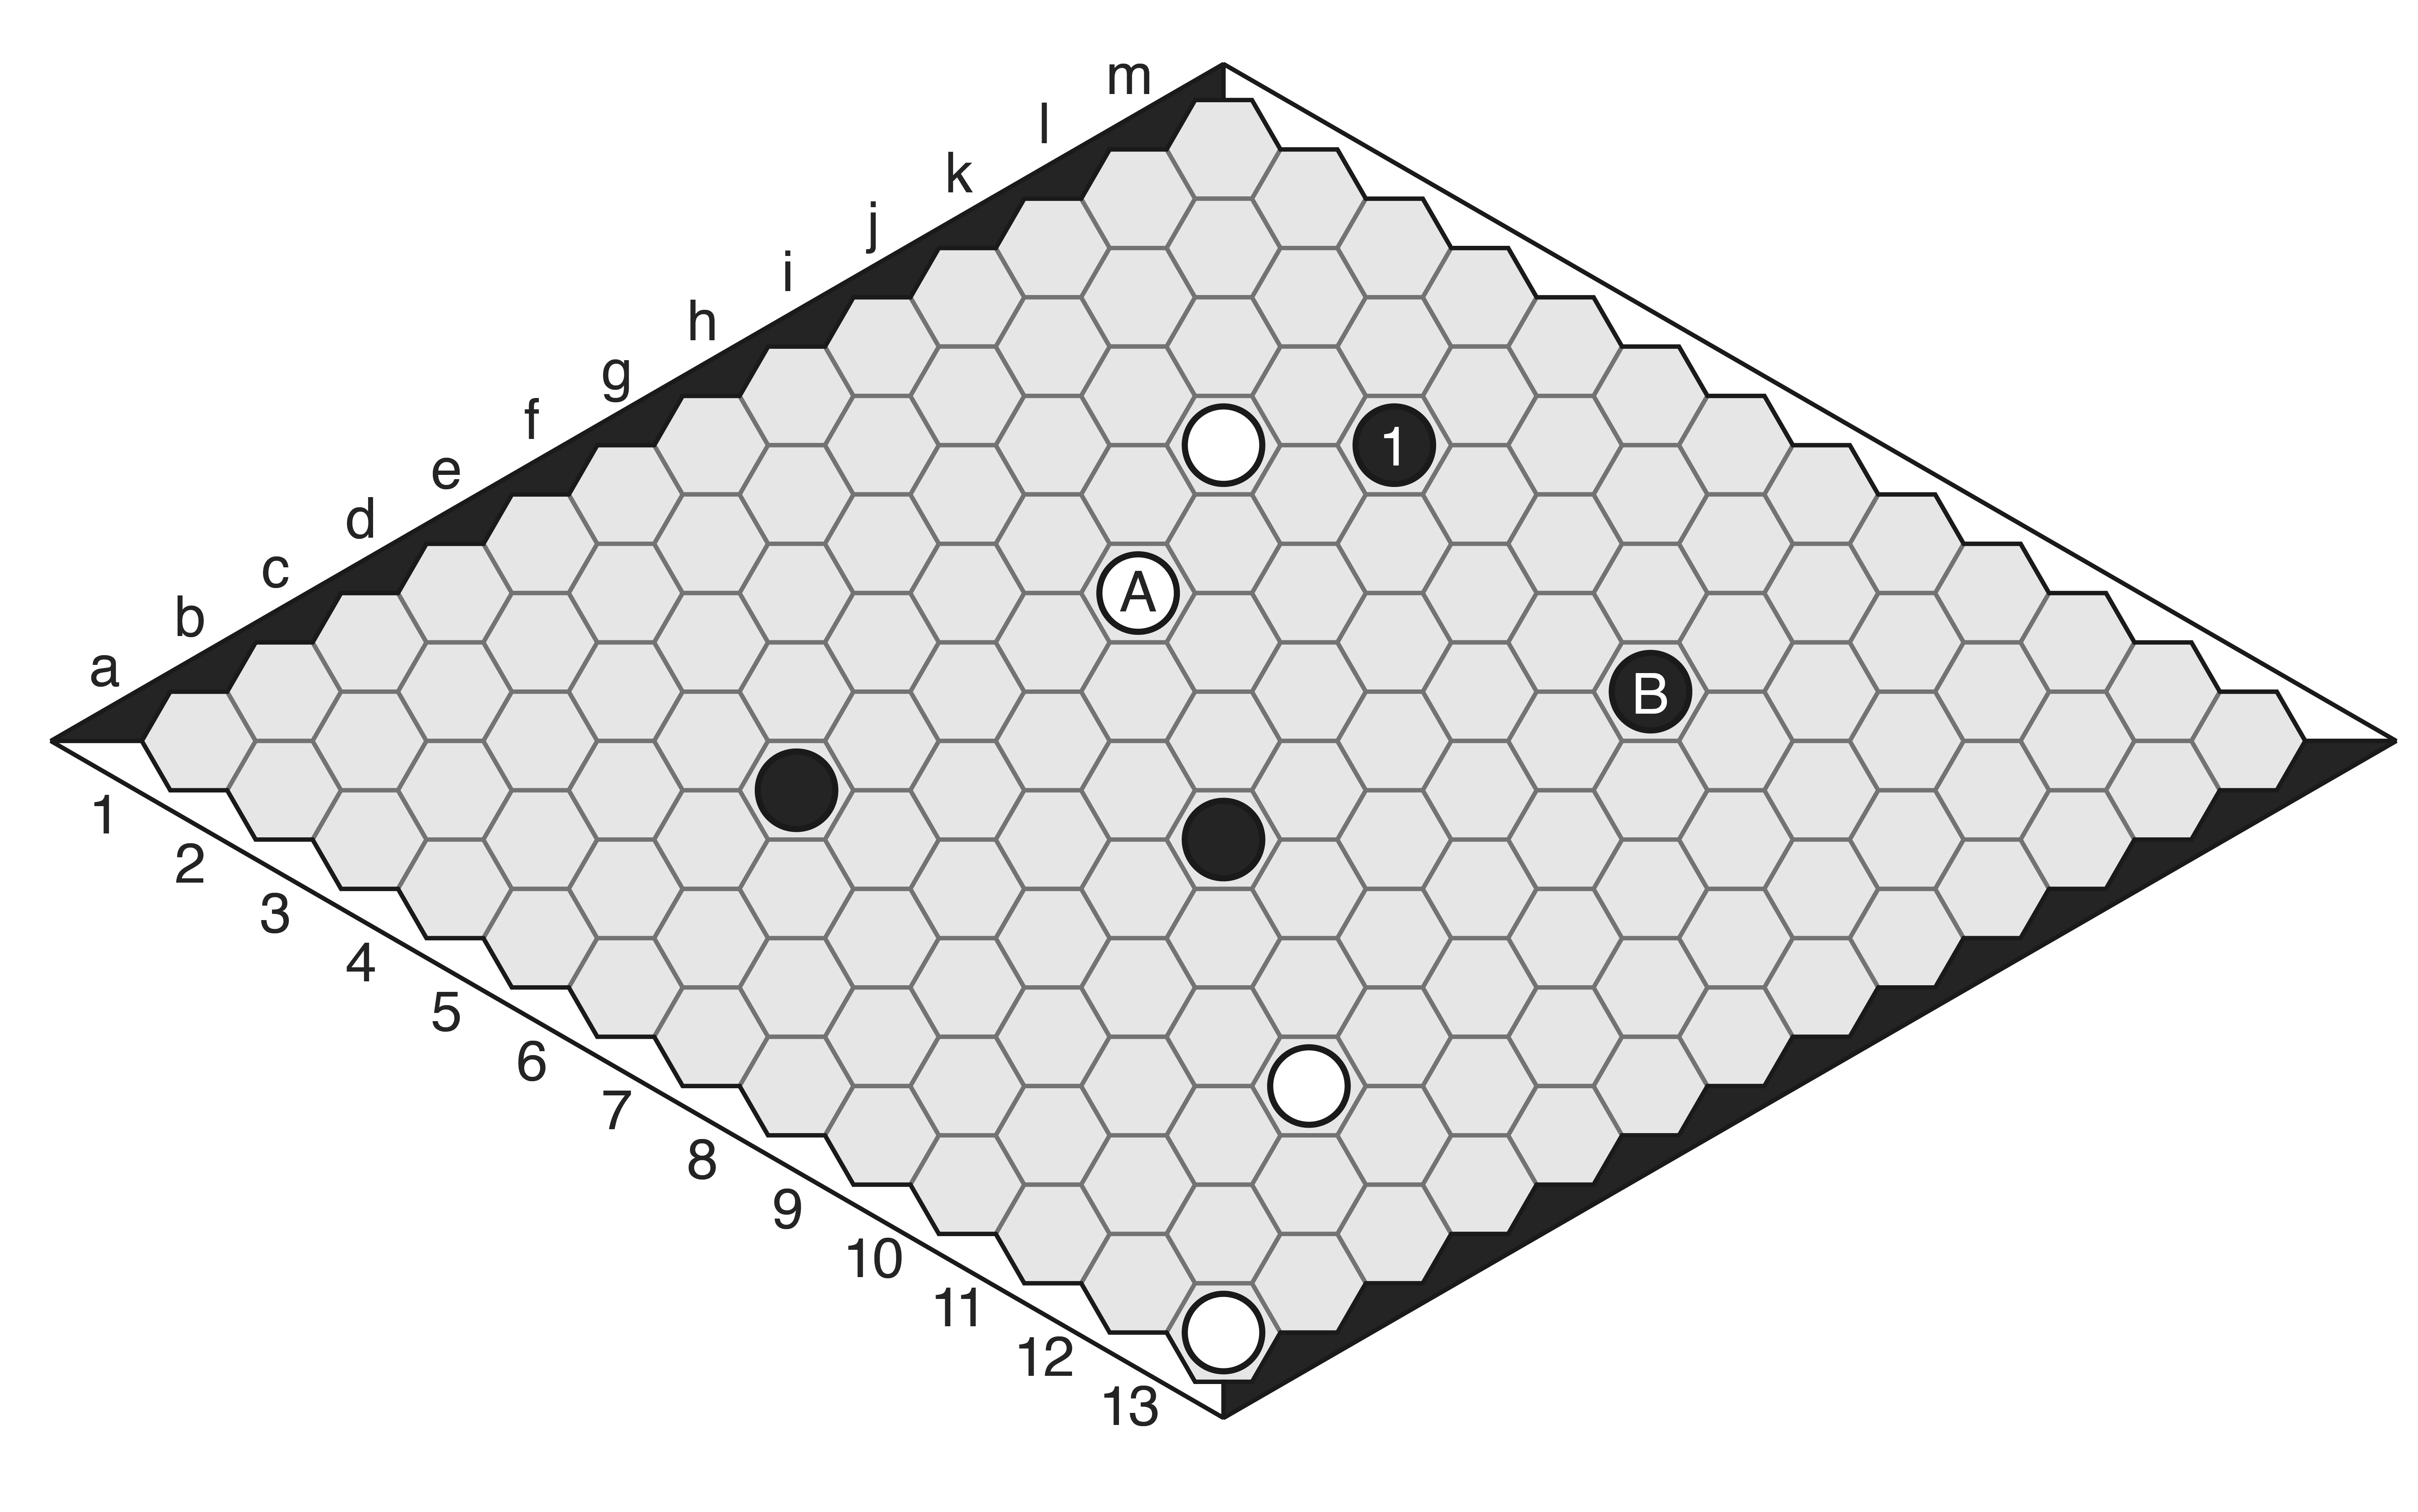
- The plan: after (20) in this variation, White is in control.
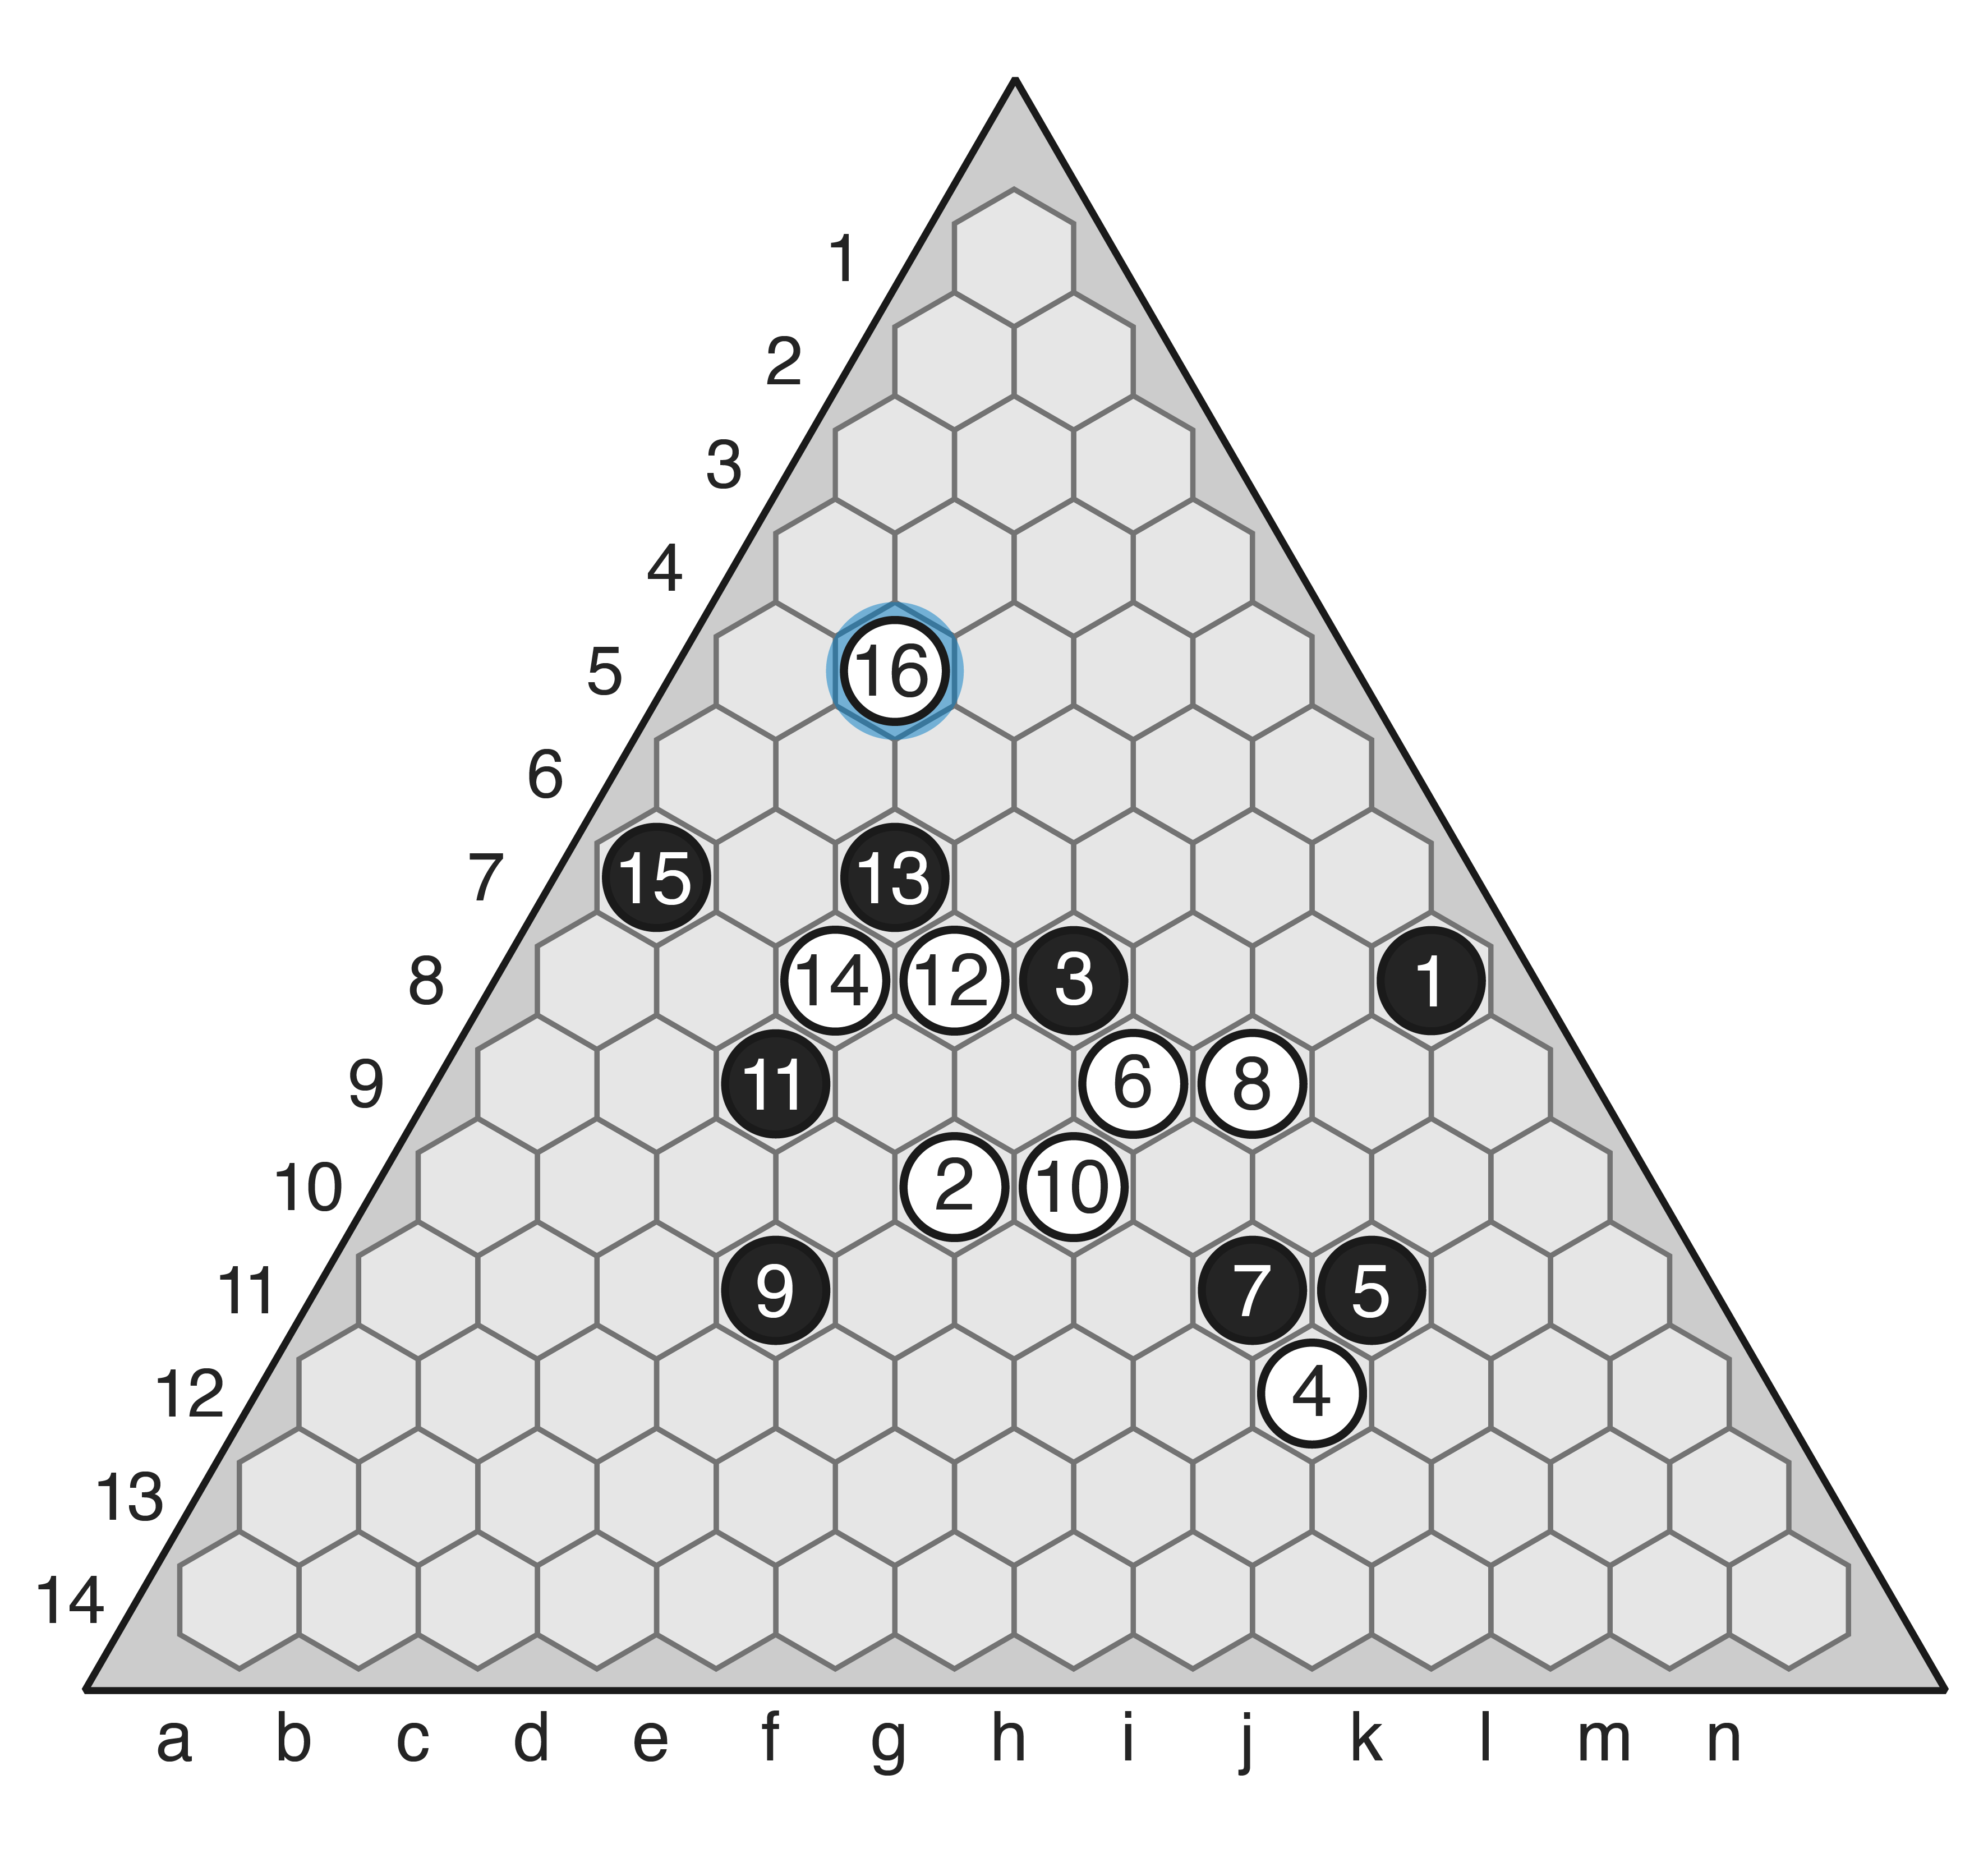
Move 16: Ladder escape. The plan here is that after b7, White plays d6 d7 f7, and now White is connected to all three edges.
-
- Move 17.
-
- Move 18.
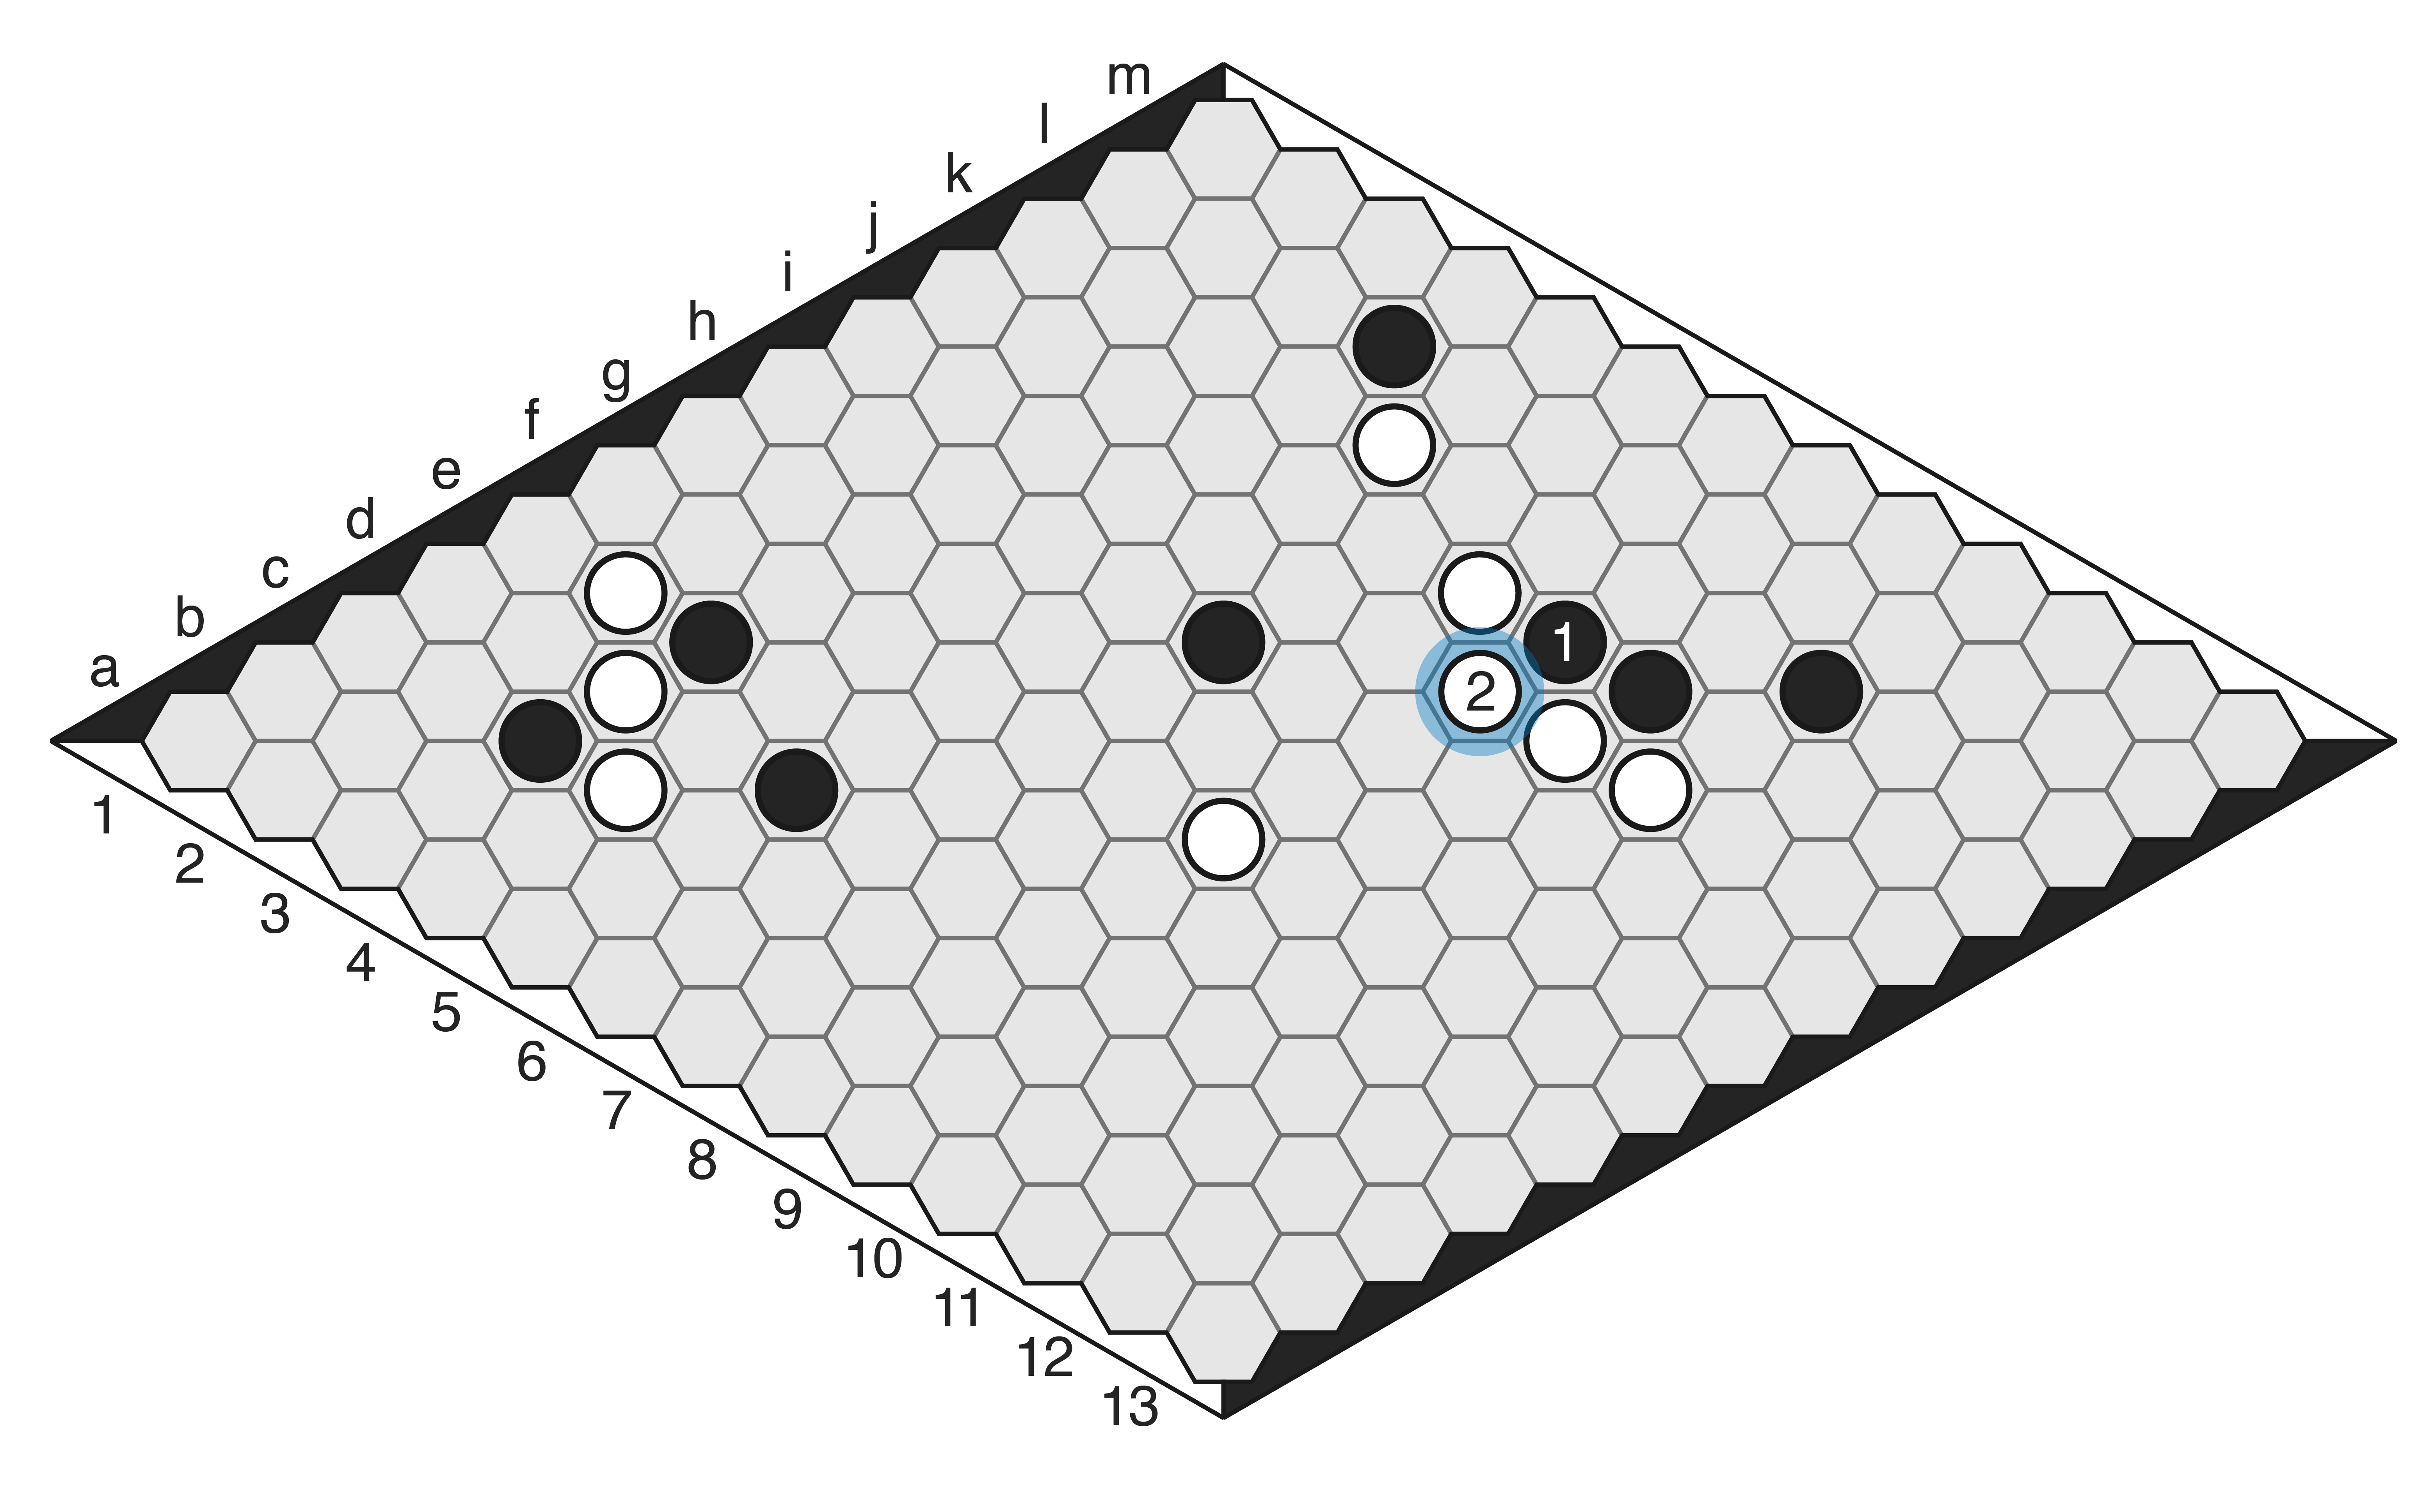
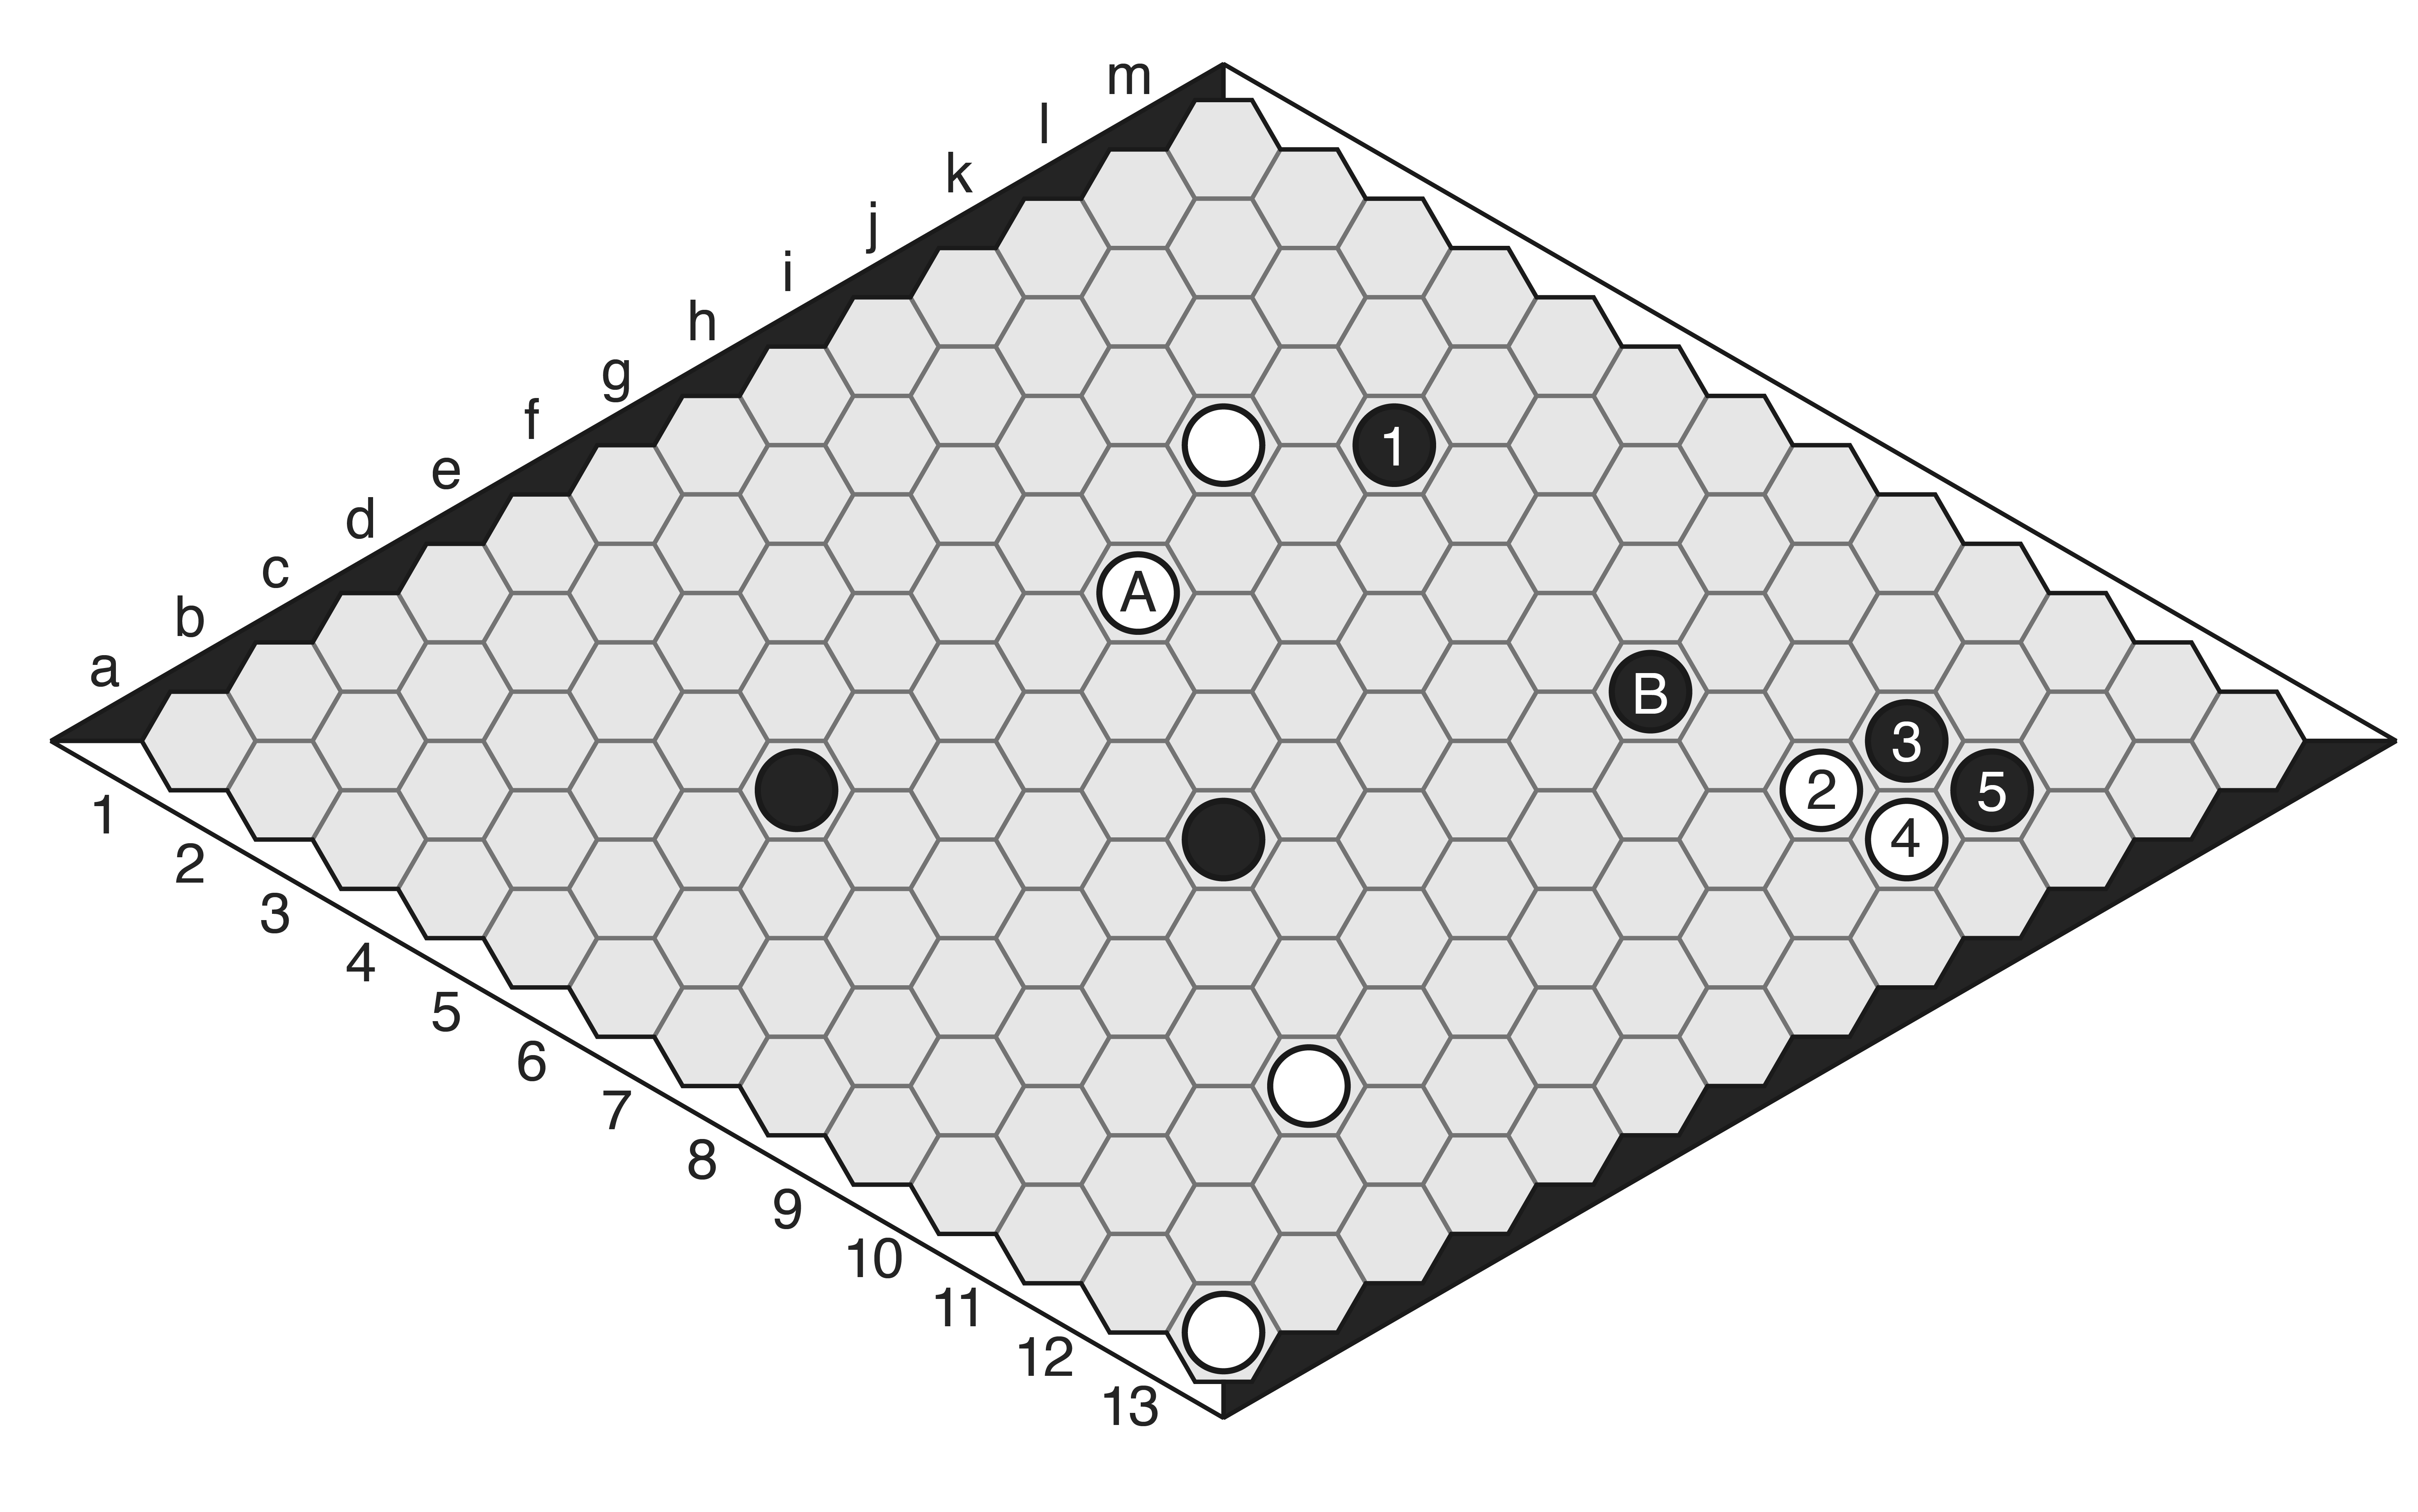
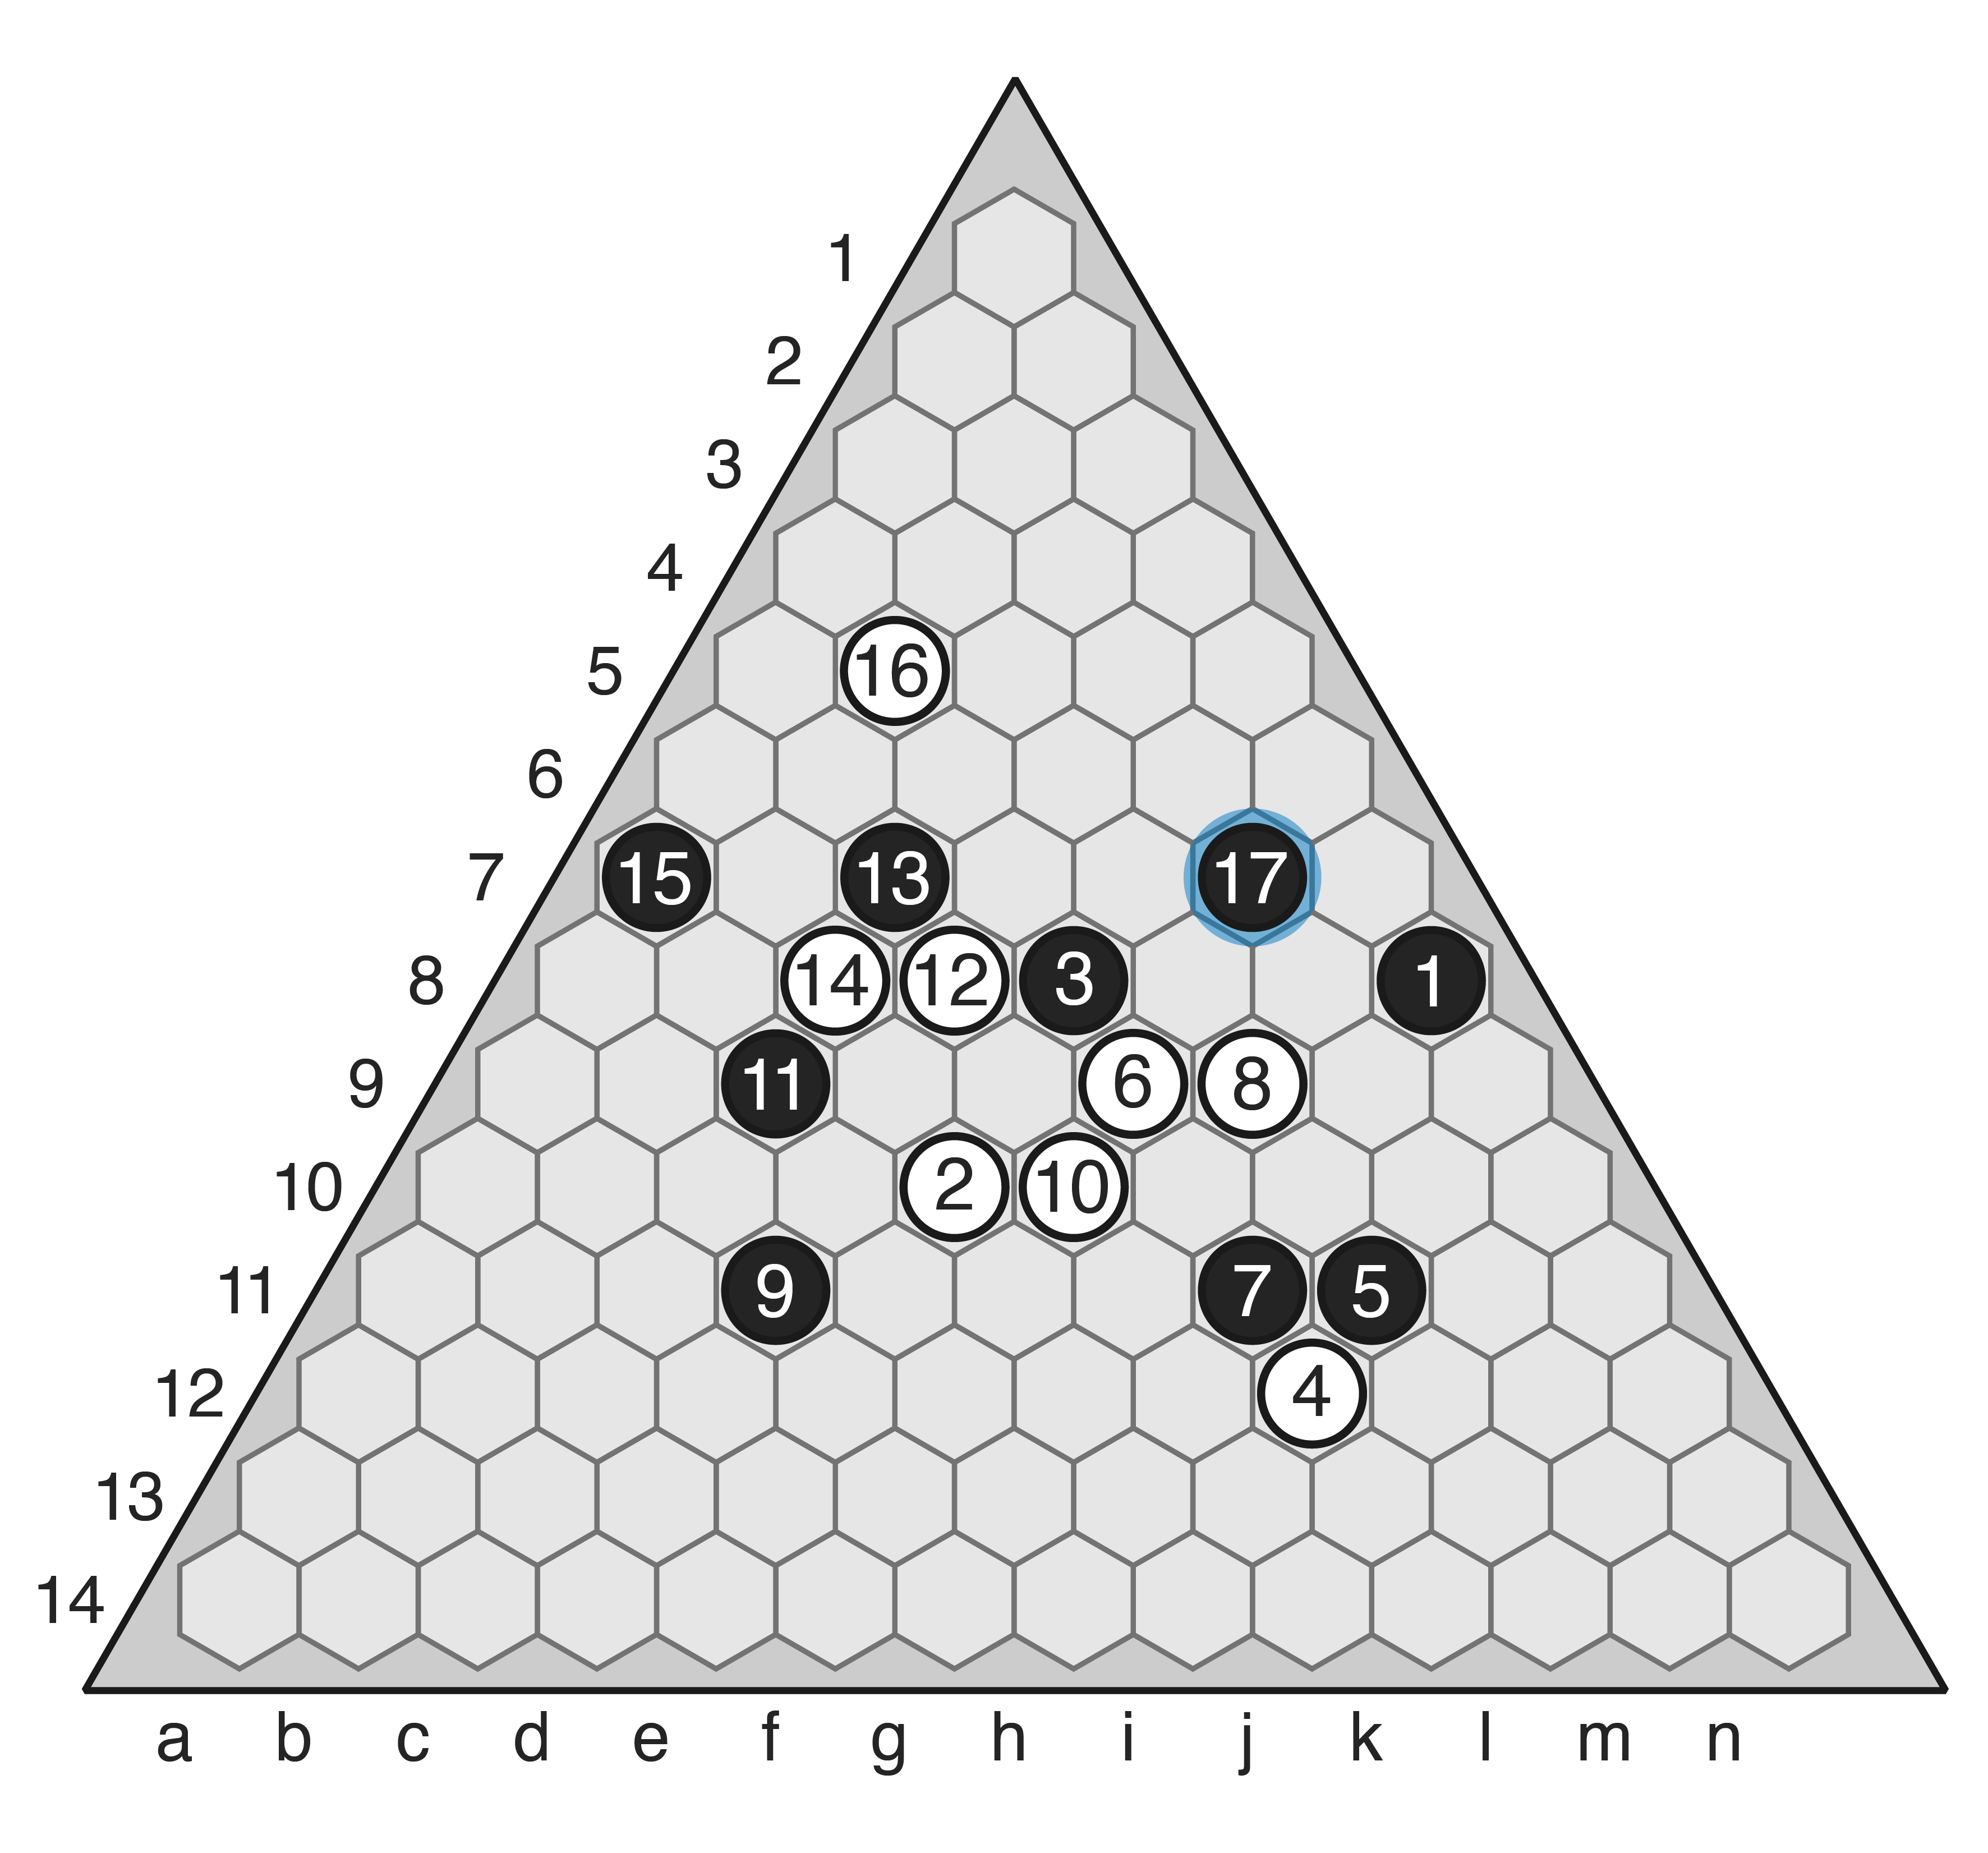
Move 17: Counter-threat, threatening the connection between (8) and the edge.
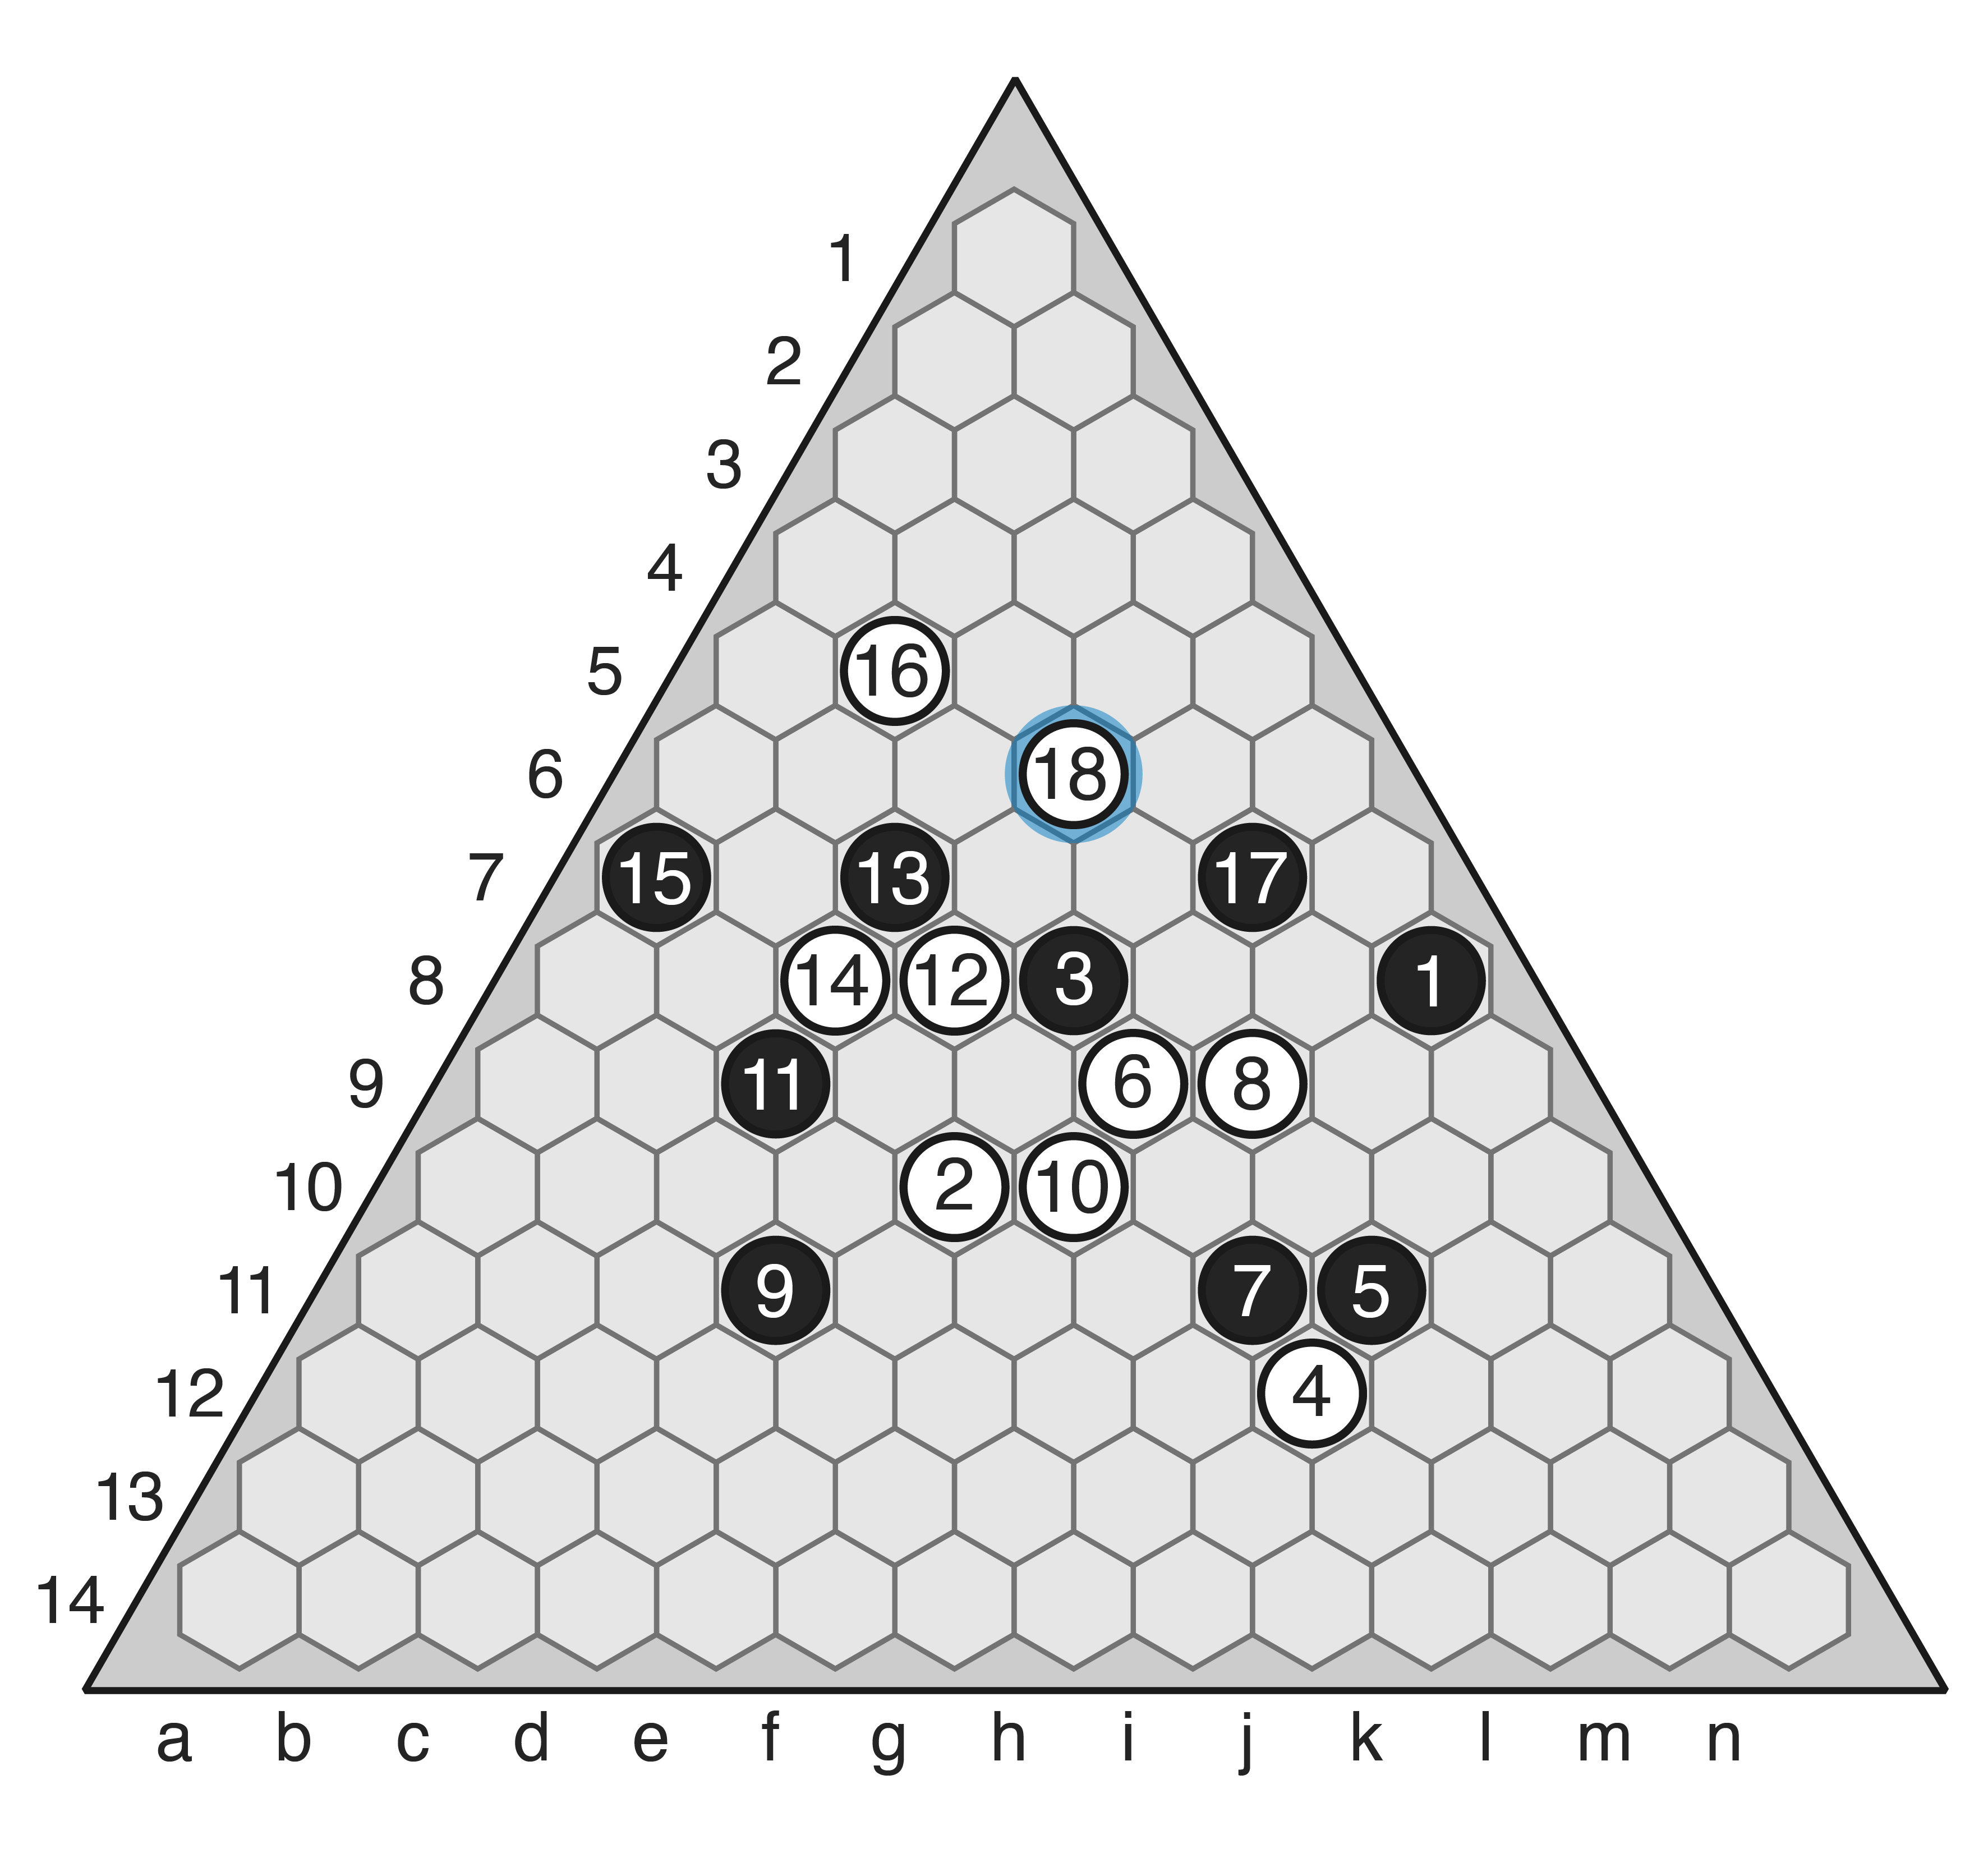
Move 18: 16-18 is connected to the right edge through the M-4a template, and connected to the central group (14-8) via either d7 or the ladder on the left.
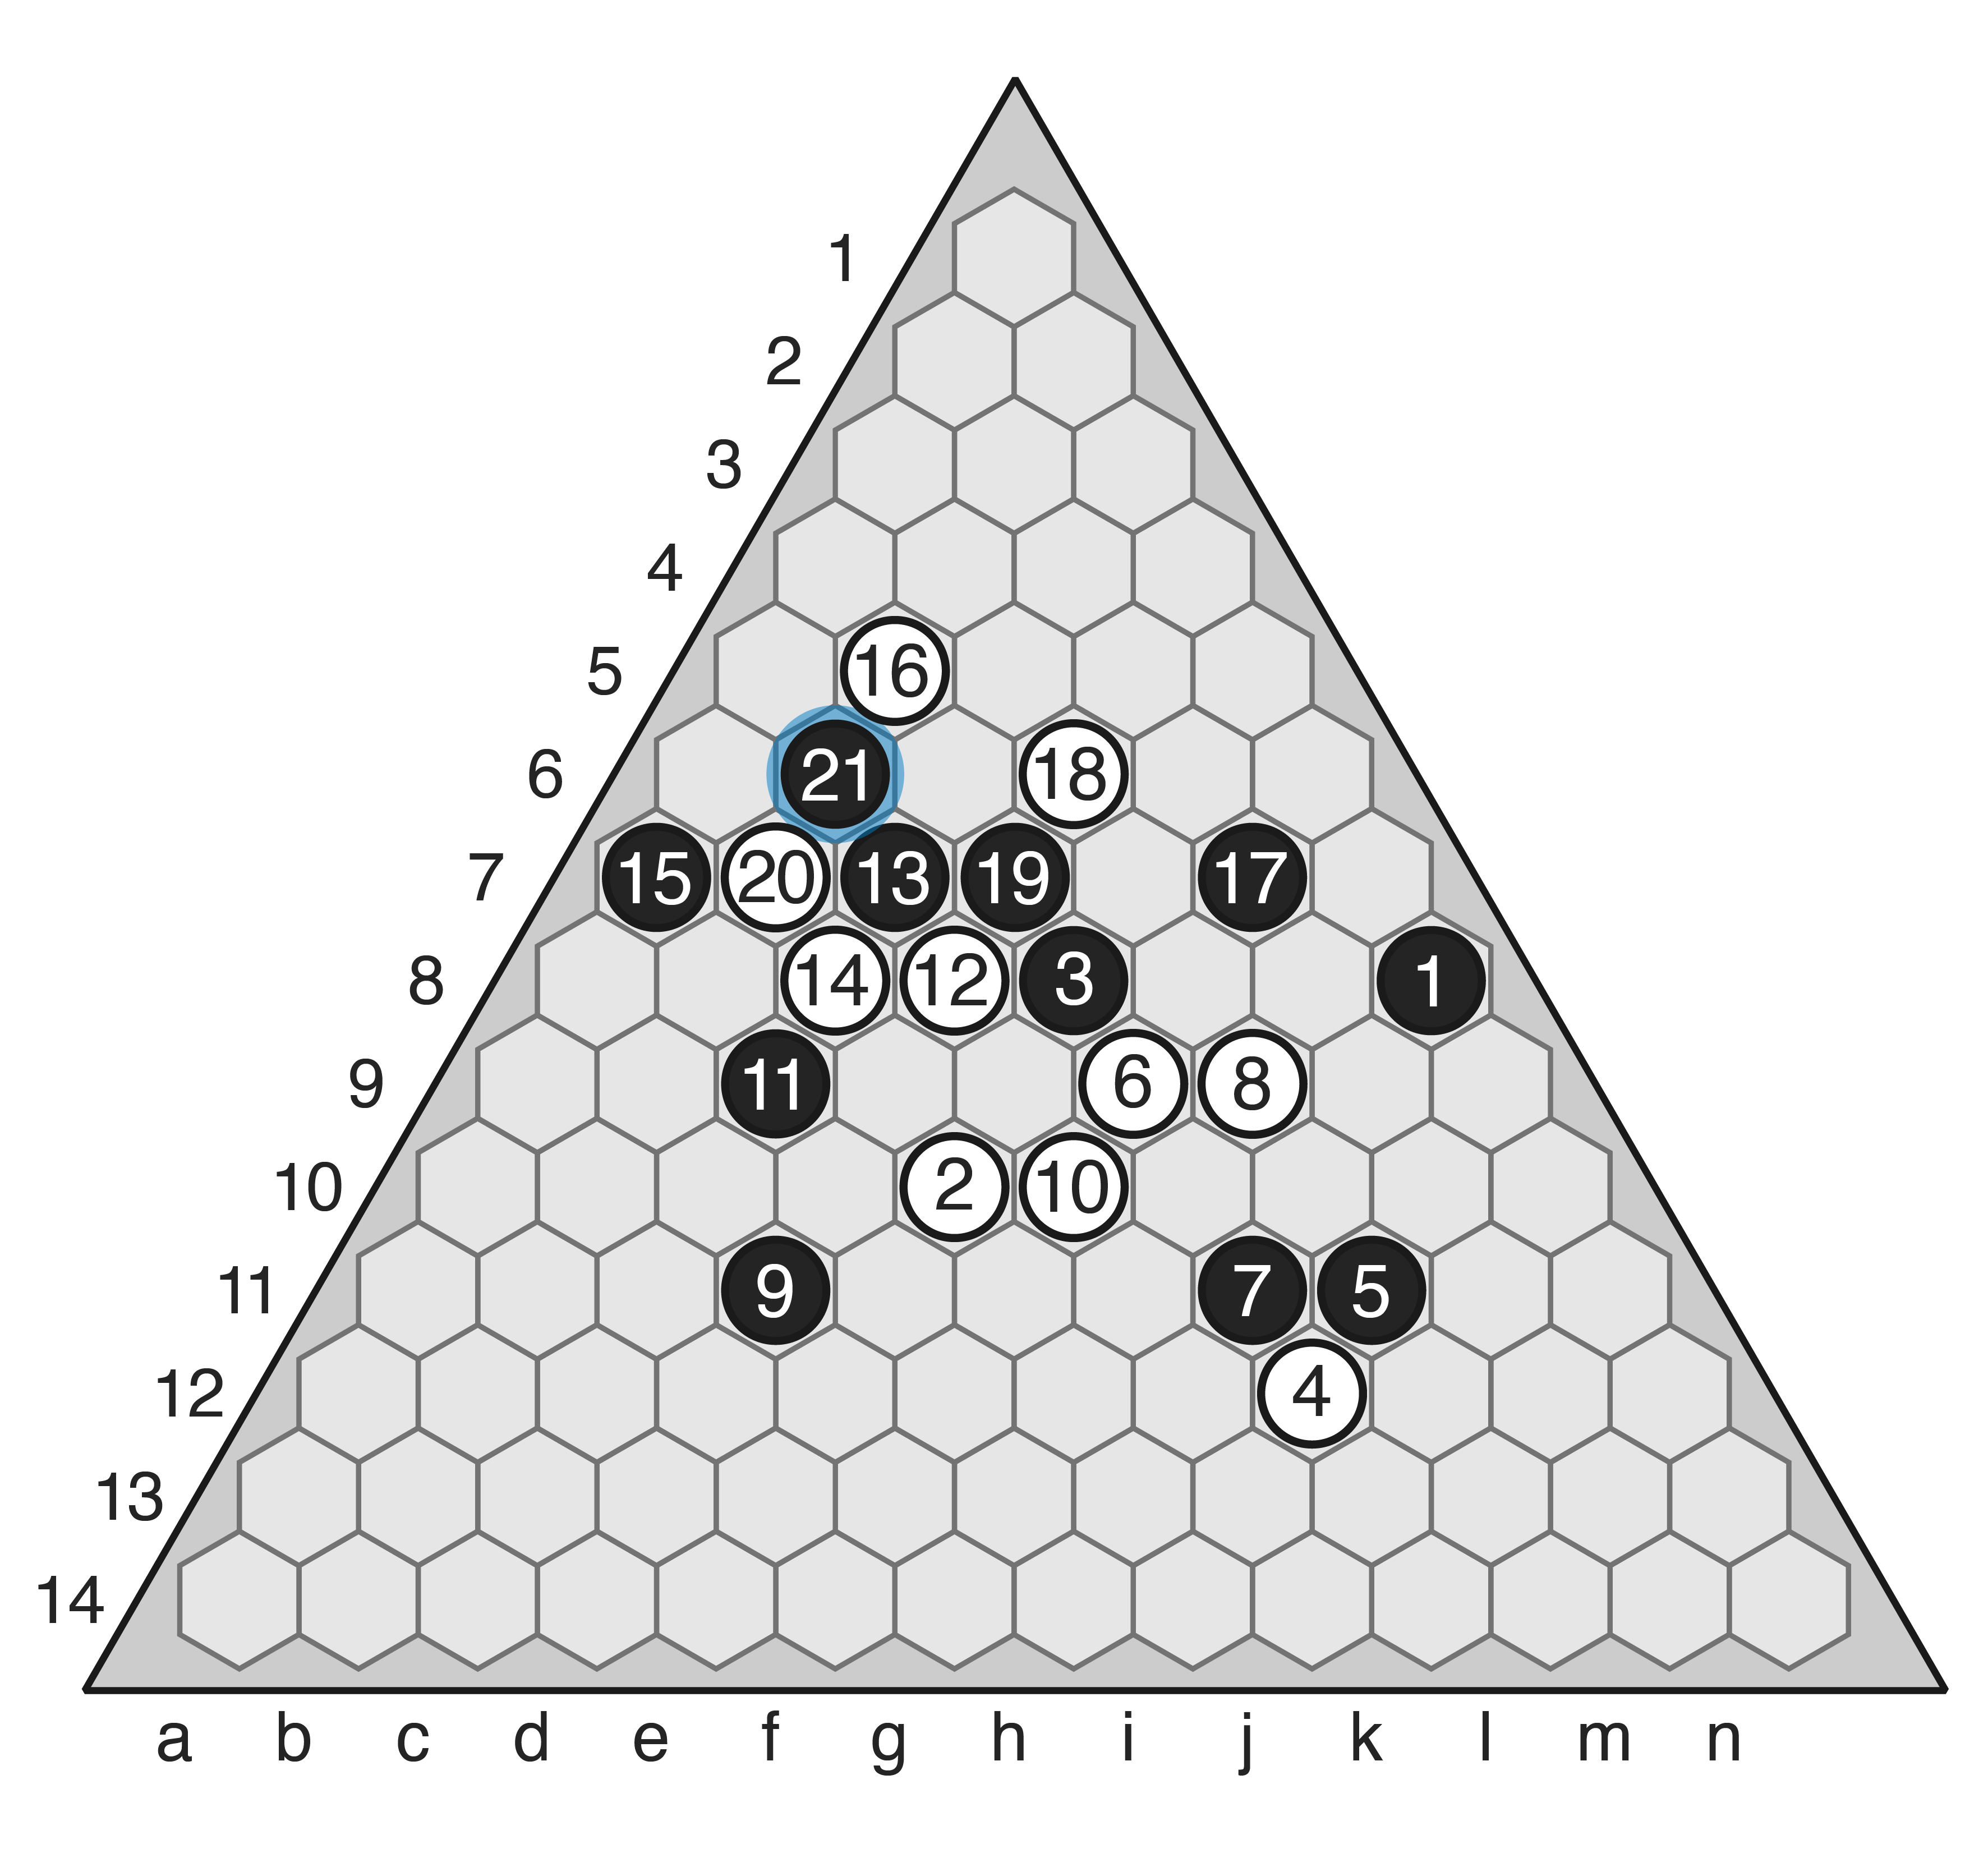
Moves 19-21: Black first blocks the d7 route, then blocks between the ladder and the escape on move 21.
-
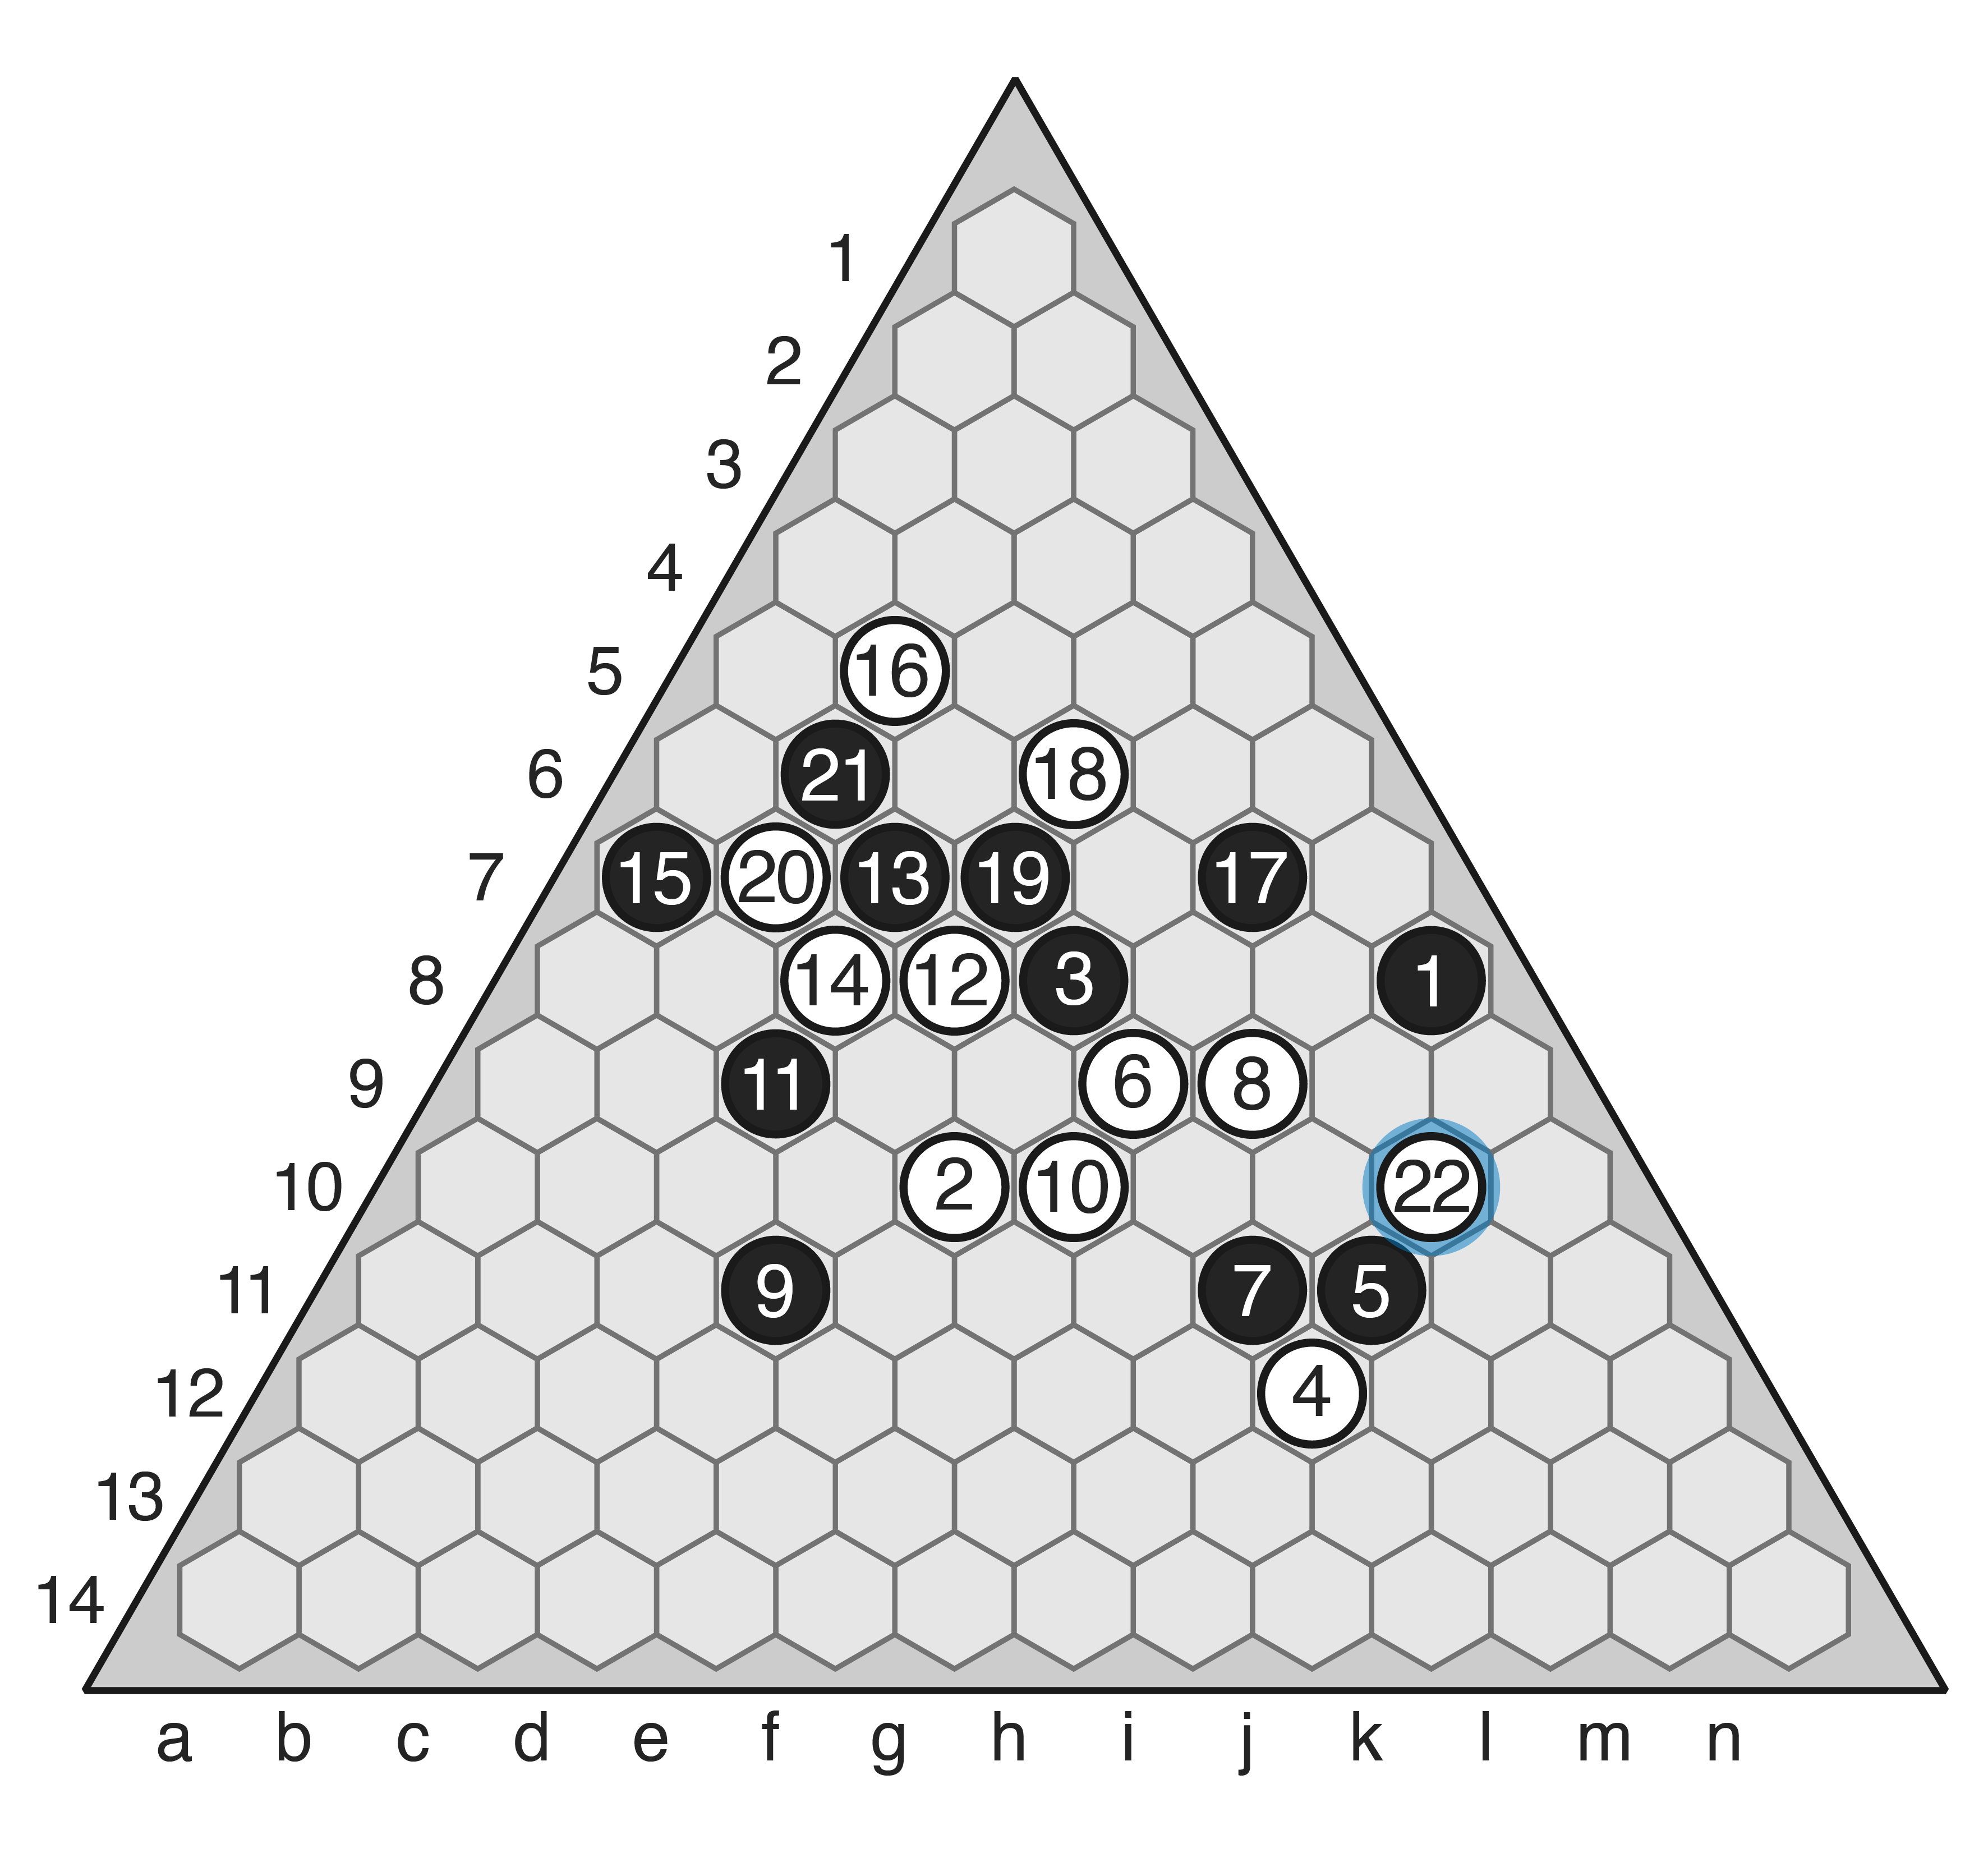
- Played in the game.
-
- Playing (22) at a6 instead would have kept the connection on the left and still threatened to connect on the right.
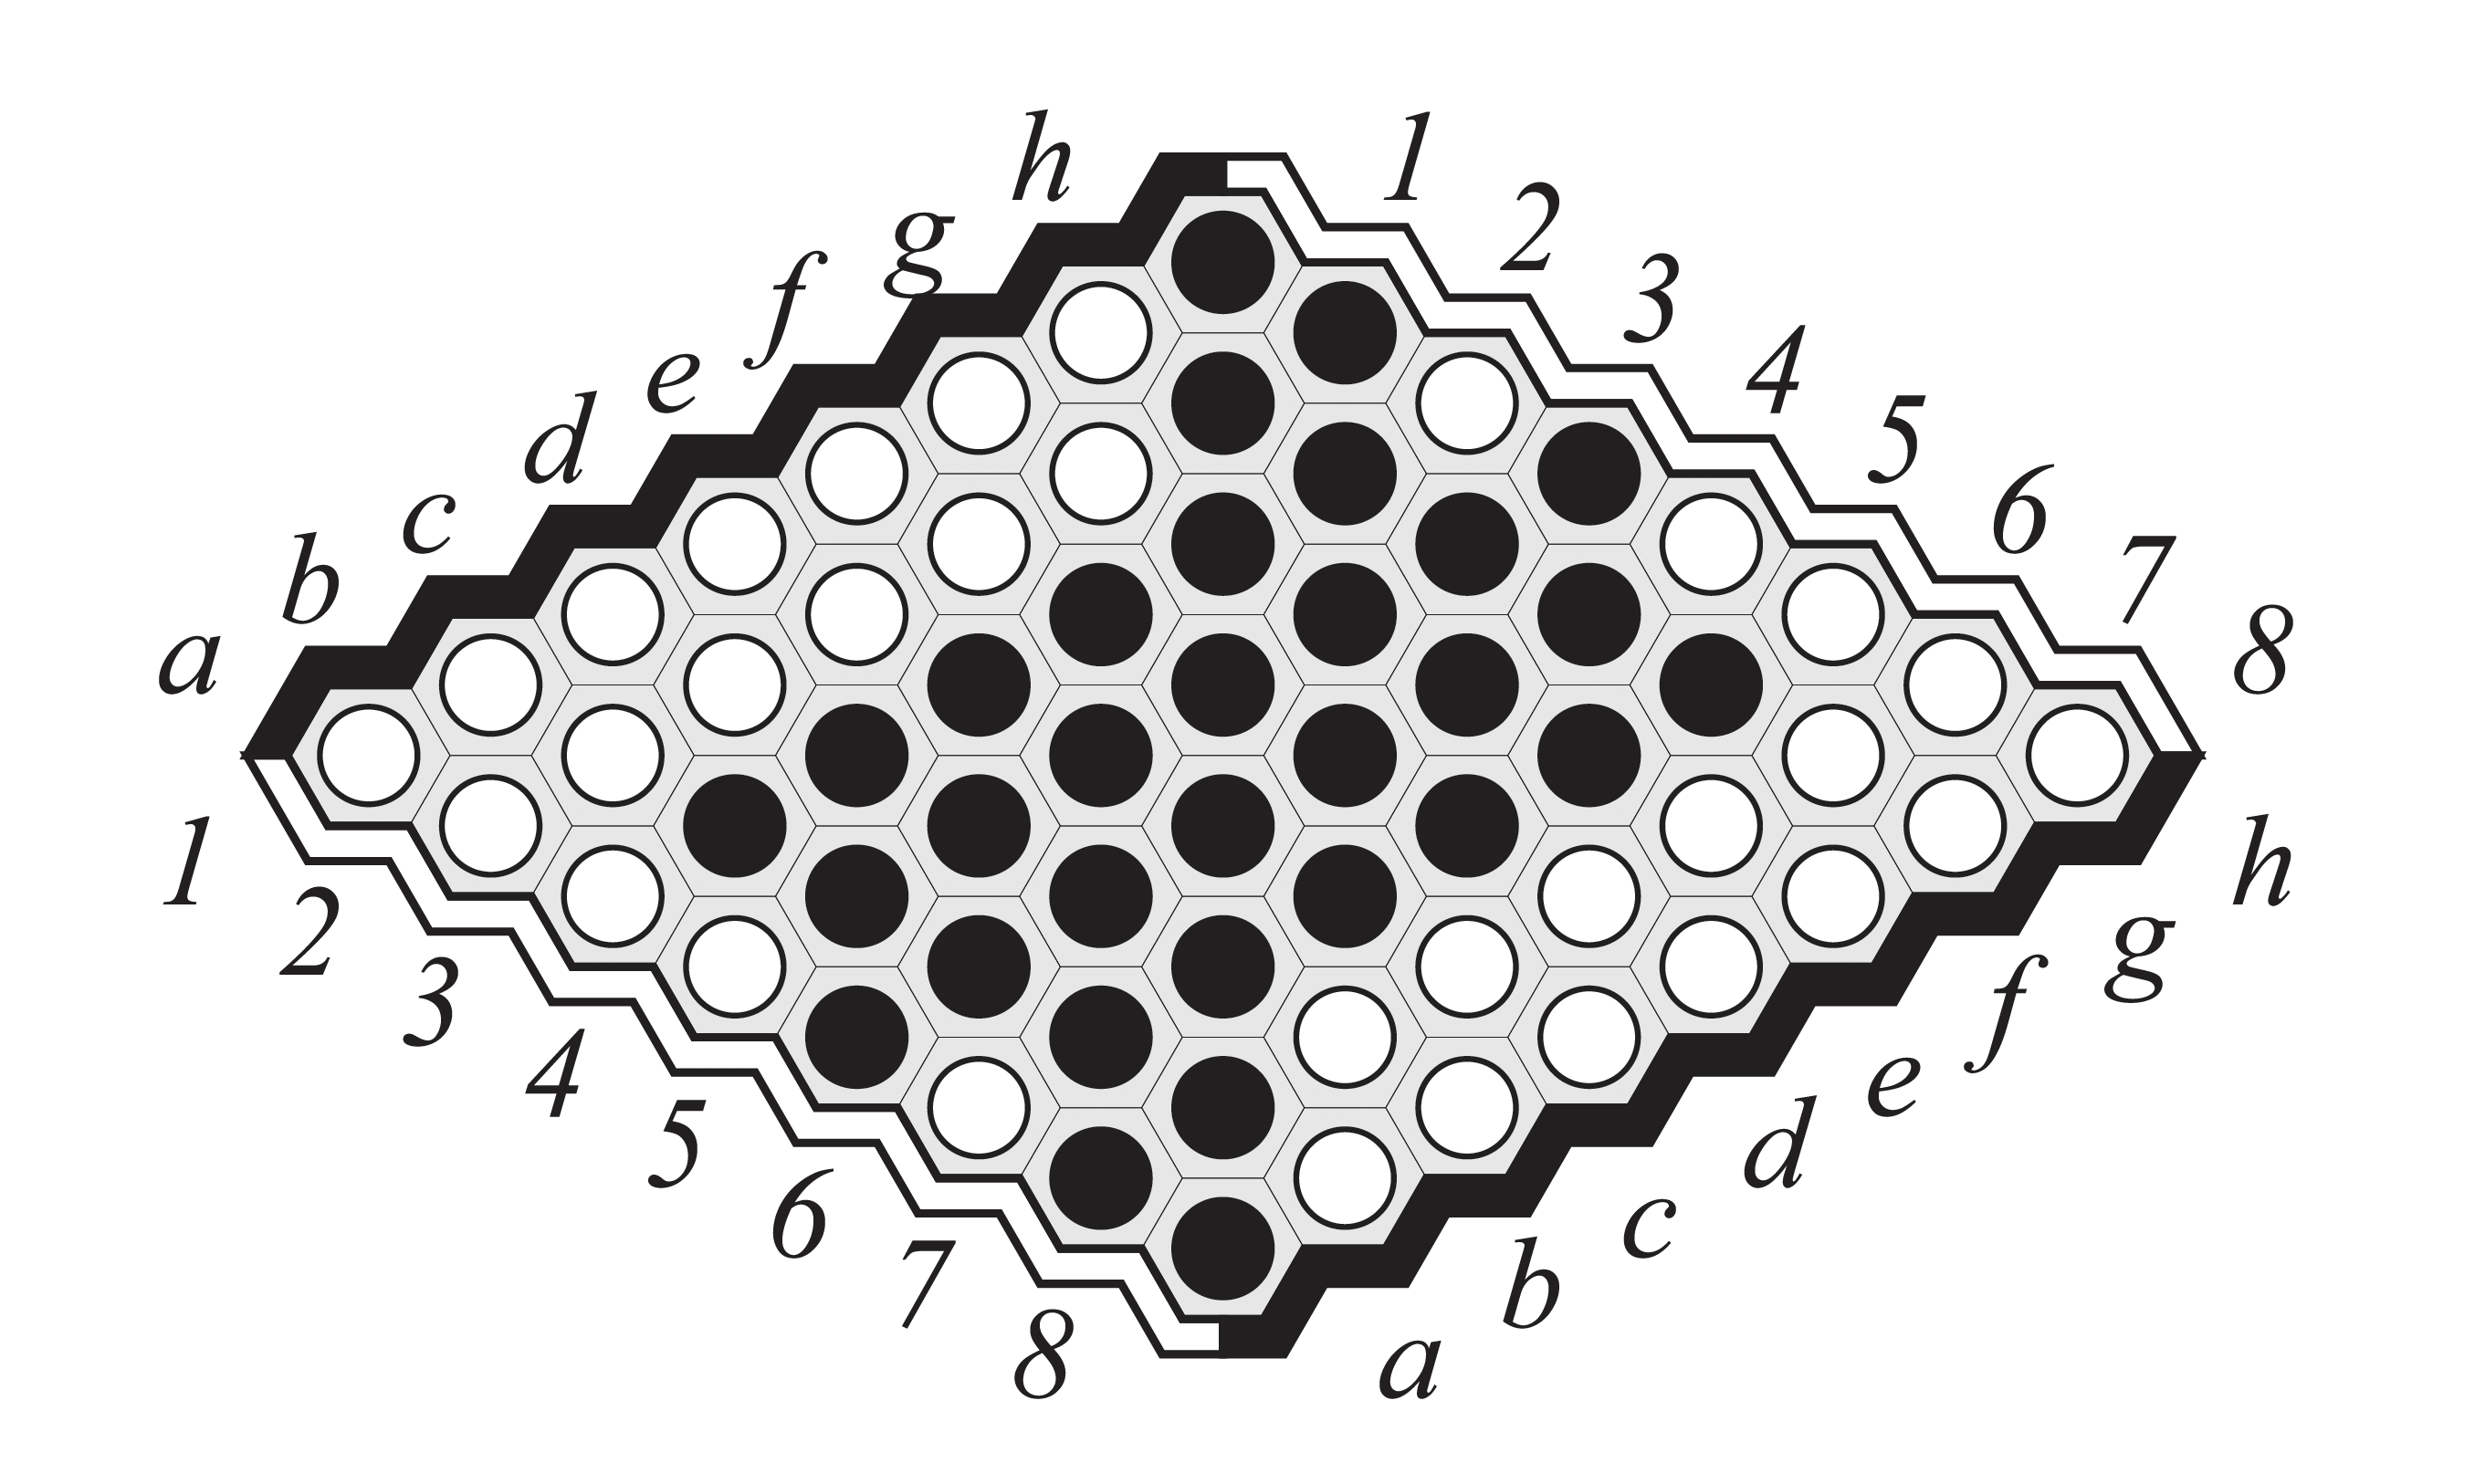
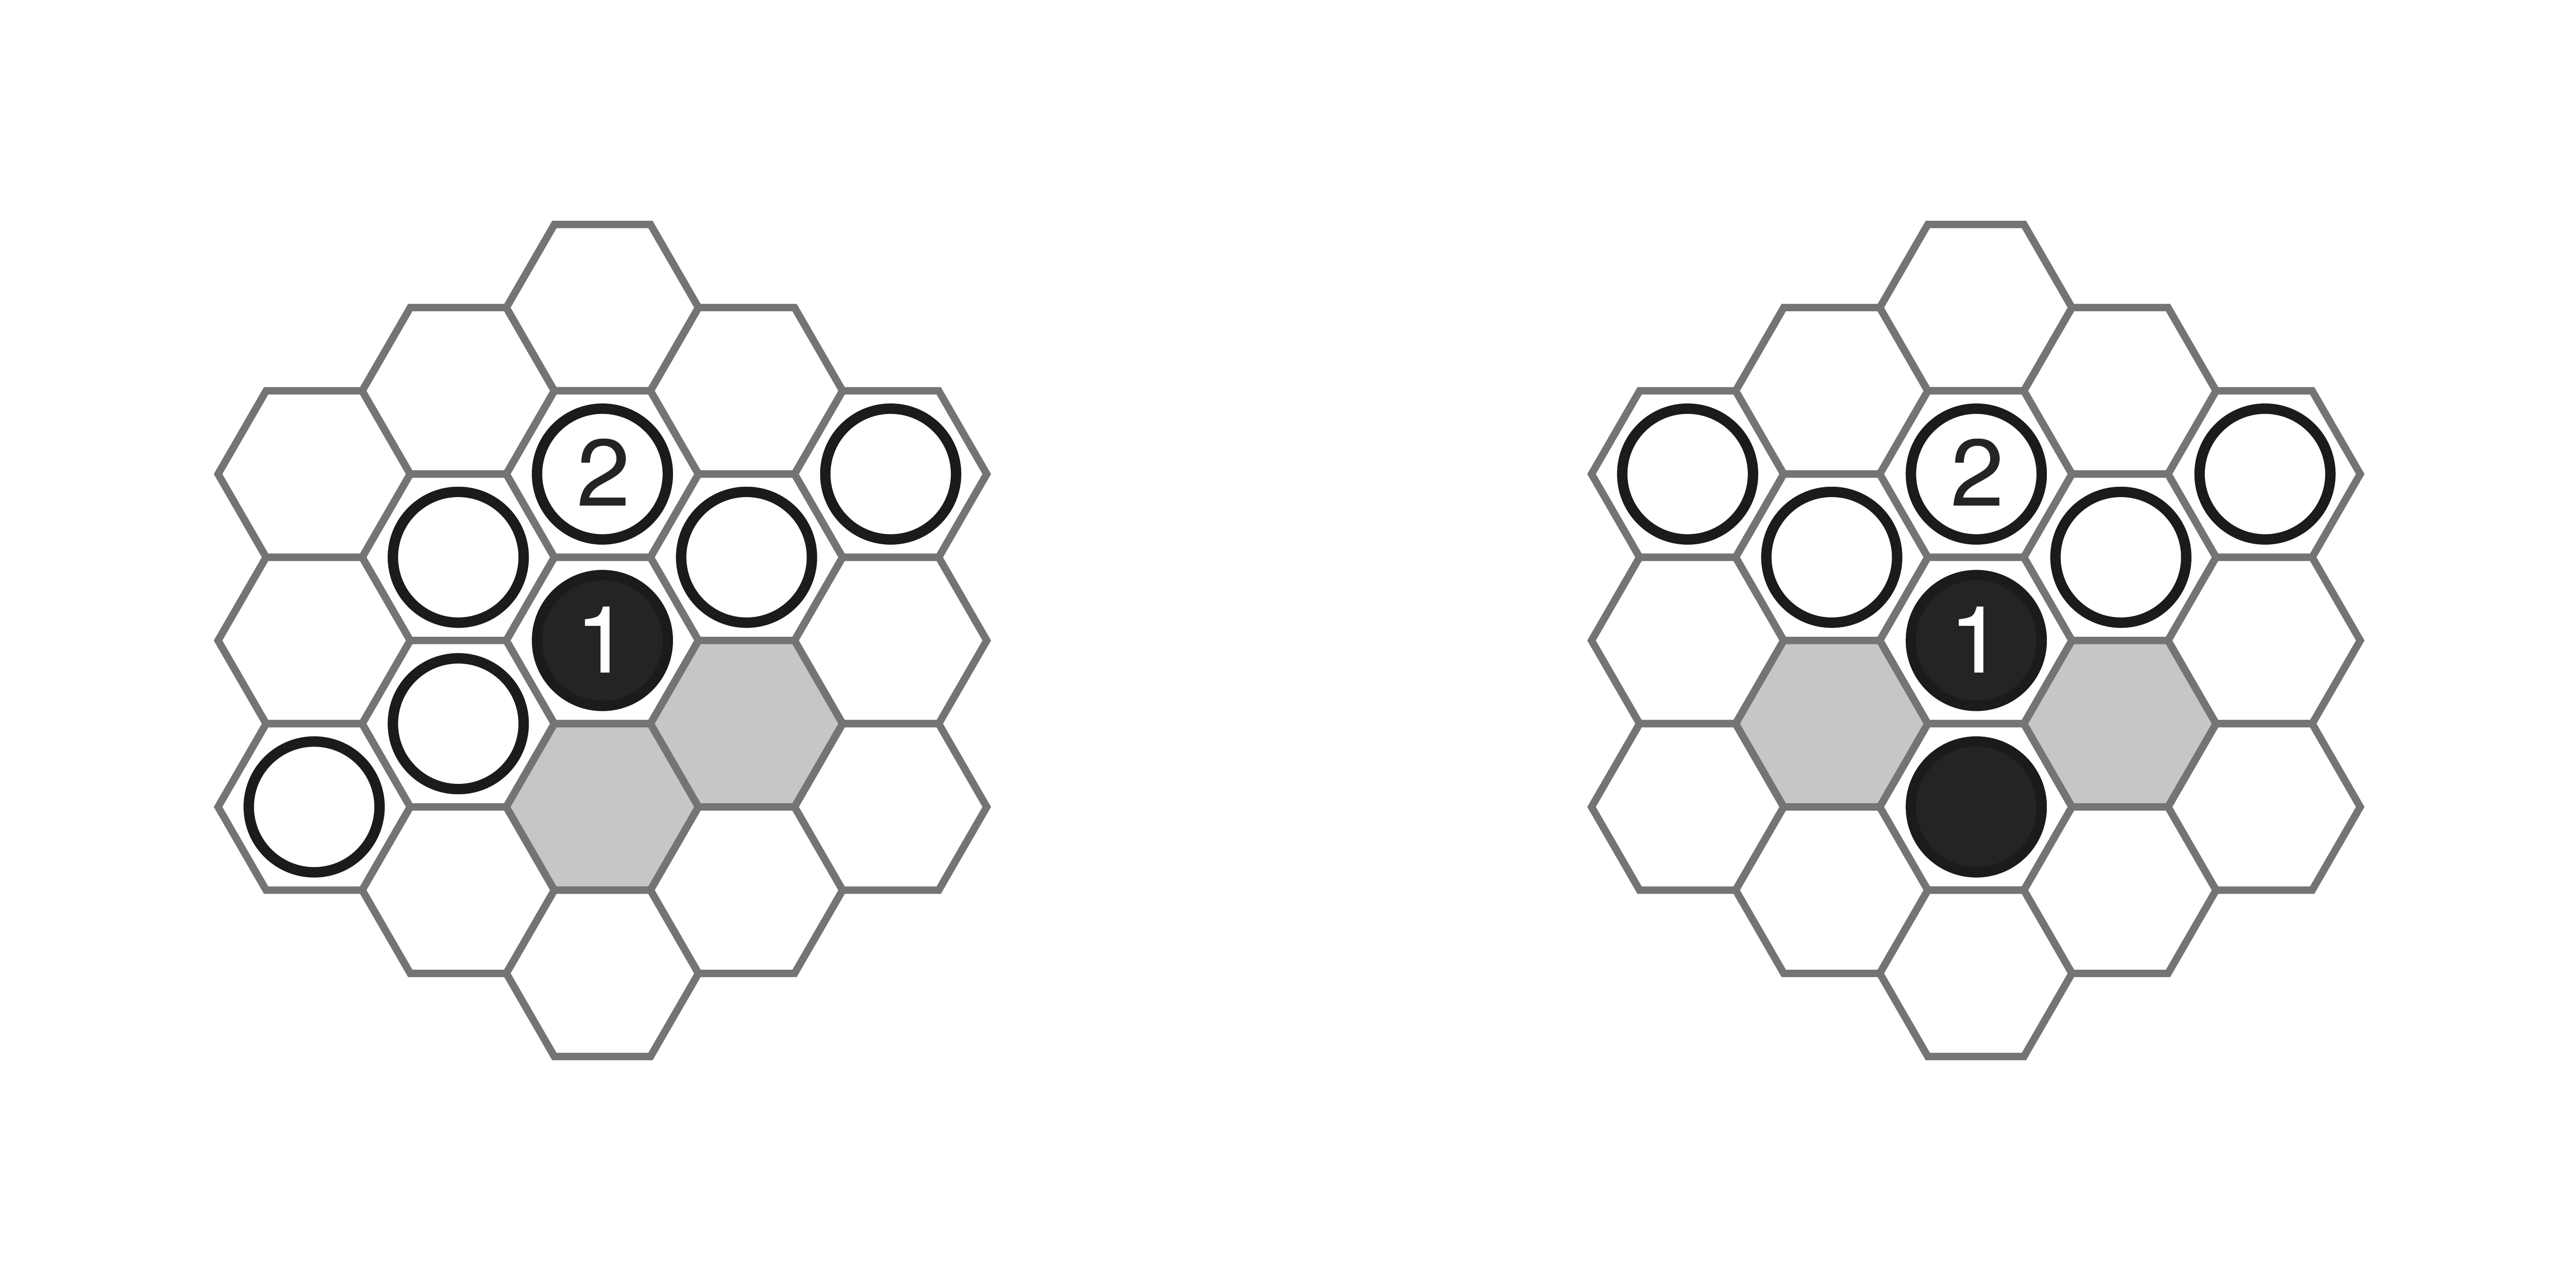
Move 22: Here I blunder the game away! I was concerned the 20-8 group might lose its connection to the right that I had through either 8 or the 16-18 group. It looked like Black had blocked off the 16-18 group, so I had to save it via (8). I missed the winning move 22. a6. Then, if 23. i10 I could simply play a5 and I would be connected to all three edges — in other words, it would have kept the double threat alive for connecting to the right, while also connected the group to the left.
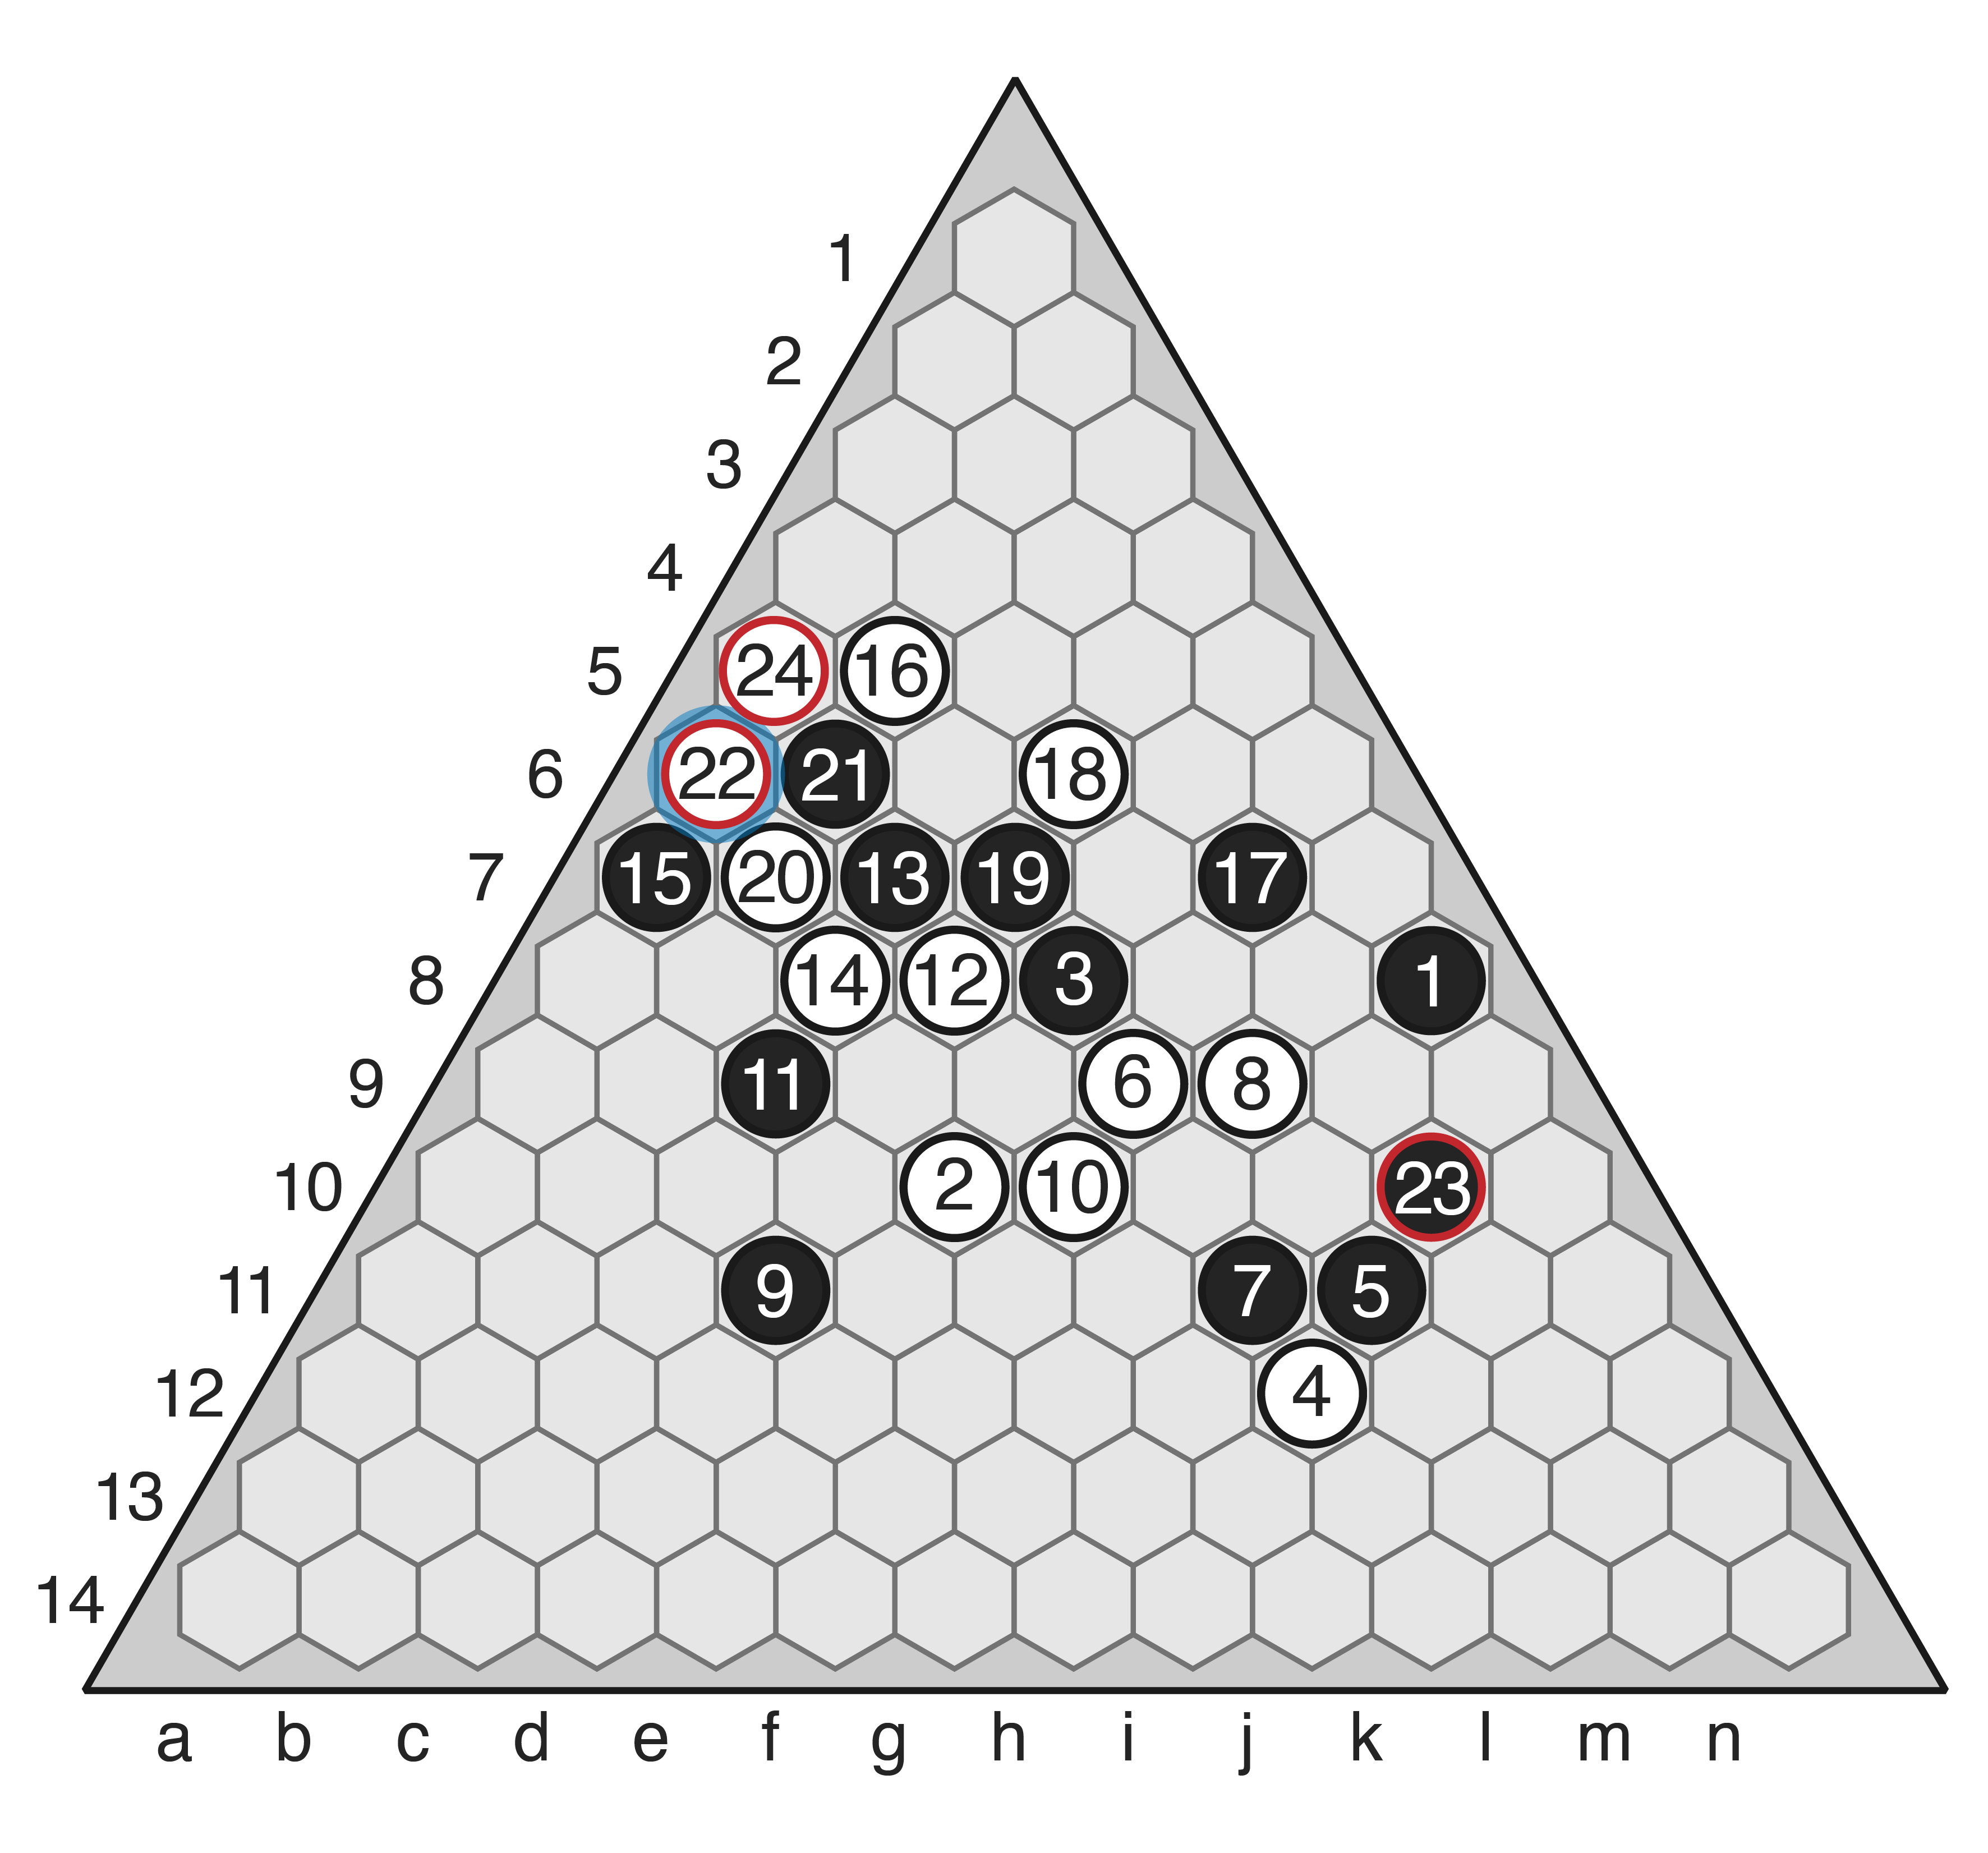
Instead, I saved the connection to the right, but now Black can now cut me off from the left at a6. I missed this “obvious” move because (I think) I’m so used to playing Hex. 21 is connected to the left via A-2, and in Hex there’s no reason to ever invade A-2 because the two empty hexes are captured. But of course, in Y, the edge is shared by both players, so these hexes are NOT captured.
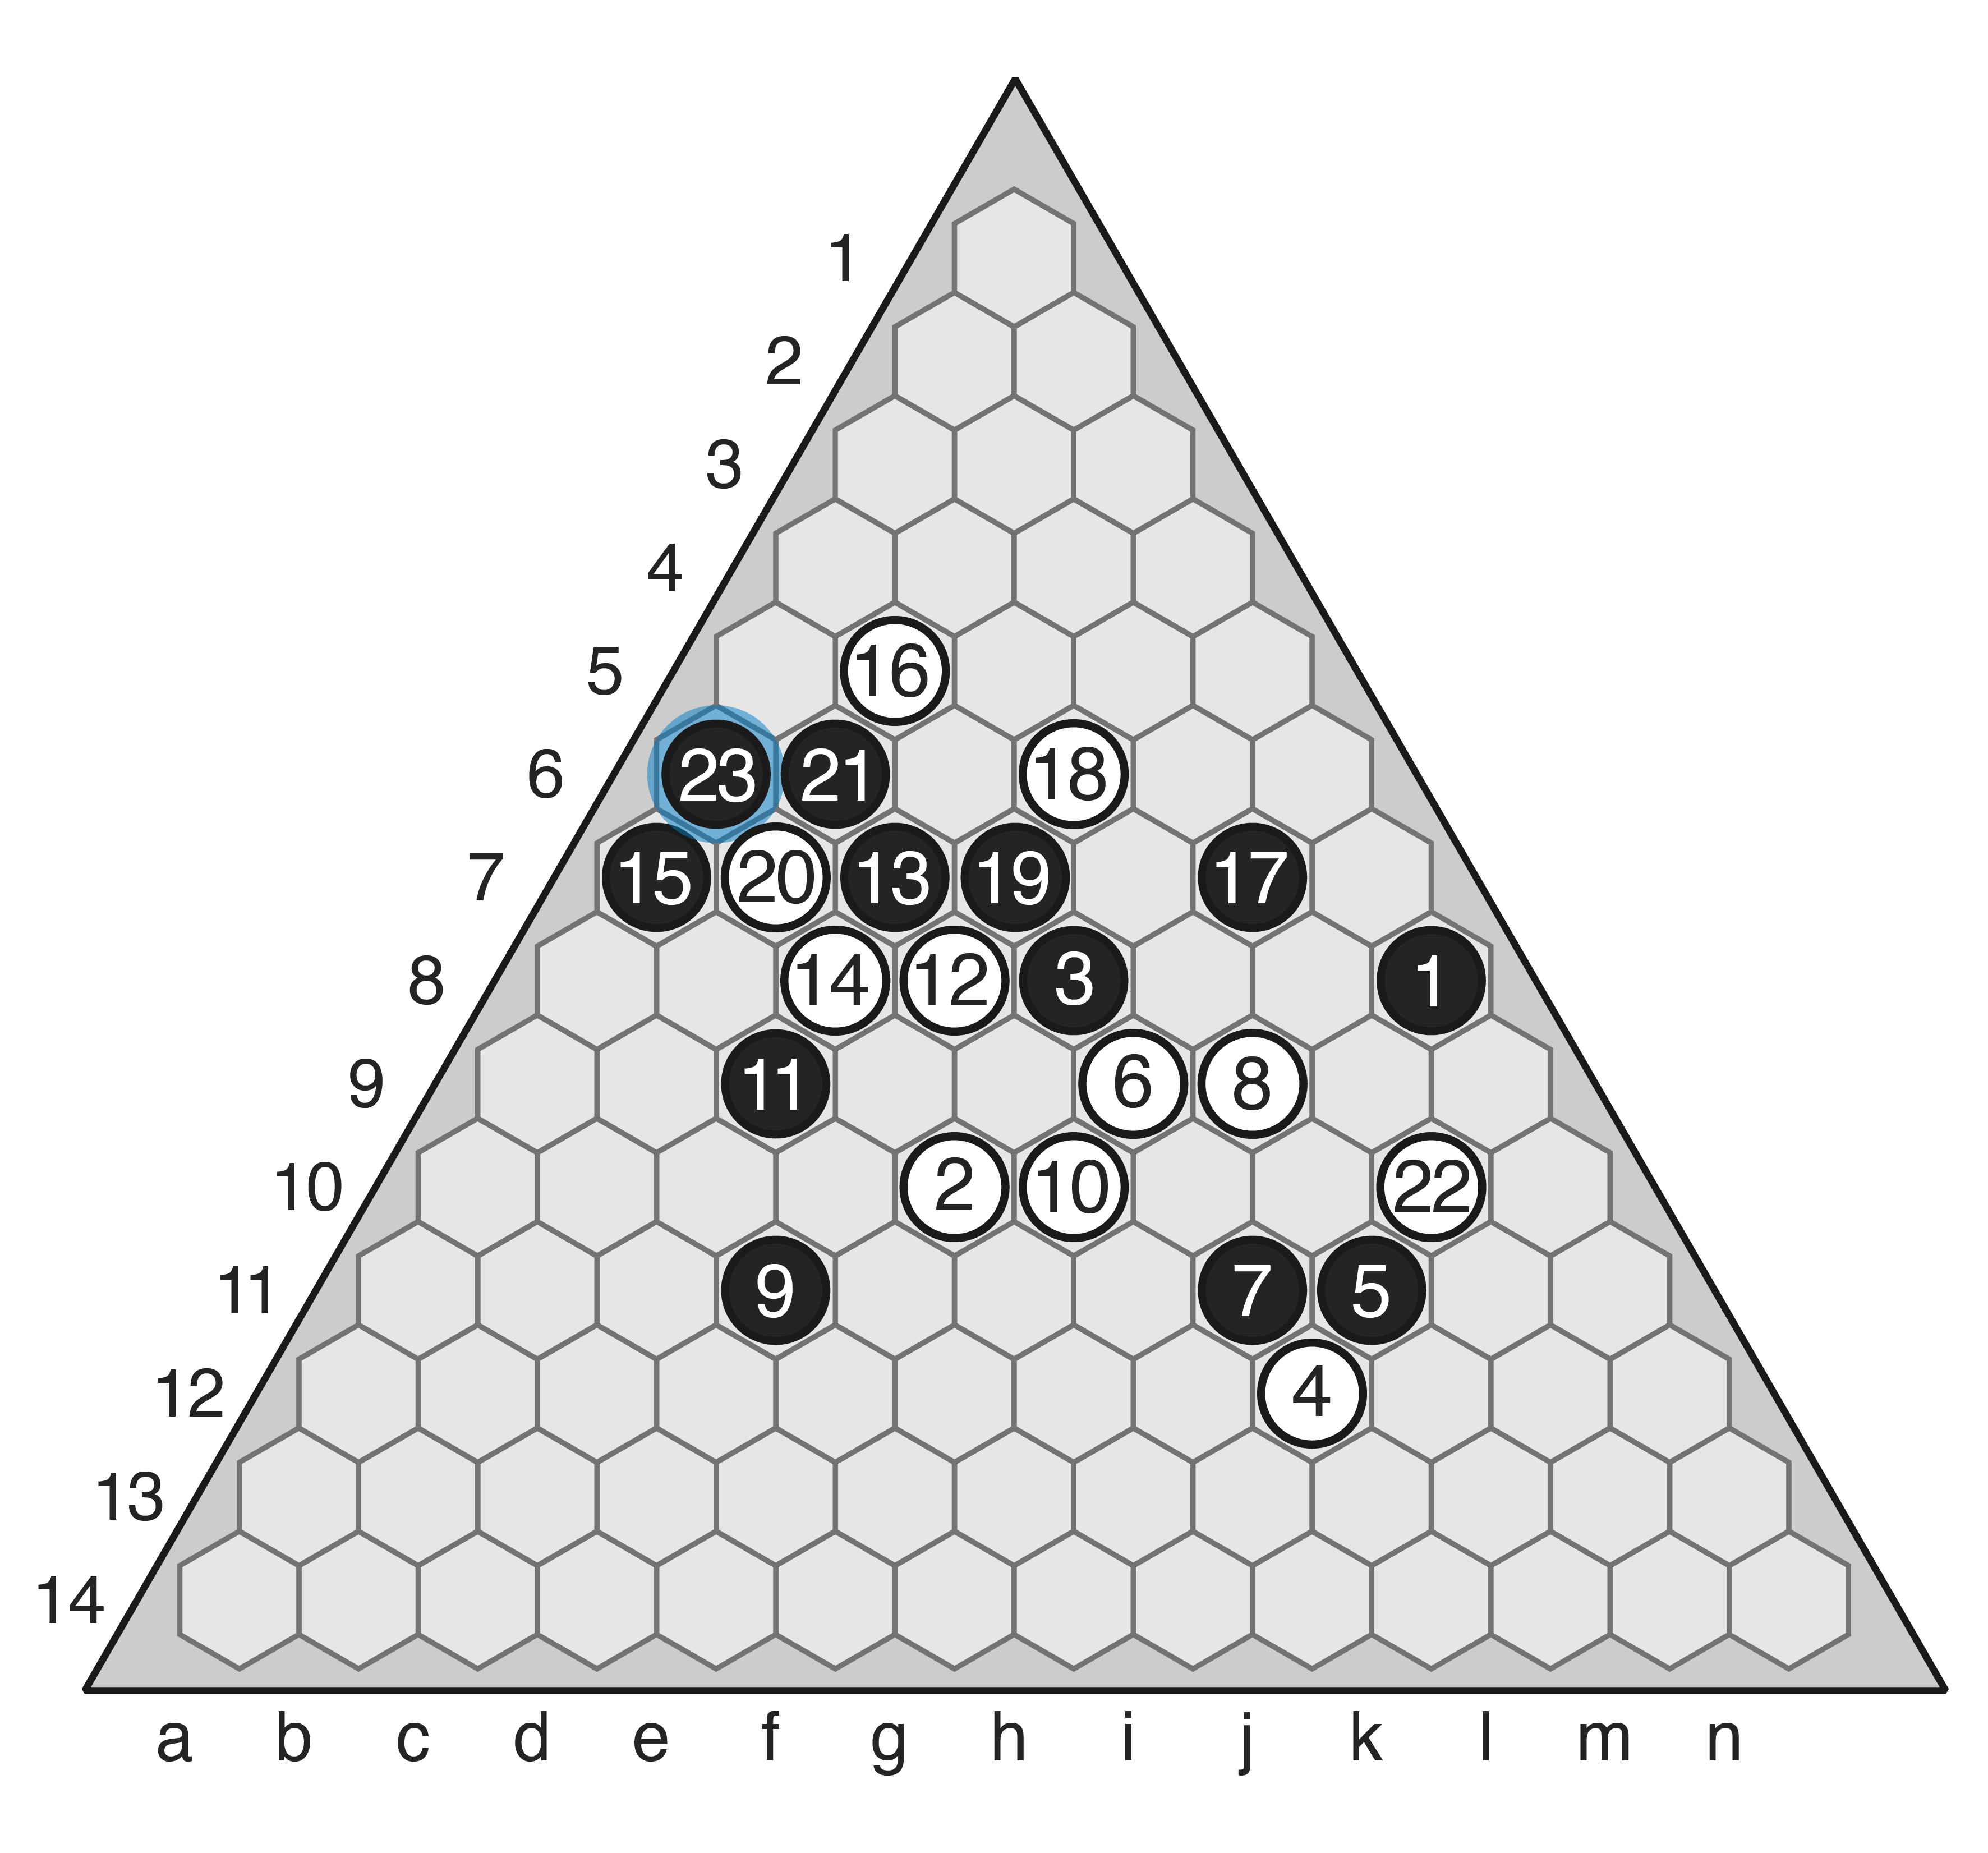
Move 23: Forced. Black blocks White from the left edge.
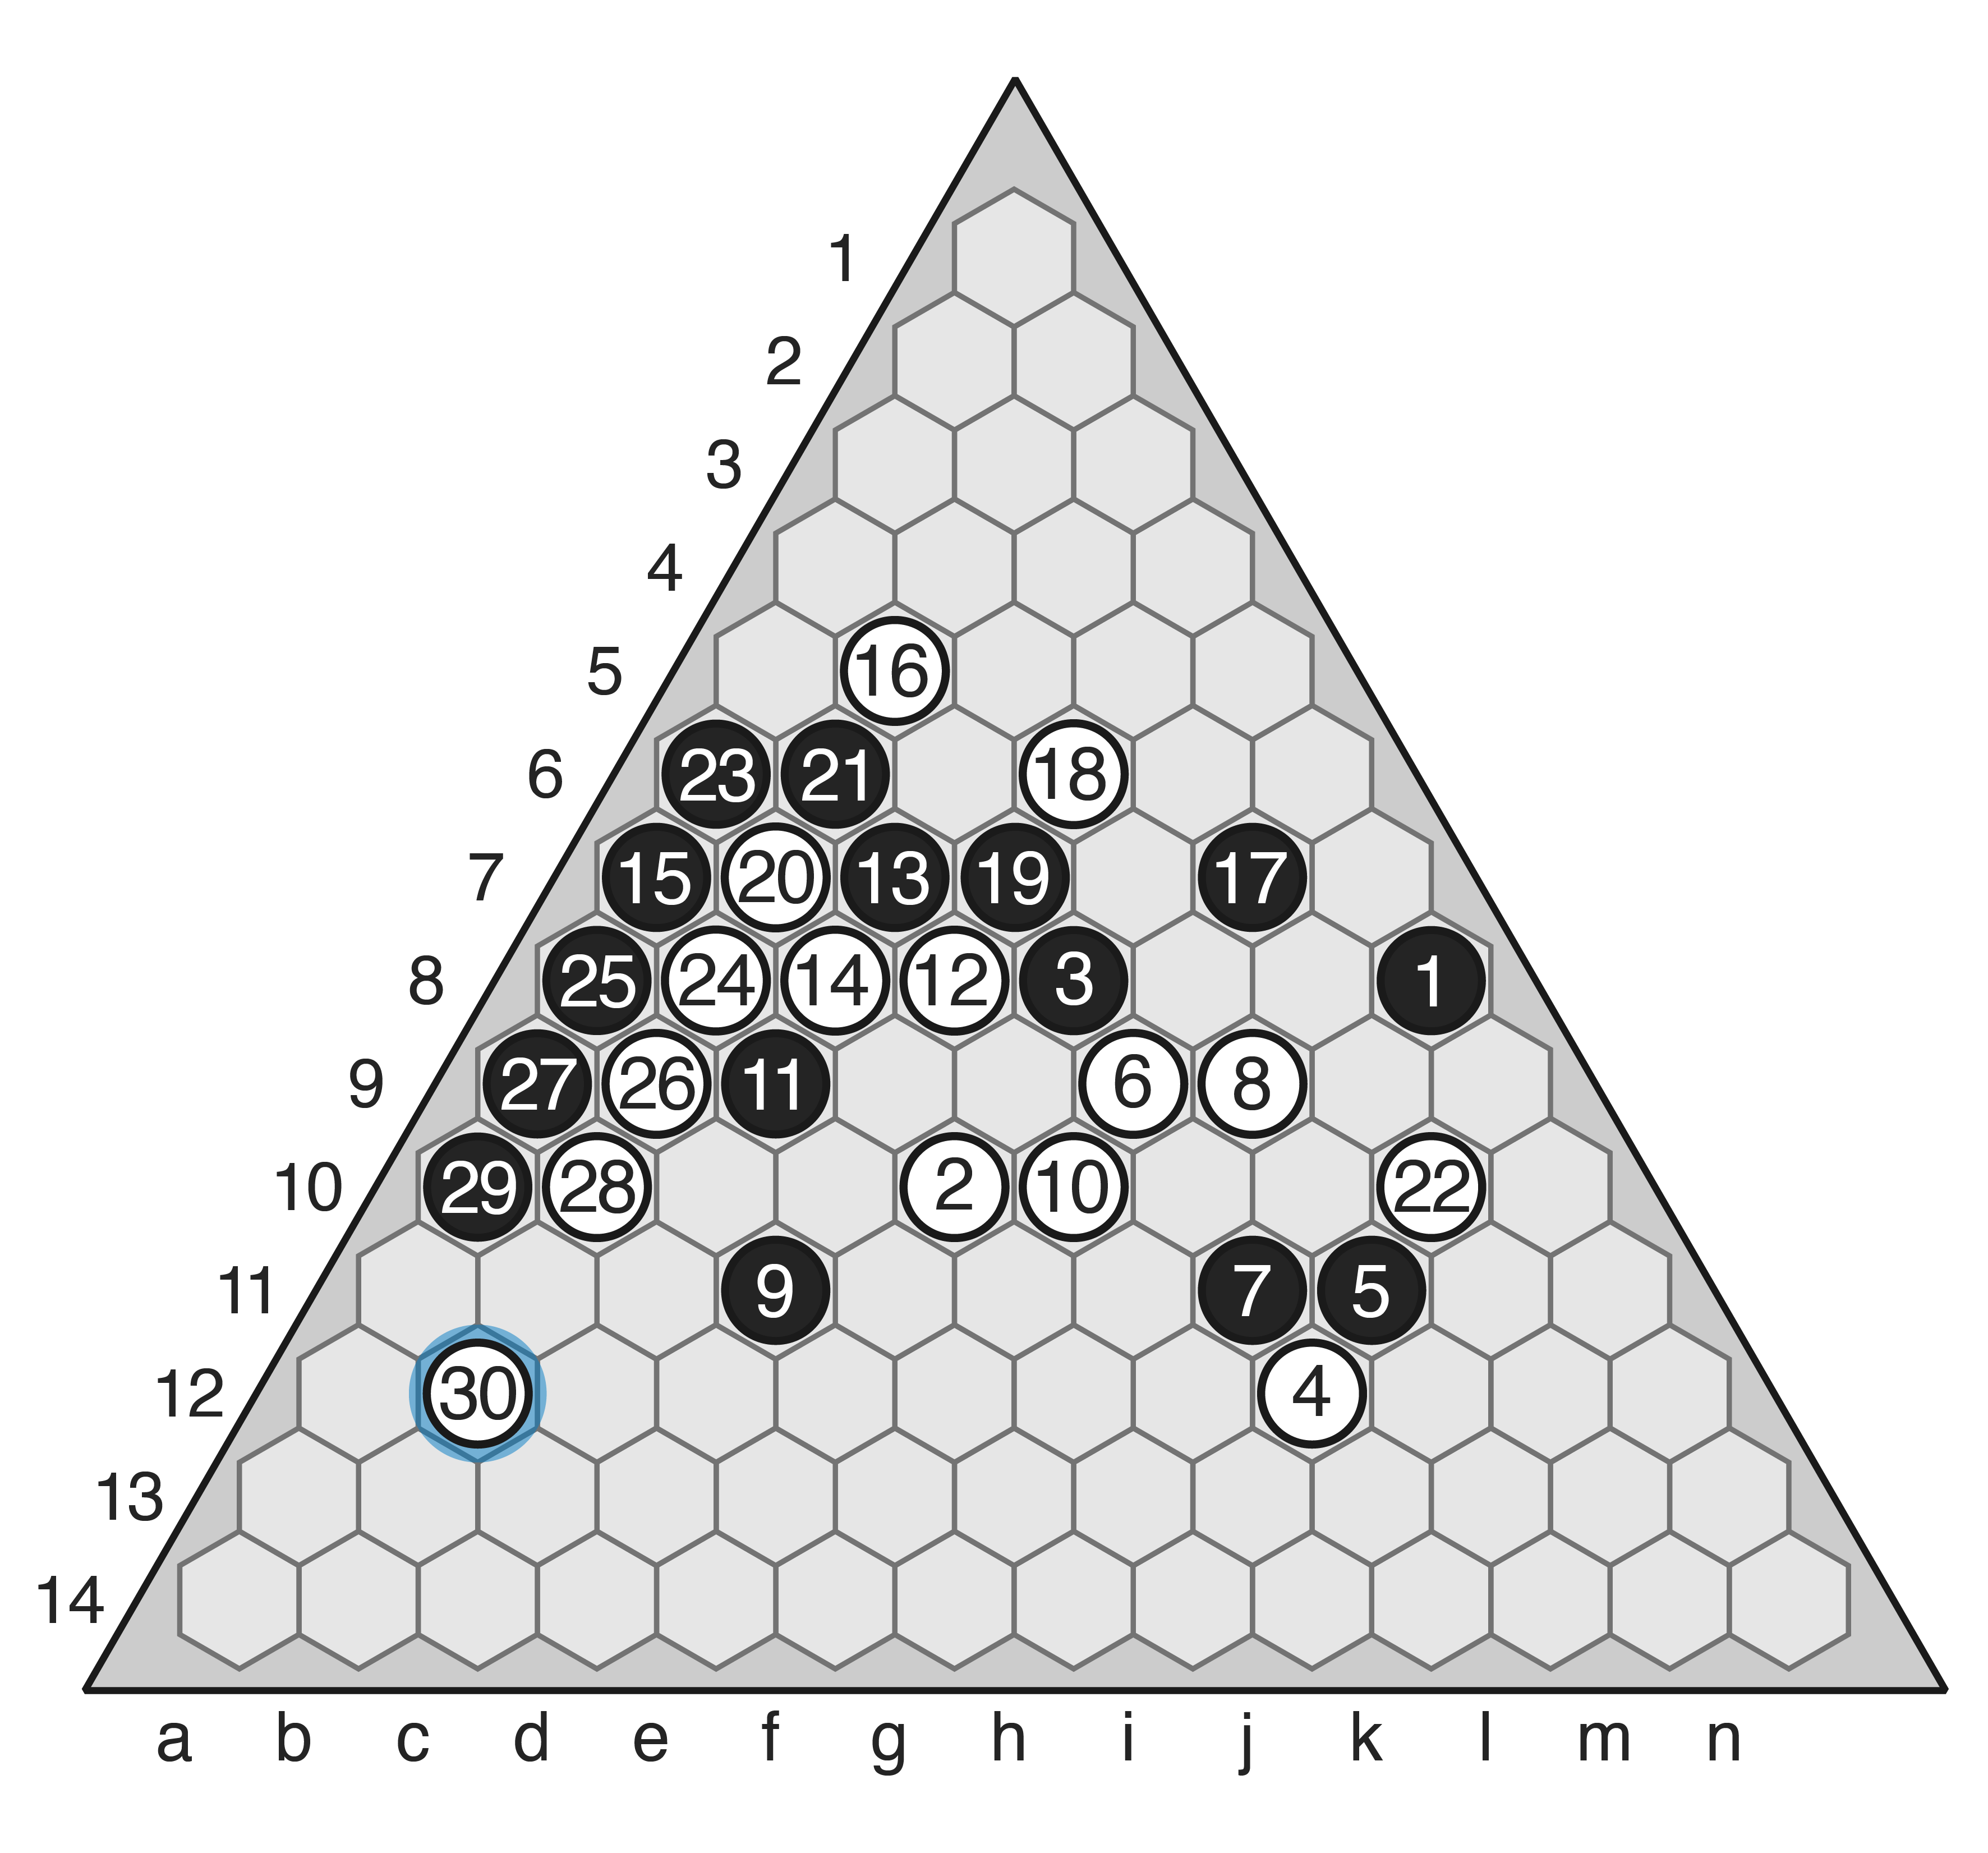
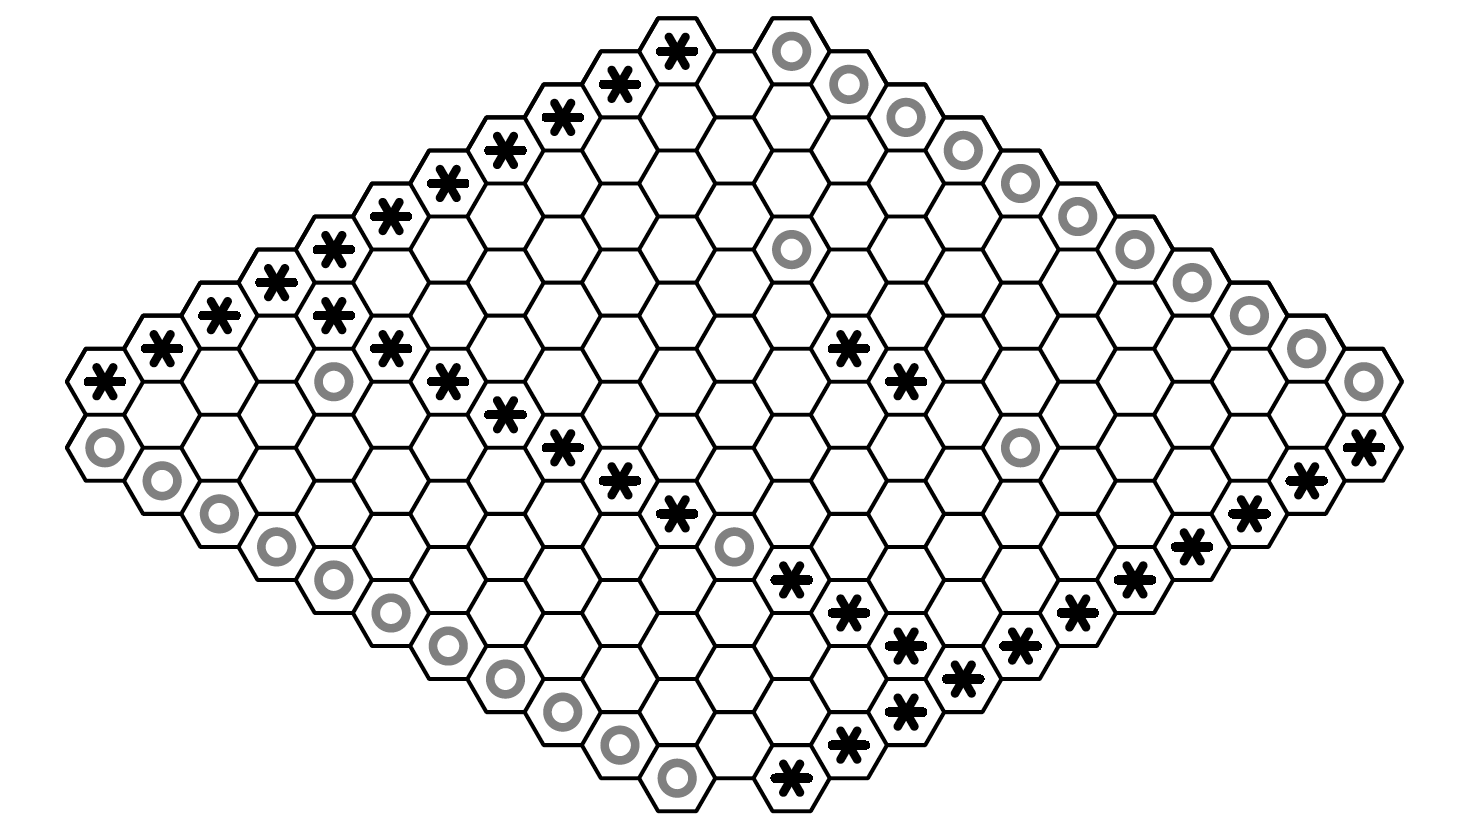
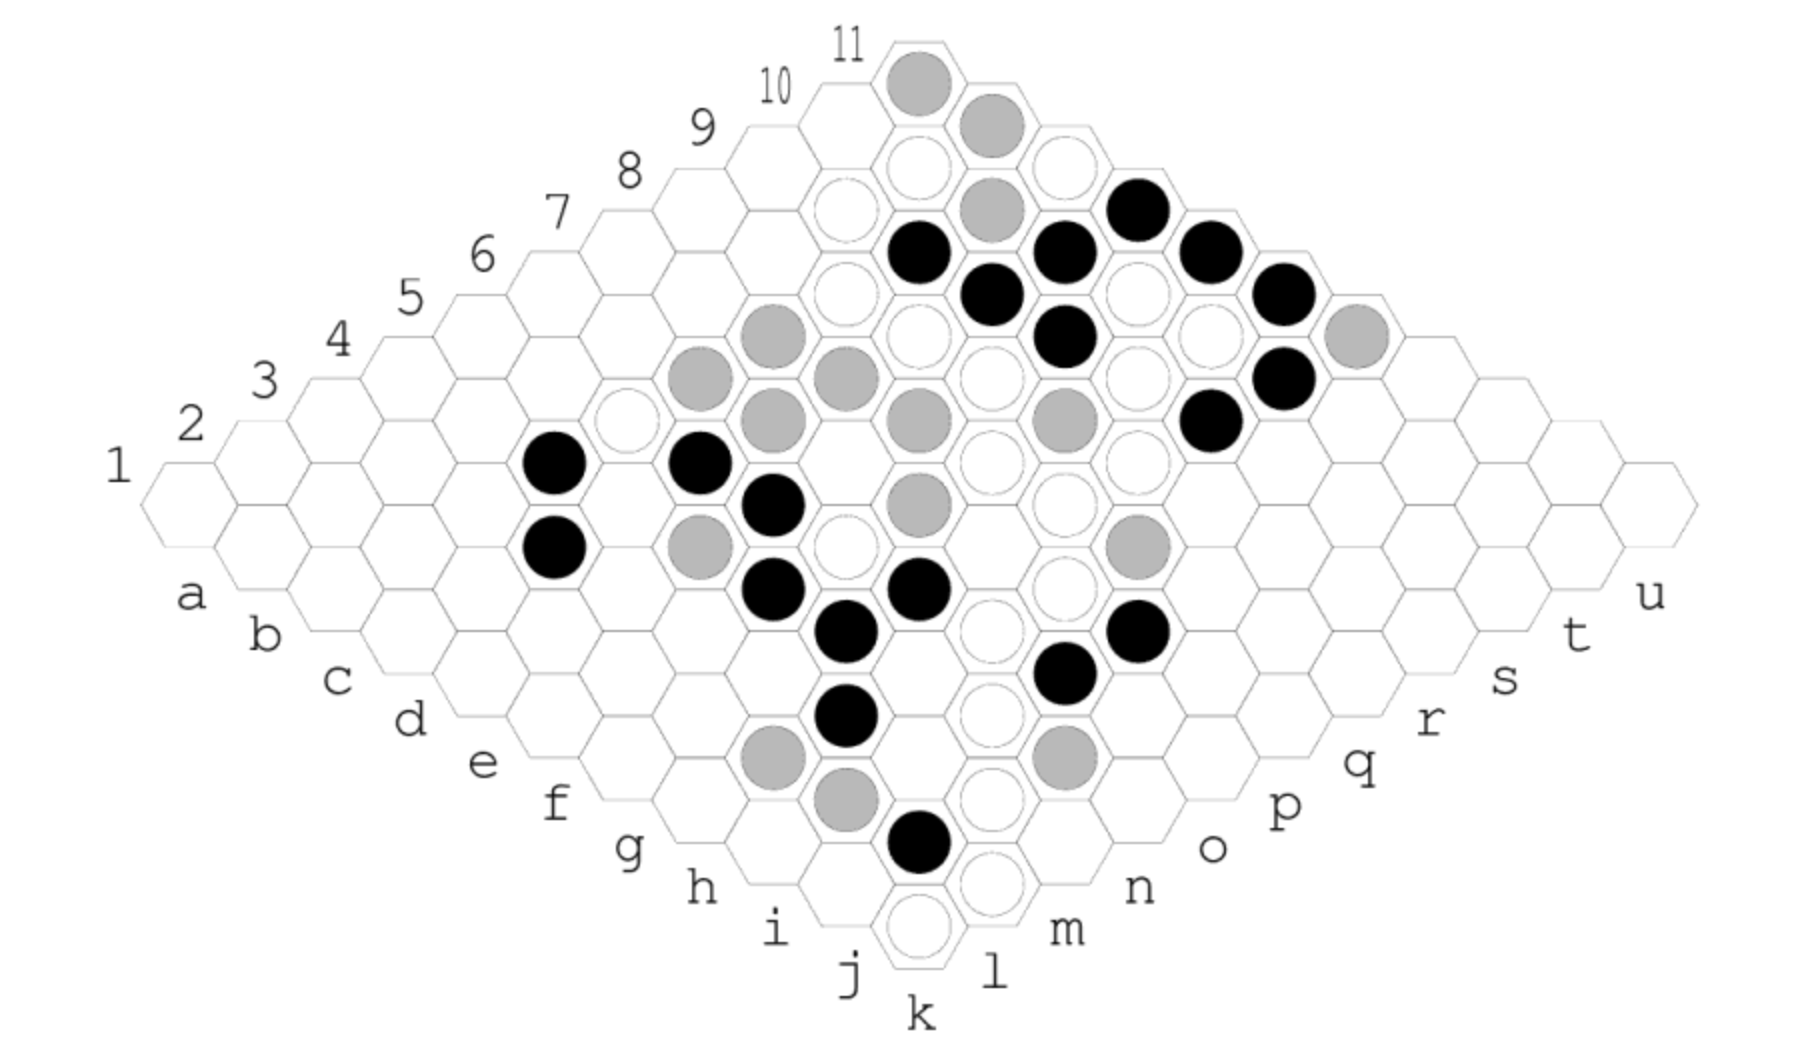
Moves 24-30: Ladder, followed by a break. The black group (1-29) is connected to the left and right edges. Black needs only to connect it to the bottom to win.
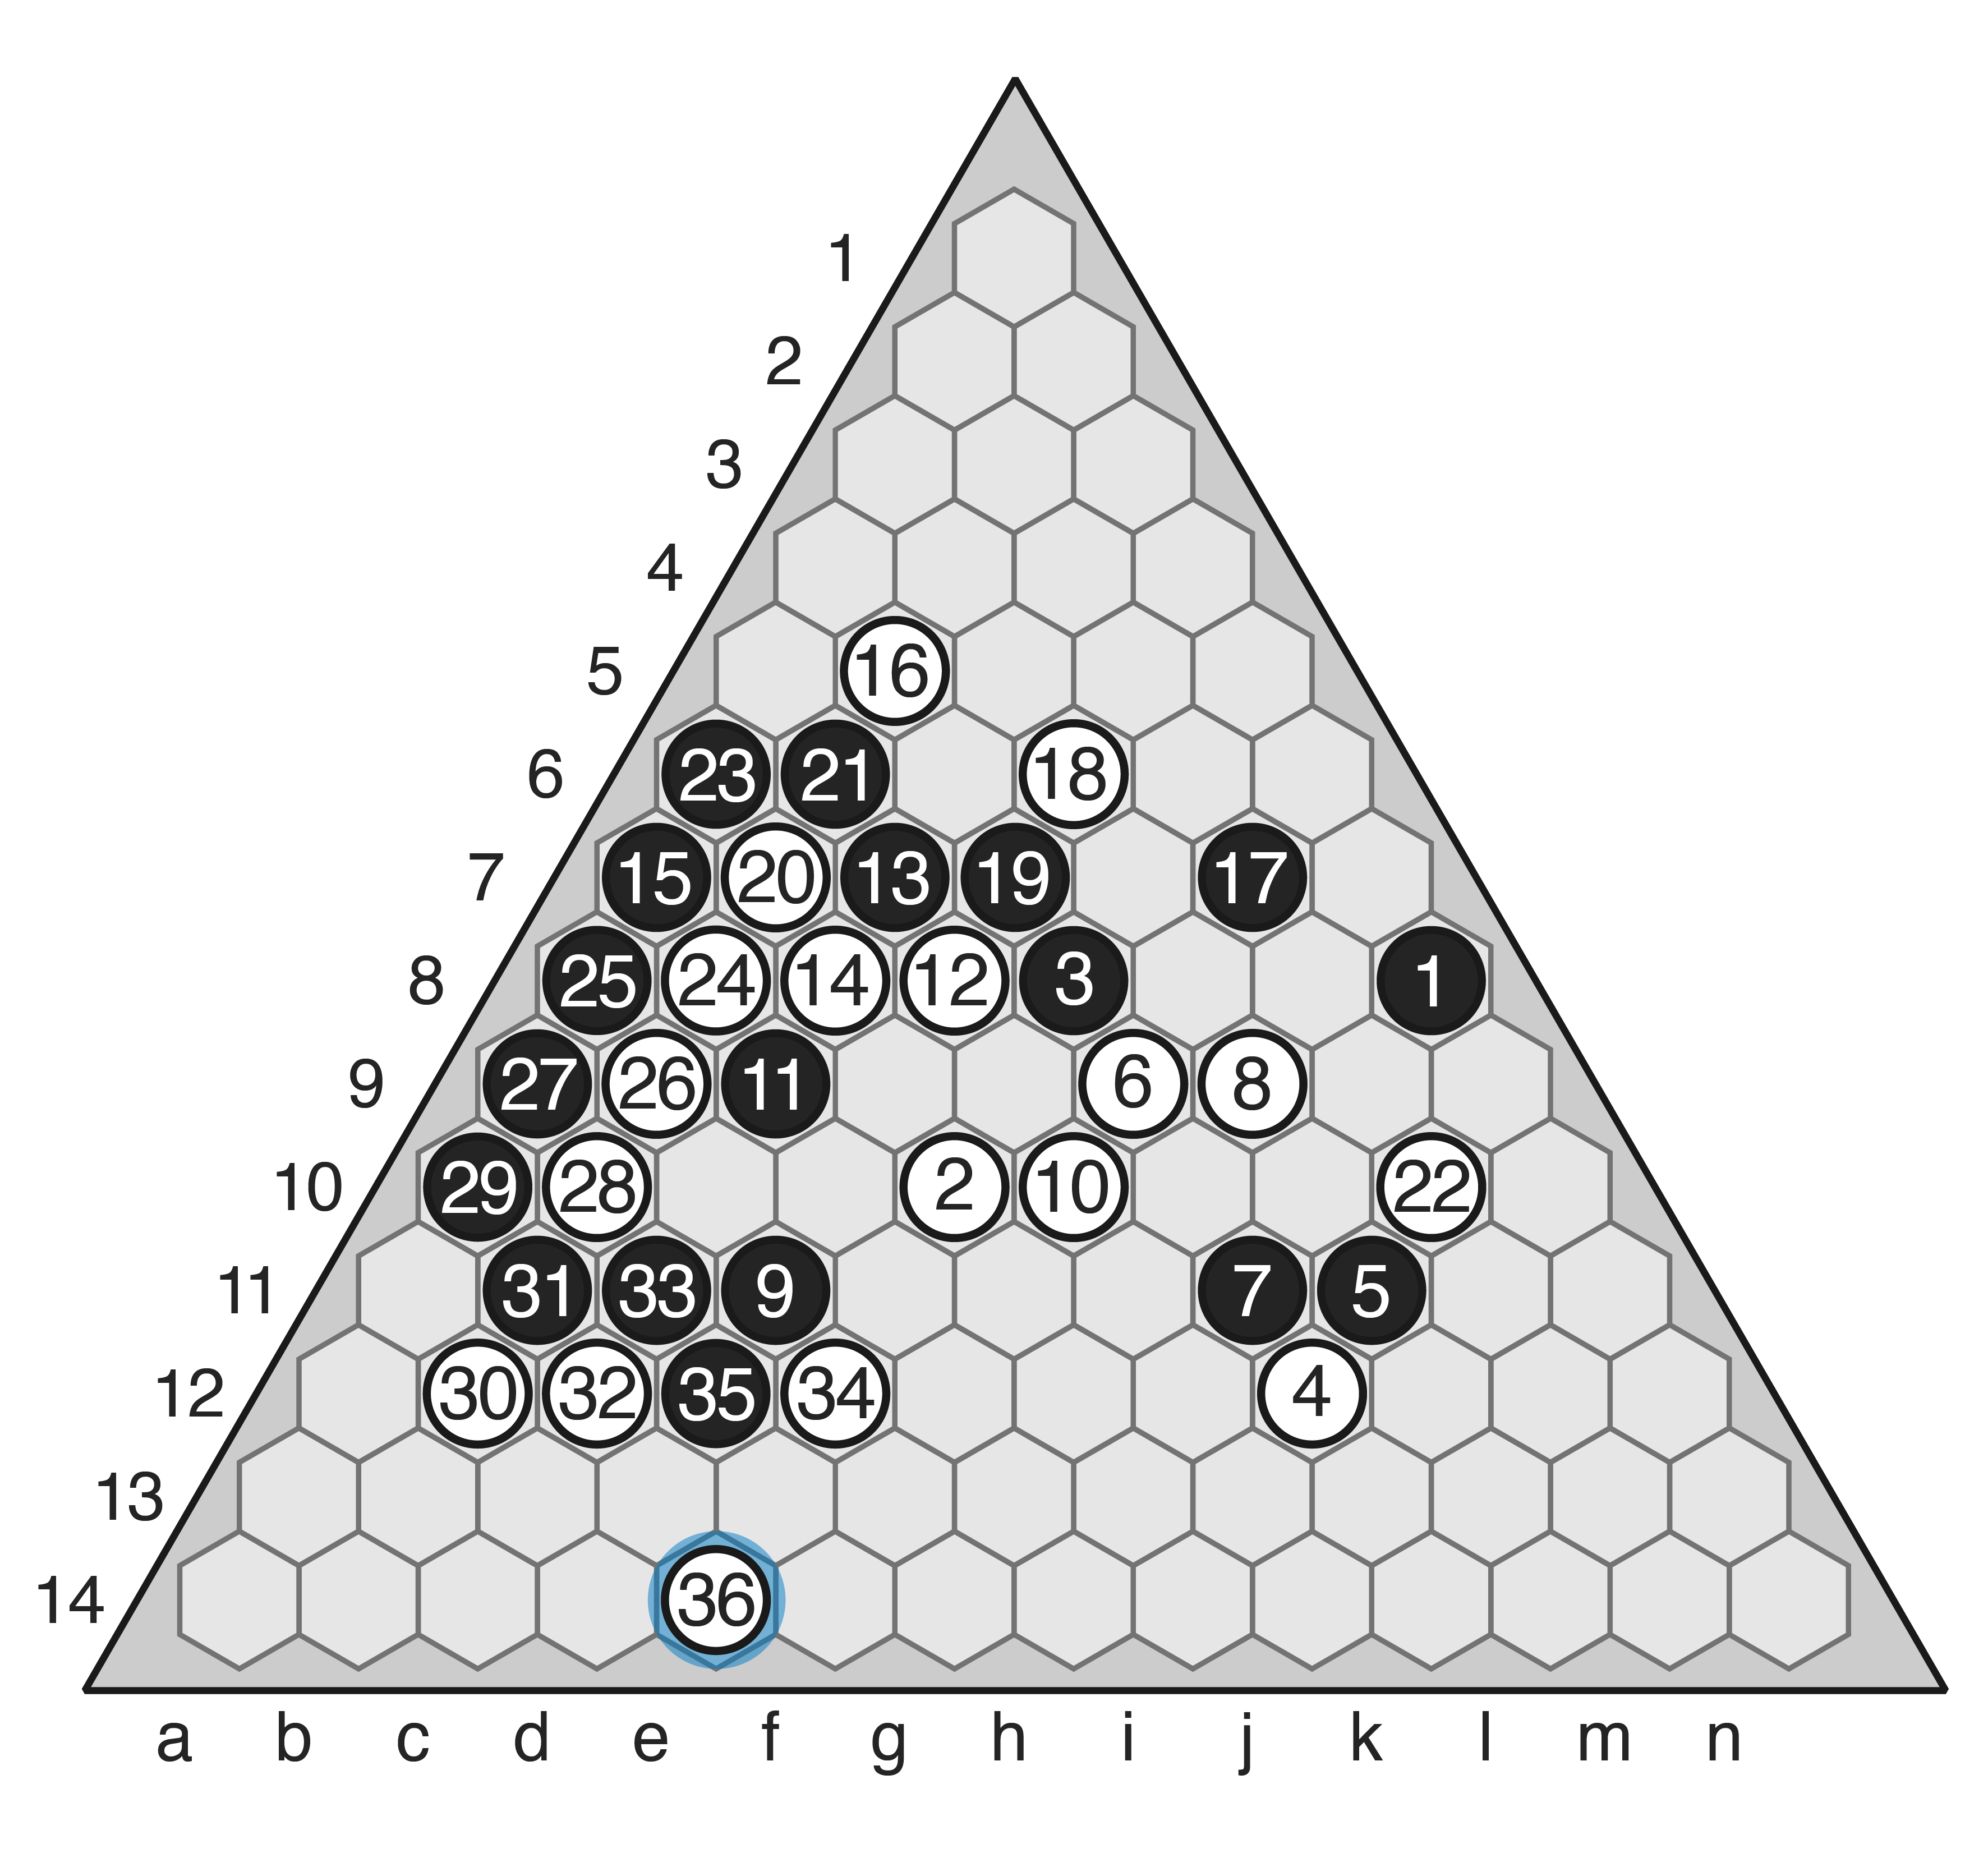
Moves 31-36: 4th-row ladder, followed by a bottleneck. White has no hope however, as the 7-5 group will help escape the ladder.
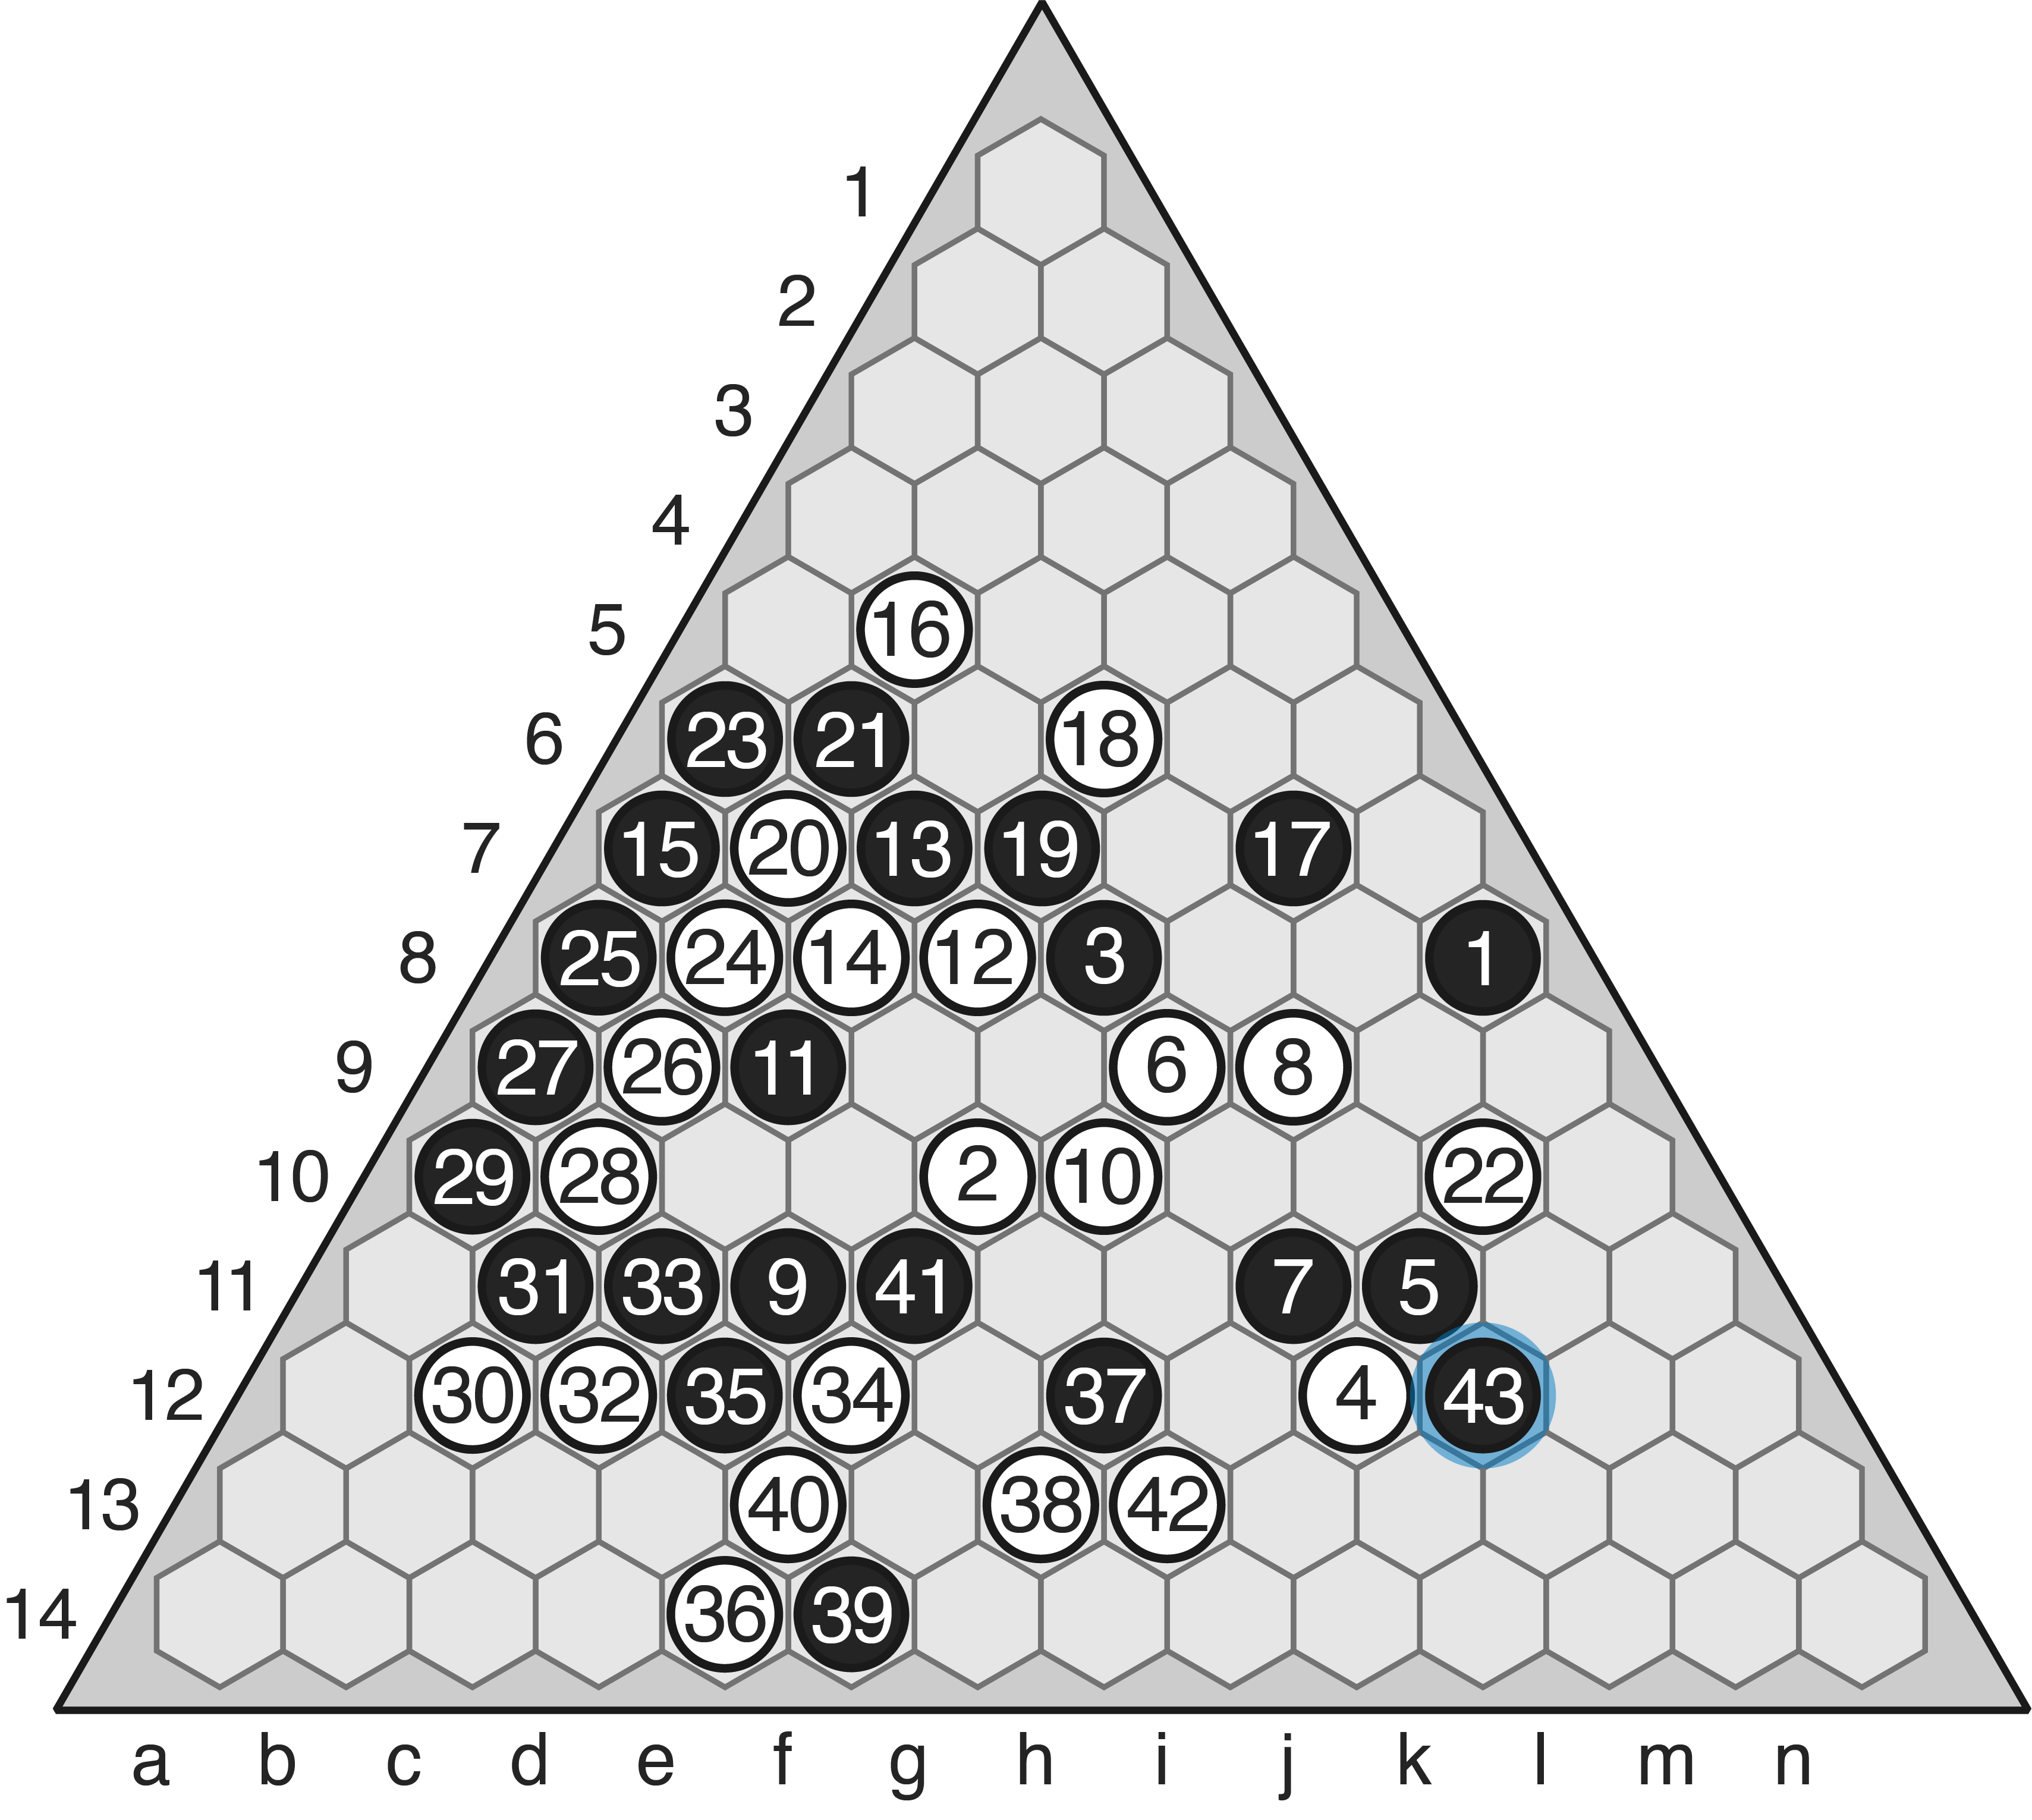
Moves 37-43: There are many ways to escape the ladder, but Black elects to go with this approach. More straightforward would have been e13 f14 f13 g14 g12 and then Black can play either h13 (with A-2) or j12 (with A-3). As played, (38) is the only reasonable reply to (37) (further left on this row, Black plays e11; further right on this row, Black plays g13; for plays on row 12, Black uses (37) as a second row ladder escape). (39) and (40) accomplish nothing but there’s no harm. After (41), Black can play either h13 (with A-2) or j12 (with A-3). White blocks the former, so Black plays the latter. White resigns.
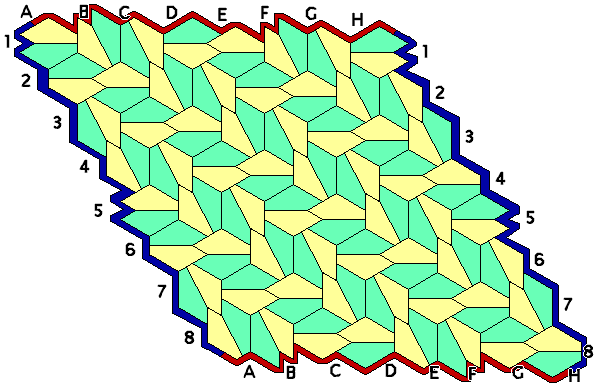
-
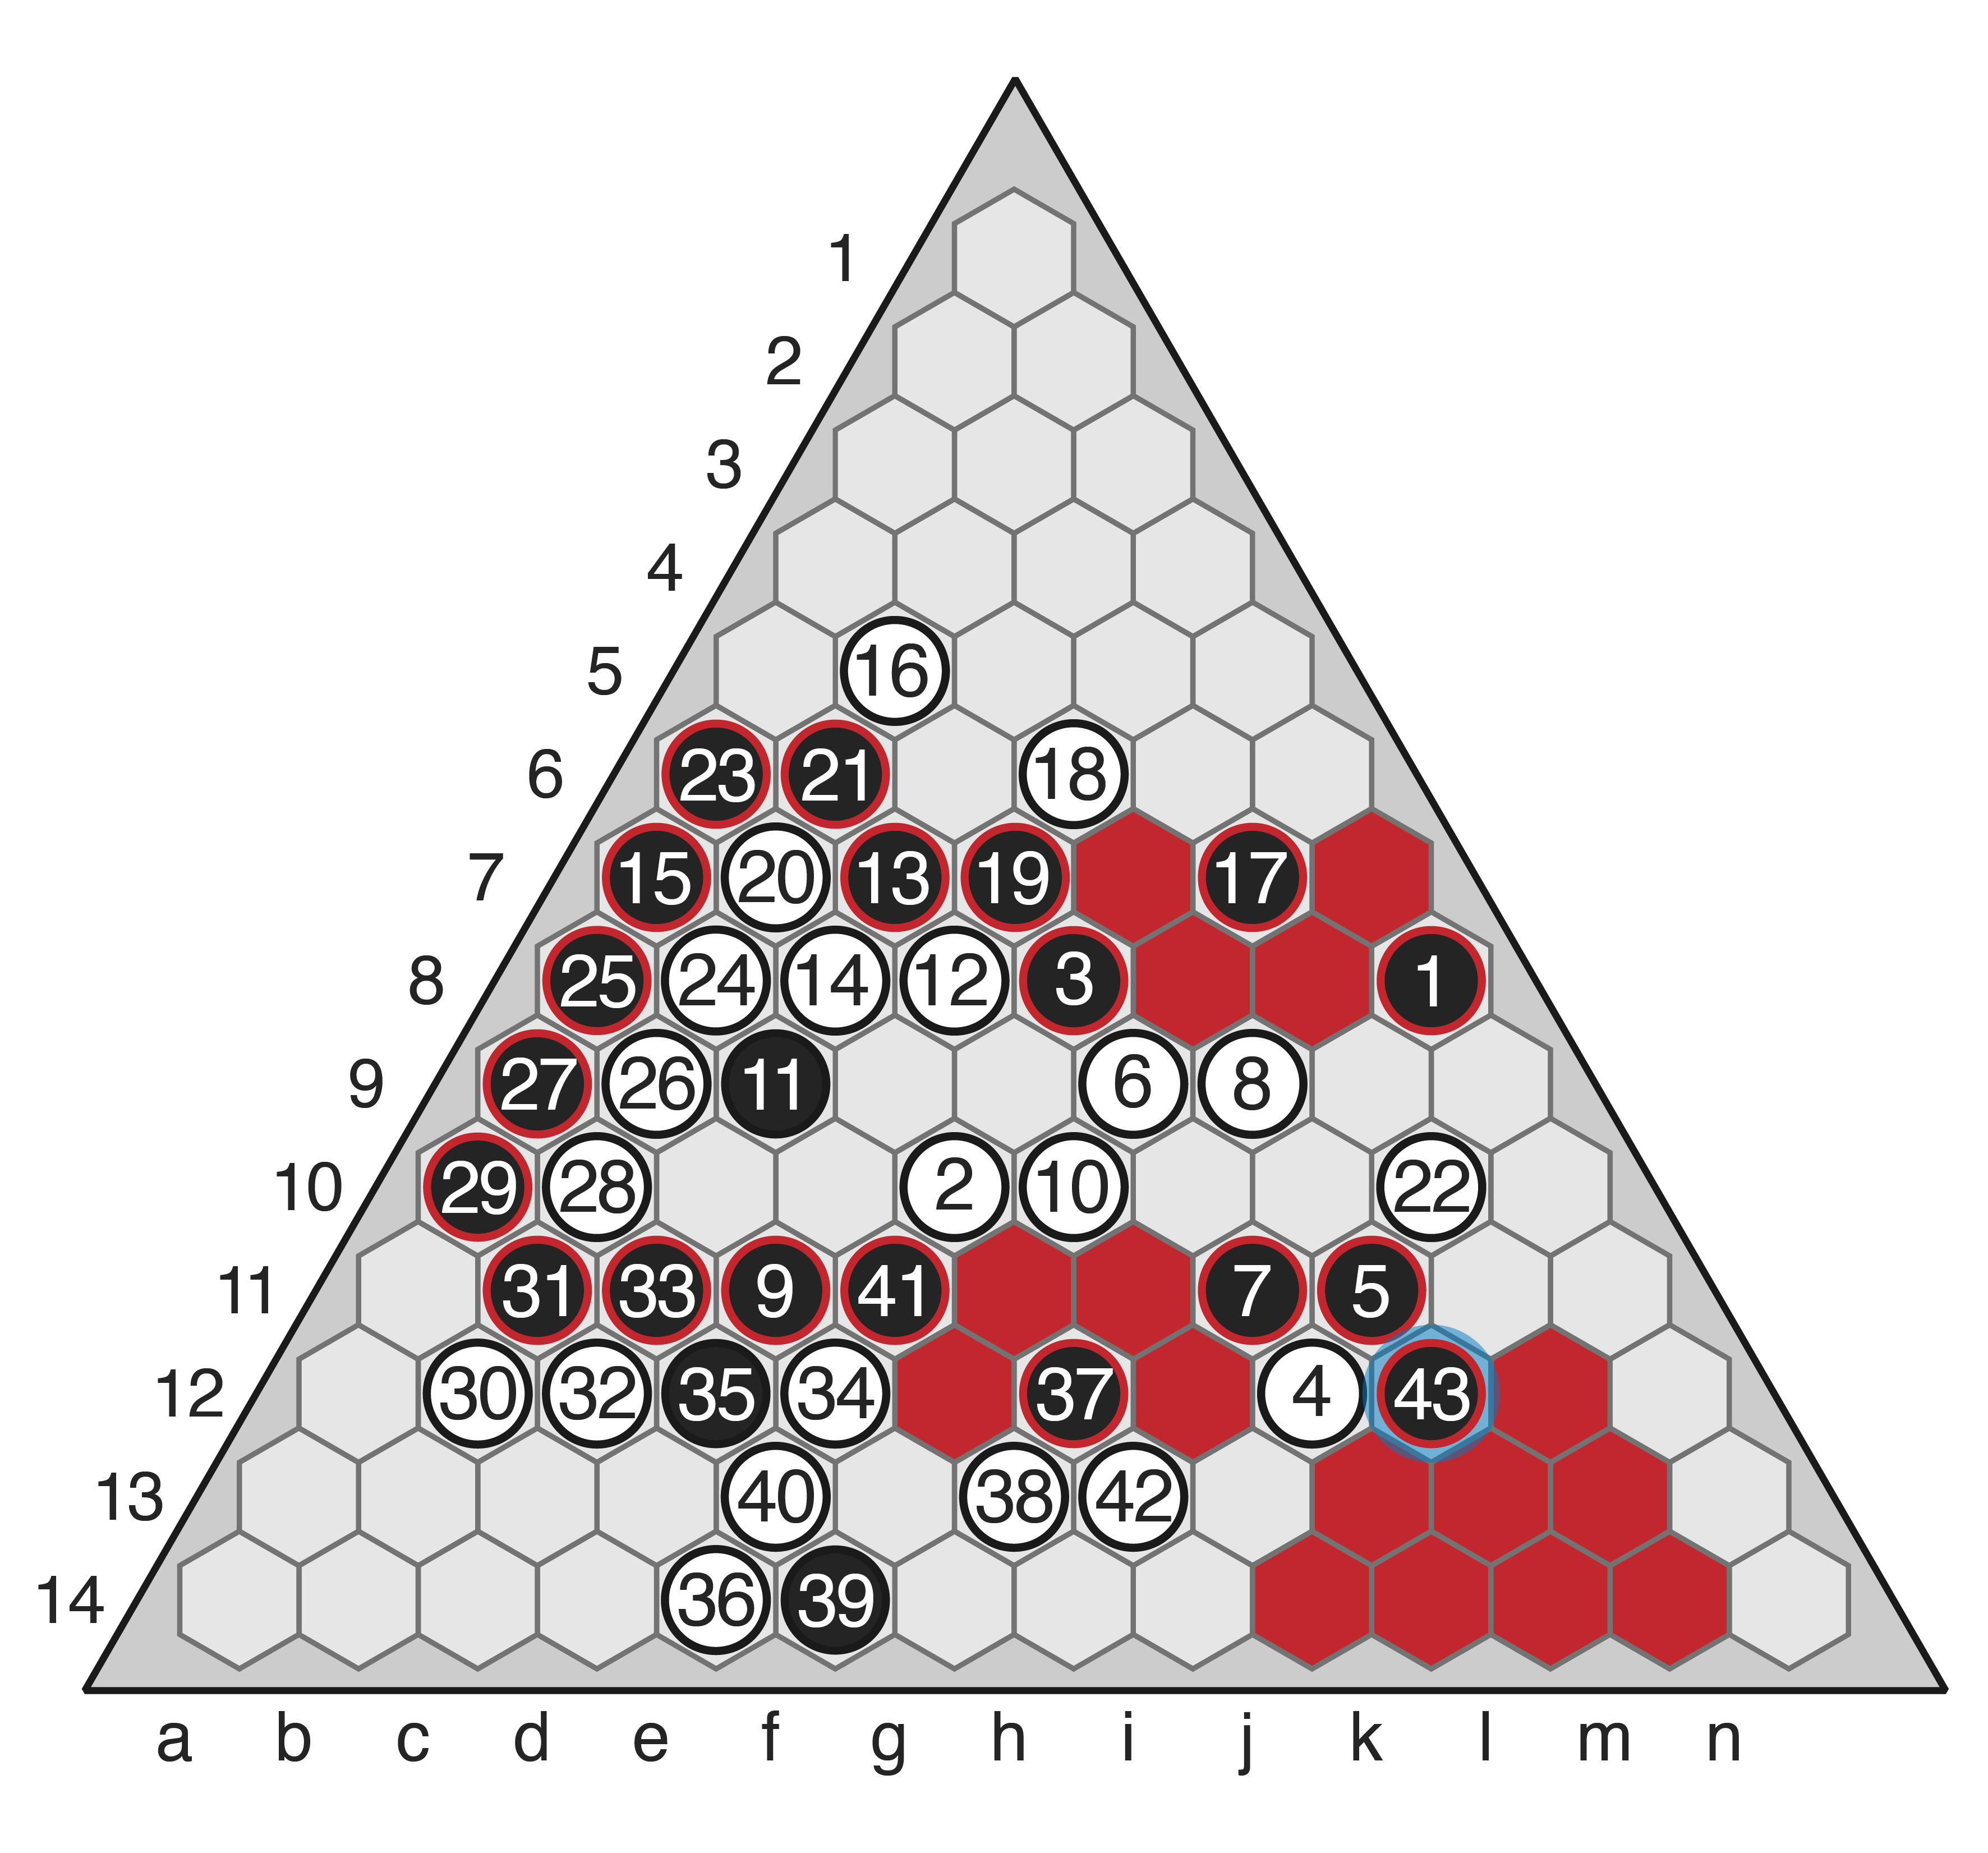
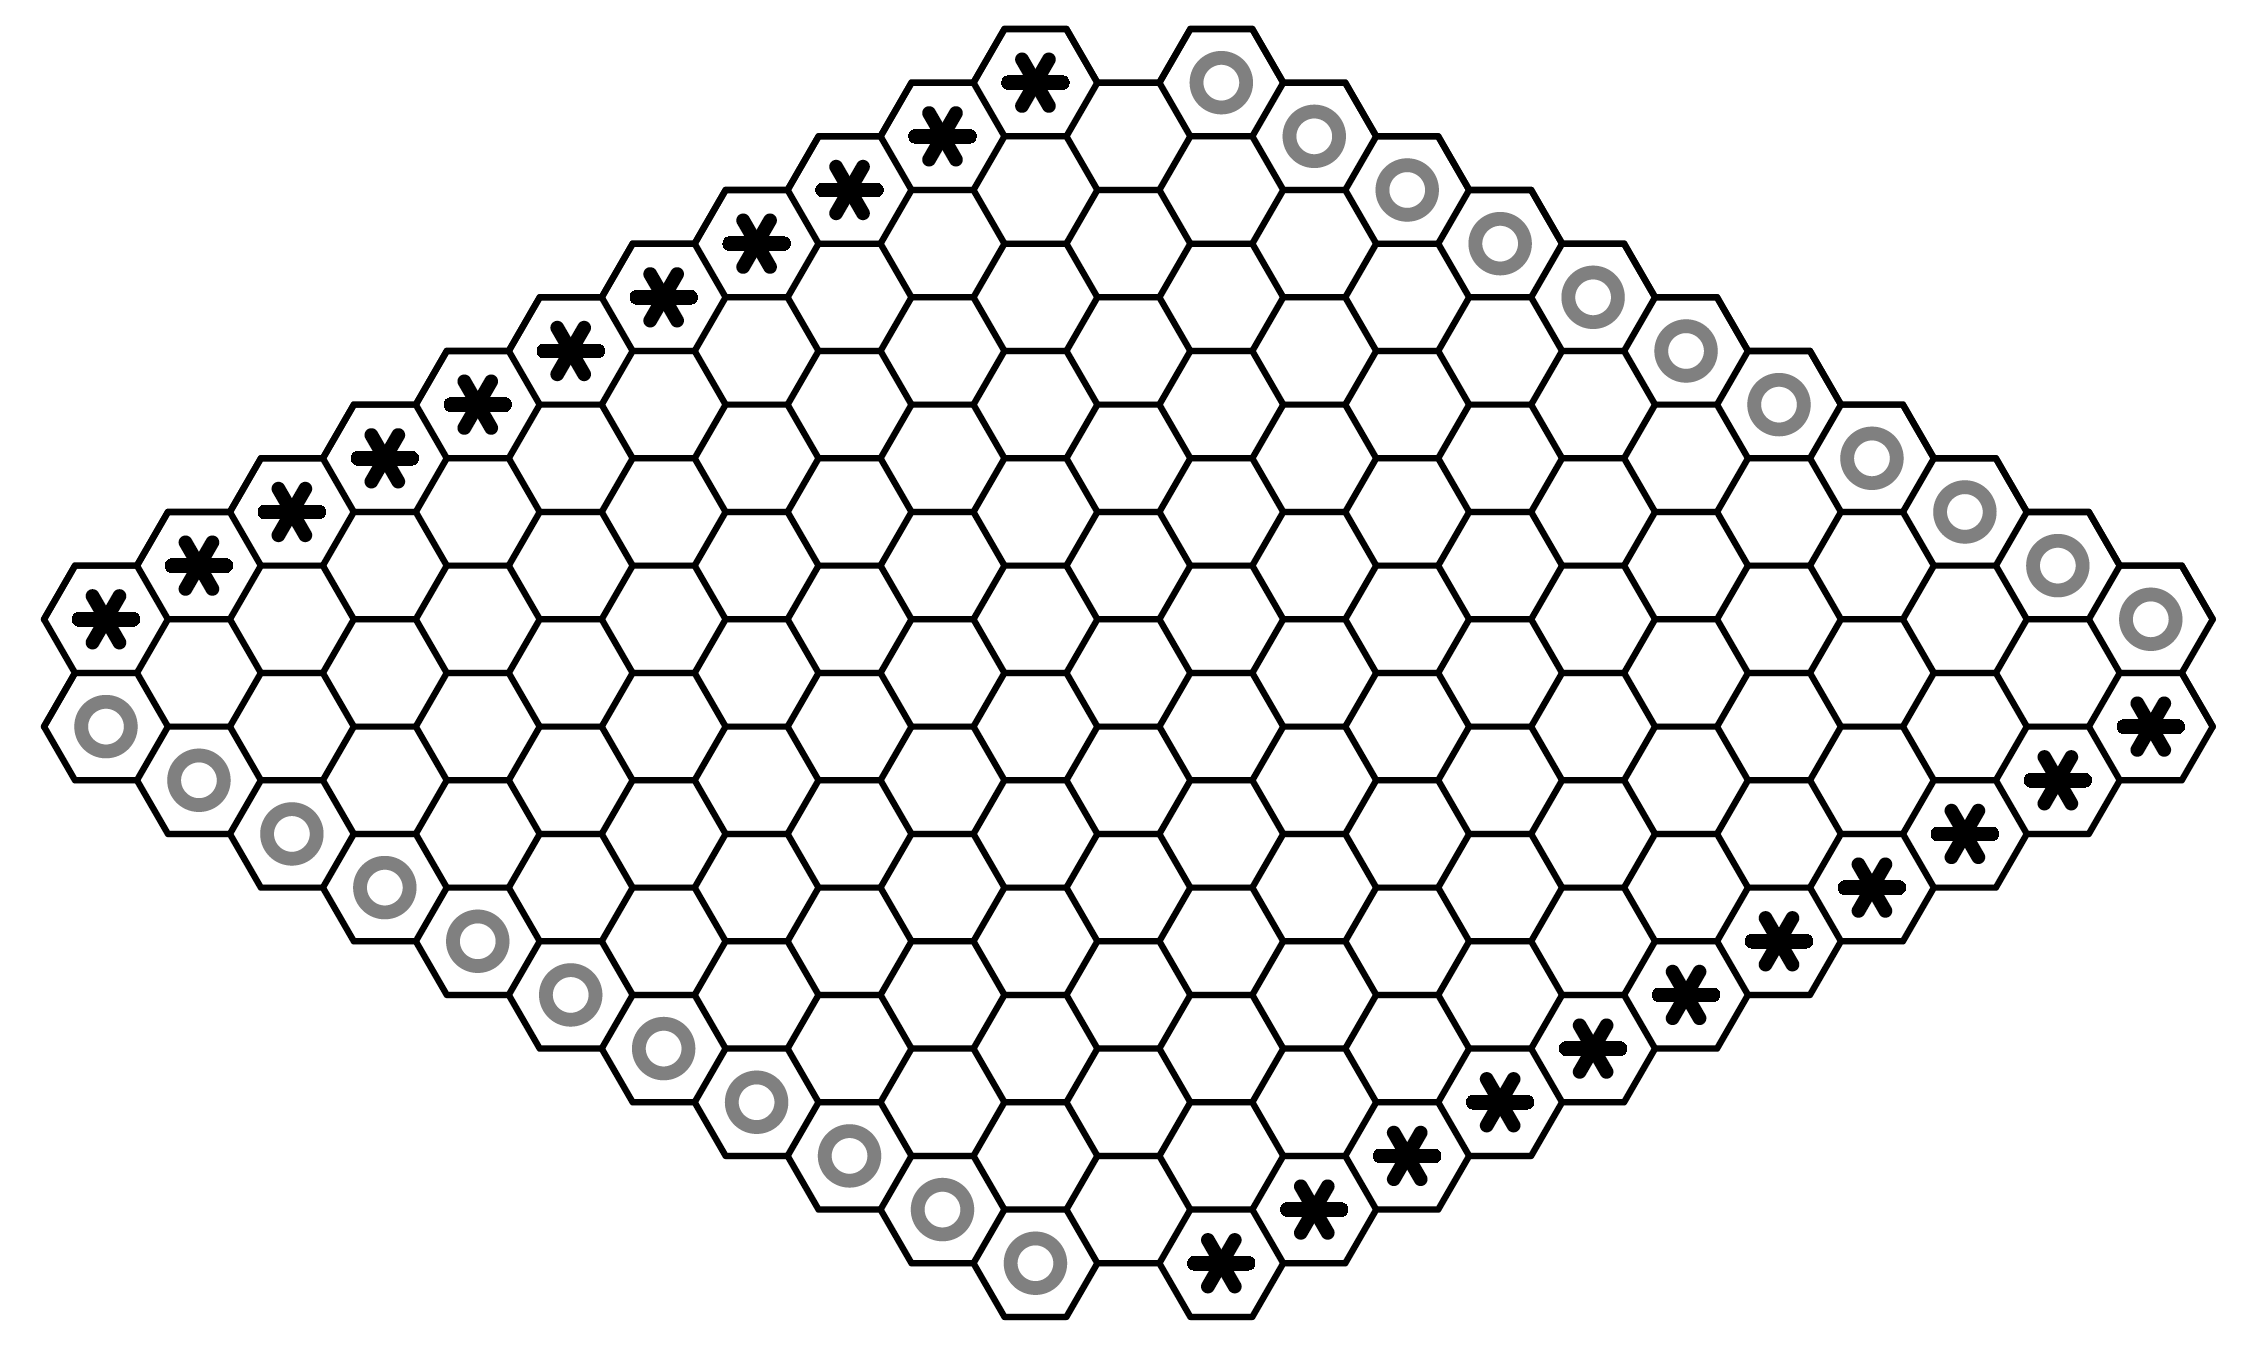
- The winning Y — all of Black’s highlighted stones are connected either directly or through templates (the red hexes), and this chain connects all three sides. White has no way to stop it and no opportunities to make an earlier connection themselves, so they resigned.
So, there we have it — a quick but well-played game of 15×15 Hex, and a tricky game of Y that shows off some of the quirks of Hex’s cousins in the connection-game world. We hope these give you some useful ideas about how to apply the core concepts of Hex strategy to your own play.
Let us know in the comments what you think, and if there are other subtleties to Hex (or Y, for that matter) that you’d like to hear more about, perhaps we may do some more posts in the future.
In the meantime, enjoy, and good luck with your journey toward becoming a strong Hex player!