If you’ve read this blog in recent years, you’ll be well aware that I consider Shogi one of the finest games ever created, surpassed only by its larger cousin Chu Shogi, which I believe to be the greatest traditional Chess-like game on the planet. As I’ve been working with Stephen Tavener and his Ai Ai software to slowly and laboriously bring Shogi and its modern variants to life as well as the fascinating historical variants, I’ve been inspired to build on what I’ve learned about the historical Shogi variants and create a modern variant that brings the unique flavour of the ancient large Shogi games into the 21st century.
In this article I’ll talk a bit about the process of creating this variant, my design goals for the game, and my own evaluation of what makes a Shogi game feel like a Shogi game. As this variant has evolved through constant, endless playtesting and experimentation, I feel I’ve learned a lot about what makes the Shogi family work so well, so I decided to share this here to generate discussion and hopefully help others who may be experimenting with Shogi variants of their own.
The Birth of Shinjuu Shogi
While testing the various historical Shogi variants in Ai Ai, I spent quite a bit of time with Wa Shogi. Wa Shogi is an 11×11 game with 27 pieces in each player’s army, and like Tori Shogi it uses a completely different set of pieces from the normal Shogi assortment, including different Pawns and Kings (though with the same moves). Wa Shogi is an excellent game in its modern form, in which it’s played with drops, but I felt the game lacks a certain intensity compared to the other historical variants, because the pieces are generally weak:

While there are a few pieces with ranged moves in Wa Shogi, the majority of the pieces have short-range stepping moves only. That means the game works very well with drops as in modern Shogi, but it also gives the game a slower, less intense tactical experience than the other historical variants, which are generally pretty packed with powerful pieces. I sometimes felt that tactical fights in Wa Shogi were too localised, and the more powerful pieces could mostly just avoid the masses of much weaker stepping pieces. In perusing the few recorded games of Wa Shogi between strong players, I was also surprised to find that most of them were shorter than a typical game of 9×9 modern Shogi (the average tournament Shogi game lasts about 120 moves).
That inspired me to try to make my own take on an 11×11 modern Shogi variant, but this time incorporating a range of pieces from the large historical variants. My goal was to generally increase the power level of the pieces, allowing for sharp tactical play, but to balance the piece array so that the games would also be a bit longer than Wa Shogi. Ideally, the game would serve a dual purpose as both a fun game in its own right, and an enticing preview of the creative and unusual piece types present in the old Shogi variants; with luck, perhaps players of this new variant might be inspired to take a look at the games that originally housed these interesting pieces.
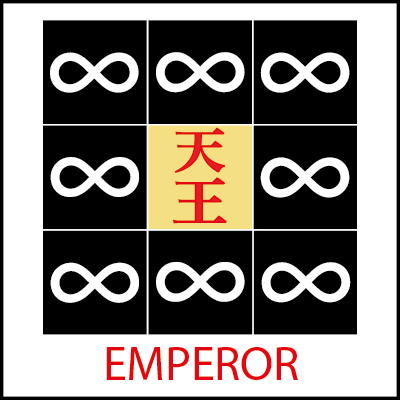
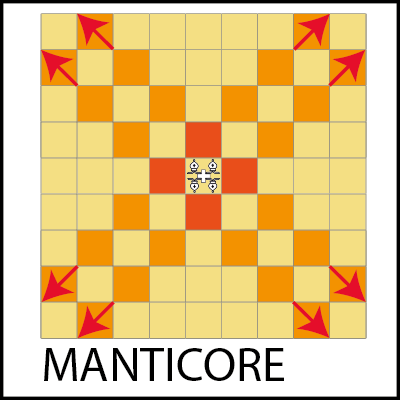
I felt the best way to achieve the second goal would be to capture some of the interesting cultural elements that exist in the old Shogi variants, so I decided to centre the game’s armies on four mythological creatures we find on the board in Tai Shogi: the Blue Dragon, White Tiger, Vermillion Sparrow and Turtle-Snake. In Japan these beings are called Divine Beasts, or Shinjuu, and hence Shinjuu Shogi was born.
Design Goals
The dual design goals of developing an enjoyable modern Shogi variant and an inspiring selection of ancient Shogi pieces meant that I’d need to break down the essential properties that make for a good Shogi game, and the aspects of the historical variants that could feasibly be transferred into a modern Shogi framework. In my view the key aspects that make Shogi so compelling are these:
- Asymmetric pieces biased toward forward movement — If we take a look at the piece types present in the starting array of modern Shogi, we can see that only the Bishop and Rook have symmetric moves. The Pawn, Lance, Silver General, Gold General, and Knight are all asymmetric, and most or all of their movements are pointed directly forward. This aspect contributes to the generally aggressive feel of the game, because retreat is often not really an option.
- Slow opening and aggressive endgame — Part of the appeal of Shogi stems from the distinctive way in which play evolves over the course of the game. In Chess, the opening is very sharp, because the board is small and packed with long-range pieces that can start causing trouble instantly. In contrast, endings tend to be intricate, strategic affairs requiring intense calculation due to the lack of mating material left on the board. In Shogi, however, openings tend to be slower and more flexible; players aim for advantageous middlegame positions, but due to the size of the board and the slower pieces, following precise move orders is less critical than in Chess. Meanwhile, Shogi endings are savage and explosive — both players have most or all of their pieces still on the board, thanks to the drop rule, so the end of a Shogi game is typically a tense race to checkmate as both players mount vicious attacks with drops and promoted pieces.
- Minor and major piece promotion — In Shogi every piece except the King and Gold General is able to promote upon reaching the enemy camp, unlike in Chess where only the Pawns promote. Promotions happen frequently, given that reaching any of the opponent’s three ranks allows a promotion, and pieces can be placed in the promotion zone when dropped. The ability of nearly every piece to power itself up again increases the intensity of Shogi tactics, and also complicates the concept of material value in the game as compared to Chess. Promoted pieces hold extra value because if your opponent captures them they get a weaker piece instead. We see this reflected in Shogi proverbs like ‘a central Tokin [promoted Pawn] cannot lose’. In other words, the Tokin is a great way to hold the centre of the board, since it controls a number of squares, but when taken it only gives your opponent a Pawn.
- Promotion can be deferred — Sometimes, a Shogi player will defer promotion of a piece, because not all promotions are directly upwards-compatible with the original piece; in other words, the promoted piece may not include the moves of its ancestor in its arsenal. For example, a promotable Knight may be left as-is even if its eligible for promotion, because the owner needs the Knight’s aerial threat, which goes away if the Knight promotes to Gold General. In fact, deferring Knight promotion is so commonplace that there’s another Shogi proverb about that, which simply states ‘Don’t promote the Knight!’
So, in order to make a fun modern Shogi variant that would capture and retain the interest of Shogi players, I felt I would need to capture all of these elements in some fashion in Shinjuu Shogi. However, the ancient Shogi variants (other than Wa Shogi) are all played without drops, and simply adopting the drop rule transforms those games into endless slogs; the many powerful pieces keep returning to the board and building powerful defensive castles around their King, making checkmate exceedingly hard to achieve. That meant I’d need to think about the fundamental aspects of large Shogi that give these ancient games their distinctive character, and try to work out which of those could be transferred intact to the modern Shogi battlefield:
- Lots of powerful pieces — As we can see in the summary of the Chu Shogi army above, the initial position of the game is filled with powerful attackers. The Rook and Bishop of 9×9 Shogi are present, but this time in pairs, along with pairs of their promoted forms, and multiple other pieces that are substantially more powerful still. The same dynamic persists in the other large variants, with each larger game bringing in even more powerful pieces. These power pieces help maintain tactical excitement in these games even when playing on these gigantic battlefields.
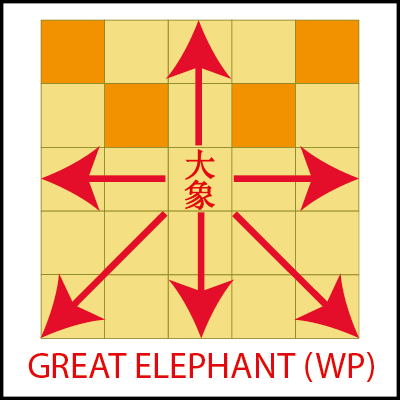
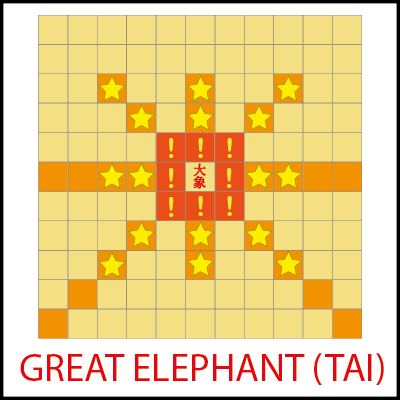
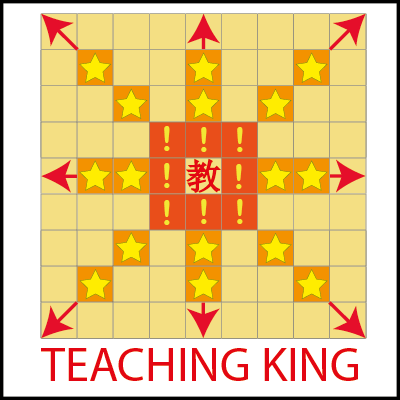
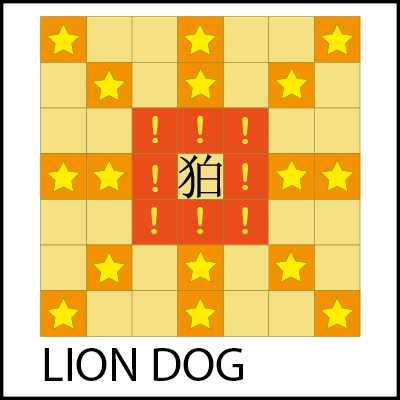
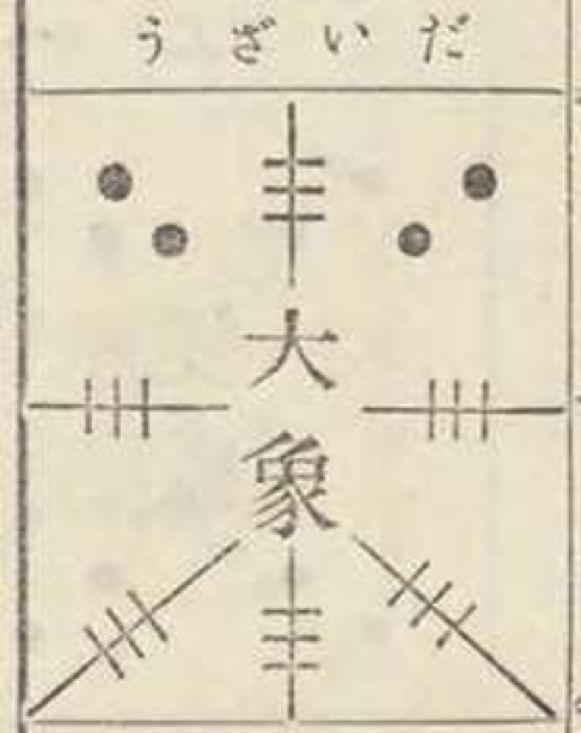
- Thematic richness — Many of the larger Shogi variants incorporate pieces linked to classical Japanese and Chinese mythology. Alongside the Divine Beasts, we find pieces like the White Elephant (bringing to mind the white elephant the Buddha’s mother saw in a dream before his birth), the Lion Dog (the creature that defends many temples throughout Japan), the Teaching King (thought to symbolise the Lotus Sutra) and many more. This thematic element and the tendency to link powerful pieces to mythological or religious figures immerses the players even more in the battle unfolding on the board.
- Even more asymmetry — While modern Shogi does have an asymmetric starting position, due to the Rook and Bishop only being present as singletons rather than pairs like the other pieces, the large variants take this much further. Wa Shogi is the most extreme example, where only the Sparrow Pawns are present in multiples in the starting position; Dai Dai Shogi is similar, with most of the starting position’s 64 piece types existing as singletons, leading to a heavily asymmetric setup. This asymmetry not only adds tactical variety and intricacy, it also lends a certain additional Japanese-ness to the game; asymmetry is highly valued in traditional Japanese arts.
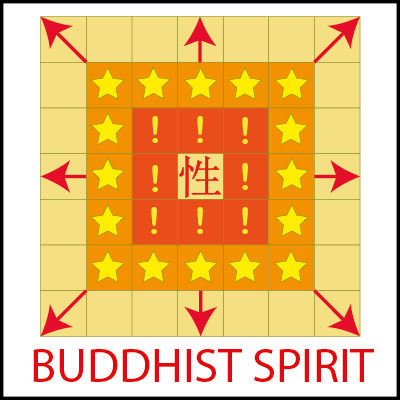
- Different approaches to promotion — In modern Shogi all pieces promote to Gold General, except for the Rook and Bishop. In the ancient variants, we see much more varied takes on promotion. For example, we tend to see weaker pieces gain very significantly in strength when promoted, as a reward for marching them all the way across these huge boards. In a few cases we have pieces that actually demote, pushing players to maximise the utility of the piece’s original form. We also see pieces that are very direct enhancements of the original piece, like in Maka Dai Dai Shogi where single-step pieces promote to ‘free’ versions of themselves that may slide unlimited squares in the same directions their original form could step. Maka Dai Dai also has the unusual Buddhist Spirit and Teaching King, which if captured transform the capturing piece into a copy of themselves, ensuring that they hardly ever leave the board permanently!
In order to bring the ancient Shogi feel to the modern Shogi battlefield, I’d need to somehow combine these different properties of these two sub-genres of the Shogi family. However, I was unsure whether some of these properties could be reconciled at all: could I increase the power levels of all the pieces without unbalancing the game or trivialising Shogi’s rich tactics? Would it be feasible to adopt different approaches to promotion in a drops-based game, or would Shogi’s explosive endgames be too quickly curtailed by the opportunity to generate strong promotions shortly after a drop?
The only way to judge these points would be through experimentation. So I began constructing possible initial positions for the game, with the four Shinjuu pieces taking up flank positions and the centre providing a home for strong pieces that could both mount damaging attacks and defend the King when called upon to do so. Then I embarked on a long, meticulous testing process, investigating dozens of possible starting arrangements and playtesting over and over again, discarding piece selections and positions that failed to produce appropriately modern-Shogi-like gameplay.
Thankfully I’m going to spare you all the details of that process, and instead show you the result! What you’ll see below is the 62nd version of Shinjuu Shogi (!), but I’m finally at a point where I’m ready to release it soon.
Meet Shinjuu Shogi
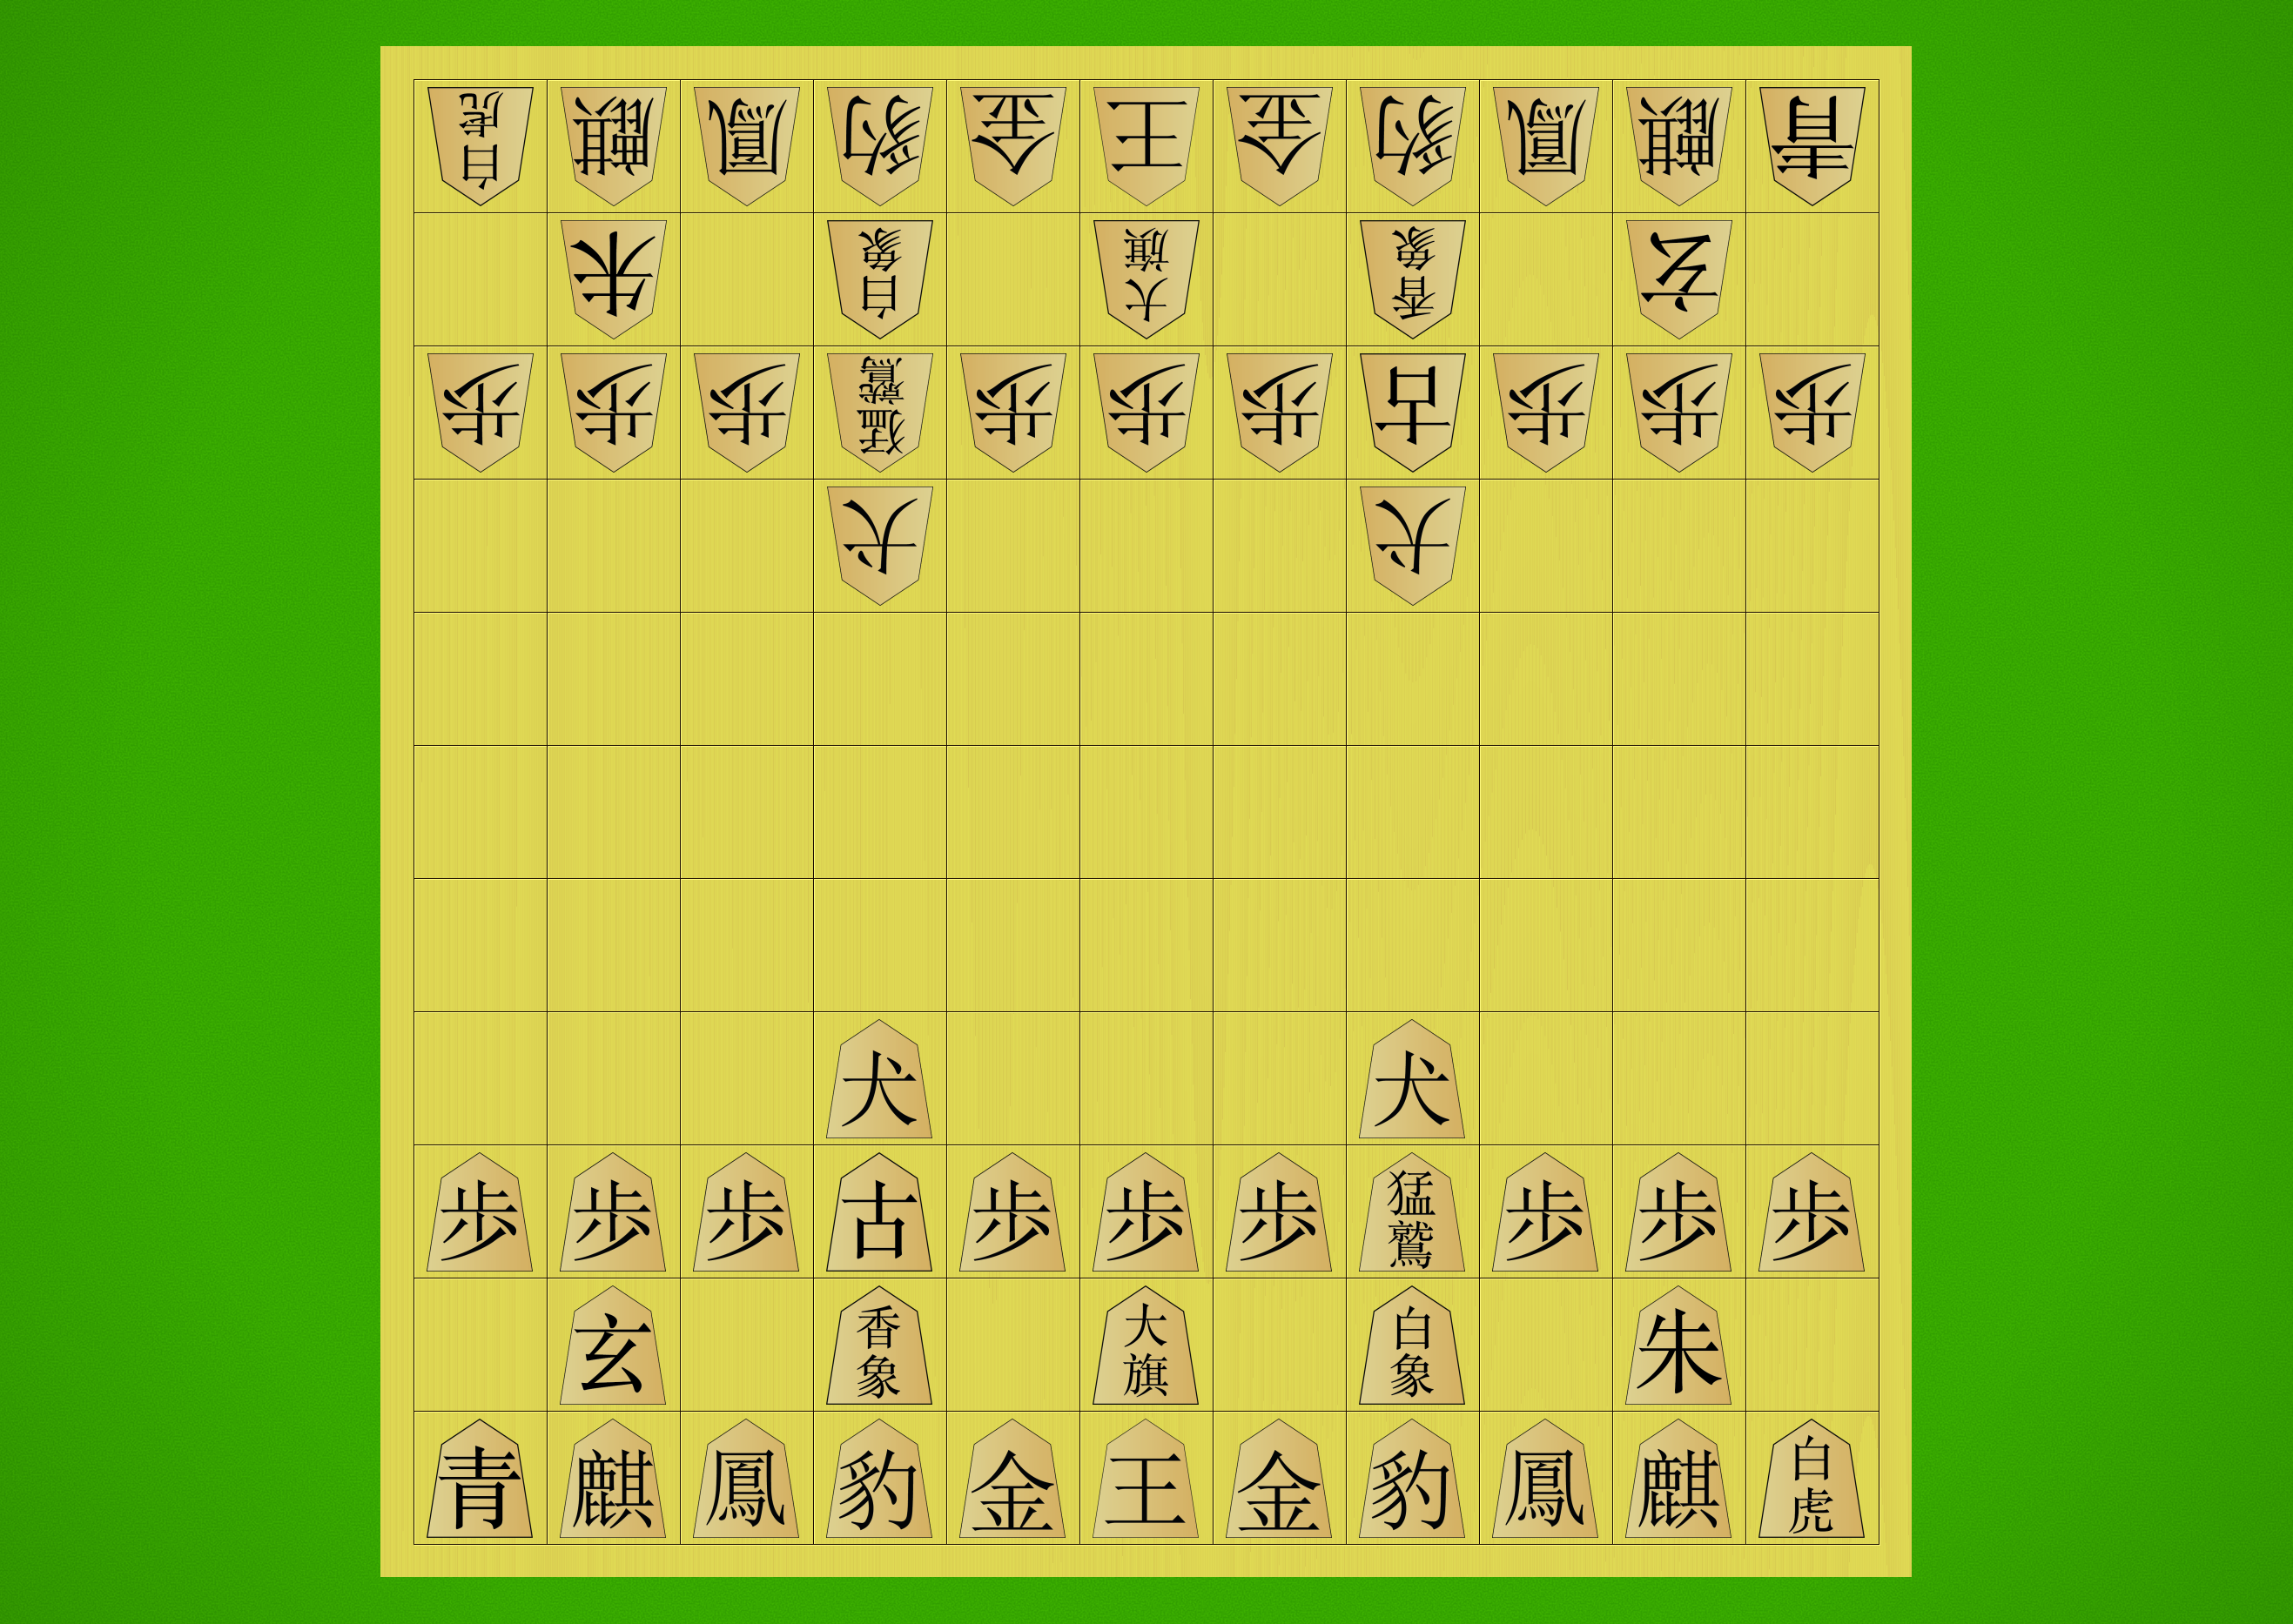
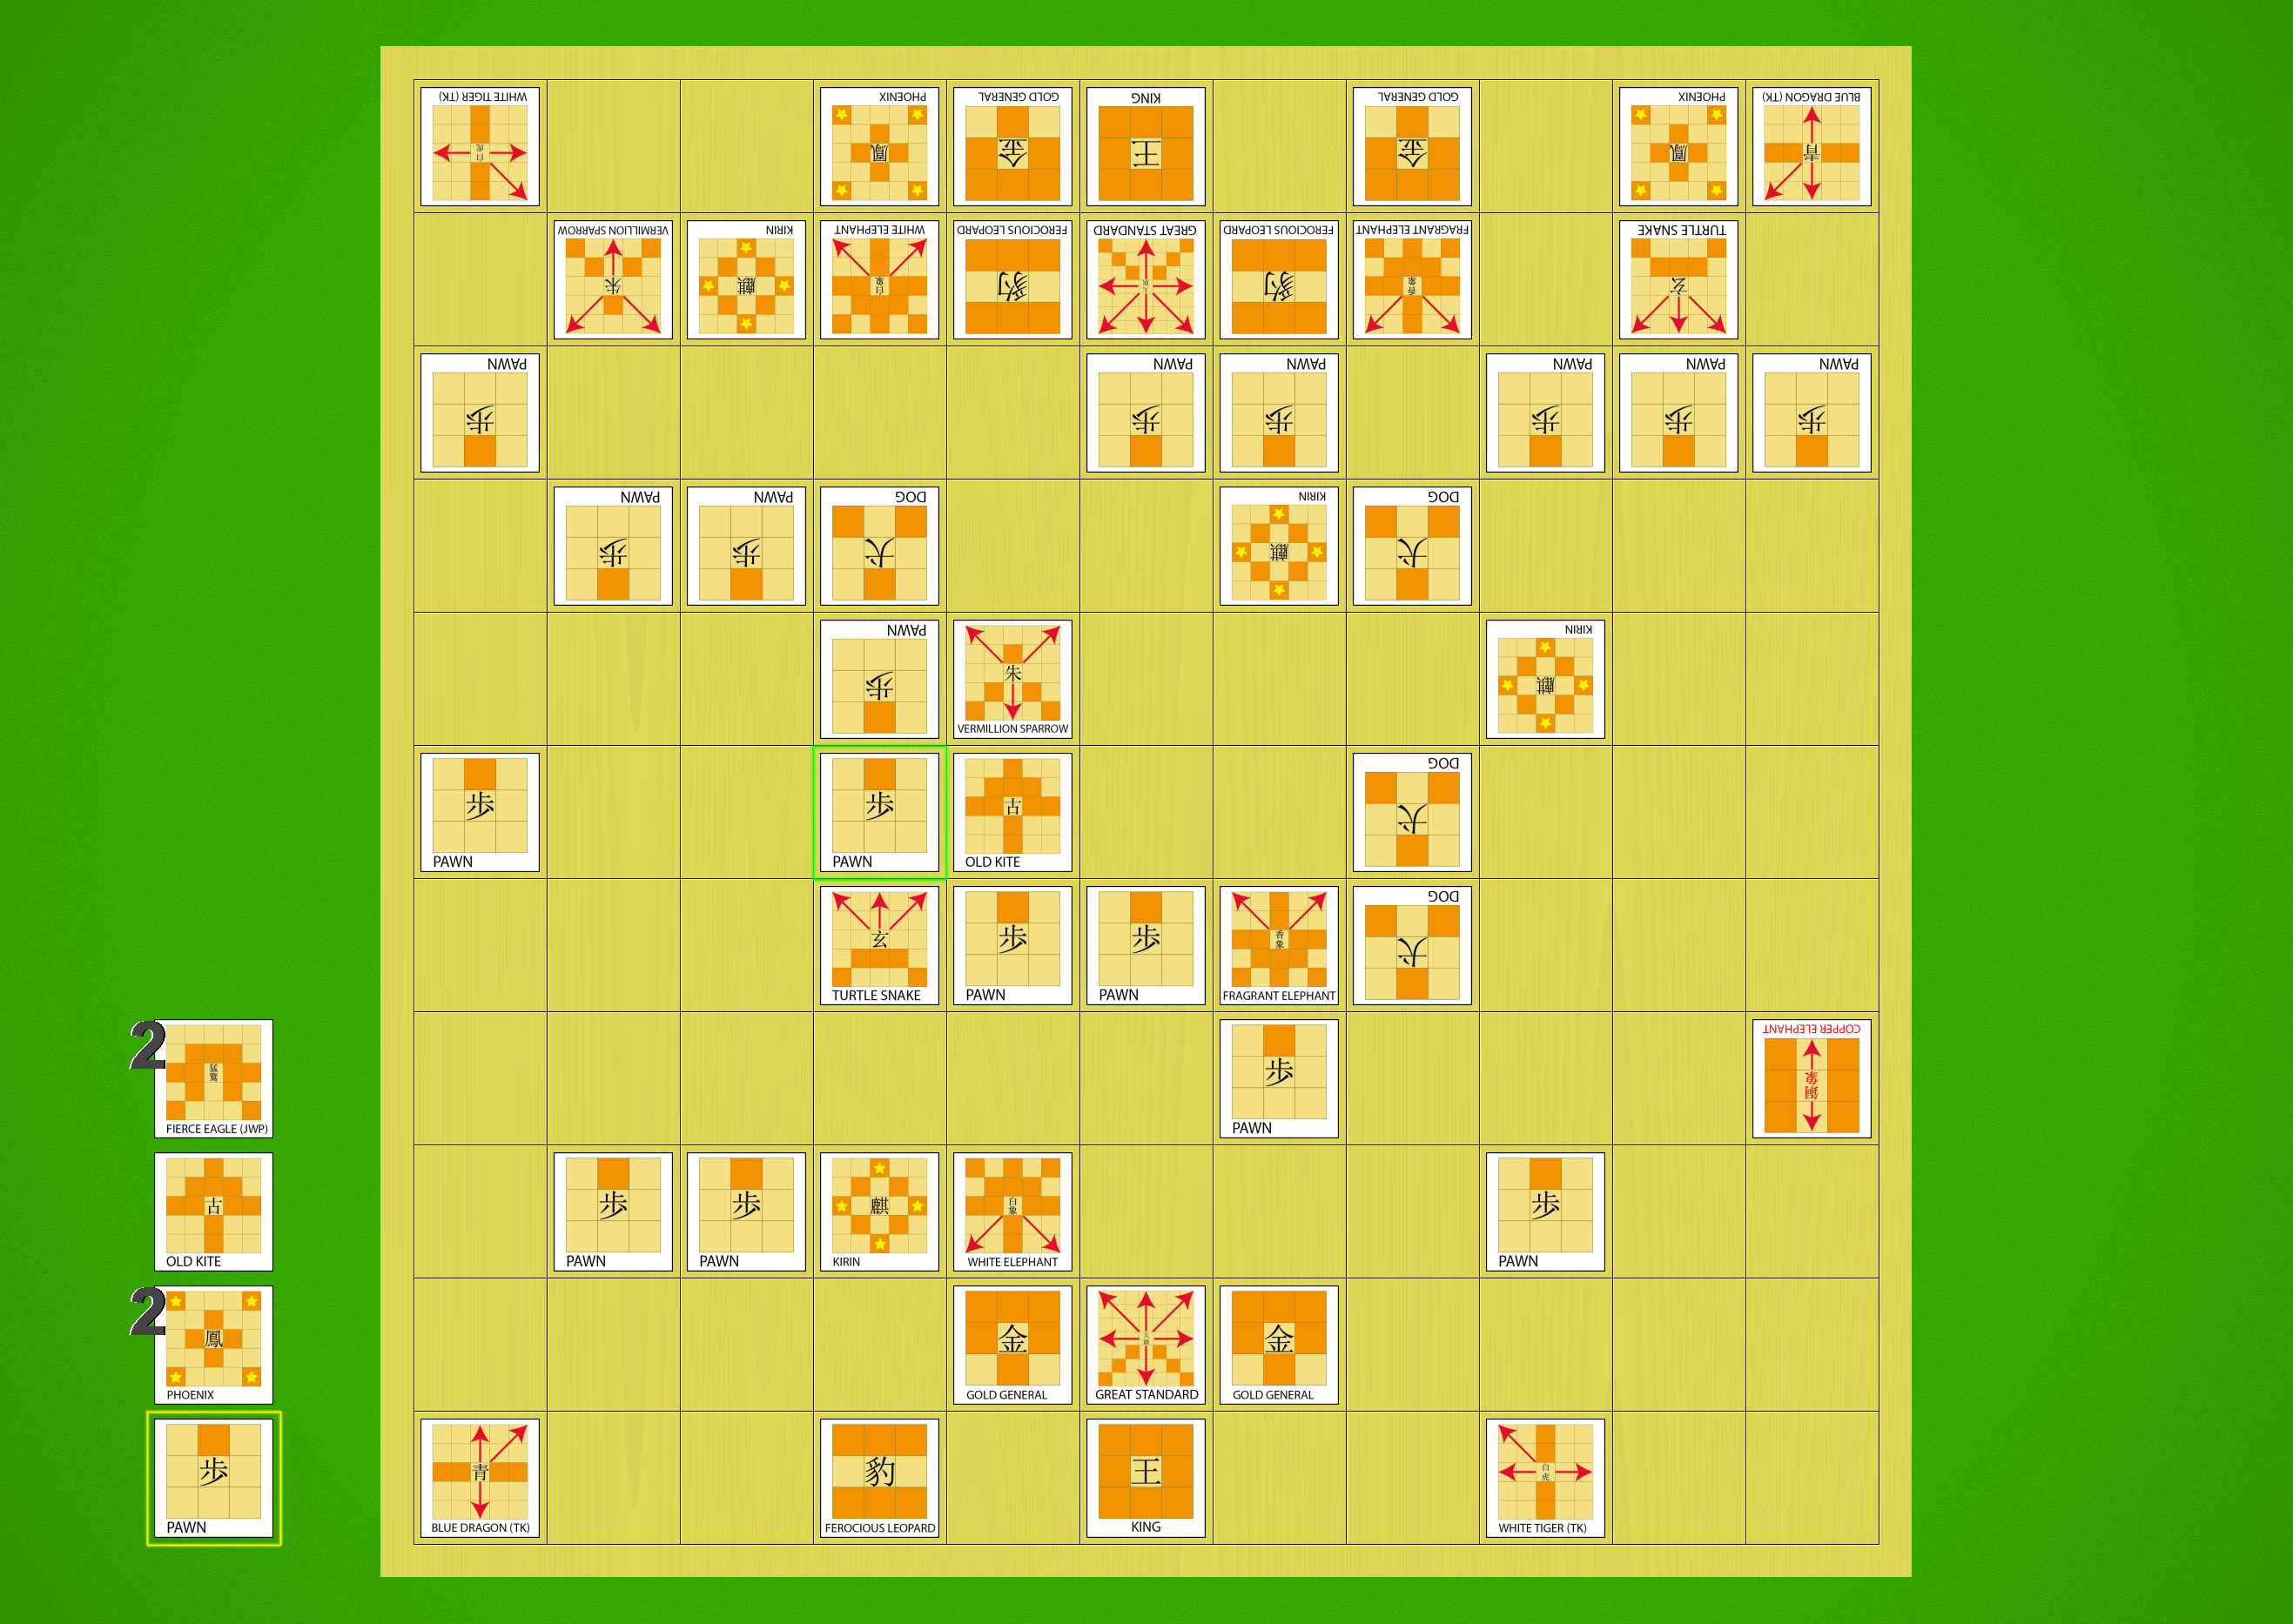
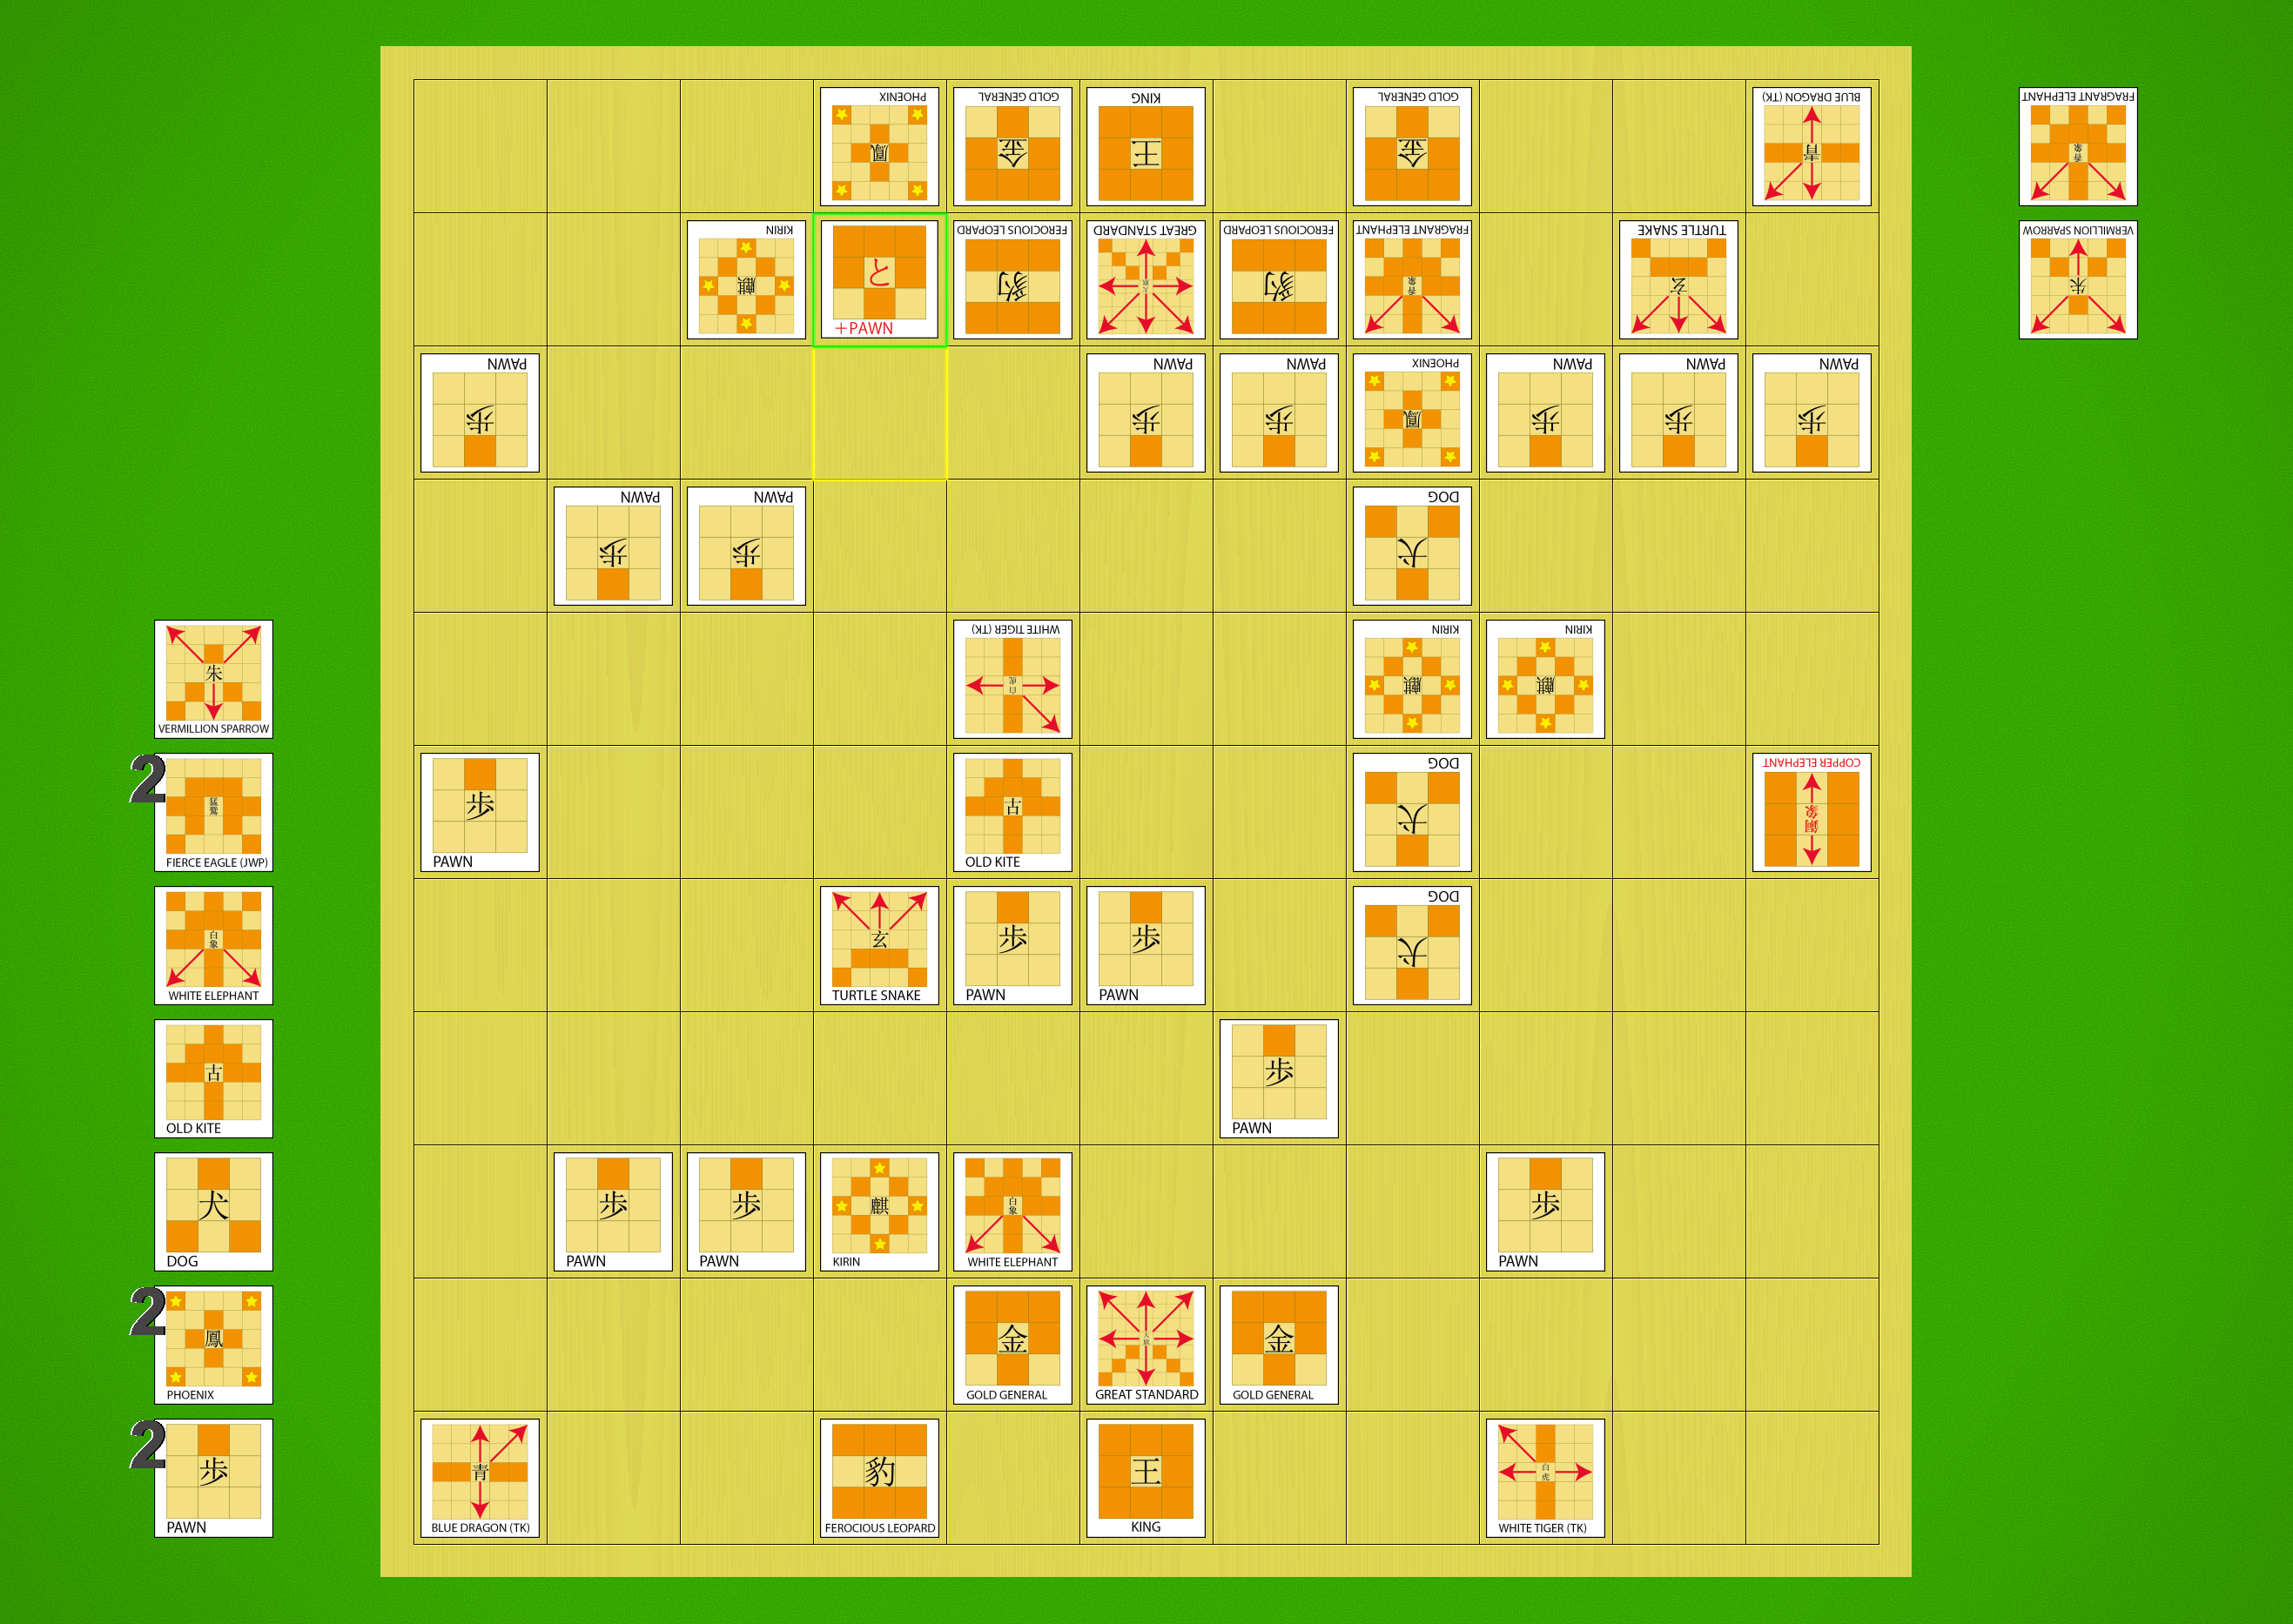
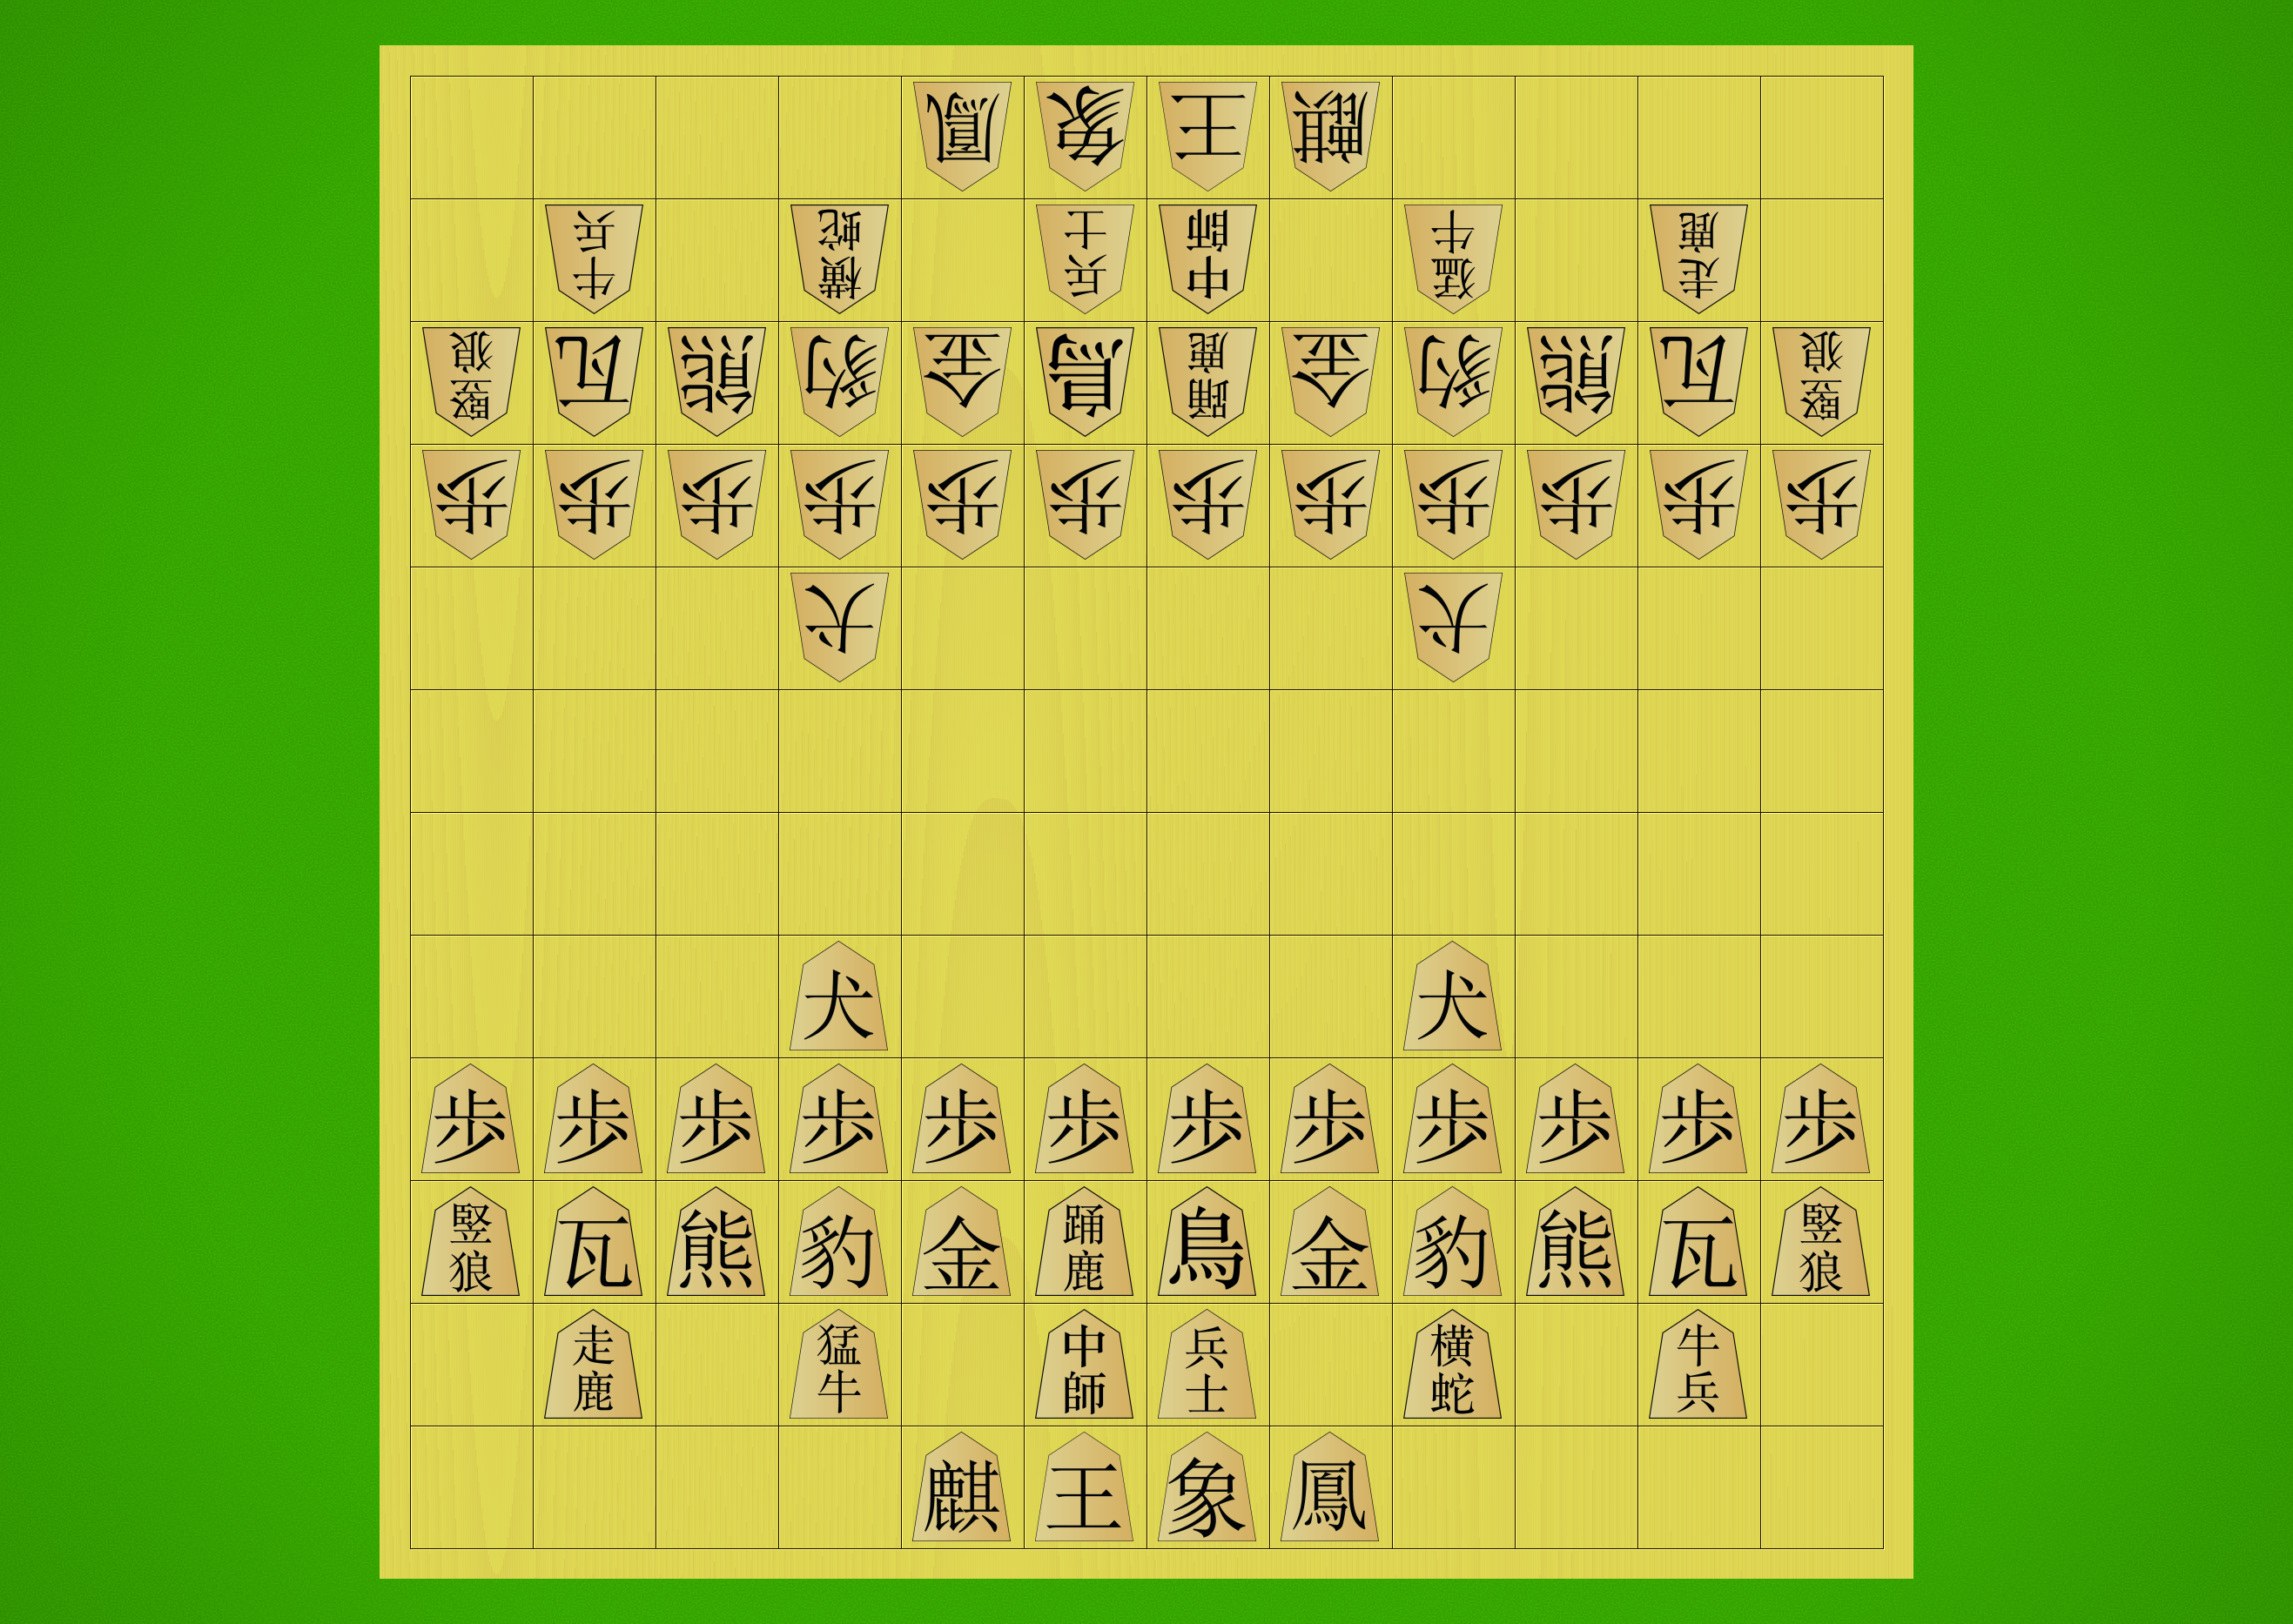
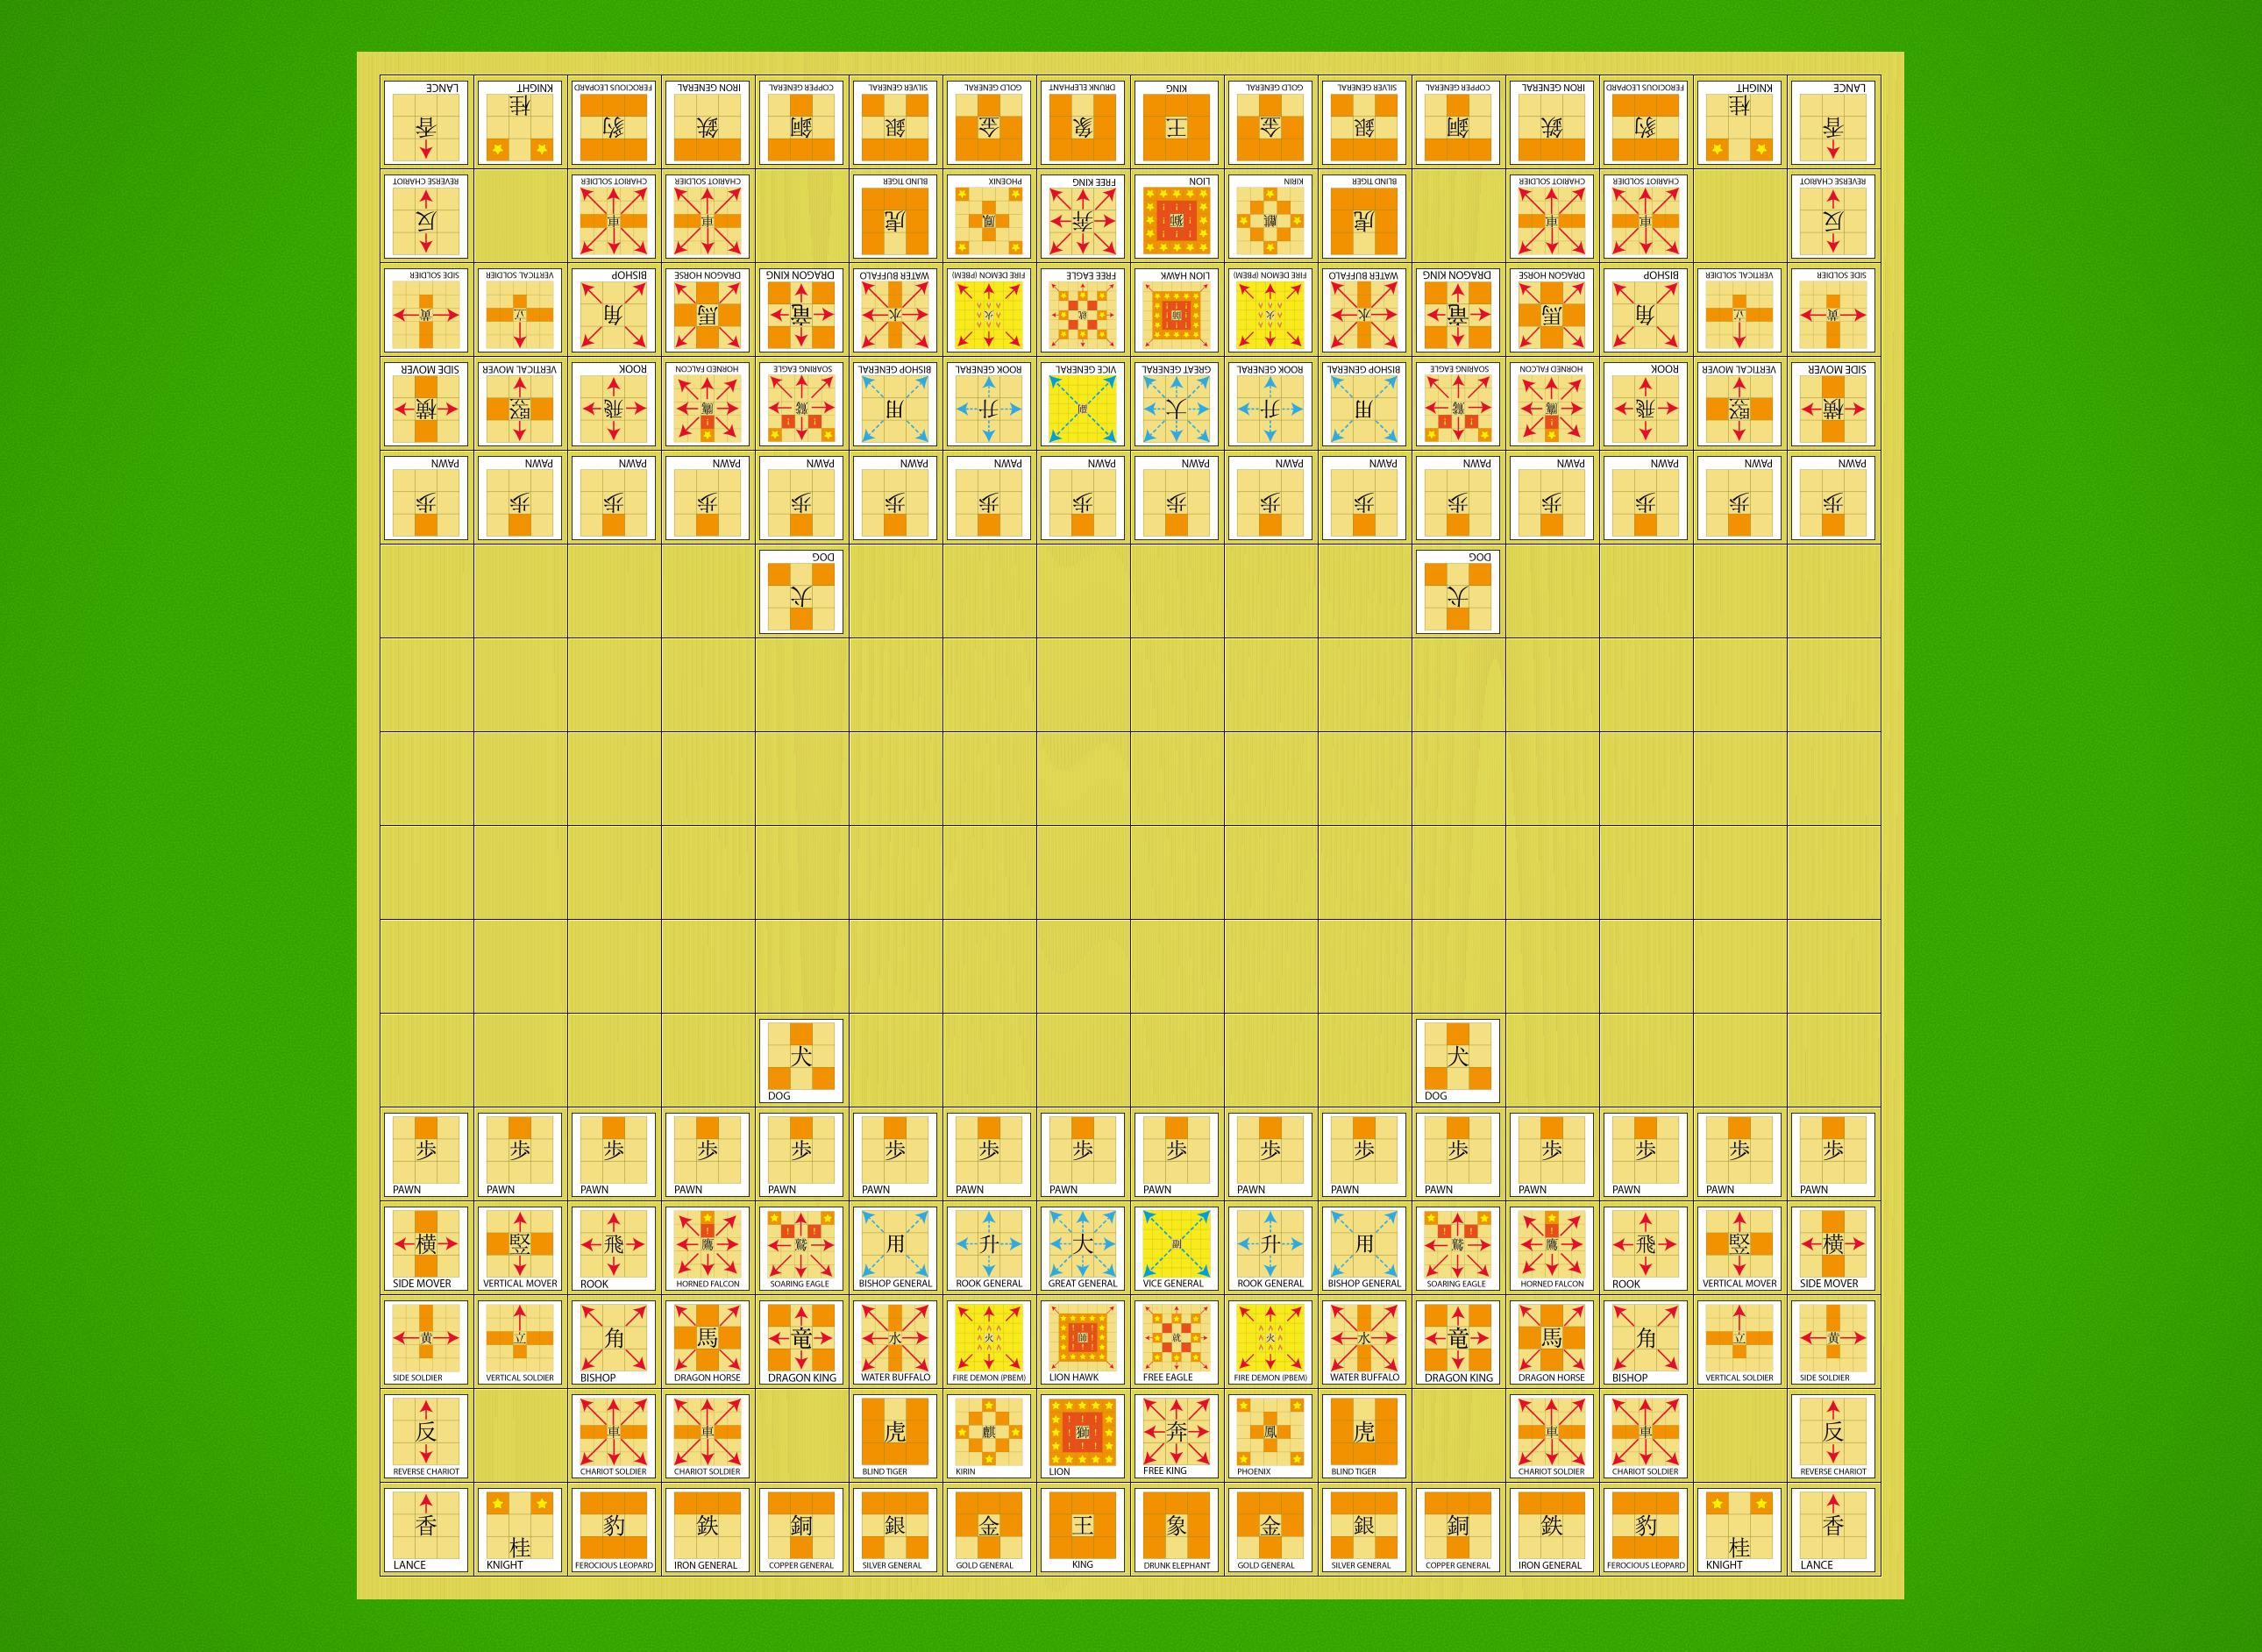
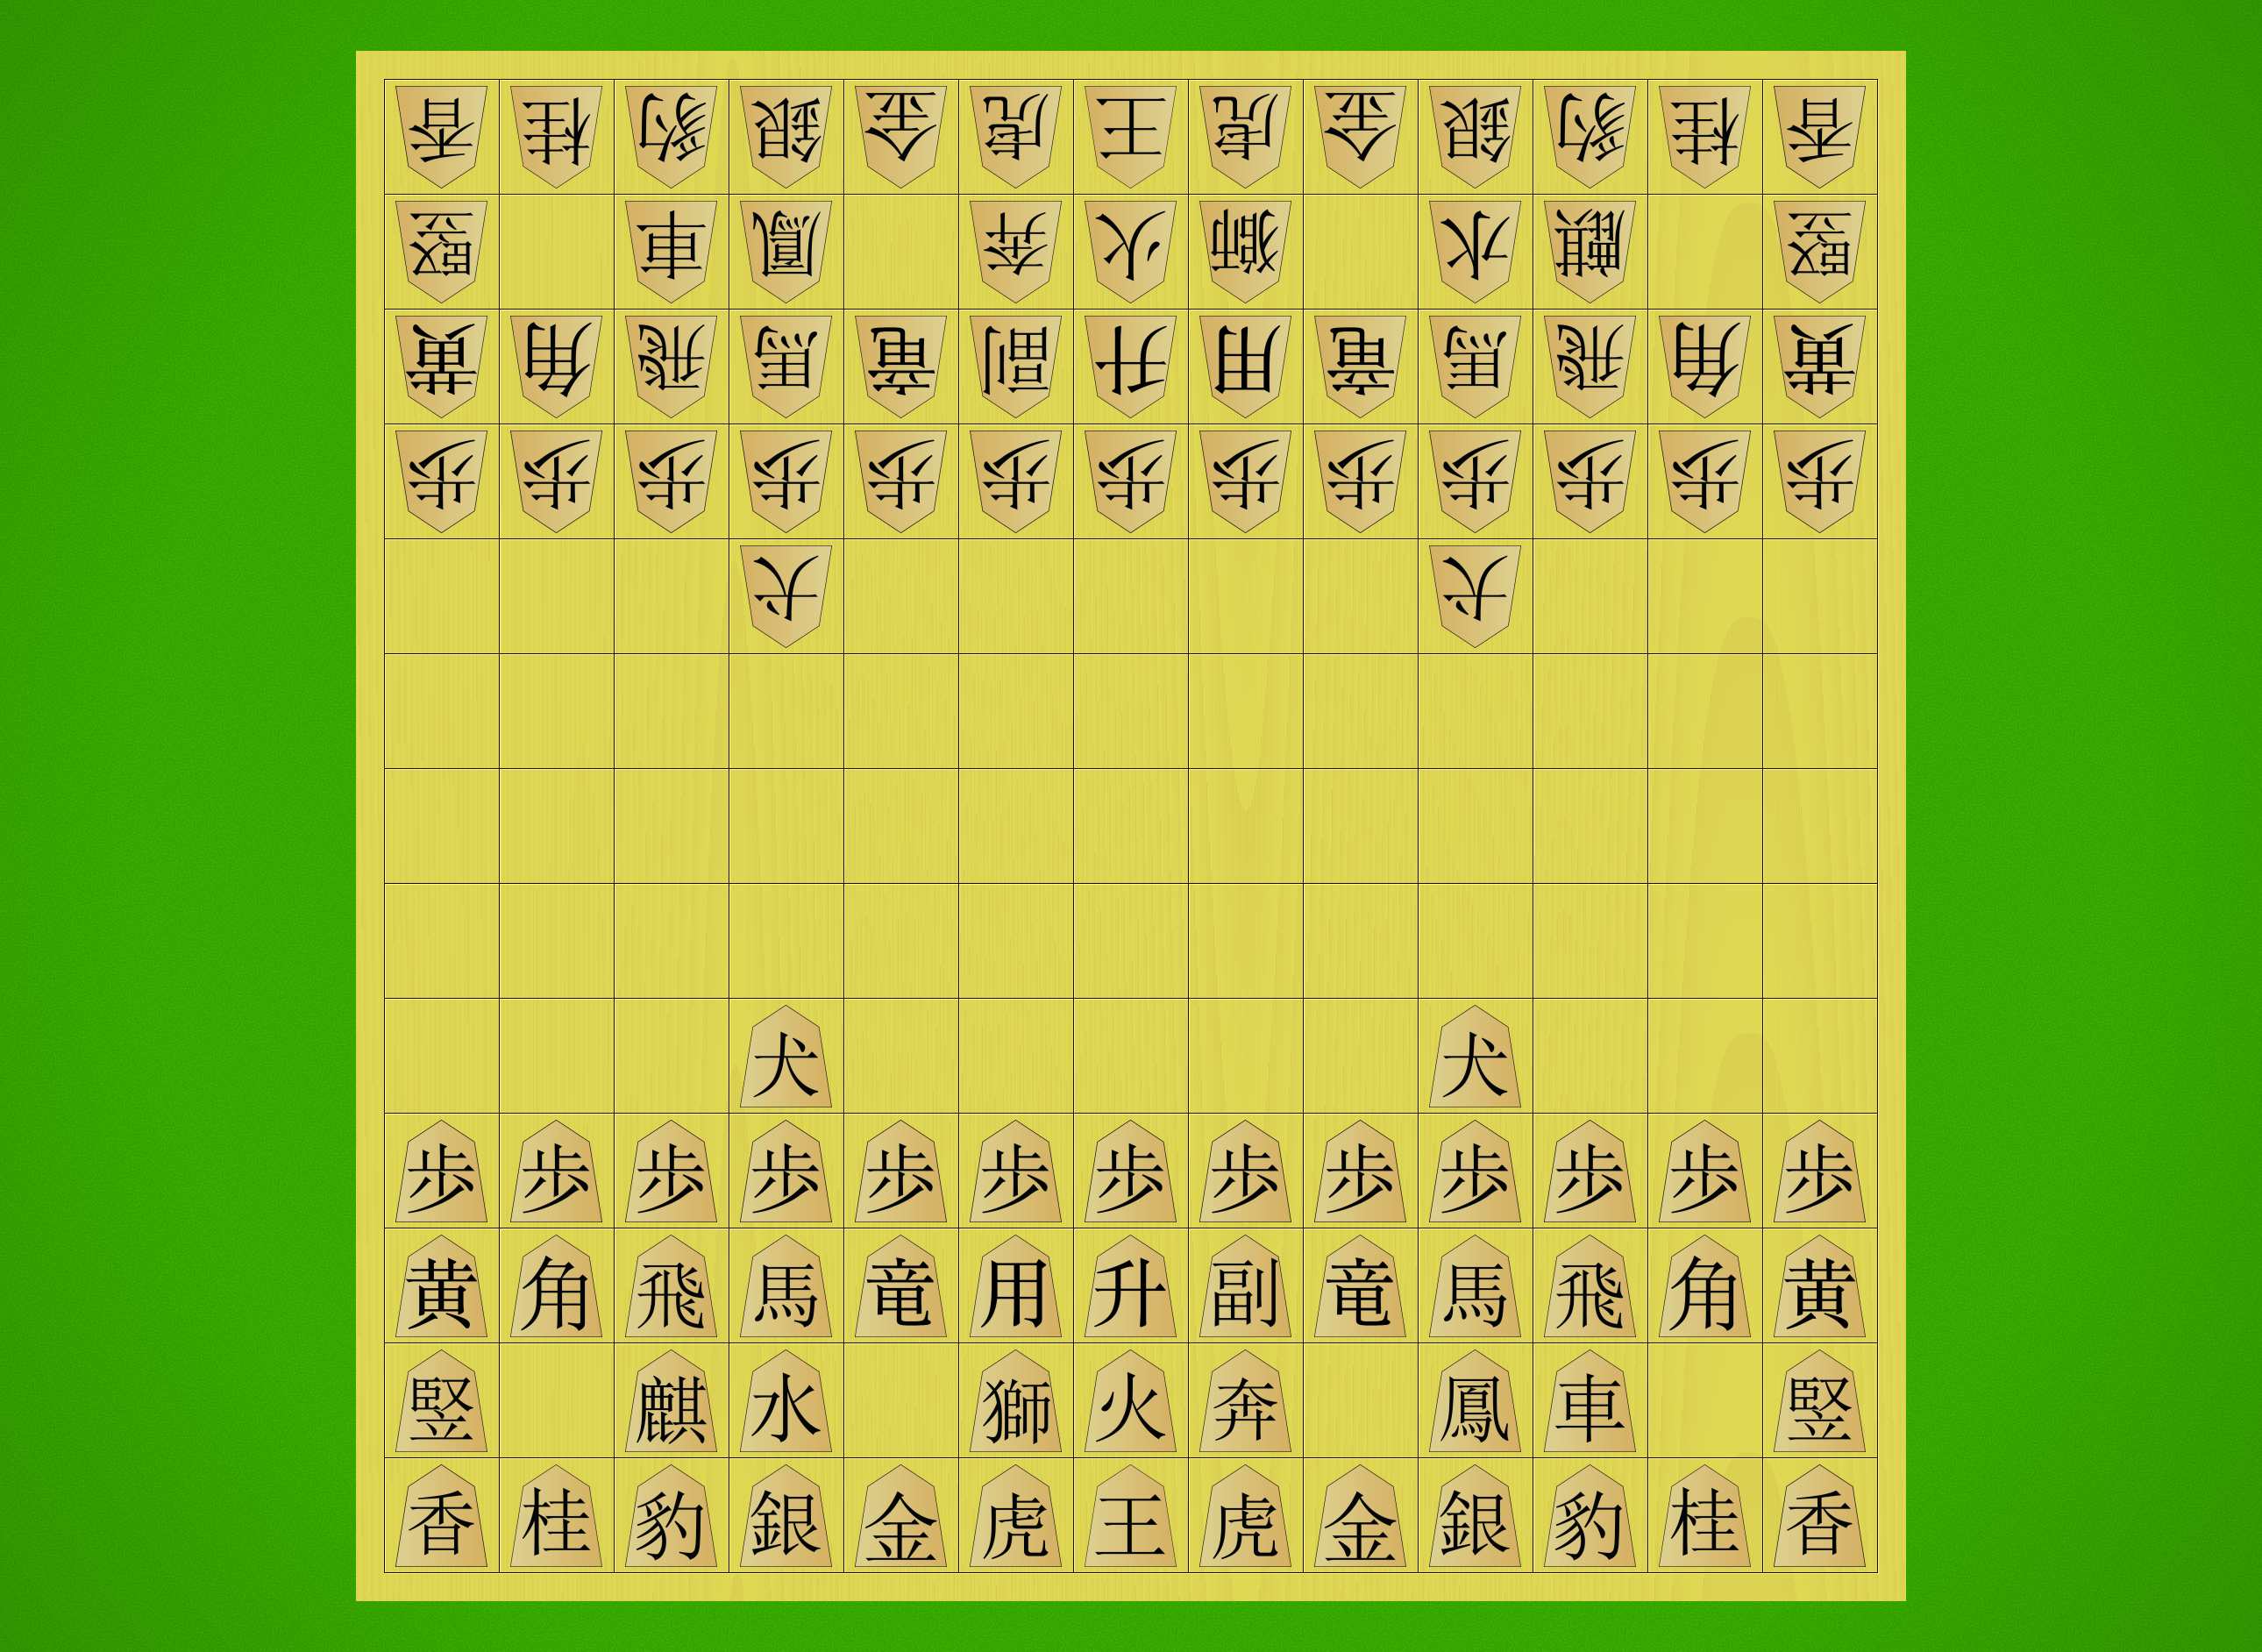
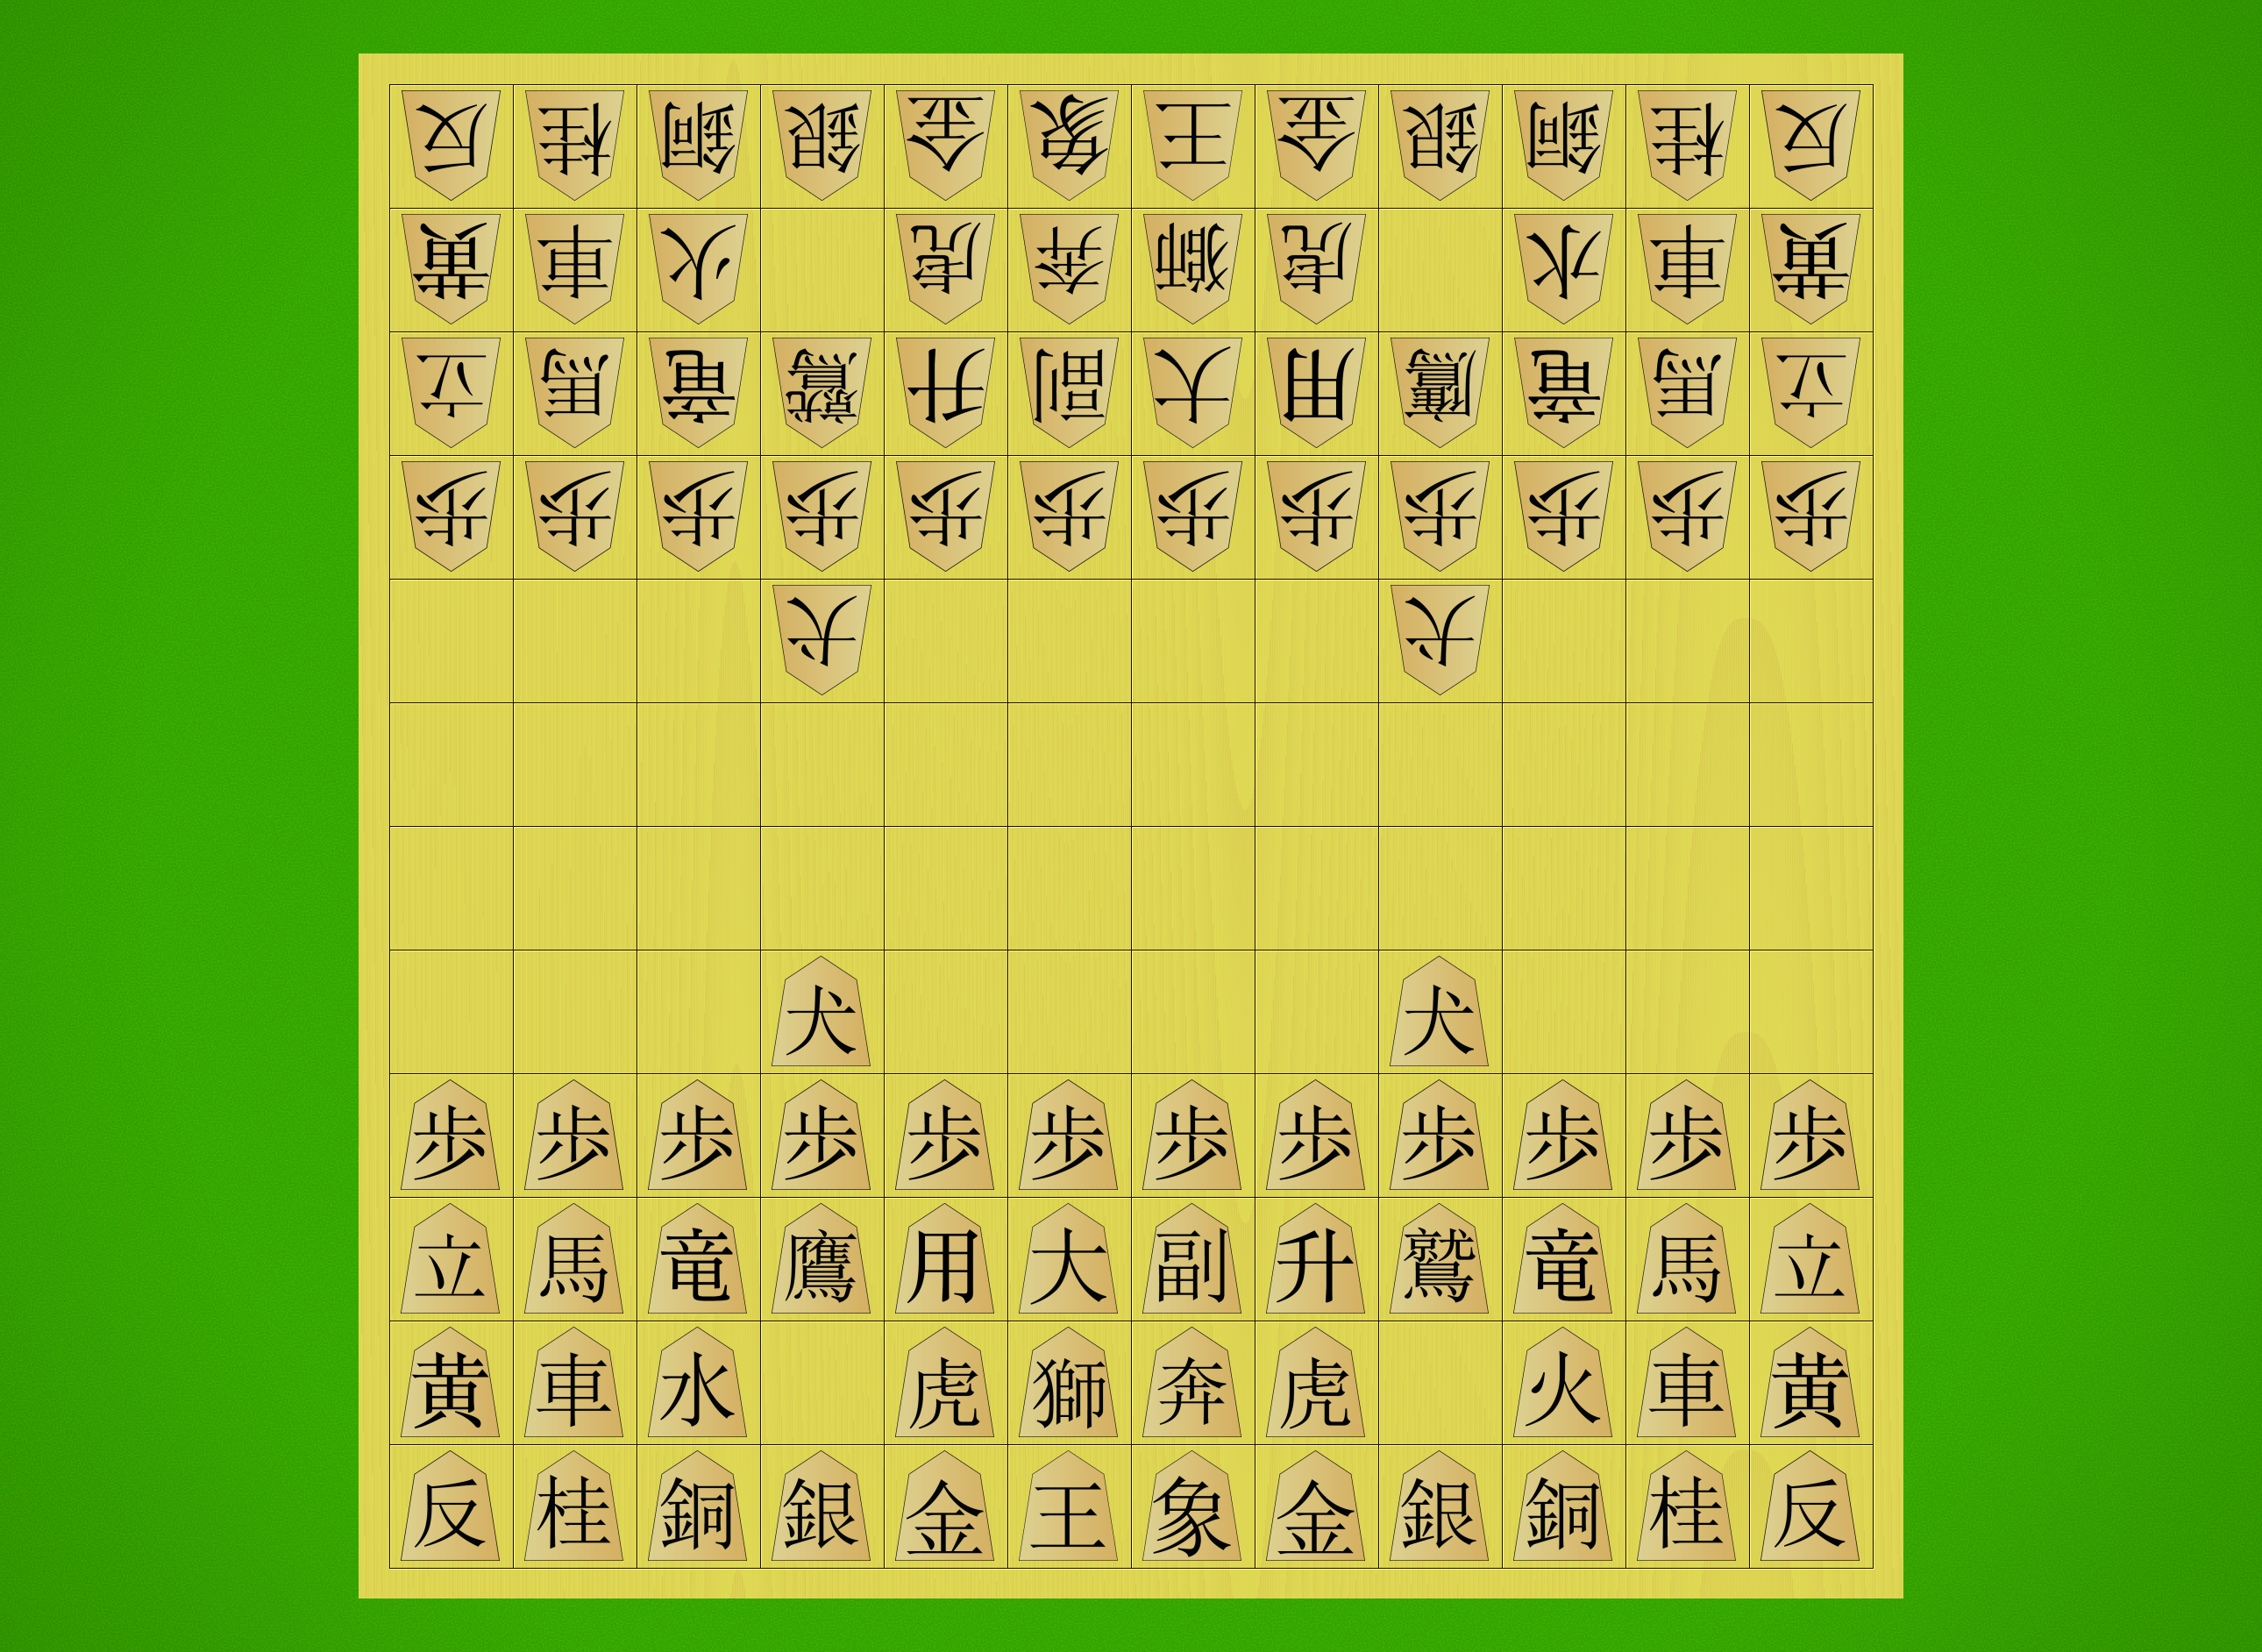
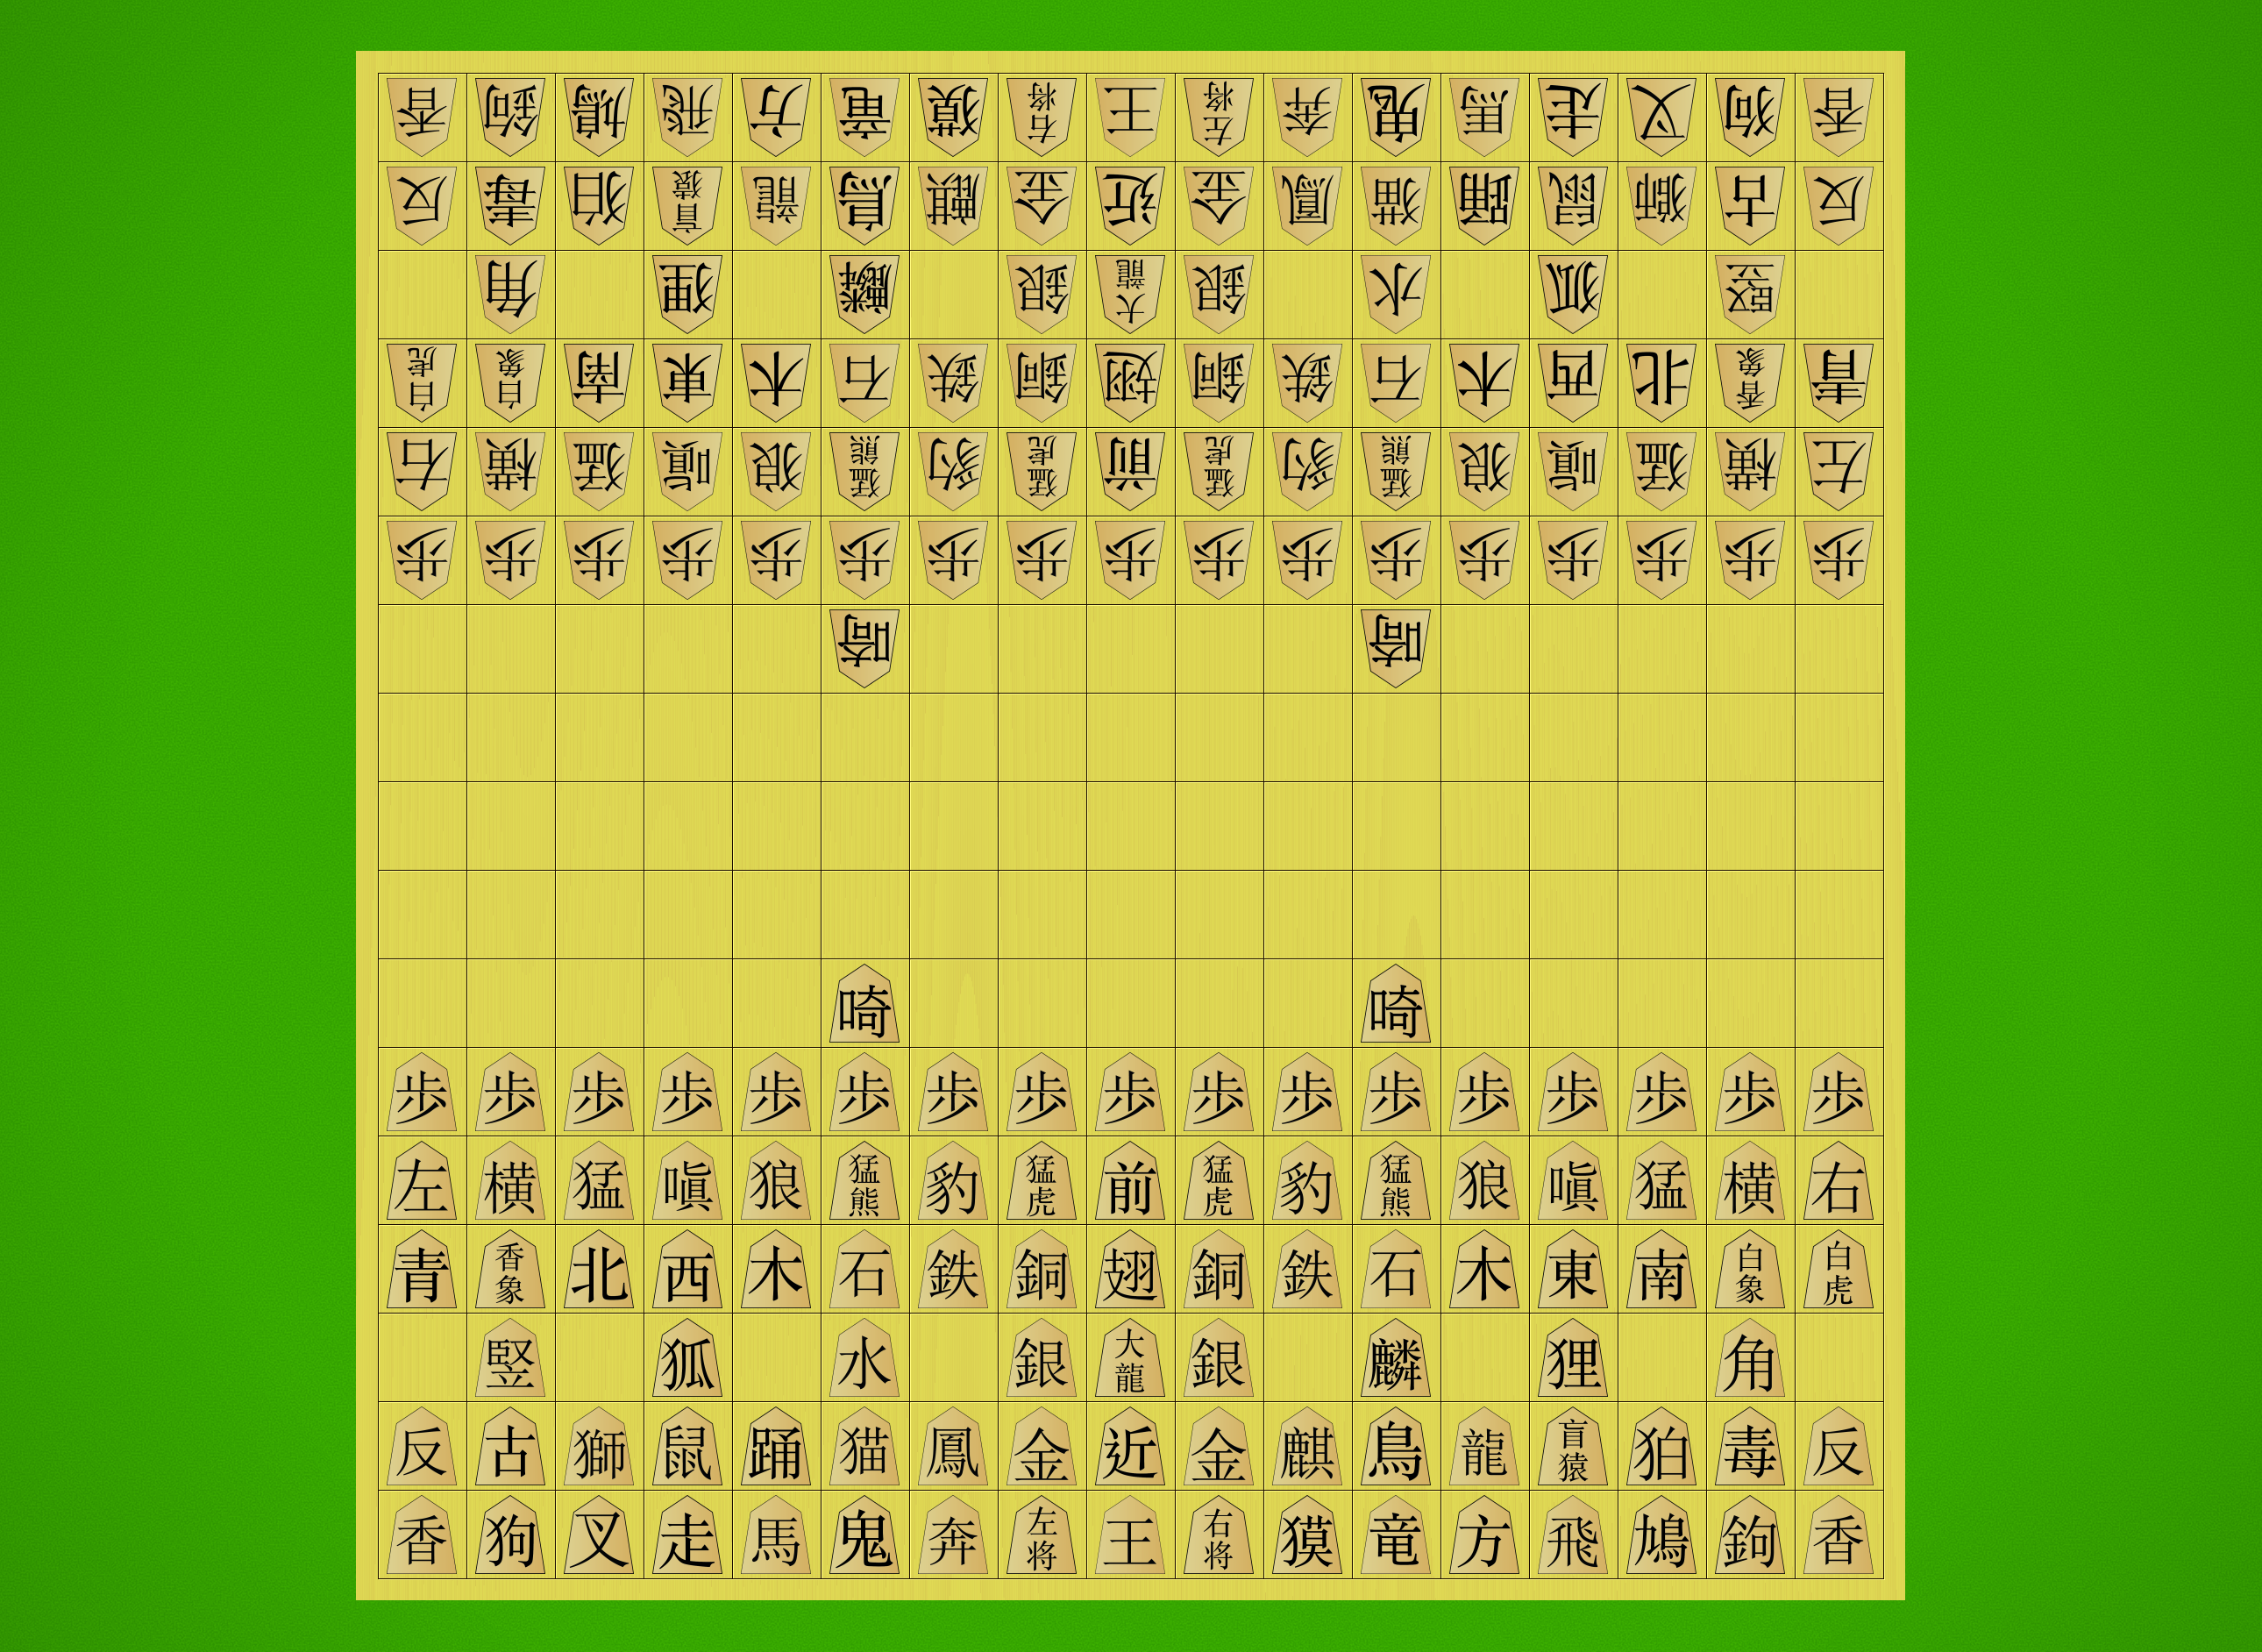
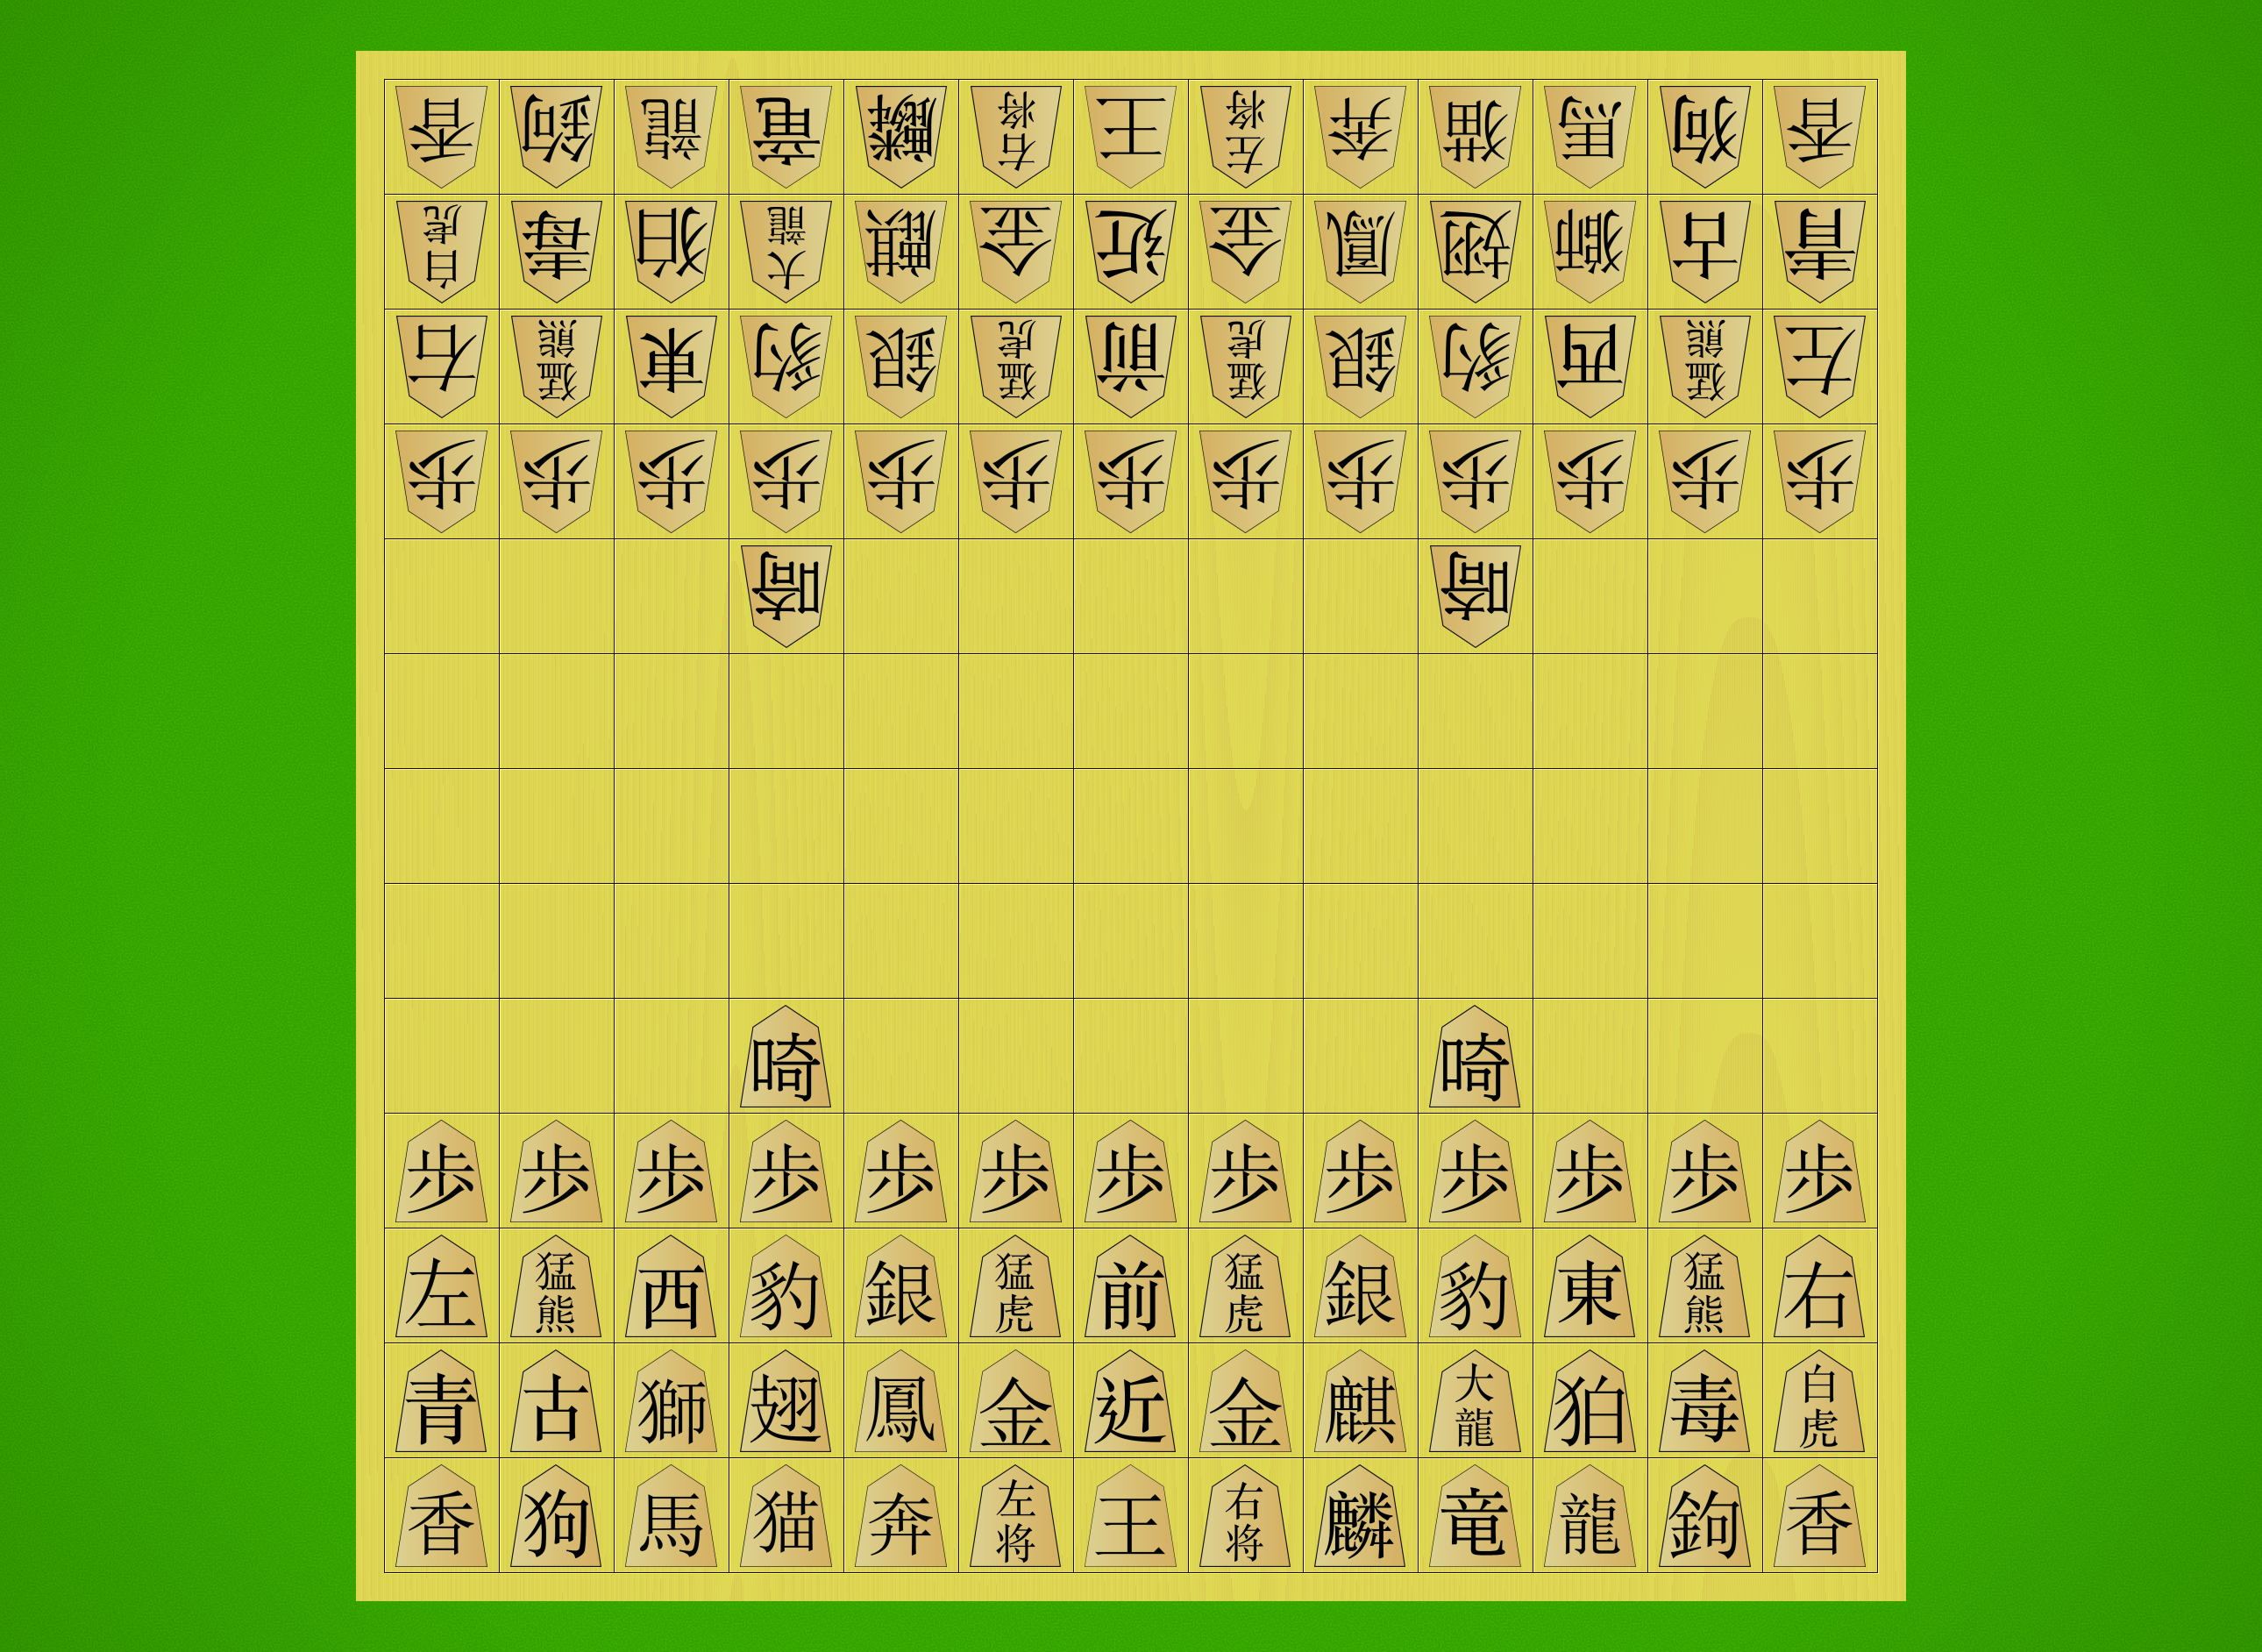
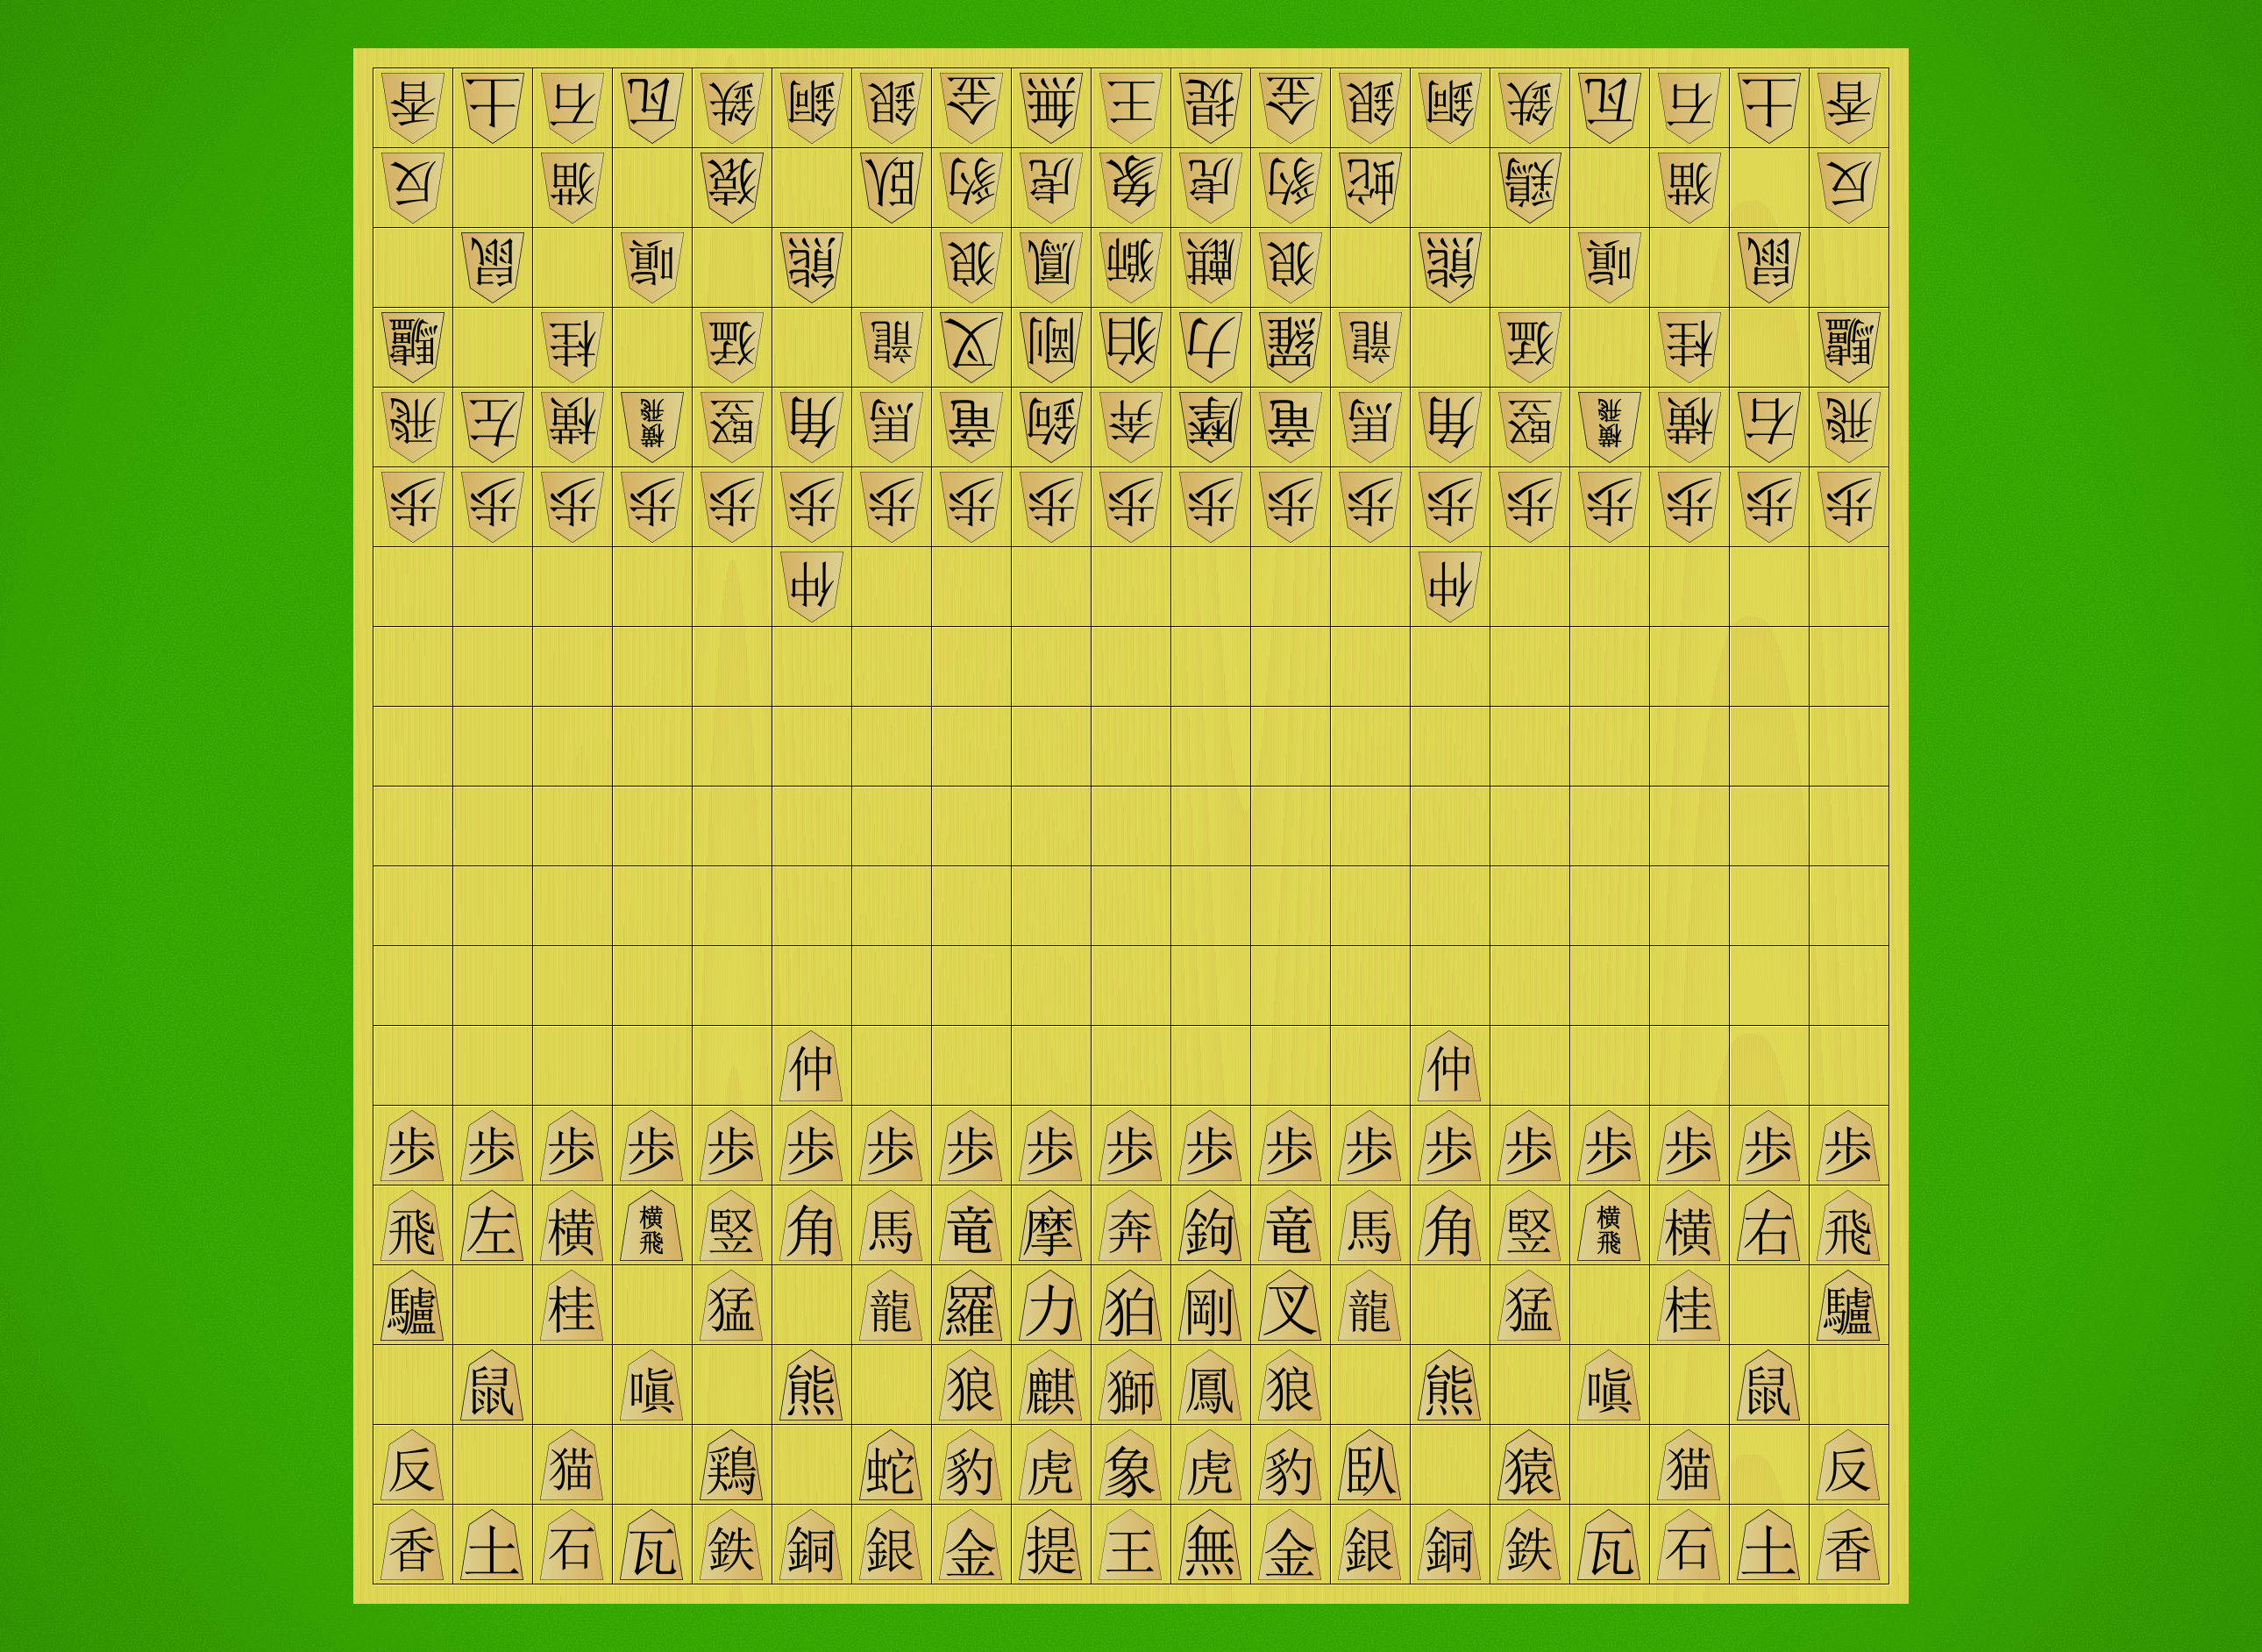
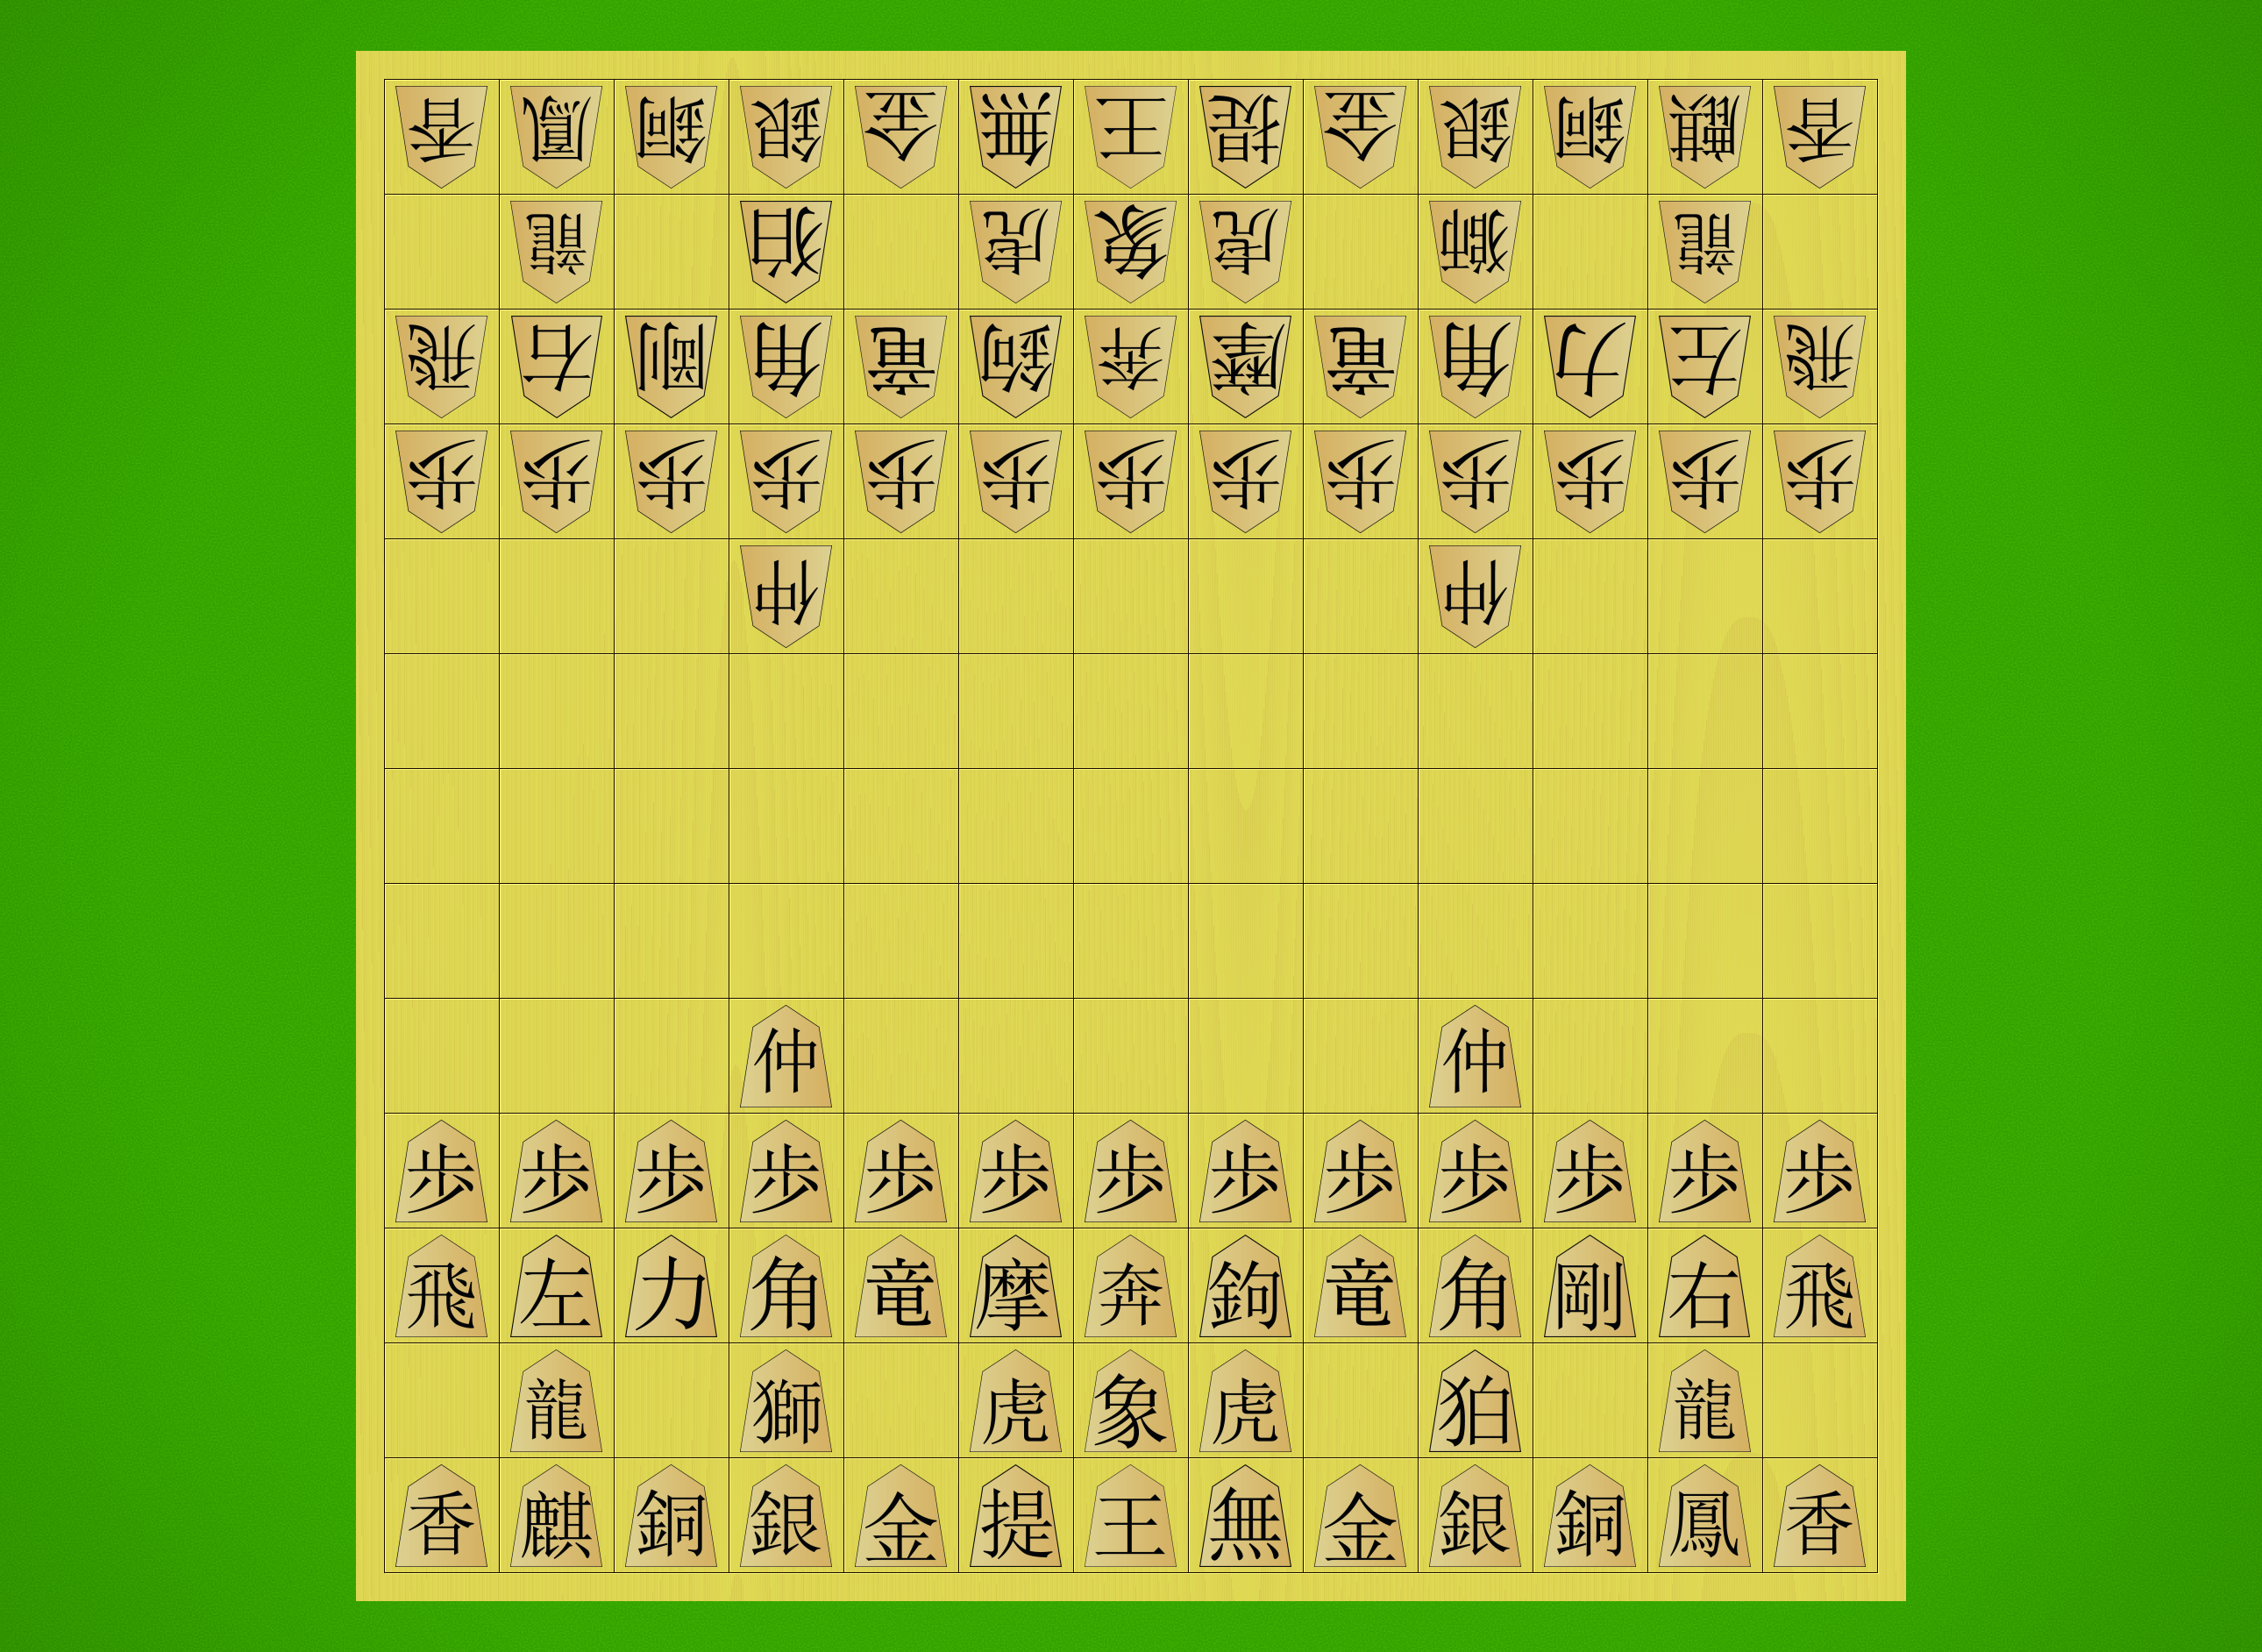
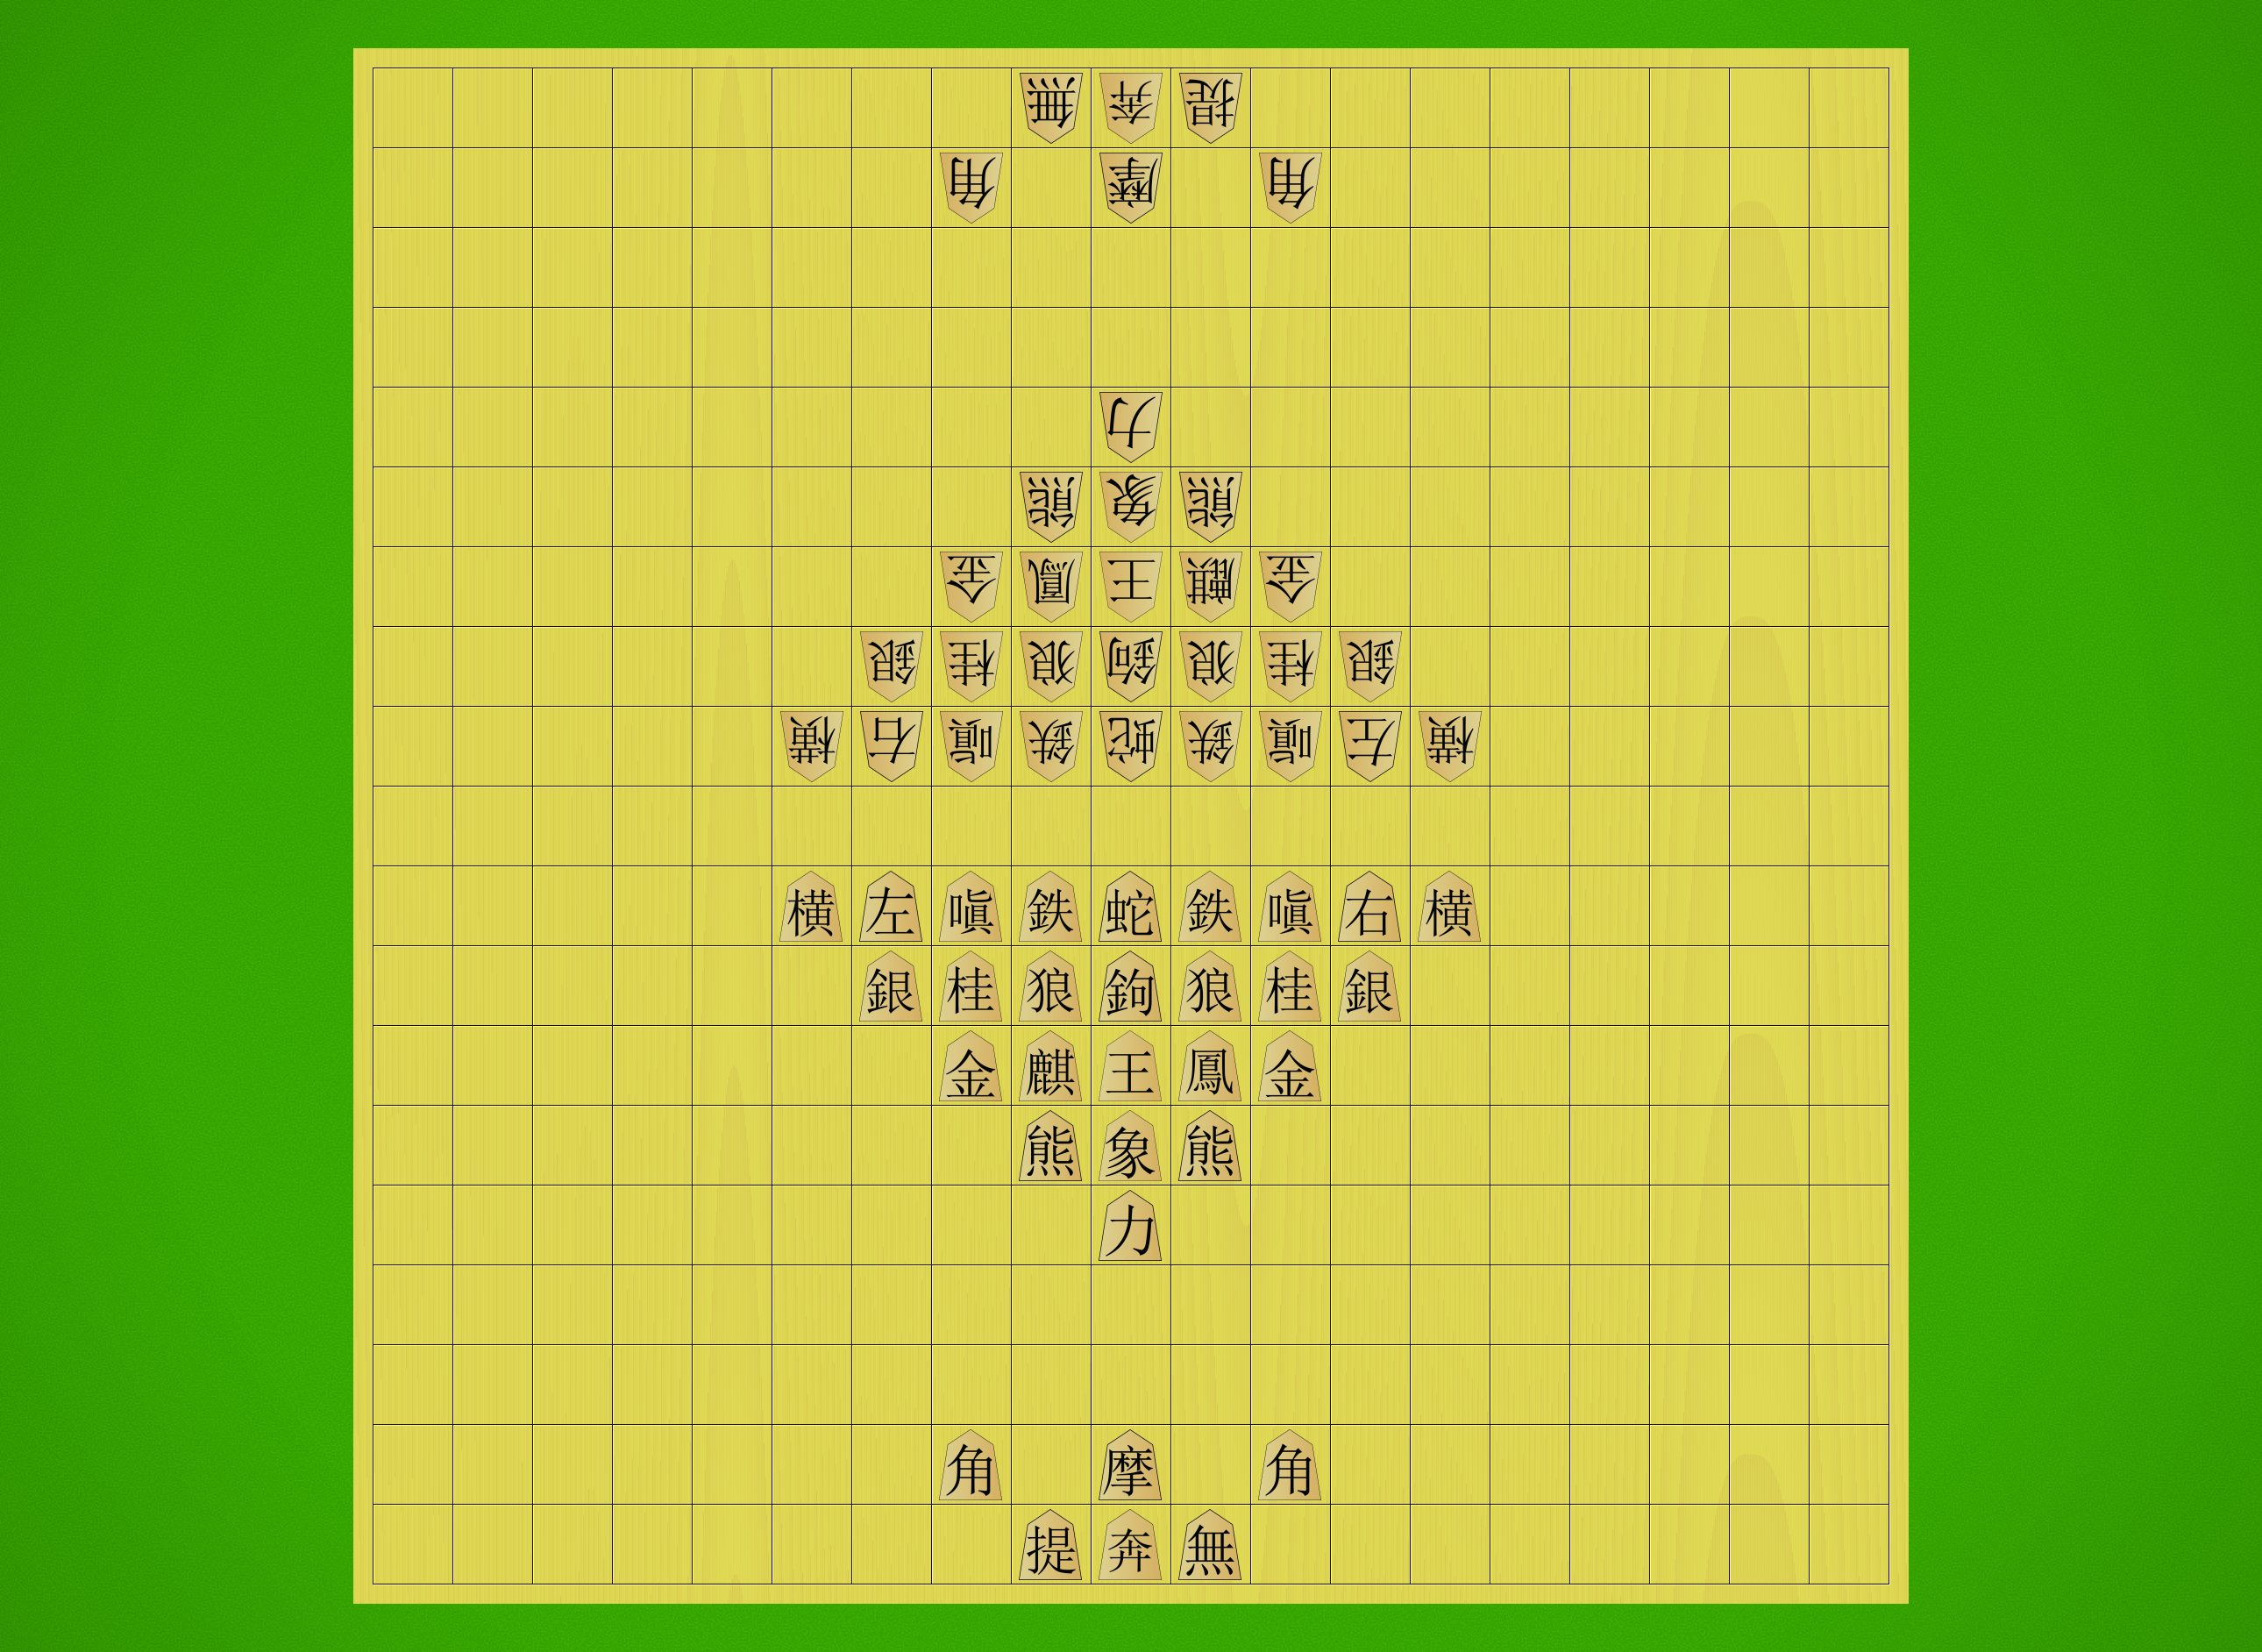
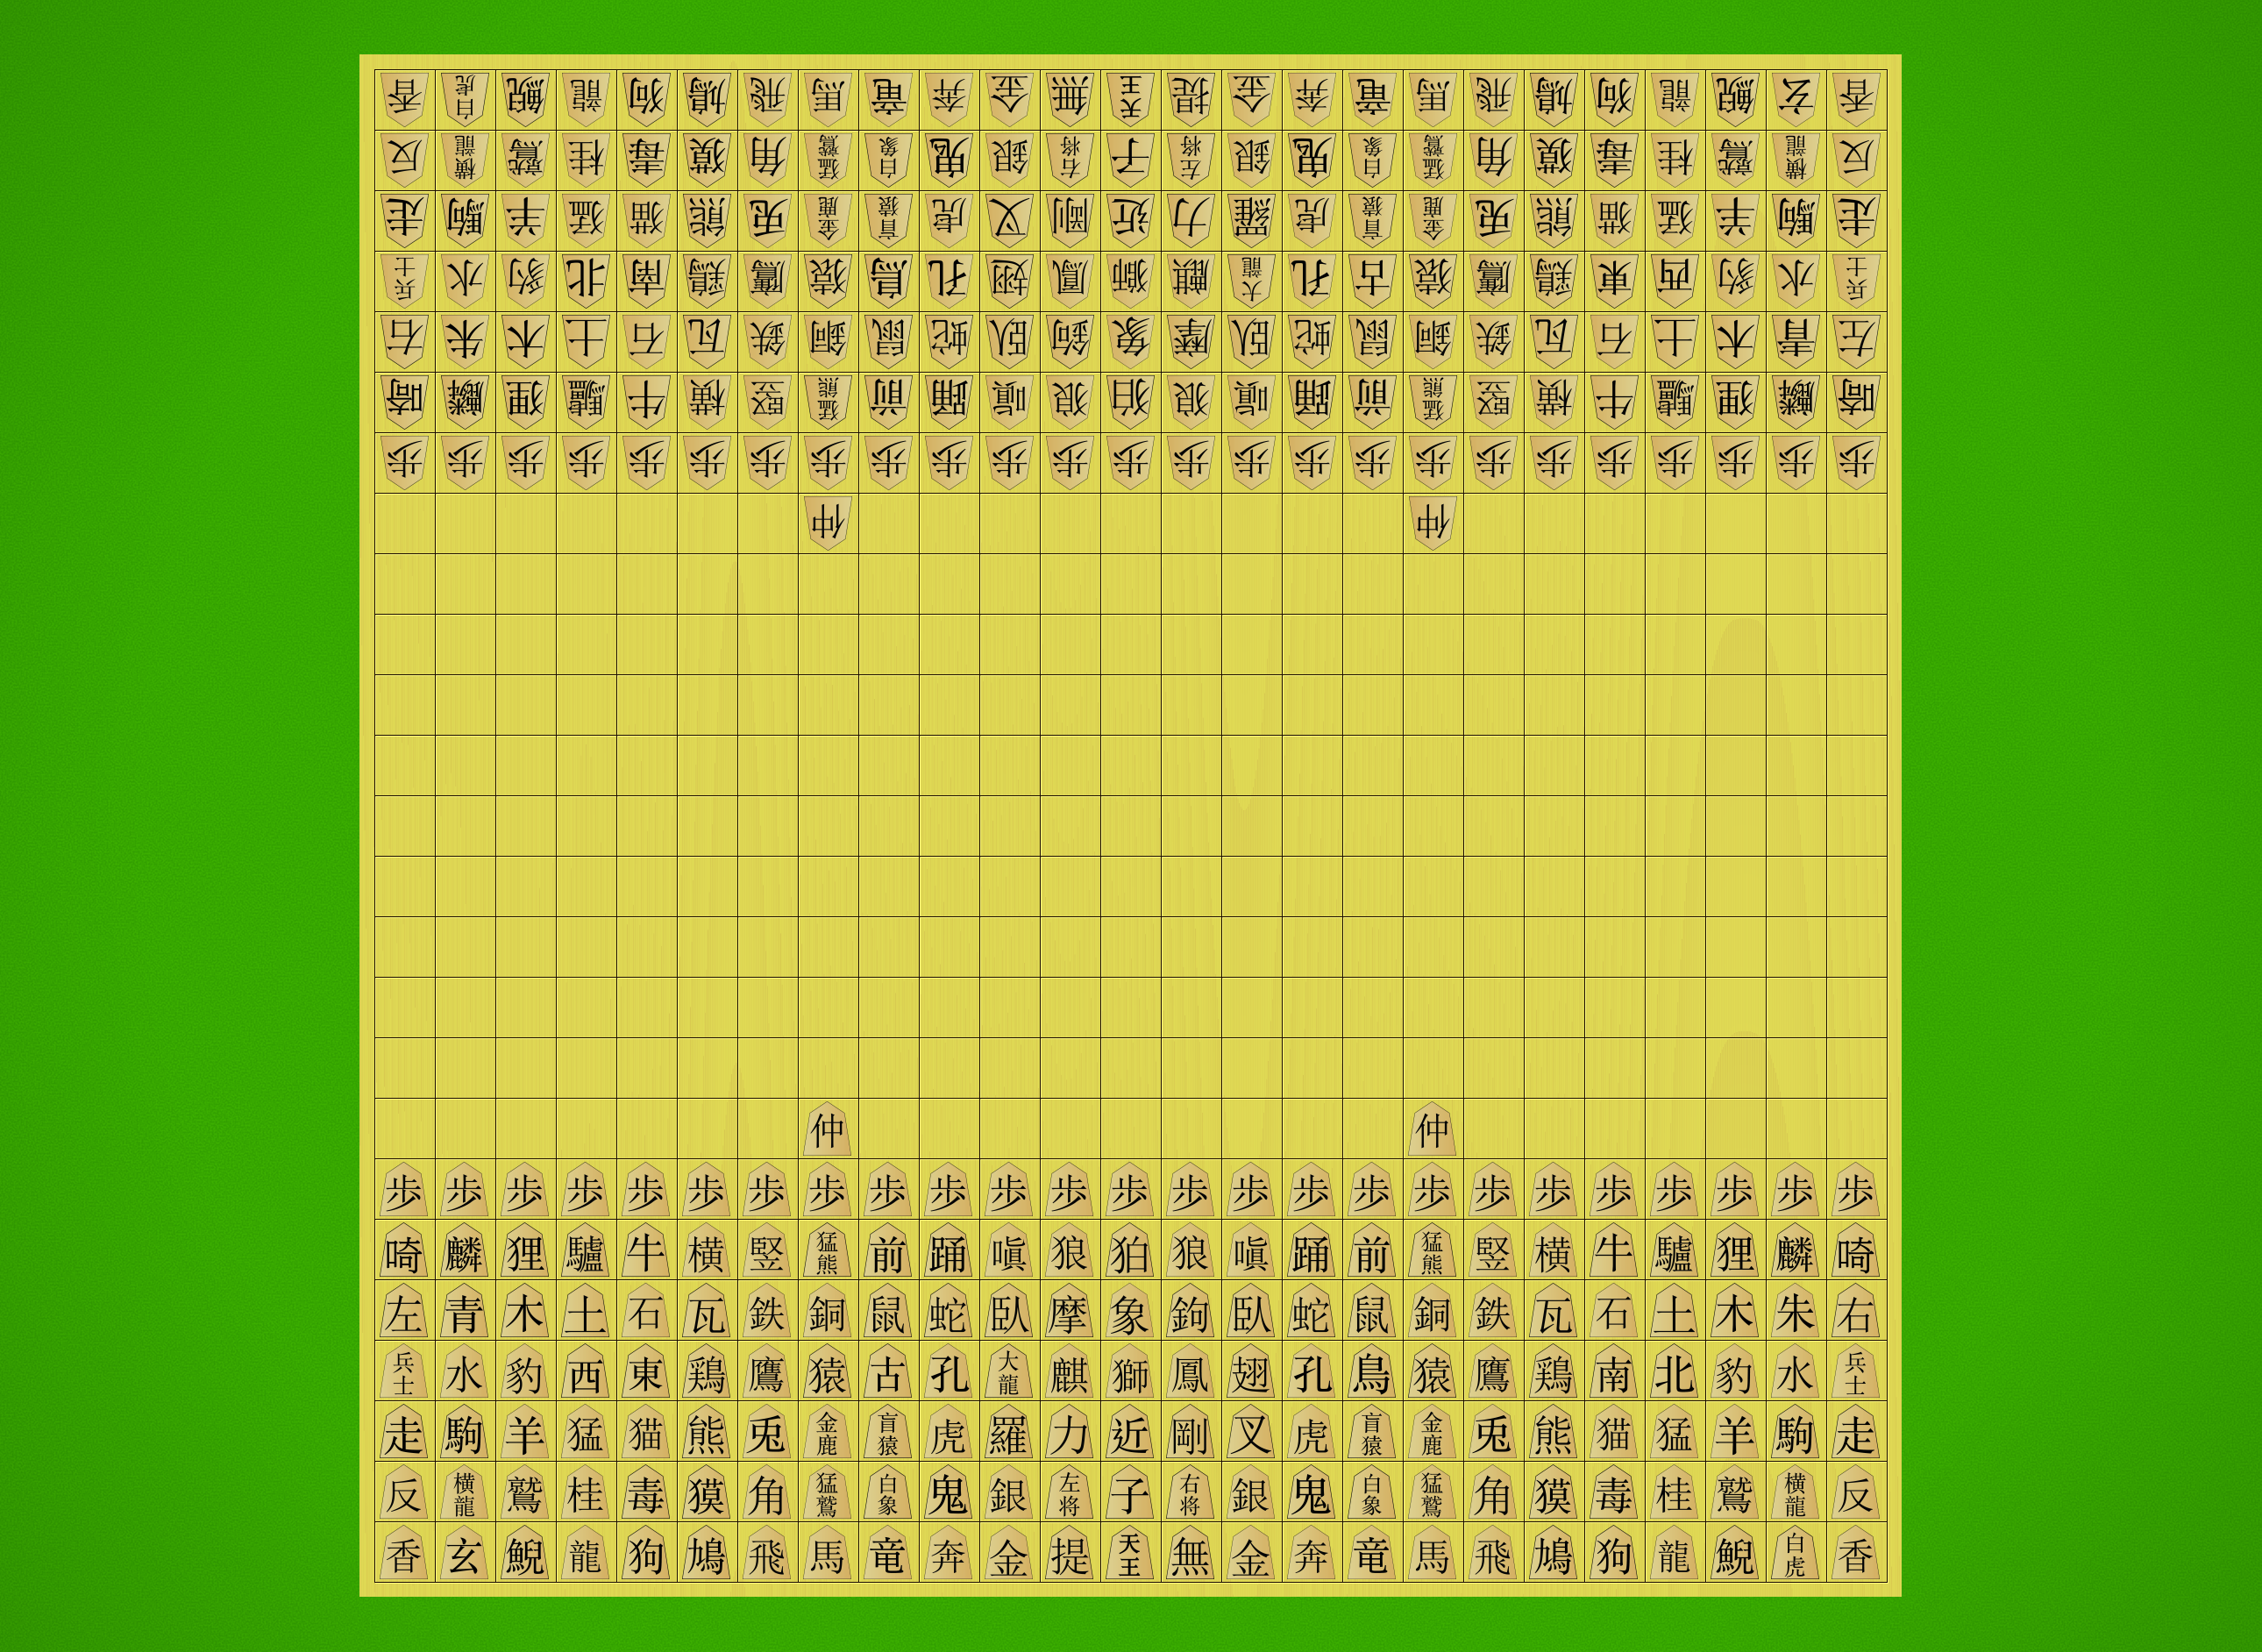
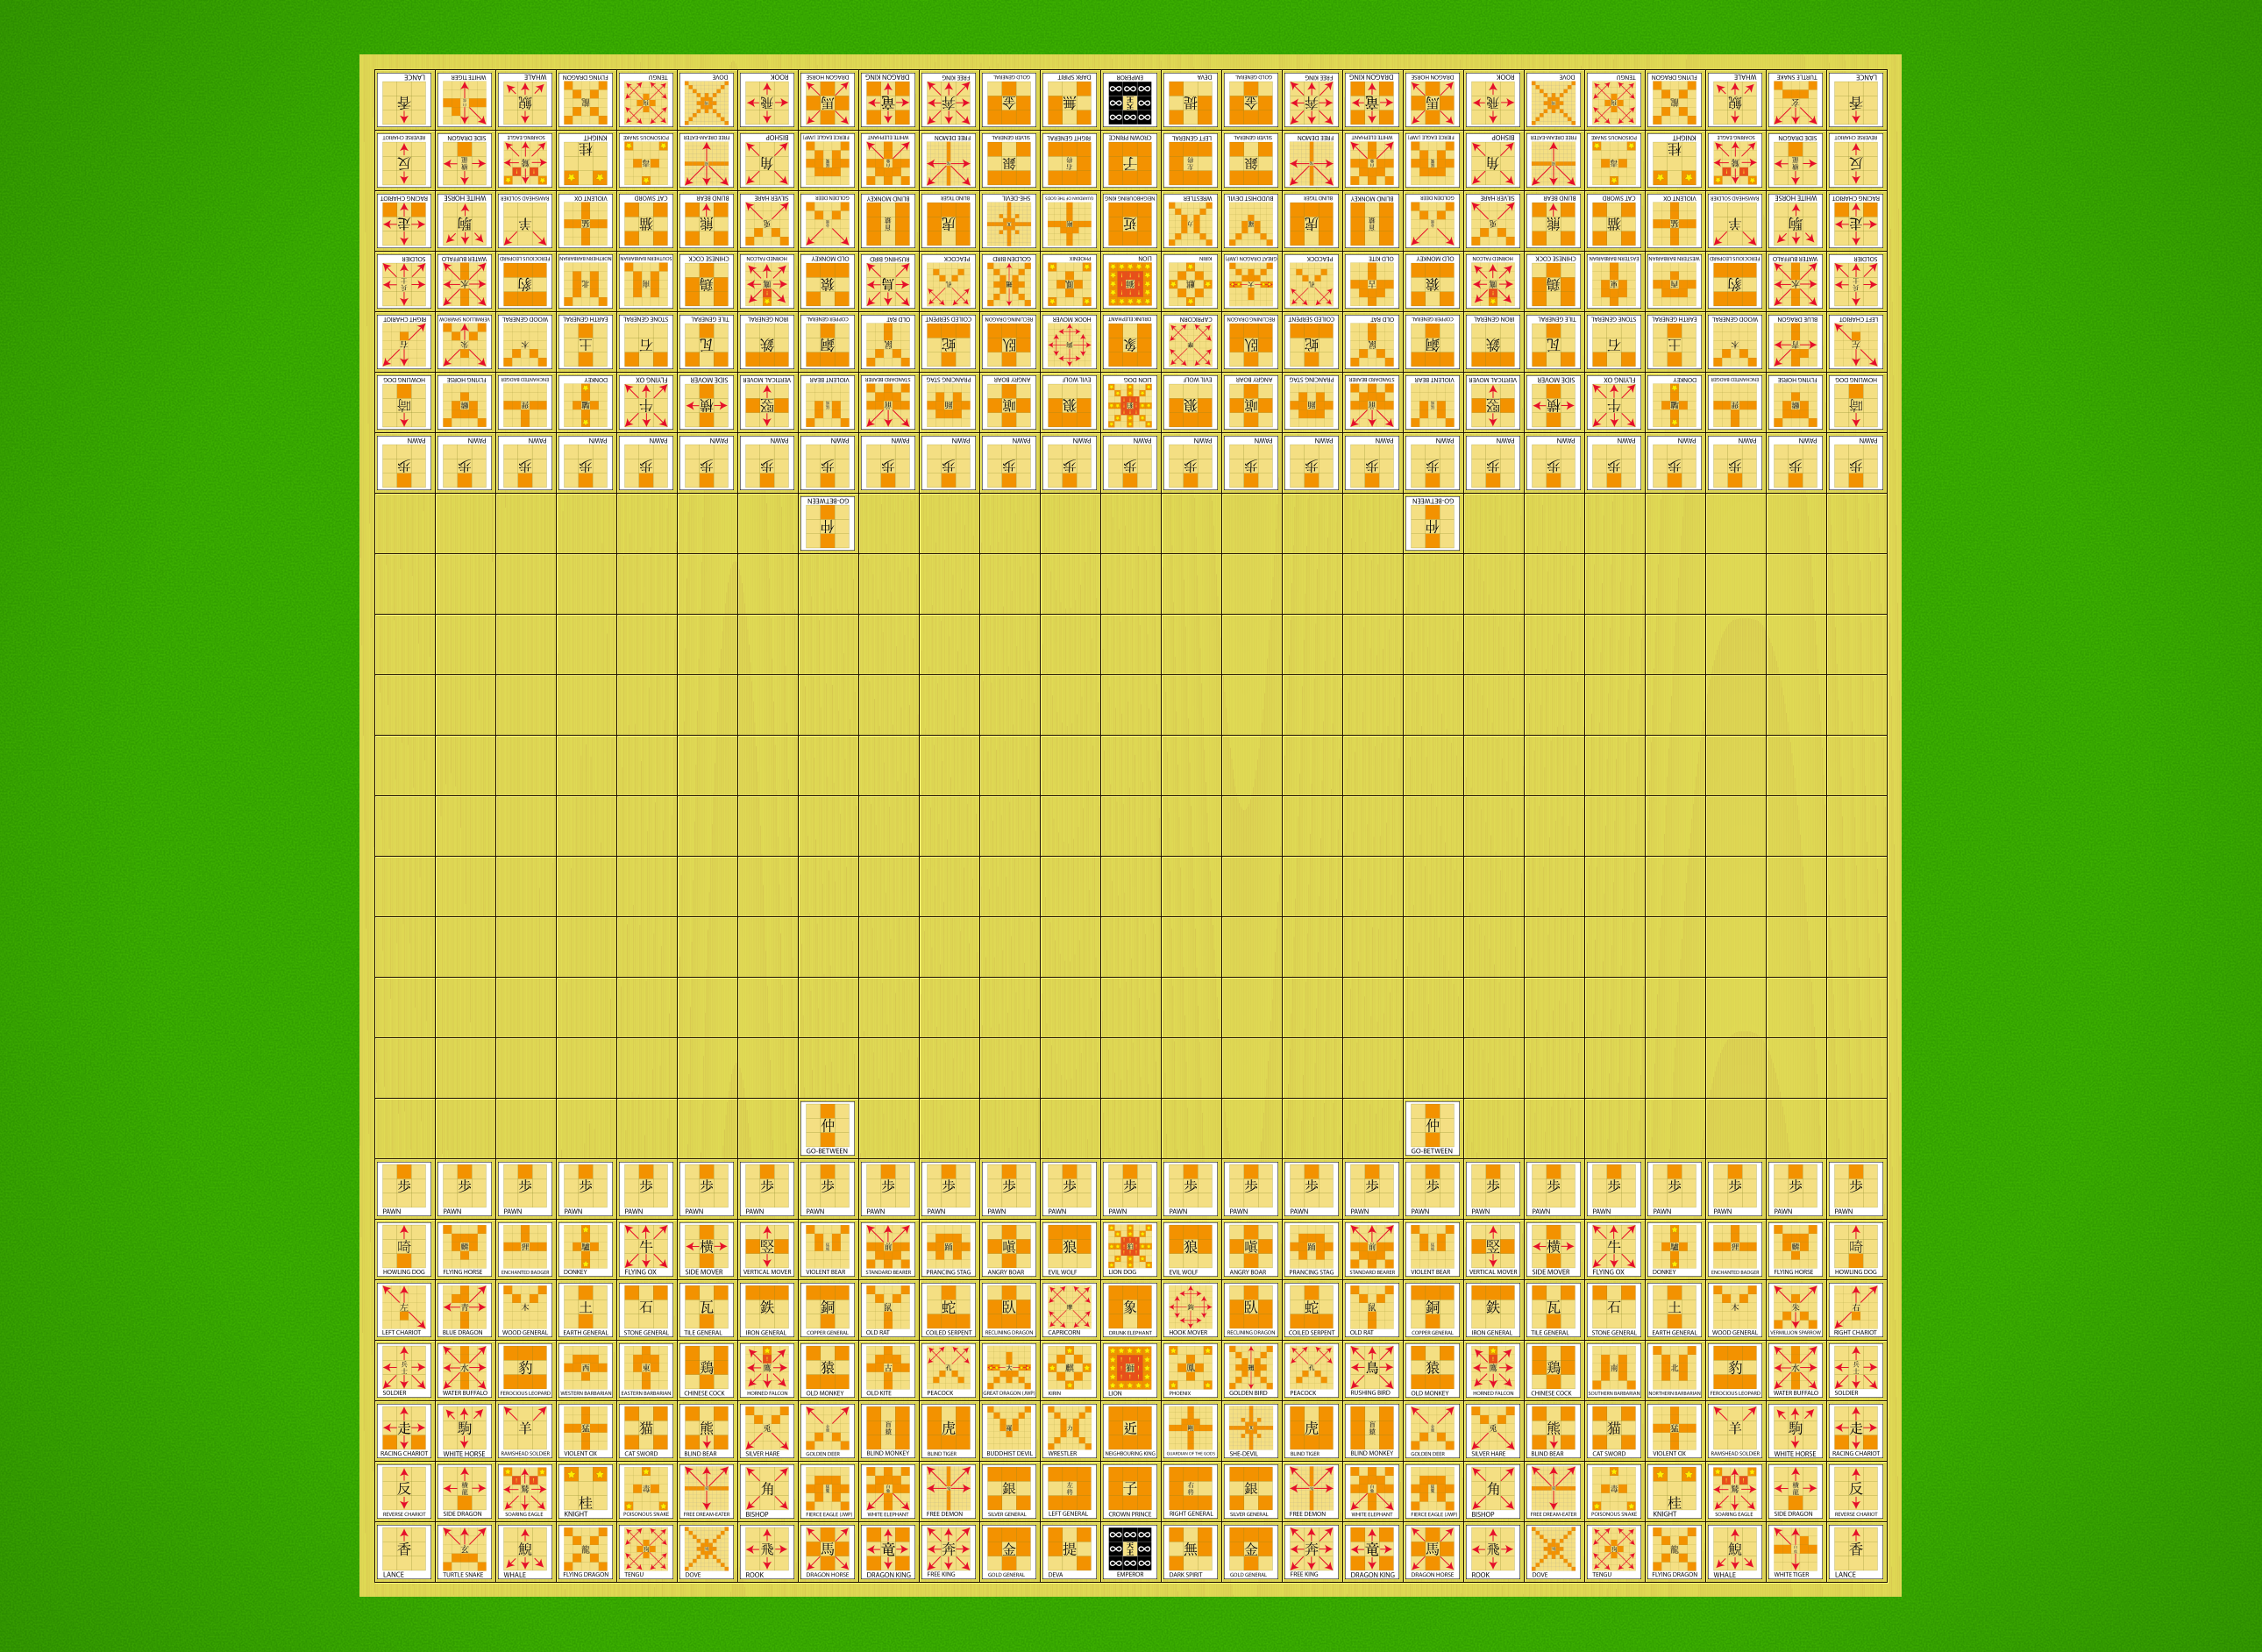
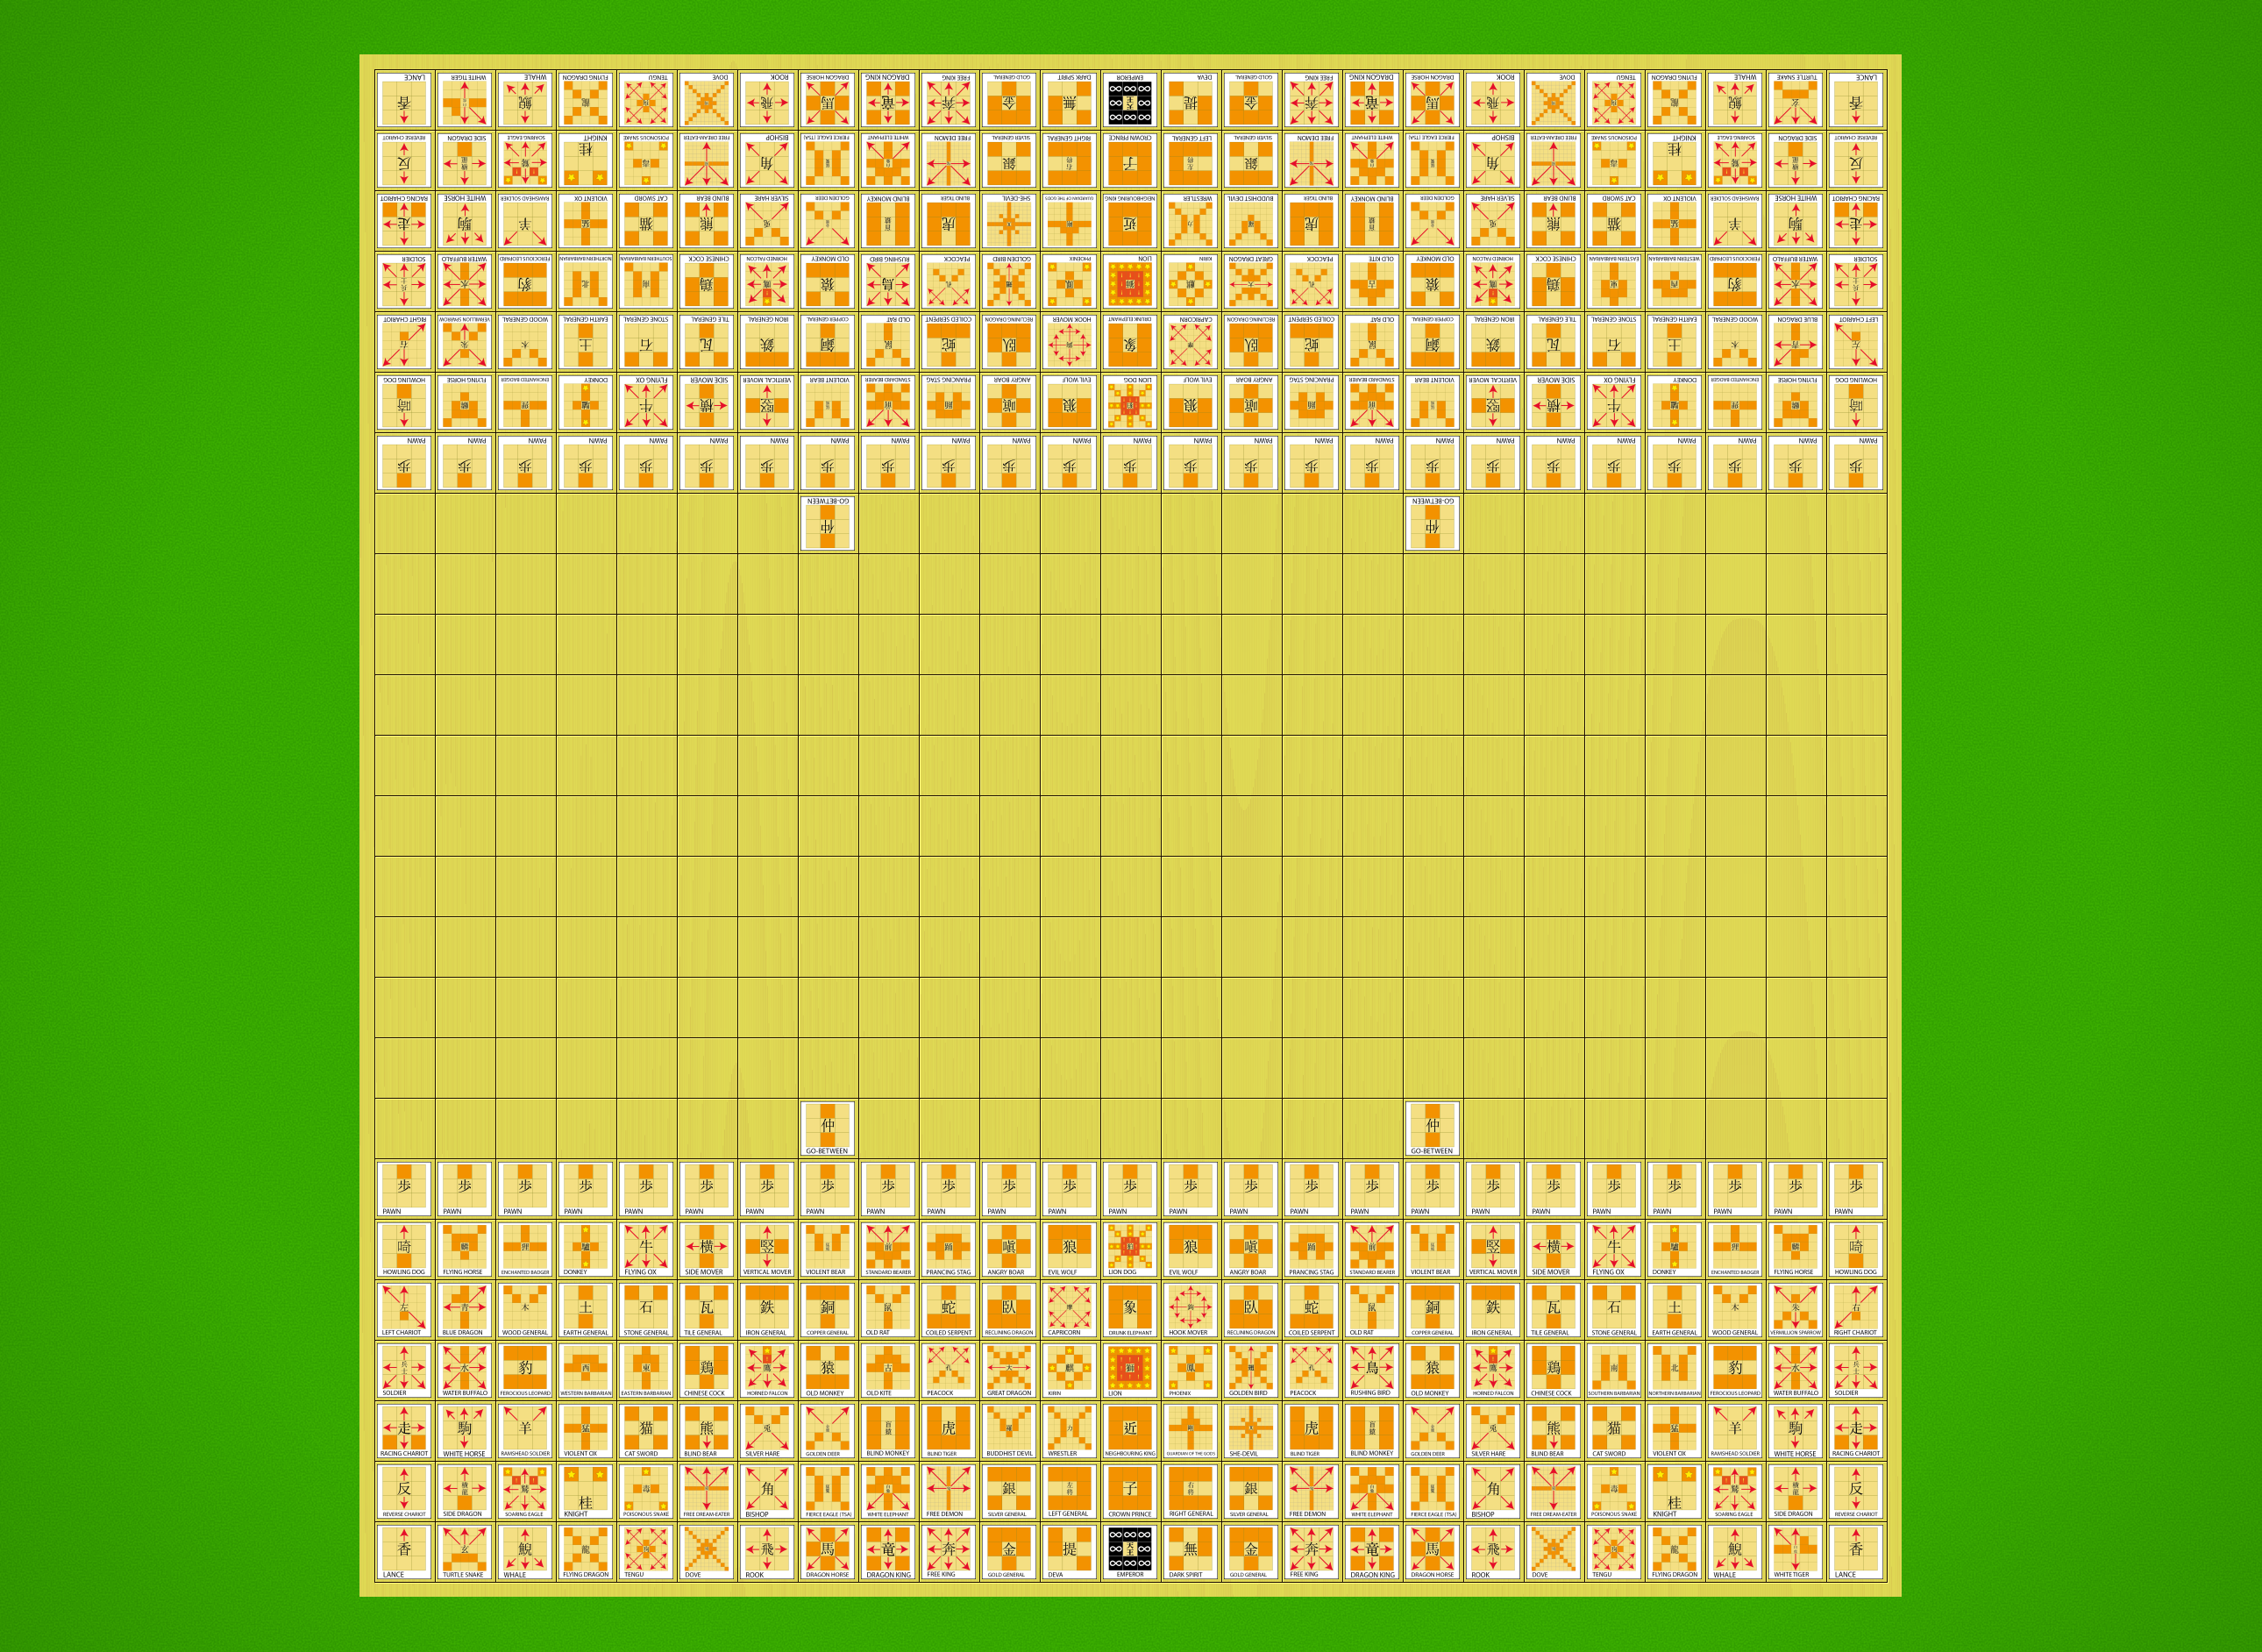
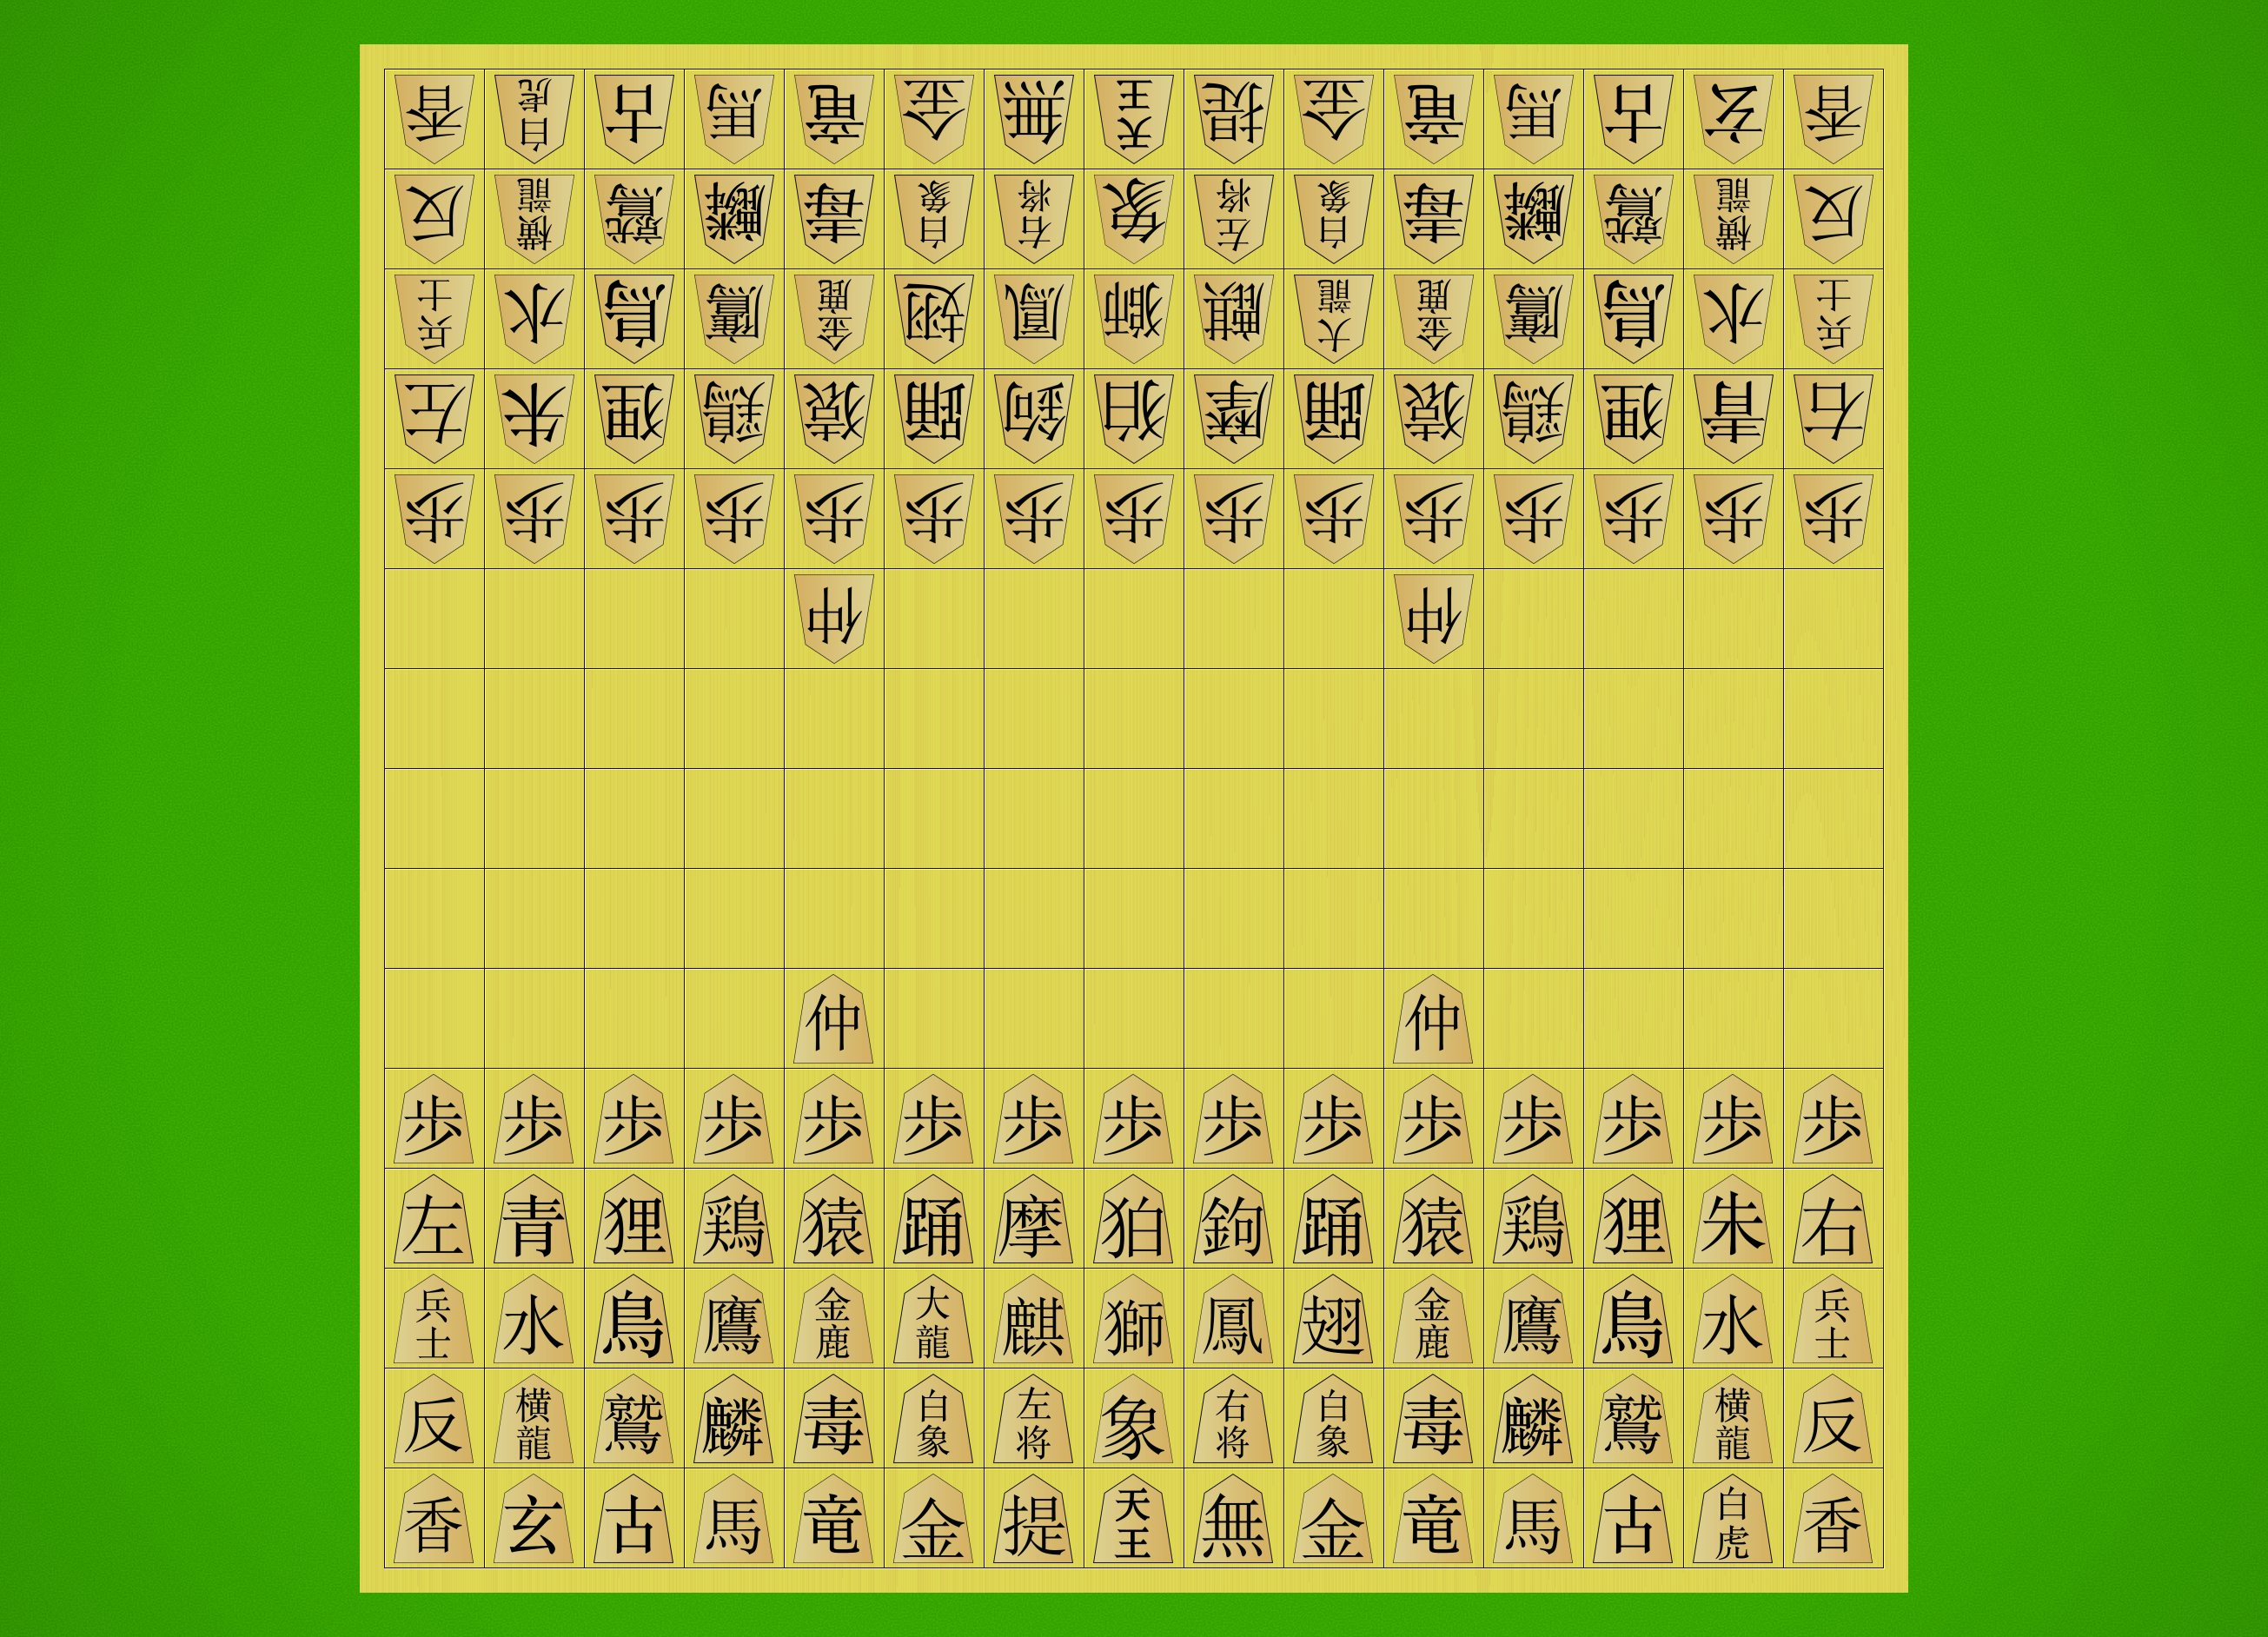
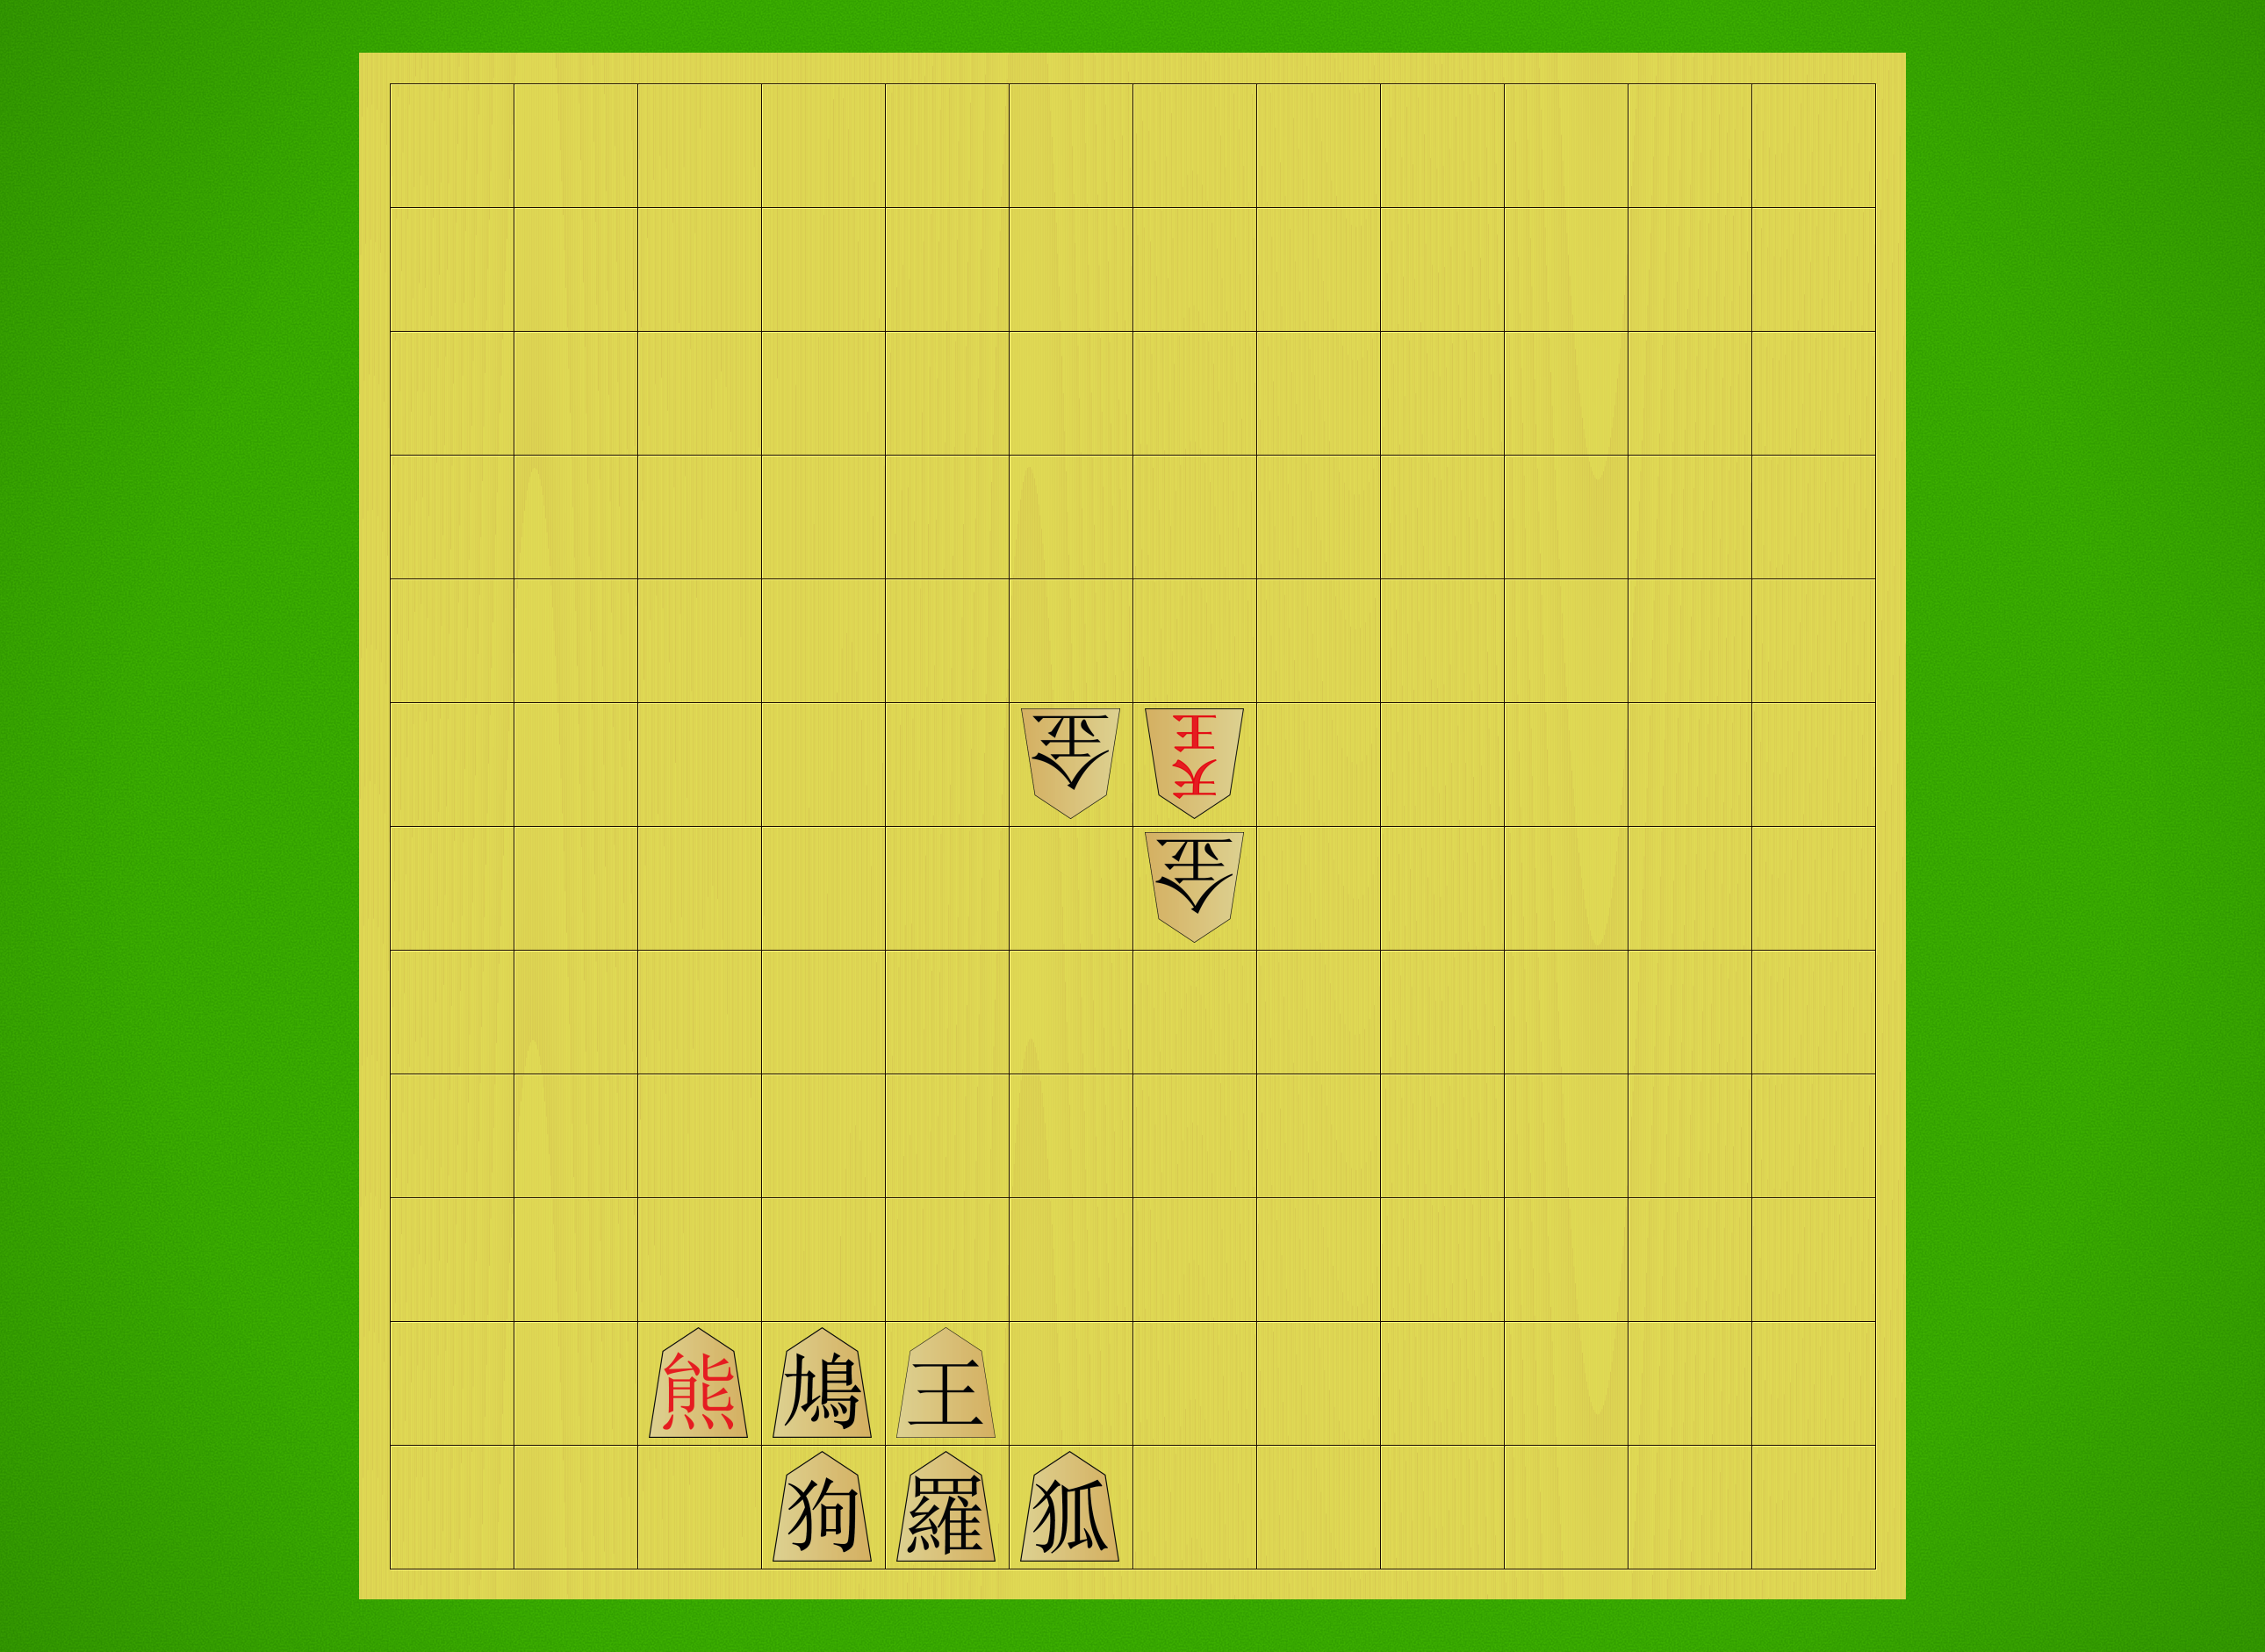
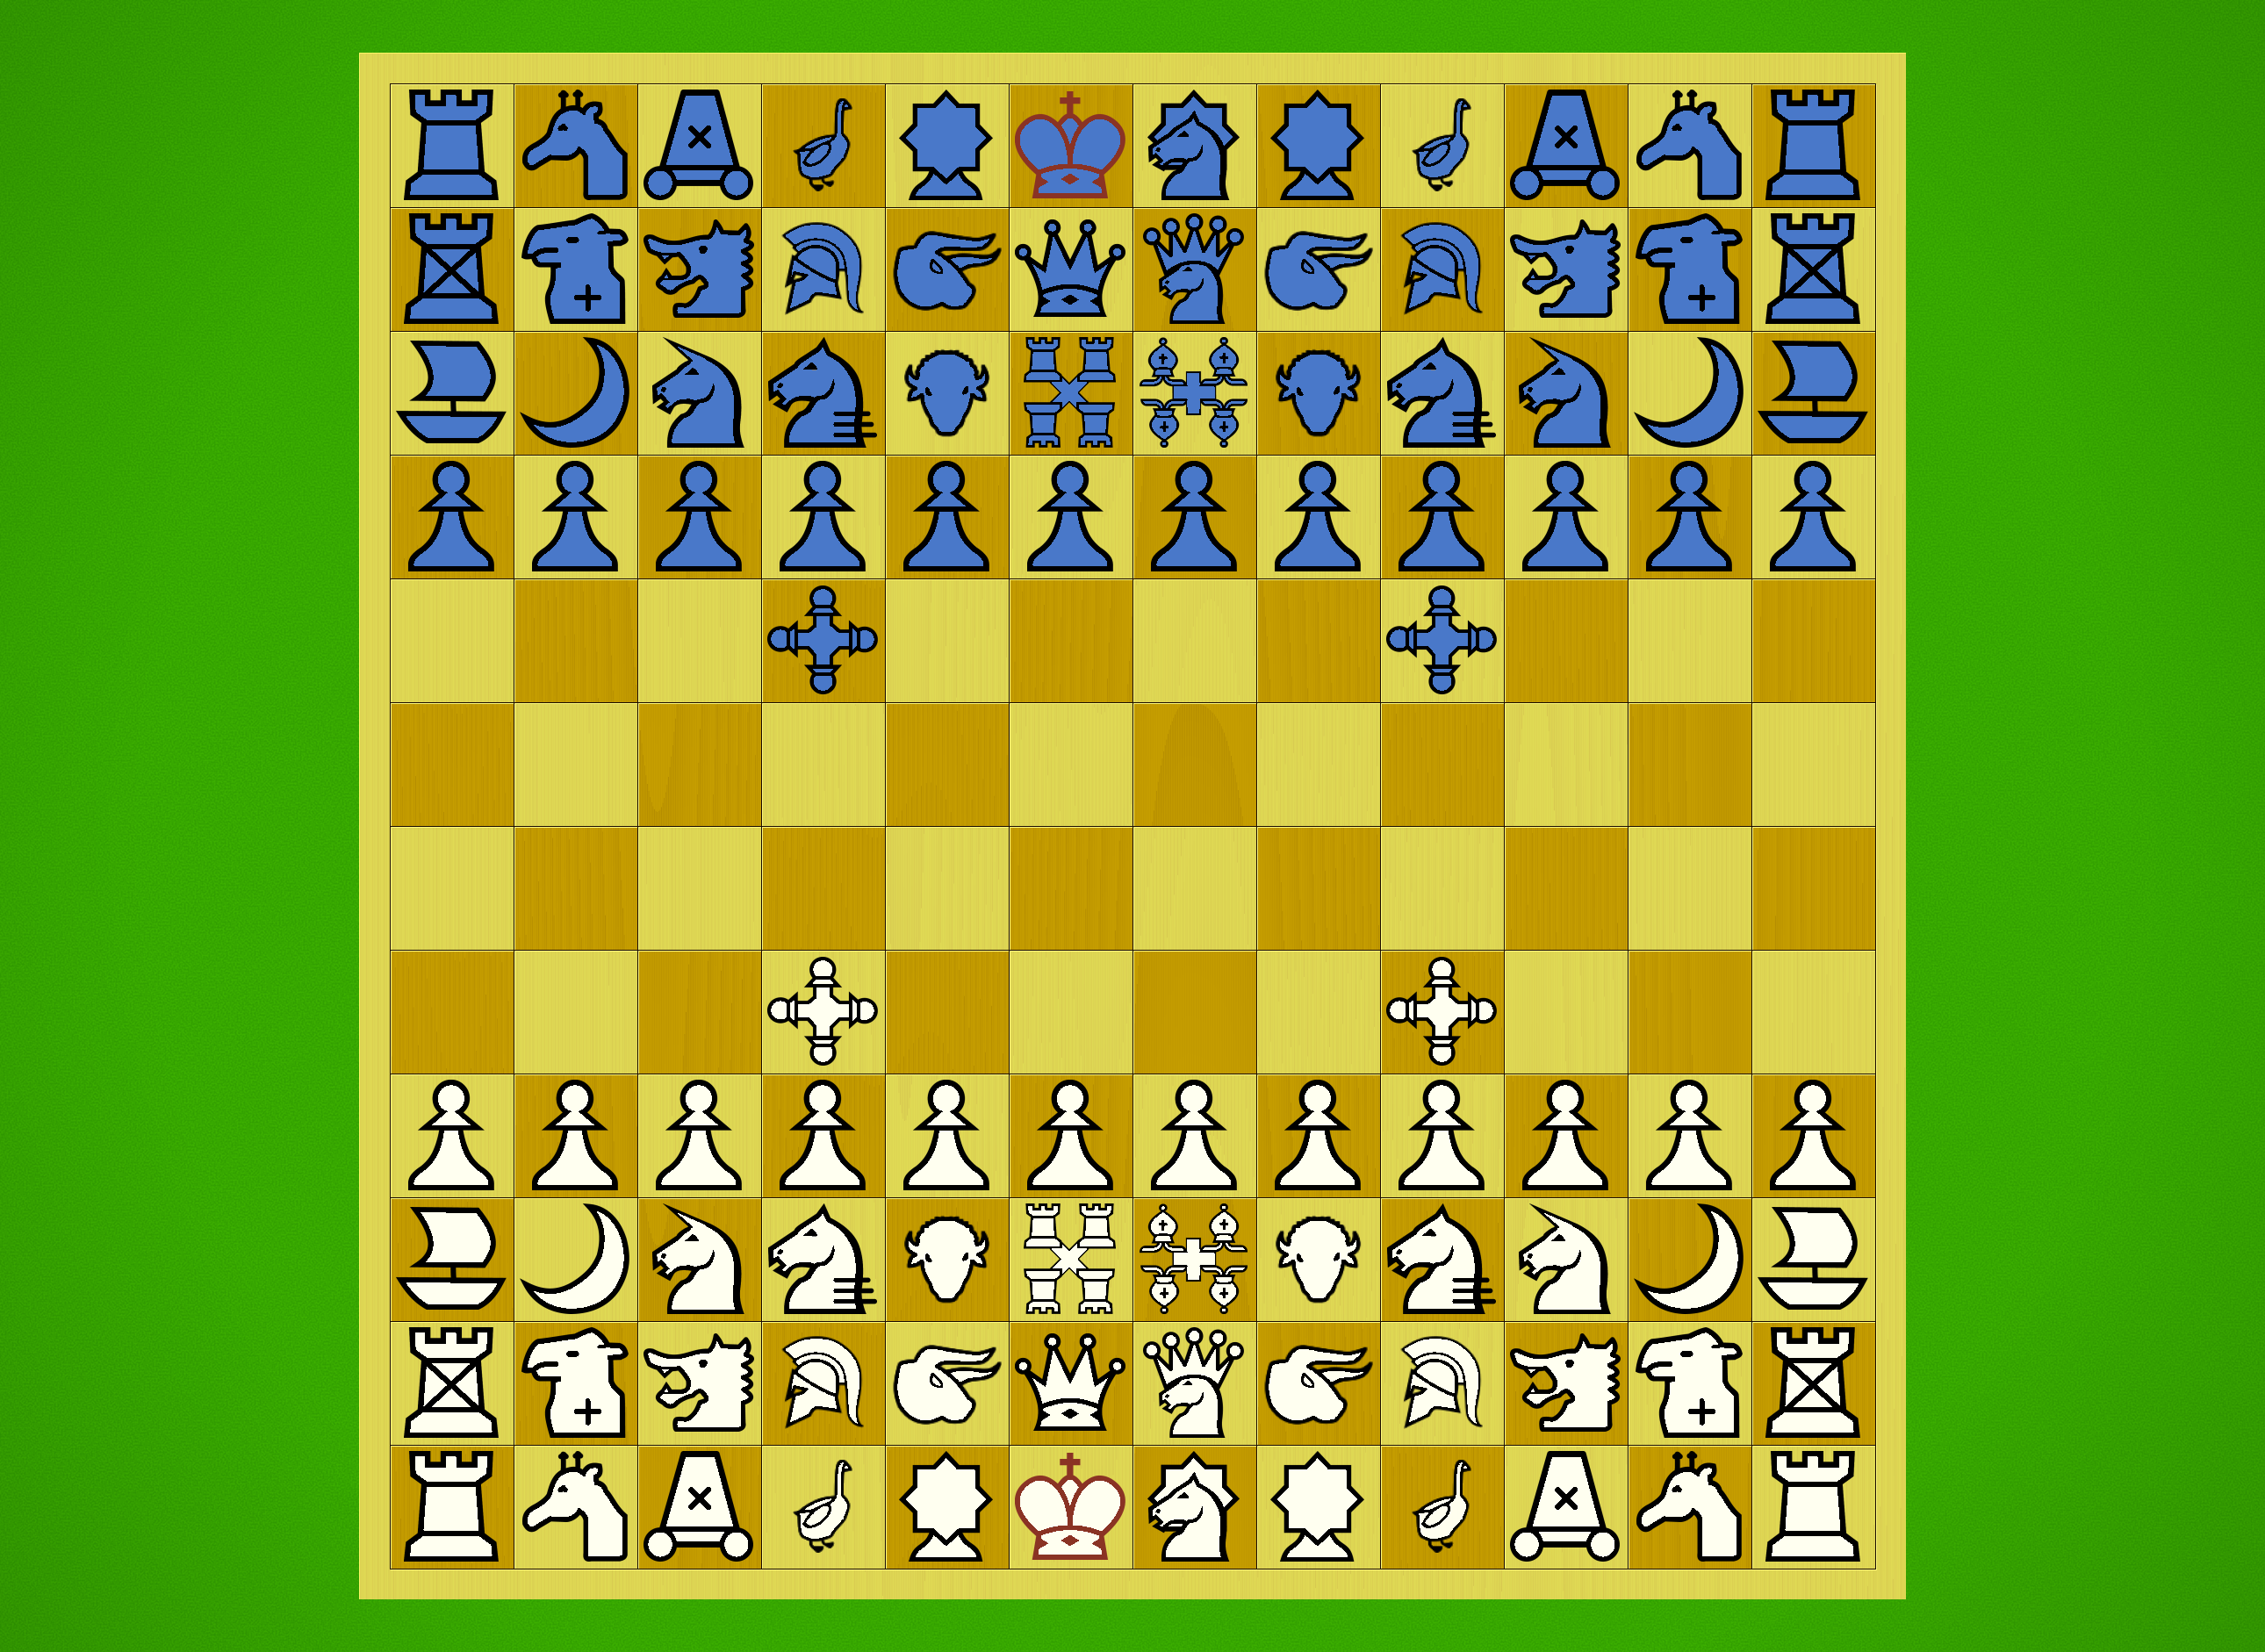
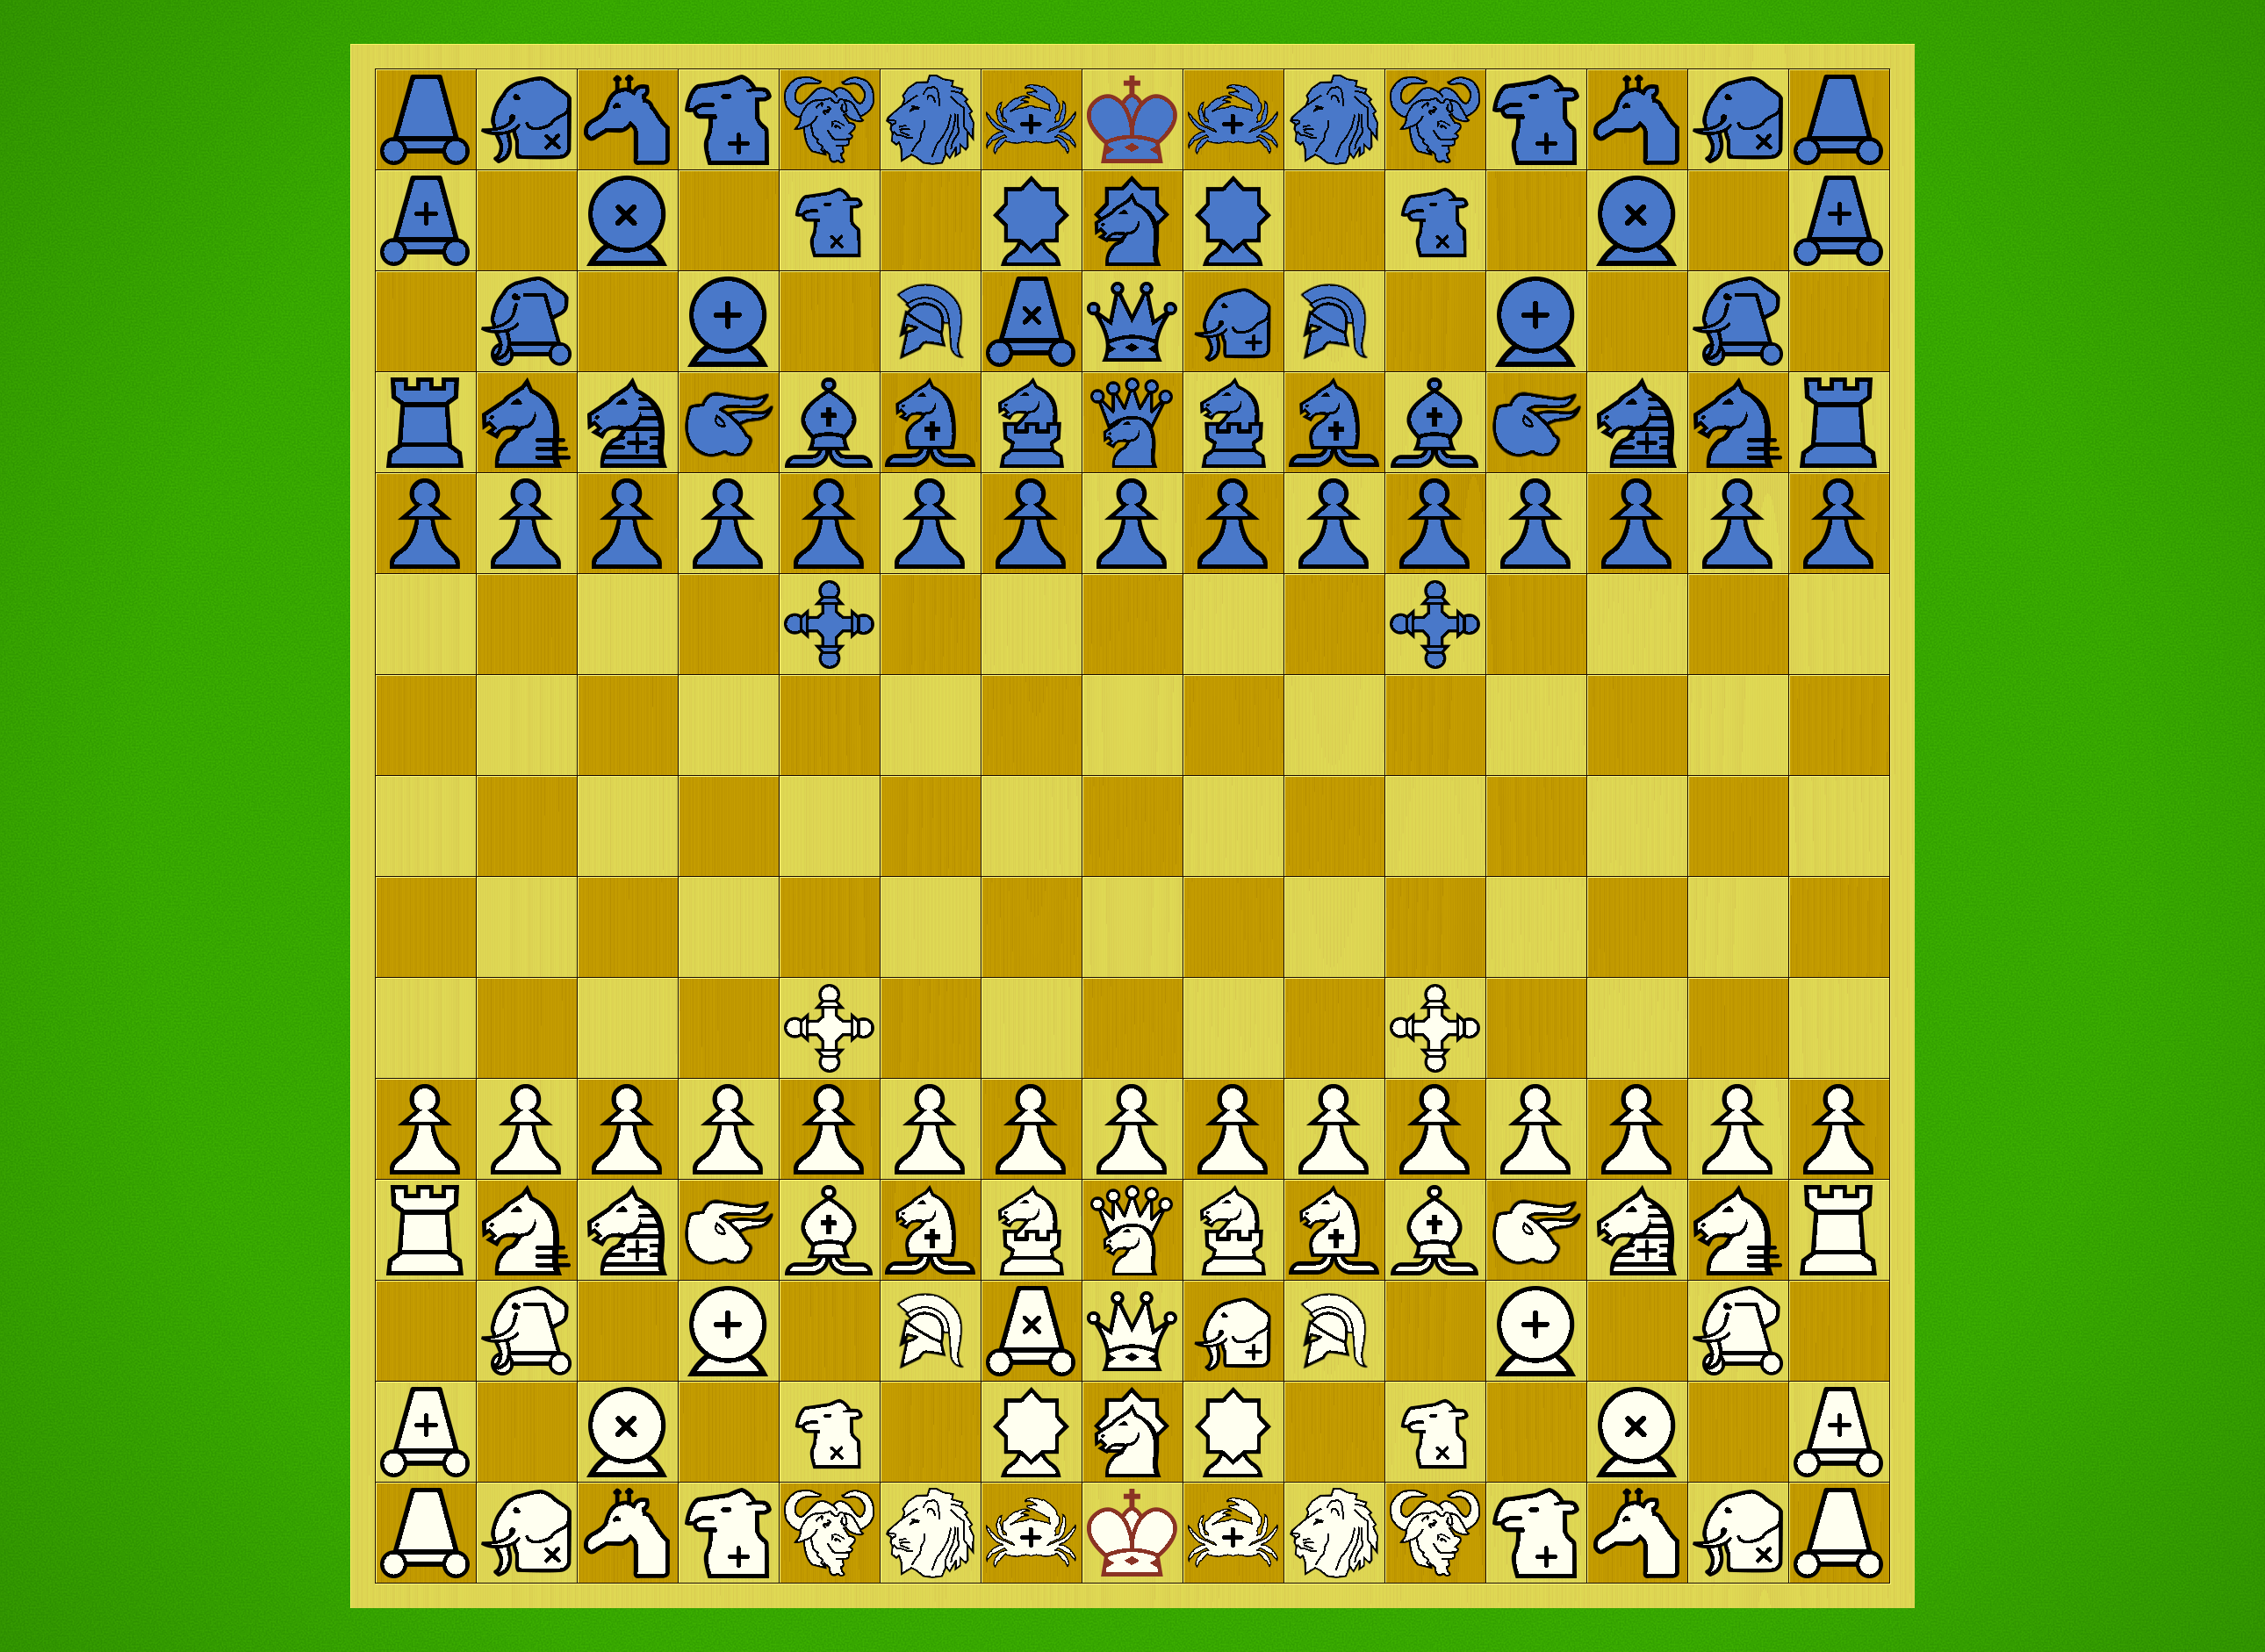
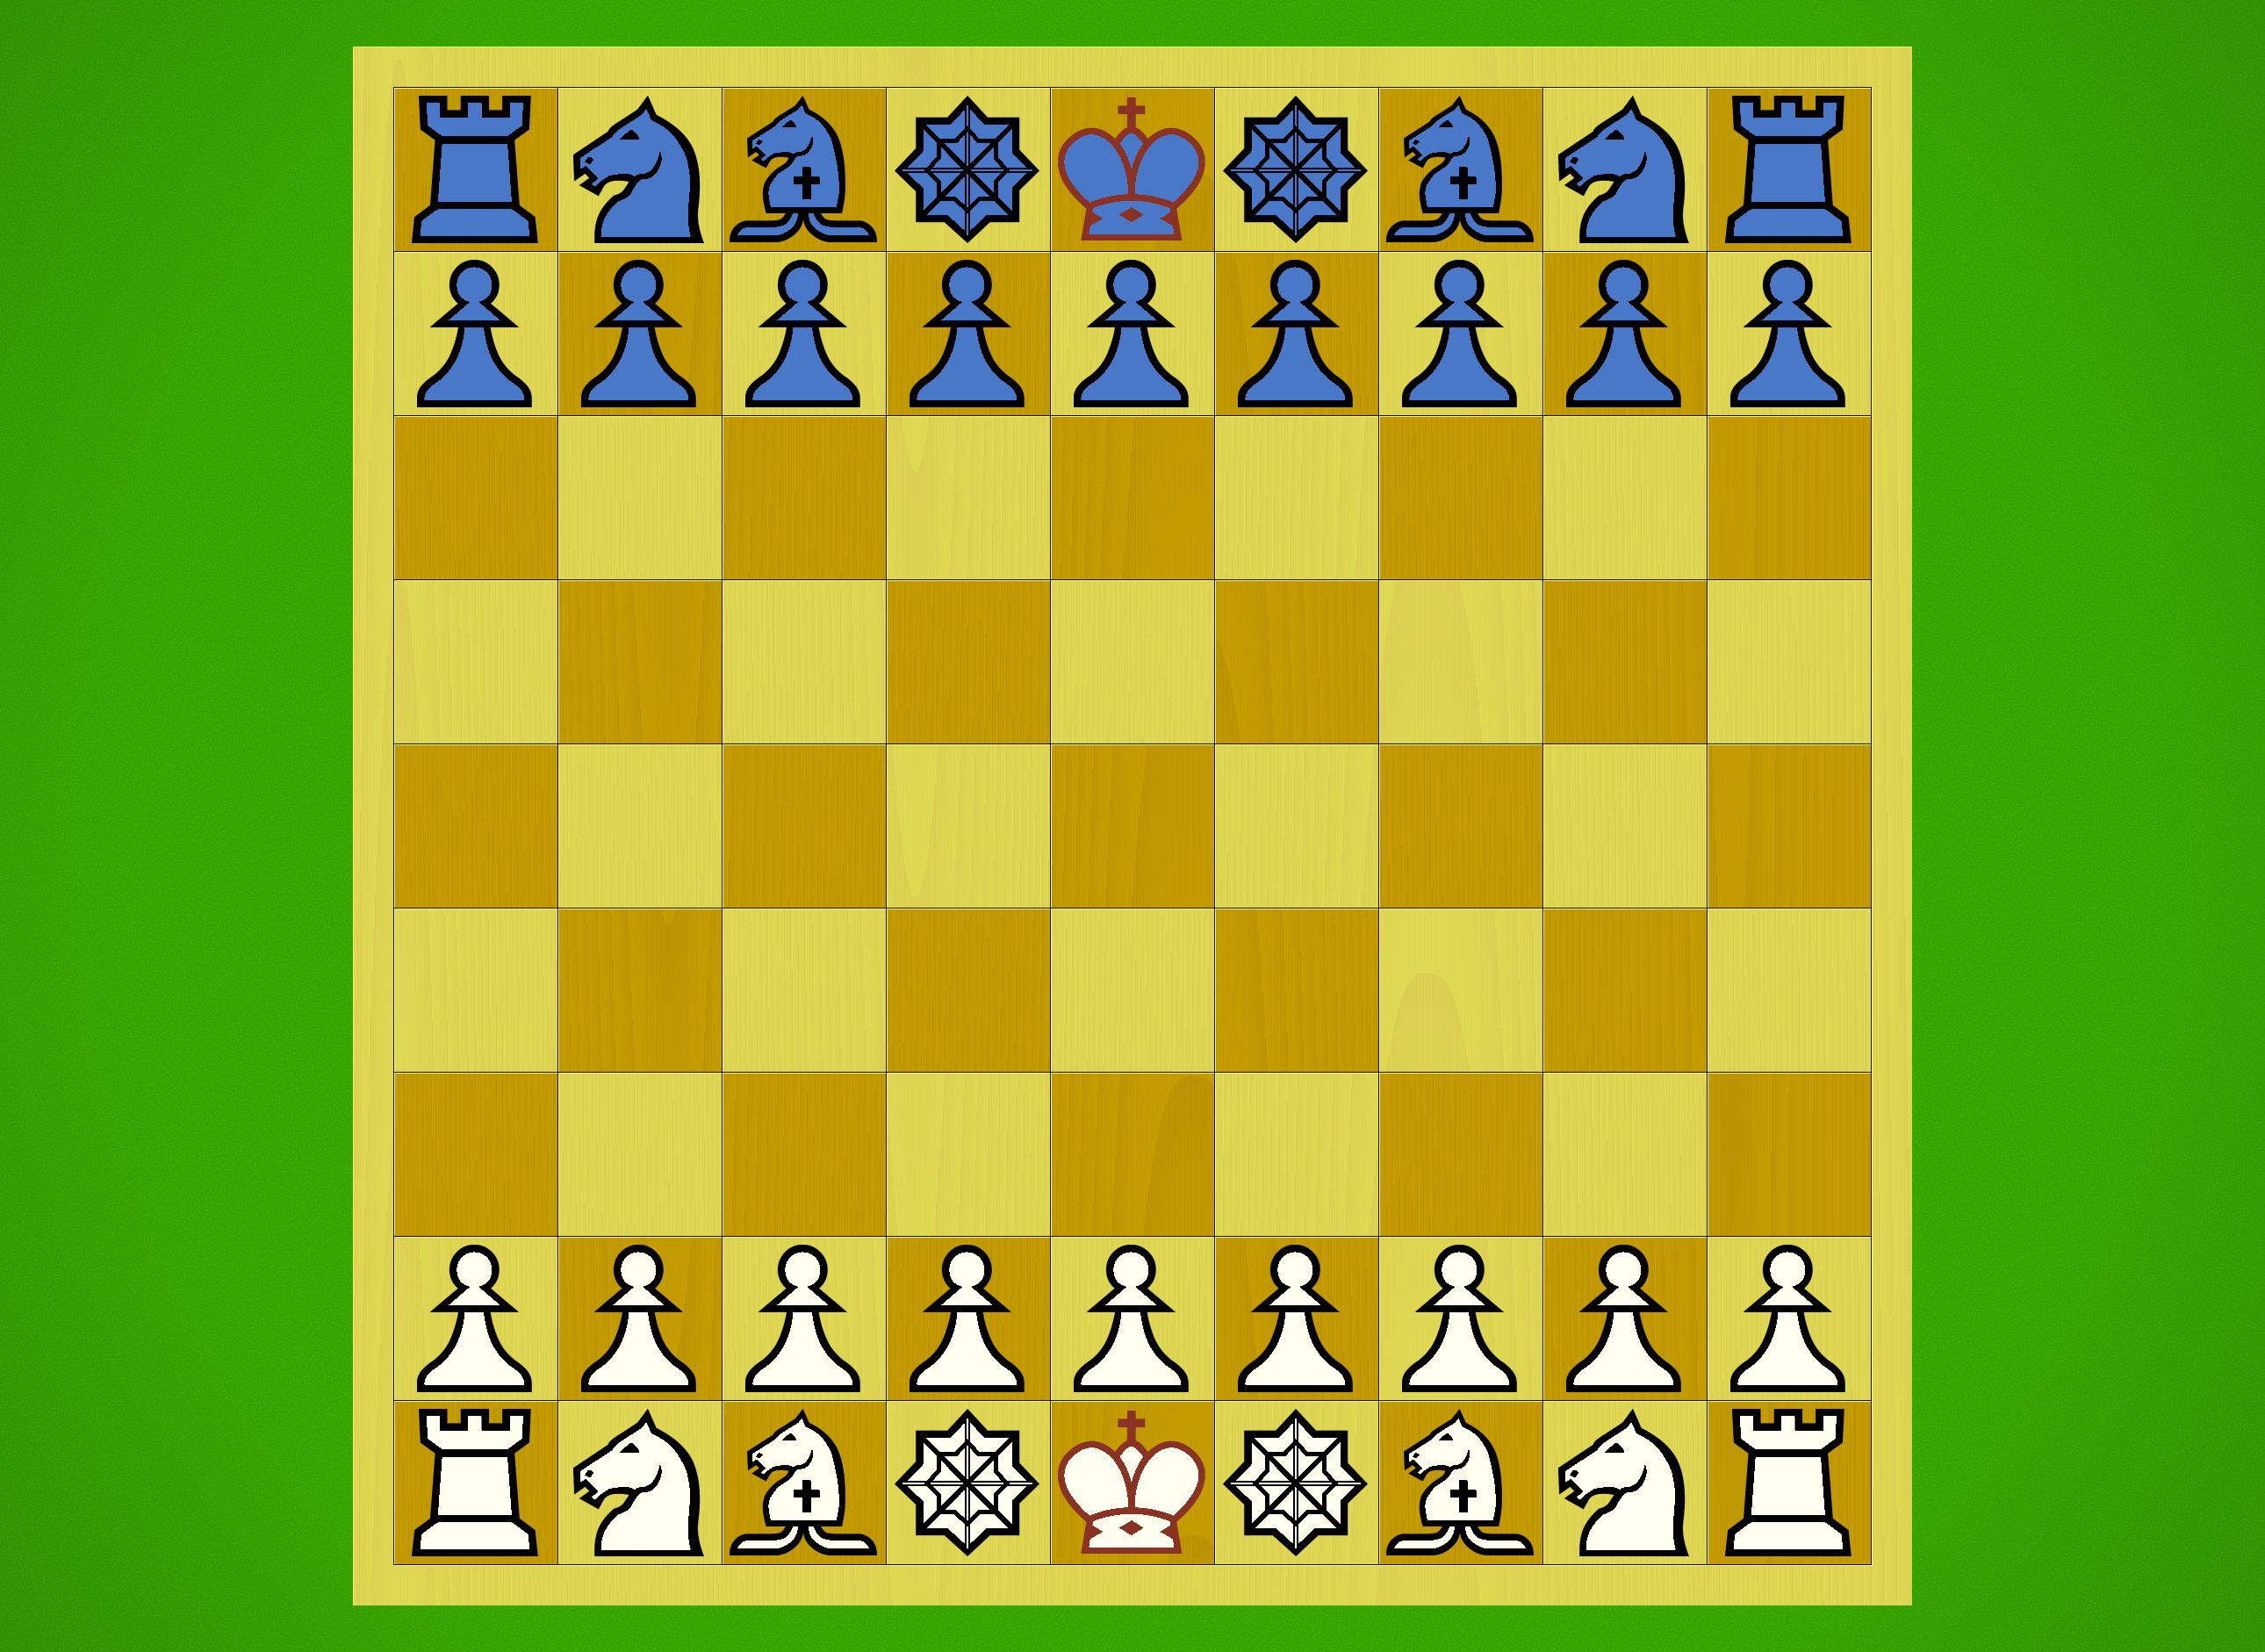
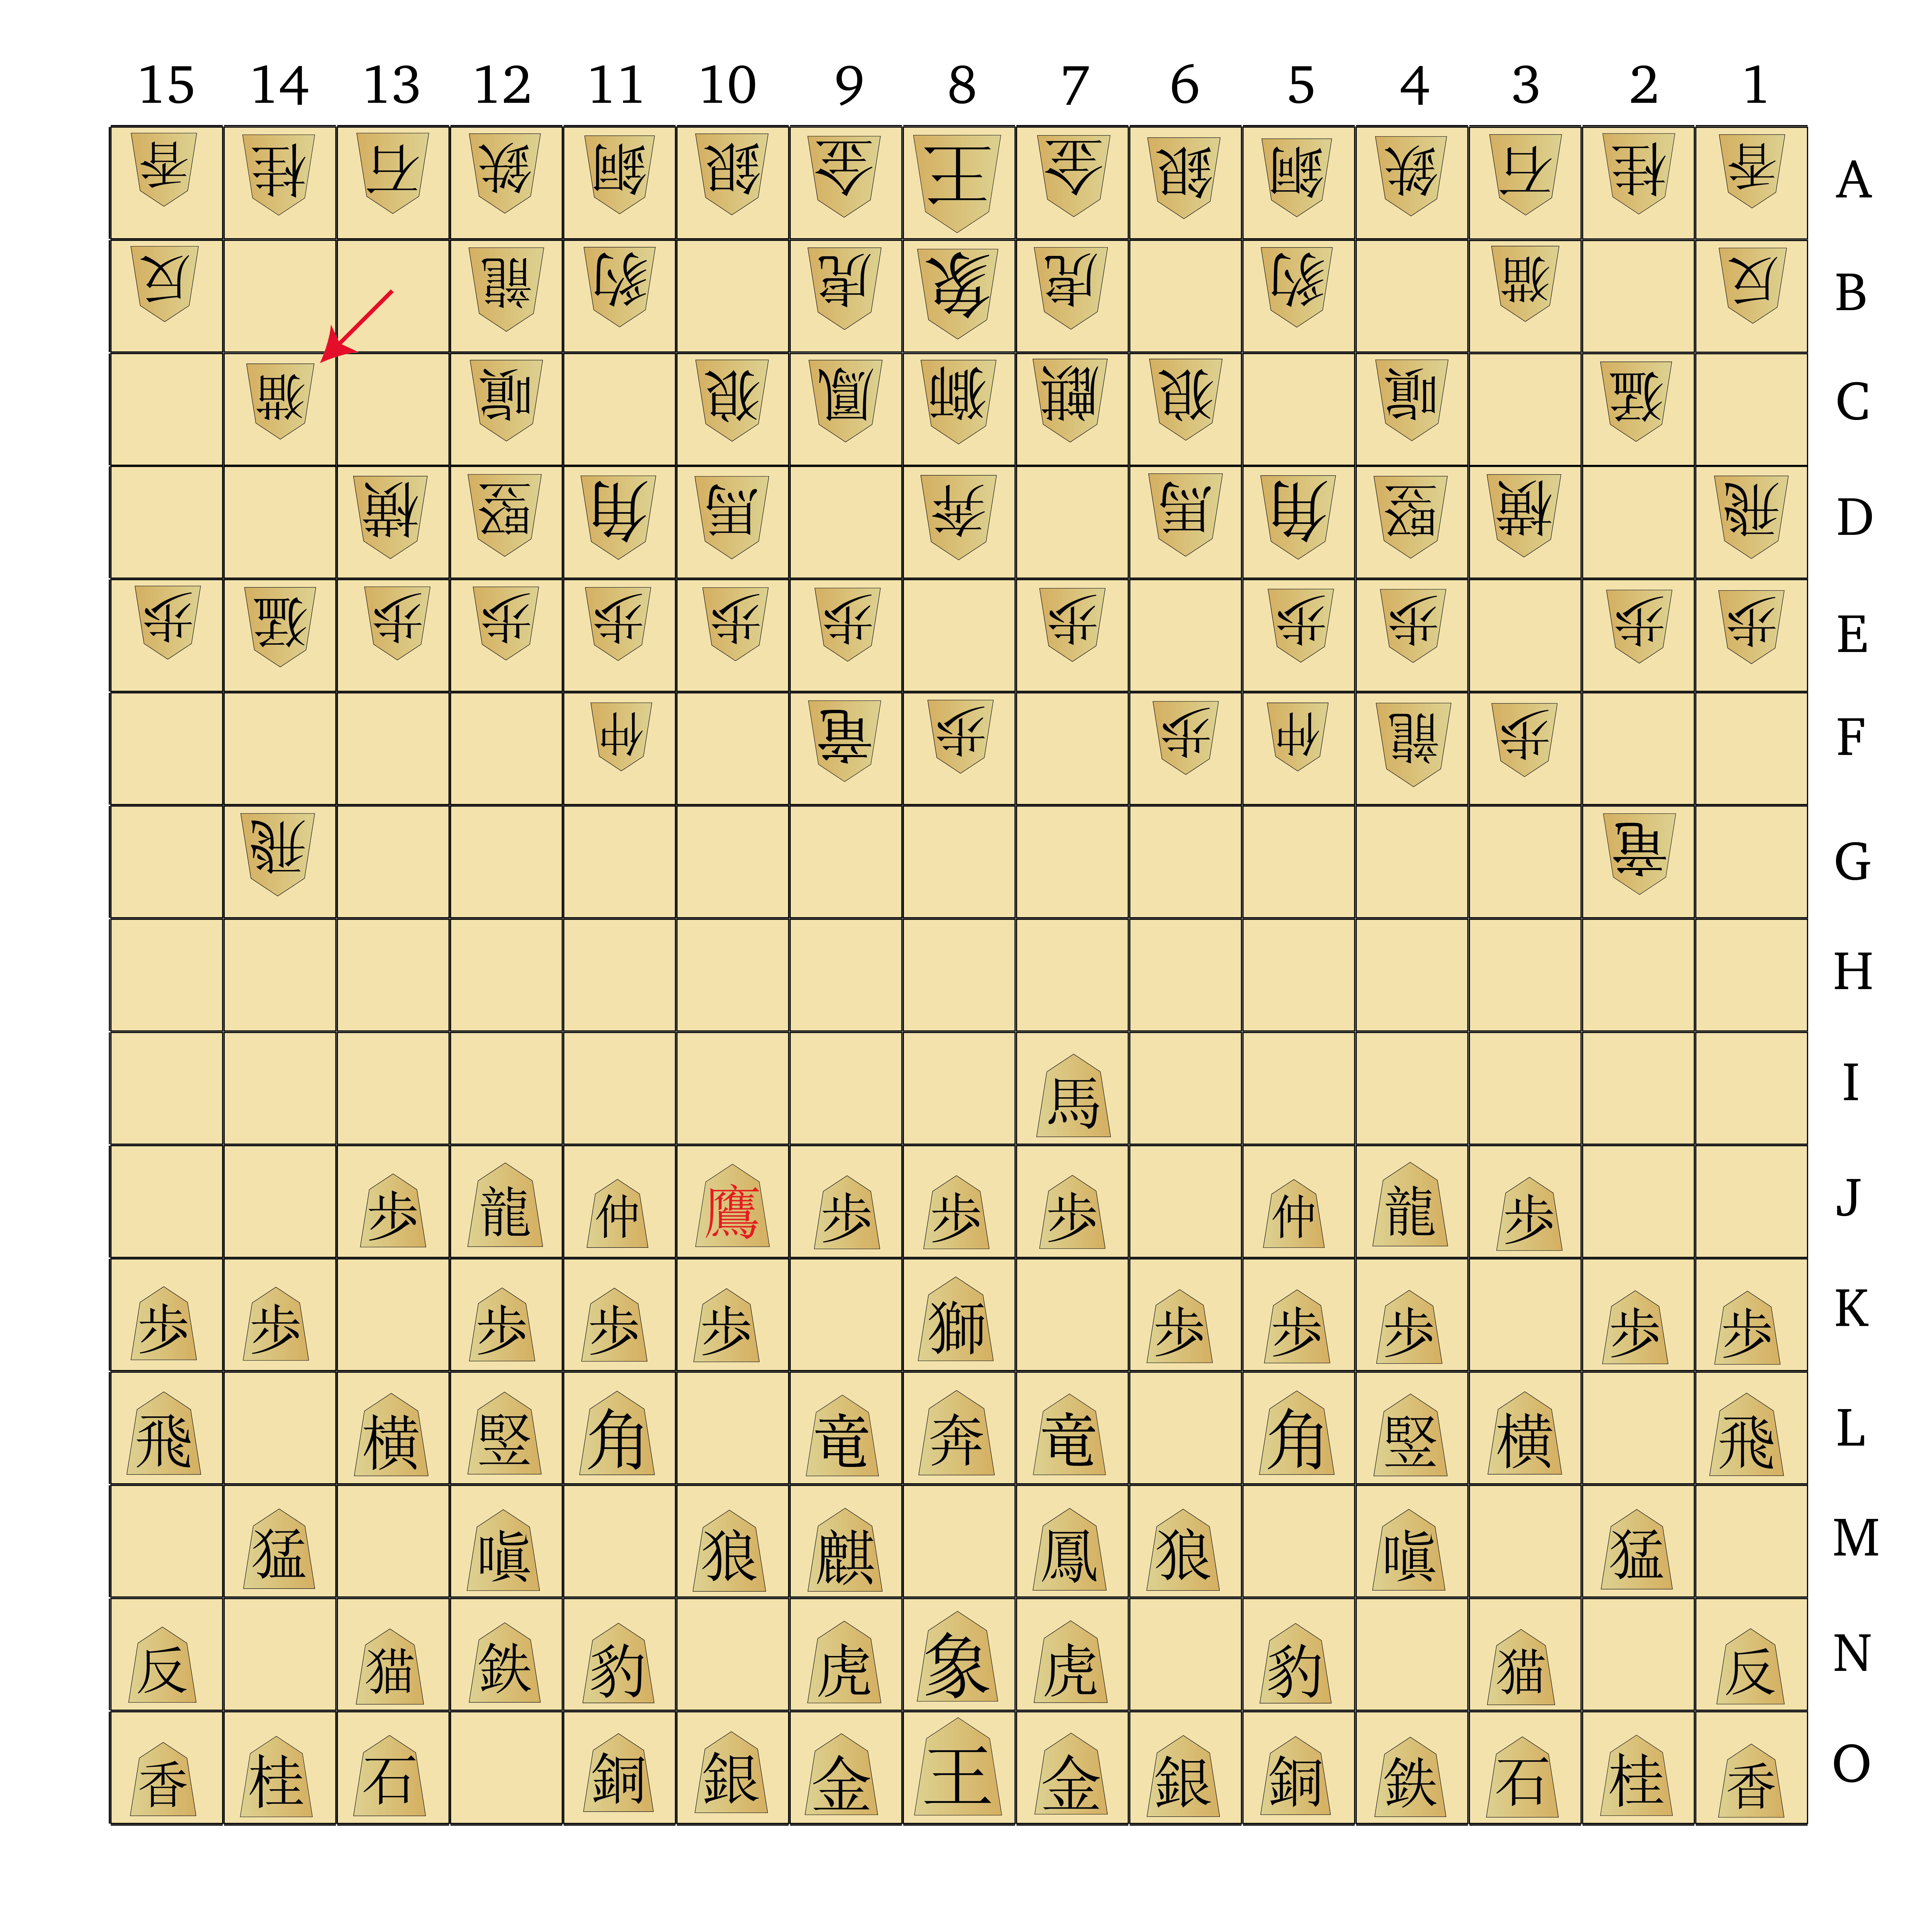
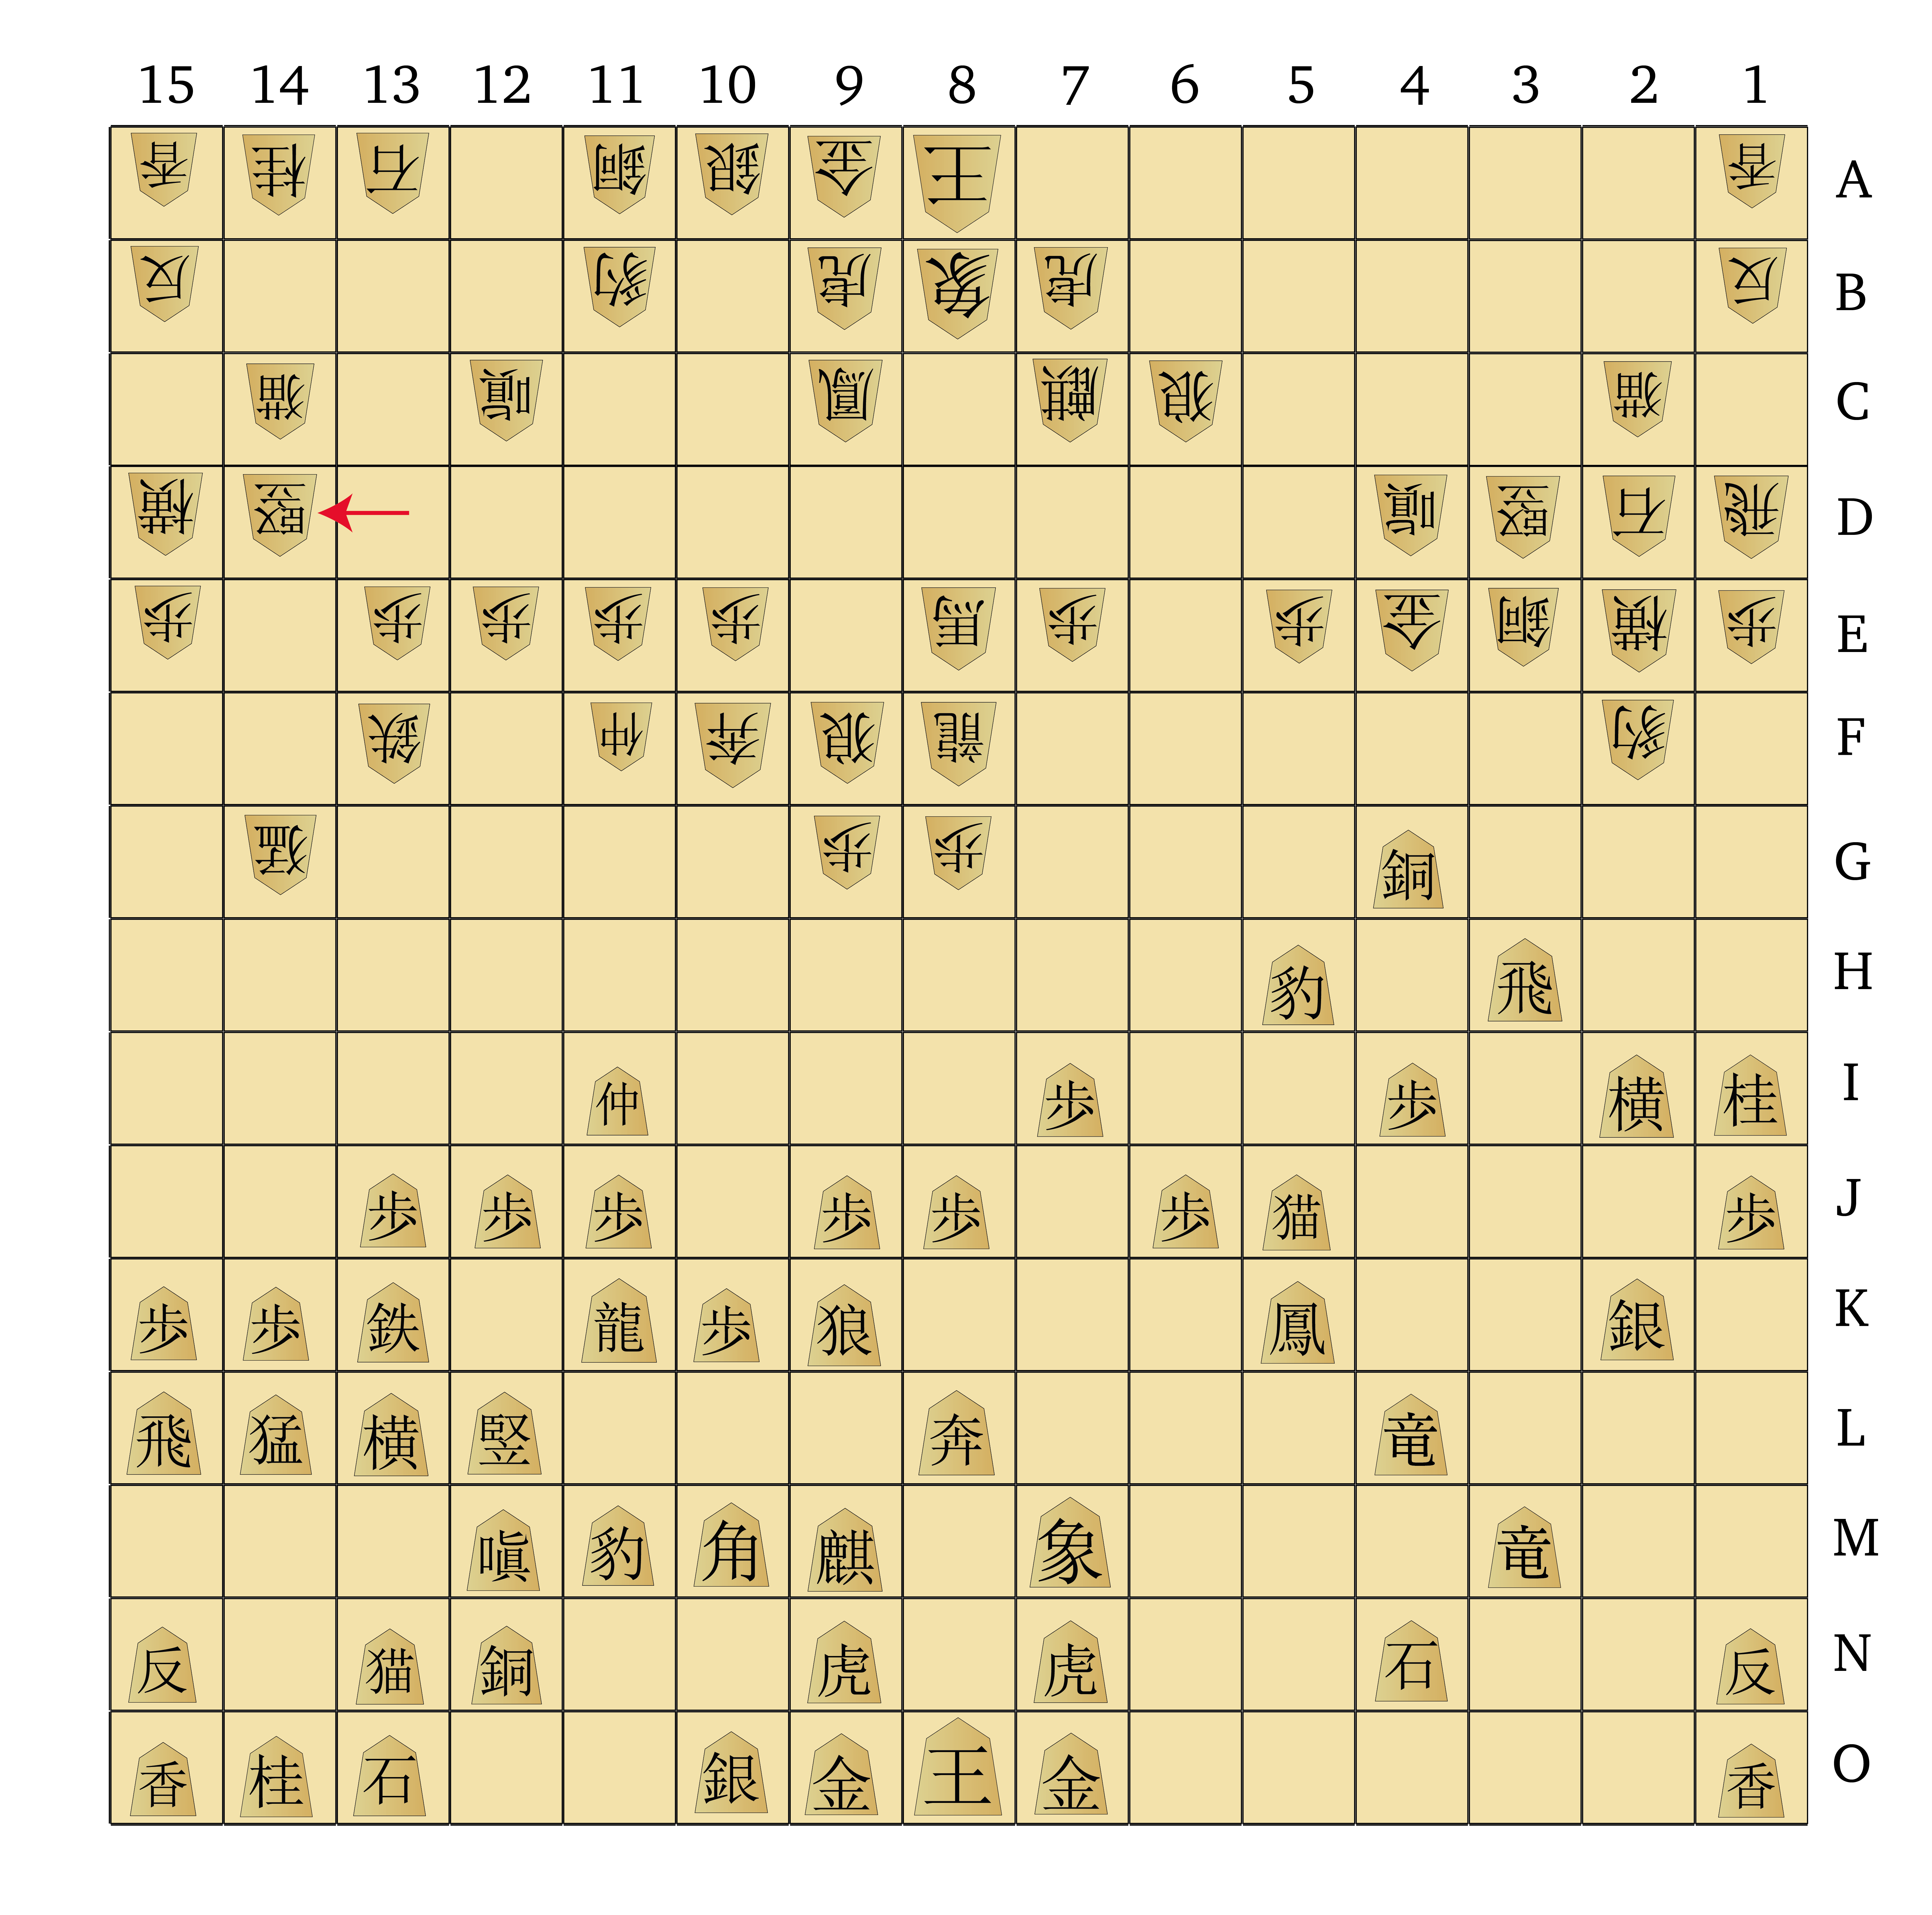
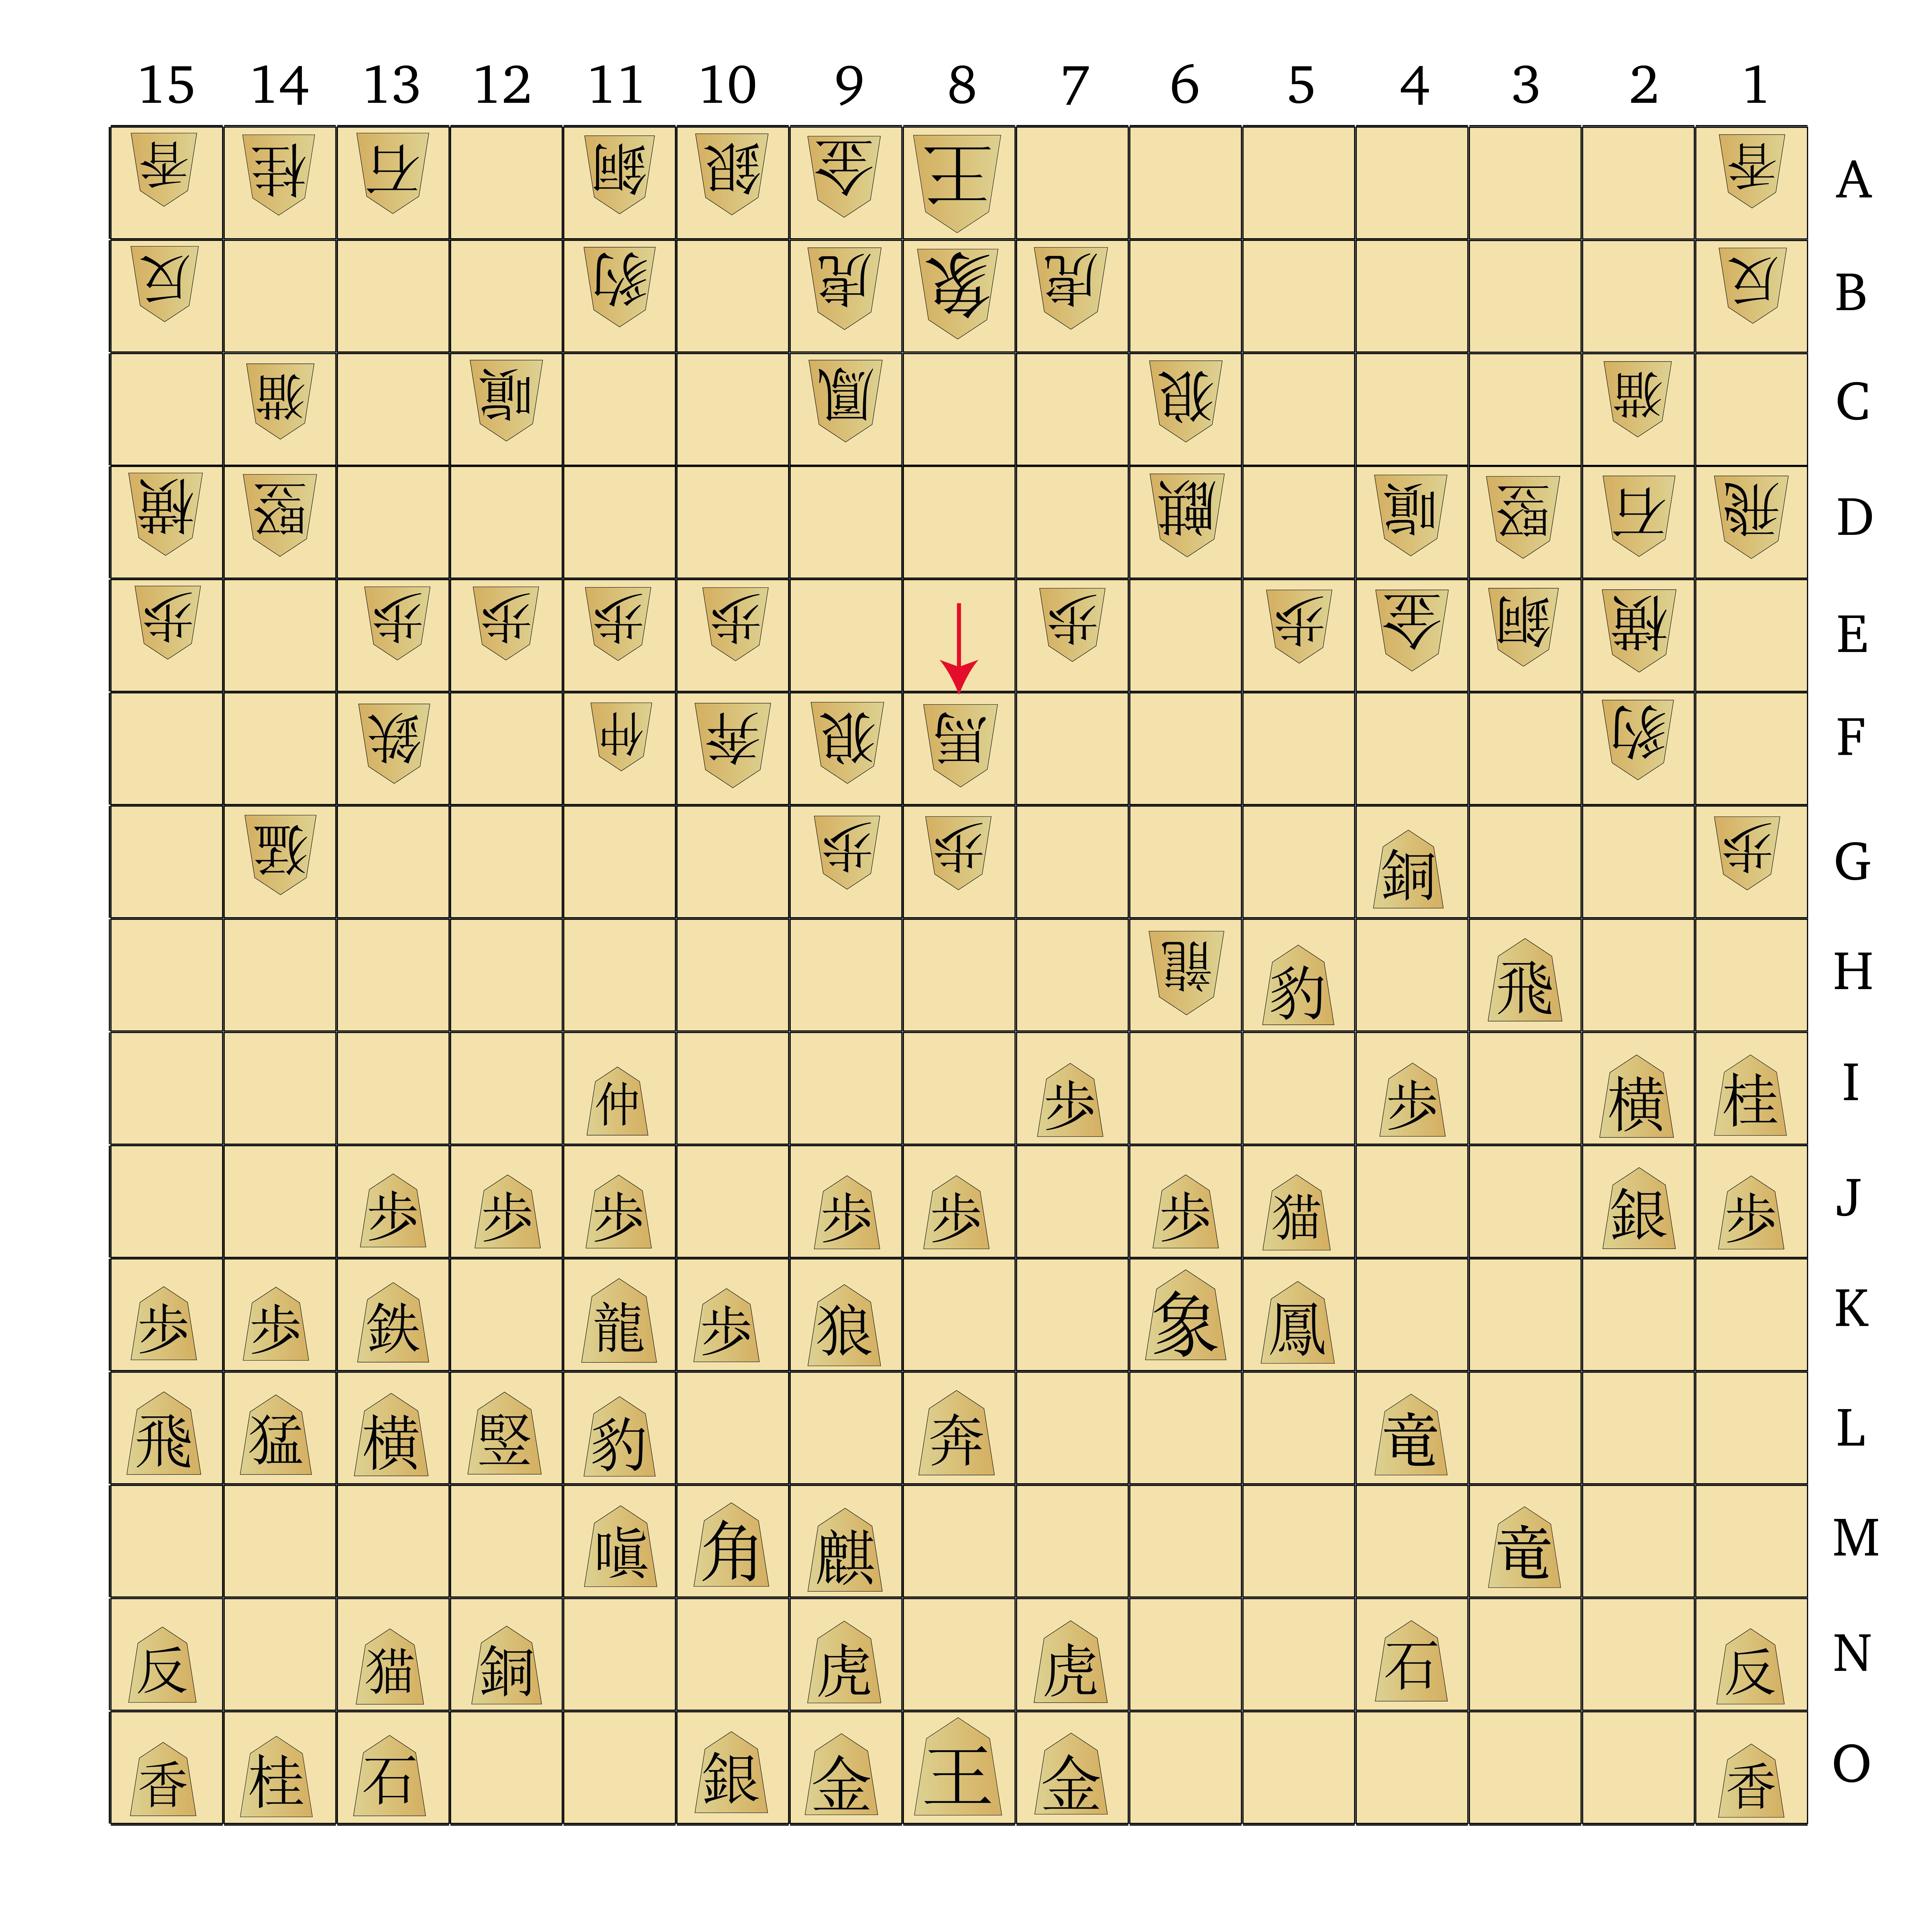
Shinjuu Shogi starting position with traditional kanji pieces. 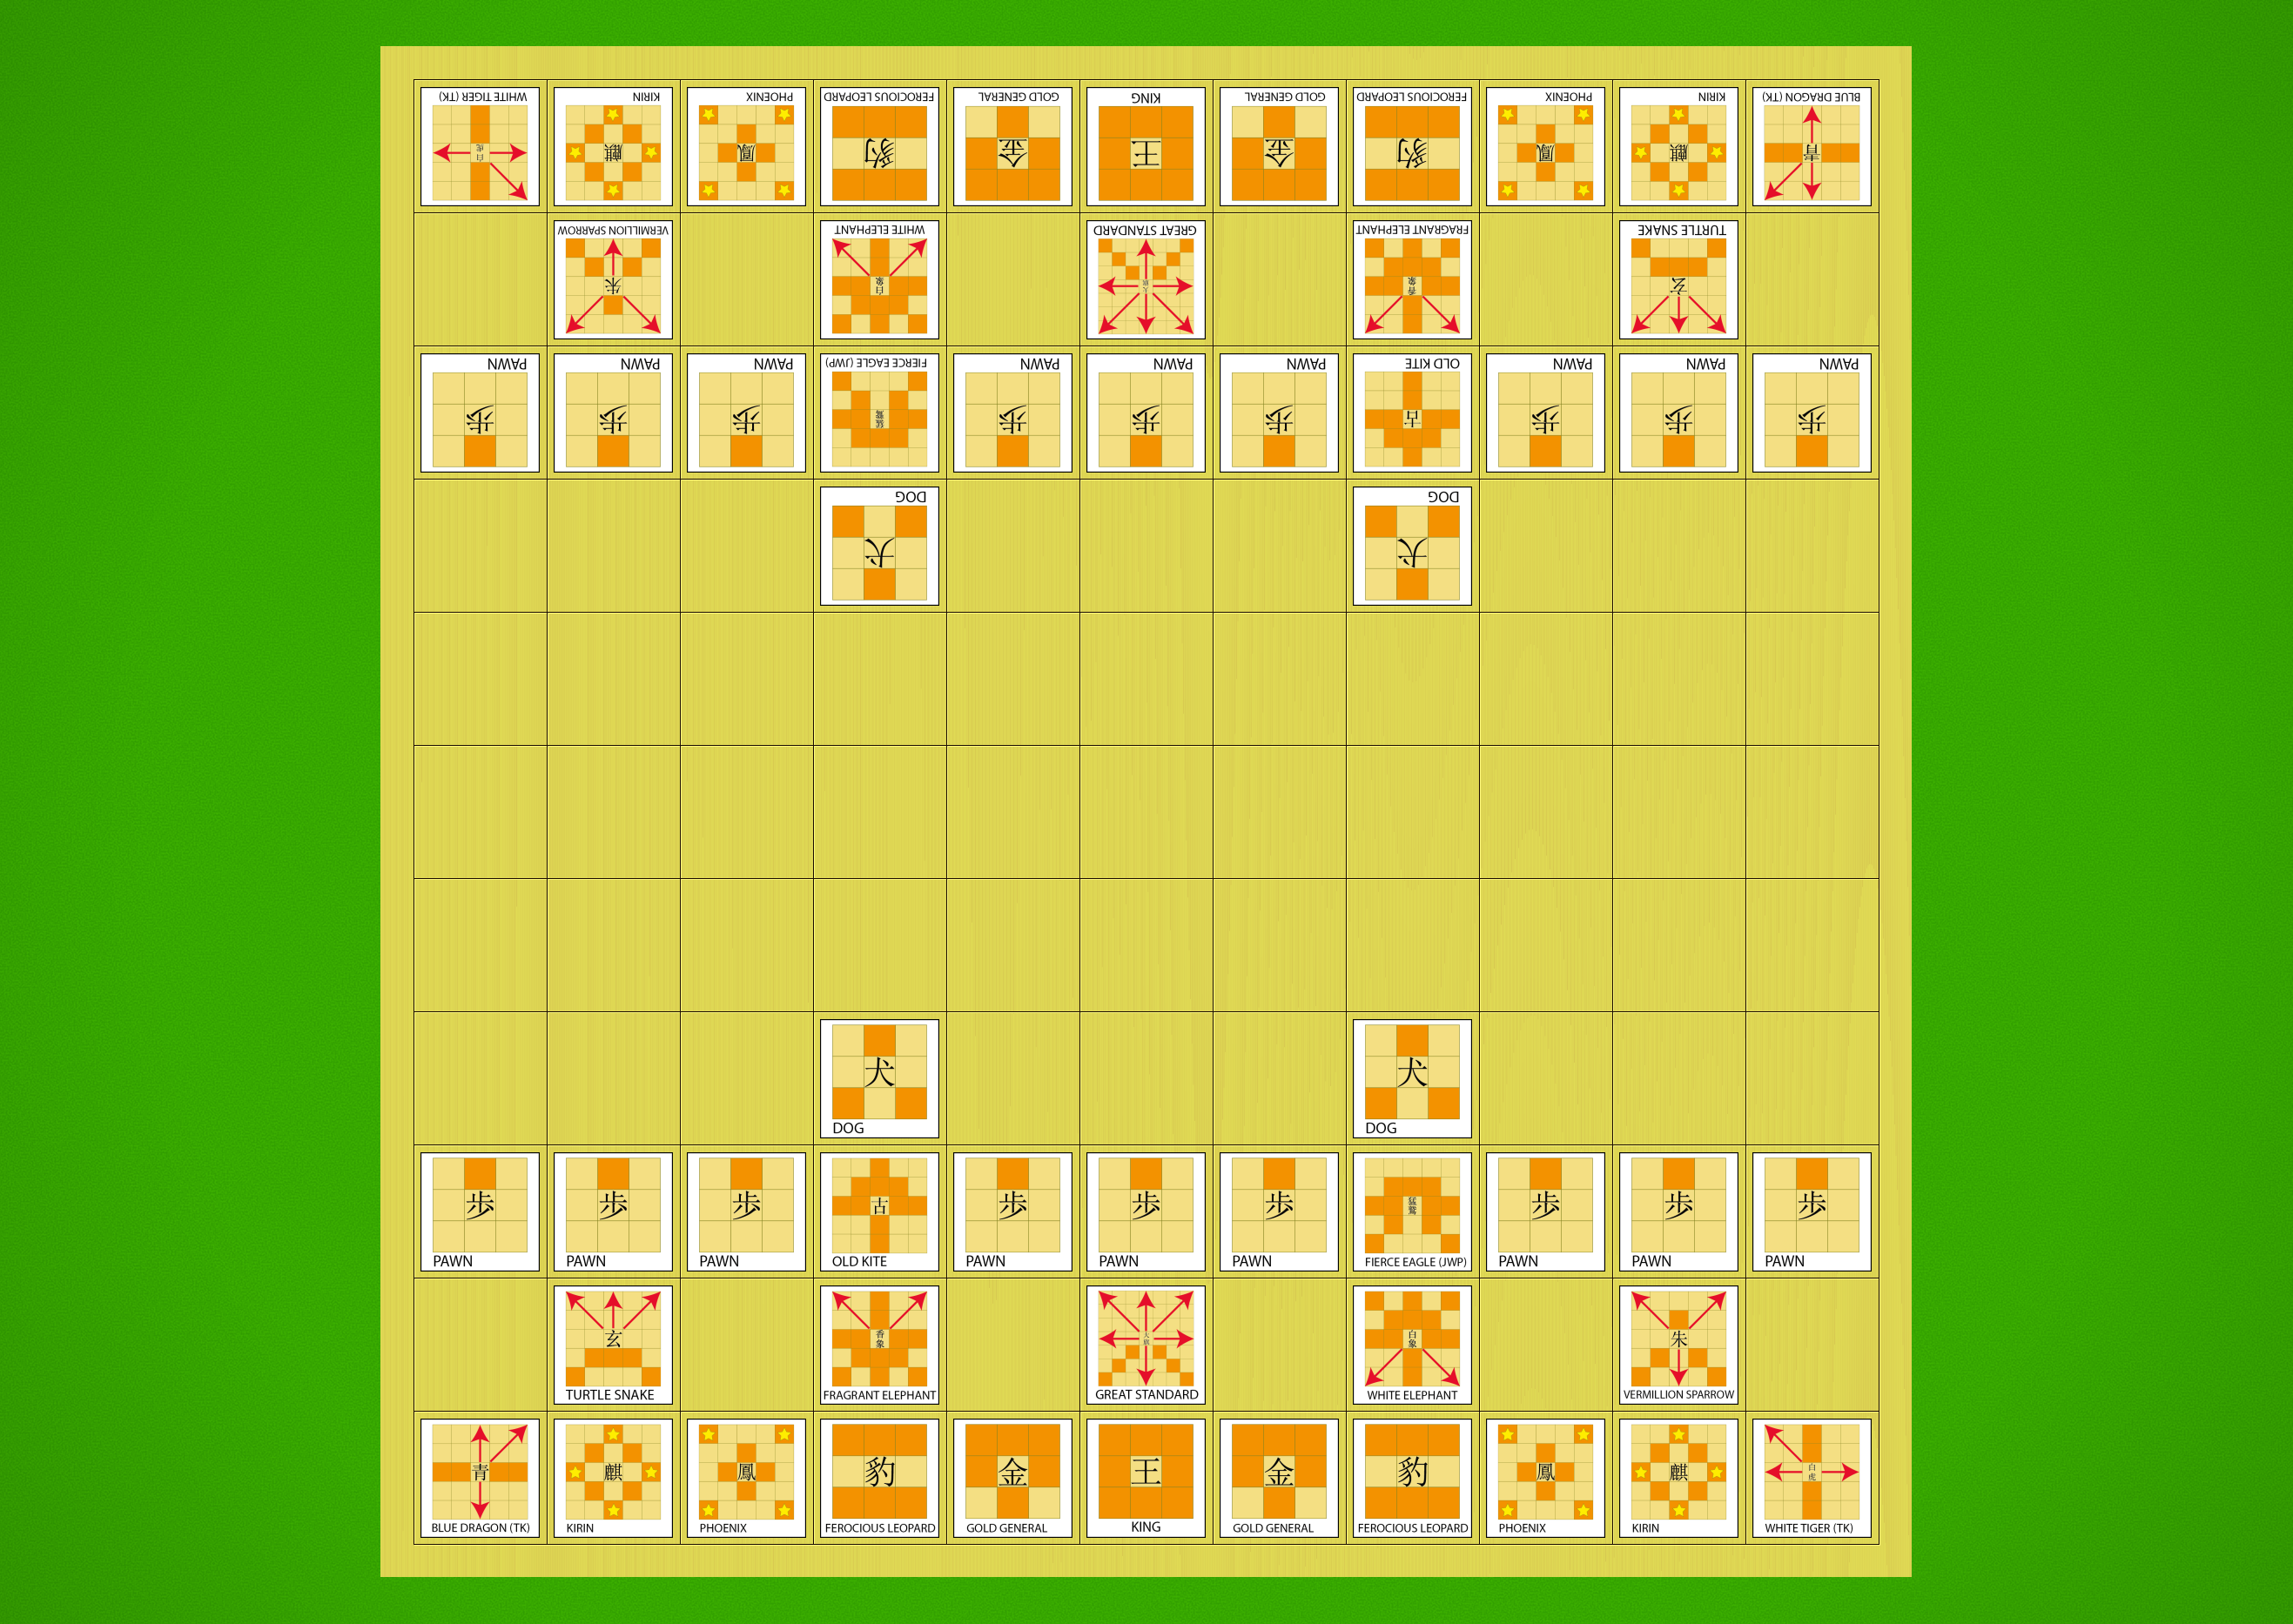
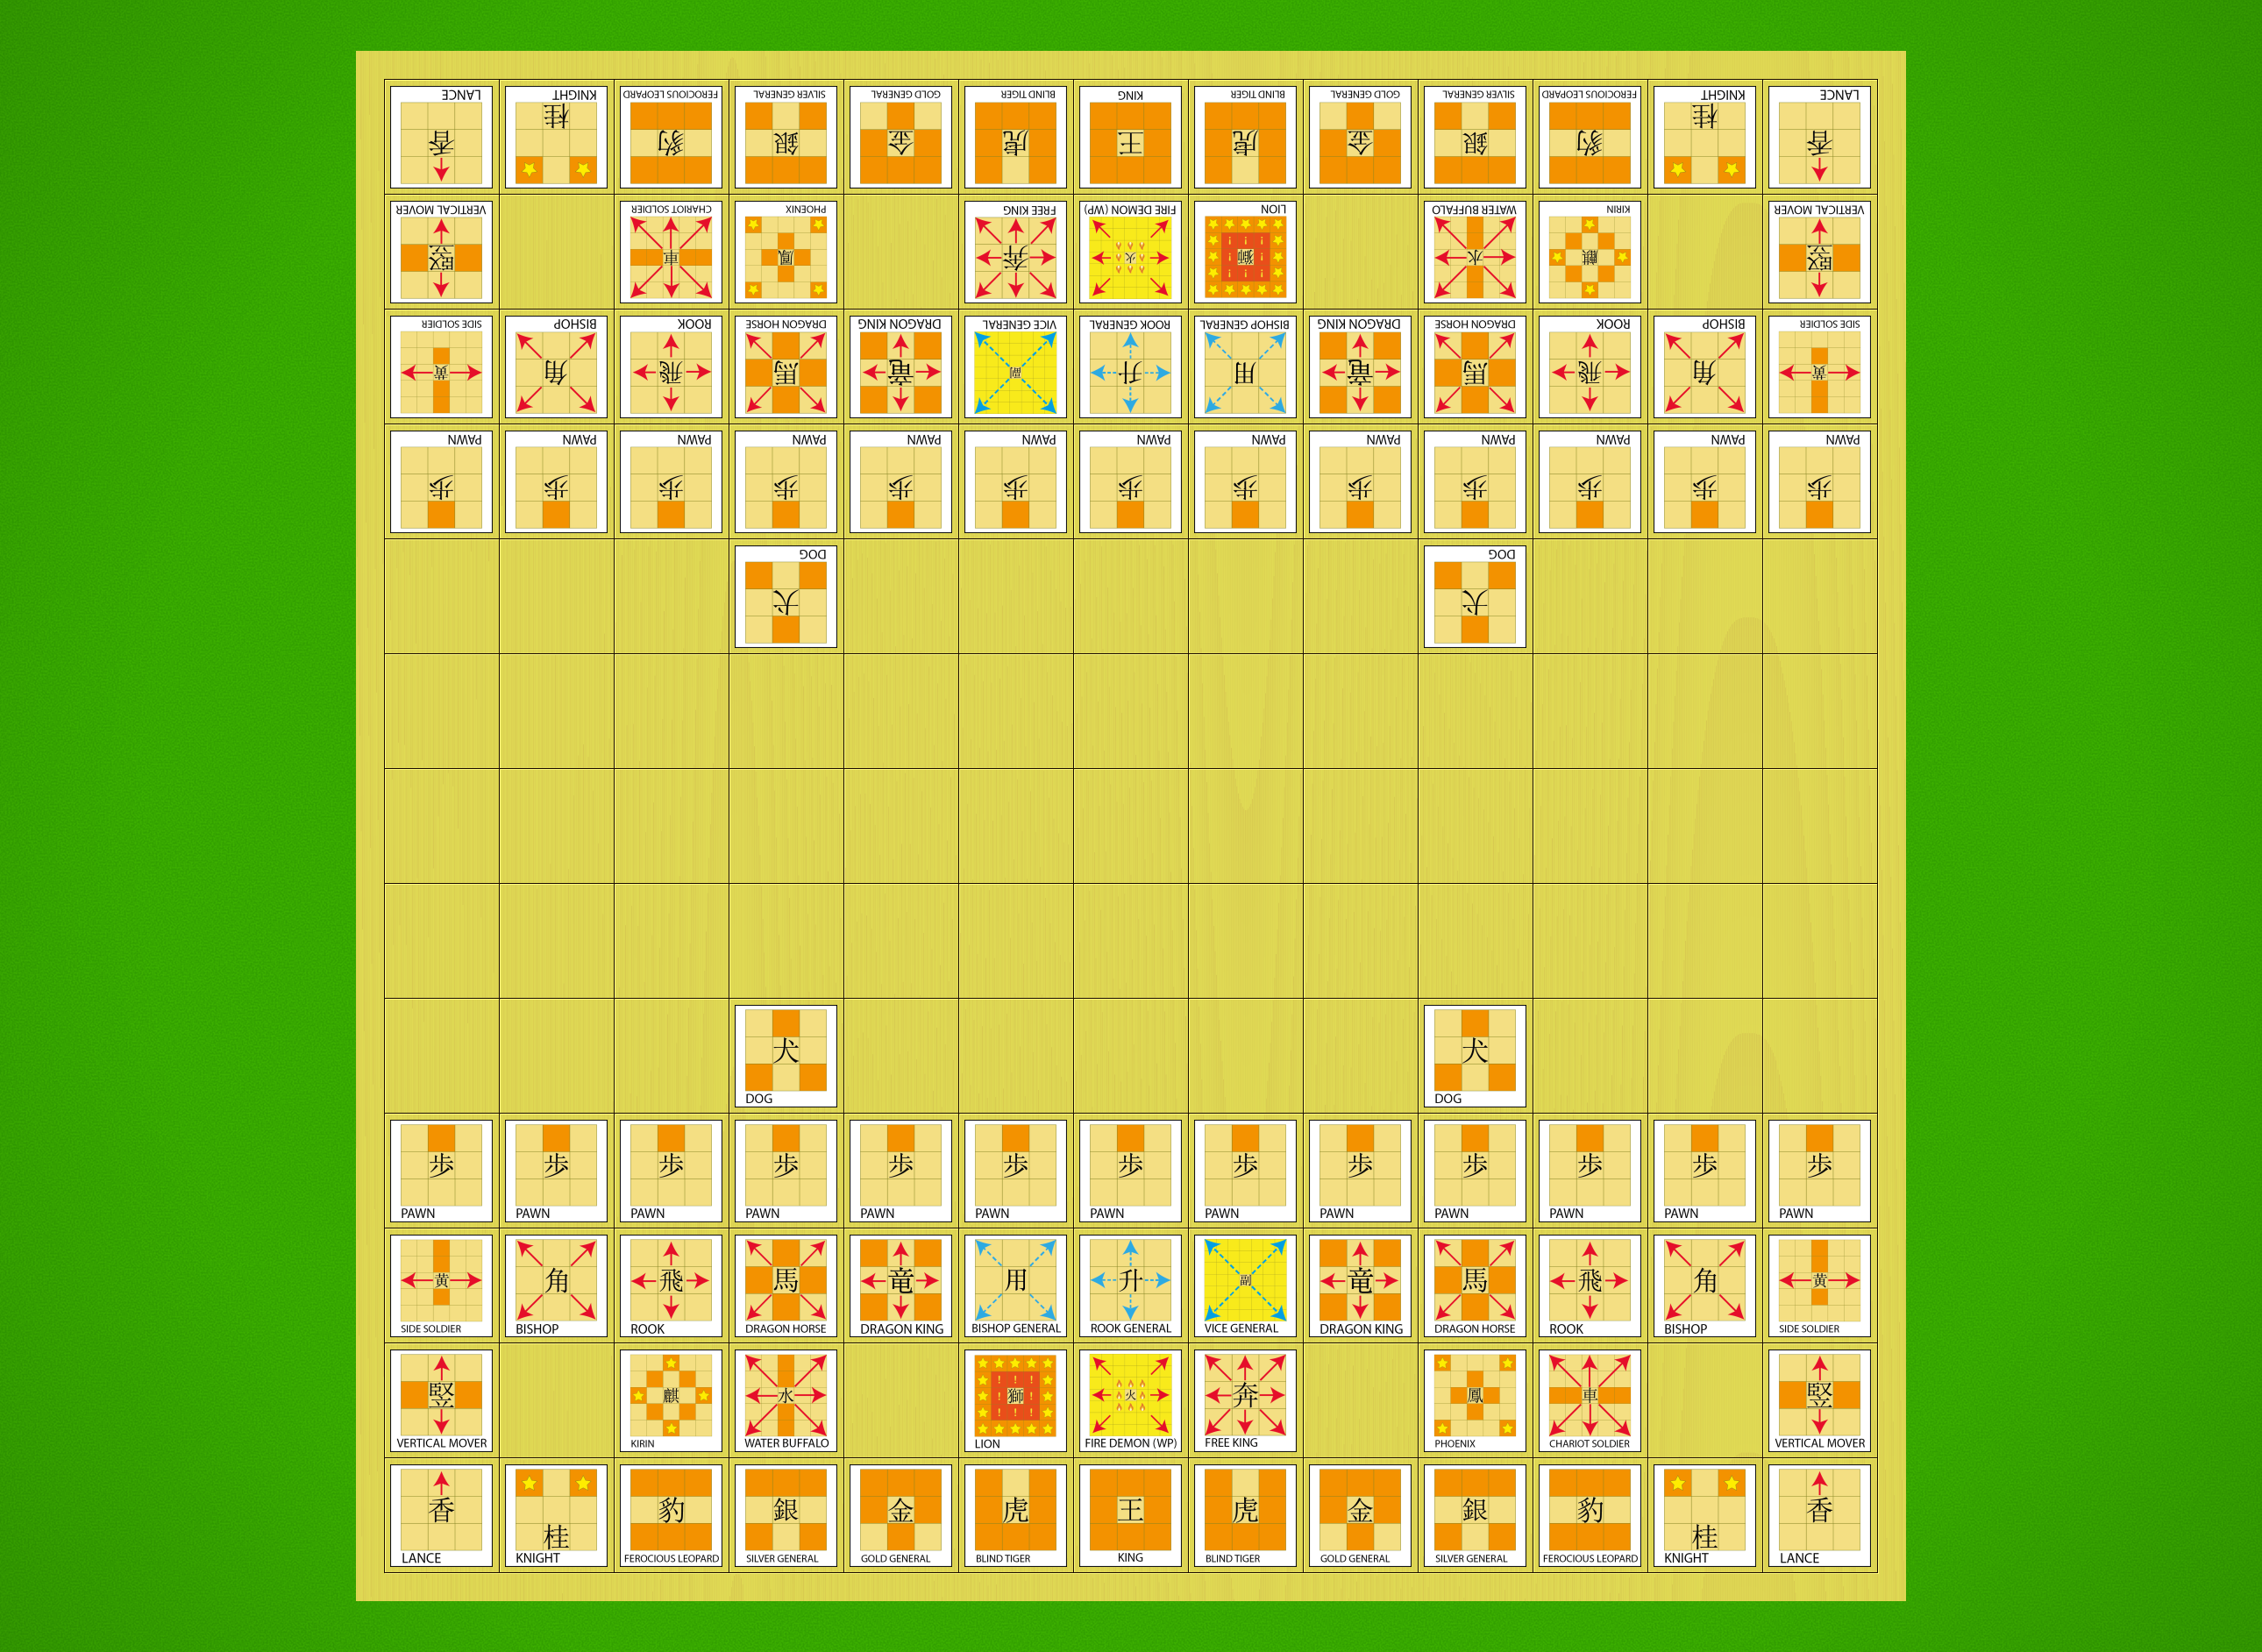
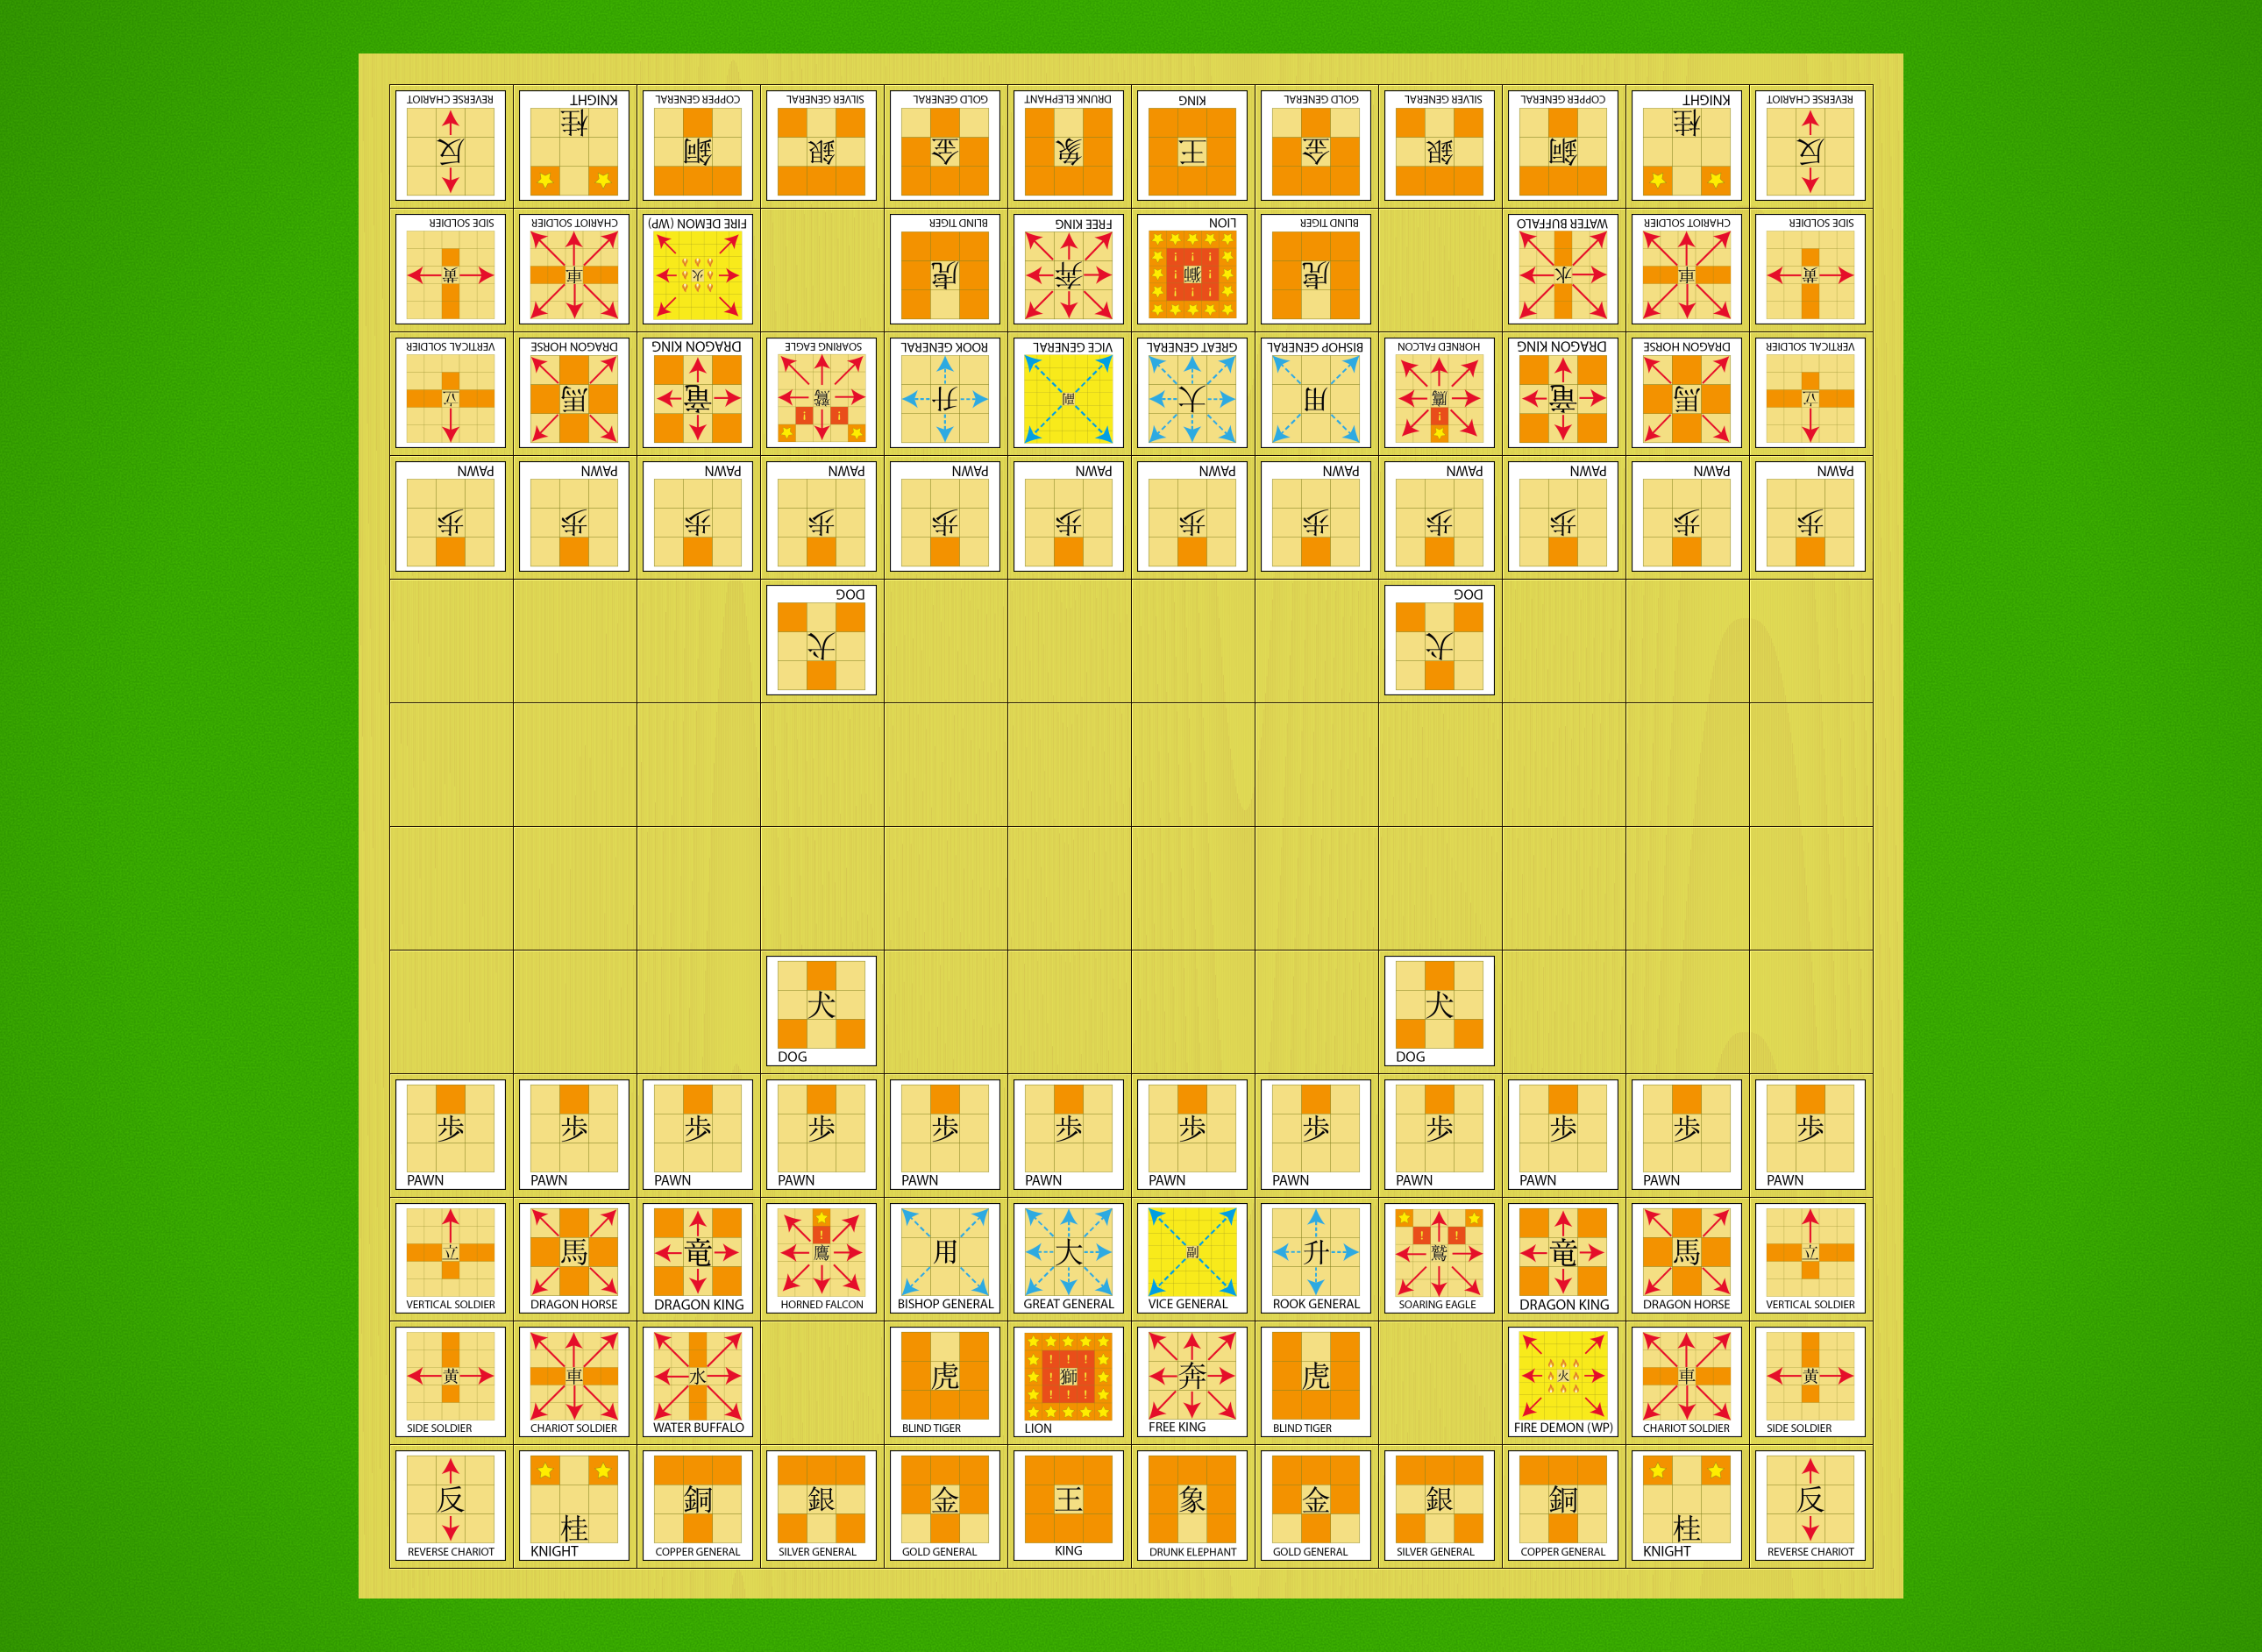
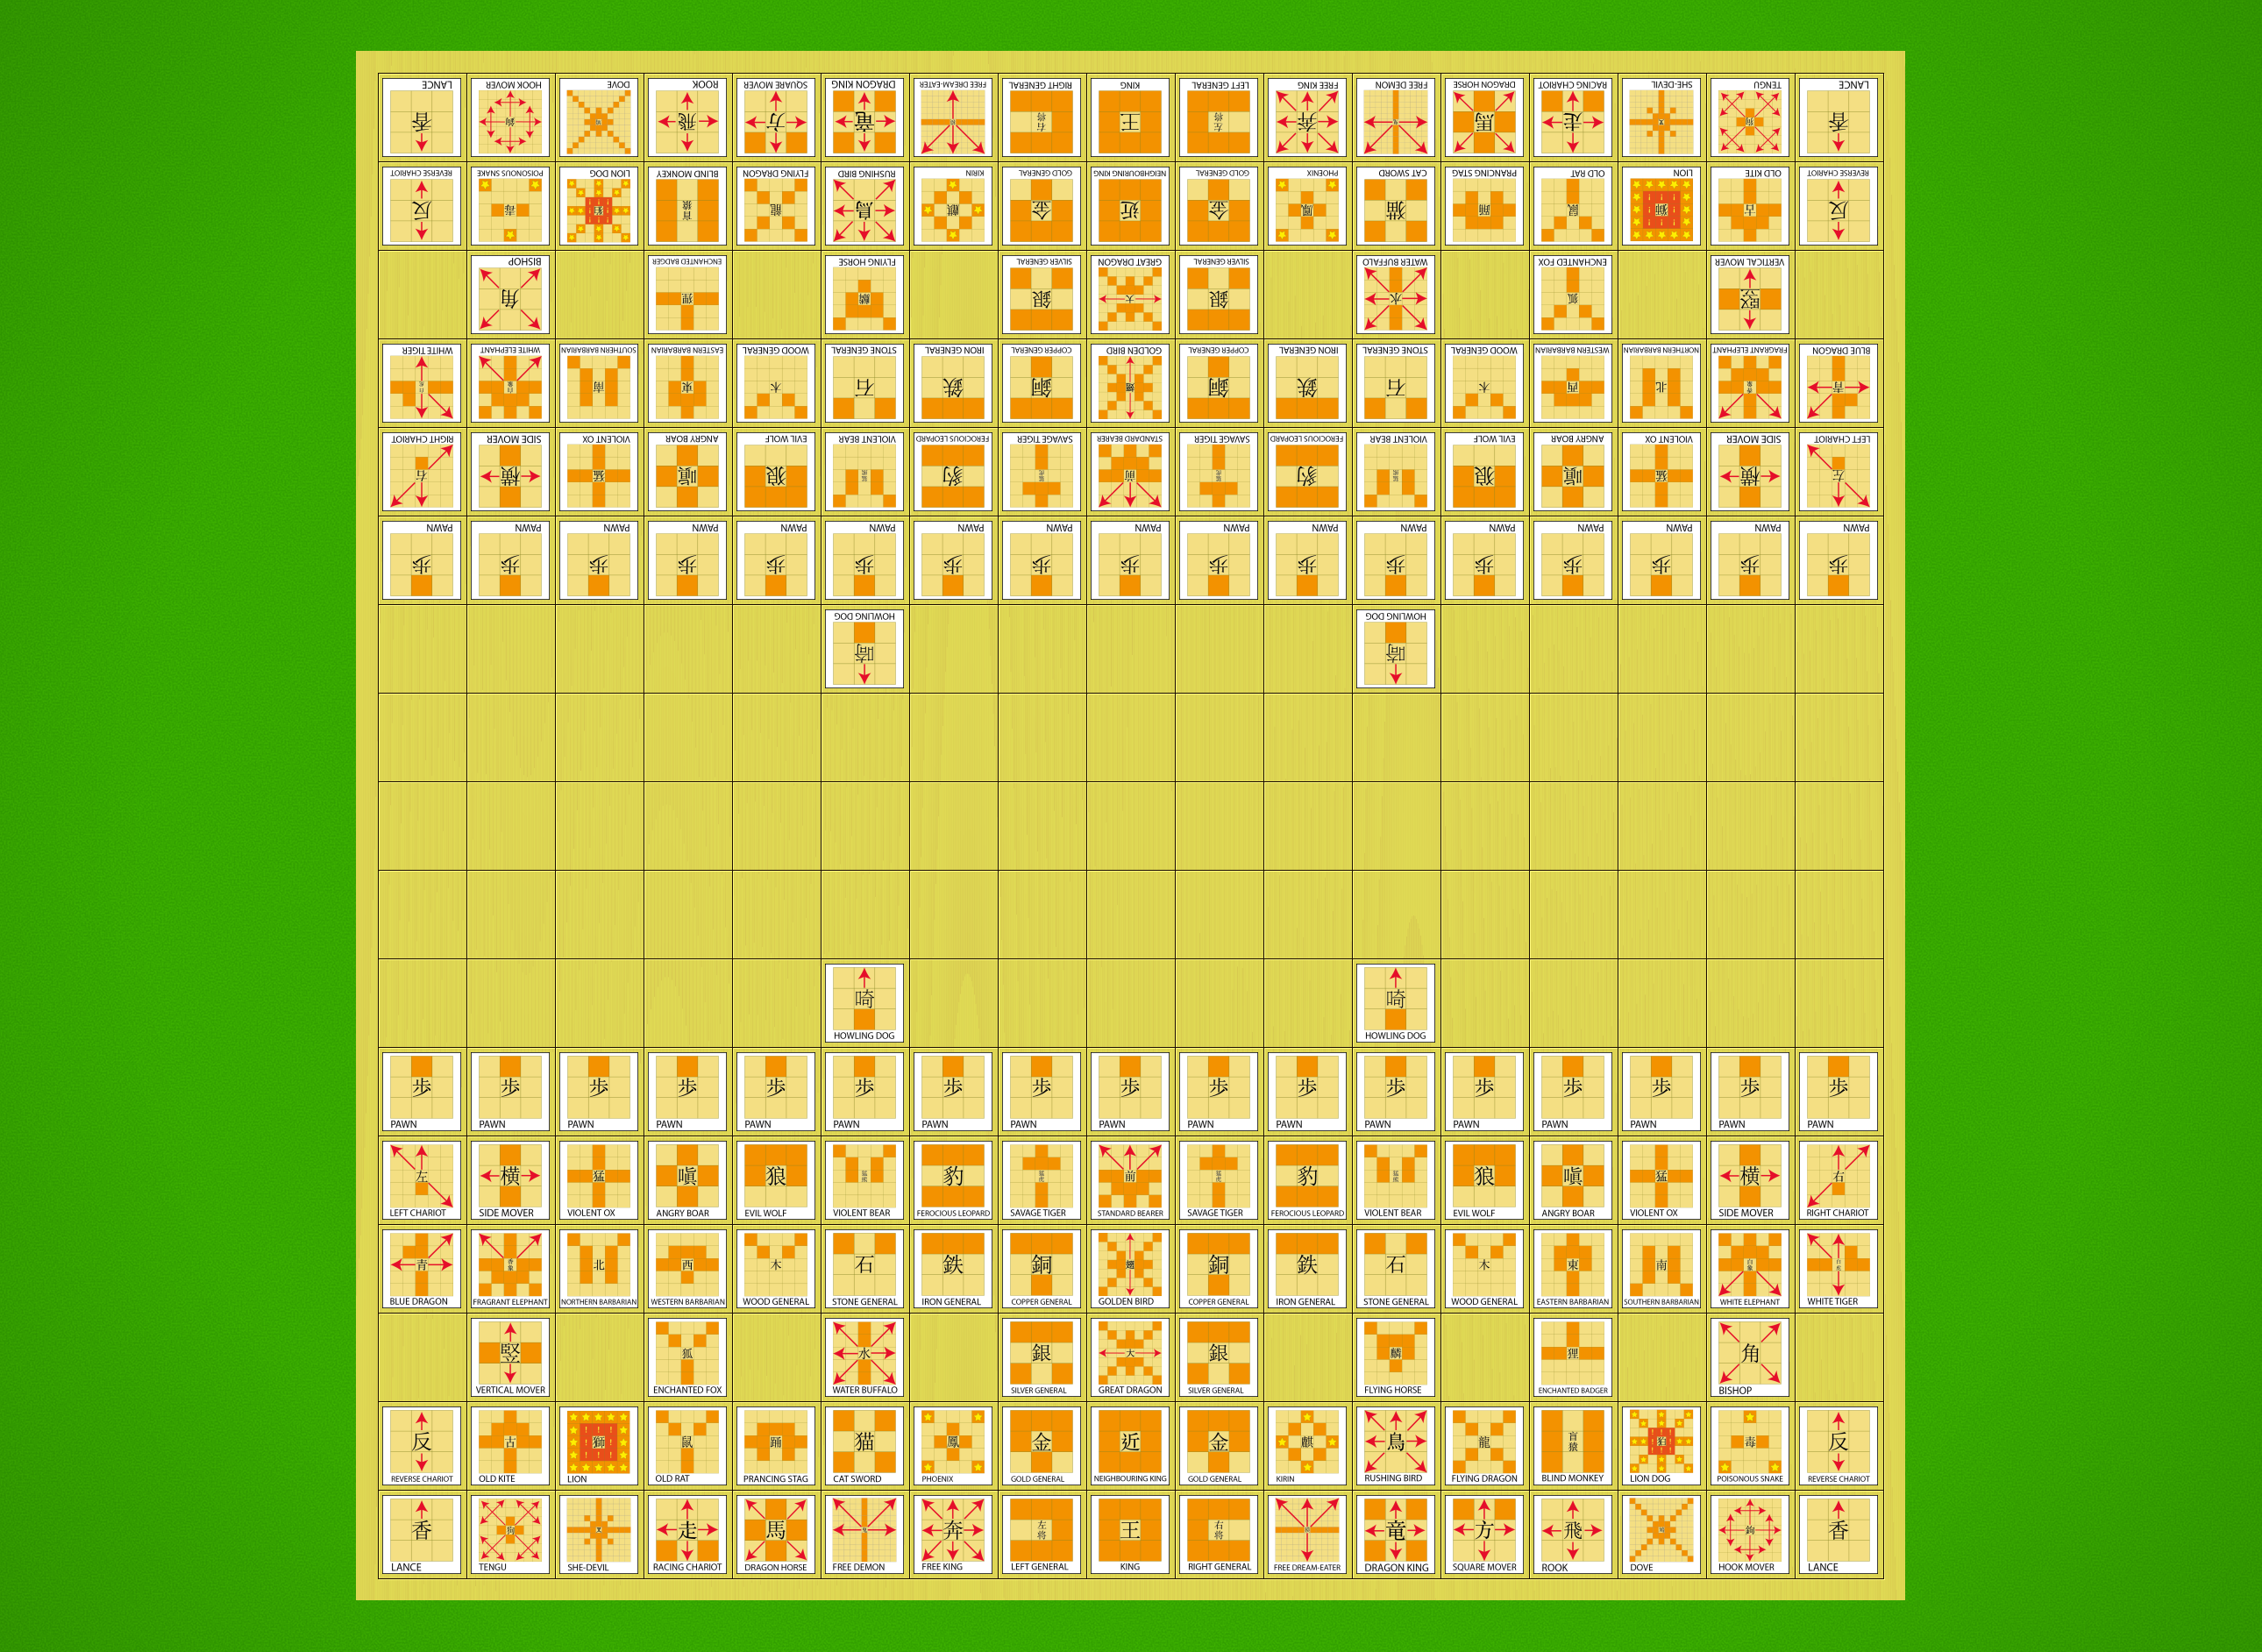
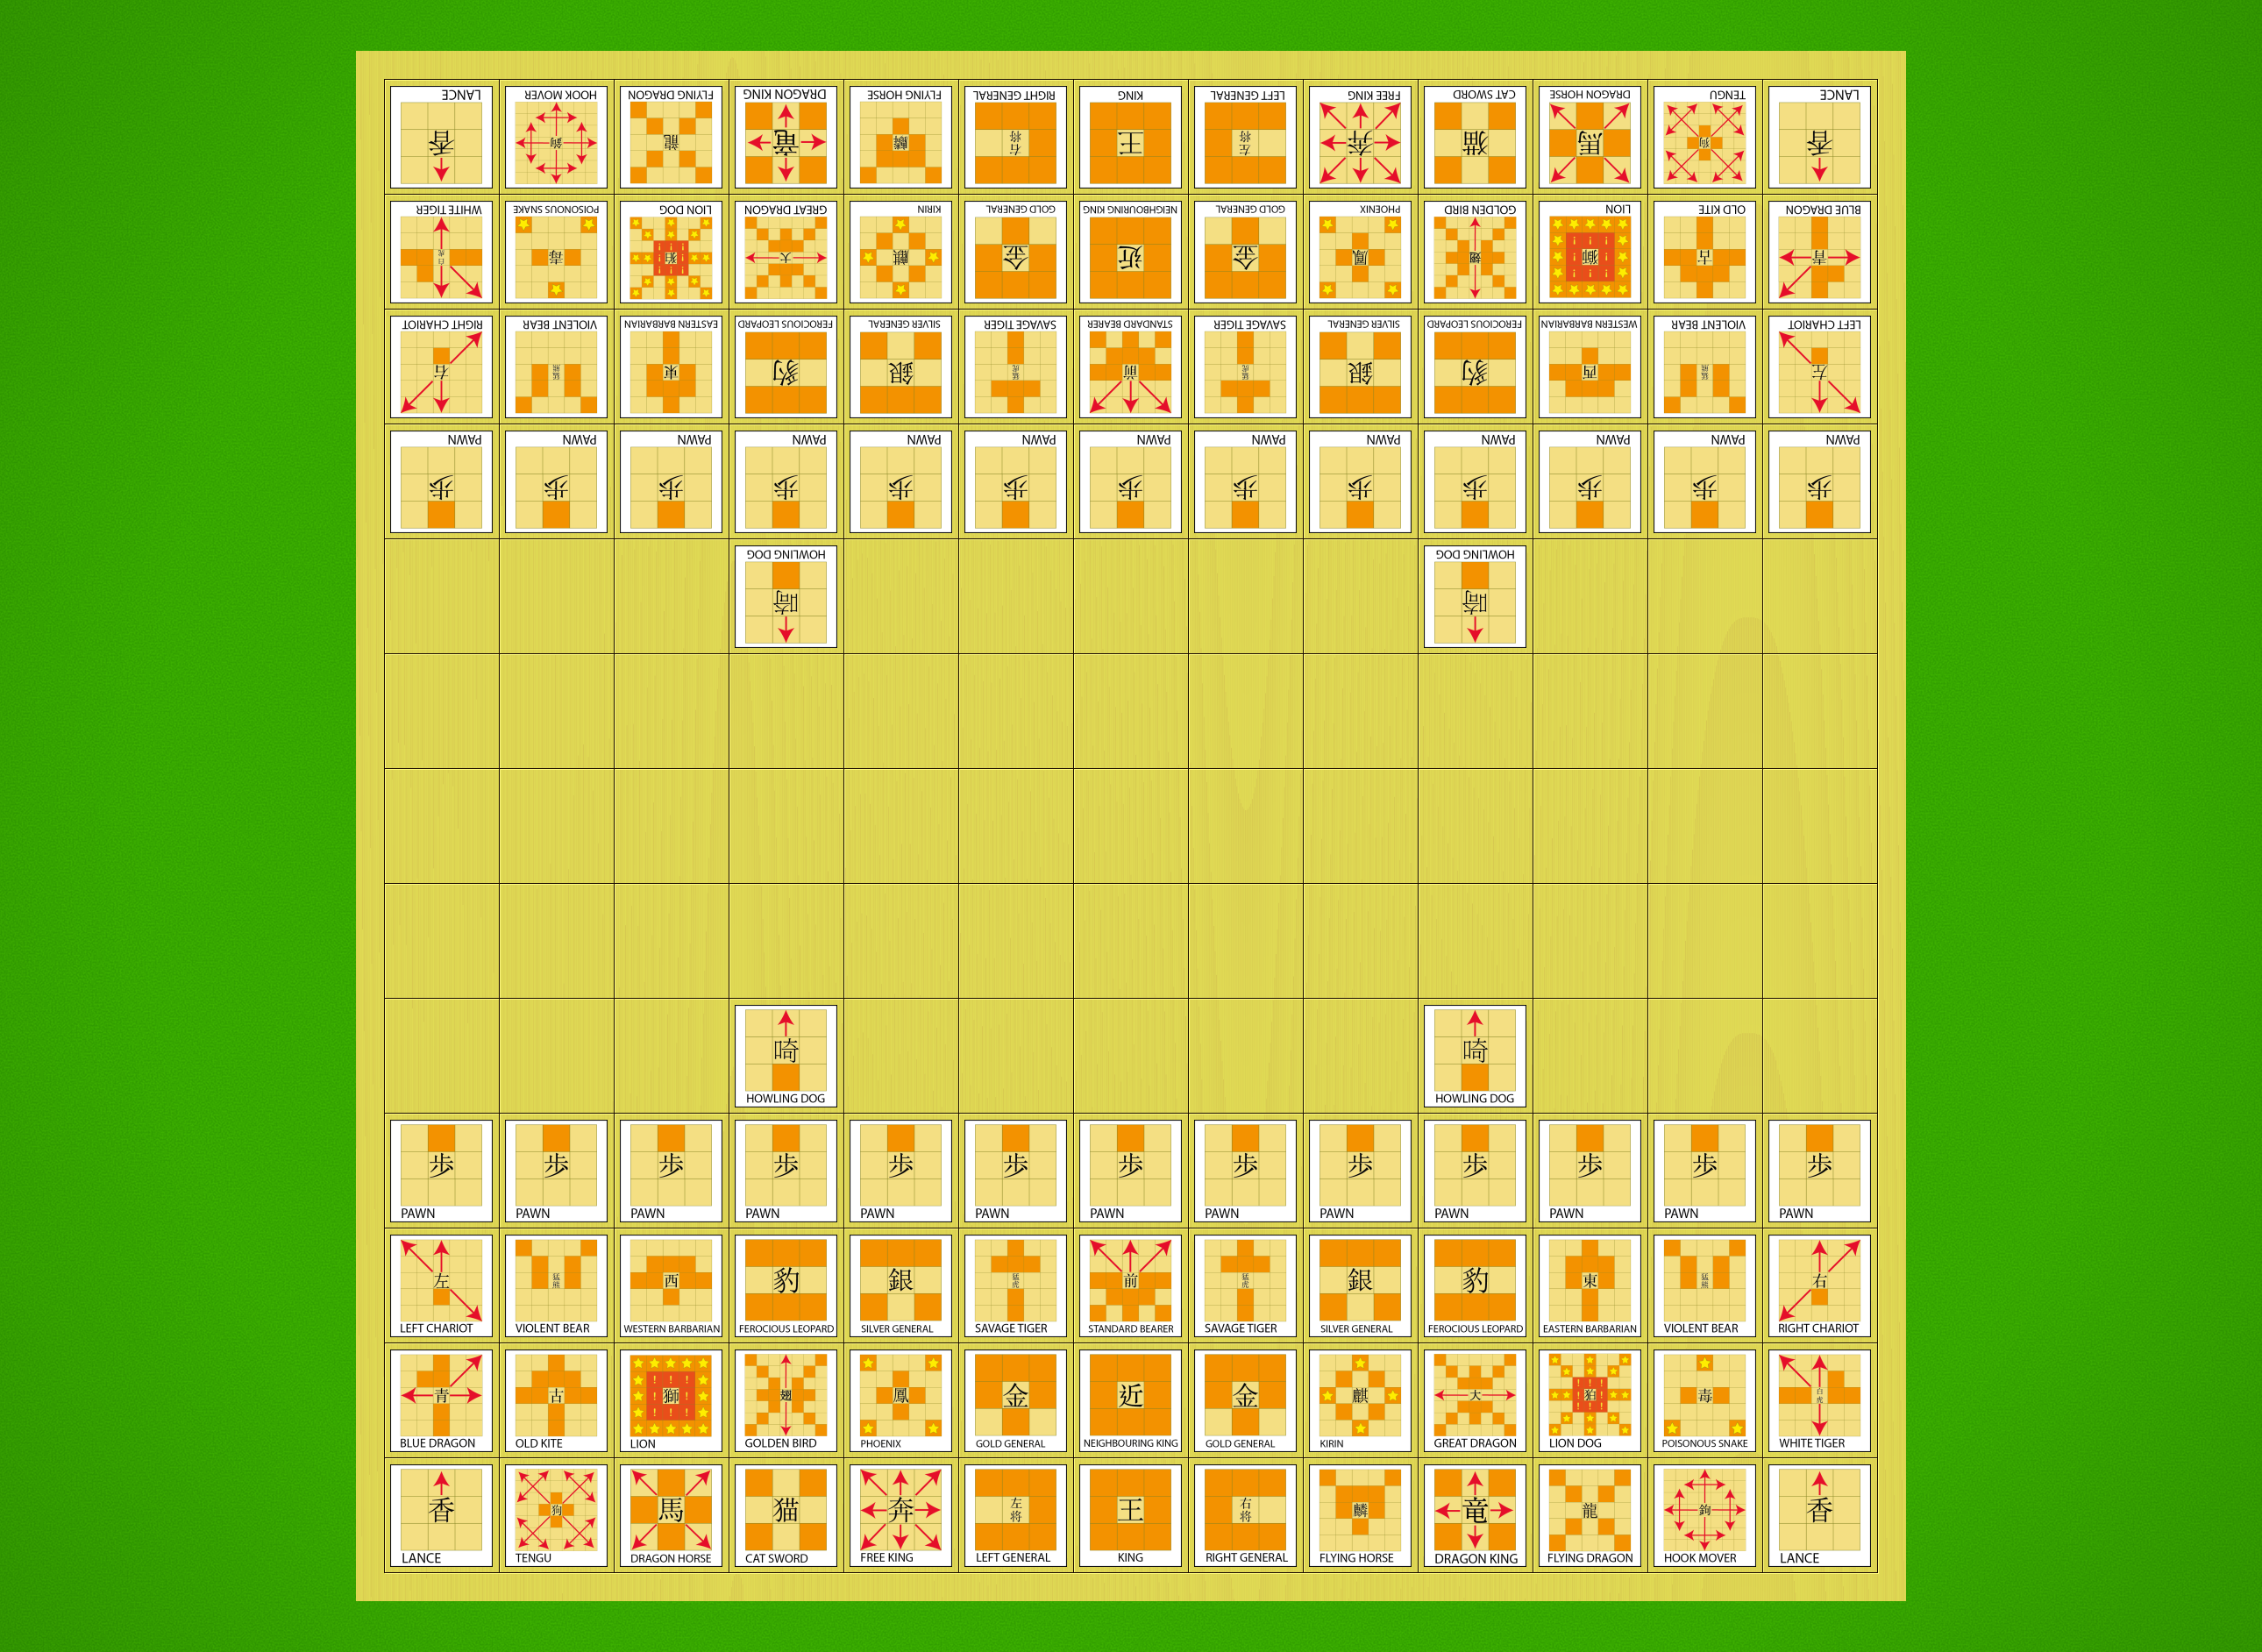
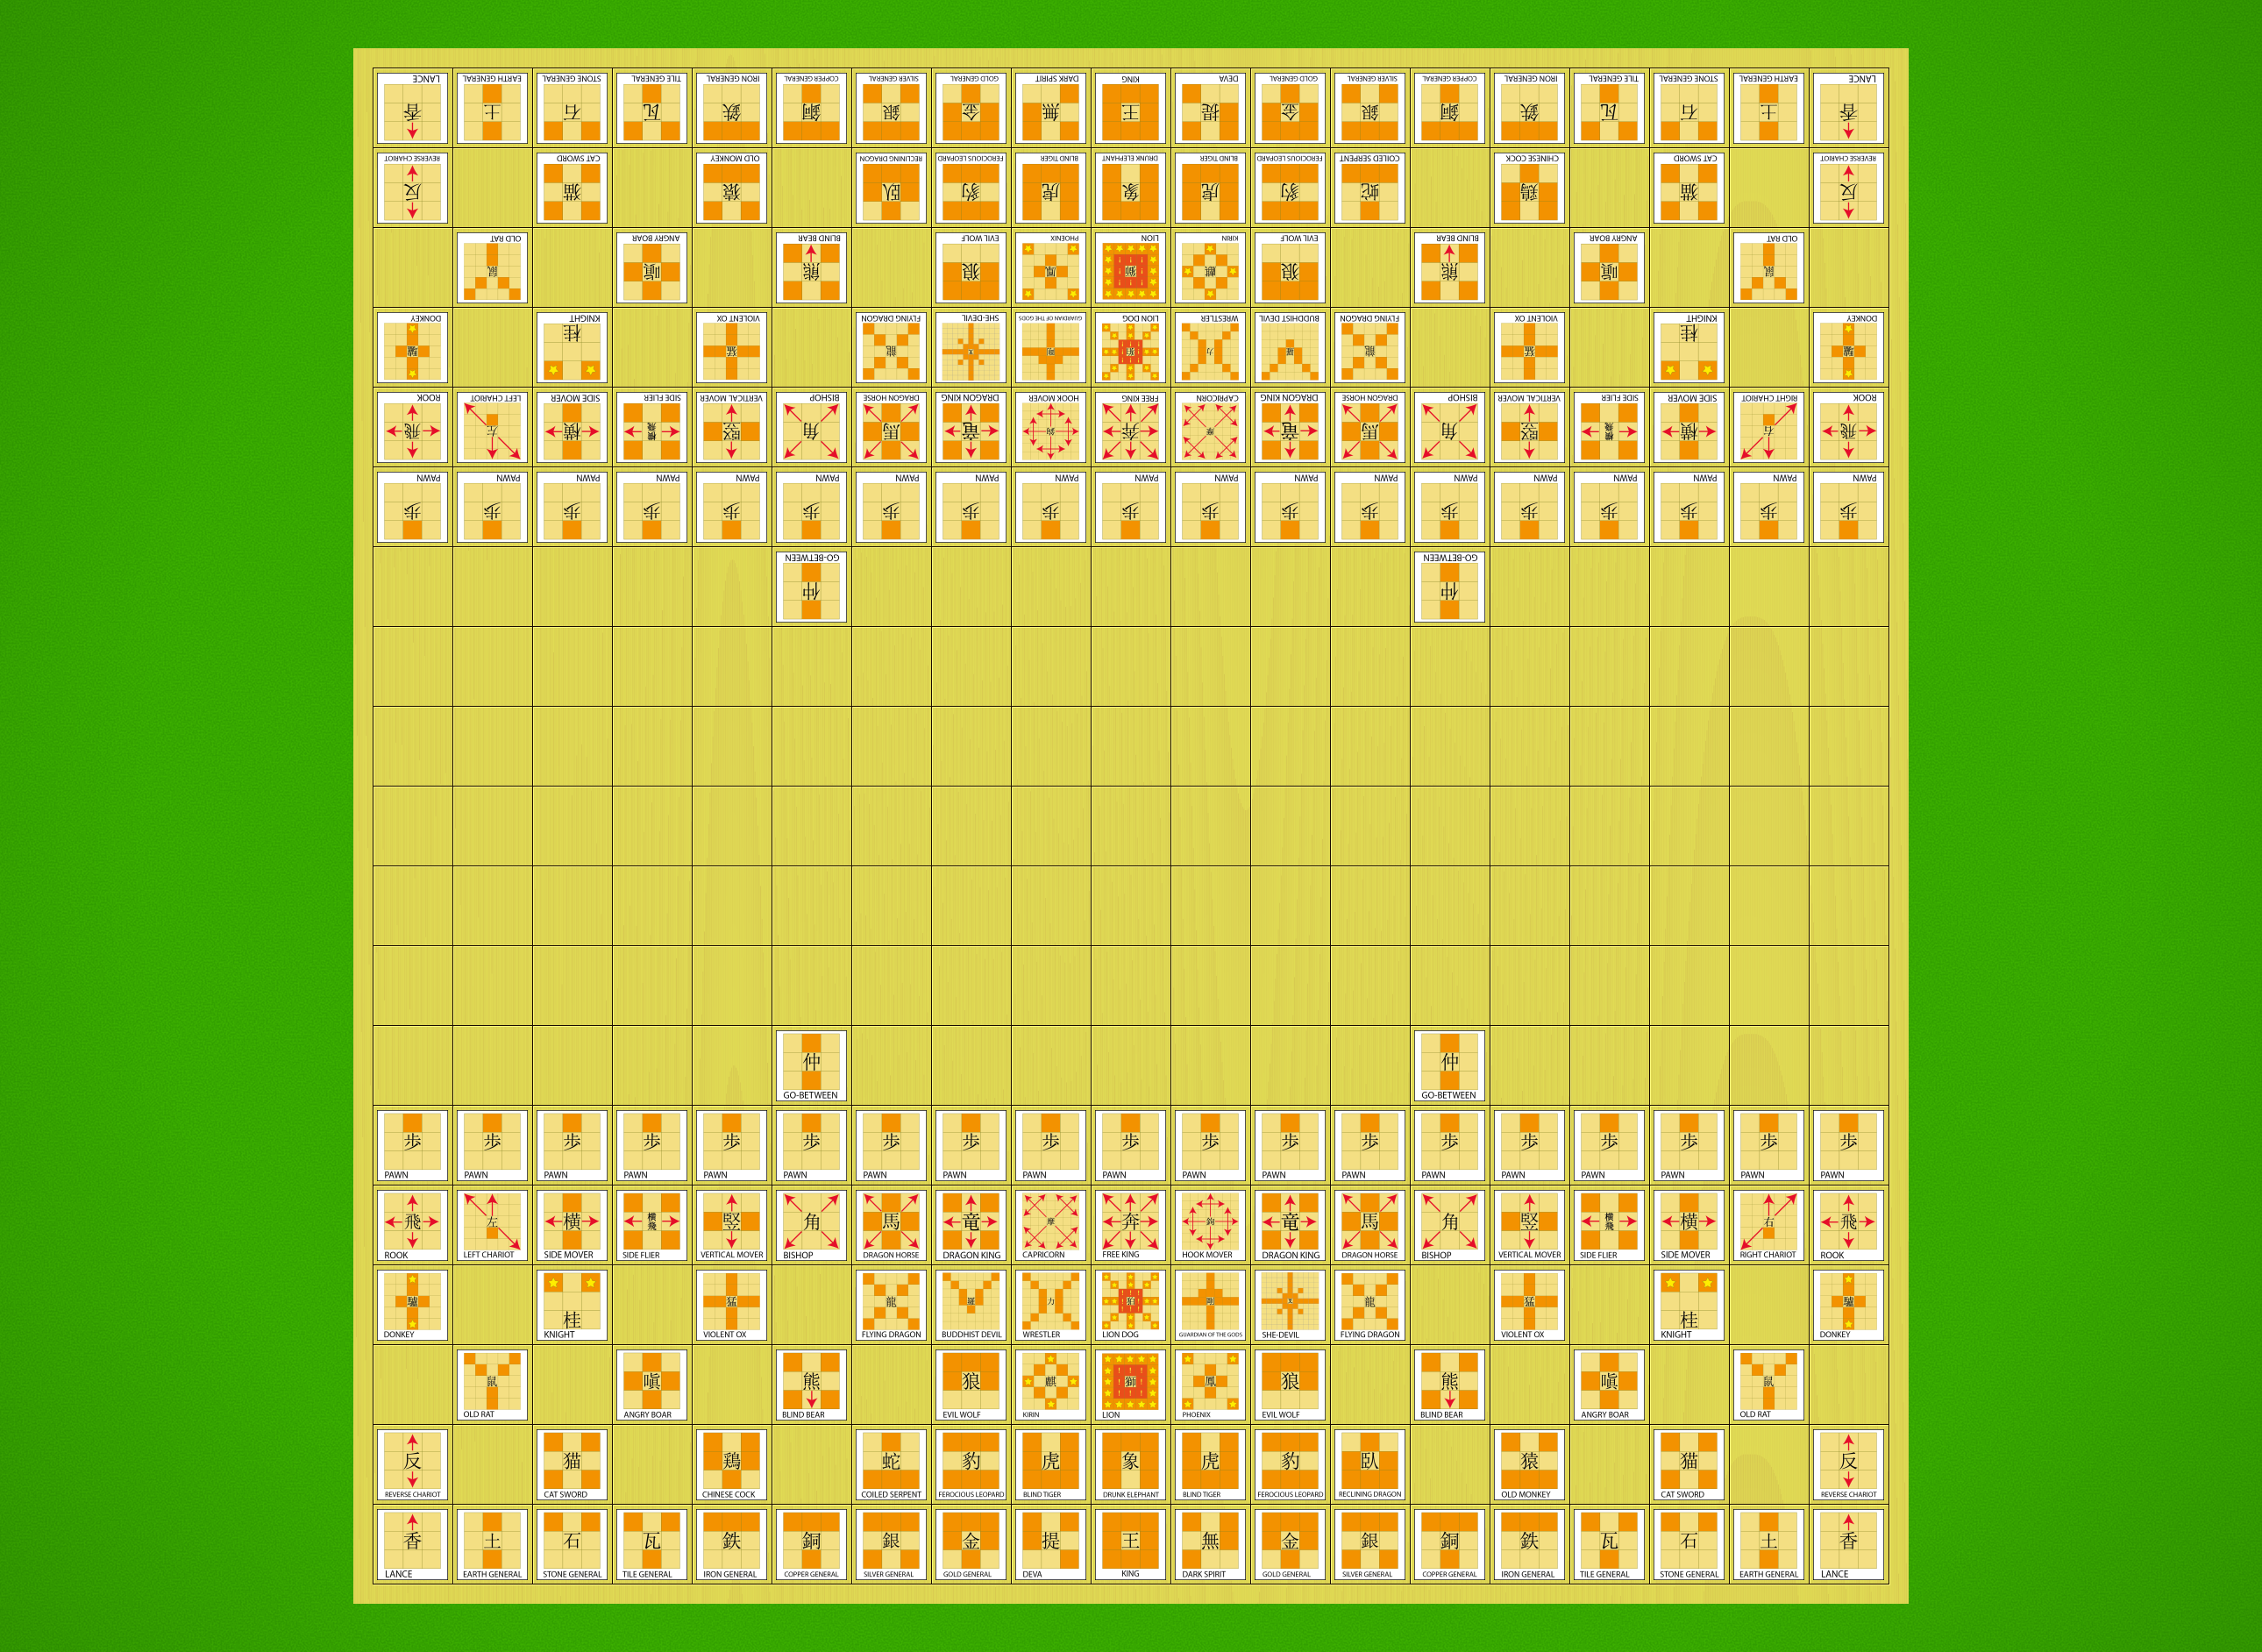
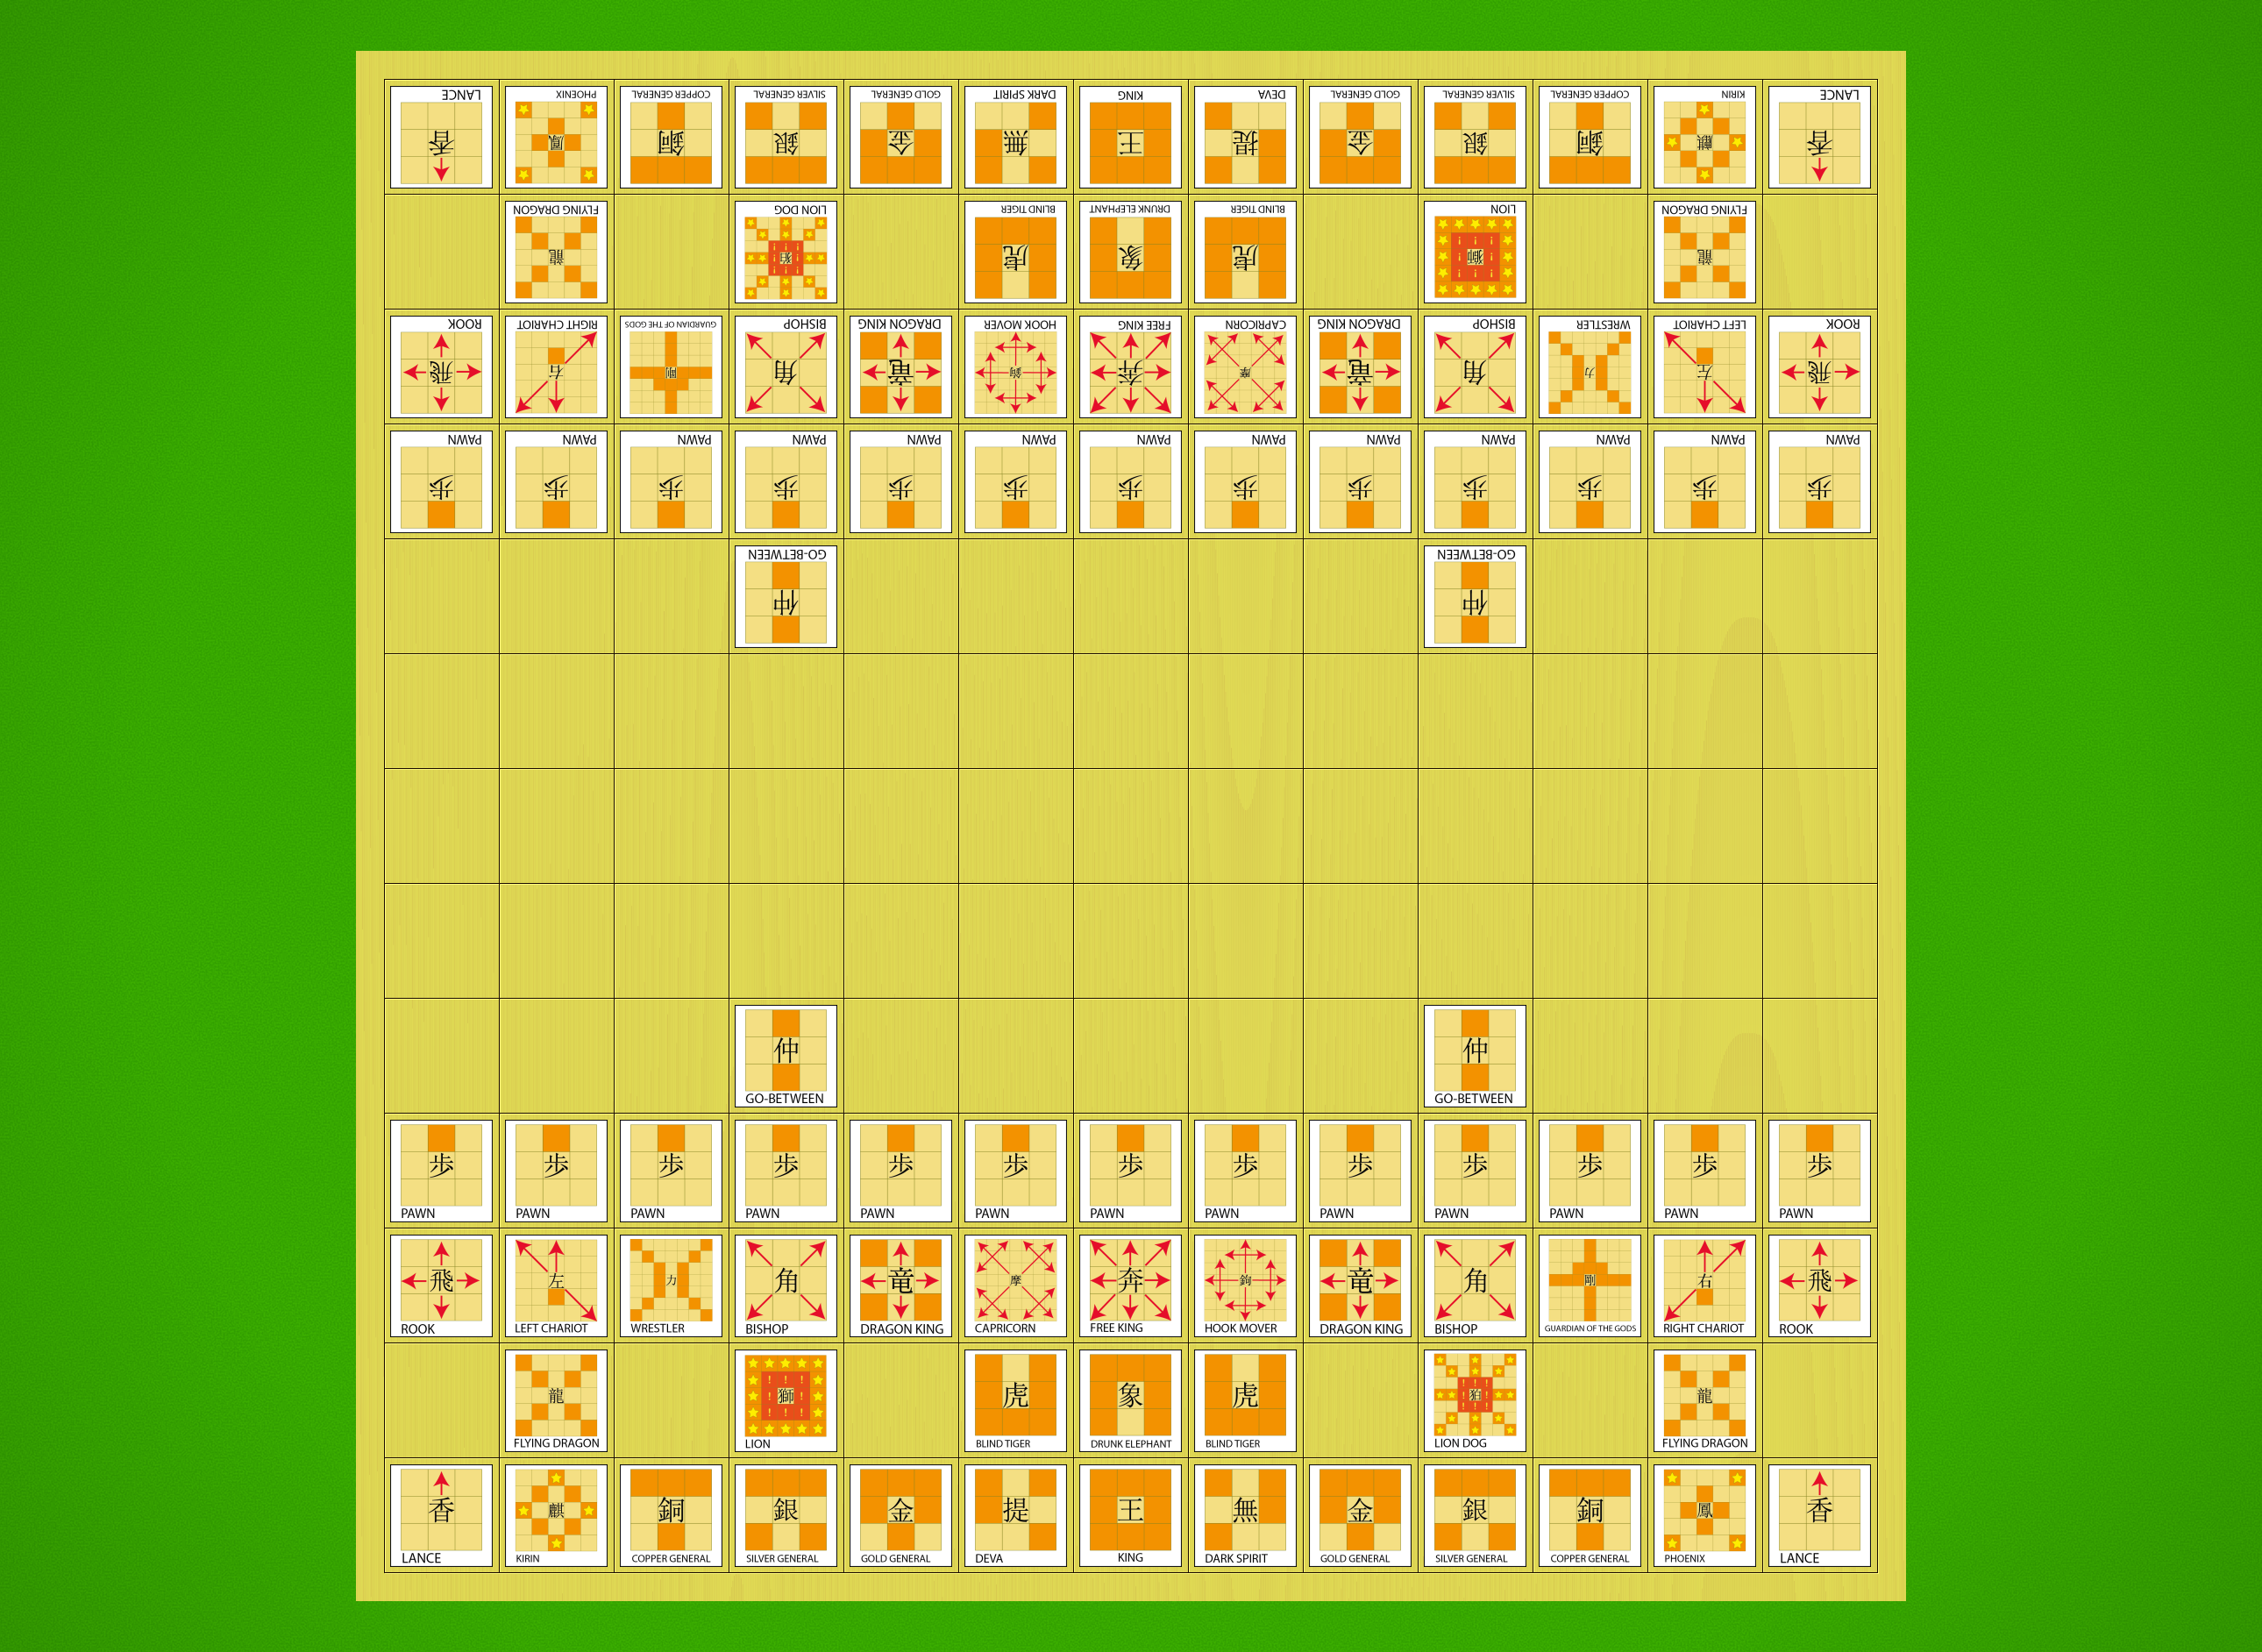
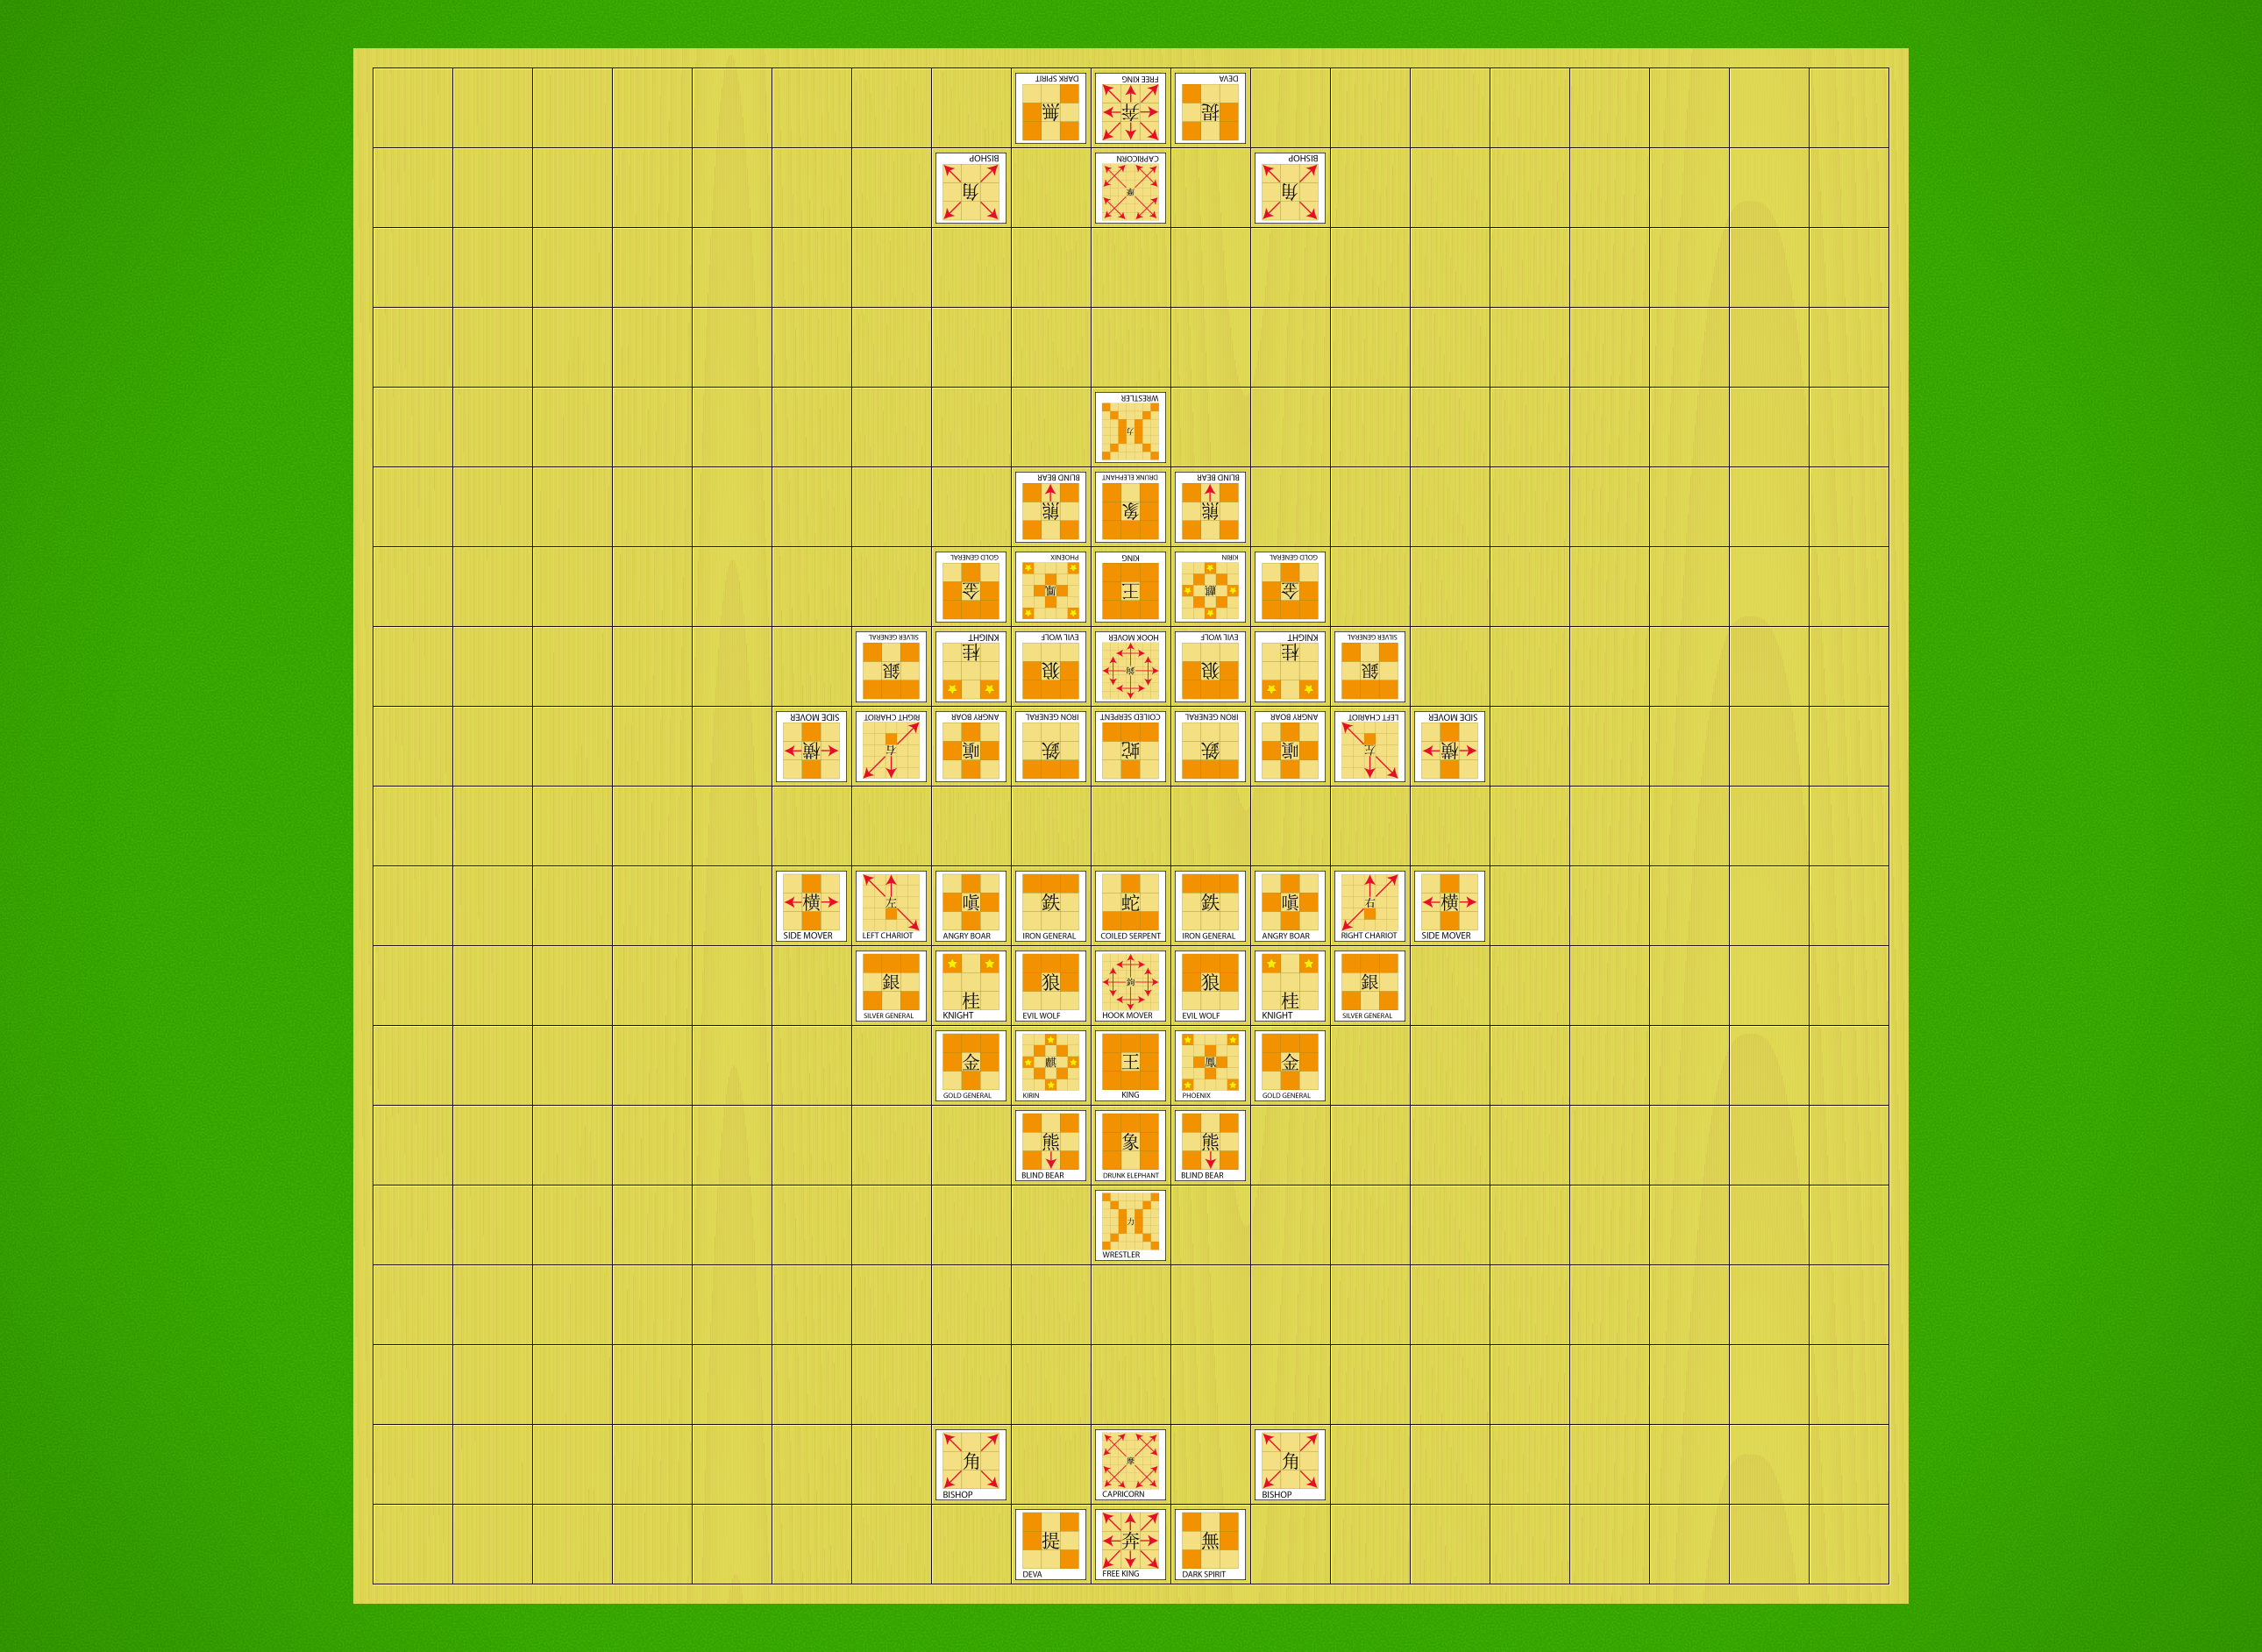
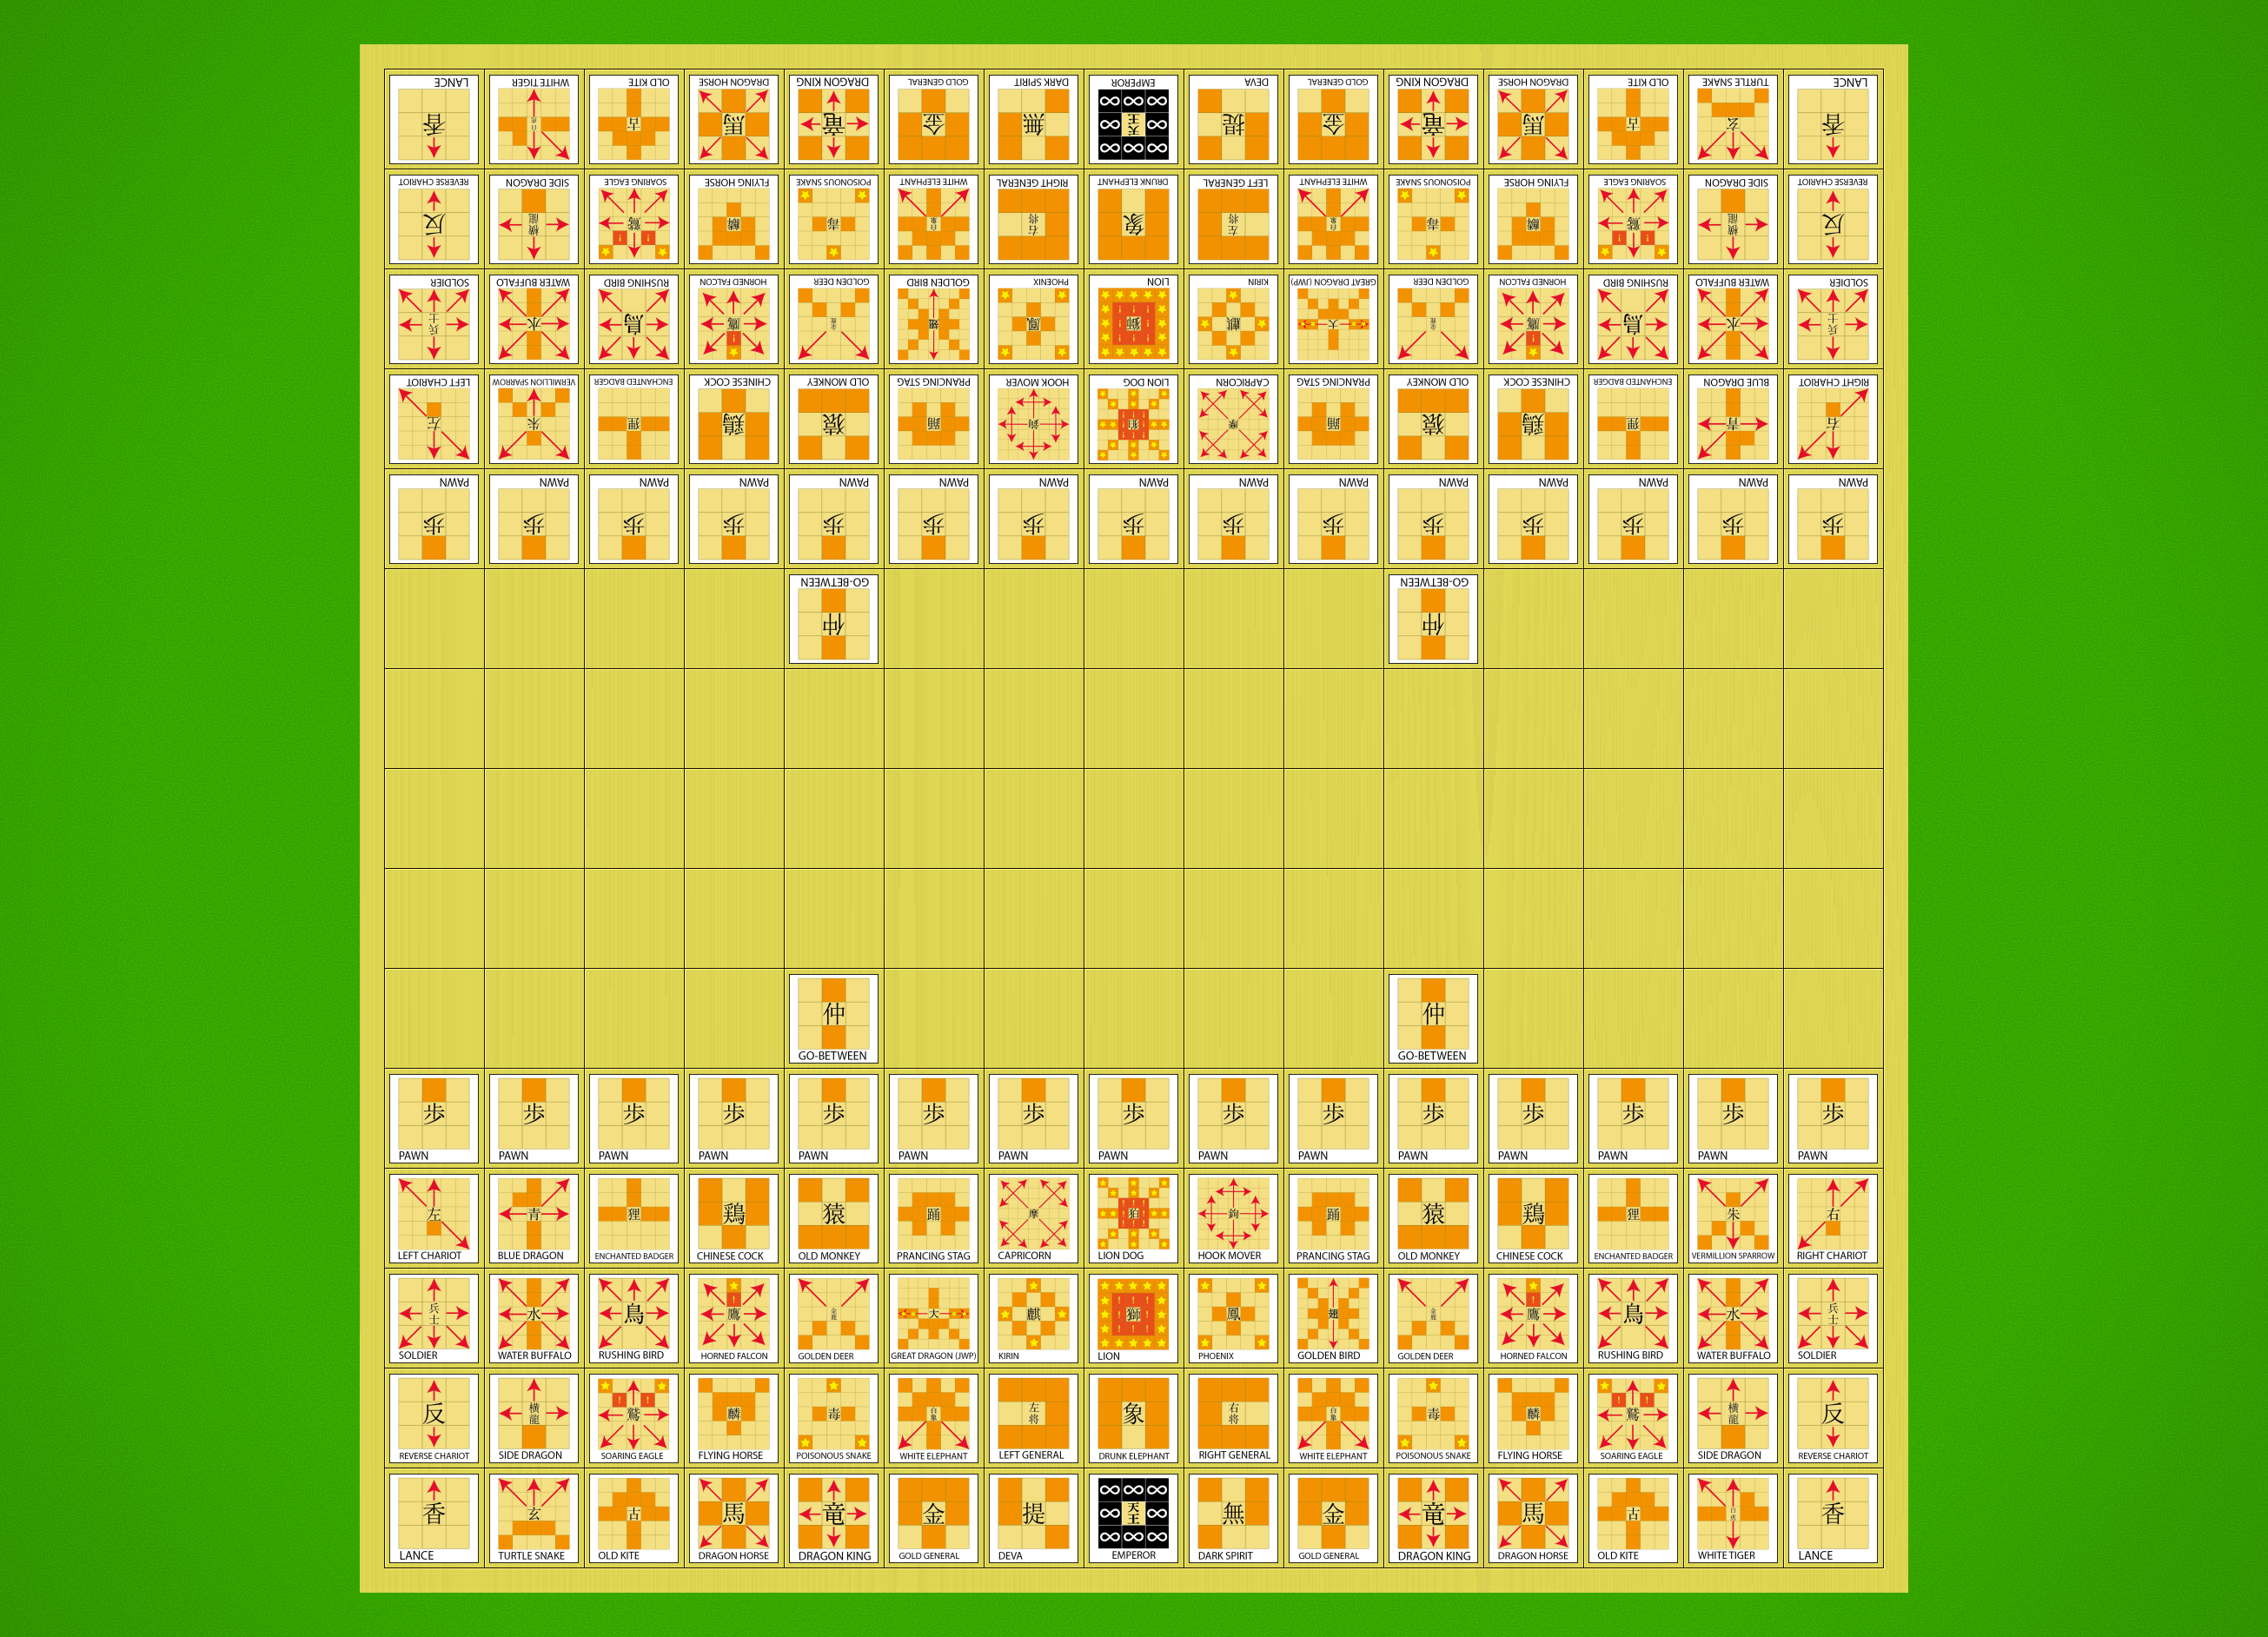
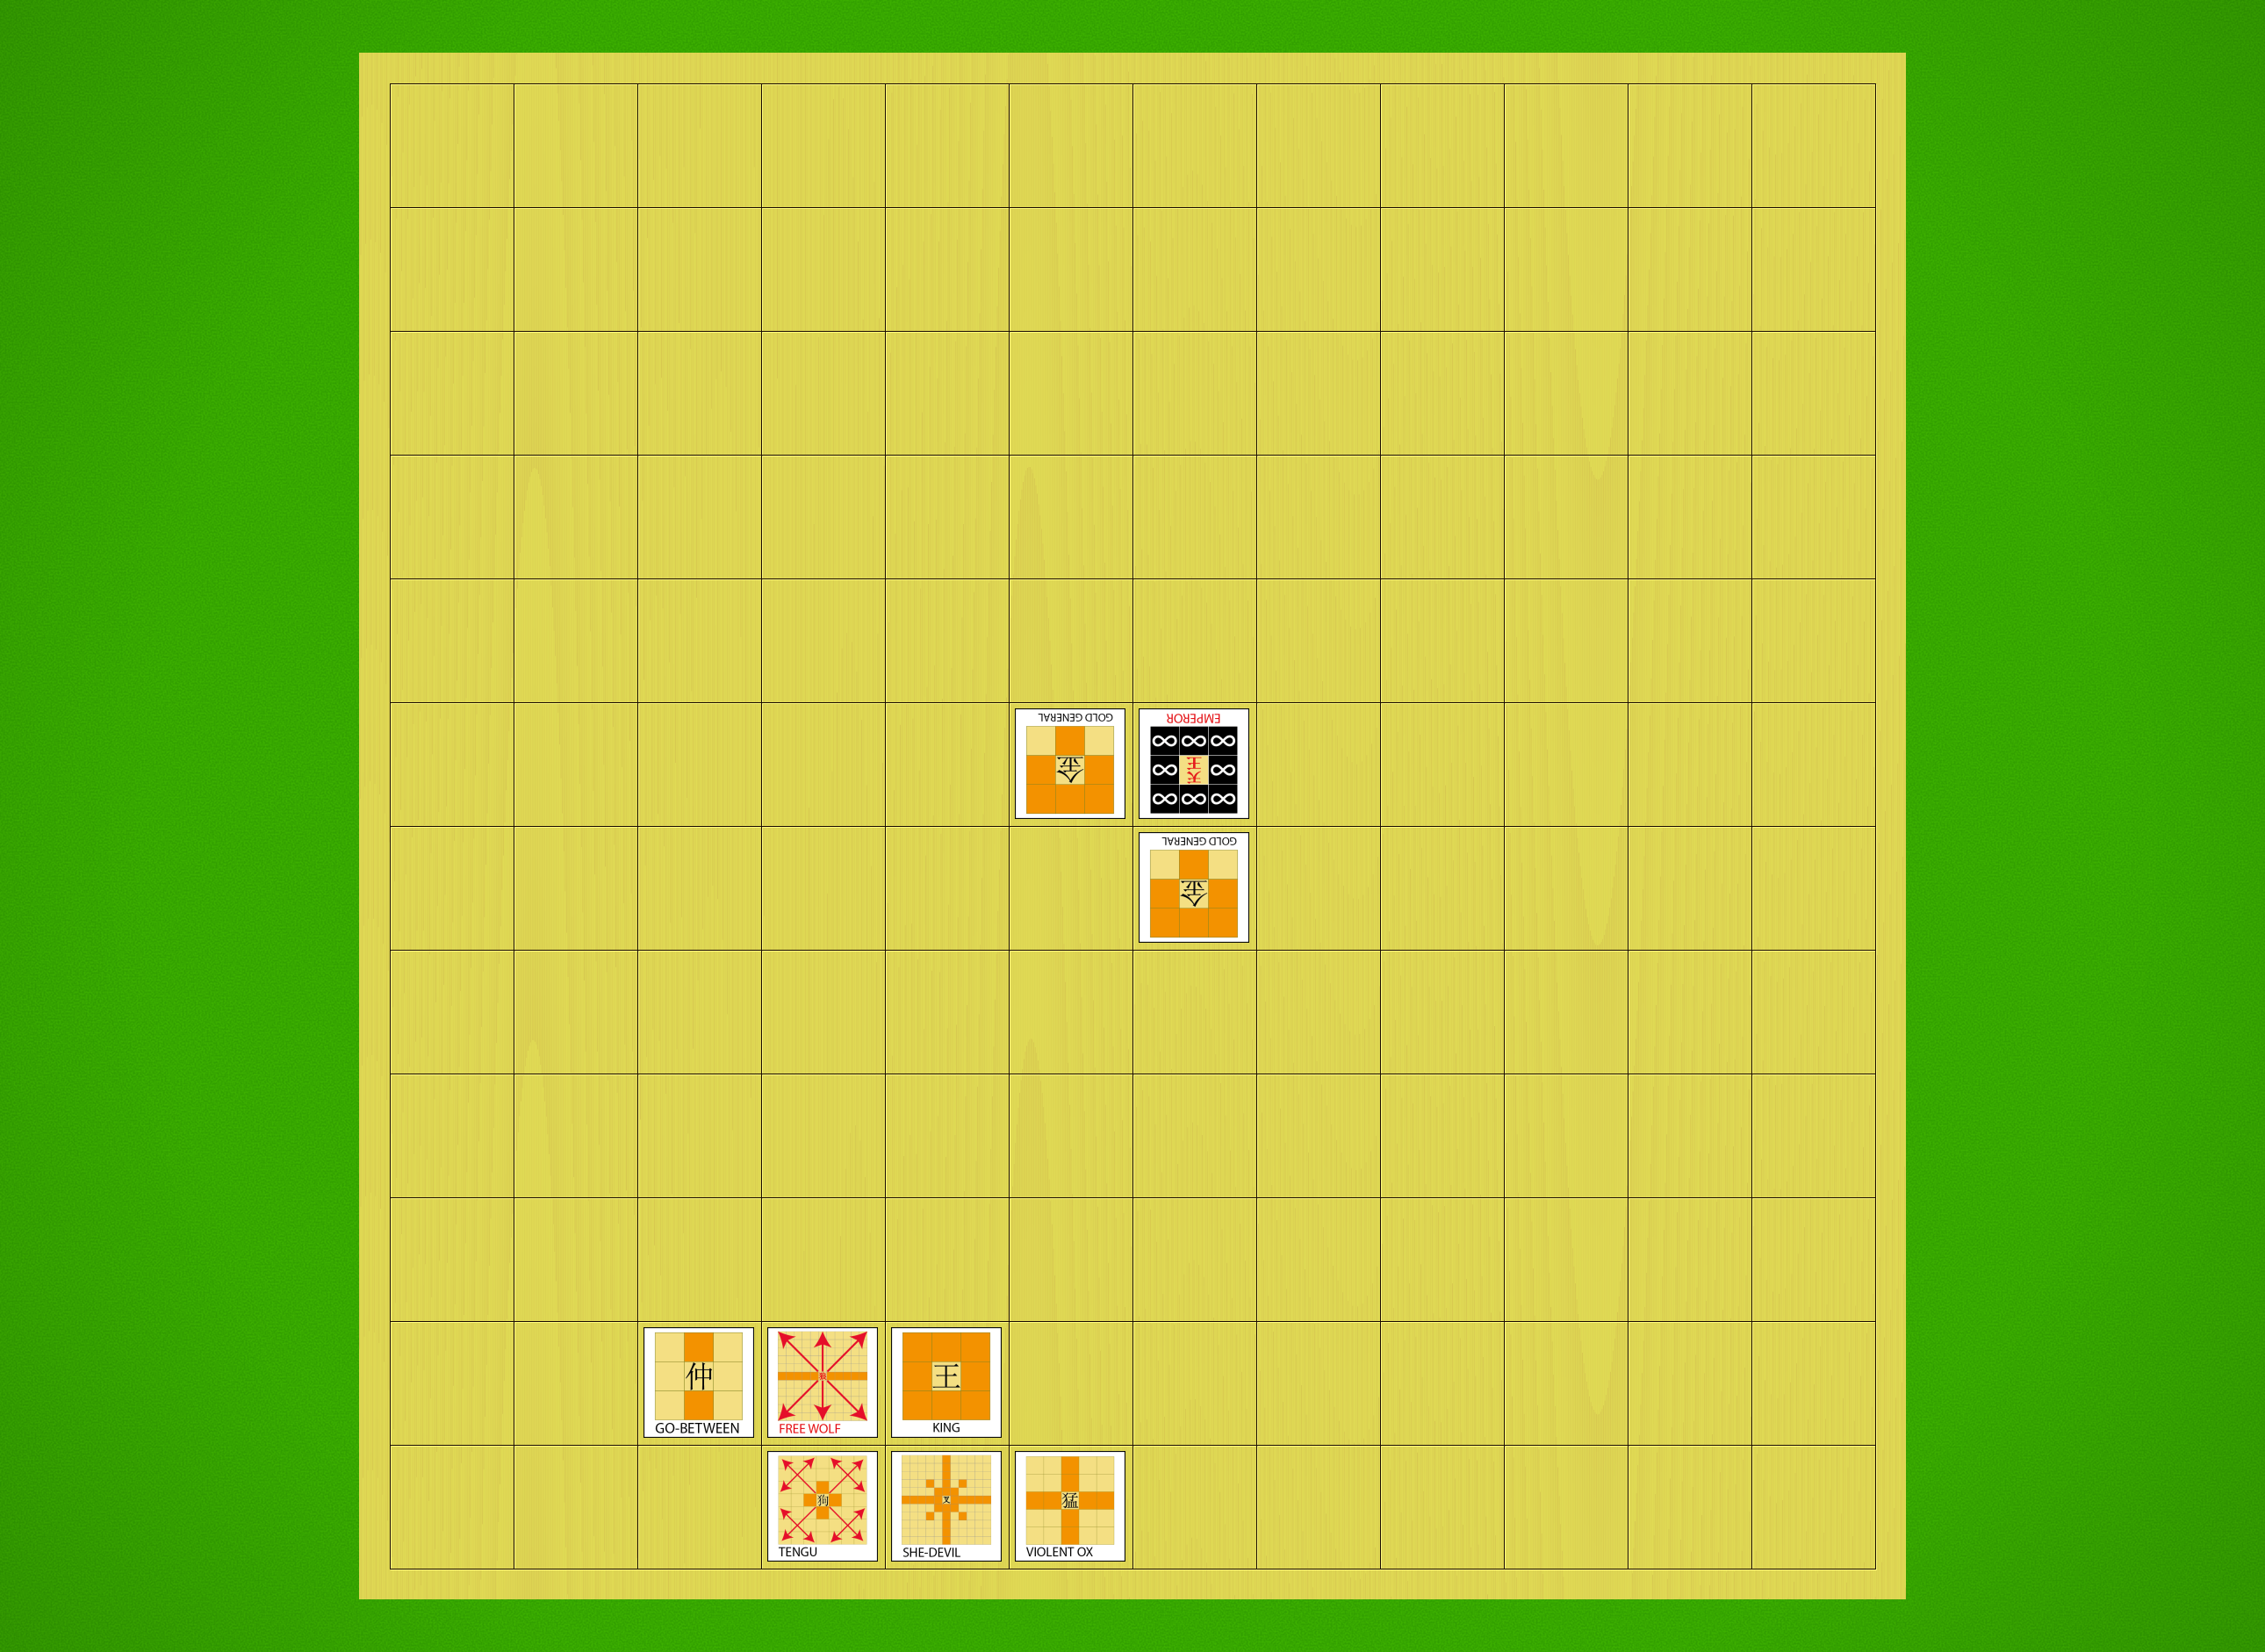
Shinjuu Shogi starting position with diagrammatic pieces. 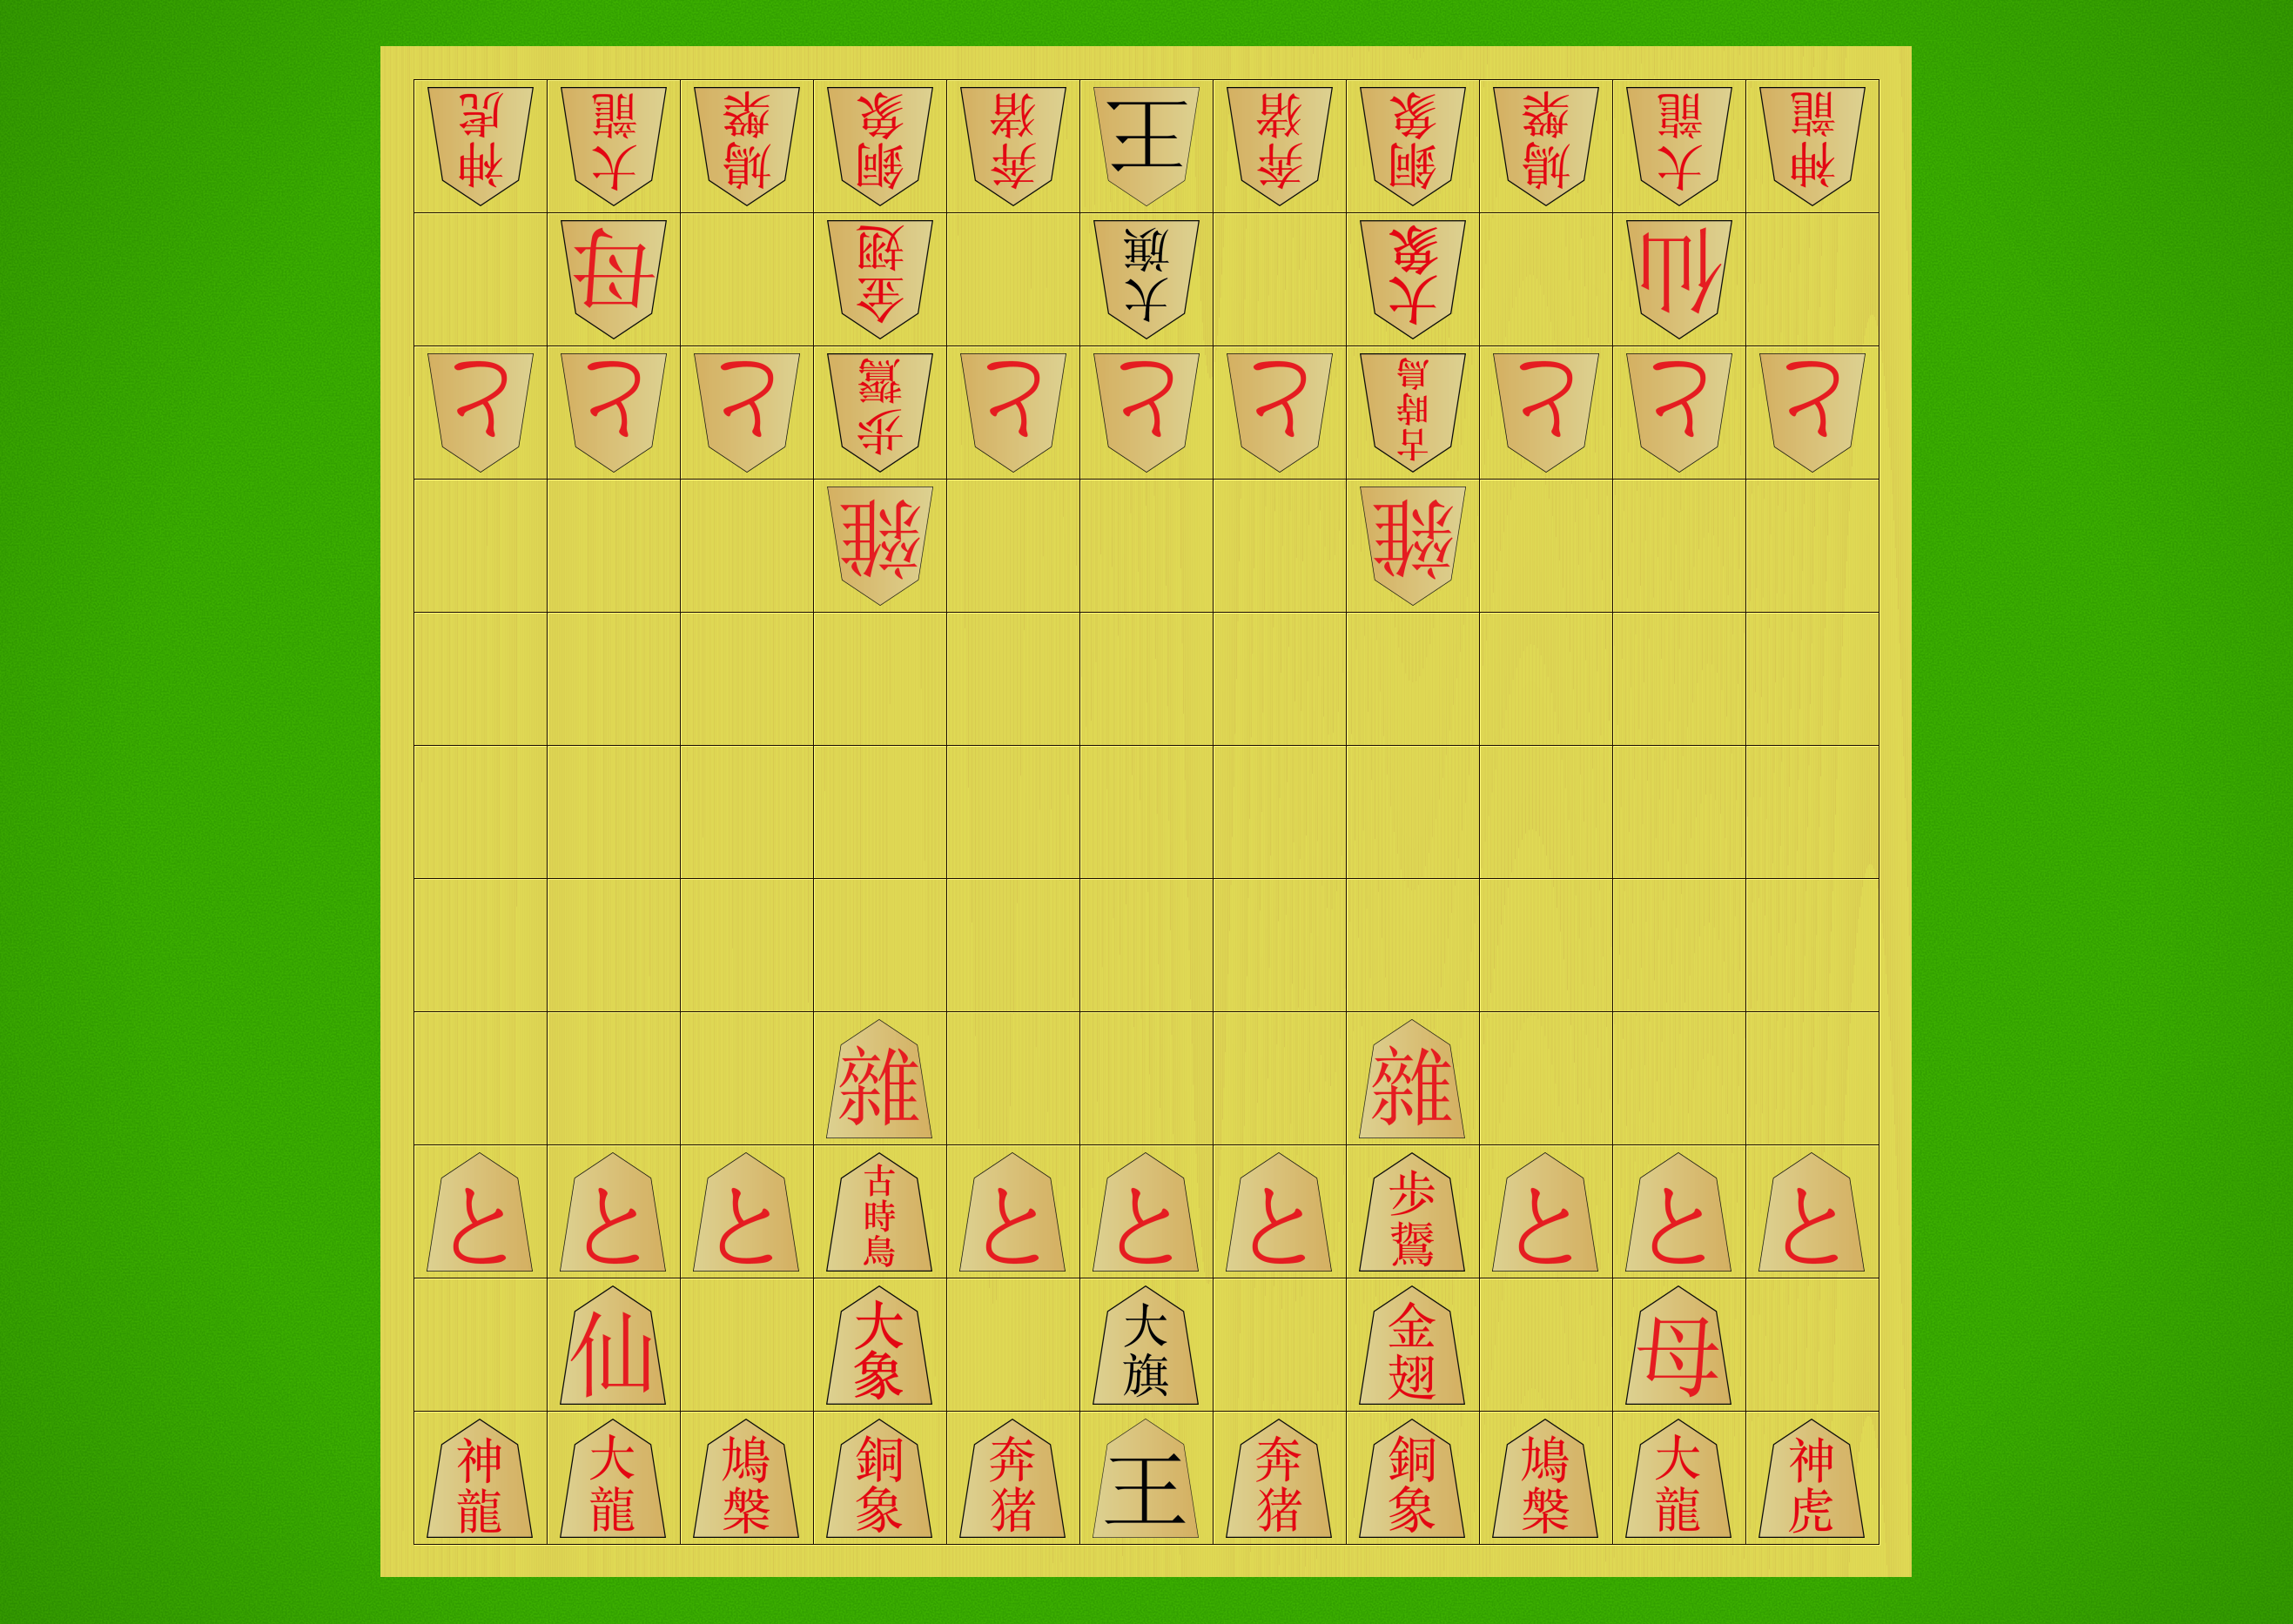
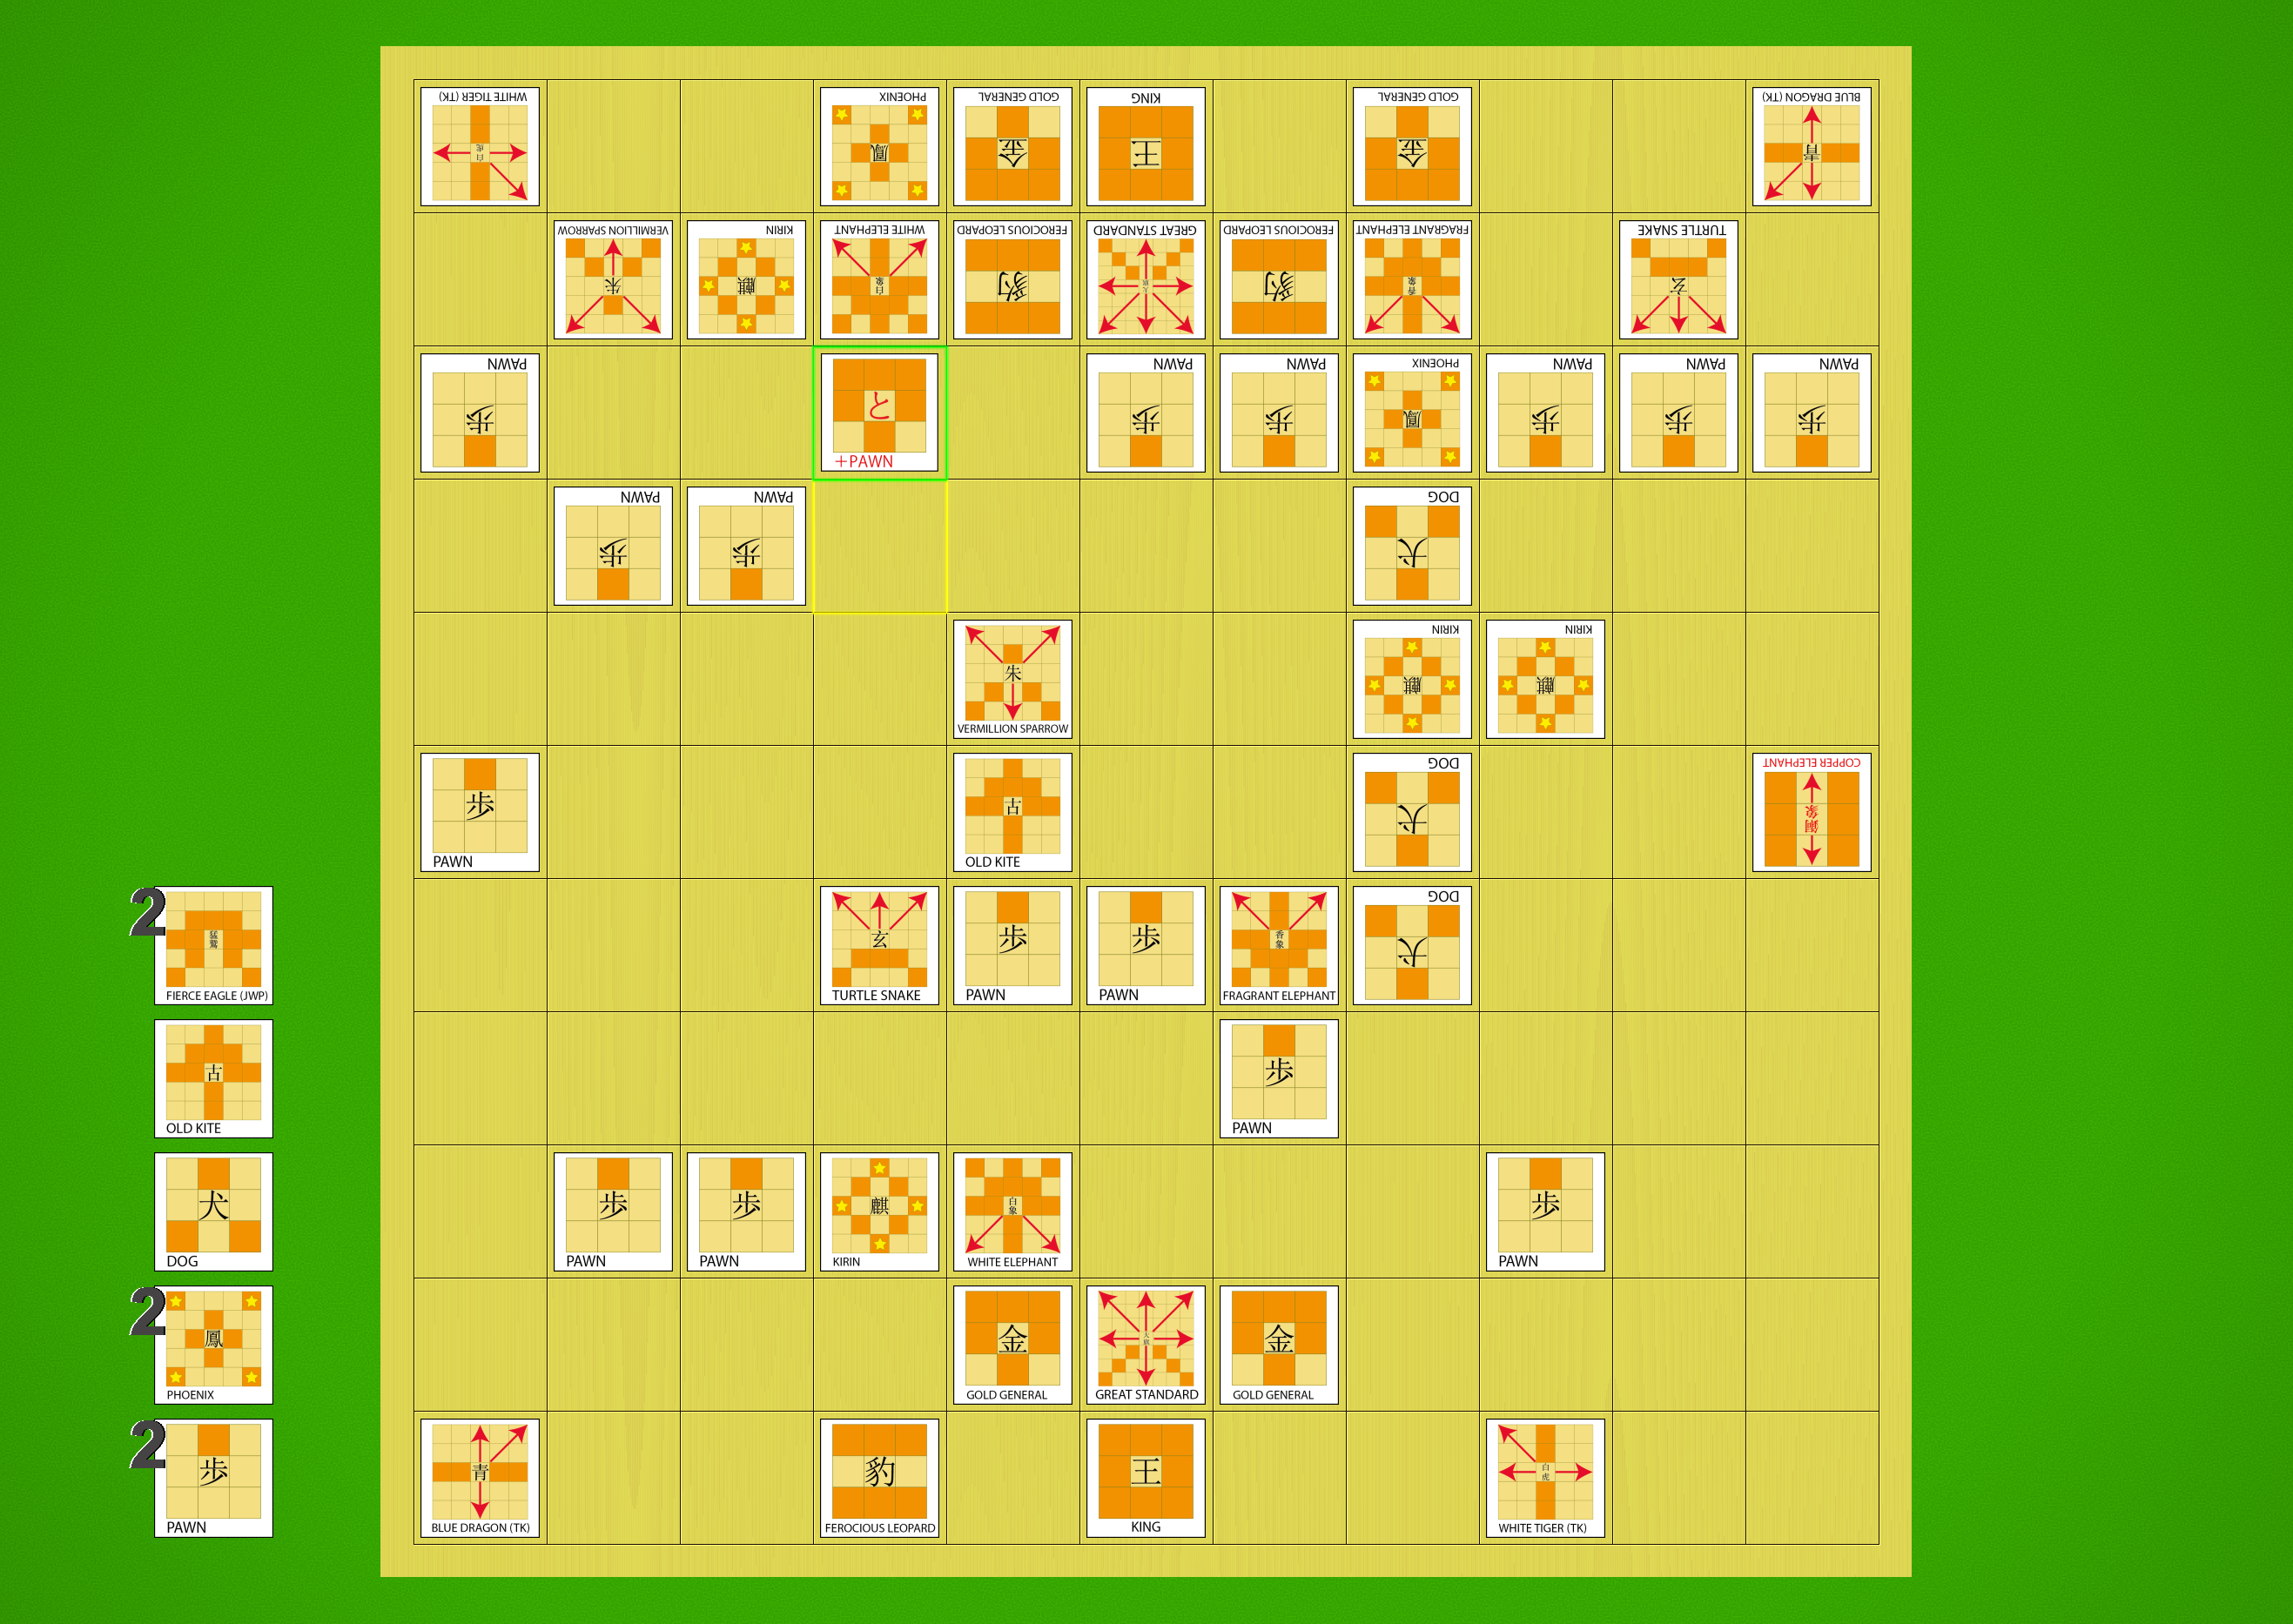
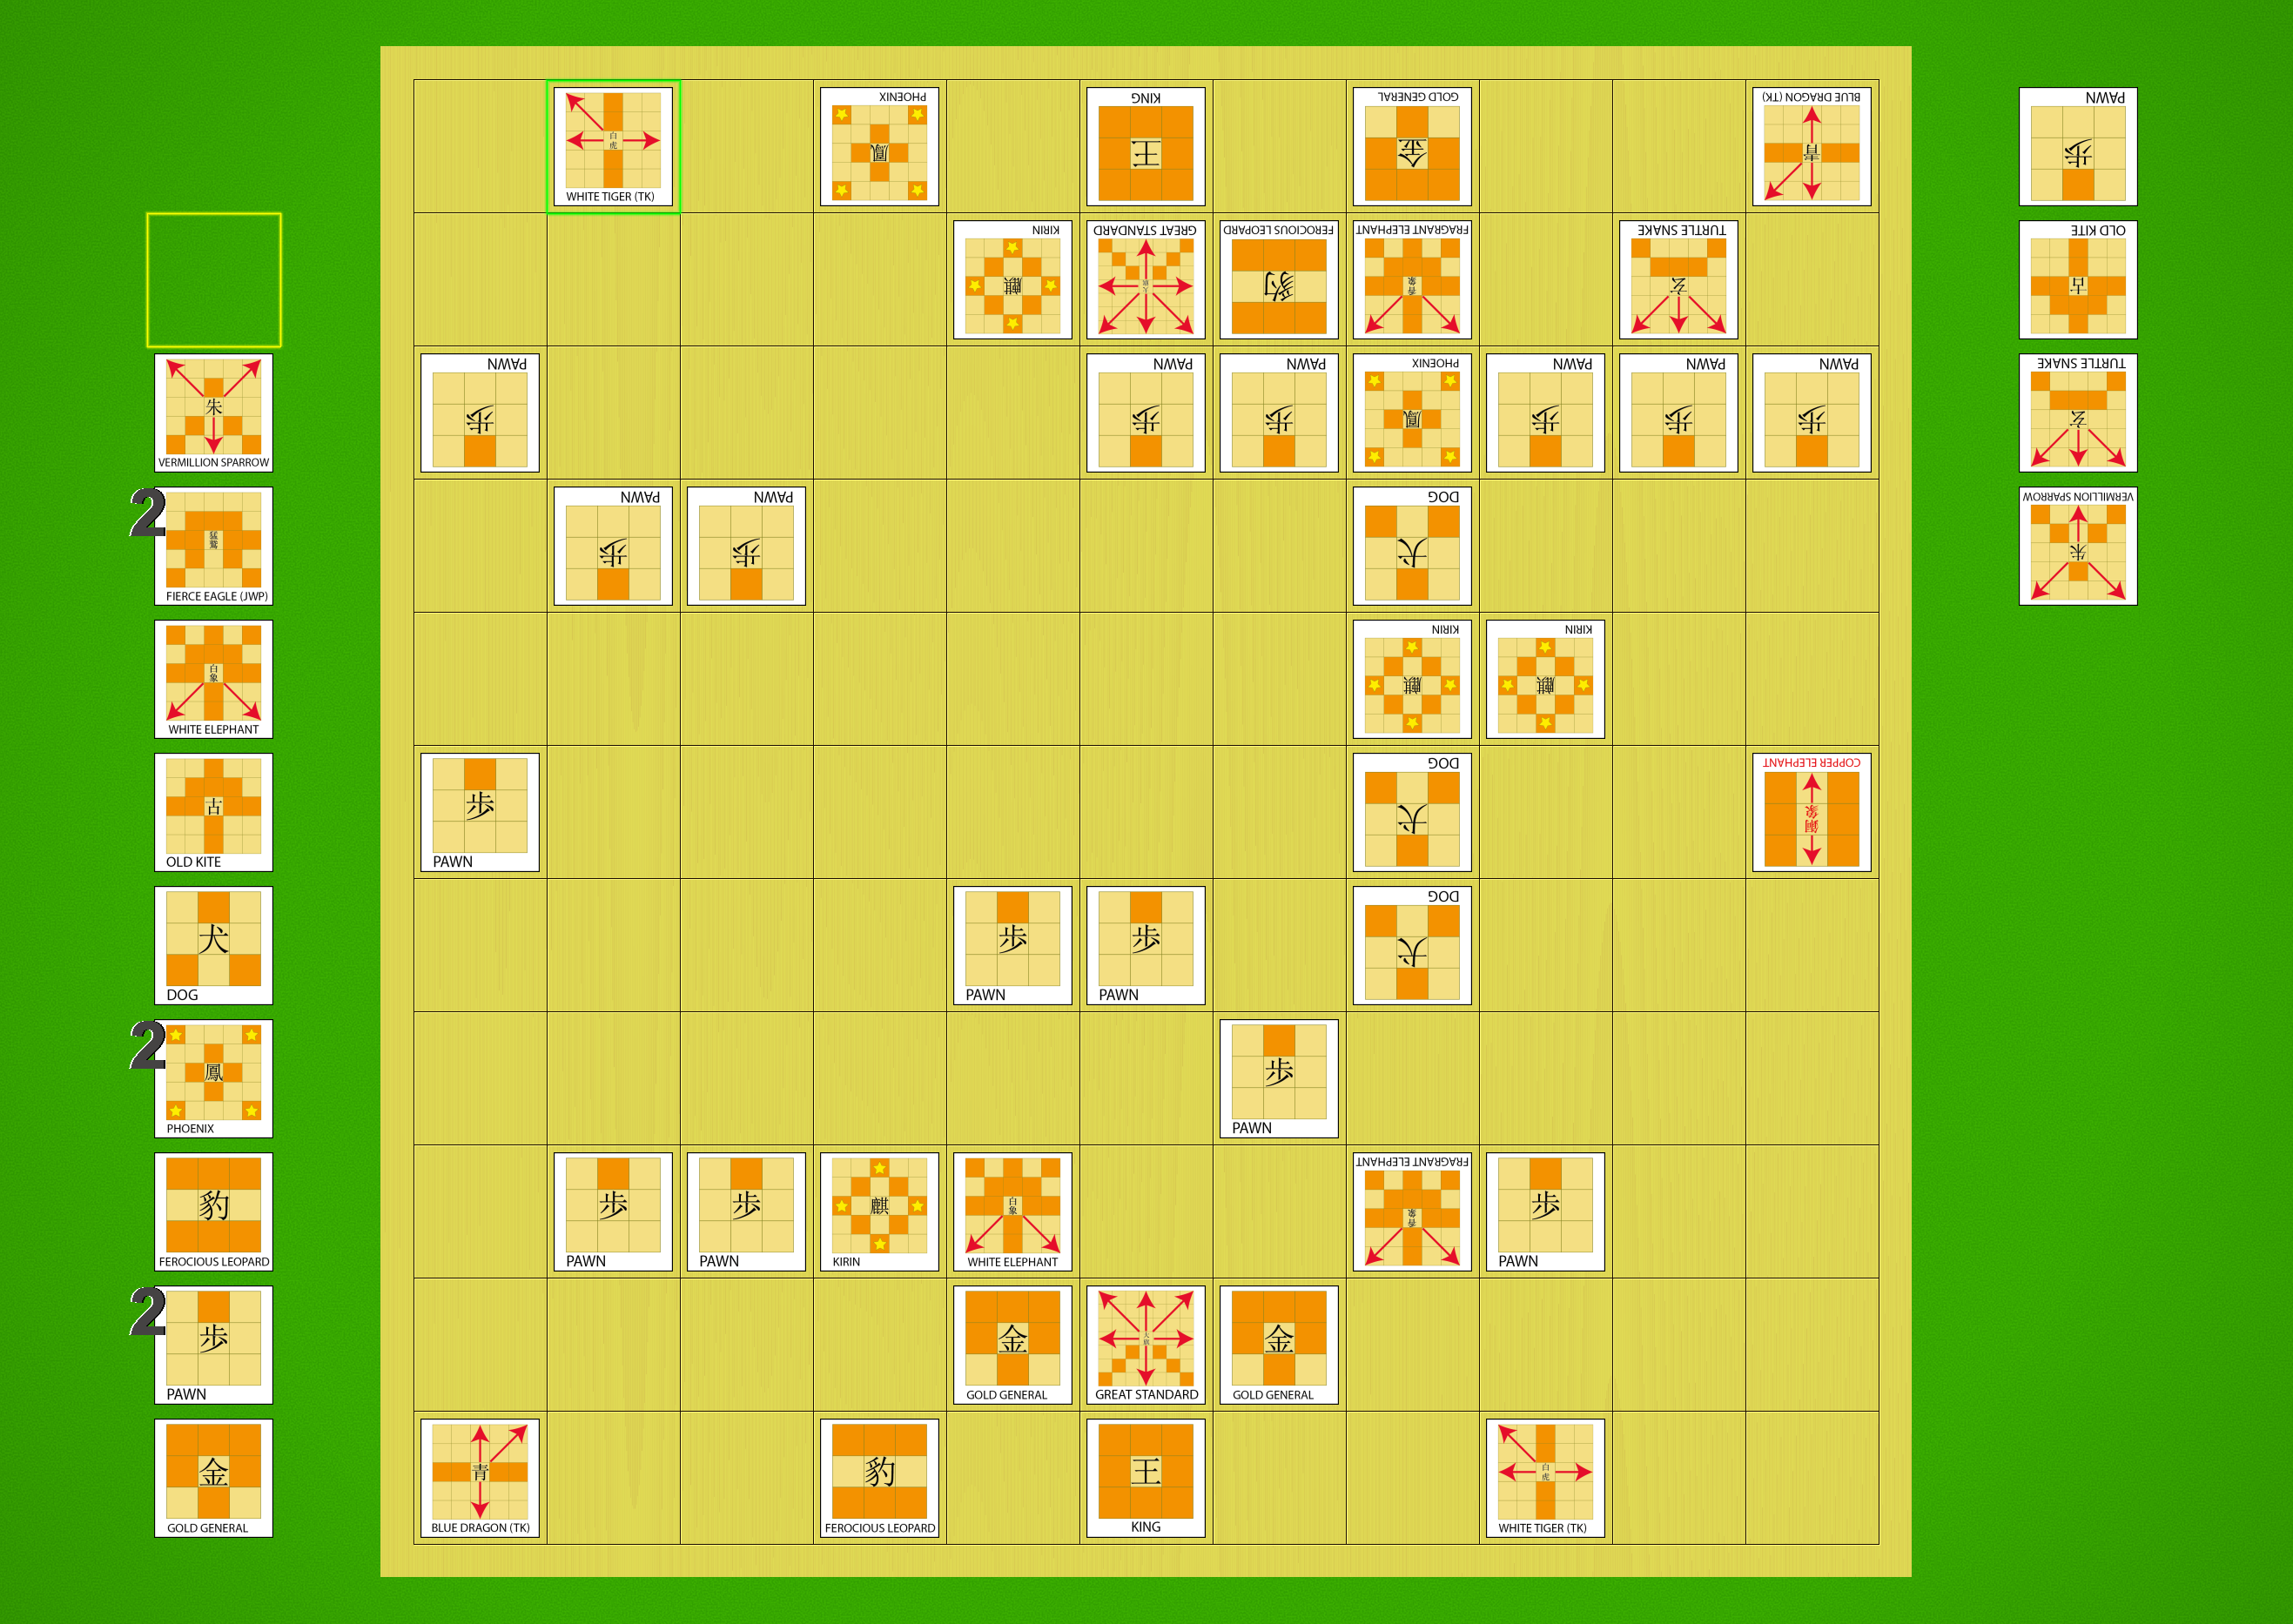
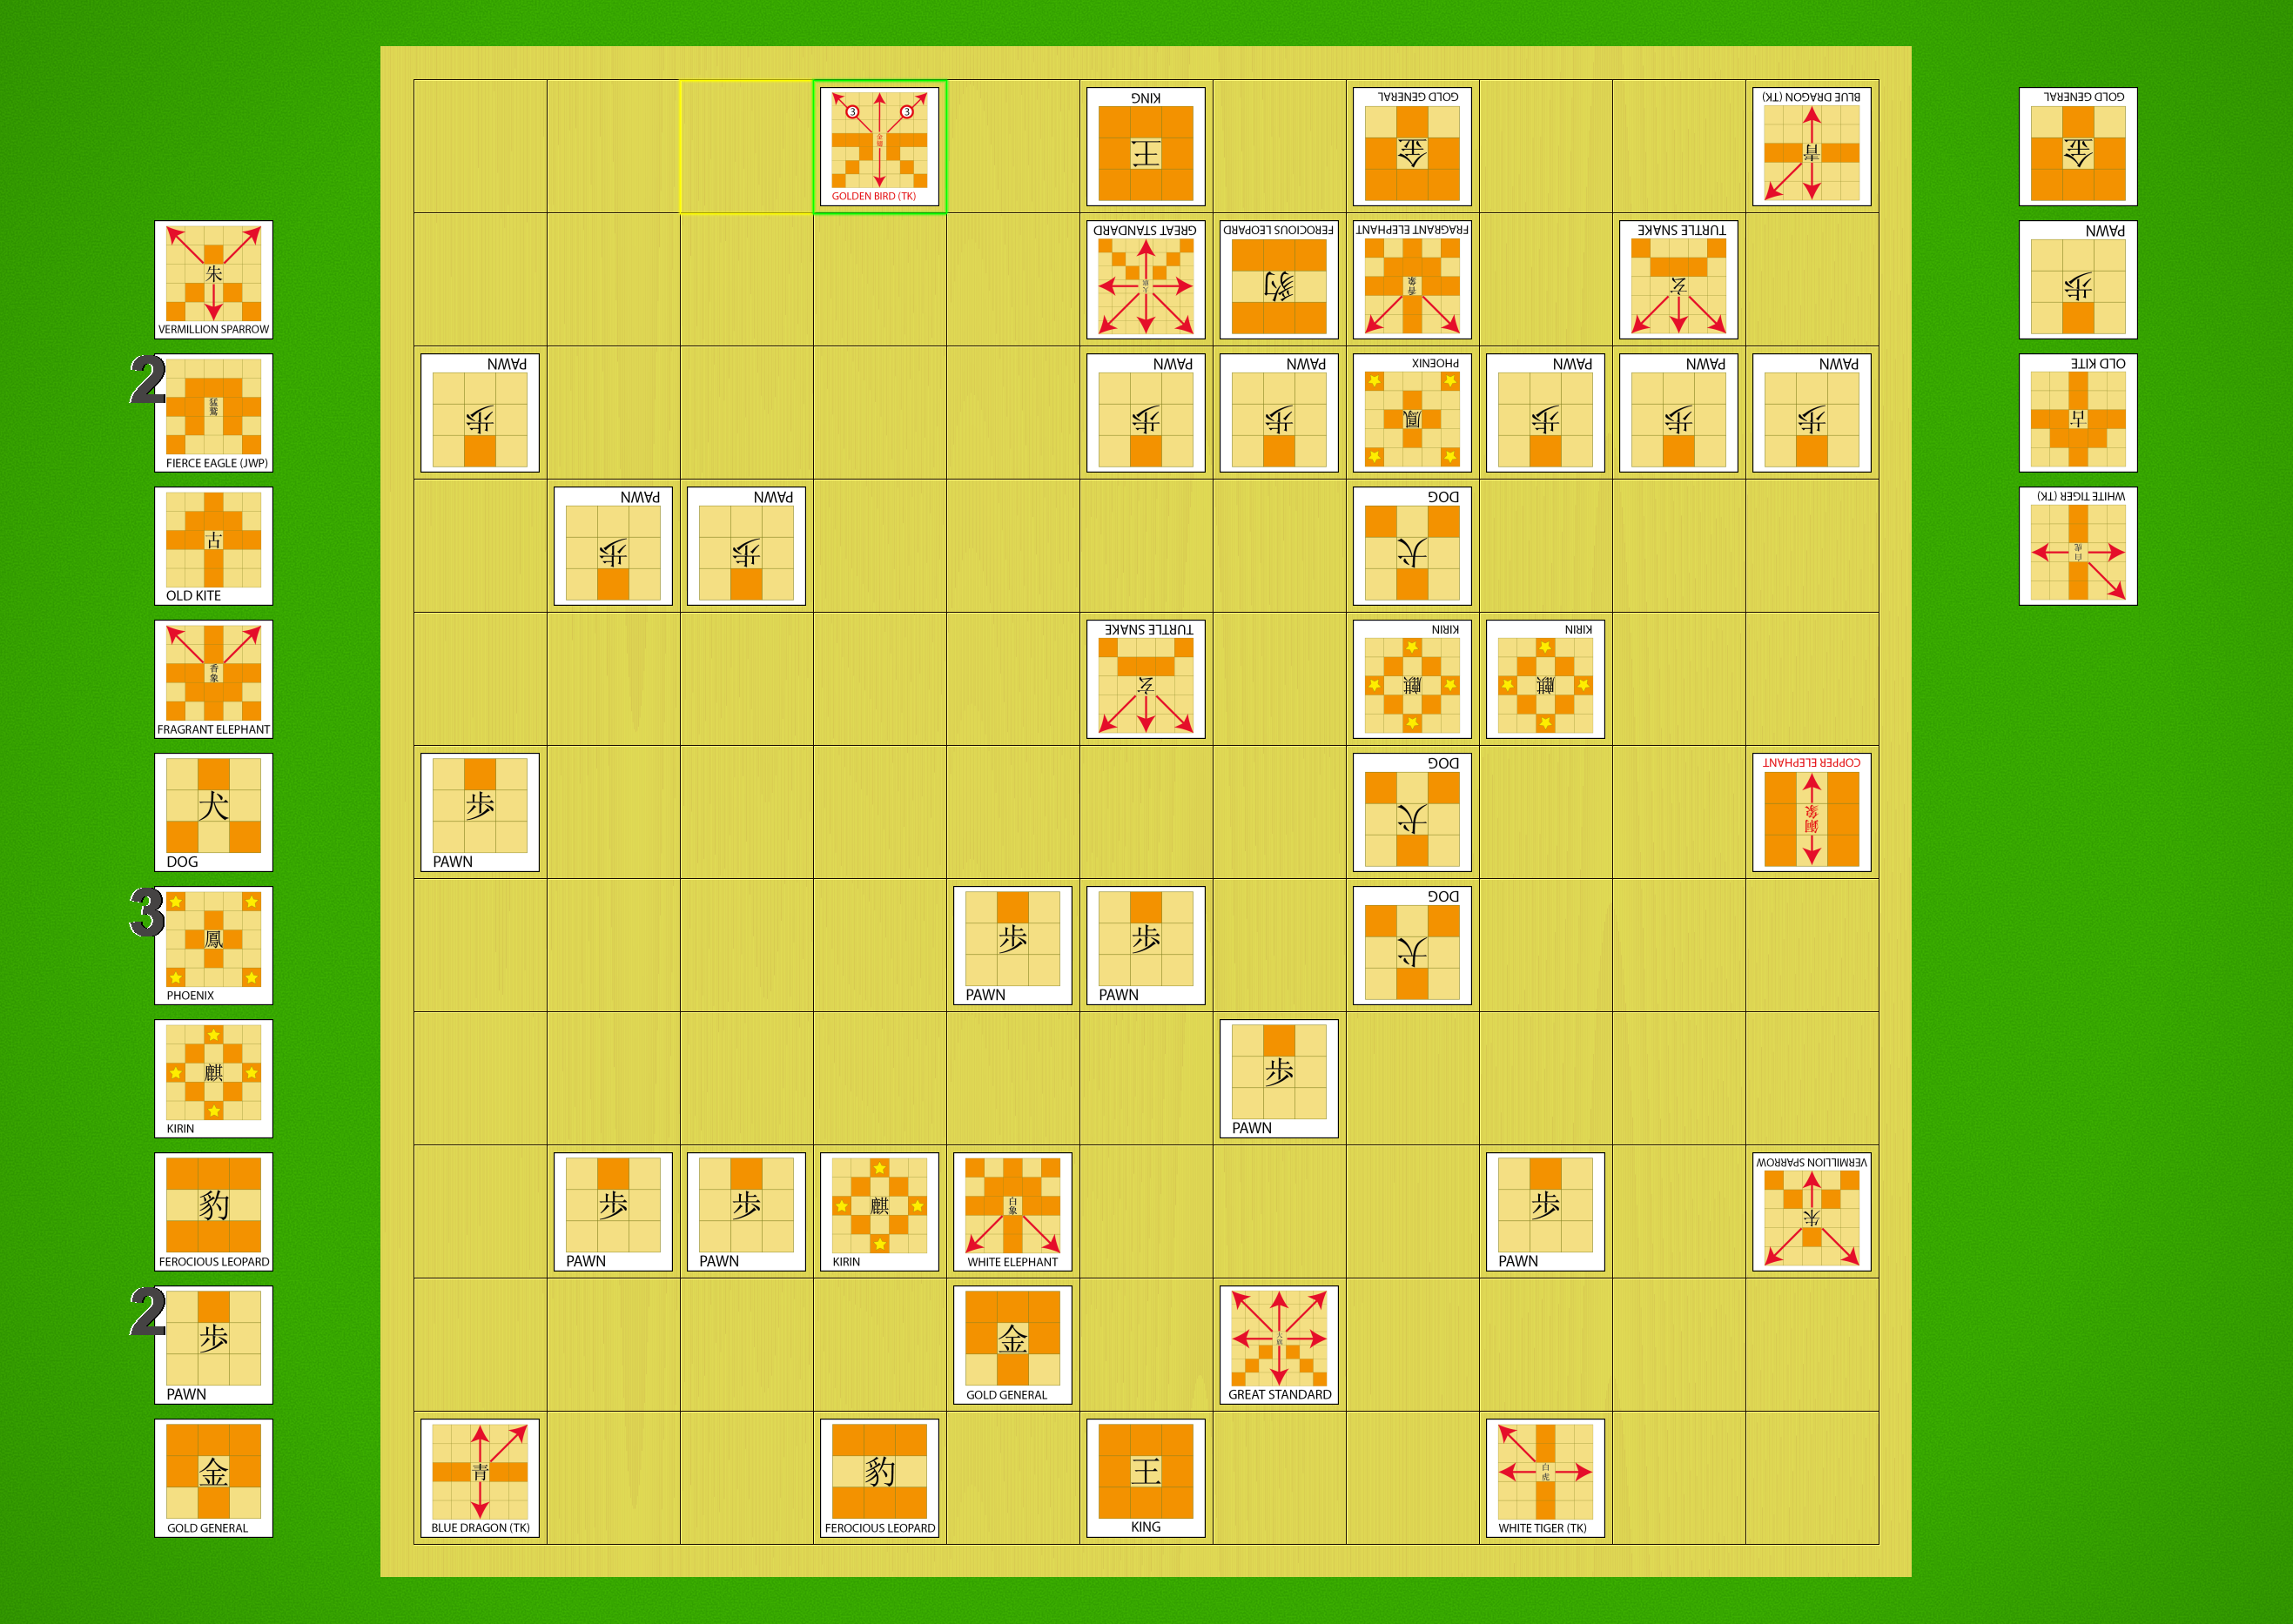
Shinjuu Shogi starting position with traditional kanji pieces, with pieces flipped to show their promoted sides. 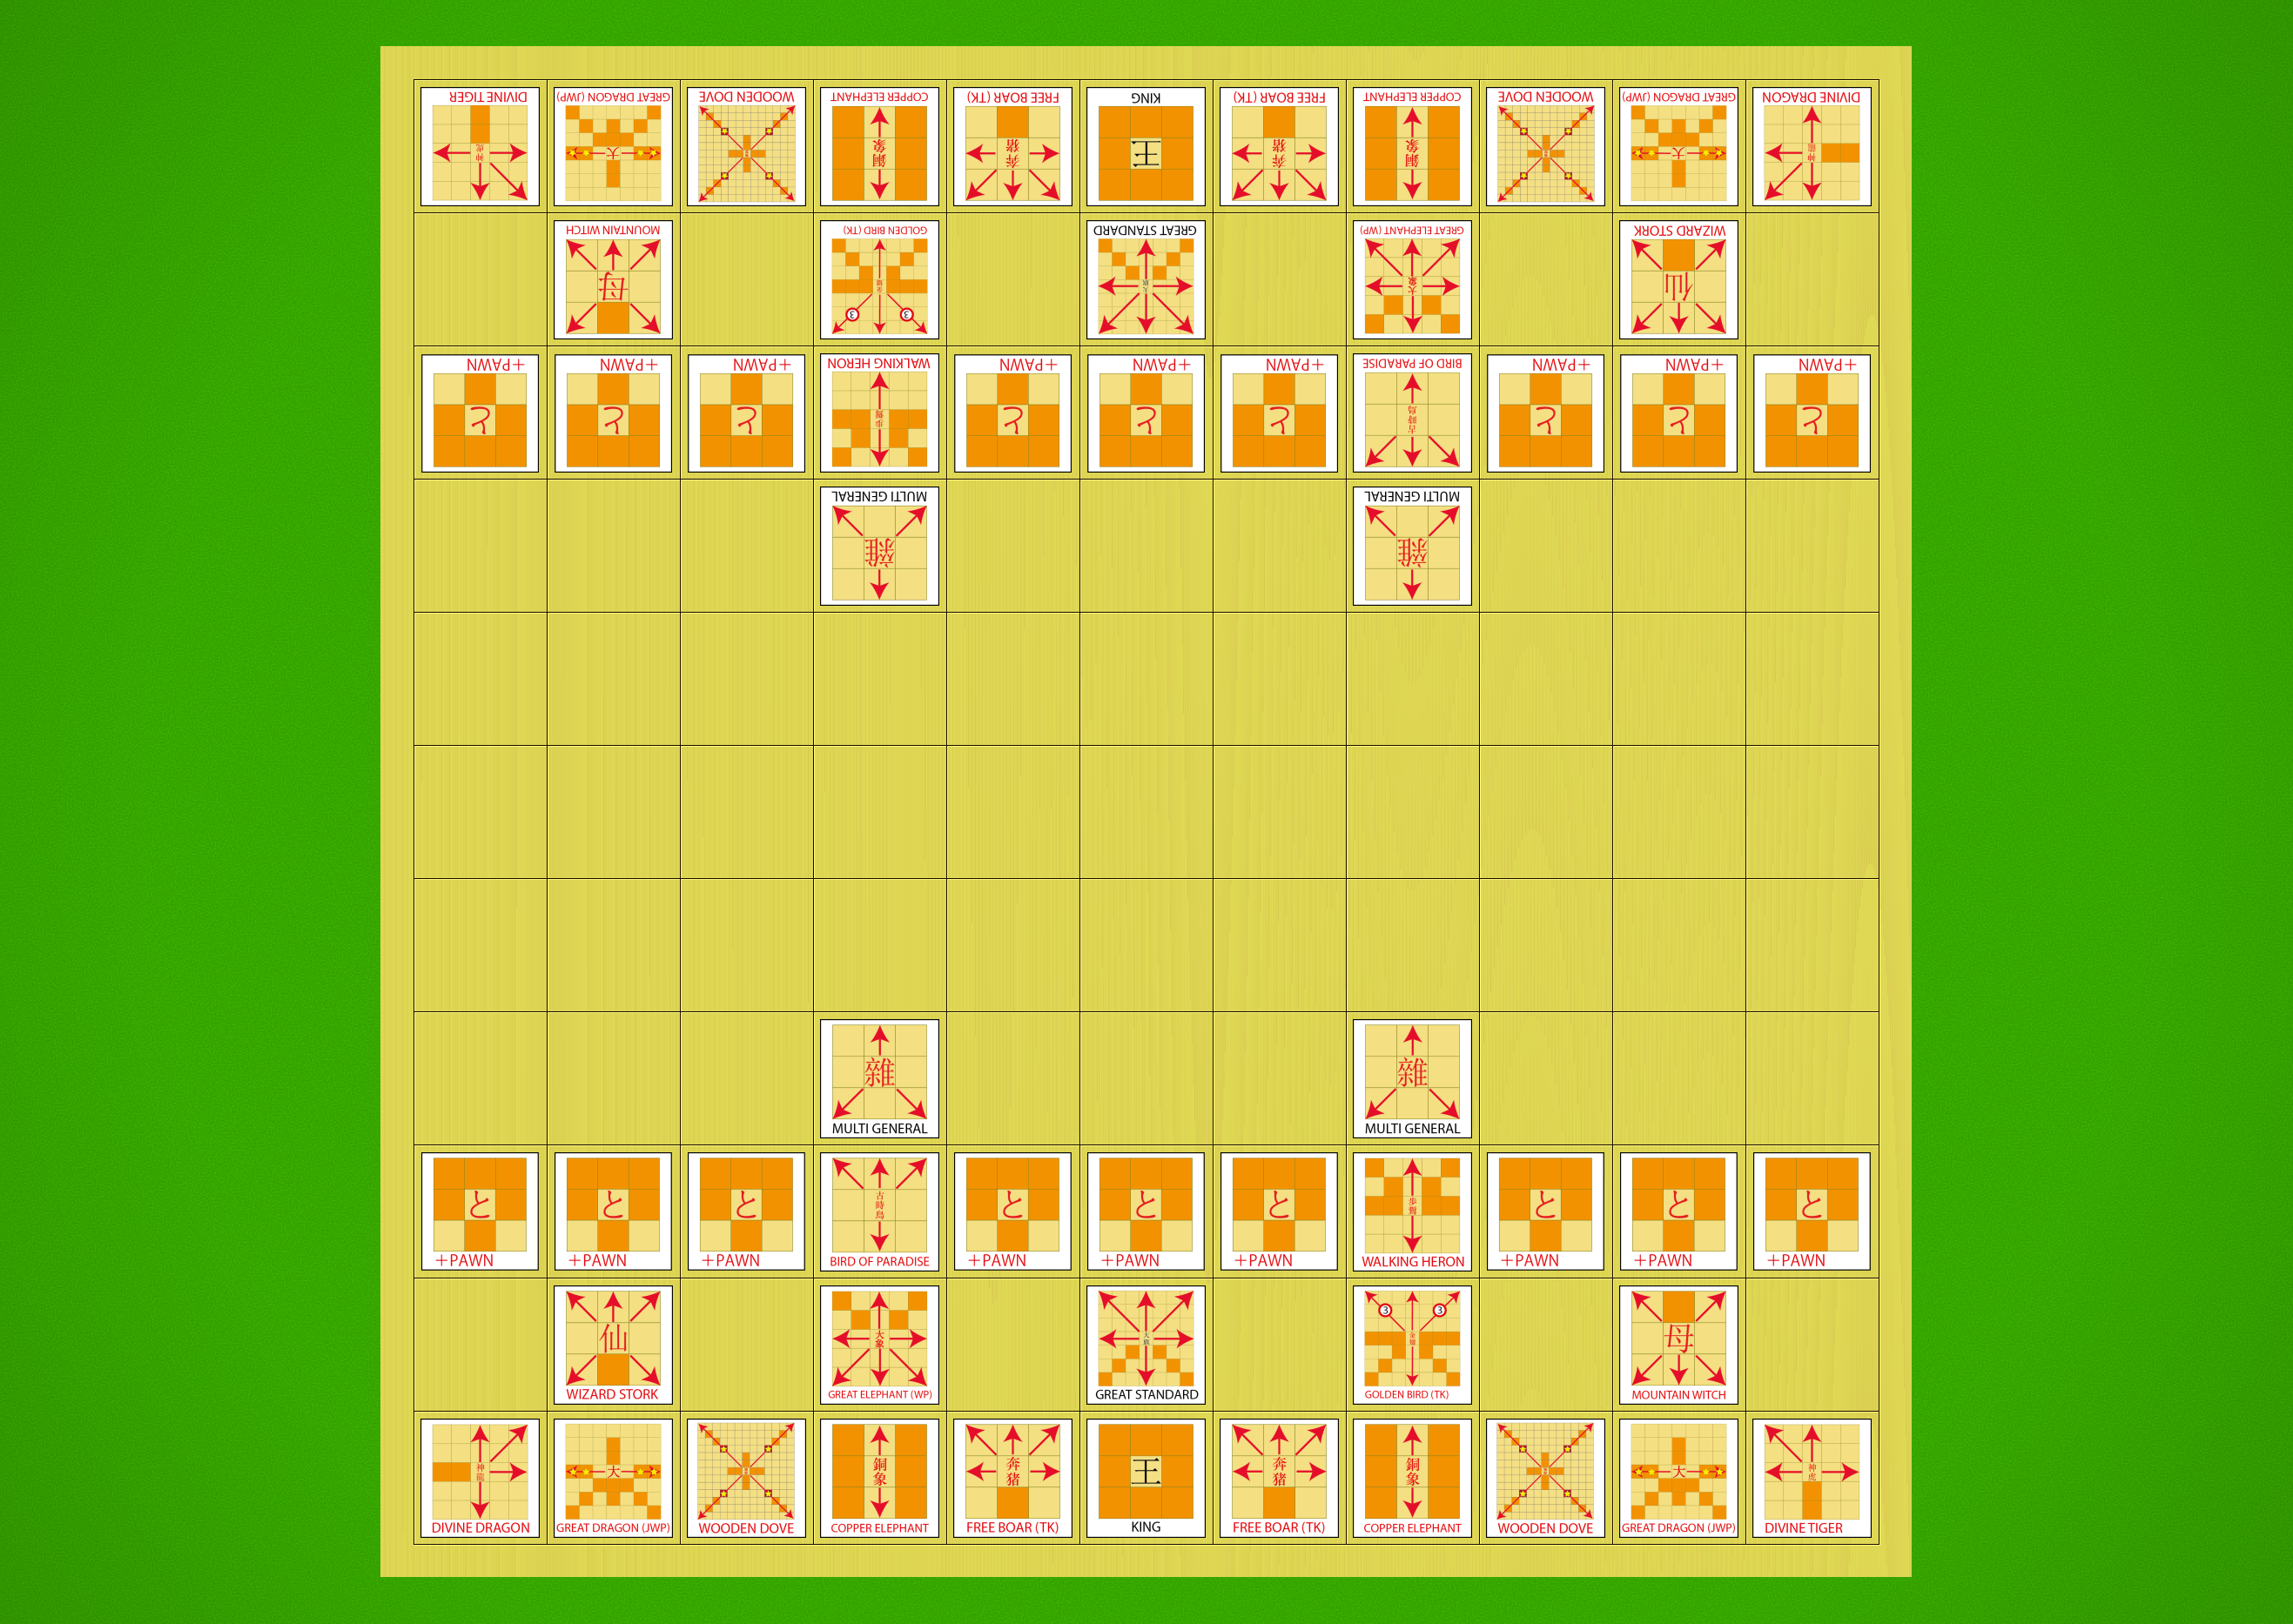
Shinjuu Shogi starting position with diagrammatic pieces, with pieces flipped to show their promoted sides.
Let’s be clear on this from the start — Shinjuu Shogi is a big game. The board is an 11×11 grid with 121 squares, substantially bigger than modern Shogi’s 81-square board. Players start with 27 pieces in their armies, nearly all of which can promote, giving us 28 different moves to remember — the same number as in 12×12 Chu Shogi. Wa Shogi is also an 11×11 game and has 25 moves to remember; the additional moves exist here thanks to the presence of the Dogs in addition to the normal Pawns, and the two additional pieces in the starting array.
The selection of piece types references most of the historical variants:
- The Pawn, Gold General and the King are present across all variants (except Tori and Wa).
- The Phoenix, Kirin, Ferocious Leopard are everywhere in the large variants, but for me they mostly bring to mind Chu Shogi.
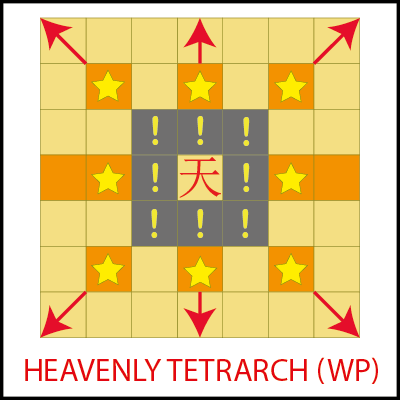
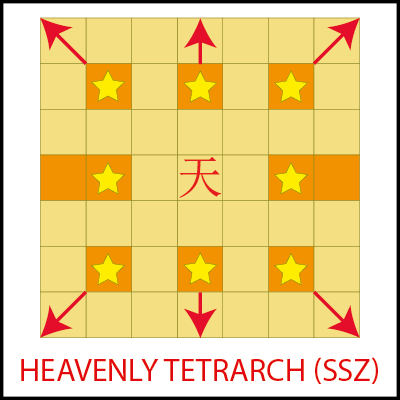
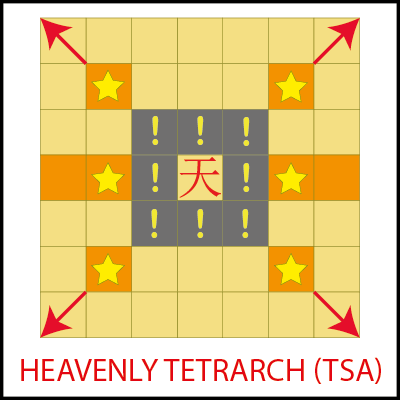
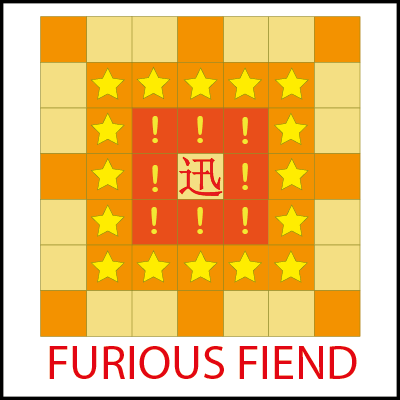
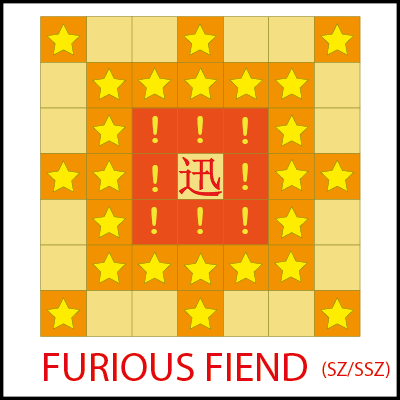
- The Divine Beasts — Blue Dragon, White Tiger, Vermillion Sparrow and Turtle-Snake — come to us from Tai Shogi, but here we use the Taikyoku Shogi moves for the Blue Dragon and White Tiger, and the Tai Shogi moves for the Vermillion Sparrow and Turtle-Snake. The White Tiger and Blue Dragon promotions also come from Taikyoku Shogi.
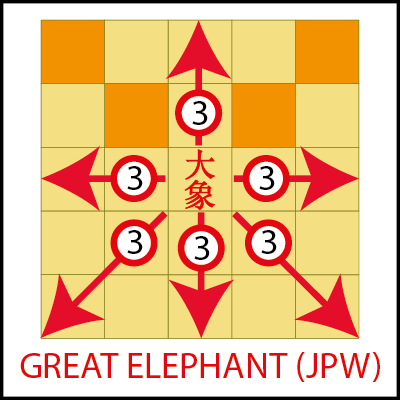
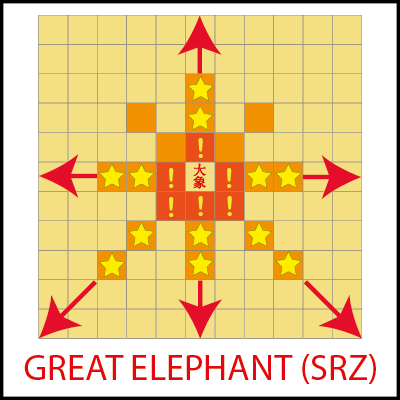
- The White Elephant and Fragrant Elephant come from Dai Dai Shogi, and their moves are vertically mirrored versions of each other.
- The Dog comes to us from Tenjiku Shogi, as well as its promotion to Multi General.
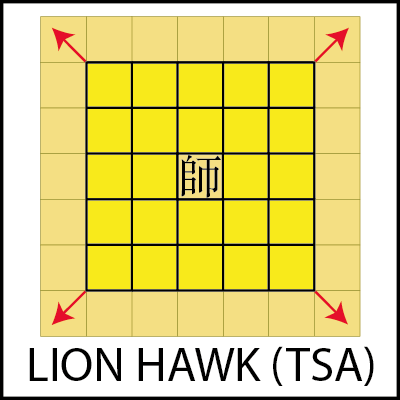
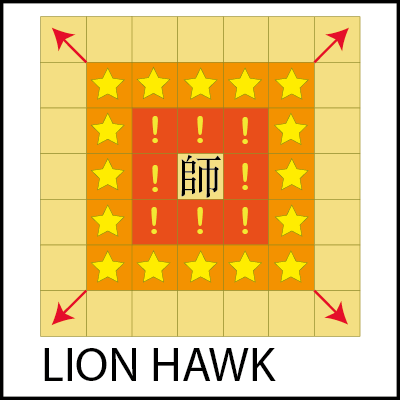
- The Fierce Eagle and Old Kite join us from Tai Shogi, with their moves drawn from the Japanese sources rather than the move promoted in The Shogi Association rules.
- The Mountain Witch and Wizard Stork join us from Dai Dai/Maka Dai Dai, as the promotions for the Vermillion Sparrow and Turtle-Snake, respectively.
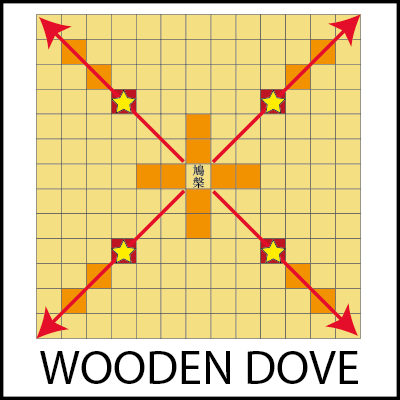
- Various pieces and promotions come from Taikyoku Shogi: Great Standard; Walking Heron (promoted Fierce Eagle); Bird of Paradise (promoted Old Kite); Wooden Dove (promoted Phoenix); Free Boar (promoted Gold General); and Copper Elephant (promoted Ferocious Leopard).
- The Golden Bird, the strongest promotion in the game, originates in Dai Dai/Maka Dai Dai but uses the Taikyoku move, which gives it the ability to leap over up to three pieces while sliding along the forward diagonals.
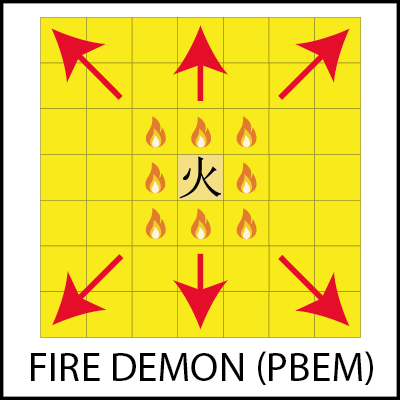
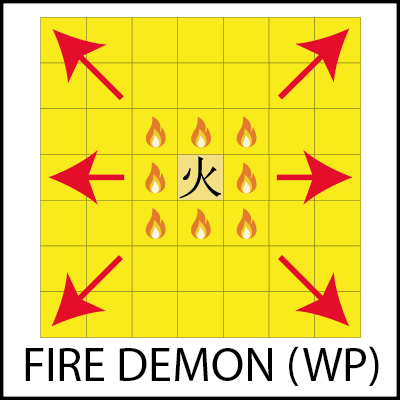
Shinjuu Shogi therefore contains references to most of the large Shogi variants, with the notable exception of Ko Shogi. Ko Shogi is a fascinating game with incredibly creative and complex piece movements, but the most interesting pieces in that game are simply too powerful to have a place in a game the size of Shinjuu. Similarly, the infamous Fire Demons and jumping Generals of Tenjiku Shogi can’t appear here either, as they would dominate the board completely.
I’ve built this game to try to capture the quirky character of the large Shogi variants:
- Asymmetry — The starting position is asymmetrical, with the Blue Dragon, Turtle Snake, and Old Kite starting on the left side, and the White Tiger, Vermillion Sparrow and Fierce Eagle on the right. The pieces themselves also have asymmetries in their movements, including both the step-moving pieces like the Old Kite and Fierce Eagle and the various sliding pieces like the Divine Beasts and the Elephants.
- Promotions — The Pawns promote to Tokin (Gold General), which is a nearly universal truth across the whole Shogi family. The other promotions here are specifically inspired by the large Shogi variants. The short-range pieces tend to gain significant power on promotion, graduating from single-step movers to long-range attackers. The Dog becomes a sliding piece that slides in the same directions it could step. The four Divine Beasts are straight upgrades of the unpromoted pieces, gaining additional sliding directions and retaining their previous moves as well.
- Promotion quirks — The Fragrant Elephant and White Elephant are vertically mirrored versions of each other, and their promotions are both strong but have a trade-off: in each case, the promoted form gains substantial power but loses their original two sliding moves, meaning that in some cases you may want to defer promotion. Similarly, the Kirin and Phoenix gain enormous mobility on promotion, but their jumping moves change. The Old Kite and Fierce Eagle gain vertical slides and some new options, but the Old Kite loses horizontal movement while the Fierce Eagle loses the rear diagonals. All these quirks mean that promotions sometimes must be deferred to make use of the unpromoted piece’s subtle differences.
- Powerful pieces — The amount of attacking power on the board is massively higher than in Wa Shogi. The starting array includes multiple-square step-movers, several different sliding pieces, and two leapers. The promoted pieces add some powerful threats: the Wooden Dove is able to leap and then slide afterward, providing dangerous long-distance attacking potential; the Golden Bird is able to leap over up to three pieces in certain directions, enabling deadly cross-board strikes; and the Great Dragon has a sideways 2- or 3-square leap that is lethal in certain close-quarters situations.
- Pacing — Piece placement has been optimised to generate a pace of play that follows the modern Shogi model. The opening position offers 39 possible first moves, which will hopefully reduce the likelihood of very deep opening analysis developing. All Pawns are protected at the start of the game, preventing any super-early tactical shots, and the longer-range pieces are tucked behind the Pawns and thus require additional moves to be developed. The result is a relatively deliberate and strategic opening phase leading up to a very active middlegame. The middlegame itself is more intricate than Wa Shogi, given the higher piece density and greater piece mobility, which allow for complex and varied tactics to emerge. The endgame is characterised by dynamic and aggressive play, with frequent drops supported by powerful long-range attacks from promoted pieces.
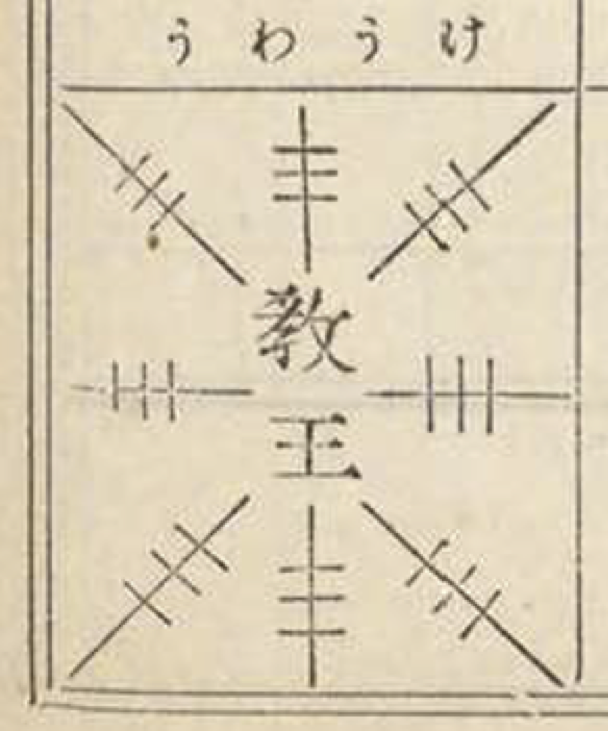
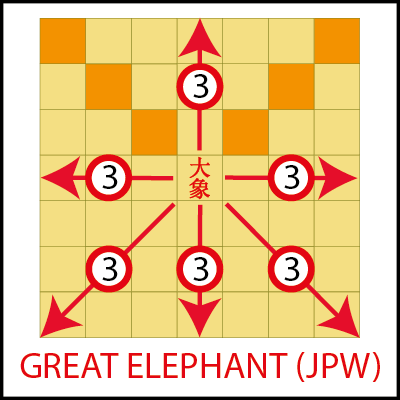
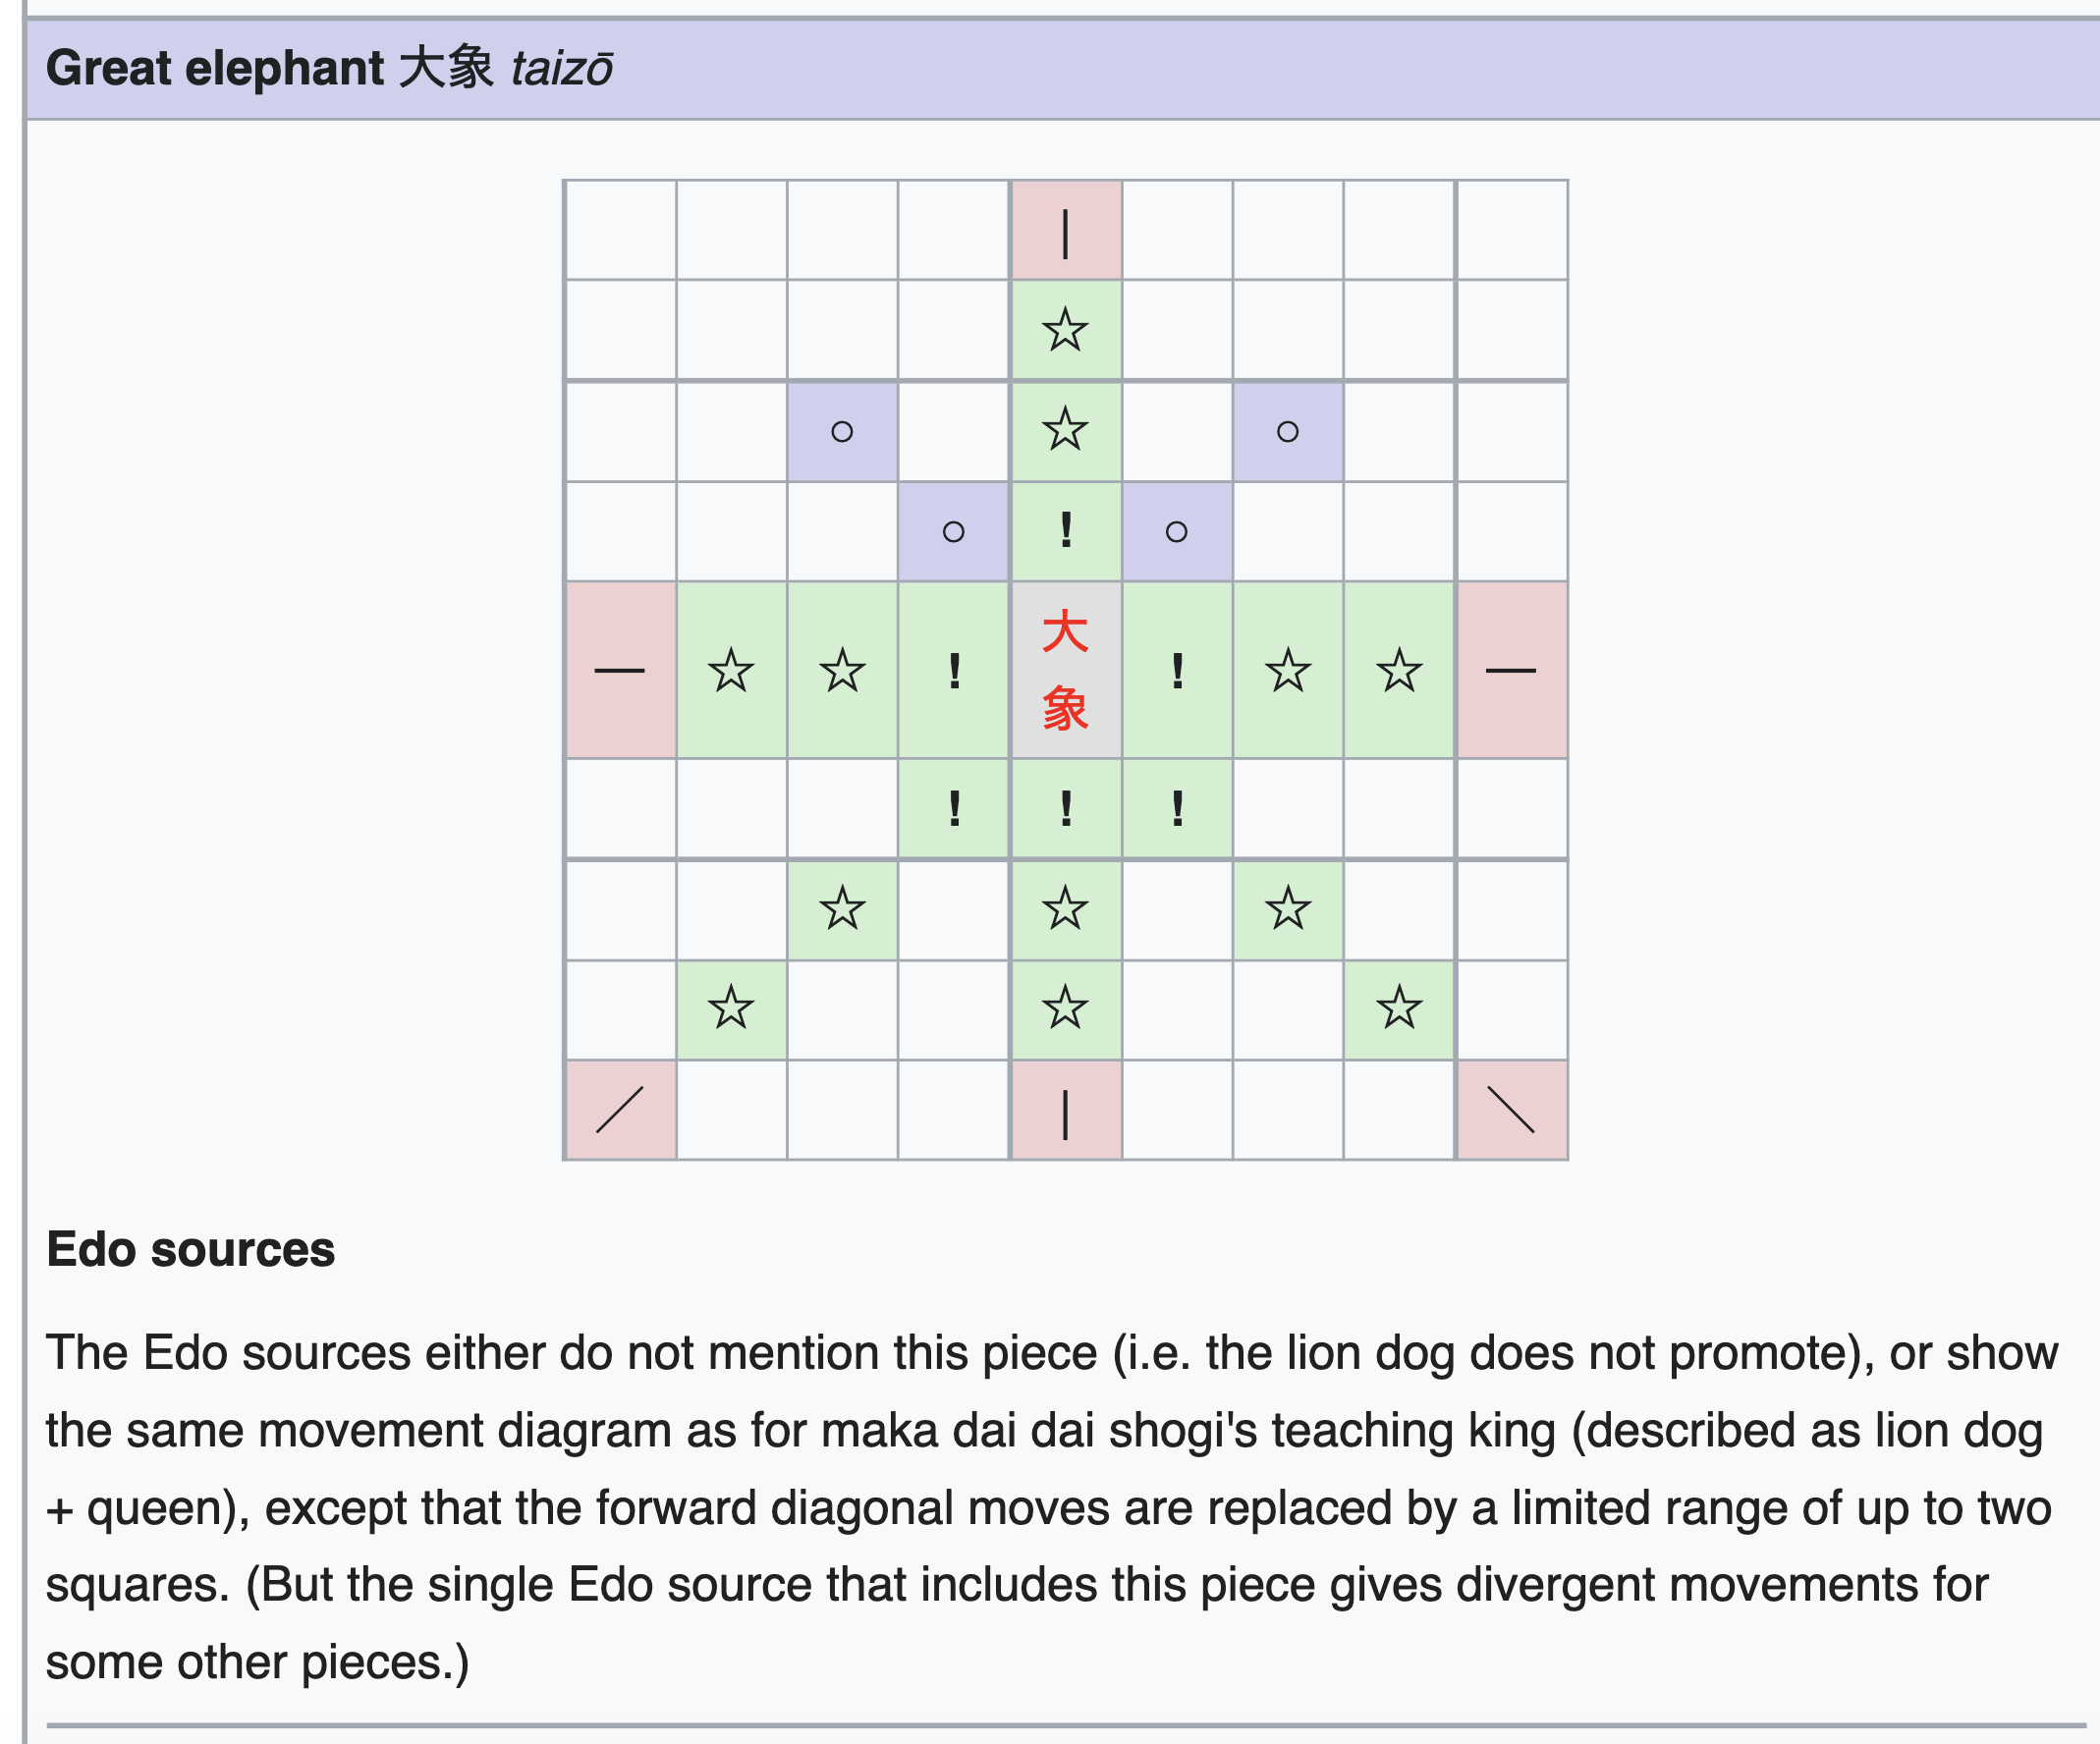
- Thematic appeal — The Divine Beasts are the thematic core of the game, and the other pieces have been chosen to amplify the feel of an epic battle between mythological forces. The Dogs, Old Kites and Fierce Eagles are the vanguards, leading these armies of beasts and gods into battle. The King is protected by a Great Standard, which effectively guards the second rank and has strong forward attacking potential when given the opportunity. The Phoenix and Kirin (Unicorn) provide nimble leaping attacks that can complicate enemy attempts to secure their King. The Fragrant and White Elephants are stalwart defenders that blossom into vicious airborne attackers when given an opening; their promotions are thematic, with the White Elephant of Buddhist mythology transforming into a Golden Bird symbolising enlightenment, while the Fragrant Elephant matures into a Great Elephant, losing some forward attacking power in exchange for strong rearward sliding capabilities.
The result of all this is, I hope, a game that combines the dynamism of modern Shogi with the creative character of the ancient large Shogi variants. To give it a distinct personality I included pieces with unusual moves and abilities:
The Wooden Dove may jump 3 squares diagonally, then optionally slide an additional 1-2 squares outward. 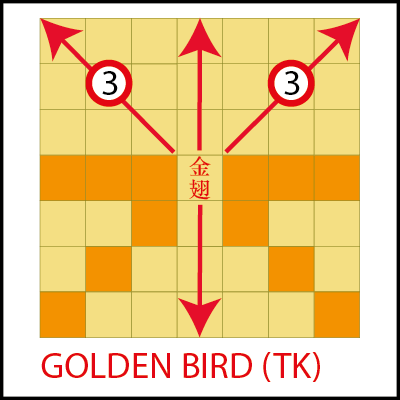
The Golden Bird may leap over up to 3 pieces when sliding diagonally forward. 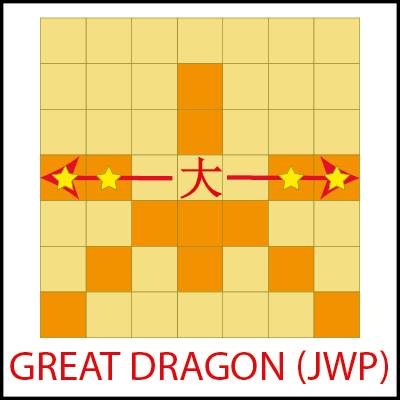
The Great Dragon may leap 2 or 3 squares sideways.
These kinds of unique moves are characteristic of these old games. Perhaps the most iconic piece of the large Shogi variants is the powerful Lion that can move and capture twice in a turn, but the Lion and its many cousins are simply too strong to live happily in a drops-based game. So instead I selected pieces with unusual sliding modes from Tai and Taikyoku Shogi, which are still strong and unique but not overpowering. These pieces also add further dynamism to the game by providing moves that neatly ignore dense defensive formations, forcing players to adopt flexible defences. I found that having a few leapers in this game also helped counterbalance the much higher attack density, and prevented games from dragging on for too long due to an overabundance of defensive power.
I should note that I made a possibly controversial decision with this game to have nearly all pieces promote to a piece type that is not present in the initial position. Pawns promote to Tokin, which moves identically to the Gold General, but otherwise all pieces upgrade to something new. This was a conscious choice, which I made to ensure that Shinjuu would maximise the opportunity to showcase a wide variety of different pieces from the ancient variants. This does mean players need to familiarise themselves with more moves, but I tried to choose promotions that have some vaguely logical connection to their unpromoted forms, particularly for the shinjuu themselves. As you’ll see in future posts, some of my other 11×11 designs do have more pieces promote to something present in the initial array.
In my defence, many Shogi variants have promotions that don’t appear in the initial position, including Shogi itself (the Dragon King/Dragon Horse); here I’ve just extended that to its logical extreme!

Shinjuu Shogi sample game (181 moves). 
Shinjuu Shogi sample game (306 moves).
Gameplay
Shinjuu Shogi is a big game, much bigger than standard Shogi, but much like Chu Shogi and its larger cousins, a few games will quickly solidify the piece movements in your mind. The major conceptual obstacle to overcome is the substantially increased asymmetry in the moves compared to standard Shogi; many pieces in this game have odd mixes of stepping, jumping and sliding moves. To play this game well, players must master all these distinct movement modes for these pieces, and this can be a challenge at first.
I was careful to select pieces that all have weaknesses in certain directions; we have no equivalent of the Queen here. Many pieces in Shinjuu cannot move in some directions at all, and even the strongest pieces have some directions with limited movement capability, which opens them up to long-range attack. These weaknesses mean that pieces generally have to be used in concert for maximum effect, and no one piece is able to fully dominate the board. In addition, these weak spots open up opportunities for fun tactics — a clever drop in an opposing piece’s blind spot can be an effective way to regain the initiative.
The general feel of the game is high intensity, and very dense. Despite the piece density being about the same as modern Shogi — in modern Shogi 40 of the 81 squares are occupied at the start, and here 58 of 121 are occupied — the game feels more dense, perhaps because the sheer number of pieces creates the impression of being constantly surrounded by threats. However, in practice the game board offers plenty of space for manoeuvre, and rarely will a player struggle to find a way to improve the positions of their pieces. In addition, once players hold a few pieces in hand the number of possible moves each turn escalates massively (over 500 possible moves is not uncommon!). This means that strategic and positional thinking is critical, because in a complex middlegame position it will be impossible to calculate out all the possible tactical variations your opponent may choose. Players have to survive by developing sound positional fundamentals and maintaining whole-board vision.
Unfortunately, I’ve yet to have the opportunity to play this game against strong opposition, but in my test games so far I’ve found a typical game will last between 200-300 moves. This is substantially more than Shogi and Wa Shogi, but on a similar level to Chu Shogi. This game length is right around the 250 move mark that I was aiming for throughout the design process. The typical game of Go is about 250 moves long, and something like ~50 million people play Go on this planet, so I felt that was a good target to aim for that would satiate my thirst for long, involved games but would not feel particularly excessive. On rare occasions I had games just over 400 moves long, but in subsequent analysis I found they could’ve ended much sooner with some sharper play.
On the whole I’m sure opinions will vary on this game and my design principles, but so far I enjoy the result. The game is big, complex, and jammed full of possibilities, but it also feels like Shogi and never slows to a crawl. The larger board and longer games create an expansive feel, and the thematic pieces drawn from ancient Shogi help create a quirky narrative feel in the game. Realistically I suspect very few people will ever play this game, but if nothing else I feel I’ve made progress on my design goals and have learned a lot in the process.
The Pieces of Shinjuu Shogi
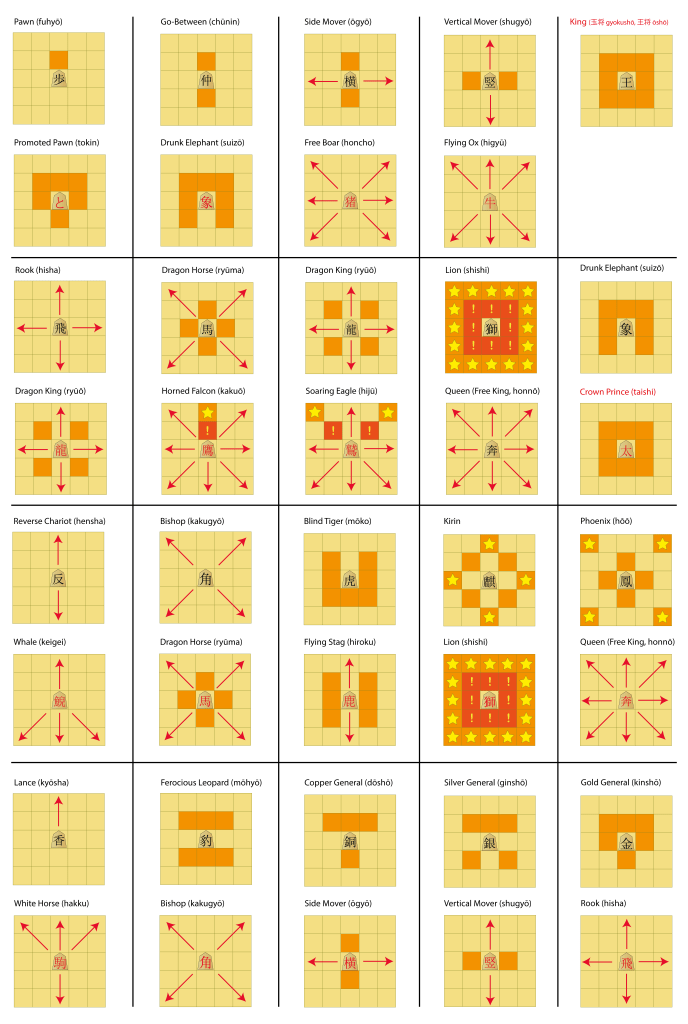
Shinjuu Shogi is a big game, and given that I want it to be a showcase for unusual historical Shogi pieces it contains few pieces that will be familiar to modern Shogi players (just the King, Pawns and Gold Generals). That means there’s a bit of a learning curve, so I’ve put together a quick reference sheet, where each piece is paired with its promoted form:
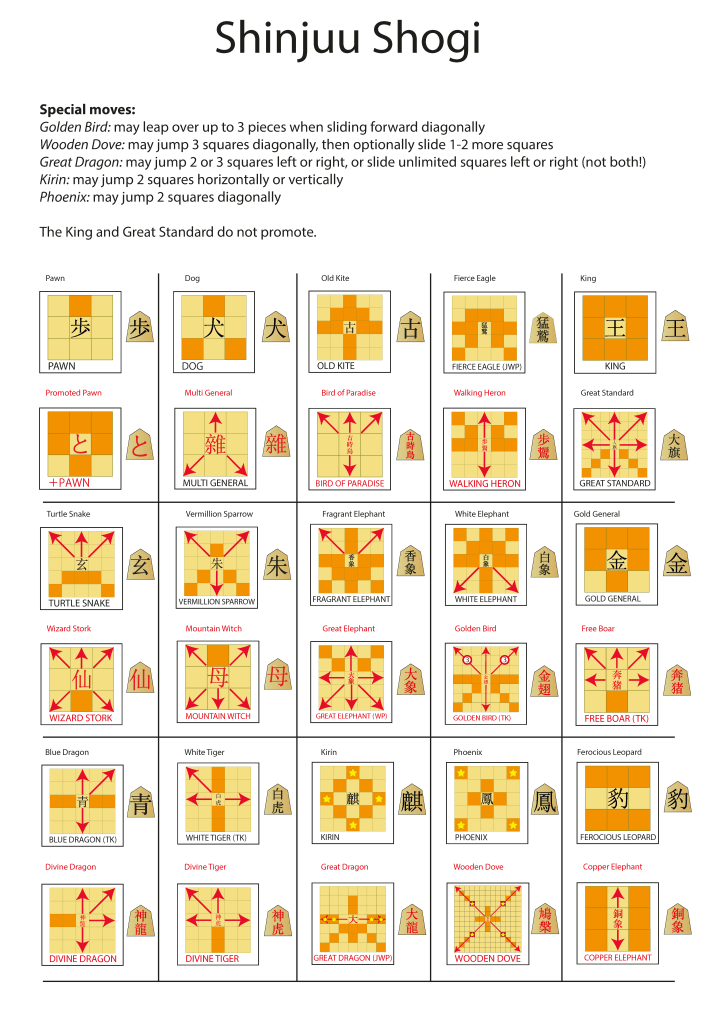
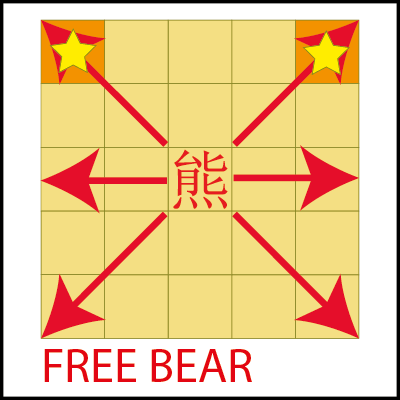
A PDF version for printing or reference is available here. Note that the top of the sheet also has some reminders of the pieces with special moves, which are various types of leaping moves.
The four shinjuu themselves are perhaps the hardest pieces to remember initially. However, it may help to realise that the moves of the Turtle Snake and Vermillion Sparrow are related — just take the forward slide and backward step of the Turtle Snake and invert them, and you have the Sparrow! Likewise, the White Tiger has the same move as the Blue Dragon, just rotated 90 degrees counterclockwise, and the same is true of their promoted forms. The Turtle Snake and Vermillion Sparrow promotions are easy to remember too, as they both simply replace the backward diagonal steps with unlimited slides, while keeping the rest of their unpromoted moves the same. Similarly, the promoted White Tiger and Blue Dragon replace one two-step move with an unlimited slide.
Players familiar with large Shogi will notice that some of the promoted pieces here are quite powerful, in particular the Golden Bird and its ability to leap over up to 3 pieces while sliding diagonally forward. However, promotions are more difficult to achieve here than in the ancient games, thanks to drops; throughout the game the number of pieces on the board remains largely constant, so any piece attempting to promote is likely to encounter a heavily-guarded promotion zone. Attackers should be more cautious about pushing for promotion here, and spend time setting up substantial weaknesses in the opponent’s defensive formations beforehand.
The generally stronger promotions mean that minor pieces are more valuable in Shinjuu than in standard Shogi. In particular the Gold Generals gain six unlimited sliding moves when they promote, but they’re also very useful for defending one’s King so deciding when or if to promote them is often challenging. Promoting a Gold General commits you to the attack, because it can only retreat one square. Meanwhile, the Kirin and Phoenix are interesting to use in this game, as their unpromoted moves include very useful leaps. Their promoted forms are dangerous aerial attackers, given they can leap 3 squares over defending pieces. Beware of these pieces when defending; the King will need escape squares, or you may end up in a smothered mate situation.
Of the major pieces, the Fragrant Elephant and White Elephant are perhaps the most dangerous. Their standard moves are strong already, but in promoted form they become highly mobile as well. Players must always be aware of any Elephants attempting to promote, and in the endgame having a couple of Pawns in hand to buttress the King’s castle against airborne Golden Bird threats can be helpful. The Great Standard is very strong but also has limited retreating moves, plus it is one of the few pieces that can slide sideways and is therefore useful for protecting the promotion zone. The White Dragon can also serve well in this role, while the Blue Dragon can guard against edge attacks and support advancing Pawns. The Turtle Snake and Vermillion Sparrow are perhaps the most active attacking major pieces, as their forward-facing slides allow them to generate a variety of long-range threats, and in promoted form they can retreat very effectively too. The shinjuu have fairly mild promotions in general, so players may be more willing to use them for daring sacrifices; in contrast, handing your opponent extra Elephants can be seriously risky!
At this early stage in the game’s life it’s difficult to judge the best approach to defence. One’s instinct may be to surround the King with a thick wall of defensive pieces, but in practice this can be very dangerous. Leaping pieces can bully the King around even from outside your defensive structure, and handing the initiative to your opponent without generating counterplay may allow them to dominate elsewhere on the board and develop opportunities for deadly promotions. My approach has been to shift the King to one of the flanks of the board, keeping him guarded by the Leopards, Golds, White Tiger and Great Standard. My frontline attackers have been the Turtle Snake, Vermillion Sparrow, and Fragrant Elephant, with the Kirins and Phoenixes providing support.
On the whole, the pieces in this game have unusual moves, and don’t fit cleanly into our pre-existing notions of what we might do with more typical Chess or Shogi pieces. I’ve found it enjoyable to try and understand the best use of these pieces, as each has a distinct personality and clear weaknesses that must be taken into account. Over time I hope to deepen my understanding of how to use these pieces effectively.
A Closer Look
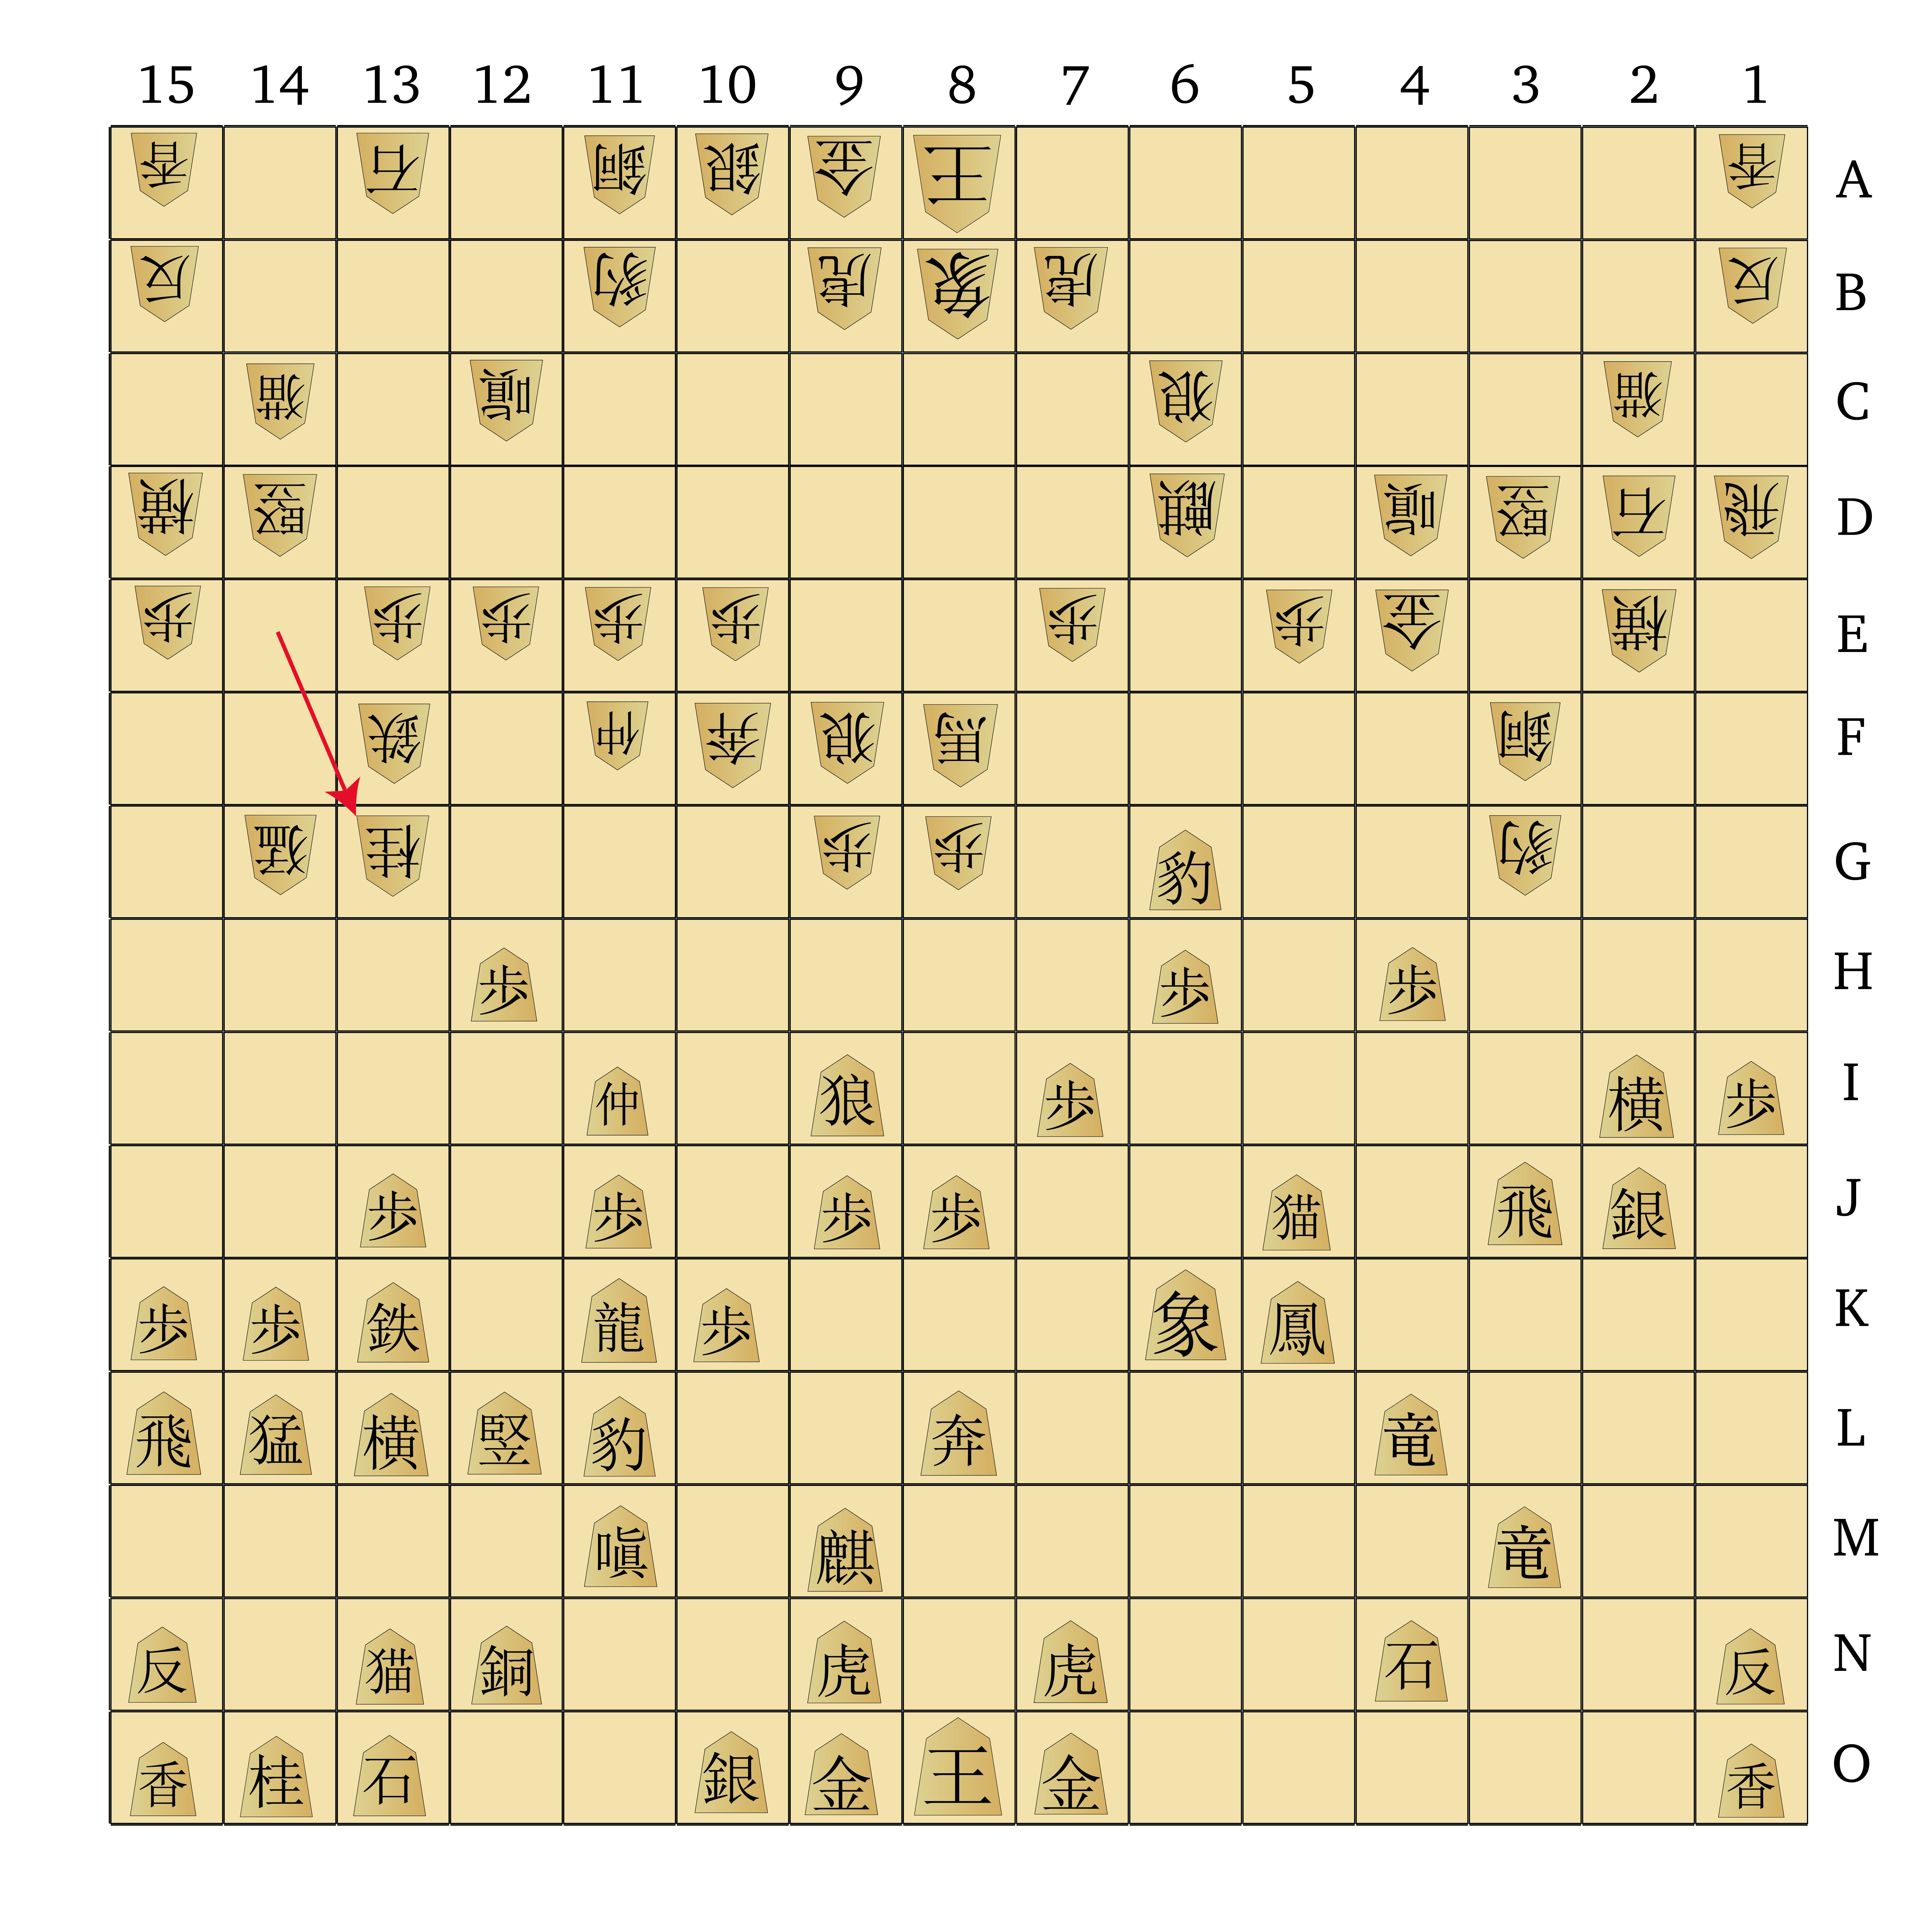
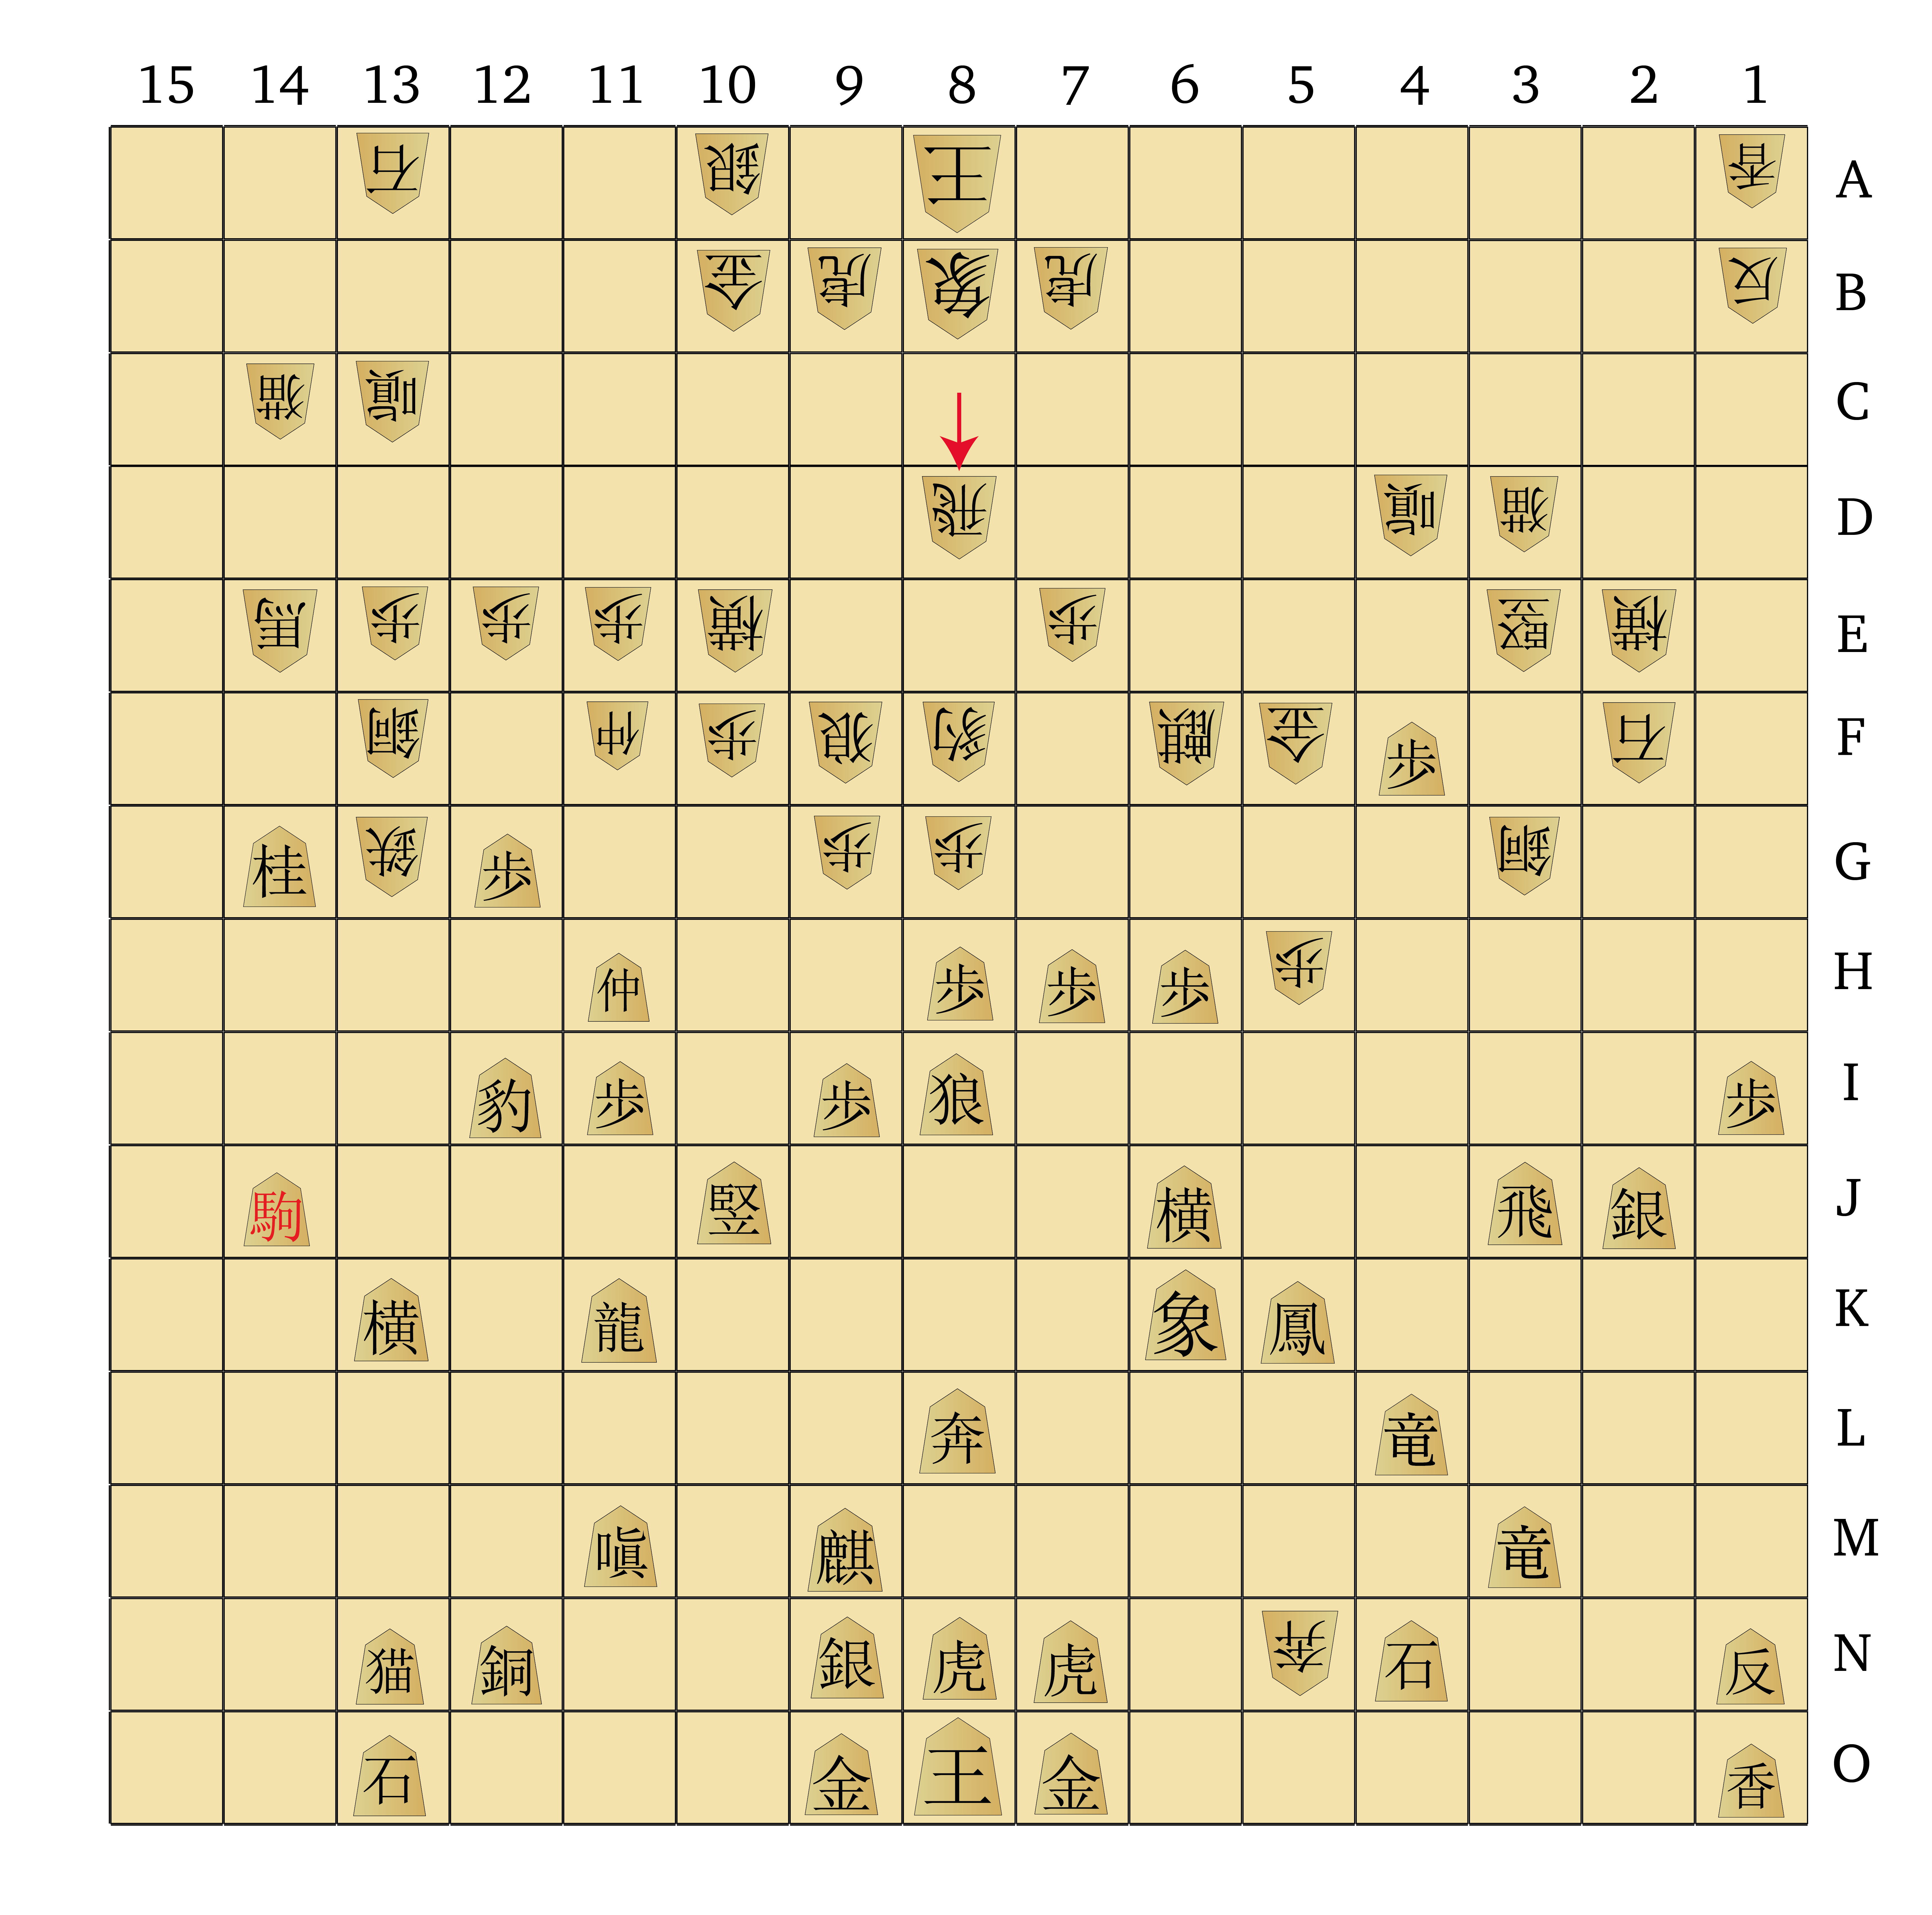
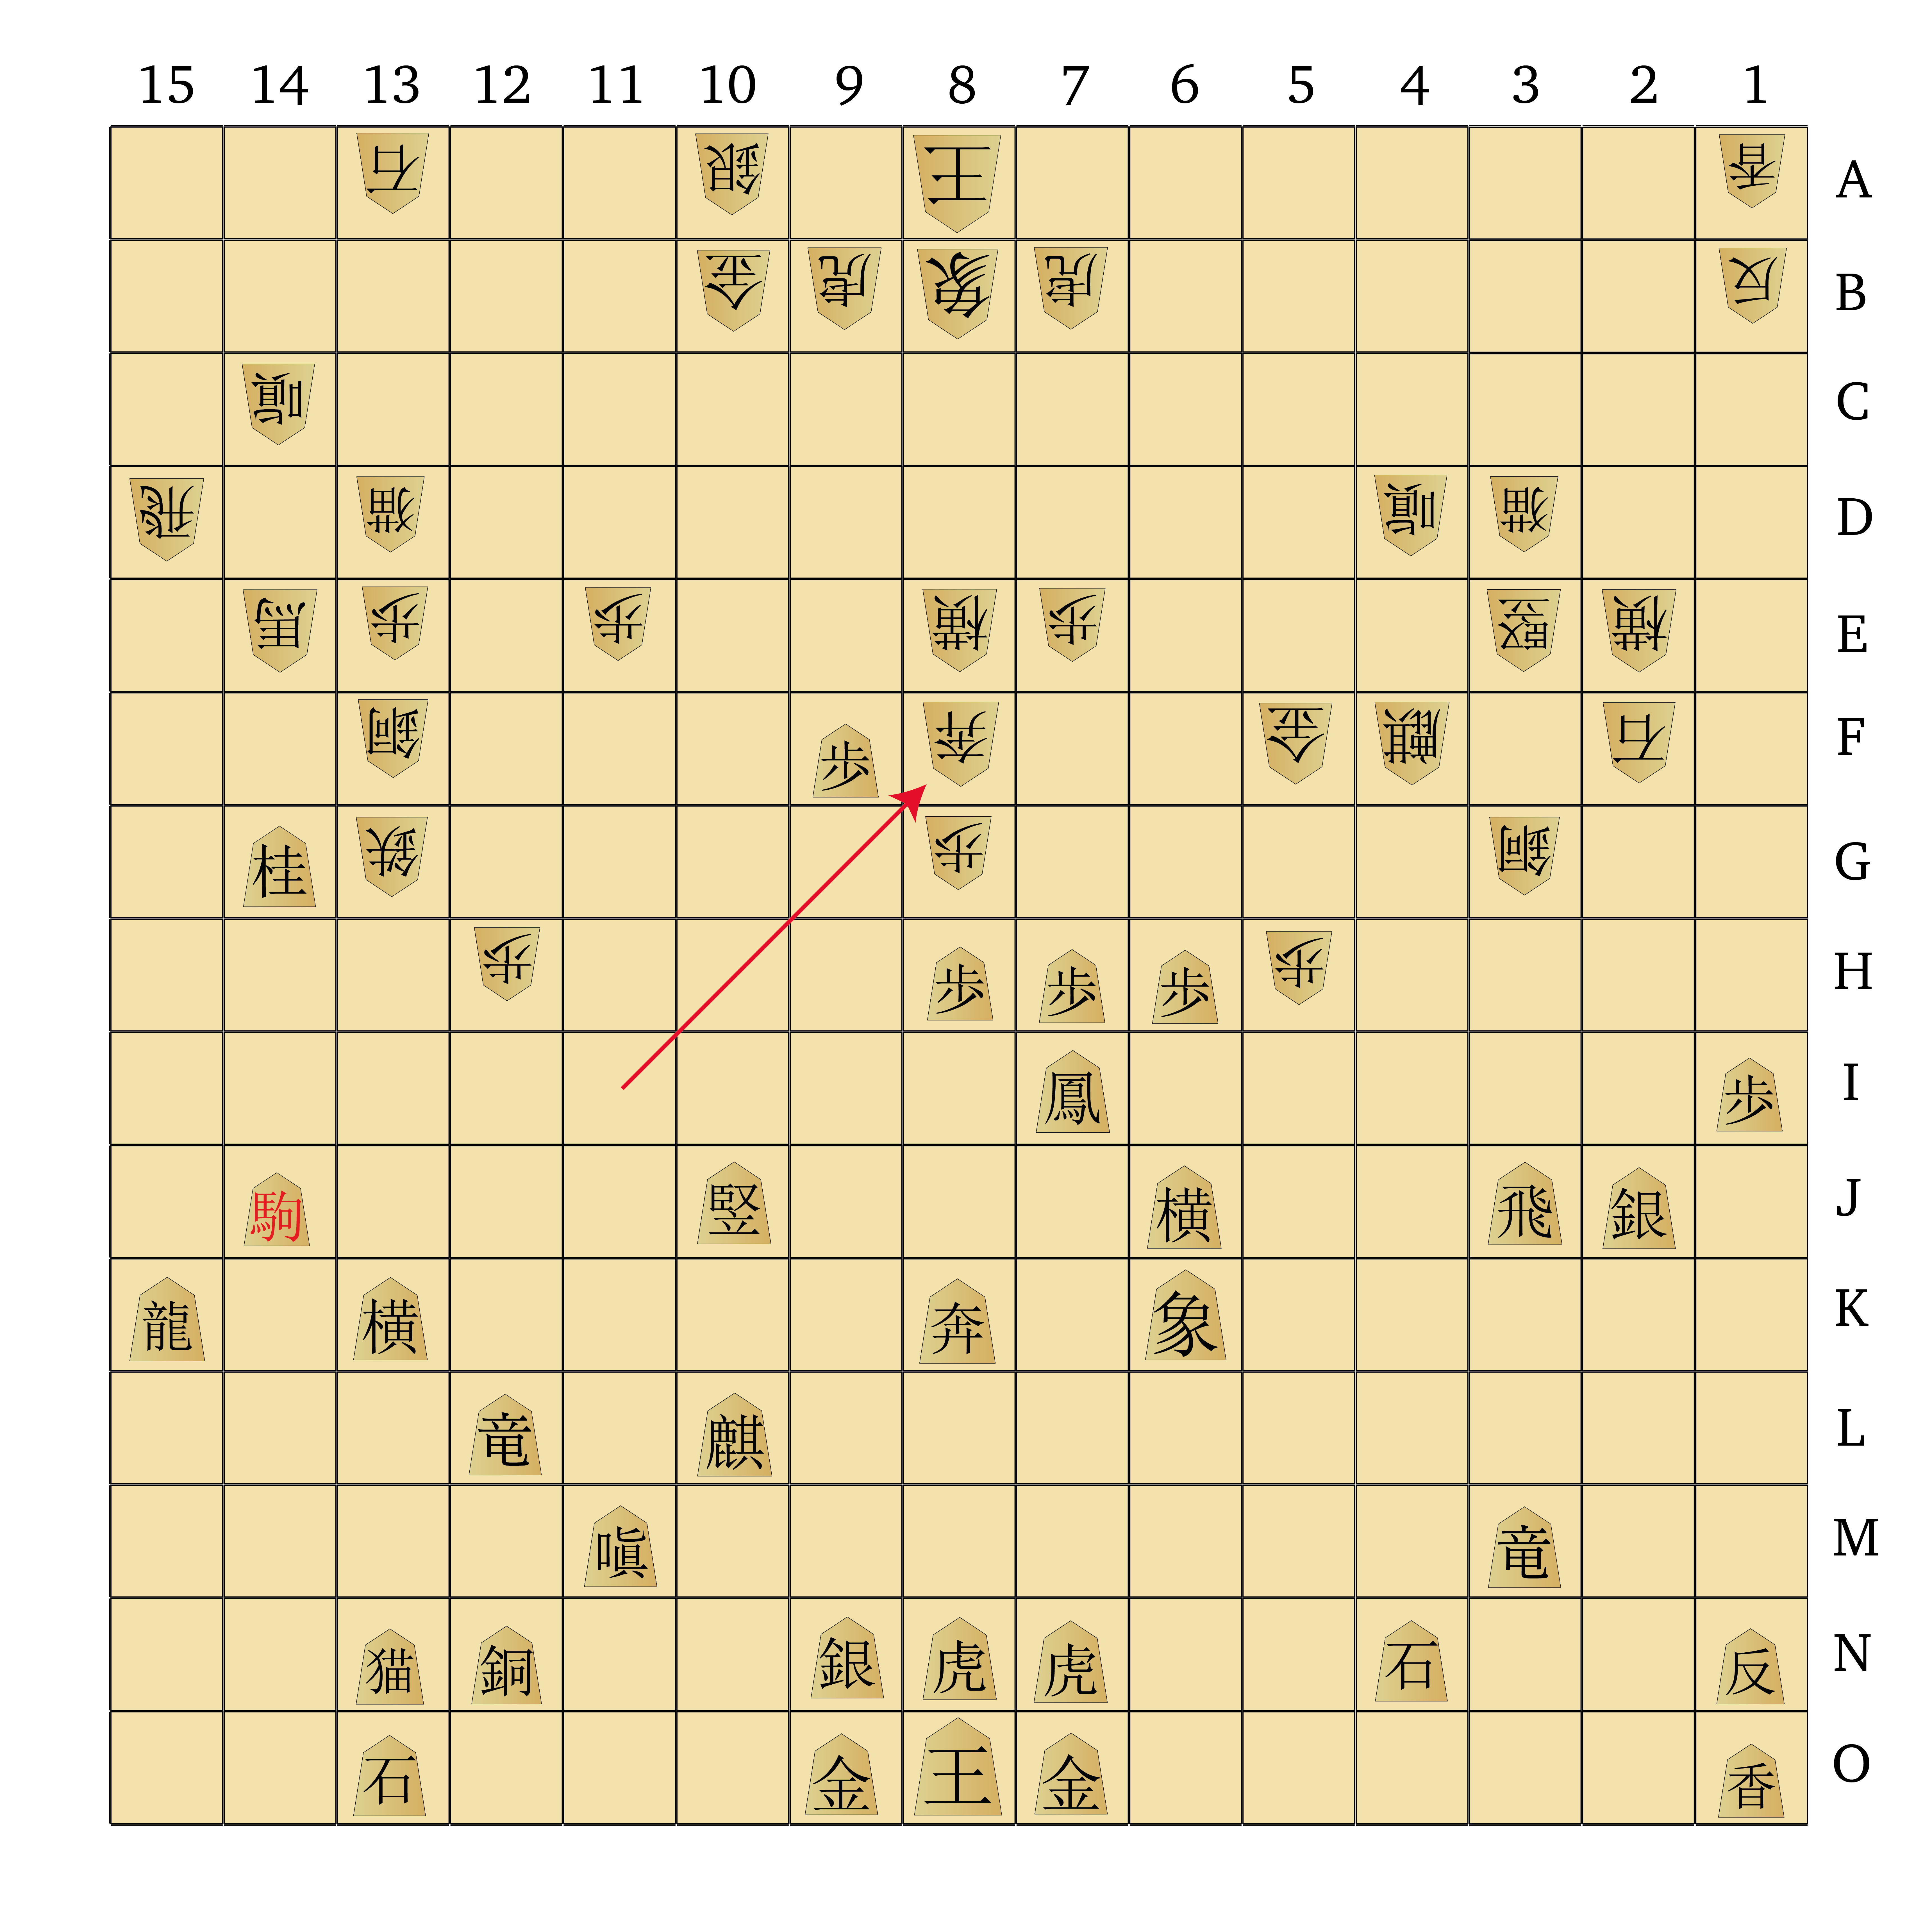
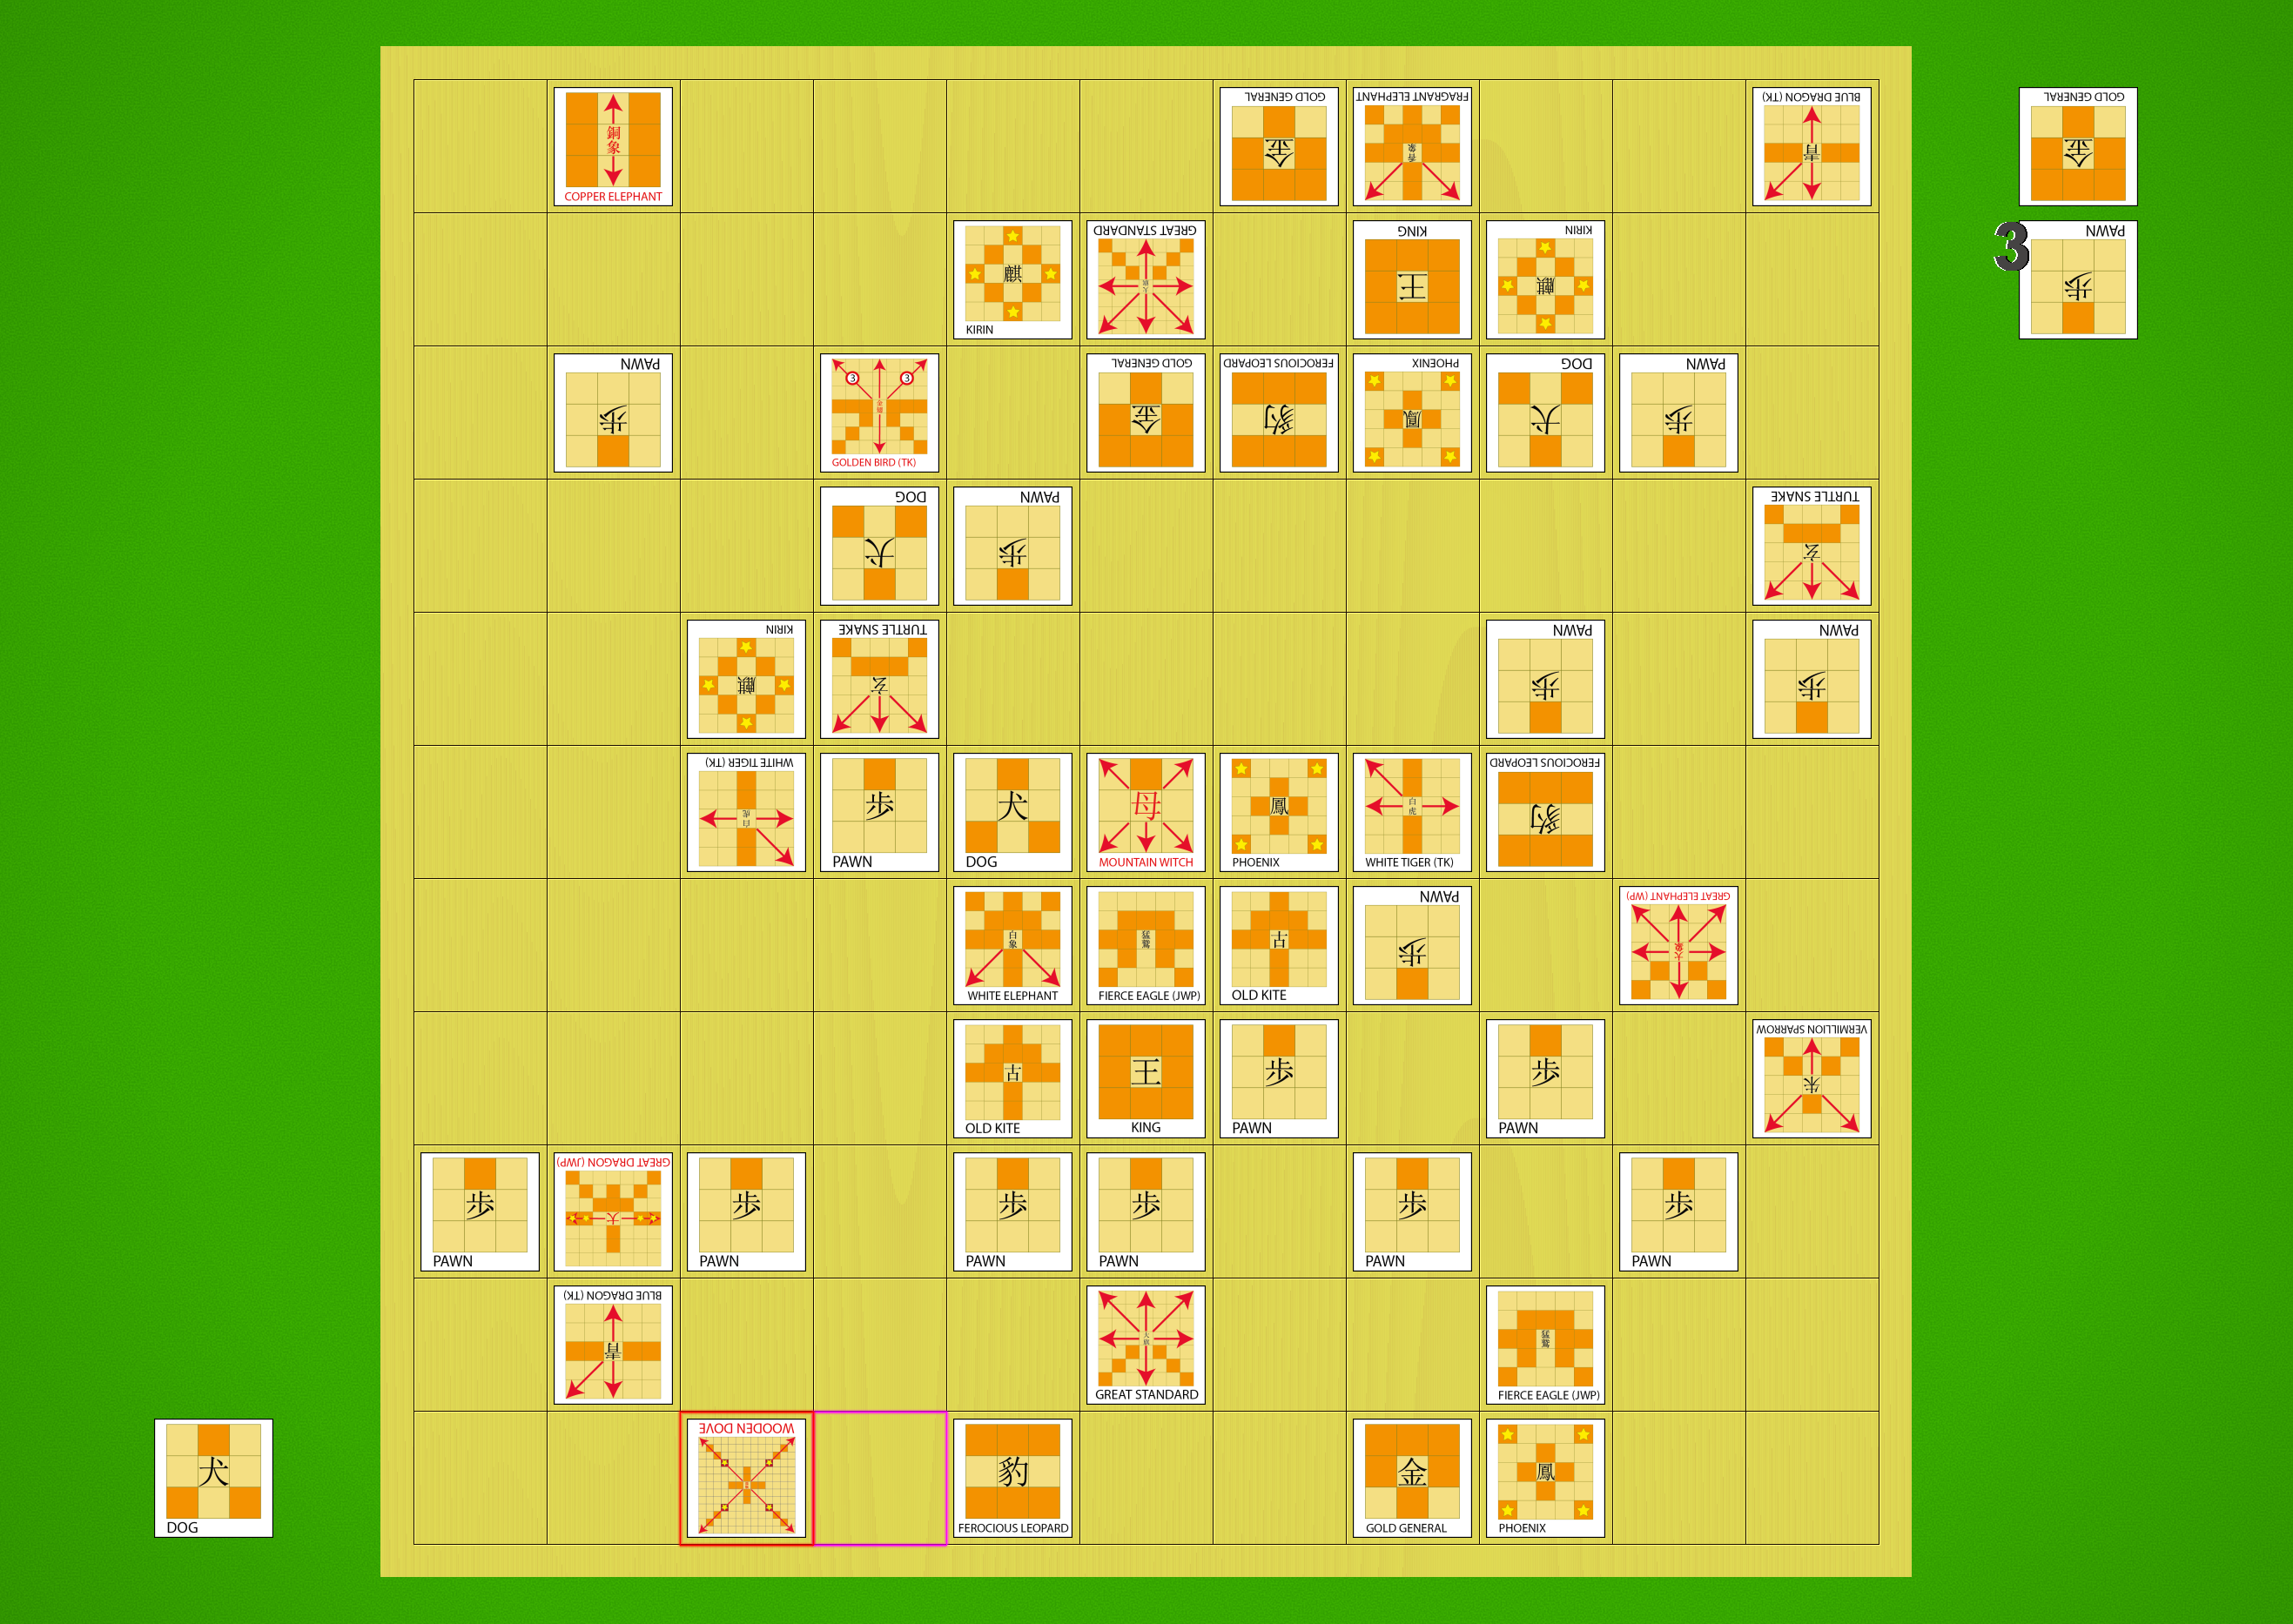
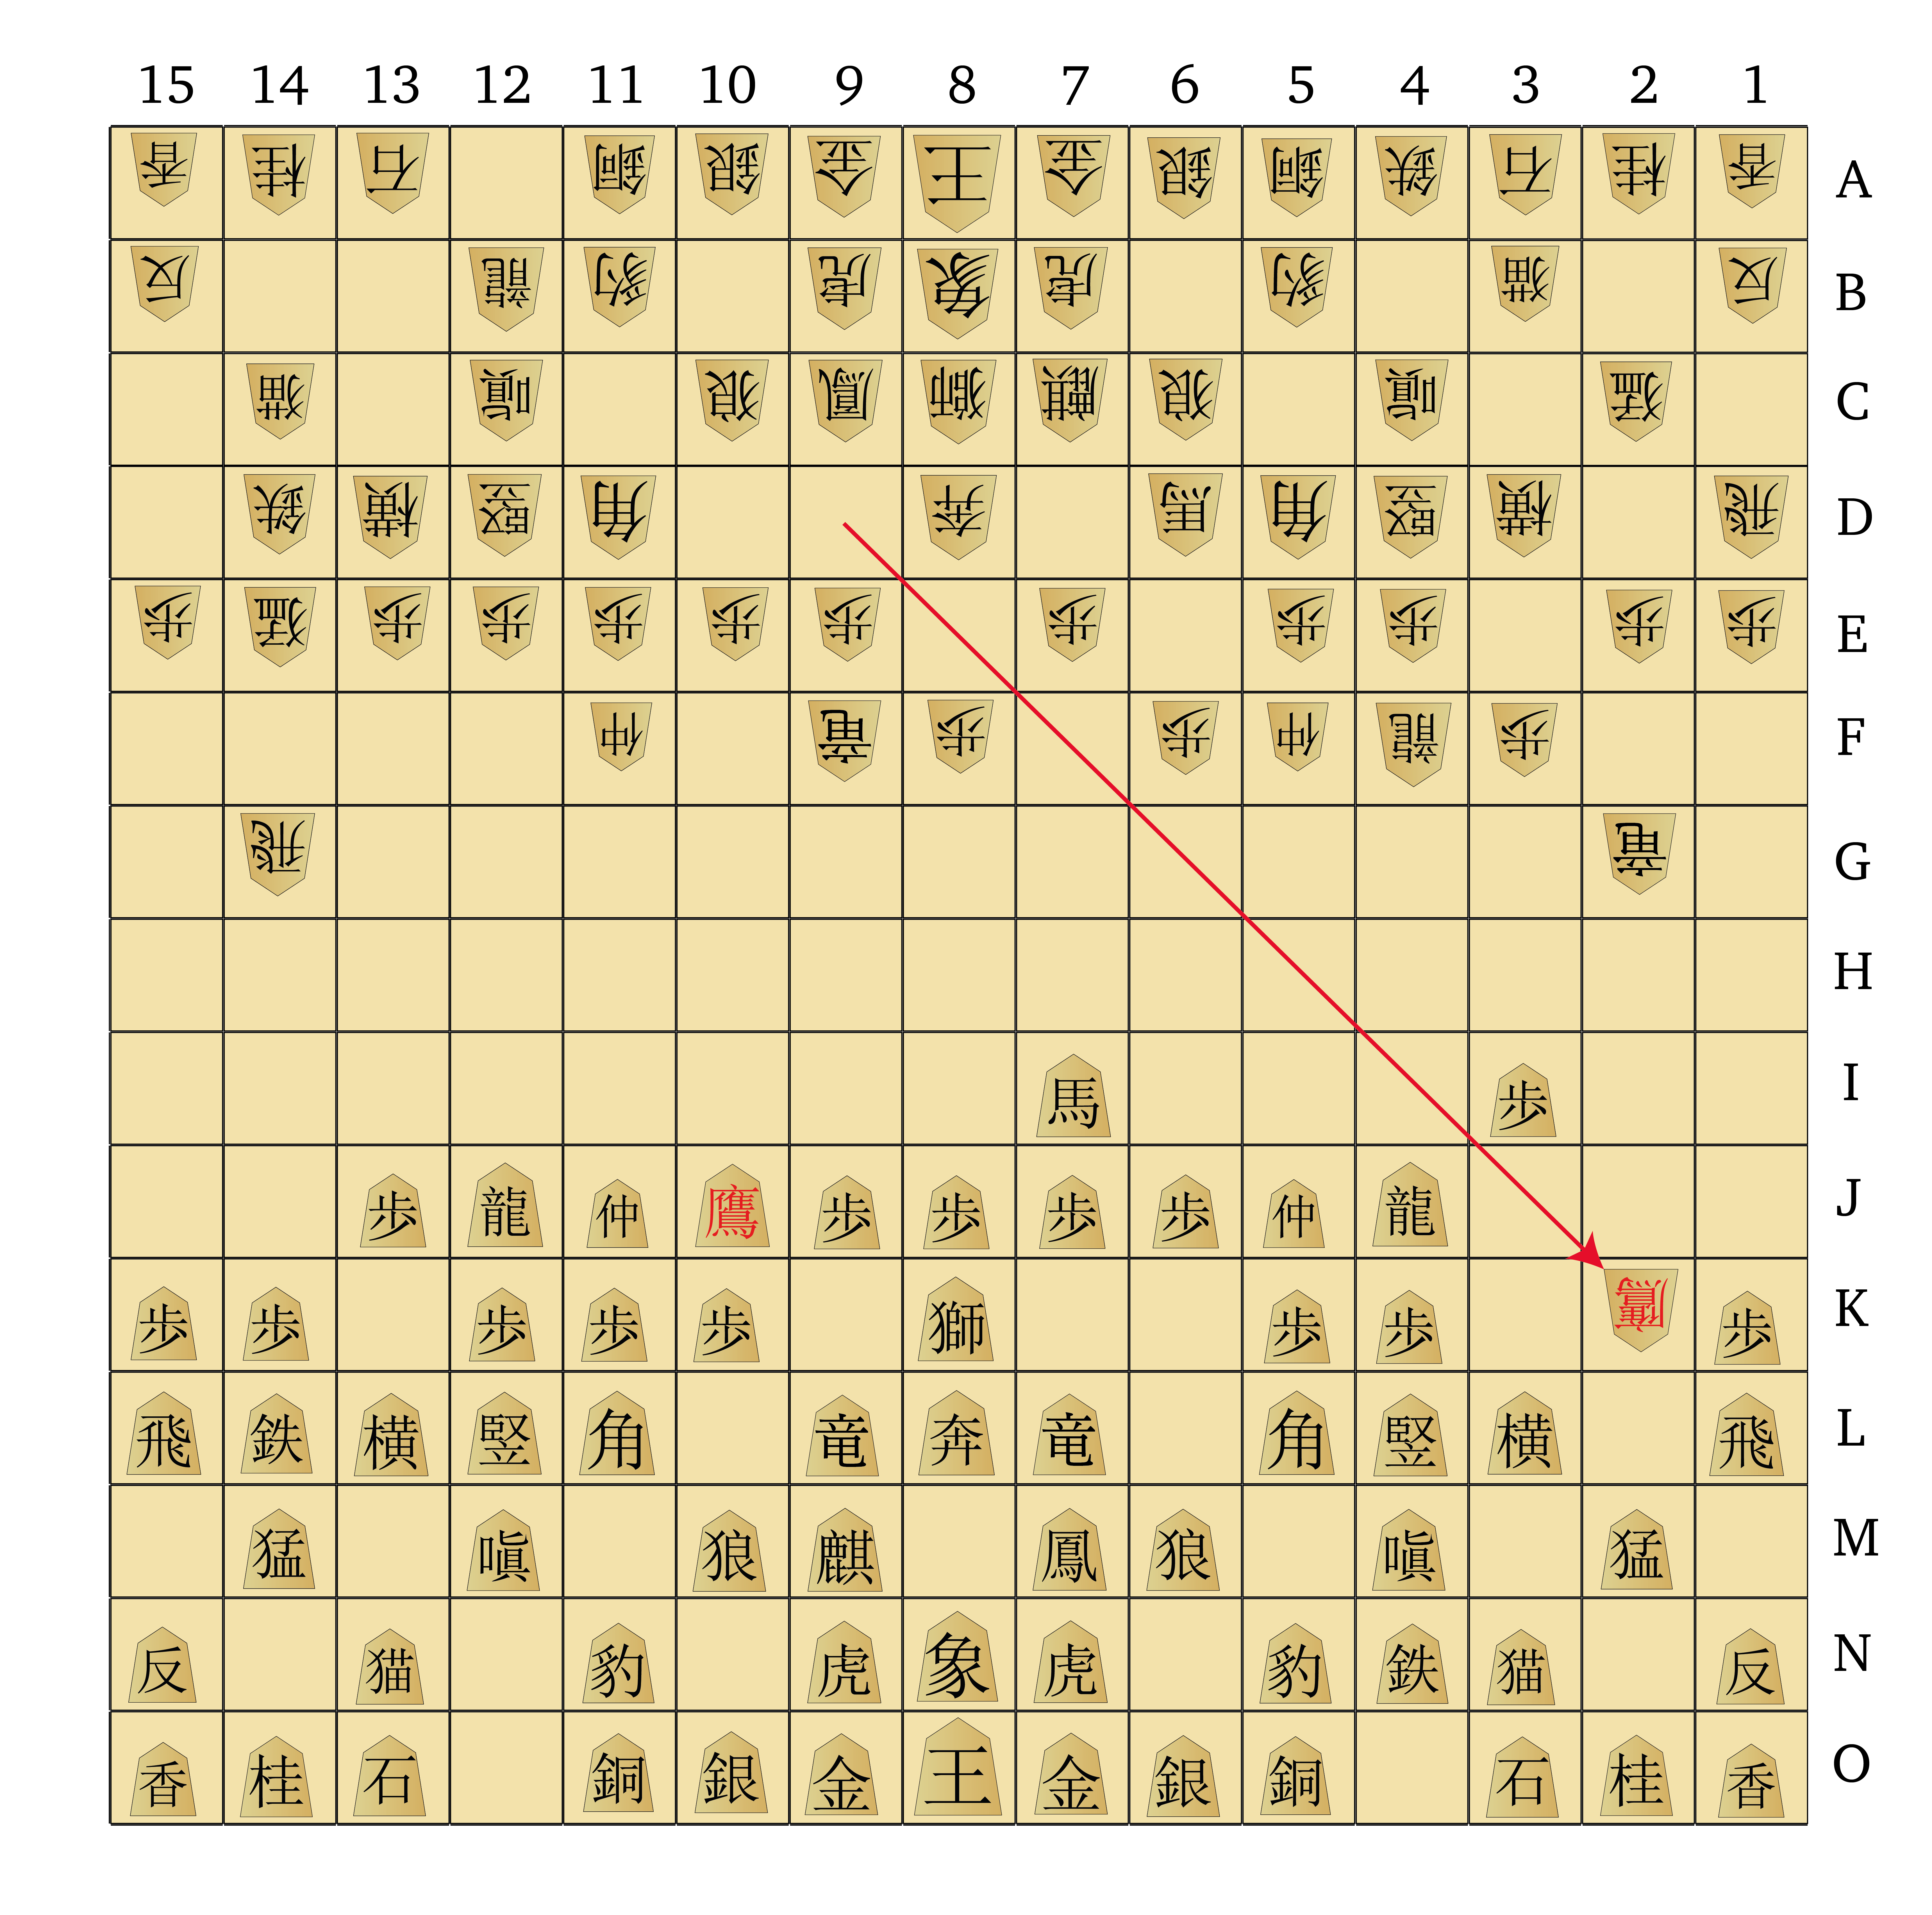
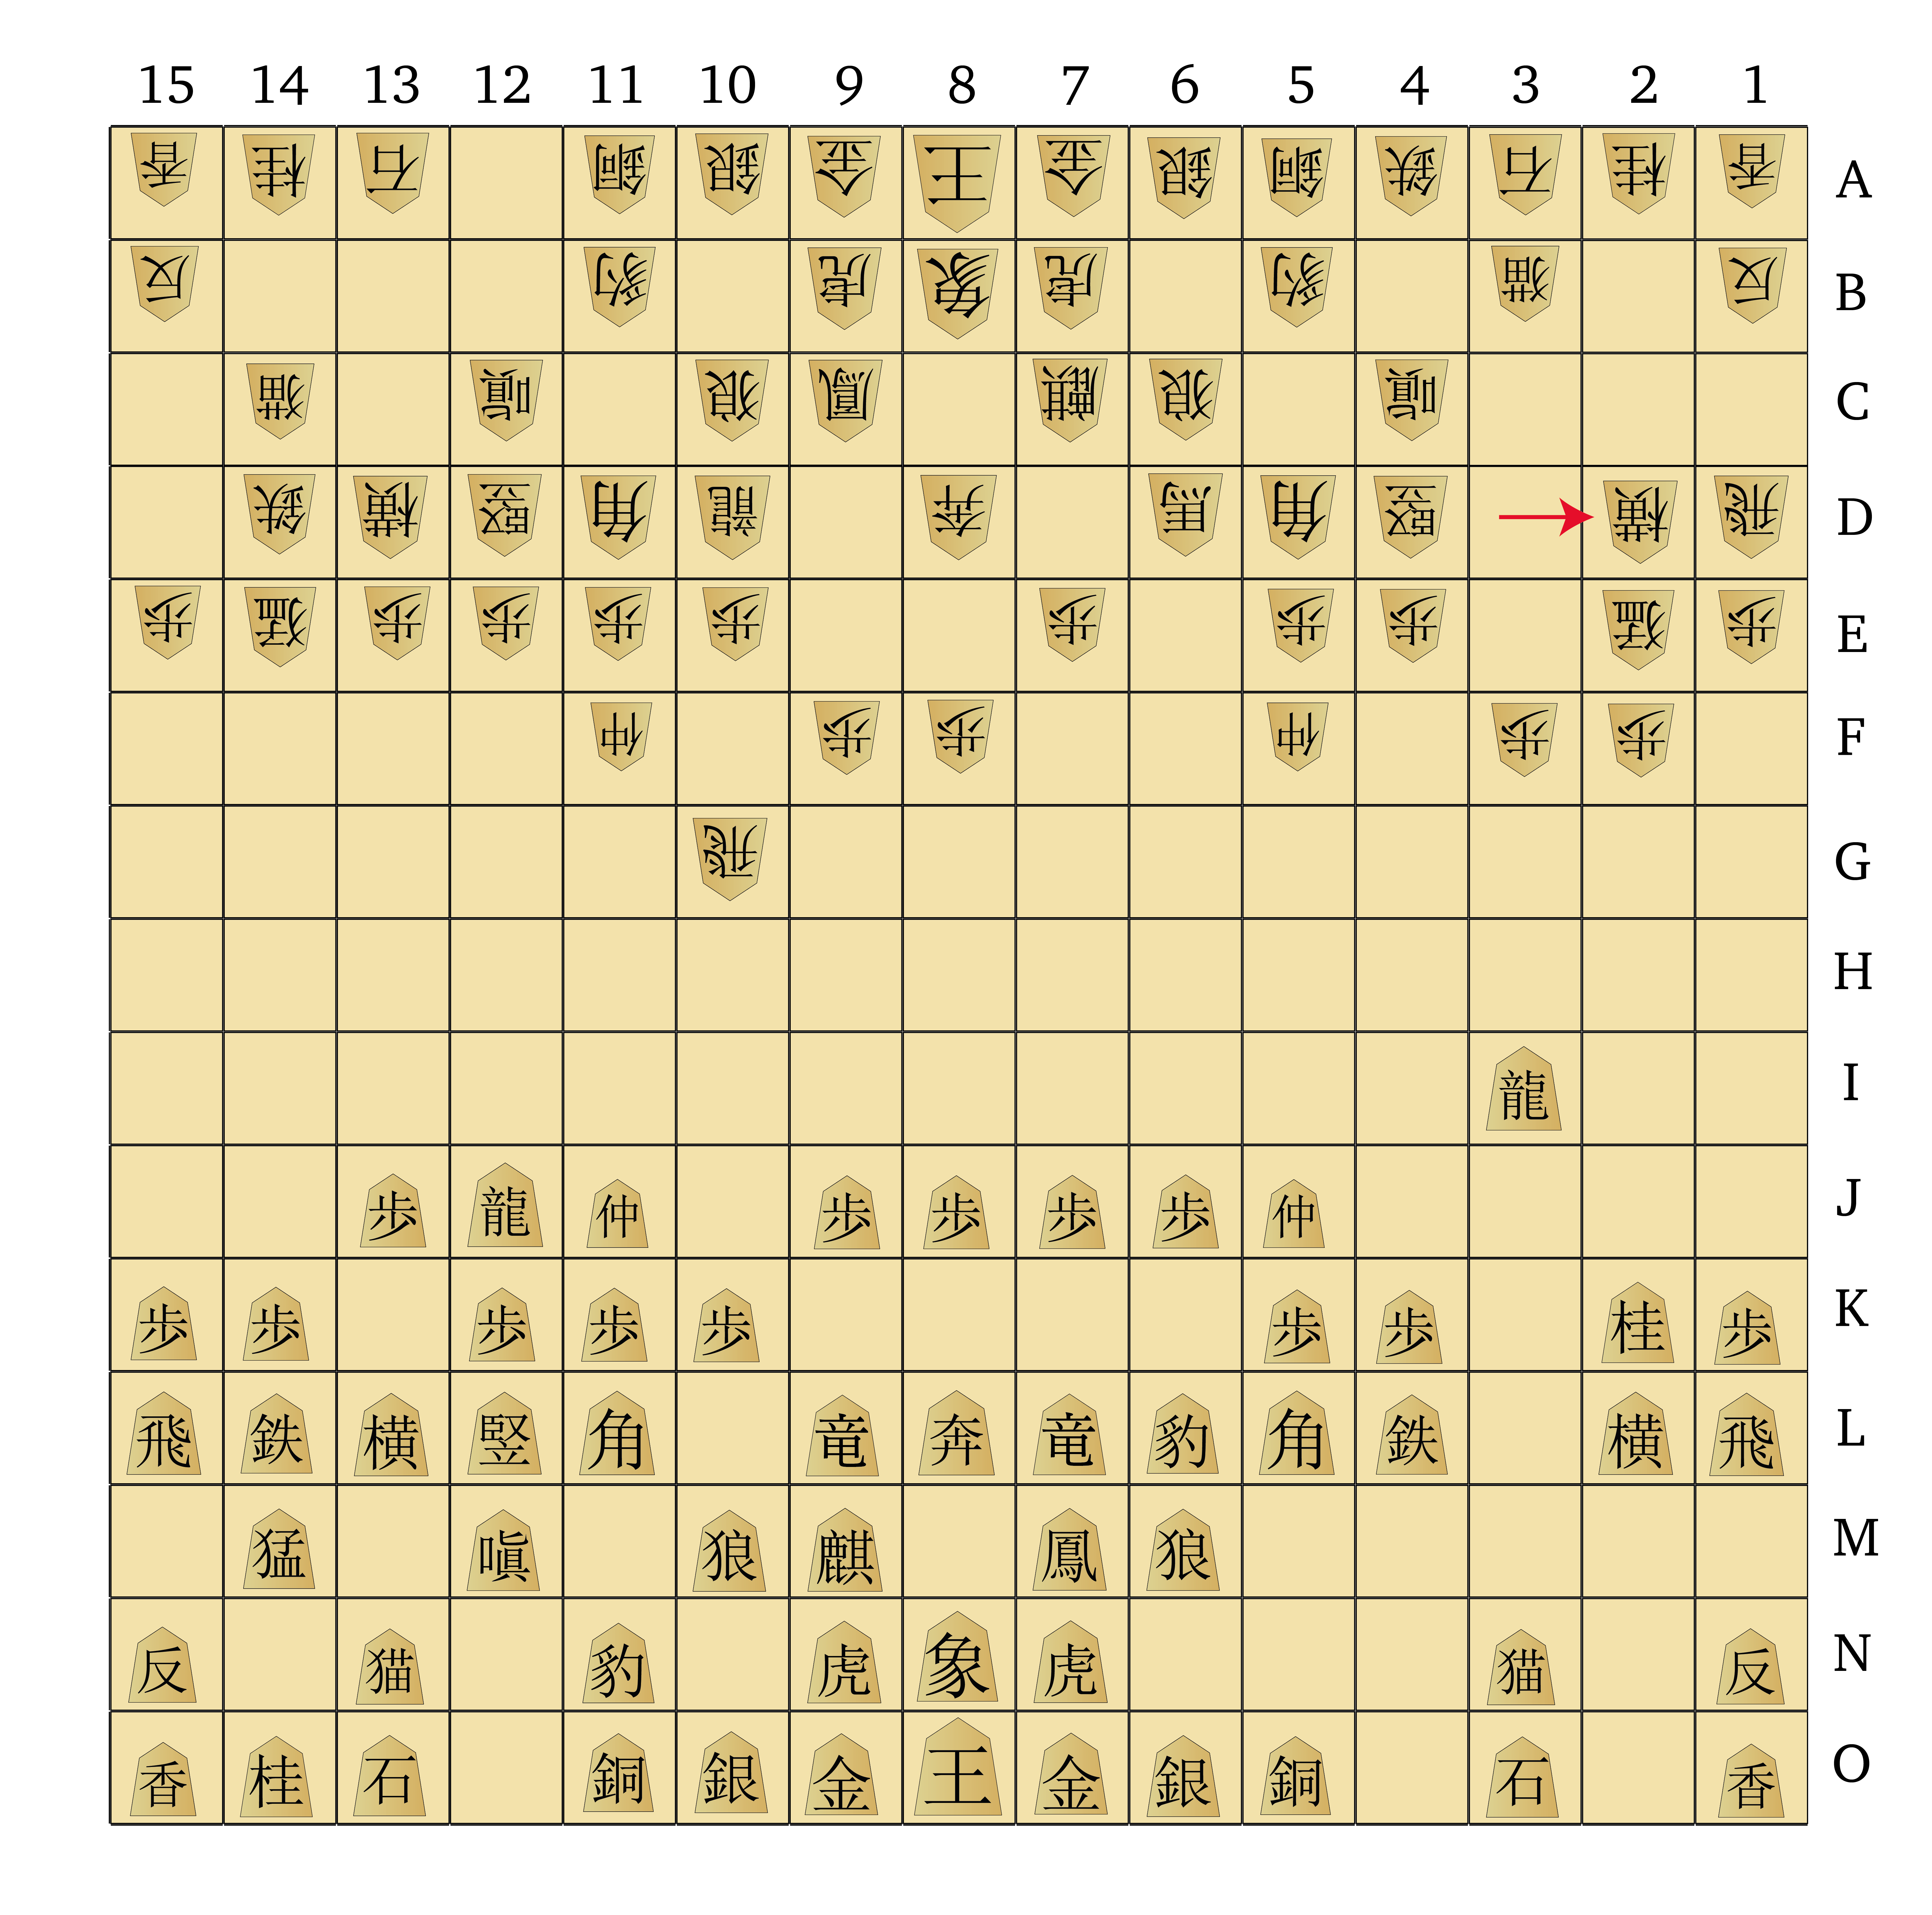
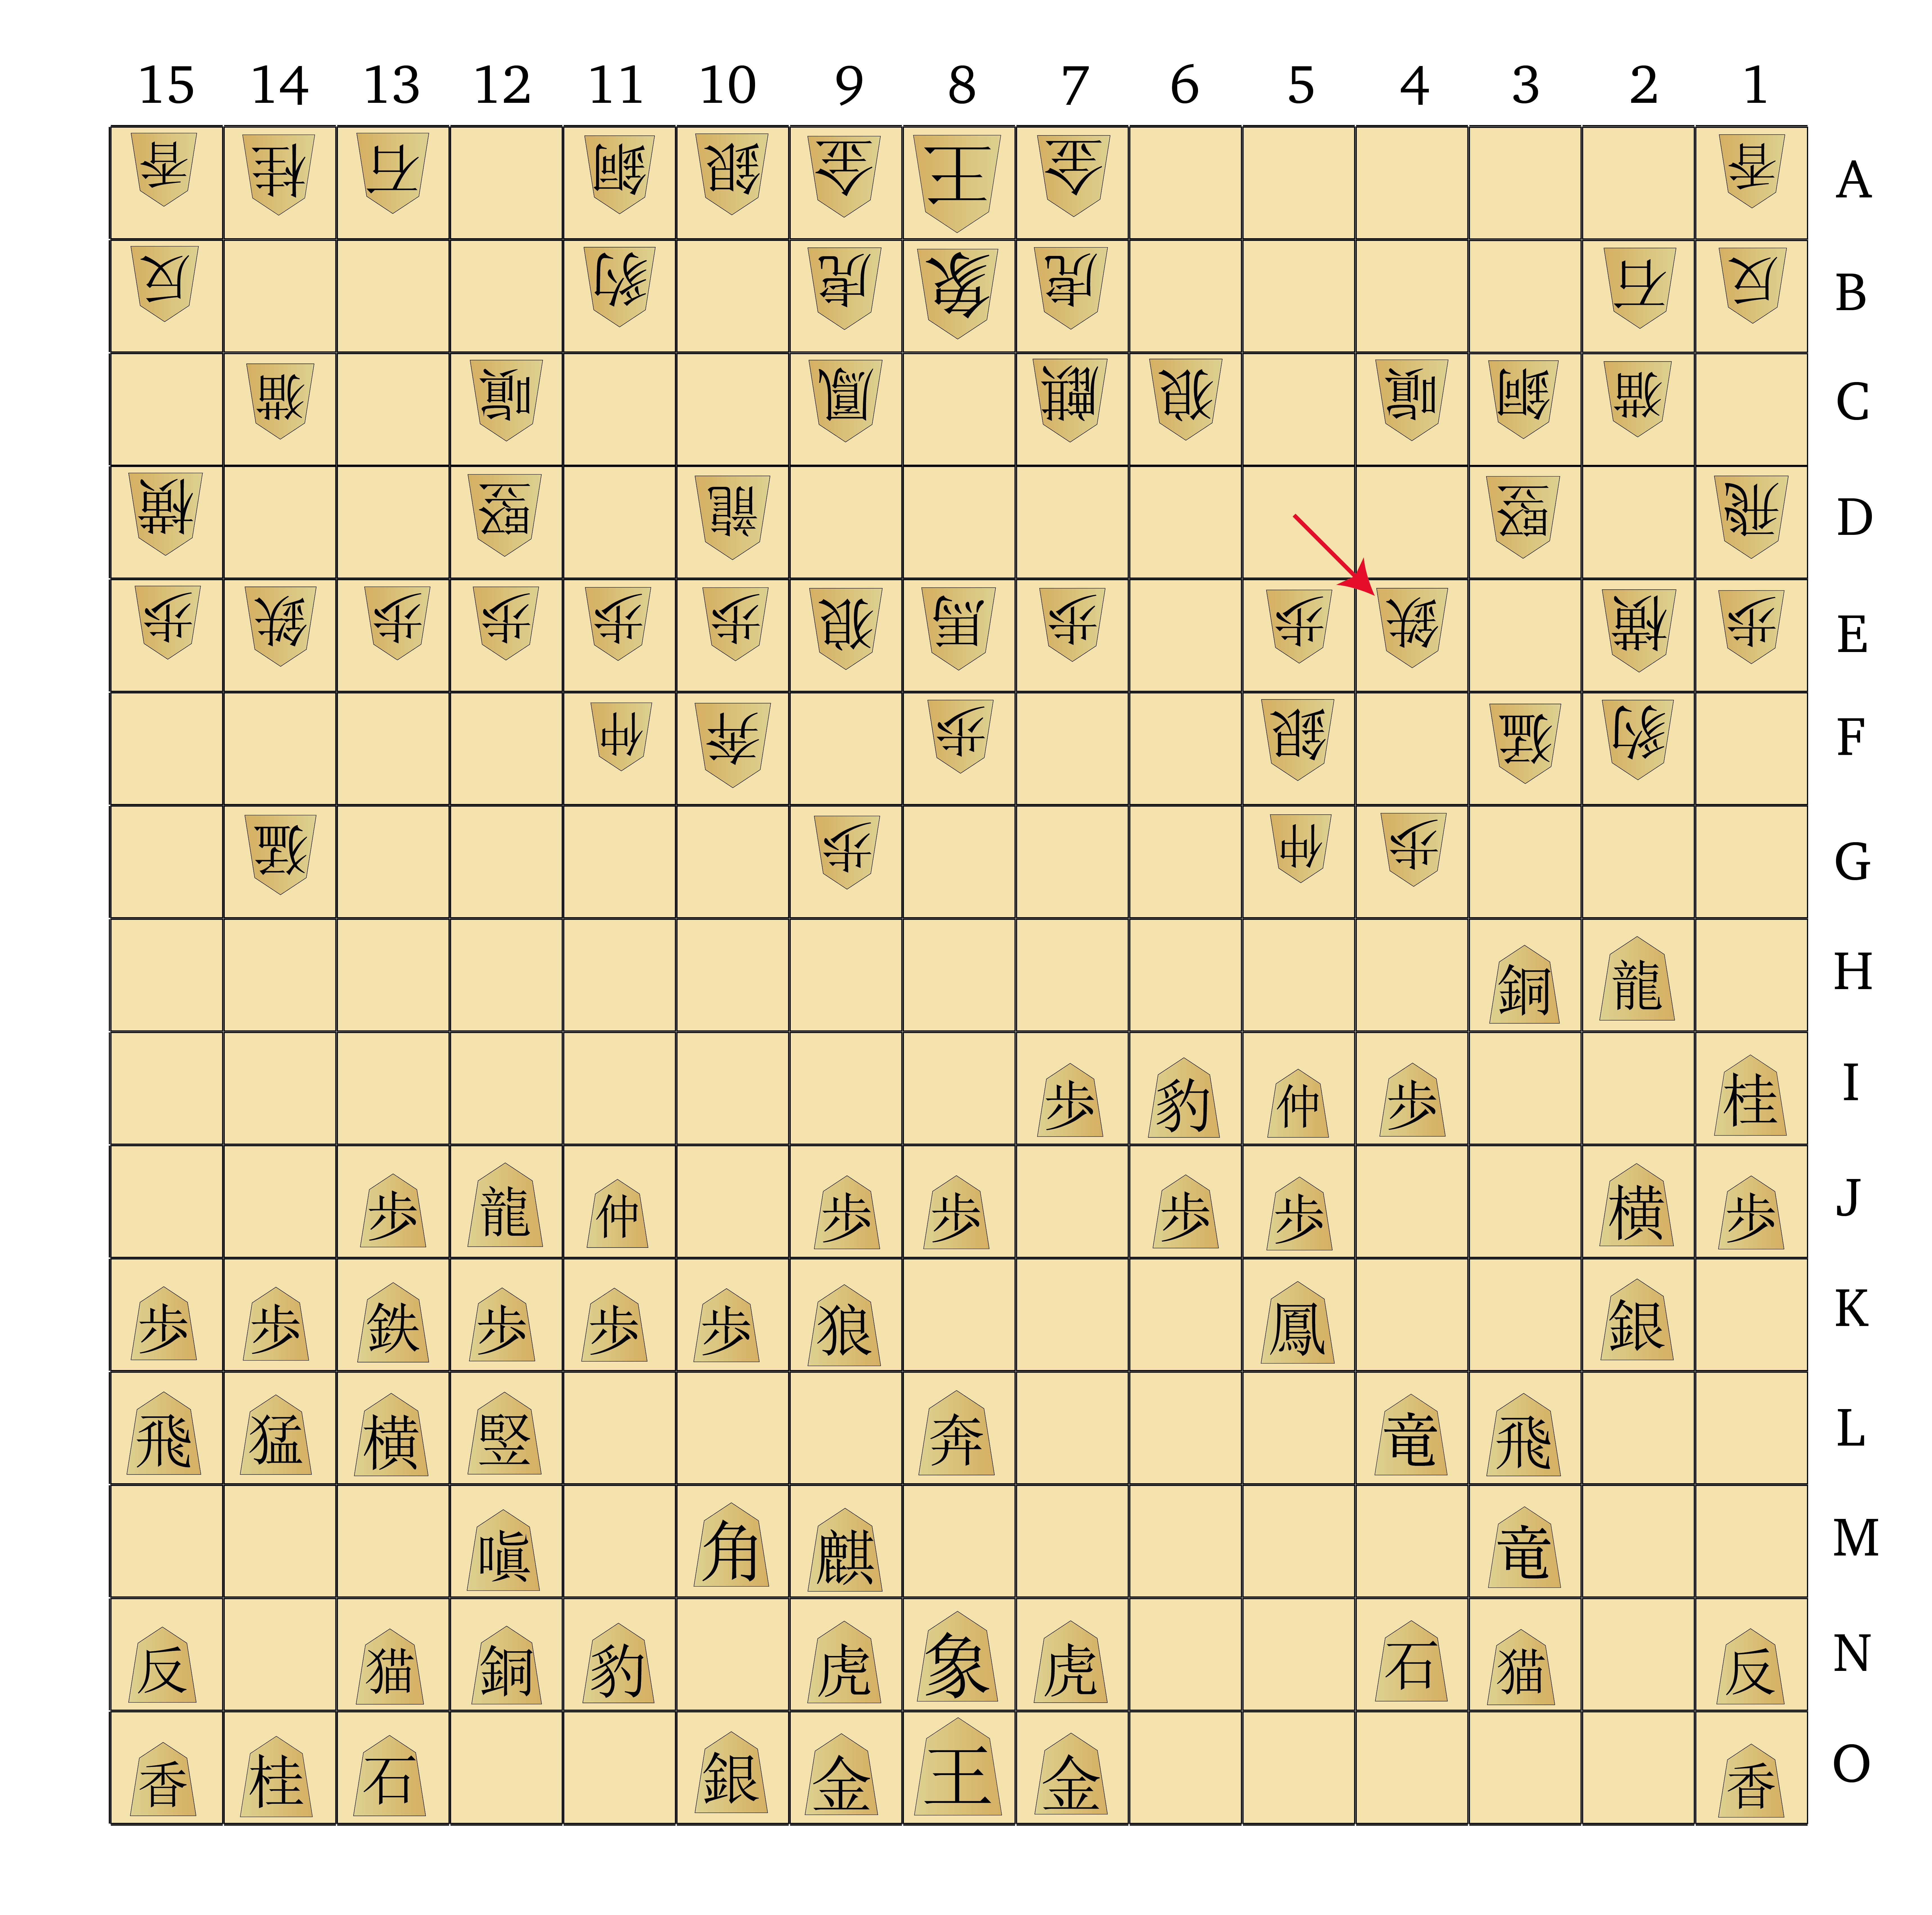
Let’s take a moment to examine the last portion of one of the sample games shown in the GIFs above. This game was played against the AI (120 seconds/move thinking time), and playing as Sente I won after 181 moves:
Bear in mind I’ve played this game a lot, so I’m quite familiar with the AI’s foibles, and I’d emphasise that Gote’s defence is not optimal. Nevertheless, hopefully this brief discussion of a sample endgame can give you a bit more of a idea of how the game plays.
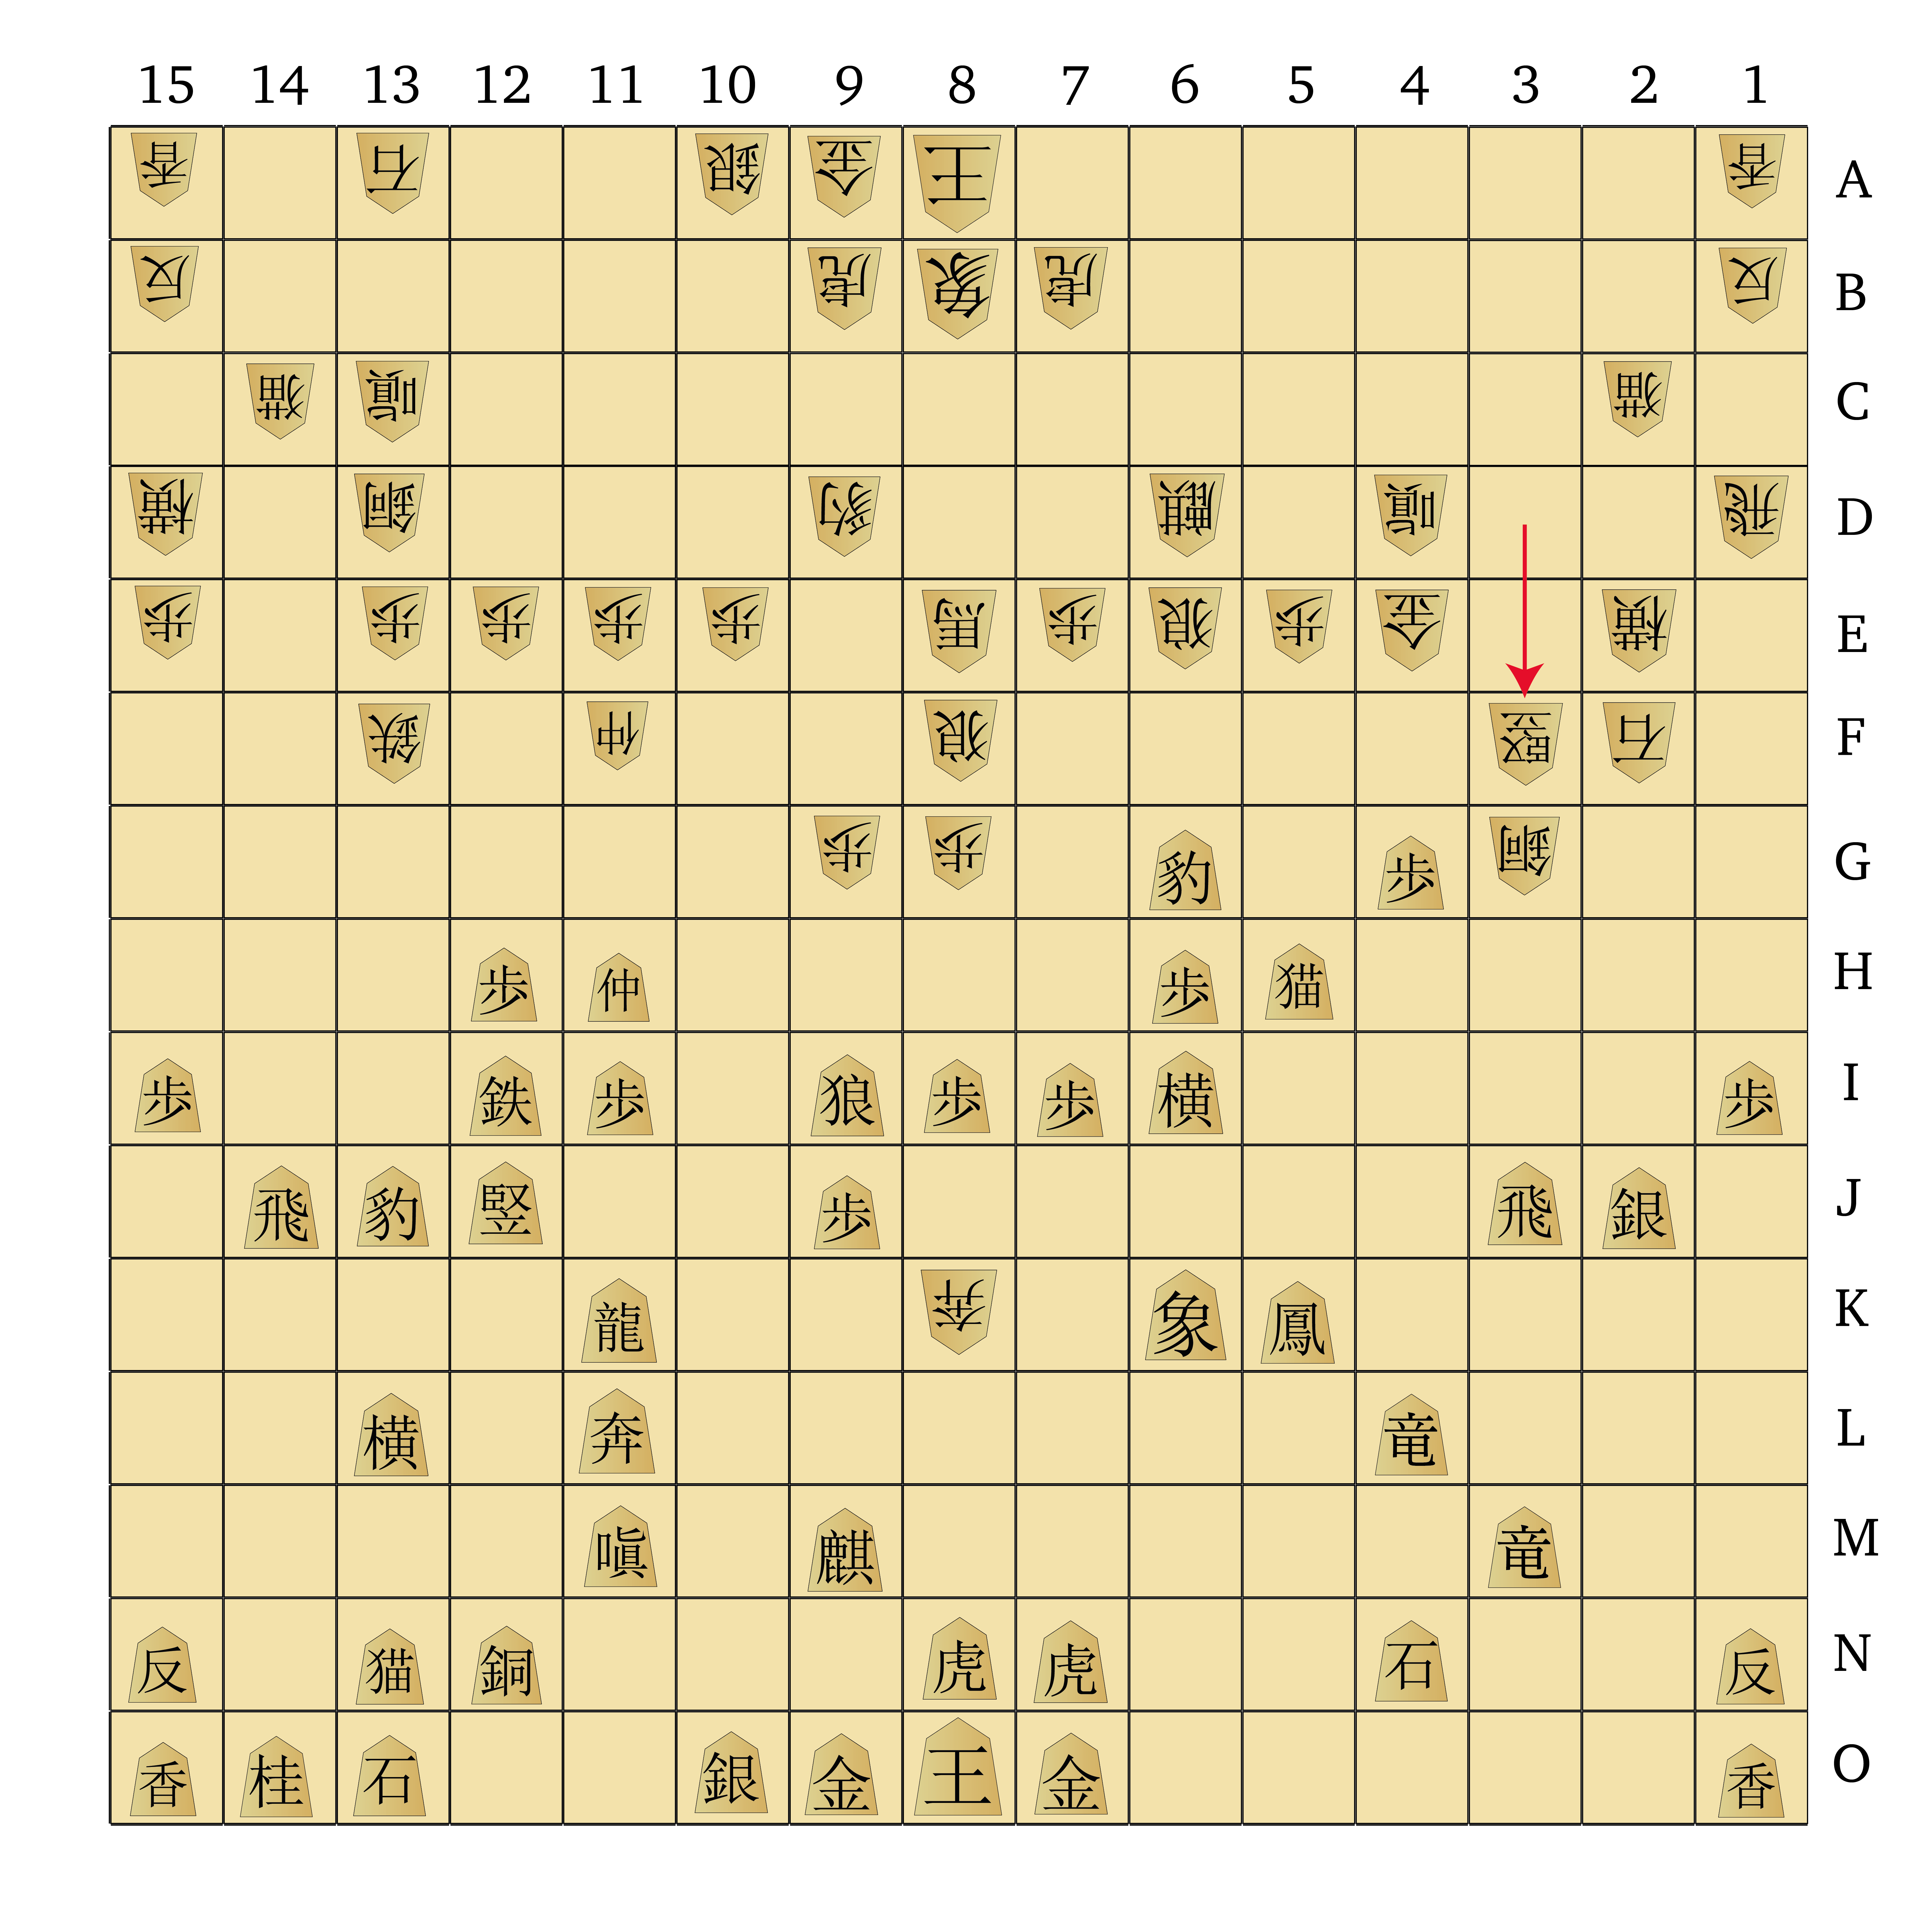
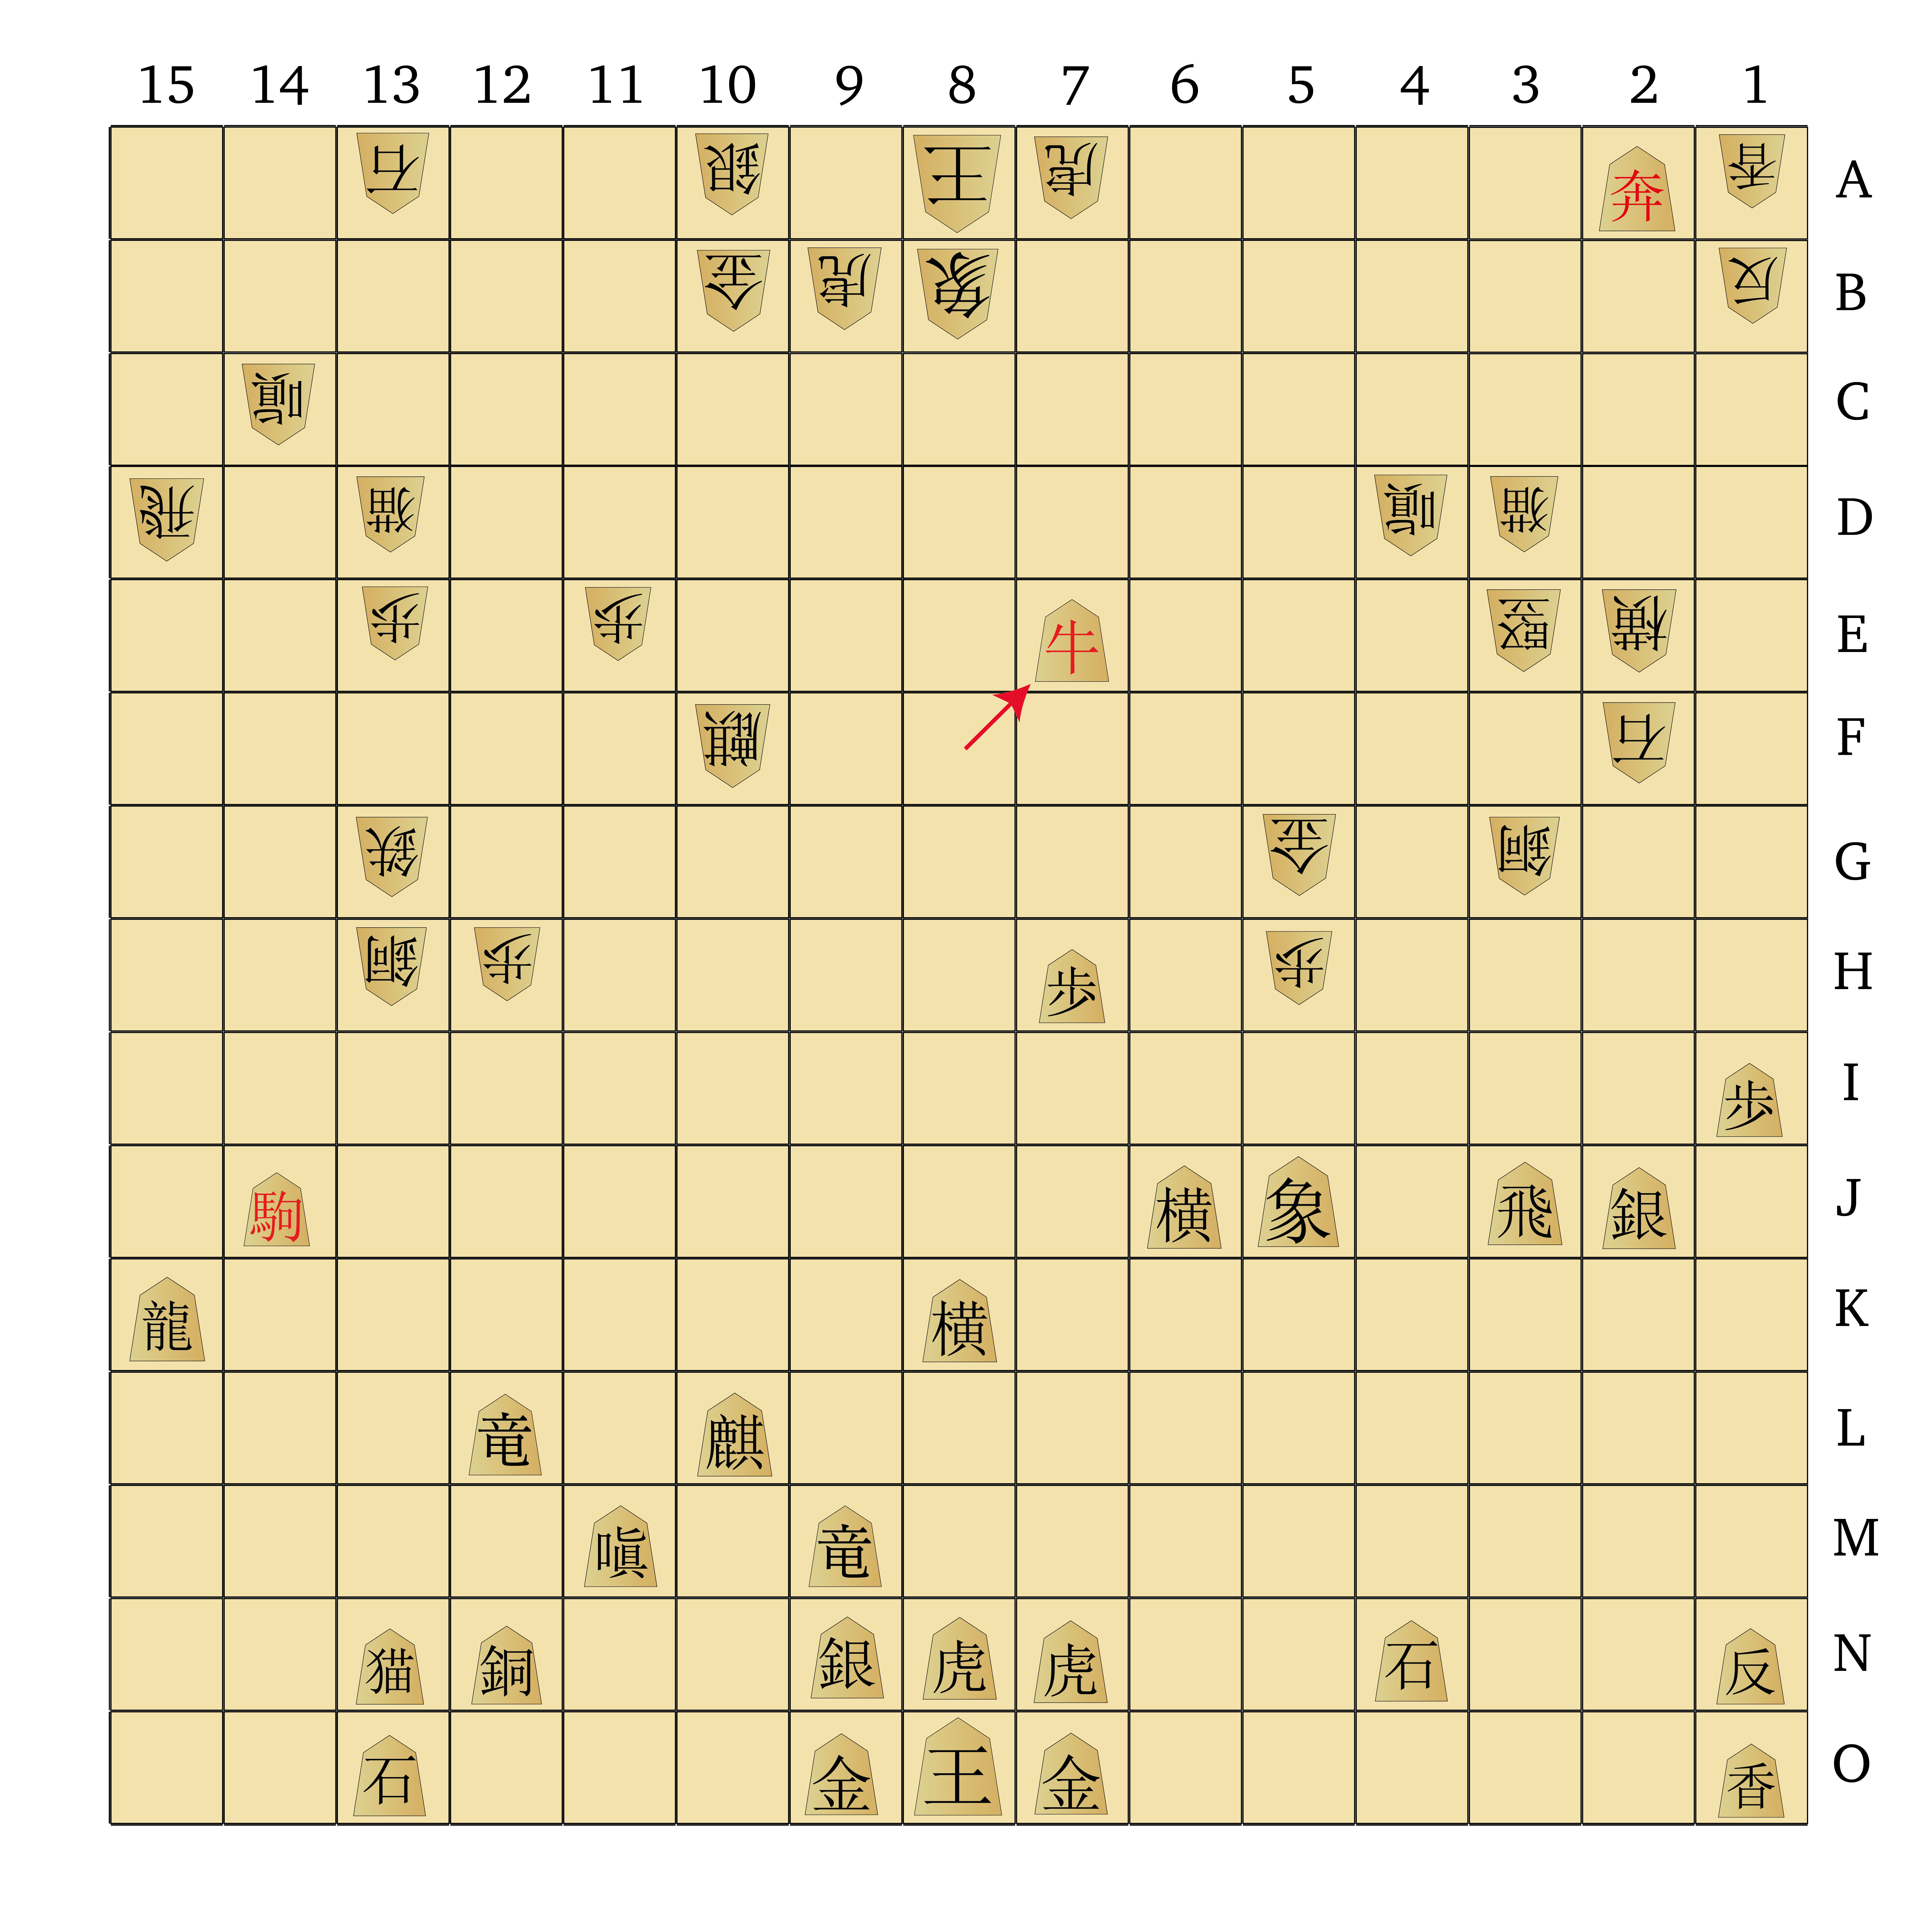
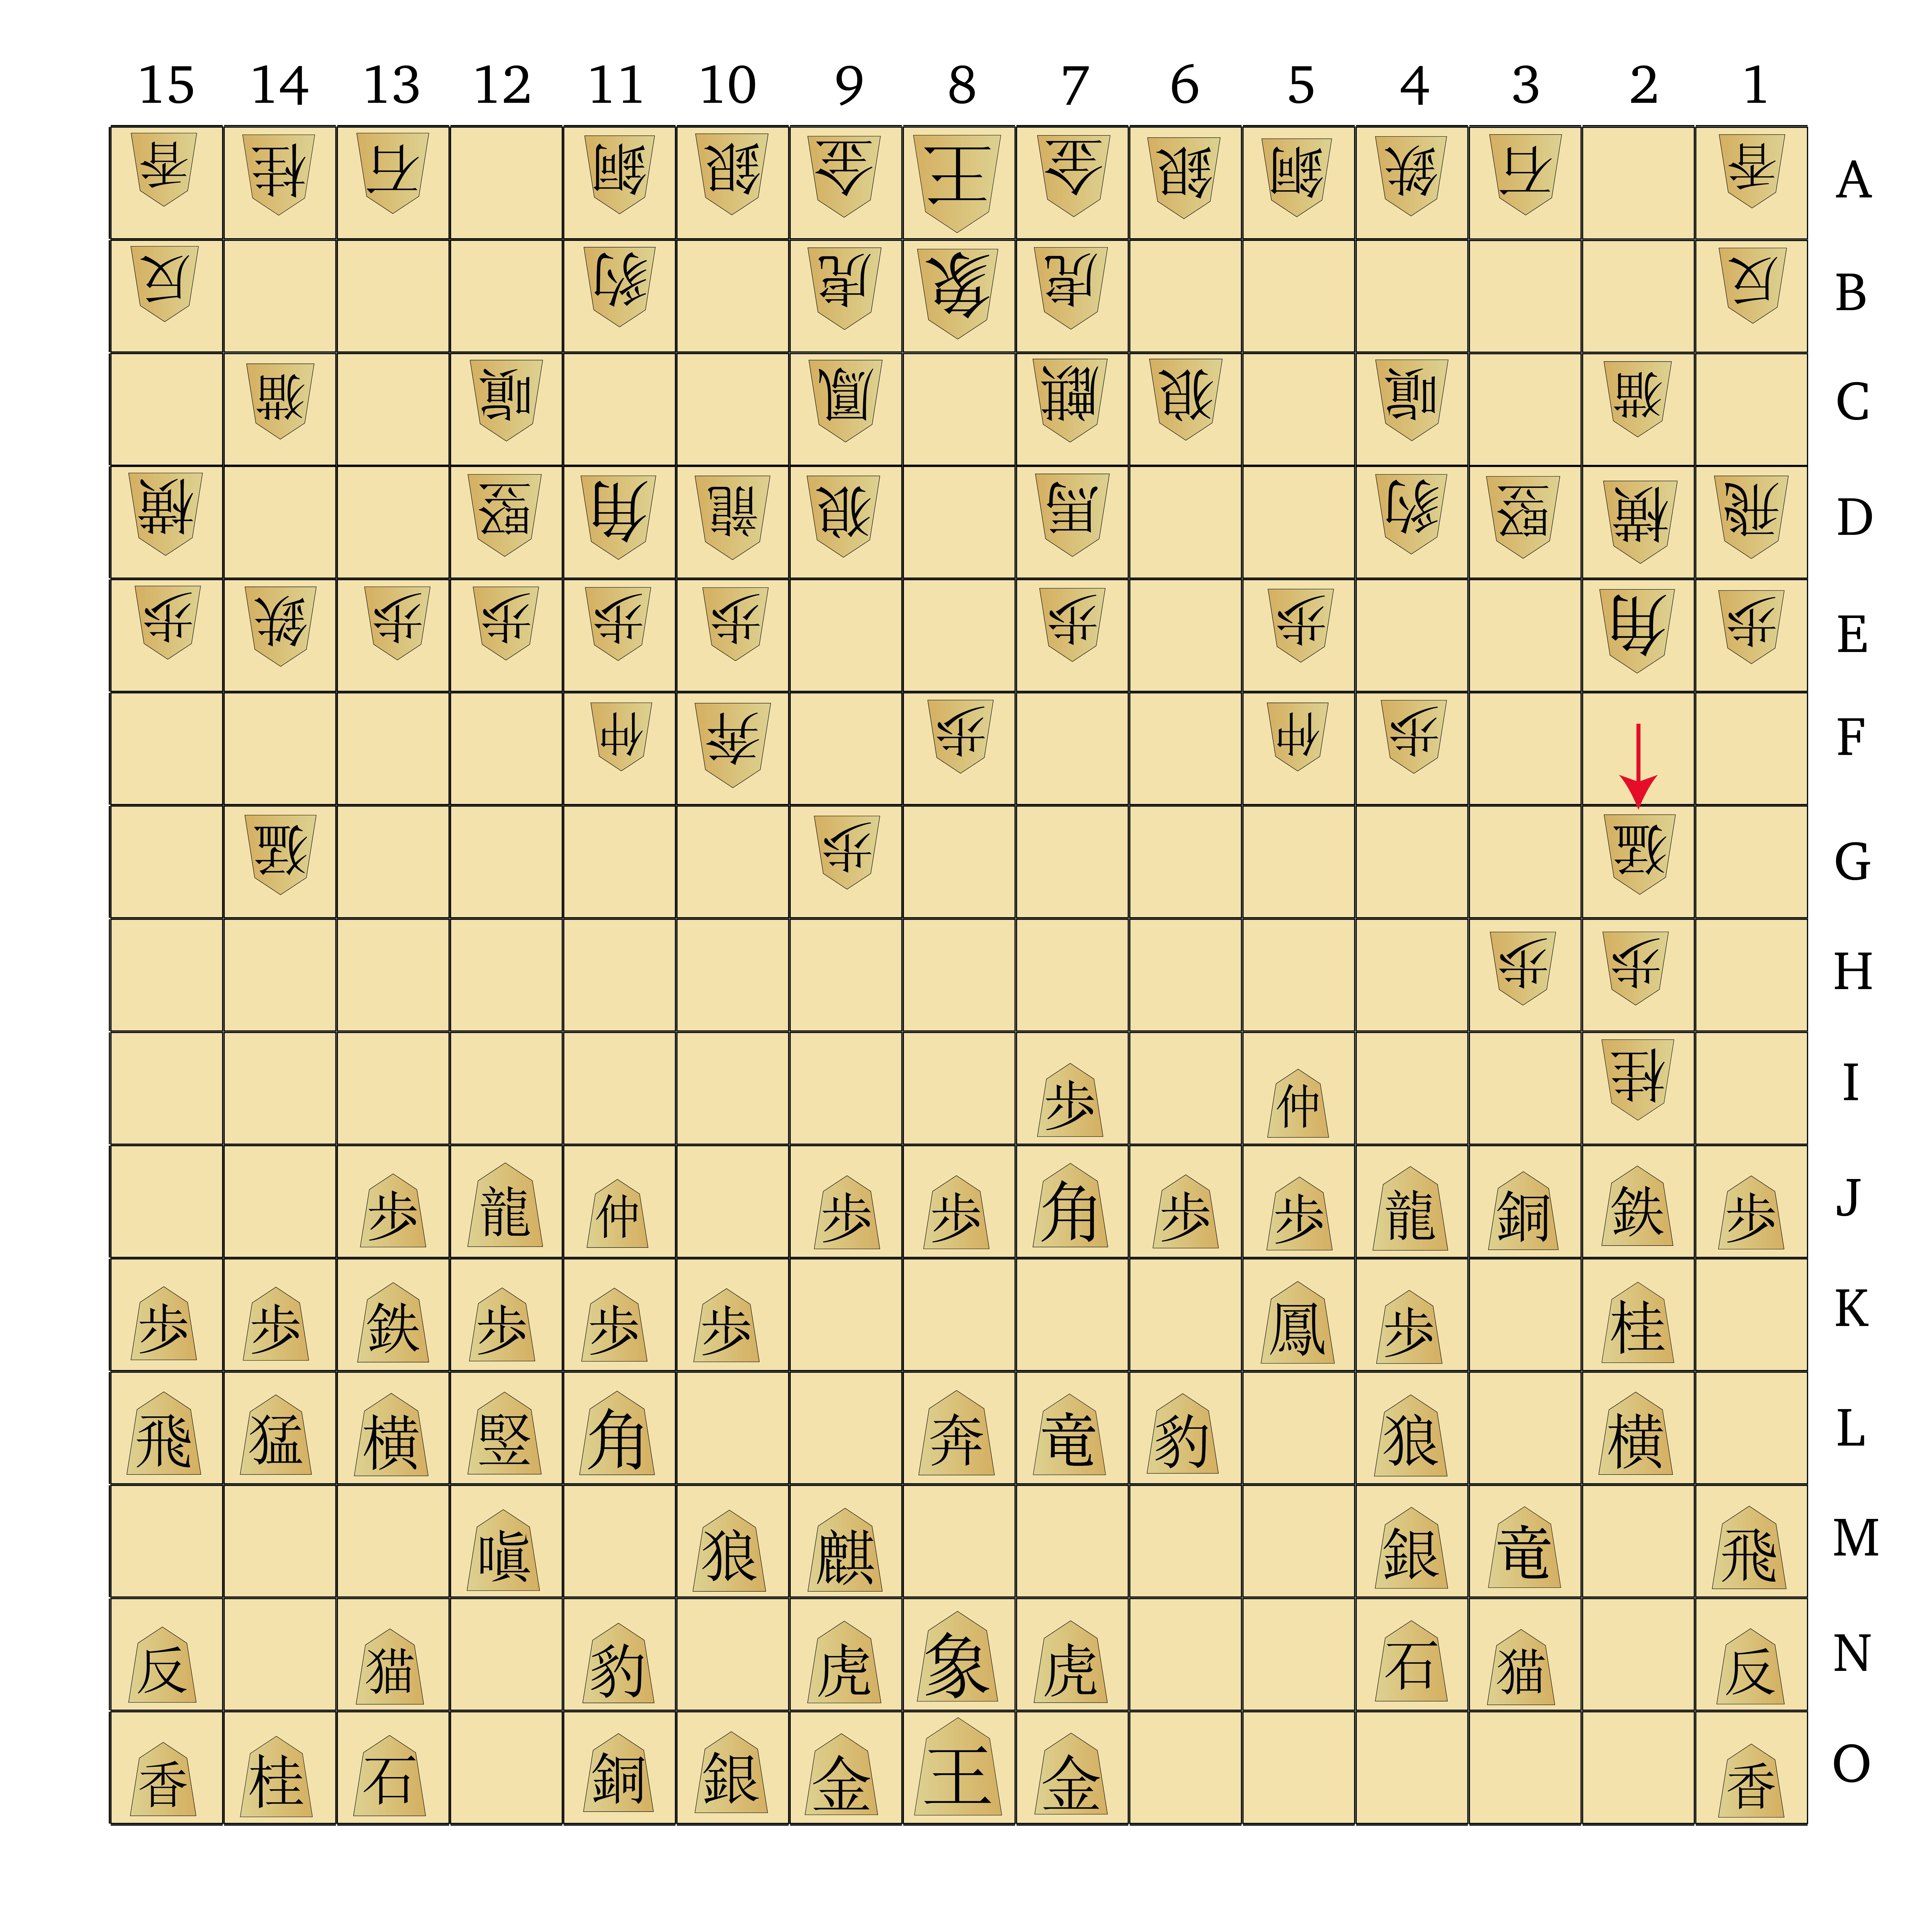
In this game I decided to press home my advantage and play for the win around move 139:
Until this point I’d been focused on securing the centre of the board, with an eye toward prying open Gote’s position on the left side. Gote’s right flank has the two Kirins and several Dogs providing additional protection, so the more lightly-defended left offered a bit more of an opportunity. I’d also developed a strong material advantage, with six pieces in hand ready for dropping.
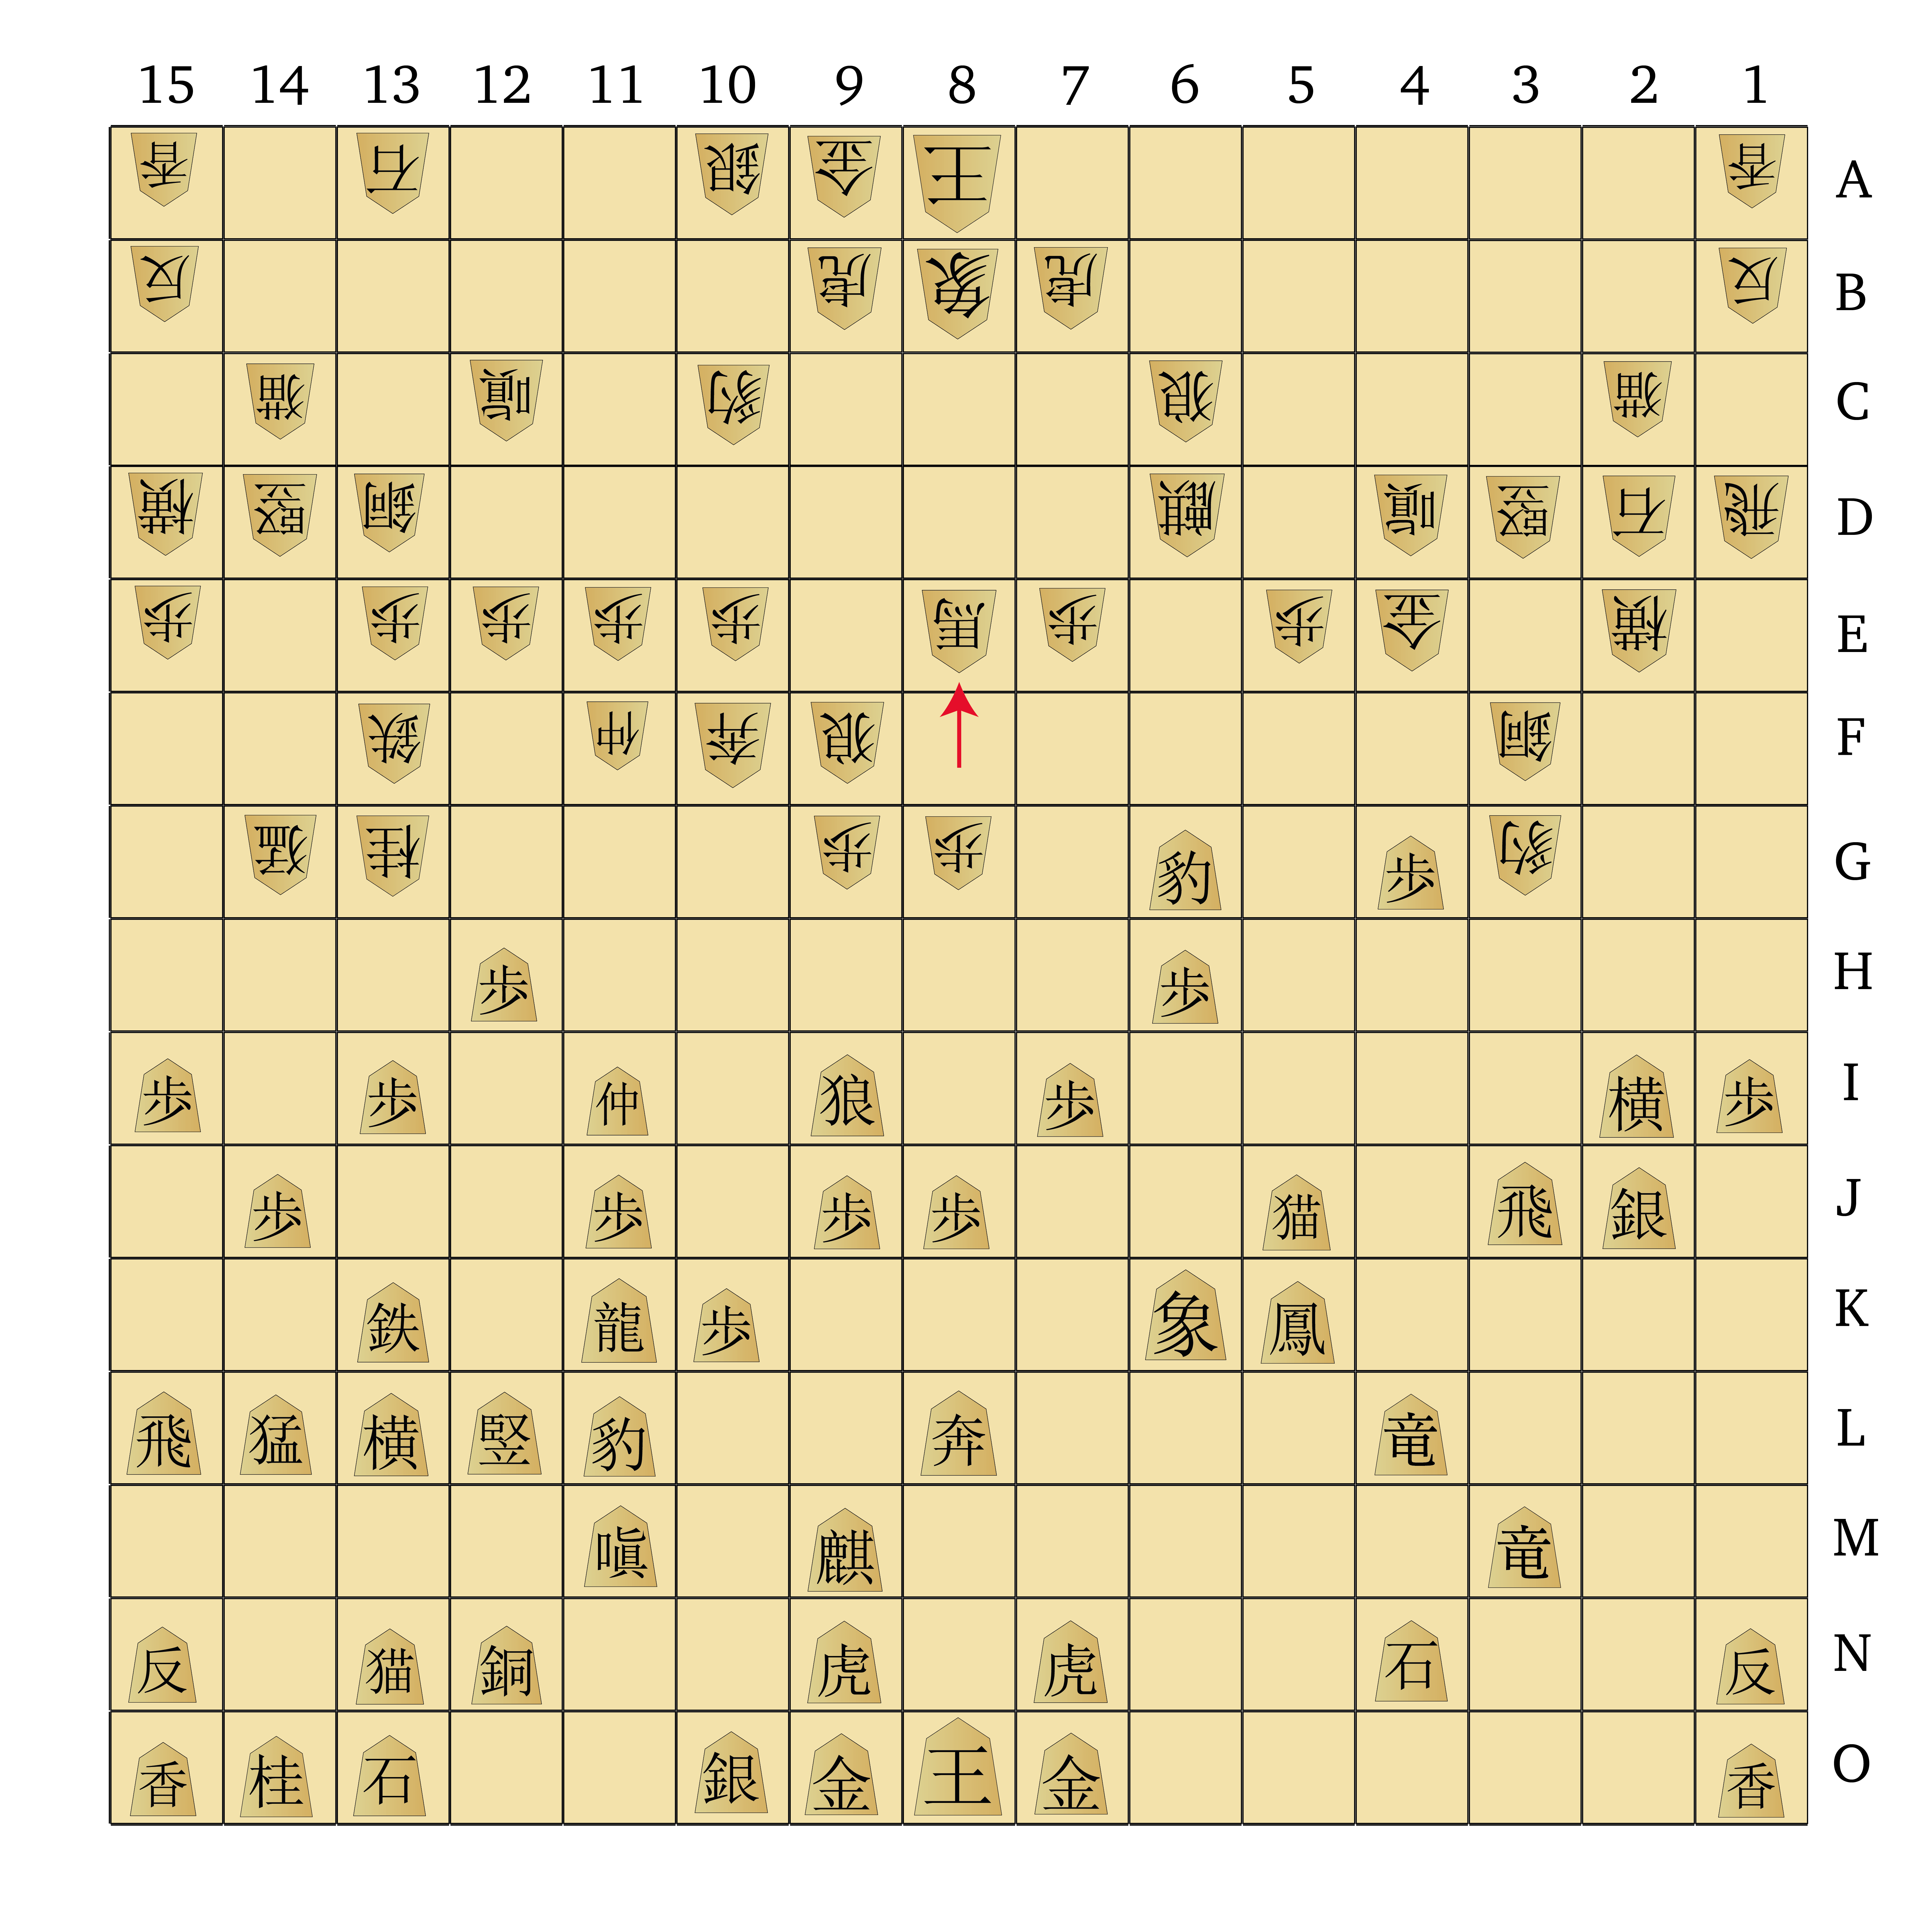
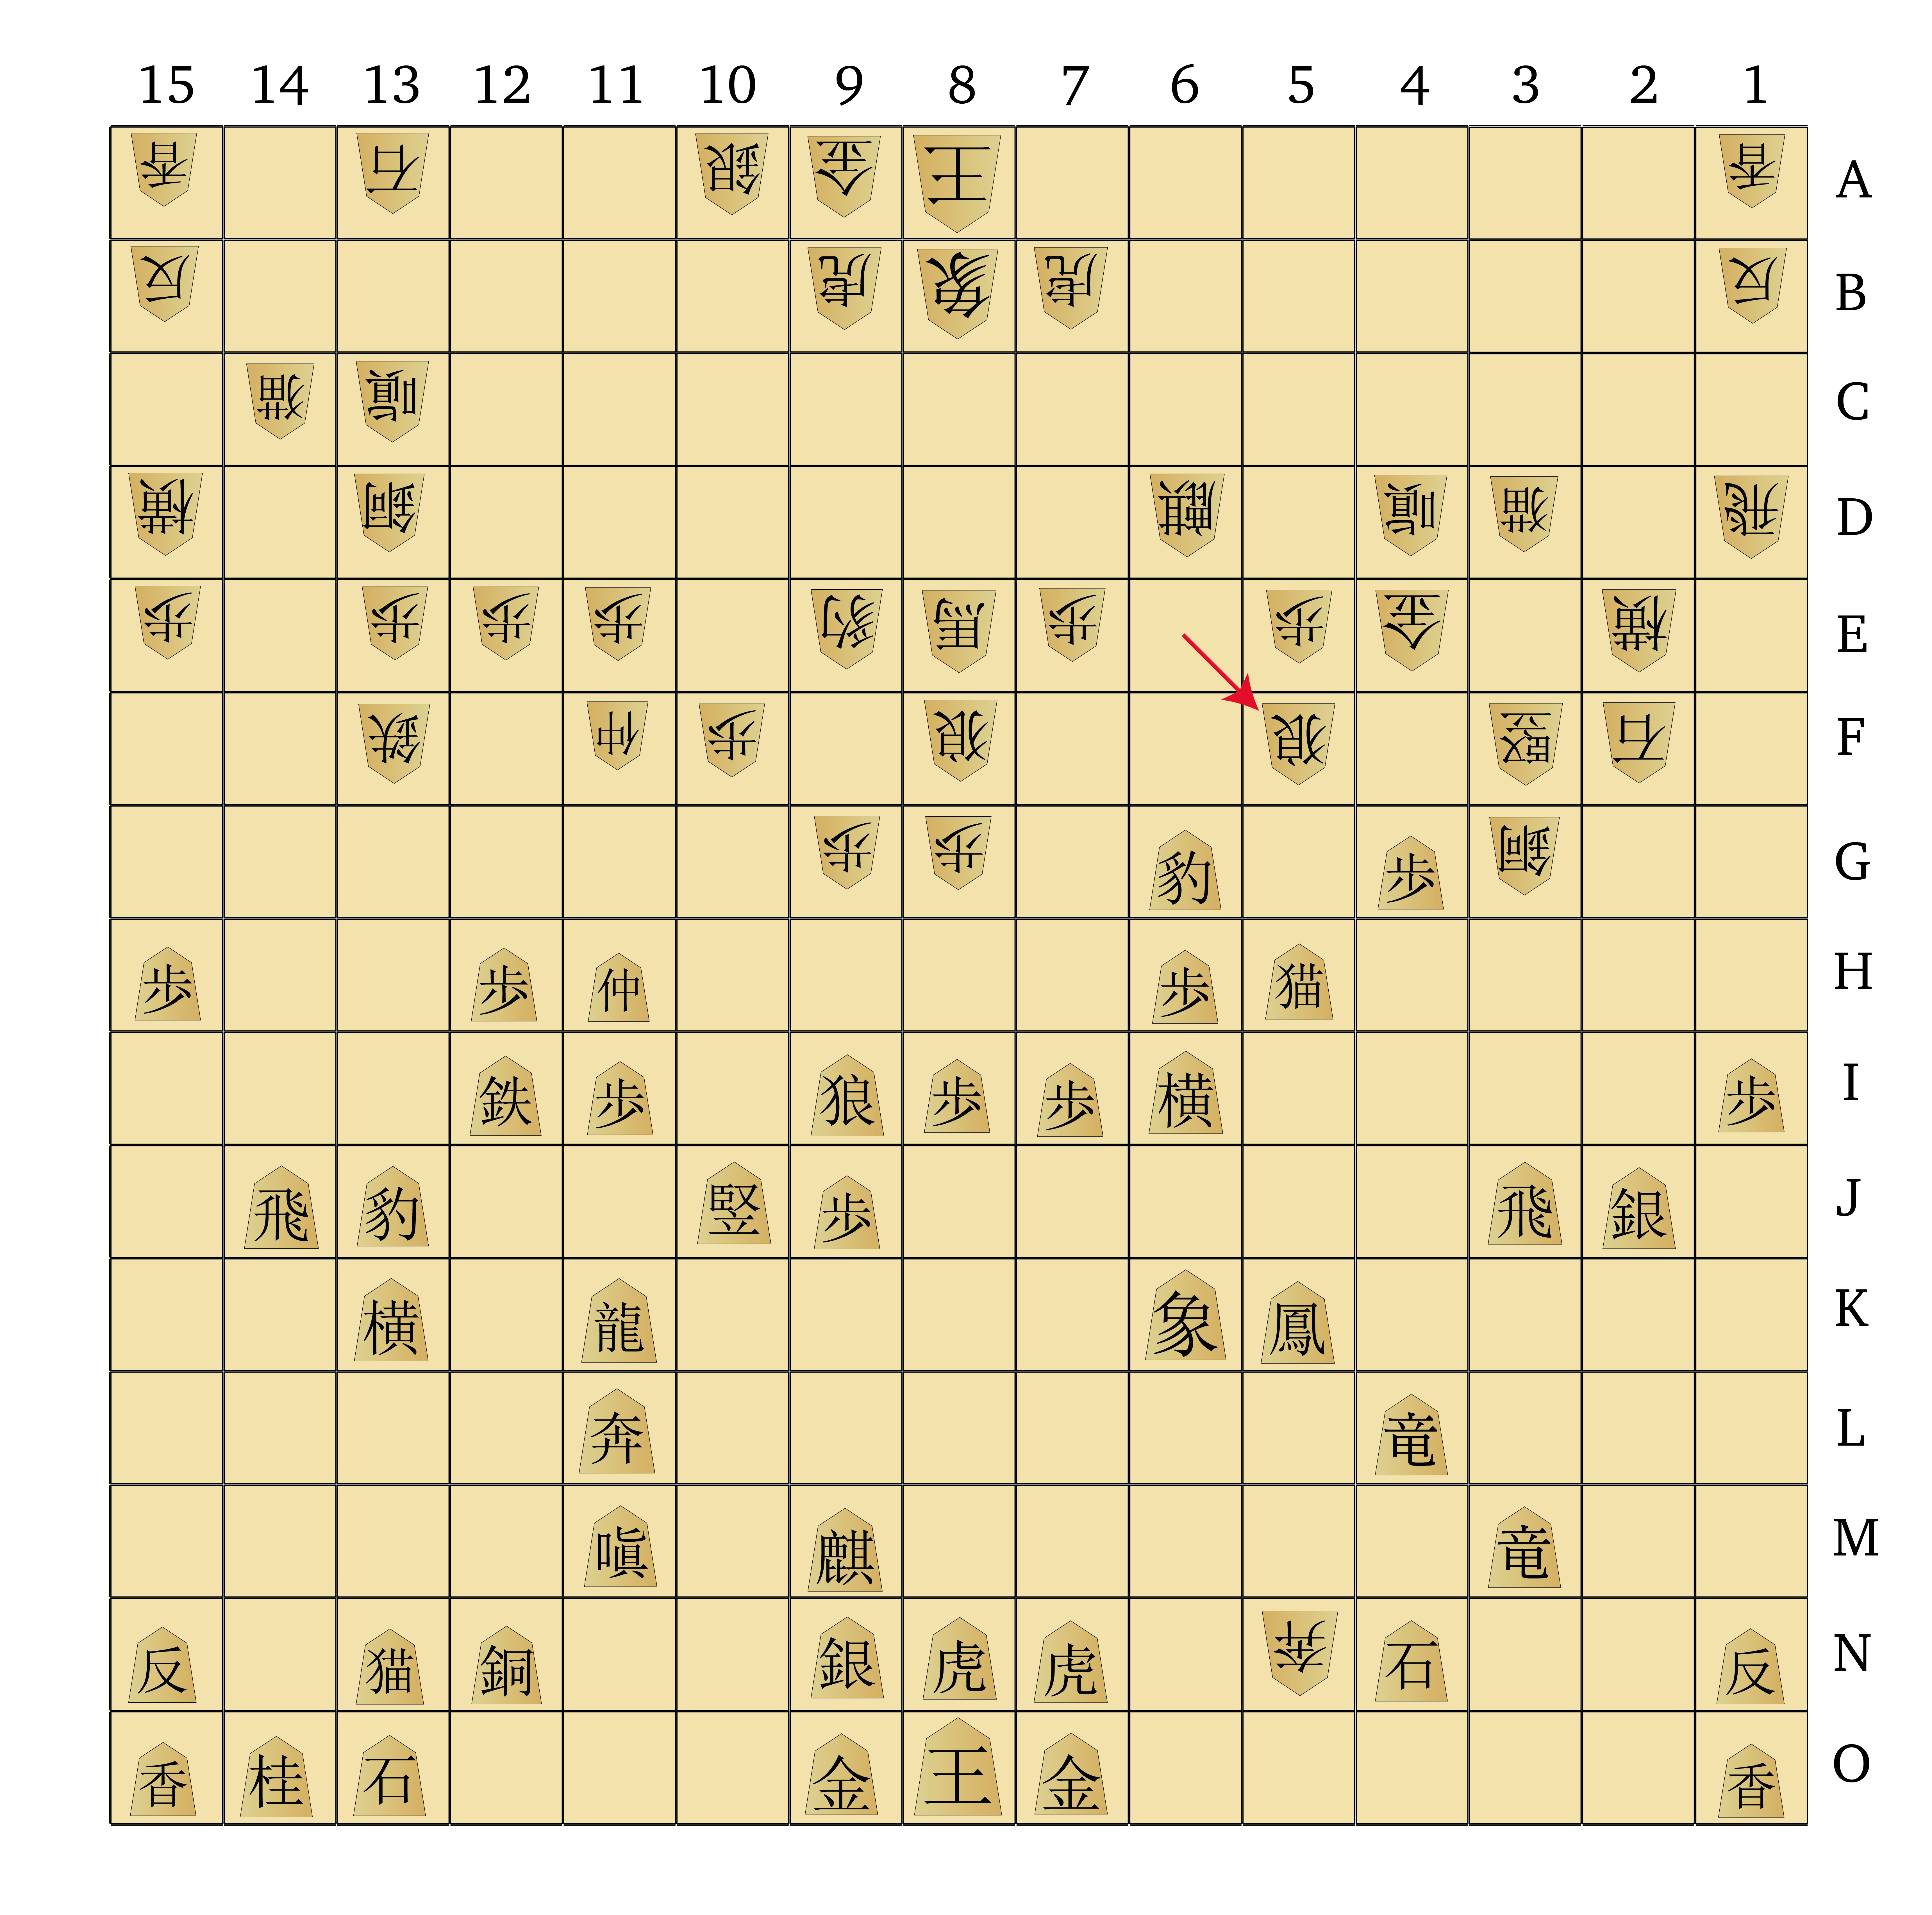
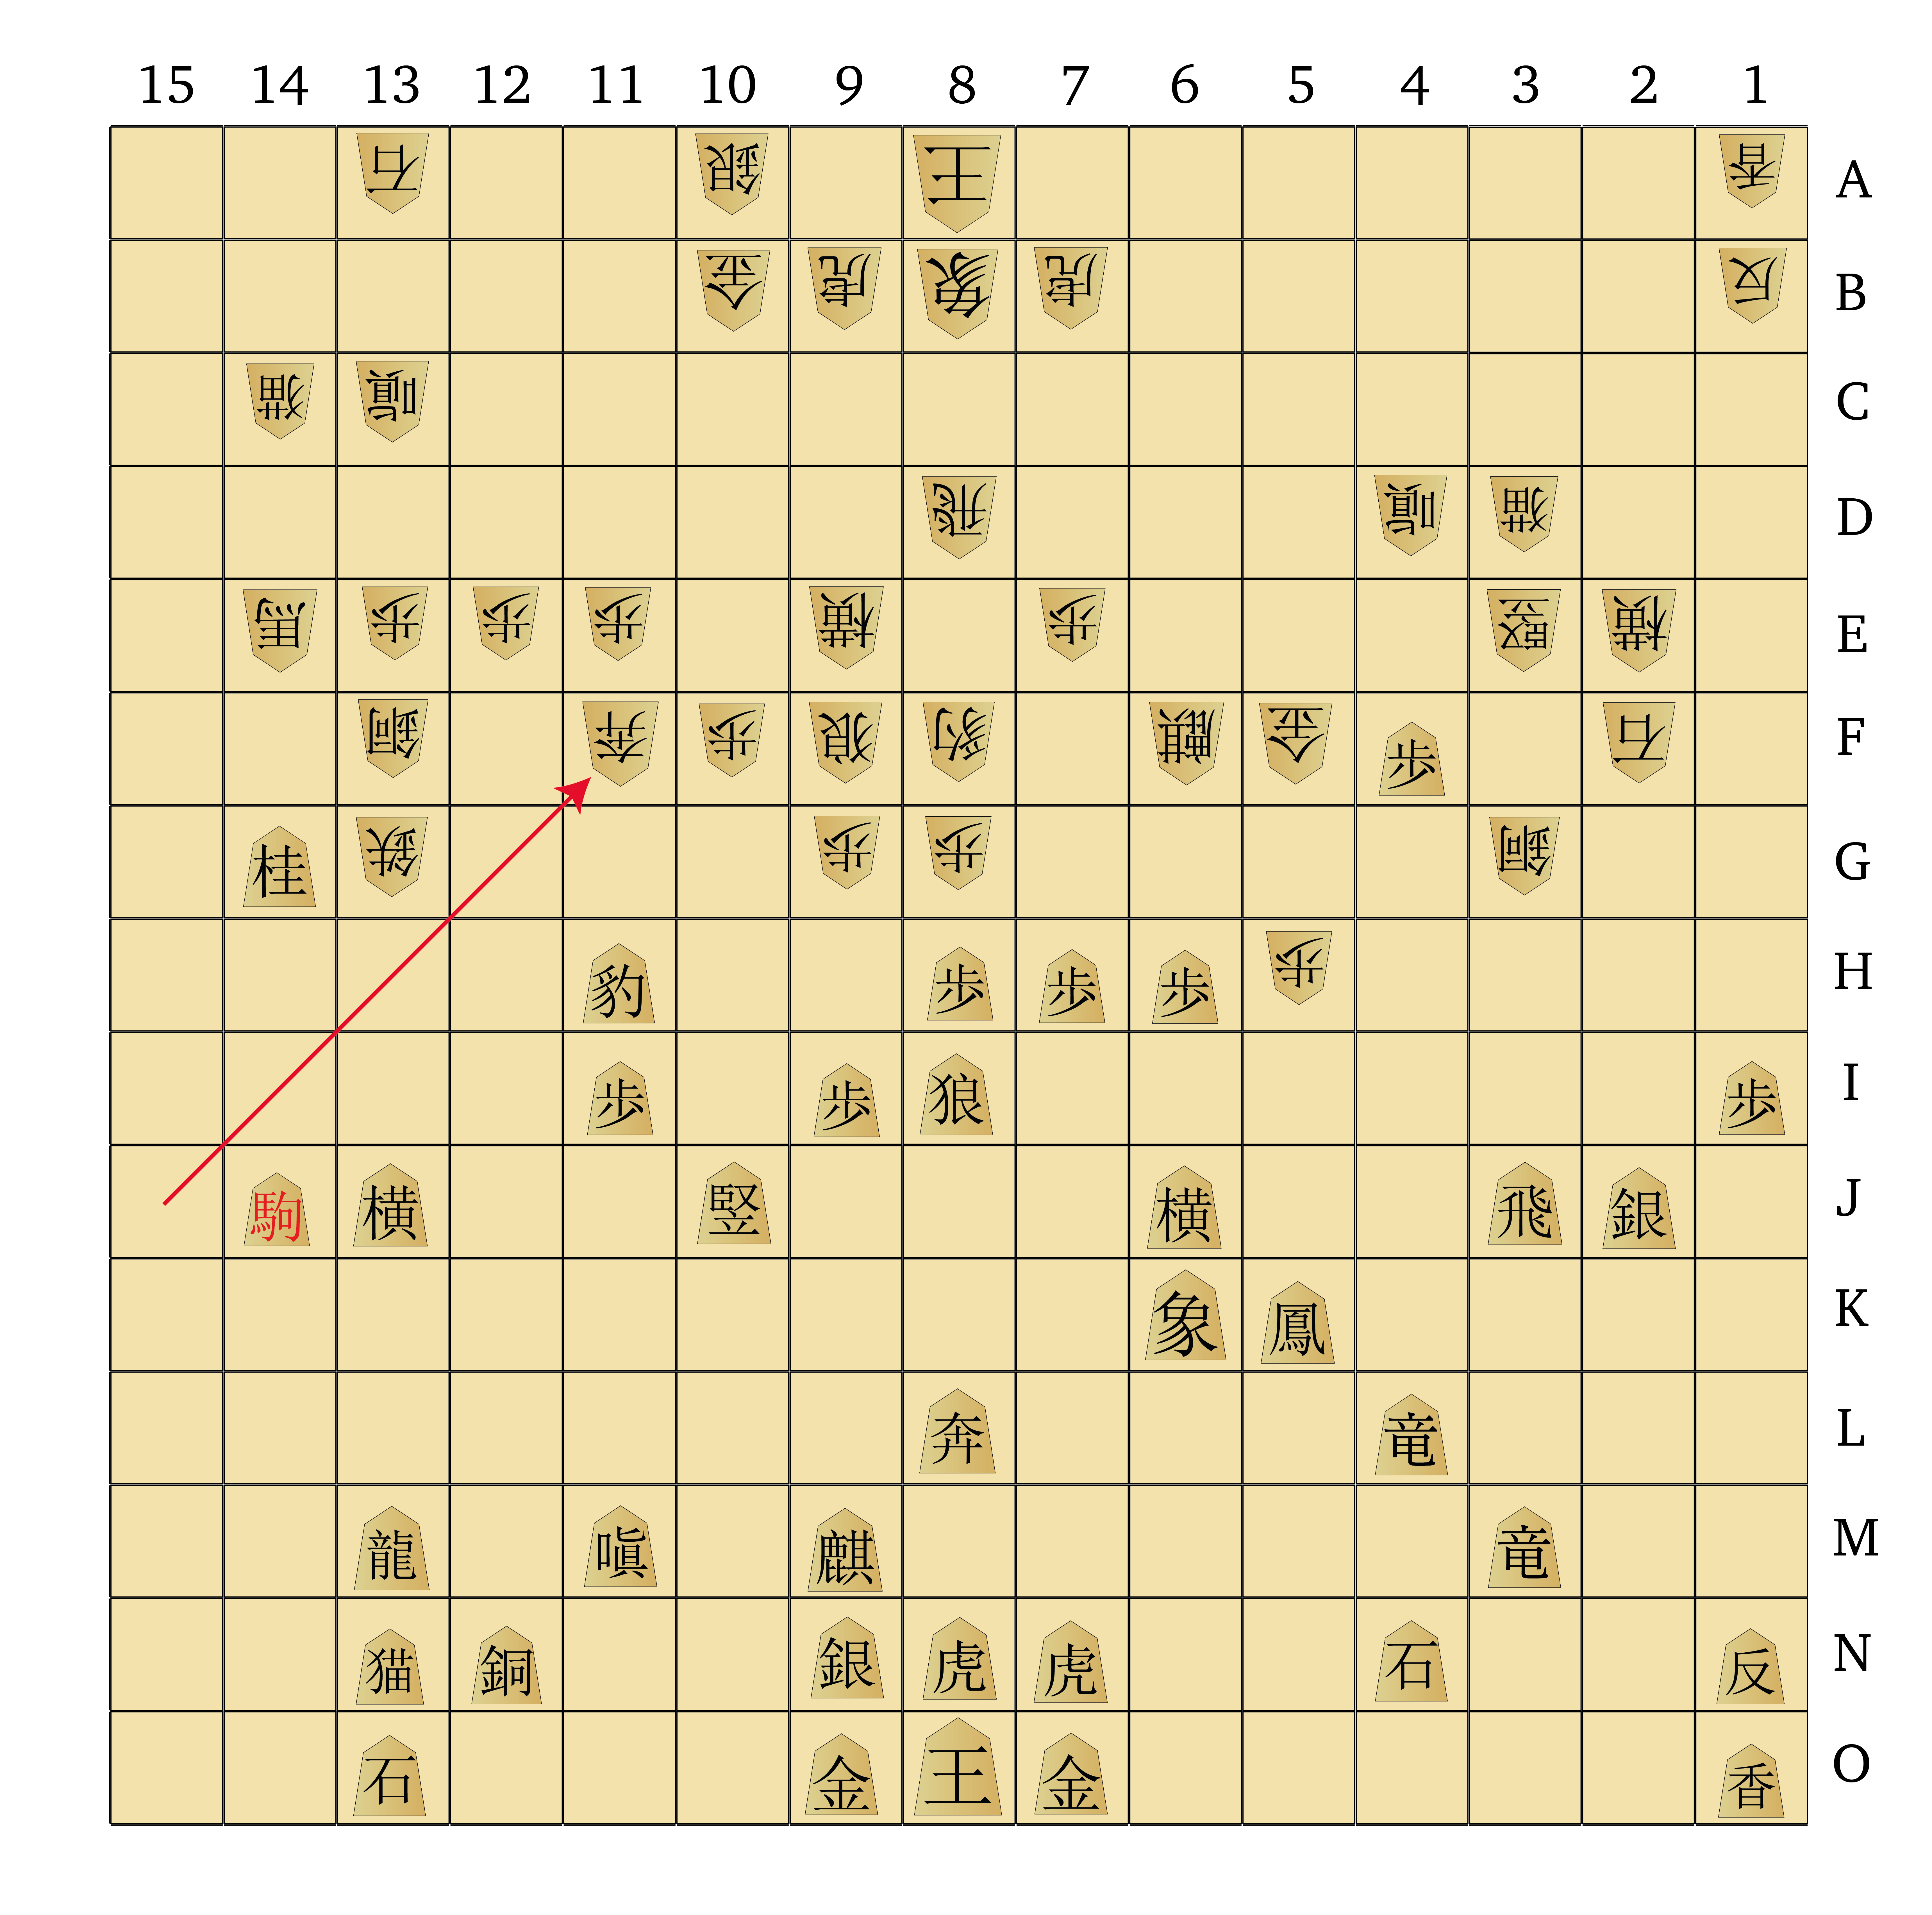
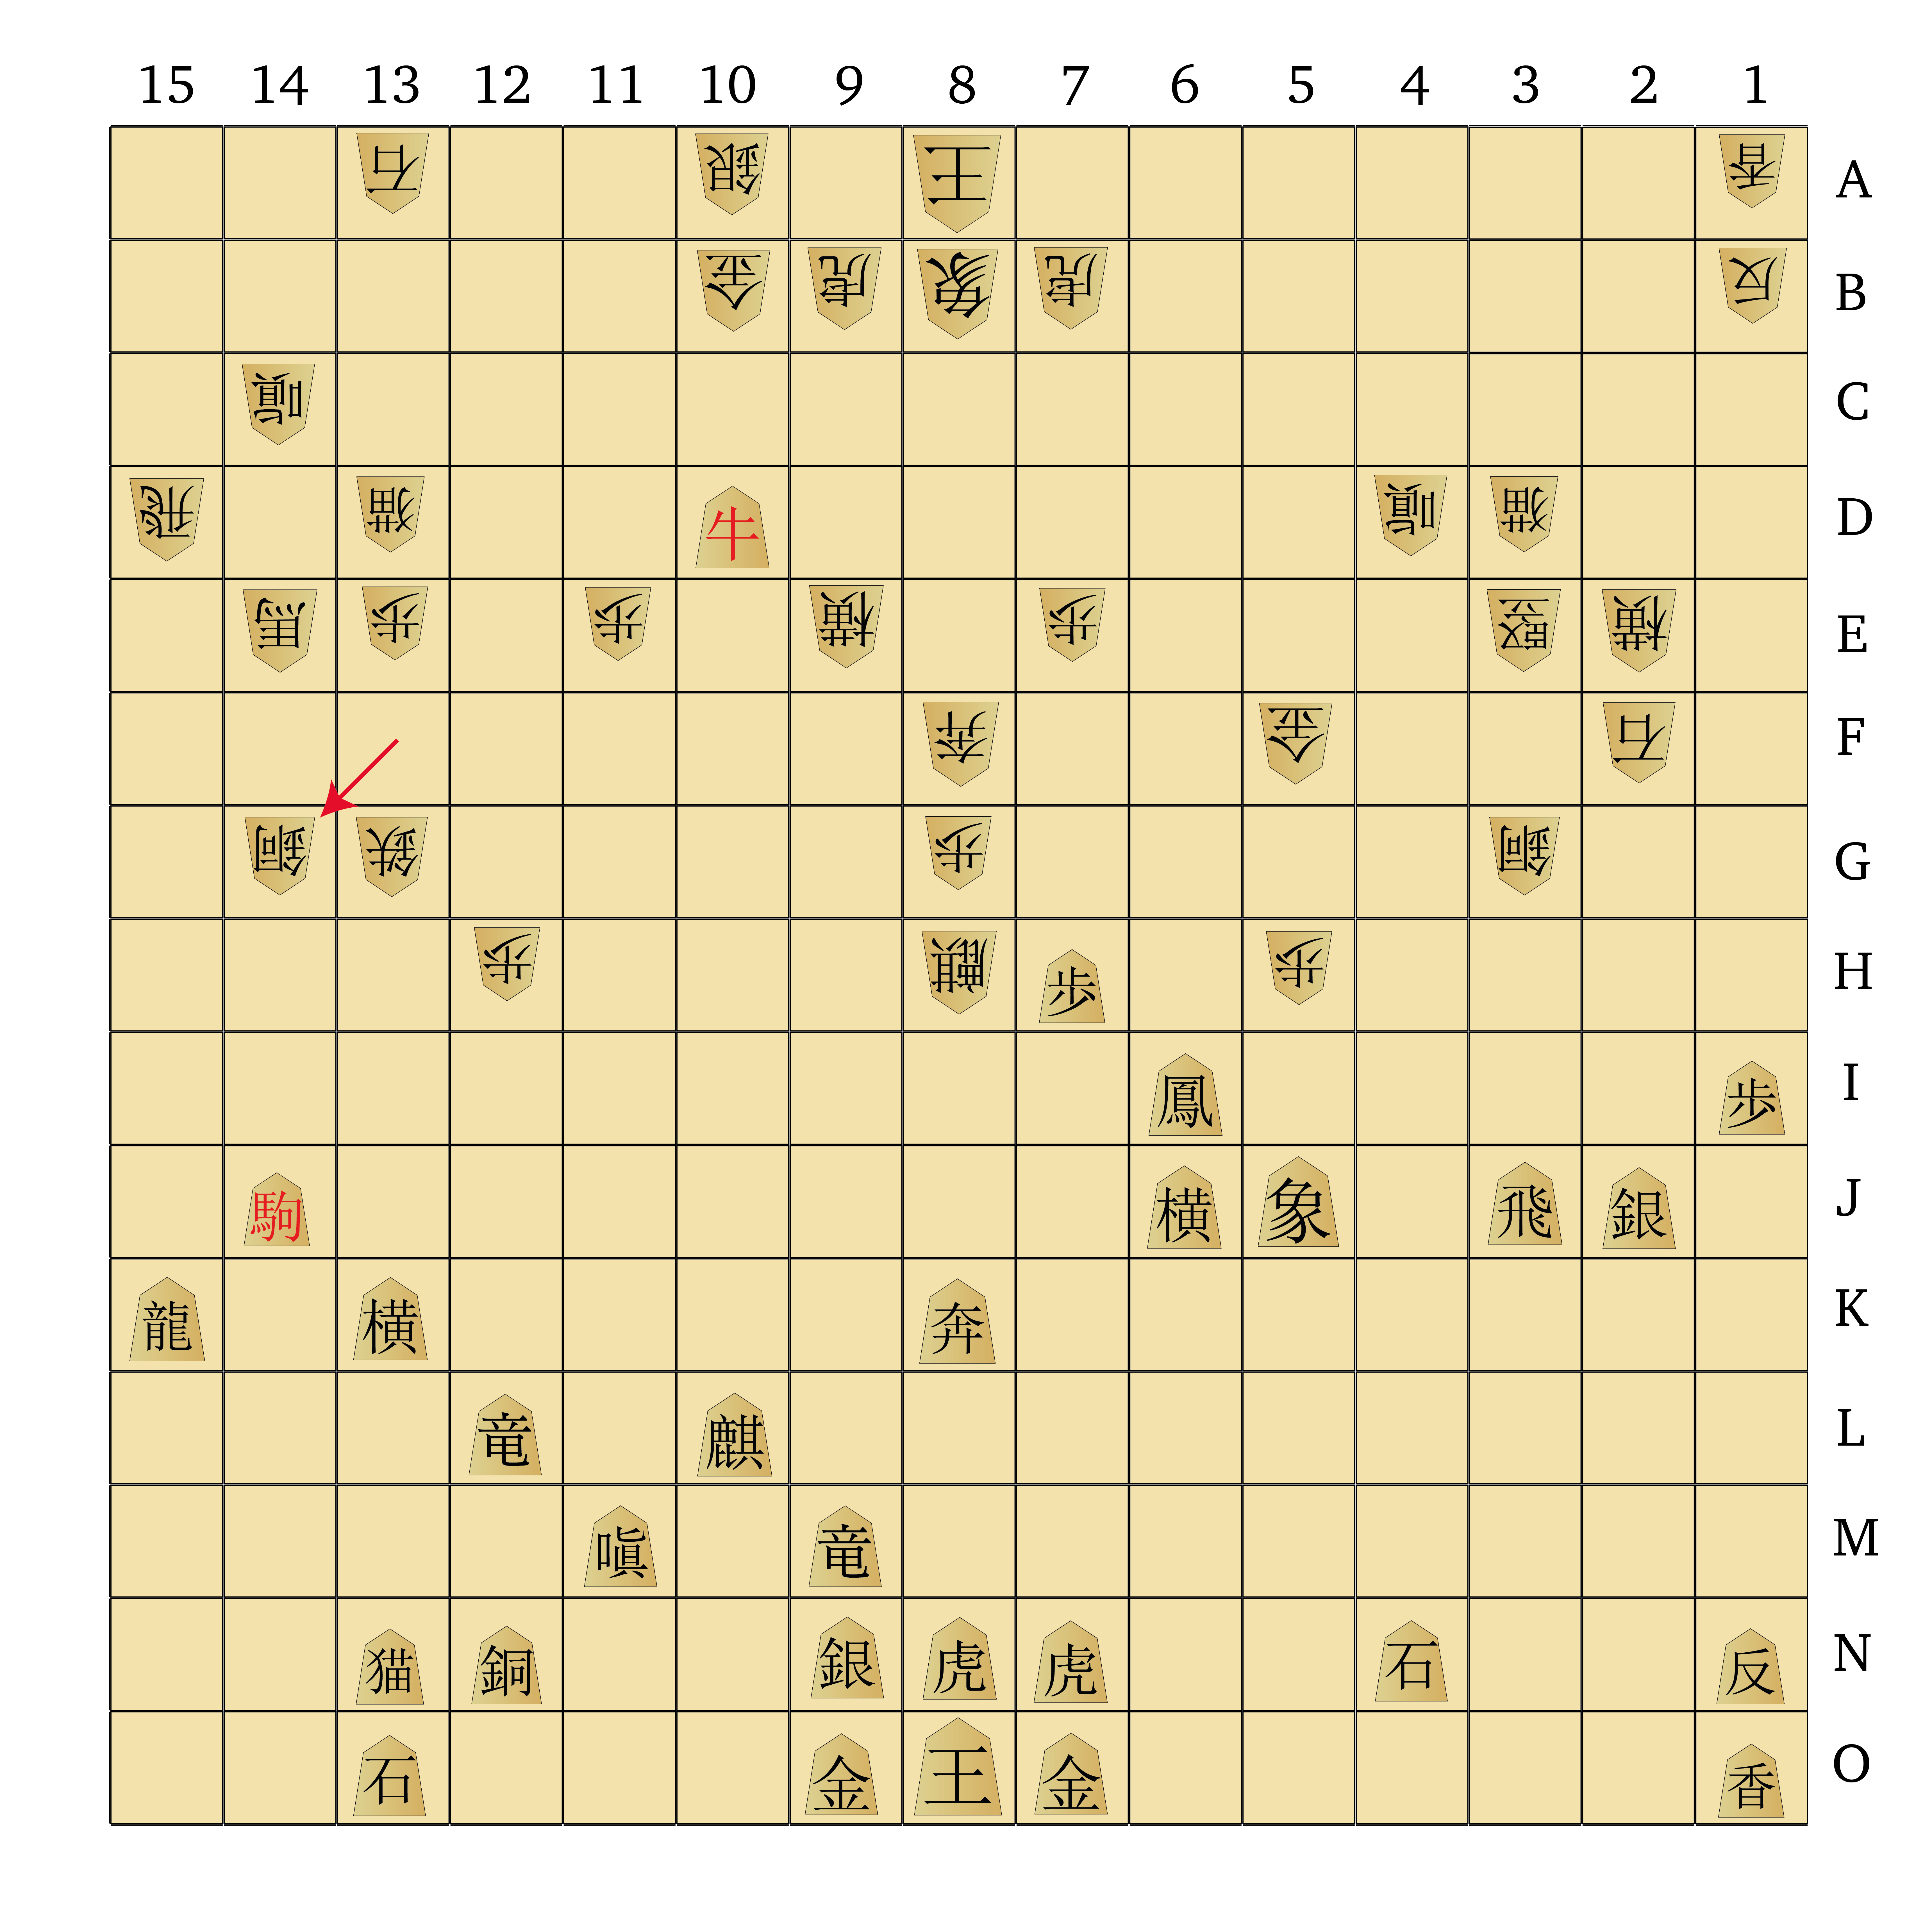
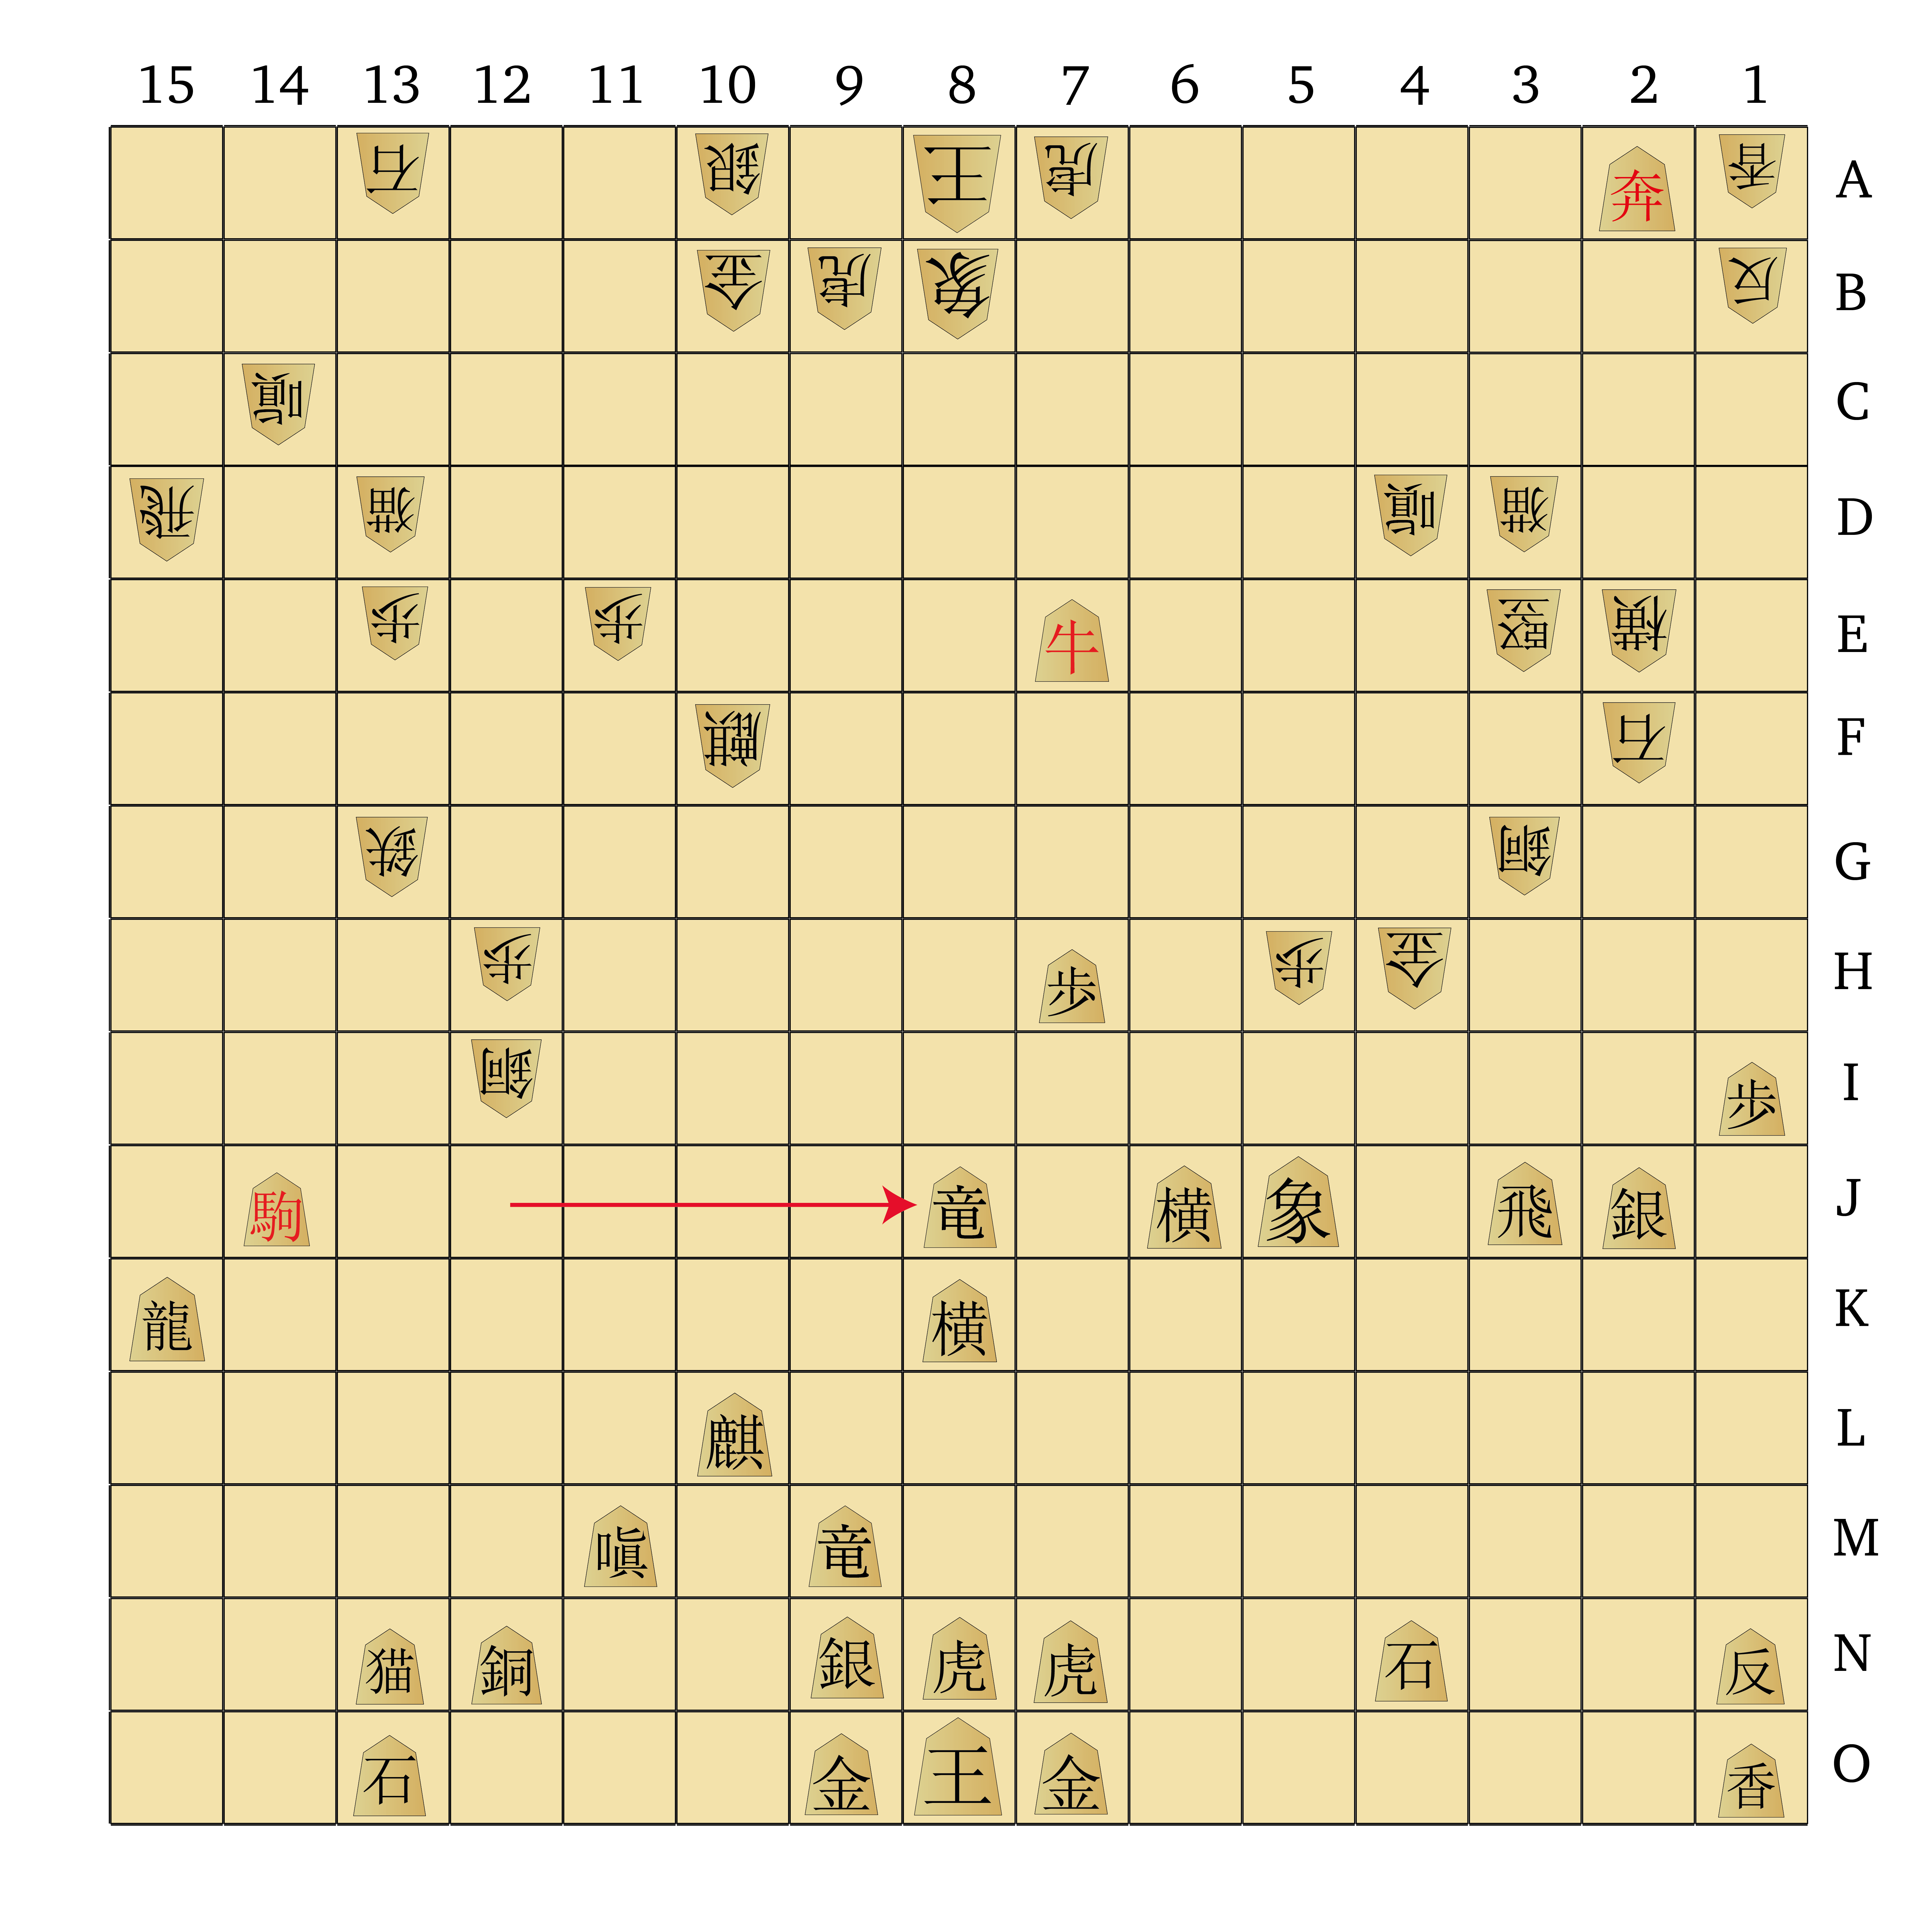
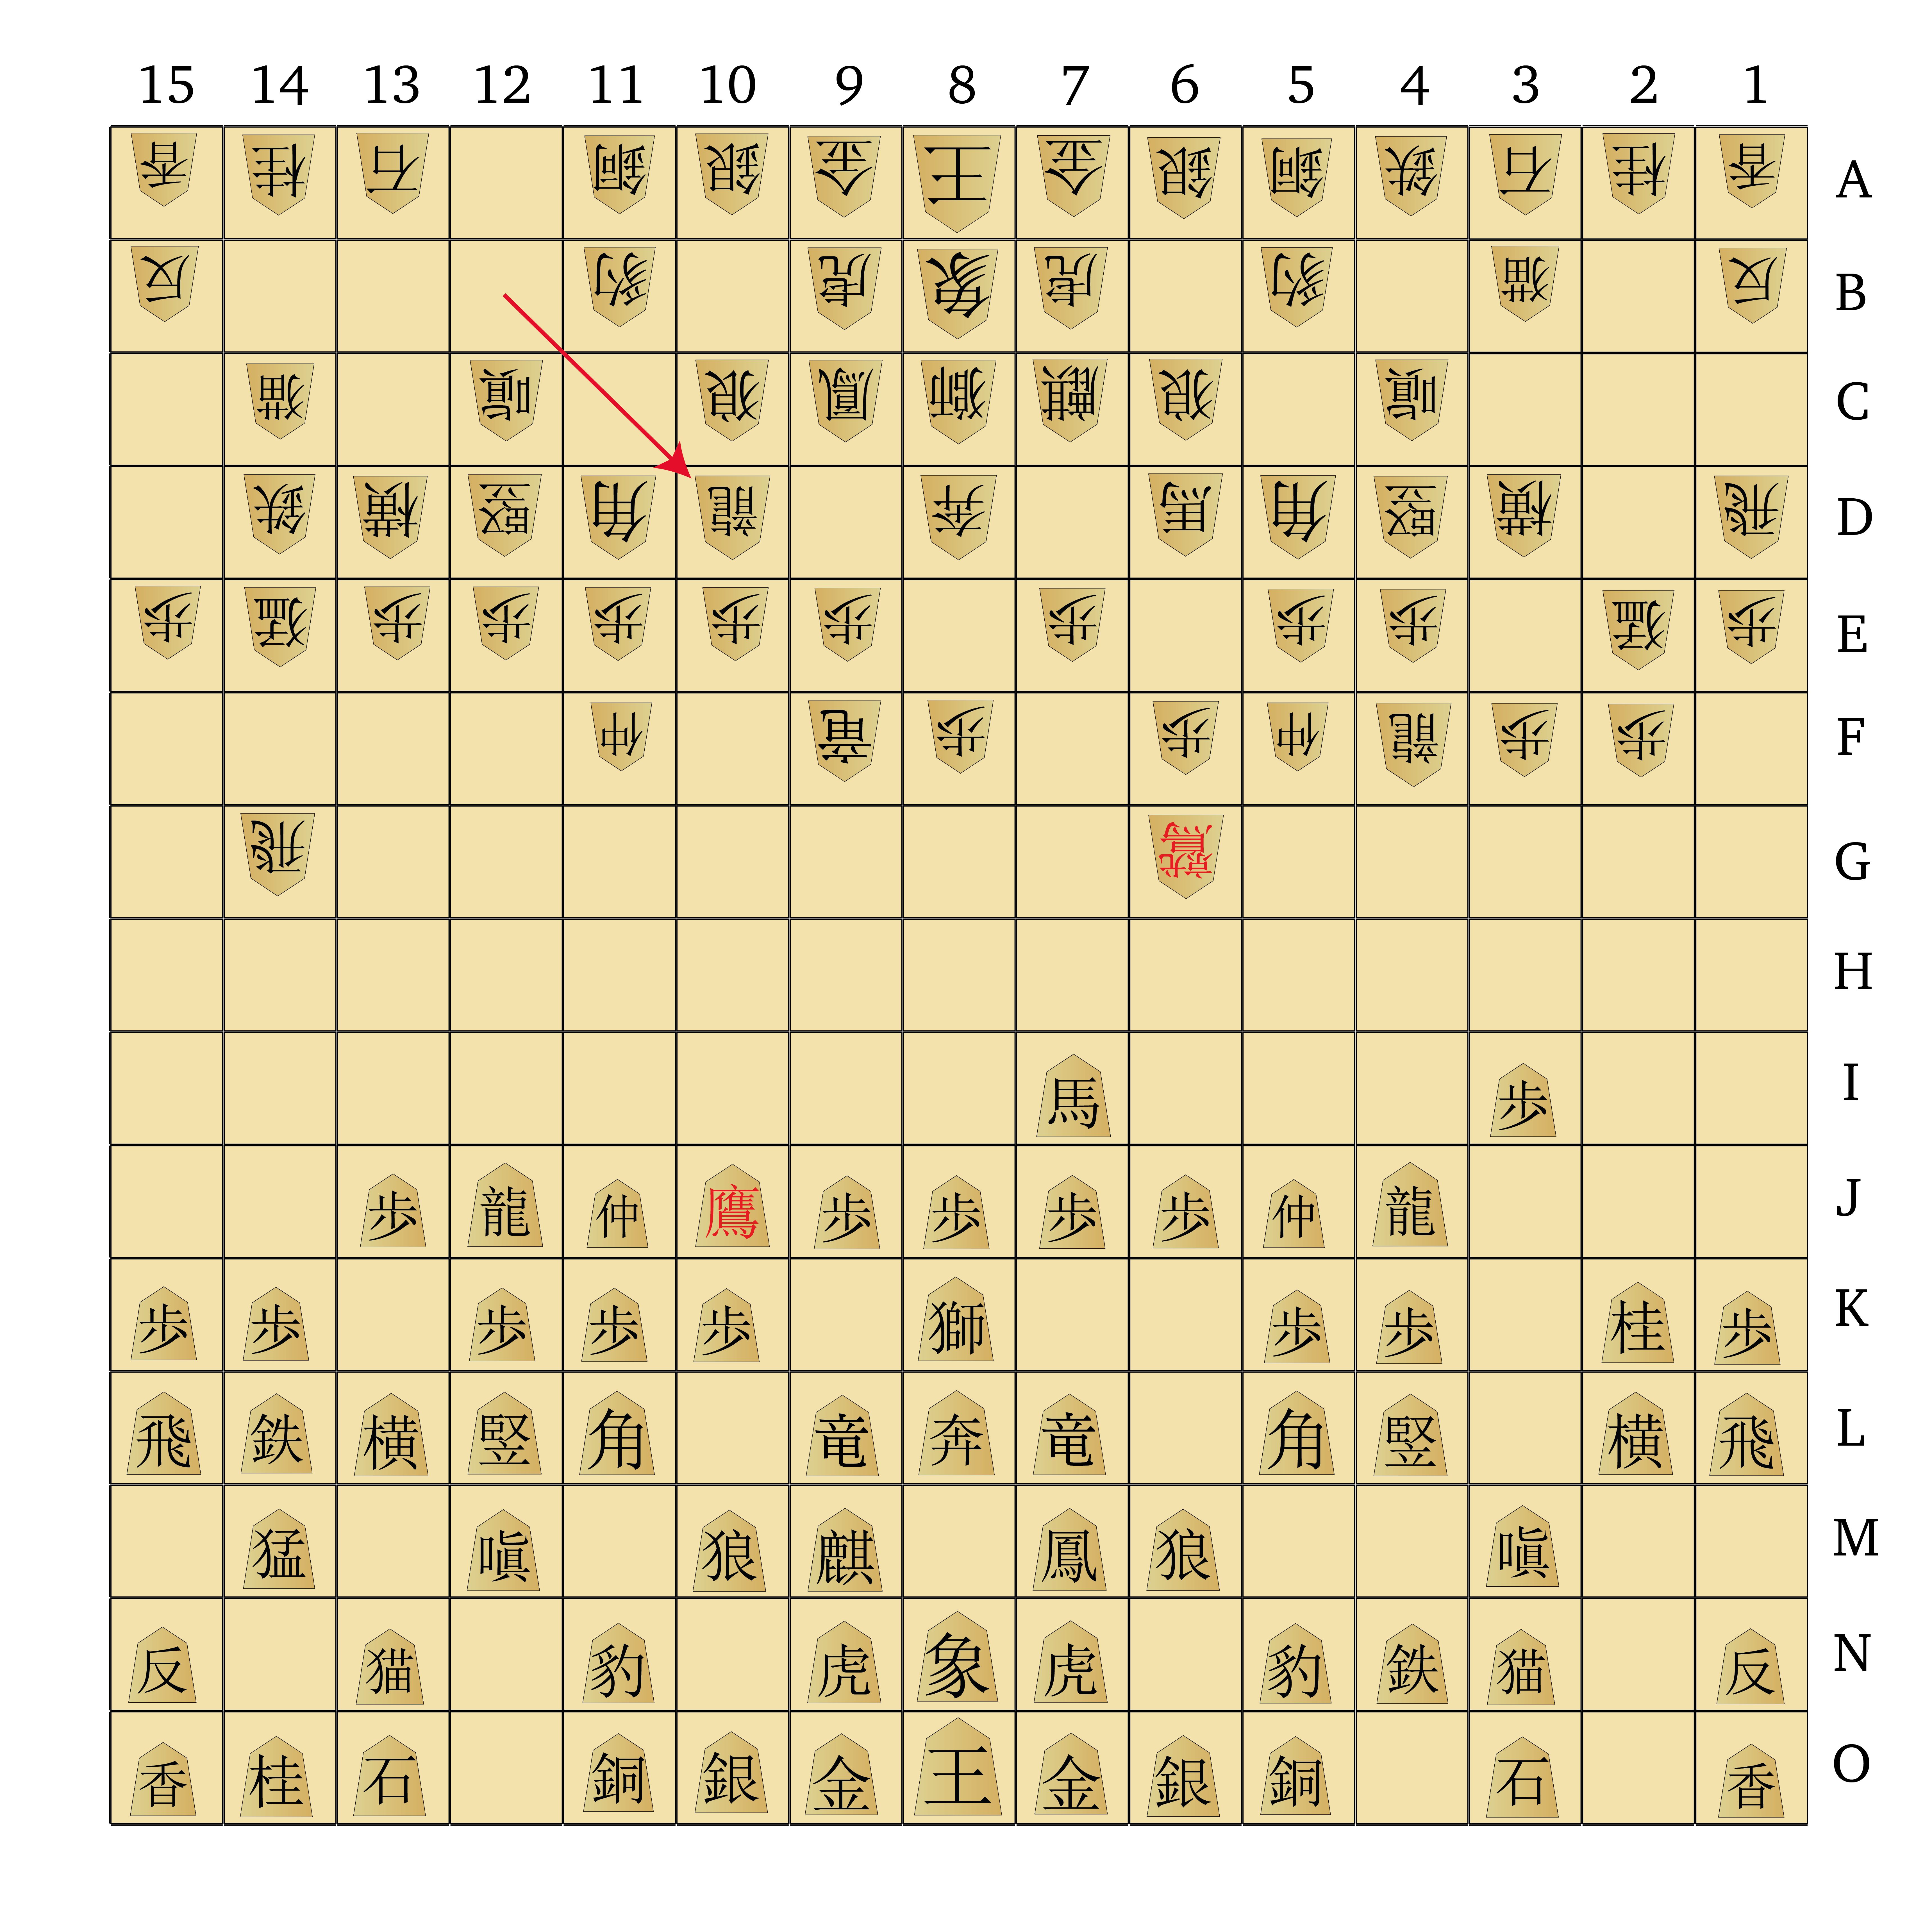
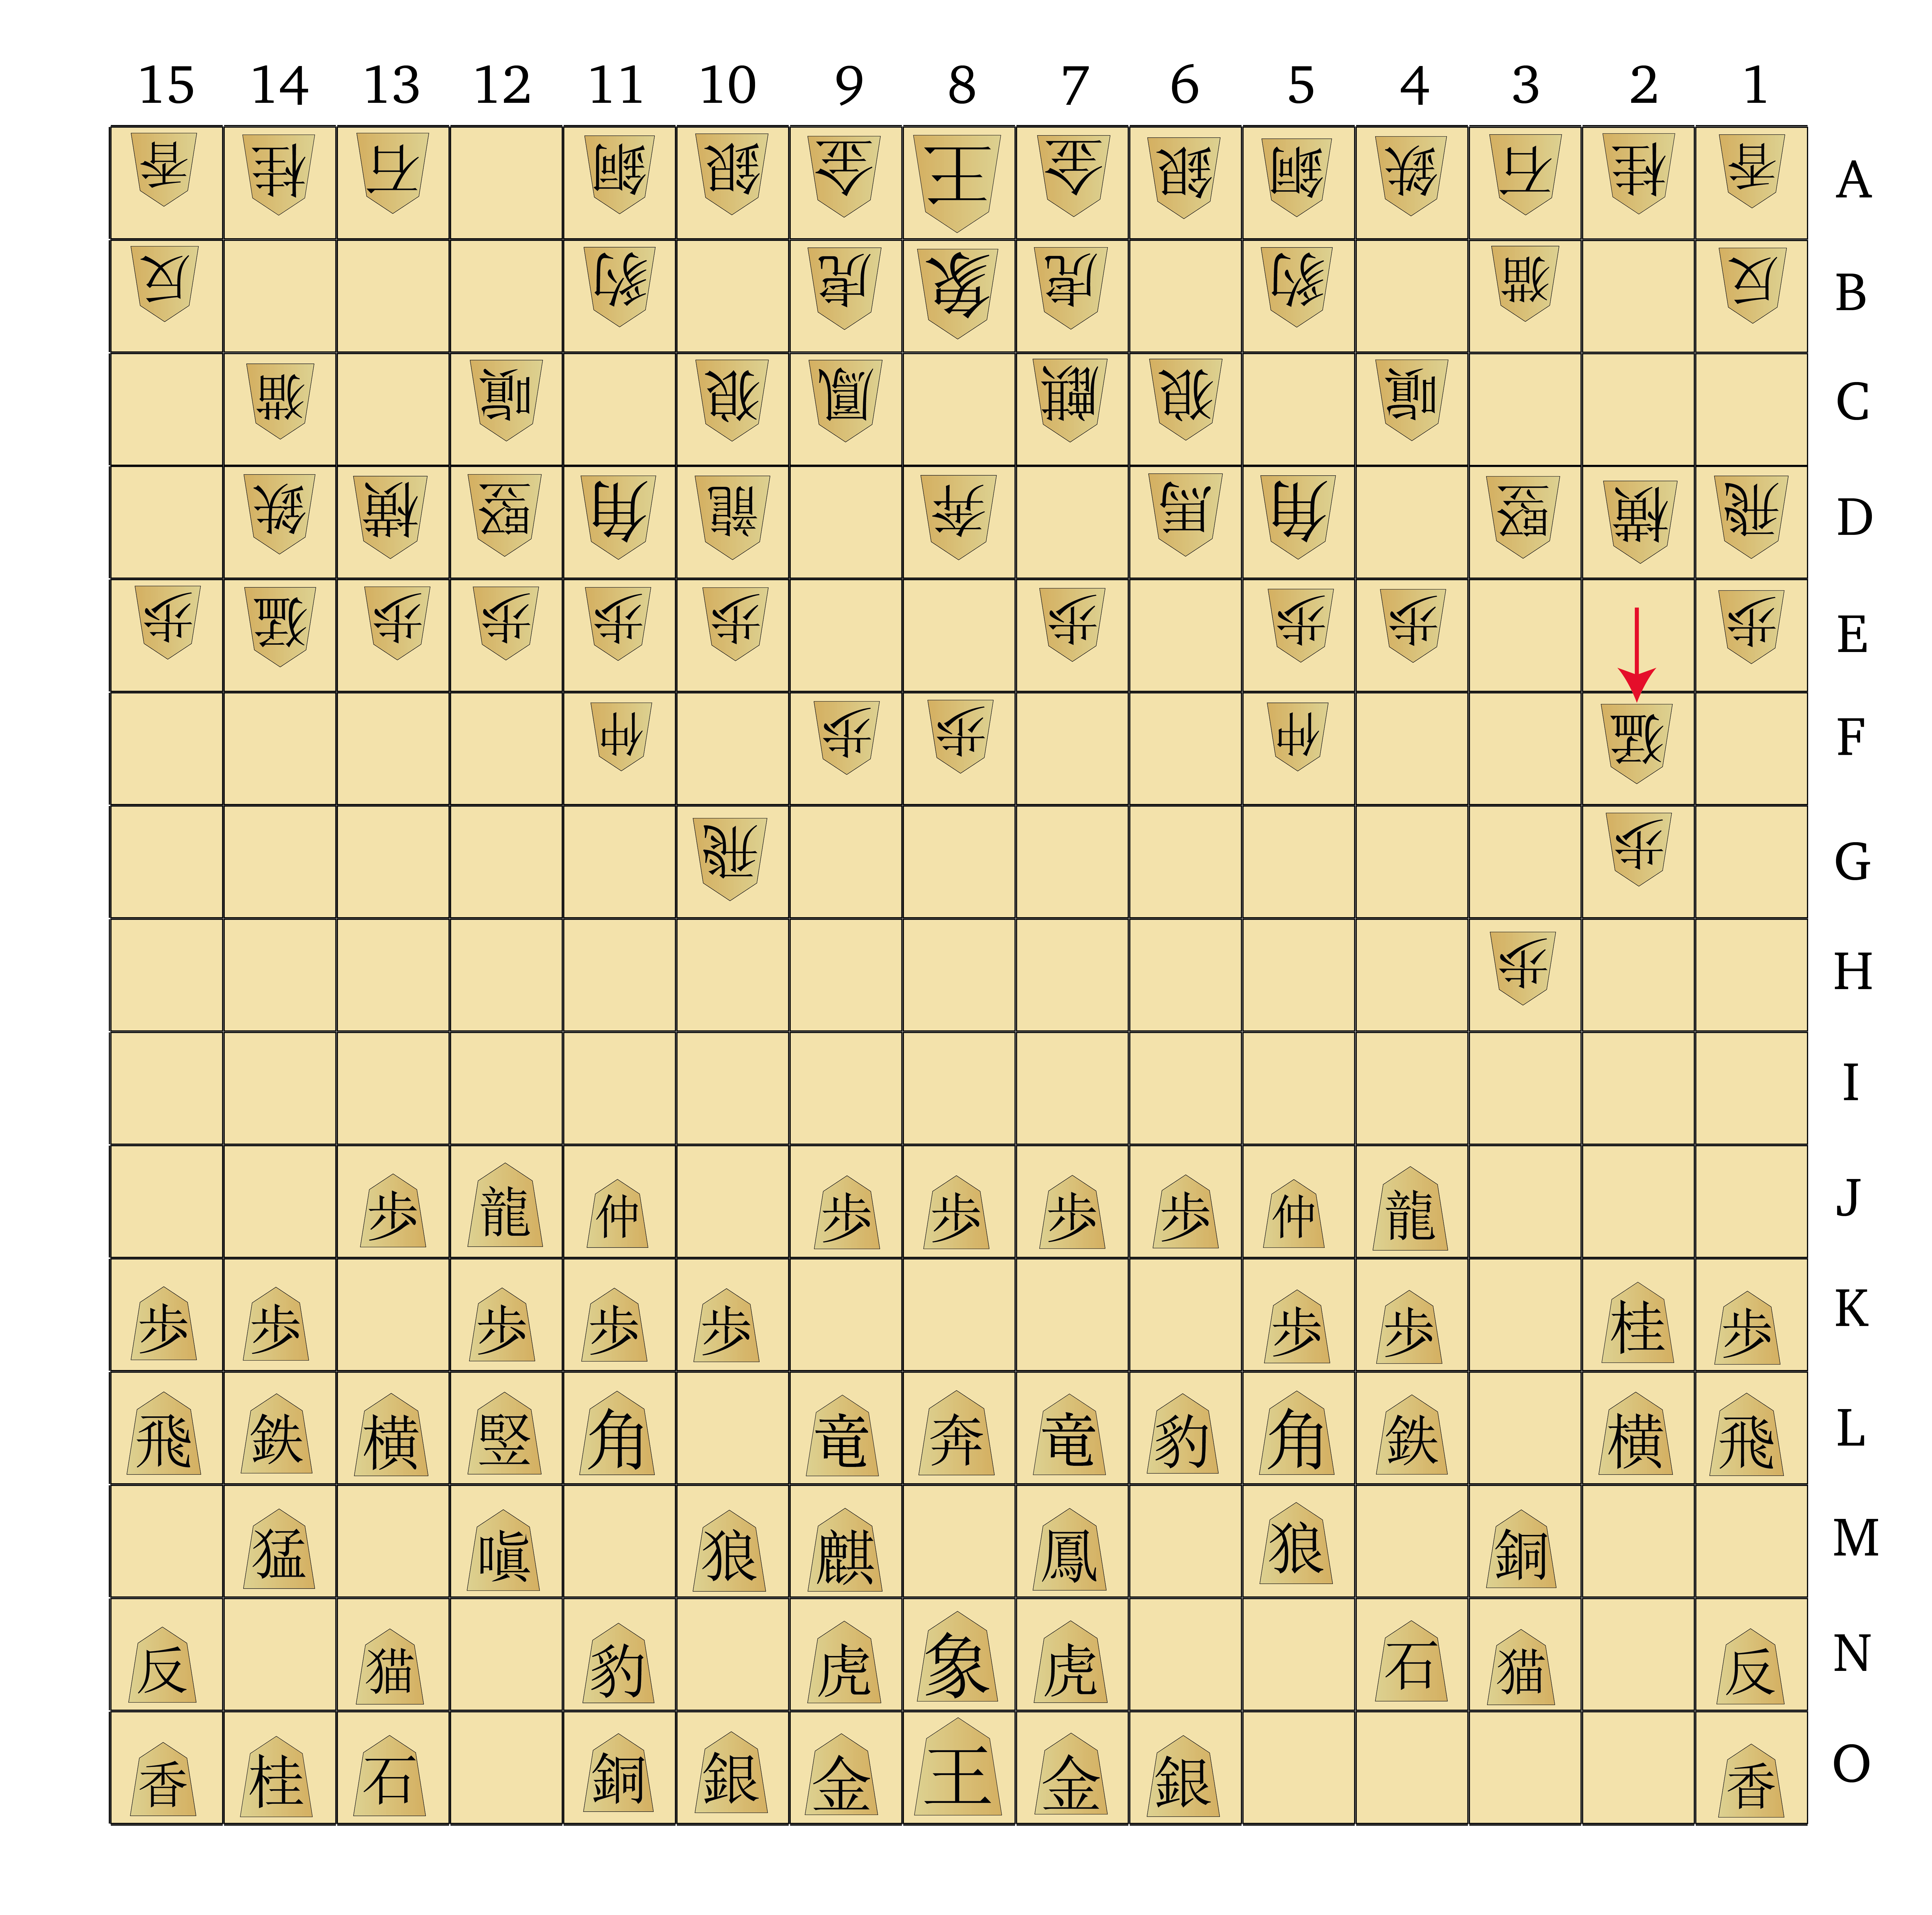
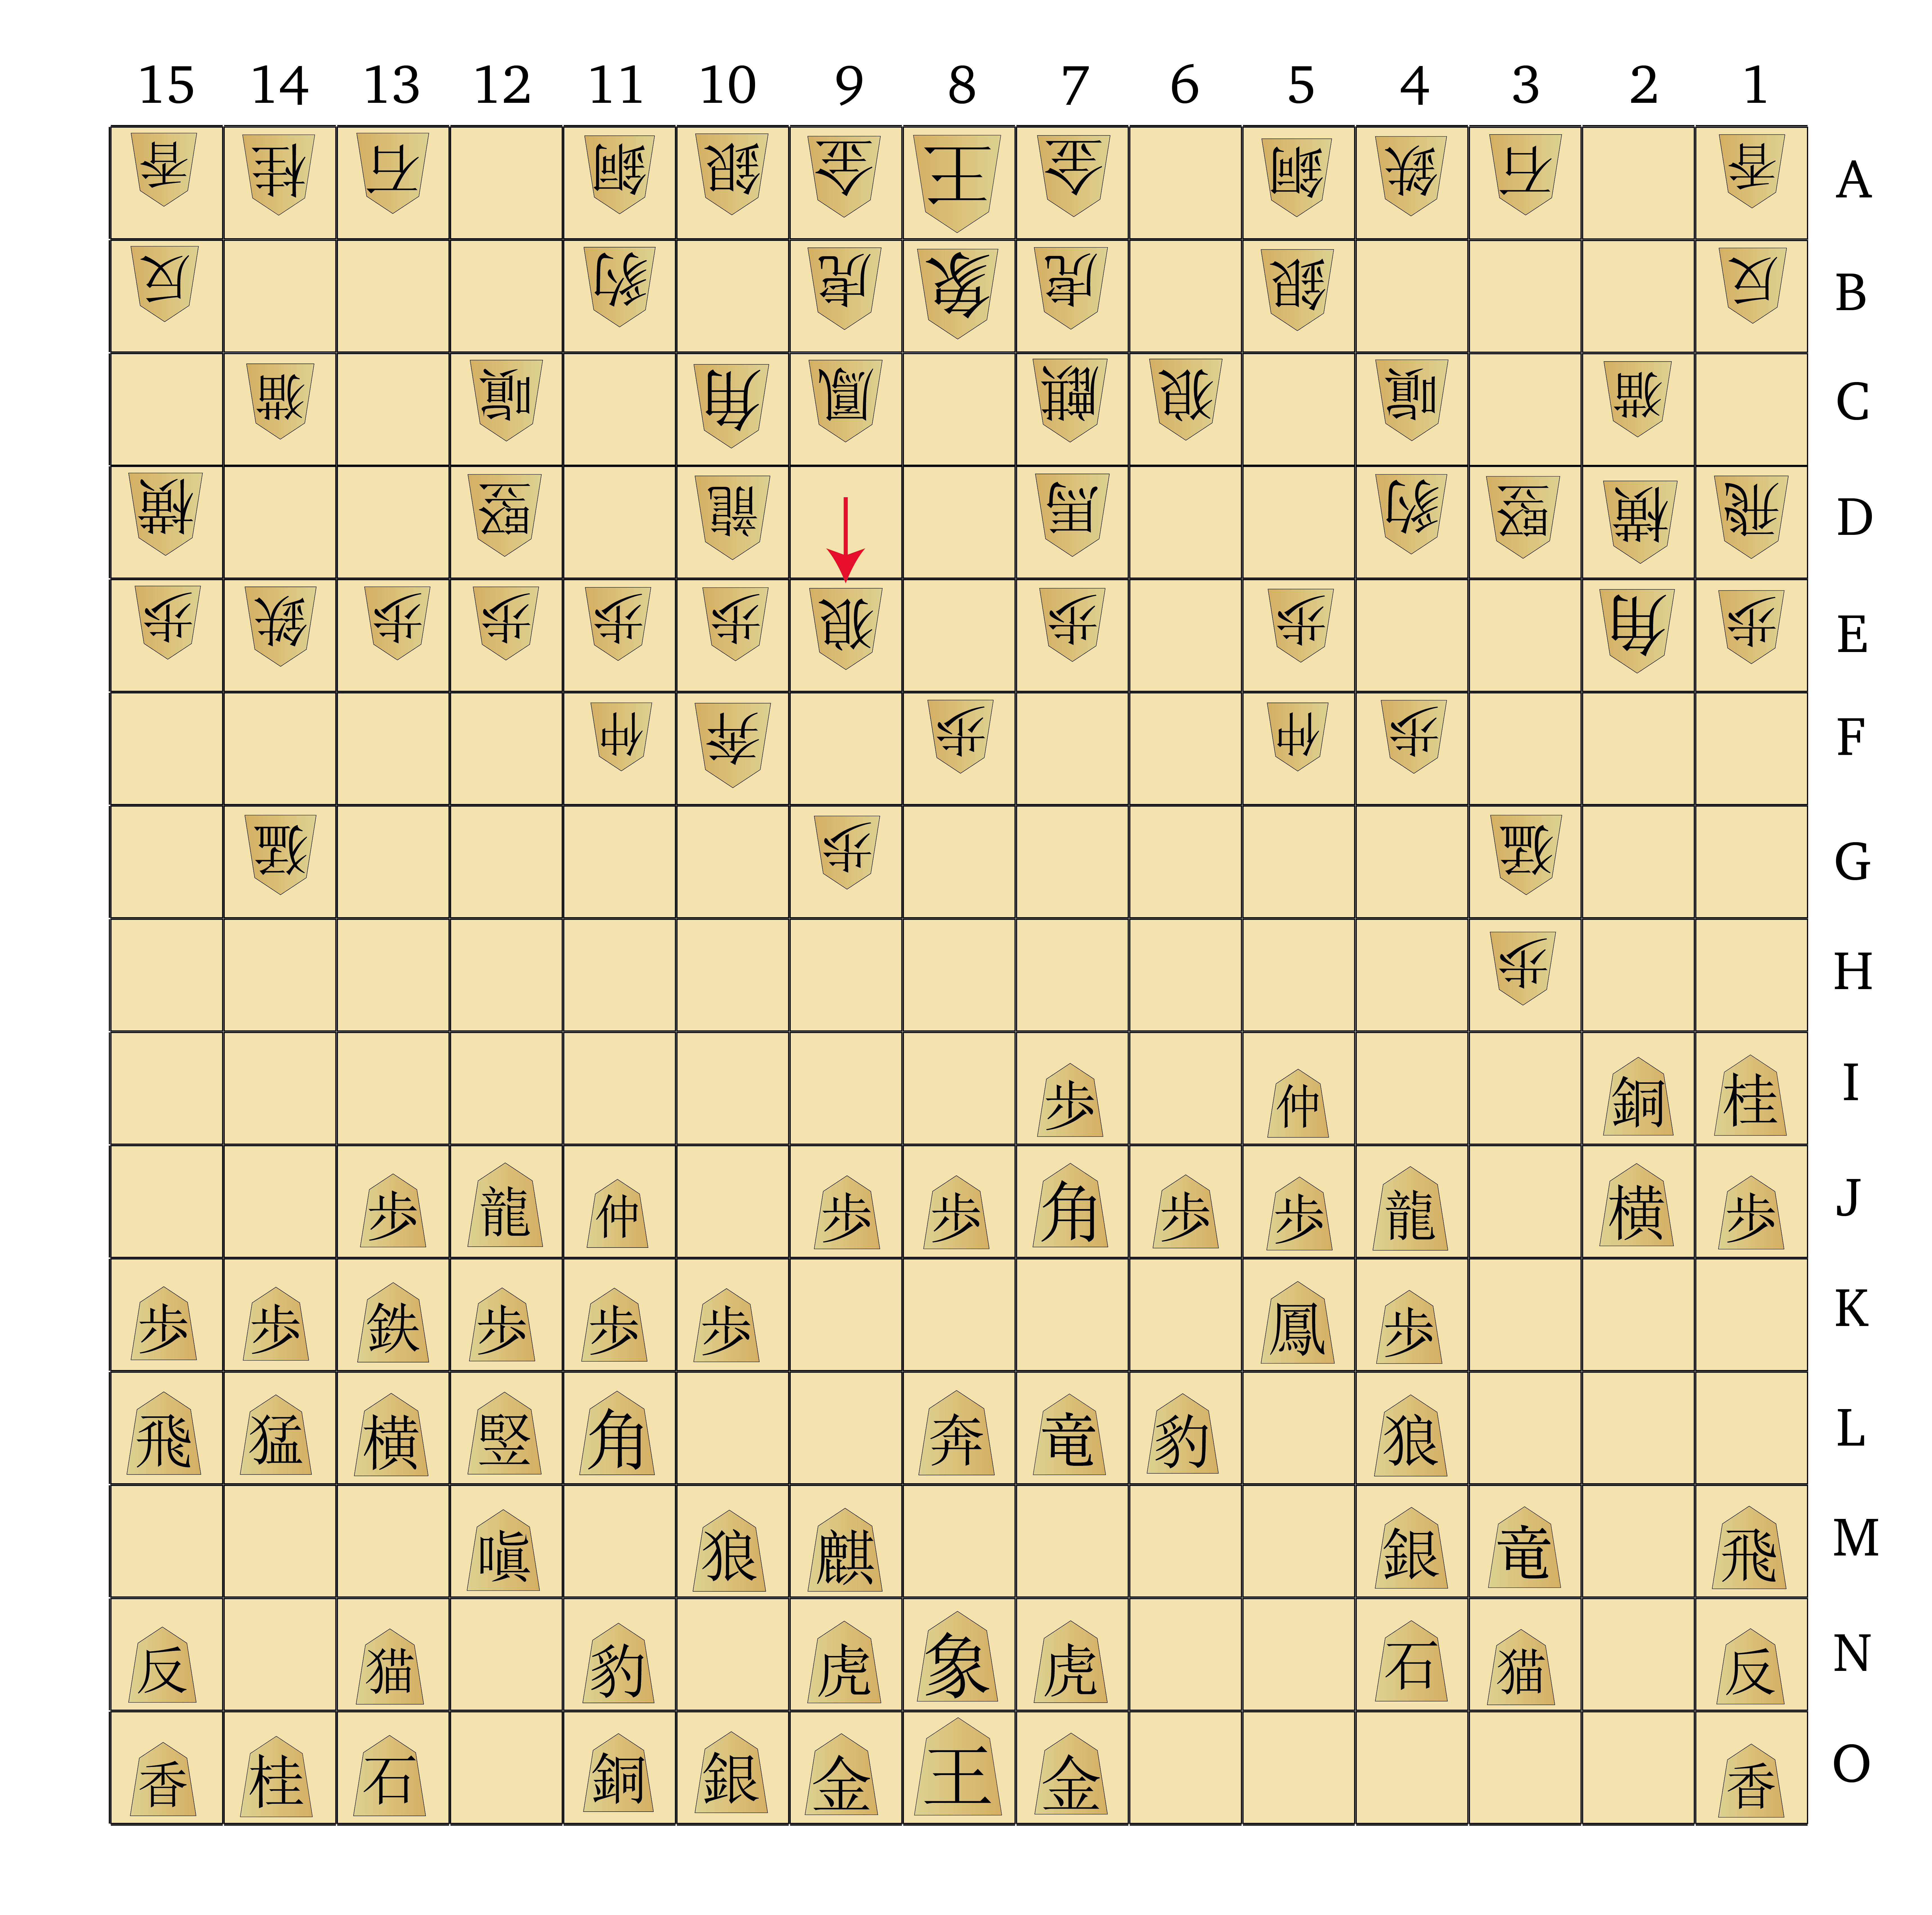
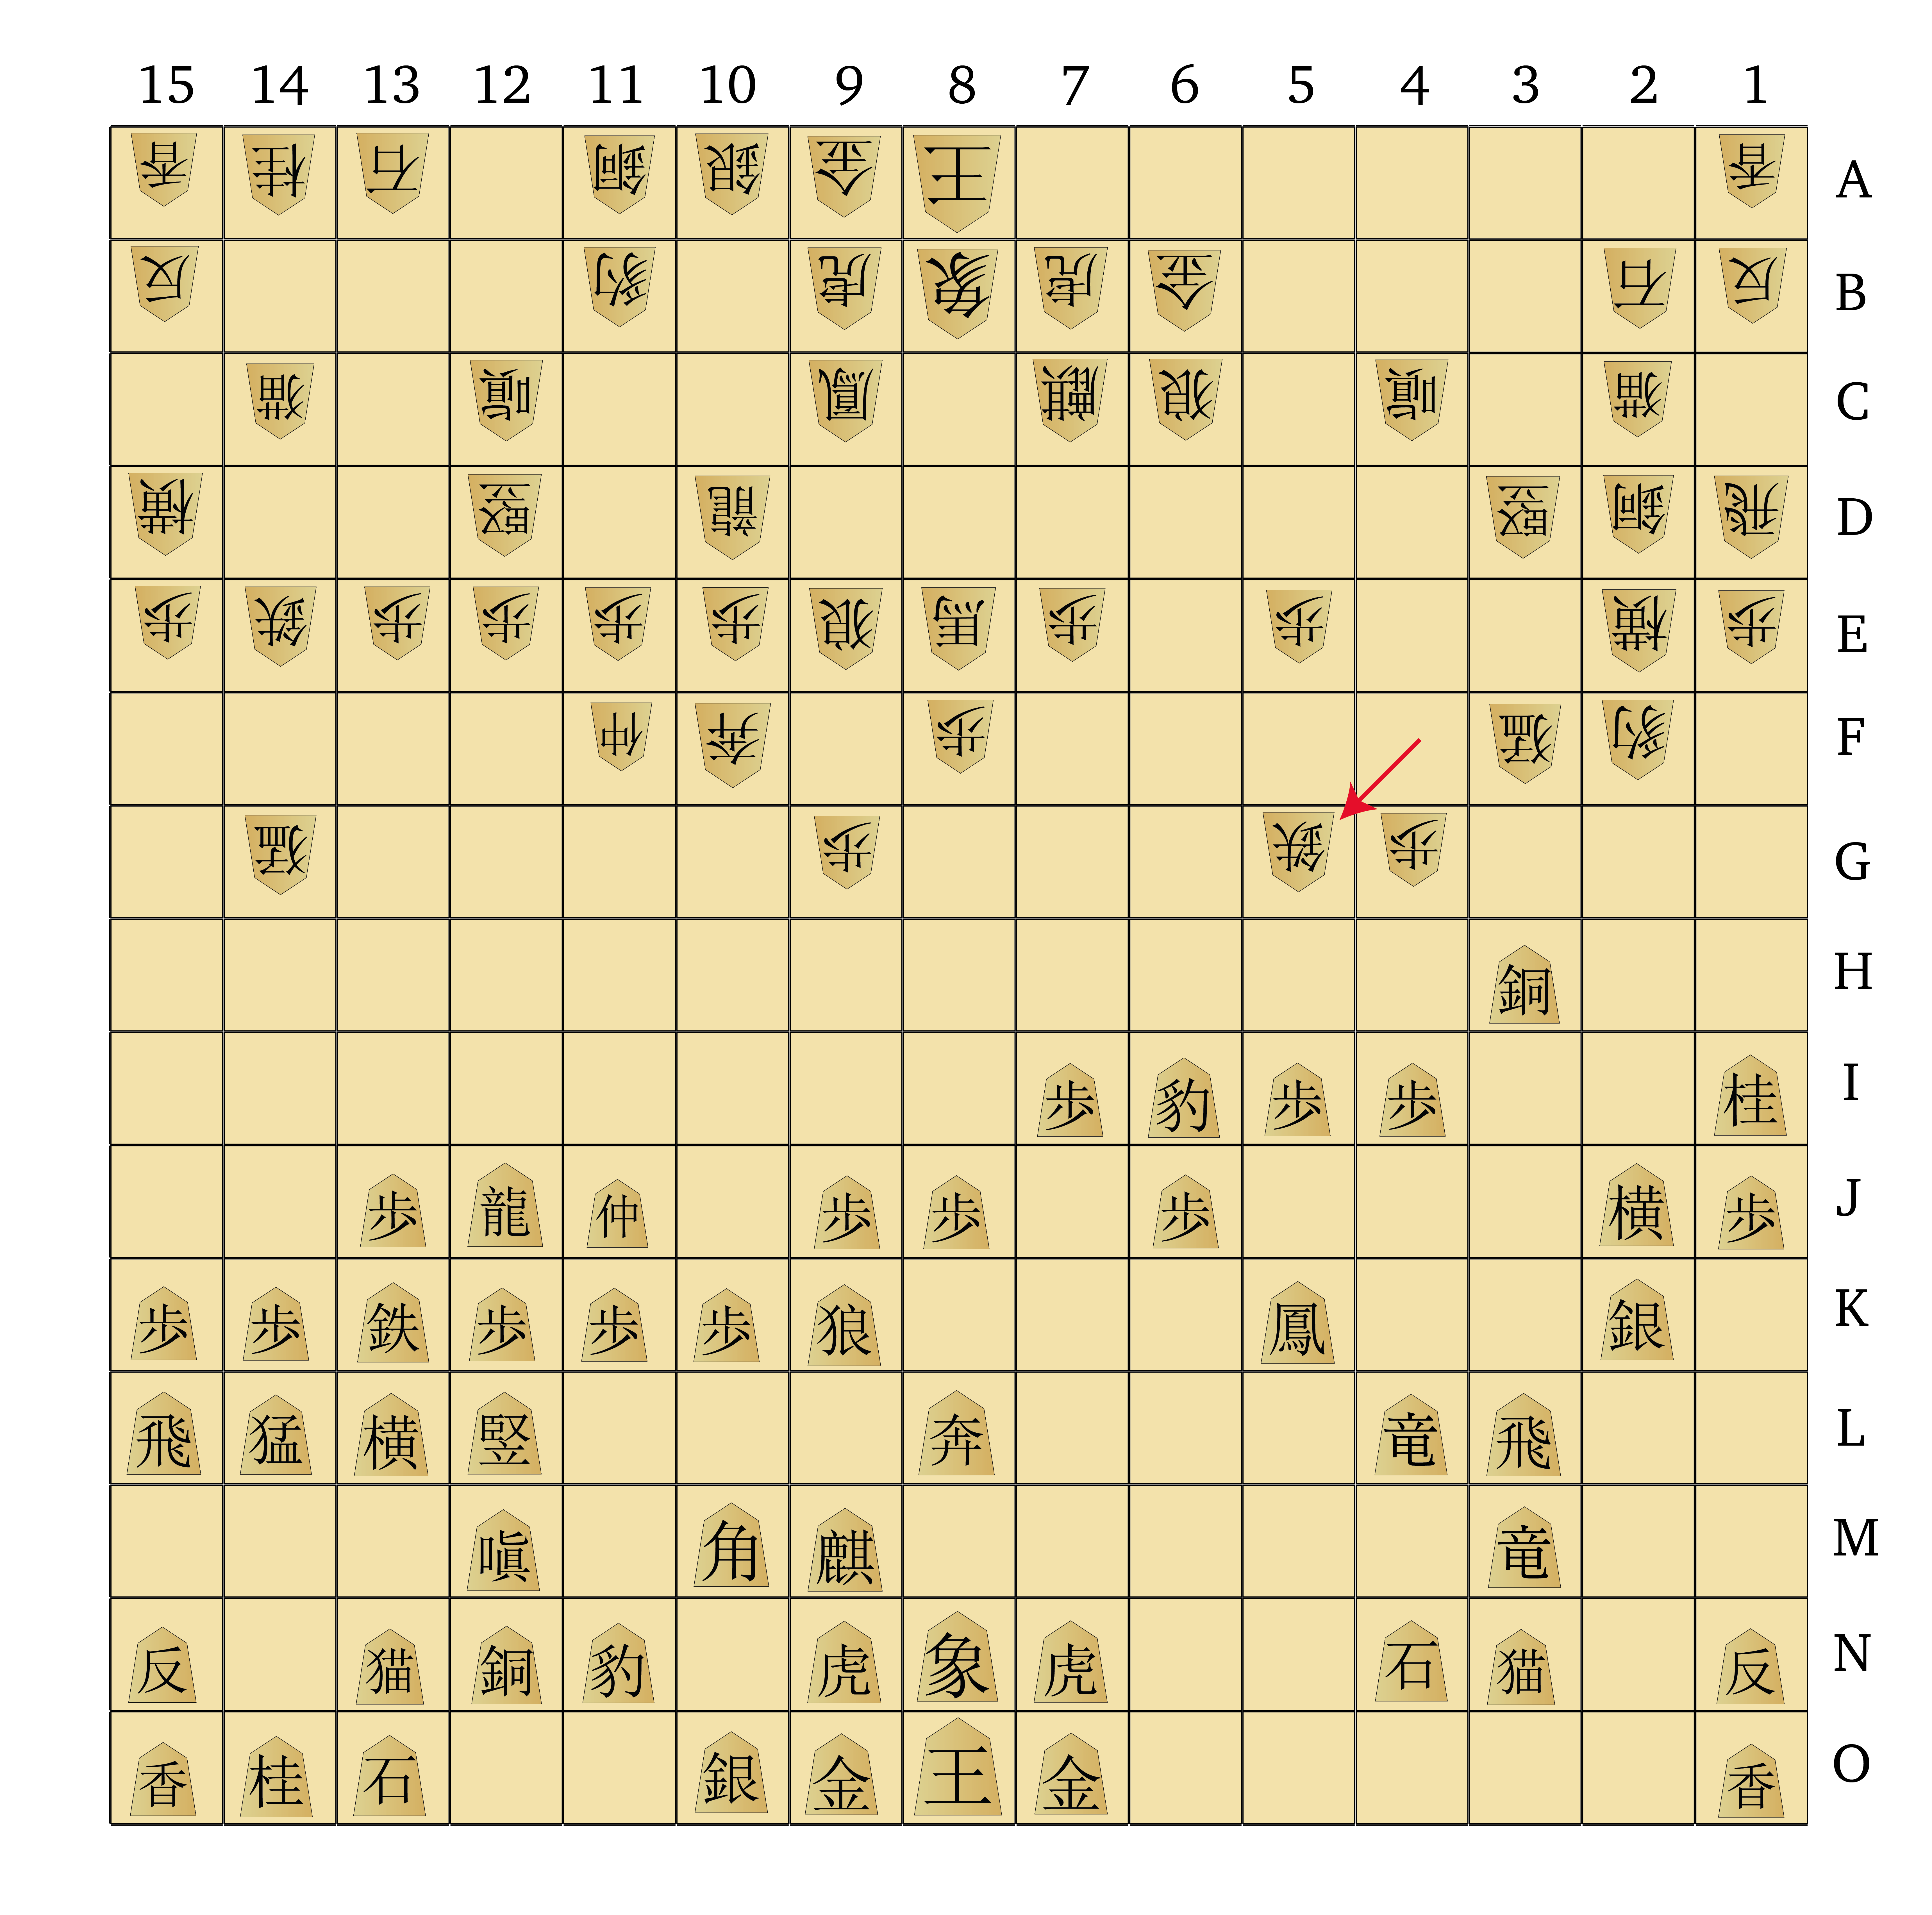
I started my plan by pushing the freshly-dropped Pawn on d6 forward, while Gote responded by advancing pieces out of the right flank to pressure me from the other side:
On move 145 my Pawn has promoted to Tokin, putting pressure on Gote to respond. Gote elects to exchange the Vermillion Sparrows, so I recaptured with my Fragrant Elephant, which Gote then took with their White Tiger. Rather than take that, I elected to press the Tokin forward, punching a hole in Gote’s defensive formation around their King:
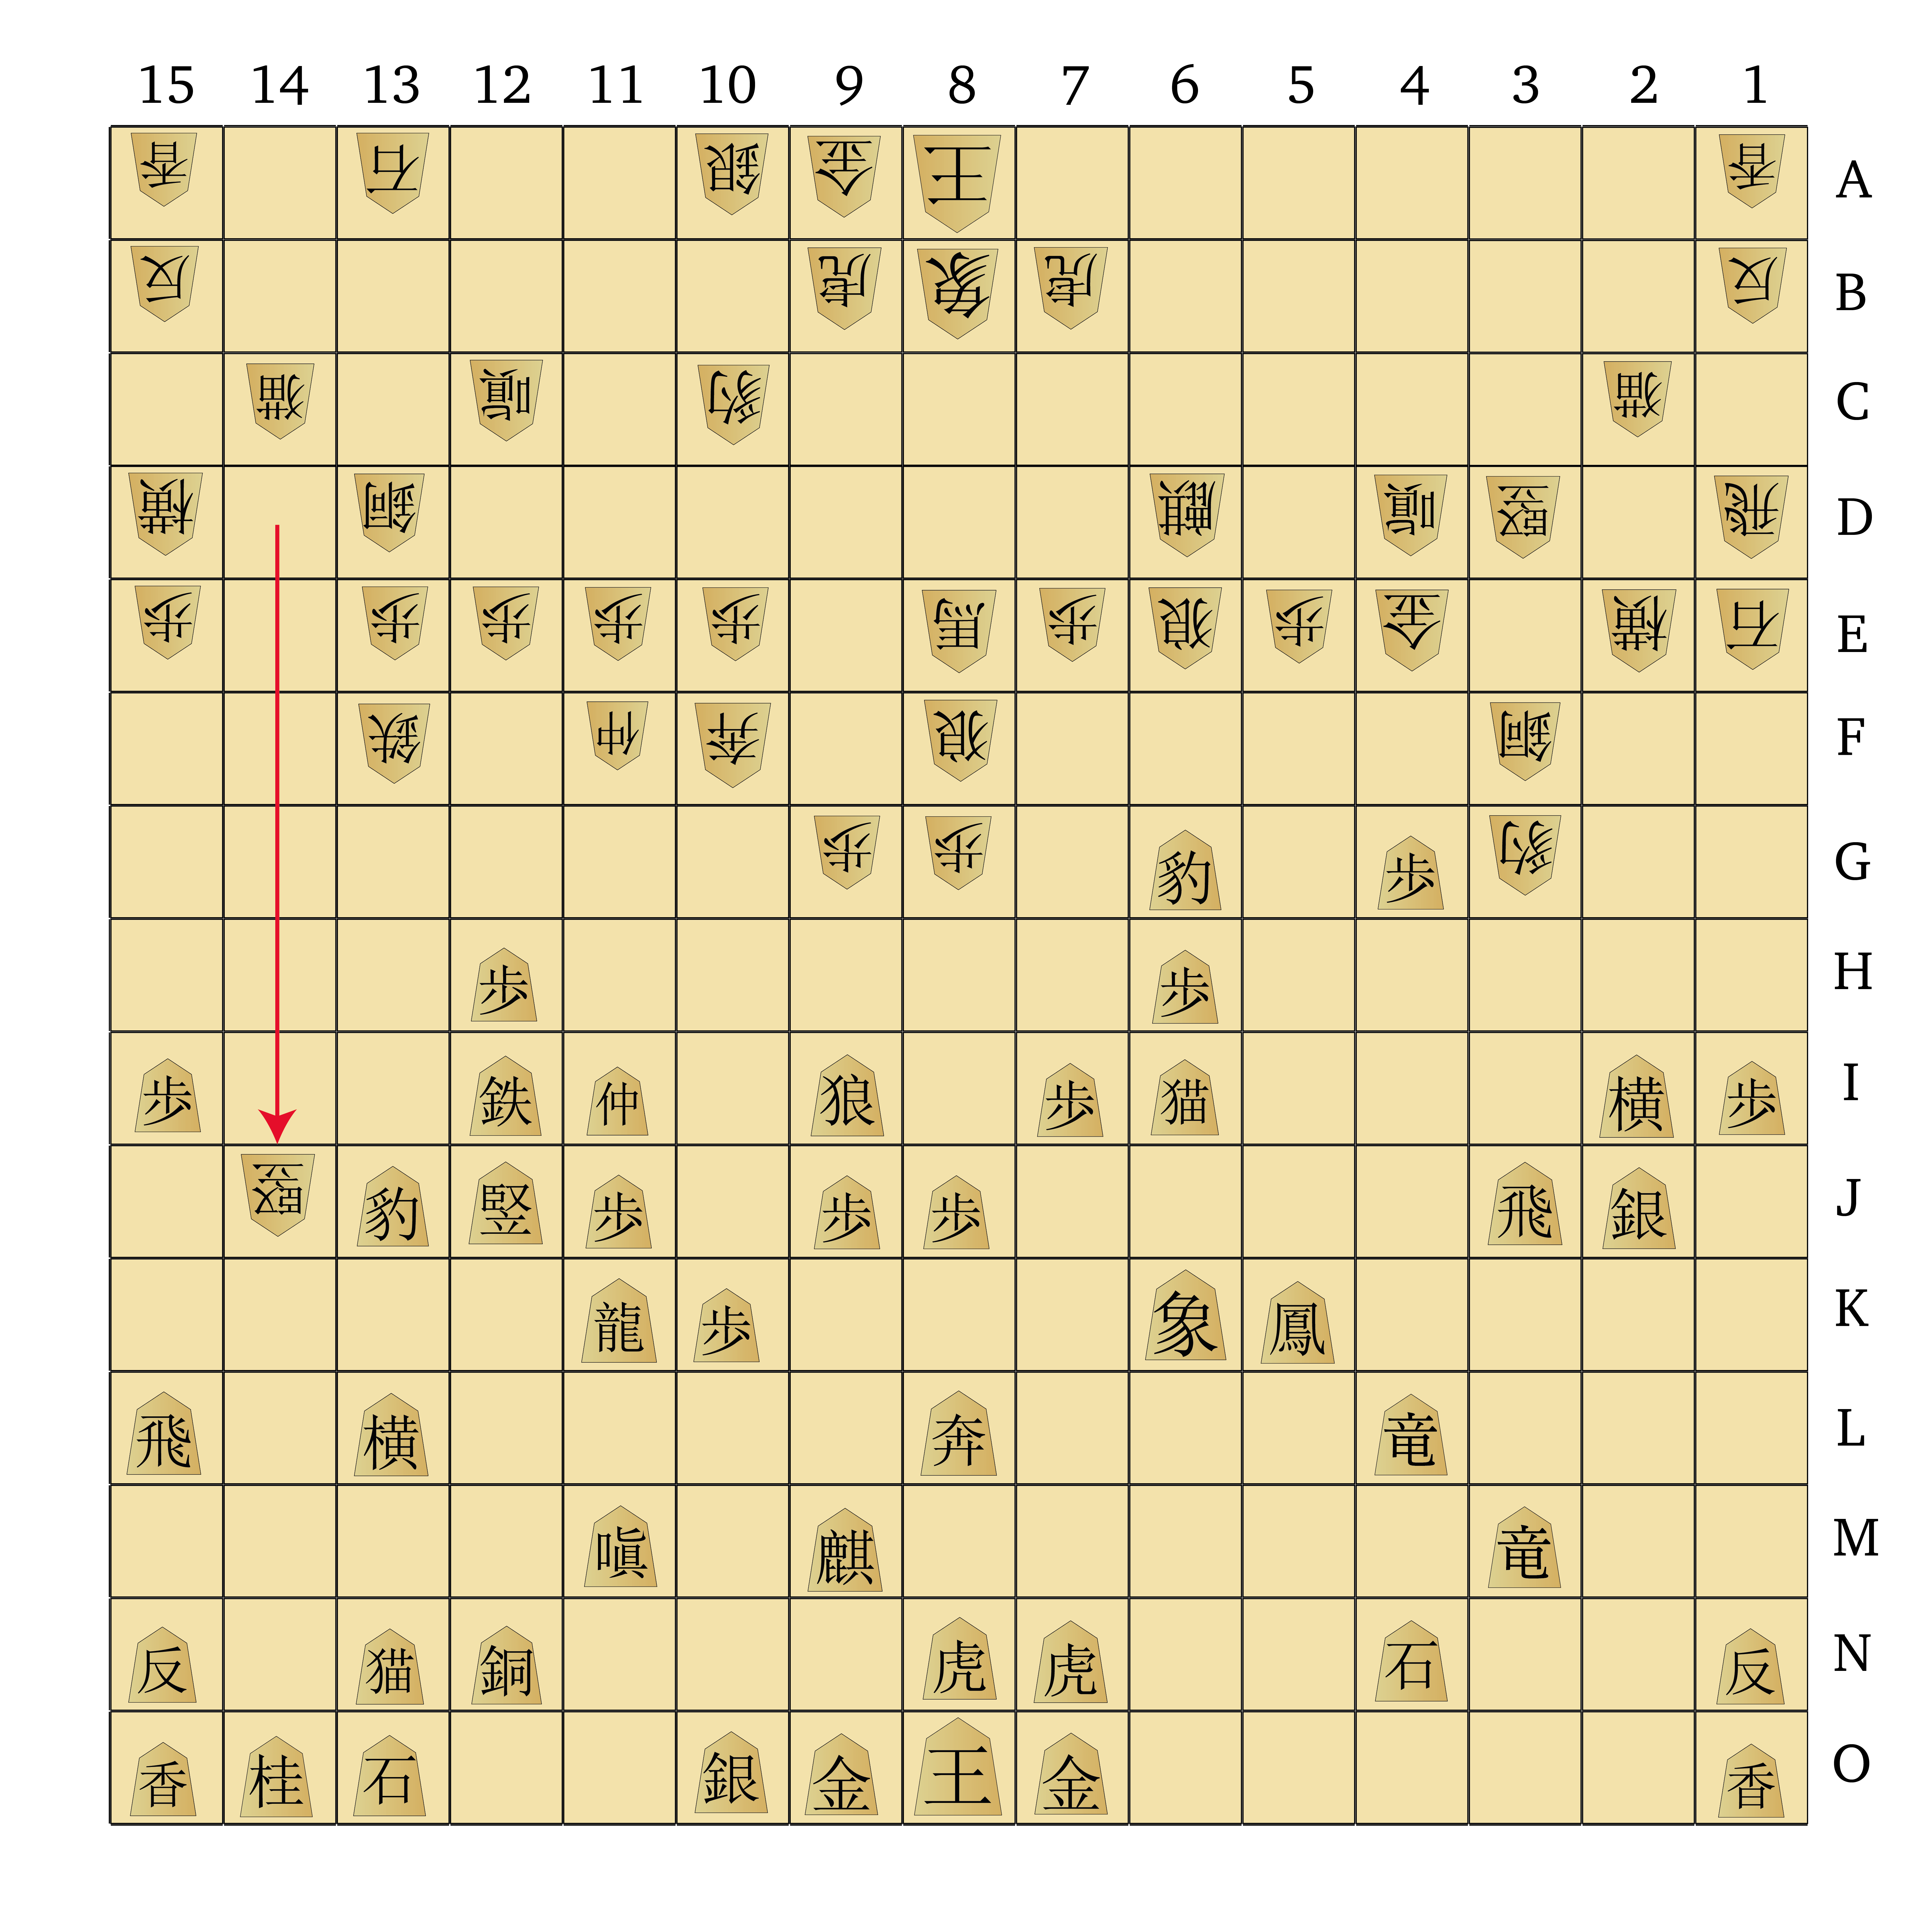
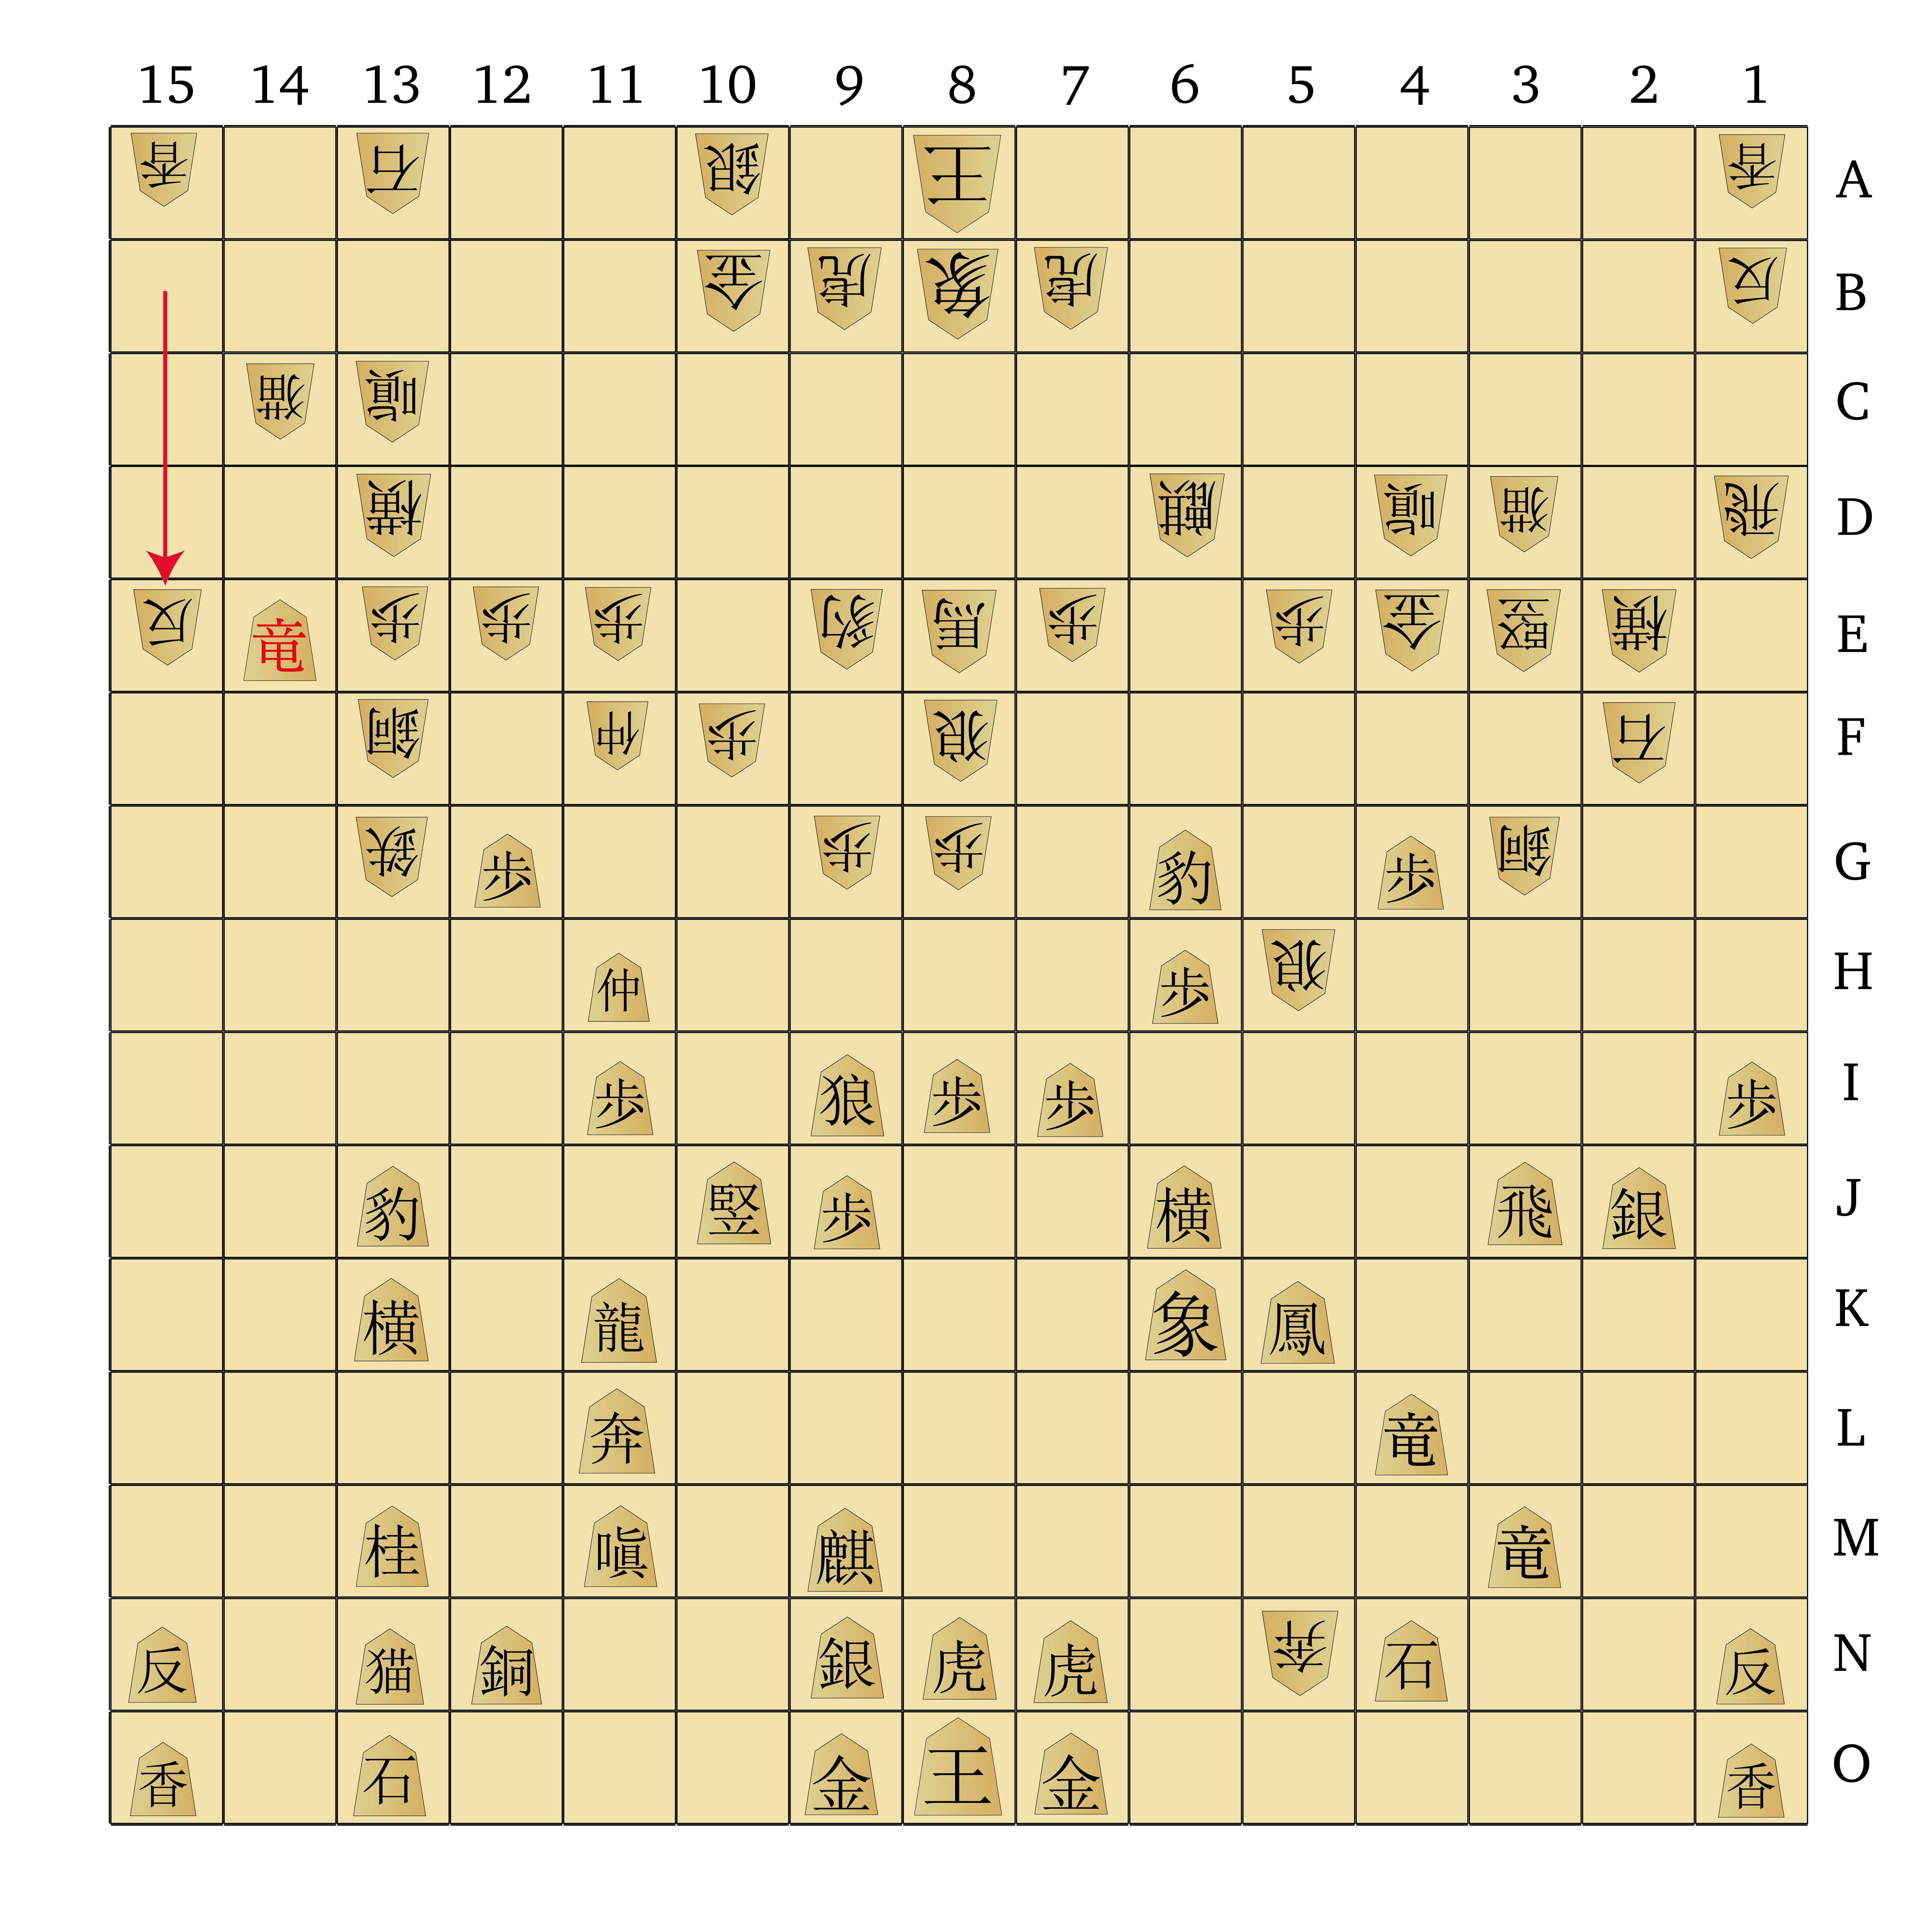
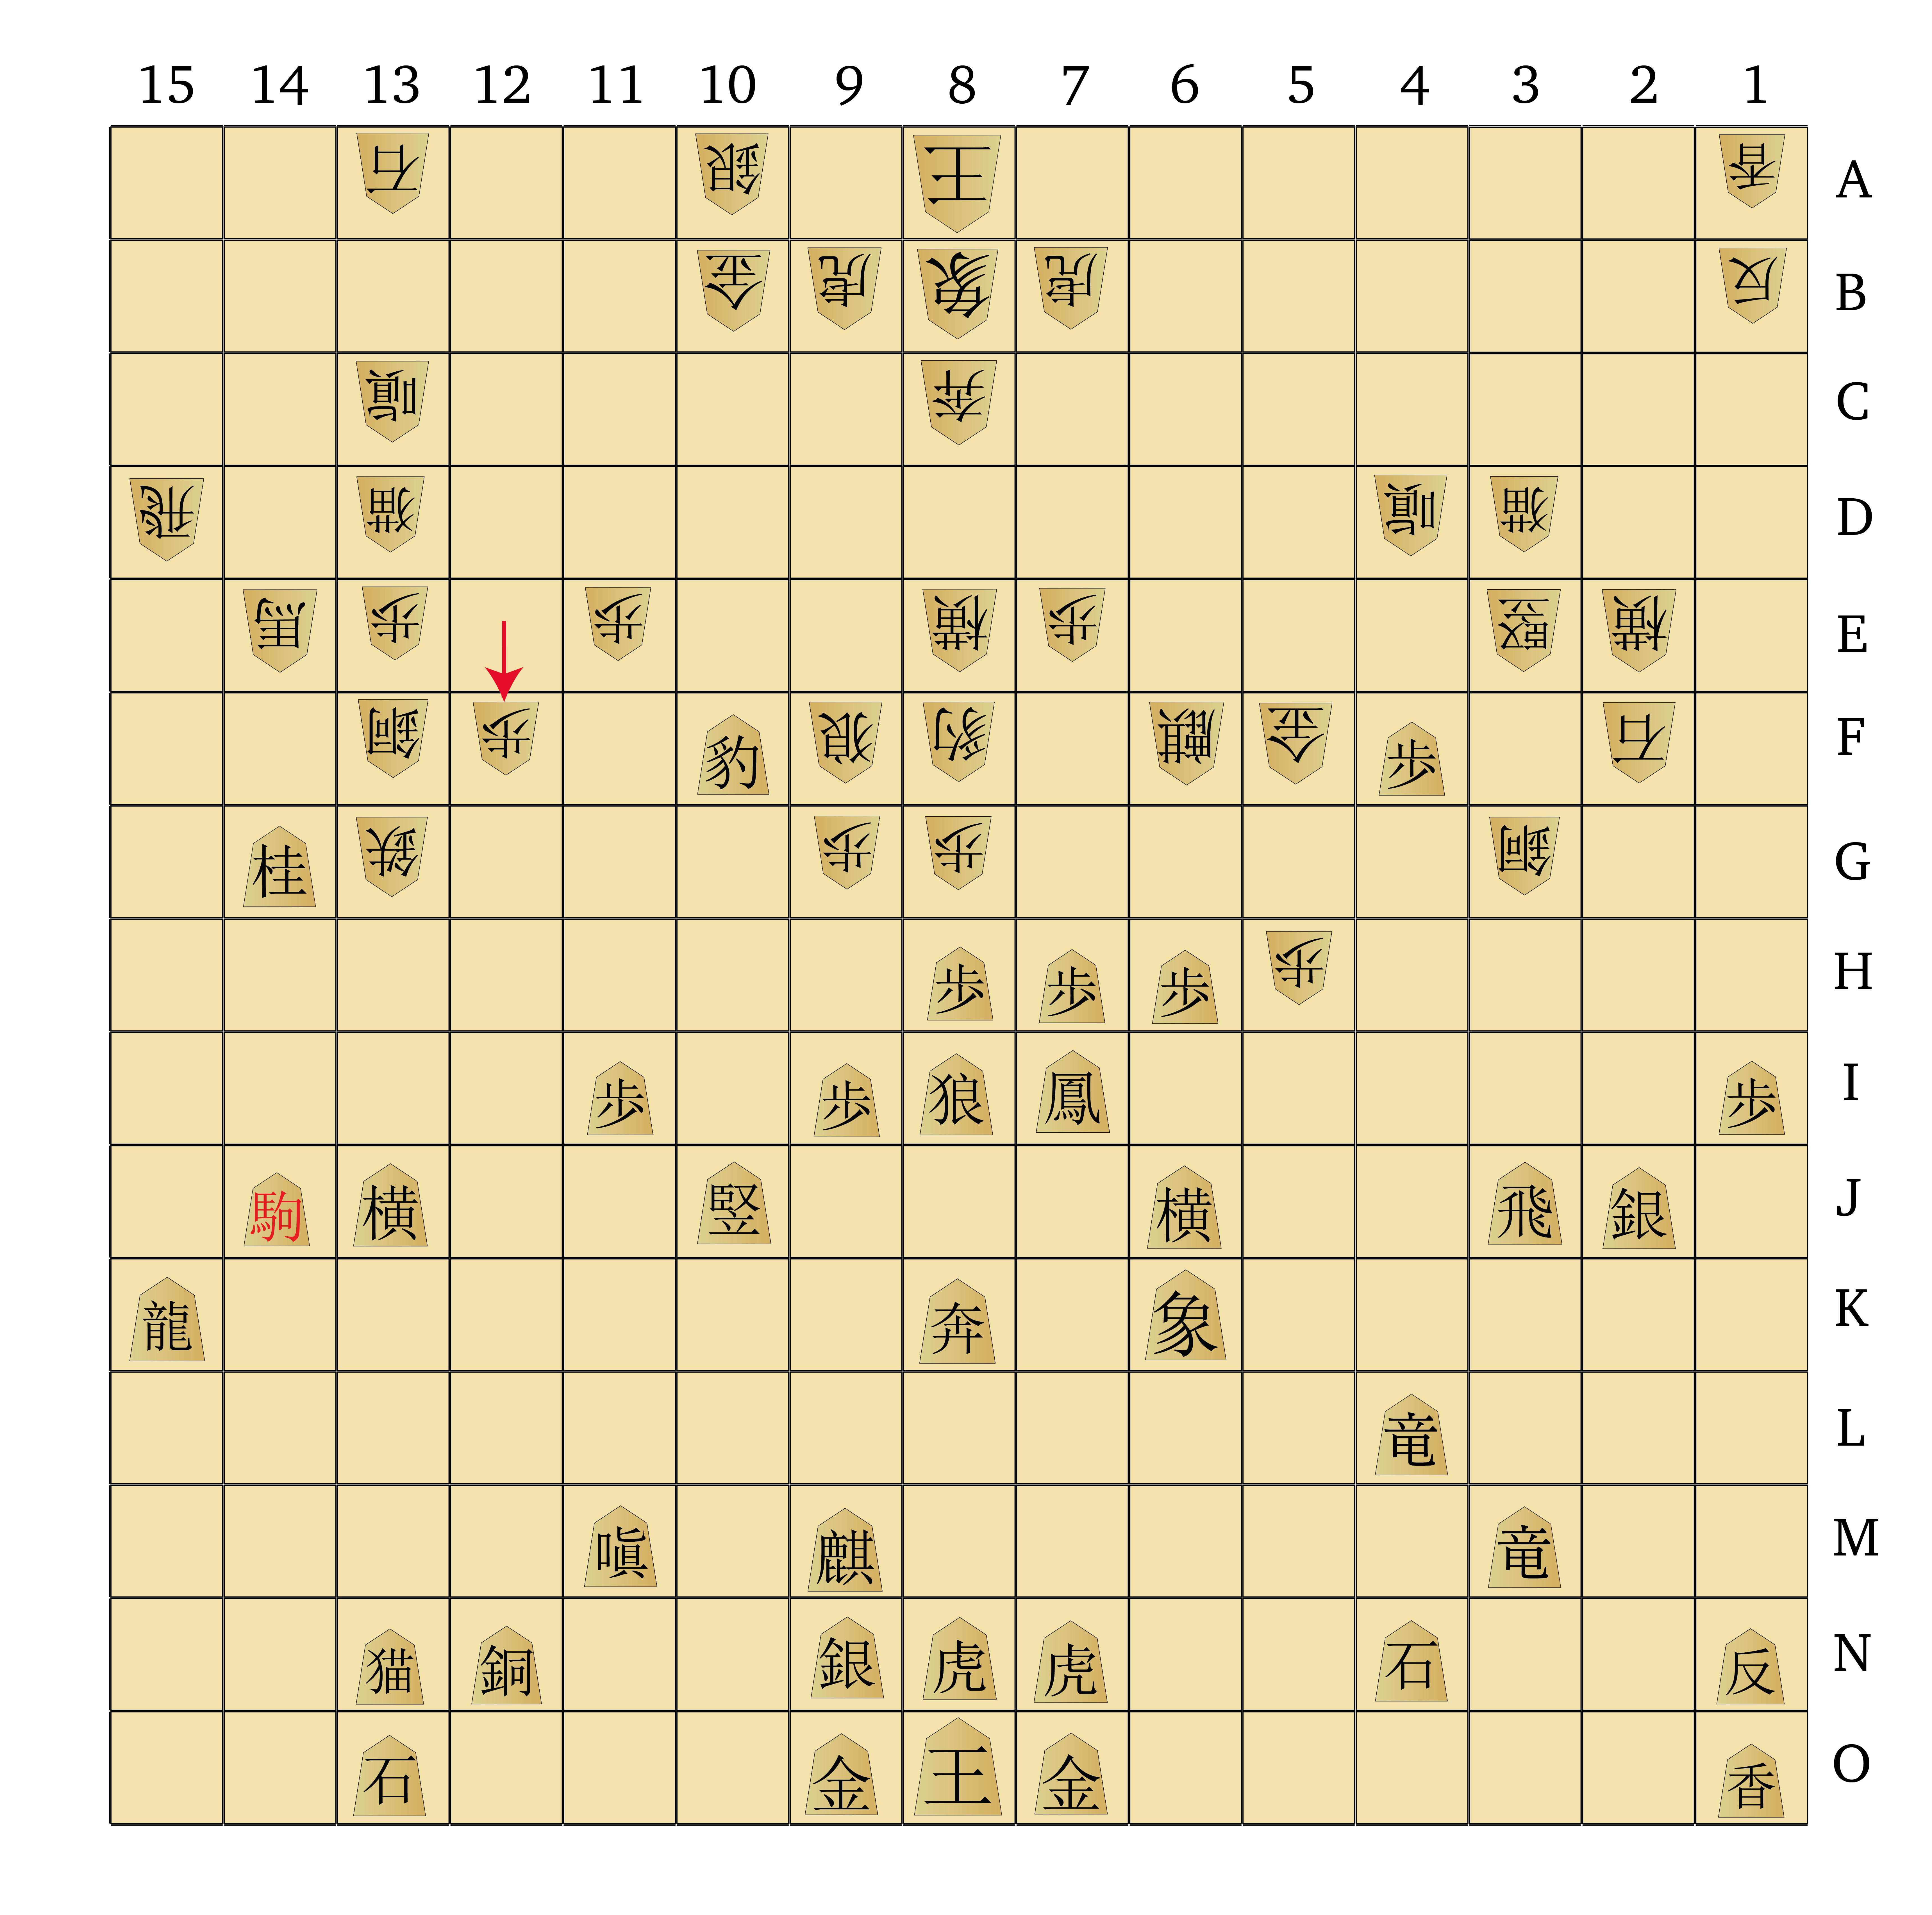
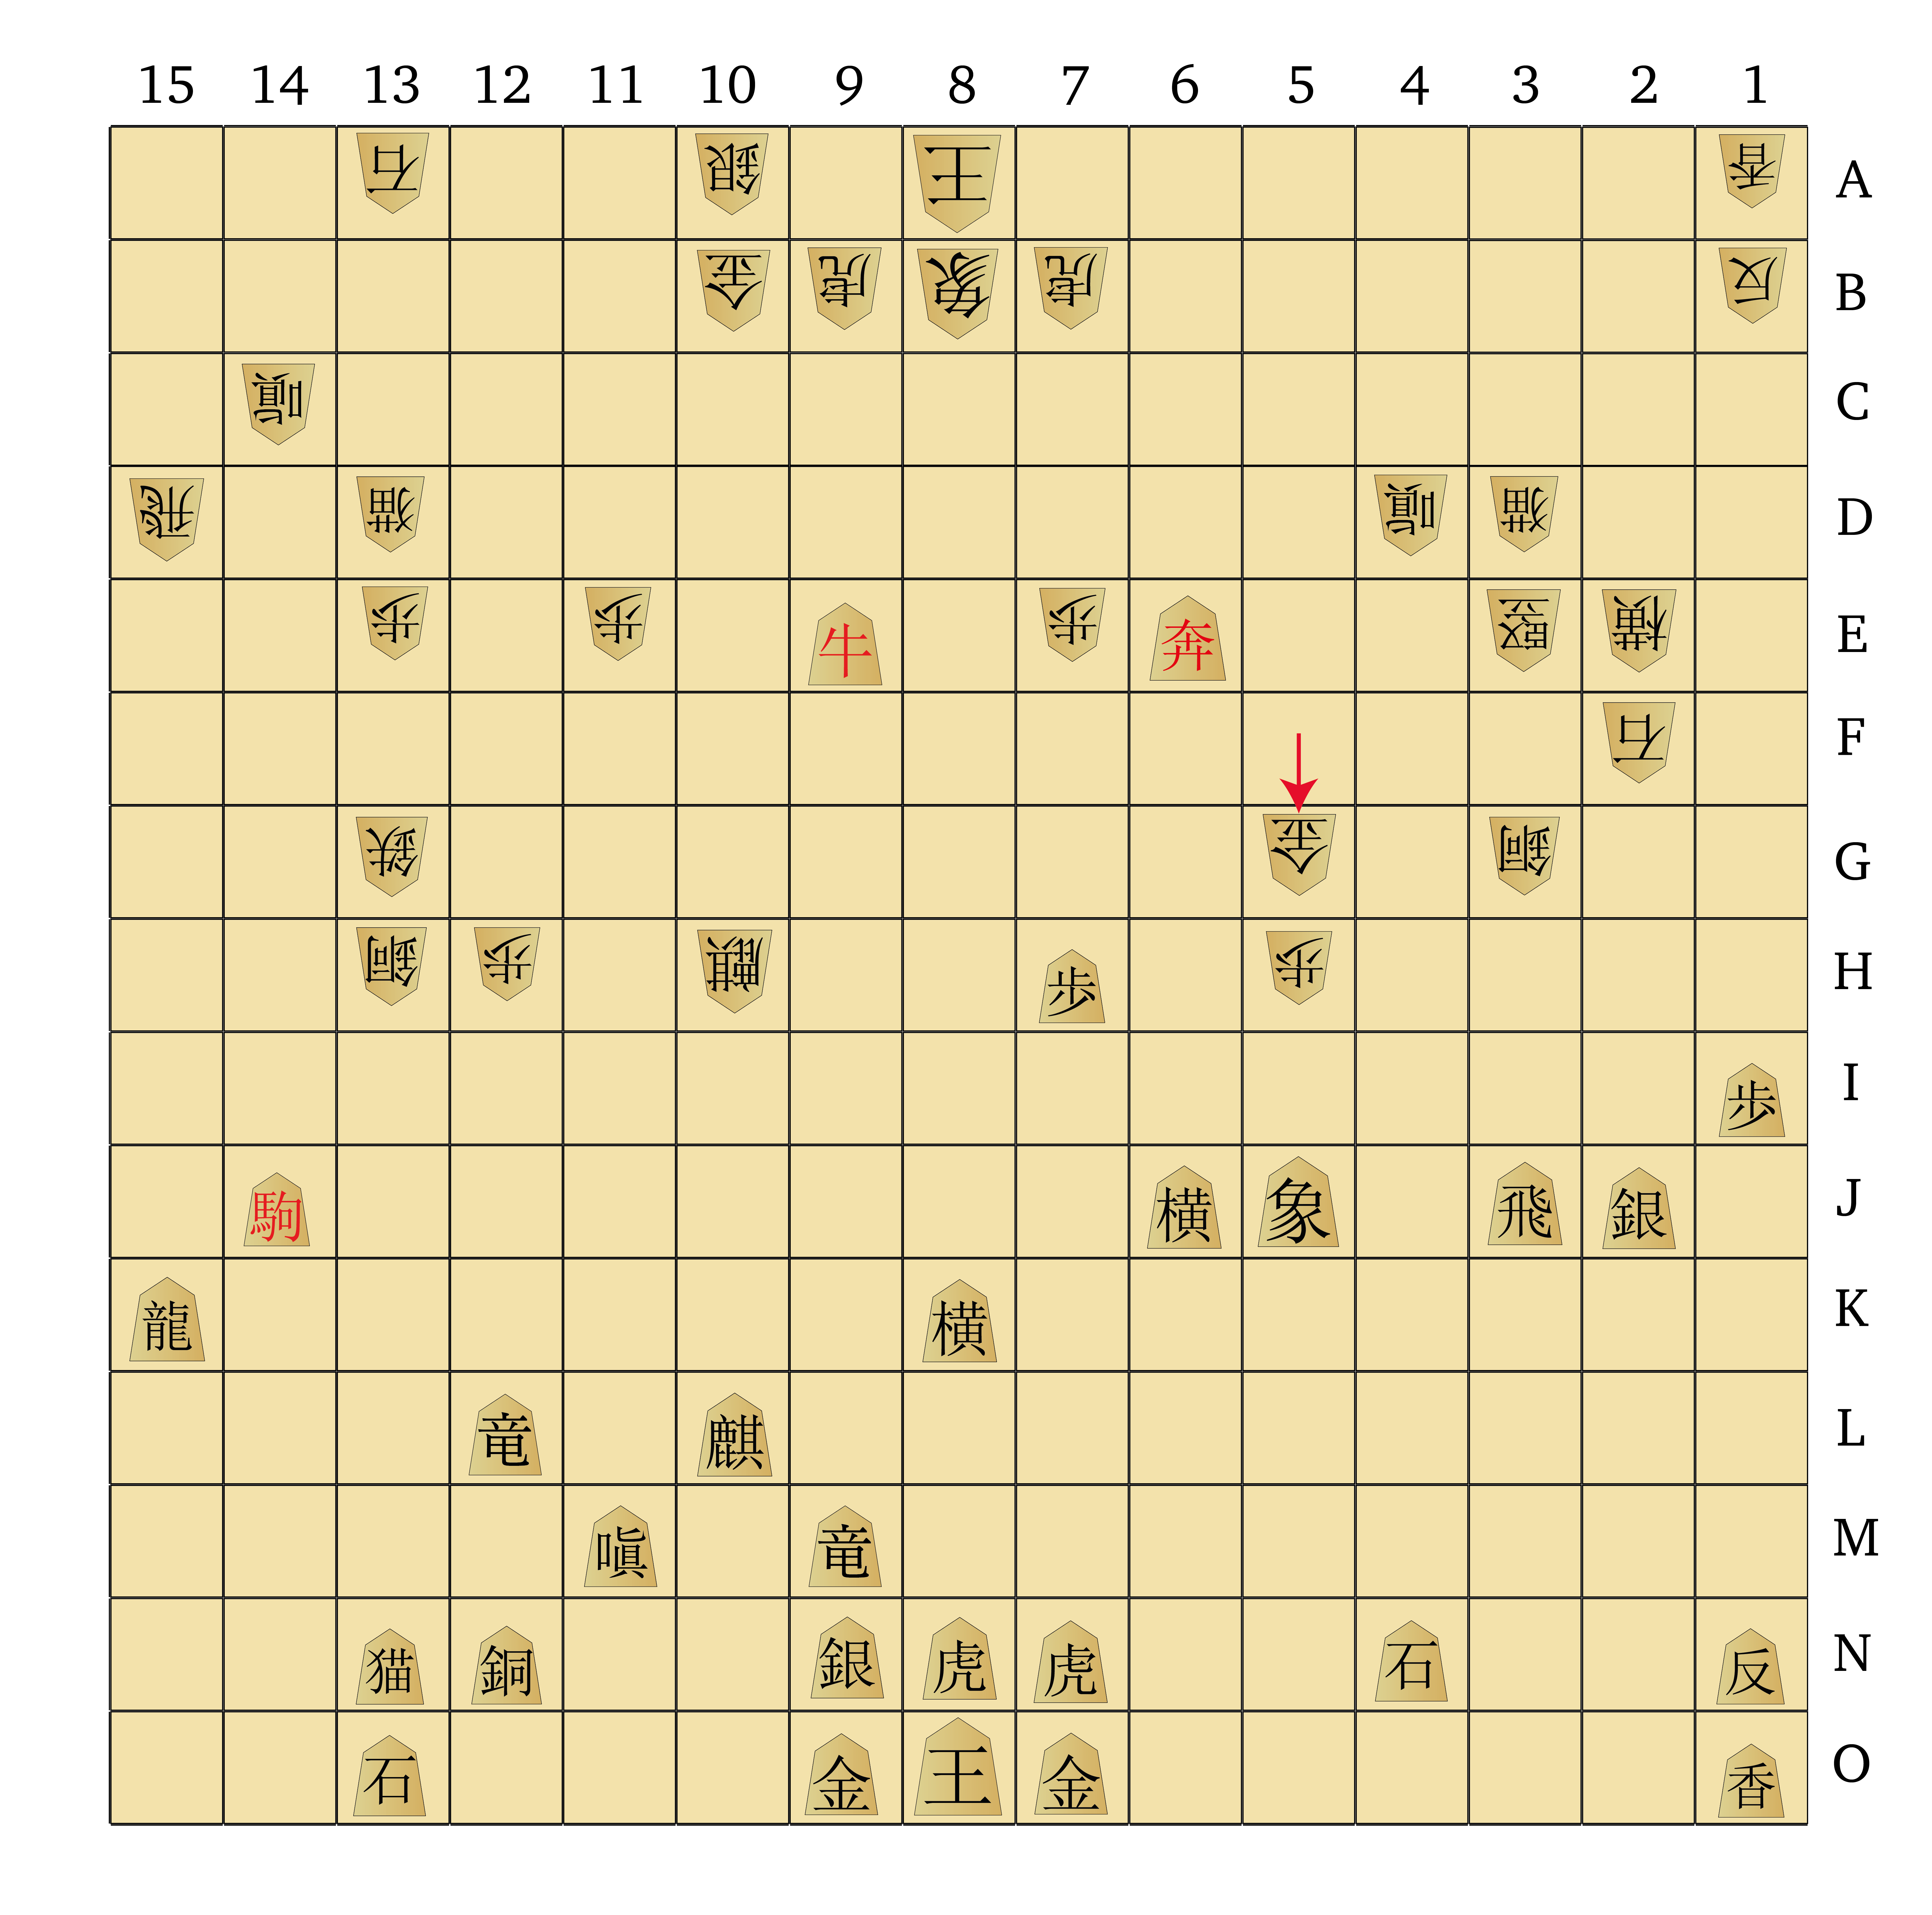
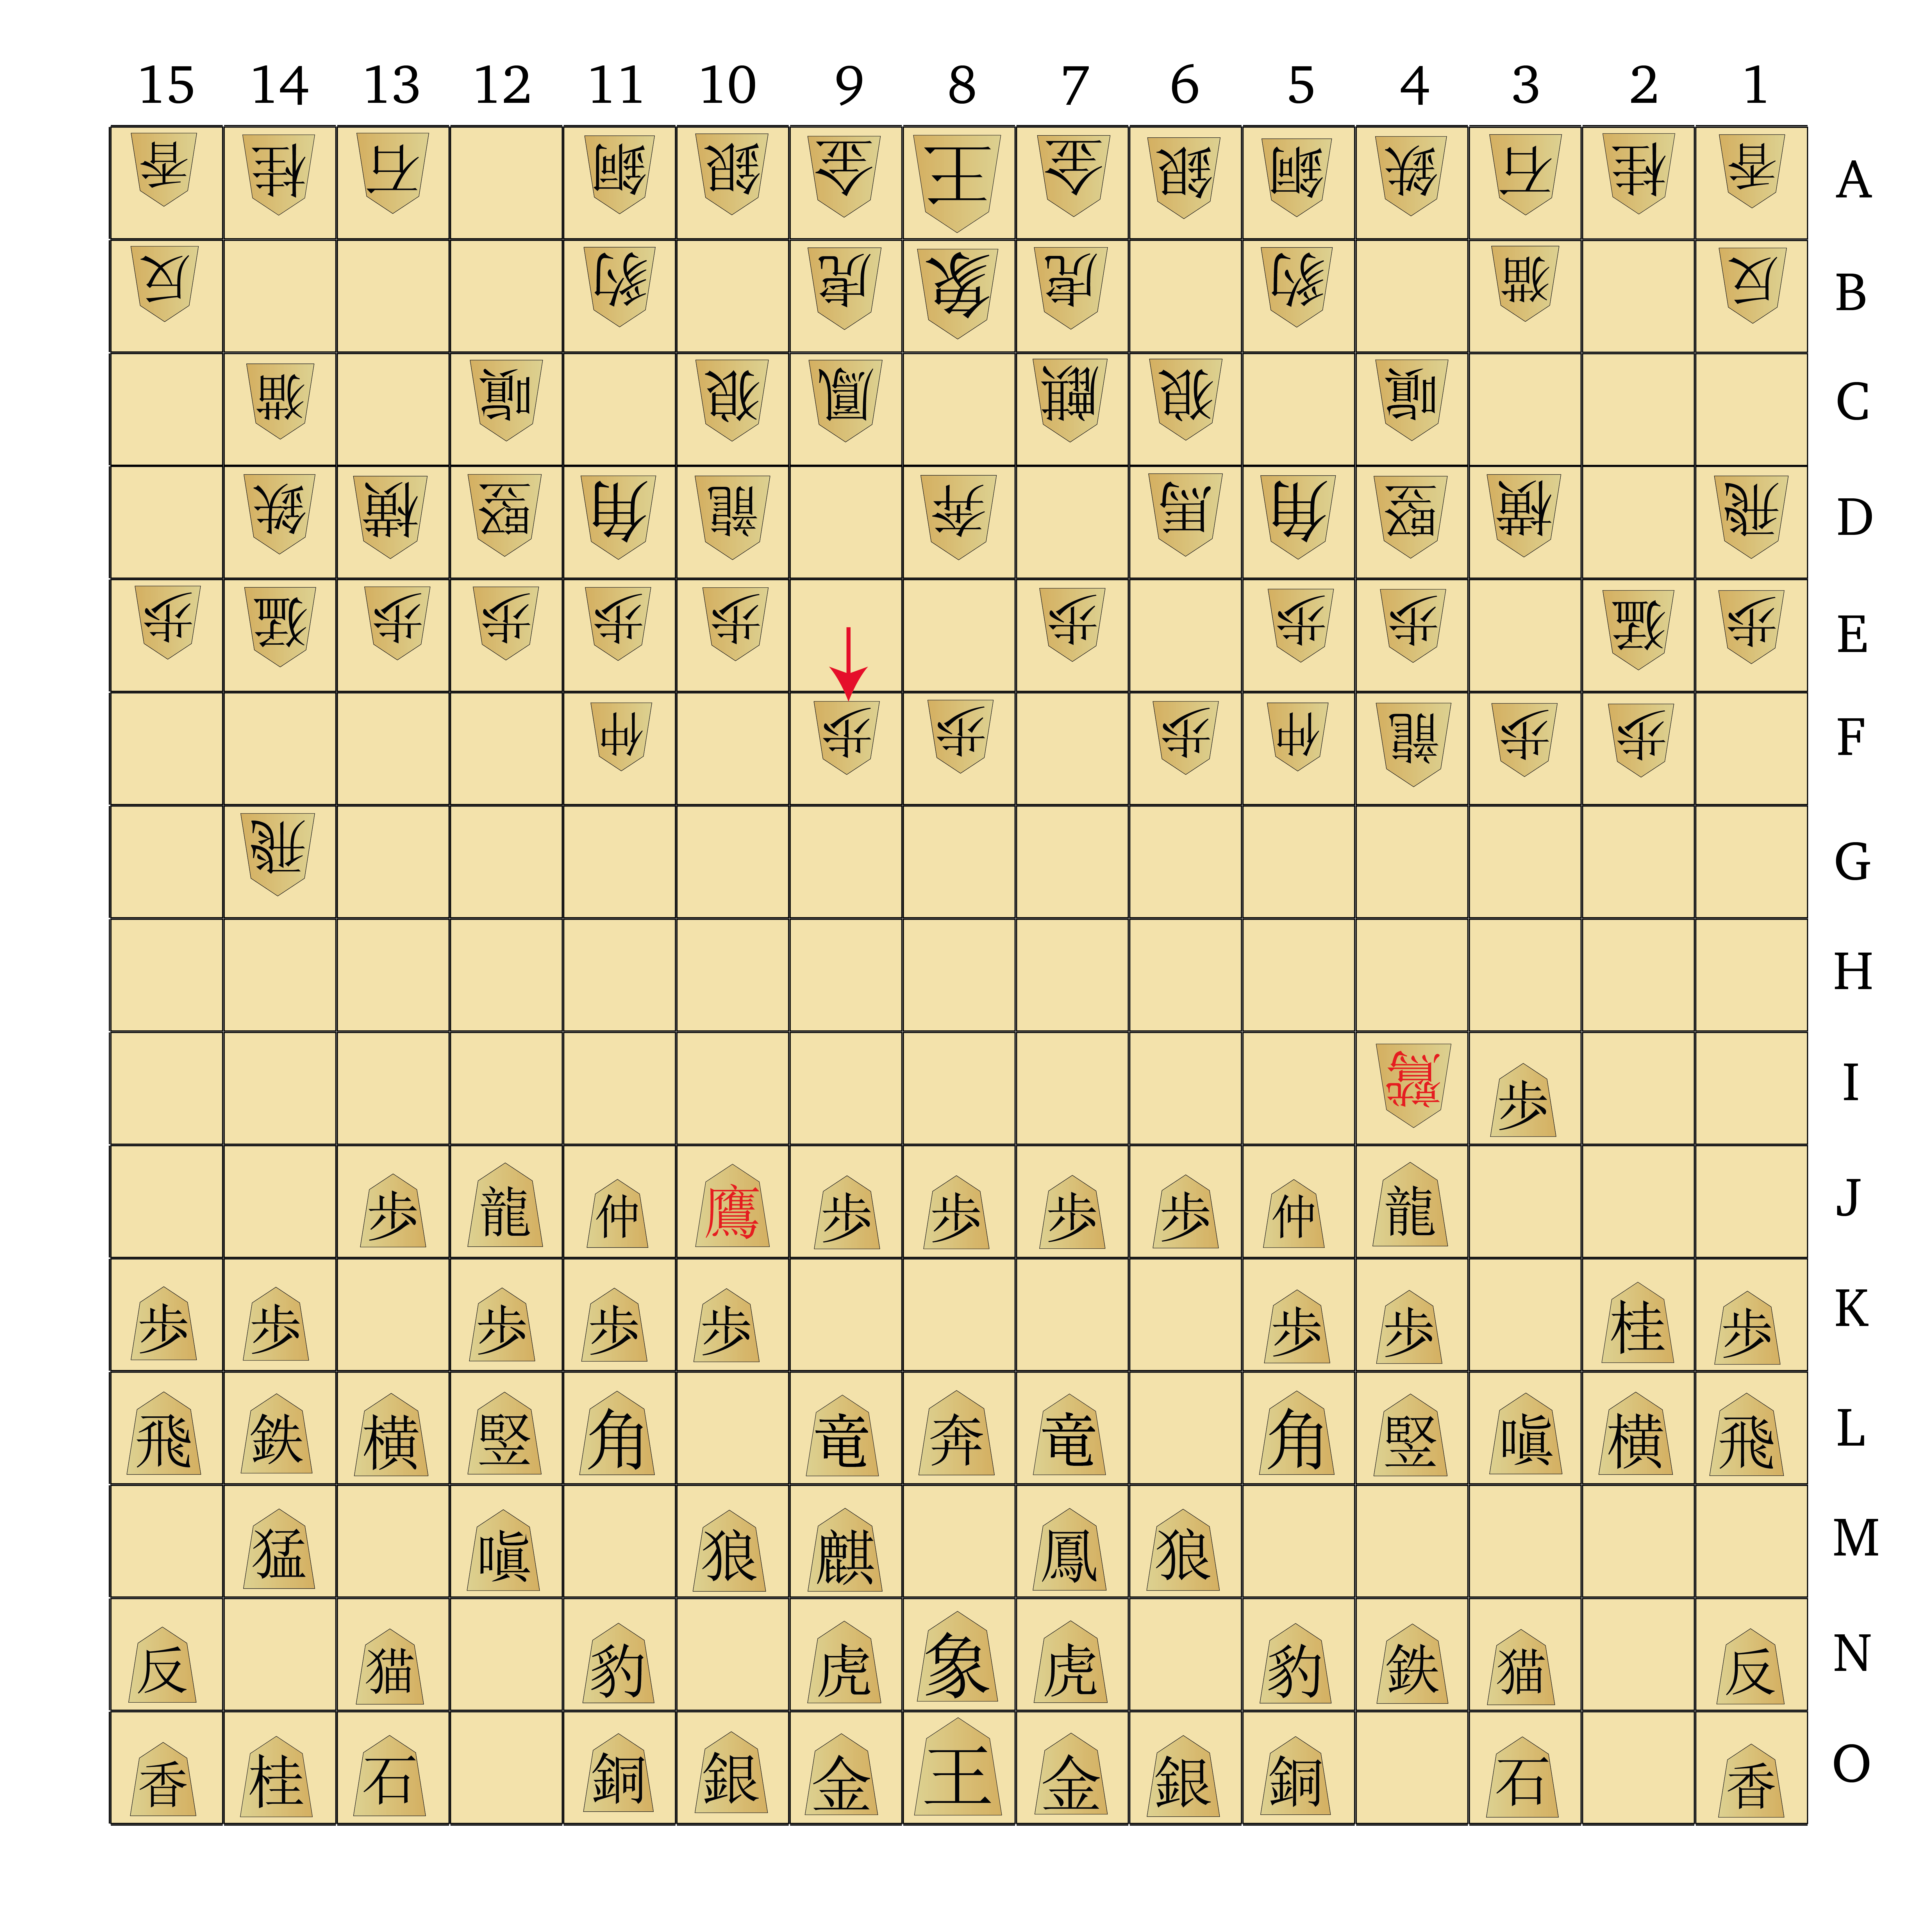
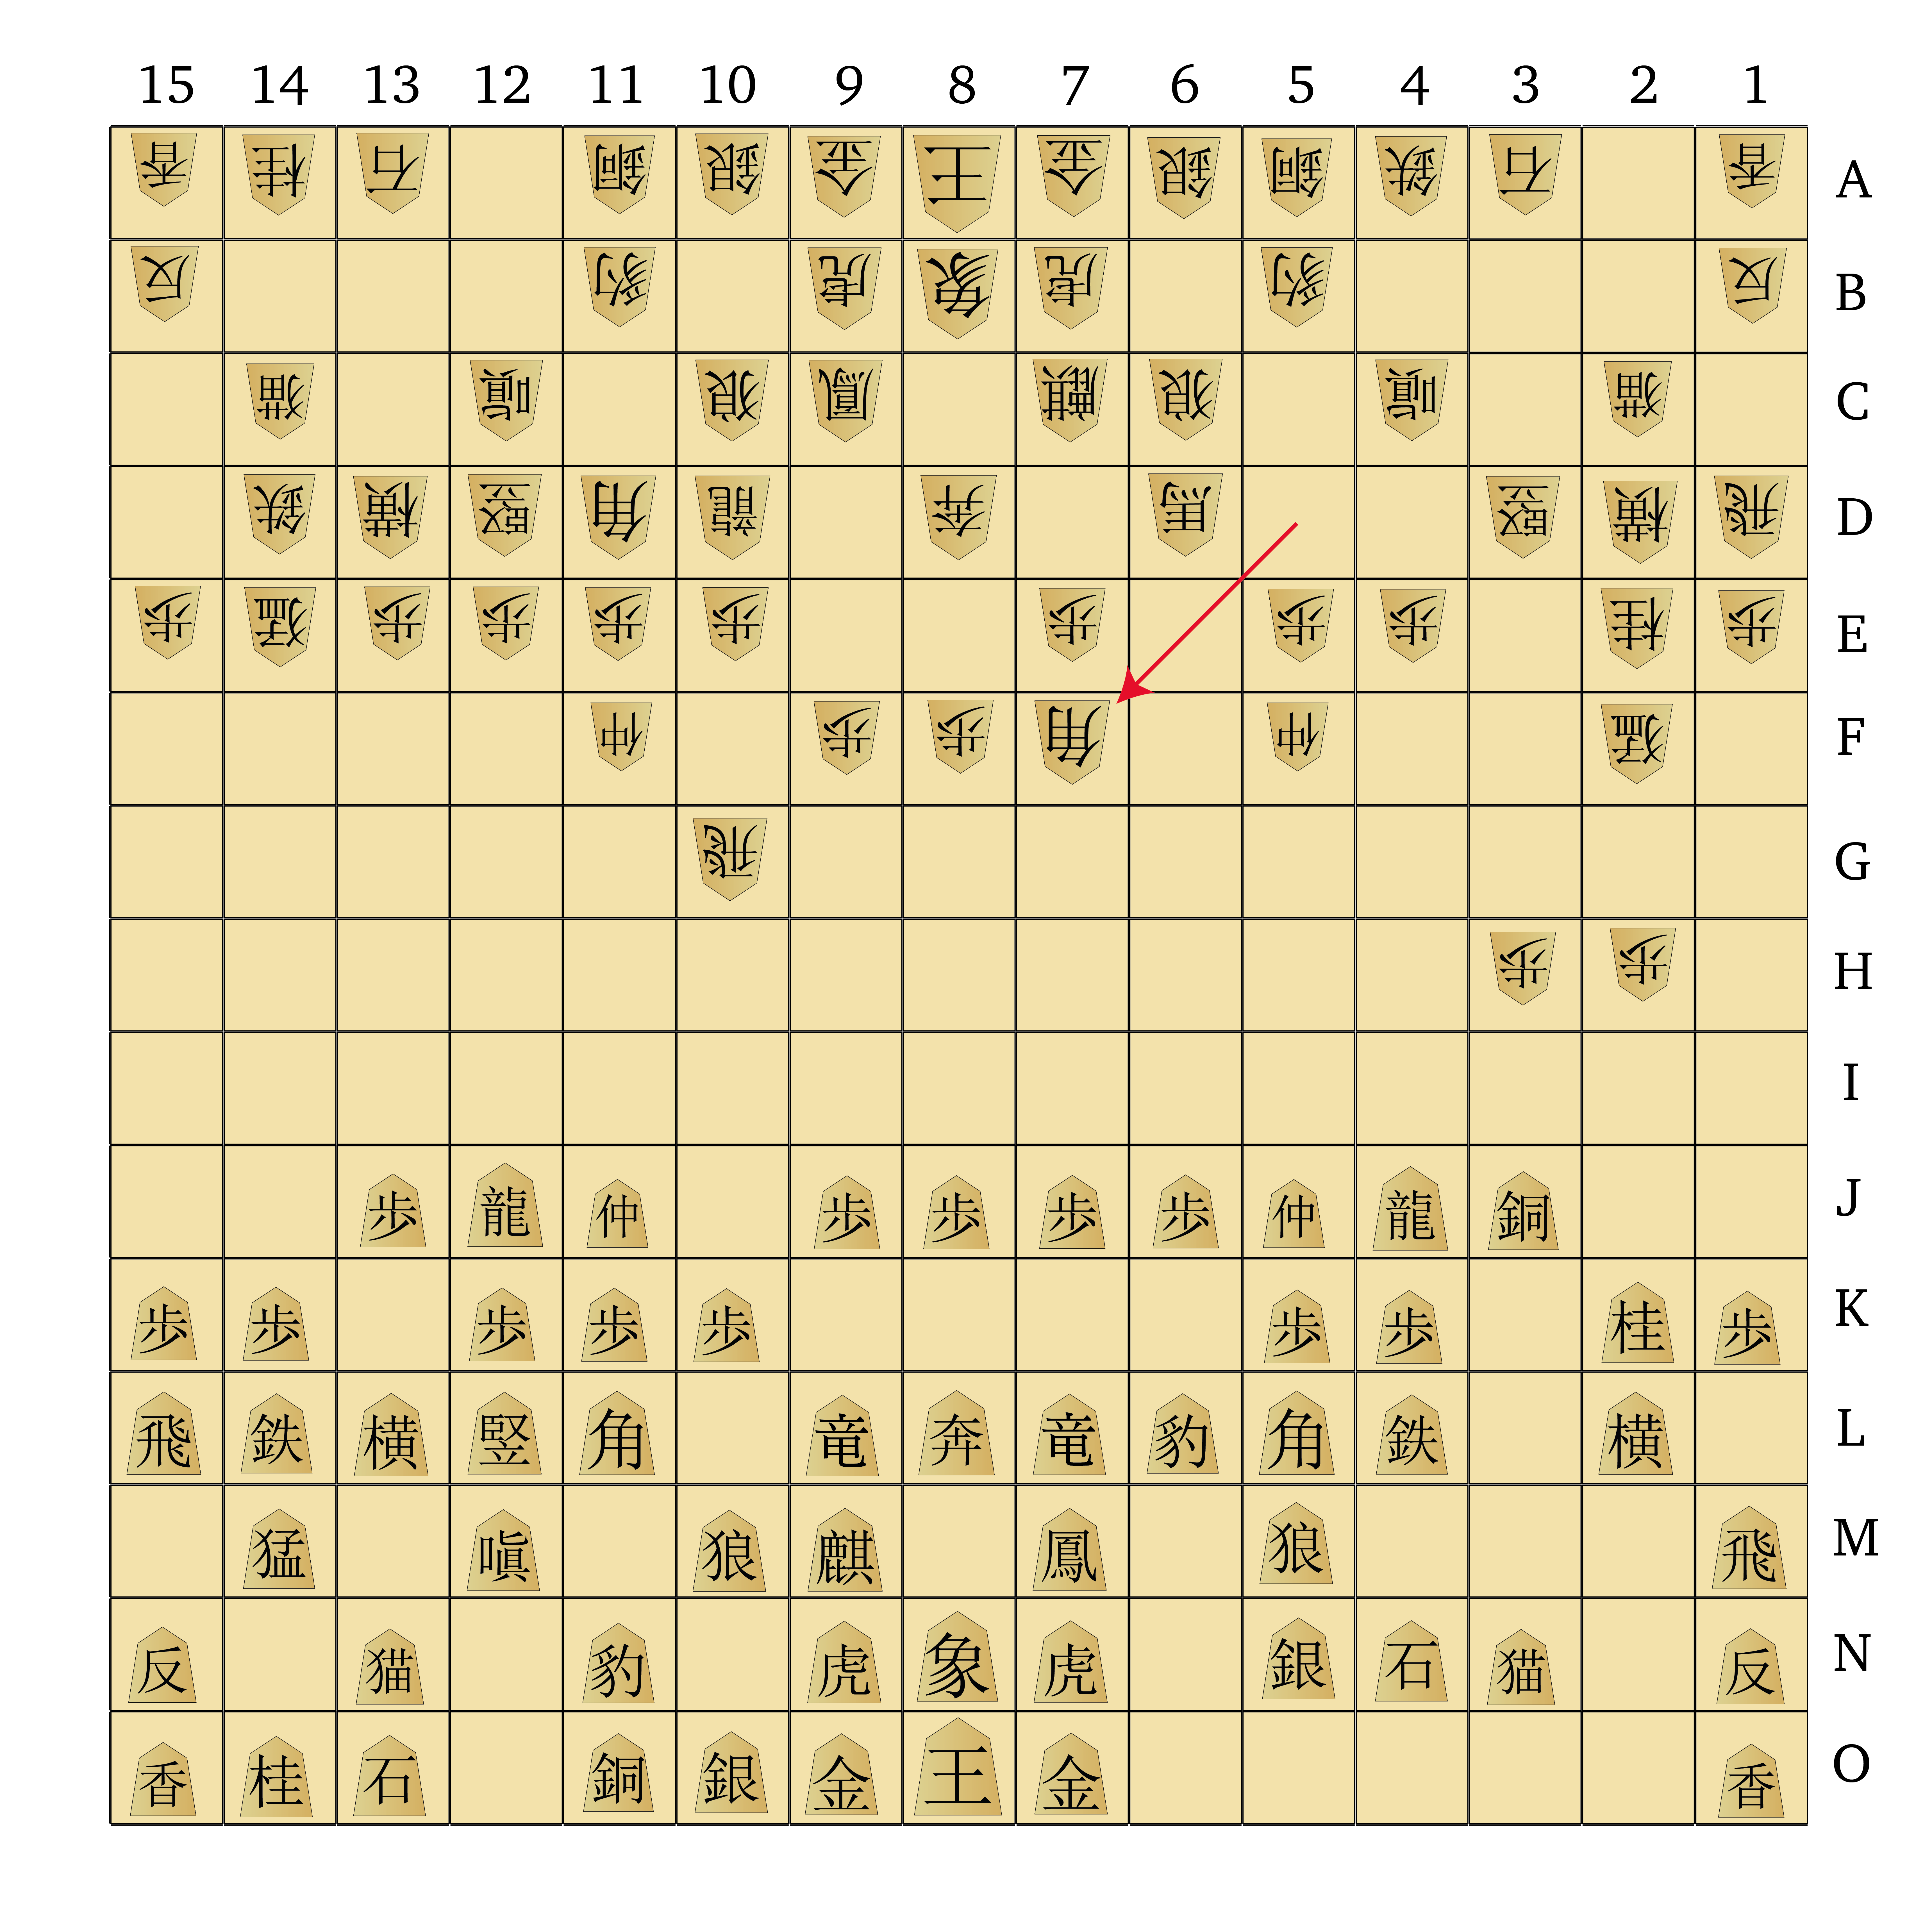
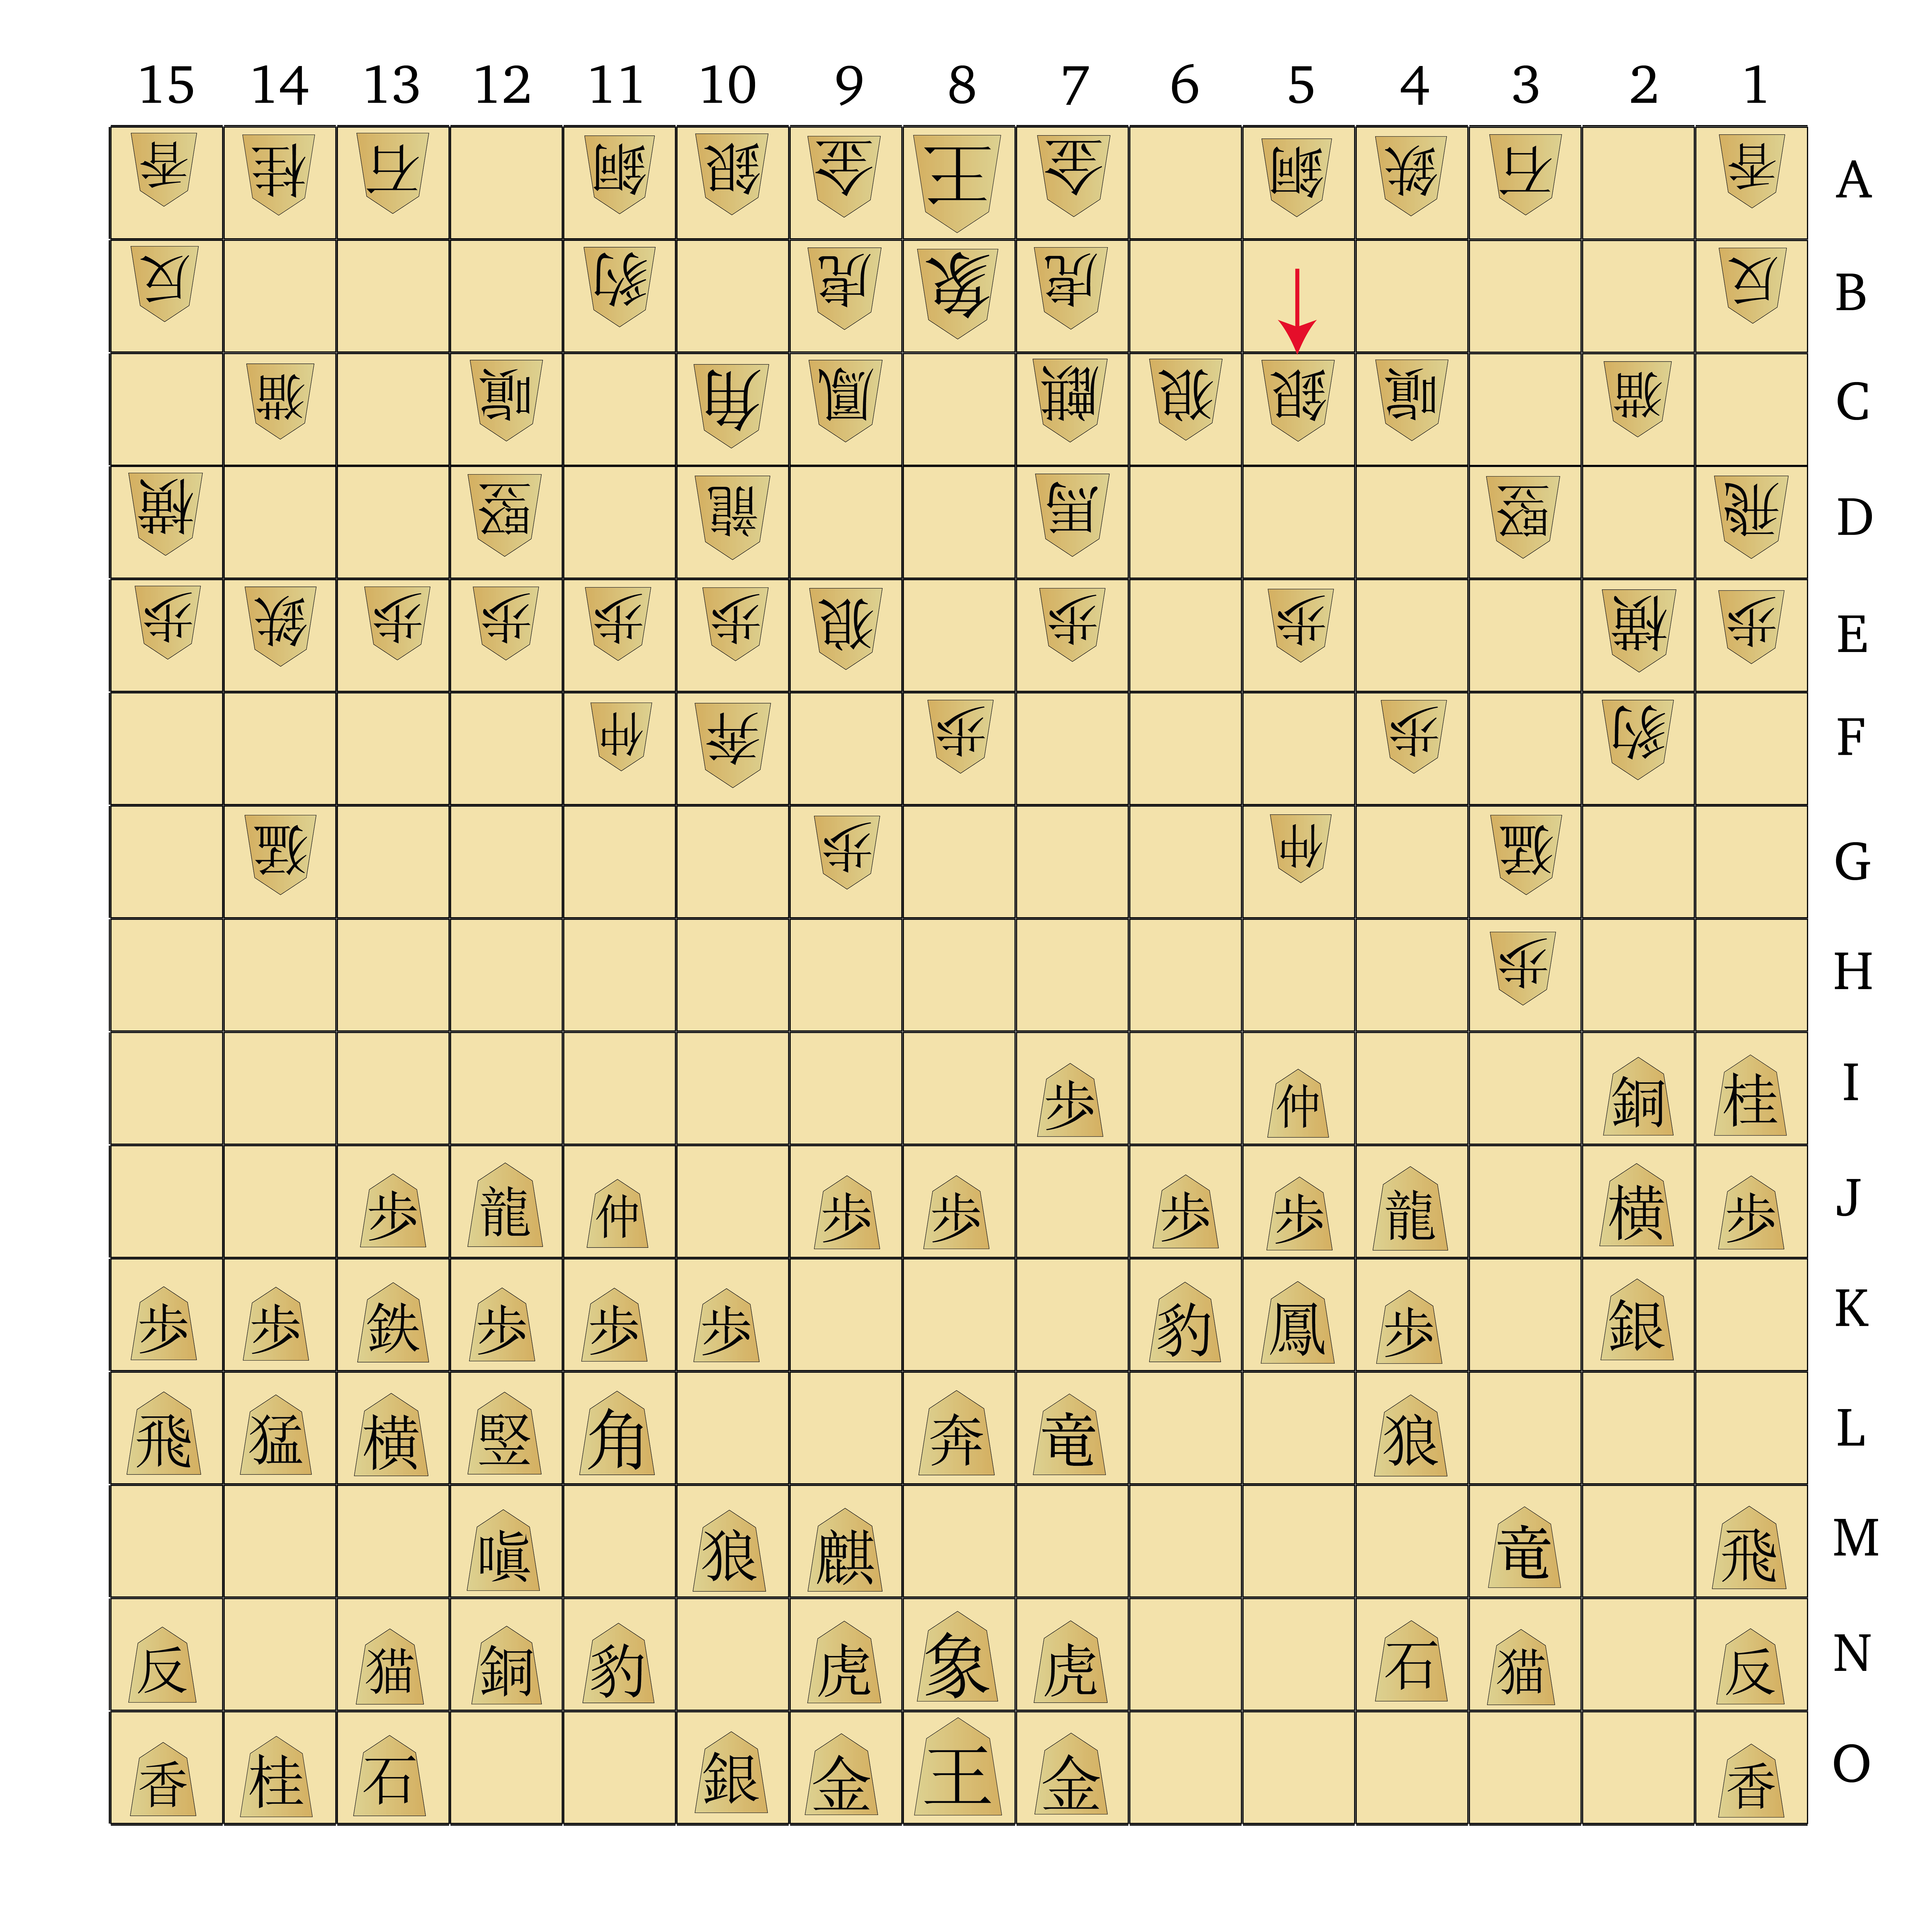
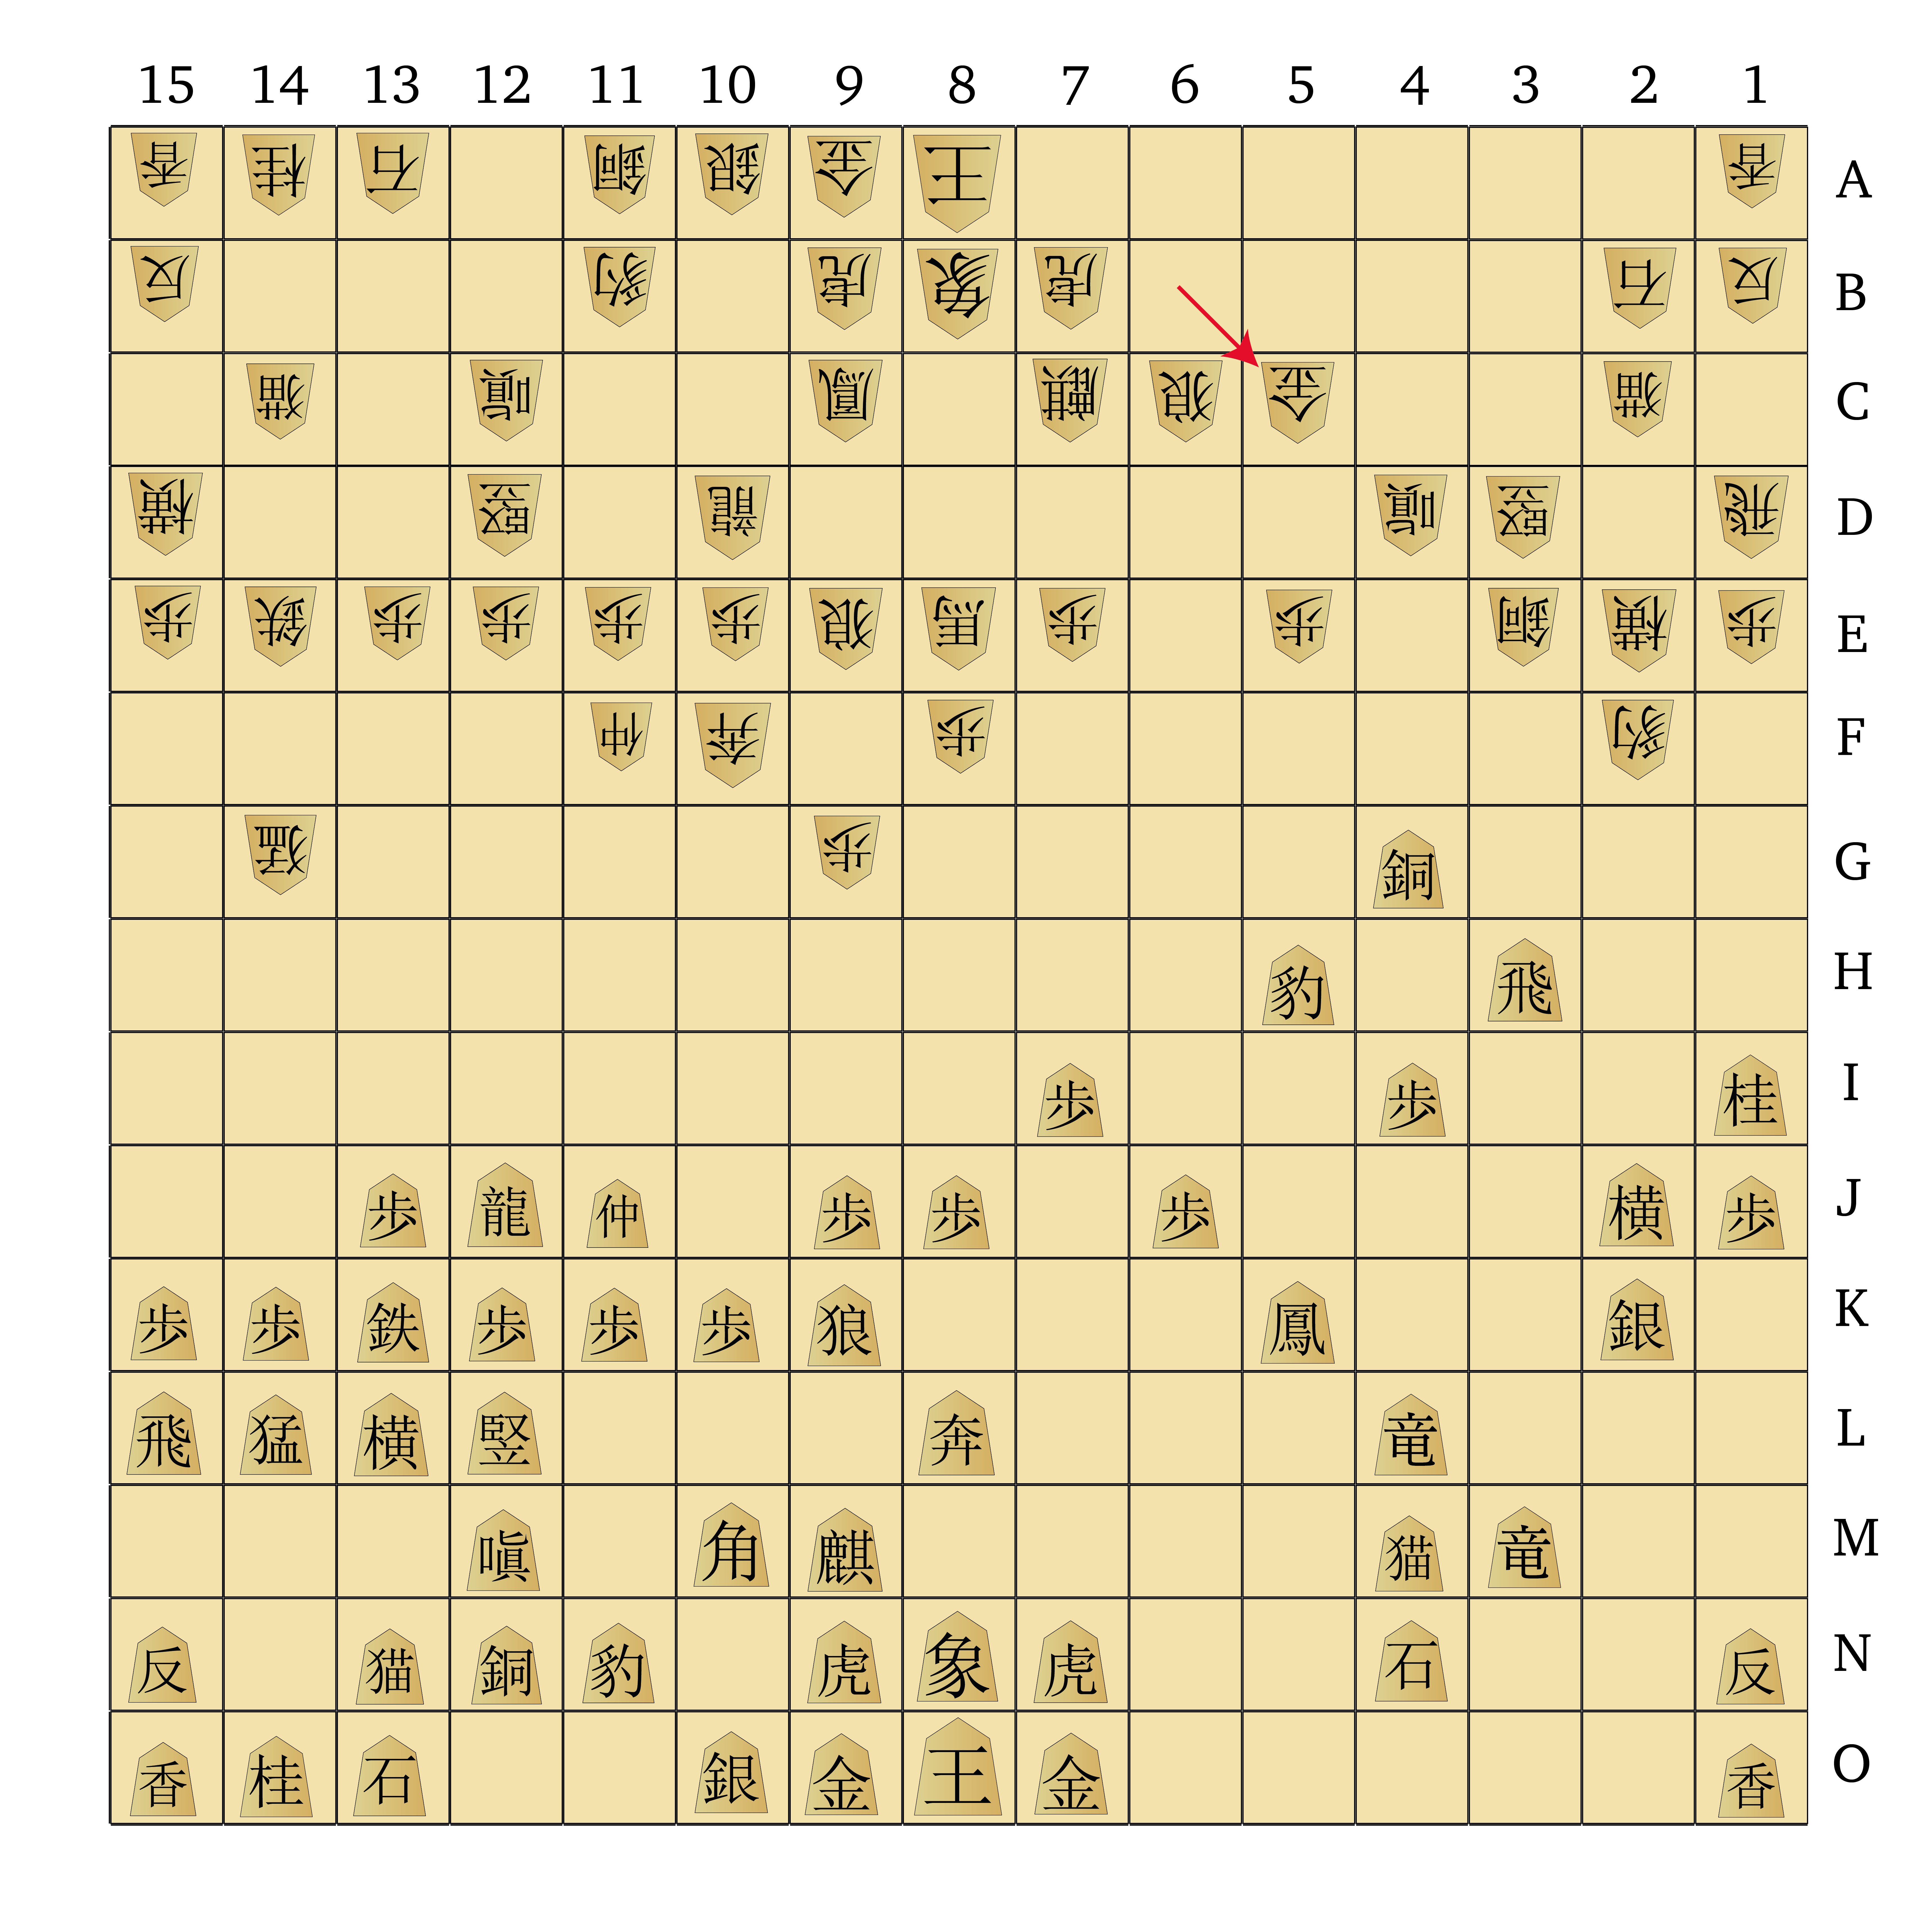
Here the AI elects to press forward with its White Tiger, threatening to fatally weaken my Pawn line in the centre. I prevent this by taking with the Turtle Snake, and then the AI attempts a distraction by dropping a Fragrant Elephant near my King. I ignore this and take the Ferocious Leopard with my Tokin, then sacrifice my Turtle Snake in exchange for the Gold General, creating a serious weakness in Gote’s defences:
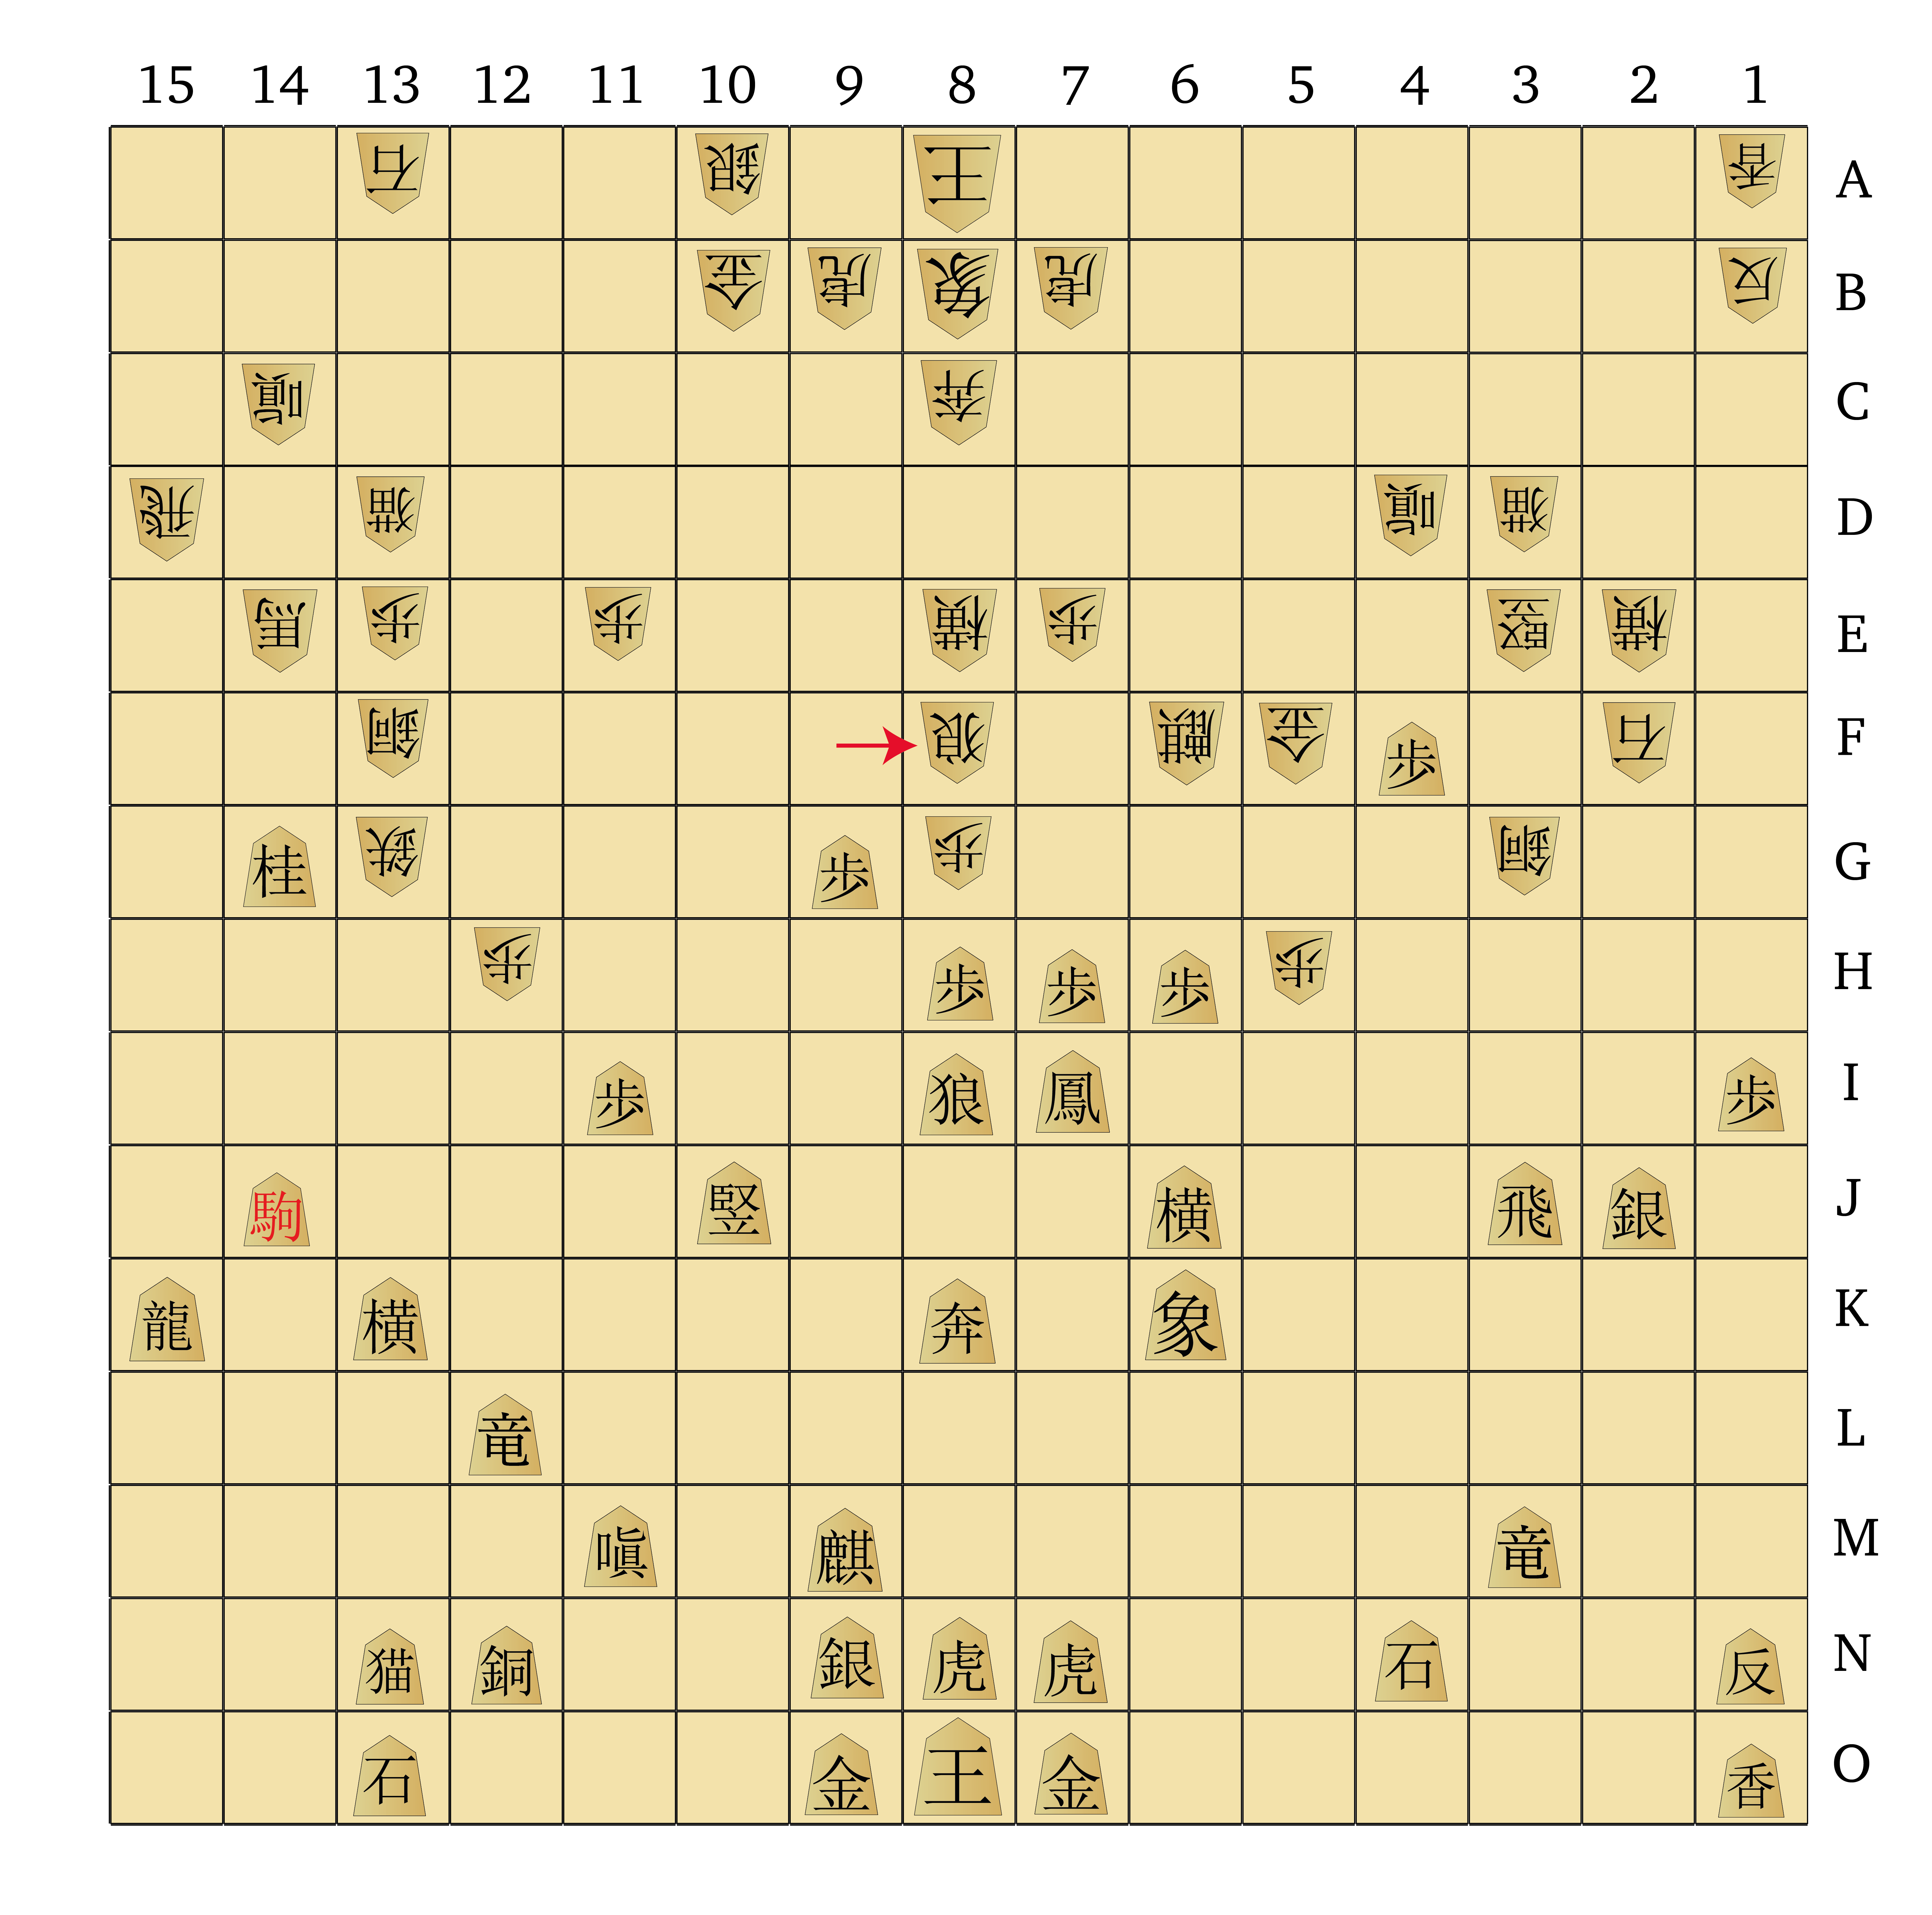
The White Tiger now pins the Phoenix to Gote’s King, and it’s time to start hurling my massive material advantage into the meat grinder. I do have to be cautious, because Gote does hold several good defenders in hand, and if I allow Gote any room to breathe they could still cause trouble around my lightly-defended King.
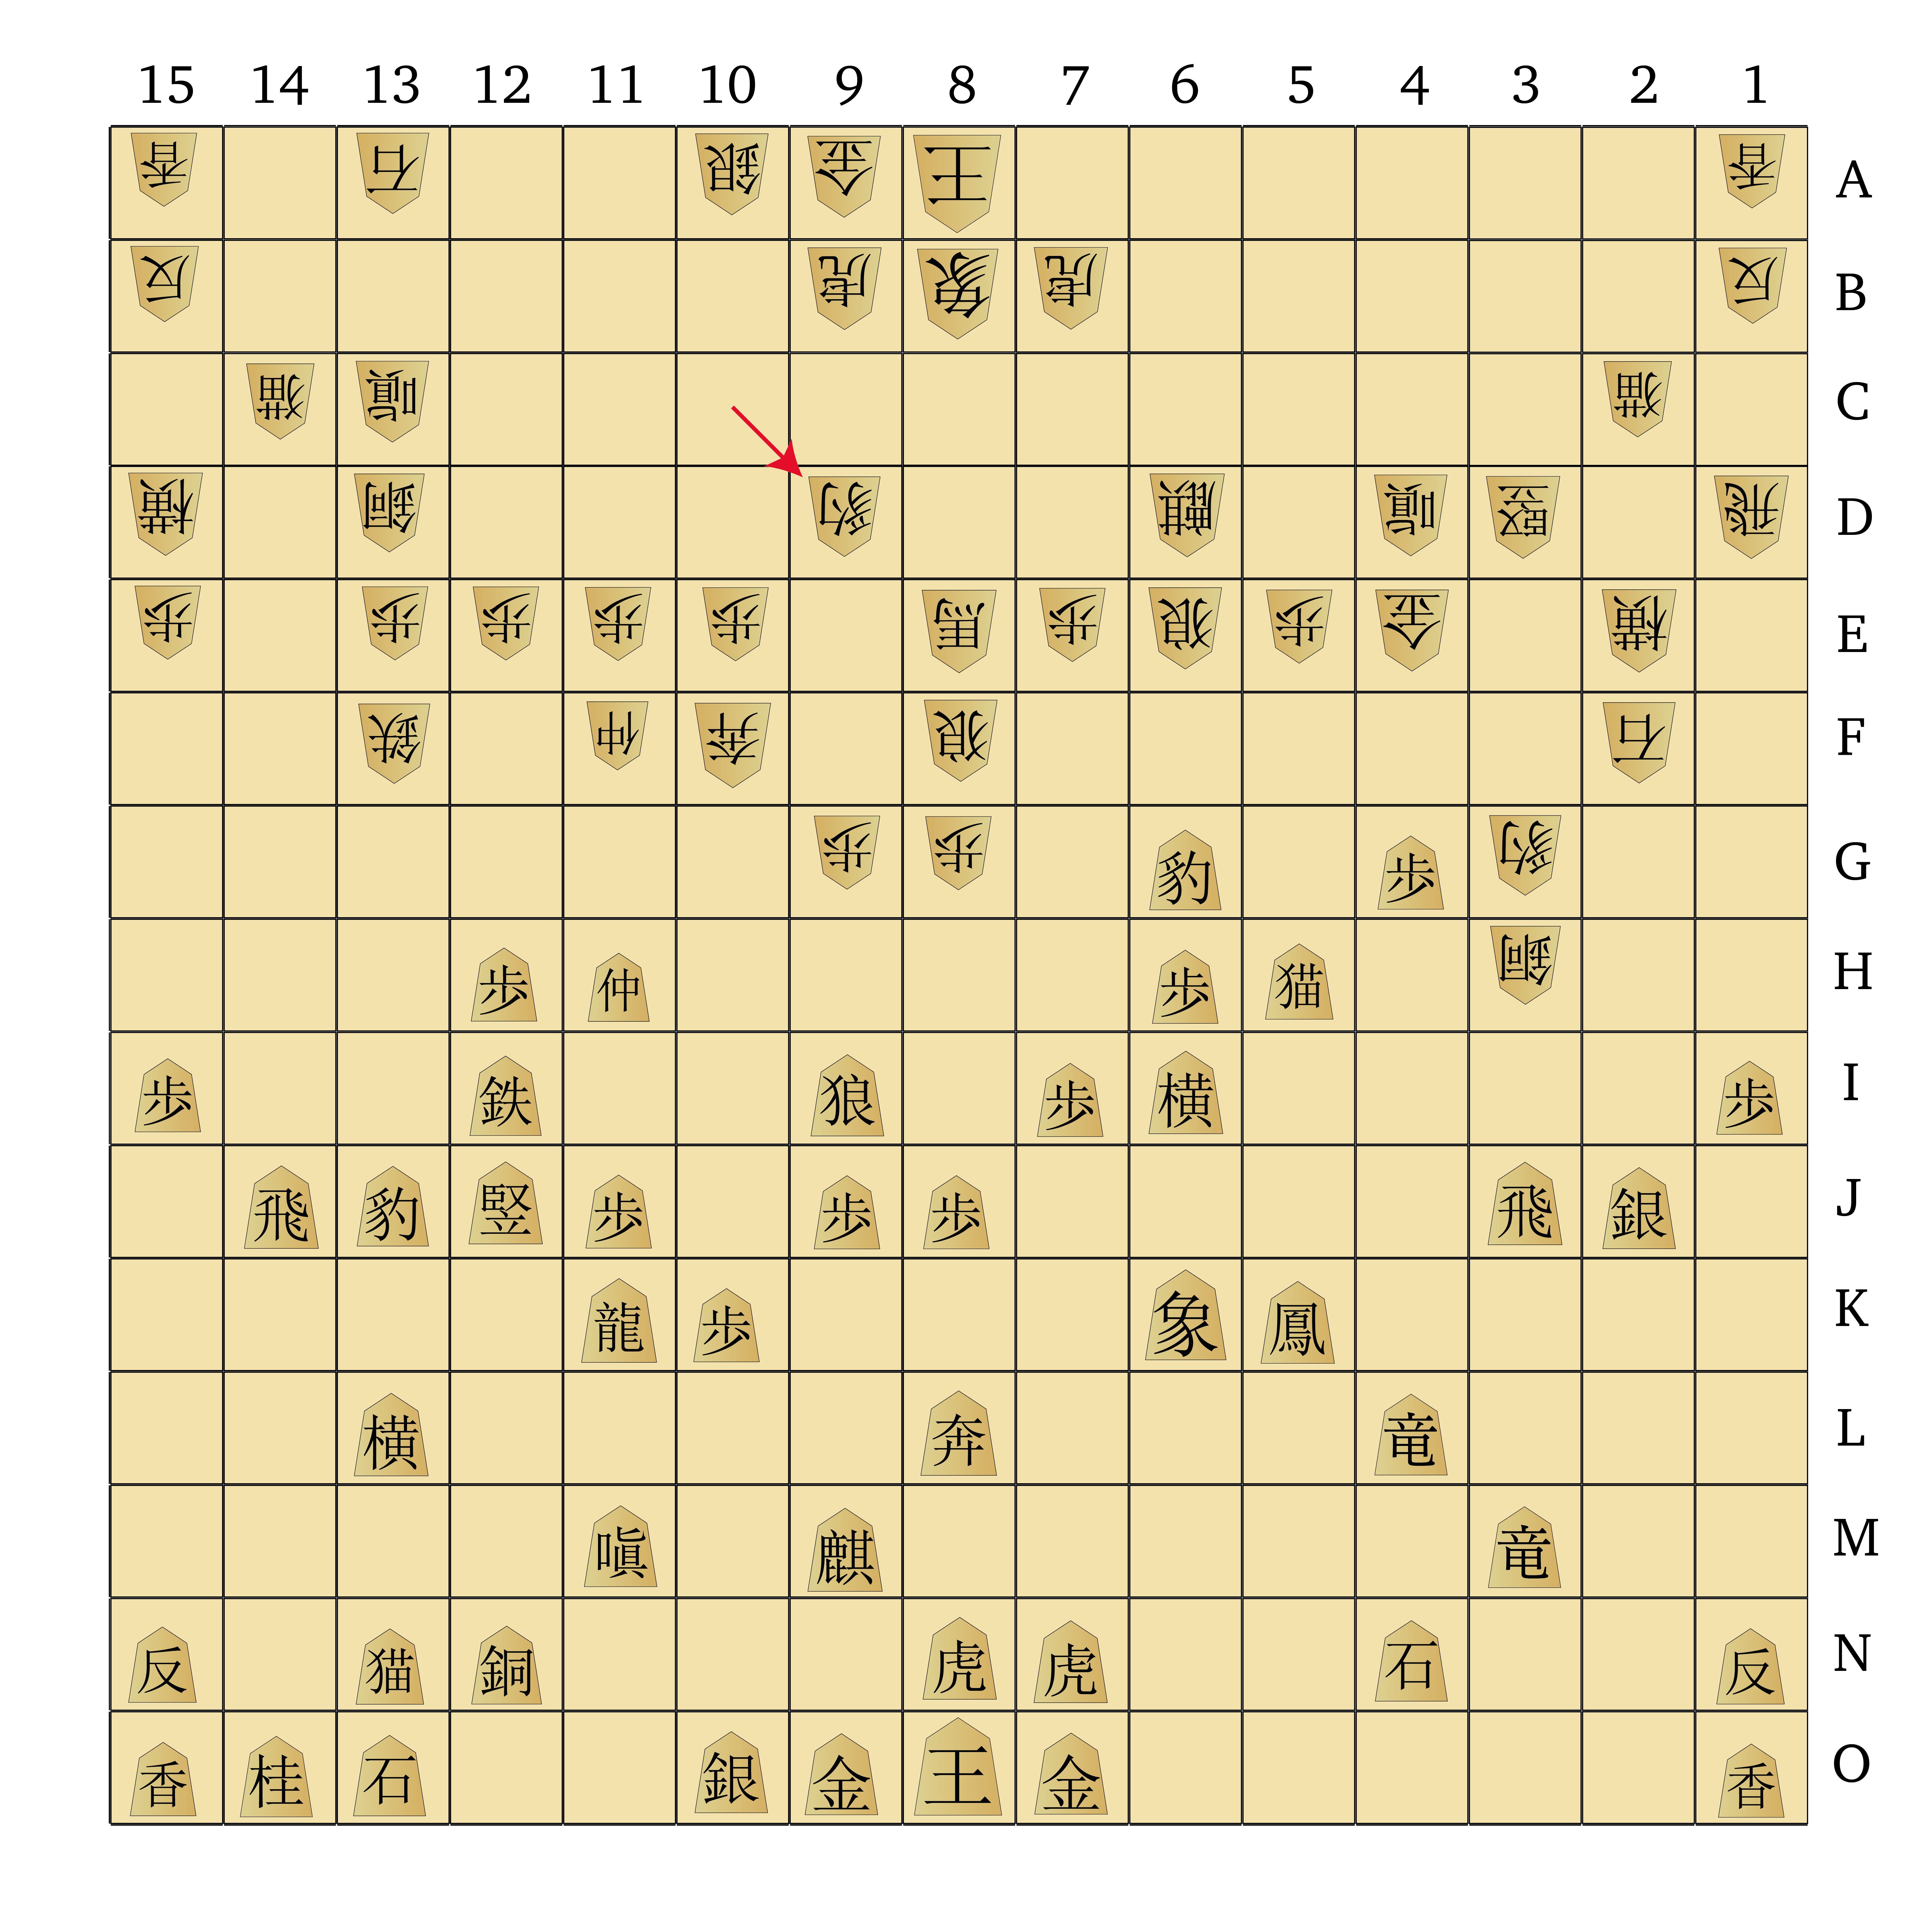
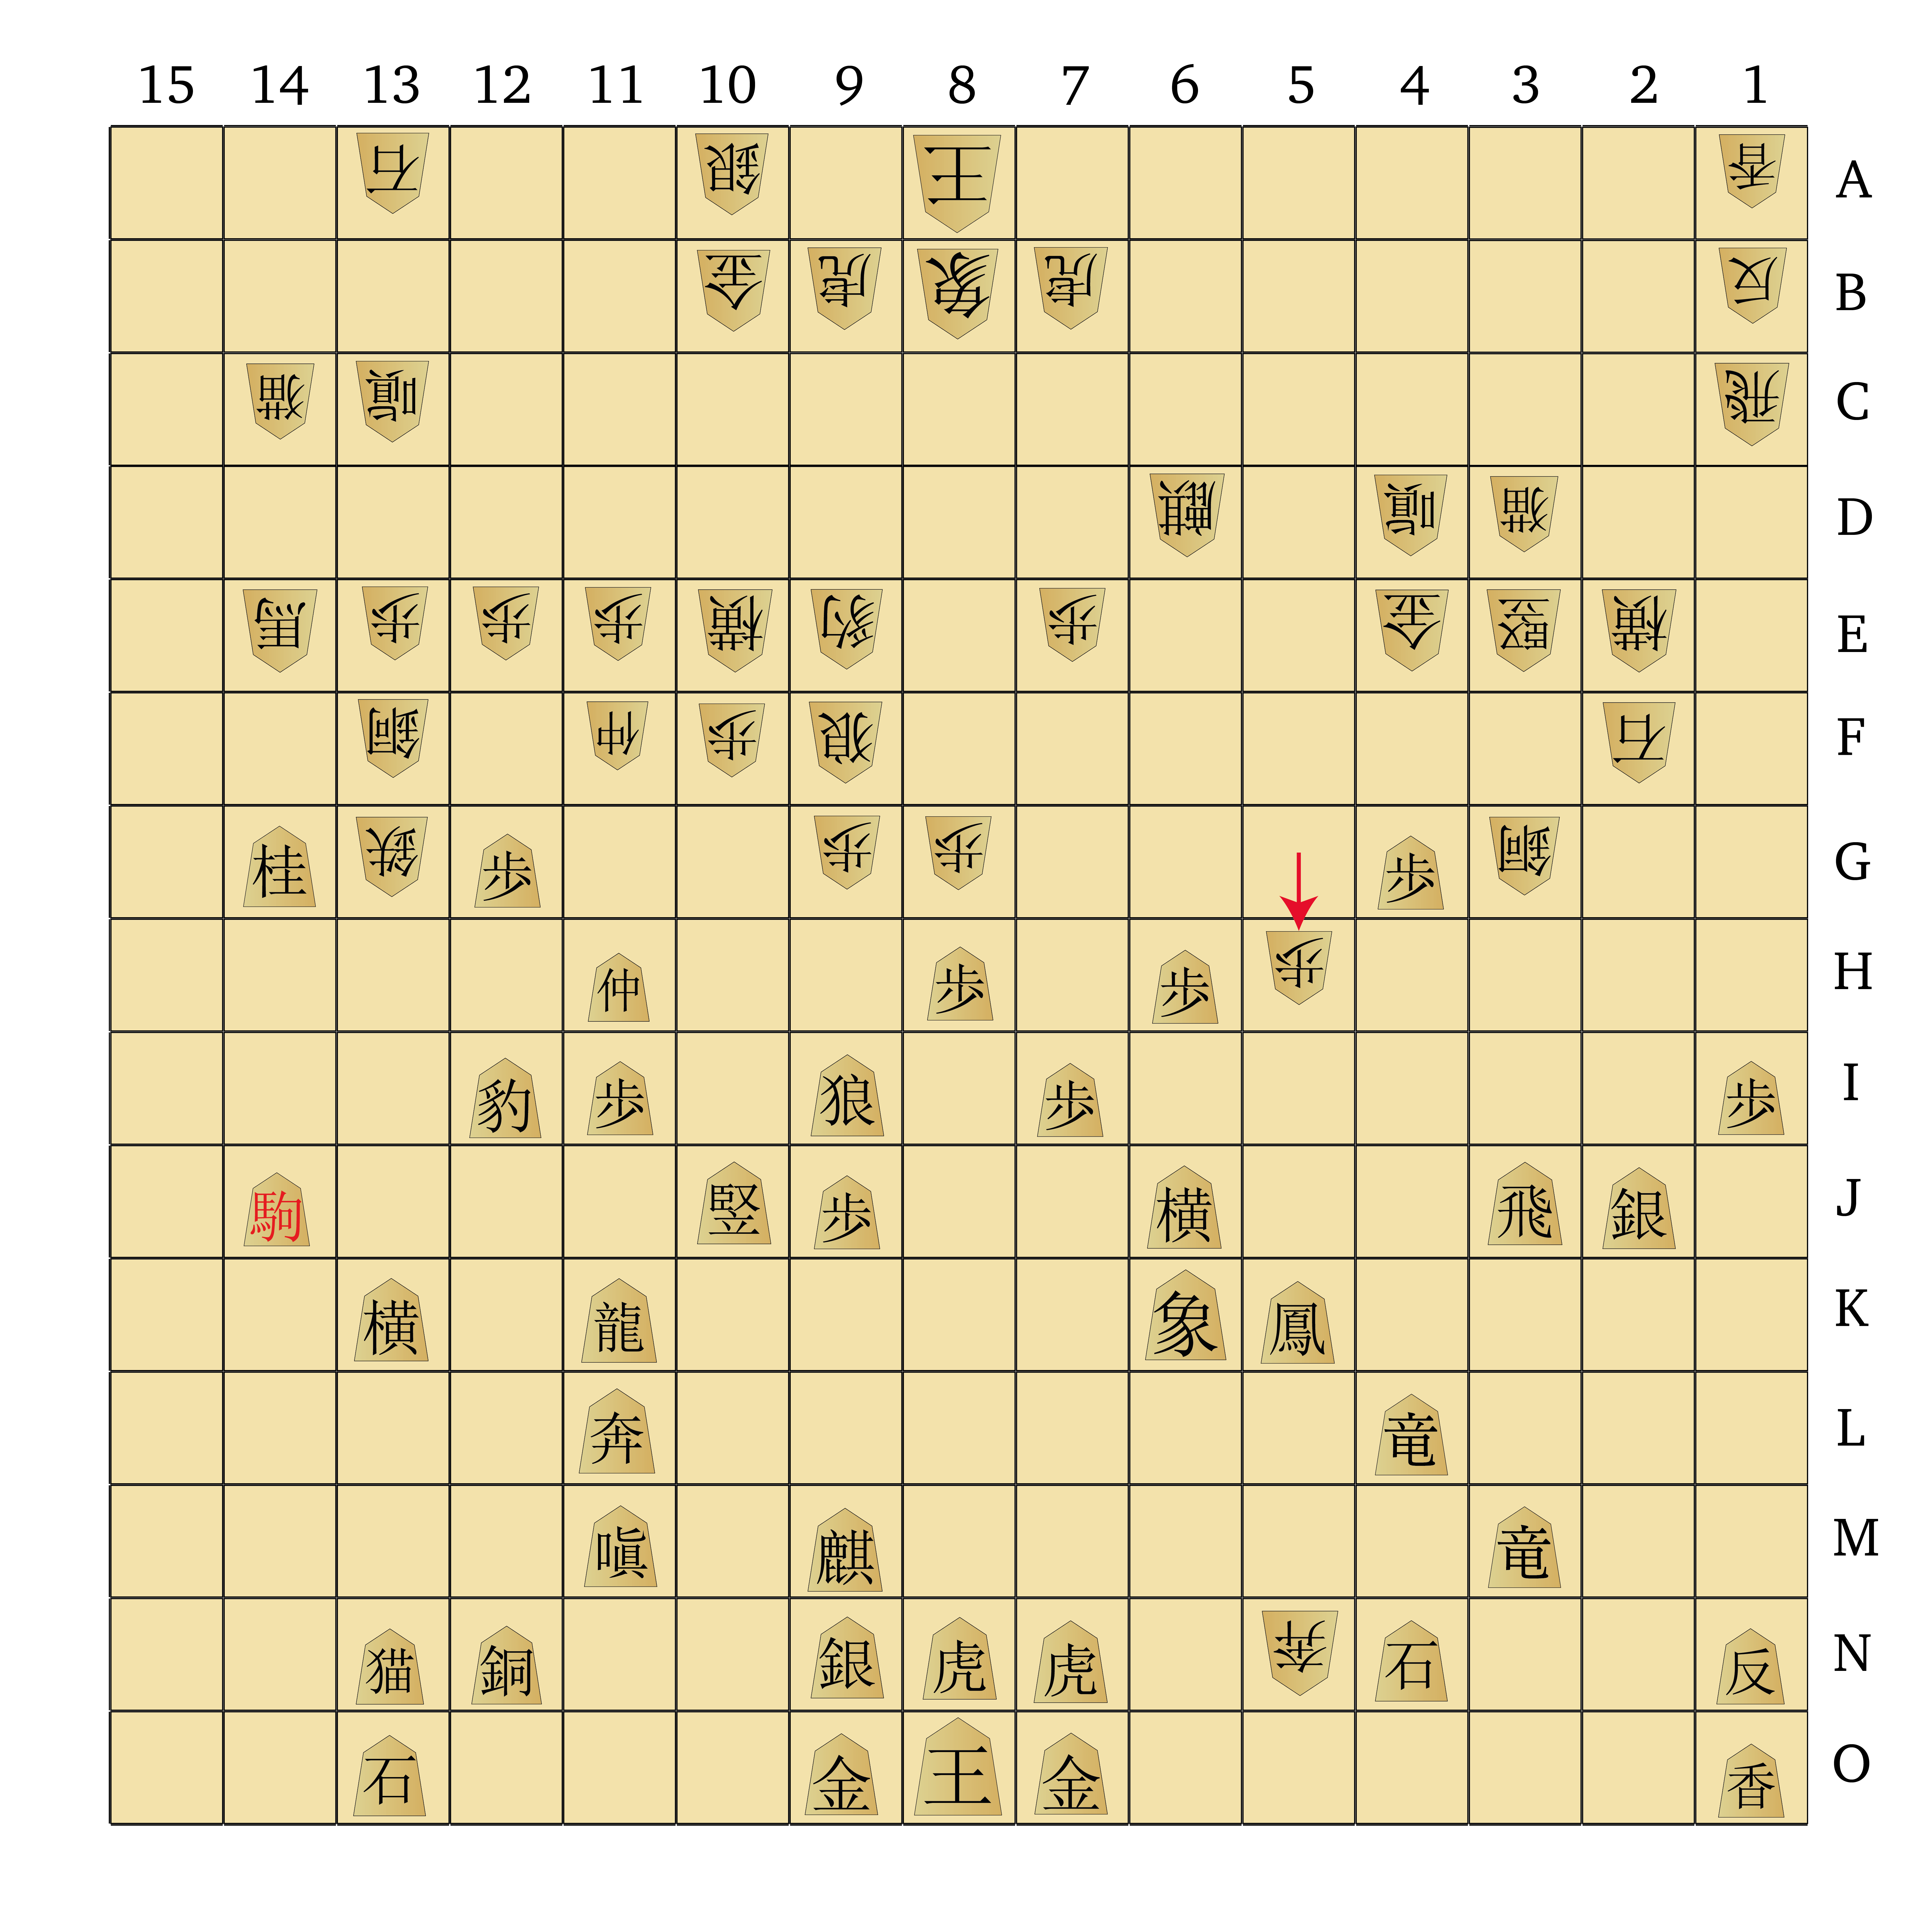
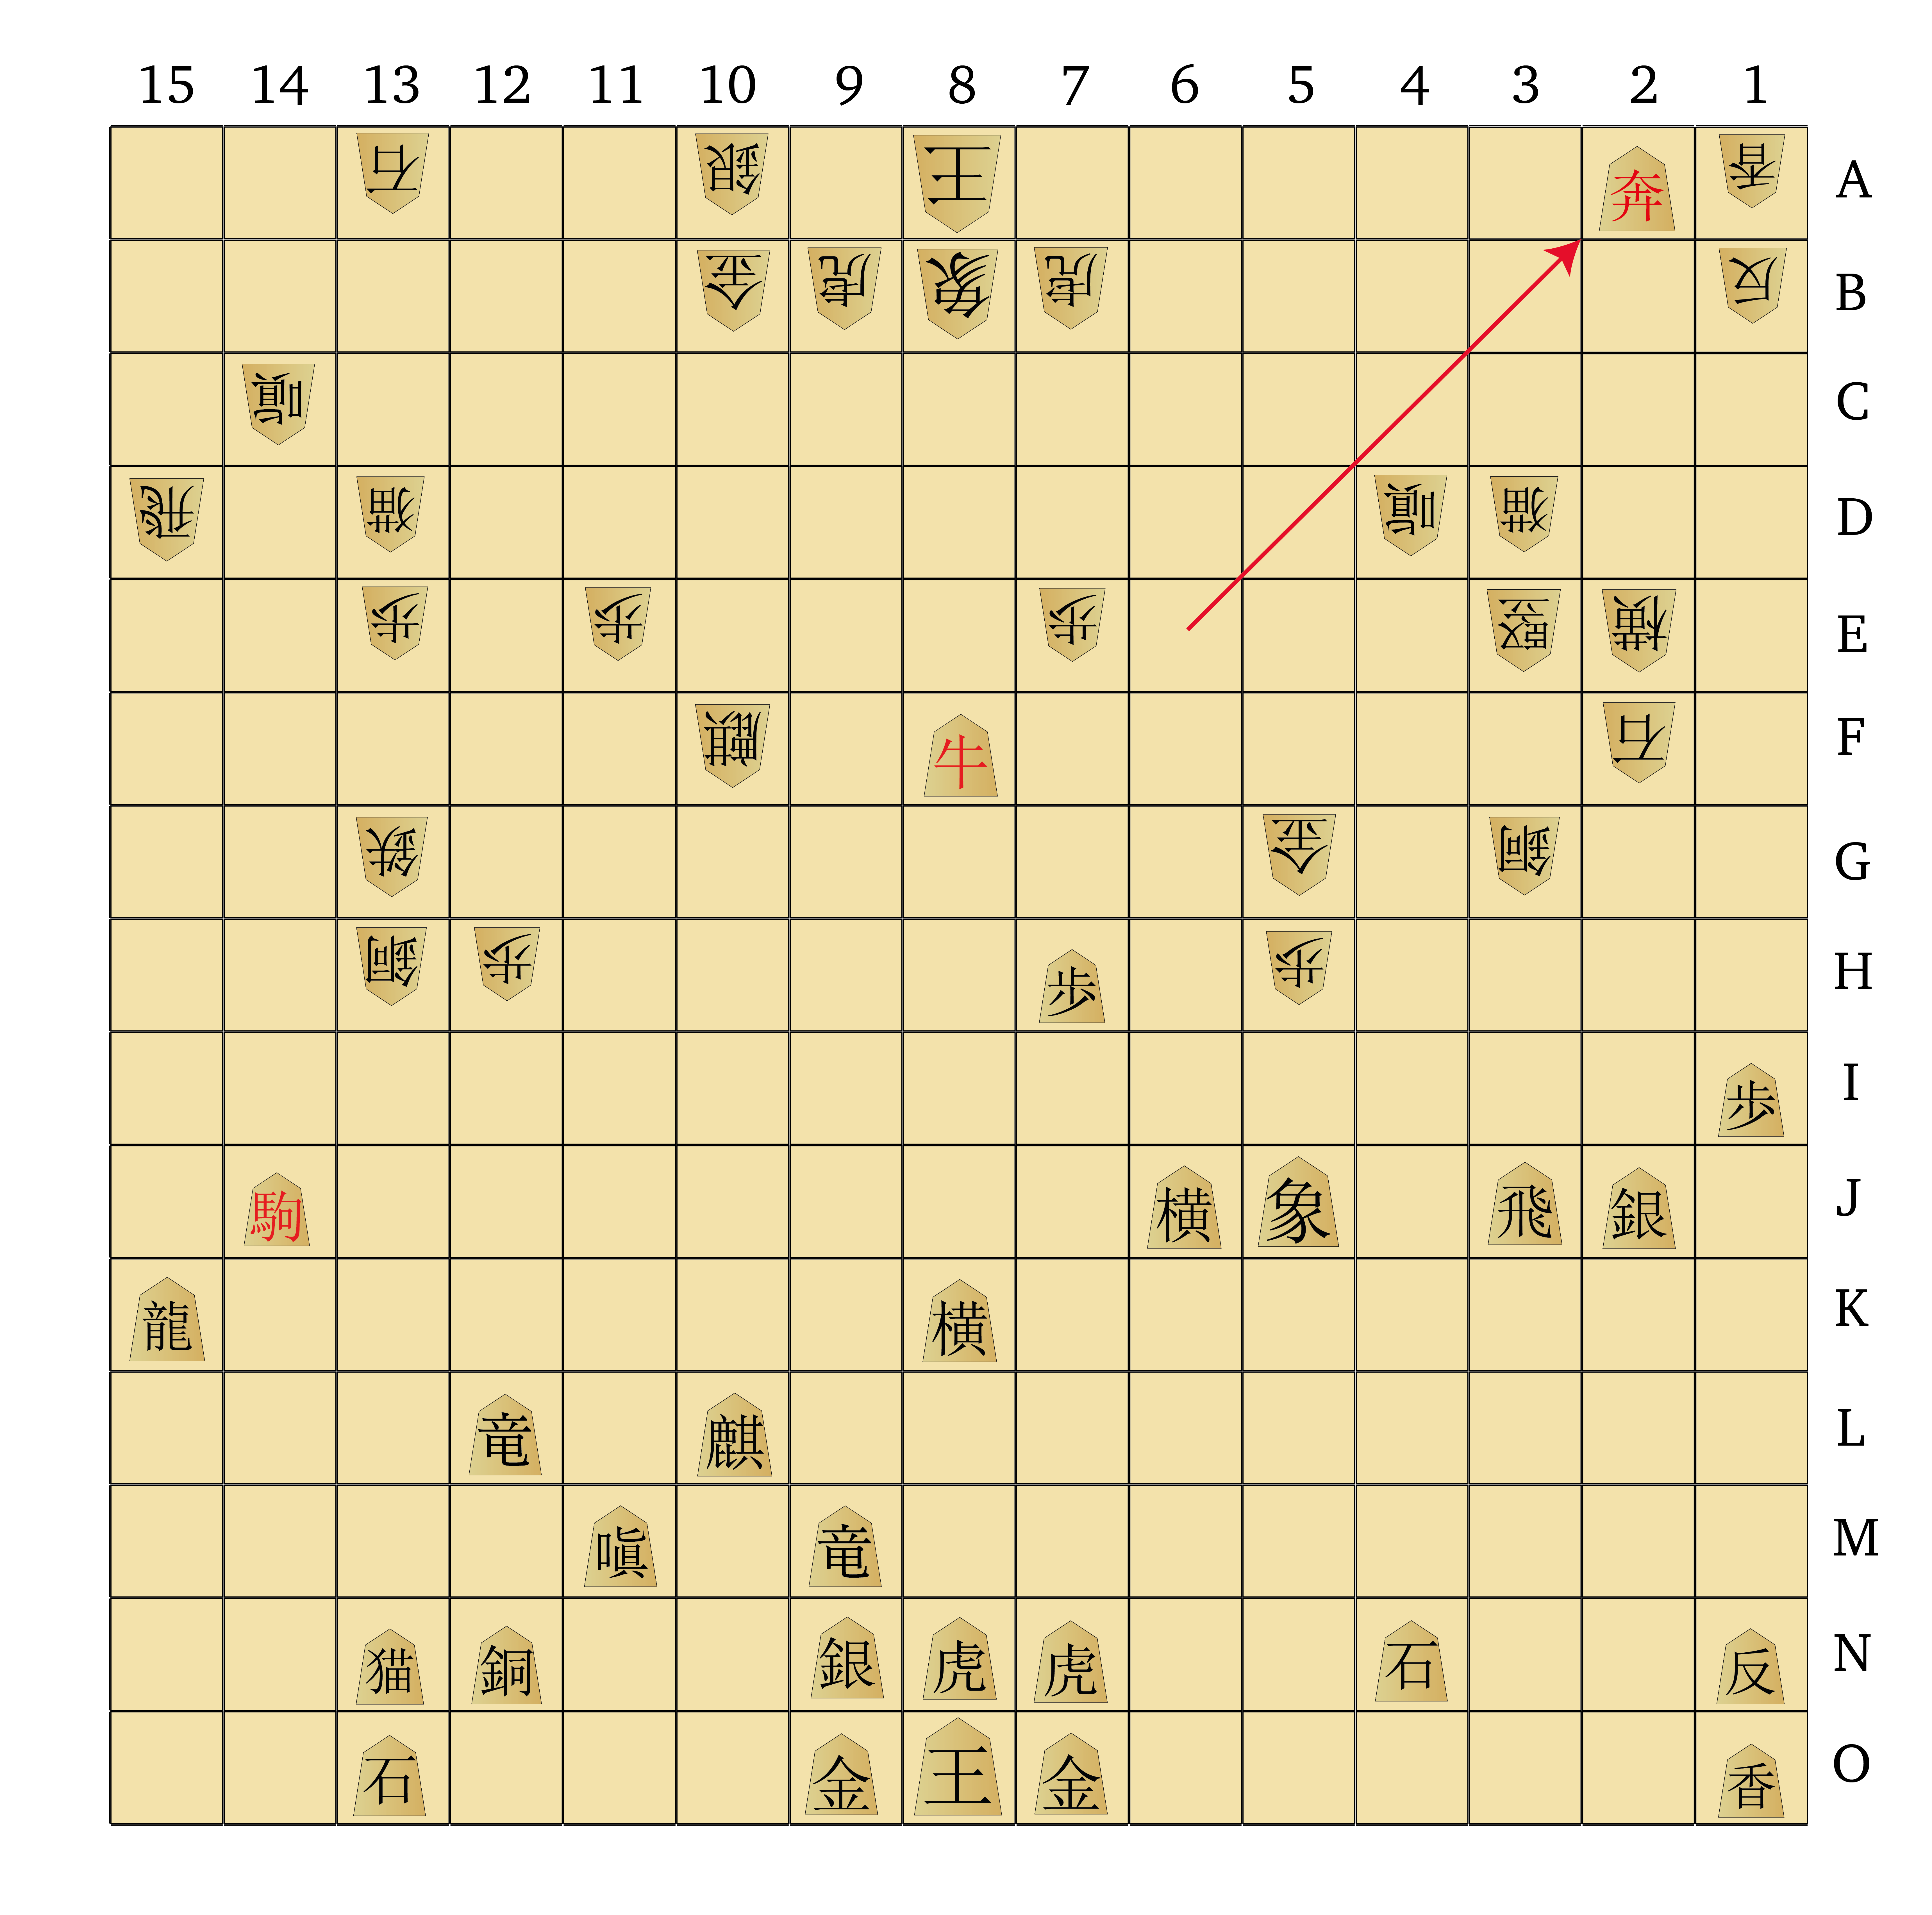
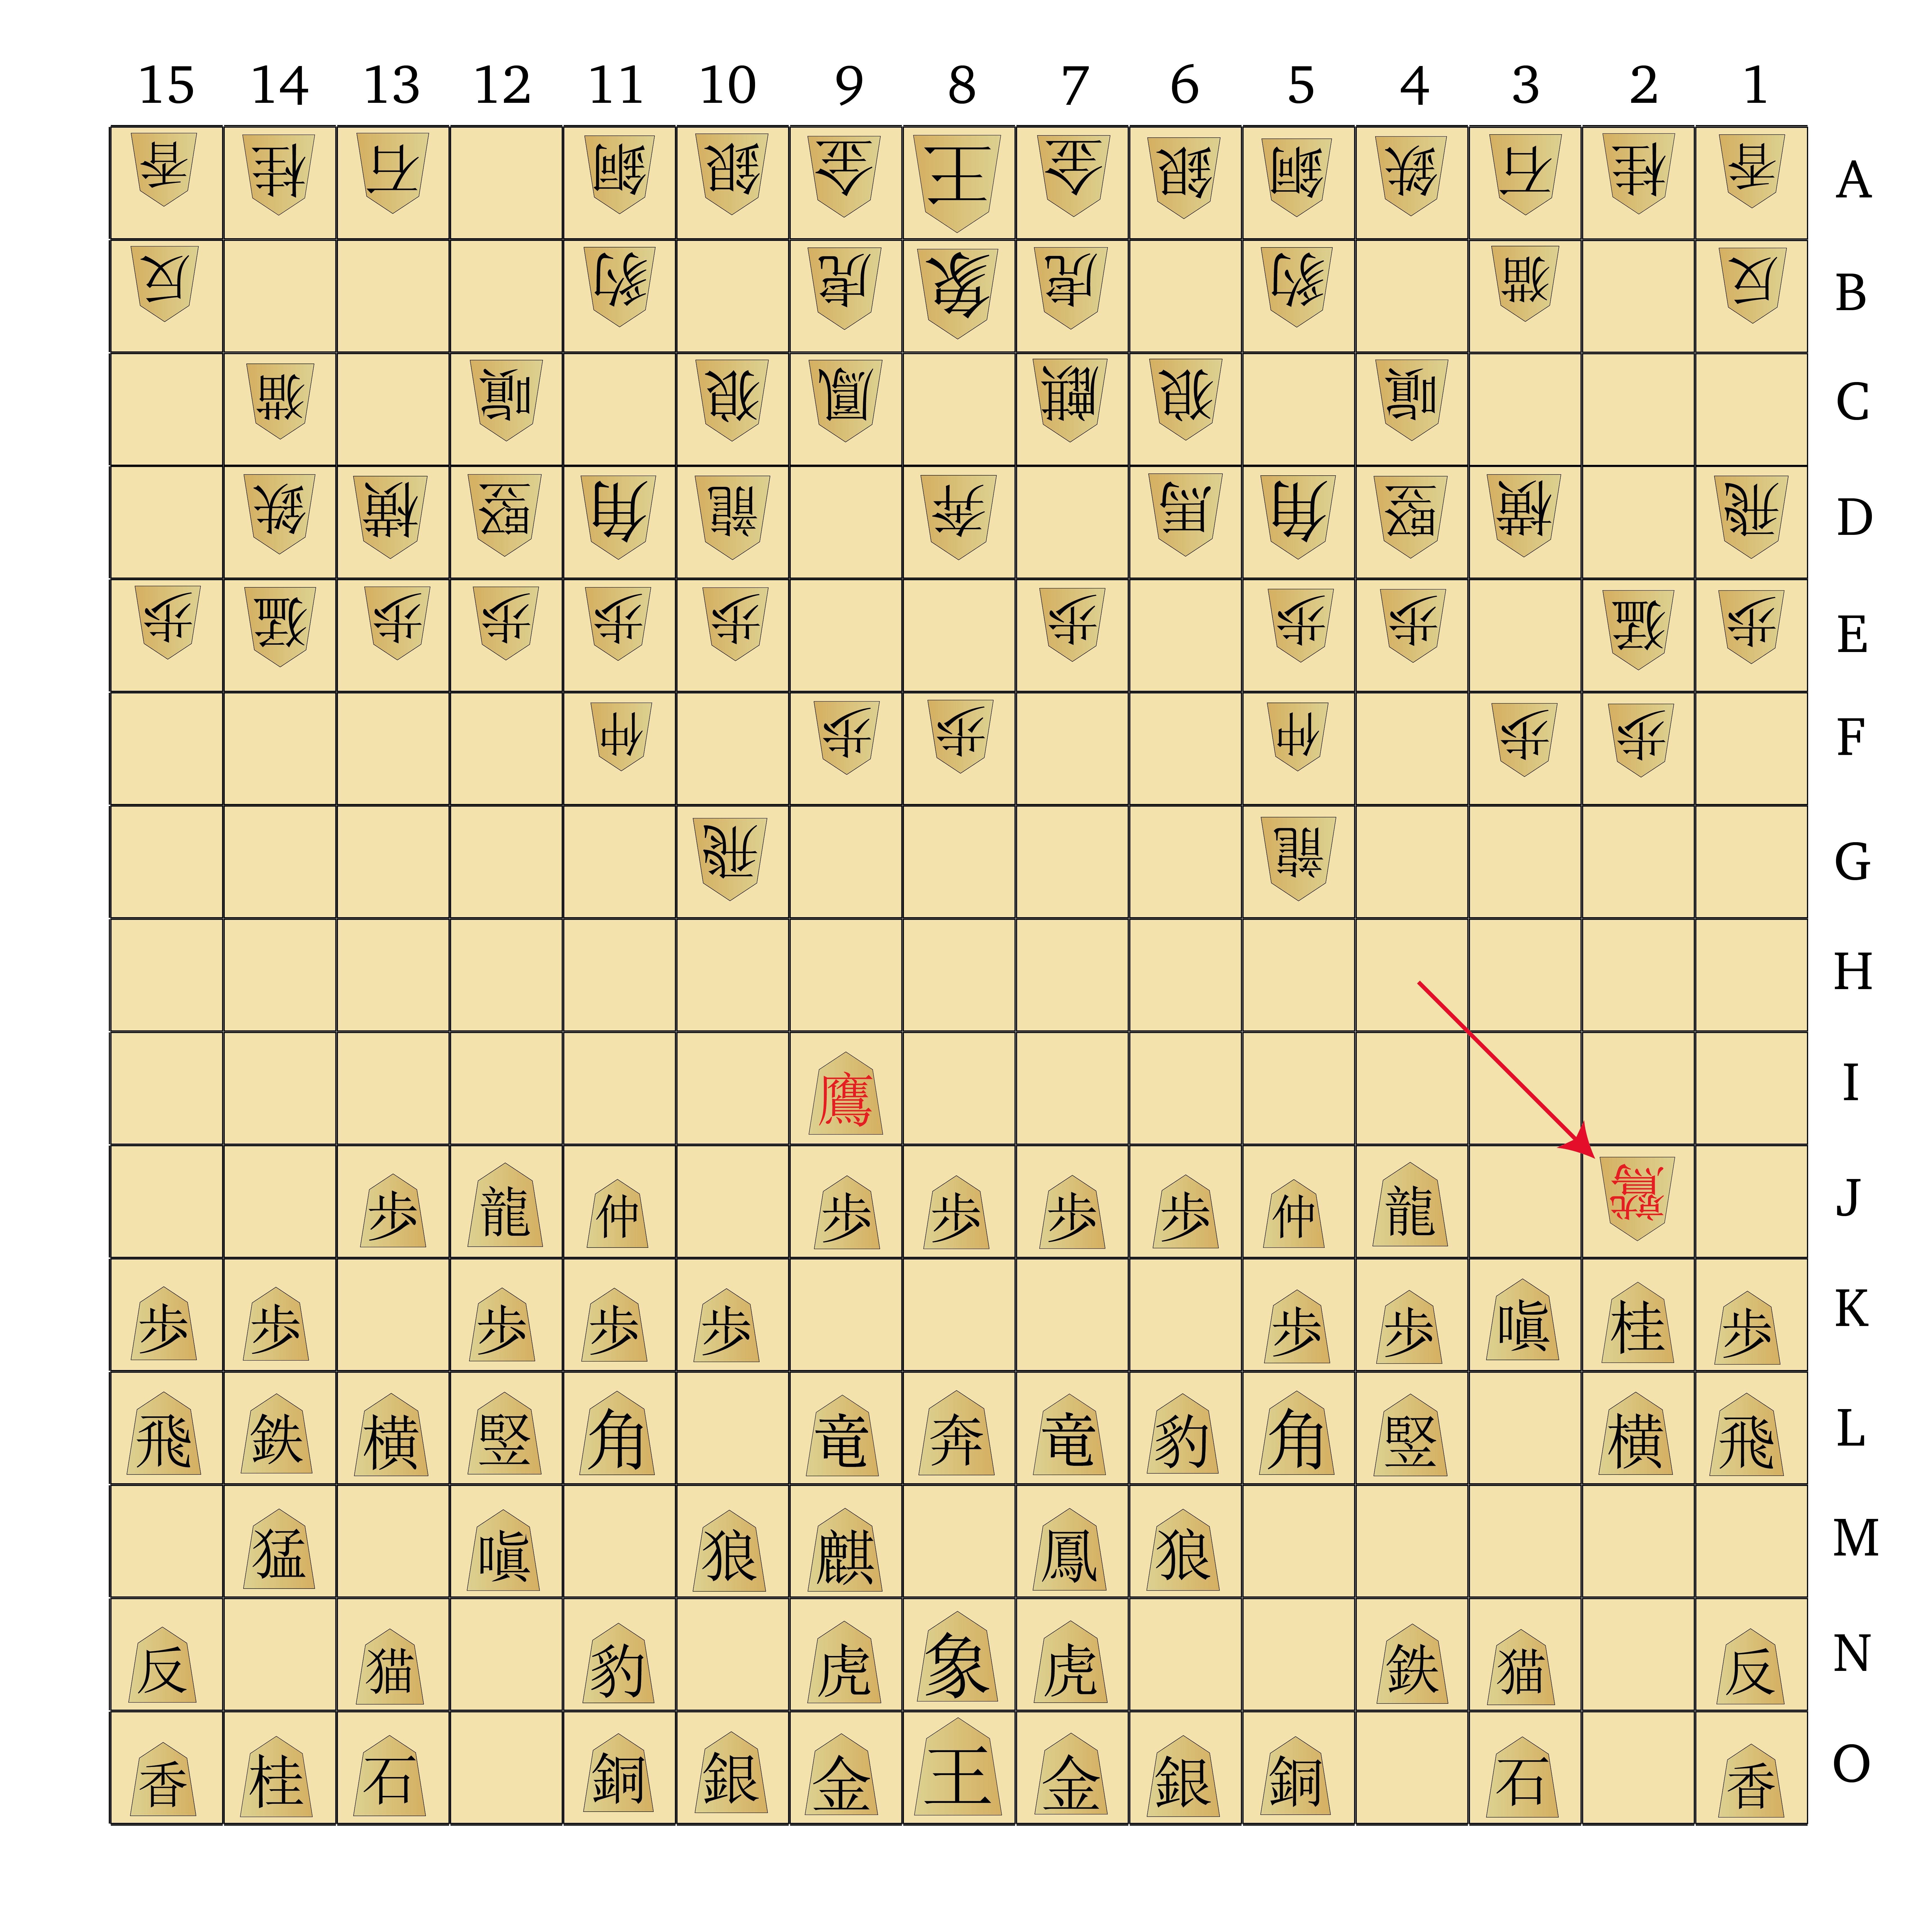
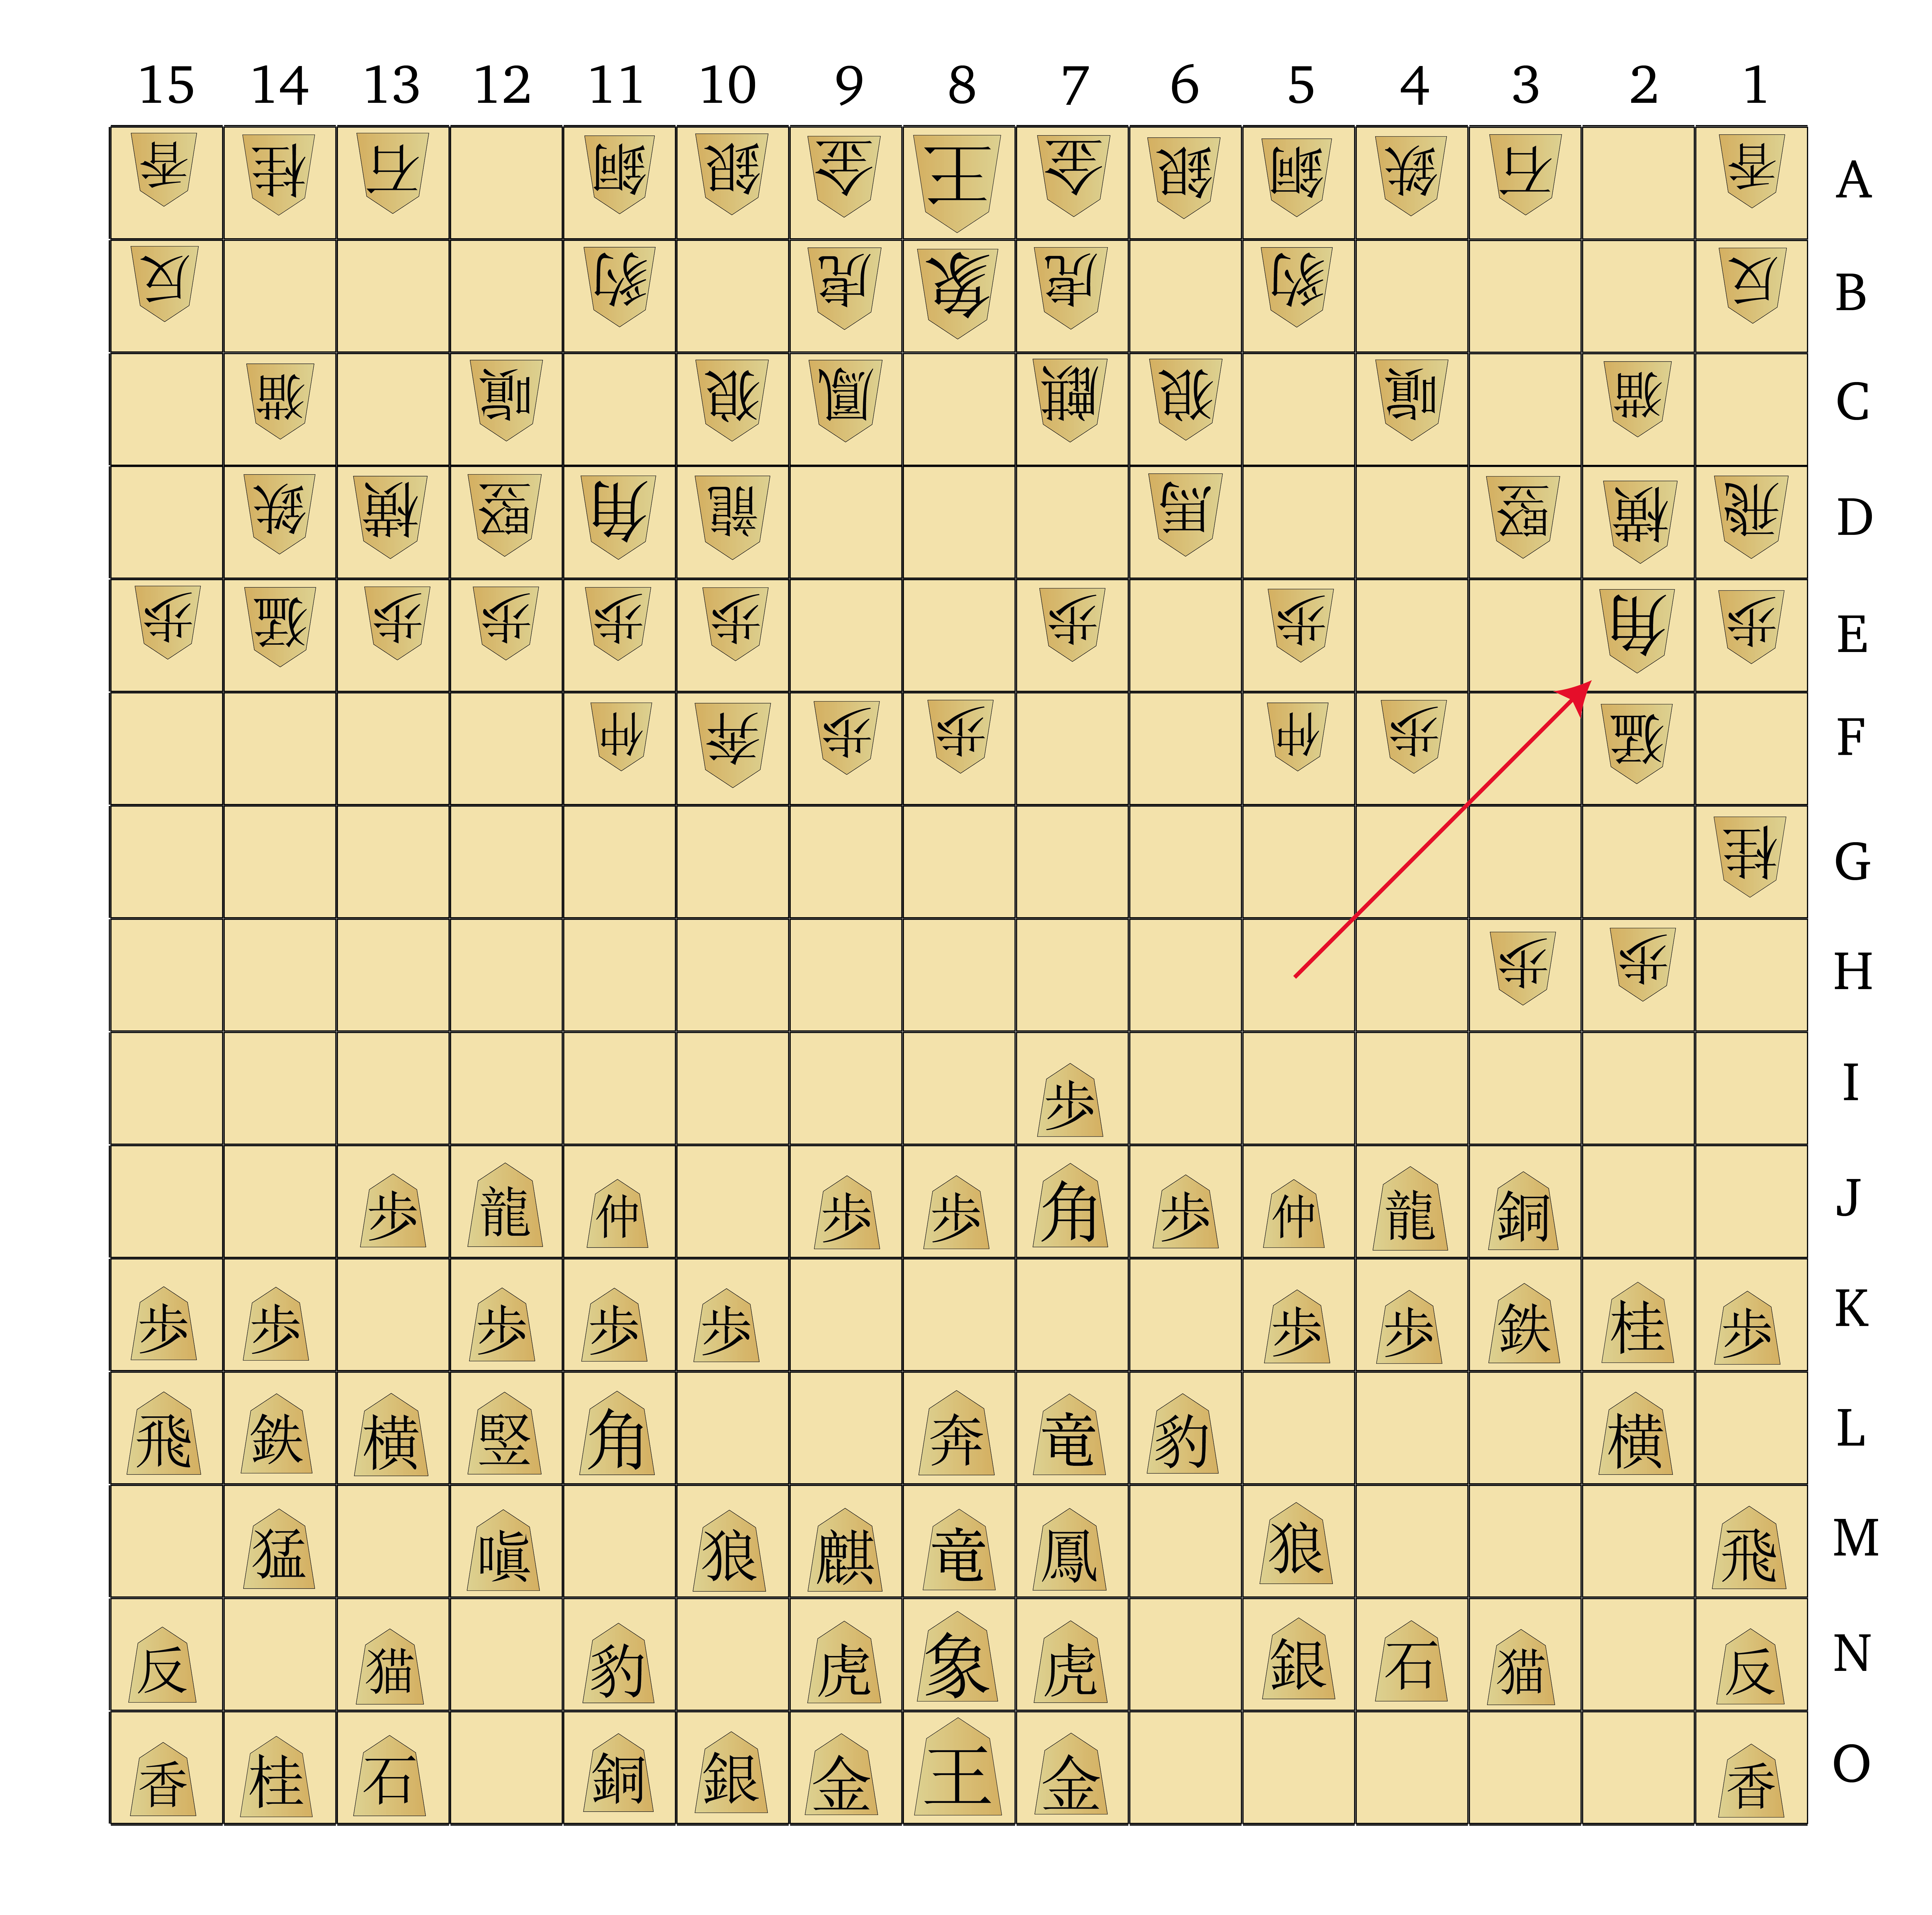
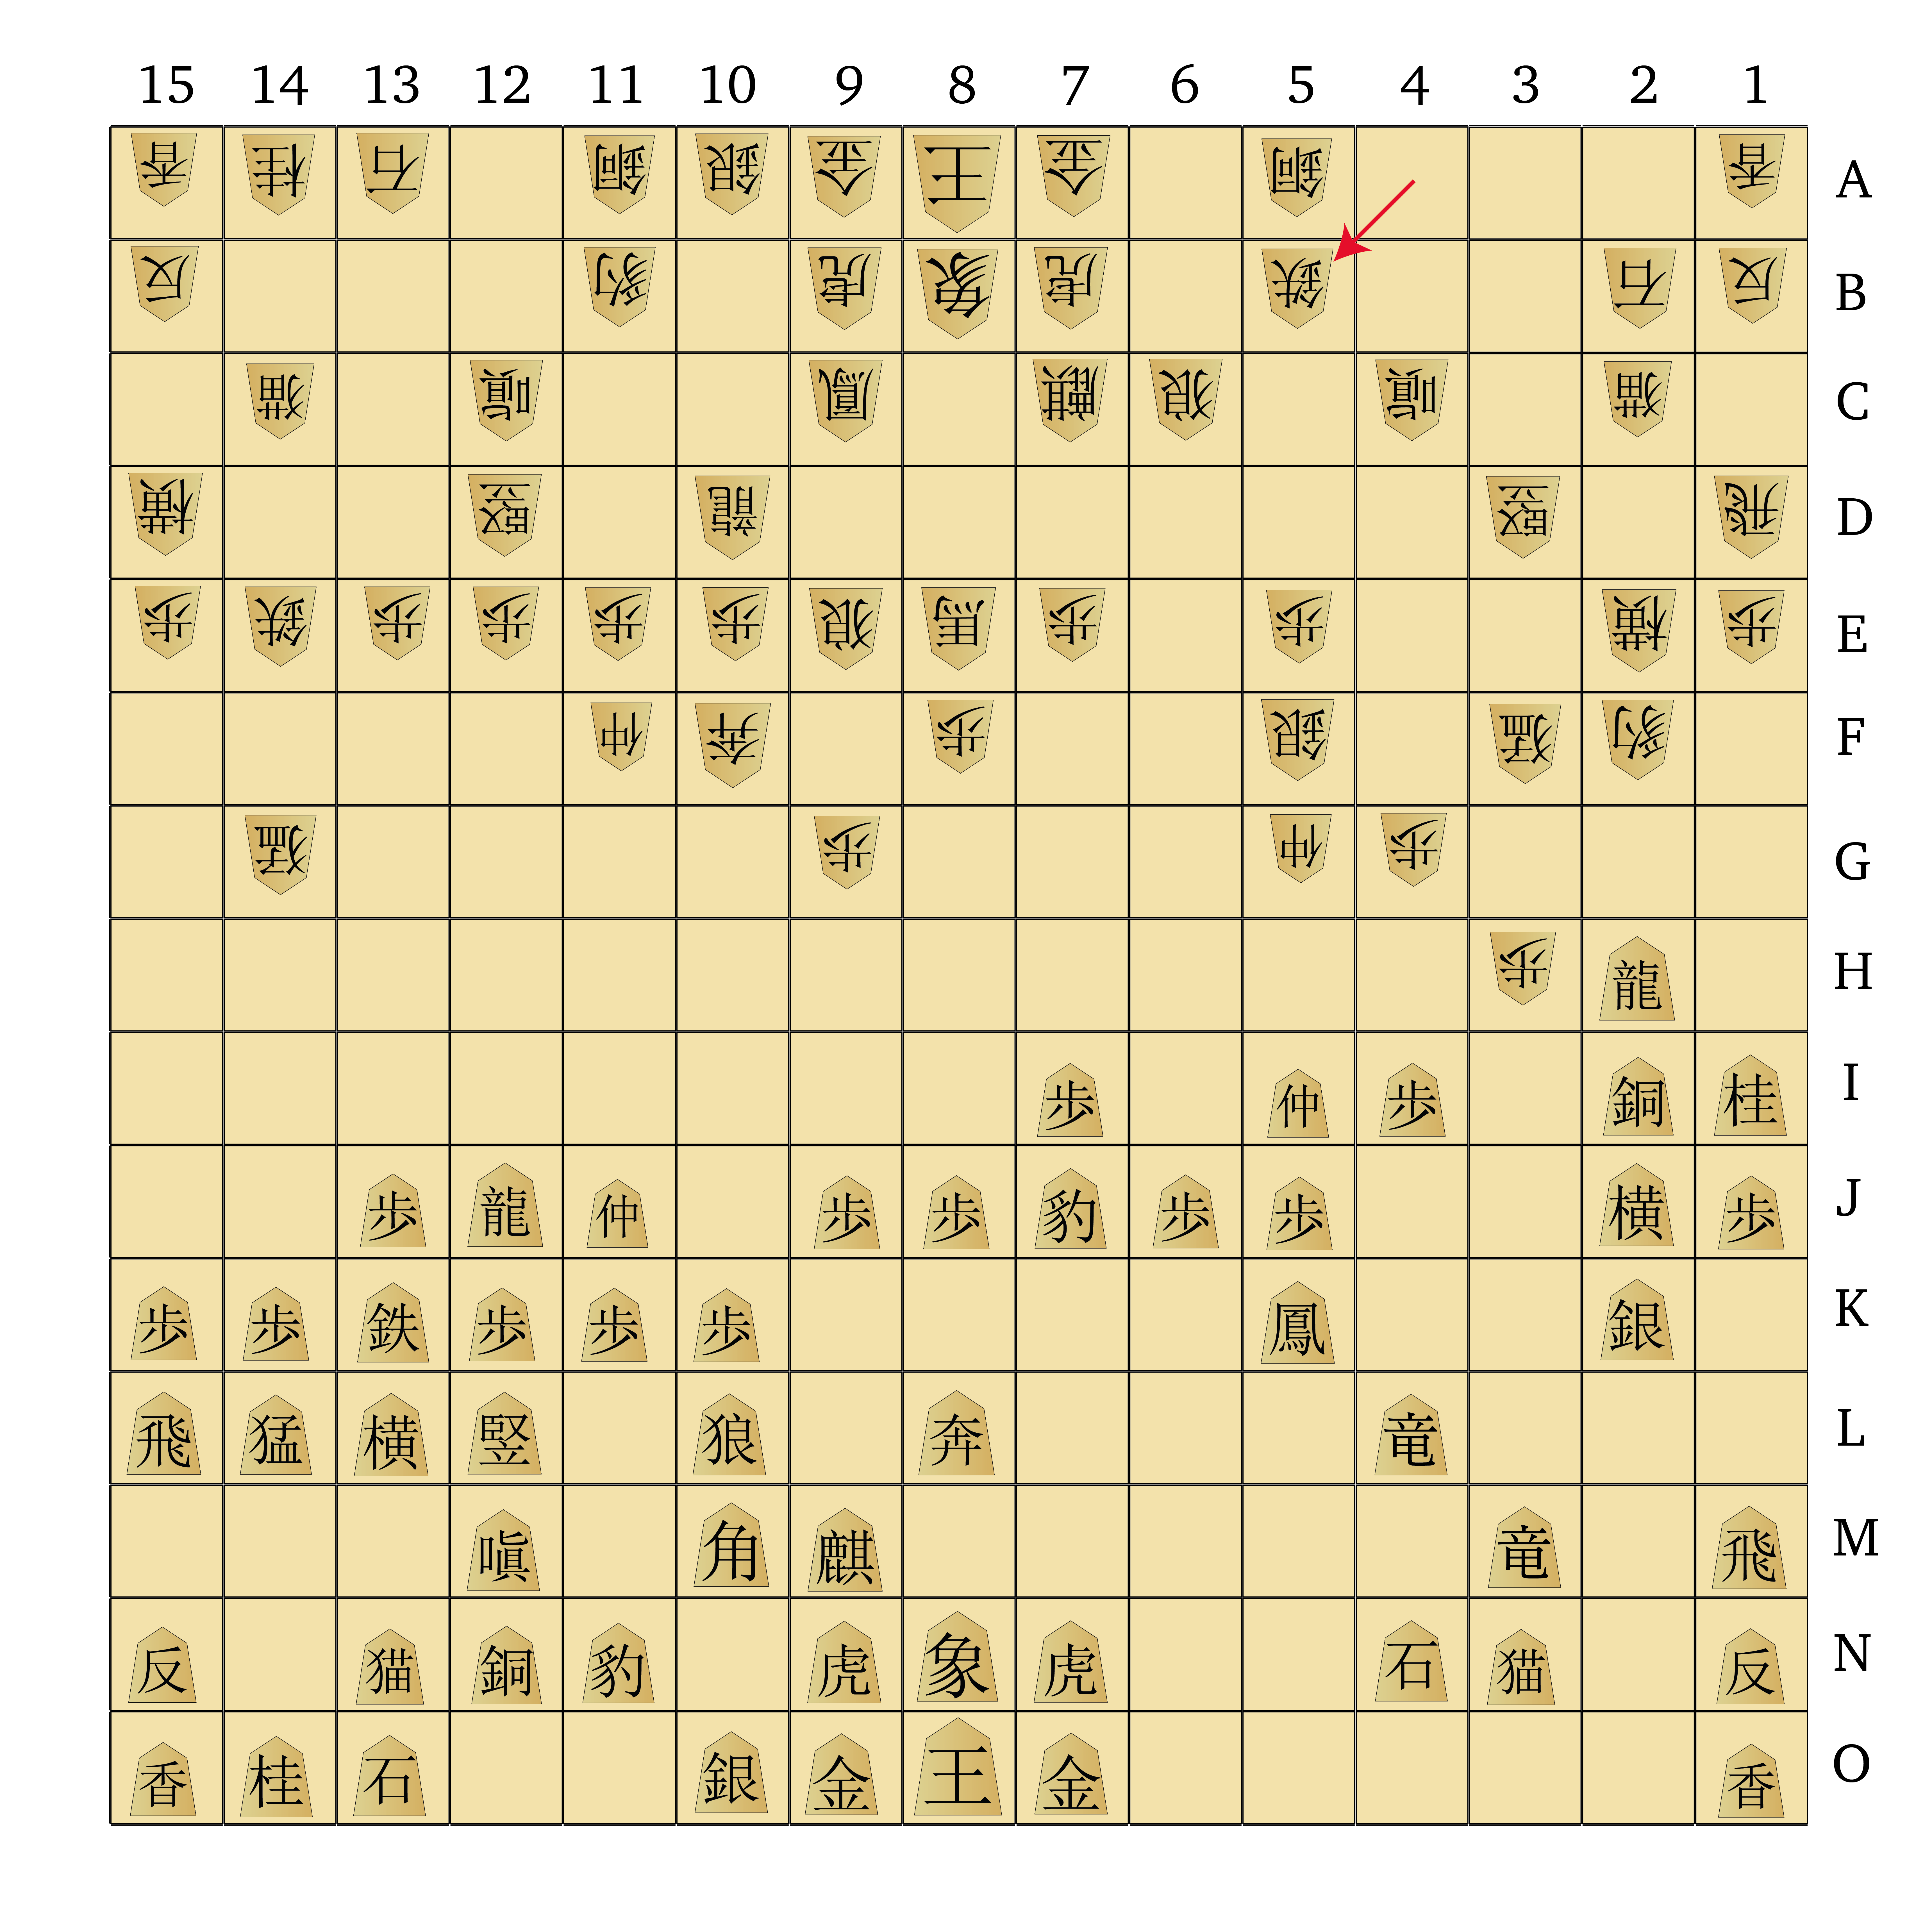
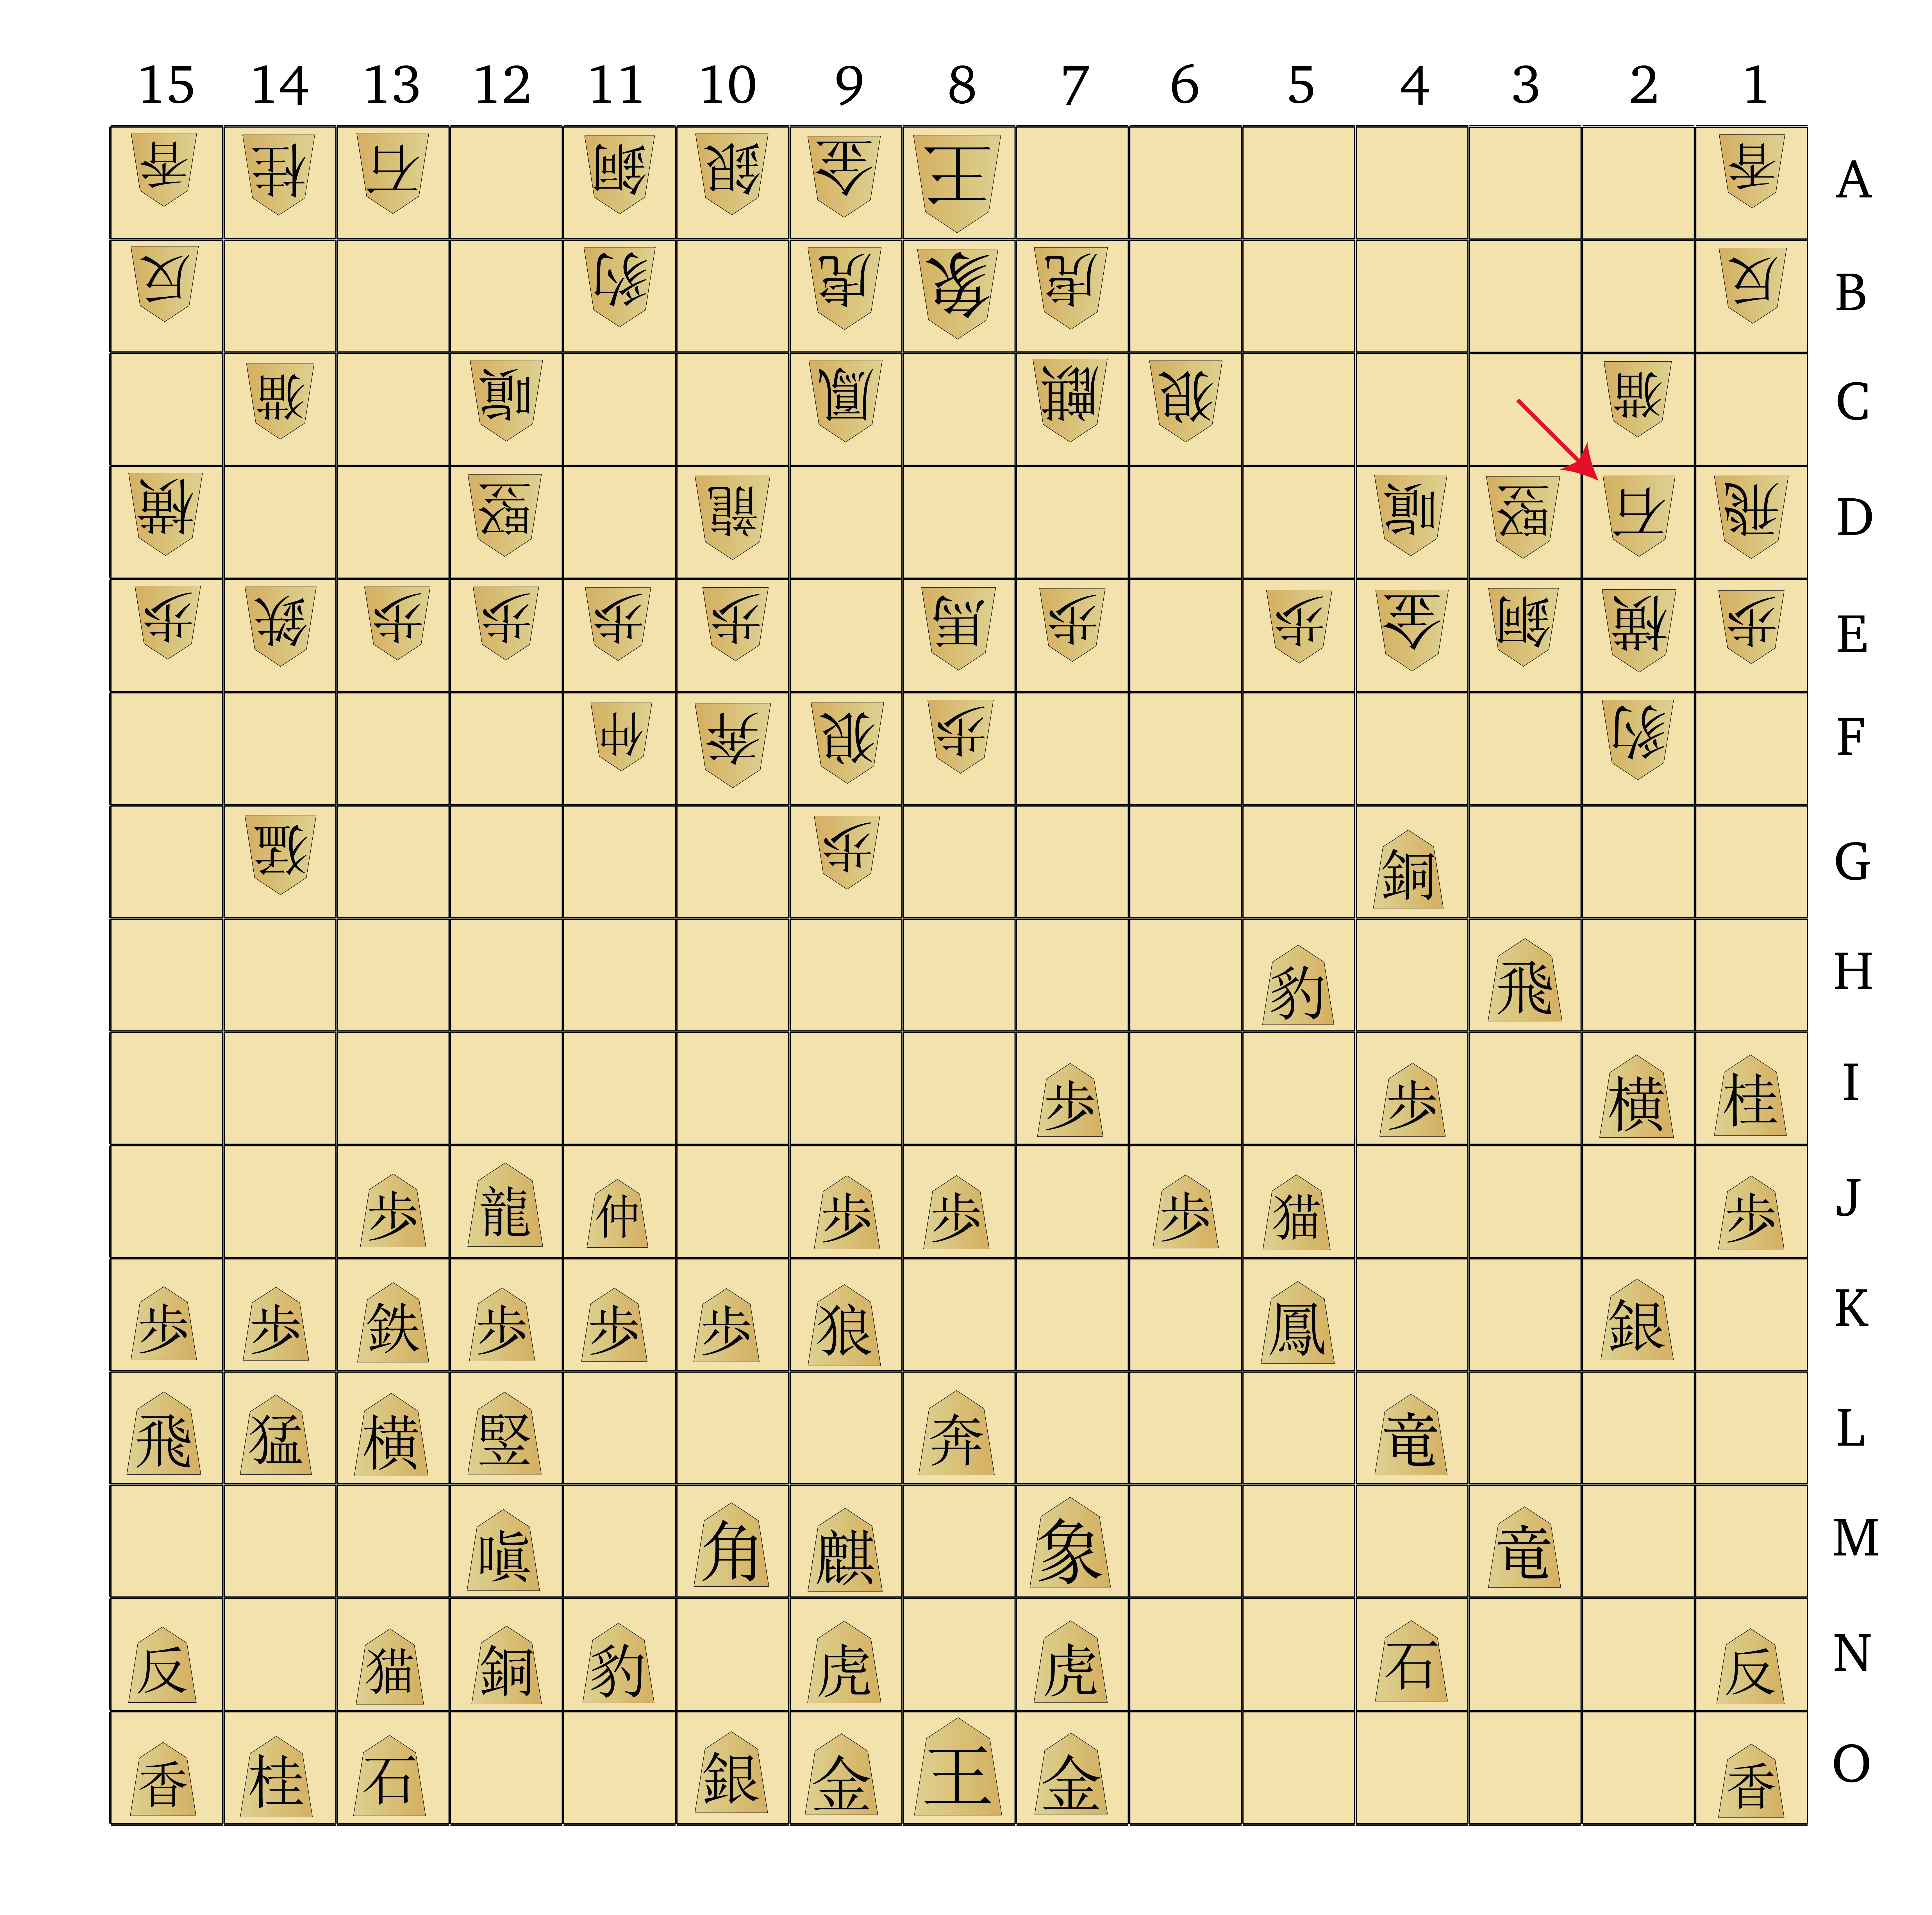
Gote proceeds to attempt exactly that, taking my Gold General with their Fragrant Elephant and forcing me to retake, then dropping a Turtle Snake in prime position in the centre. However, this is fine for me, as I can take Gote’s Phoenix with my White Tiger, forcing a recapture with the Kirin and opening a diagonal toward Gote’s King. Rather than exploit this immediately I drop a White Elephant next to the Phoenix, which can’t attack orthogonally adjacent pieces, and promote to a deadly Golden Bird:
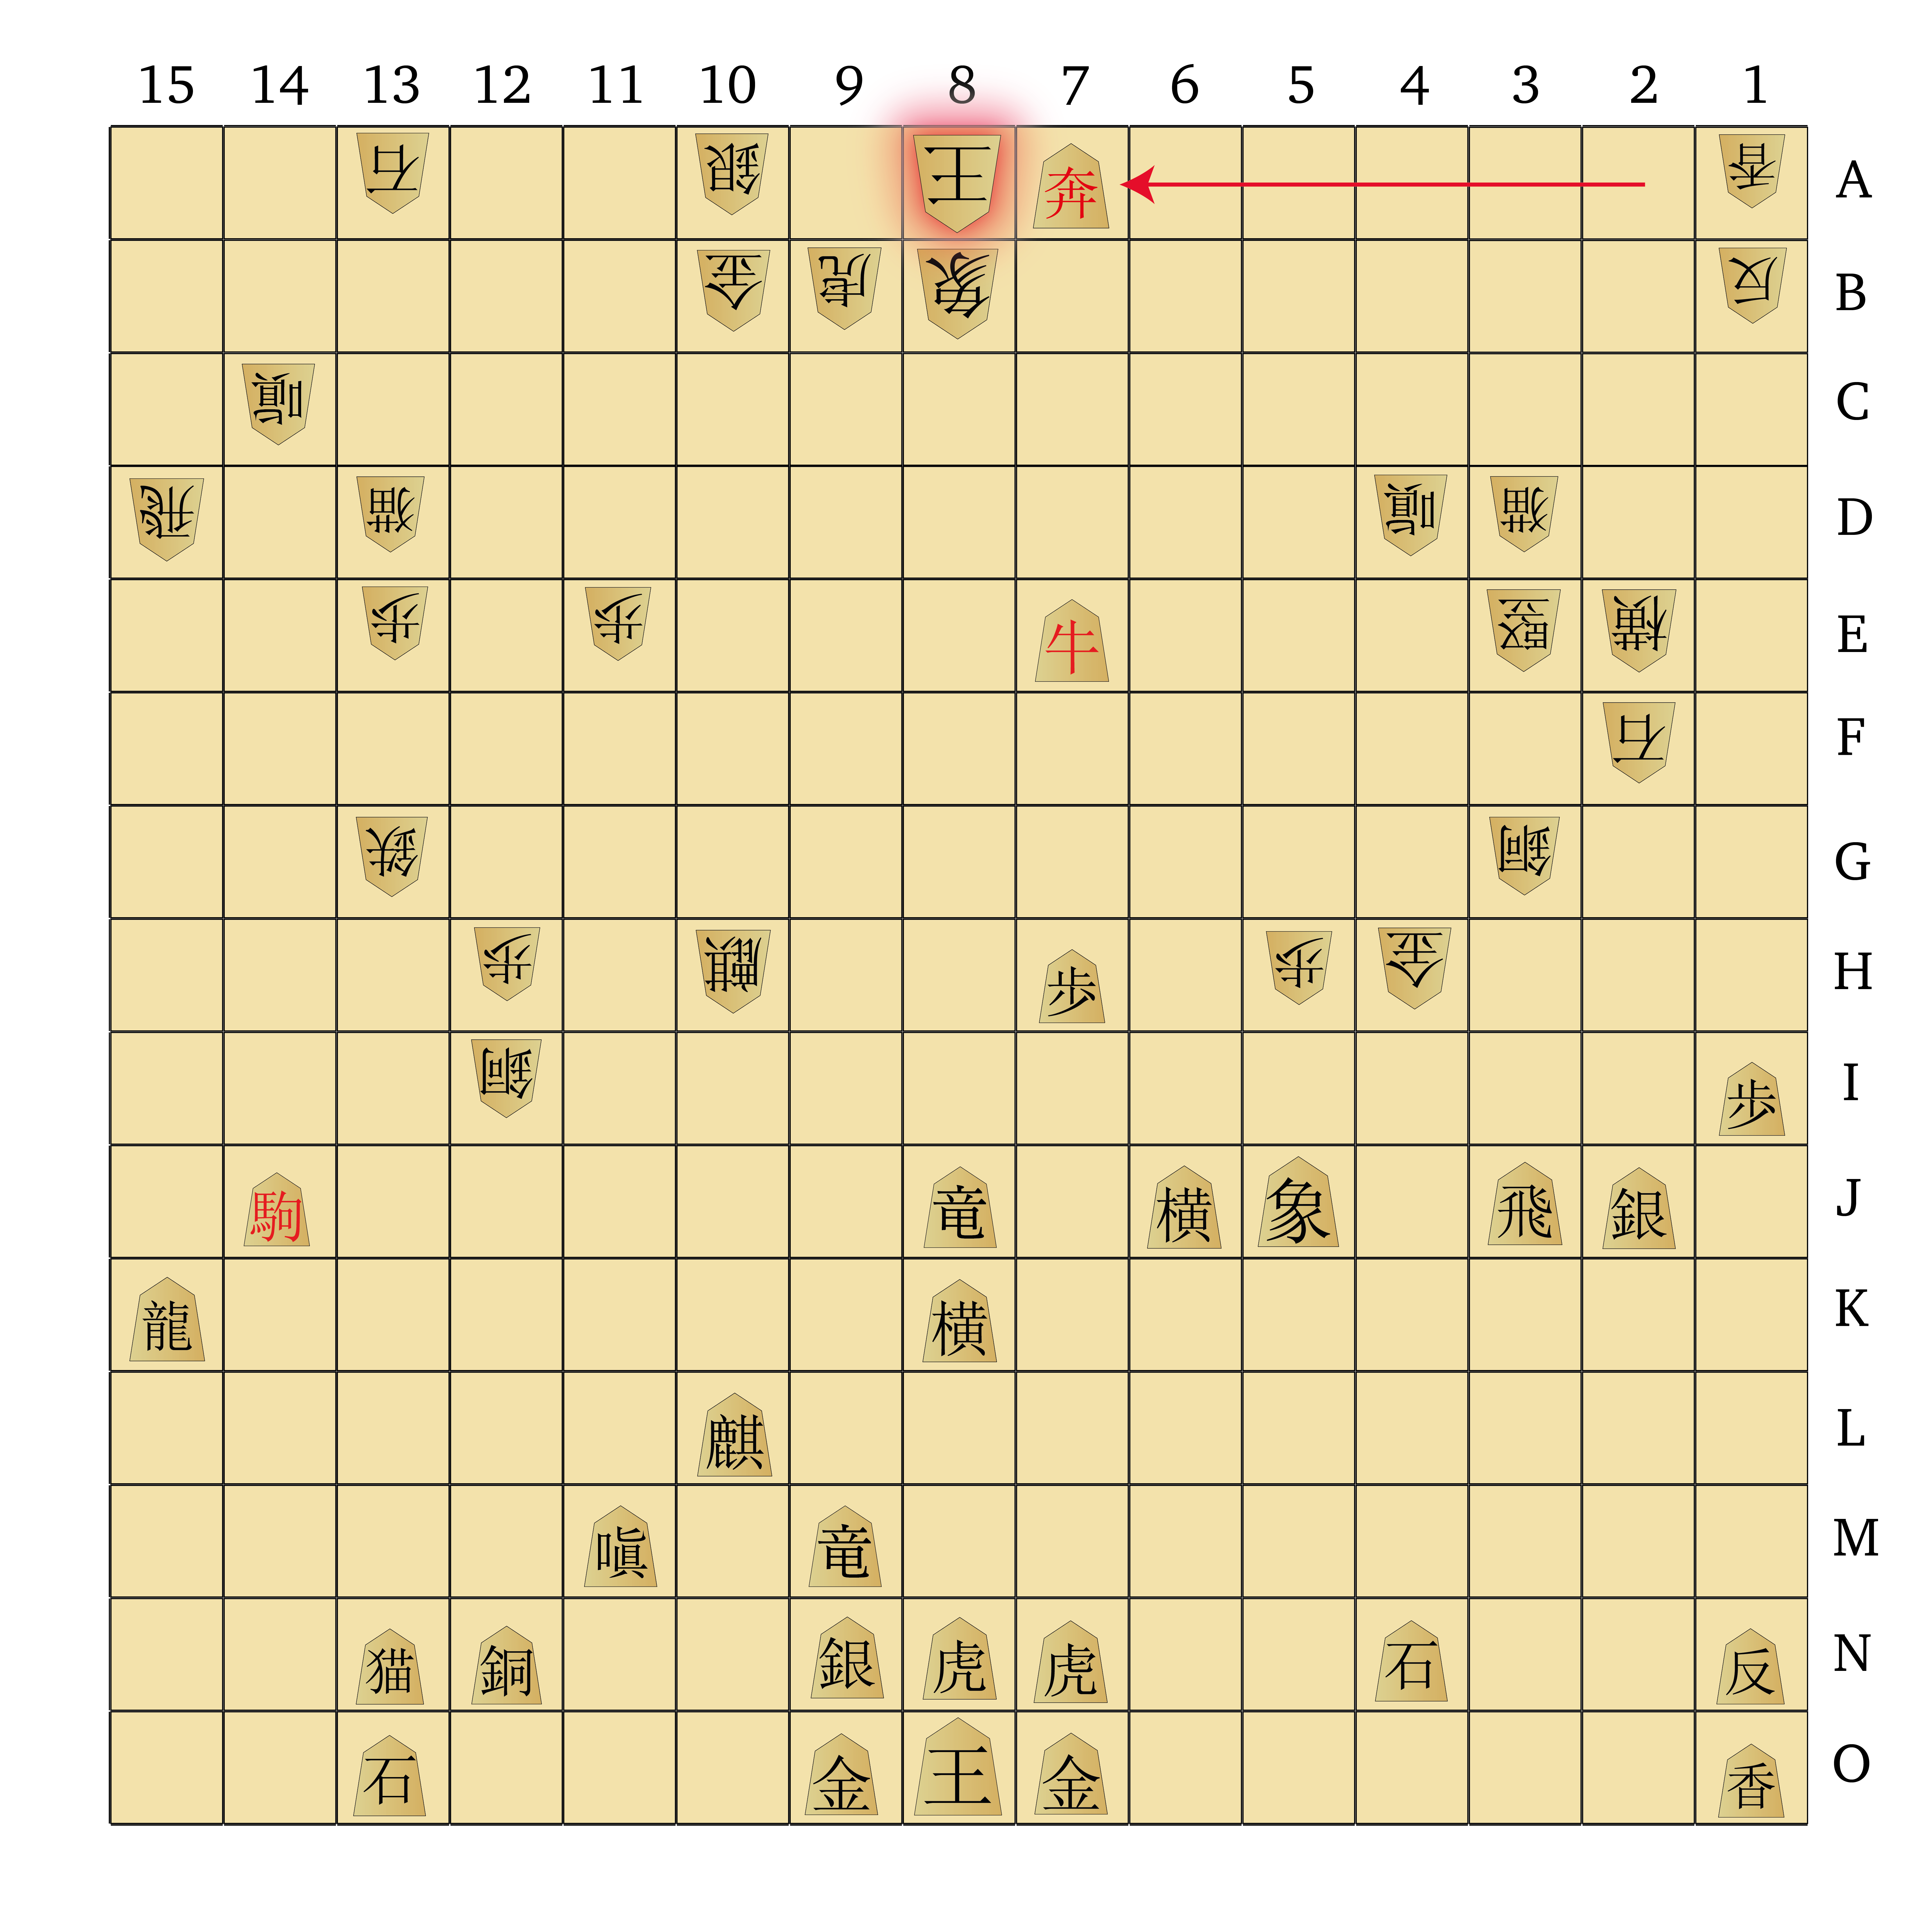
This forces Gote to drop a Gold to block, and then I can drop a Vermillion Sparrow on that key diagonal. Gote is now firmly on the back foot, with only two droppable pieces left, and it’s time for me to end the game in a hail of drops.
There’s no way out for Gote, and their King ends up checkmated by a deadly combo of Mountain Witch and Great Elephant:

Granted, I’m no Shogi master, and the AI is struggling on without a specialised evaluation function for this game, but hopefully you can see that Shinjuu offers interesting checkmating sequences that feel very Shogi-like. Despite the larger board, bigger armies and wackier pieces, the general strategic themes feel very reminiscent of the modern game. Battles for central control, prying open weaknesses in the position with drops, and building up pieces in hand for a final assault — all these aspects of Shogi play are still present.
The moment-to-moment tactics do feel distinct though, as the pieces are generally quite powerful, so choosing the right moment to attack is crucial. Pieces like the Elephants can protect a large number of squares, so using your leaping pieces and strong promoted pieces is important to get around solid defences.
The other sample game has an example of this aspect. In that game, a crucial moment happens on move 250:
Here Sente has had its King forced into the centre, but it’s completely cocooned by a deep fortress of strong defenders. However, Gote drops a Phoenix and promotes to Wooden Dove, which puts the King in check via its 3-square leaping slide! This shows us the danger of having a dense fortress — the King can be forced out via leaping attacks, and in this case if the King hadn’t had this one escape square, this move would have been checkmate.
From there, Gote launches a vicious attack that completely bypasses Gote’s massive central castle, and Sente’s desperate counterattack fizzles due to Gote’s more flexible defensive structure on the back ranks. As Sente’s offensive splutters and dies, Gote seizes the moment and forces an unusual checkmate with Blue Dragon, Great Dragon and Fierce Eagle:

So, while some basic Shogi principles do transfer over, the presence of many strong pieces and leaping attackers changes attack and defence significantly. While Sente could have defended better here, that check on move 250 was a nice refutation of Sente’s attempt at King safety, and once the King was isolated on the back ranks it was difficult to defend against Gote’s assaults. Gote, in contrast, kept the King out of the centre with a looser defensive formation, enabling them to absorb counterattacks well and maintain more escape squares to protect against leaping attacks.
In any case, I hope that some Shogi fans out there might be convinced to give this game a try, as I’d love to see what strong players could do with this game. On more than one occasion I’ve had very exciting endgame attacks in this game, where the path to victory was a spectacular sequence of 20+ drops with both Kings getting pushed all over the board. A tense battle between two strong players could provide quite a spectacle!
Lessons Learned
When I started working on this game, I hoped that I’d have a chance to really test some of the standard assumptions one encounters in discussions about Shogi variants. There are a couple of widely repeated concerns I’ve seen relating to drops-based variants:
- Games with drops should have weak pieces — This point is often justified by pointing at Shogi, Tori Shogi and Wa Shogi, all of which are excellent games and all of which have generally weak pieces. However, a few other examples of larger drops-based games like Okisaki Shogi and Futashikana Shogi seem to show that more powerful pieces don’t break the game, and of course Crazyhouse uses the strong Chess army on the tiny 8×8 board and is still great fun to play (though White has a nice advantage).
- Drops-based games won’t work on large boards — I’ve seen this brought up often in passing; people will say things like ‘imagine playing 12×12 Chu Shogi with drops, that would be preposterous!’ Of course they’re completely right about this, but I wasn’t sure that the general point follows; after all, Chu Shogi is completely crammed with super-powered pieces and the start position is much higher density than modern Shogi (66.7% vs 49.4%).
Having spent ridiculous amounts of time on Shinjuu Shogi at this point, and a number of related drops-based variations during testing, I’ve convinced myself that both these issues are not as bad as they seem and the pitfalls they identify can be avoided.
Firstly, powerful pieces seem quite at home in drops-based games, so long as they have weaknesses that prevent them from dominating the board. In Shinjuu, I accomplished this by using pieces with clear blind spots. The selection of weaker pieces helps here, and ideally some of those pieces should provide an effective countermeasure to the strong pieces. Okisaki and Futashikana Shogi replace the Shogi Knight with the strong Chess Knight, which I think works well because the Knight can attack the Queen from squares it can’t see (and conversely, Knight + Queen is a potent attacking combination).
As far as large boards go, again I found this to be a matter of balance and piece density. The general approach in large drops-based variants seems to be to lower the density relative to modern Shogi, but I’ve found it equally playable to keep the piece density around 50%. Having done extensive testing on 11×11 with anywhere from 23 to 33 pieces per player, I found that lower densities tended to lead to less exciting tactics and somewhat shorter games, while higher densities were packed with tactical shots but were either overly long (due to an overabundance of defensive resources) or overly short (due to an overabundance of powerful pieces that could checkmate with a single drop), depending on other factors like piece selection. The sweet spot was right in the middle, at or near the 50% density of modern Shogi.
I’ve since begun experimenting with a 12×12 drops-based game called Yuudai Shogi (Grand Shogi) which follows these principles, and the results have been interesting:
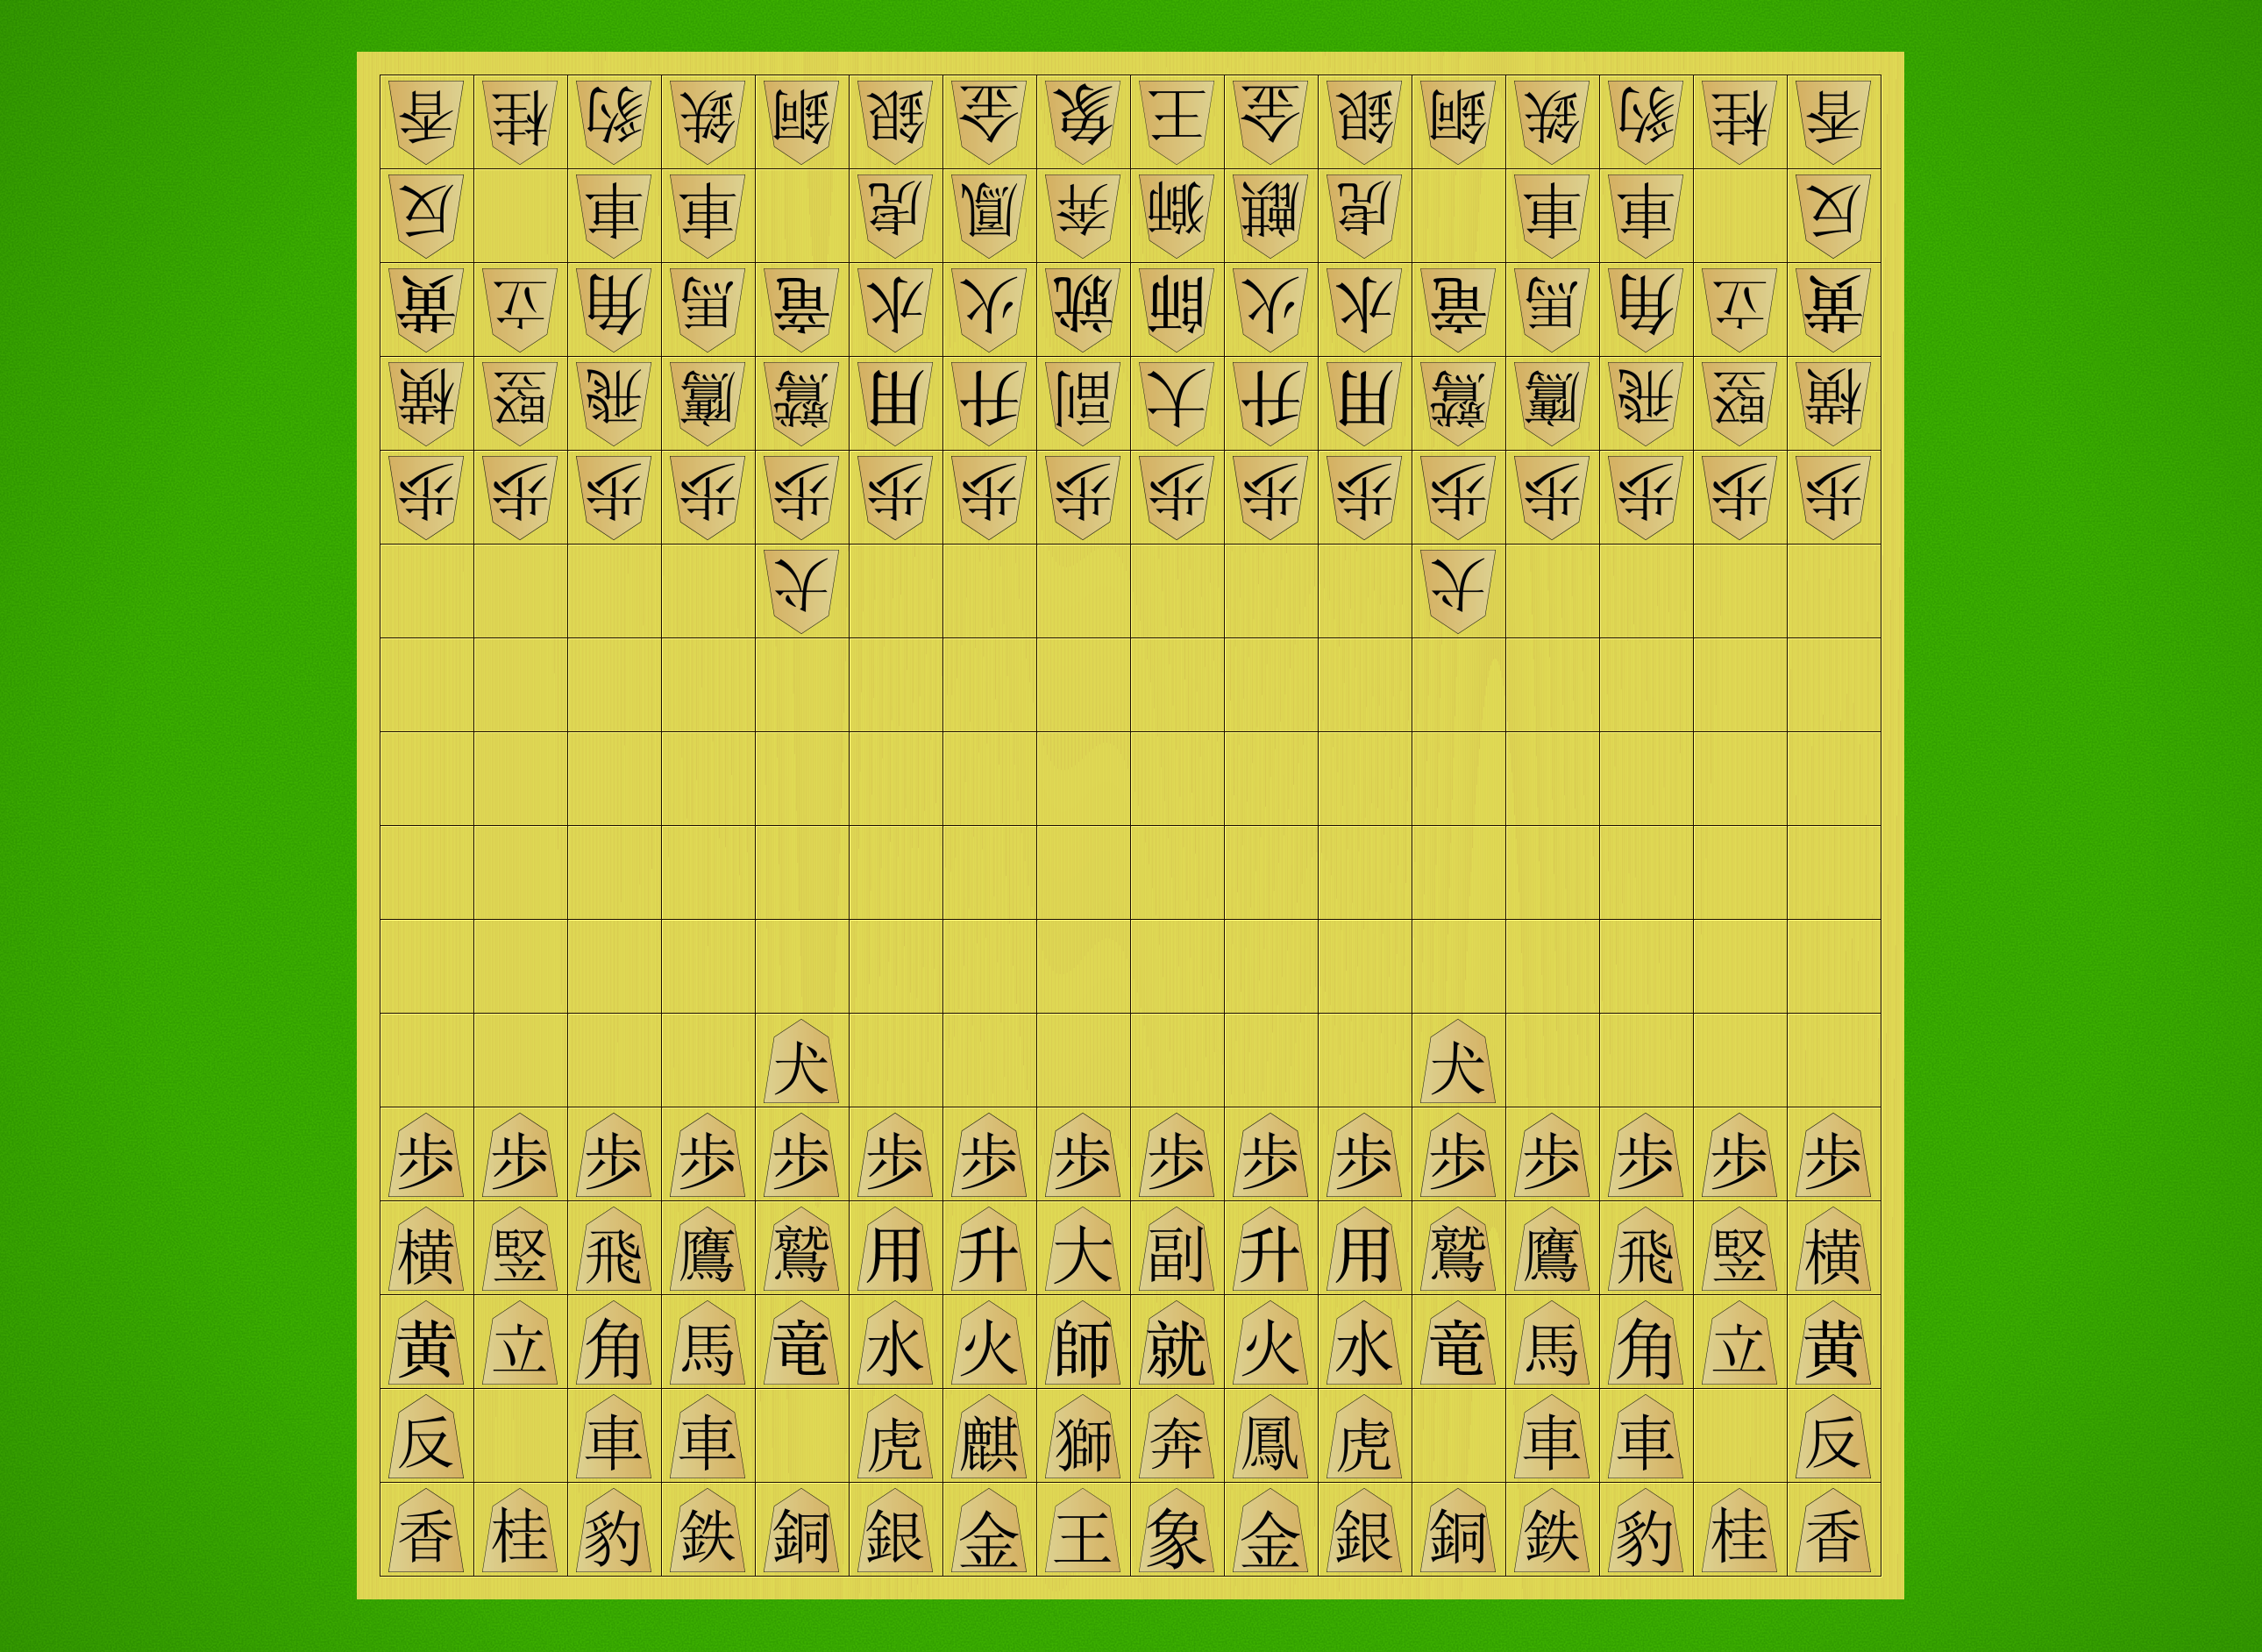
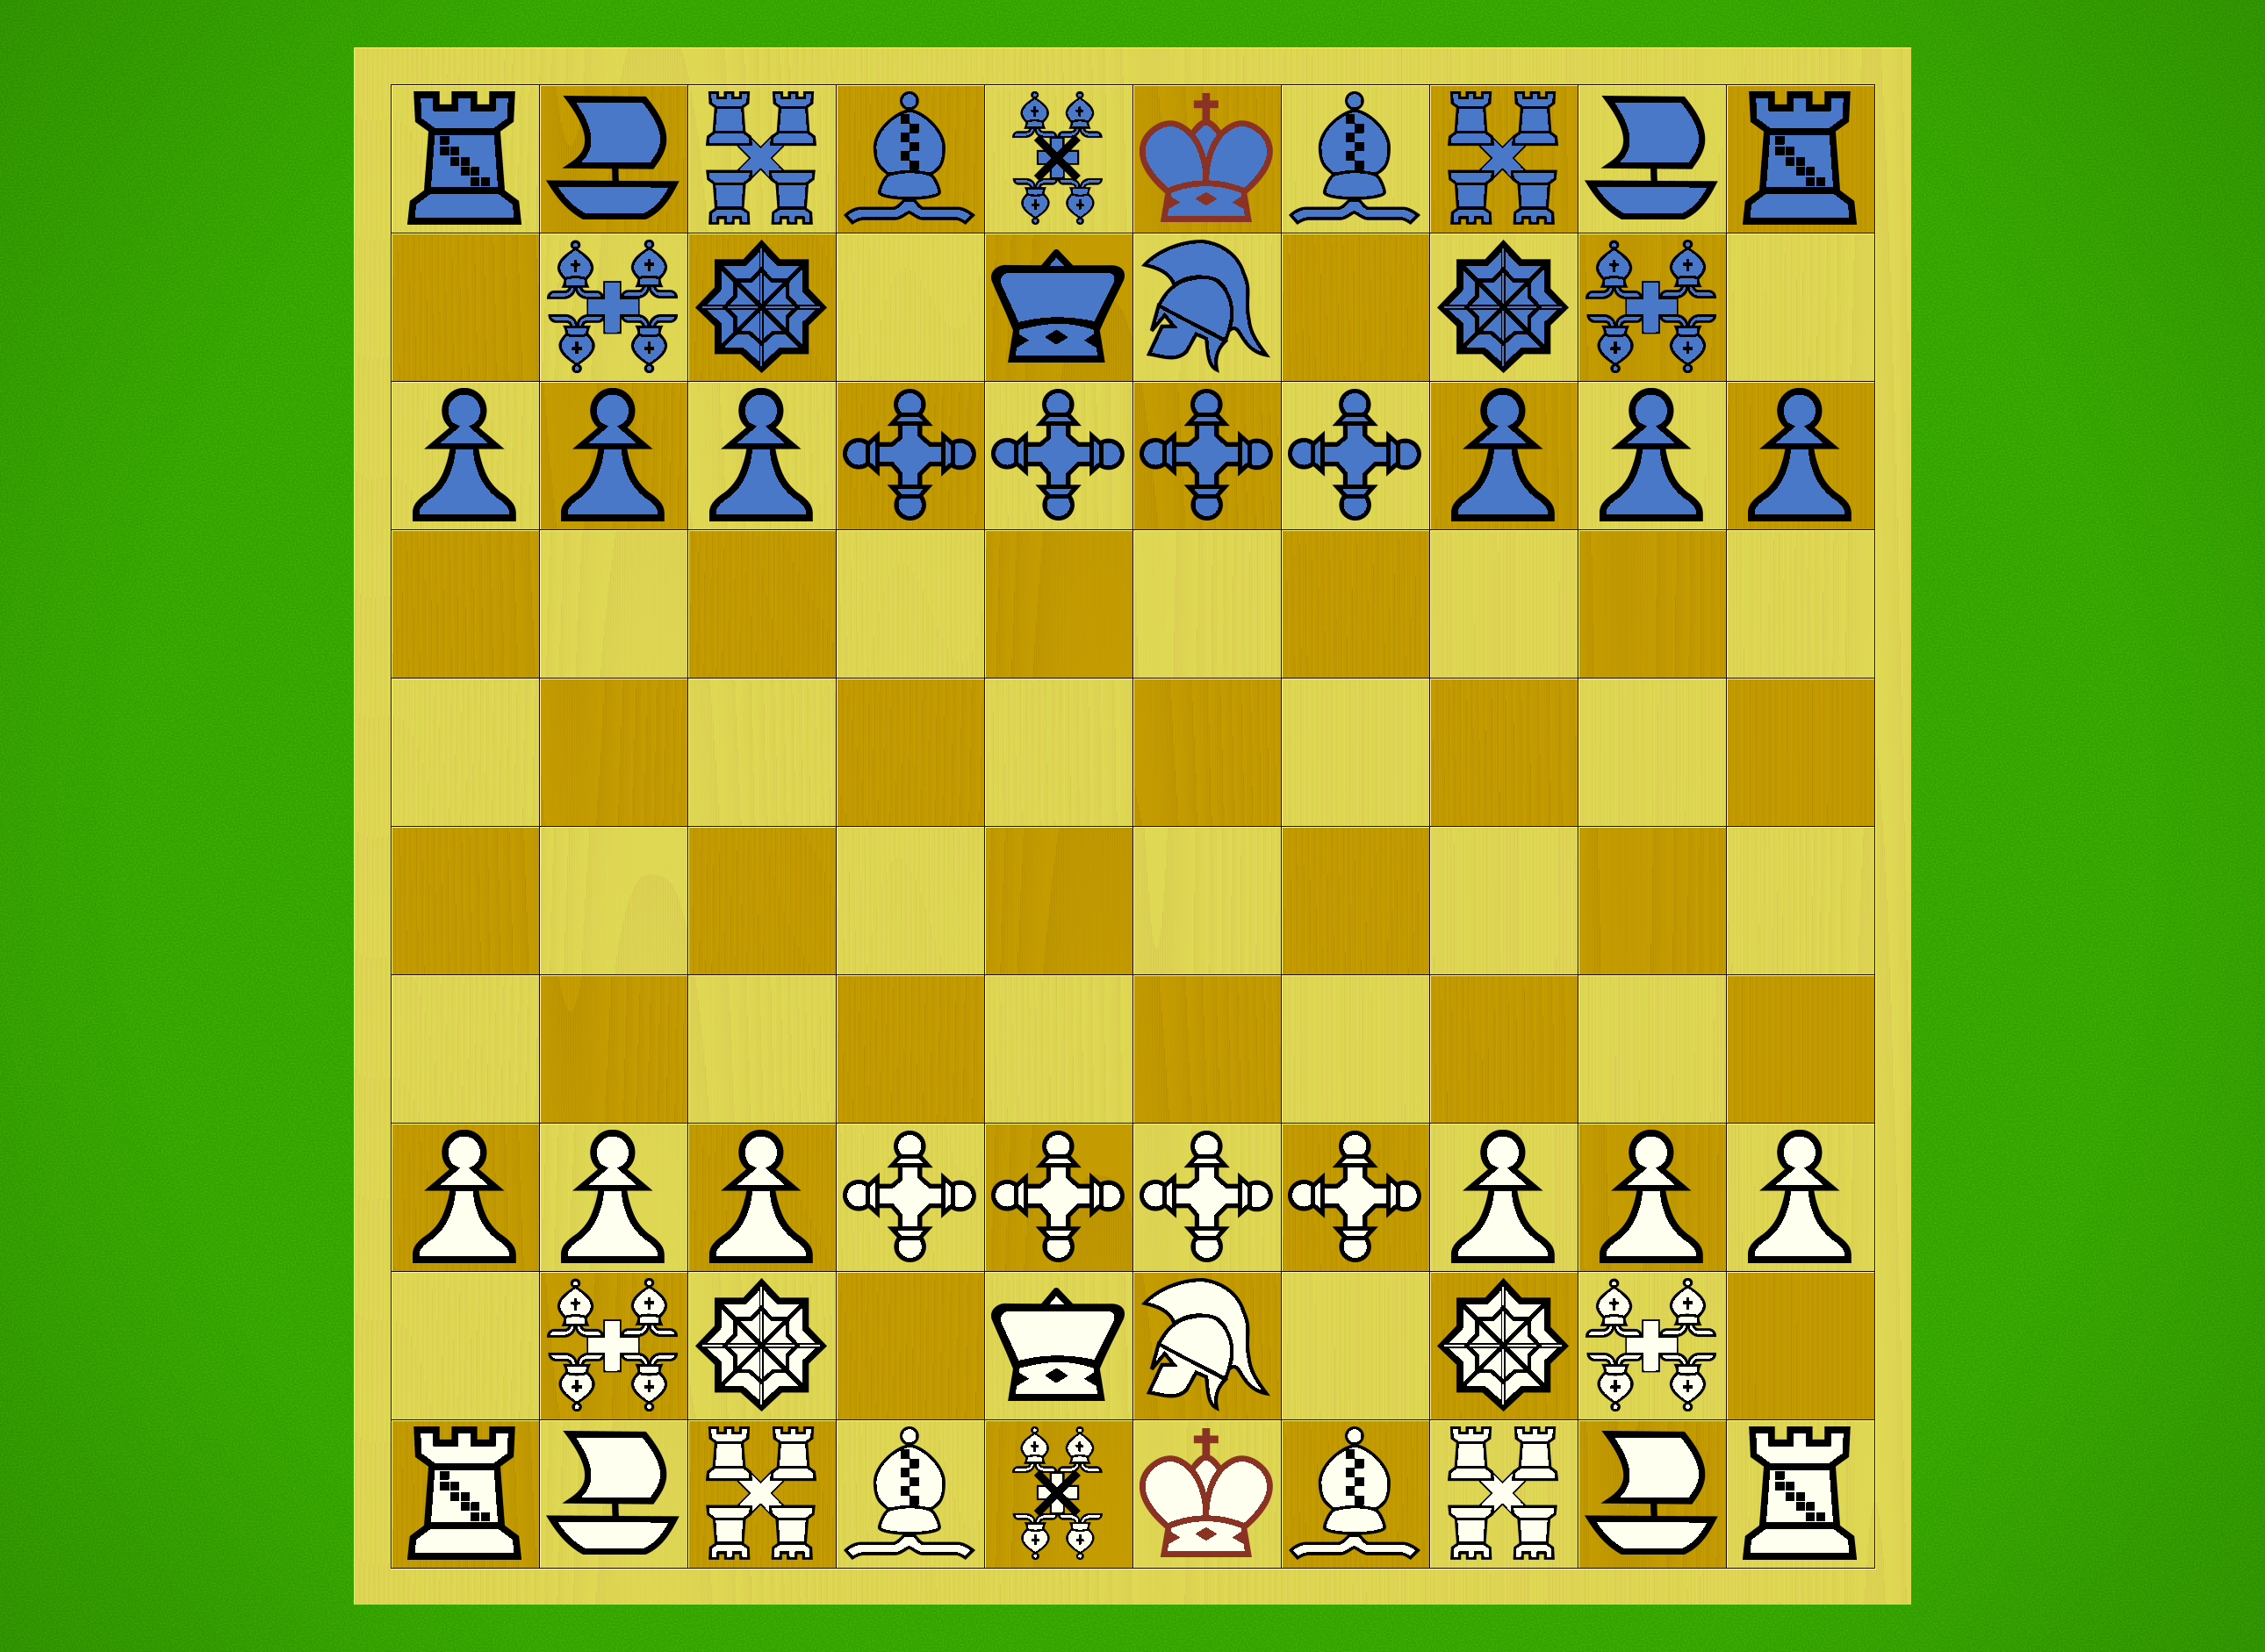
Yuudai Shogi initial position with traditional kanji pieces. 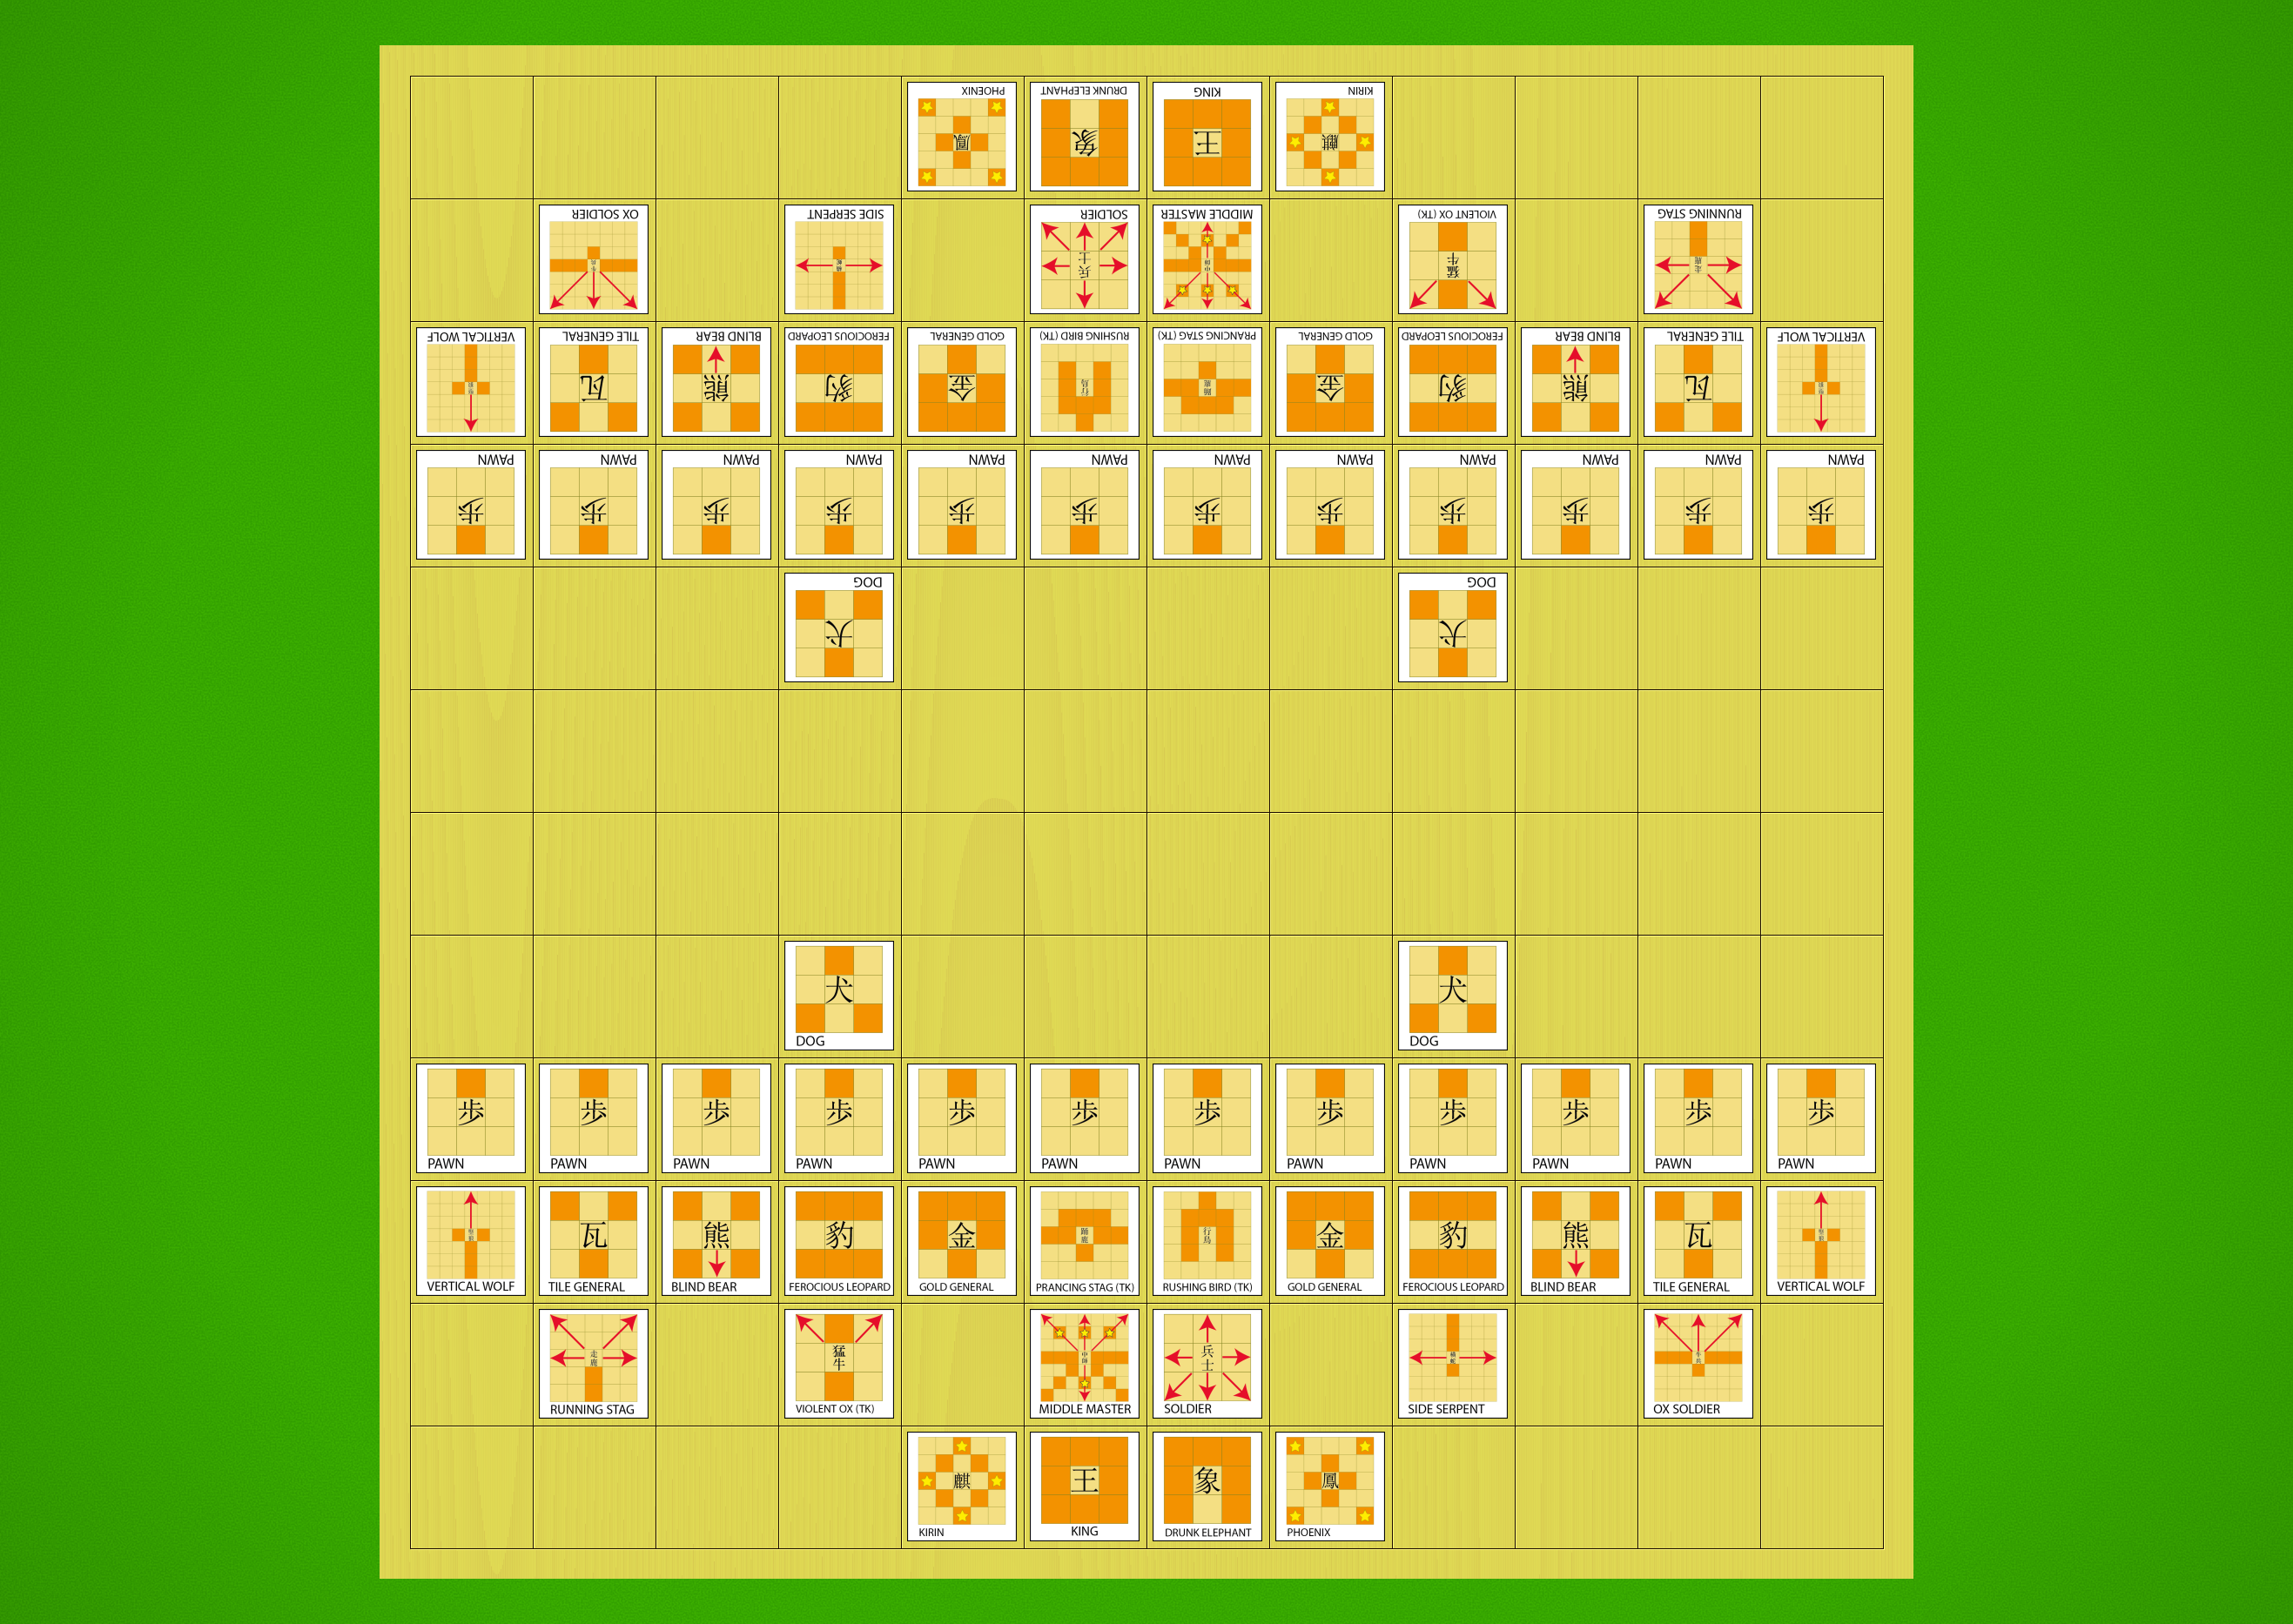
Yuudai Shogi initial position with diagrammatic pieces. 
Yuudai Shogi sample game (396 moves).
The sample game above is actually unusually long; most test games so far have been under 300 moves (against AI with 120 seconds of thinking time). The piece density is much less than Chu Shogi (precisely 50% in Yuudai), and the piece selection is very different as well. Again I selected pieces with limitations, and there are no super-powered monstrosities like the Lion of Chu Shogi.
This game is still very much in development, but so far it’s quite playable. Games are over in a reasonable amount of time, given the board size and number of pieces, and play maintains momentum and intensity despite the huge armies protecting each King. I imagine that between two very strong players, some games might top 500 moves. Having said that, if someone is willing to spend the time necessary to master a huge 12×12 game with 35 types of pieces, I suspect they’ll have the patience needed to fight such an epic battle!
I should stress that I’m still at the early stages of these experiments, and I may end up finding that there are pretty hard limits on board size or other elements when building drops-based games. But for the time being at least, I think there is a lot of promising and mostly untapped design space here that should be investigated further.
If I were to revise the general wisdom on drops-based games, I would just soften it a bit, and say that when building games of this type on large boards with strong pieces, just be prepared to do a lot of work. Chess is a generally remarkable game category in that the basic framework remains robust and playable even when we use extremely powerful pieces and/or go nuts with board sizes and other aspects (Tenjiku Shogi is a fine example of this phenomenon). For better or worse, this has allowed Chess variant design to be pretty wide open, given that one can place just about anything on the board and the resulting game will probably still work. But when we introduce drops and pieces keep coming back to life, suddenly things get a lot more brittle, and relatively small changes can have large effects.
Given the nature of drops, perhaps this isn’t so surprising; a capture in a drops-based game constitutes a significant swing in material value between the two players, and allowing any piece to suddenly materialise nearly anywhere on the board necessarily amplifies its potential impact. Combine that with complicated positions allowing hundreds or even thousands of possible moves (when using large boards), and we can see why certain non-linearities of effect start coming into play.
So, at this point my (very) basic suggestions are:
- Drops-based games on large boards need armies where pieces have weaknesses and blind spots (note that pieces having weaknesses isn’t the same as a piece being weak!).
- Piece density should be at or around 50% to avoid overcrowding and games dragging on too long, or ending too suddenly under a hail of super-powered drops.
- Even small changes in the composition of the armies can have large effects when drops are involved, so when you make a change, test, test, and test again!
Over time I hope to build on these principles and develop more detailed tips, but for now, I hope at least some other Shogi variant designers might be inspired to give larger drops-based games a try and share their experiences.
Of course, these ideas are built on the assumption that we will keep drops exactly as they are in Shogi, but this doesn’t need to be the case. What might happen, for example, if we took Chu Shogi, chopped out a few pieces to reduce density and added drops, but Lions, Free Kings, Dragon Kings and Dragon Horses were permanently eliminated from the game when captured? Or what if we introduced a system like Kamikaze Mortal Shogi, where captured pieces degrade in power until eventually they fade away completely? Or what if we restrict drops to only one’s own half of the board? Or what if we allowed only a small number of captured pieces to be held in hand for drops, with any additional captured pieces being removed from the game instead? So far as I know, few of these ideas have been tried with large-board drops-based variants. At this point I’m fairly convinced that, with a bit of clever engineering, drops could be used in nearly any size of Shogi variant.
Next Moves
Now that testing is mostly done, I plan to release Shinjuu Shogi in a future Ai Ai update. At that point, I’d welcome any feedback from players, and of course I’d be happy to play games with readers of this blog via Ai Ai’s online functionality.
During the construction of Shinjuu Shogi I’ve learned a great deal about the challenges of designing larger drops-based Shogi variants, so I’ve been applying this experience to my development of 12×12 Yuudai Shogi. Over the next few months I plan to put this game through an intensive testing regime as I did Shinjuu Shogi, and hopefully at the end of all that I’ll have a game worthy of release.
While working on Shinjuu I also constructed several other 11×11 modern Shogi variants, all of which incorporated pieces from Taikyoku Shogi. Each game focuses on a particular thematic category of pieces, like dragons, cats, and so on. I’ve been testing these in tandem with Shinjuu, and have found them to be fun introductions to the wild piece selection of the enormous Taikyoku Shogi. In the future I will feature these games as well, in particular Shouryu Shogi (Rising Dragon Shogi) and Puppy Shogi, which I believe to be the most promising games.


![Dai Shogi 420 -- Move 240 [Recovered]-01](https://drericsilverman.com/wp-content/uploads/2020/09/dai-shogi-420-move-240-recovered-01.png)