
What with one thing and another, I haven’t had the time or energy to write gaming-related posts for a while, and in particular annotating very long games of large Shogi variants just seemed a bit too much to handle. However, lately I’m in desperate need of distractions to keep positive and motivated, so it’s a good time to get back to writing. For my first post in ages I decided to jump right into the deep end — so here we have an annotated Dai Shogi game! If you’re new to Dai Shogi, please check out my detailed introductory post on the game here.
You may well ask, quite reasonably, why am I doing the Dai Shogi game before the Chu Shogi one I’d promised to do? Wouldn’t the Chu Shogi game be about half as long, and have more resources available for you to draw on when analysing it? Yes to both of those questions, but I feel a bit more urgency to promote Dai Shogi than Chu Shogi; Chu Shogi is already pretty well-regarded among those who’ve heard of it, and is frequently referred to as one of the best Chess-type games ever created. Dai Shogi, on the other hand, is often thought to be Chu’s boring, slower sibling, and this idea seems to have been spread largely by people who’ve never actually played the game.
I feel this is very unjust, as Dai Shogi is a beautiful game that in my view deserves just as much attention as its slightly smaller brother, and has unique charms that set it apart from Chu and from the other large-board Shogi variants. So, I hope that by providing some in-depth discussion of the game, perhaps a few people out there might choose to forget the nay-sayers and give the game a shot.
In fact, as far as I can tell, this may well be the only annotated Dai Shogi game in English on the Internet right now. The game I’ve chosen was played on Richard’s PBEM Server and is listed, somewhat confusingly, as Chu Shogi Game 420. This is due to the fact that Dai Shogi is a sub-option of the Chu Shogi section on the PBEM Server. Our combatants are Sean Humby (shumby) playing Black, and tkr101010 playing White. We will follow Shogi convention, and have Black at the bottom of each diagram and playing upward, and White at the top of the board playing downward. I provide a diagram every ten moves, with some extra ones at the very end of the game.
This game is actually somewhat shorter than most of the Dai Shogi games I’ve played, ending at 441 moves, but throughout there’s no shortage of action, clever manoeuvring, and sharp tactical exchanges. I think this game offers a nice peek at what Dai Shogi has to offer, and I hope it will inspire some of you out there to give it a try.
Before we get started, I’ve placed my Dai Shogi move reference guides here again, in case you’d benefit from a reminder of how the pieces move and promote:

Dai Shogi reference sheet (1-kanji pieces)

Dai Shogi reference sheet (2-kanji pieces)
You can also find PDF versions here:
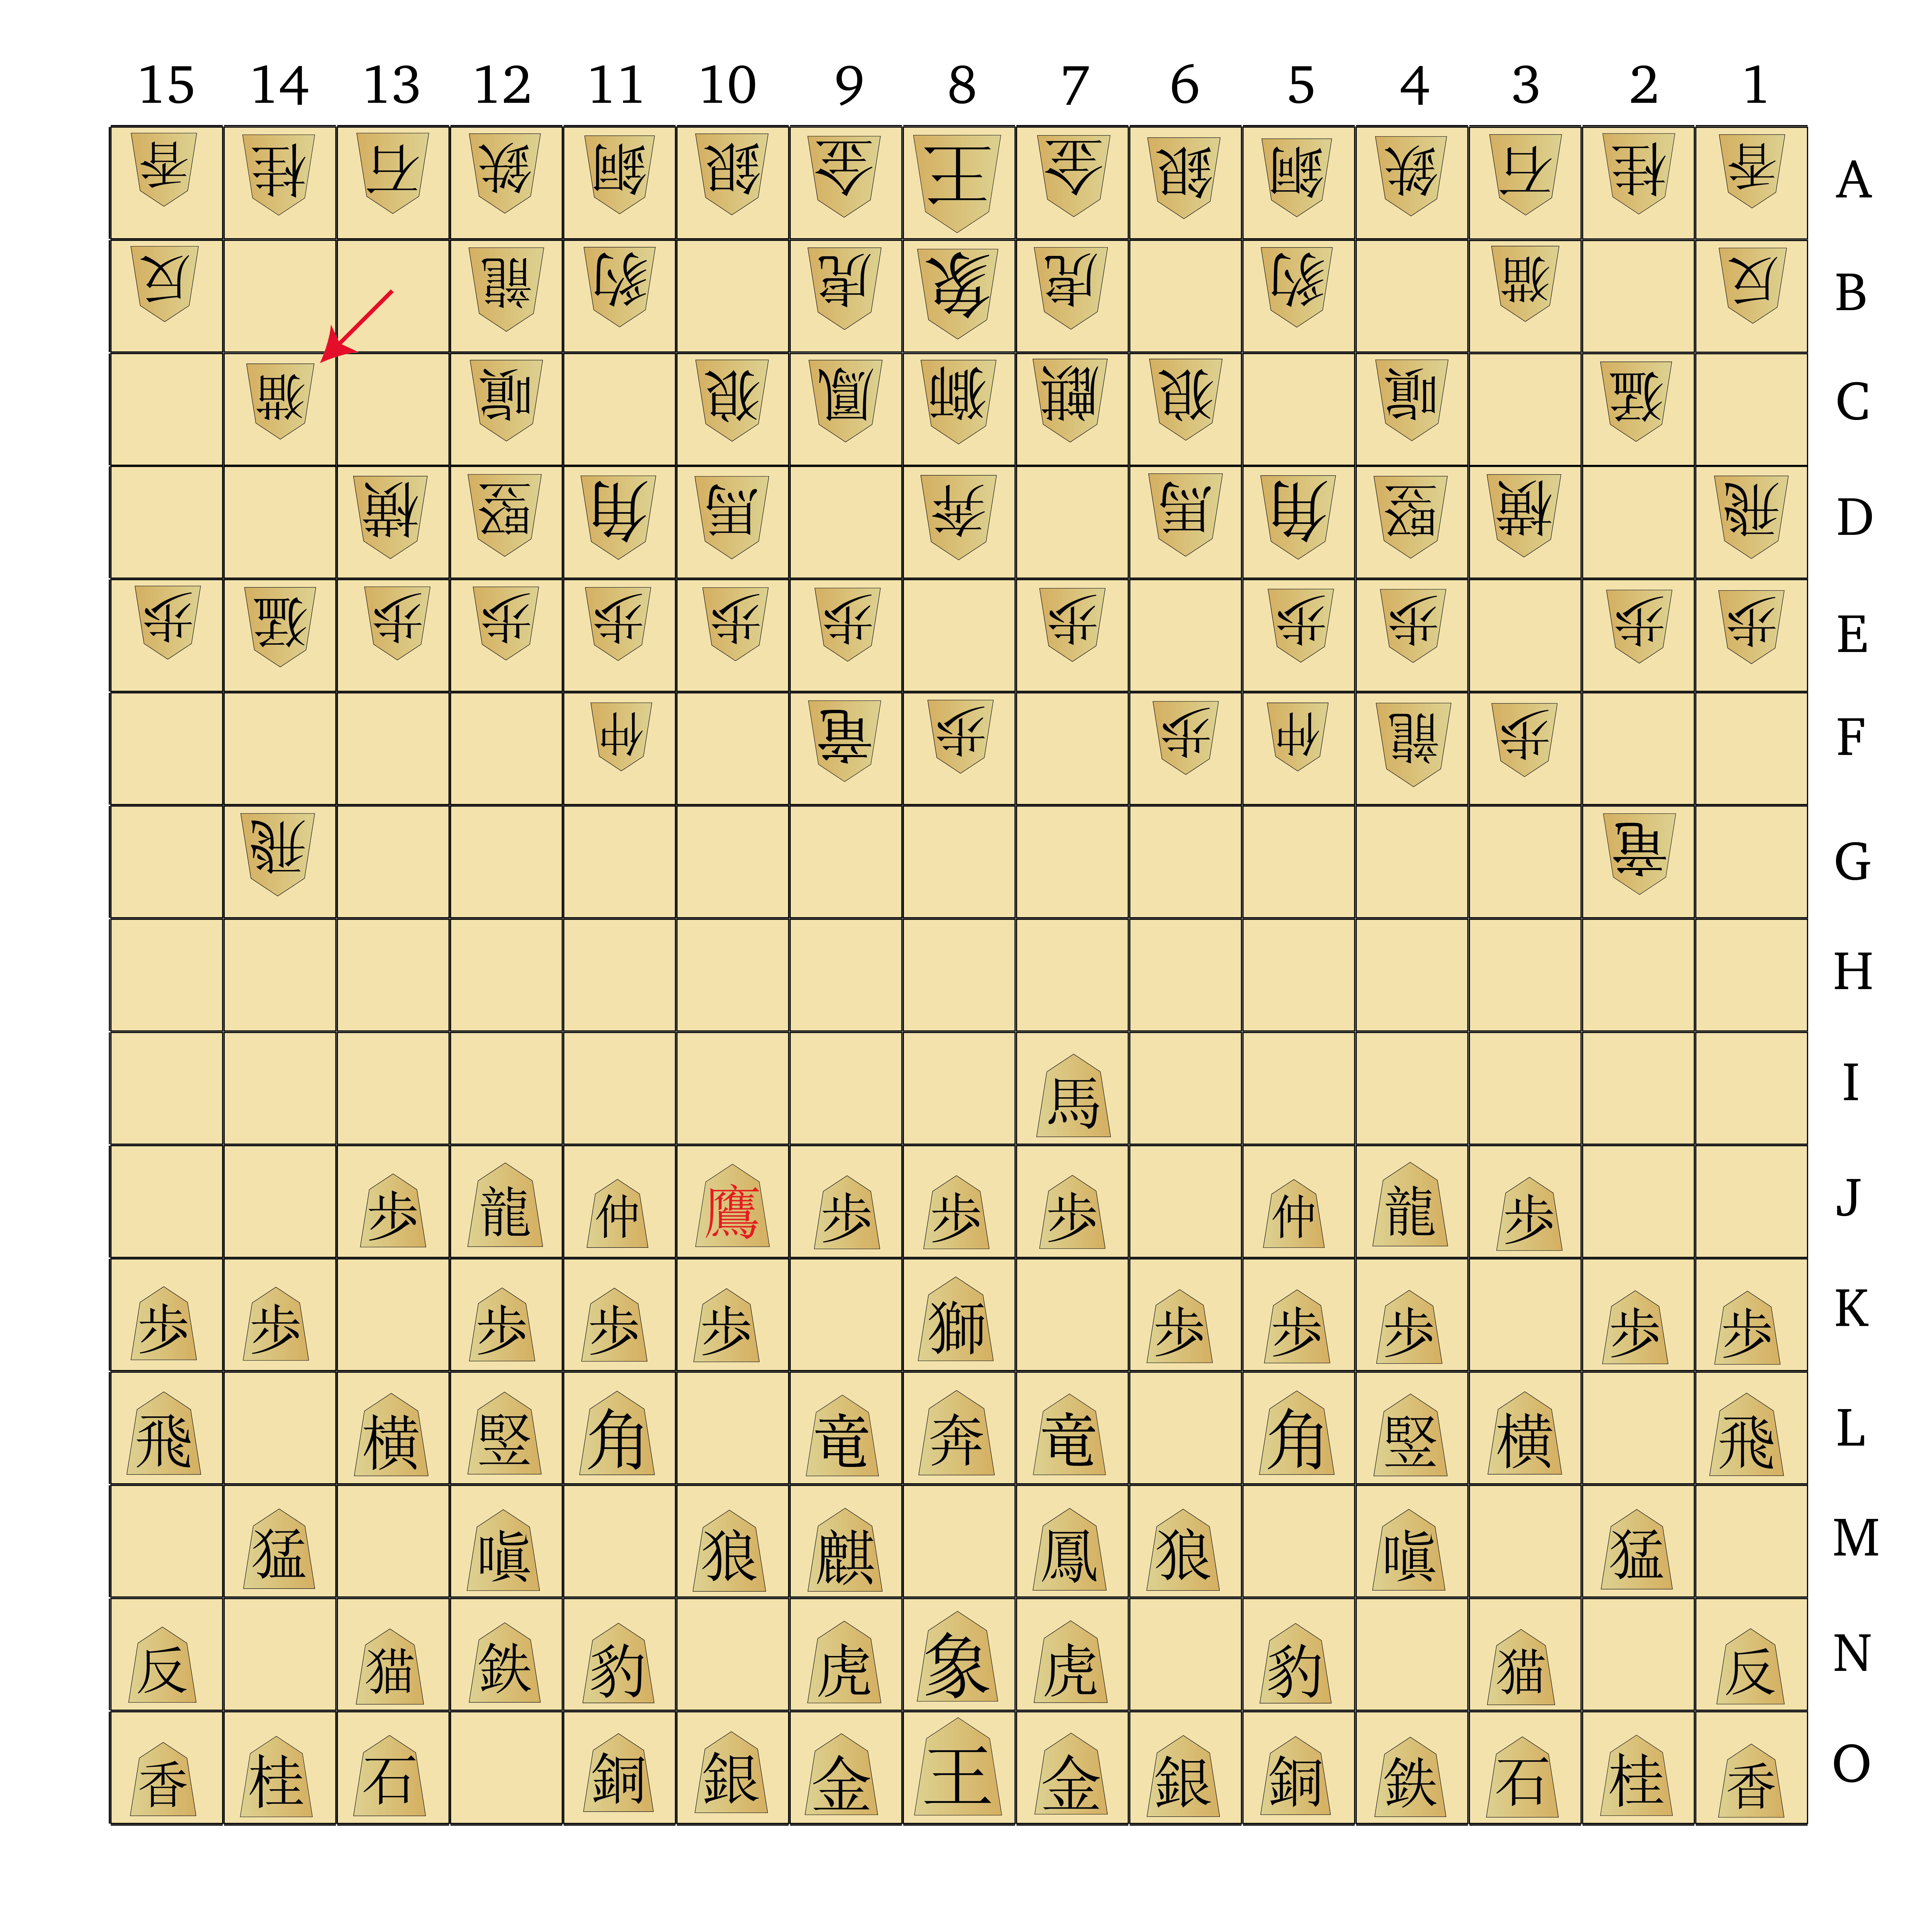
Now that’s out of the way, let’s get started! First, let’s remind ourselves of the starting position of Dai Shogi:

The Dai Shogi starting position is slightly more convenient than Chu Shogi’s, in the sense that the Kings both start already ensconced in a pretty reasonable castle. They are surrounded by strong defensive pieces from the beginning — a Drunk Elephant to the front, a Blind Tiger to the front-left and front-right, and Golds on both flanks. As a result of this both players focus entirely on developing their pieces in the opening, as King safety is already sorted out.

1 P-7j 2 P-8f 3 P-9j 4 DK9d-8e 5 P-3j 6 DK-7f 7 P-13j 8 DK7d-8e 9 DH-9i 10 DK-9f
Right from the start both players adopt a fairly aggressive posture. Black opens lines for his Dragon Kings, Dragon Horses and Flying Dragons with four Pawn moves, leaving a lone Dragon Horse perched atop the Pawn on 9j. White takes things a step further, opting to move only the central Pawn and bring both his Dragon Kings straight to the front of his formation. Both players appear ready to fight!

11 DH-10i 12 DK-7g 13 DHx14e+ 14 FD-12b 15 +DH-10i 16 R-14d 17 FD-12j 18 R-14g 19 DH-7i 20 P-6f
Black responds to White’s provocation by pulling off a sneaky manoeuvre with his Dragon Horse — he takes the Pawn on 14e, where neither the Rook nor the Flying Dragon can retaliate. White moves the Flying Dragon out of harm’s way, leaving Black with a gain of initiative and his Dragon Horse now promoted to a Horned Falcon. White brings out his Rook from the 15th file and sets it up in defence of his advanced Dragon King. Somewhat ominously, White then advances the Pawn on 6e, suggesting a path of egress for the Lion on 8c.
In this opening we can get a taste for the sheer variety that is possible in the early stages of a Dai Shogi game. While the board is large and progress can seem slow, both players also have a plethora of very powerful pieces lurking just behind that first layer of Pawns. So a Dai Shogi opening can be slow and stately, or aggressive and tactical, or often a mix of both.
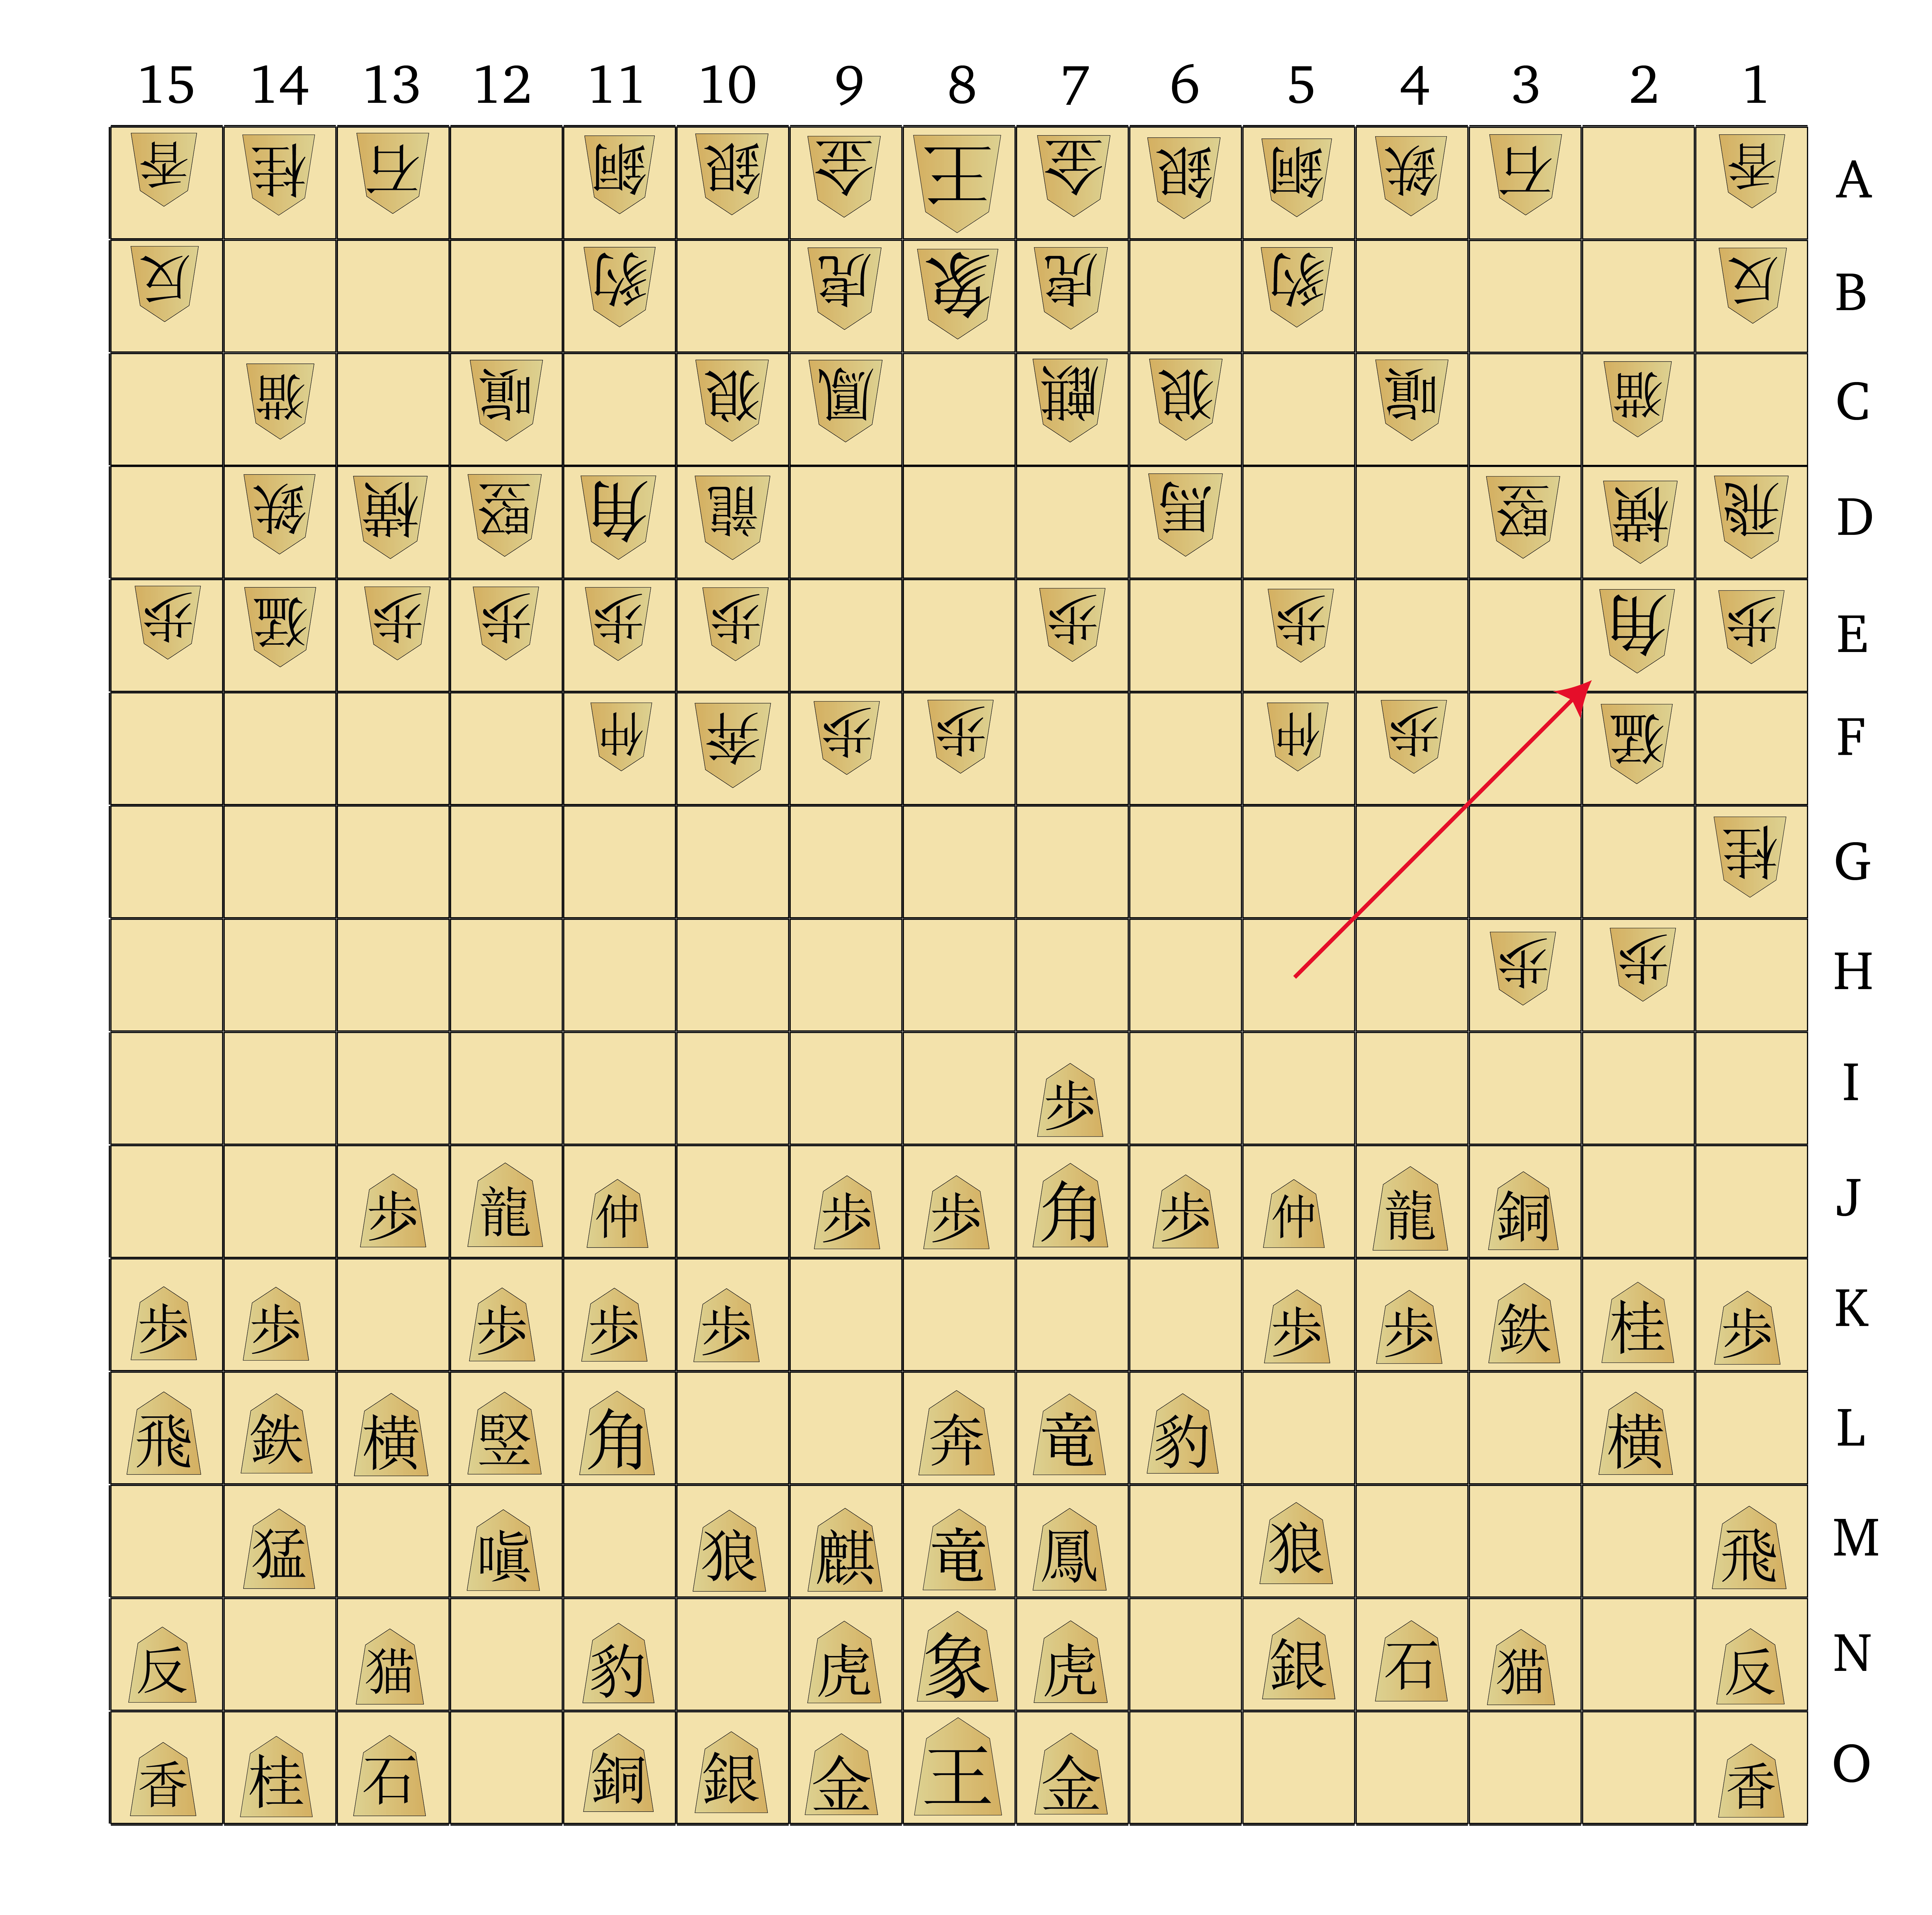
21 +DH-10j 22 DK-2g 23 FD-4j 24 P-3f 25 P-8j 26 FD-4f 27 Ln-8k 28 VO-14e 29 I-12n 30 CS-14c
Here we start to see both players beginning to shore up their flanks. In Dai Shogi the central files around the King are thick with the strongest pieces in the game, so attacking in the middle is a difficult proposition. Instead, advancing along the flanks is more typical, as players develop pieces along the sides of the board, eventually aiming to draw out those powerful central pieces and begin eroding the opponent’s defences.
White shows their intent to attack along the right side, bringing their Dragon King over to the 2-file from the centre and advancing the Flying Dragon behind it. At the same time they bring up their Violent Ox on the left to defend the Rook on his forward outpost. Black also starts progressing on both flanks, bringing forward their Flying Dragon on the right and the Iron General on the left. They also bring the Lion forward; clearly Black noticed White’s advancement of the 6-Pawn and doesn’t want to be caught unawares by White’s Lion.
31 I-4n 32 I-13b 33 P-6j 34 I-13c 35 I-13m 36 I-14d 37 I-14l 38 DH-9d 39 P-3i 40 DHx2k+
Both players now take a moment to make a number of Iron General moves on the left side. This may seem odd, but in Dai Shogi, as in Chu Shogi, we should never forget about advancing the weaker pieces to the front lines. Pawns can only capture forward, and therefore can’t protect one another, so they rely on the protection of the Generals and other short-range pieces. Without protection your Pawn line will be weak, allowing the opponent’s mobile long-range pieces to gobble them up and open up your camp to attack.
White then wastes no time pressing their attack on the right, bringing forward a Dragon King which then pierces into Black’s right flank, taking out the pawn on 2k. The now-promoted Dragon King is backed up by the Dragon King on 2g, giving White a strong attack down that file.
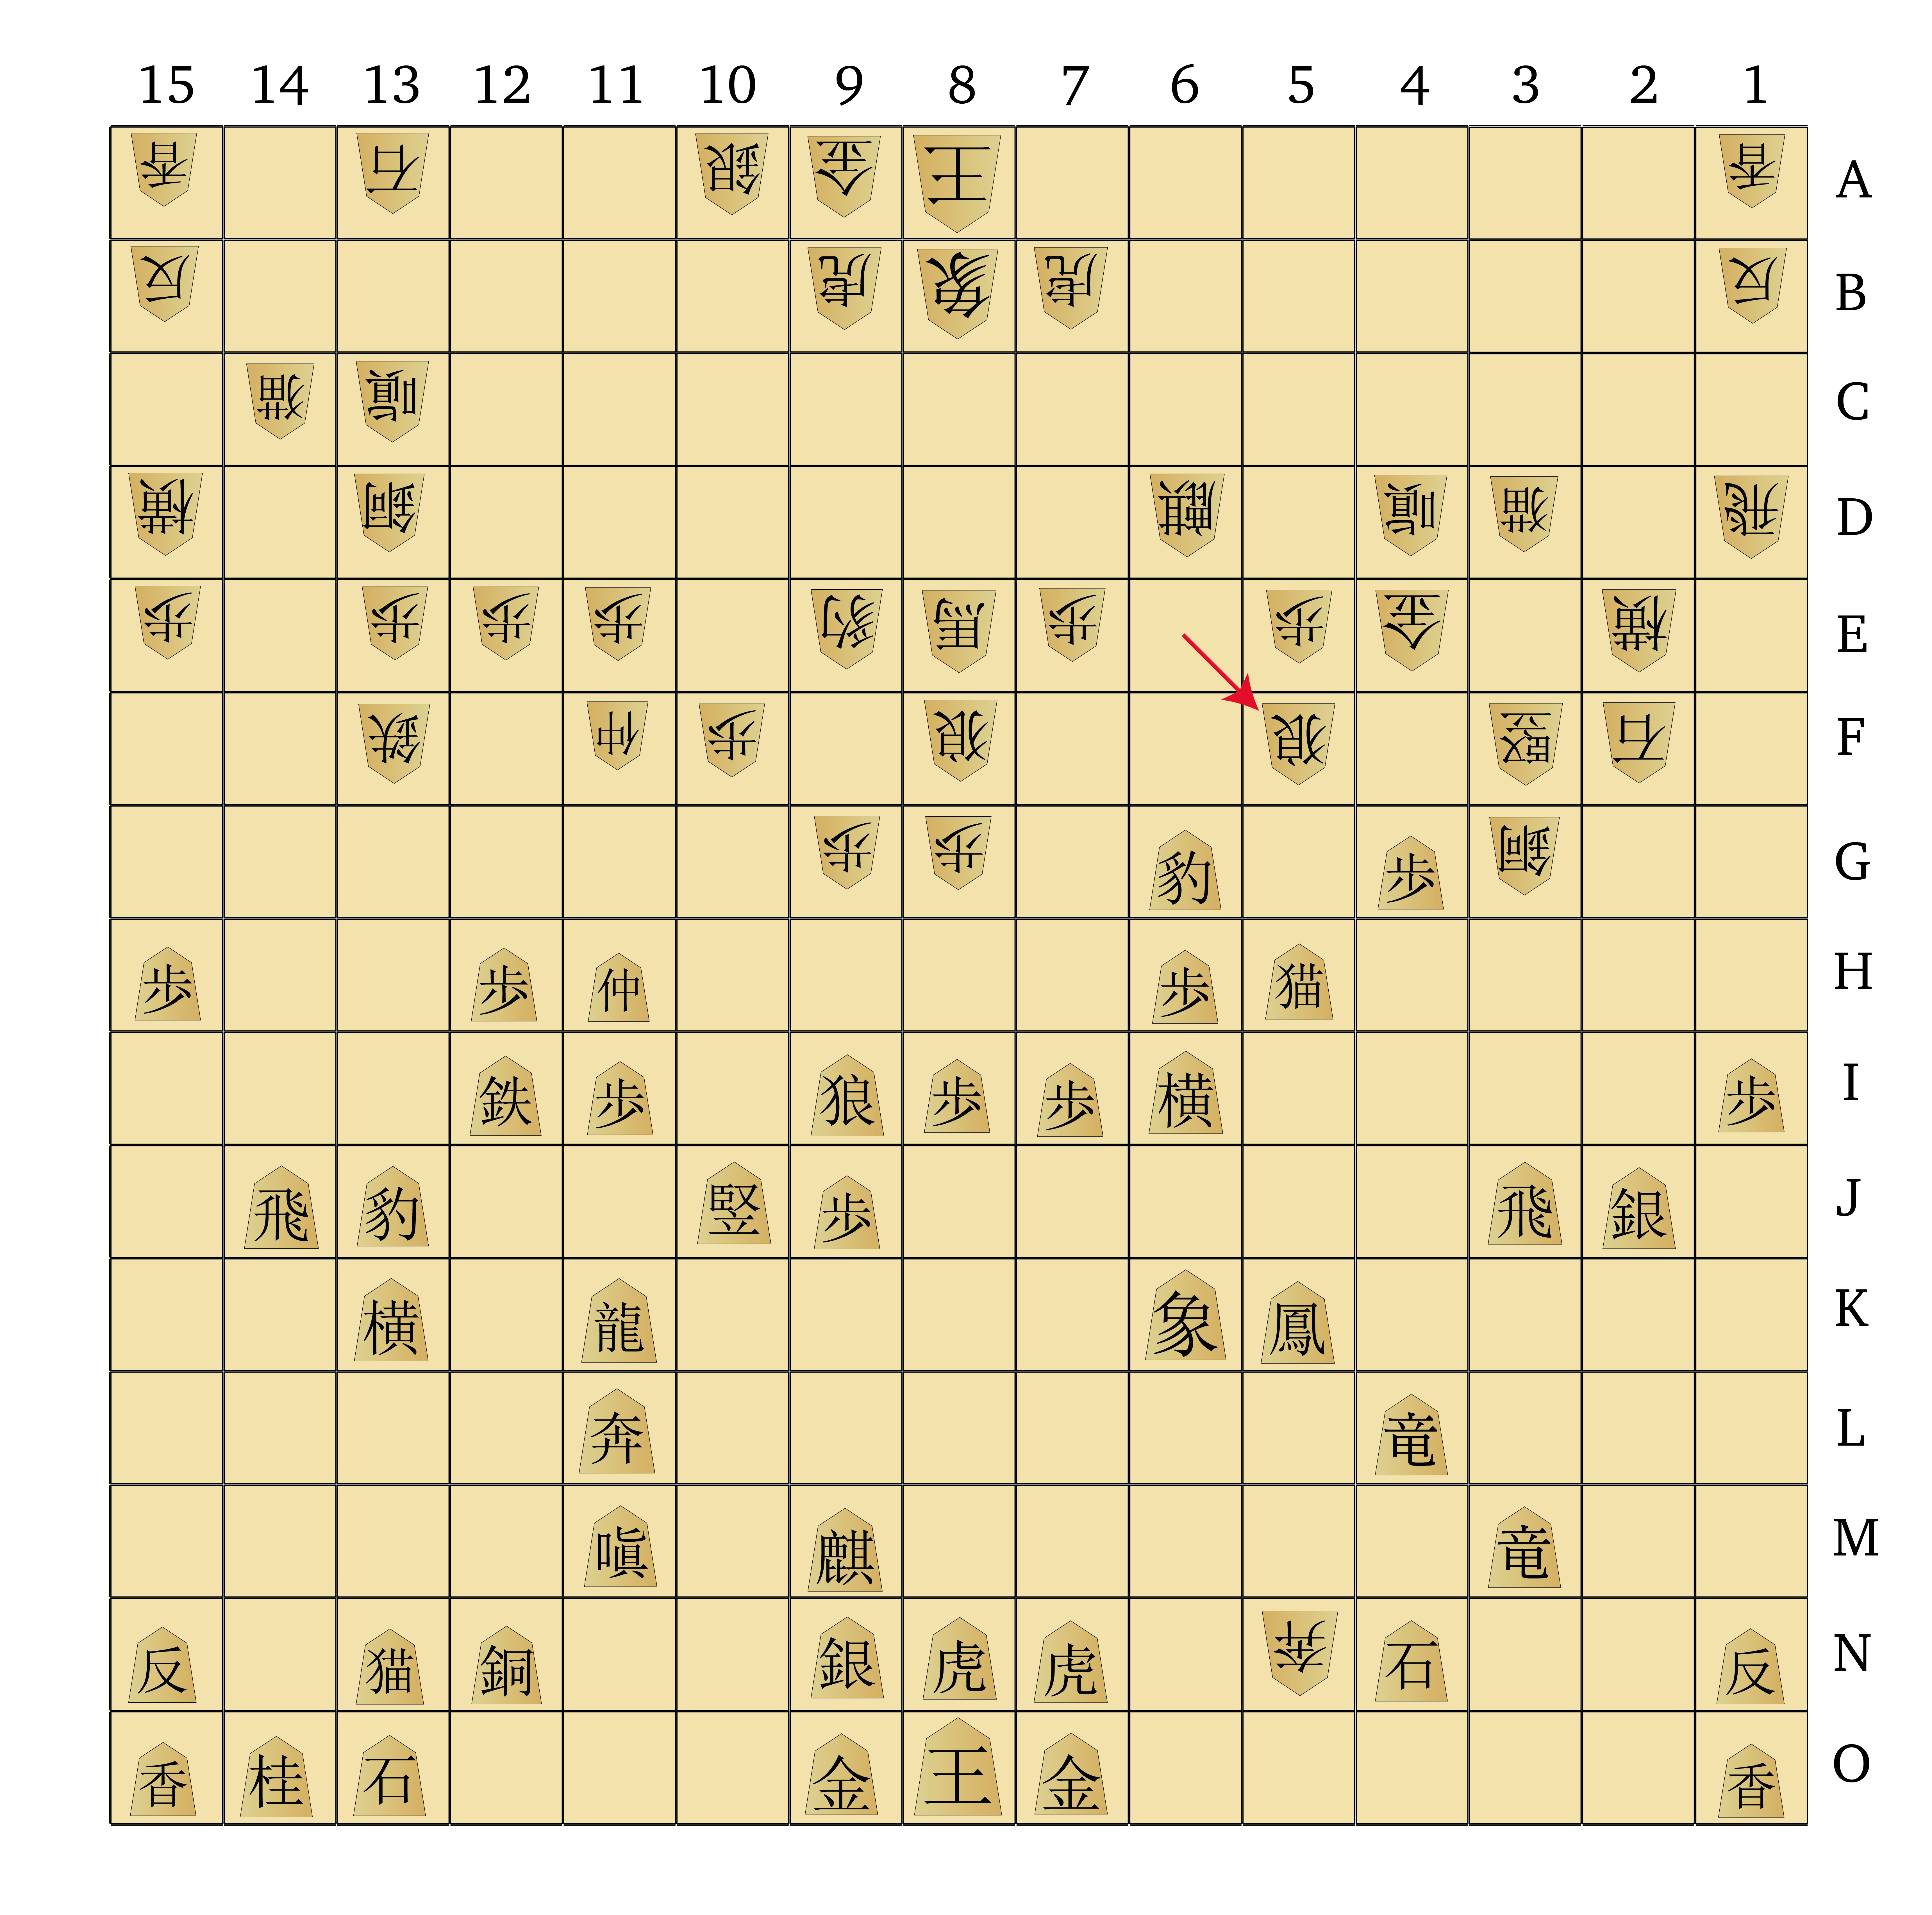
41 VOx2k 42 DKx2k+ 43 N-3m 44 +DK-6g 45 SM-2l 46 P-2f 47 N-2k 48 VO-2e 49 AB-3m 50 FD-10d
Unsurprisingly, Black elects to take the attacking Horned Falcon on 2k, after which White takes back with the Dragon King, which then promotes to Soaring Eagle. Black has no pieces around that can take the Eagle, and White cannot take the Rook or will be taken by the Reverse Chariot, so White happily retreats the Eagle to 6g. Black then shores up his defences around the 2-file, bringing in the Side Mover and Angry Boar. White takes a moment to defend the Pawn on 11e with his Flying Dragon; that Pawn could otherwise be taken by the Dragon Horse on 7i, allowing Black another promotion.
51 AB-3l 52 Ln-6e 53 Ln-6k 54 Ln-4g 55 DH-6i 56 Ln-4i 57 Lnx4i 58 +DKx4i 59 DHx9f 60 Px9f
Here we have a somewhat surprising turn of events. White finally advances their Lion, only for Black to do the same, and ultimately we end up with an exchange of Lions on 4i. Unlike Chu Shogi, in Dai Shogi the Lion has no special protection against being traded off the board. That means that on occasion players will trade them off to simplify the game somewhat.
For Chu Shogi players this can be a bit disappointing, but one of the reasons I chose this game to analyse is that I wanted to show that even without the mighty Lions running amok, Dai Shogi has a lot to offer. The game still has sharp tactical moments and ample strategic manoeuvring, so I feel it’s worth looking at a game like this to demonstrate that the absence of a Lion needn’t make the game boring.
Following the exchange of Lions, Black’s Dragon Horse is vulnerable to capture by the Soaring Eagle on 4i, so Black elects to take White’s Dragon King on 9f. This is a slightly advantageous exchange for Black, as the Dragon King is generally considered slightly more powerful than the Dragon Horse.
After these exchanges, White has an advanced Soaring Eagle perched on 4i, though Black has a good defensive line along the 4th rank. Meanwhile, Black has a slight advantage in the centre due to the protected Horned Falcon on 10j.
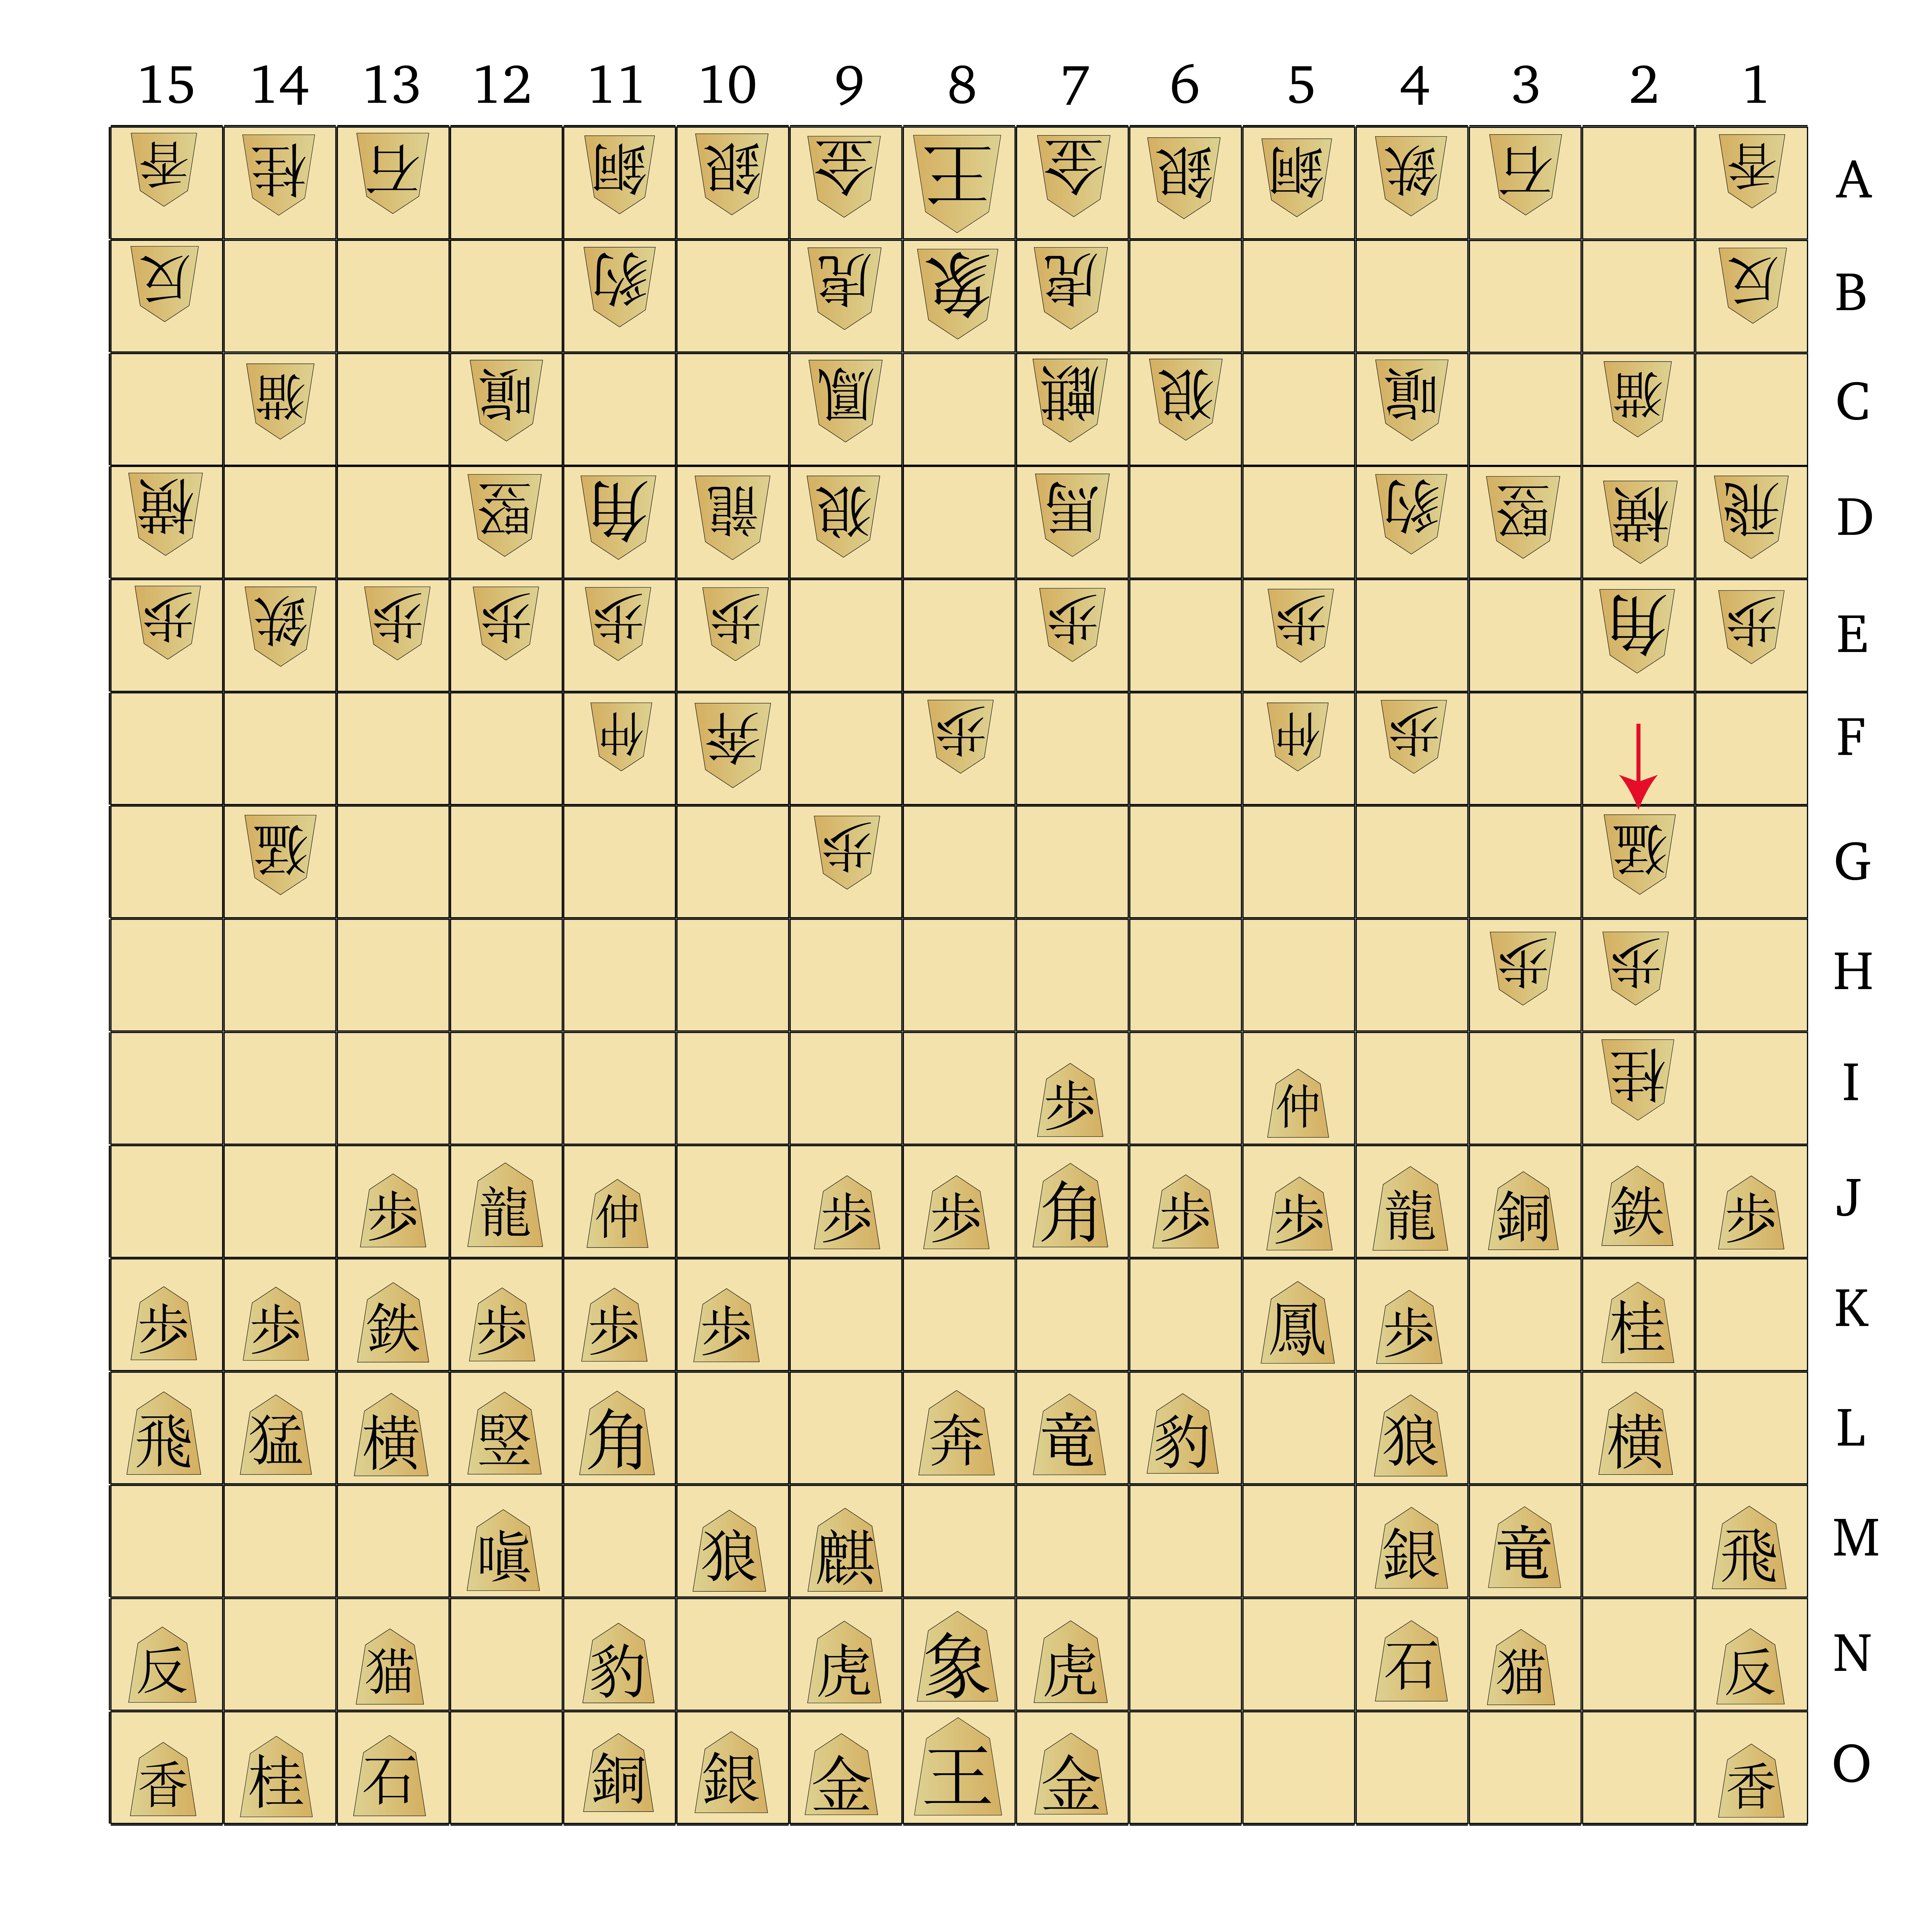
61 AB-3k 62 R-10g 63 +DHx6f 64 FD-5g 65 +DH-9i 66 +DK-4h 67 FL-5m 68 +DKx!3i 69 FL-6l 70 +DK-2j
White brings cross their Rook to attack the dangerous-looking Horned Falcon, but Black simply uses this opportunity to grab an unprotected Pawn on 6f before retreating back to a safe square. White then gives us a timely reminder that an absence of Lions doesn’t mean an absence of Lion Power, and uses the Soaring Eagle’s forward-diagonal Lion Power to take a Pawn without moving!
Black now has their Angry Boar standing in defence of the Knight on 2k, and their Ferocious Leopard is shuffling over to join the front line. White’s Soaring Eagle continues to be a threat, as Black has nothing in place that can drive it off yet. The Eagle could potentially double-capture on 3k and 4l, leaving the 3-file very weak, but the possible recapture of the Eagle by the Side Mover makes that a difficult trade to justify. Even so, just the presence of such a dangerous piece on Black’s periphery demands a response.
71 +DH-1i 72 FD-4h 73 +DHx2j 74 FDx2j 75 FD-3i 76 FDx3k+ 77 I-3m 78 +FDx4l 79 Ix4l 80 SM-2d
Black wastes no time here and swings his Horned Falcon all the way across to 1i, where it threatens the Soaring Eagle and is protected by the Knight on 2k. White brings their Flying Dragon forward to protect the Eagle, and Black immediately makes the exchange. Black then offers an exchange of Flying Dragons, but White elects to take the Cat Sword in exchange, leaving Black with a Flying Dragon perched on 3i.
Black made a pretty significant decision here to exchange the Horned Falcon for the Soaring Eagle, but I believe it was a sensible call. The Eagle was in a prime attacking position, while Black’s Falcon was sitting rather idle in comparison. The Eagle could have done significant damage to Black’s right flank using Lion Power, which would have forced Black to spend significant time plugging those newfound holes on that side. Instead, better to make some exchanges and calm things down on the right flank before White does any more damage to Black’s position.
81 C-4n 82 VM-3d 83 C-3m 84 P-3g 85 ST-4n 86 P-3h 87 FD-4j 88 P-2g 89 EW-5m 90 VO-2f
With the immediate threats defused, Black moves to shore up his defensive lines on the right, bringing the Copper General, Stone General, and Evil Wolf into play, while also retreating the Flying Dragon to a protected position on 4j. White continues to press on the right, advancing more Pawns and the Violent Ox. Black’s defensive moves here are very prudent; White clearly wanted to break through on the right, and hasn’t given up on that plan just yet.
91 S-5n 92 P-2h 93 C-3l 94 N-3c 95 R-1m 96 CS-2c 97 C-3k 98 N-2e 99 C-3j 100 B-7f
As expected, White keeps up the pressure on the right flank, bringing forward the Knight and Cat Sword. Black responds by advancing the Copper General all the way to 3j and shifts the Silver General off the back line. White then ups the pressure even more, using the Bishop to take aim at the vulnerable Copper.
At the moment White appears to have the advantage — they are exerting pressure along the right flank, and have a slight material edge. Black will need to keep their front lines solid along the right to withstand the assault.
101 I-3k 102 P-4f 103 P-7i 104 B-5h 105 DK9l-8m 106 N-1g 107 Bx10g 108 FK-10f 109 B-7j 110 B-2e
Black decides to tackle his problems by going on the offensive. He opens a line for the Bishop by moving the 7-Pawn, and subsequently takes White’s Rook on 10g, which addresses the material-balance issue. White drives the Bishop away with his Free King, but Black can simply pull back and force White’s Bishop to retreat as well.
At this point in the game White has done some damage with these early attacks, but Black remains solid and has constructed a pretty sturdy front line. Many of the Pawns are backed up by other pieces, and Black has a slight edge in development, having brought more of his back-line Generals forward. These early decisions have significant ramifications in the late game, where slow-moving pieces closer to the front may promote and generate threats at a point where the more powerful pieces have been exchanged off the board.

111 GB-5i 112 P-9g 113 P-5j 114 EW-9d 115 Ph-5k 116 DH-7d 117 I-13k 118 VO-14g 119 VO-14l 120 I-14e
White seems aware that his position has some weaknesses, and here stops pushing along the right side to focus more on development on the left flank and in the centre. Bringing the Evil Wolf and Dragon Horse into the centre helps shore things up there somewhat, though still White has some unprotected Pawns to sort out. Meanwhile, Black is already pretty solid on the left and spends some moves further strengthening the defensive line on the right flank, by bring forward the Go-Between and Pawn on the 5-file to clear a space for the Phoenix to jump in.
121 EW-4l 122 SM-15d 123 DK-3m 124 FL-5c 125 S-4m 126 FL-4d 127 P-1j 128 N-2i 129 I-2j 130 VO-2g
Suddenly focus returns to the right side! Perhaps White saw a need to react to Black’s steadily strengthening formation. Black brings the Dragon King, Evil Wolf and Silver General to the party, providing some more backup to the Copper General that proved to be a target earlier on. White responds by forcing the issue, bringing the Knight and Violent Ox closer to the fray. Clearly a conflict is brewing!
131 N-1i 132 VO-3g 133 Ix2i 134 Px2i 135 Cx2i 136 S-5b 137 SM-2k 138 B-10c 139 SM-2j 140 EW-9e
As expected, a brief exchange flares up on the right side. Black’s Iron General takes White’s Knight, then White’s Pawn takes back, and Black’s Copper finishes off the Pawn. Black drafts in the Side Mover to protect the Copper, and we’re left with a somewhat perilous position with some holes in both sides’ flanks. White then moves an Evil Wolf out of the Bishop’s line of sight, adding some additional long-distance pressure to the right side.
141 C-12n 142 GB-5g 143 Bx2e+ 144 SMx2e 145 S-3l 146 FL-3e 147 S-2k 148 FL-2f 149 FL-6k 150 S-5c
Black again seeks to reduce White’s attacking potential on the right side, and suddenly elects to exchange Bishops on 2e, after allowing them to remain in a tense standoff for quite a few moves now. He then brings the Ferocious Leopard into play, stepping it methodically forward to add some strength to the Pawn formation around the 5- and 6-files. White also brings their Silver off the back line and into the battle on the right side.
One senses that the situation on the right flank is far from resolved….

151 EW-10l 152 S-5d 153 FD-2h 154 VO-3f 155 B-10m 156 P-4g 157 P-4j 158 S-4e 159 EW-4k 160 ST-2b
Sure enough, the tension continues to build on the right side of the board. Both players continue to march pieces forward into the growing tangle, with Black following White’s lead and bringing the Bishop to 10m to bear down on the fight from a distance.
These kind of long-range pressure tools are really helpful in Dai Shogi, and it can be easy for your opponent to forget that a piece is relevant to the local board situation even though it’s 10 ranks away! On such a big board, threats can easily fade into the distance. So during a large melee, be sure to double-check whether any long-range snipers are pointing at your pieces, too; you may need to think twice about starting a cascade of exchanges if some distant snipers might pick off whatever survivors you may have after the battle.
161 EW-3j 162 DH-10g 163 EW-4i 164 Bx4i 165 Px4i 166 DH-8e 167 DK7l-4l 168 S-5f 169 FL-7j 170 I-5b
As with normal-sized Chess and Shogi, in Dai Shogi it’s very easy to be tempted to jump into a tactical melee too early, when letting the tension build for a while longer would better allow you to prepare for the aftermath. Knowing *when* to drop the hammer is very important. Here we’ve had constant building tension on the right side, and both players have been restrained, making small exchanges but not overcommitting.
Black begins this passage of play by bringing forward their Evil Wolf. White can see that Black is building an array of well-coordinated pieces on the right side, and perhaps is preparing to launch a counterattack or lay the foundations of a breakthrough for the Dragon King on 3m. White decides to put a stop to this by launching the Bishop into the fray, taking out the Evil Wolf. Black recaptures with the Pawn, then White pivots the Dragon Horse back to point at this now-weakened Pawn. Black responds by committing his other Dragon King to the fight, sliding it over to 4l to support the Pawn.
Effective use of advancing Pawns is important in Dai Shogi, just as in Chu Shogi. Setting up long-range pieces behind the advancing Pawns is very typical and is often used to set up an advance down the side of the board.
171 EW-9k 172 I-5c 173 FL-6i 174 I-5d 175 R-1l 176 C-4b 177 R-3l 178 C-3c 179 Cx3h 180 I-4e
The strategic manoeuvres continue. Black brings his Ferocious Leopard nimbly around the Pawn formation on the 5- and 6-files, threatening a push of the Go-Between on 5i. A shift of the Rook over to 3l provides some additional strength bearing down on the 3-file, enabling the Copper to take the Pawn on 3h without breaking a sweat.
Meanwhile, White brings his Iron General all the way up to the front lines, perhaps sensing that Black may be preparing to launch the threatened counterattack.
181 GB-5h 182 G-6b 183 GBx5g 184 Sx5g 185 P-5i 186 C-2d 187 FD-3i 188 I-4f 189 FDx5g 190 Ix5g
Black makes good on their threat to push the Go-Between, then brings the Flying Dragon down to aim at White’s Silver General. White allows the exchange of the Silver for the Flying Dragon, although in my view this is a mildly favourable exchange for Black; the Silver is a stronger attacking piece as it can attack any forward square. The Flying Dragon can attack two squares away but only on the diagonal, so its attacking potential is more restricted.
After these small exchanges, some of the tension on the right side has been relieved. Black is probably pleased with the outcome, having reduced White’s amassed forces slightly and getting the Silver out of the mix. Black also has gained some ground here, and controls some useful squares with the advanced Pawns and the Copper on 3h, all backed up by strong pieces on the back ranks. White is still fine though, for the time being.
191 Cx4g 192 VO-3h 193 Rx3h 194 C-3e 195 P-5h 196 Ix5h 197 FLx5h 198 AB-4d 199 CS-4m 200 G-5c
Black wastes no time in trying to consolidate his positional advantages. The Copper draws first blood, taking out White’s other forward pawn. White responds by sending the Violent Ox headlong into the battle, which is promptly taken by the Rook. White again attempts to strike back with his Iron General, but Black’s Ferocious Leopard takes it out in return. In the end we see Black’s Copper still standing proudly on the front line, backed by the Ferocious Leopard and Rook, with Black’s long-range pieces still at the back ready to jump in if needed. Black has again made some gains of space in the process, leaving White a bit cramped on that right side. White is clearly keen to protect this flank and drafts in a Gold, calling it away from the King’s side to join the battle.
201 CS-5l 202 G-5d 203 DE-7m 204 G-4e 205 SM-2i 206 EW-9f 207 CS-6k 208 ST-3c 209 CS-5j 210 ST-2d
White, quite understandably, spends some time here further strengthening their defensive formation on the right. The Gold strides all the way to the front, with the Stone General sneaking up into the back of the formation. Black, meanwhile, marches the Cat Sword up to protect the Pawn on 4i.
Then Black does something a little surprising, and pulls the Drunk Elephant away from its defence of the King, presumably also headed toward the front lines on the right side. The Drunk Elephant is a strong piece, but is more typically kept on defence for the most part, so perhaps this move shows Black has confidence that King safety is not a concern in the immediate future.
211 GB-11i 212 P-8g 213 P-11j 214 FD-8f 215 FD-11k 216 I-13f 217 FL-11m 218 VM-13d 219 P-12j 220 VM-14d
Having established a strong foothold on the right side and drawn away some more of White’s pieces to defend, Black turns his attention to the left flank. Bringing forward the Go-Between and Pawn on the 11-file gains a bit more space, and some reshuffling of the Flying Dragon and Ferocious Leopard provides some more defence of the left-side Pawn line. White senses danger and brings the Vertical Mover over to support the Violent Ox parked on 14g.
221 FL-11l 222 P-1f 223 S-2j 224 FD-6h 225 DE-6l 226 Ky-6d 227 AB-11m 228 P-1g 229 DE-6k 230 DH-8f
Now White tries to shift emphasis a bit, and pushes forward in the centre. He drops the Flying Dragon into a safe square on 6h, then supports it with the Dragon Horse on 8f. Given Black’s strong positions on the left and right, a central advance can draw away some of Black’s defenders from their posts. At the same time, White shifts the Kirin over to 6d, perhaps in the hopes of getting it ready for a promotion to Lion should he be able to clear a path for it.
Black obliges, advancing the Drunk Elephant to support the Pawn on 6j, and shuffles the Angry Boar over slightly. Black is far from being in danger here, but it’s worth remembering that the departure of the Drunk Elephant leaves Black’s King more exposed than White’s.
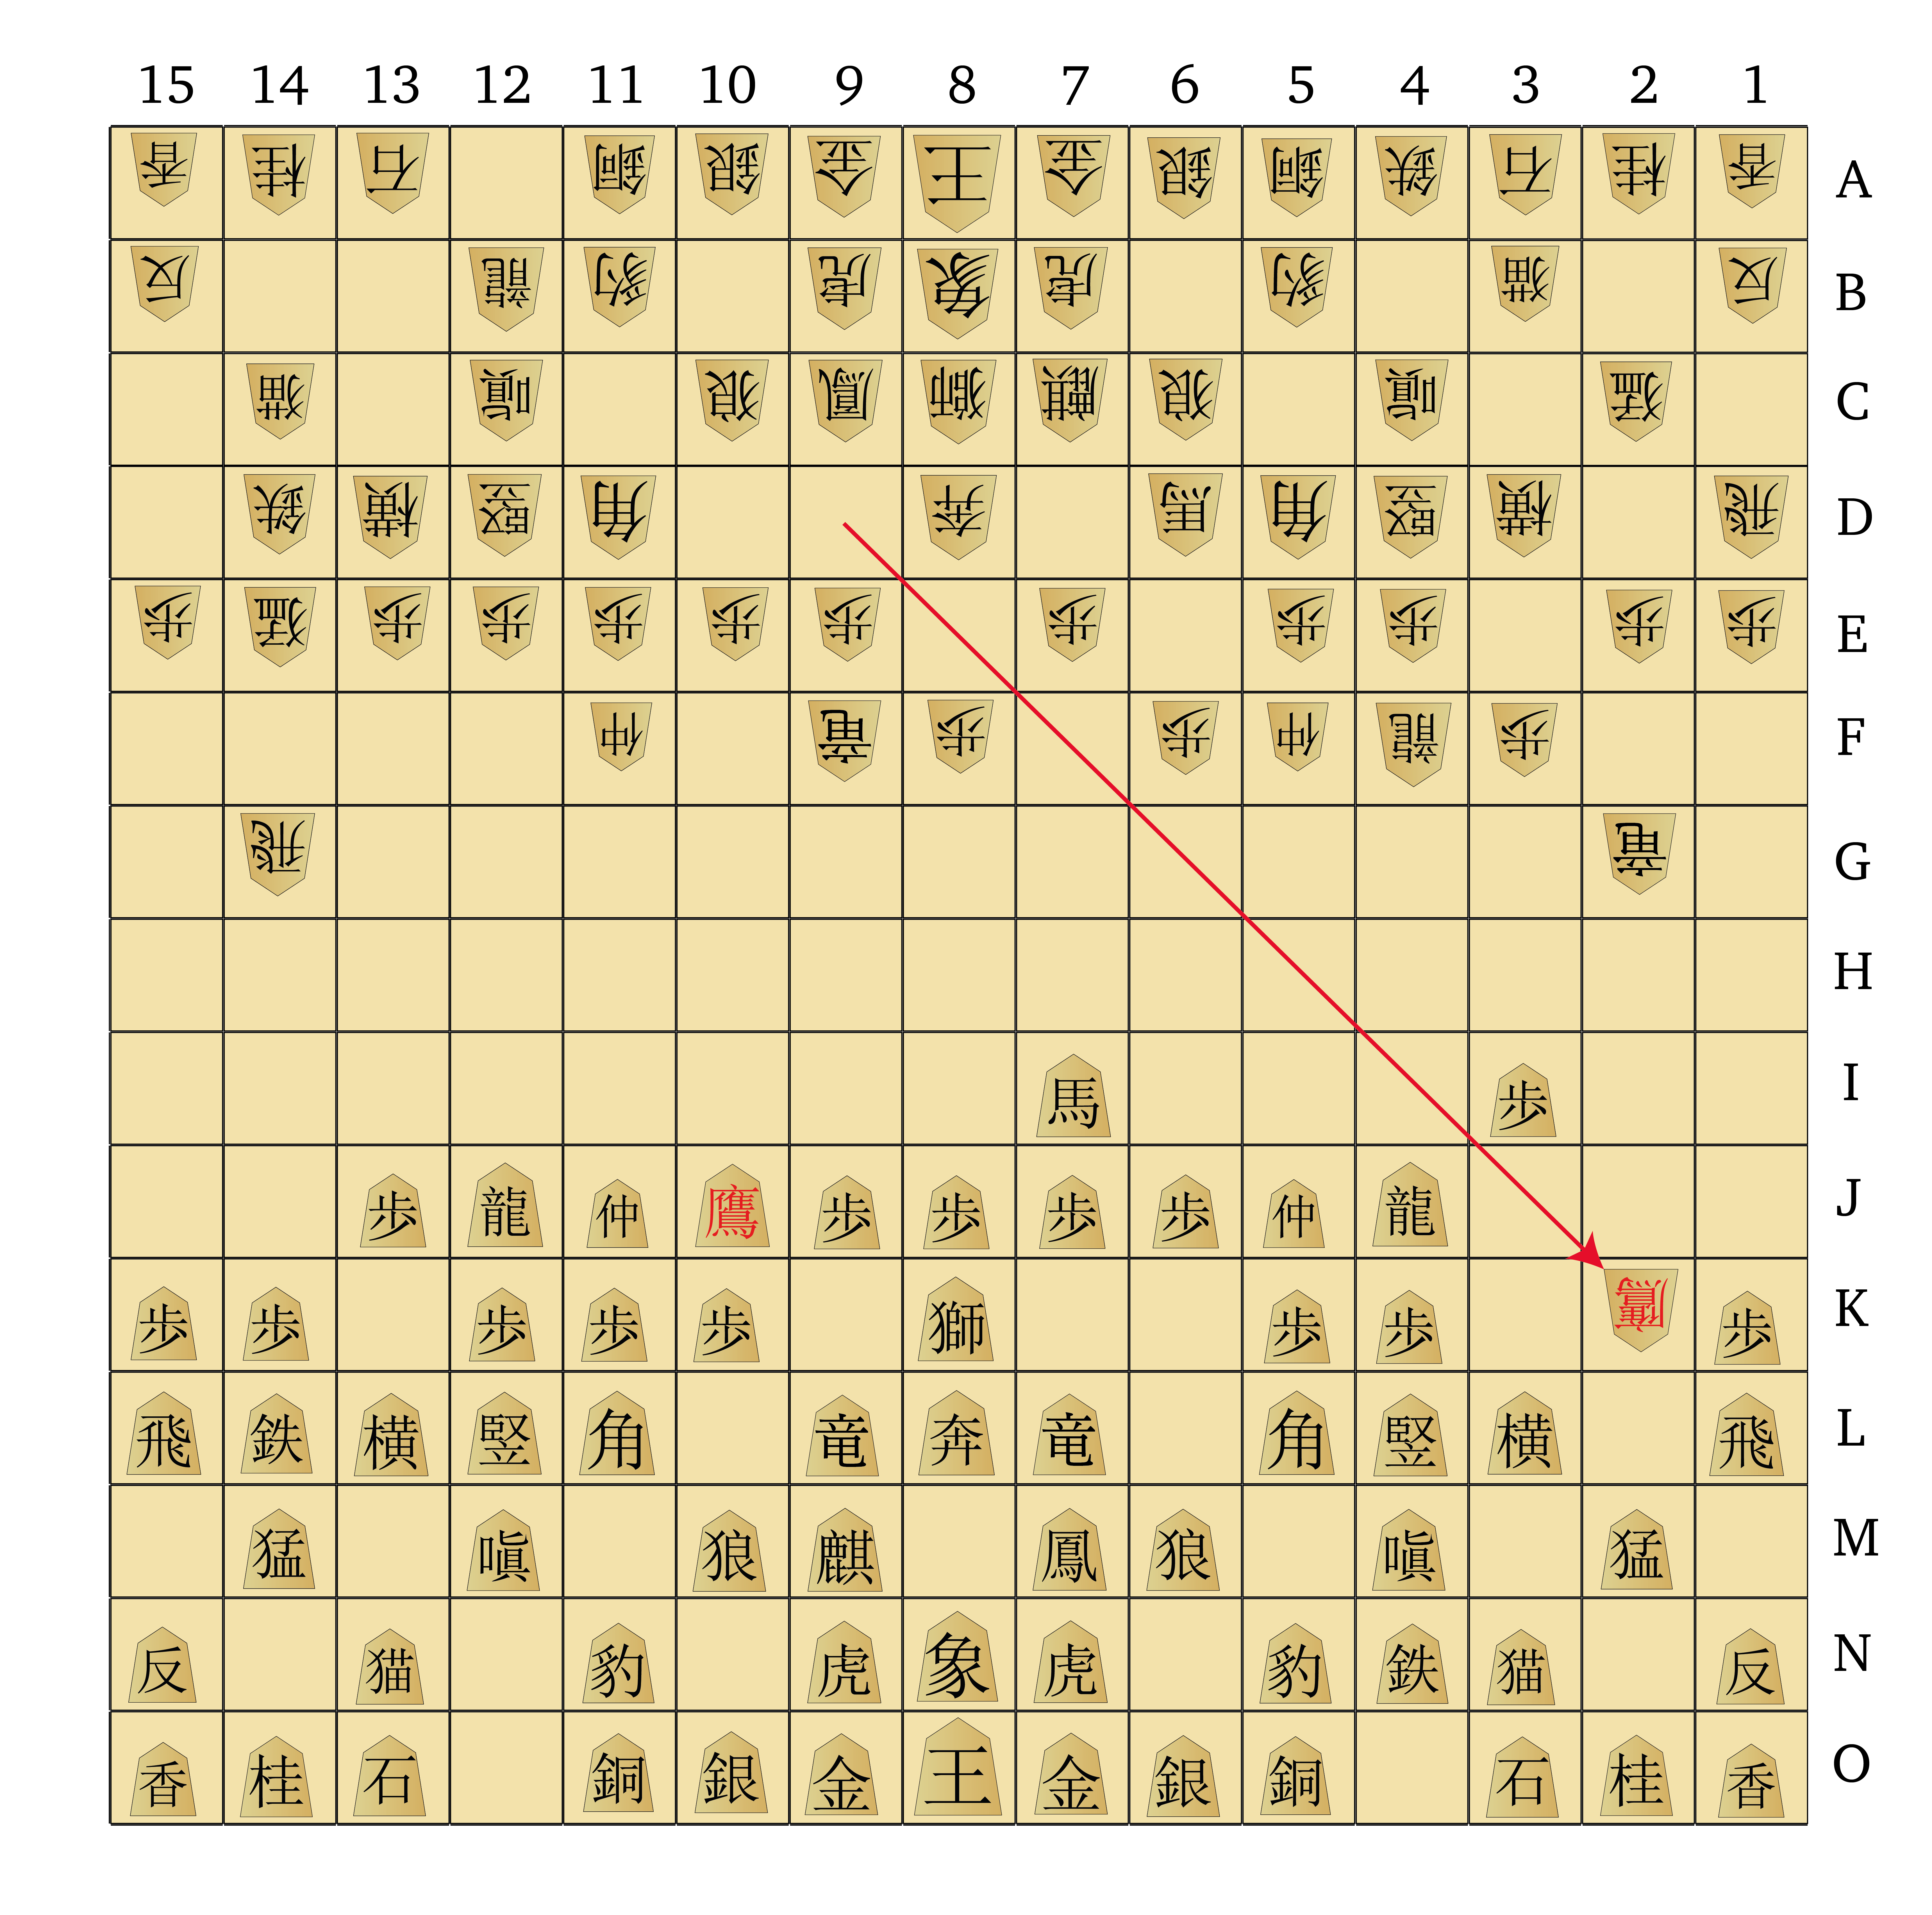
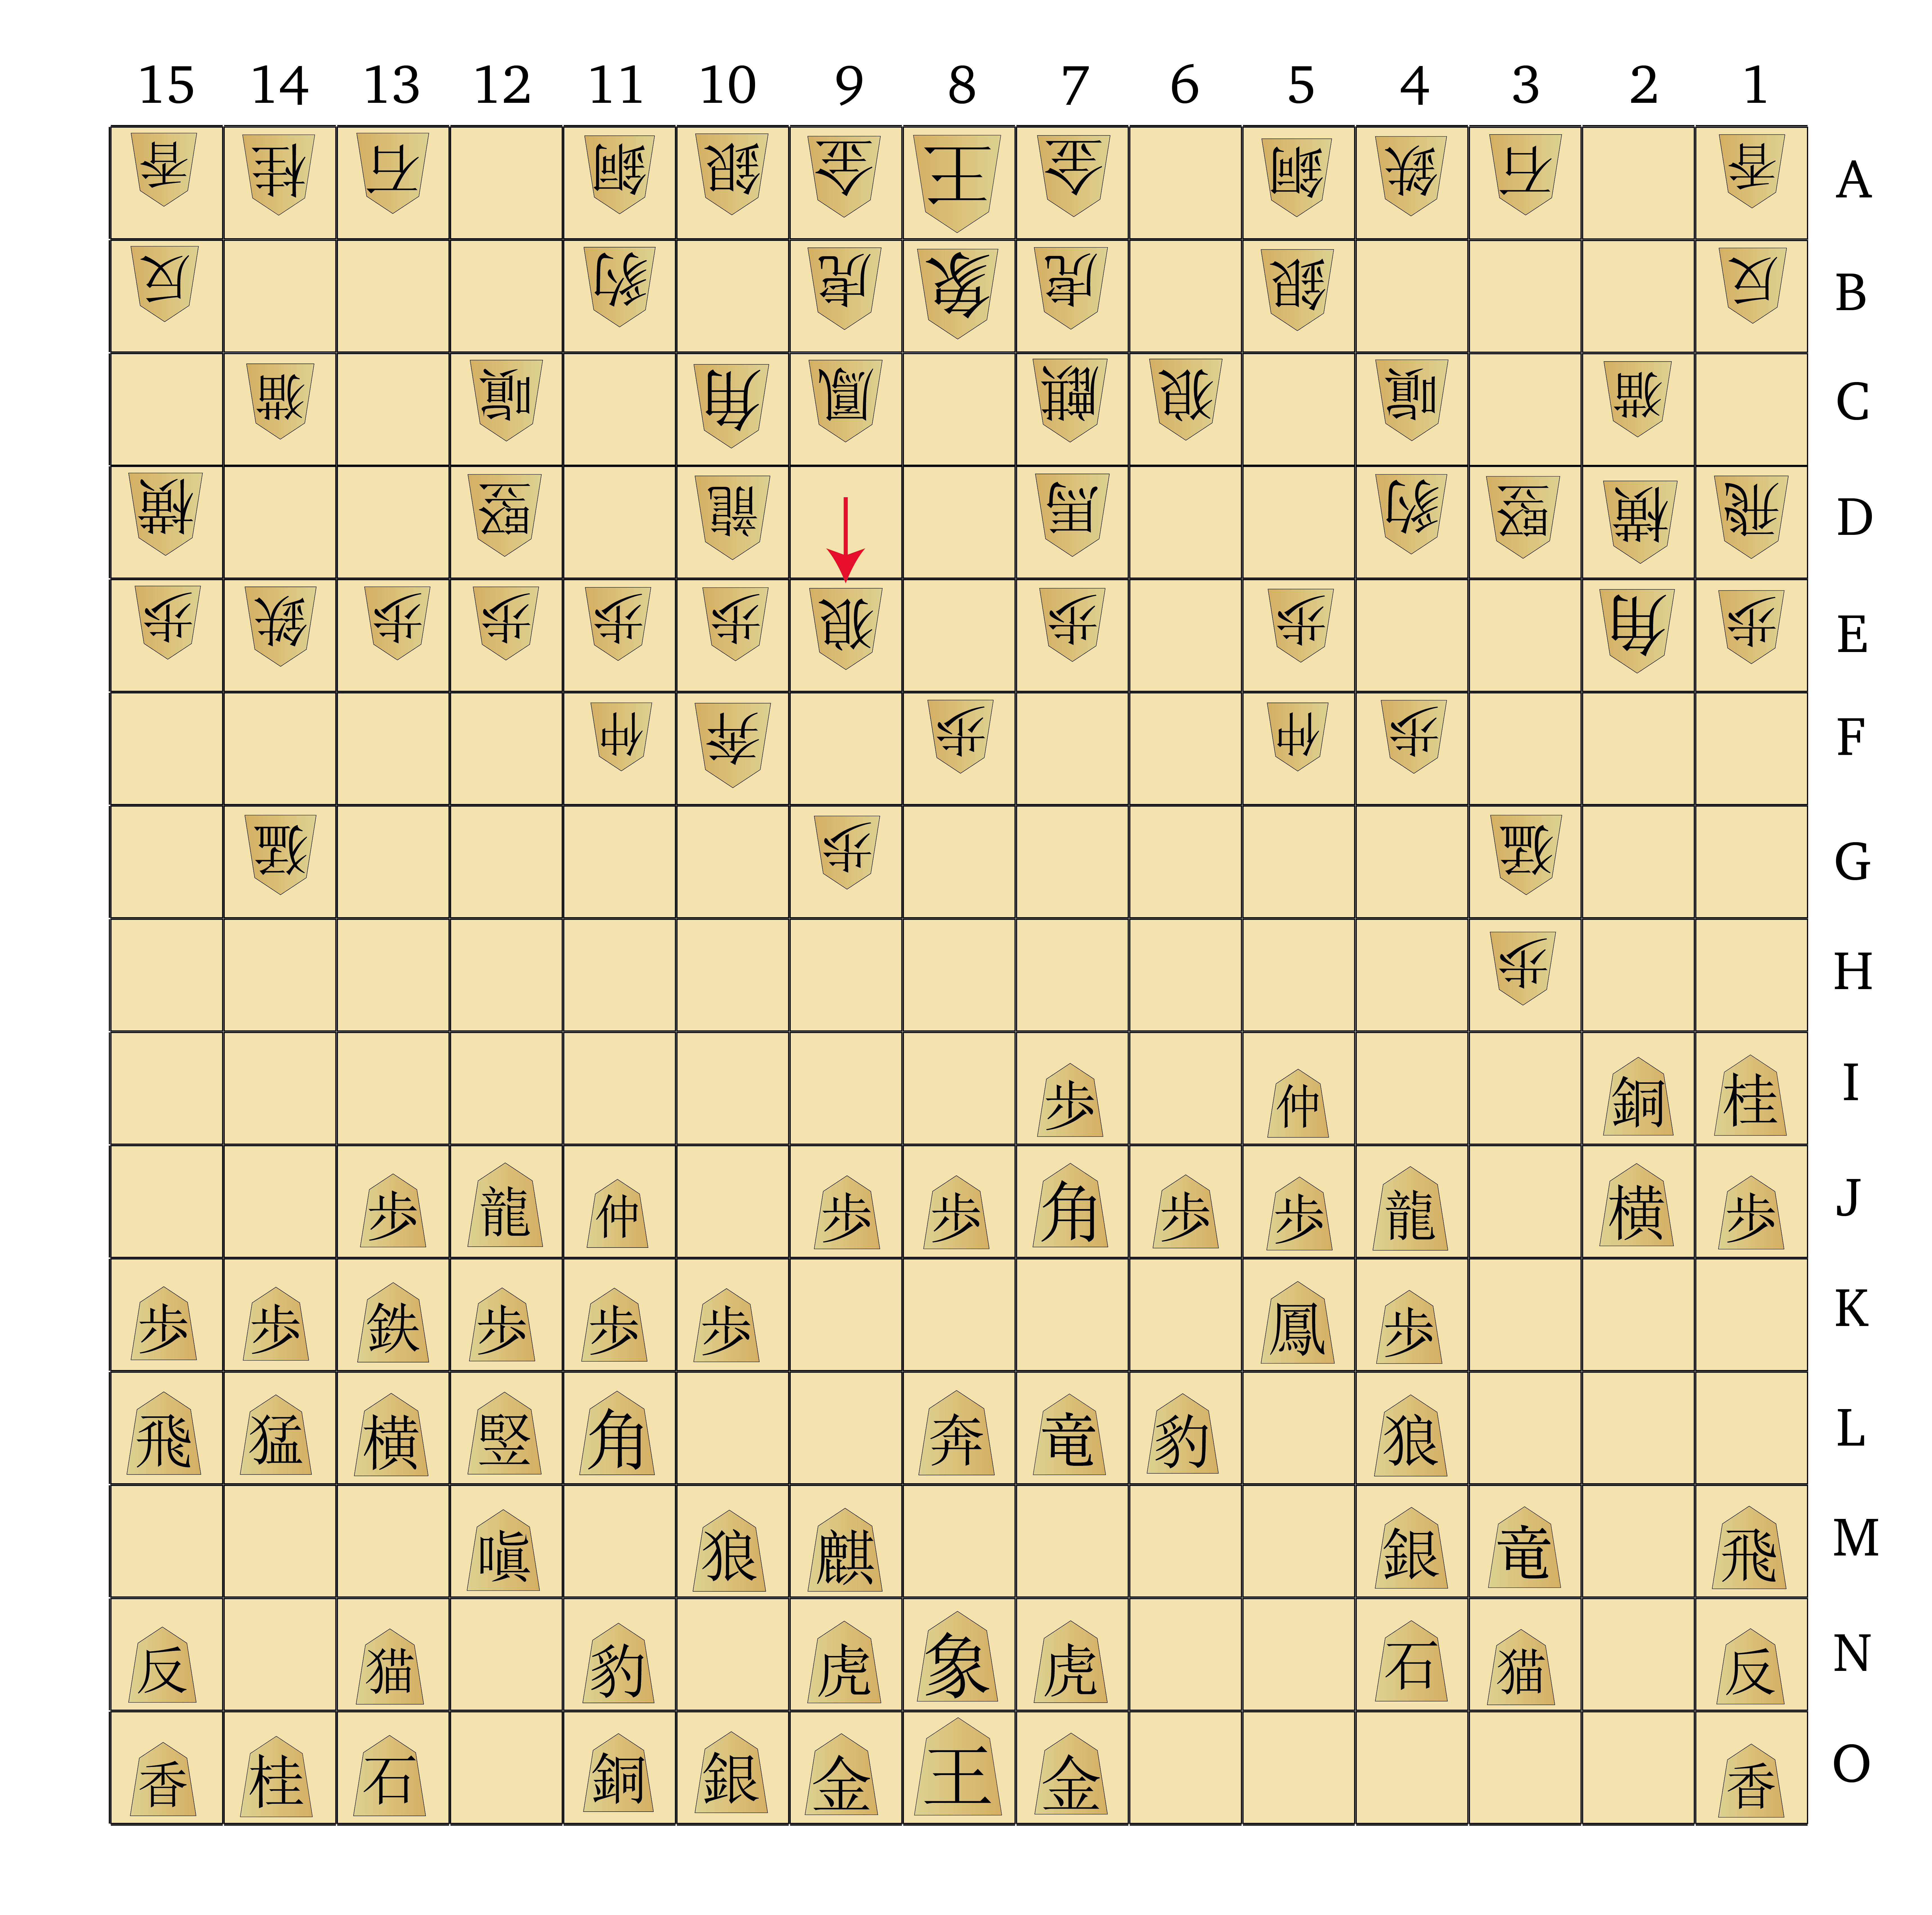
![Dai Shogi 420 -- Move 240 [Recovered]-01](https://drericsilverman.com/wp-content/uploads/2020/09/dai-shogi-420-move-240-recovered-01.png)
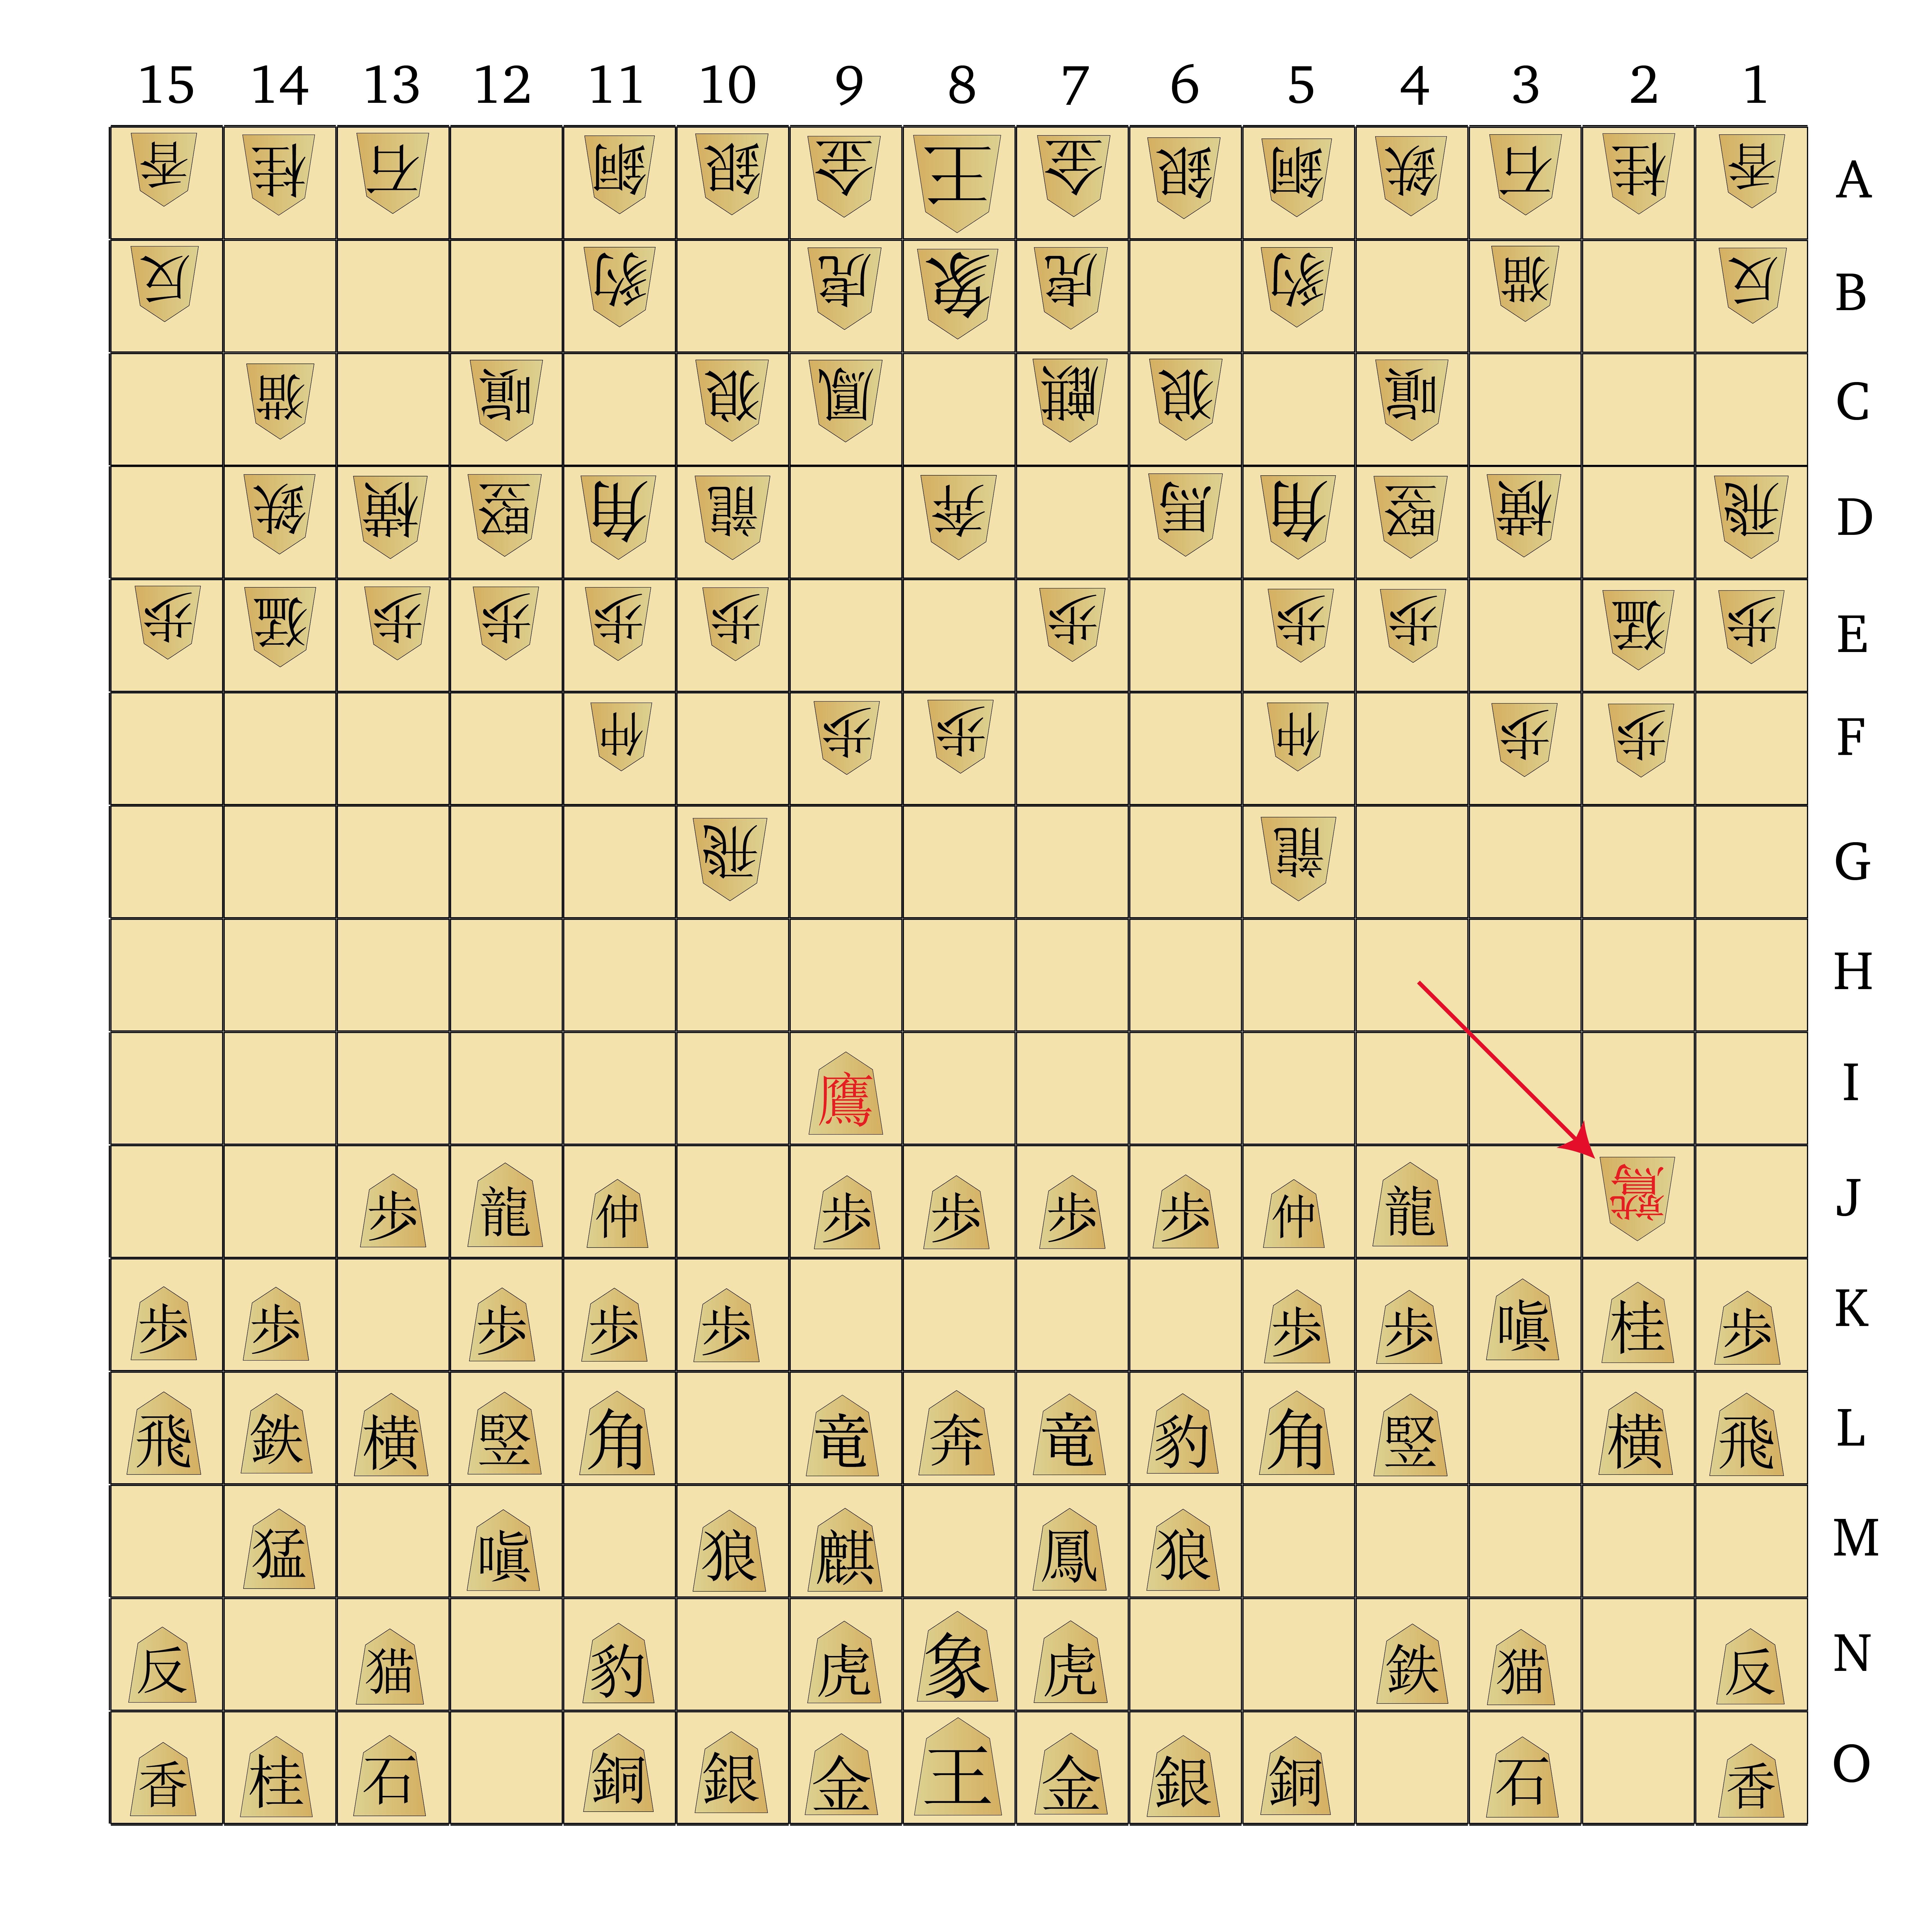
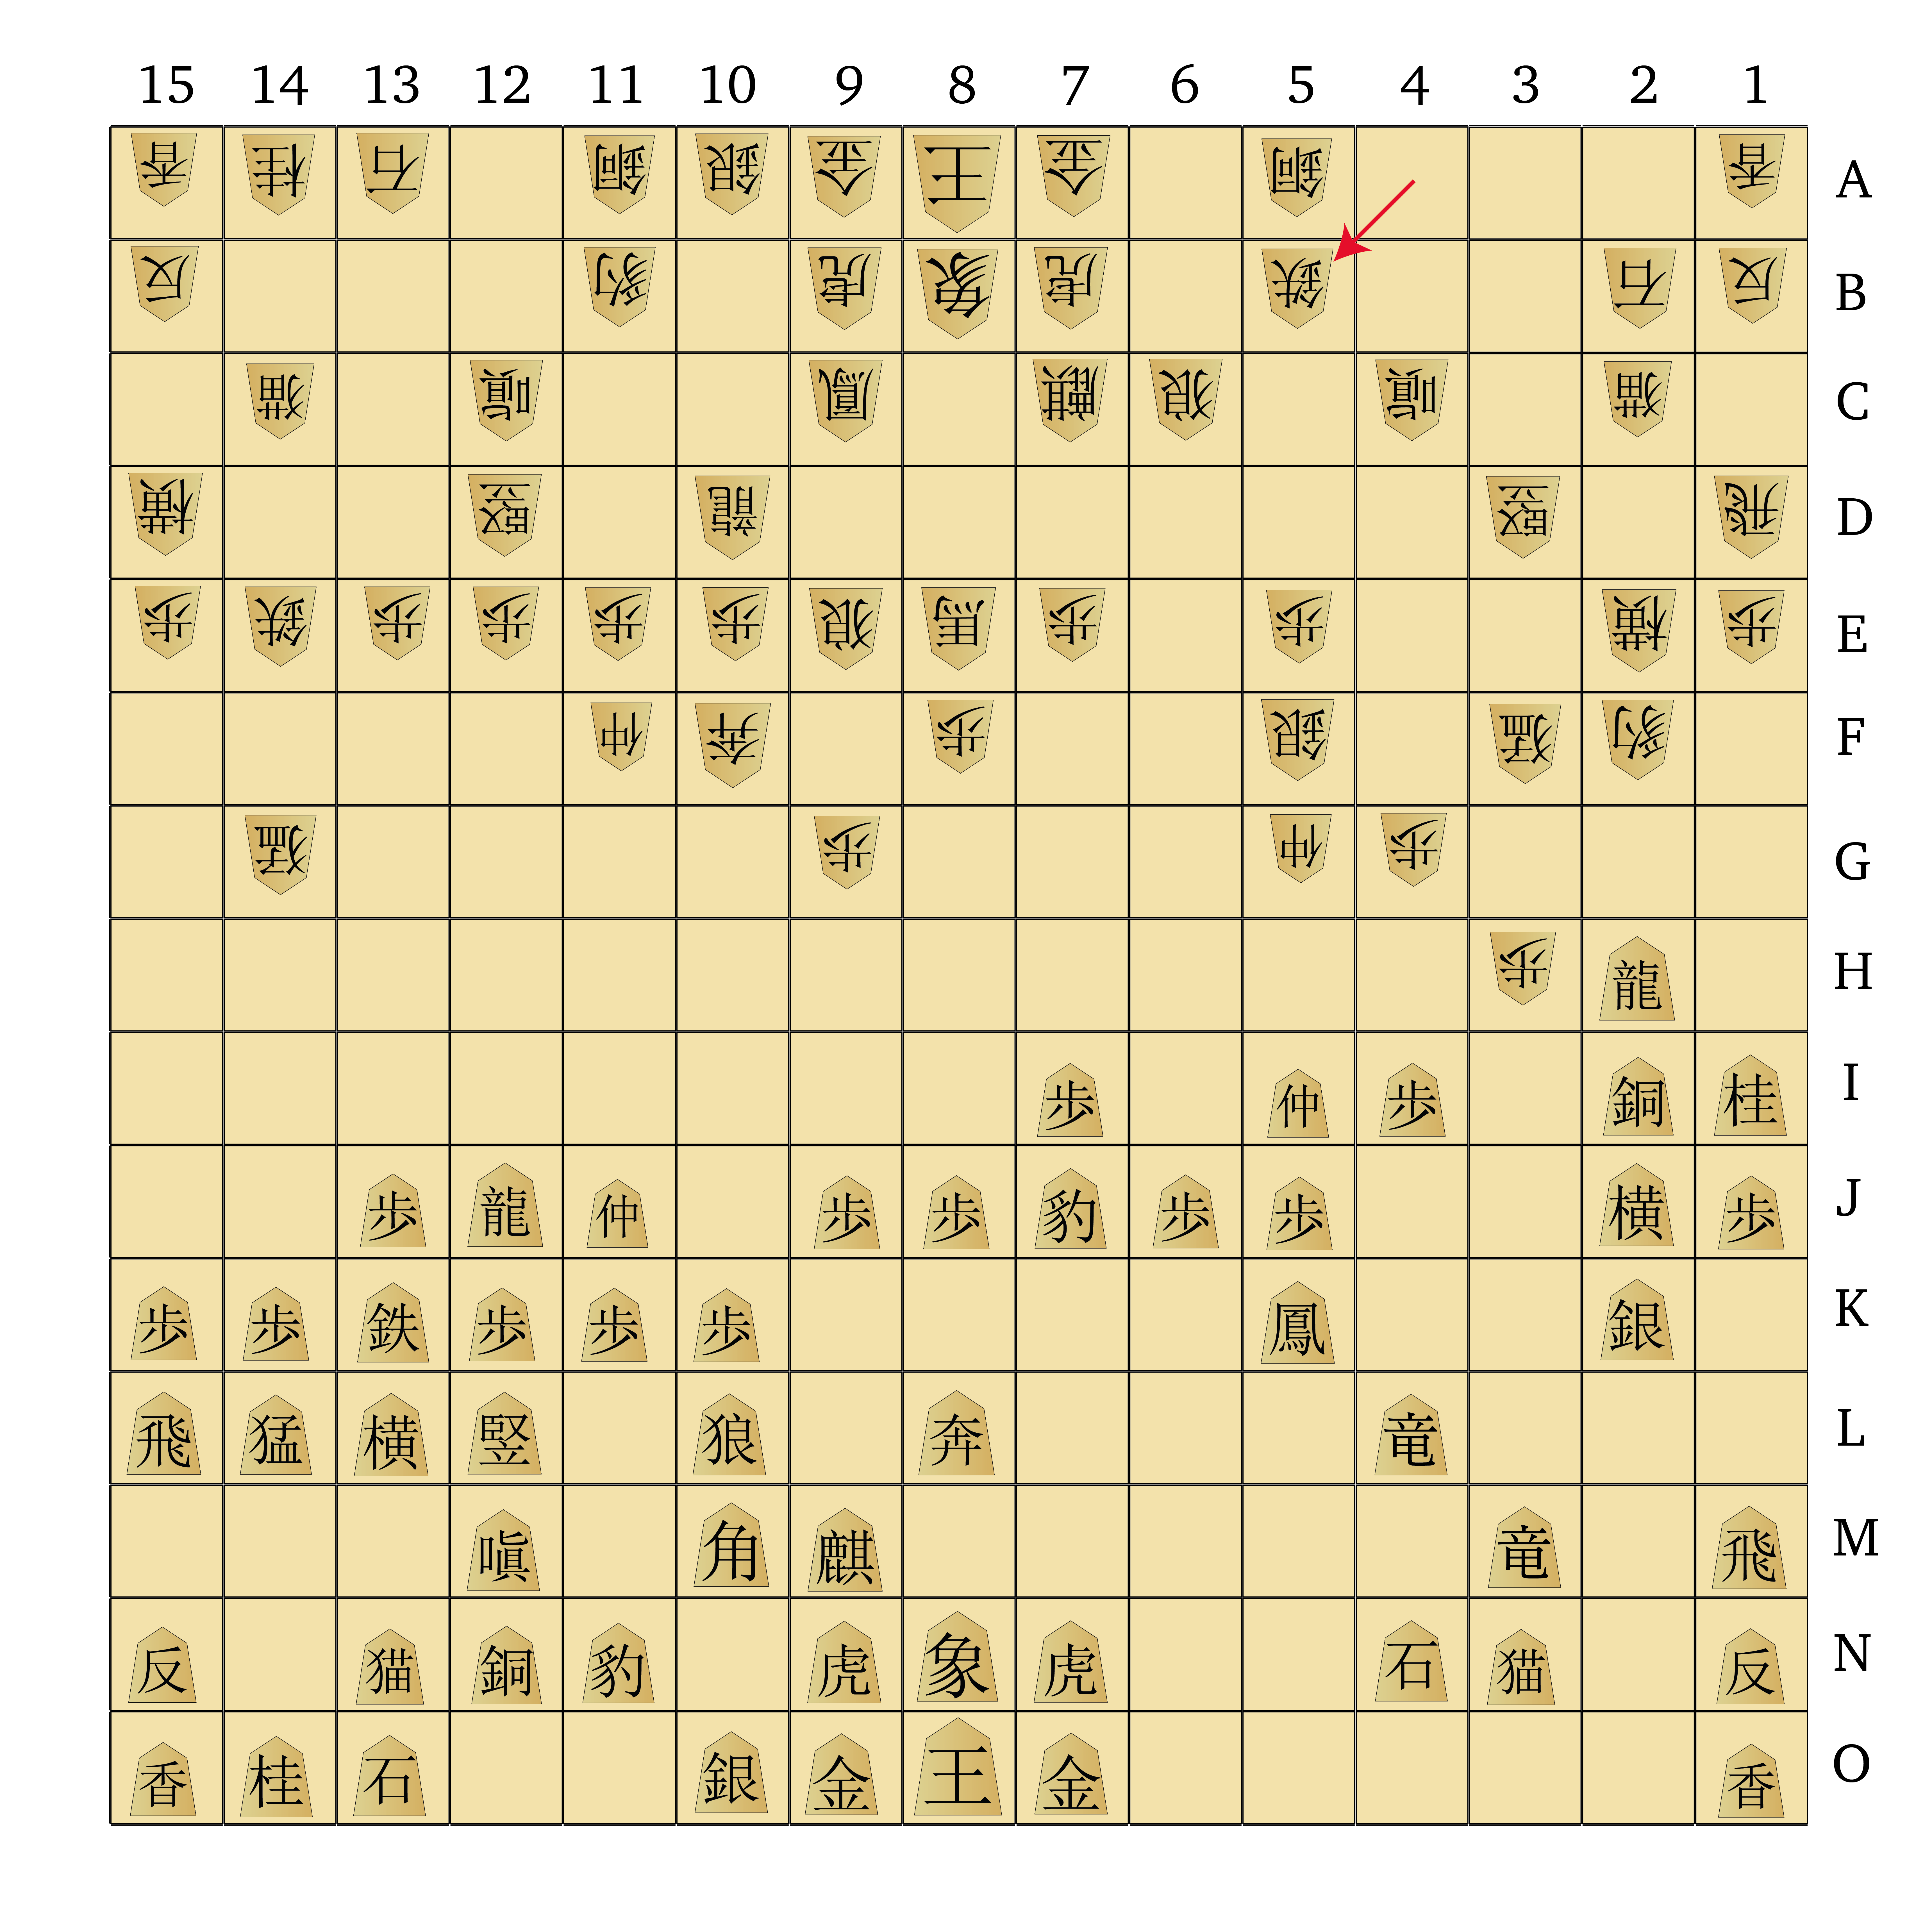
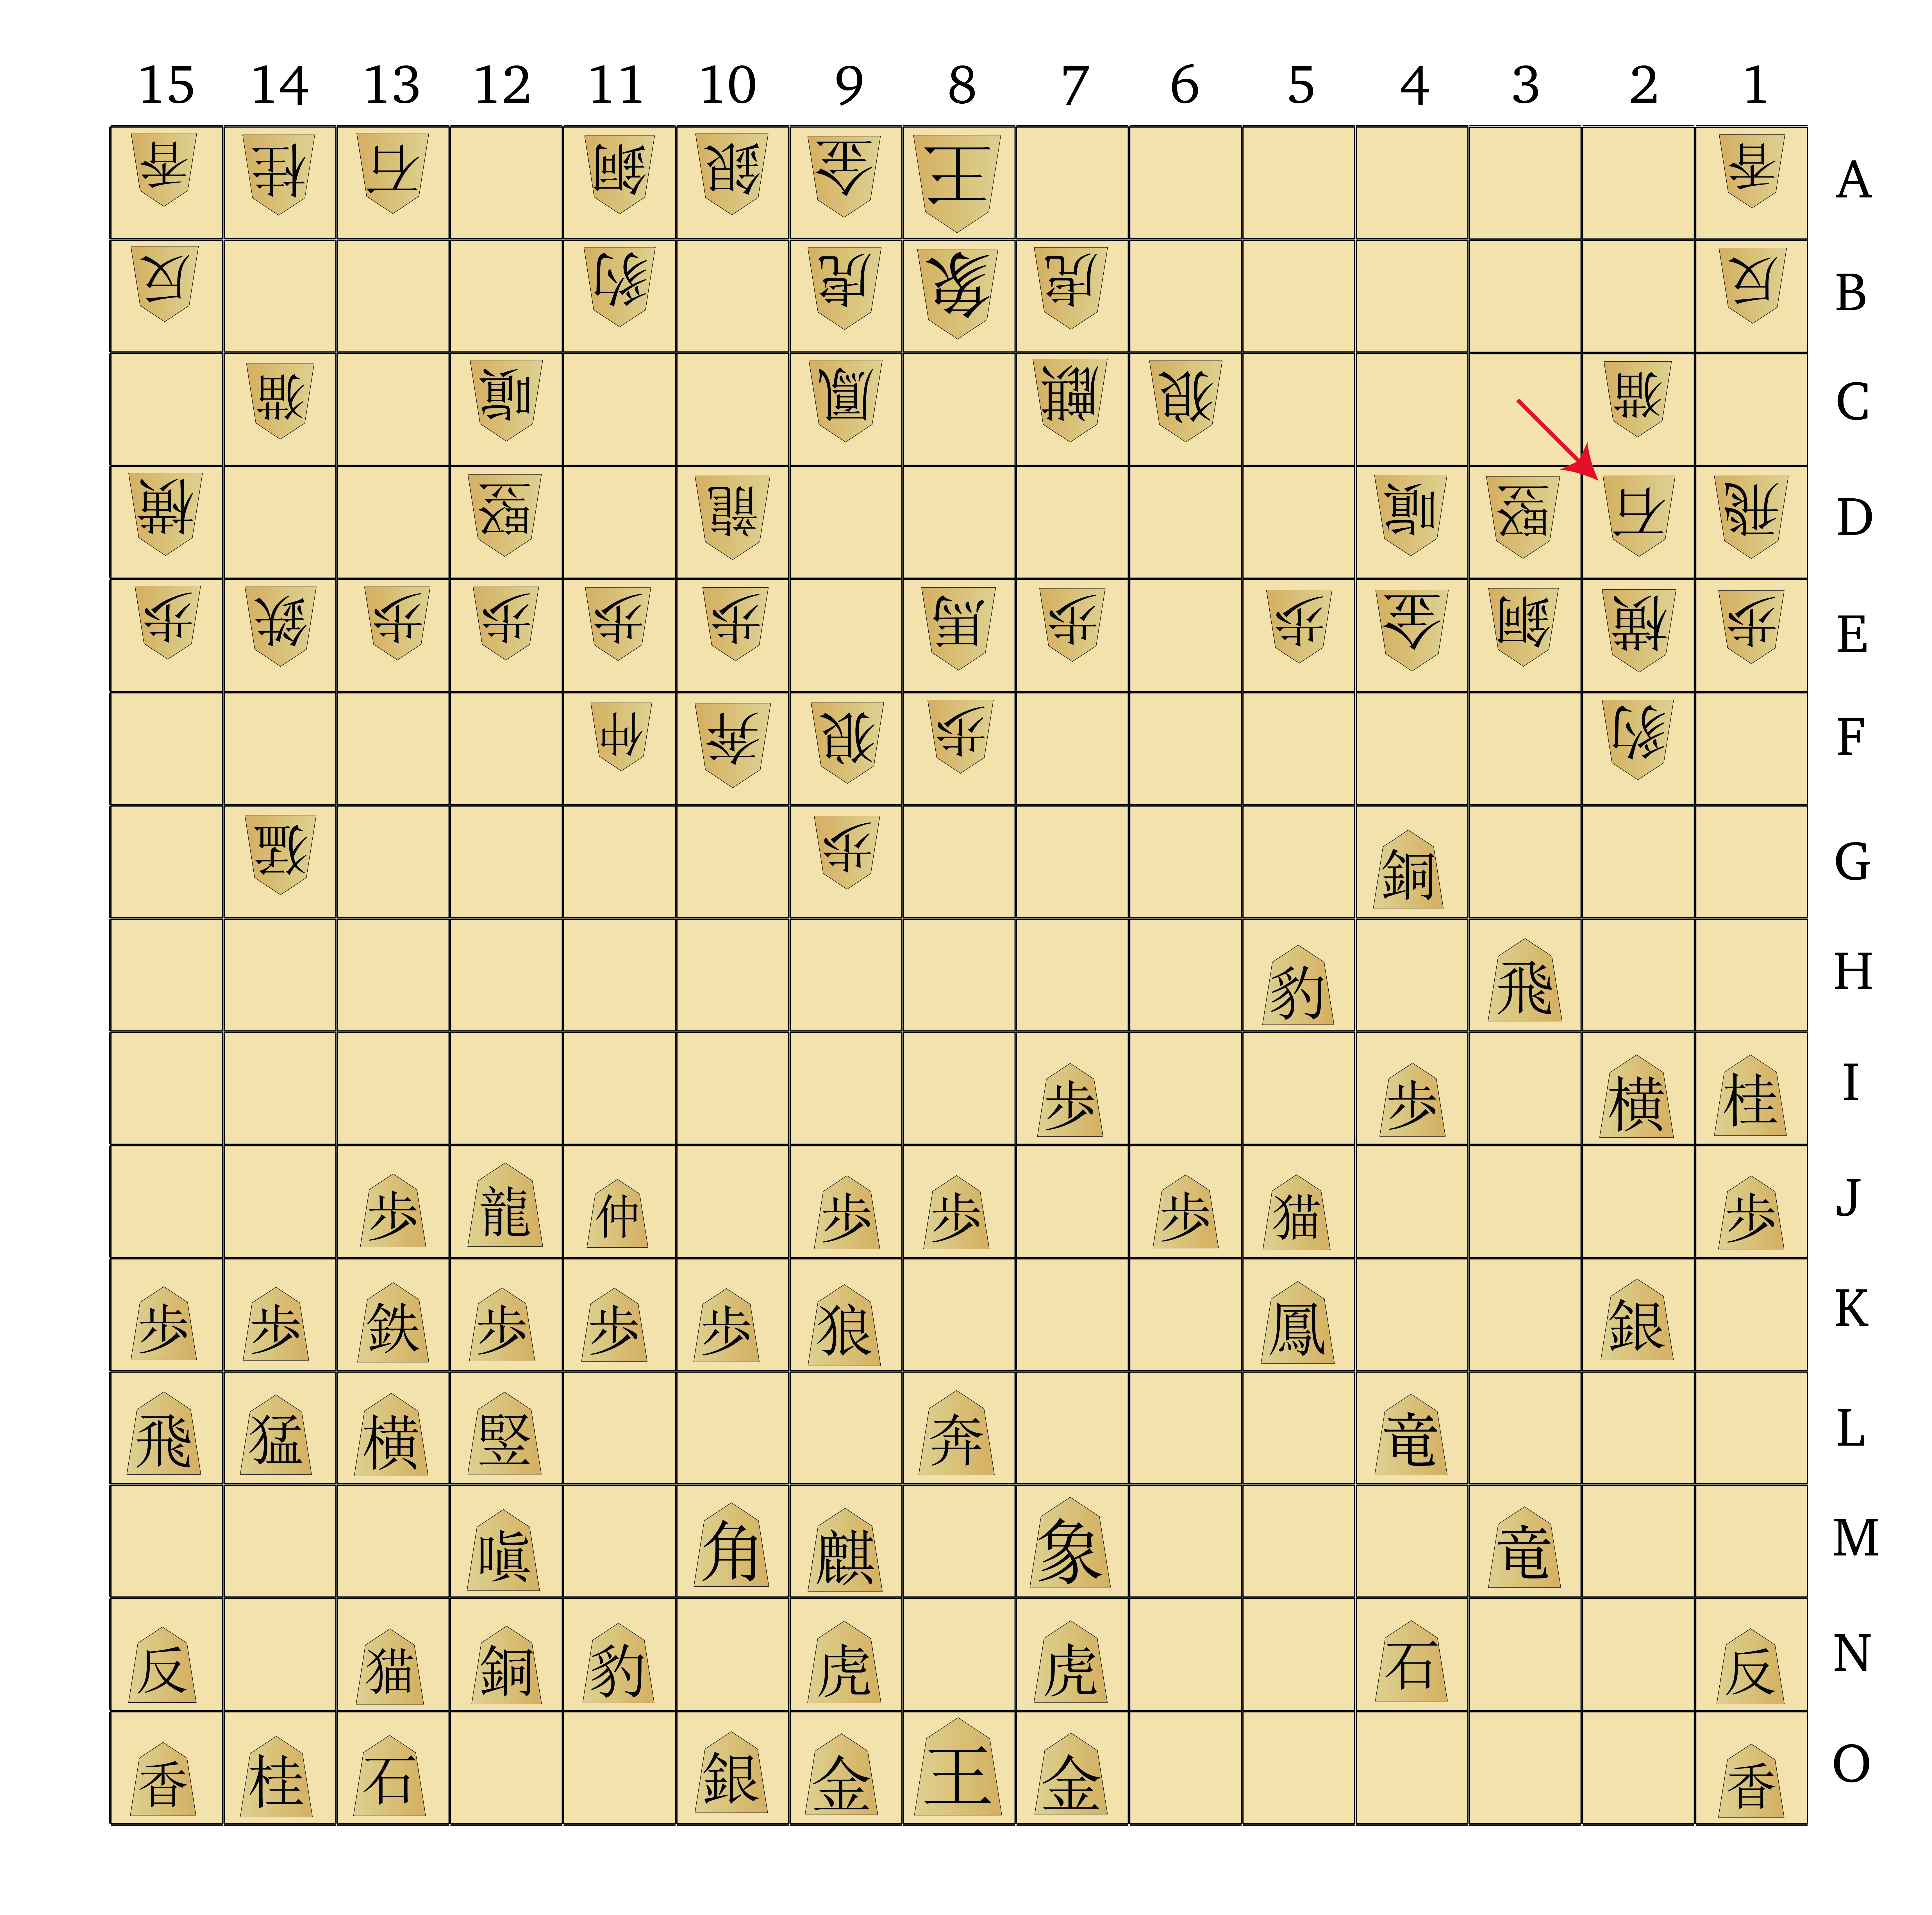
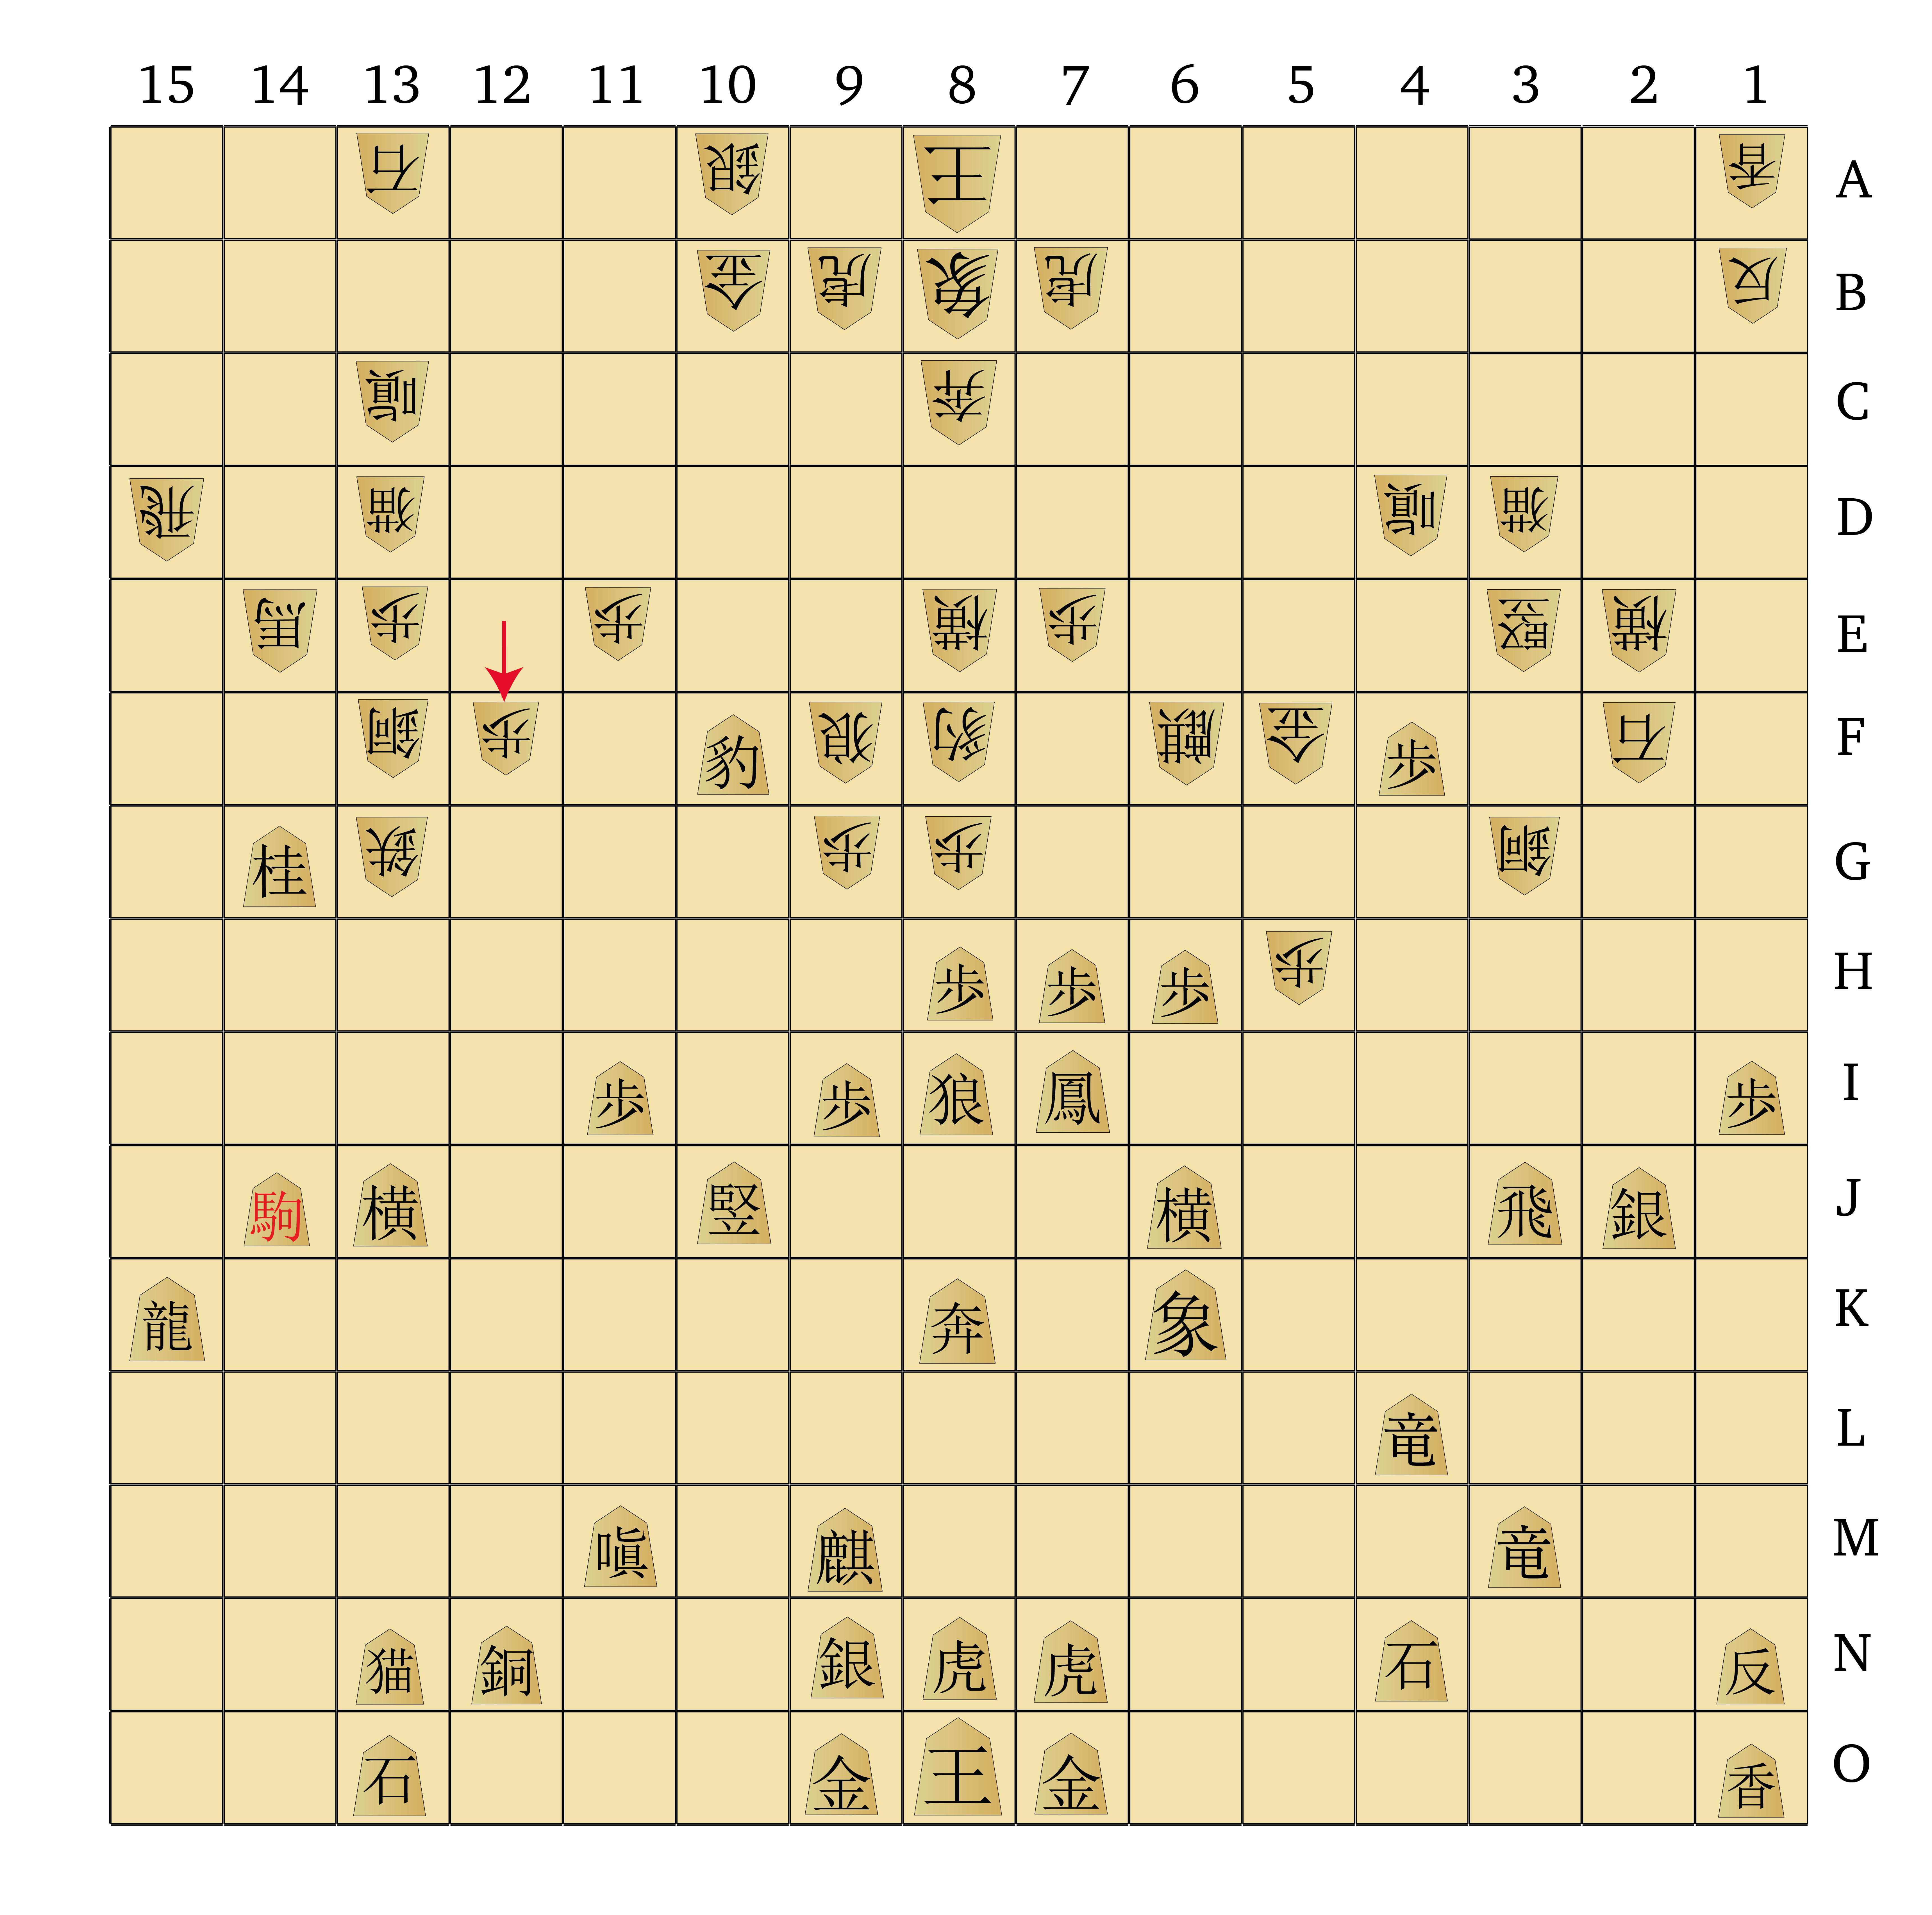
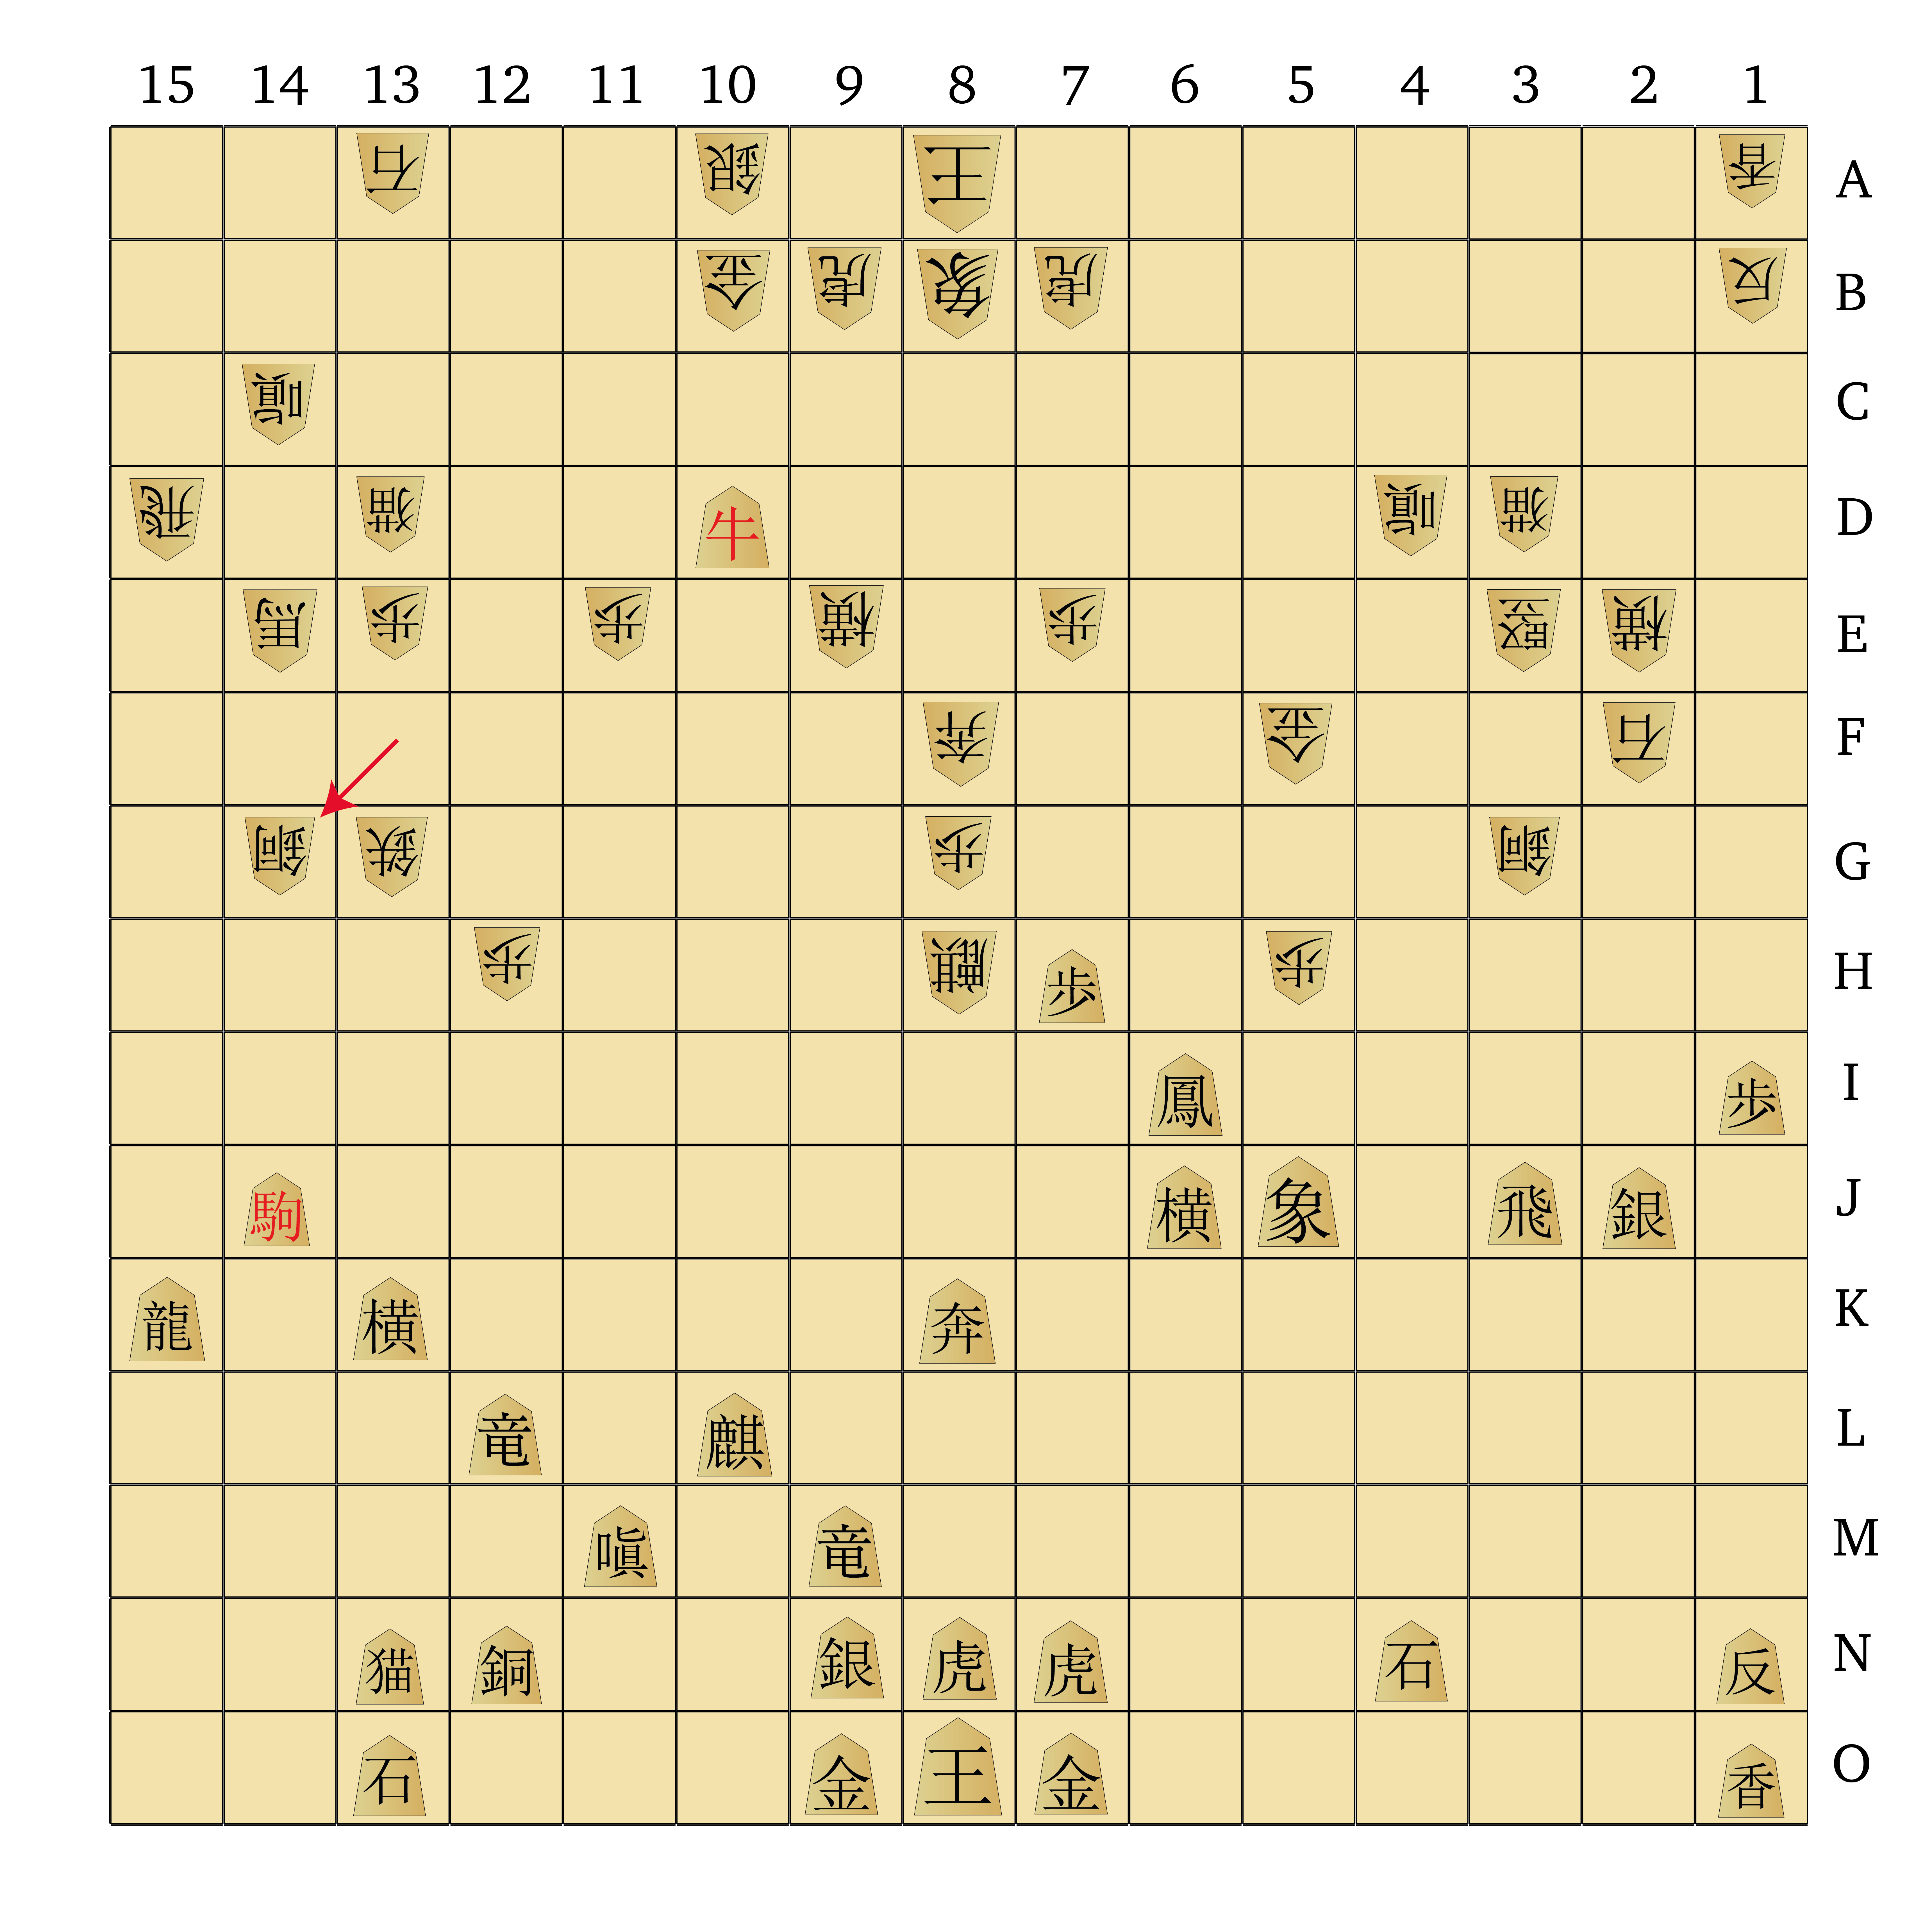
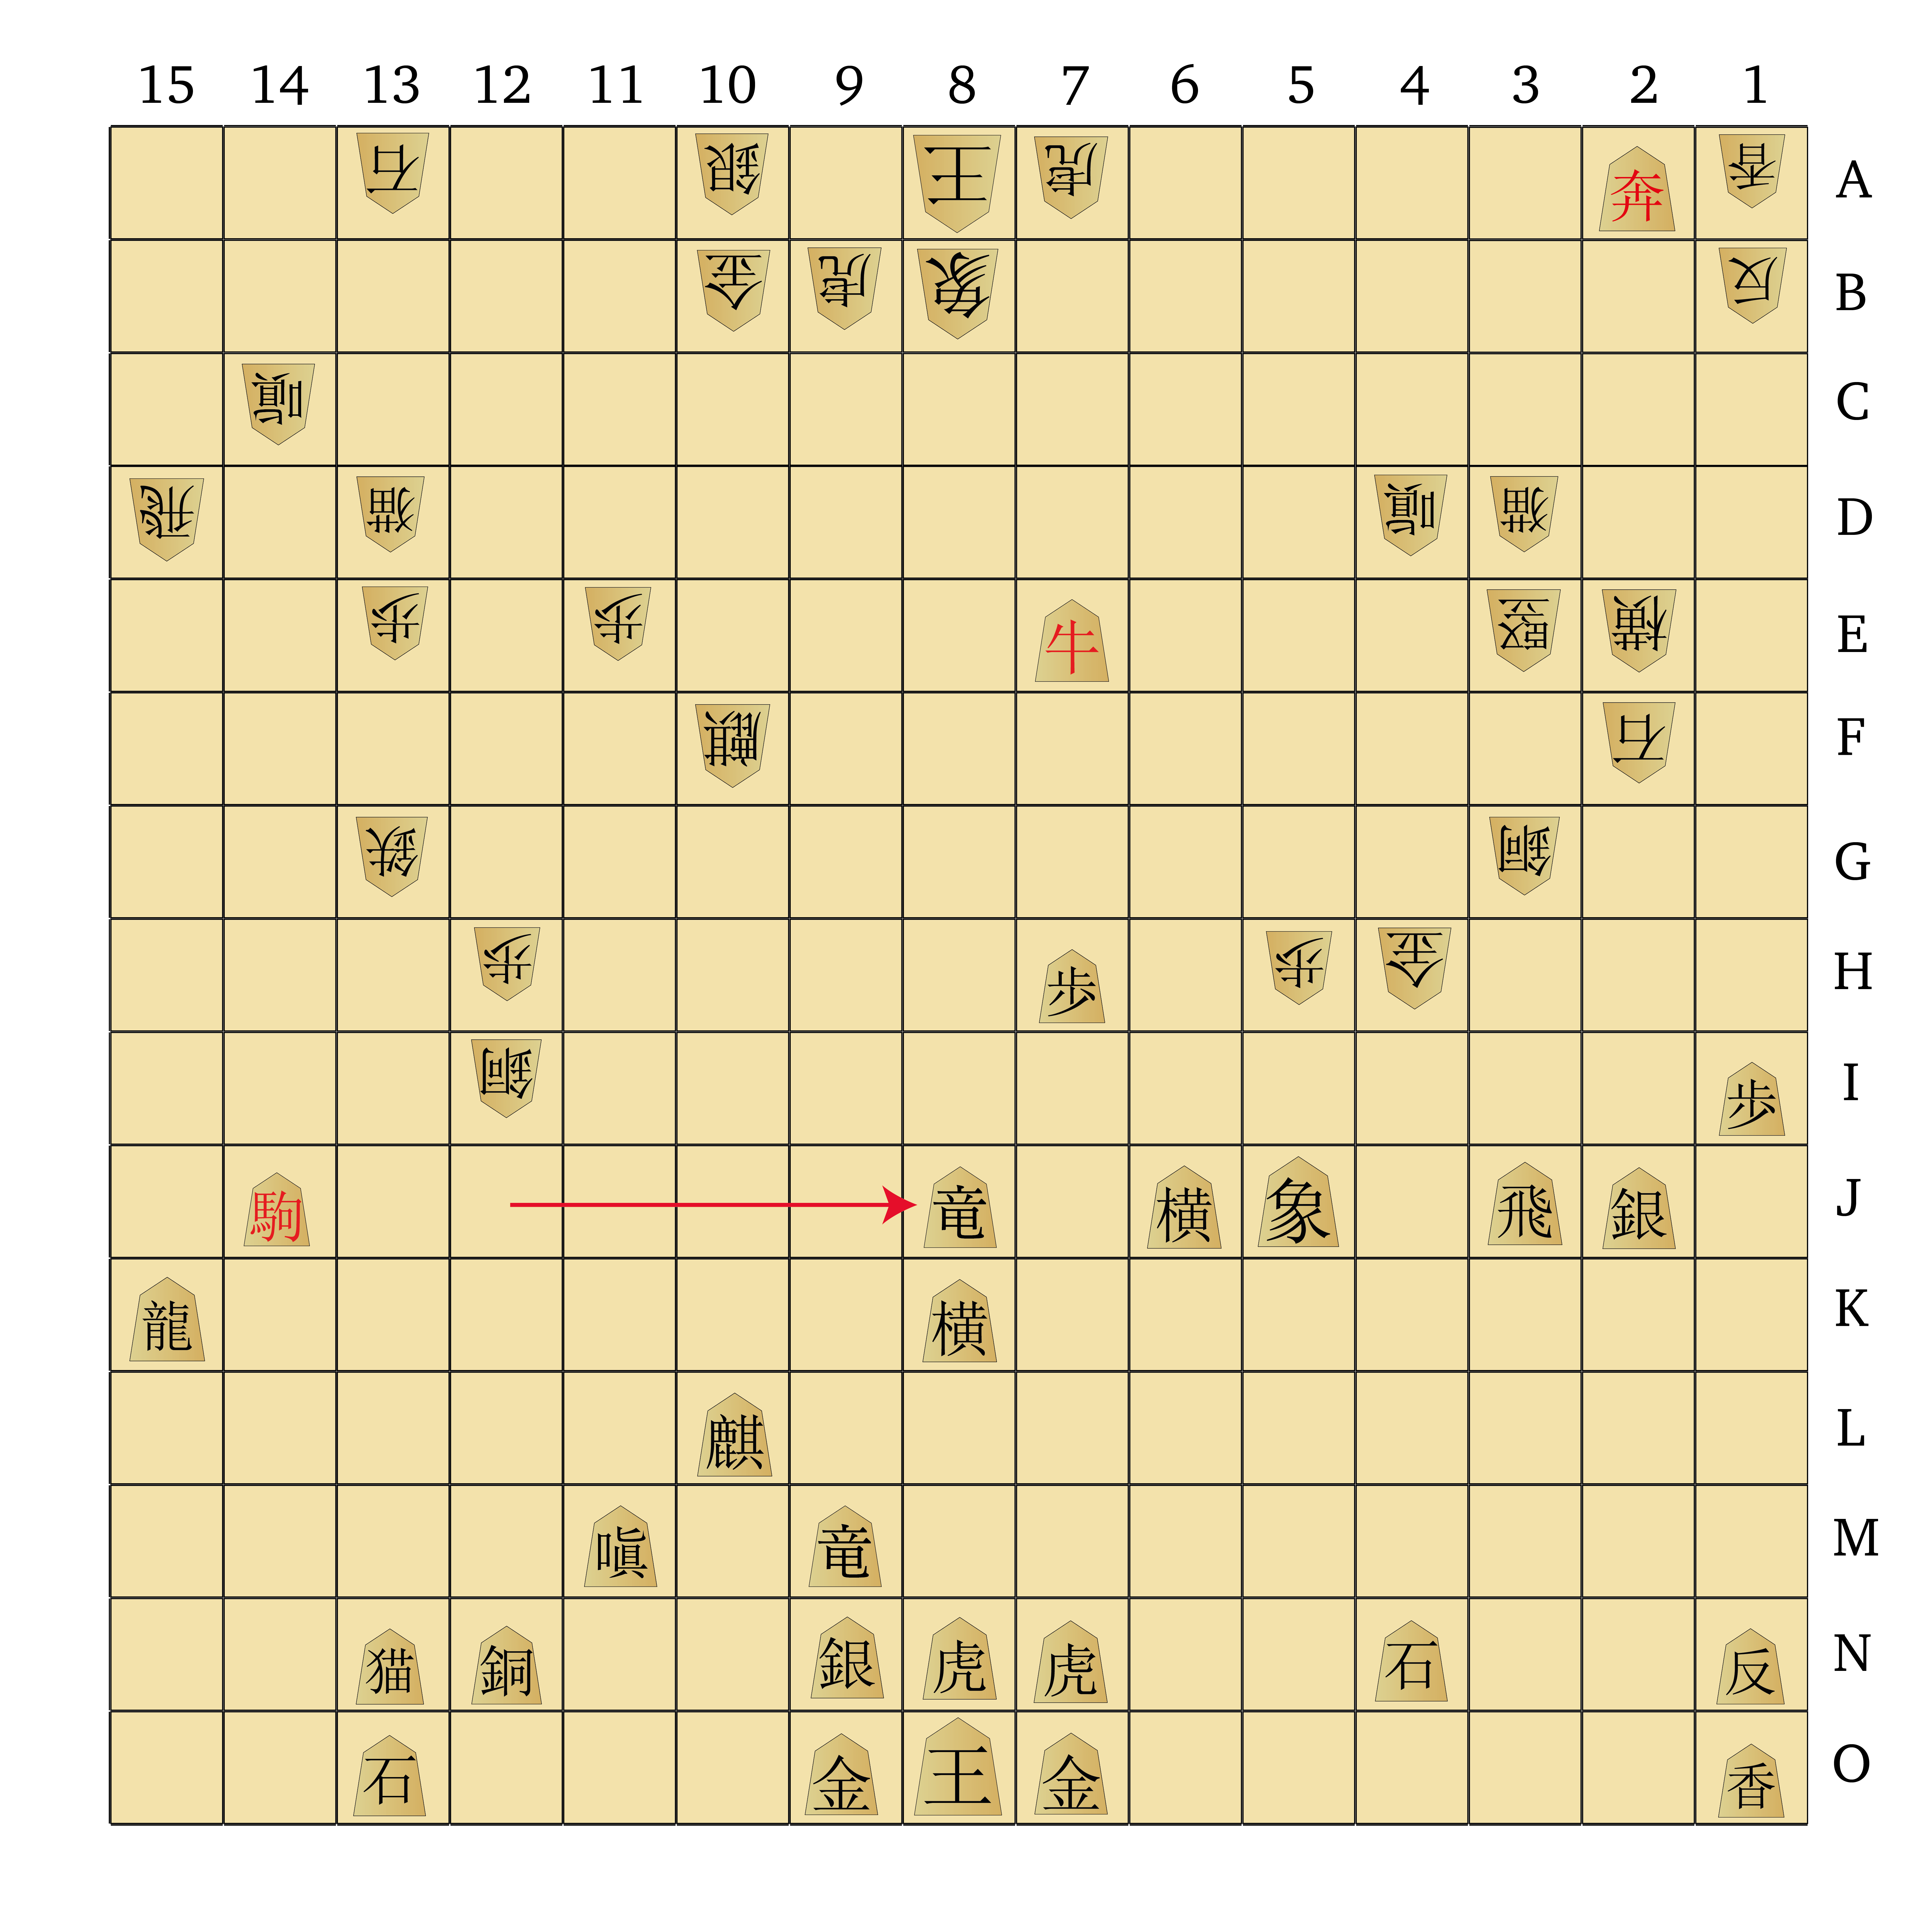
231 R-3j 232 Ph-9d 233 FK-7k 234 Ph-7f 235 C-4h 236 P-1h 237 FL-6g 238 Ph-9h 239 EW-10j 240 GB-11g
White commits more forces to the centre now, leaping the Phoenix around until it’s perched on 9h ahead of the frontline Pawns. At the same time White brings the 1-Pawn ahead to sit menacingly on the head of Black’s Knight, but Black ignores this and instead brings the Ferocious Leopard forward and sets the Evil Wolf in defence of the Pawn on 9j.
White’s advance in the centre appears to be gathering pace. Now he has the Phoenix, a small front of protected Pawns, and a Free King all directed at Black’s centre. Black’s pieces are well-coordinated but the 8- and 9-Pawns appear somewhat weak in the face of White’s gathered forces. How would you respond?

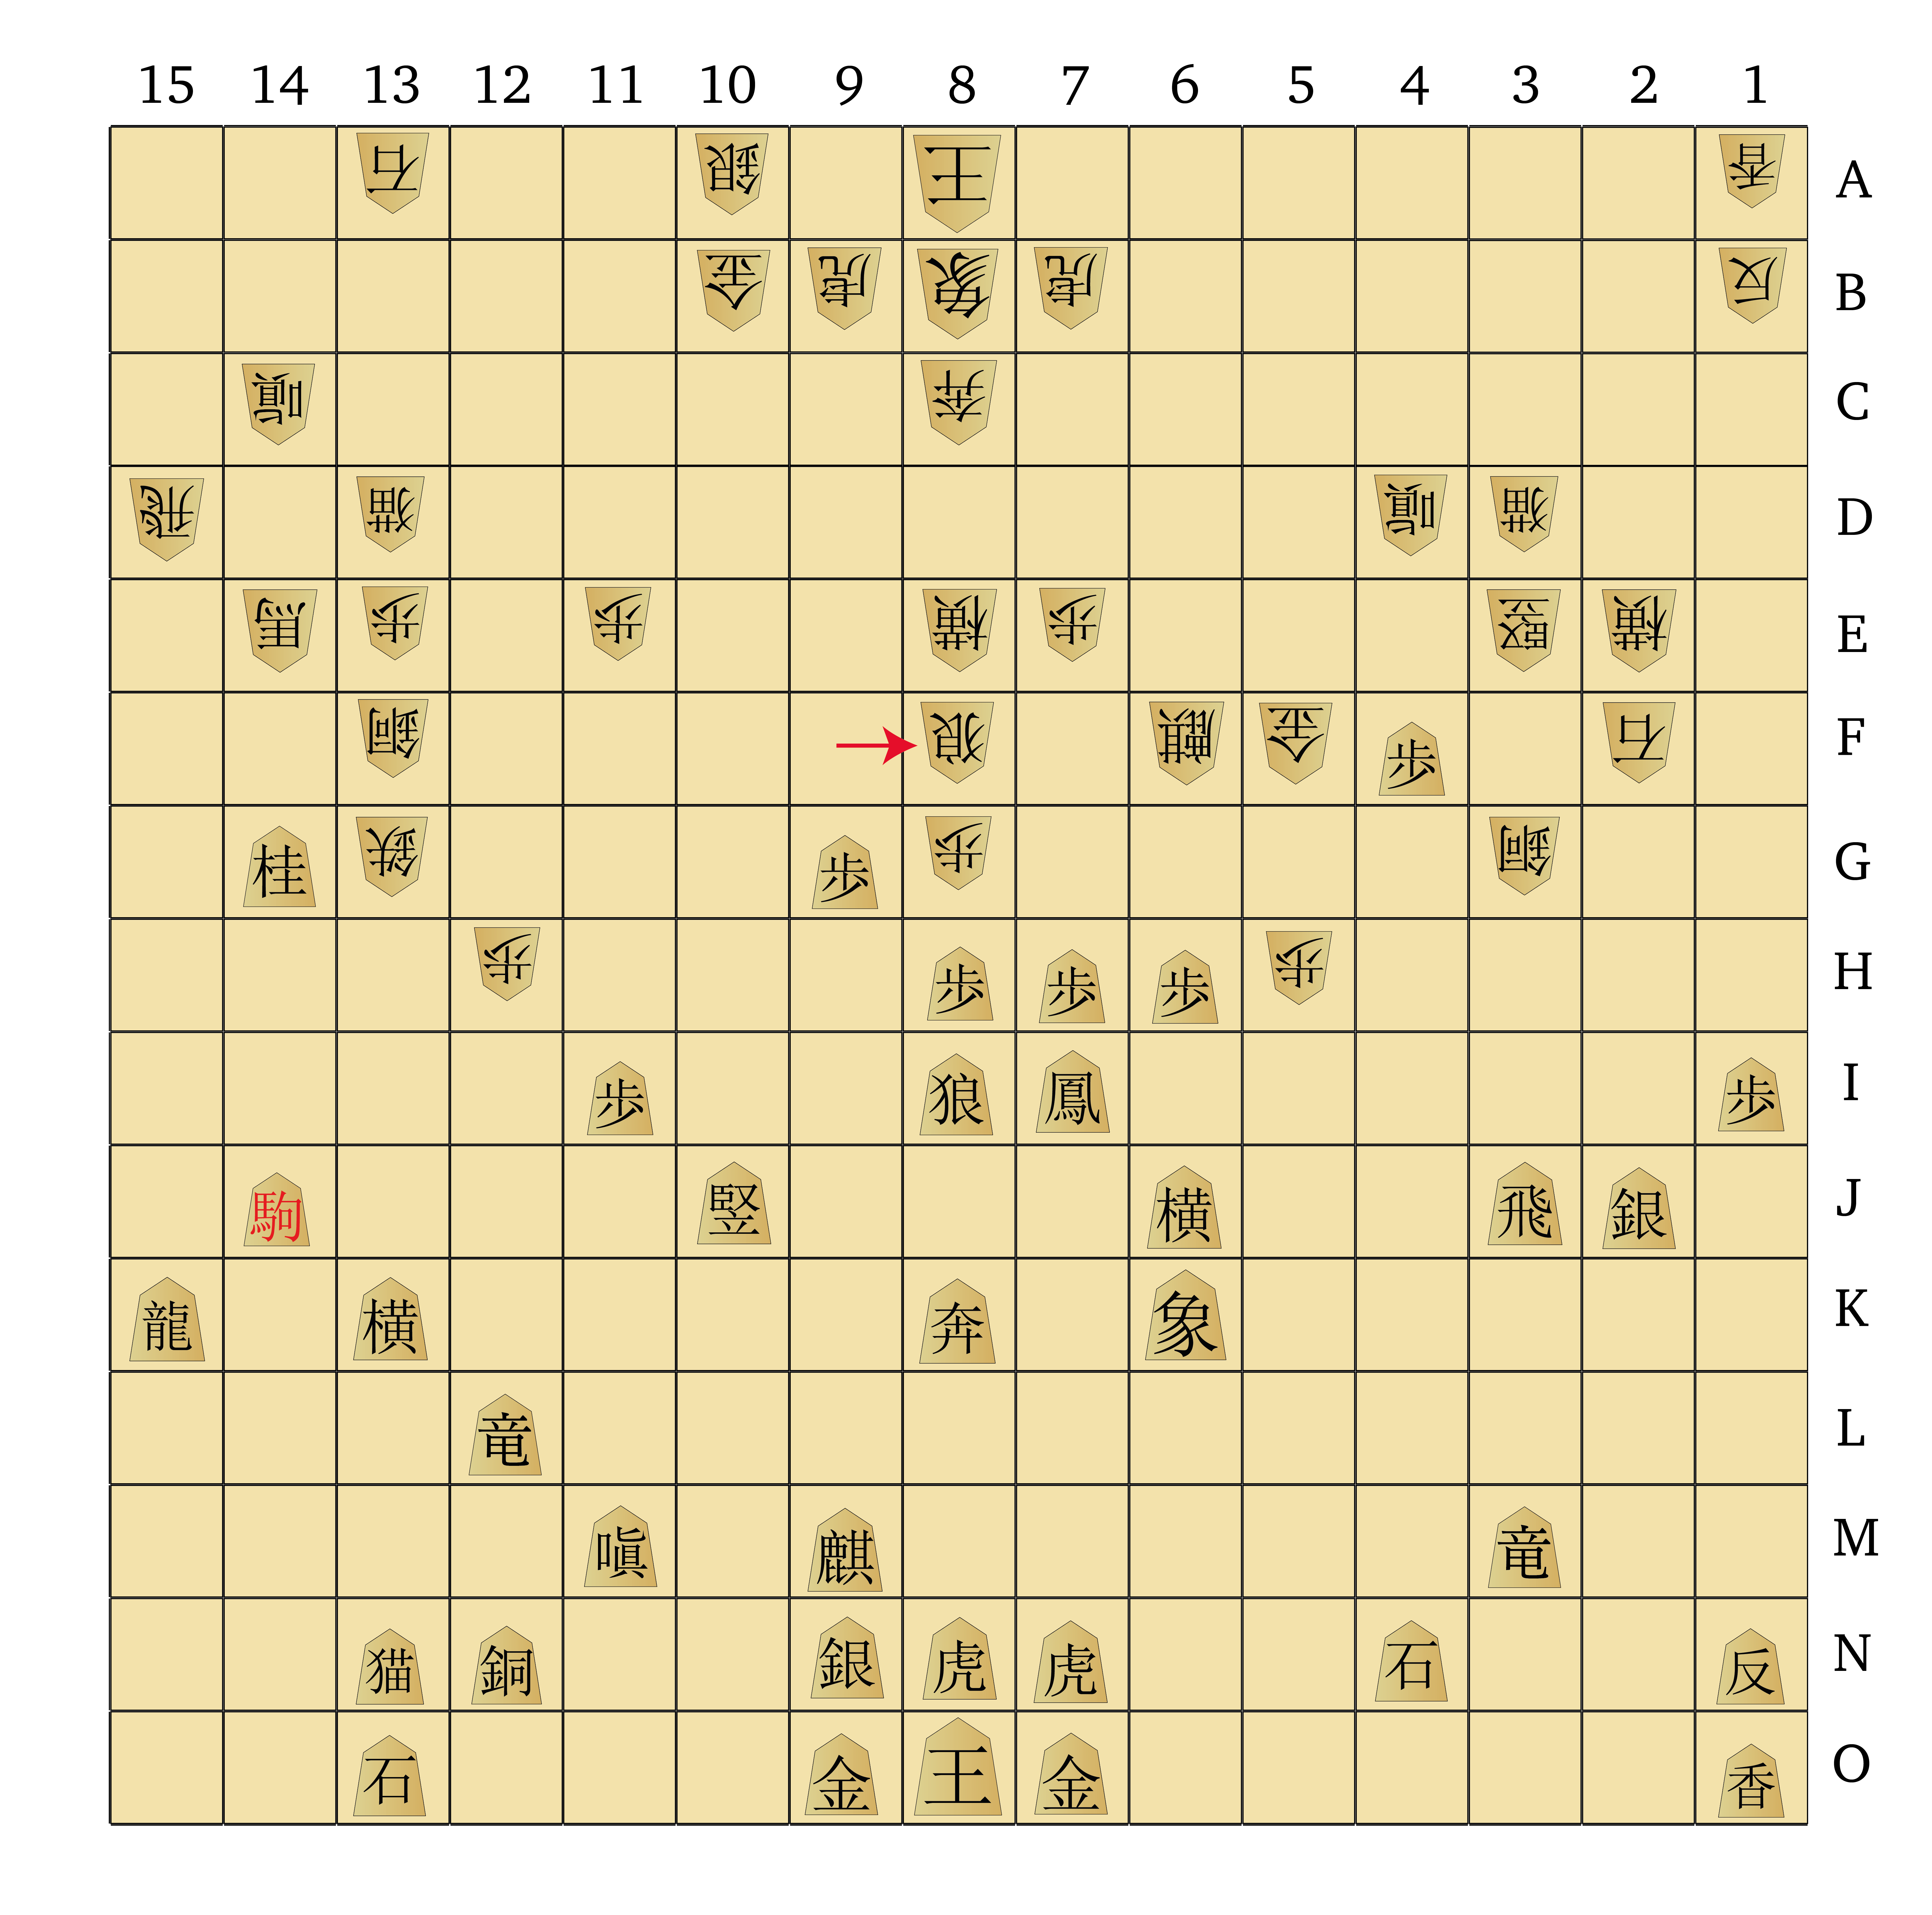
241 P-6i 242 FD-5i 243 FK-8l 244 Px1i 245 Px1i 246 C-3f 247 P-6h 248 FDx4h 249 Px4h 250 N-13c
I’m assuming you probably didn’t guess, in response to my last question, ‘let White take a bunch of stuff’! Don’t blame yourself, I didn’t expect that either. But let’s remember that at this point in the game, Black is ahead on material by a reasonable amount, and the pieces White is threatening are not hugely important to Black’s overall plan. That being the case, Black lets White take the Knight and the Copper General, and in the meantime use his moves to gain a bit more space. Black takes the Flying Dragon back after it takes the Copper on 4h, so ultimately he’s down only a Knight, and that Knight was mostly stuck on the edge of the board facing down a large mass of White’s pieces. Letting it be taken enables a pawn push on the edge and further gains of space on the 6- and 4-files.
This exchange is a useful reminder that material value can be looked at differently in a game this large. Each player in a Dai Shogi game has 65 pieces in their starting army, so losing a weaker piece here or there for some positional compensation can be well worth it. Here, I believe Black decided that giving up the Knight for a bit of tempo and space would pay off in the end, and perhaps lead White to overextend as well. Dai Shogi is a deeply strategic game, so learning to judge when to accept a tactical loss for a strategic gain is a valuable skill.
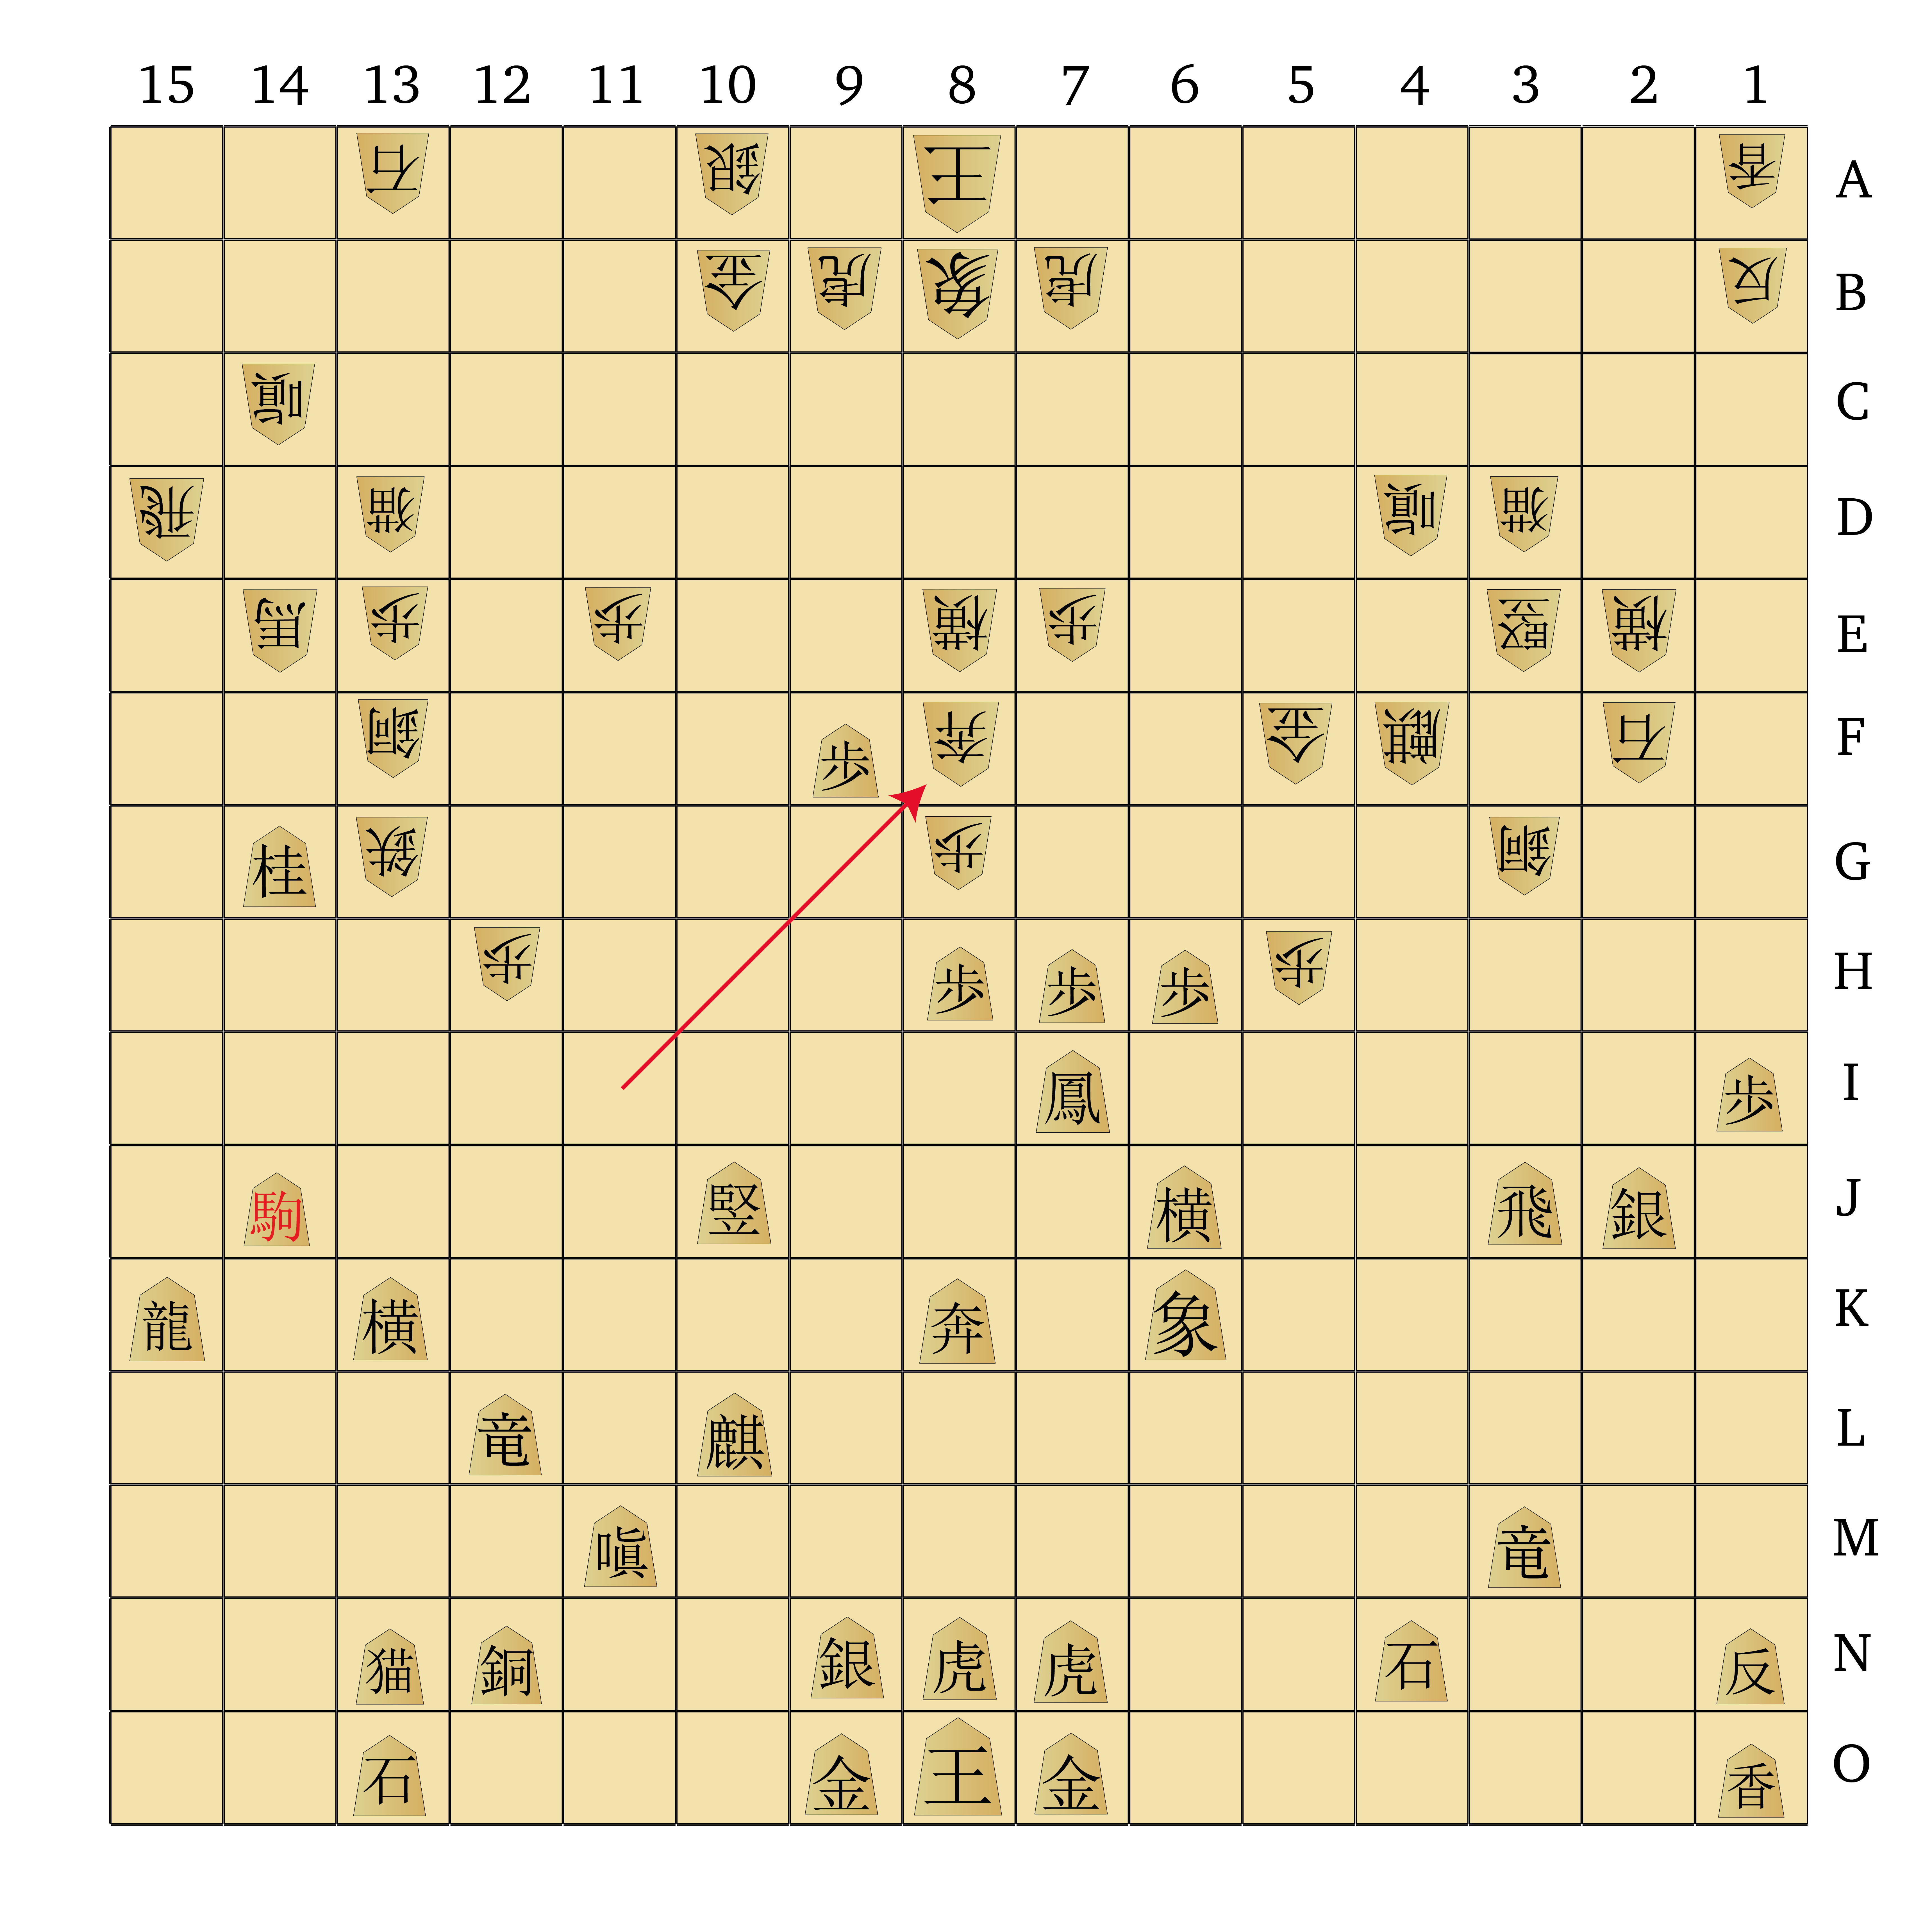
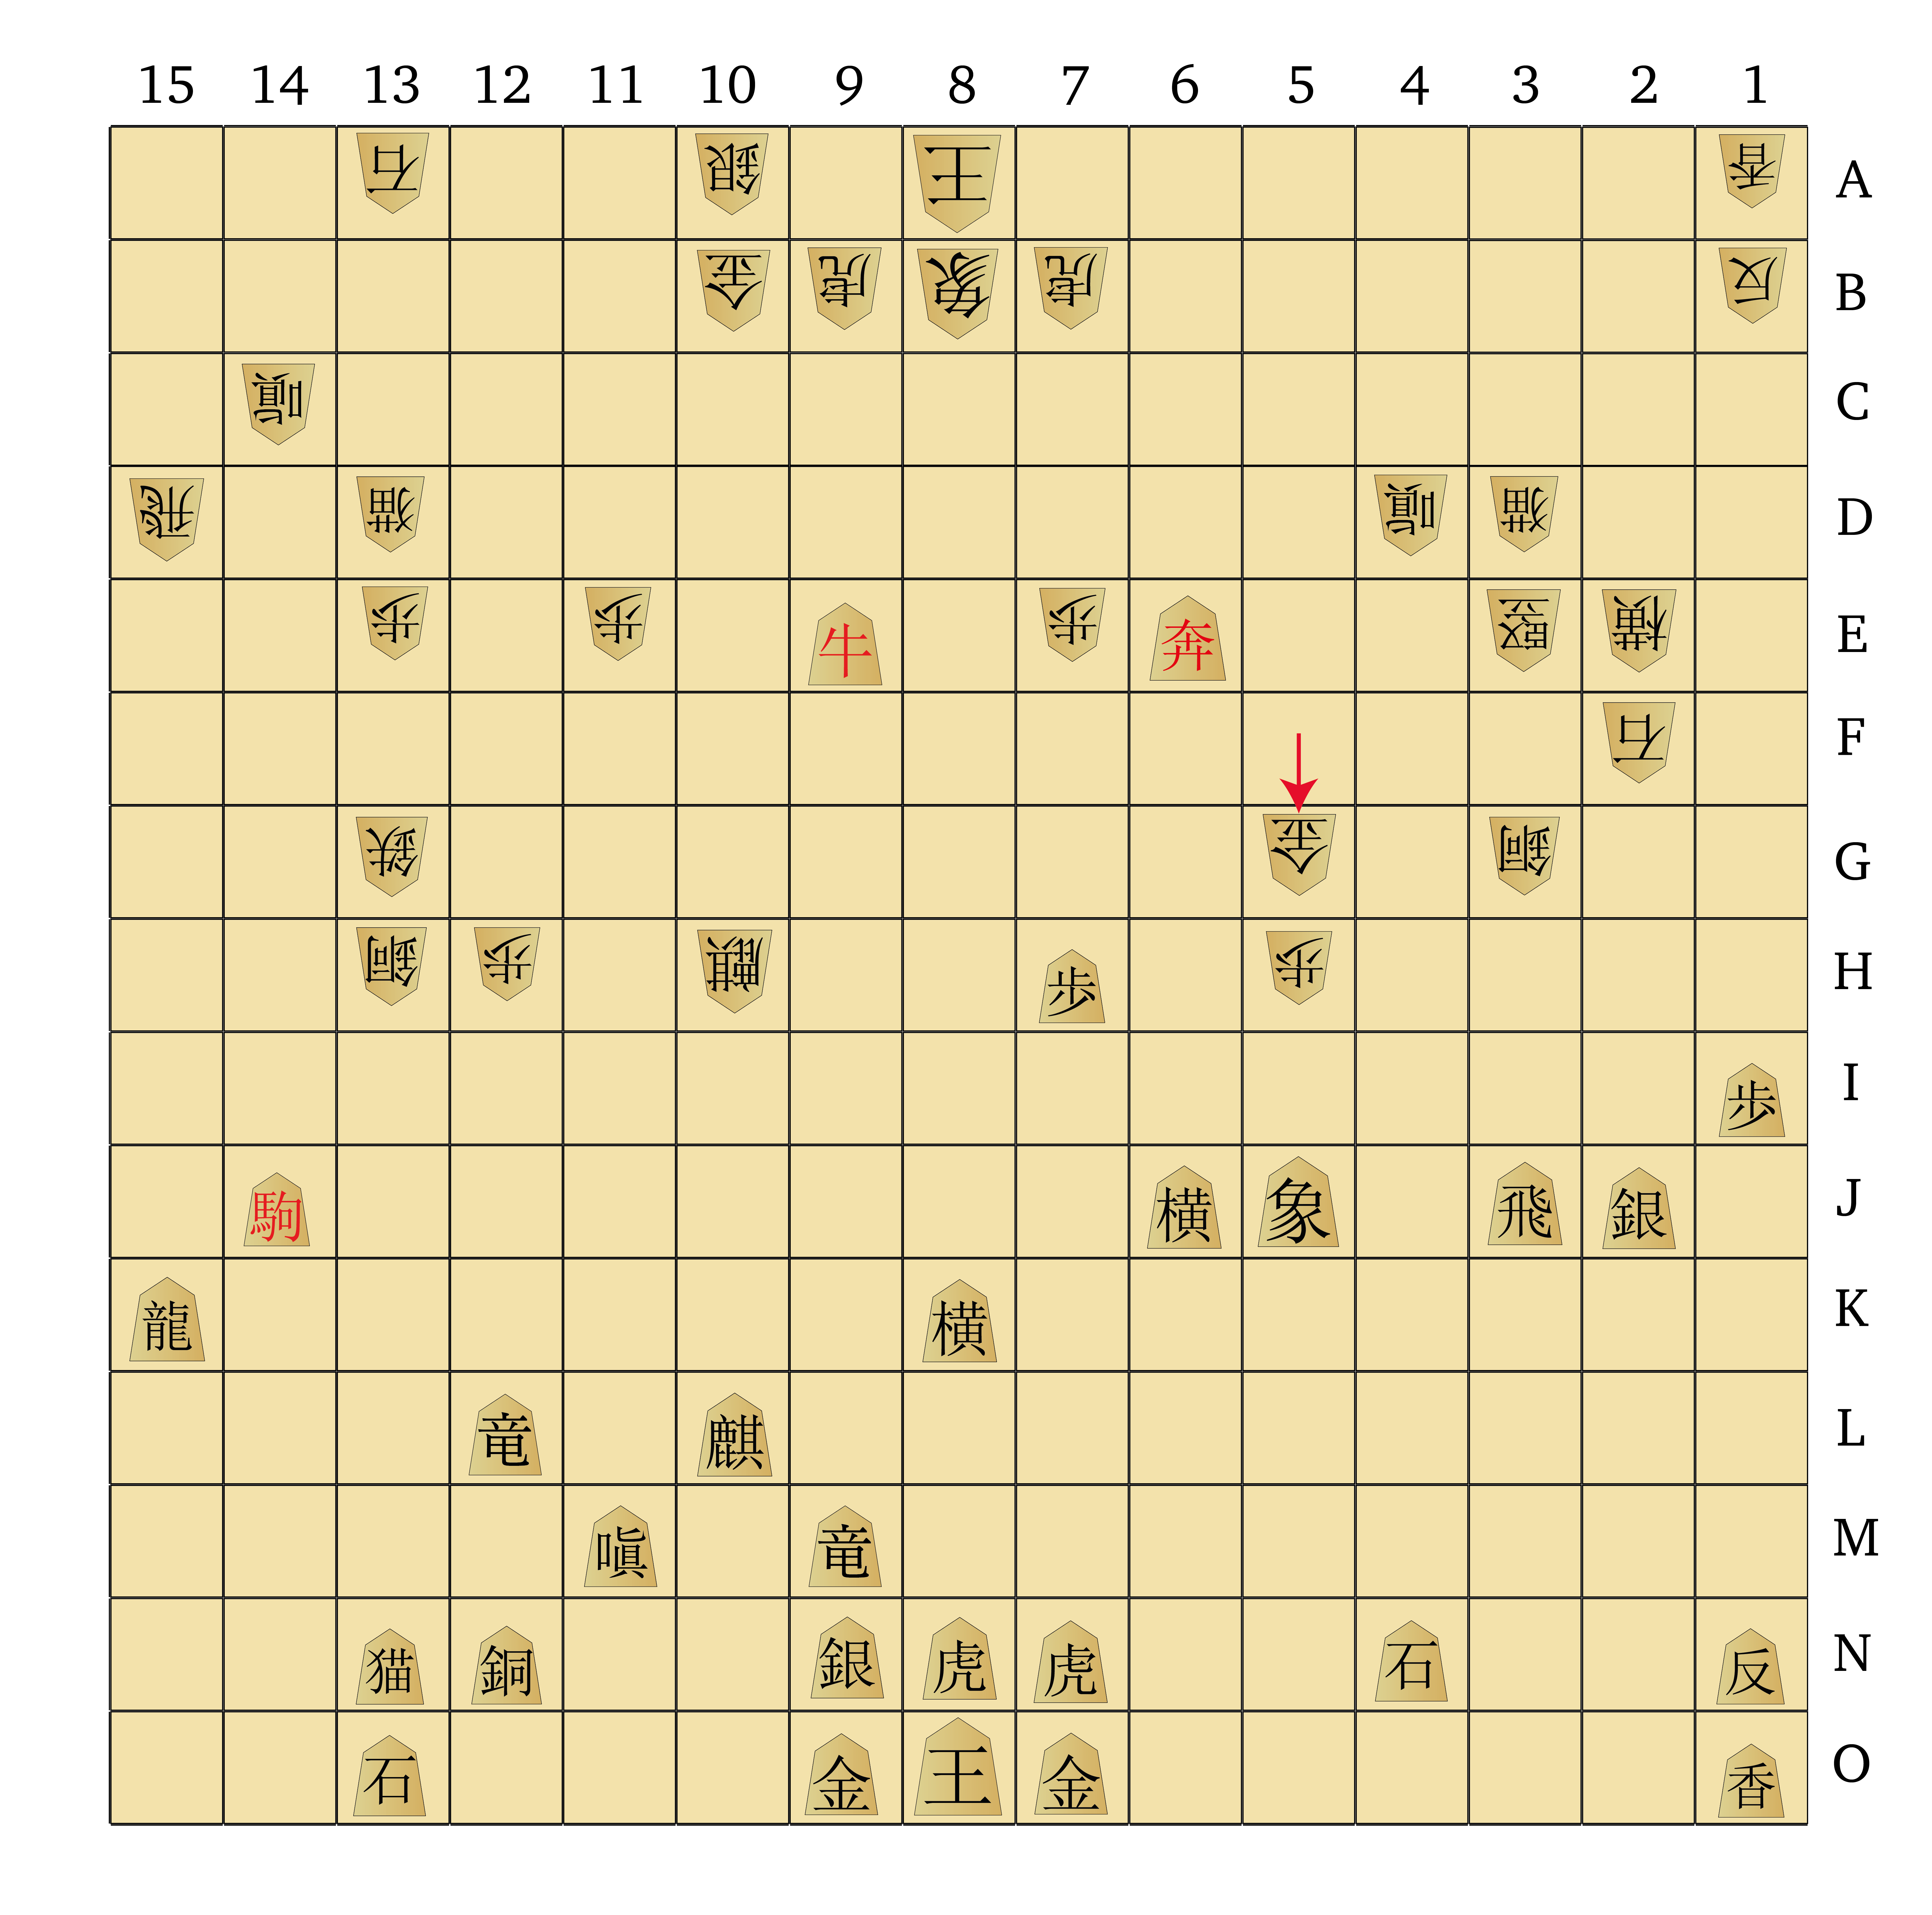
251 EW-9i 252 Ph-11f 253 B-7j 254 FL-3g 255 Bx11f 256 GBx11f 257 P-12i 258 N-14e 259 P-12h 260 N-13g
Having let White have some fun on the right flank, Black decides to disrupt White’s central advance. Bringing forward the Evil Wolf pushes White to shunt the Phoenix to the side to avoid losing it, only for Black to take it with his Bishop. White immediately takes back with a backwards step from his Go-Between, but Black was probably quite pleased with this exchange; the Phoenix promotes to a Free King, one of the most powerful pieces in the game, whereas the Bishop is a great piece but well worth sacrificing to eliminate White’s chance at a second Free King. Black follows up by pushing the 12-Pawn, creating a little bit of counter-play.
261 P-15j 262 C-12b 263 P-15i 264 C-13c 265 P-4g 266 C-13d 267 P-14j 268 FL-10c 269 P-13i 270 DH-8e
Black continues the forward press, advancing Pawns on the 13-, 14- and 15-files, as well as on the 4-file. Black wants to continue to gain space along the flanks, which serves to increase his own options while cramping White’s ability to manoeuvre. White responds by bring his Copper from the back line to support the Pawns on the left flank, then shuffles his Dragon Horse back one square; this way it continues to protect the Pawn on 8g and the Evil Wolf on 9f, but also pins Black’s Ferocious Leopard on 6g to the Rook on 3j. Not a particularly strong pin, mind you, but still something Black should keep in mind if that Rook is important to his plans on the right side.

271 P-13h 272 N-12i 273 VMx12i 274 EW-8f 275 VM-12j 276 EW-7d 277 BT9n-8n 278 EW-6e 279 CS-6i 280 ST-1e
Now both players get into some more subtle repositioning. Black’s Pawn push to 13h forces White’s Knight to jump, although ultimately it’s a bit of a waste as the Knight is immediately taken by the Vertical Mover on 12i. White retaliates by moving the Evil Wolf to 8f, which opens a line from the Dragon Horse toward the Vertical Mover, which Black promptly drops back to 12j. White’s other Evil Wolf then shuffles toward the right flank, while Black finally accepts the need for King safety and moves a Blind Tiger over to cover the space abandoned by the adventurous Drunk Elephant.
281 FL-12k 282 VO-14h 283 I-13j 284 VOx13h 285 I-12i 286 VO-14h 287 FL-13j 288 VOx14j 289 VOx14j 290 VMx14j
Suddenly the left flank explodes into action! White advances the Violent Ox down the 14-file, then gobbles up a Pawn on 13h. Black threatens to recapture with the Iron General, pushing the Violent Ox back to the 14-file. White’s Ox then leaps into battle, taking a Pawn, getting taken in return by Black’s Ox, then White’s Vertical Mover takes Black’s Ox. The 14-file is now mostly open, and White appears to have made a dent in Black’s lines for the first time.
291 R-14l 292 ST-2f 293 Rx14j 294 AB-13c 295 GB-11h 296 C-2g 297 CS-5h 298 C-3h 299 SM-6i 300 FL-9d
Fortunately for Black, the excitement is short-lived. Black brings the Rook forward and takes White’s Vertical Mover on 14j; this leaves White’s Cat Sword on 14c vulnerable to capture, so the Angry Boar shuffles over to protect it. White then changes tack, advancing his Copper toward the front on the right side. Black responds calmly, bringing his Side Mover over in defence of the Pawn and Ferocious Leopard on the 6-file; this helps deter any ideas of the Dragon Horse on 8e breaking through to join the fight on the right.
301 P-11i 302 FKx10k 303 FK-11l 304 FK-8k 305 P-8i 306 FL-4h 307 DKx4h 308 C-3g 309 DK4h-4l 310 VM-3f
White now makes a serious play down the centre. His Free King, having sat quietly on 10f for a large portion of the game, darts downward and takes the Pawn on 10k! This is clearly a dangerous development, so Black sweeps his own Free King over to 11l and offers an exchange. White refuses and parks the Free King on 8k, pinning the Blind Tiger to Black’s King.
While this looks deadly, for the moment Black can breathe easy; the Free King is in a dominating position but has no support. The King can only be attacked via the diagonal on 10m, and that square is amply protected. So, for now at least, the Free King bears down on Black’s camp but doesn’t present any immediate checkmating threats.
311 S-9n 312 FL-9e 313 SM-13k 314 FK-5n 315 VM-11j 316 CS-3d 317 VM-10j 318 P-10f 319 P-15h 320 EW-5f
Black once again stays cool under pressure. First, he brings the Silver into position on in, plugging the one remaining hole in the King’s castle. Then he shifts the Side Mover up to 13k, preparing for a discovered attack on White’s Free King via a move of the Flying Dragon. White sees this coming and sweeps the Free King down to 5n, where at the moment none of Black’s pieces can threaten it. Black then acts to plug more holes in his defences by bringing the Vertical Mover over to protect the 10-file. Meanwhile, White has advanced the Copper General and Evil Wolf down the right side, perhaps hoping to reverse some of Black’s space gains there.

321 N-13m 322 G-10b 323 P-15g 324 EW-5g 325 I-13h 326 EWx5h 327 SM-6j 328 VM-3e 329 I-14g 330 I-13g
At this point Black remembers he has a Knight on 14o that hasn’t been developed yet, so he brings it into play. Similarly, White decides to draft the other Gold General into action, drawing it away from the stationary defence of the King.
From here we have a scenario that by now is somewhat familiar in this game: Black moves to consolidate his gains of space, while White opportunistically captures on 5h. Black is still ahead in material, having captured 25 pieces to White’s 22 captures, so the loss of an Ox is not particularly bothersome. The increasingly cramped nature of White’s position leaves Black with more options.
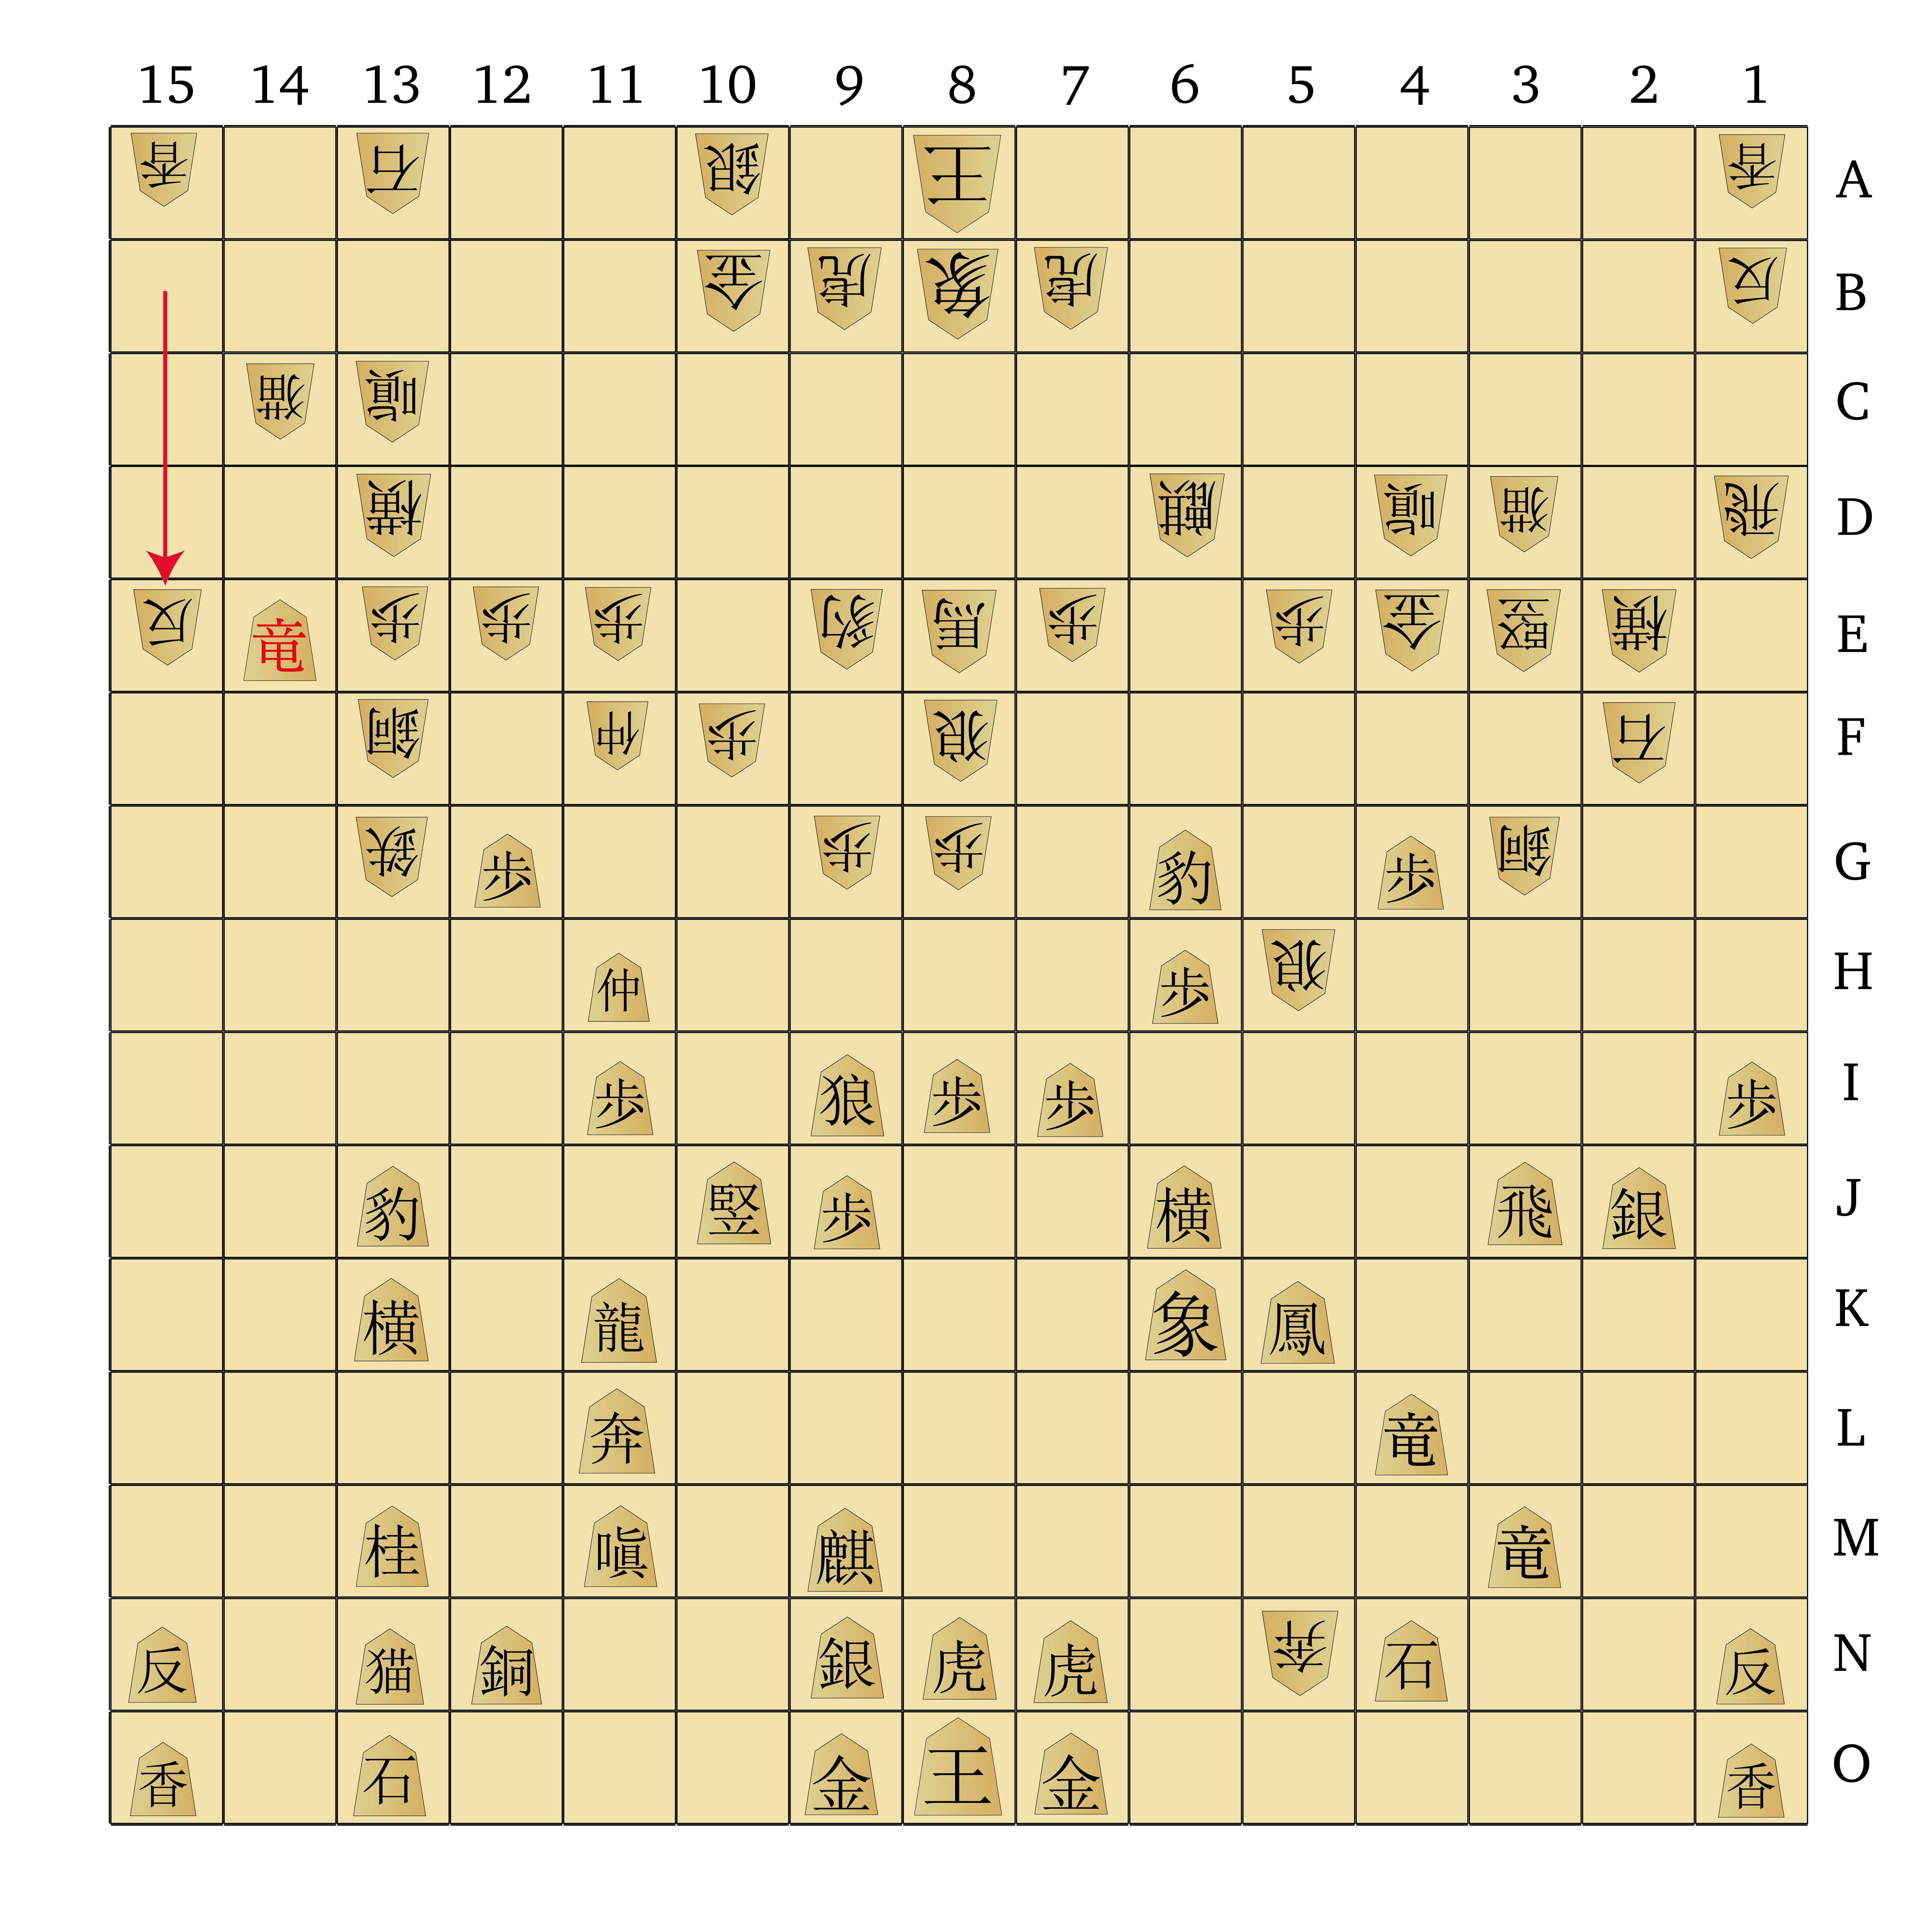
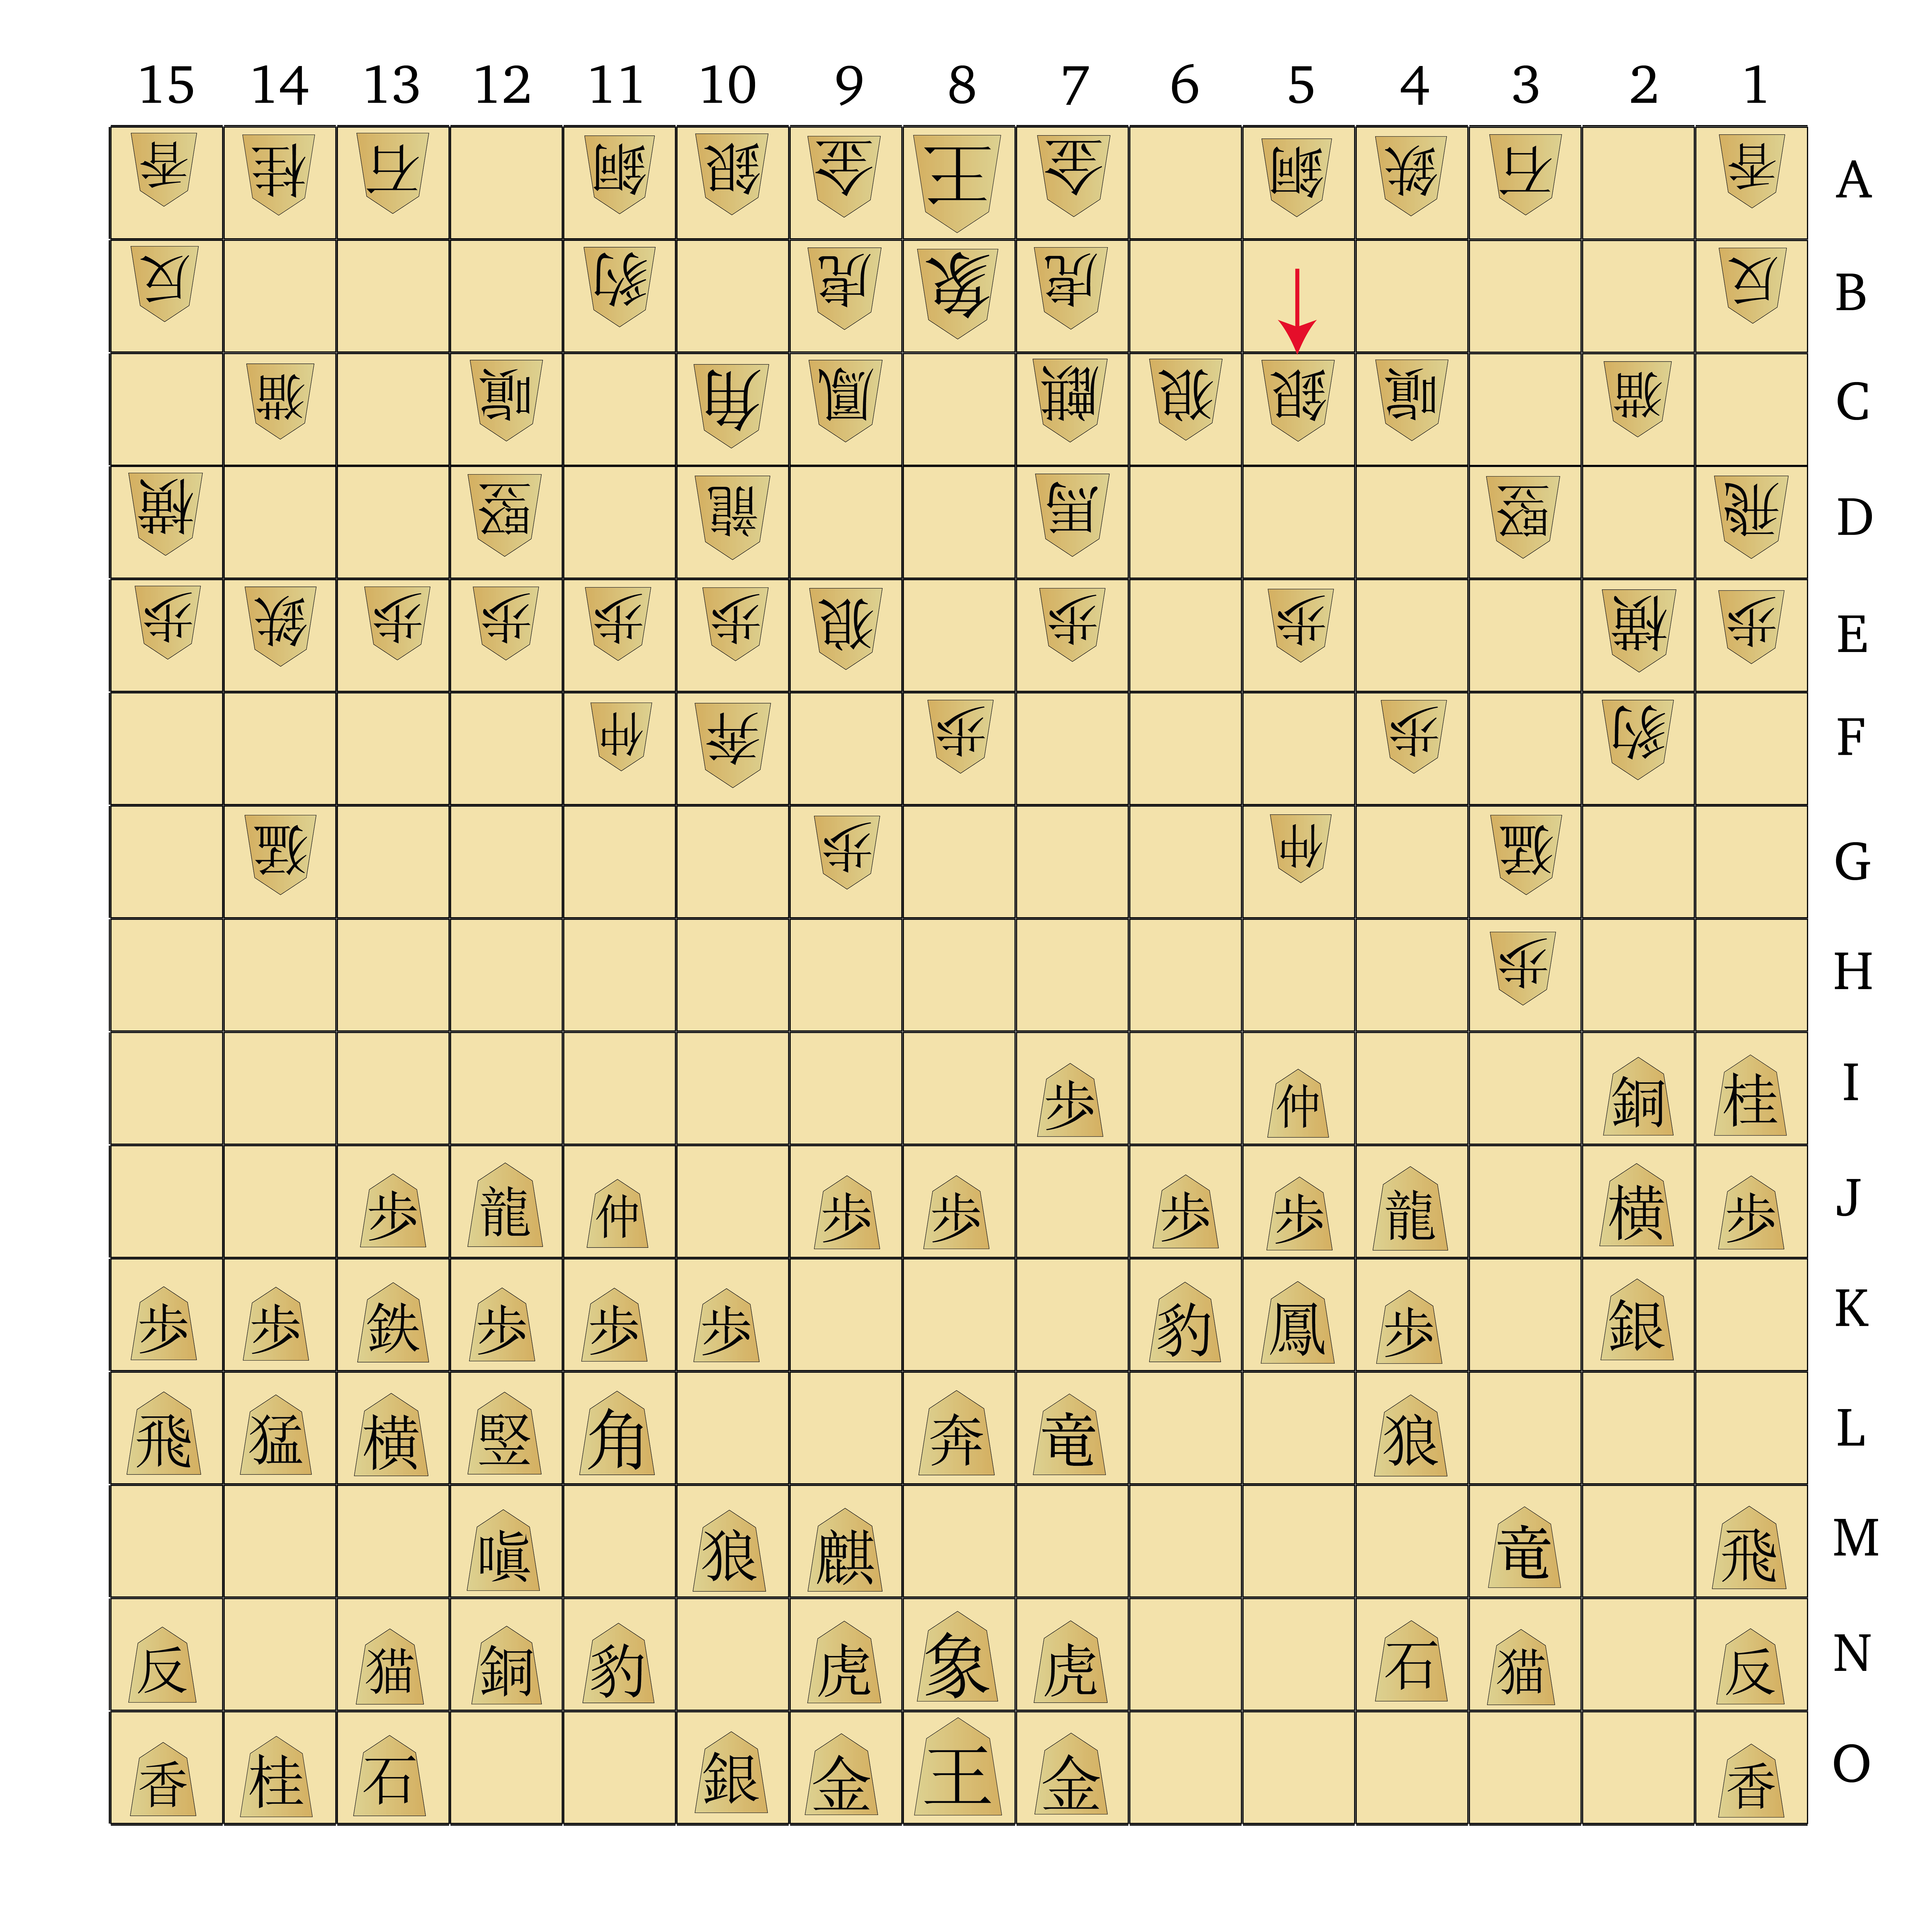
331 P-12g 332 C-14e 333 P-15f 334 Px15f 335 Ix15f 336 C-13f 337 R-14e+ 338 SM-13d 339 I-15e+ 340 RCx15e
Finally Black decides to cash in his hard work along the left side and mounts an edge attack! A final Pawn push on the 15-file triggers a Pawn capture from White, then a recapture from Black’s Iron General. This opens up a spot for Black’s Rook to dart forward to 14e and promote to Dragon King. White takes Black’s Iron General with his Reverse Chariot, but Black is sitting pretty with a Dragon King in a threatening position in the depths of White’s camp.

341 RCx15e+ 342 Lx15e 343 Lx15e+ 344 R-1c 345 +L-15k 346 EW-9f 347 FL-12i 348 P-5f 349 N-14k 350 DH-11b
A second flurry of captures along the left edge finally settles matters: Black ends up ahead, with a Lance now promoted to White Horse. Black then pulls the White Horse back to 15k, where it remains in control of the file while exerting additional pressure on White’s centre via the diagonal. White tries to keep a handle on the situation and prevent any incursions by Black’s newly-minted Dragon King; he brings the Rook back to 1c to guard the third rank and swings the Dragon Horse back to 11b to protect the Side Mover on 13d.
Black seems to have chosen a good moment to break the tension on the left side; he ended up ahead in material, with a two strong promoted pieces remaining in control of the area. White does have a strong wall of pieces blocking further progress by the Dragon King, but as of now none of them can threaten this powerful piece directly.
351 P-8h 352 SM-10d 353 +L-14j 354 SM-10e 355 N-15i 356 P-5g 357 N-14g 358 DHx14e 359 FLx5h 360 Px5h
White elects to respond by pulling the Side Mover away from the dangerous Dragon King, and uses it to reinforce the centre. Black continues to exert pressure from a distance via the White Horse, and starts moving the Knight forward along the 14- and 15-files. Unfortunately this exposes the Dragon King to capture for a moment, as the Knight blocks the White Horse’s protection; White wastes no time in taking the Dragon King off the board. A lucky escape by White?
361 P-4f 362 G-5f 363 P-7h 364 Ky-6f 365 EW-8i 366 R-8c 367 FK-8l 368 FL-8f 369 P-9i 370 R-8d
Black now moves to take advantage of his gain of initiative. He advances some more Pawns to gain more space and create some tension in the centre and on the left side, and his Free King which has been sat quietly off to the side for quite a while finally awakens and provides backup for the central Pawns. White responds by bringing forward his Gold and Kirin on the right and swings the Rook over to the 8-file to help protect the centre.
At this point quite a lot of tension has built along the central files, but neither player has yet pulled the trigger. Both are manoeuvring carefully to prepare for the inevitable clash.
371 FD-13m 372 GB-11g 373 GBx11g 374 FKx12g 375 FL-11h 376 FK-15j 377 SM-13j 378 SM-9e 379 GB-11f 380 FKx11f
Now White mounts a rescue operation of sorts, aiming to recover his Free King from its imposing but ultimately useless post all by itself near the Black castle. Triggering an exchange of Go-Betweens on 11g allows the Free King to dash back out of Black’s camp, and after a brief shuffle where it is threatened by Black’s Ferocious Leopard, the Free King is now back in the game and has picked up a Pawn and a Go-Between along the way.
The Free King is very powerful, particularly on a board this large where mobility is paramount, so rescuing it and putting it into service protecting the centre certainly seems prudent. But will it be enough to deter Black’s determined advance down the middle of the board?
381 FL-11g 382 FK-8c 383 FLx10f 384 SM-8e 385 FK-8k 386 R-15d 387 FD-15k 388 CS-13d 389 Ph-7i 390 P-12f
As it happens, White does quickly get the Free King back to base, and points it directly at the endangered 8-file. Black finds a new means to menace the centre and curls the Ferocious Leopard up and around, gobbling up a Pawn and forcing the Side Mover to shuffle away. Black’s Free King steps up slightly to offer its protection to the Flying Dragon on the left edge. Now the stage appears to be set for a showdown on the central files.
391 DK-12l 392 P-12g 393 SM-13k 394 AB-14c 395 P-9h 396 P-12h 397 FLx9g 398 FLx9g 399 Px9g 400 EW-8f
Yet more tension building up in the centre. Black swings a Dragon King across the fourth rank to gain some control of the 12-file, while White advances the 12-Pawn forward to interpose itself in the White Horse’s line of fire. Meanwhile Black pushes forward in the centre, triggering an exchange of Ferocious Leopards, which then forces White’s Evil Wolf to the side and off the 9-file.
401 EW-9h 402 FK-11f 403 EW-10g 404 FKx11i 405 Ky-10l 406 Kyx4f 407 EW-9f 408 EWx9f 409 Px9f 410 FK-8f
Now, at last, the war in the centre kicks off. Black’s Evil Wolf steps into the fray, threatening White’s Free King, which then takes the Pawn on 11i. The Evil Wolves are exchanged in the centre, drawing White’s Free King right into the middle of the action. After these quick exchanges, the centre is already much more open than it was just a few moves ago.
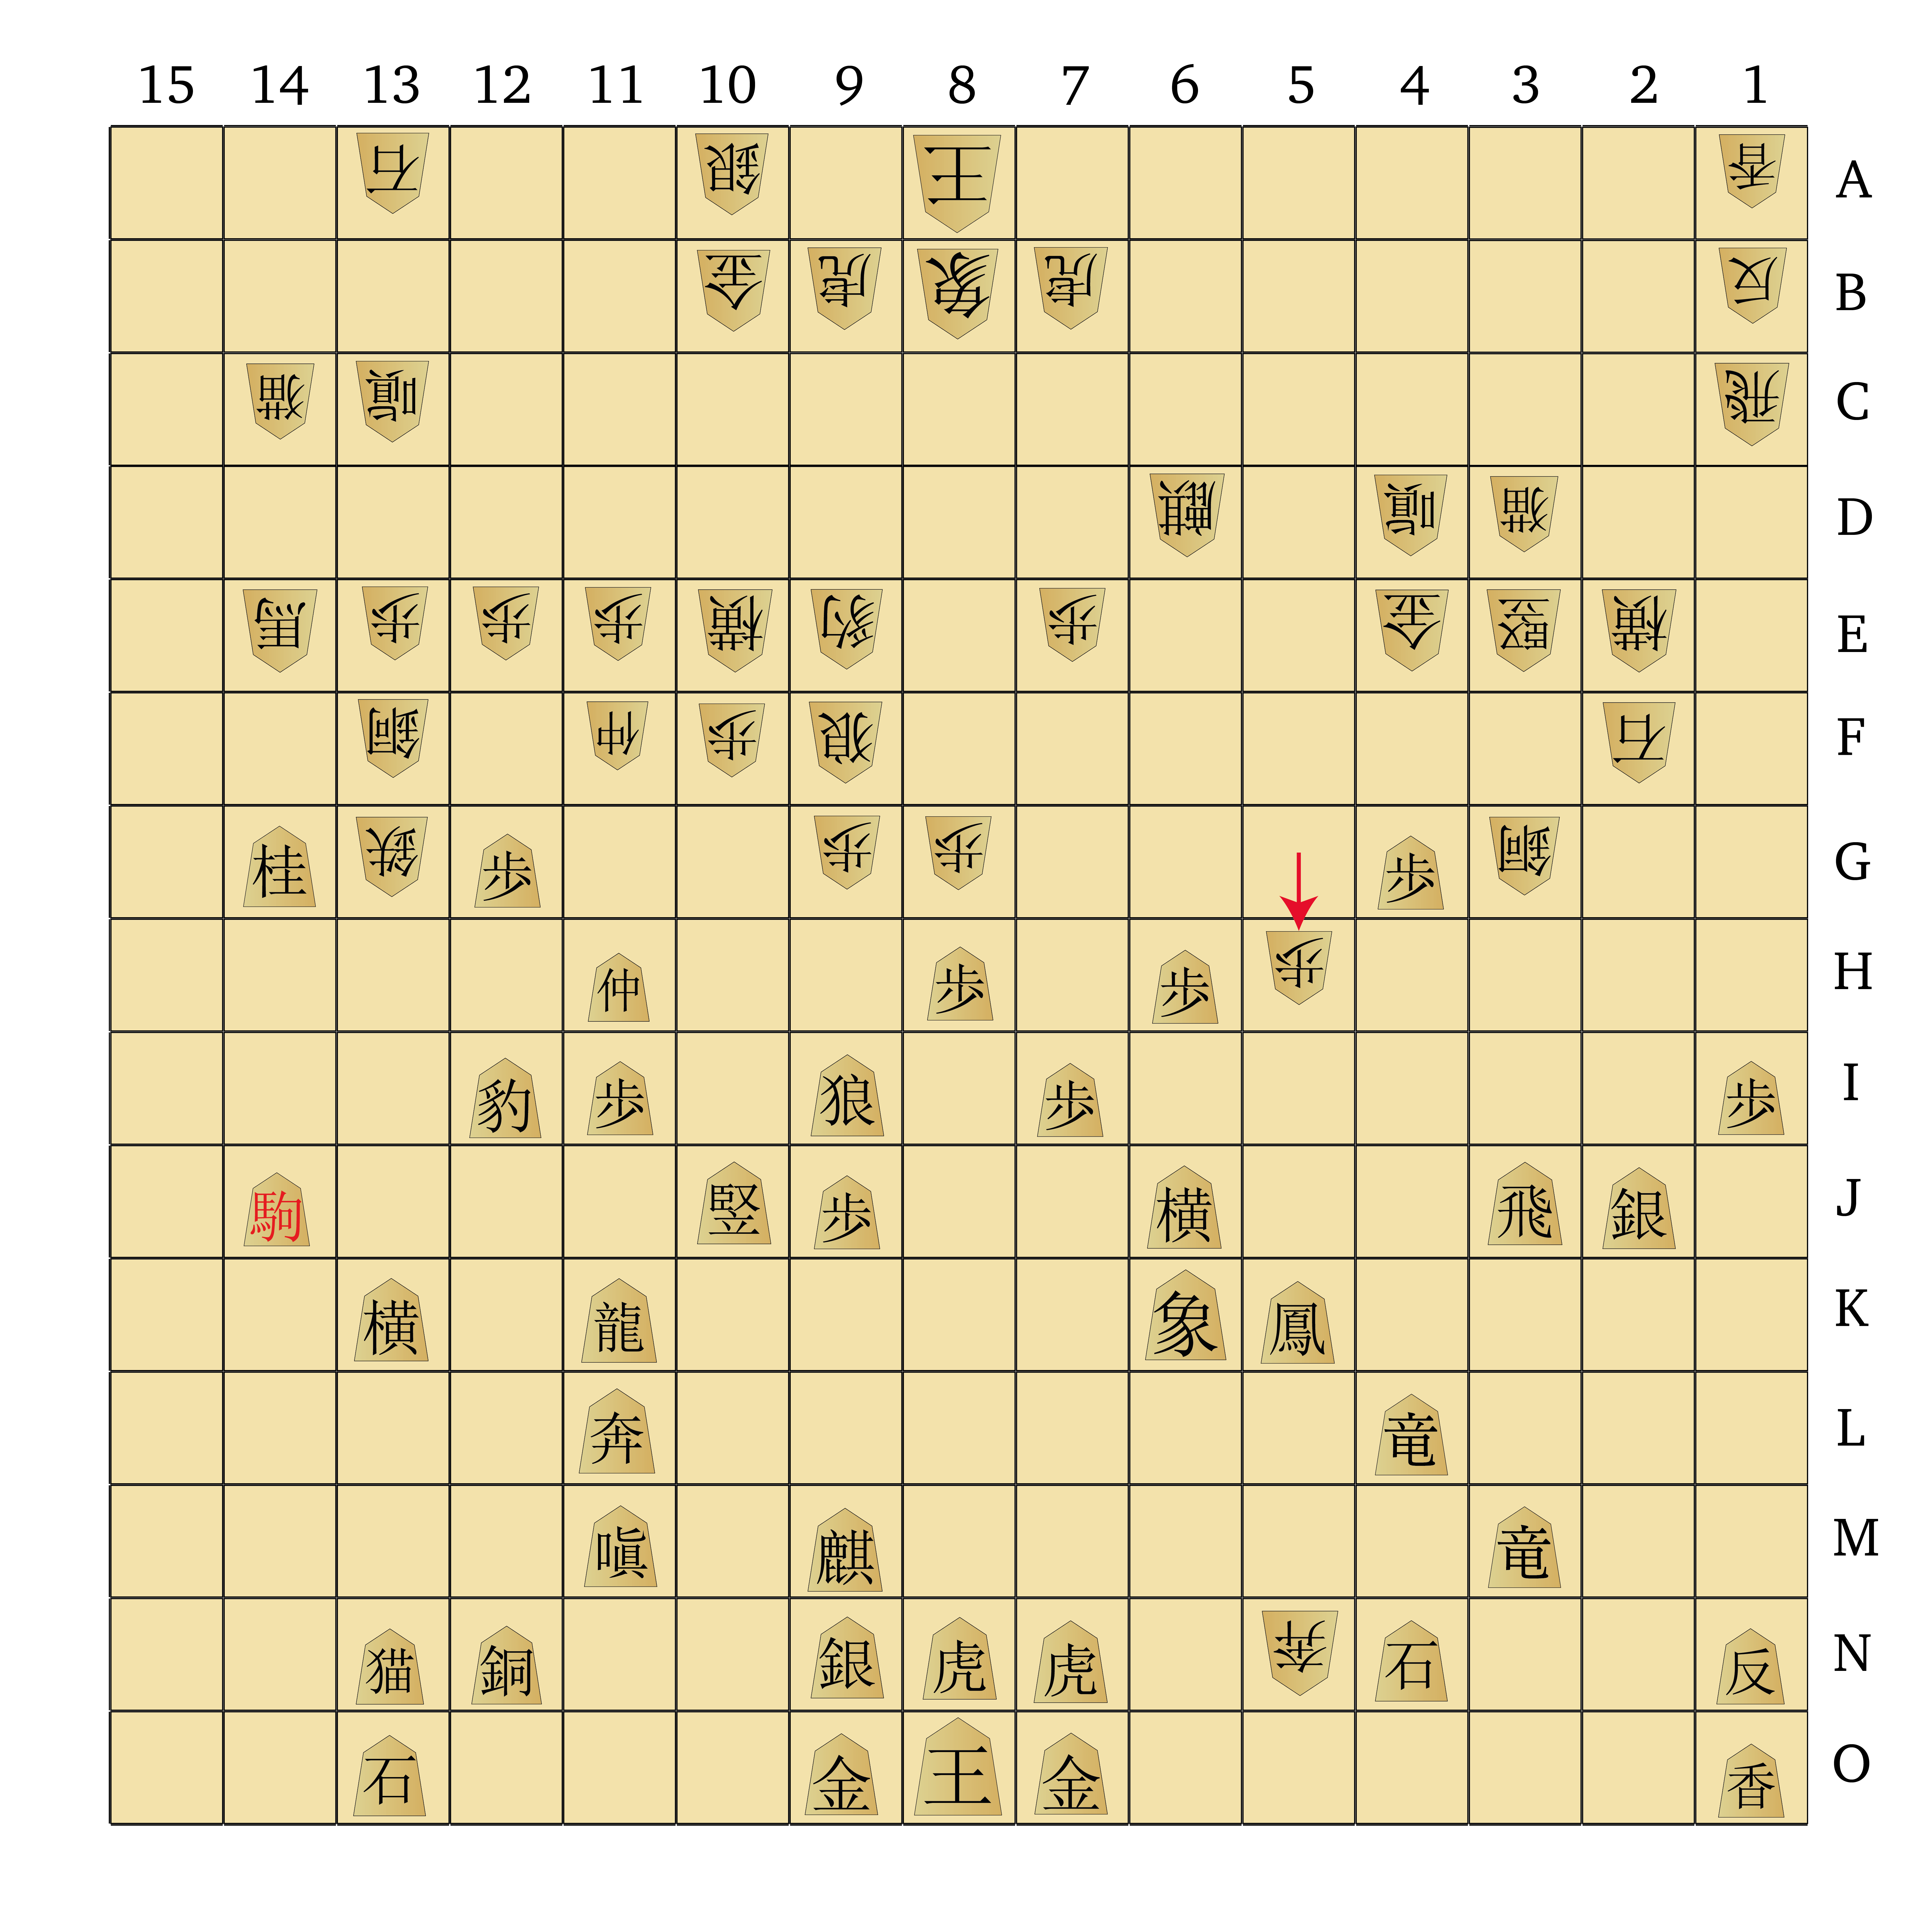
411 DK-9m 412 Ky-4h 413 DE-5j 414 Kyx6h 415 Ph-6i 416 Kyx8h 417 P-9e+ 418 SMx9e 419 VM-10d+ 420 Cx14g
We’re getting into the endgame now! The board is wide open, and the last few remaining long-range pieces have a great deal of mobility. King safety will start to become an issue now, as threats may pop up virtually anywhere on the board with little warning. Those short-range pieces with strong promotions become really dangerous now, as there’s a real chance they can reach the promotion zone and overwhelm the King’s remaining defences.
Black starts the action by bringing over the other Dragon King from the right side, bearing down on the 9-file. White’s Kirin starts to advance, offering threats not only of captures but of possible promotion to a Lion. Black ensures his Drunk Elephant, Side Mover and Phoenix hold the line, forcing White’s Kirin to detour toward the centre.
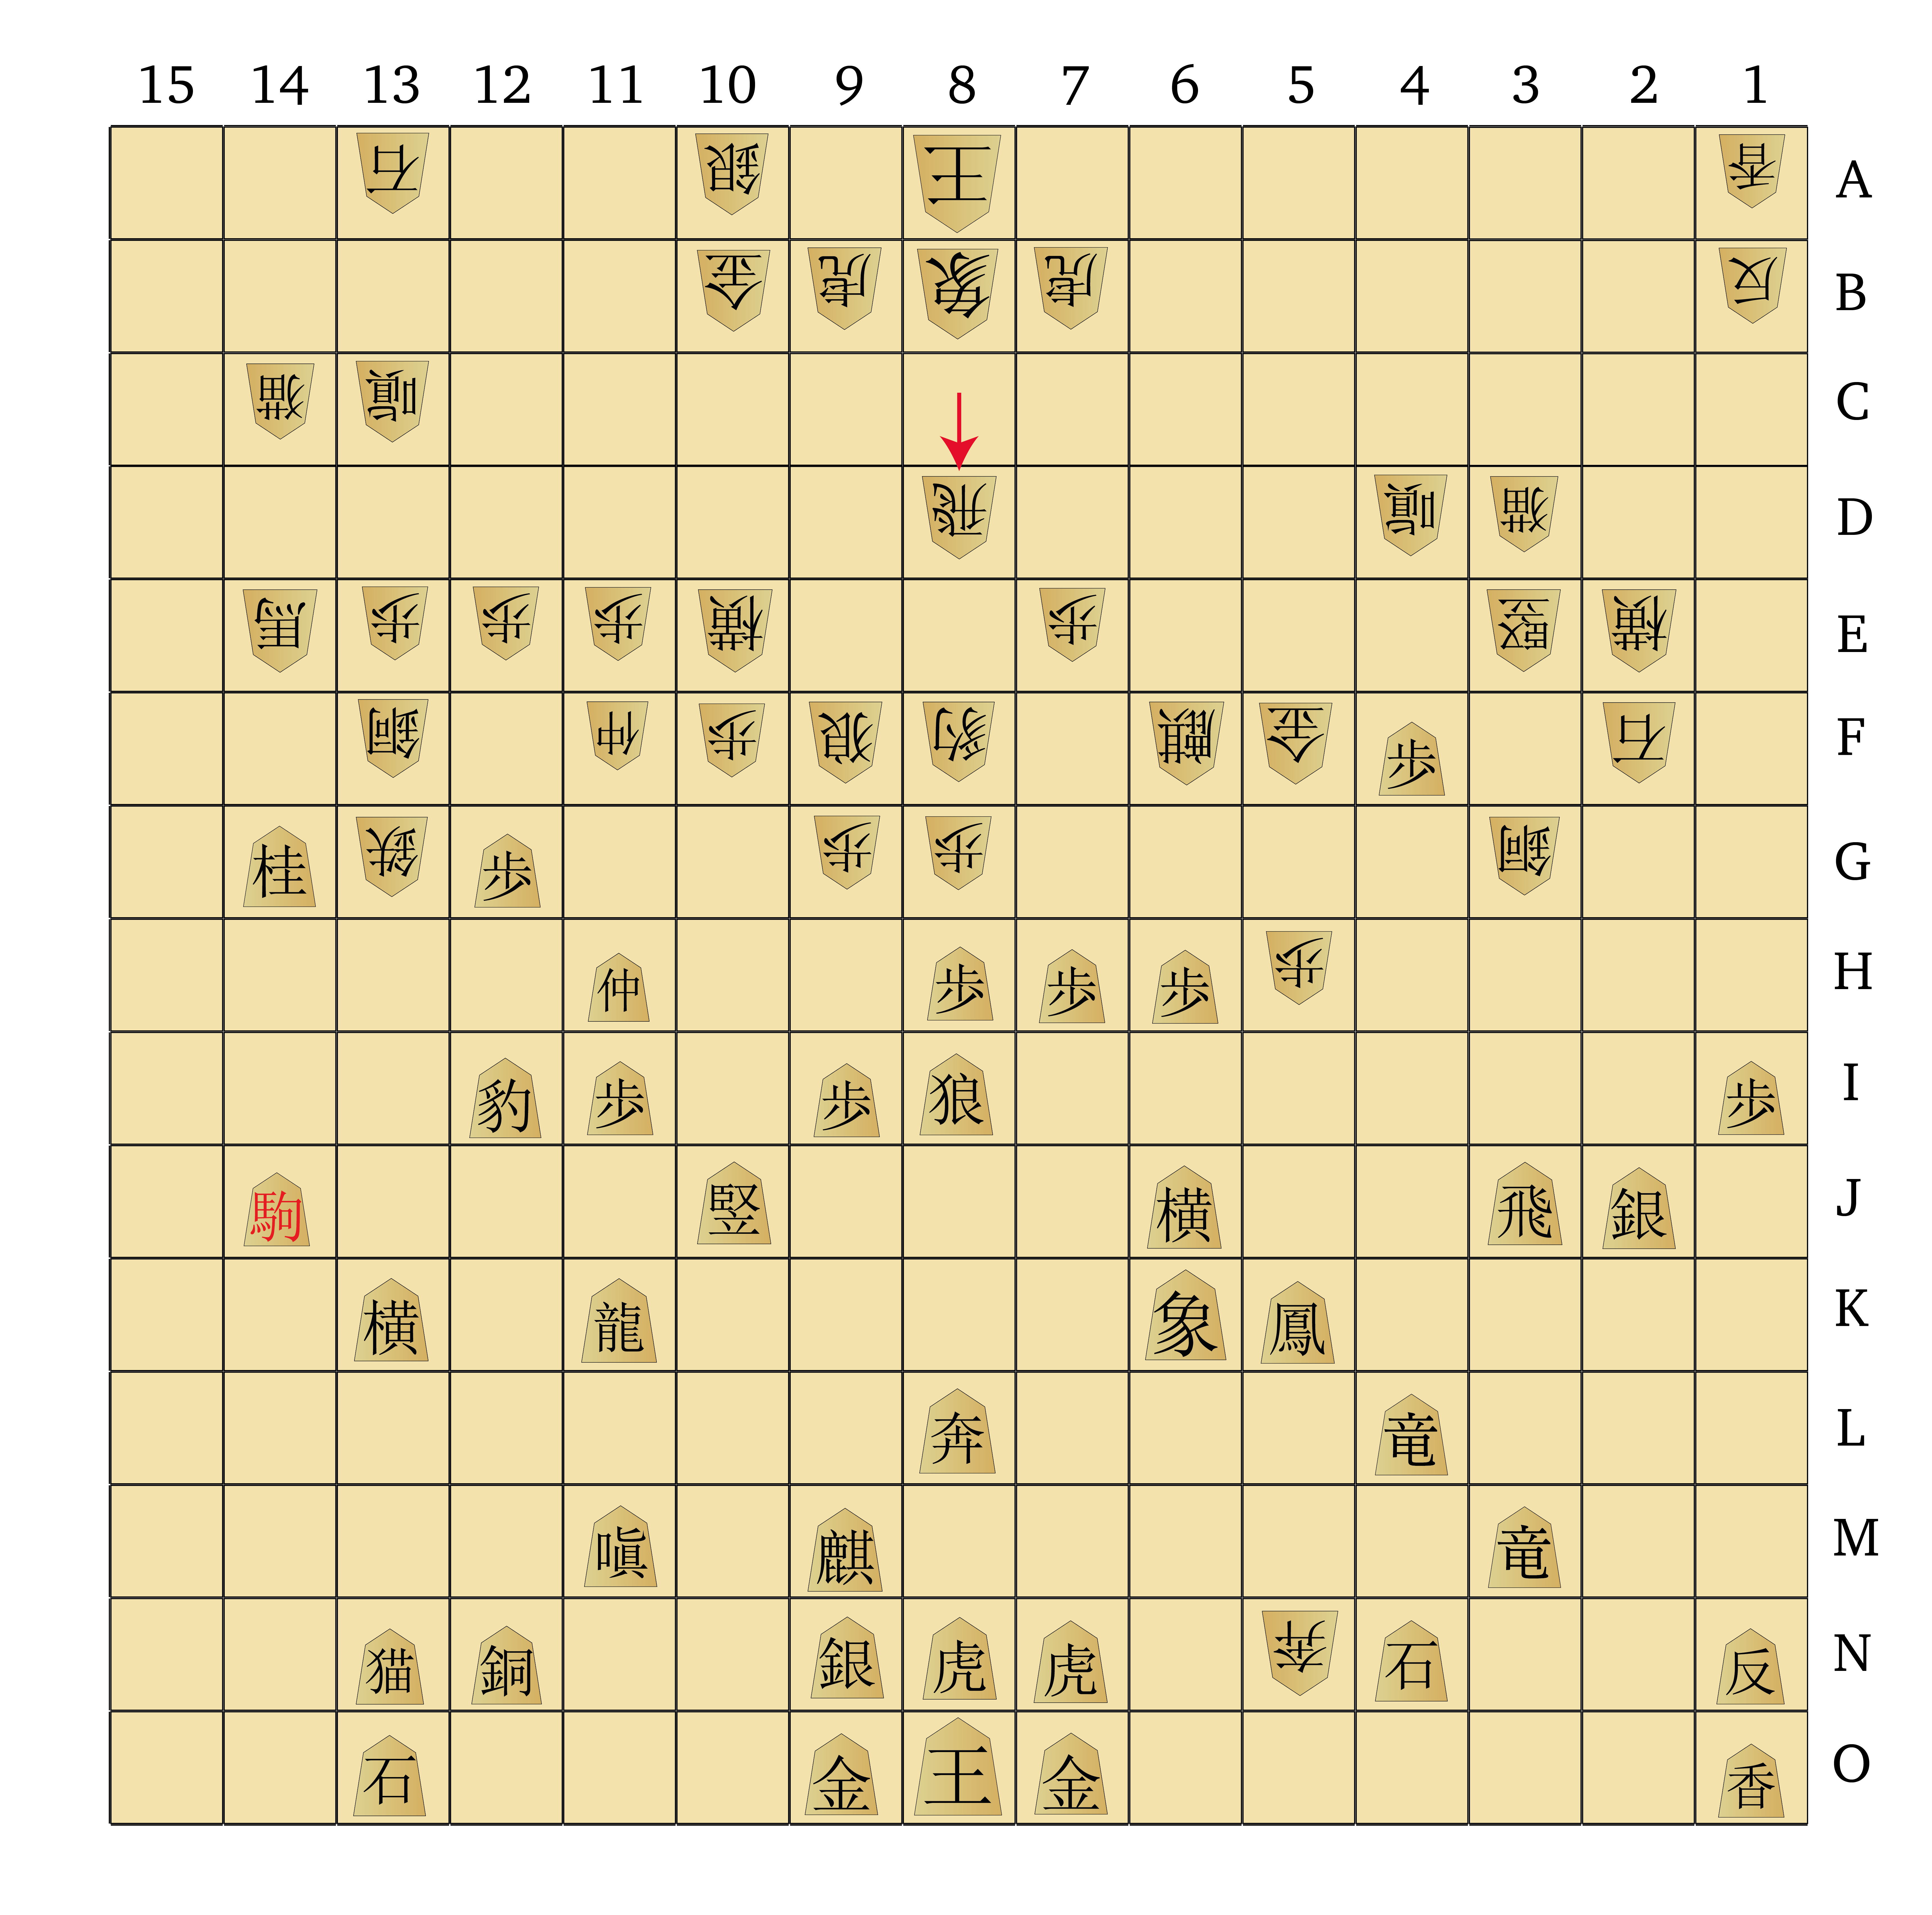
Then Black pulls off a nice tactical ploy: pushing the Pawn on 9e and promoting coaxes a recapture out of White’s Side Mover. This conveniently blocks the diagonal from the Free King to 10d, allowing the Vertical Mover to promote to Flying Ox on that square! The Flying Ox is very powerful, able to move freely in every direction except sideways. Black has punched a hole through the centre and now has a very dangerous piece perched right above the White King’s castle. White seems to be at a loss, and rather than try to address this problem advances a Copper on the left flank.
421 DKx9e+ 422 FKx9e 423 +VMx9e 424 DHx8k+ 425 SMx8k 426 C-13h 427 Phx8g 428 Ky-10h 429 Ph-6e+ 430 G-5g
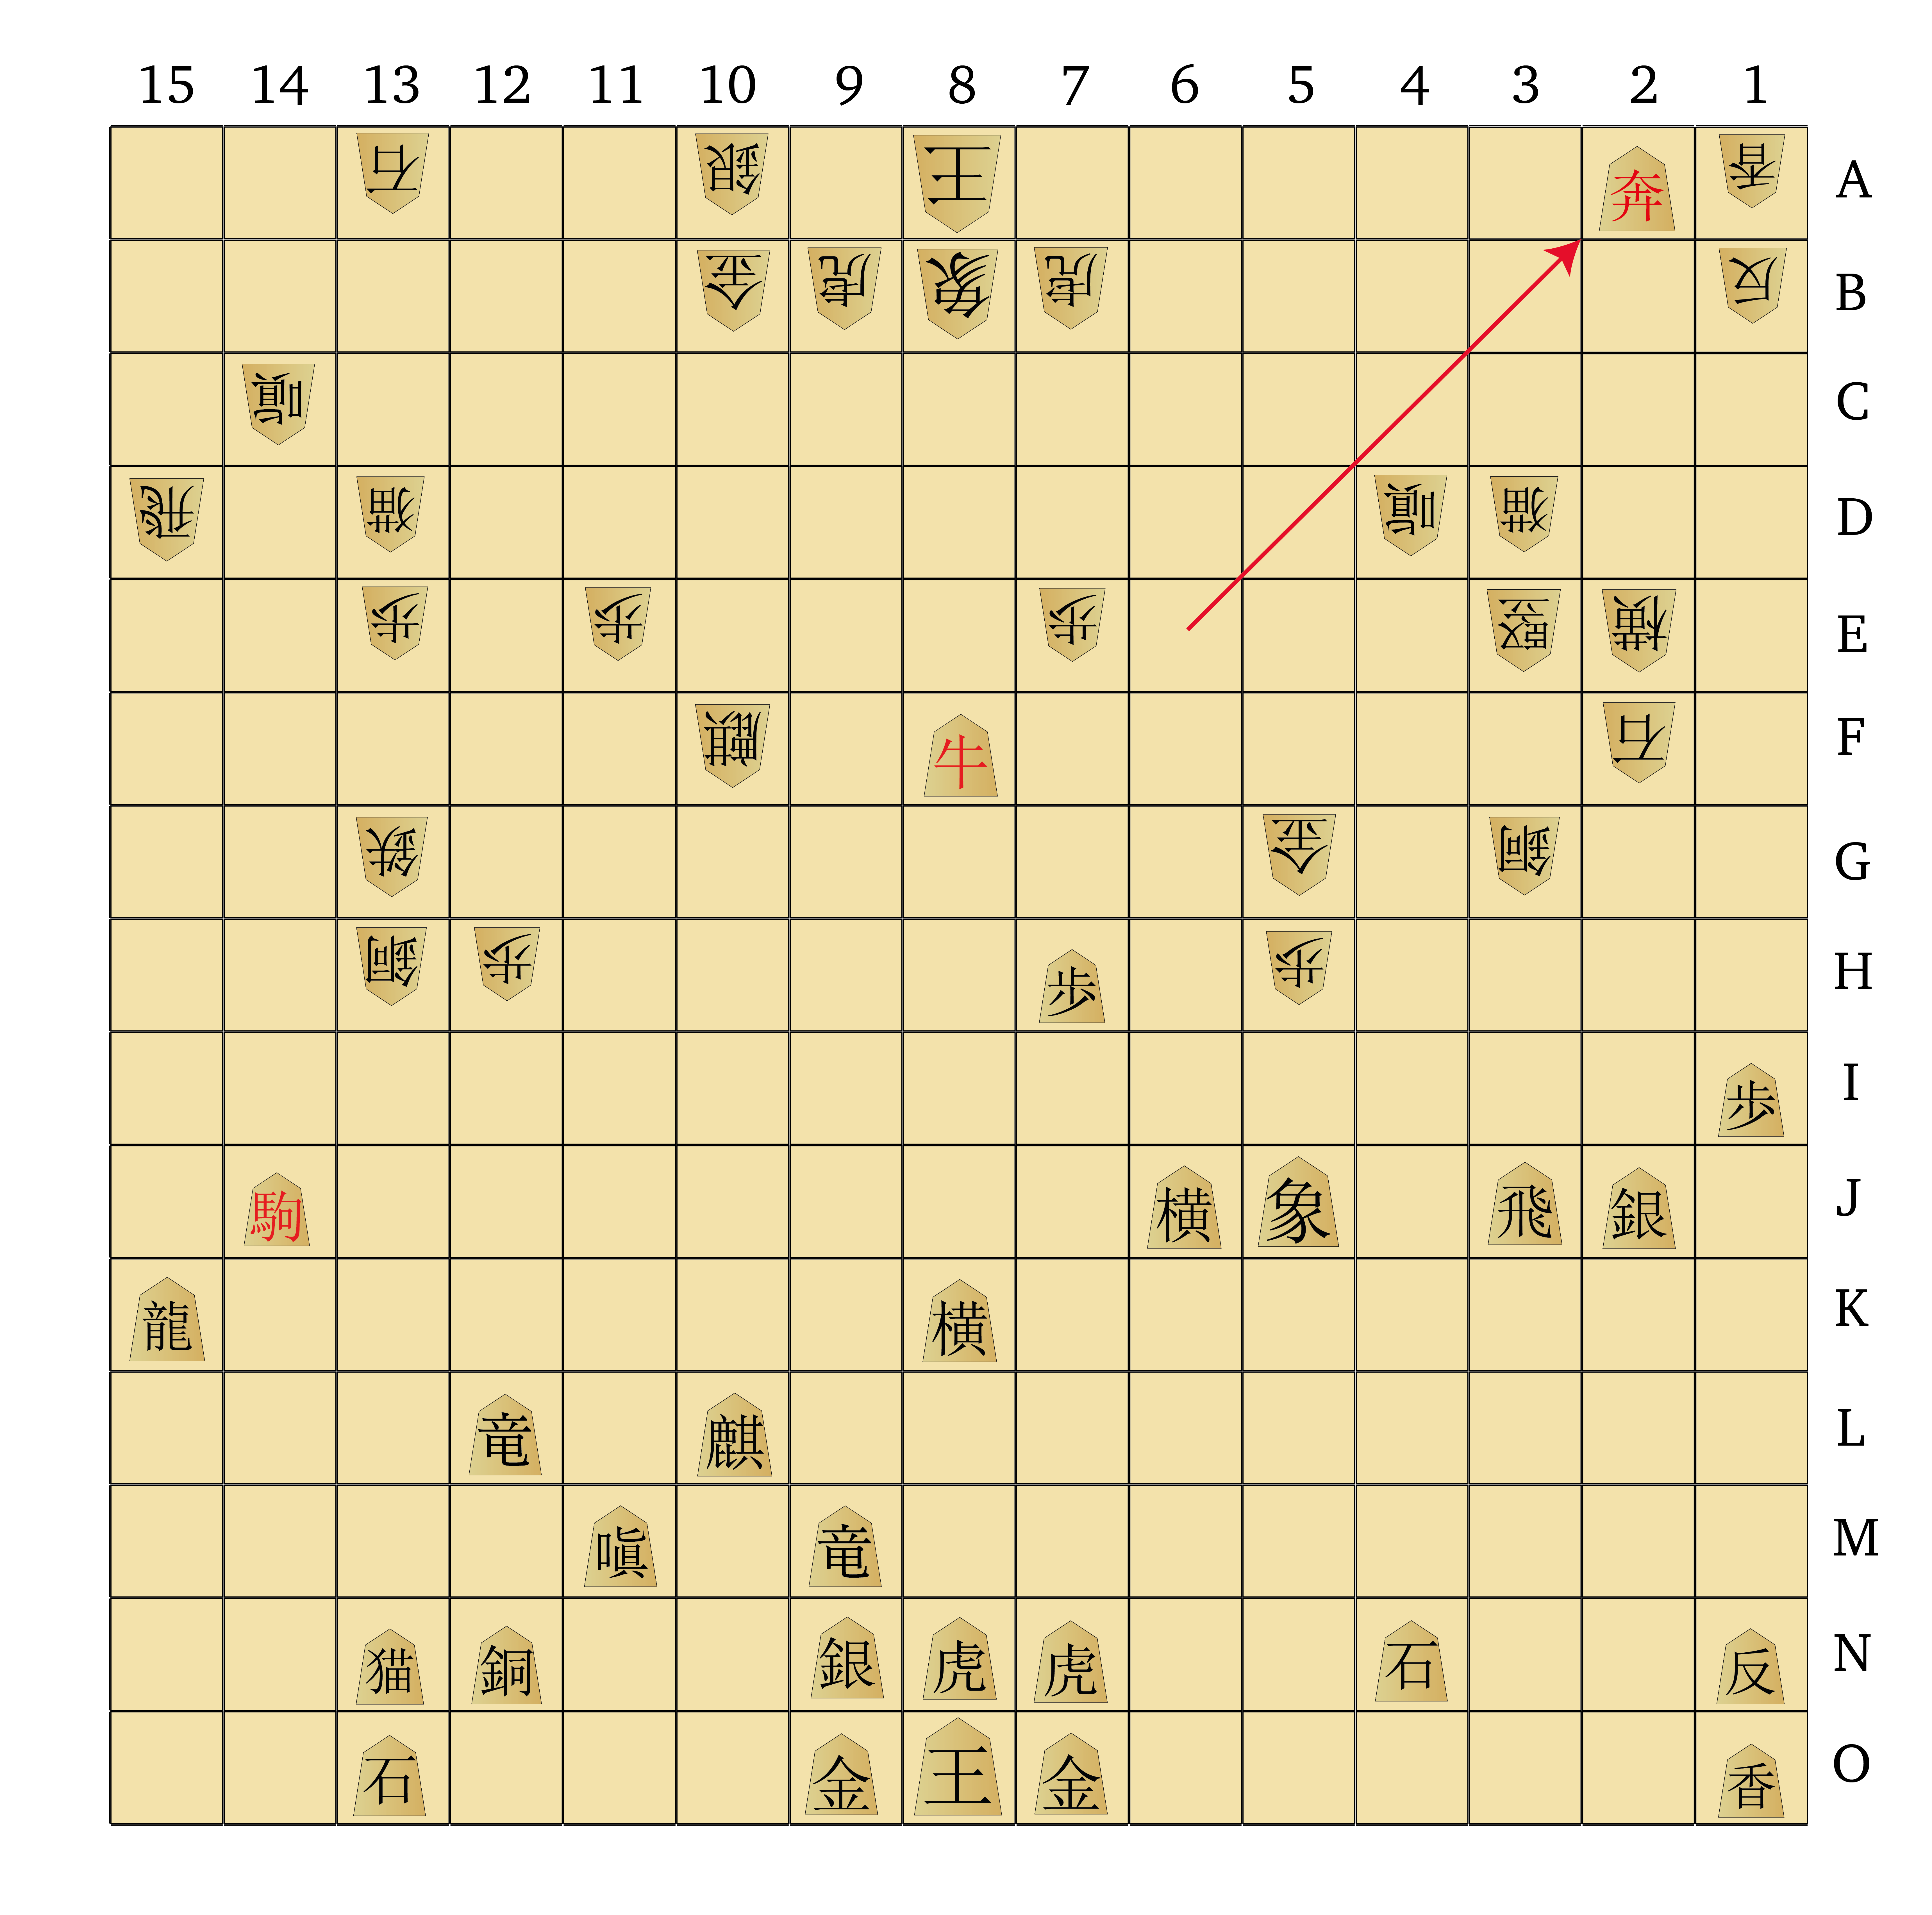
Now White’s situation is extremely dire. Black shunts his Dragon King forward to promote to Soaring Eagle right next to his Flying Ox, placing White’s Free King in the firing line. White is forced to take immediately, because a Soaring Eagle with its Lion Power is simply too dangerous to be allowed to roam near the increasingly vulnerable King. Black of course takes the Free King, giving him a very significant material advantage.
White retaliates by taking Black’s Free King with his Dragon Horse, promoting it to Horned Falcon in the process, but Black does not mind; his Phoenix is about to replace it. Sure enough, after taking White’s Horned Falcon with his Side Mover guarding the fourth rank, Black marches his Phoenix forward and gains a new Free King as it promotes.
431 +VM-8f 432 Ky-10f 433 +Ph-2a
Now Black starts setting up the kill. He brings the Flying Ox onto the 8-file, pinning the Drunk Elephant to the King. White desperately calls back his Kirin to threaten it, but Black simply sends his Free King to White’s back rank to check the King — the first check of the game, only 431 moves in (!!).
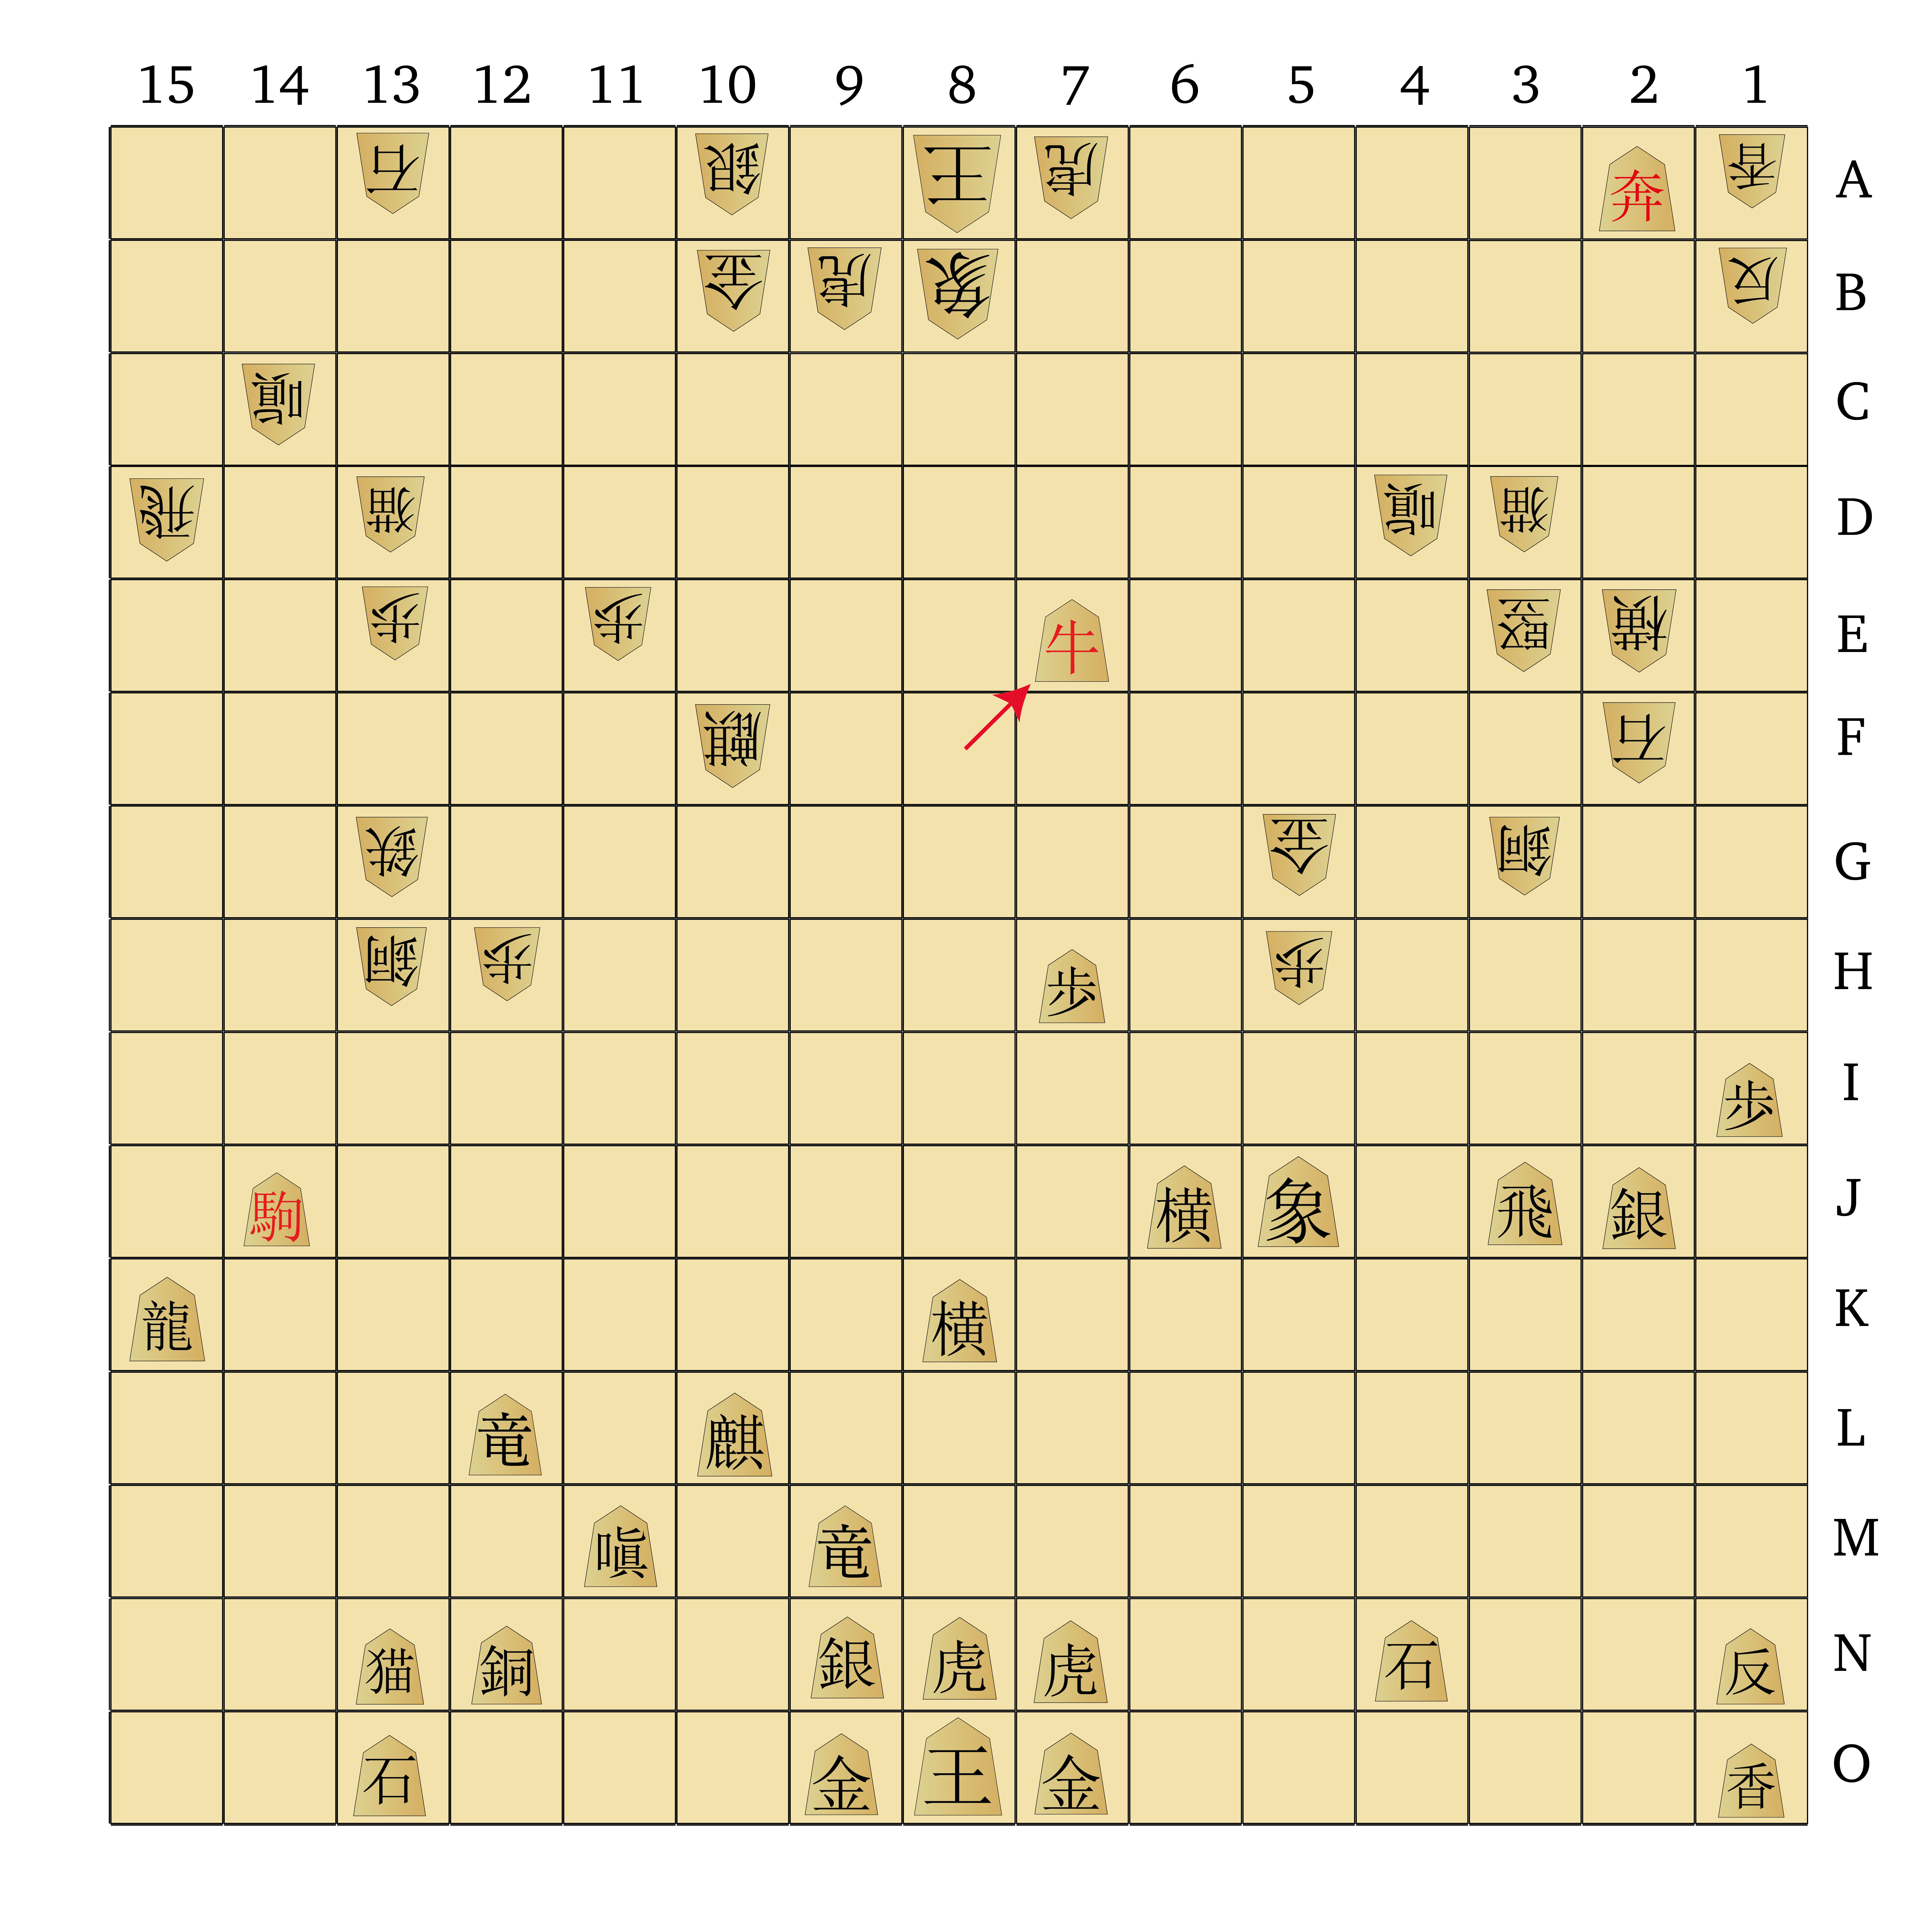
434 BT-7a 435 +VMx7e
To evade the check White brings the Blind Tiger back to 7a, blocking the Free King’s attack. The Flying Ox then steps away from White’s Kirin, focussing its gaze on the Blind Tiger and pinning it in place.
Black now threatens checkmate on 7a, if the Free King slides over and takes the Blind Tiger, but then the Drunk Elephant would be free to recapture it. To enforce mate, Black needs to find a way to pin the Drunk Elephant as well.
436 G-4h 437 DK-12j 438 C-12i 439 DK-8j
With White’s forces scattered and helpless, Black’s task turns out to be relatively straightforward. Black brings his Dragon King up to the sixth rank, deftly evades a last-ditch threat from White’s Copper General, and slides over to the 8-file, enforcing a pin on White’s Drunk Elephant.
440 Ky-10h 441 +Phx7a
The final moves are just a formality at this point, but White is a good sport and lets Black achieve checkmate on the board rather than resigning. After one final pointless Kirin move, Black fires the Free King onto 7a and it’s checkmate — all the King’s defences are pinned in place, and there’s no escape!
I can’t speak for you, of course, but I very much enjoyed analysing this game. Both players fought hard throughout, and in truth the mistakes White made were relatively minor. A few positional overreaches, some needless captures here and there, and that was enough to let Black build up a positional advantage that eventually became insurmountable. White did cause Black some panic here and there, but ultimately Black’s control of space and carefully-judged attacks won the day.
I hope this game can demonstrate to some of you out there that Dai Shogi is a phenomenal game that does bring some things to the table above what Chu Shogi offers. Yes, the game is longer and slower, but in return you get a deeply strategic, positional game that is epic in scope. The larger board affords tremendous flexibility in how you approach every stage of the game, and despite the sheer size of your army every piece has a role to play. As a result, even when the Lions disappear off the board as in this game, plenty of taut excitement remains for the taking.
From here, I hope you’ll seek out some games of Dai Shogi for yourself, or even challenge me to a game, perhaps. There’s something special about playing such an ancient and rich game that once was the most prestigious version of Shogi in medieval Japan; when I play, I feel like I’ve stepped back in time, to an era when we didn’t have to rush through every leisure activity, and spending a day or two on a drawn-out battle of small pentagonal wooden pieces was a perfectly sensible way to spend our days. Luckily we still can enjoy this centuries-old treasure today, and it’s a useful and stimulating distraction during this terrible period in history we find ourselves in.
Now that I’m back in the blogging mood, I’m planning to analyse a Chu Shogi game as well (finally), and then I’ll take on Wa Shogi, the only large Shogi variant that uses drops as in modern Shogi. In the meantime, I hope anyone out there reading this is staying safe and healthy.

I found your website today and really enjoy your articles. Getting through them one by one, hope you’re doing well and many thanks!