
Some time ago I talked a bit about Hex on this blog, discussing its history and how it kickstarted the entire connection game genre. Since then, a few readers have asked for a bit more detail on how to actually play Hex. So, for this post I have teamed up with Matthew Seymour, author of the brilliant Hex: A Strategy Guide, and we have put together this beginner’s guide to Hex strategy and tactics.
Below we will introduce you to basic tactics, templates, openings, and strategic considerations. Each section is very brief but will give you enough to get you started on improving your Hex play; after you tackle each section, please continue your studies with Matthew’s guide, which has much more detail and numerous examples of each critical concept.
Basic Tactics
The edges
Edge play in Hex is obviously critical, since in order to win we must connect our two edges across the entire board. Initially, connecting a chain of stones successfully to the edge seems like a baffling enterprise — an adept opponent can bend and twist your attempted connections away from the goal, and it can be difficult to understand how to set yourself up for a strong connection.
Edge templates are extremely useful tools for understanding edge play. In our previous discussion of Hex, we met the bridge, a configuration of two stones that proves to be virtually connected even though the stones aren’t adjacent. Similarly, edge templates show us configurations of stones that, with correct play, are guaranteed to result in connect to the edge. Templates indicate patterns where, even if your opponent has the first move, you will always be able to connect successfully. Your opponent may intrude on your template, but so long as you defend your template at every step, you will succeed.
-
- The bridge: the two black stones on the left are connected. If the opponent intrudes at either cell between these two stones, Black can simply respond in the other cell to save the connection, as in the example to the right.
This means however that templates are always just a move away from breaking. If you have two overlapping templates, and your opponent plays a move that intrudes on both, you can only potentially save one of them.
Here are some examples of basic edge templates:
Our first edge template is the very basic A-2 template, consisting of a stone on the second row. If White tries to block at A, Black can respond at B (second diagram), and vice versa. Either way, White has no means of stopping black. This template is very similar to the bridge template.

One of the most useful templates is template A-3, consisting of a single stone on the third row. This template comes up very frequently. We’ll analyse the situation by considering Black’s possible threats. On one hand, he could play at A and connect to the edge with template A-2. Or, he could play at B, and connect by a chain of a bridge and template A-2. The important part here is that these threats don’t overlap. If White plays at A, or one of the two hexes below it, Black simply plays at B and connects by that route. And if White plays in any of the 5 hexes on the right, Black plays at A and connects by that route.
We can succinctly convey this information in what’s called a pivot diagram. The two small dots indicate Black’s alternative moves. We can see that the rightmost dot connects back to the top stone with a bridge. Both dots are connected to the edge by one of two possible moves (template A-2).
Lastly, let’s look at Template A-4, on the fourth row:
Similar to A-3, Black has two threats: to play adjacent at A, connecting to the edge with A-3 (left), or to bridge to the side at B, also connecting with A-3 (right).
These alternatives can get around most possible blocks by White. But there’s one issue, the point C. Both the threats above overlap at this point. So Black needs a response to a block at this point. The solution is shown below (note that if White played (3) on the left side, Black could bridge to the right instead).
There are a large number of edge templates. You can find an excellent catalogue here or here.
Interior templates: connecting chains
We’ve already encountered one interior template — a template for connections in the centre of the board, away from the edges: the bridge. As you might expect, other templates exist for more complex configurations of interior stones. Knowing these templates is very helpful indeed, as once you achieve such a configuration on the board and recognise that template, you can play elsewhere, knowing that you’ll be able to successfully defend that template against later intrusion.
Some well-known interior templates are the Wheel, the Crescent, the Span, and the Trapezoid.
-
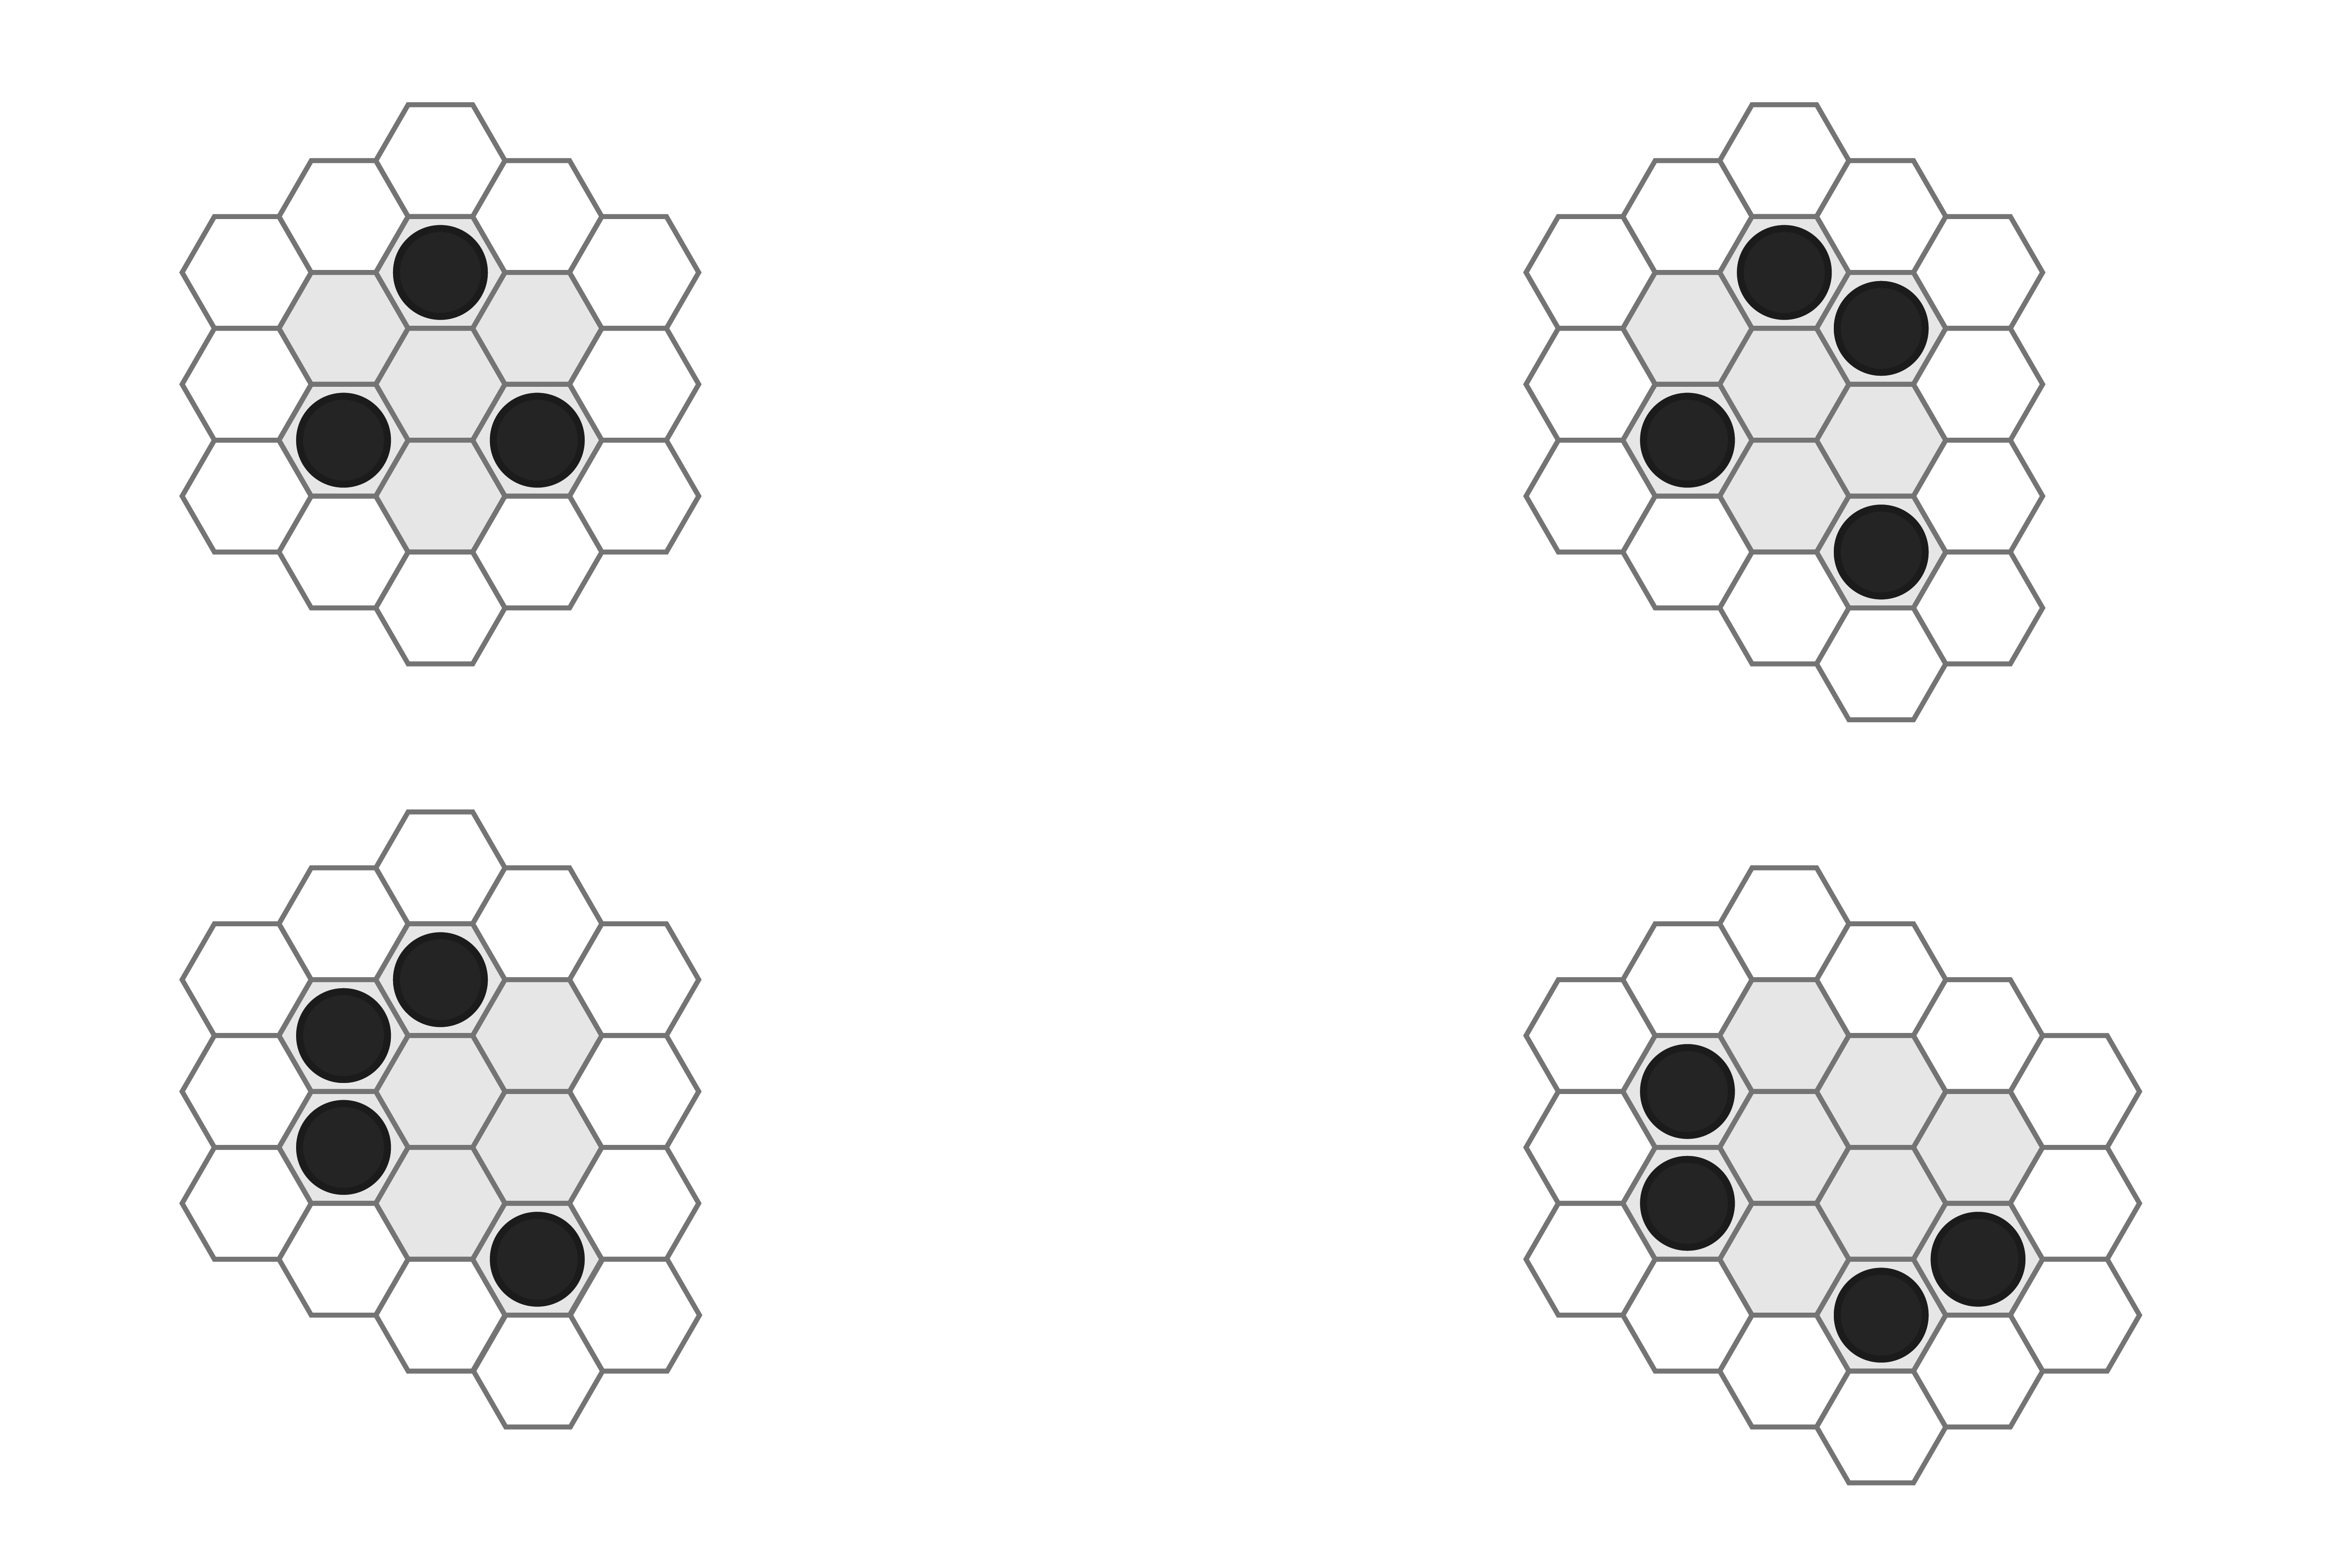
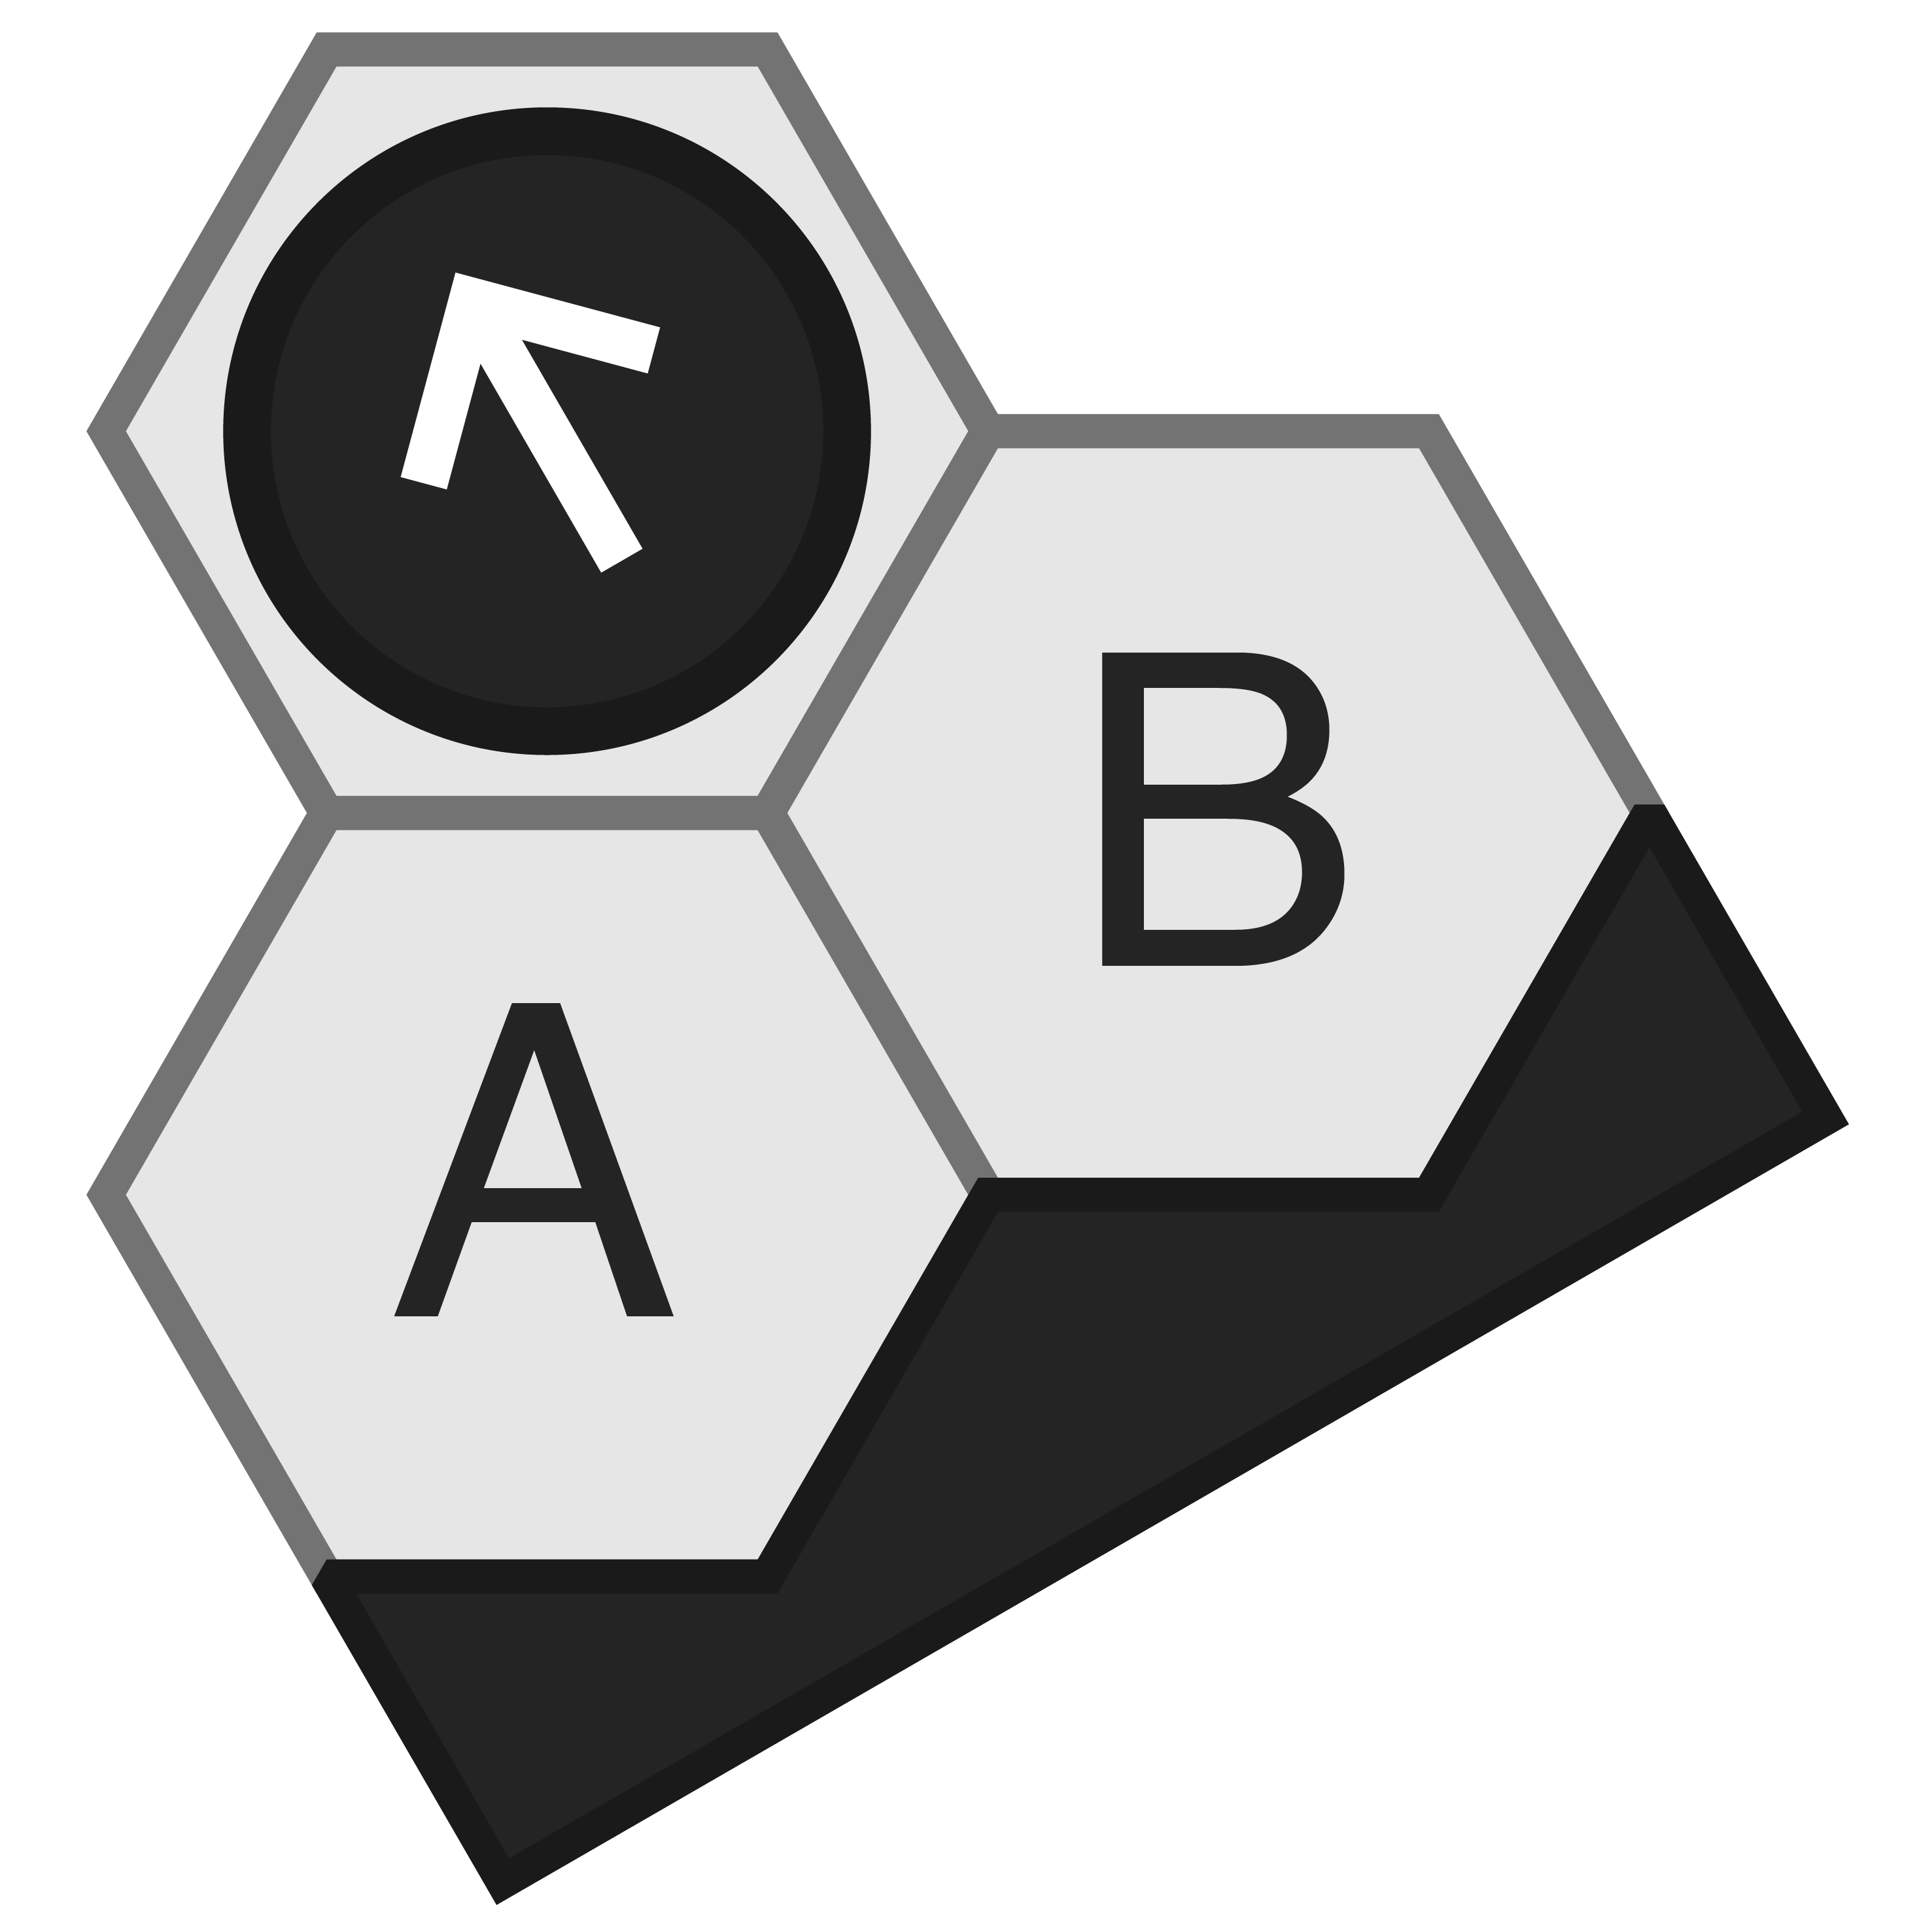
- Four simple interior templates. Clockwise from top left: the Wheel, the Trapezoid, the Span, the Crescent.
-
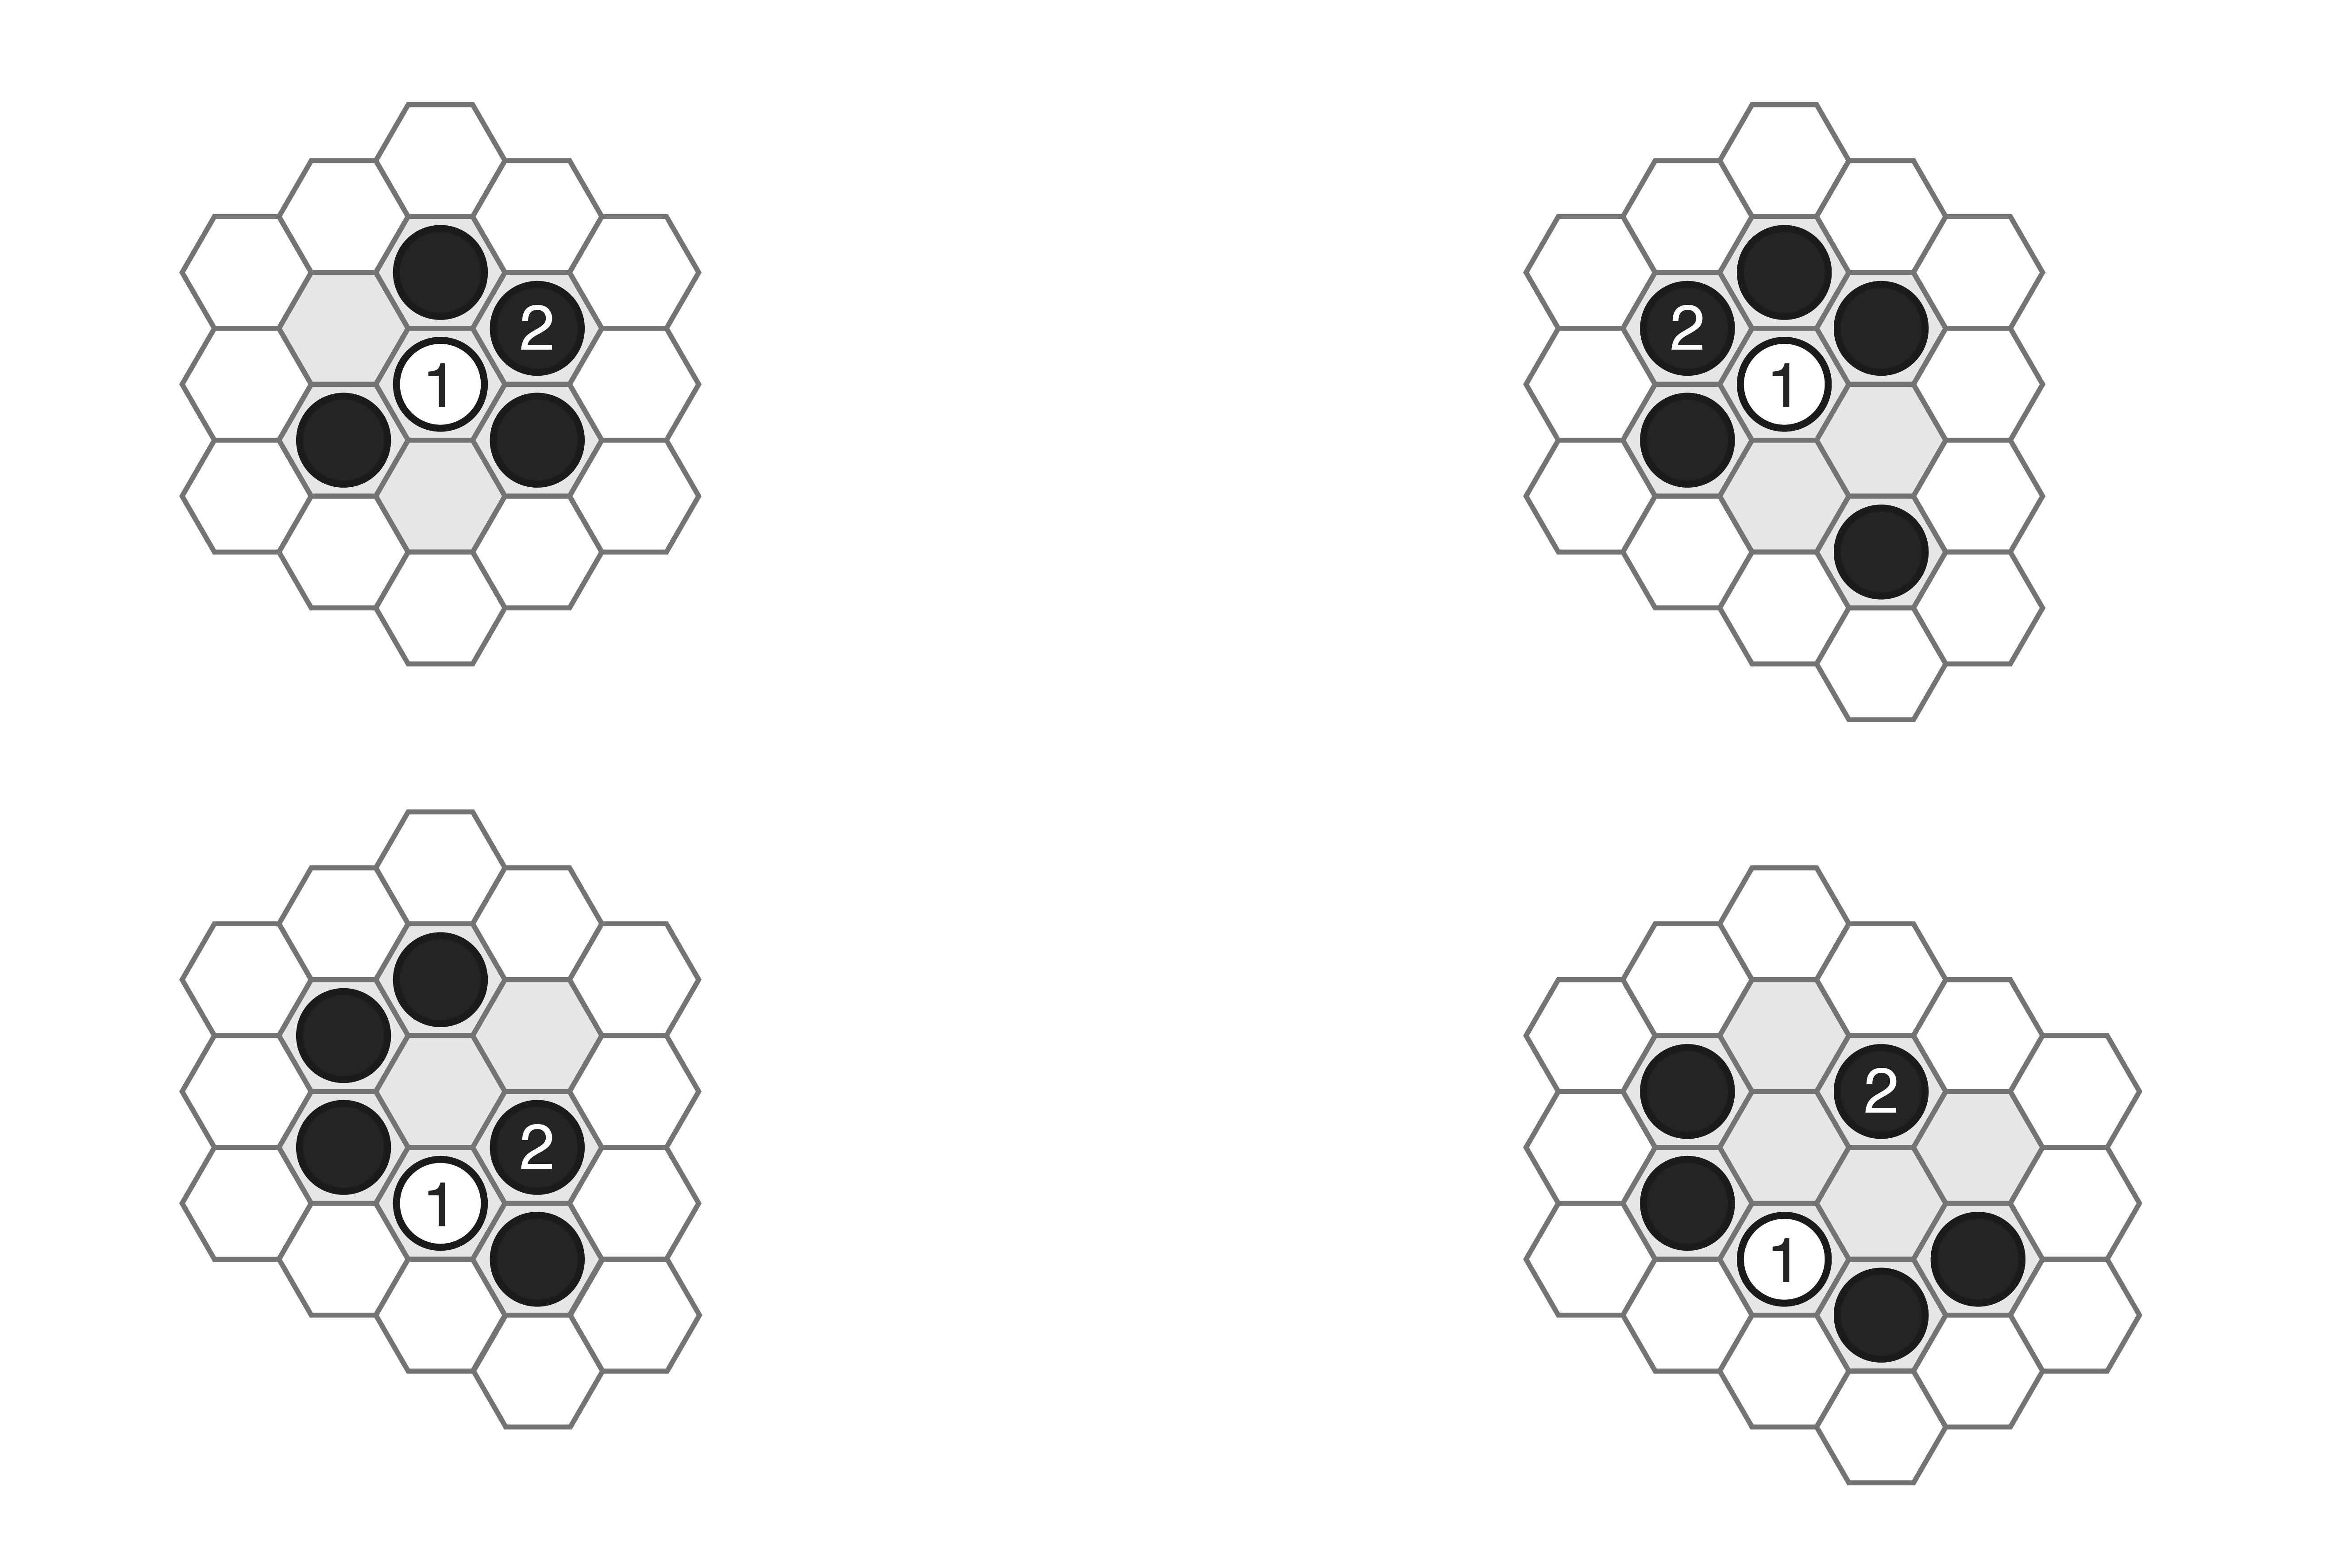
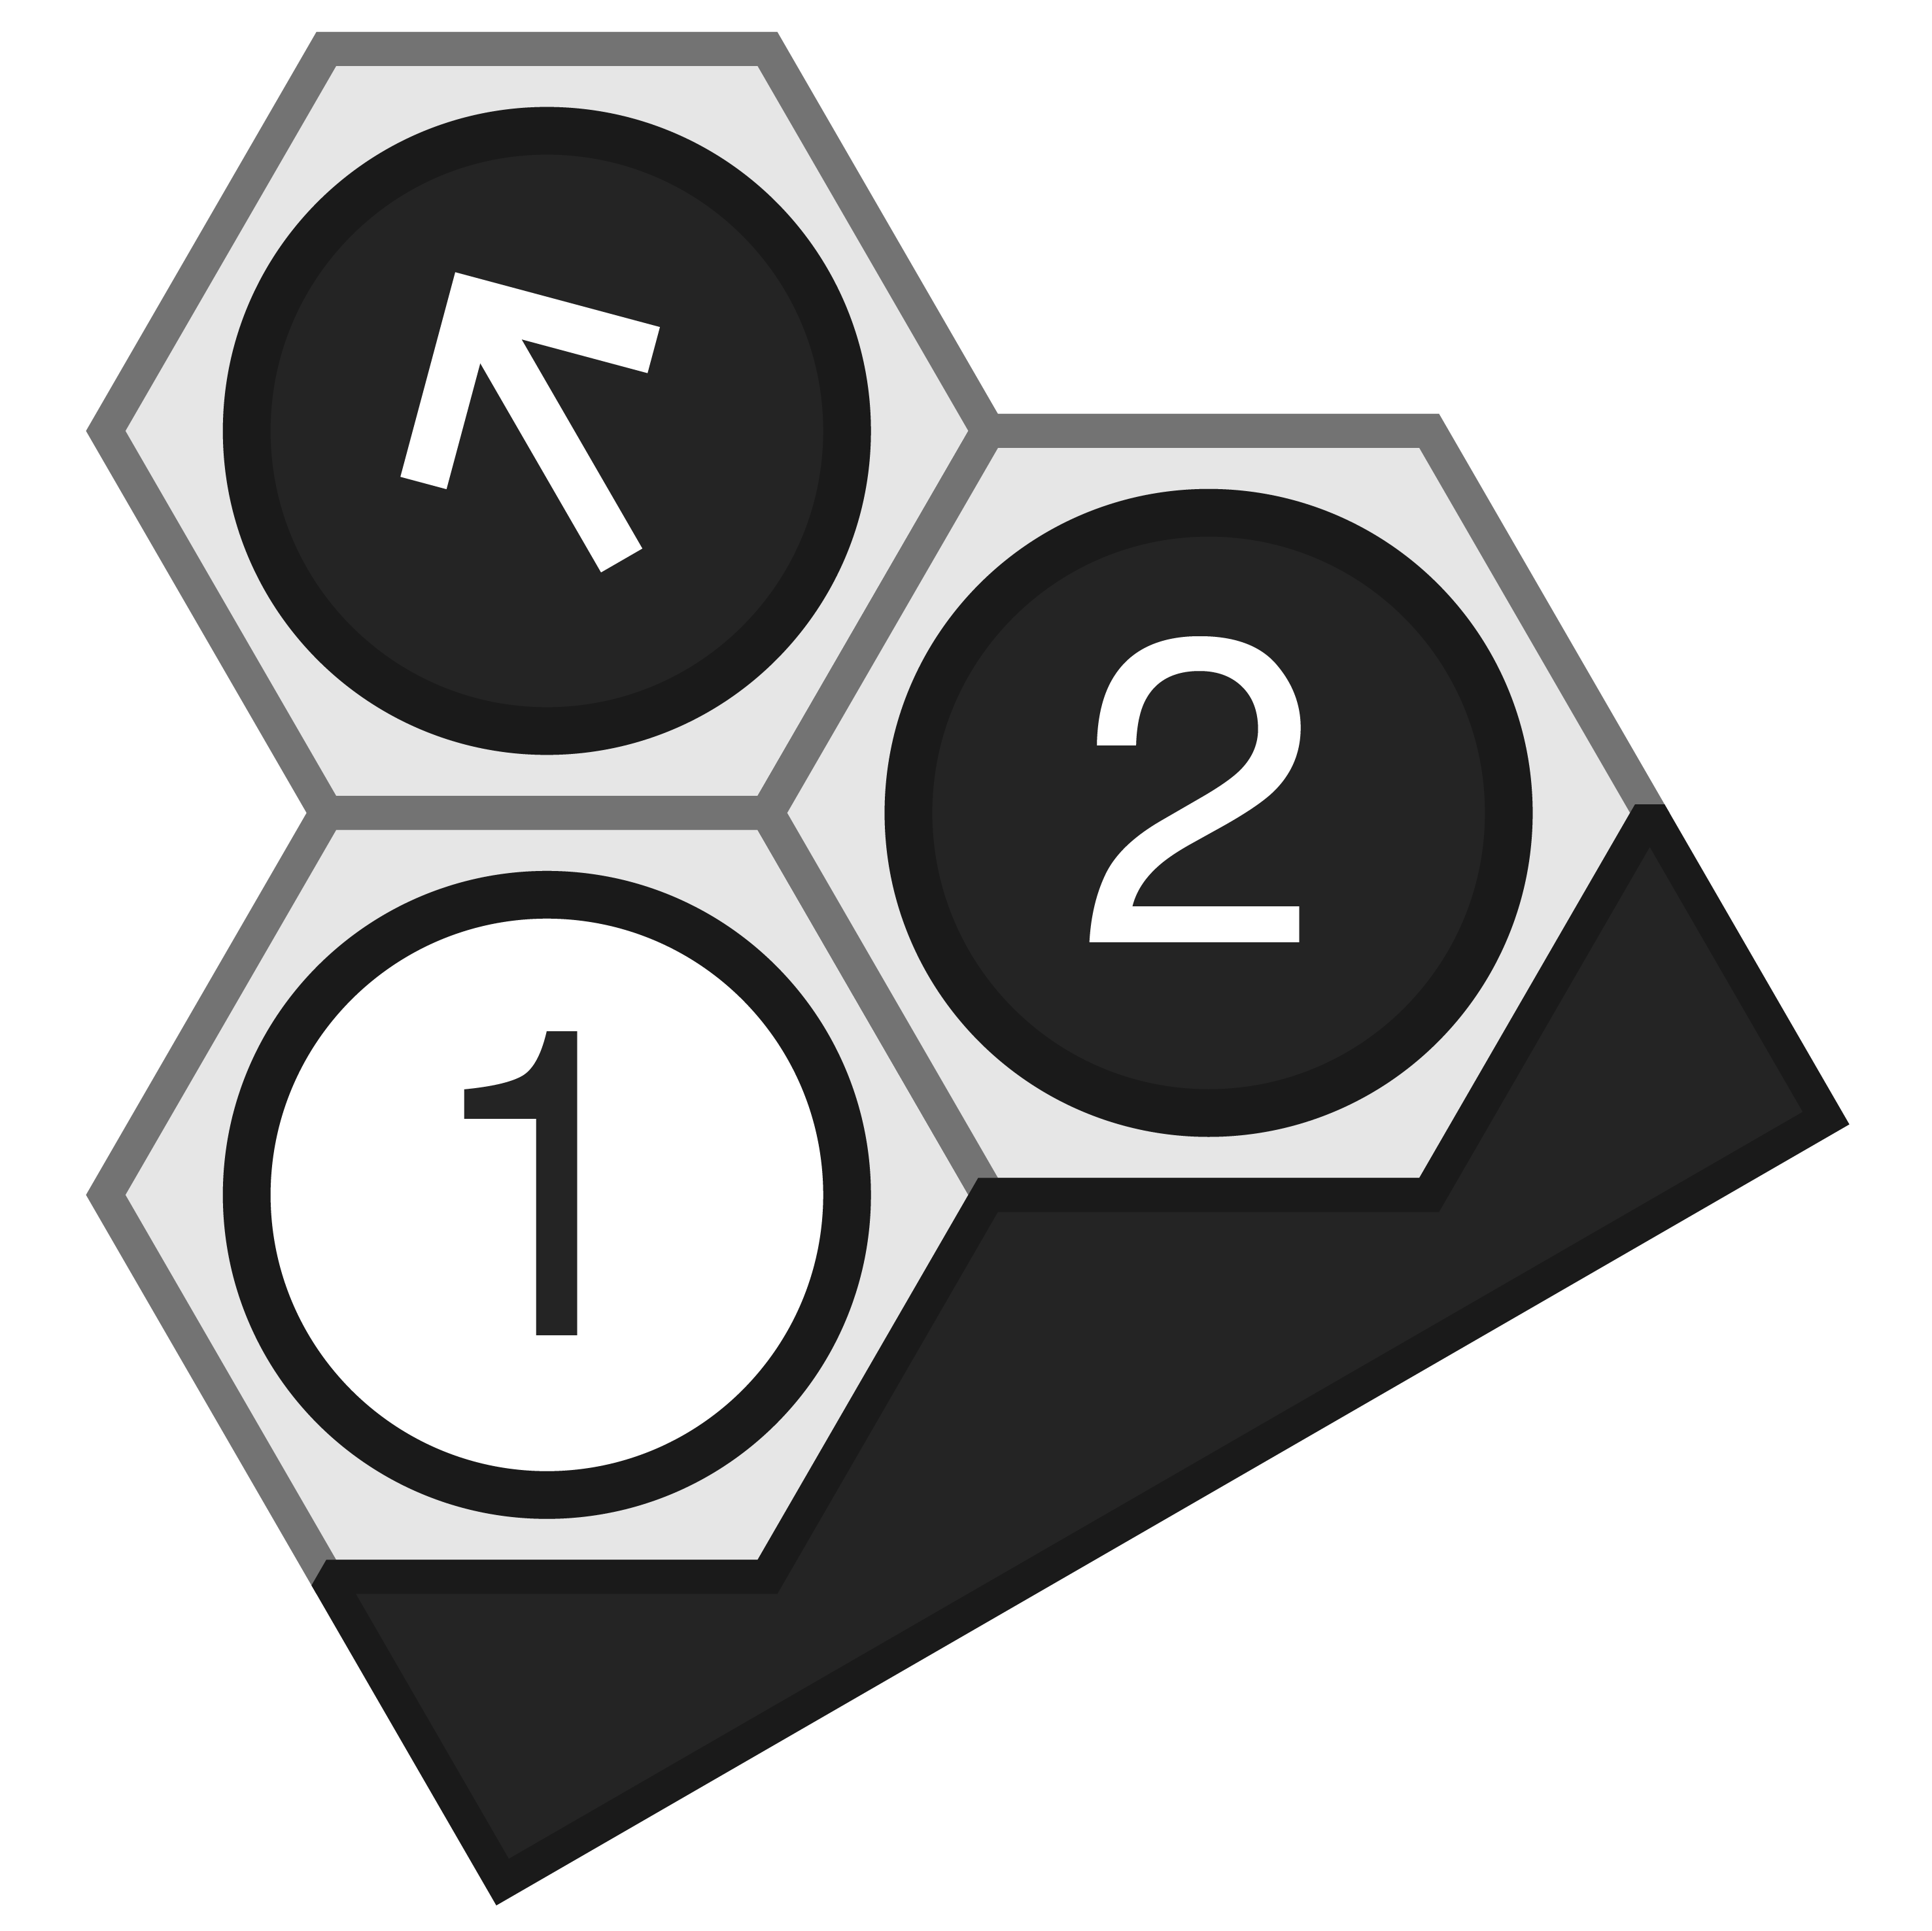
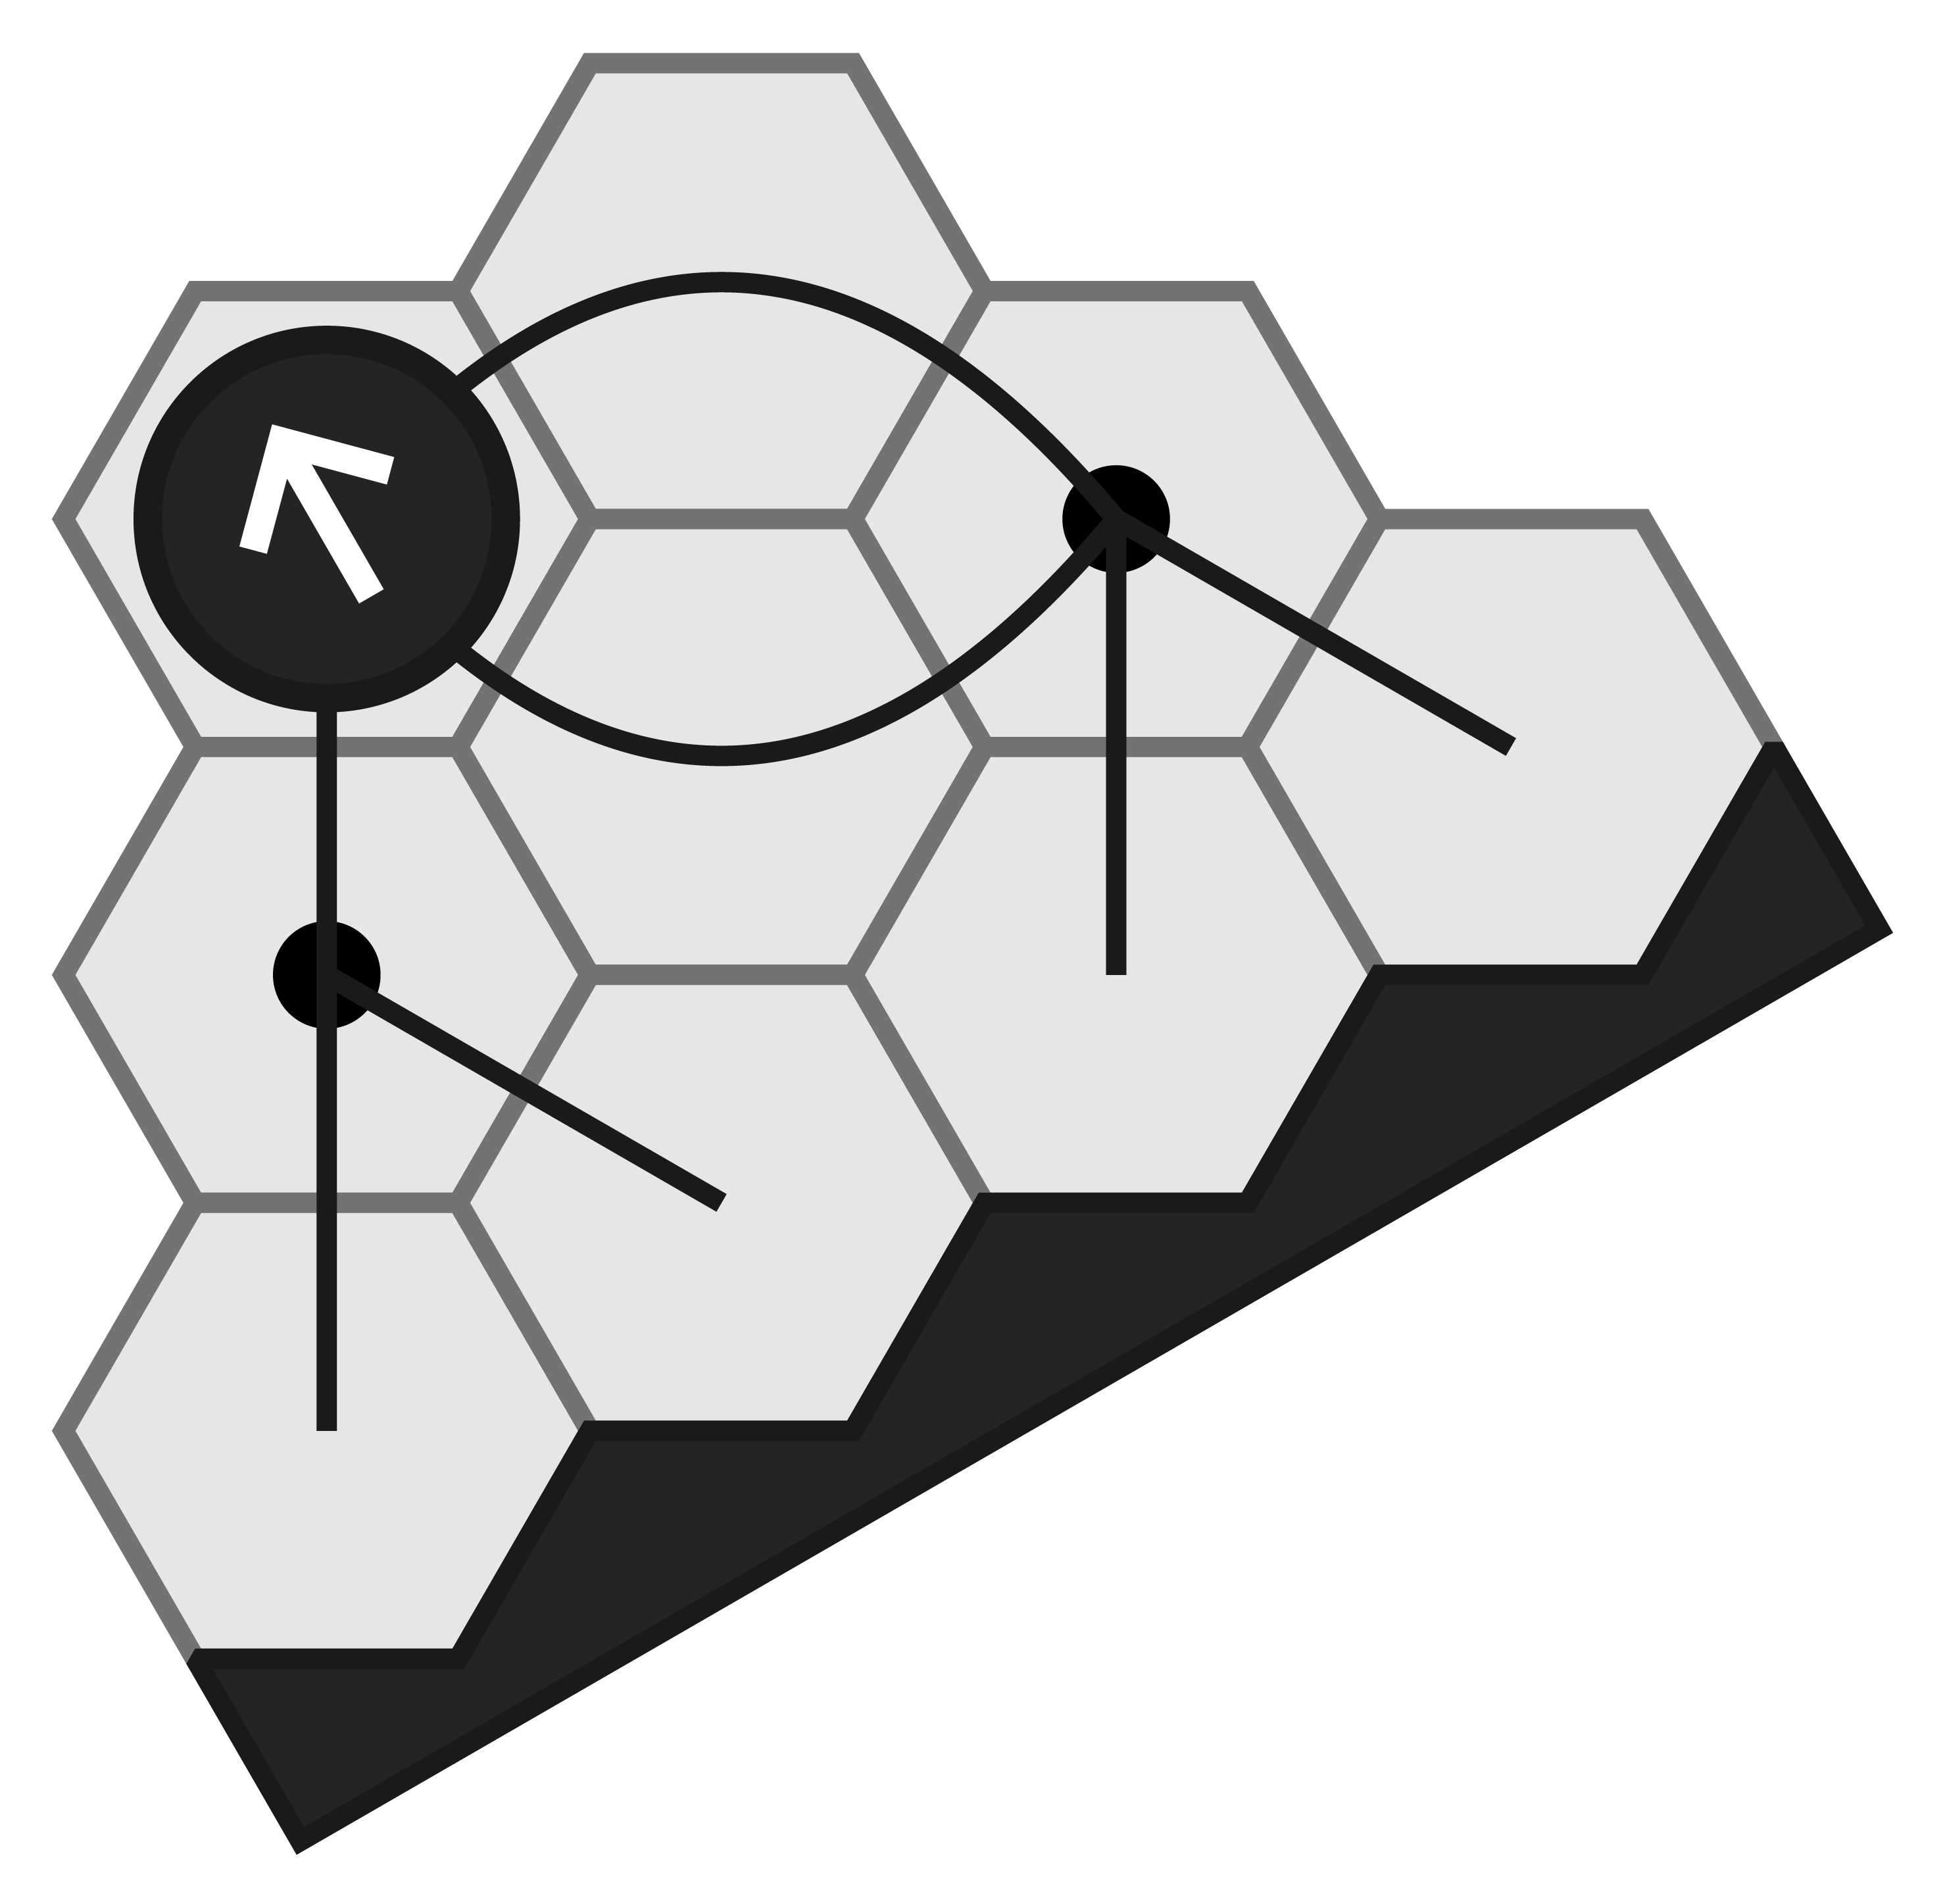
- Responding to play when White tries to intrude. Note how Black has easy responses to every intrusion that save the connection, either through direct adjacency or bridges.
Defending at a distance
We’ve talked a lot so far about connecting — positive, attacking play. But what to do if our opponent has us on the back foot, and a deadly connection is looming? How can we stop them?
First, we should remember that as satisfying as that positive, attacking play may be, Hex is what is called in combinatorial game theory a hot game. This means that it is always beneficial to make a move in Hex, and no stone of ours on the board is ever a detriment to us. On top of that, one player must always win in Hex, so if we successfully block the opponent from any possible connection between their edges, we’ve in fact won the game. So don’t neglect defensive play — in Hex, it’s precisely as powerful as attacking play, and will win you the game just as effectively! Defensive moves in Hex are also offensive moves.
Having said that, defence in Hex can be a delicate affair. As we’ve seen in numerous examples, stones can be connected even if they aren’t adjacent, and skilled players can move across the board at high speed, staying connected the whole way. Therefore, if we attempt to block simply with adjacent blocks — playing right next to opposing stones — a skilled opponent can easily bend around us. Likewise, if we block at a distance but misjudge the situation, the opponent may still get round us by using bridges to cover enough ground to do an end-run around our defences.
In practice we may need to combine adjacent blocks with more distant blocks in many cases. The adjacent blocks restrict the opponent’s options for bridging forward, while the distant blocks contain those advances:
-
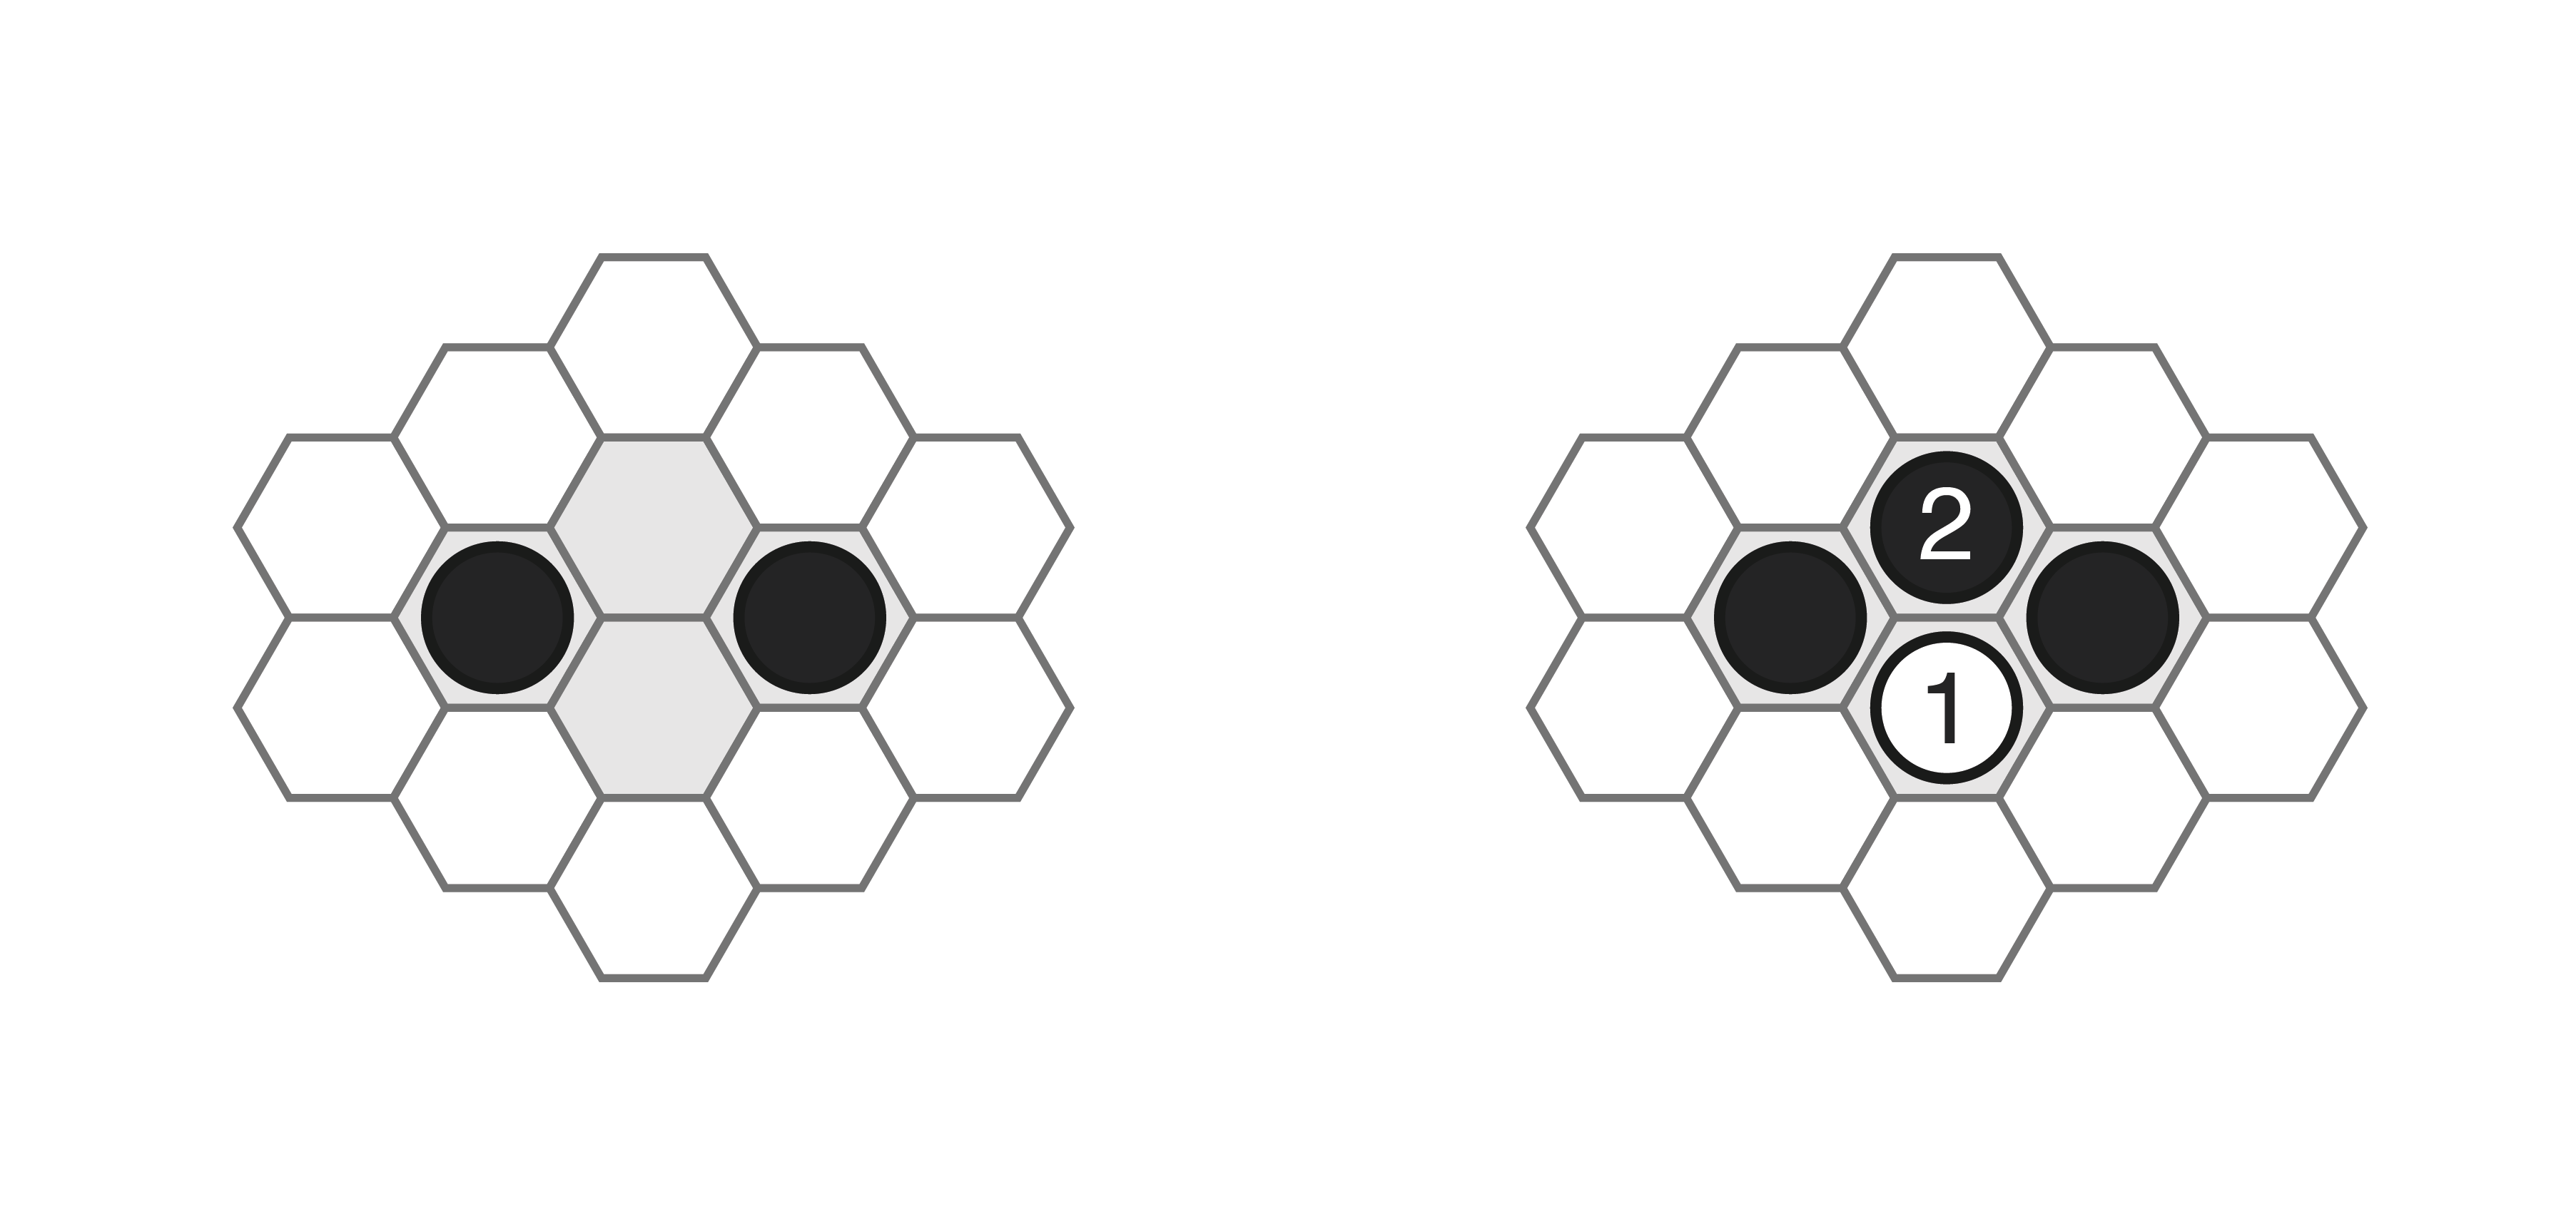
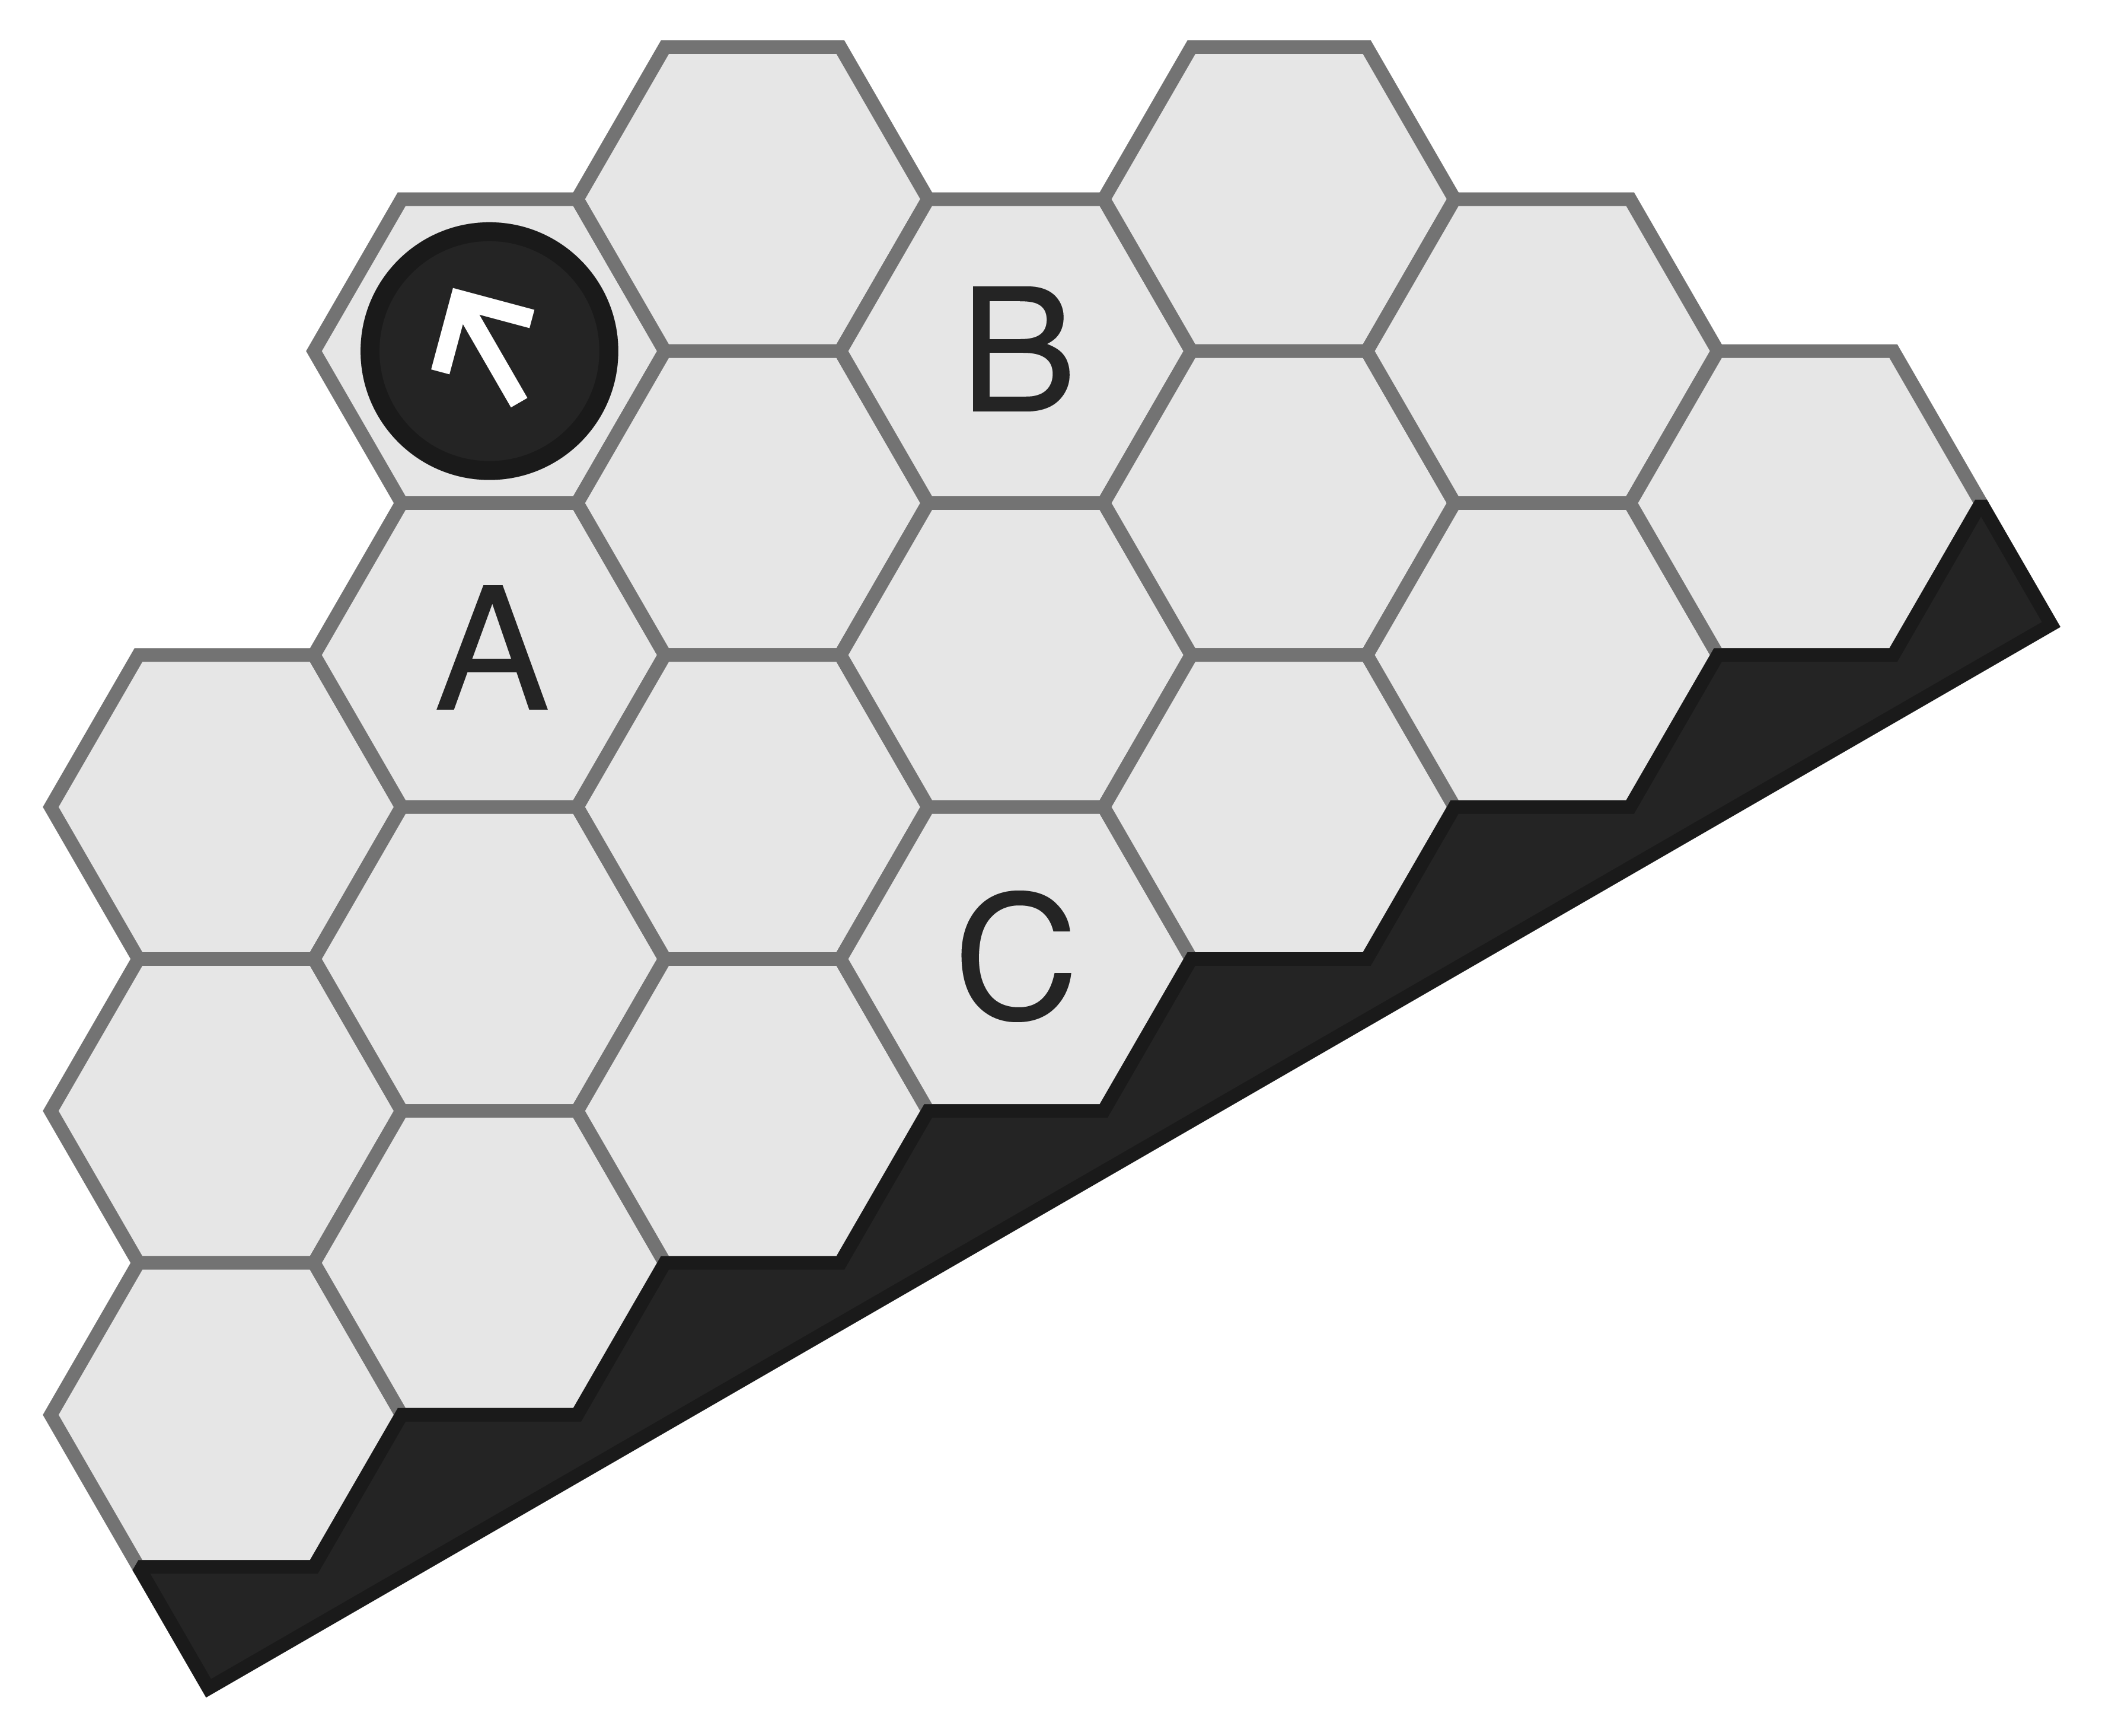
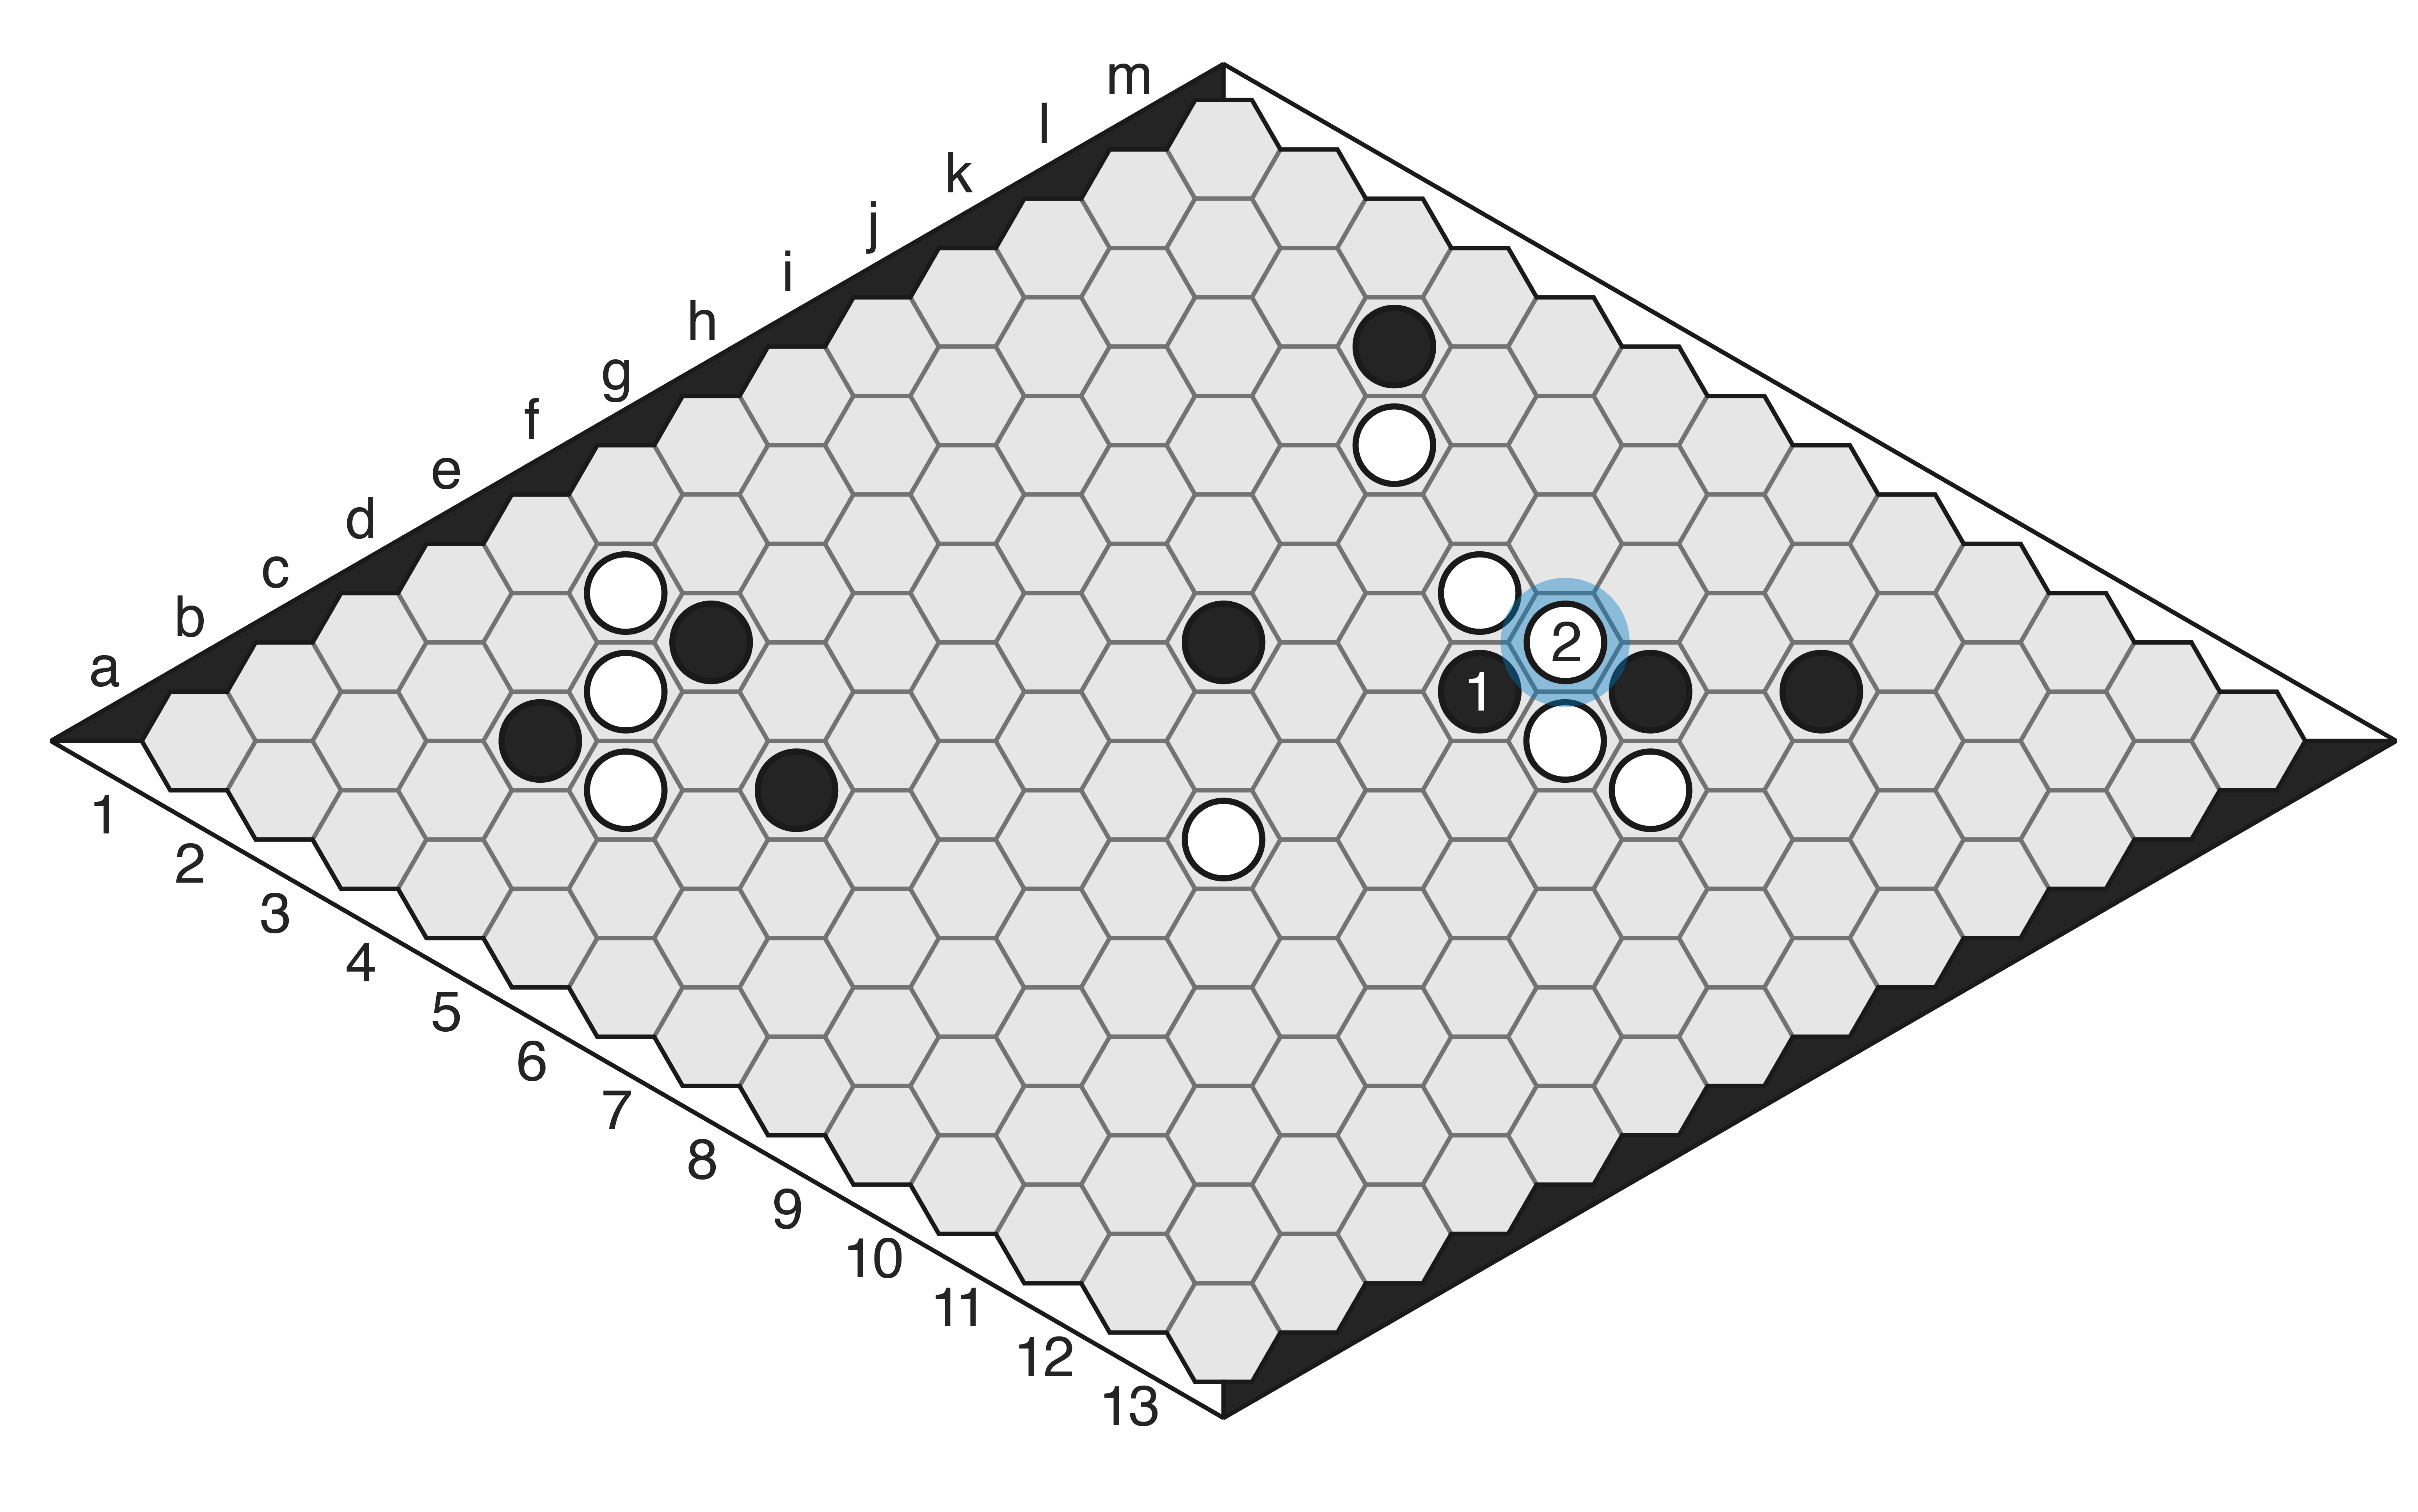
- Caption: A combined block. White (1) leads Black to attempt to run around with (2), only for White to catch them with (3), preventing a further bridge forward.
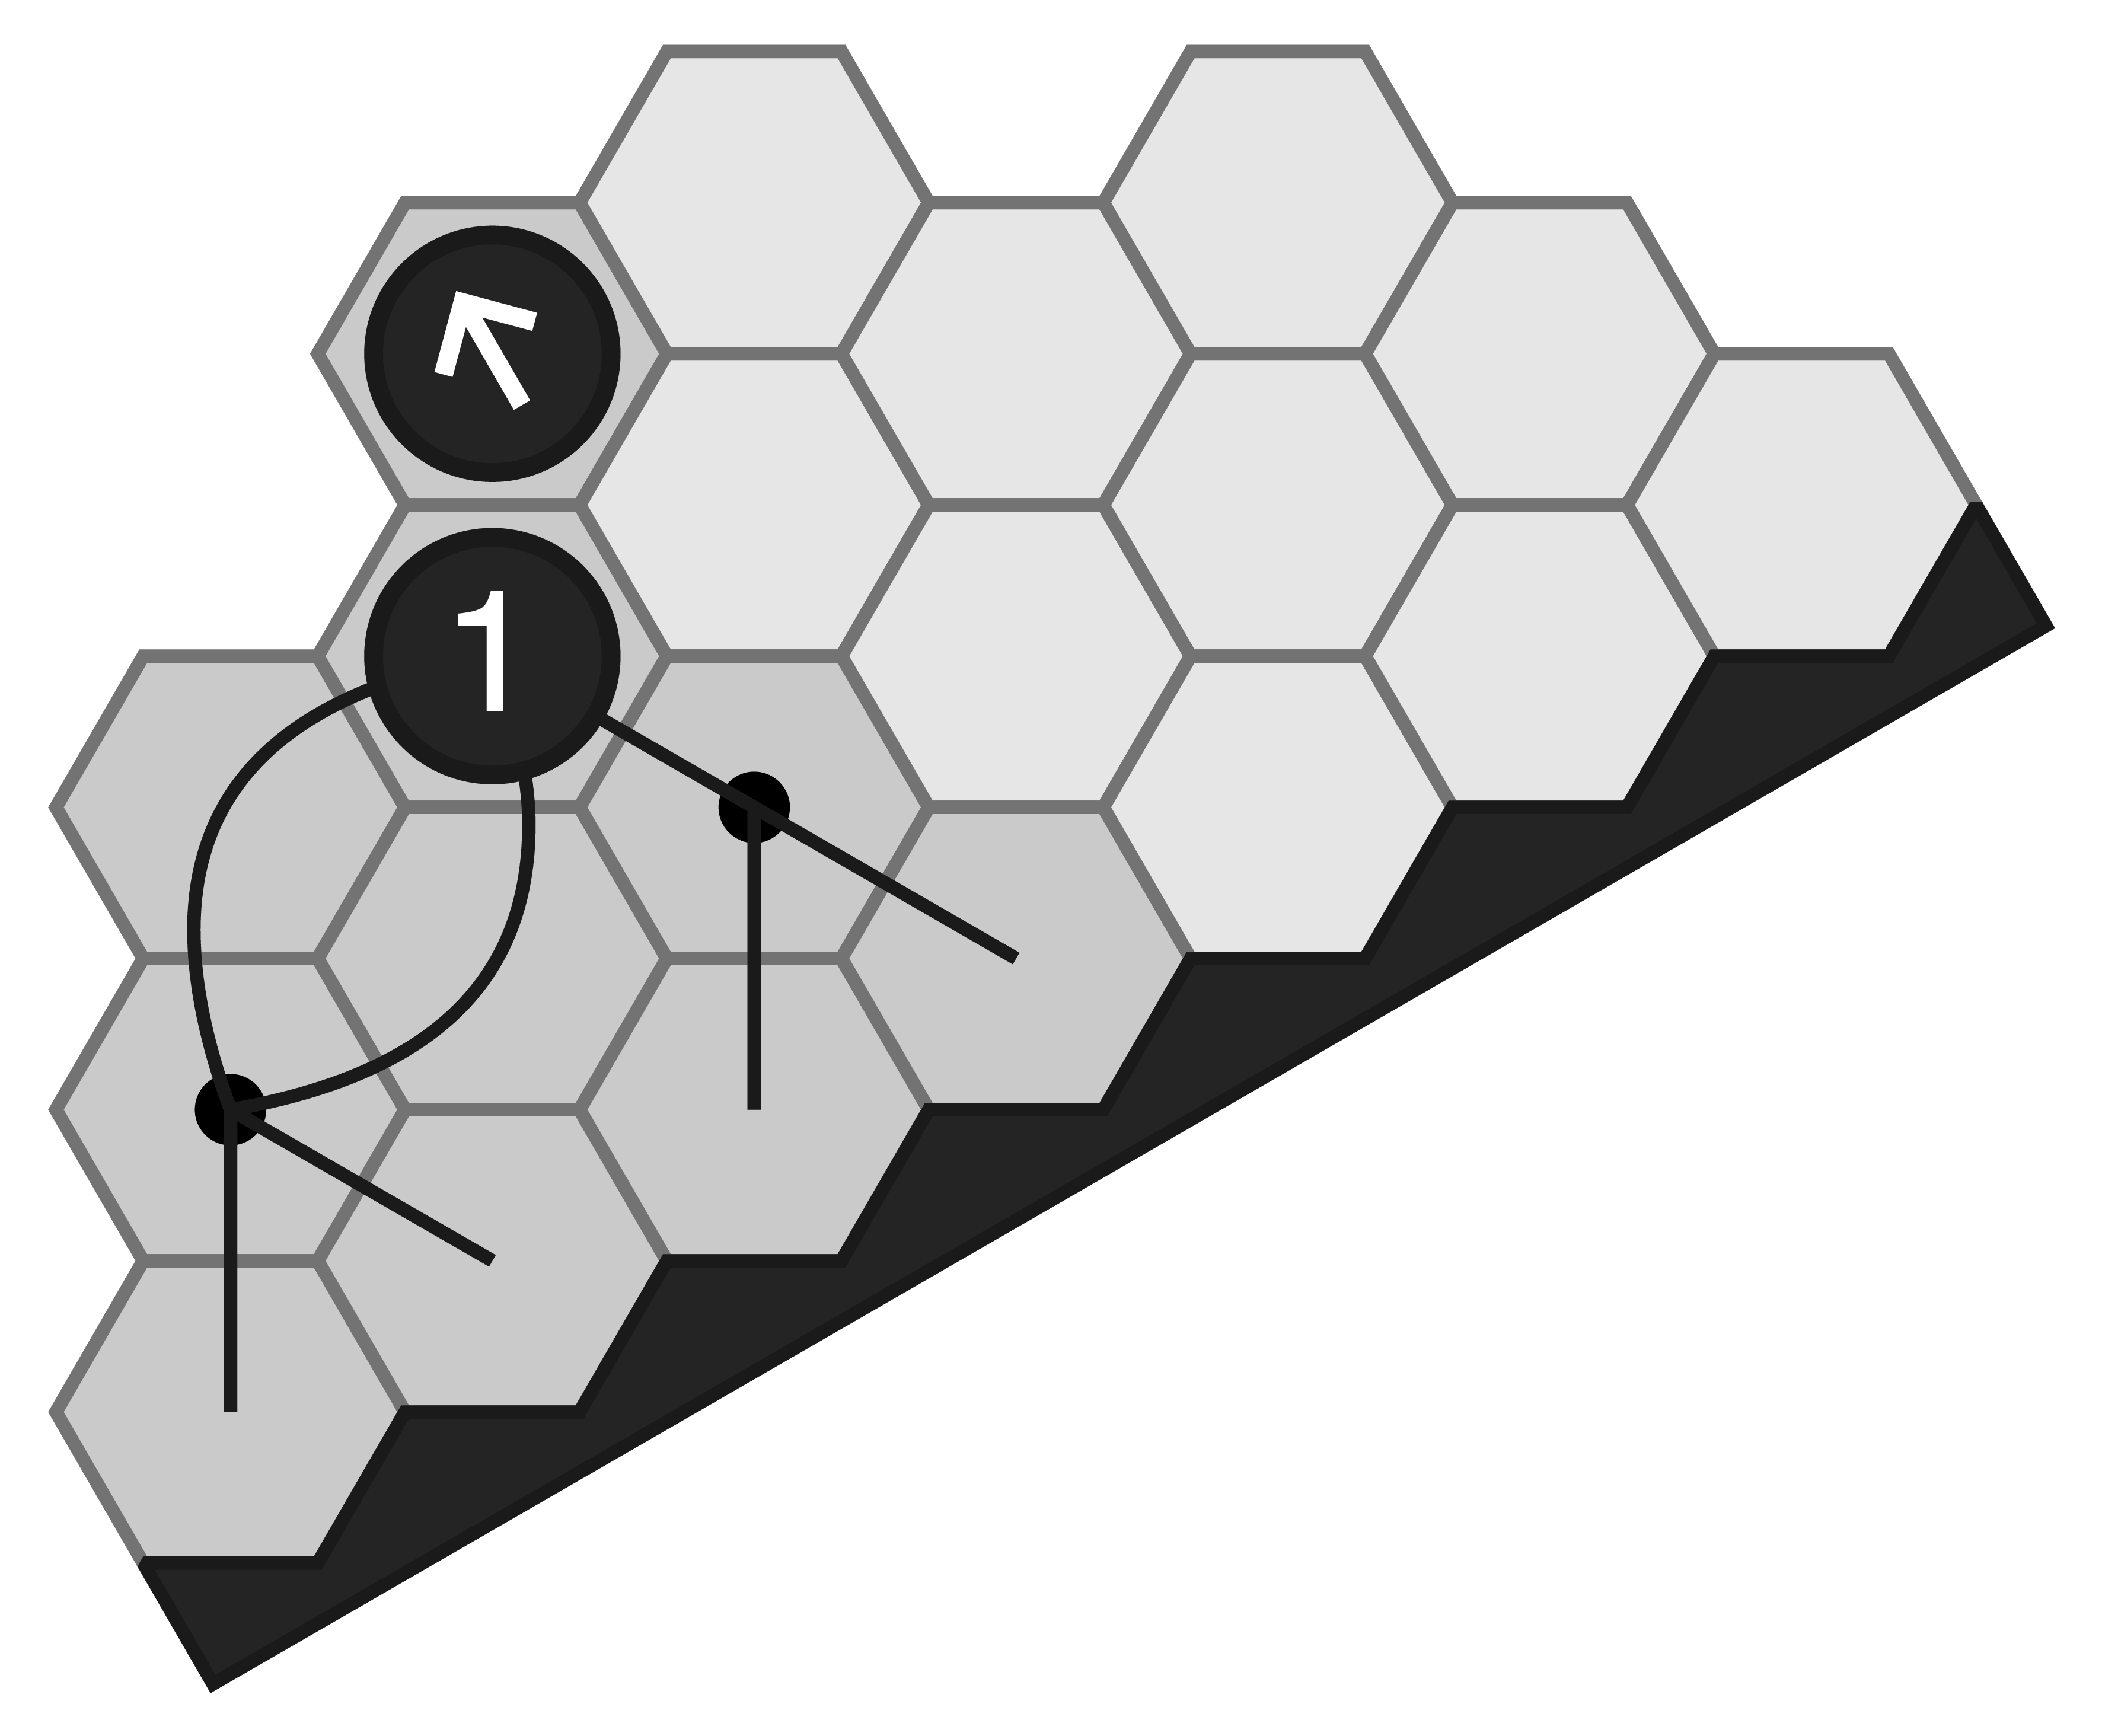
The classic block short-circuits the opponent from afar, allowing the defender to respond whether the opponent advances directly forward or takes a more oblique approach:
-
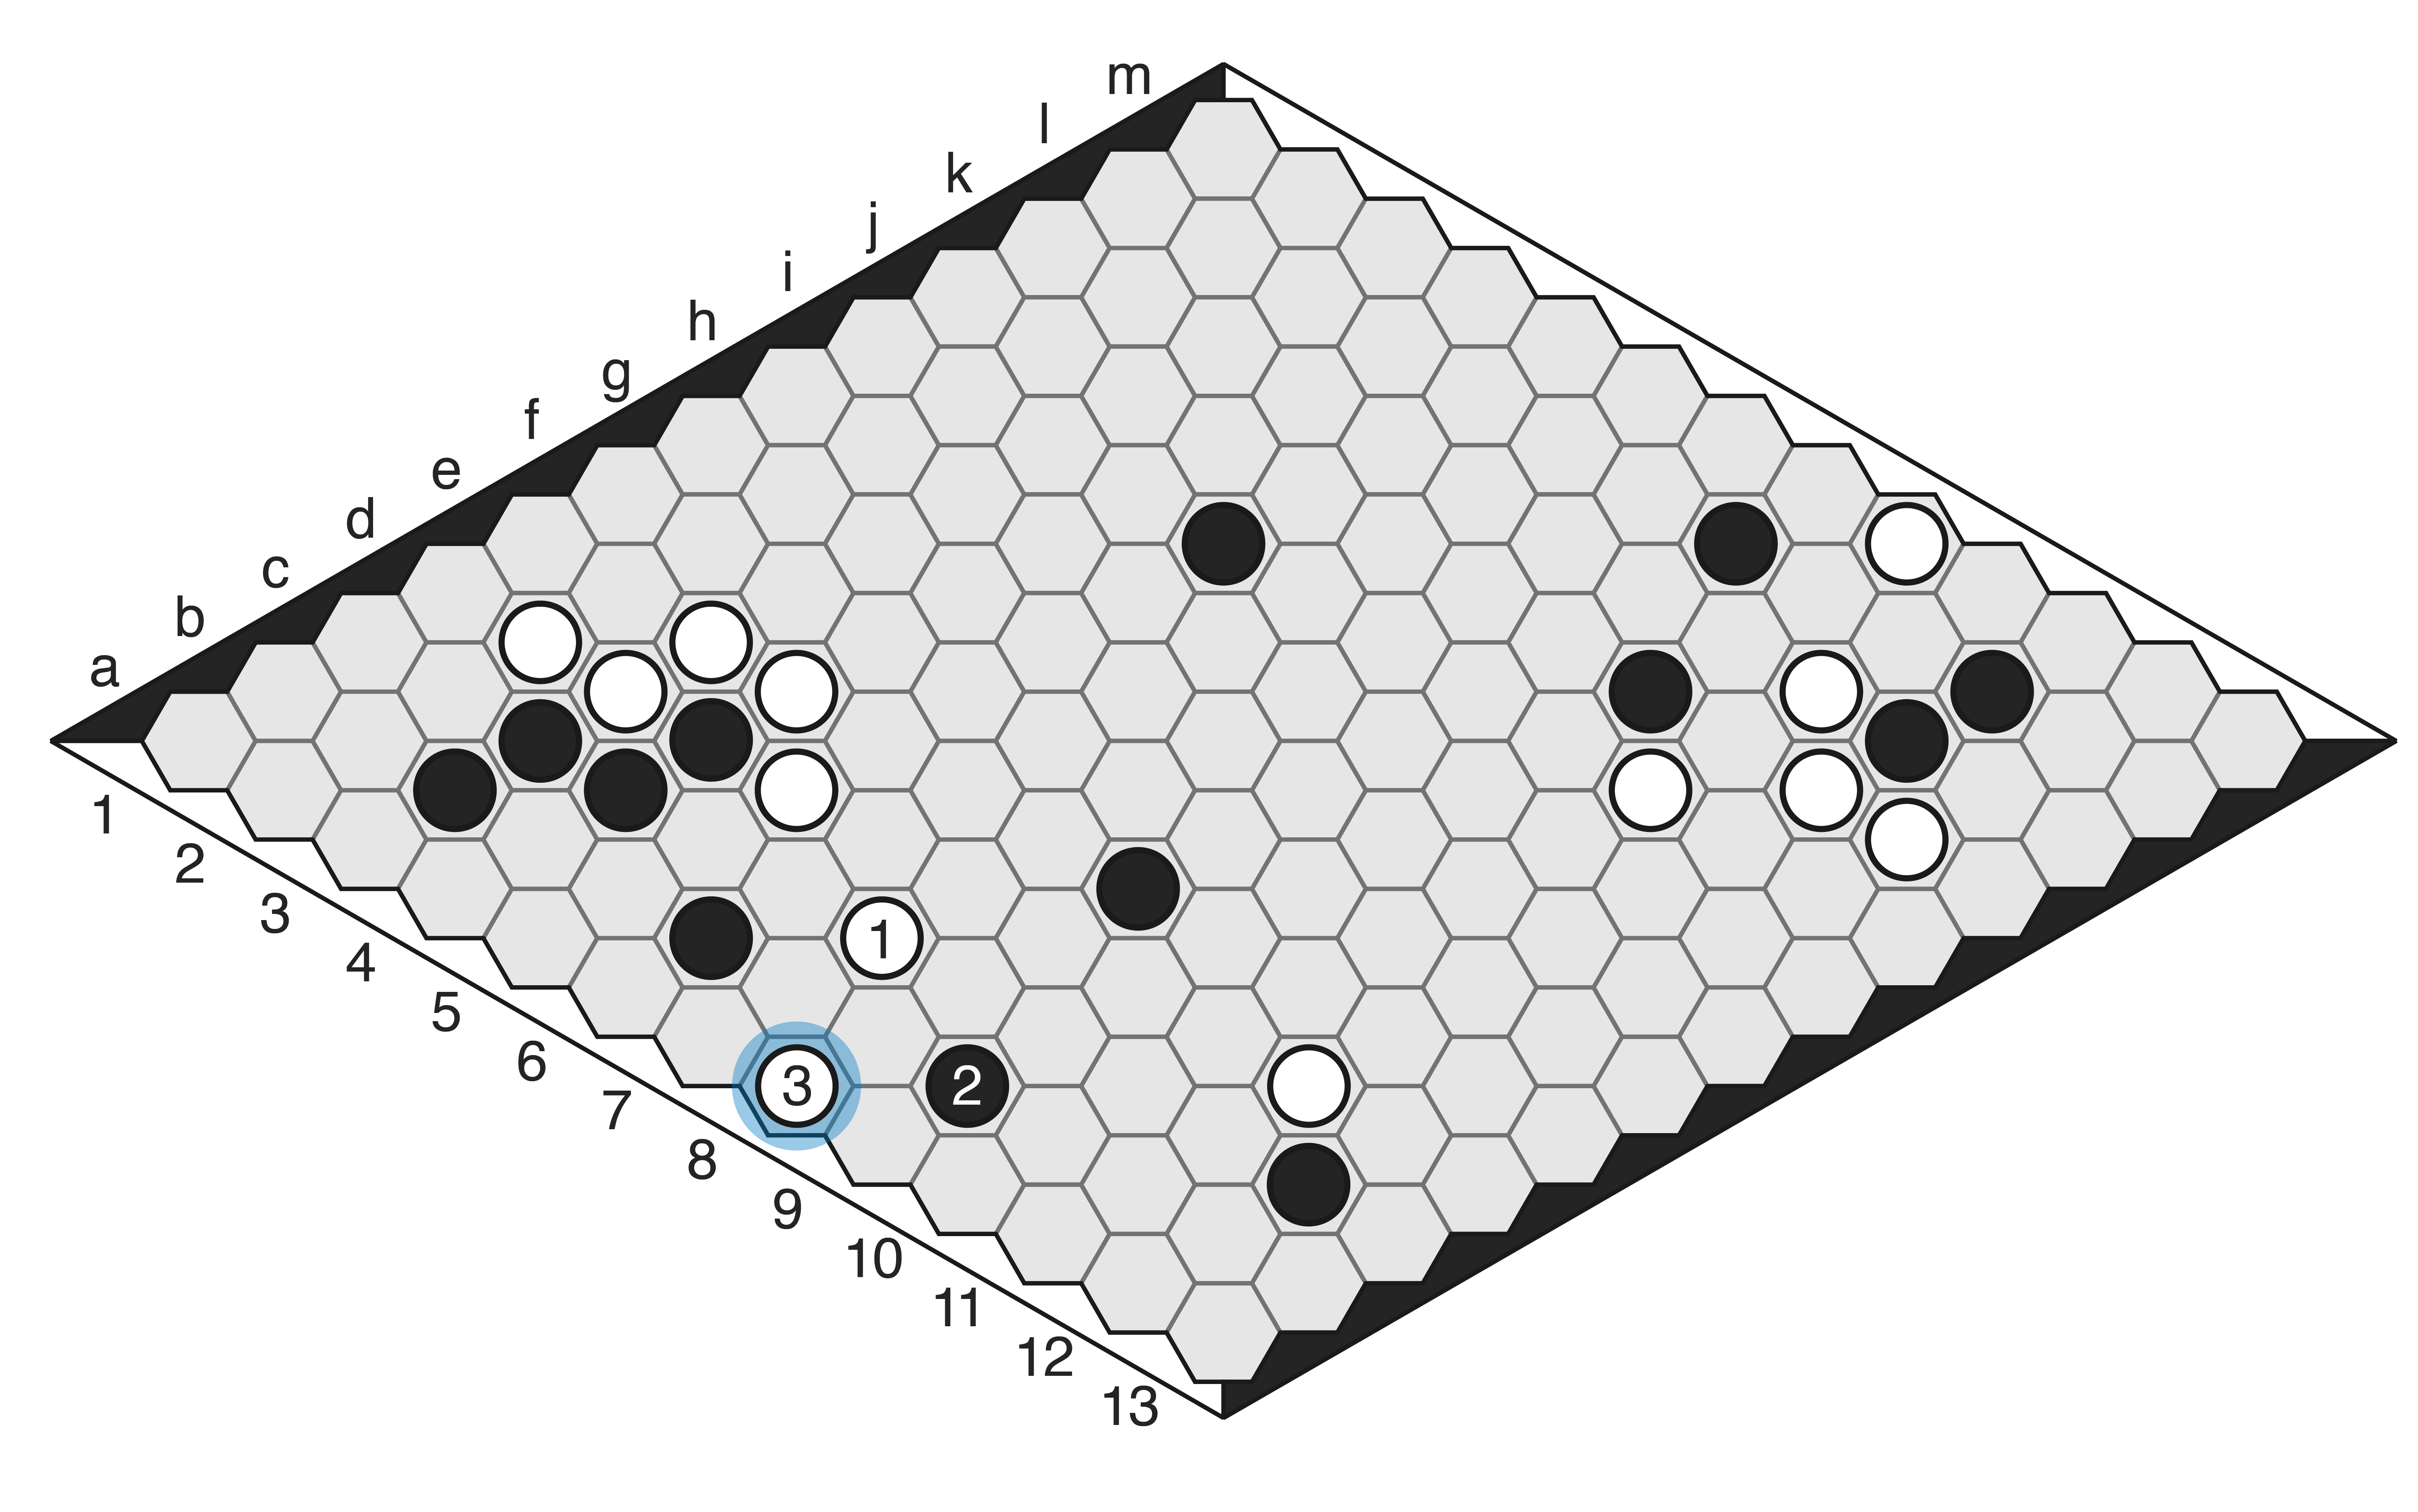
- Caption: A classic block. White blocks at a distance at (1), and when Black encroaches with a bridge to (2), White can block further advances with (3).
In either case, in order to defend we need to evaluate the opponent’s options for onward connection, and place our stones in anticipation of those options. If we defend reactively, and follow the opponent around right at their heels, then we’ve no hope of survival. If we instead constrict their choices and contain their subsequent advances, then we may just keep them at bay.
Ladders
Often, when approaching an edge of the board, you’ll end up in a situation like this:
White wants to connect and Black can’t allow it, so Black blocks at (3). White can’t connect right away but can force Black to carry on blocking all along the edge. This series of back-and-forth adjacent plays is called a ladder. White is completely in control here; Black has to respond to every ladder stone White plays, otherwise White’s connection is assured.
Go players will be familiar with sente — the concept of maintaining the initiative, by making moves that force an immediate response from the opponent. When you have sente you are in control of the game; you are making profitable moves, and all your opponent can do is match you, stone for stone, unable to direct play to their advantage. Sente is just as important in Hex as it is in Go, and ladders are one common manifestation of it.
However, you have probably noticed that if White continues playing the ladder here, it’s Black that ends up connecting across the board:
To make the ladder profitable for them, White needs to incorporate some additional tactical plays. If White had an additional stone in place to form a ladder escape, then when the ladder reaches that stone, they can connect to the edge with ease.
Of course, when a ladder is already forming, taking a turn to place a ladder escape stone simply dooms the ladder. So players will often place ladder escape stones during the opening phase of the game, to allow for profitable ladder play later.
Another option is to place a stone that is both a ladder escape and a threat to connect by another route. Your opponent will be forced to block either the threat or the ladder, and then you can connect by the other means. In the diagram below, Black plays a stone at 1. This can escape the ladder, but it also threatens to connect via A (with two bridges). White can’t block both approaches, so Black will connect. This is called a ladder escape fork.
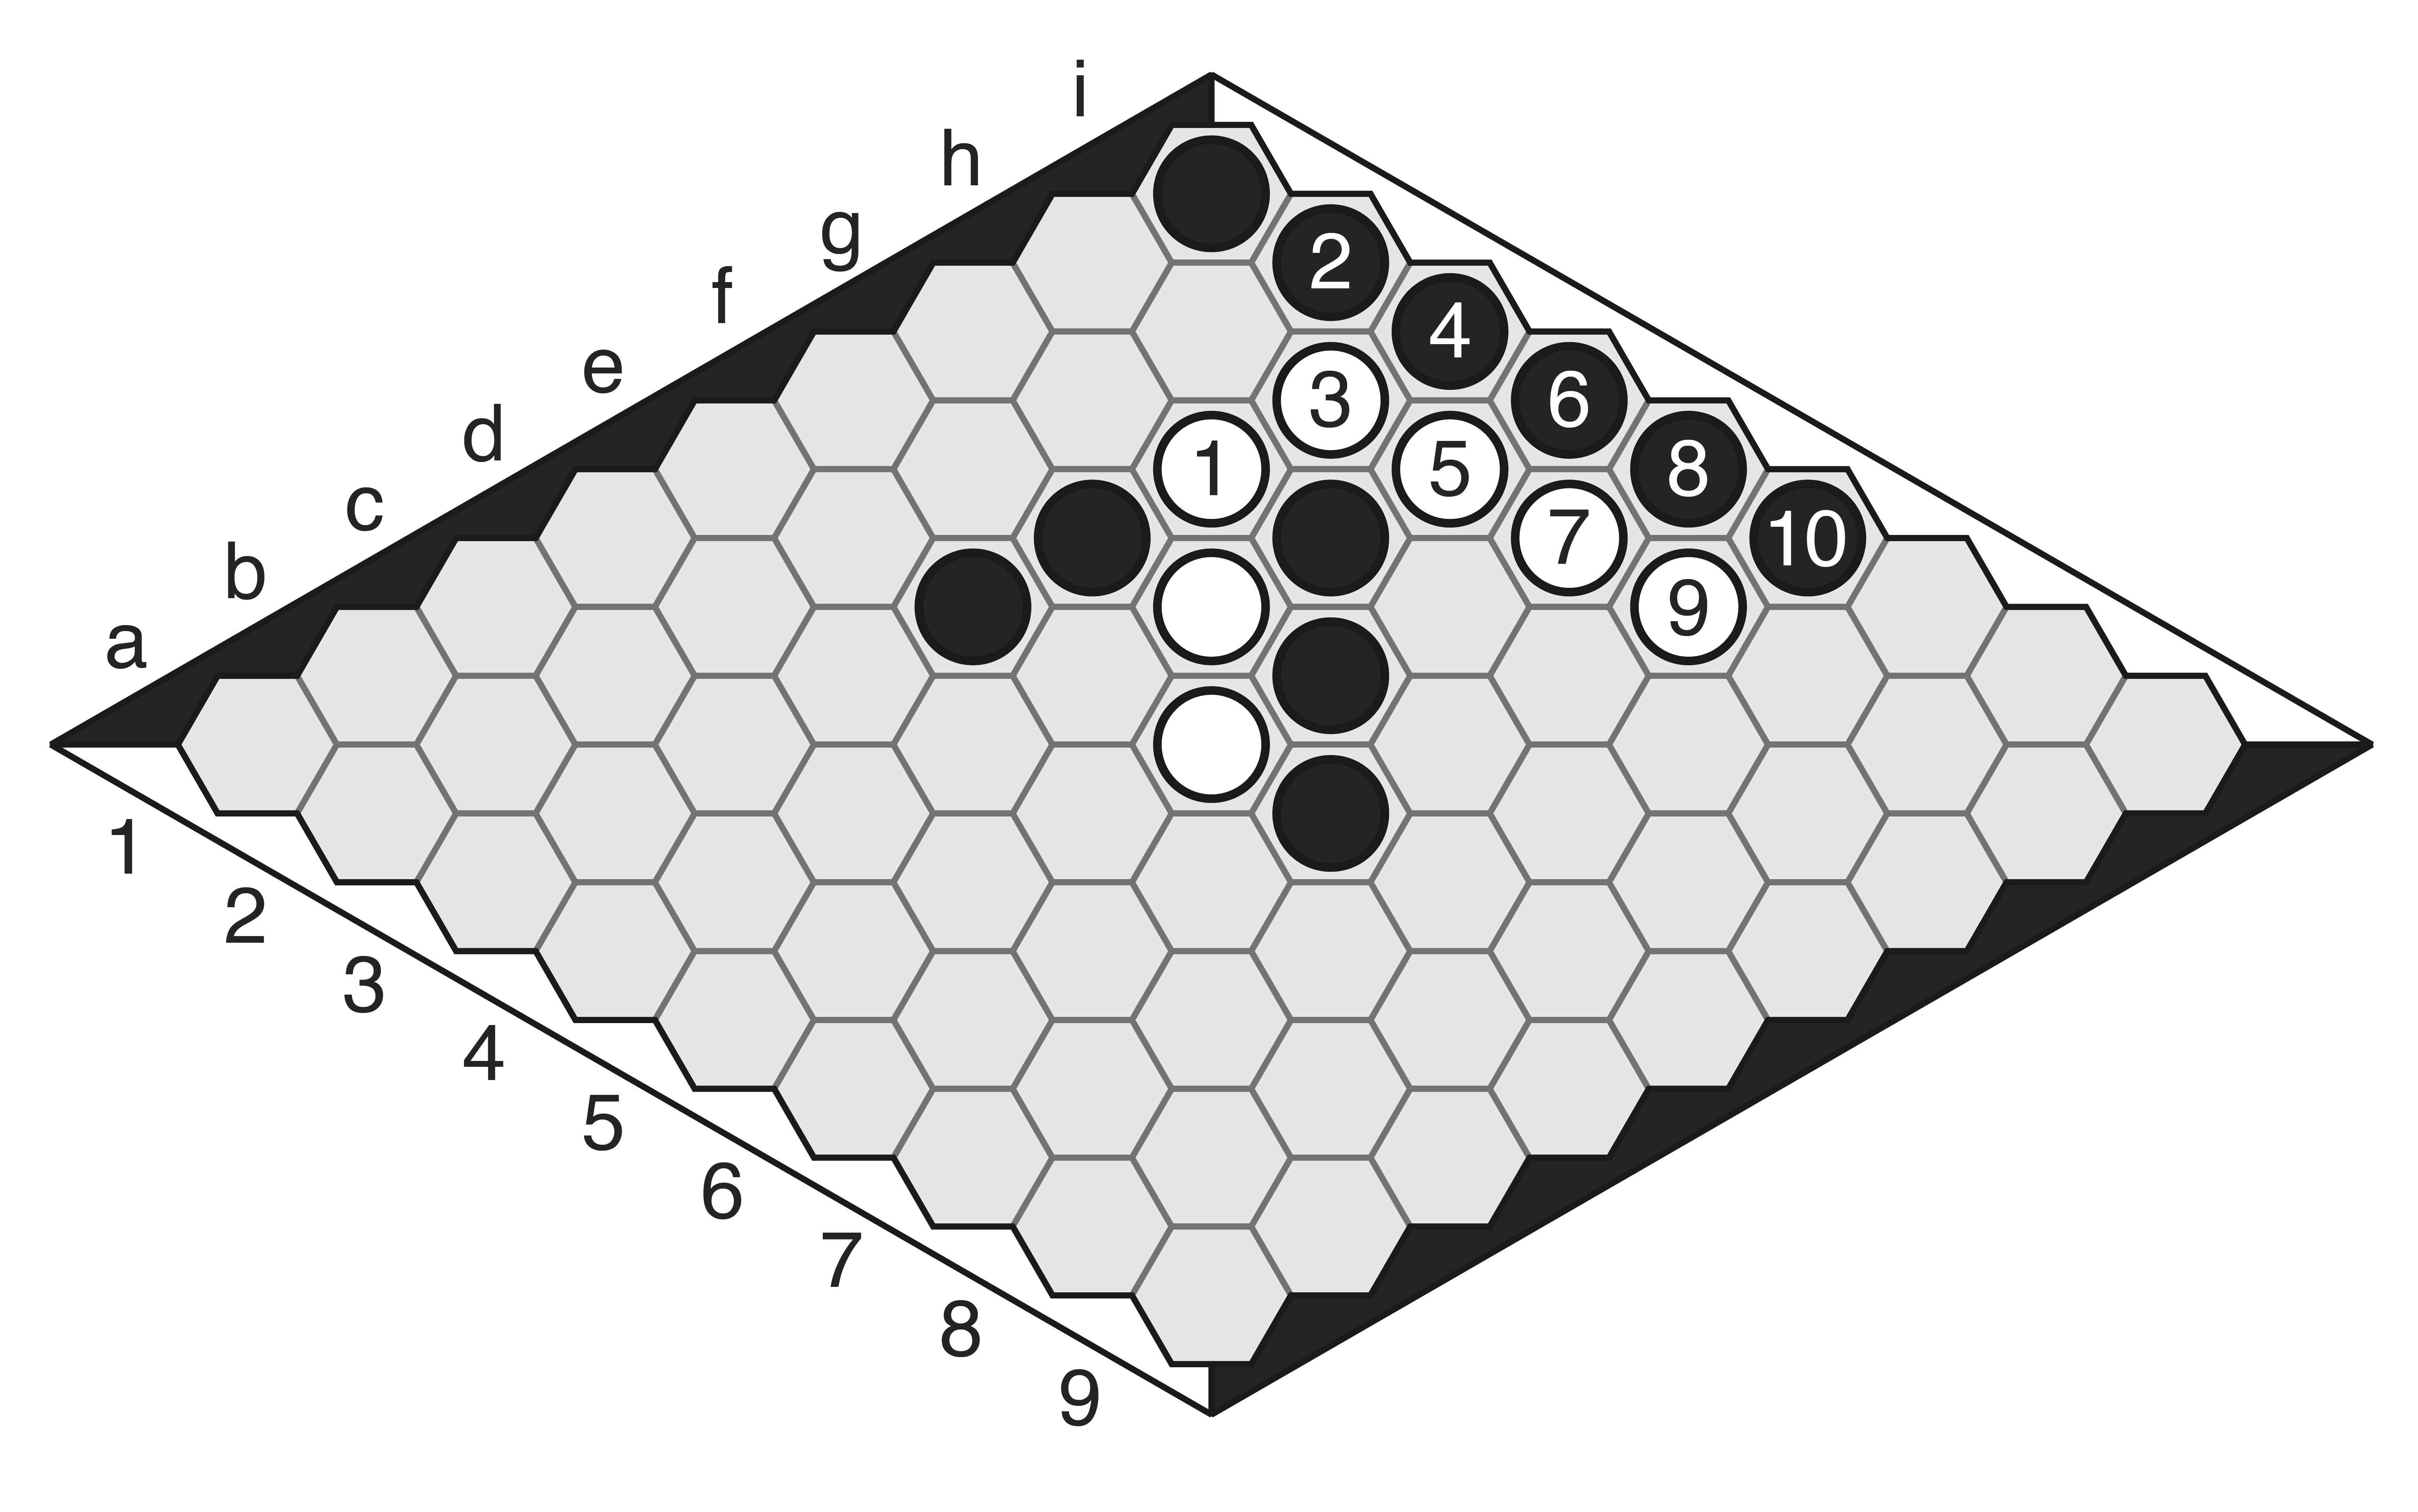
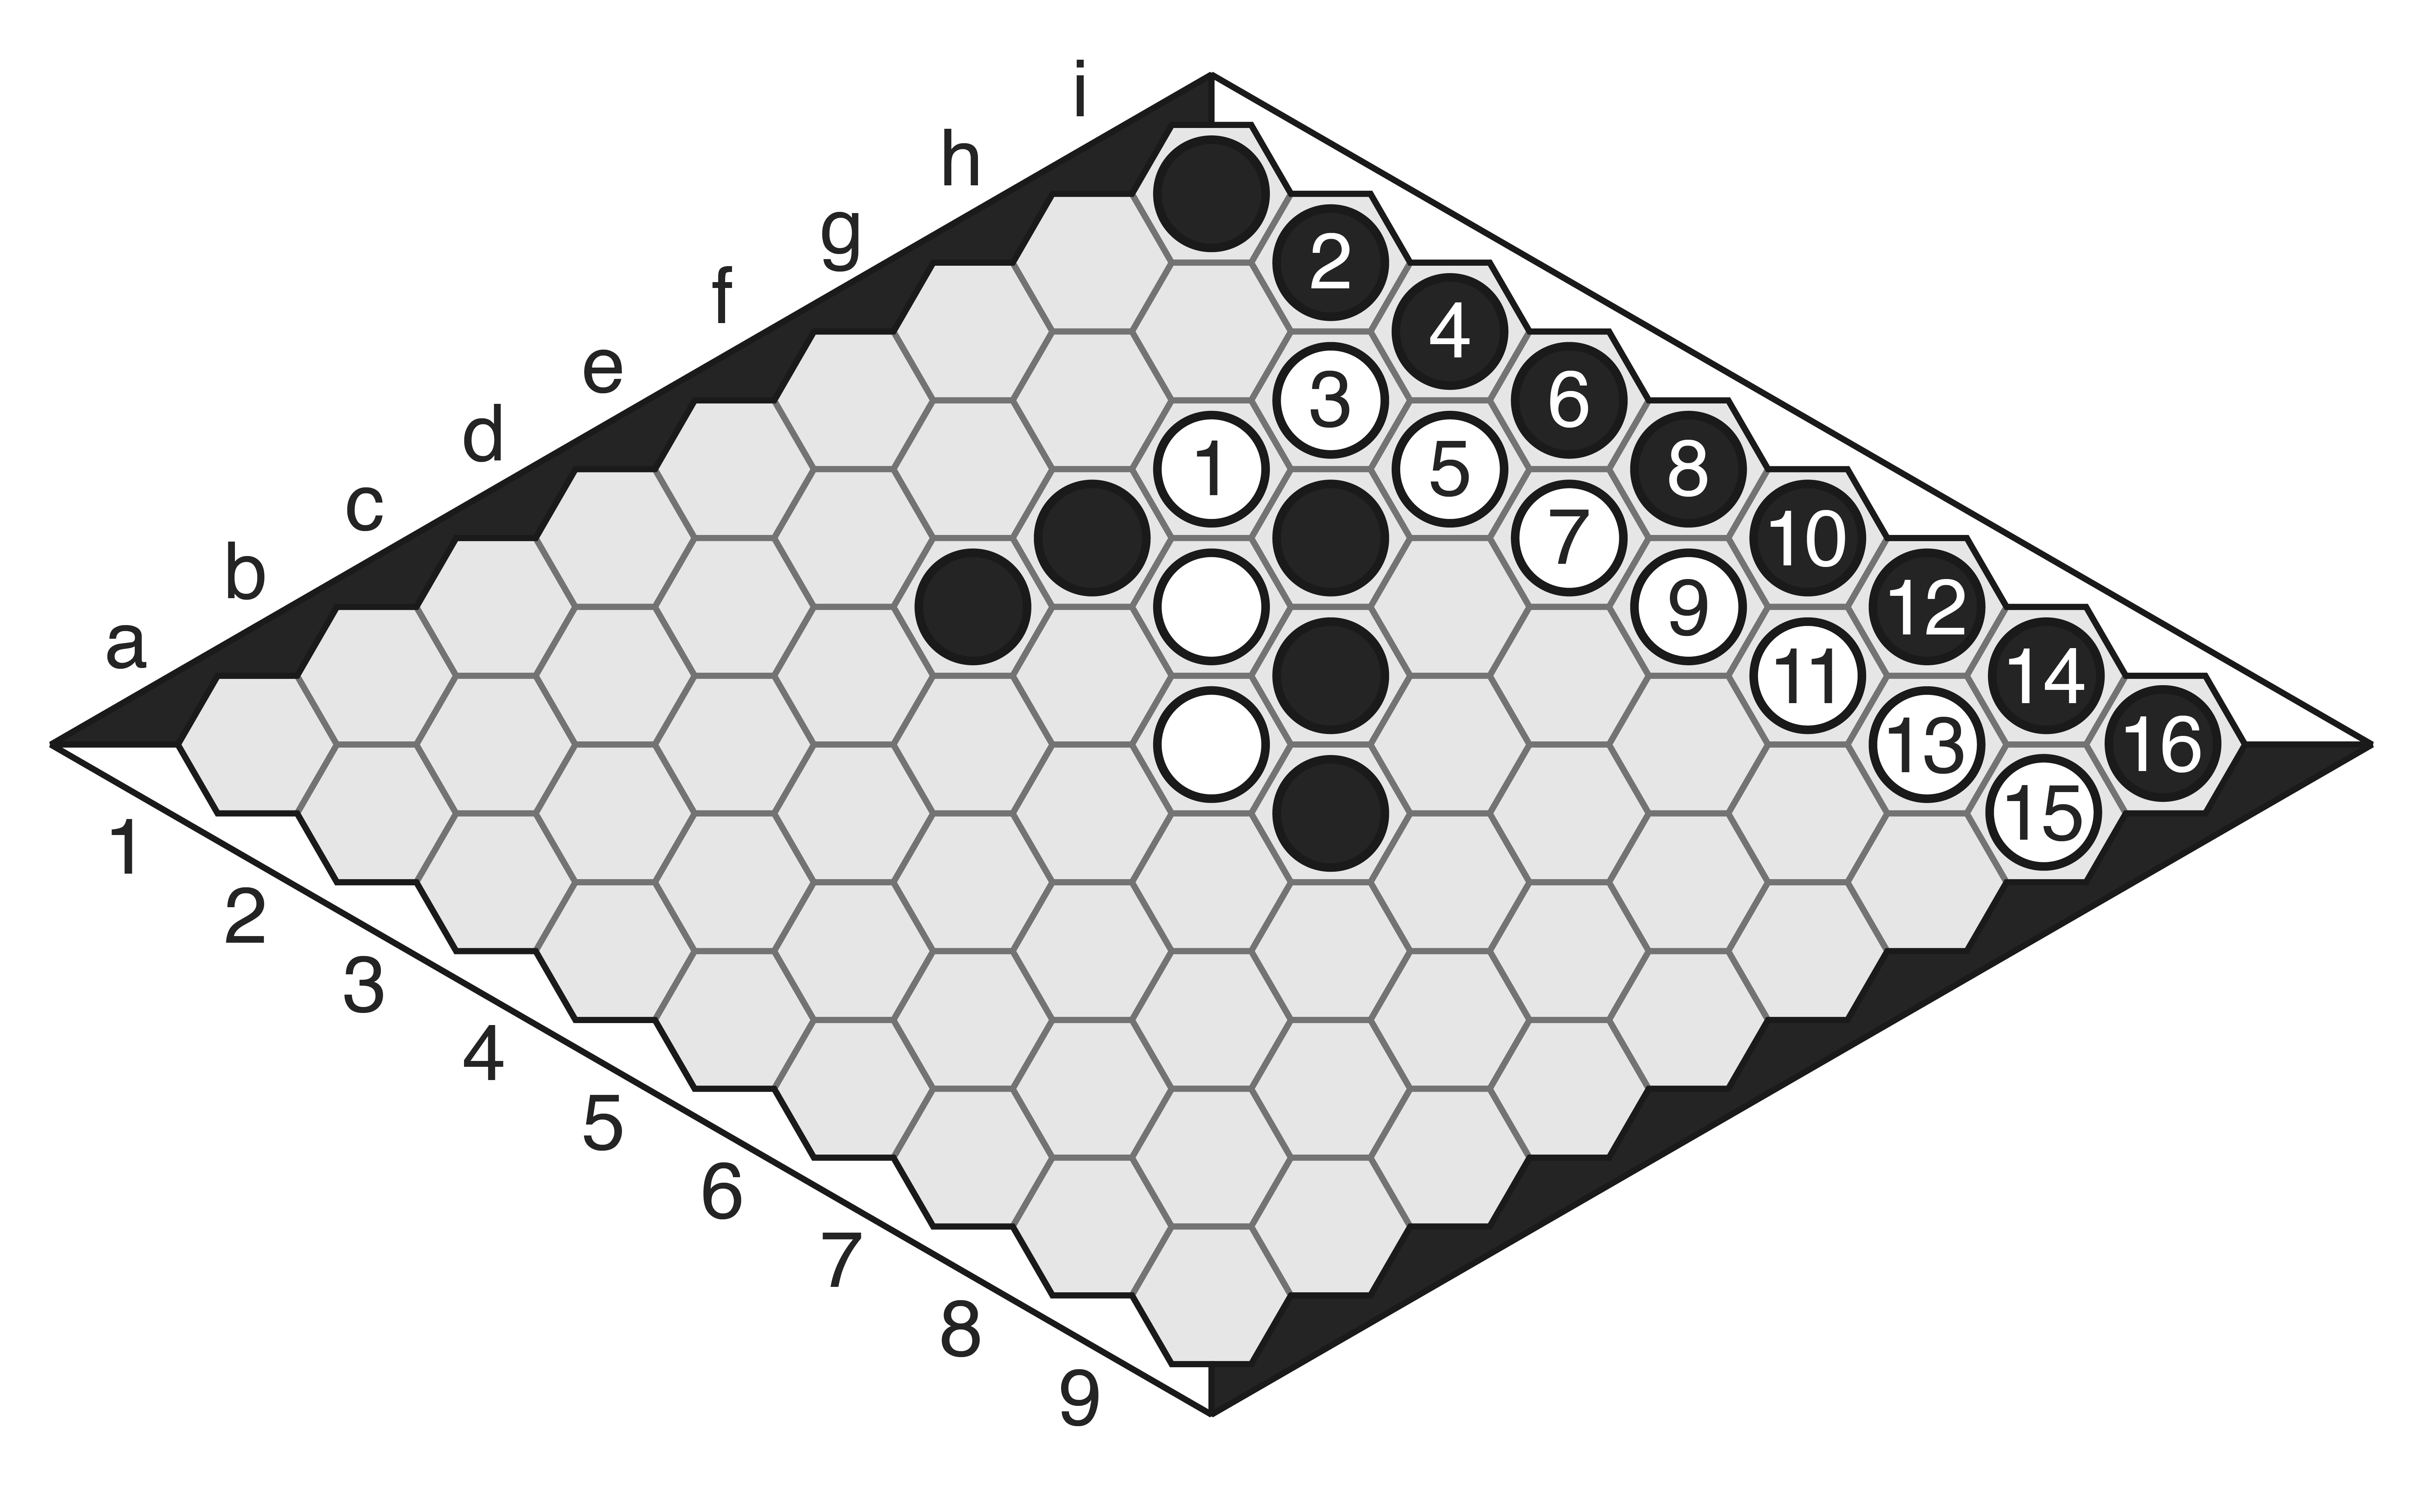
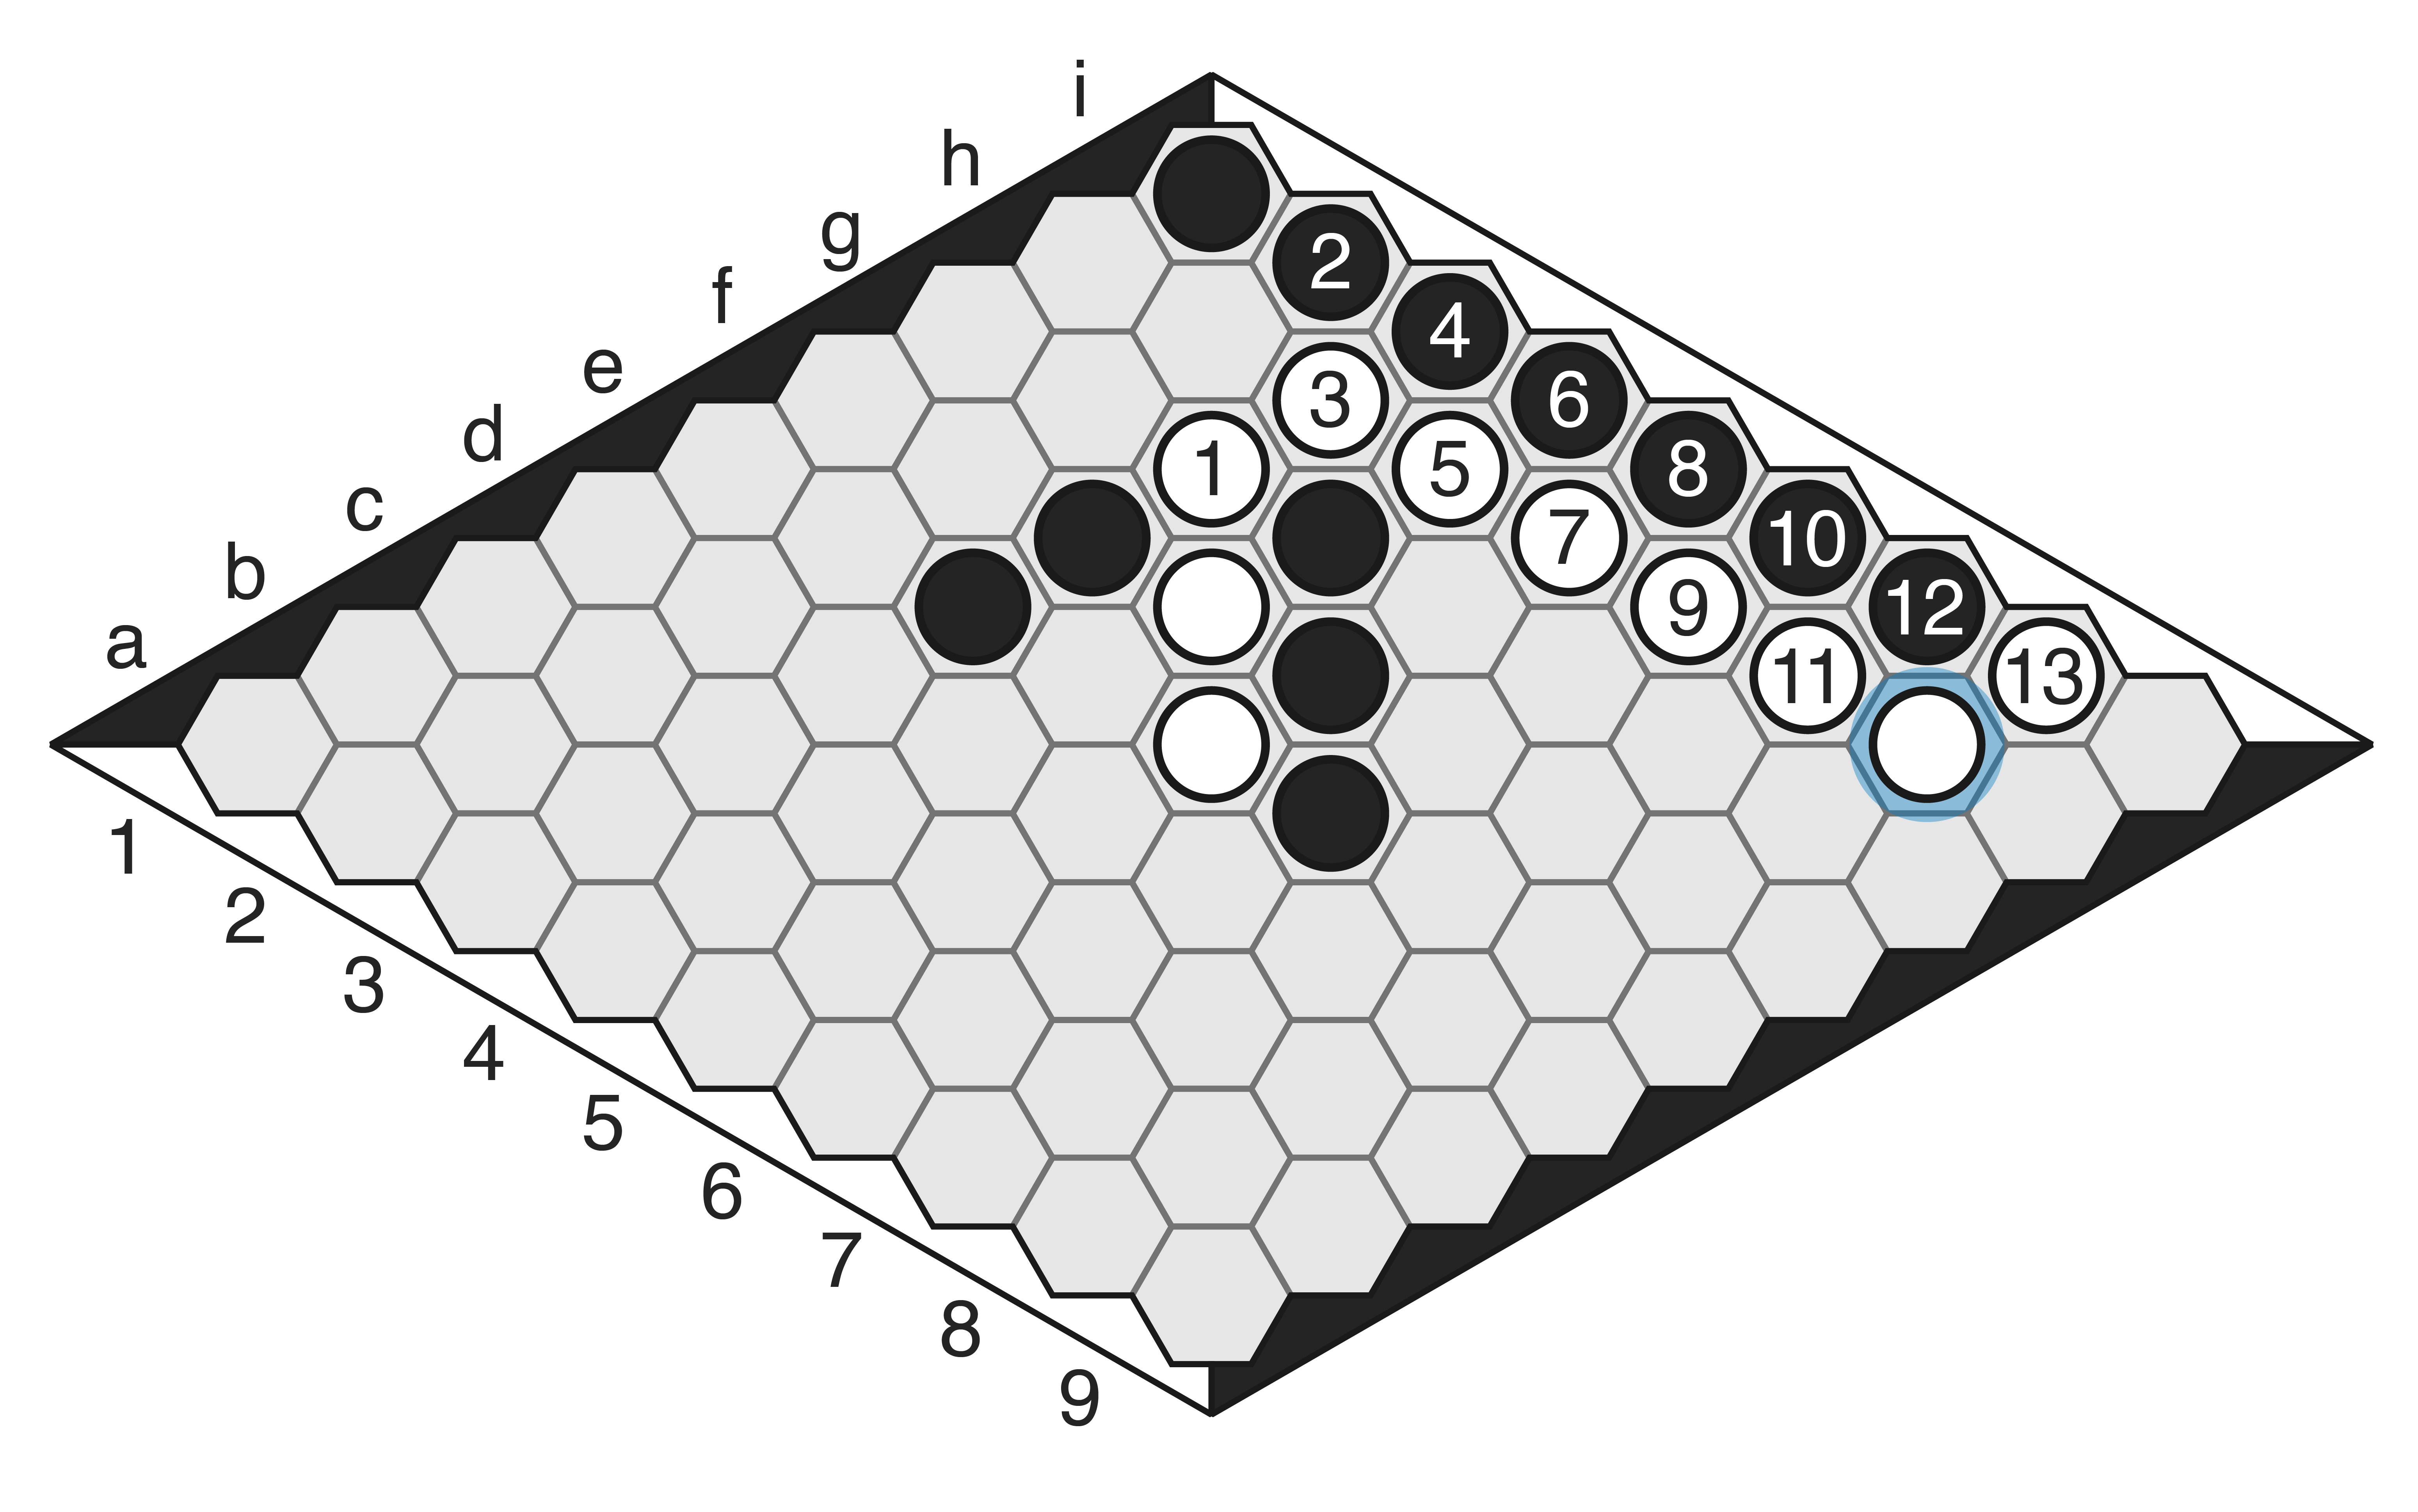
If you have no ladder escapes or forks available, you’ll have no choice but to “break the ladder”, as Black does with move 7 in the diagram below (note that 7 is connected with Template A-3). In the acute corner, this tends to reverse the roles: notice how now it’s White who’s the attacking player with a ladder.
Strategic Considerations
Openings
The opening in Hex is an interesting moment, as the first player needs to consider not just what is the best move to play, but what is the best move to play that won’t get swapped. In Go or Chess, you can play your opening move without fear of that move suddenly becoming your opponent’s opening, but not so with Hex!
As the second player, you need to do the opposite calculation: has my opponent played a move that, with perfect play, would give them a winning advantage? If so, I should swap; if not, I can safely play on.
On smaller boards, Hex has been solved, meaning that we know the precise outcome of any given opening move. That leads to diagrams like these:
-
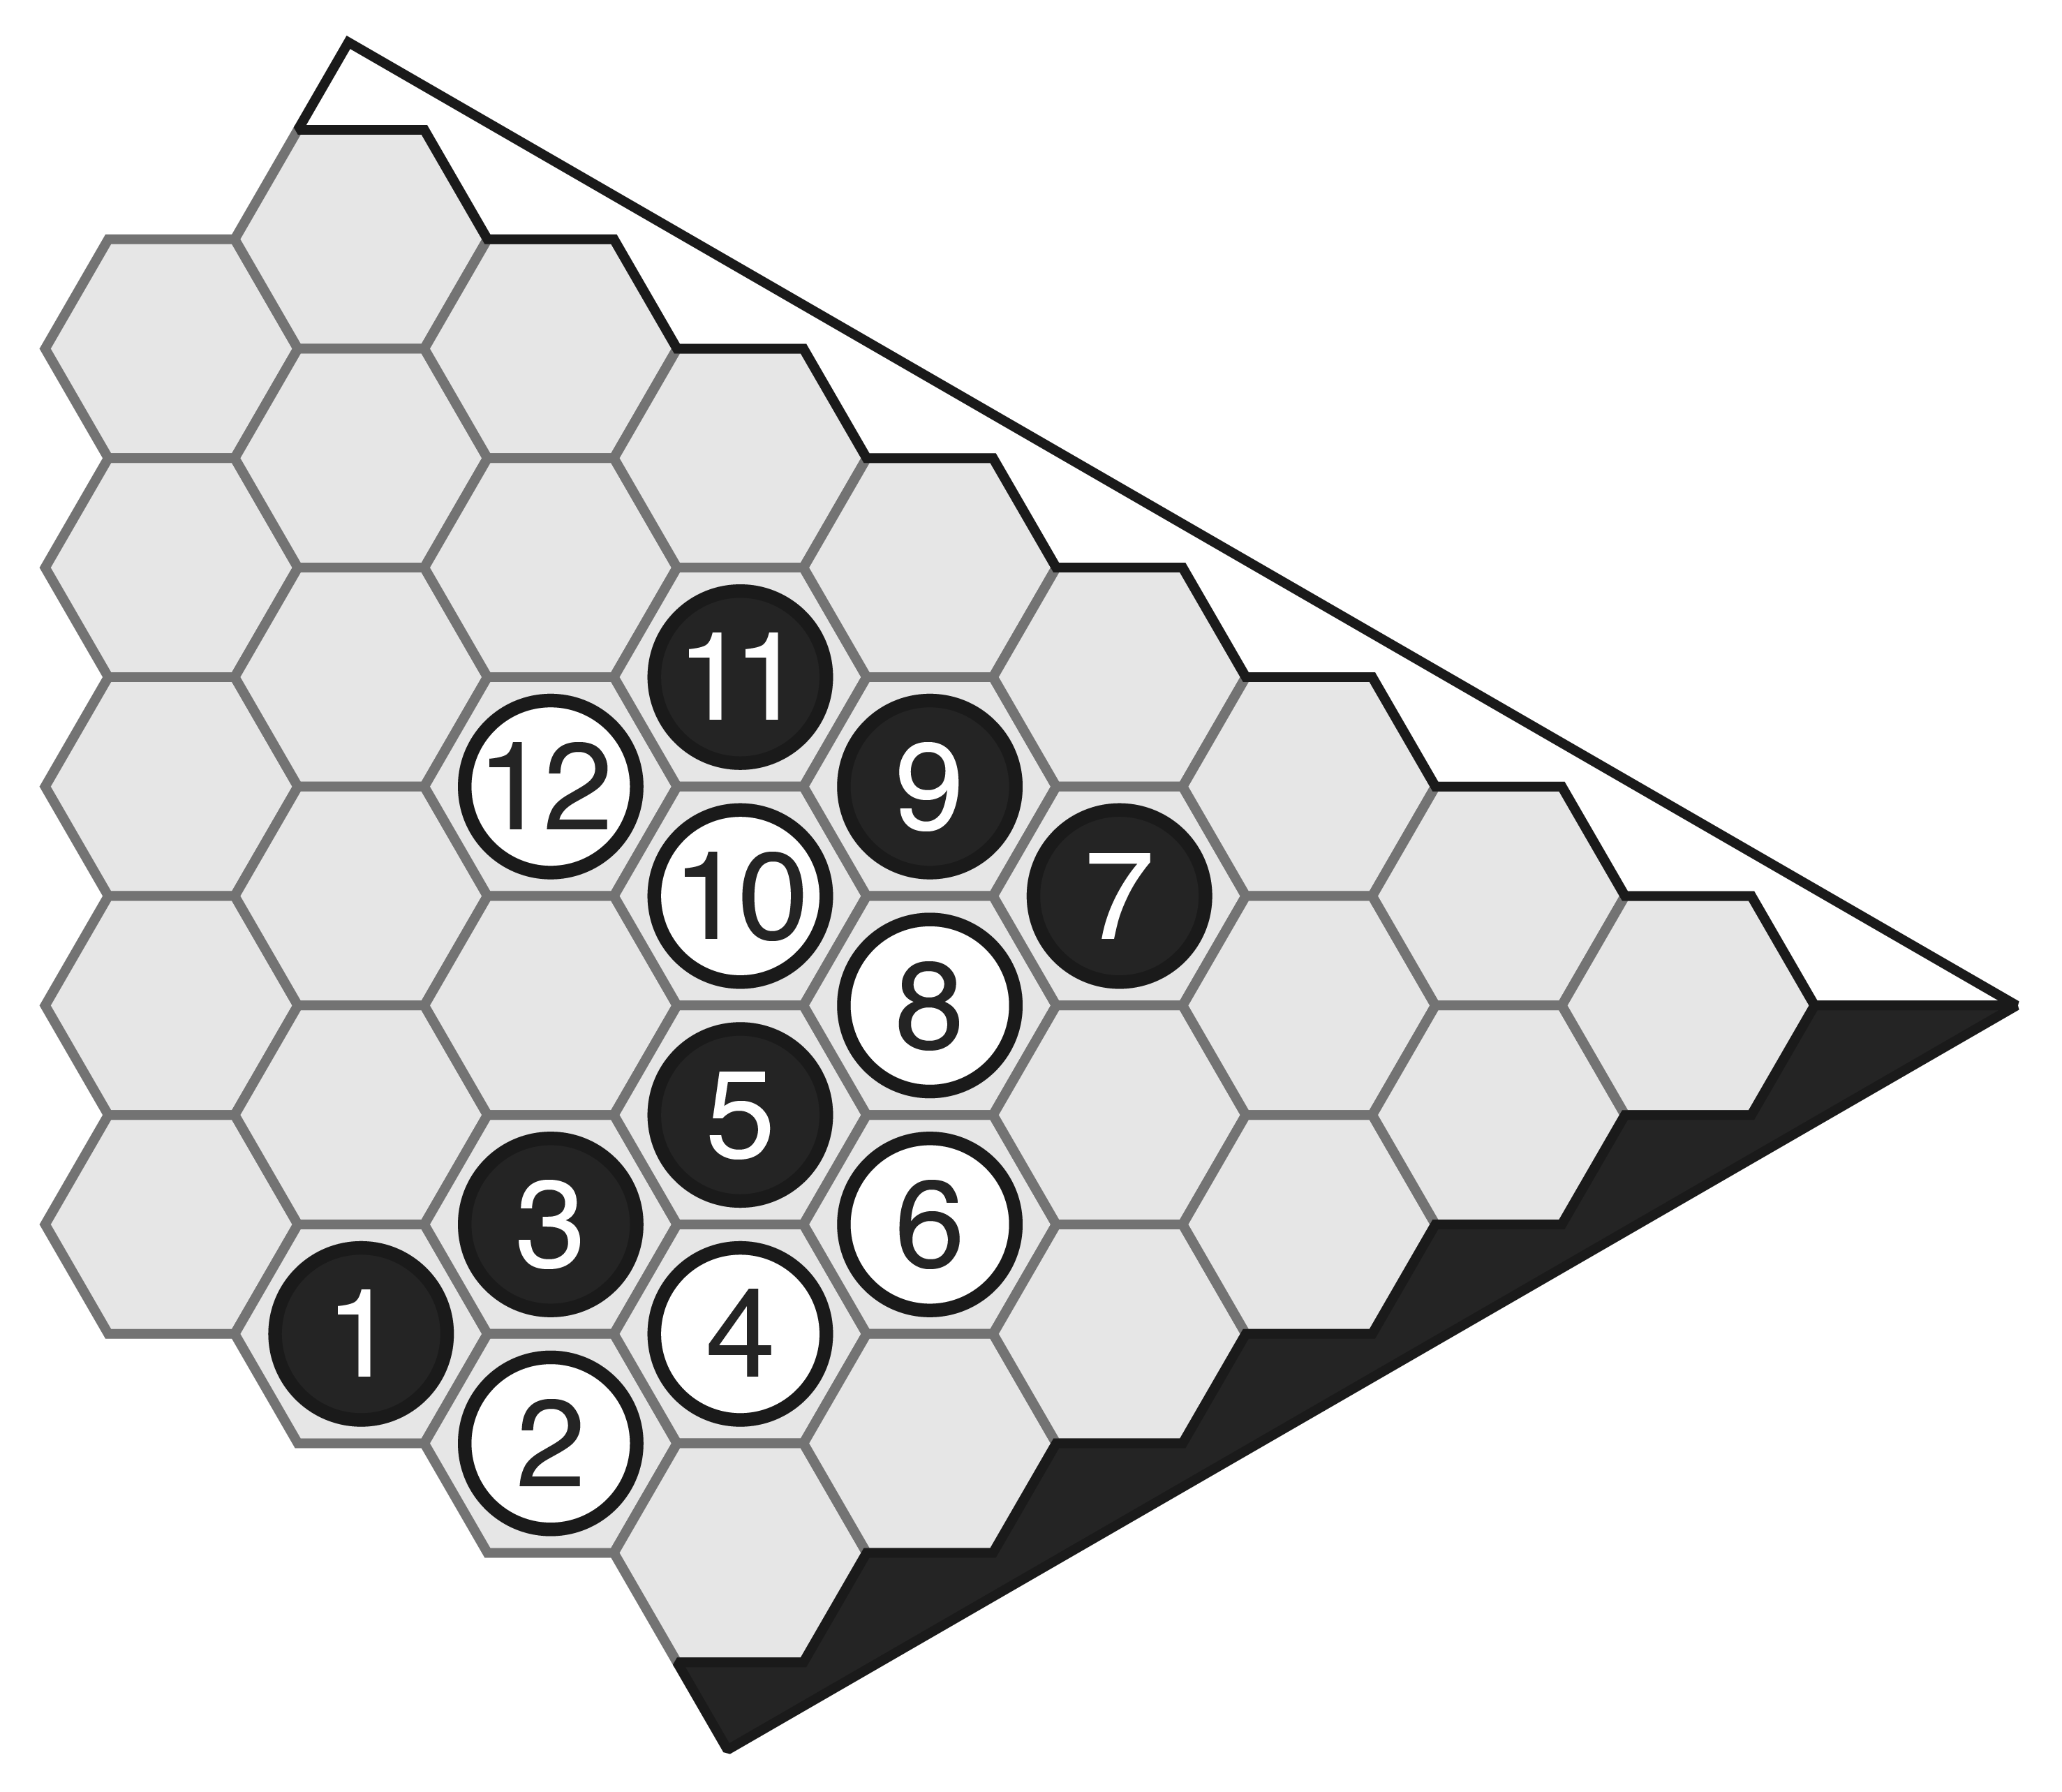
- Opening results for 7×7 Hex. The colour of the stone on each cell indicates the winner, if Black plays their first move to that cell. (recreated from Hayward et al., 2004)
-
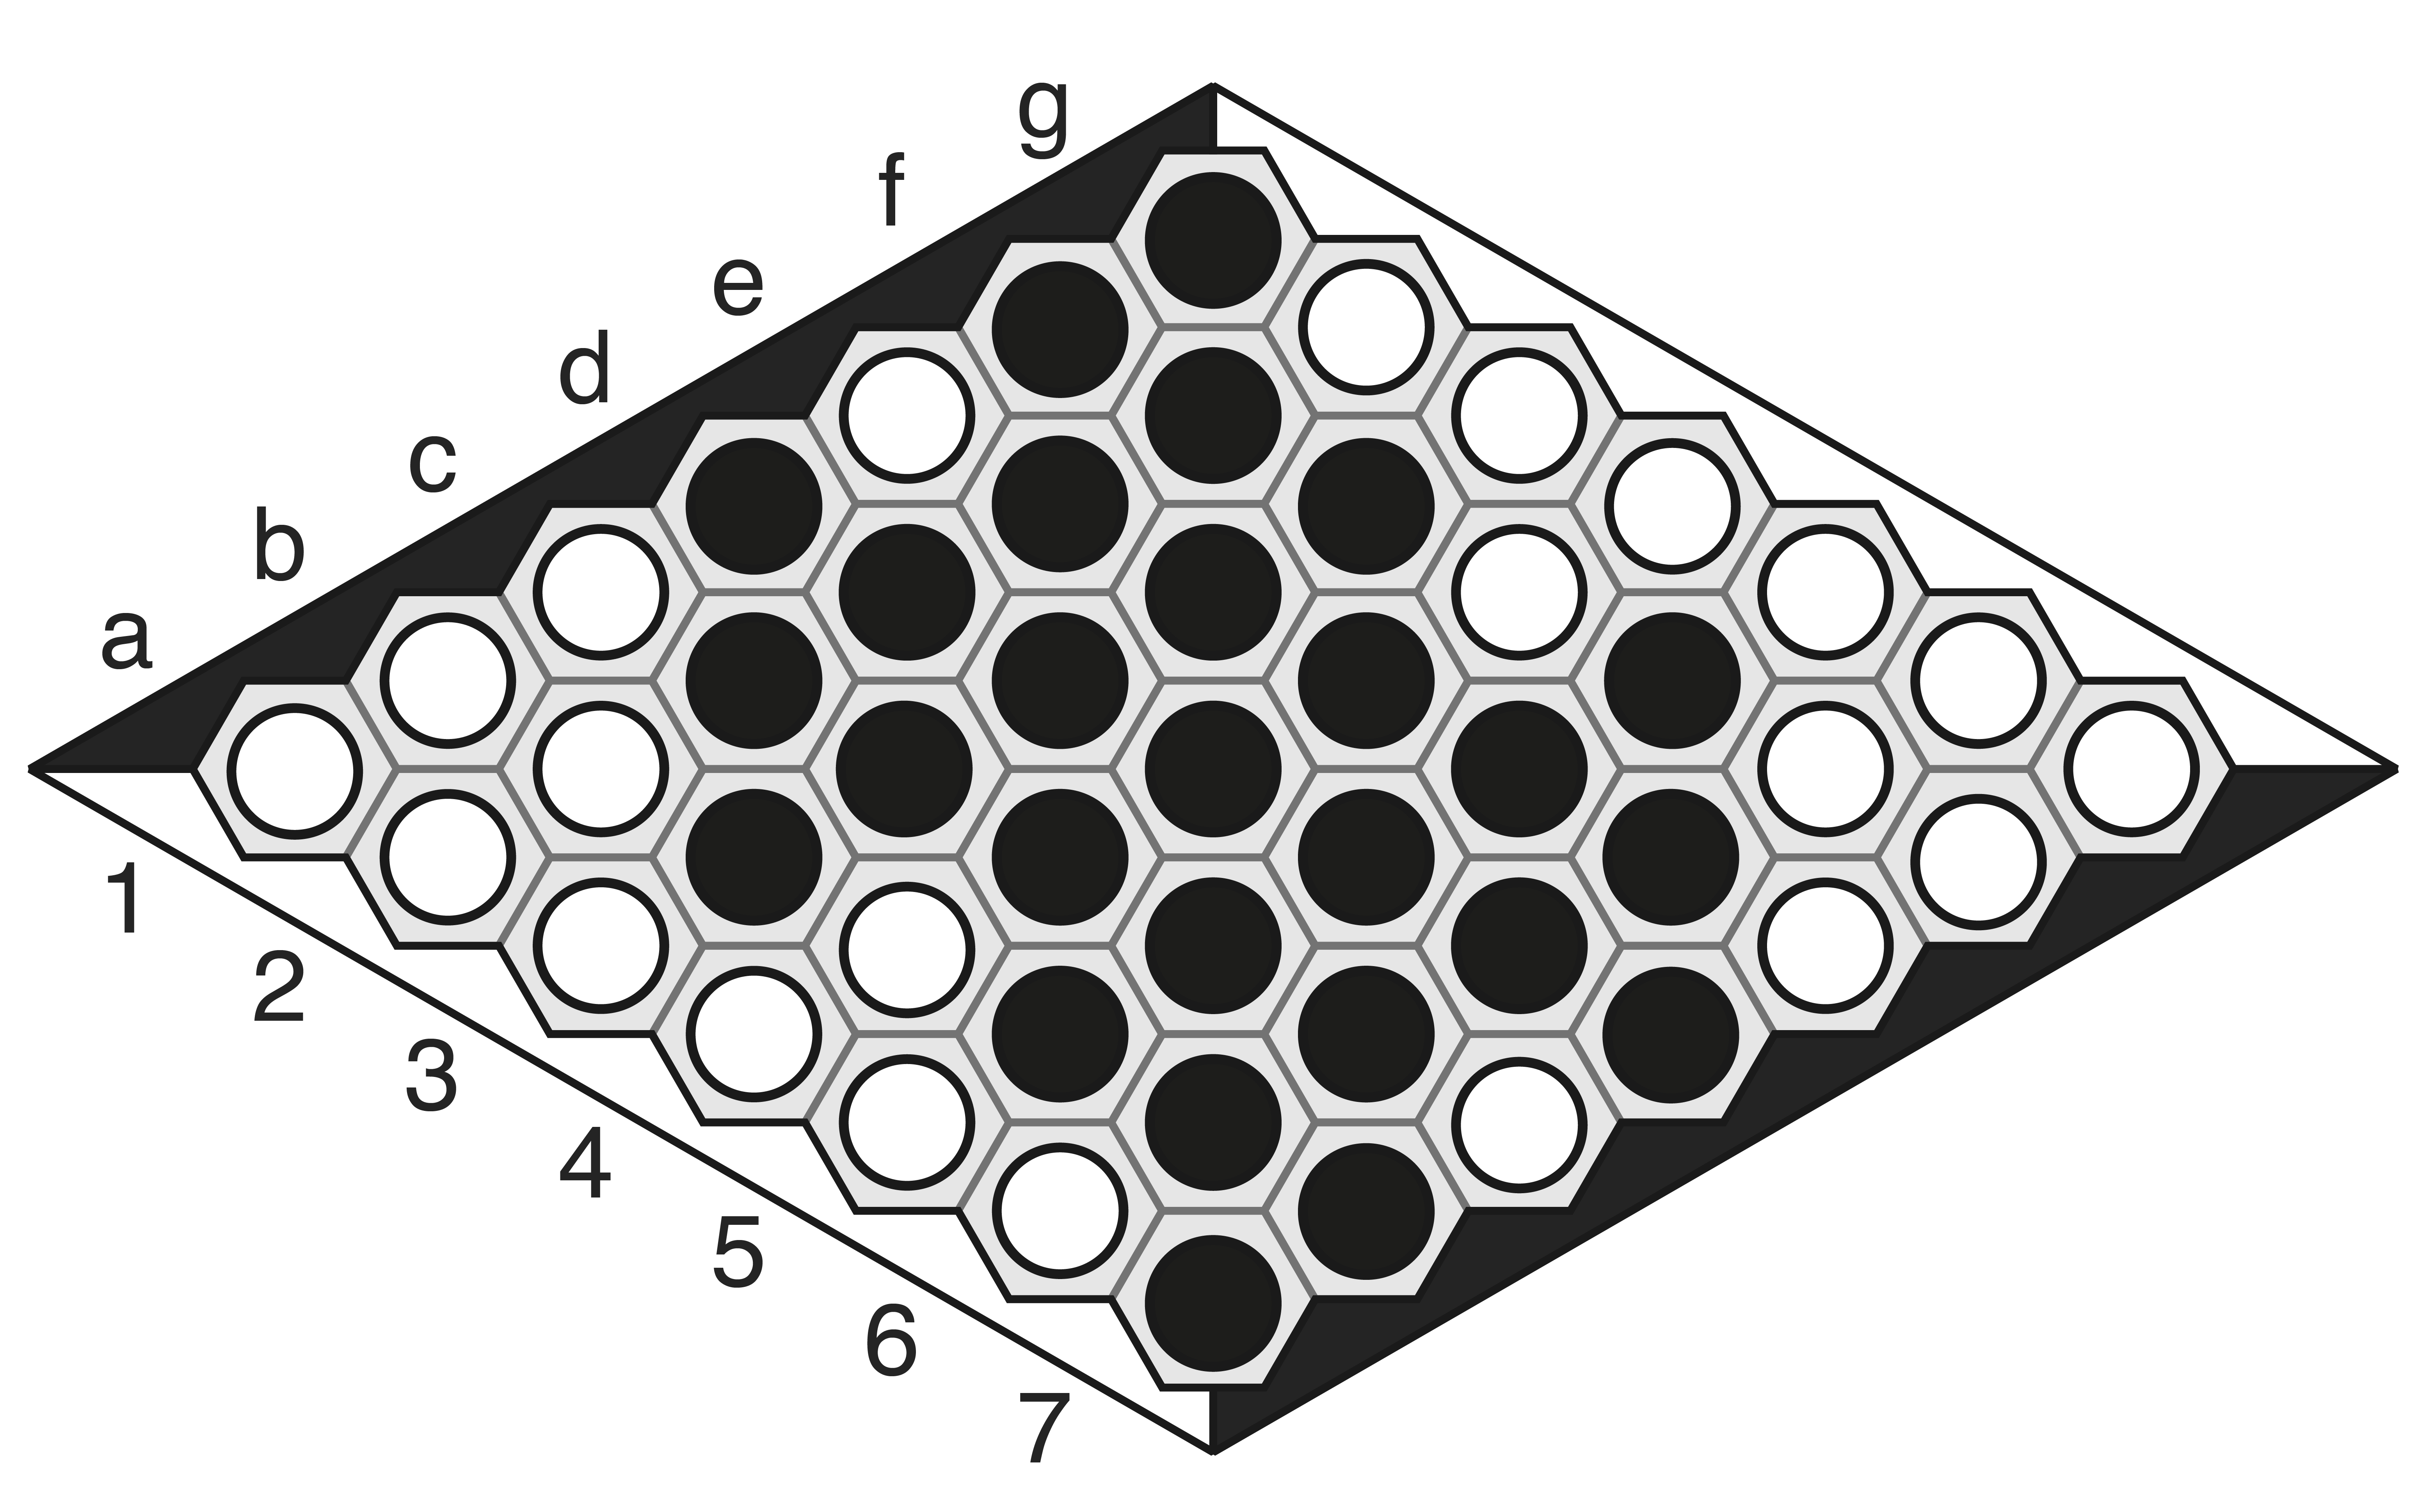
- Opening results for 8×8 Hex (winner if Black plays first). (Hendersen, Arneson and Hayward 2009).
-
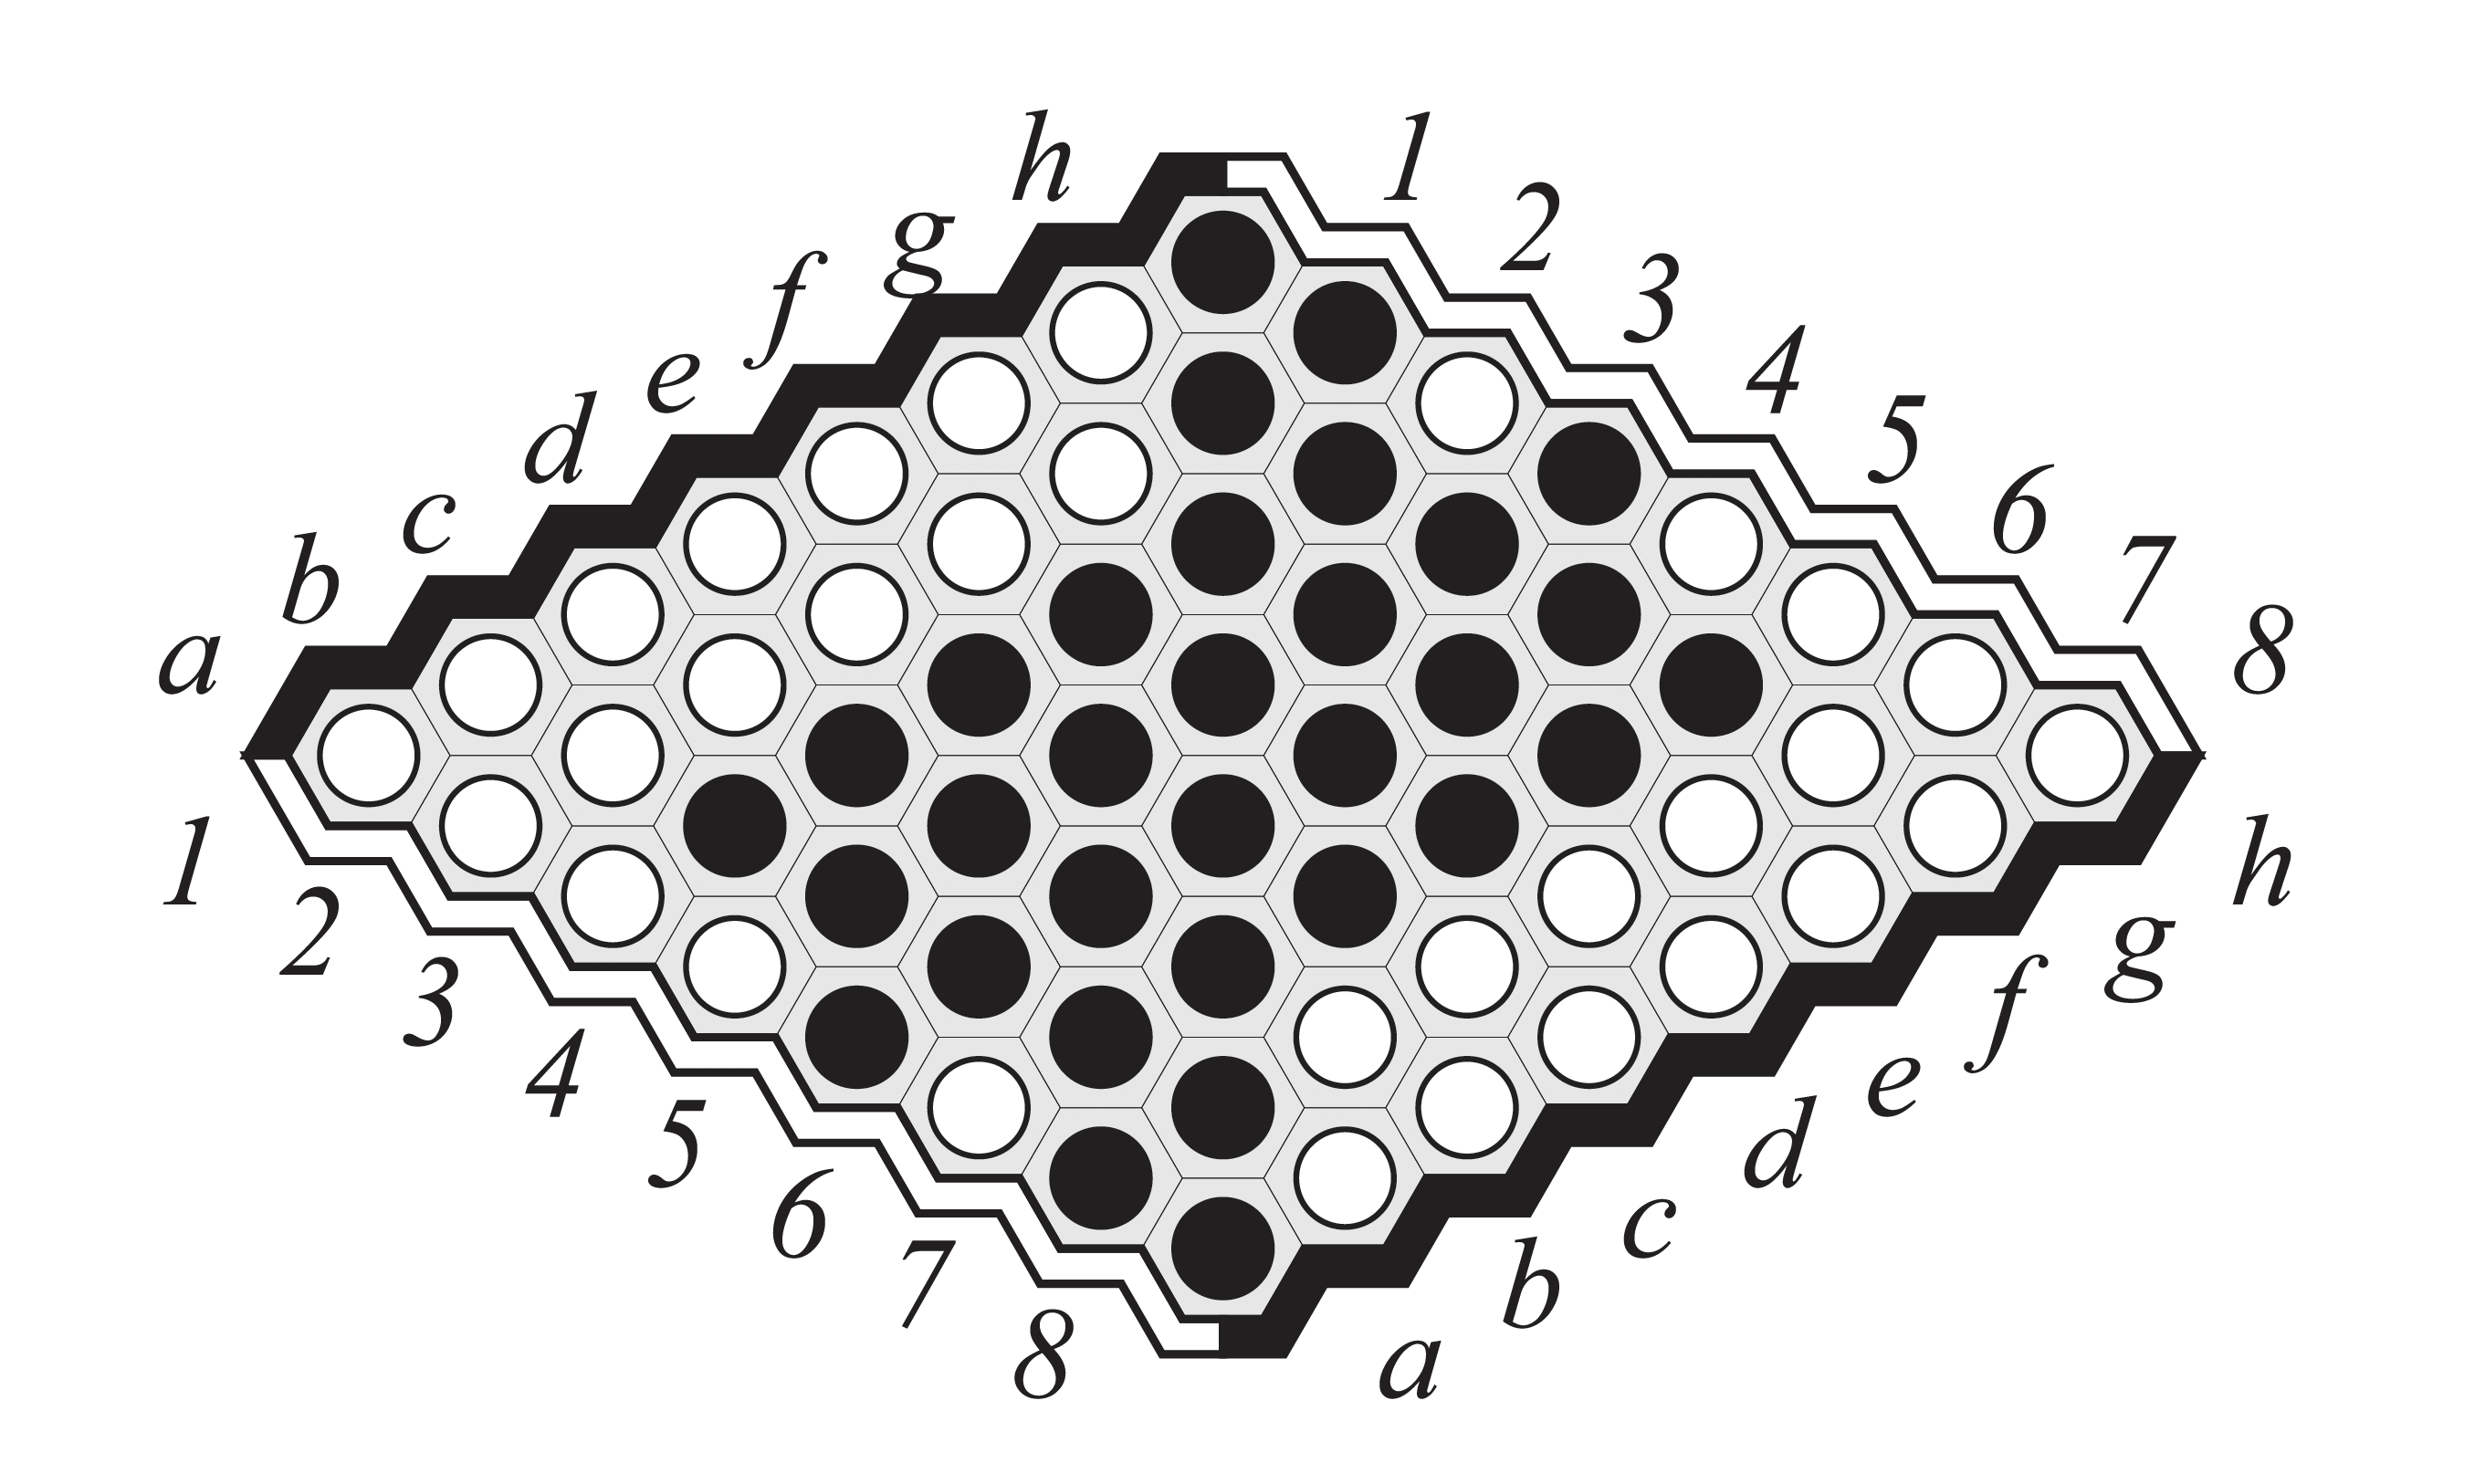
- Opening values for 9×9 Hex (winner if Black plays first). (Pawlewicz and Hayward 2014)
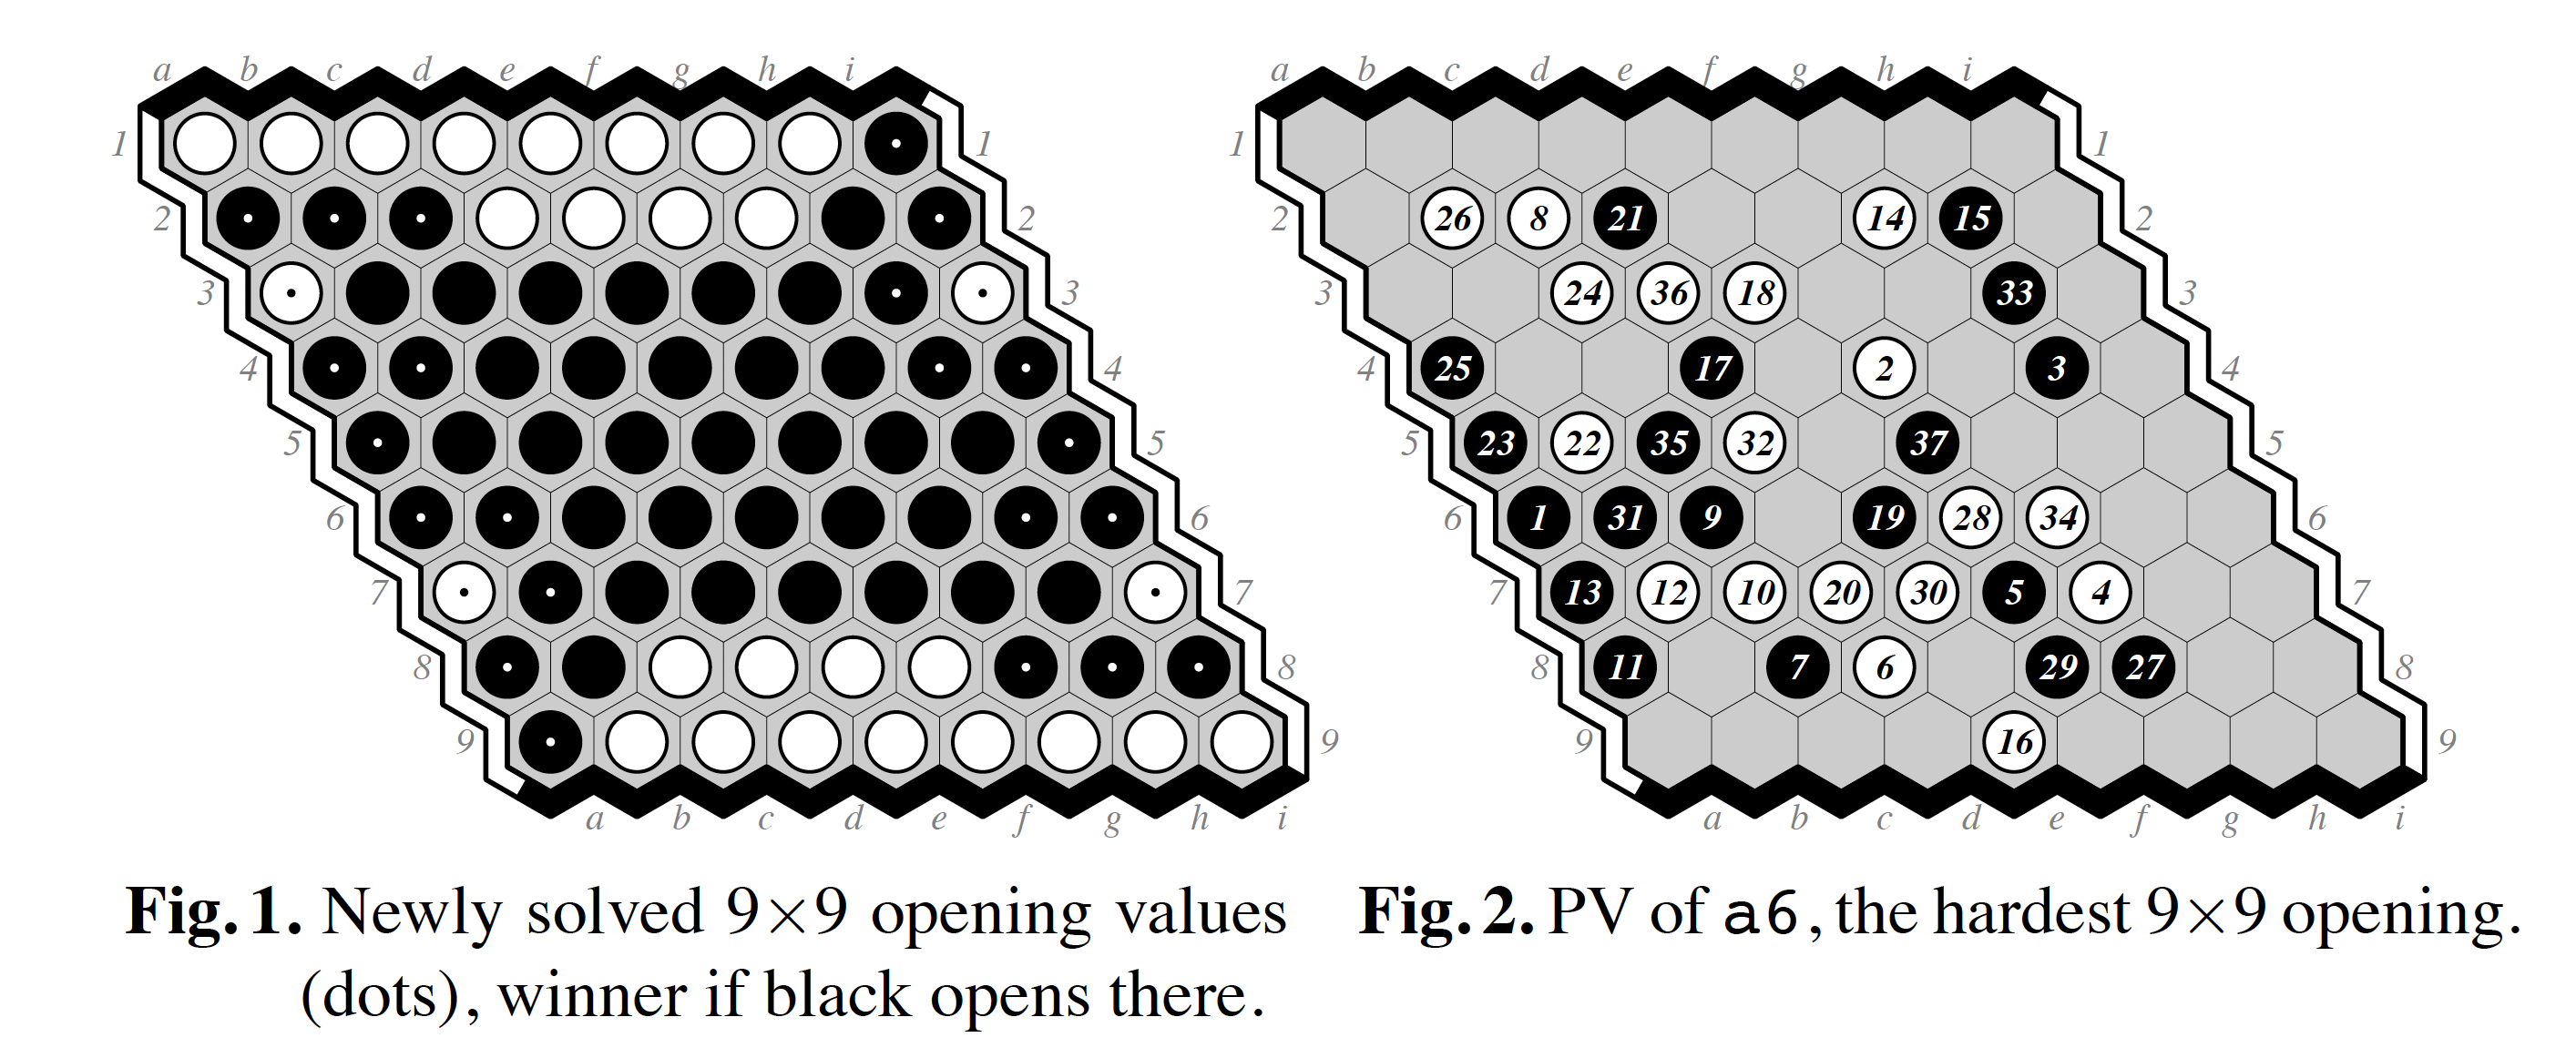
Above are three diagrams showing the ultimate winner, with perfect play, of opening moves played at every cell on the board. There’s an important trend to notice here — the winning openings for any given board size are not straightforwardly extendable to larger boards! While we can see a general theme that opening moves in the centre are stronger than those on the edges, the specific outcomes of those edge cells change as we change the board. That means that on the boards we humans play Hex on — from 11×11 upward — not only do we not have these convenient maps of what moves win or lose, but we cannot use the opening maps from smaller boards as a definitive indication of the outcome of any opening on the bigger ones.
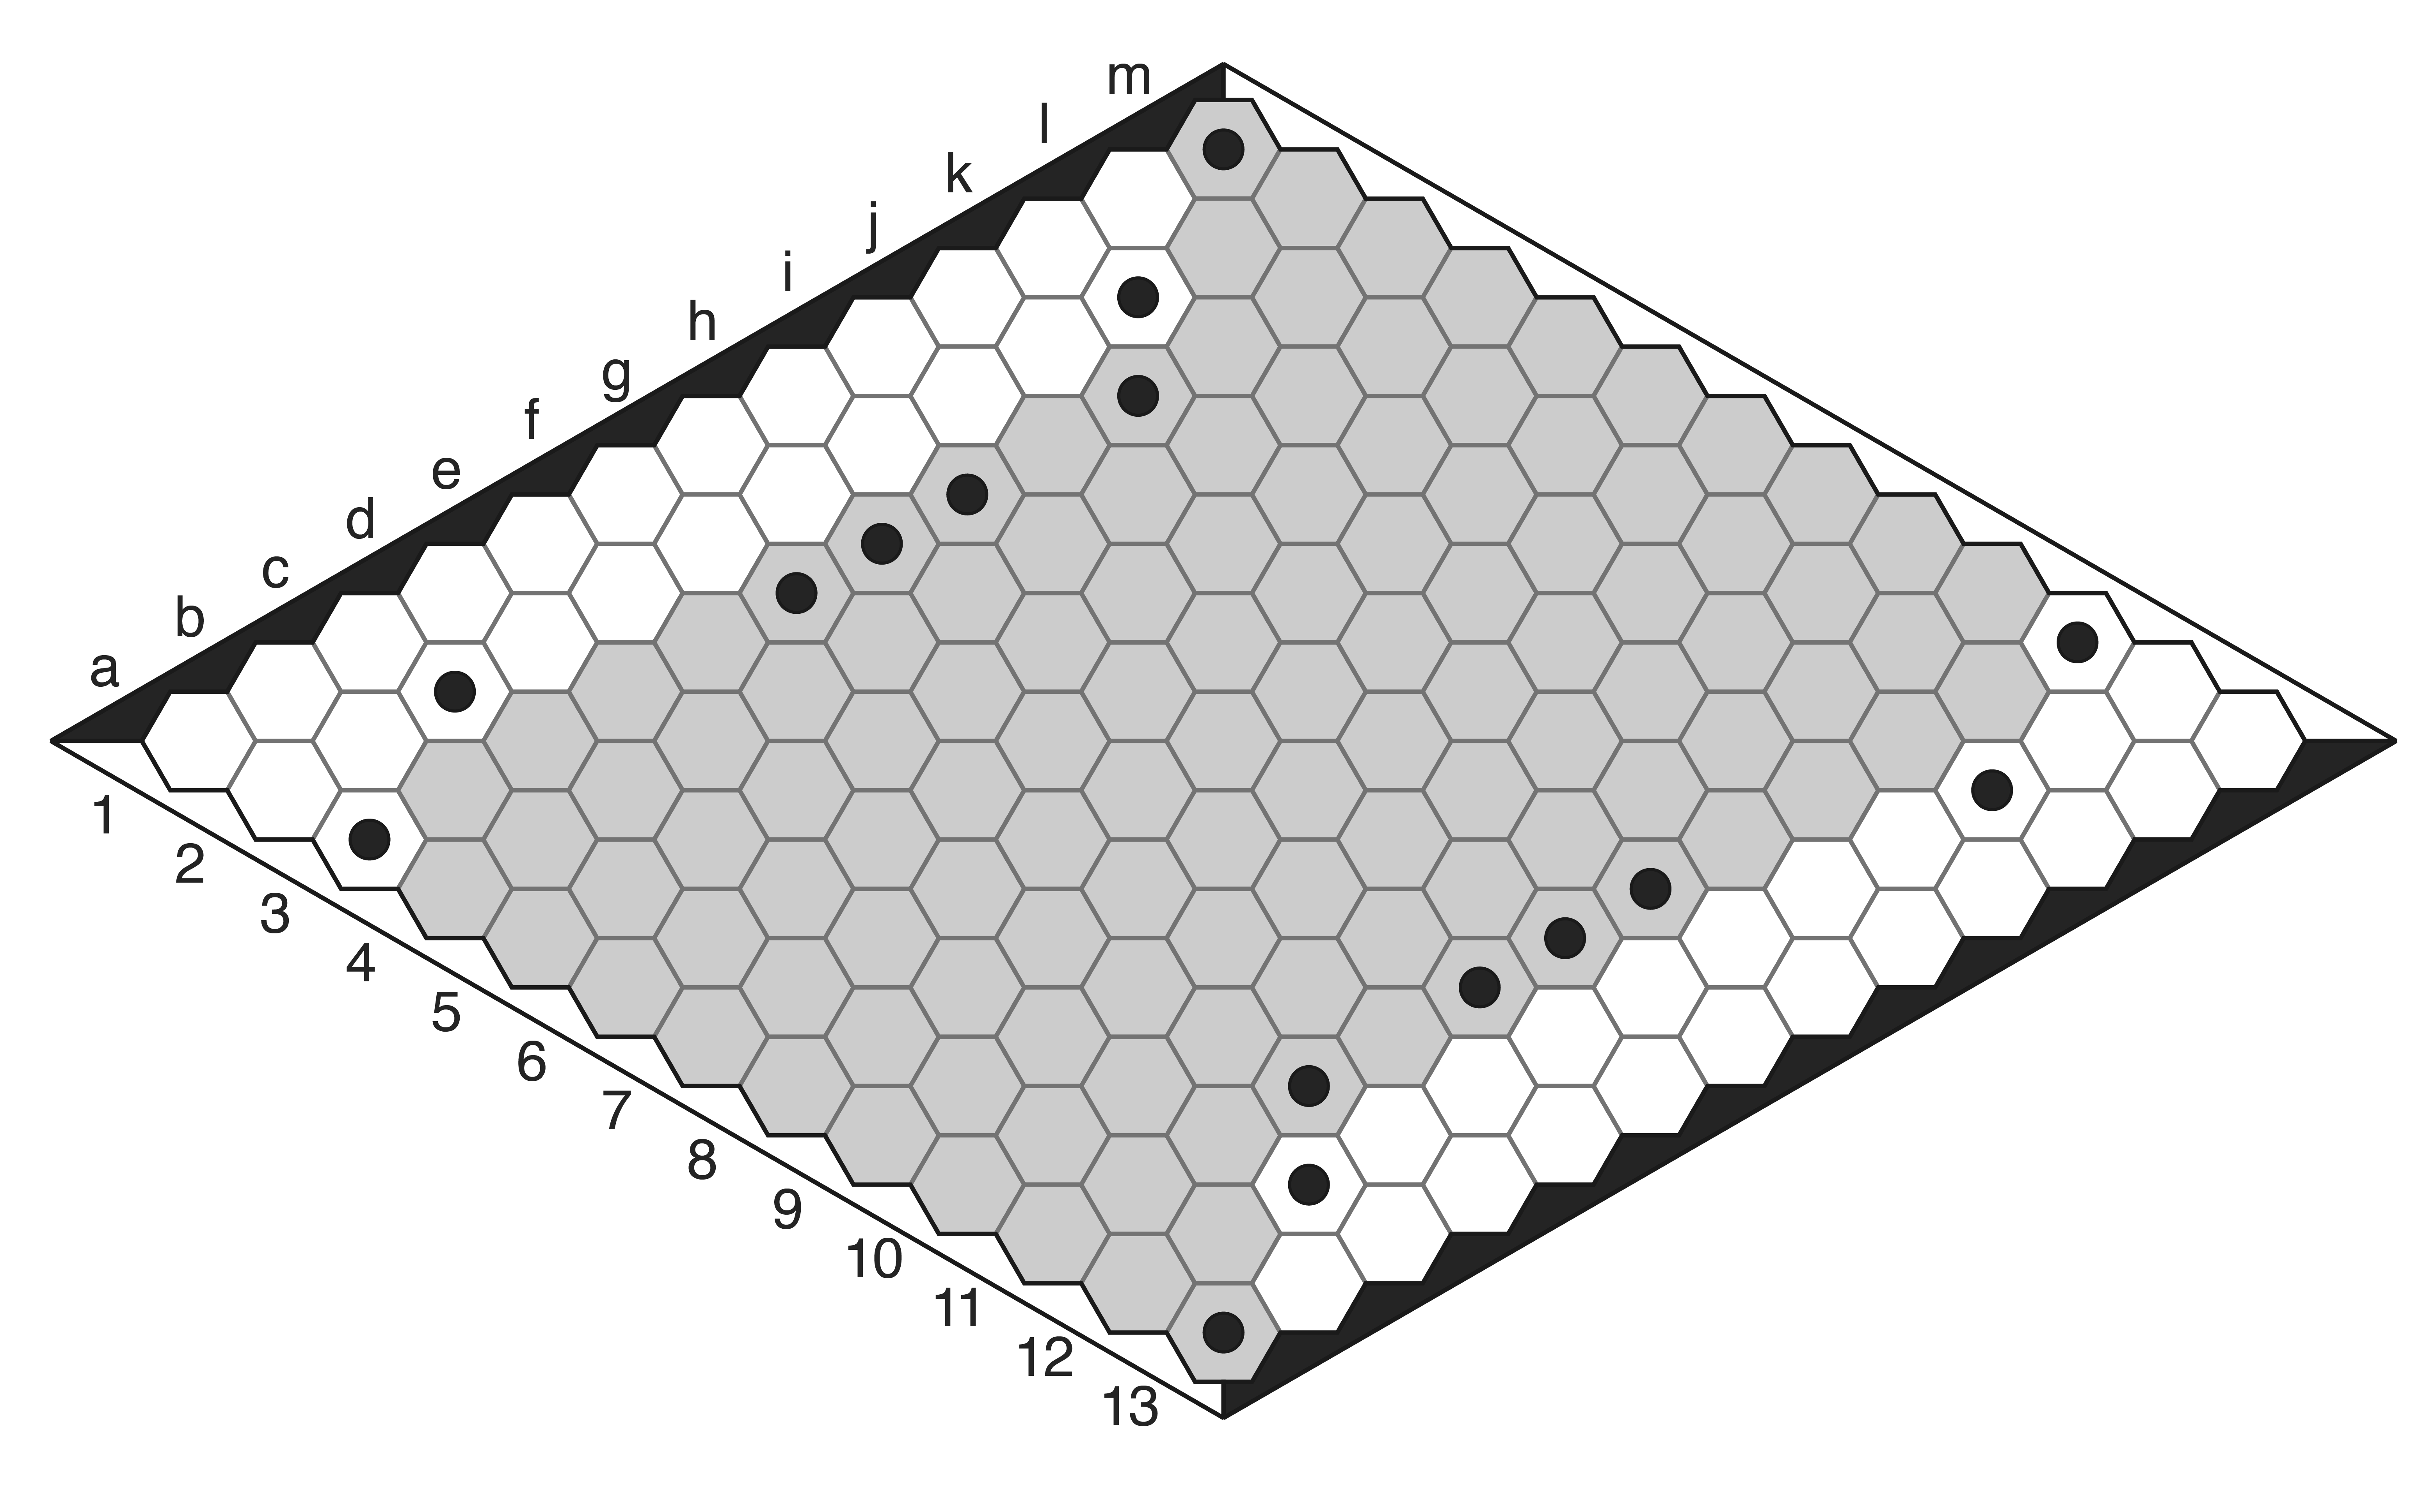
Matthew’s guide focusses on the 13×13 game, and for openings on that board, he’s produced a swap map that can help guide you in the opening. The cells with black dots are Matthew recommendations for good opening moves for Black. When you are the second player, if your opponent opens anywhere in the shaded area, you should swap — those moves have the potential to give a winning advantage, so you’re better off taking that stone for yourself. If your opponent plays outside that shaded zone, let them carry on — you can possibly do better by playing your own opening.
For larger board sizes, like 15×15 and 19×19, we don’t yet have enough games played at a high level to put together a reasonable swap map. However, we can make some reasonable inferences about good opening moves; in particular, opening in the obtuse corners seems a good way to go on all board sizes.
These are very simple principles, but should be enough to get you started. One thing to bear in mind is that we humans are far from perfect play, even on 11×11, so both sides are likely to make mistakes, not just in the opening but throughout the game. So our goal at this stage should be simply to ensure that our opening doesn’t obviously disadvantage us; we don’t need to fret too much about whether a particular move is 100% winning or losing.
Playing in the corners
The Hex board has two types of corners — acute and obtuse — that have different properties. Corners are the only parts of the board where your stones can both strengthen your own position and weaken your opponent’s, and for that reason, players tend to play stones in the corners early in the game. Typically you will want to play stones in at least one corner on each of your edges during the opening.
The corners being so important often leads to pitched battles to establish control over them, and so strong players may study corner patterns (think joseki in Go) to navigate these tactical scuffles. If you don’t have a presence in a corner and your opponent does, invading is useful in order to reduce their influence there, and corner patterns will help you to reduce that influence. Conversely, if your opponent invades your corner, you can use these patterns to settle the fight and maintain as much of your initial influence as possible. The challenge in these situations is judging when there is no more profit to be gained, and thus when it’s time to move on from the corner battle and establish yourself elsewhere.
There is a lot to discover in these corner patterns, but don’t worry too much about these early in your Hex journey; as you start to face stronger opposition and find your corner play is letting you down, refer to Matthew’s guide for detailed examples of how to fight for the corners.
-
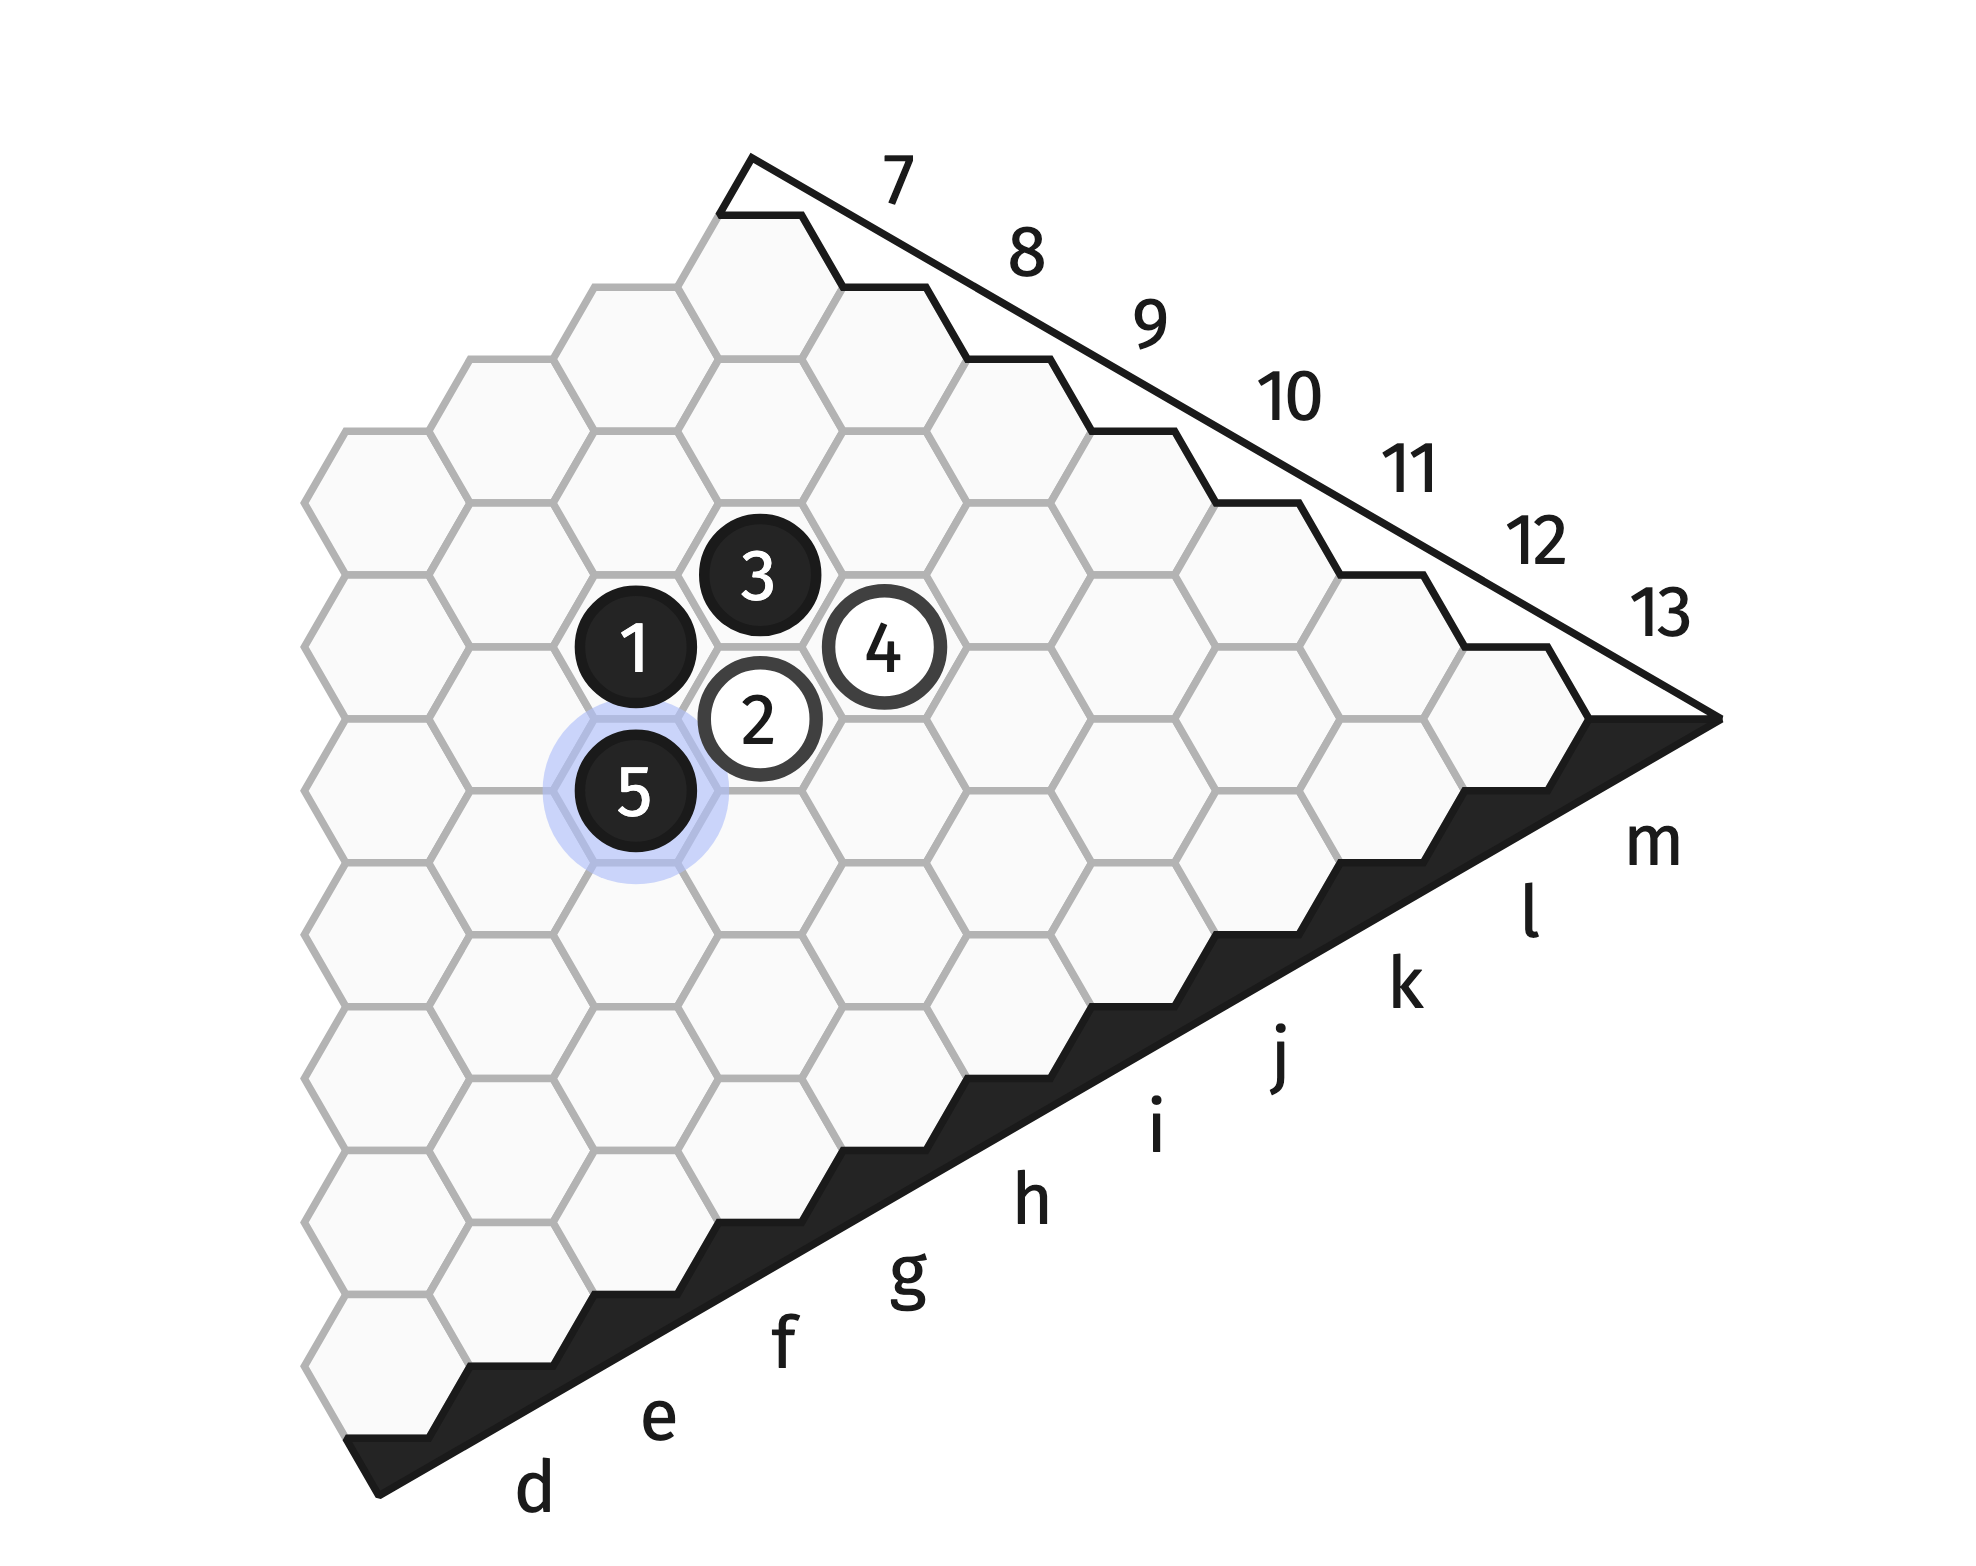
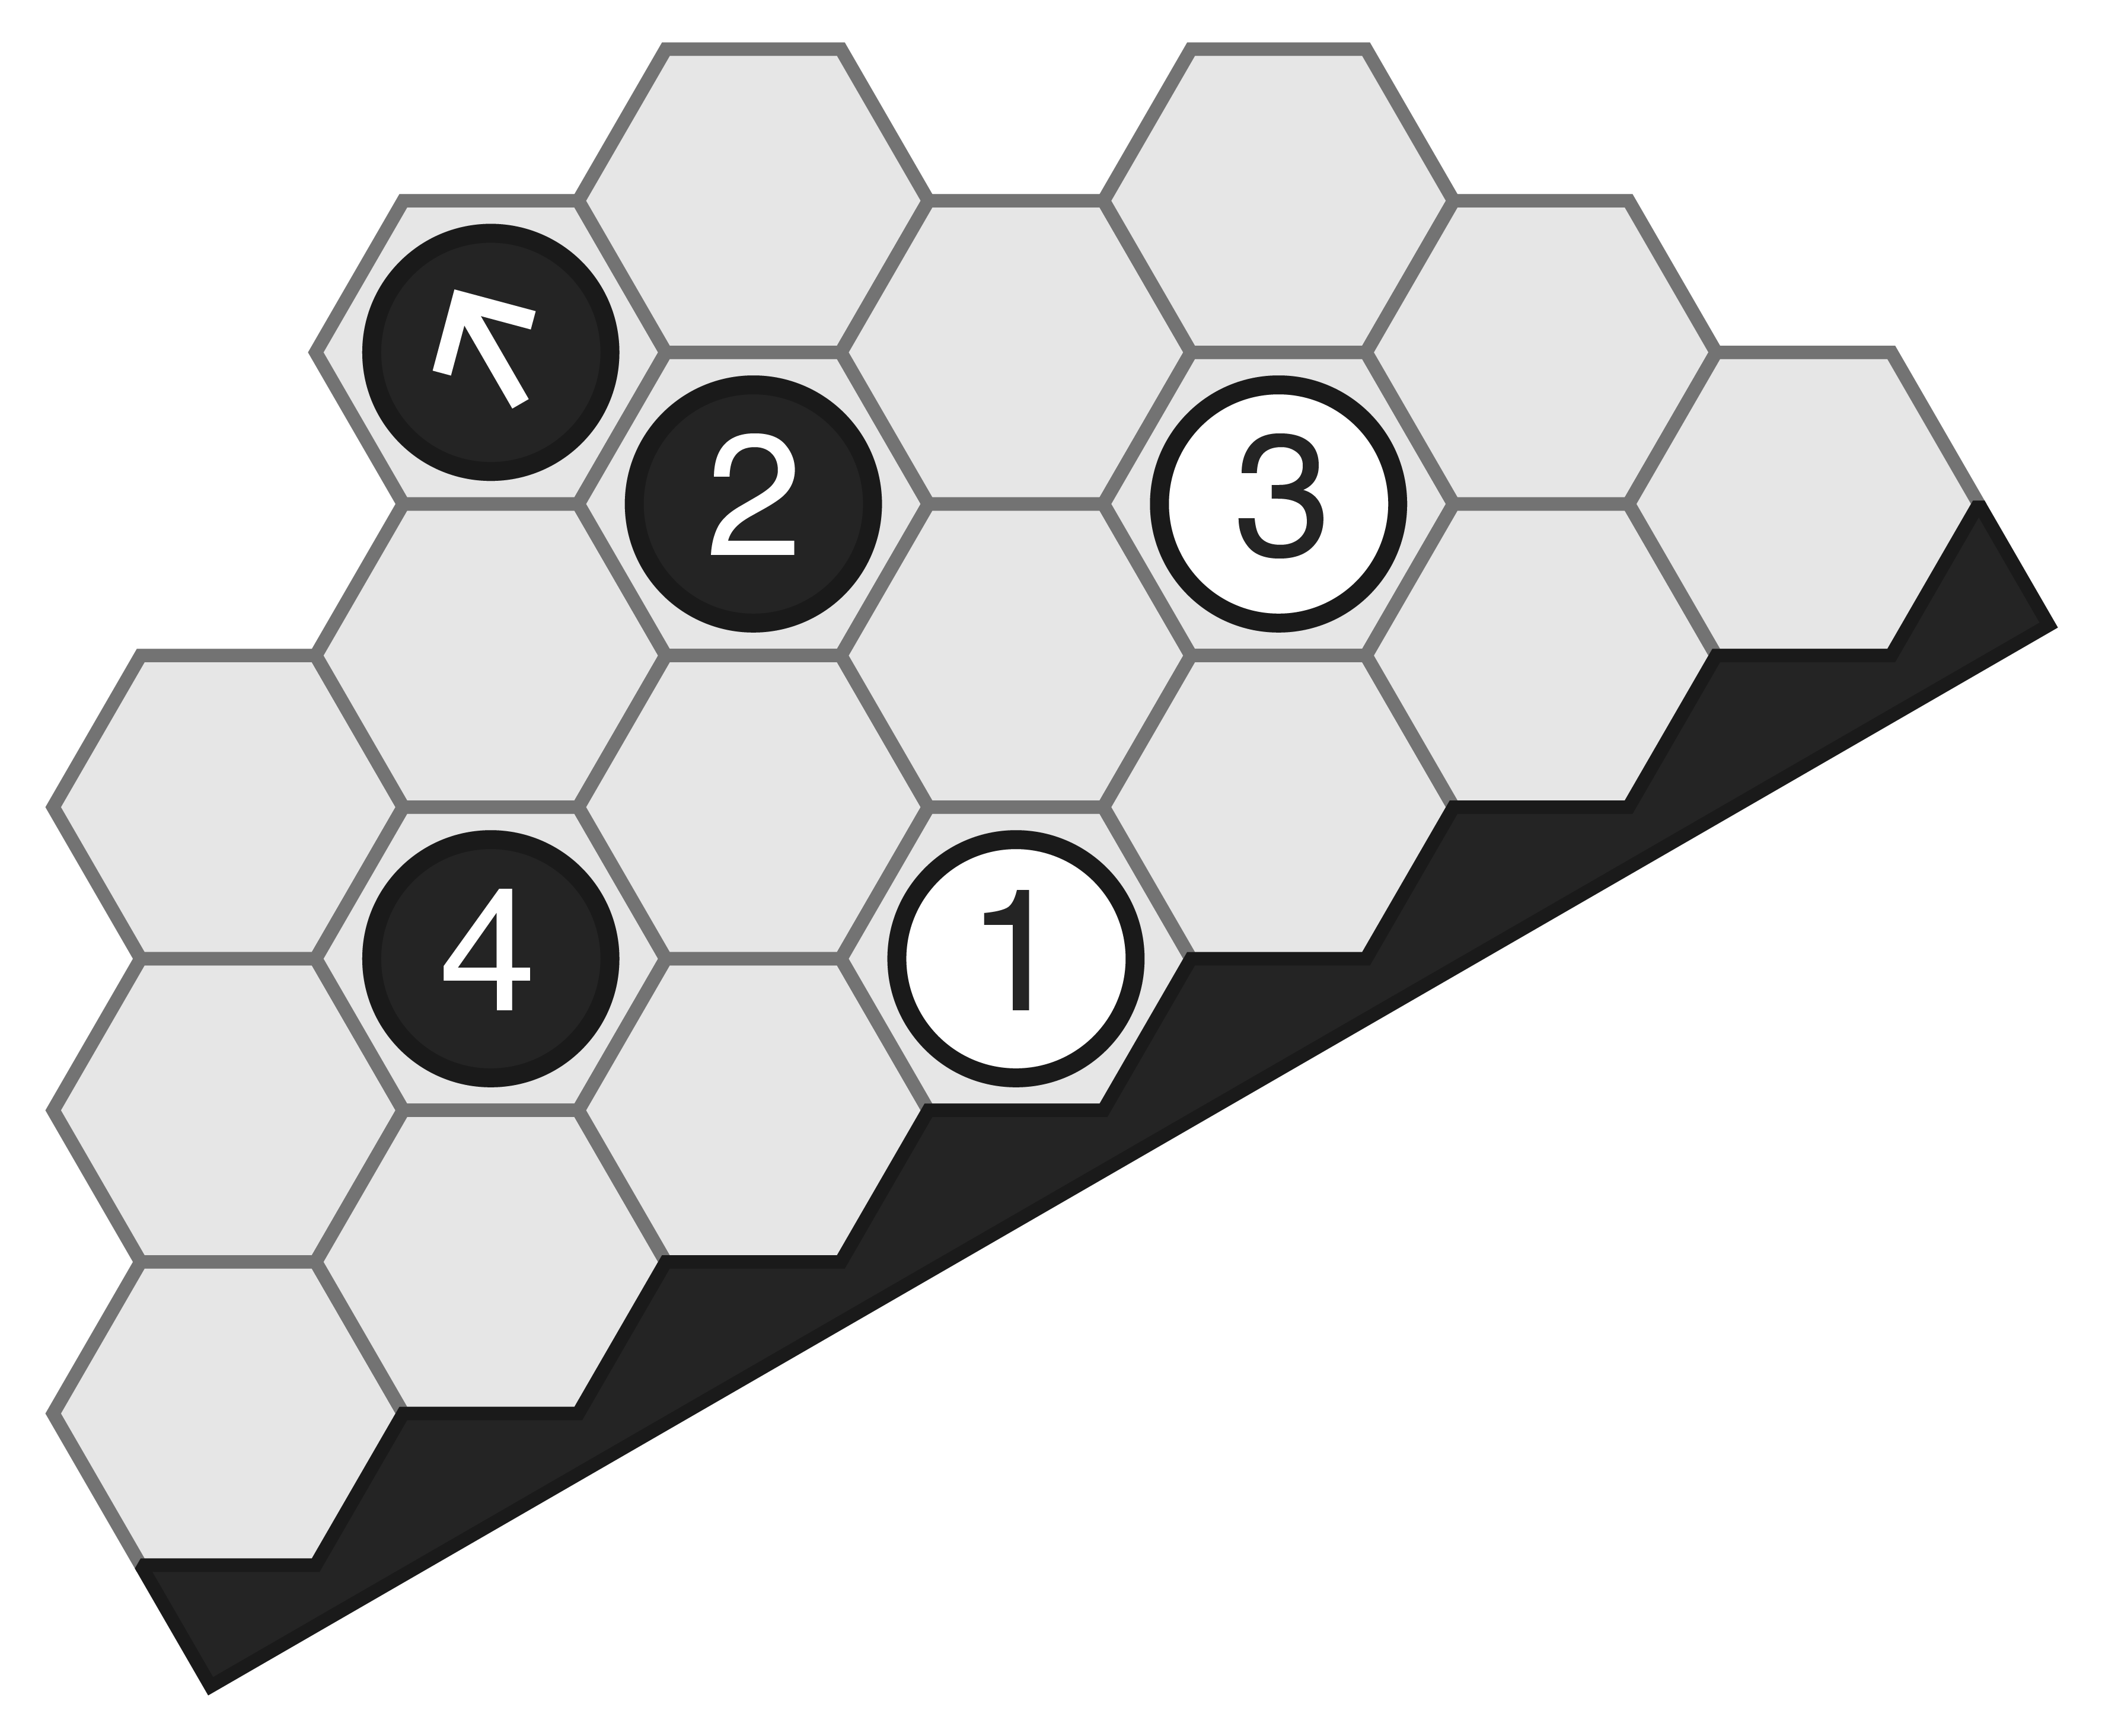
- A sample corner pattern. Black jumps into the corner with (1) (the most common acute corner opening), and White responds with a close block at (2), which is also connected to the edge via Template A-4. Black (3) blocks the template while gaining some territory, while White (4) allows second-row ladder escapes. Black (5) connects to the southern edge by Template A-4.
Influence
We’ve alluded to this concept in the previous section, so now let’s expand on what influence means in Hex strategy. Stones in Hex are not just localised points — they have impact on the board around them and on other nearby stones. Every stone has the potential to connect to something or to block something else, and when placing our stones we need to consider the influence of the stones around our planned placement.
In the early stages of a Hex game, gaining influence is important. We would do well to place our stones around the board, to spread them out; this maximises the potential influence of each stone. Conversely, if we don’t spread our stones out, we may have a strong influence in a particular area but will be weak elsewhere. If we are struggling to find an effective place to play, we can look at our relative influence on different areas of the board; if we find some areas where we have low influence, those might be good places to play our next moves.
As you might expect, stones in the corners have a high degree of influence — the proximity to two edges means those stones are better able to restrict your opponent’s activity in that area and force them to work around you in a limited space. Placements in the corners also are tougher to block, and provide you with ladder escape stones for later in the game.
-

- The first ten moves of a Hex game between two strong players on Little Golem (https://www.littlegolem.net/jsp/game/game.jsp?gid=2000904). Note that play in the early going has focussed mainly on the corners, and both players are spreading their stones far across the board to gain influence.
The edges are somewhat less intuitive. We might feel secure playing near the centre of our own edges, as this seems a useful way to block the opponent, but in practice these kinds of placements do not provide strong influence. Instead, we should play near our opponent’s edges — this forces them to work around you and makes it harder for them to connect.
Beginning Go players often play in a style referred to as Puppy Go, where they continually play very close to every one of their opponent’s moves, following them around the board like an excitable puppy. We can easily be tempted to play Puppy Hex in a very similar way. Unfortunately this is an adorable, but poor strategy; in a Puppy Hex scenario your opponent is dictating play completely, and since you are always one stone behind they will have free choice of where to establish influence and you will always be playing catch-up. Always keep an eye on the broader board situation, and try to take the initiative when the situation allows it — don’t let your opponent drag you around by the nose!
As you become more comfortable playing in an influence-oriented style, you can start to focus on making moves that serve multiple purposes. Gaining influence is good, but gaining influence and blocking the opponent is even better! This is a challenging step, requiring you to have both tactical and strategic vision, but as you gain more experience and become able to recognise common tactical motifs, you’ll be better able to keep these in mind as you seek to expand your presence across the board as well.
As a final note, we should remember that Hex is fundamentally a scalable game — we can play Hex on any size board we like without changing the rules, but the feel of play will change. Hex on larger boards is a challenging and rewarding affair, but specific tips on those epic battles is beyond the scope of this article. However, we encourage you to try larger boards, as they by necessity will make you play in an influence-oriented style. With so much additional empty space on the board, you’ll need to learn to anticipate where battles for influence and territory will rage, long before they actually happen. That experience can help you on the smaller boards too, training you to think globally more consistently.
Territory
Territory is a critical concept to understand in Hex strategy. Think of territory as the potential your stones create for future connection; the more territory you control, the more tactical options you have for later attempts to form connections between your stones.
As a starting point, we might say that each stone creates territory in the area immediately around itself; in other words, the empty hexes immediately adjacent to it. However, as we see below, this definition falls apart fairly quickly:
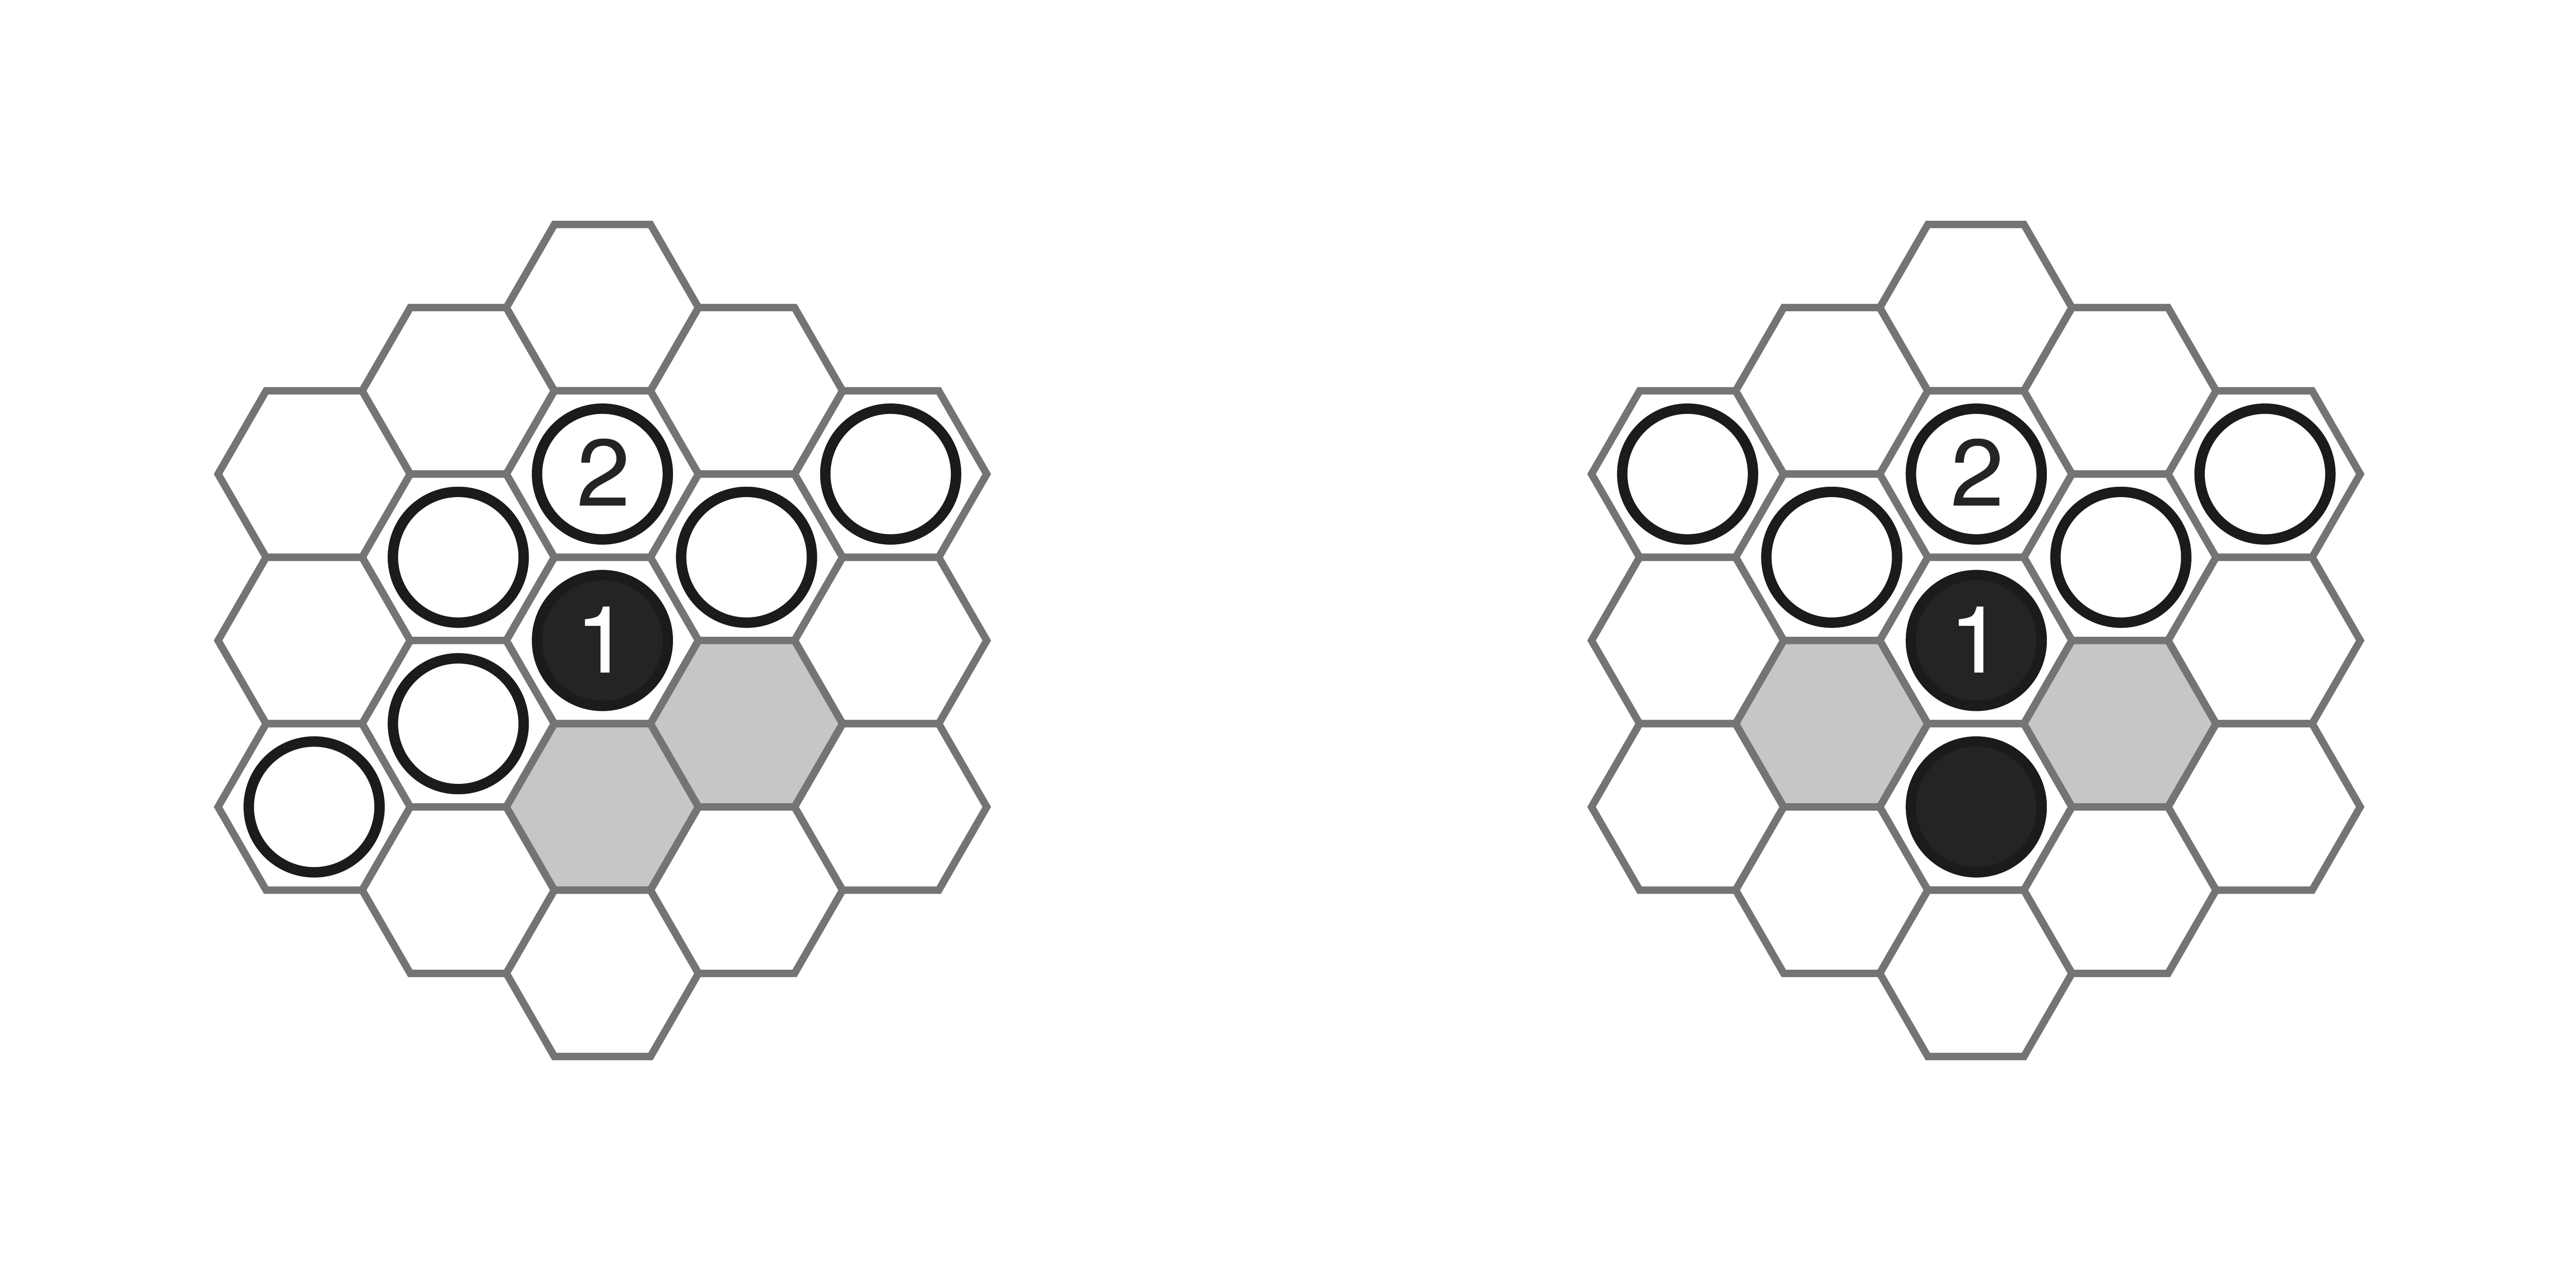
These intrusions by Black gain no useful territory. In both cases, White simply blocks any onward connections, so the ‘territory’ gained (the shaded cells) offers nothing that Black didn’t already have!
If we believe that stones create territory regardless of their disposition, then we will run into situations like the above, where our stone is effectively a wasted move, as it will never actually be able to connect to anything. Instead we should restrict the definition a bit more: the territory around our stones consists of the adjacent hexes that could in theory participate in a connection. If we want to invade somewhere and gain influence from that play, we need to be certain that the placement provides useful territory; if the stone does not gain territory, then we have simply placed a stone for no real purpose. Without territory we cannot claim influence, as the enemy can simply work around us at no real cost.
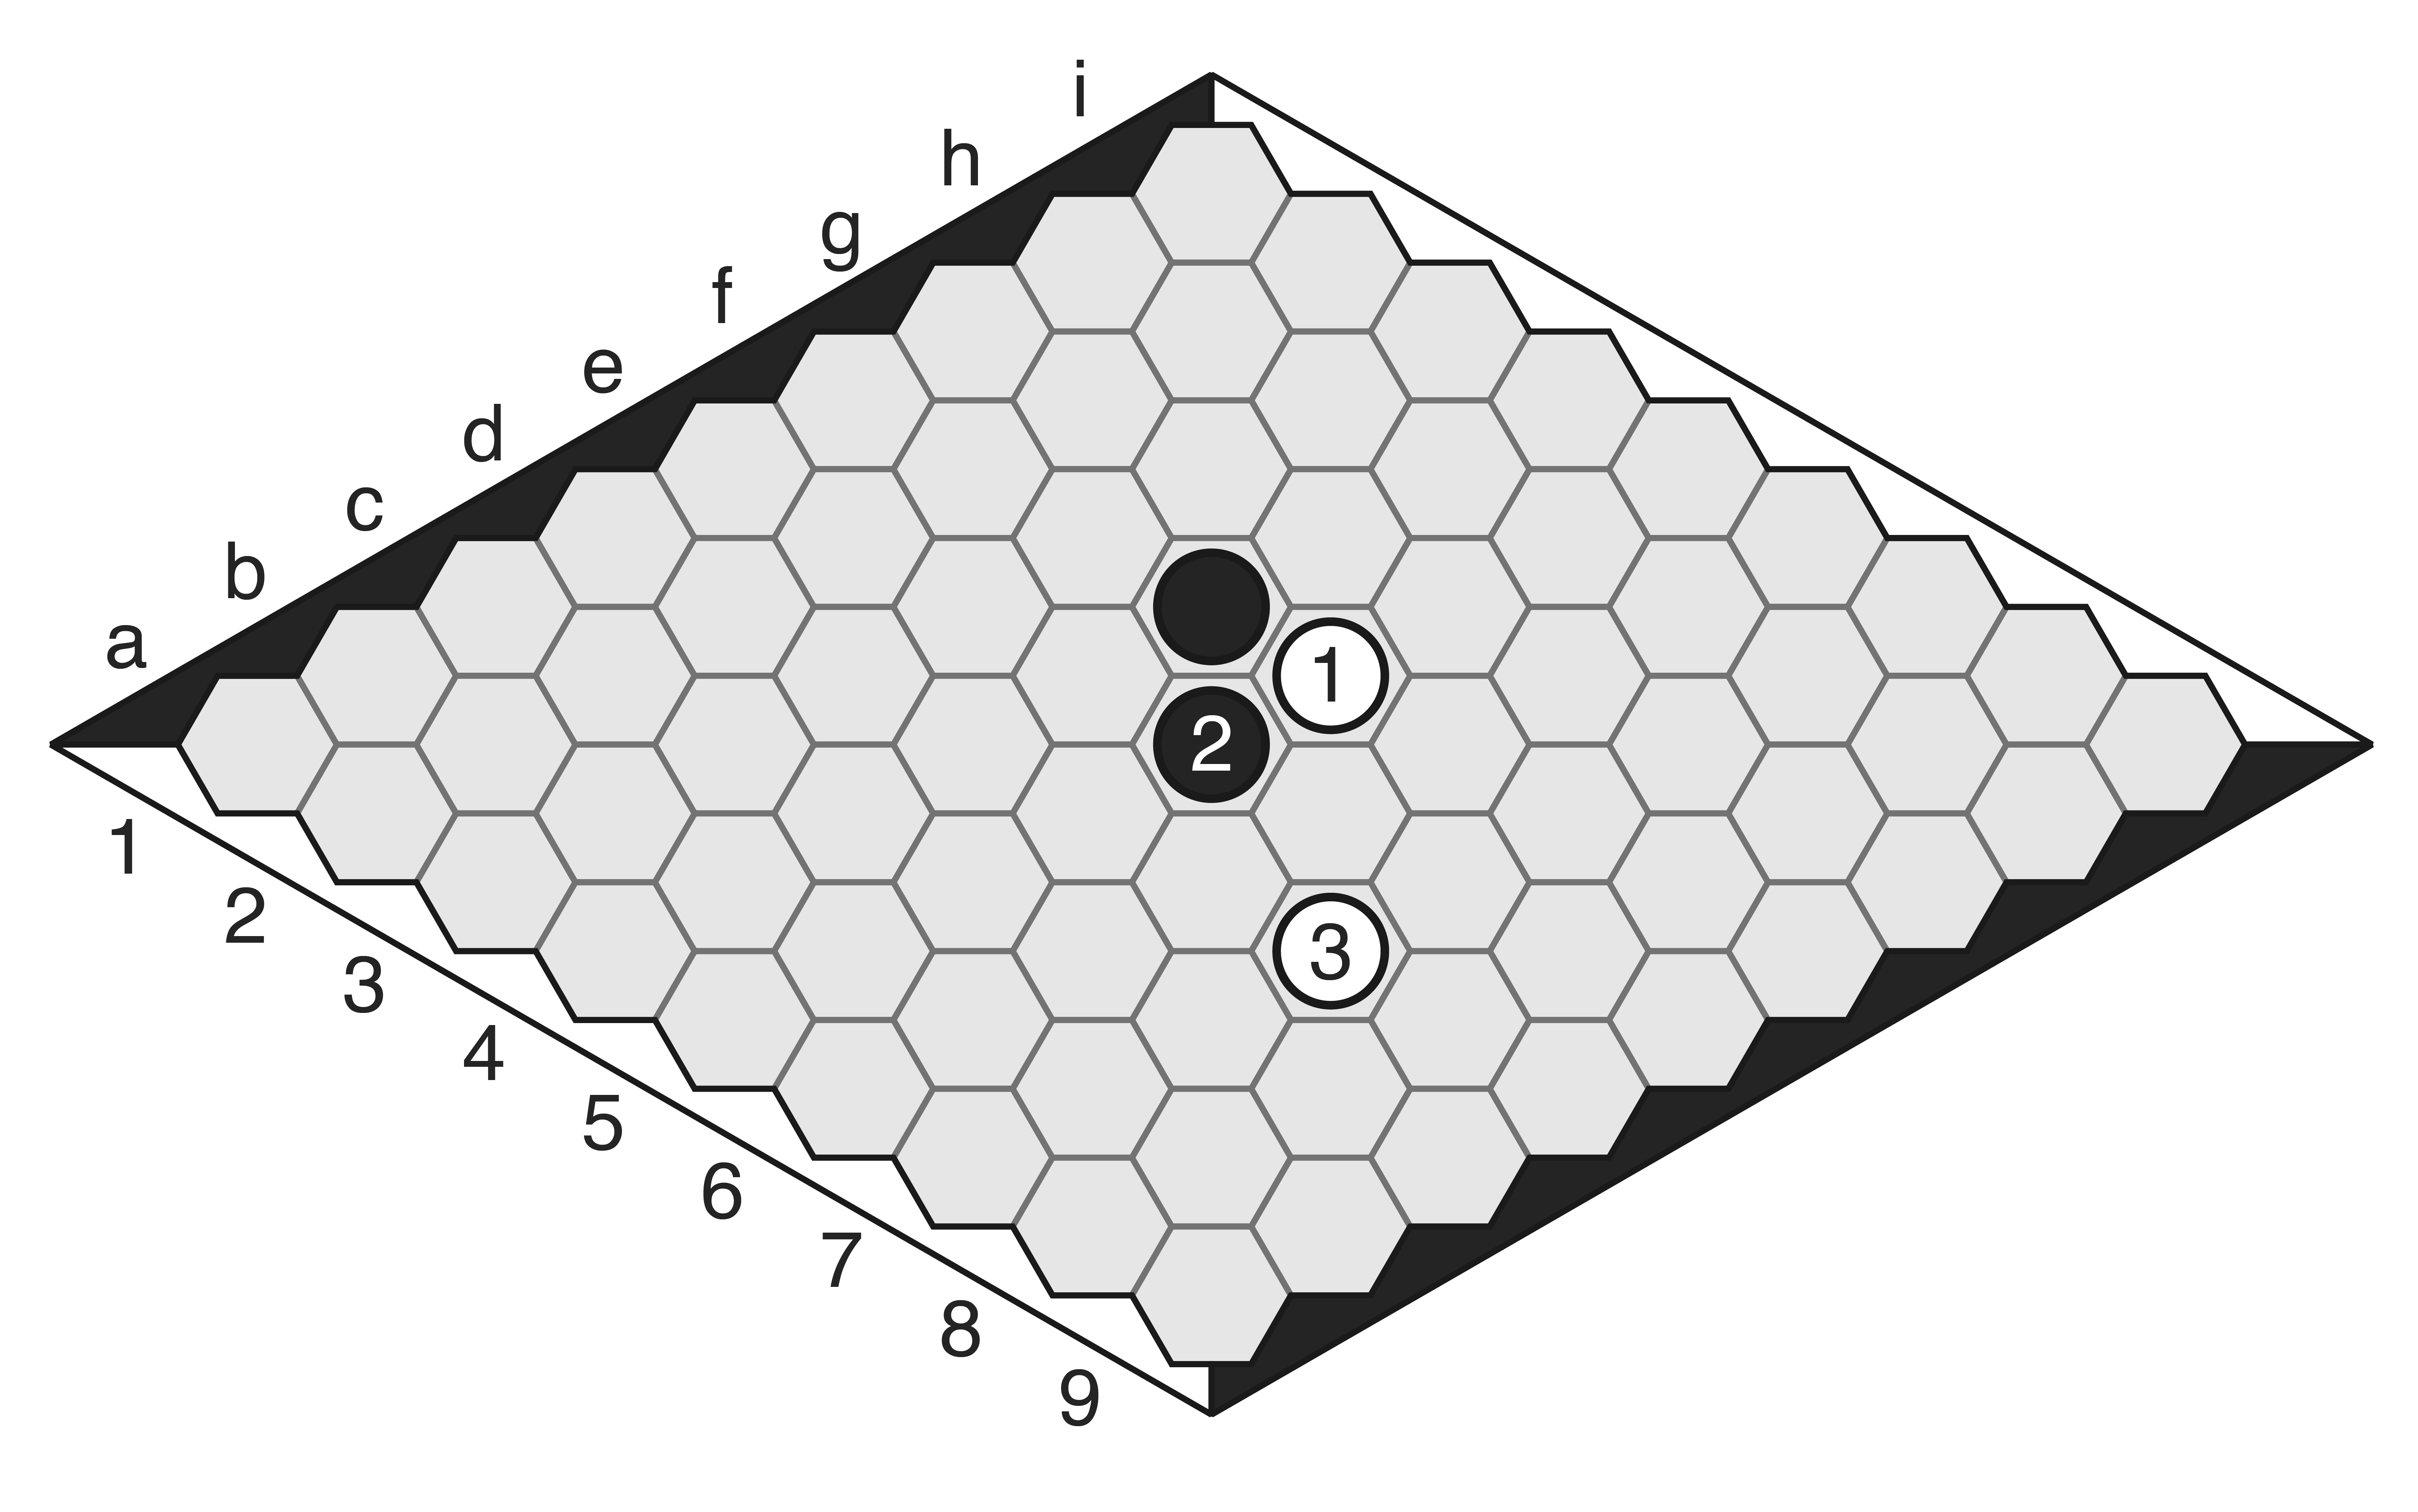
-
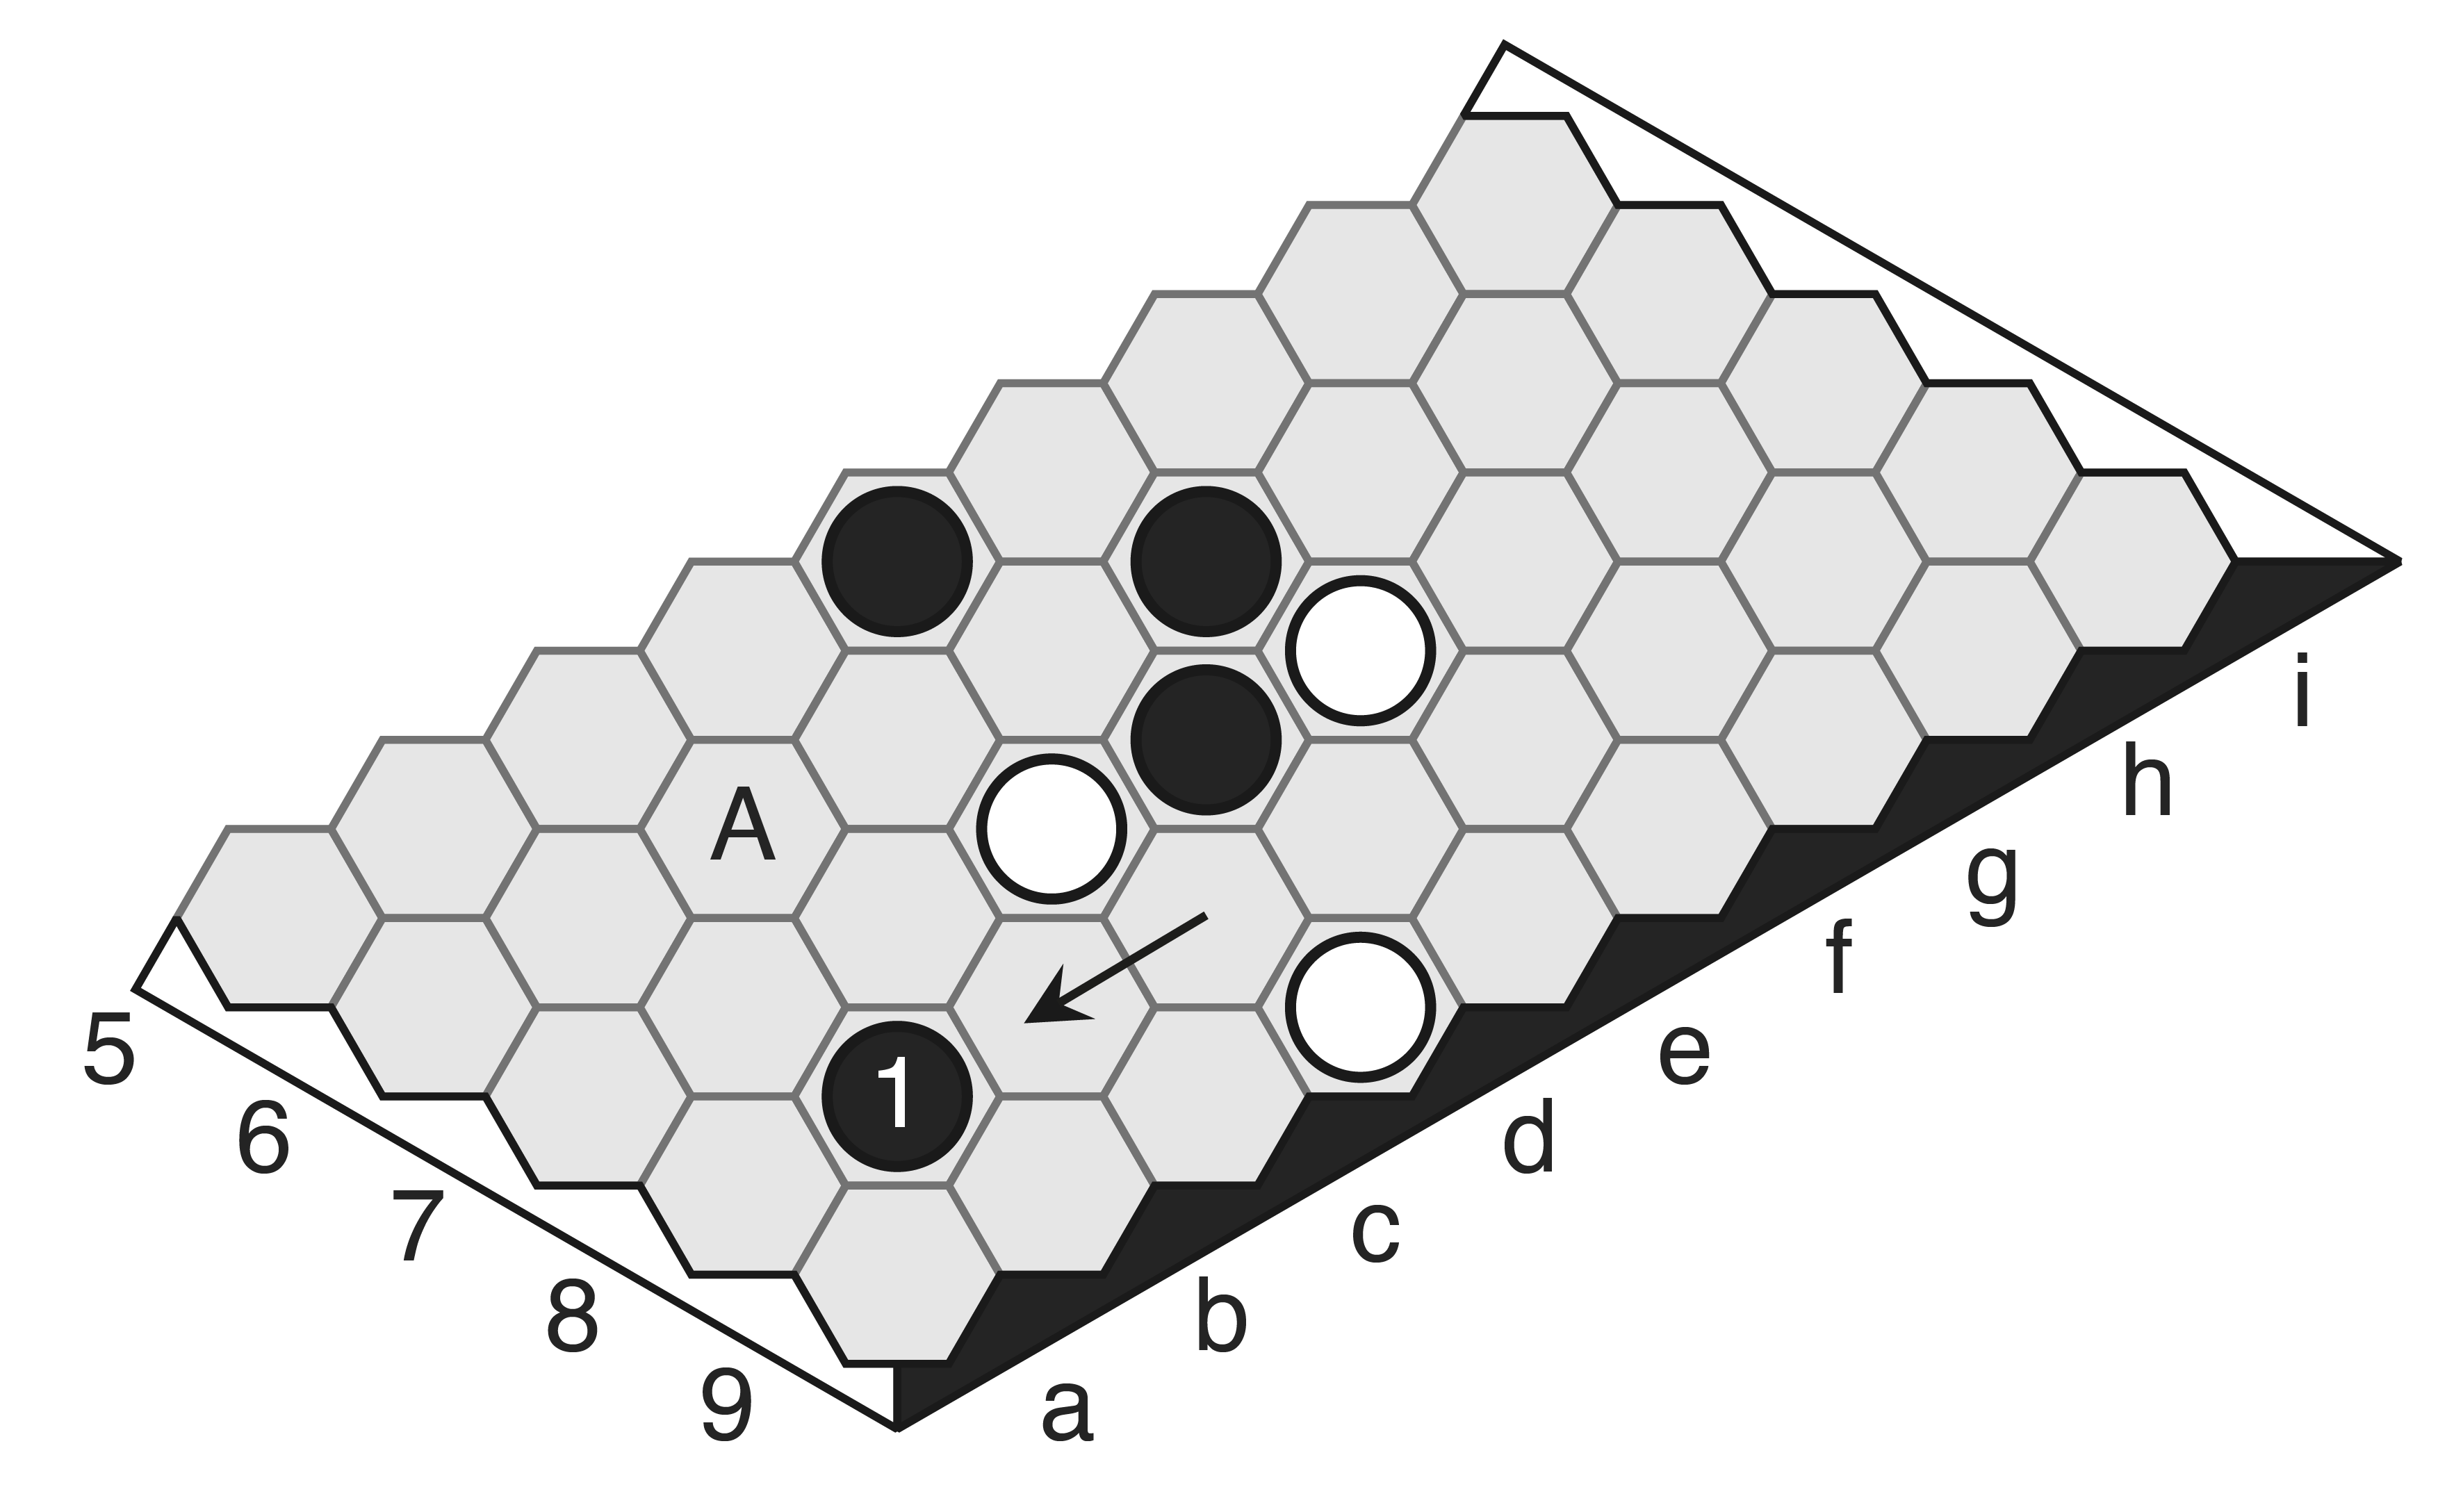
- Black (1) is a useless gain of territory, as there’s no way around the White group just above it. Black simply ends up hemmed in the corner.
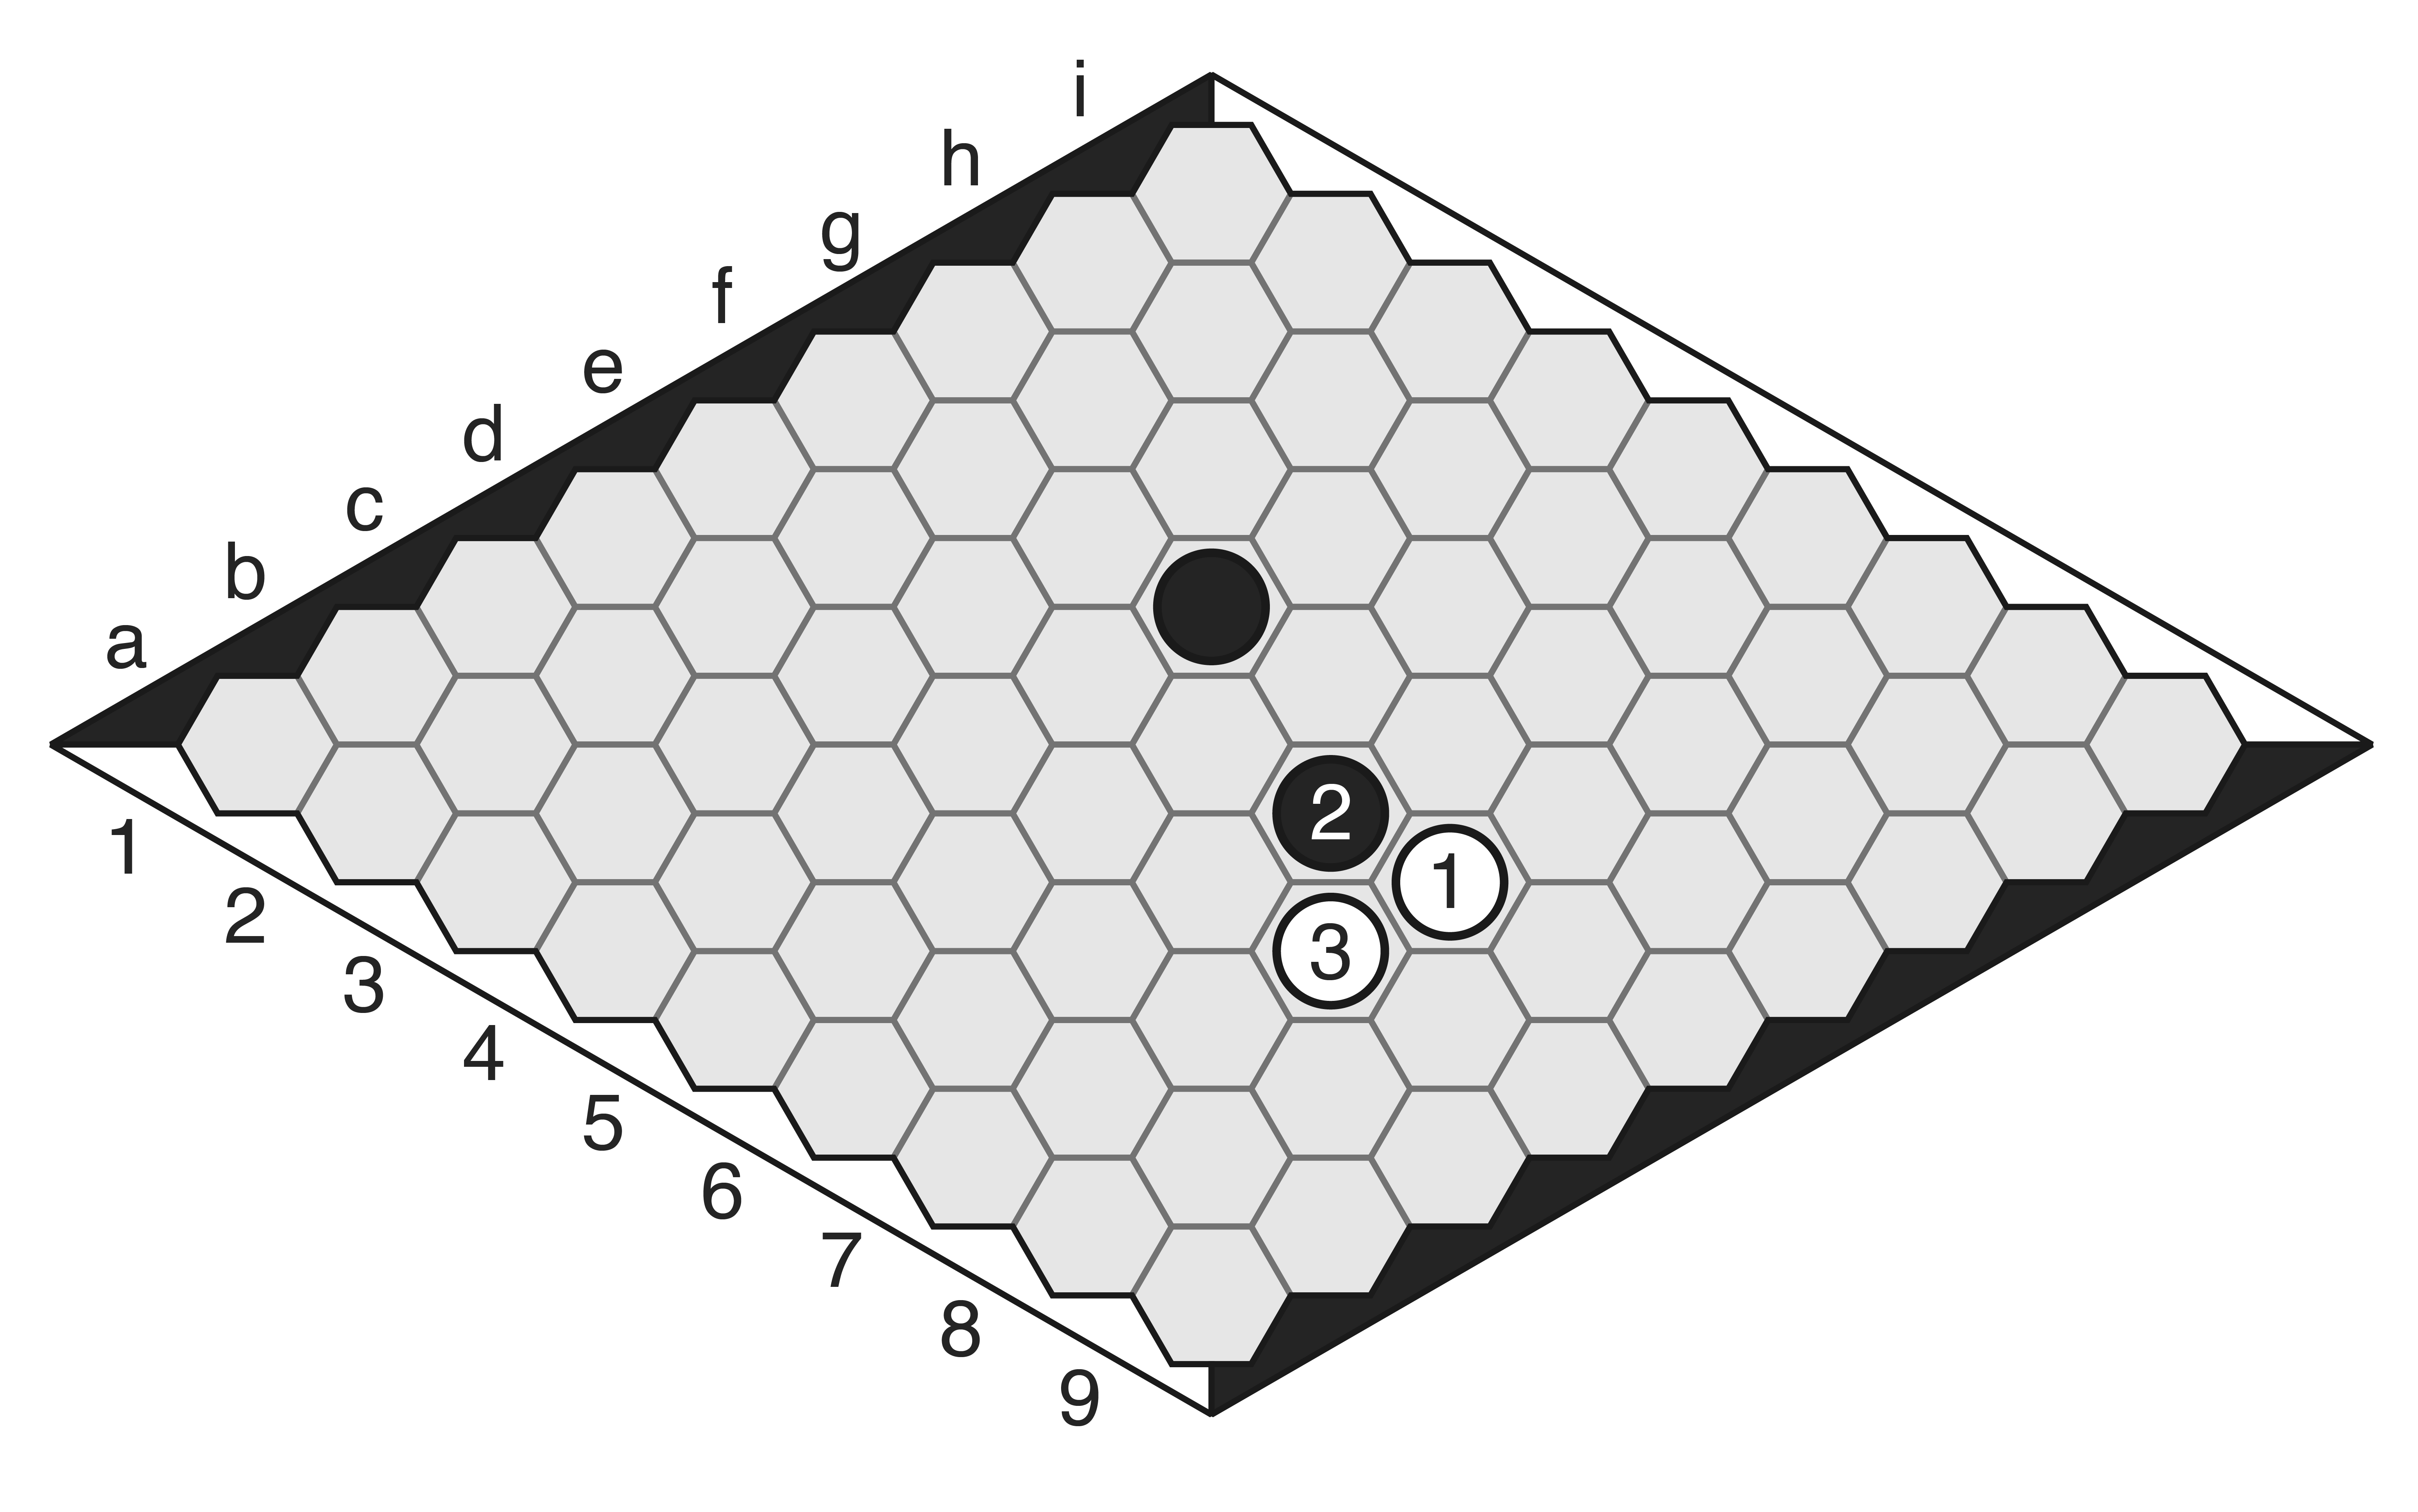
-
- Black (1) at i8 is better — this move gains territory heading back toward the centre, where Black already has a presence and can make use of it.
Taking the initiative
As in many other abstract games, in Hex gaining the initiative is of huge importance. Recall the Puppy Hex discussion earlier — imagine if we could force the opponent to play Puppy Hex. If we can place stones with aplomb while our opponent can do nothing but respond, we can dictate the pace of play and dominate the board at our leisure.
Here we will go in-depth into some Go terms we mentioned earlier: sente and gote. In Go, when we play a stone that forces the opponent to respond — because a group is threatened with capture, for example — we say that is sente, meaning we are gaining the initiative. Our next move after the sente move is essentially free; the opponent’s response is mandatory, so our next placement can be anywhere we like, and we can use that to gain influence or territory. Conversely, the forced response the sente move creates is gote — we are forced to be the puppy for that move and play where the opponent demands.
In Hex we also have sente and gote moves. For example, we may recognise that our opponent has an edge template in play, so we may choose to intrude on that template and gain some influence. That move is sente because it demands a response; the opponent must play to save the template, otherwise that connection is lost. At that moment our opponent’s move is gote, lending us the initiative.
-
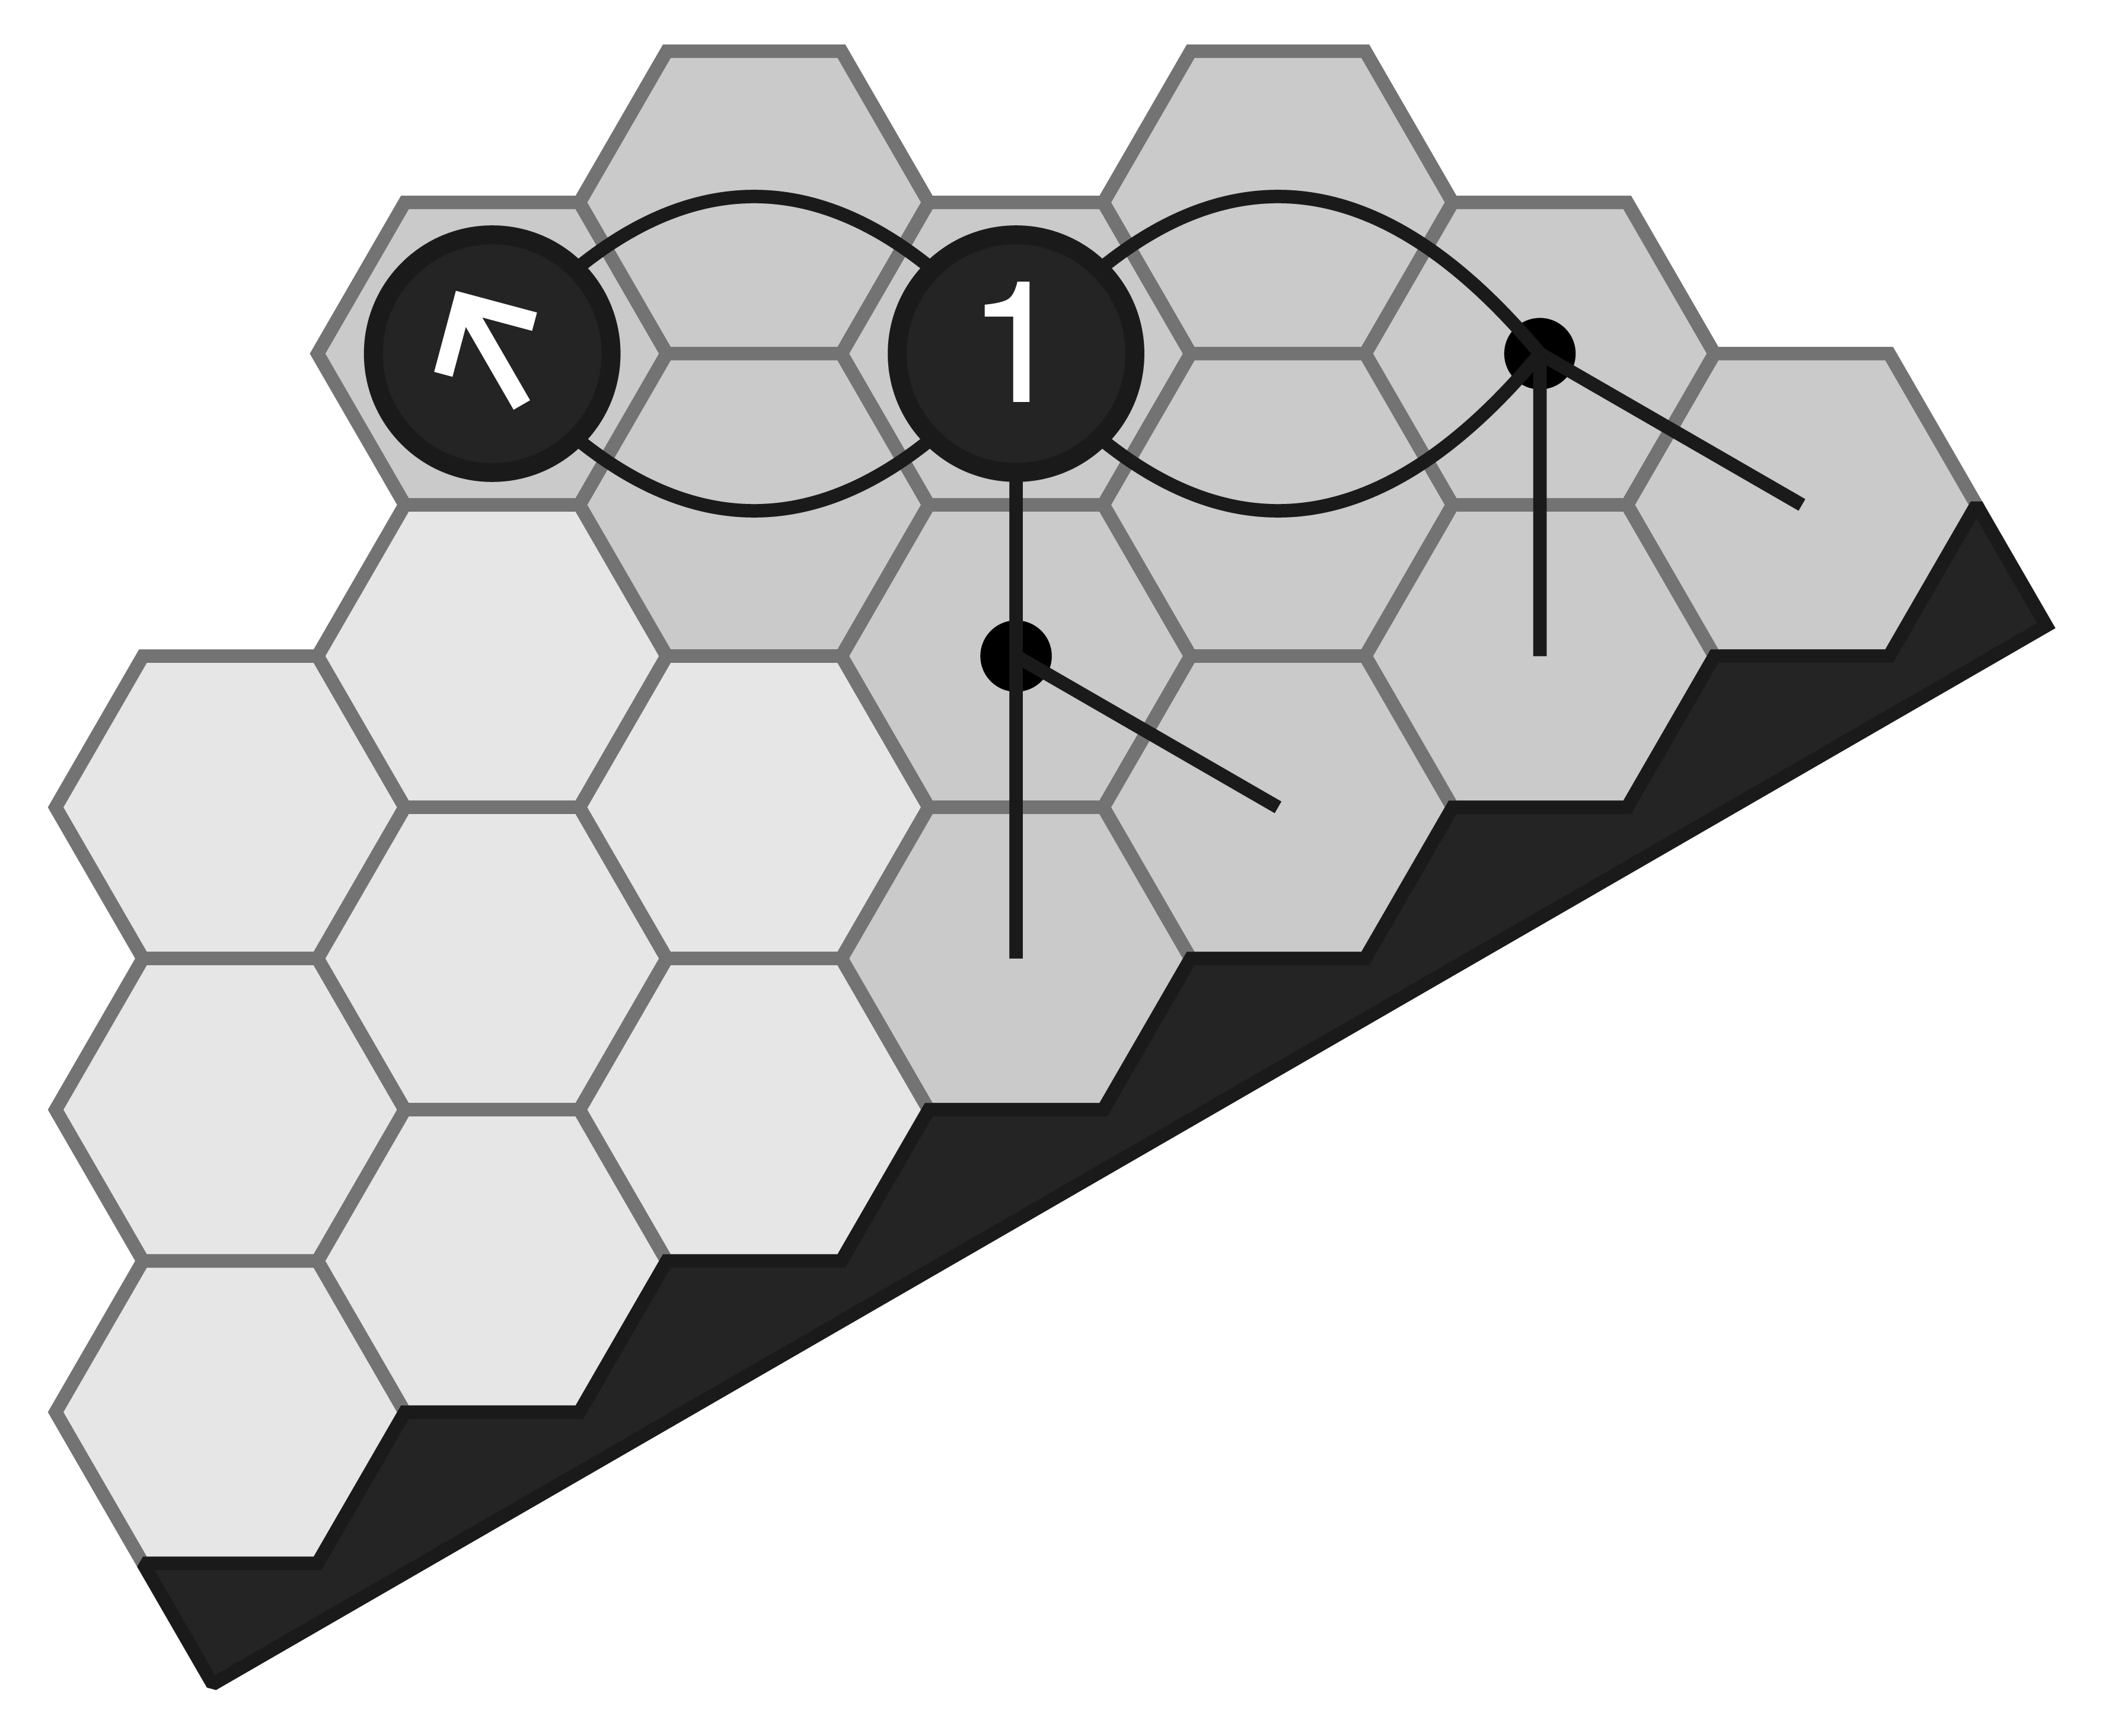
- A sente move in Hex. White aims to connect to their edge with (1). Black intrudes at (2), and White is forced to play at (3) to save the connection.
As we gain more experience of Hex strategy, we will be better able to identify opportunities to gain sente. At the same time, we must be mindful of our opponent’s threats, and remember that playing gote moves to save a critical connection is vital too! We should try to avoid being the Hex puppy whenever possible, but sometimes there’s no escaping it.
Tenuki
Let’s look at another situation:
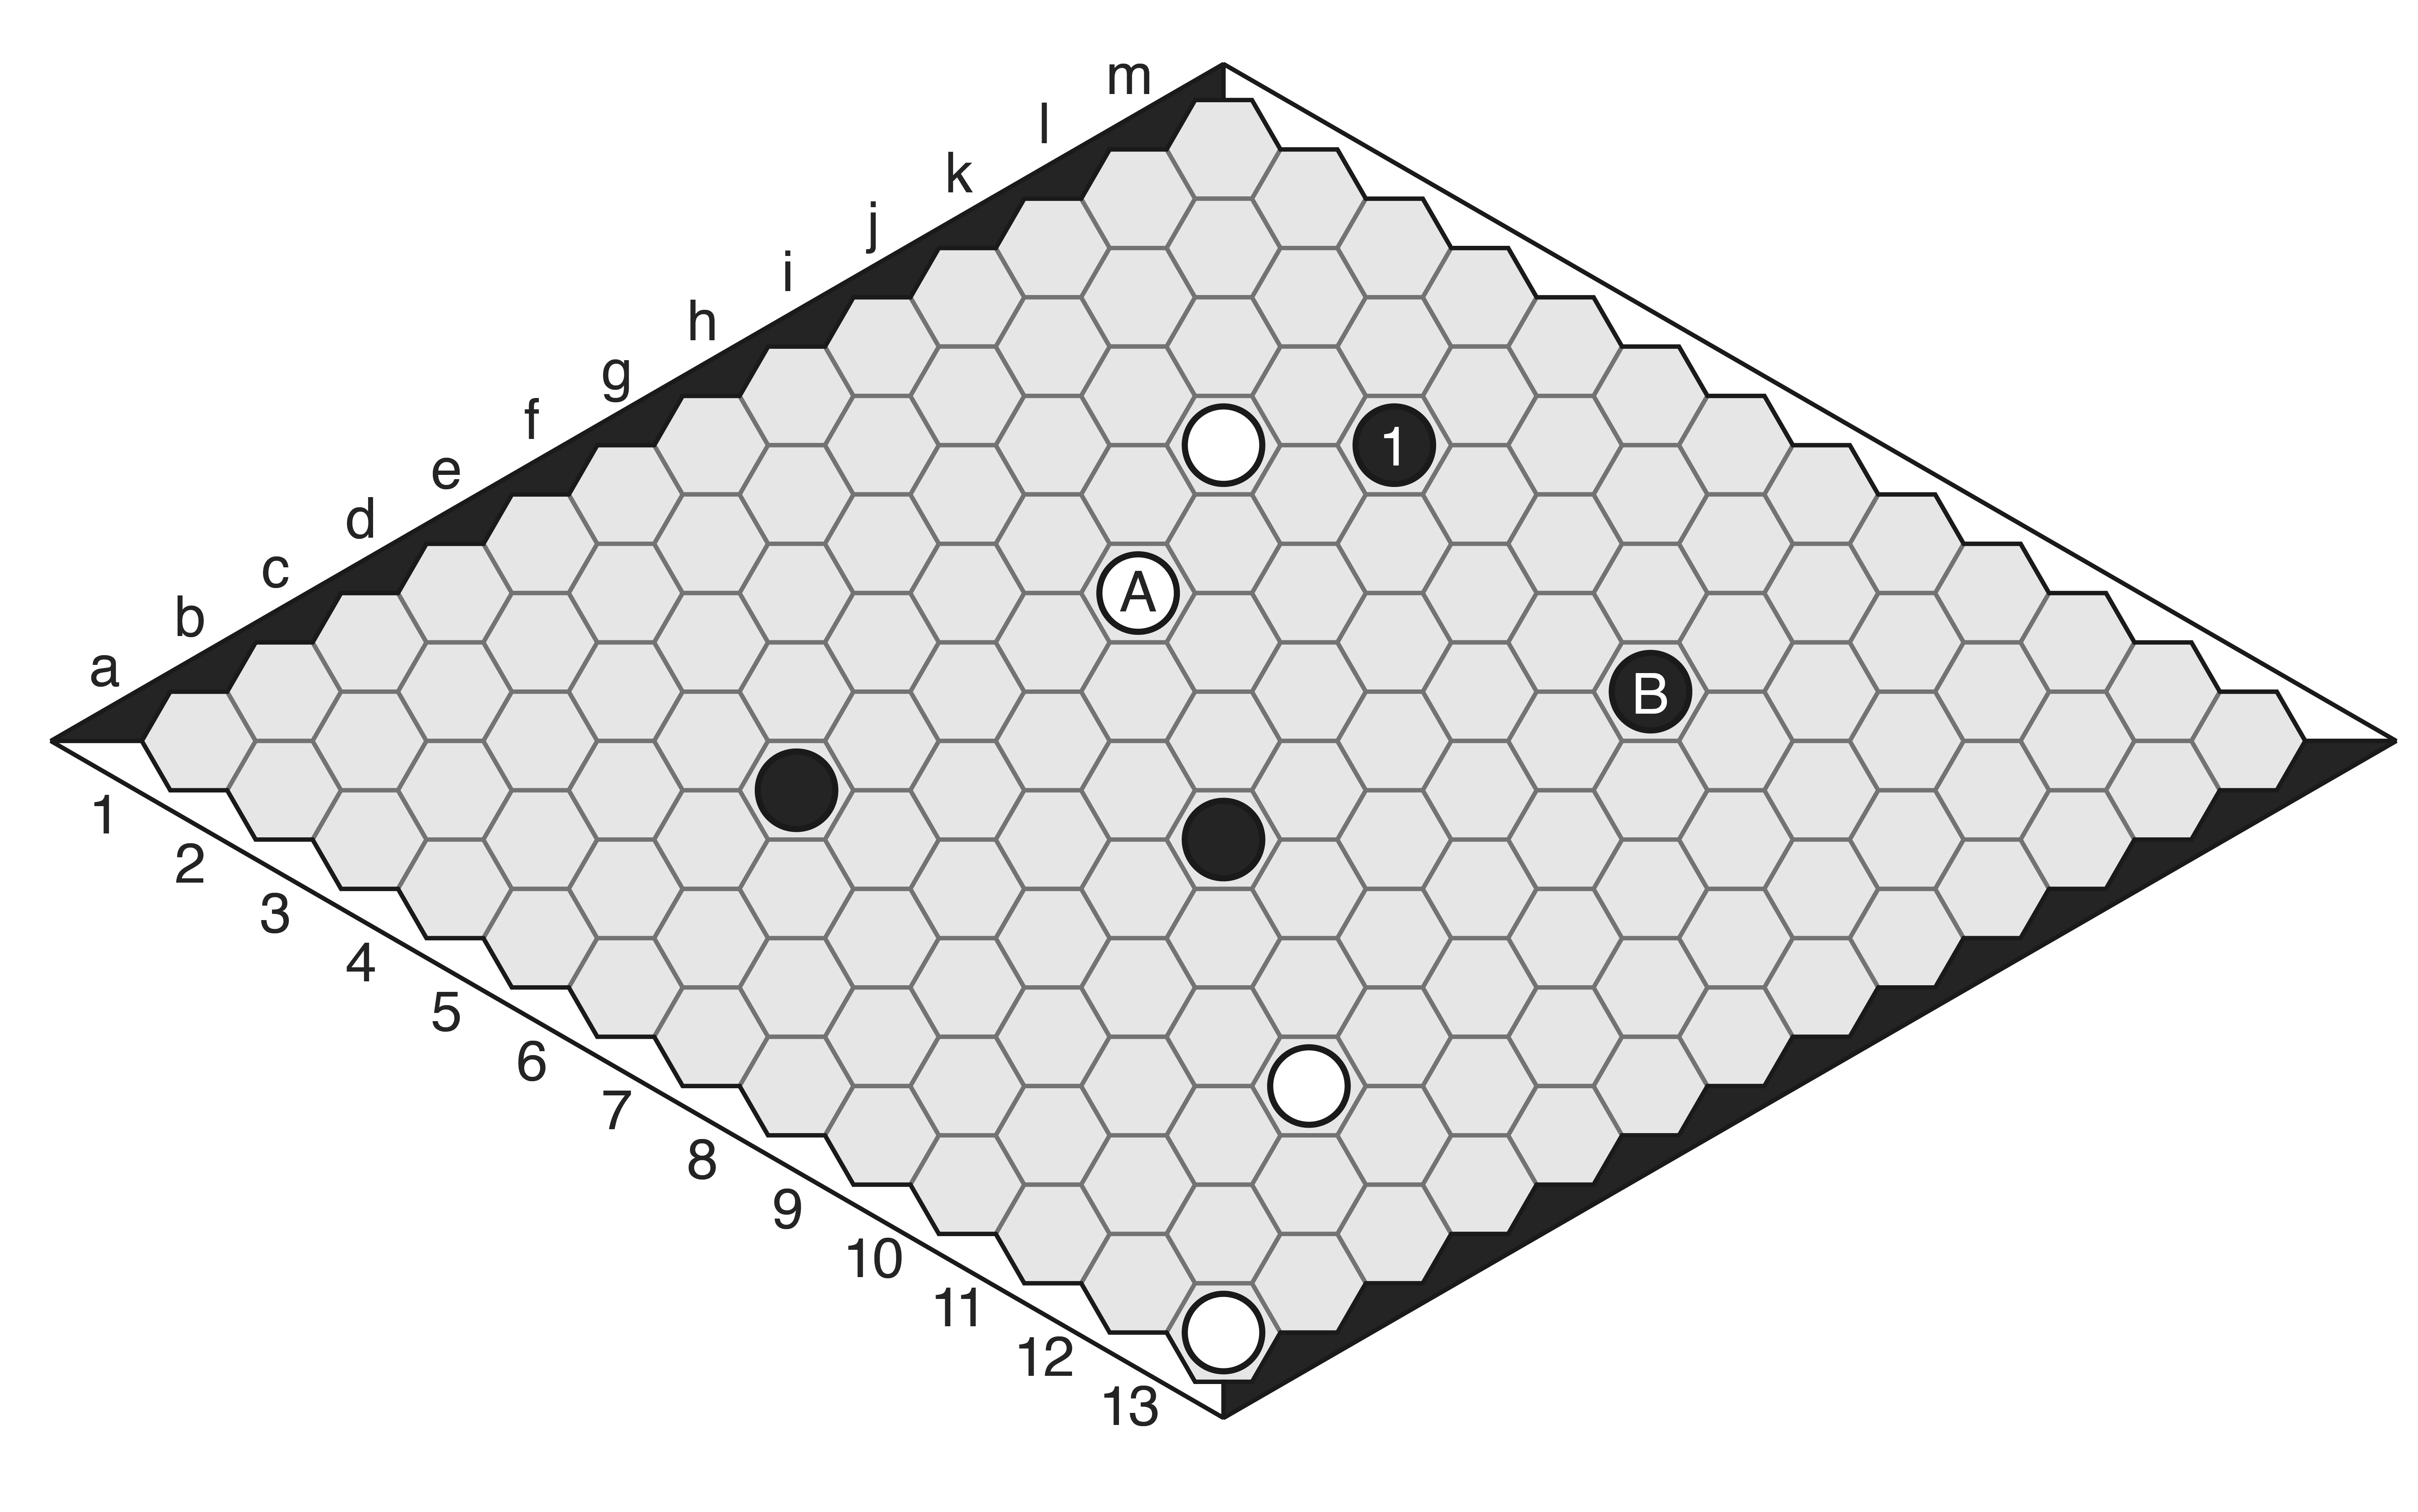
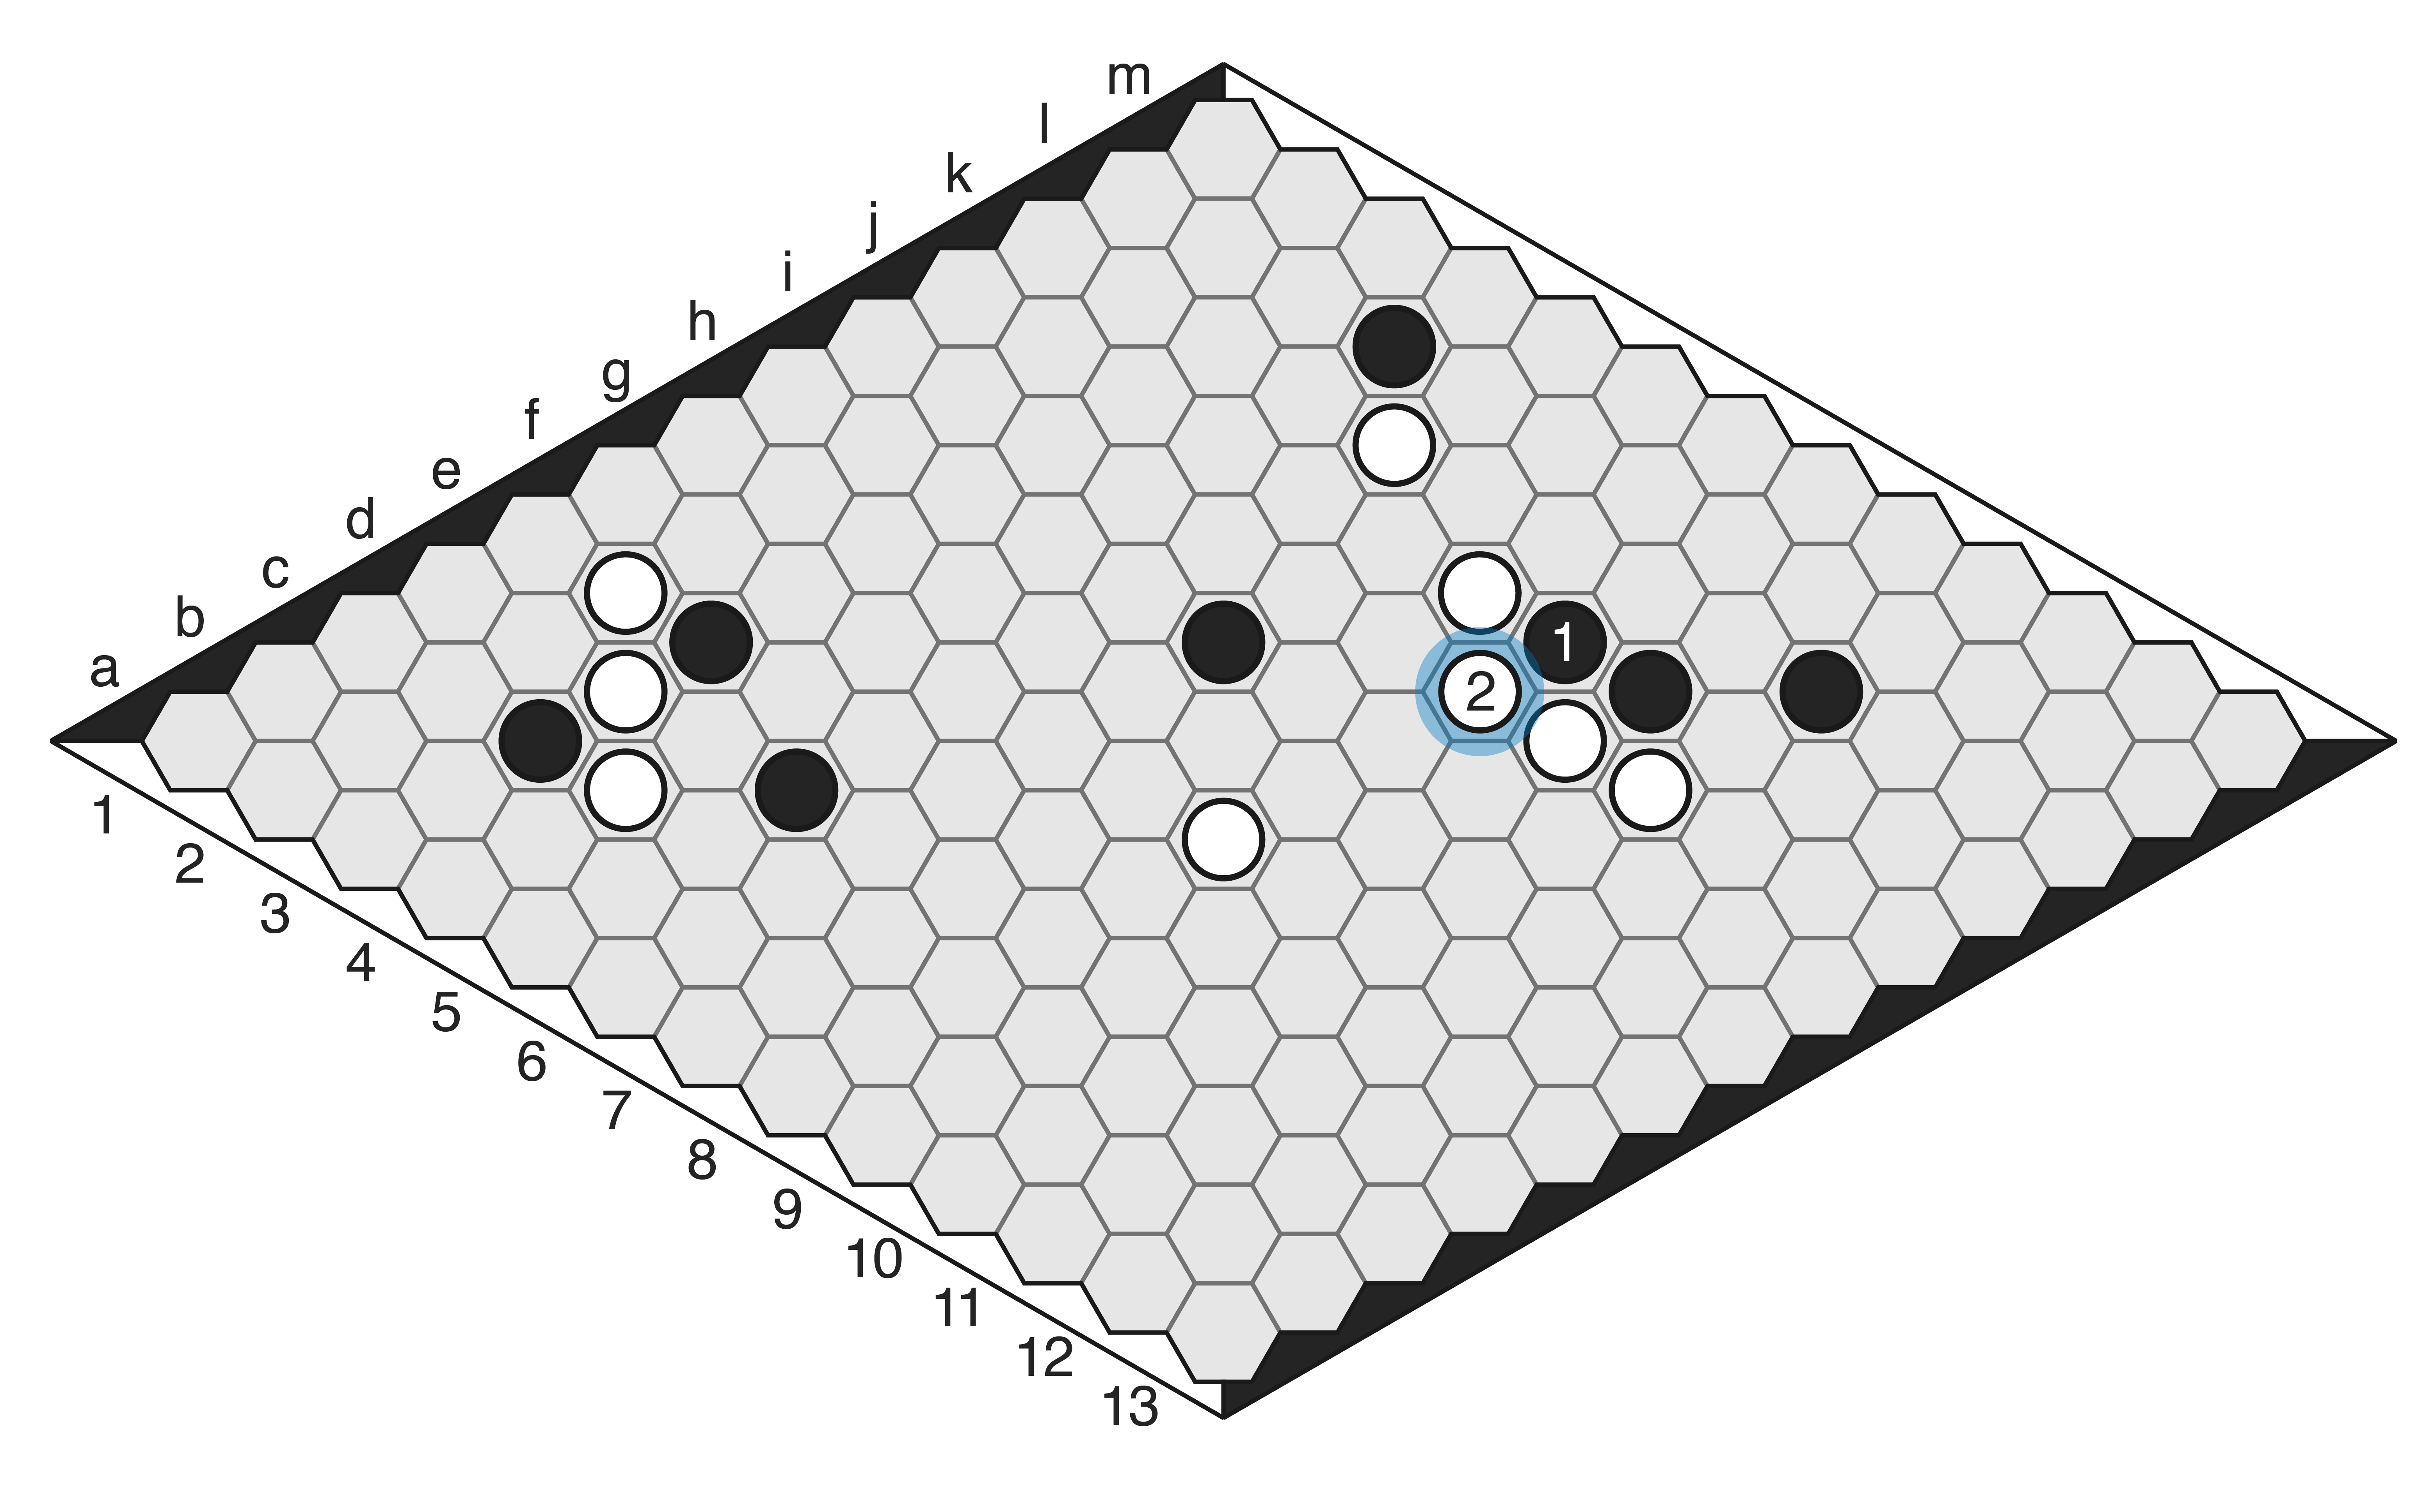
Here Black is threatening to cut the stone A off from the top-right edge, and the straightforward response would be for us to save the connection and take gote, such as by responding at L3. After all, by not playing there we lose the connection.
However, in this situation we can see that White has an opportunity to make an intrusion of their own, on the other end of the board. Black’s threat depends on using the stone B to connect to the bottom-right edge of the board. White’s board situation will allow them to make other connections, even if they sacrifice the connection under attack by Black, but Black’s situation is just as fragile. In cases like this we may elect to tenuki — to play away from the threat and allow our opponent to break the connection. Instead of defending against the threat we attack elsewhere, and now they must make a choice: either save their own template, or finish ours off. If they finish ours off, they must make a second move, giving us influence elsewhere; if they take gote to save their own connection, then we have regained the initiative.
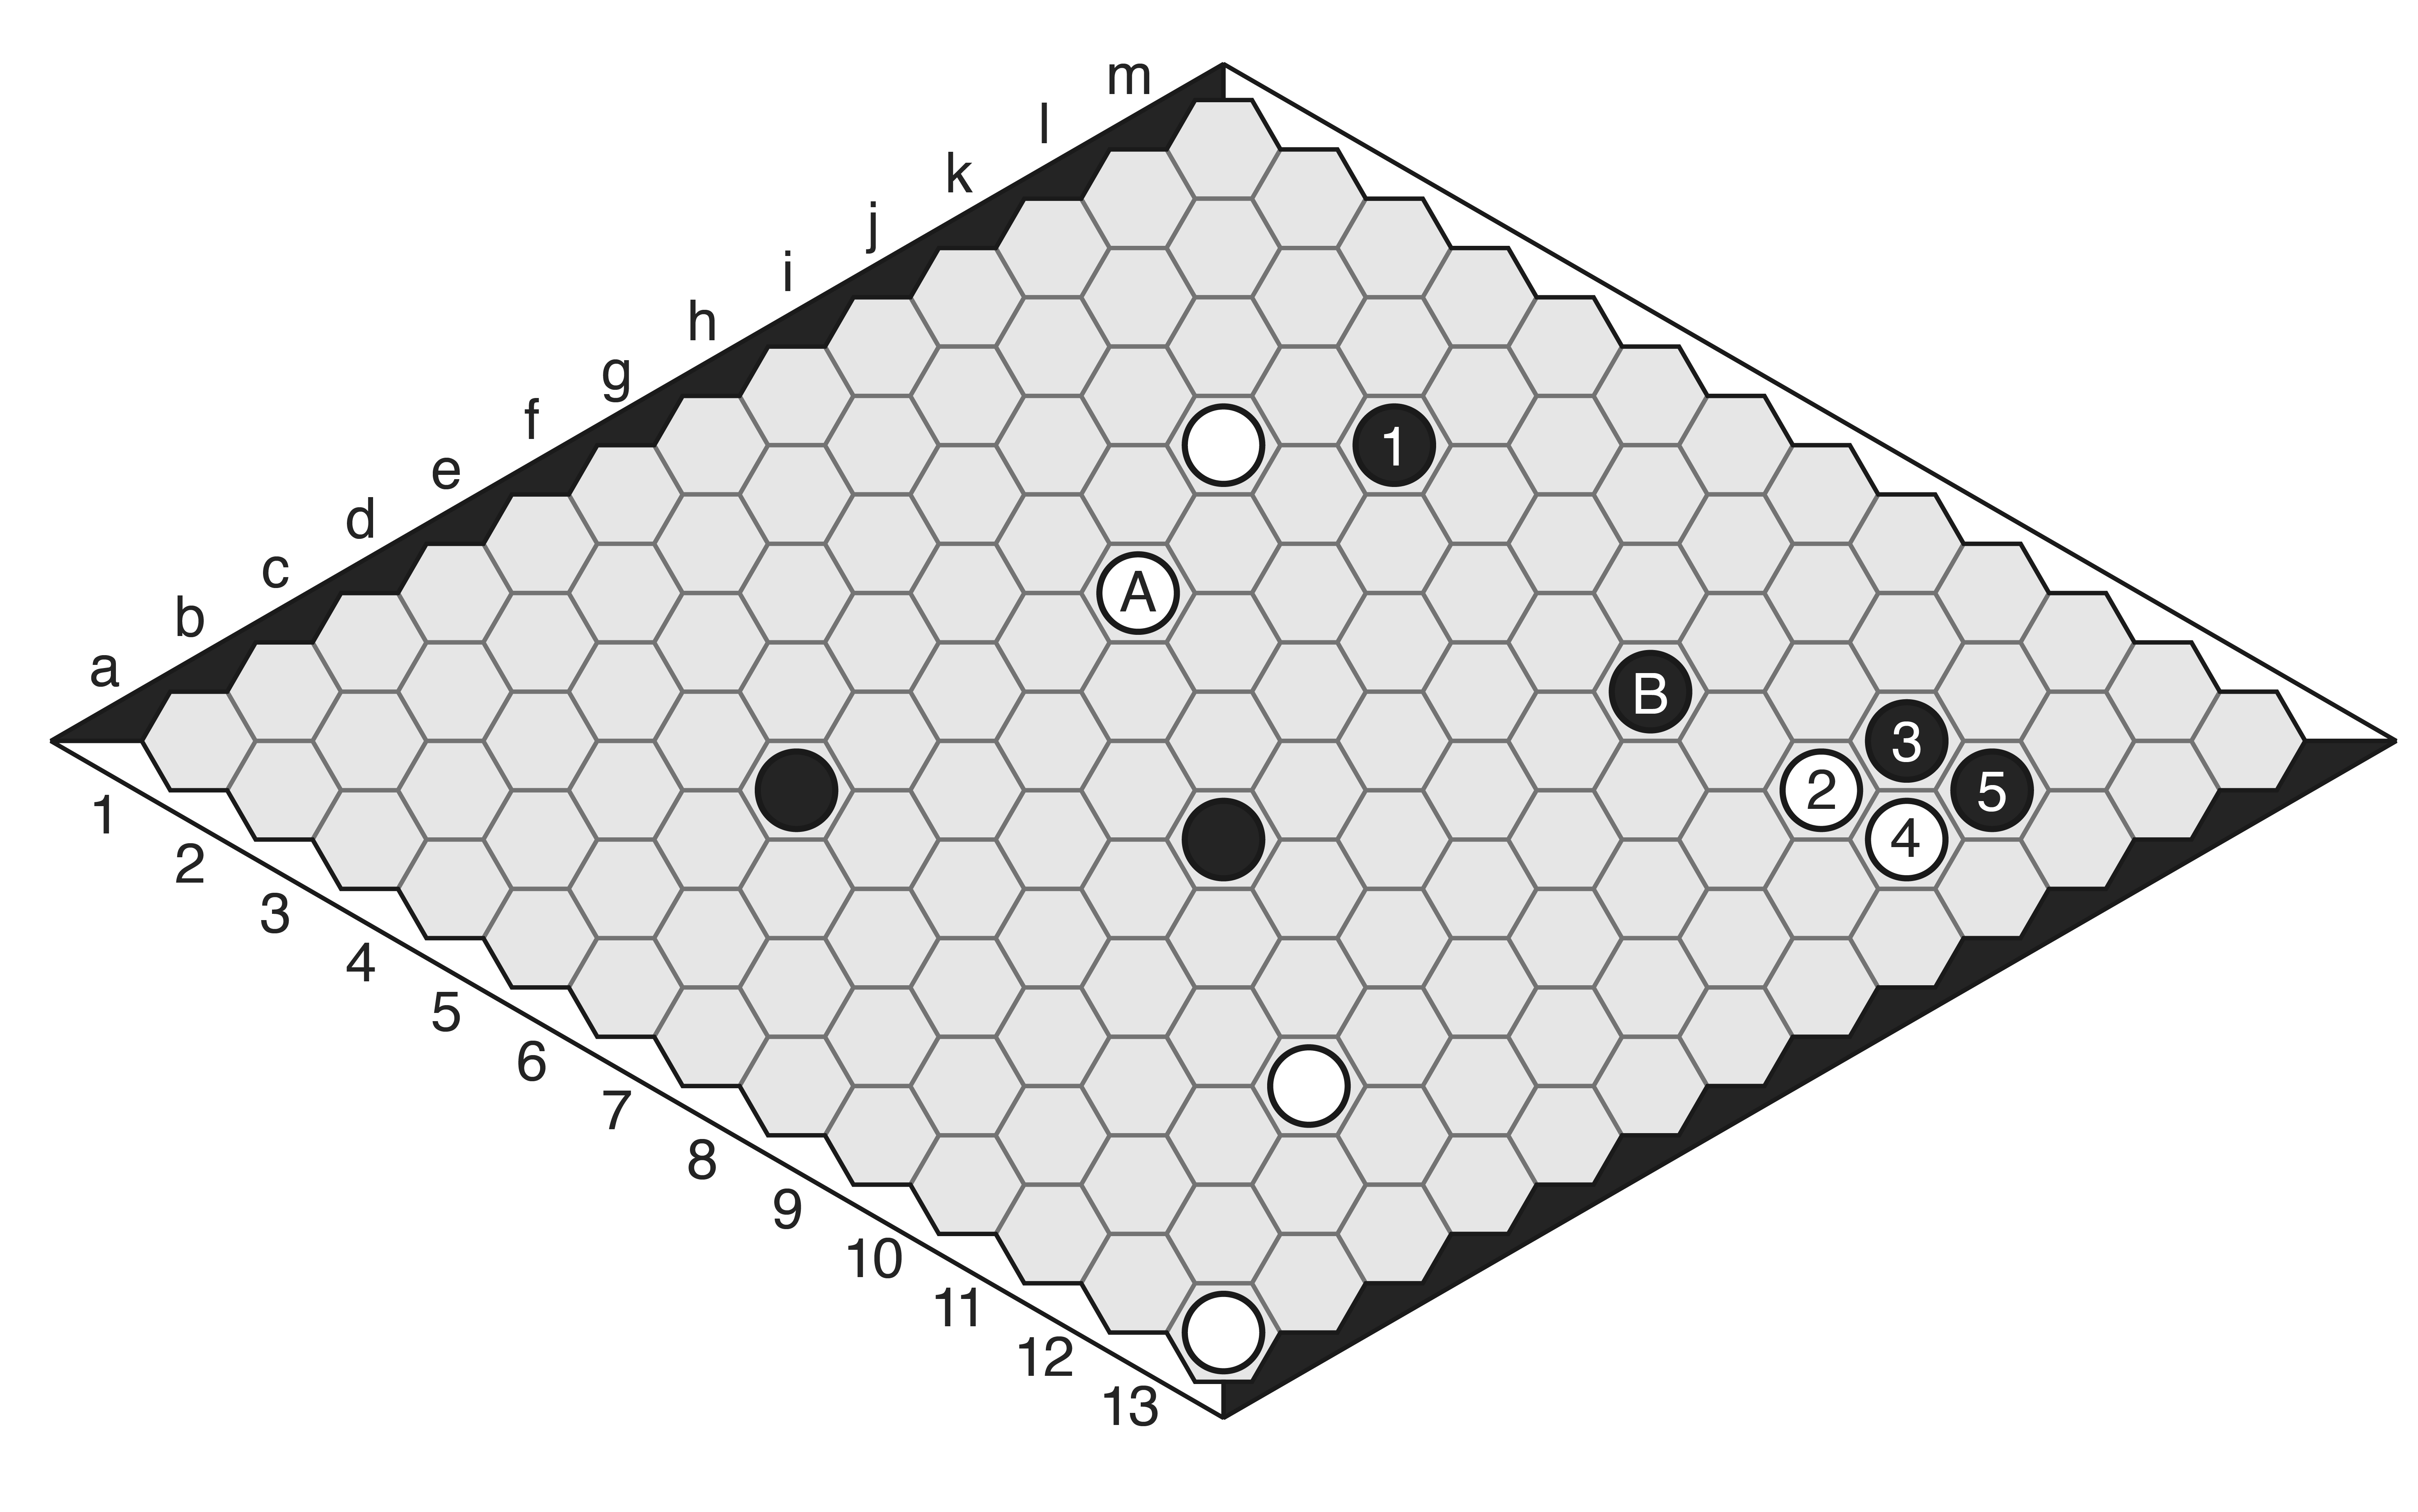
In this game, White elected to attack Black’s B stone with move (2), rather than save the connection of A to the edge. Black elected to save the connection, playing out a standard joseki sequence, leaving White with the initiative.
Tenuki is an advanced concept, and often difficult to judge. In general, you will have more opportunities for playing away from threats in the early- and middlegame, when the board is less full and there will be opportunities for other connections. In the late game, typically both players will have committed many stones to particular connections, and there is inherently less flexibility; if we ignore a threat, we are more likely to hand the win to the opponent.
The Joy of Hex
We’ve covered a lot of ground in this post — over the course of these few sections we’ve gone from the basics of the board geometry through to advanced strategic play. Yet for all that, we’ve barely scratched the surface. From here, you can move on to Matthew’s detailed guide to Hex, and dig deeper into all of these concepts. While you’re there, be sure to try out his fantastic collection of 500 Hex puzzles (also available in PDF, in Hex style and Go style) to sharpen your tactical vision. If you need help with openings, he also used over 6,000 online games on 13×13 to generate a very useful opening database.
Having said that, resist the temptation to power through all this material. Take some time with these concepts, apply them to your games, and move on only when you feel comfortable and confident. Remember too that Hex is perhaps the most famous modern abstract strategy game, but it is still very new in the grand scheme of things. Traditional games like Go, Chess and Shogi have had centuries for strategies to be developed, whereas in Hex we are all still beginners in some sense! So there is always more to discover and more to learn.
If nothing else, we hope this brief introduction will give you an appreciation for Hex’s incredible depth and nuance. Hex is a disarmingly simple game, so much so that a brand-new player may be tempted to ask ‘…that’s it?!’ when told the rules for the first time. But within that sparse framework lies a world of intricate tactical and strategic variety. This simplicity means Hex also has amazing flexibility — we can play lightning-fast blitz games on 11×11 boards, strategic masterclasses on 19×19, or mind-bending, baffling escapades as long as a game of Go on 26×26. Each one of these configurations is rich with possibility. Learning Hex also benefits you in other connection games — the tactics you learn here can transfer to other games, like the Game of Y (more on that in our next post).
Above all, we hope you have fun with the game! Go spend some time testing out your strategies online, entering tournaments, analysing games and writing about them. But alongside that, teach your friends and family (when Covid restrictions allow!), help them learn some basic tactical and strategic concepts, and show them why you love it. Every new player we bring to the game makes Hex’s future ever brighter, so the more we help others to see what the game can offer, the more enjoyment we’ll all have in the years to come.
Next moves
In the second and final part of our Hex mini-series, we will analyse a complete game of Hex in detail, and show how the concepts we’ve introduced here play out in a game between strong players.
Then we will analyse a brief game of Y, as well, to demonstrate how Hex concepts transfer to other, related games — and we’ll point out how some concepts change when we move to a different game.
Extra nerd stuff
Check out these papers if you’d like to know more about how the small-board swap maps above were generated:
SOLVING 7×7 HEX: VIRTUAL CONNECTIONS. AND GAME-STATE REDUCTION. R. Hayward, Y. Bjomsson, M. Johanson, M. Kan, N. Po, J. van Rijswijck. Department of Computing Science, University of Alberta, Edmonton, Alberta, Canada.
Solving 8×8 Hex. Henderson, Arneson and Hayward, IJCAI 2009.
9×9 Hex: Scalable Parallel Depth-First Proof Number Search. Paulewicz and Hayward, Proc. Computers and Games CG2013, Springer LNCS 8427 (2014) 138-150.

[…] Part I of our Beginner’s Guide to Hex, we covered some critical tactical and strategic concepts that will help you get a flying start in […]
I never even knew about hex before and now I’m playing it quite a bit. This is all your fault.
[…] Hex — The game which looms so large in the world of modern abstract games that any connection game is inevitably compared to it. Hex is incredibly simple to explain — take turns placing a single stone of your colour, win by being the first to connect your coloured sides with a continuous line of stones — but in play one finds endless intricacy and an innate focus on global strategy. The more I play Hex, the more I admire it, and unlike some other games I admire, I actually thoroughly *enjoy* it as well. I strongly recommend starting on 13×13 boards, then progress to 15×15 and 19×19, where the territorial aspects become significantly more important. A must play. 10/10. (read more here) […]