“Despite this complexity, after playing [Chu Shogi] a few times, one begins to feel that each piece has its own personality, and that not one of the pieces could have been left out without harming the character and charm of the game. A game as large as Chu could easily have been dull and ponderous; instead, it is rich in tactics, deep in strategy, and exciting to play.”
–R. Wayne Schmittberger, Shogi Magazine, October 1986
Following on from my previous article on Chu Shogi, this time I’d like to get into a bit more detail about attack and defence strategies. My main vehicle for this will be a discussion of building defensive castles, then attacking and utilising your pieces’ strengths, and finally some instructive checkmate puzzles (tsumeshogi) that demonstrate the powers of the unique Chu Shogi pieces in the endgame.
Before we get started, two quick clarifications:
- Notation: in the diagrams below I’ll be using Western-style notation, as described on the Wikipedia page. This system is pretty easy to understand — Chess players please note, however, that a ‘+’ at the end of a move means the piece was promoted, not that it gave check. Also I’m used to Japanese notation, so I may not get it right all the time — if I make any mistakes, please shout and I’ll fix them.
- Move numbering: Most Western sources use Chess-style move counting, where each numbered ‘move’ is actually a move pair, one from Black and one from White. I find this confusing when dealing with tsumeshogi puzzles, so I’m sticking with Shogi/Go-style move counting, where a move is simply a move from one player.
Building Castles in Chu Shogi
For us Chess players, building defensive structures for the King is made substantially easier by the presence of the castling move, which enables us to tuck the King safely behind one of the Rooks in a single stroke. For Shogi players, castling is not a move, but a process; players spend quite a few moves re-arranging their pieces to build fortresses around their King. Often these castles require substantial material investment and cover quite a bit of board space; Shogi castles need to be solid, given that the ability to drop captured pieces anywhere means that deadly attacks can occur very suddenly.
Chu Shogi of course is closer to the latter than the former — there is no specific castling move, and instead players must construct castles themselves. In Chu Shogi there are no drops, but the Lion Power pieces do present significant dangers; they can deliver mate even when pieces block their direct path to the King!
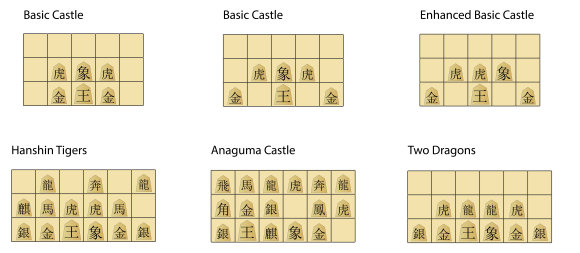
Below are some example castle formations that you may encounter in a Chu Shogi game:
The Basic Castle is very commonly seen in Chu Shogi games, and is easily built: simply bring the Drunk Elephant in front of the King, flank it with your Blind Tigers, and keep your Gold Generals on either side of the King. The Golds are somewhat better placed one square out from the King, as in the centre of the top row in Diagram 1. The Basic Castle may be basic, but when combined with Side-Movers parked on the 3rd and 4th ranks and some patrolling Rooks as well, this formation can provide a decent amount of safety.
However, this castle has some weak points that become apparent if an attacking Lion breaks through and has the support of a long-range piece. The long-range piece pins the Drunk Elephant to the King, preventing it from capturing the attacking Lion (since that would expose the King to immediate capture):
The immobile Drunk Elephant can’t defend the two red points in the blind spots of the Blind Tigers, so these squares become convenient places for the Lion to give immediate checkmate. The Enhanced Basic Castle, developed by Colin Adams, reduces this problem to only one weak square by swapping the Drunk Elephant and the right-side Blind Tiger. The Enhanced Basic Castle takes an additional move to build, but reducing these key weaknesses by half seems like a reasonable return on that tempo investment.
The bottom-left of Diagram 1 shows the Hanshin Tigers castle, which is also fairly easily formed but requires a greater material investment than the Basic or Enhanced Basic. In this formation, once the Phoenix and Kirin move away, the Blind Tigers are brought together in their place, allowing the Tigers to cover one another’s blind spots. Both Dragon Horses are then brought down over the Golds and backed up by the Silver Generals. A variant of the Hanshin Tigers moves the Silvers up over the Golds instead of the Horses. Either version creates a strong protective barrier, but requires keeping the Dragon Horses or Silvers locked down in defence of the King:
This castle comes recommended by the old Lucky Dog Games website. They give as a sample opening sequence for the Hanshin Tigers with Silvers as 1. Ln-6h 2. P-8h 3. P-5h 4. P-7h 5. Ky-7i 6. Ph-8i 7. BT-7k 8. BT5k-6k 9. S-8k 10. S-5k; a similar sequence would work for the Dragon Horse version, just leave the Silvers in place and shift the Dragon Horses one space inward instead.
In the bottom-centre of Diagram 1 you can find the Anaguma Castle. This castle is inspired by the Anaguma Castle of modern Shogi; the name means ‘Bear in the hole’ and it has a reputation as a very strong castle. The Chu Shogi version is certainly strong against frontal attacks, but requires a large material commitment, just like the modern Shogi version. The Anaguma also has the side effect of shifting your King closer to the left side of the board and reducing potential avenues for flight if the castle should collapse. On the positive side, the Anaguma does not tie down your Dragon Kings, which can then join your Free King to contribute to attacks elsewhere on the board.
Finally, in the bottom-right of Diagram 1 we have the Two Dragons formation. In this castle the two Dragon Kings occupy the spaces left by the Kirin and Phoenix once they are moved away. The placement of the Dragon Kings is ideal to support an attack in the centre. Since the powerful long-range pieces tend to be held back in early- and middlegame positions anyway, placing them in the centre of the castle is relatively convenient. However, committing early on to an attack in the centre can be risky — that can leave the wings more open to counter-attack from the opponent. In any case, this particular castle apparently was popular during the Edo Period in Japan, so it may be worth having in your arsenal. If you want to see a historical example of this castle in action, do check out this famous game between Mori and Fukui.
So, what castle should you use? There’s no single answer to this, I think — as in modern Shogi, your choice of defence will depend on the board situation and your own particular style. In a fast-moving, attacking game, the quicker castles like the Basic may be appropriate; whereas in slower, positional games, you may be want to take time to set up a robust defence. In any case, I’d recommend going through Chu Shogi games on Richard’s PBEM Server and observing how strong players adapt their defences to different board situations.
Attacking Principles in the Middlegame
As described in Part I, Chu Shogi is a fundamentally strategic game. The size of the board and of each player’s army means that precise forward calculation of tactical variations is often not practical; instead, aiming for good strategic positions and solid arrangements of your pieces is more important. Generally you will find it very difficult to imagine where your opponent’s piece may end up in 50 moves by just looking ahead move by move, as there are simply too many possible moves on each turn; but if you have a sense for what type of offensive or defensive shape he is going for, then you will be able to place your pieces properly to cope with that.
After the opening, the Chu Shogi board will have some clearly defined battle fronts where each player is attempting to make gains. Each side will have advanced phalanxes of short-range pieces to protect their pawn lines, with long-range pieces on the back ranks providing further support. The Lions will often be placed high in the centre of the board, both sides searching for opportunities to start a Lion invasion of the other’s camp. Both sides will aim to push their attack forward on one of the flanks, cramping their opponent’s defences, and cascades of piece exchanges may happen as one or both sides start attacking.
While going through my collected Chu Shogi materials I found this interesting exemplar early-middlegame position from Shogi Magazine:
This position is by no means meant to be prescriptive — your positions should be constructed in accordance with what the game requires, not any specific target — but it can be useful to look at the key features of this position and why elements of it may be desirable.
First of all, in the diagram we can see that a Basic Castle has been built, albeit in this case with the Phoenix next to the King. The King is flanked by the two Golds, and ready to defend to the front are his Blind Tigers, Drunk Elephant, and Dragon Horses. The Lion is placed high and centrally, in front of the pawn line. Note that every single short-range piece on the back rank has been brought straight to the front lines, backing up the advancing Pawns. The 4th rank is defended by two Side-Movers, and the 3rd by two Rooks. On both flanks we have lined up long-range pieces, backing up the generals on the front line. Note that the Free King, the second-strongest piece on the board, is tucked away safely on 2L; just like the Queen in Chess, it doesn’t pay to bring your Free King out too early!
Now, I’ve no doubt that some choices made in this position would not stand up to current Chu Shogi theory, but nonetheless I believe it’s an instructive example. Leaving aside the specifics, we should be aiming for similar cohesion in our own games and applying appropriate core principles as we aim for a robust post-opening posture:
- Bring the King to safety
- Keep the Lion centrally placed, restricting the opponent’s Lion and looking for opportunities to invade
- Bring the Free King to a safe spot on or near the back ranks
- Advance most or all of your short-range generals to the pawn line to press an attack
- Use long-range orthogonally-moving pieces to defend the 3rd and 4th ranks — Side-Movers and Rooks are good choices
- Position your long-range attacking pieces to defend the advancing generals and Pawns, and drive out the enemy Lion if it attempts to invade
Keeping these principles in mind can help you navigate the opening and develop an early middlegame position that sees you ready to launch a coordinated attack. As you gain experience you will develop a greater sense for the positional requirements of each game situation, and you will get more comfortable experimenting with these principles and finding strategic setups that fit your personal style of attack and defence.
Tips for Specific Pieces
Chu Shogi has a diverse range of pieces at the players’ disposal, and each of them has a role to play in the battles to come. Here are some tips on how to put your soldiers to good use, gathered together from my archive of Chu Shogi materials.
- The King: Often the King will stay in the centre of the back rank for most of the game. Try to set up a castle around him and cover the 3rd and 4th ranks to prevent the Lion getting too close too early. If you and your opponent are locked in a mutual mating attack situation, then it can pay to retreat your King toward a safer side of the board, but think carefully about when to spend your moves on a retreat; sometimes the best option is to regain the initiative and counterattack instead.
- Pawns/Go-Betweens: In a game with so many powerhouse pieces, it’s easy to forget about the lowly Pawns and Go-Betweens. But both these pieces are essential to Chu Shogi play, and they should never be advanced thoughtlessly. A strong Pawn line backed up by short-range pieces provides an essential barrier against the opposing Lion, and letting your opponent break down that wall could be fatal. As the game develops and you continue to gain space, your Pawns and Go-Betweens can promote as well, so it’s worth carrying Pawns forward with you as you advance.
- Phoenix/Kirin: These two pieces have the strongest promotions in the game (Phoenix promotes to Free King, Kirin promotes to Lion), so don’t advance them too early. In the endgame these pieces may have space to advance and promote, so until then keep them well back from the action.
- Gold Generals: These pieces have the strongest promotion of any of the Generals (they promote to Rook), so they’re best kept away from the action to leave open that option in the endgame. They’re excellent on defence as part of your castle; in unpromoted form they cover very useful squares in your defensive formation. When the game opens up they can then be advanced if needed to bolster your attacking forces.
- Silver Generals: The Silvers are useful attacking pieces, as in Shogi, but in a pinch they work well as defensive pieces too; as you saw above, some castle formations use Silvers to defend the King. Optimal placement and use of the Silvers may depend on what defensive formation you choose to adopt.
- Ferocious Leopards/Copper Generals: These pieces should be on the front lines, backing up your Pawns. When advancing your Pawns and attempting to gain space, try to build up numerical superiority with short-range pieces like these. Above all, be patient — hold back on launching an attack until all your short-range generals are in place behind the pawns, and you know you’ll be able to continue pressing your attack even after your opponent starts exchanging pieces to slow you down.
- Lances/Reverse Chariots: These pieces can’t move off their file anyway, so I advise keeping it simple: leave them in place defending their edge of the board! Opportunities may arise to promote them in the endgame, but for the most part these pieces tend to stay fairly static unless defending or attacking along the edge of the board, or if promotion opportunities open up later in the game.
- Side-Movers: I’ve said this a few times already, so probably you got the message, but the Side-Movers are very important defensive pieces and should generally be patrolling your own 3rd and 4th ranks. An invading Lion is extremely dangerous and with even one supporting piece can probably demolish your castle, but Lions can only step twice on a turn — so with your Side-Movers covering two ranks, your opponent will need to work harder to approach your King with their Lion.
- Vertical Movers: These pieces can sit together with your Dragon Kings and other long-range pieces, providing support to your front-line attackers and standing ready to harass the enemy Lion away should it be necessary. Once you gain sufficient space on one side or the other, try to promote your Vertical Mover to a Flying Ox. The Flying Ox is a strong attacking piece and will be a valuable addition to your forces once the board opens up.
- Drunk Elephants/Tigers: These are paired together because they are prime defensive pieces — they both can cover 7 of 8 adjacent squares. Blind Tigers are easily moved into a Basic Castle early in the game, and they are very awkward to advance anyway due to being unable to move directly forward, so keeping them on defence is usually the best role for them. The Drunk Elephant should also be kept back to hold the line, but they serve a valuable extra purpose in the endgame. If enough lines open up for the Drunk Elephant to potentially promote, and you’re deep into the endgame, its potential to become a Crown Prince can be very useful. If you do get a Crown Prince, this is insurance against checkmate; even if your opponent succeeds in preventing the promotion, they will have spent valuable time doing so.
- Rooks: Along with the Side-Movers, Rooks are key allies in the defence of your King. They can patrol the 3rd and 4th ranks very well, so try to keep these ranks clear so they can readily switch sides depending on your offensive and defensive requirements. As in Chess and Shogi, Rooks can play a valuable attacking role in the endgame, too.
- Bishops: The Bishop, like your other long-range pieces, works well sniping from the back of your position and harassing the enemy Lion. Their diagonal movement can often provide opportunities for sneaky discovered attacks — where a move of another piece opens up a line from the Bishop to an opposing piece. On such a large board these opportunities can be easy to miss, so try not to forget your Bishops!
- Dragon Horses/Dragon Kings: These pieces are strong ranged attackers, and can work well backing up your attacking generals on the front lines from the safety of the back ranks. As we saw above, both pieces can also strengthen your castle defences if needed or help prosecute a central offensive. In general, don’t be tempted to sacrifice these pieces for short-term positional or material gains — better to build a solid, well-supported attack, winning them the space to eventually promote and become very powerful Soaring Eagles and Horned Falcons. As attractive as those promotions are, don’t rush it; once the board thins out later in the game these pieces can dash across the board and promote pretty easily, and often safely. Rushing them to promotion may just give your opponent chances to gain tempo by harassing them with their long-range pieces.
- The Free King: This piece is extremely strong, second only to the mighty Lion. In the early game, keep it far away from the front — a tactical mistake leading to a captured Free King would leave you at a huge disadvantage! Your opponent can also take advantage of a poorly-placed Free King and harass it from range, forcing you to retreat it and lose tempi. In the endgame, let the Free King run wild — its very high mobility is a valuable asset when harrying the enemy King.
- The Lion: Your Lion is the most important piece in your army other than the King, but its unique capabilities mean it doesn’t need to hide away in the early game like the Free King. Most players advance the Lion over the Pawns very early in the game, attempting to stake a claim to the centre and probe for weaknesses in the enemy lines. Middlegame Lion invasions are a major feature of Chu Shogi, but don’t be tempted to attempt one too early; without backup your Lion could be easily driven back by your opponent’s long-range pieces, or even forced into a dangerous position if you haven’t opened up enough lines for it. Be aware too that the Lion loses some of its power as the board opens up, since then the opponent has an easier time targeting it with long-range pieces.
In the endgame, the Lion is absolutely devastating. Your goal here should be to advance your Lion as close to the enemy King as possible. To achieve this, bring forward your short-range pieces to interfere with or exchange off your opponent’s defending Side-Movers and Rooks; this will enable your Lion to break through. In combination with long-range pieces pinning down your opponent’s defensive line, Lions can create some spectacular checkmate opportunities once they get in range of the enemy castle. When paired with even a single short-range piece, the Lion can work methodically with it to compromise the enemy’s defenses. If need be, don’t be afraid to sacrifice powerful pieces to force your opponent’s King into the open — in those situations the Lion is often able to achieve a brutal checkmate all on its own!
The Endgame
The endgame is characterised by a much more open board, and this is often where the remaining long-range pieces become very important attacking pieces. Your long-range pieces held in the back ranks can dash forward and promote, and the Lions must advance a bit more carefully given their limited range and susceptibility to attacks from a distance.
To help simplify matters in this stage of the game, look for opportunities to exchange off long-range pieces if you have material superiority. A clever opponent can still mount a stout defence against greater numbers if they have some nimble long-range pieces roaming about the board, so exchanging them off the board so you have the only remaining long-range pieces can be much better for you. Meanwhile, be sure to promote whatever unpromoted pieces you have remaining, assuming you can do so safely, and if you have a Drunk Elephant in a position to become a Prince, try and do so. That leaves you with an extra royal piece which will force your opponent to split their attention.
Remember that Chu Shogi’s endgame is by nature very different from Chess and Shogi, so in certain situations you’ll need to be mindful of some of the special rules of Chu:
- No stalemate: In Chess, stalemate — where a King is not in check but has no legal moves — is a draw. In Chu, stalemate is a loss, as there’s no prohibition on moving into check — so the weaker side must do so eventually, and hence loses.
- No perpetual check: Repetition is illegal in Chu Shogi, so escaping from a losing situation via perpetual check is impossible.
- Bare King loses: Under the Chu Shogi Renmei rules, as soon as one side loses all pieces besides the King or Crown Prince, they lose the game. Often this won’t happen as the losing side will resign first anyway, but in certain situations you may want to take this into account when planning your approach to an endgame with only a few pieces left on the board.
In addition to these differences in rules, Chu Shogi’s unique pieces add many interesting tactical possibilities to the endgame. The super-powered Lion and the late-game appearance of the other Lion Power pieces create some exciting possibilities for pretty checkmates. Probably the best way to get to grips with these possibilities is to try solving some tsumeshogi.
Tsumeshogi
Tsumeshogi are Shogi checkmate puzzles, and are perhaps my favourite Shogi-related activity. I’ve gone to a lot of effort in recent years to acquire tsumeshogi books from Japan, and I never cease to be amazed at the level of artistry in some of these puzzles. Chu Shogi has tsumeshogi too, although of course there aren’t nearly so many of them compared to modern Shogi. Having said that, there are some excellent ones to be found on the Japanese web, including historical 17th-century puzzles from Chu Shogi Renmei available here and here, or some modern creations here.
In this section I’ve picked out a few puzzles that illustrate some of the interesting endgame situations that can occur with Chu Shogi’s unique pieces. As with modern Shogi, solving puzzles like this is hugely helpful for your endgame attack technique, and for increasing your accuracy. The more tsumeshogi you solve, the quicker you’ll be able to spot strong continuations in your own endgames.
Before we start, I’ll summarise the rules of tsumeshogi:
- The solver is always Black (moving up the board), and always has the first move.
- Black’s King is not on the board in normal tsumeshogi; it’s assumed that Black’s King is going to be mated on the next move if the opponent gets a chance to counterattack.
- Due to the above, every move from Black in a tsumeshogi must be check (a forcing move attacking the enemy King).
- After each check, White must make the move that most prolongs the mate.
- Some tsumeshogi are sou-gyoku tsumeshogi: two-king puzzles, where Black’s King is on the board and gets involved in the mate.
- Hisshi tsumeshogi problems have at least one move that is not check.
- A well-constructed tsumeshogi problem should have only one solution.
Tsumeshogi for the modern 9×9 game have additional rules relating to pieces in hand and drops, but that’s obviously not relevant here; I do love these kinds of puzzles a great deal, so at some point I’ll try to do a post about the many awesome varieties of tsumeshogi puzzles available for Shogi fans.
Now, below are several Chu tsumeshogi, each more difficult than the last. Try to find the solution by visualising the moves in your head, as you would during a game. Remember that all your moves must be checks (no hisshi puzzles here), and White’s response will always be the reply that keeps them alive the longest. I’ll also put a hint for each puzzle in the caption. The solutions will appear at the bottom of this article.
An interesting quirk in the Lion-trading rules
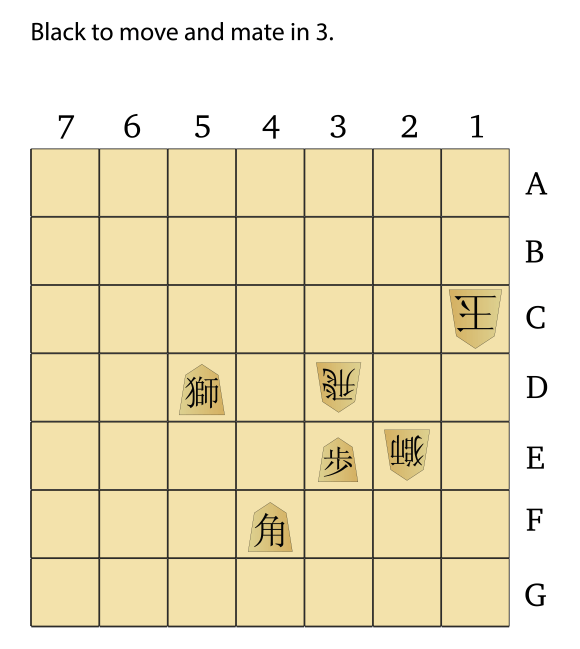
Now, while you’re mulling those problems over, I want to share with you something I discovered while picking which problems to diagram for this post. While searching through shorter problems for an introductory example, I found this puzzle:
At first glance this is a fairly simple three-move puzzle, but the solution turns out to be rather confusing. You can see the solution below; do you notice anything strange about the solution?
The final position has Black’s Lion protected by a Pawn. In theory, at least according to the Lion-trading rules on English Wikipedia, this is not checkmate — White’s Lion can legally take the Pawn, then the Black Lion, and then there’s no longer a threat to the King! But that being the case, why does this Japanese site present this as a correct tsumeshogi?
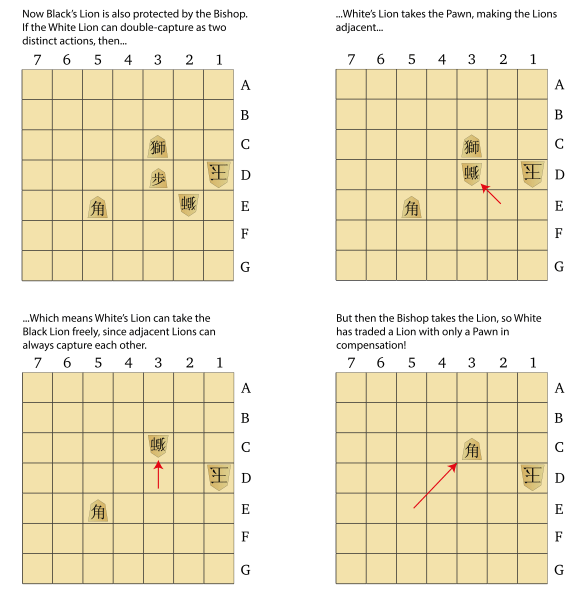
As it turns out, this specific situation — a non-adjacent Lion protected by a Pawn or a Go-Between alone — is covered by an addition to the Lion-trading rules adopted by Chu Shogi Renmei in 2004. They received a question asking whether the Lion’s double-capture in this situation should be viewed here as a single action, in which case the Pawn cannot be taken, because when viewing the board state as a whole the Lion is both non-adjacent and protected. Alternatively the double-capture could be seen as two separate actions, in which case the Lion can take the Pawn first, then the Lion is adjacent and can be taken freely.
Ultimately, Chu Shogi Renmei adopted the single-move interpretation, meaning that the above puzzle does have a checkmate. The Lion cannot be taken, because it is considered to be protected by the Pawn even though the Pawn could be taken and the Lion would have no further protection afterward.
The reasoning behind this, as I understand it, is that in certain situations ruling the Lion’s double-capture as a double move can lead to contradictions in the trading rules. Let’s use the same puzzle, but just shift the Bishop slightly so it protects the Lion:
So under the two-move interpretation, in this situation White effectively ends up trading away their Lion and only nets a Pawn, which is exactly the sort of thing the trading rules are supposed to prevent. As a consequence Chu Shogi Renmei ruled that we should view the Lion’s proposed double-capture as a single move, so that effectively when the Lion is taken the Pawn is still in place, threatening recapture. That in turn means the double-capture cannot be made, and so in the original puzzle, we do have a checkmate.
At first this seems complicated, but in practical terms it’s just reinforcing the aim of the Lion-trading rules, and ensuring that there are no situations where trading off the Lion for only a Pawn in compensation is allowed. A Lion may still take a Lion one space away protected by a different piece, by taking the protecting piece and then the Lion on the same turn — the protecting piece just cannot be a Pawn or a Go-Between. If you can read Japanese, you can see Chu Shogi Renmei’s discussion of this precise situation here (see Case 4 on that page).
Having learned all this, I felt that using a problem relying on a very specific rules quirk as an introductory puzzle would be far too confusing, and selected the other three-move problem above instead.
Tsumeshogi Solutions
Now then, hopefully you’ve set some time aside and worked out the solutions to the four tsumeshogi above? If so, well done! If not, we’ll go through the solutions so you can see where you went wrong. First, the three-move puzzle:
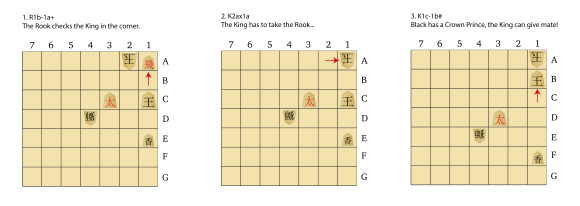 Since Black has a Crown Prince as well as a King, the King can finish off the other King personally! I was very pleased with this as an introductory Chu puzzle, since the solution highlights the unusual consequences of having an extra King, which is a very new concept if you are more accustomed to modern Shogi or Chess.
Now the five-move puzzle:
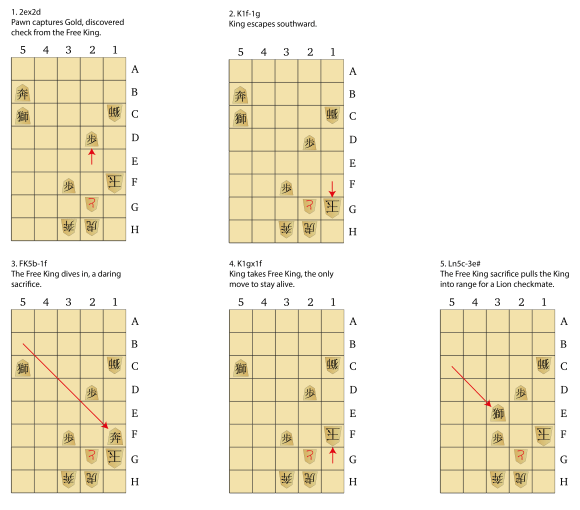
Here we have a lovely example of a Lion checkmate, enabled by the valiant sacrifice of the Free King. As mentioned in the endgame section above, sacrificing material to bring the King in range of the Lion often pays off — the Lion can very frequently chase down the enemy King and give mate on its own.
Next, the nine-mover:
For one of the puzzles I wanted to showcase a different Lion Power piece, and in this puzzle we get an instructive example of how the Horned Falcon can very effectively trap the enemy King even in a seemingly well-defended corner. The Falcon’s forward Lion Power allows it to jump or double-capture its way to the King, and conveniently it can also cover both potential escape squares. The setup is nice too — once we figure out that the Horned Falcon can deliver mate in the corner, opening the line to the King for the Whale pops out as an elegant way to drive the King toward his doom.
This puzzle also reinforces a very useful rule of thumb for tsumeshogi — every piece on the board is there for a reason! If a problem could be remade without a given piece and not change the solution, then it’s not a well-constructed problem. So when you’re stuck for a solution, have a think about what every single piece is doing on the board, and see if that shakes loose any clues.
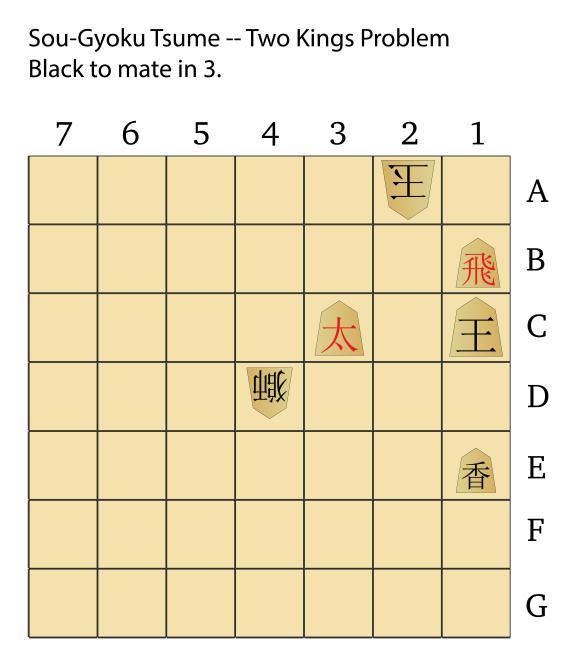
Finally, the mammoth eleven-mover:
Yes, it’s another problem playing with Chu Shogi’s multiple royal pieces, but this one was too good to pass up. Sacrificing a King is an outrageous way to start a checkmating combination! I feel the puzzle would be even a bit more impactful if the King sacrifice came directly before the checkmating move, but even so it’s a fairly jaw-dropping thing to see for a Chess or Shogi player.
From here, I’d suggest checking out the other tsumeshogi I linked earlier, and try some of the other audacious puzzles available to test your Chu instincts to the limit. Solving puzzles like this is a huge help to one’s endgame technique, generally speaking, and some of these puzzles are very cleverly made artistic works, as well. If you eventually become able to solve the really long puzzles lasting a hundred moves or more, you’re well on your way to being an extremely strong Chu player. The real test, however, is whether you can solve the infamous Skyscraper, the longest tsumeshogi ever created, which lasts a staggering 3,257 moves.
For those who can’t read Japanese: you can view the solution to any of the puzzles on the linked sites by selecting it from the drop-down menu on the puzzle’s page, then scroll through the moves using the buttons underneath. There are two rows of buttons; the second row of six is the one you need to use. Going from left to right, the buttons are [Go to first move][Go back ten moves][Go back one move][Go forward one move][Go forward ten moves][Go to last move].
The final installment
The third and final part of my Chu Shogi coverage — for now, at least — will be an annotated Chu Shogi game. I will be presenting a game from the Chu Shogi Renmei website that, to my knowledge, has not been analysed in English before. I’m by no means a master of Chu Shogi, but I know enough to explain the basic ideas behind key moves in the game, so hopefully that will give you a clearer sense of how to evaluate positions in Chu Shogi and how a typical game might flow.
Also, in the near future I’ll be covering Chu Shogi’s big brother: Dai Shogi. My materials for the Dai Shogi introductory article are already almost finished, so this may get posted before the Chu Shogi game. Either way, I hope you’re enjoying my Shogi variant coverage — please do post comments below or send me an email if you have any feedback, corrections, or suggestions.








[…] on from my previous two posts about Chu Shogi (Part I, Part II), I plan to provide a full annotated Chu Shogi game for you. This is still in the works, but Chu […]
The tip to move the steppers up behind the pawns was very helpful. I had to back off my play and not just start attacking right out of the gate. However, now it just feels like I’m spending an extra 50 moves just to set up the game. How much does it matter how you line the steppers up?