
Today I’m going to talk about a game with a highly unique visual presentation and capture mechanism: Onyx. I’m really fascinated by this game, which is helpful, because making all the boards and diagrams for this post took a lot of time!
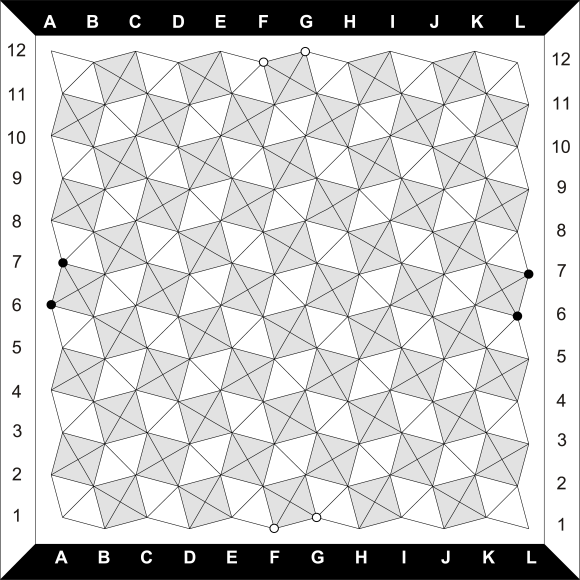
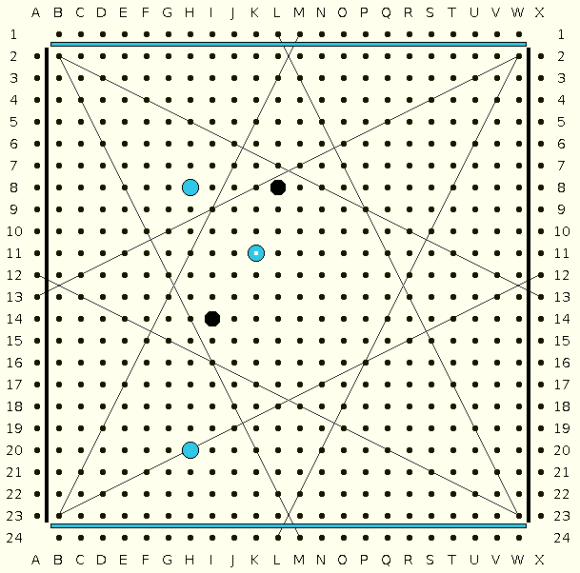
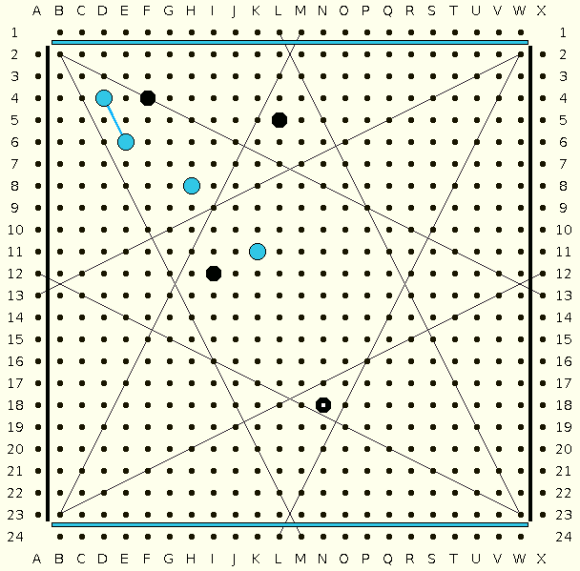
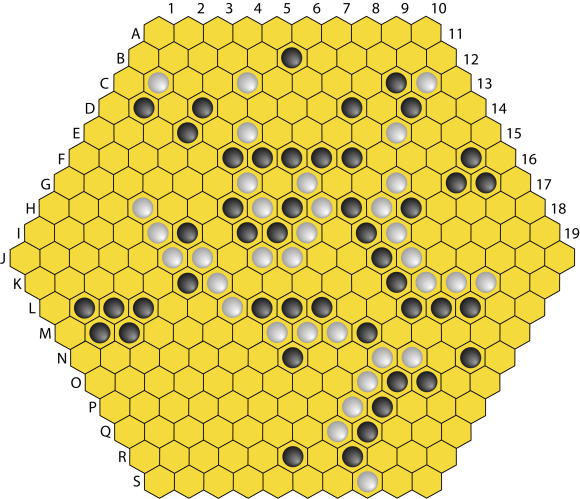
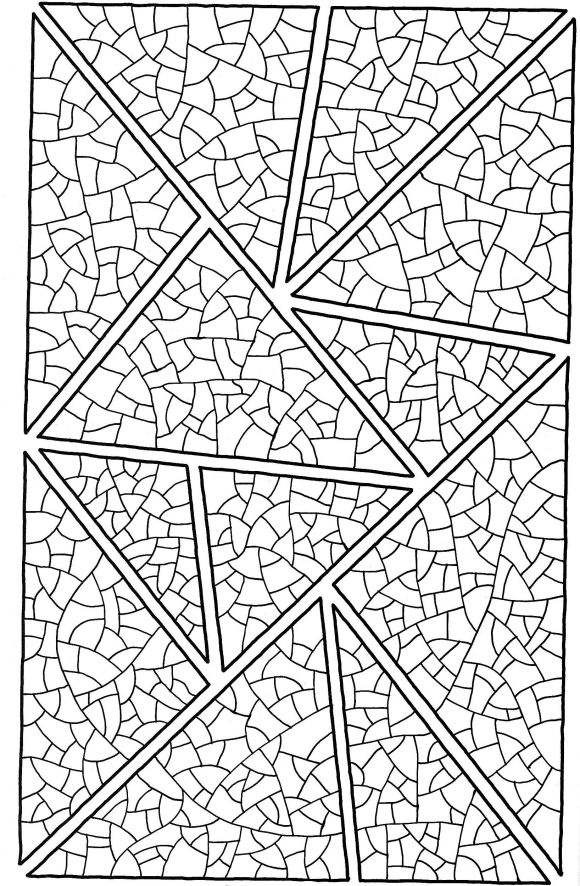
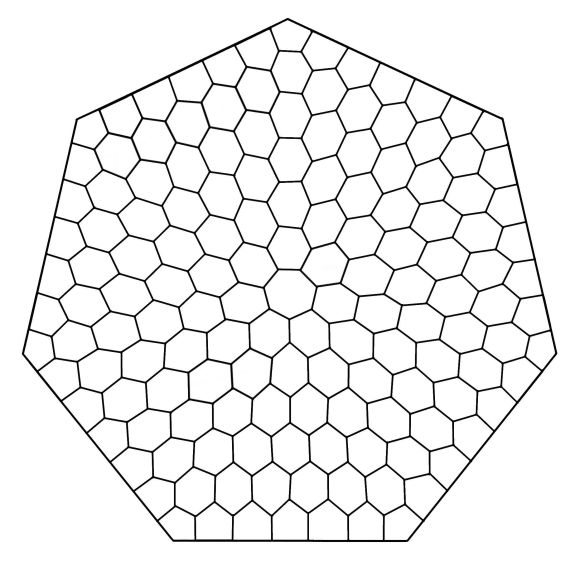
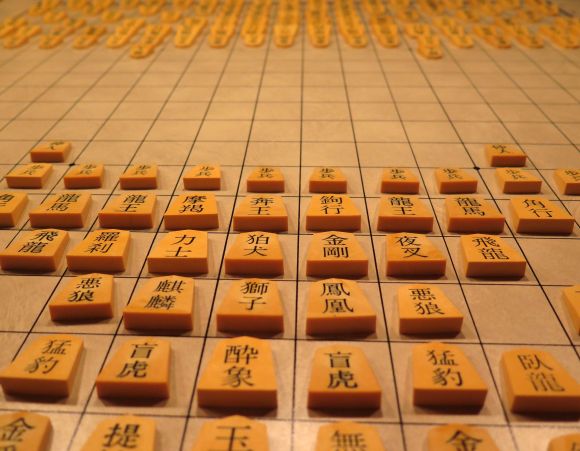
Onyx was published by Larry Back in the year 2000 in Abstract Games Magazine Issue 4. The board geometry immediately stands out — the game takes place on the intersections of an Archimedean tiling of squares and triangles (well, technically all triangles but the squares are important in this game):
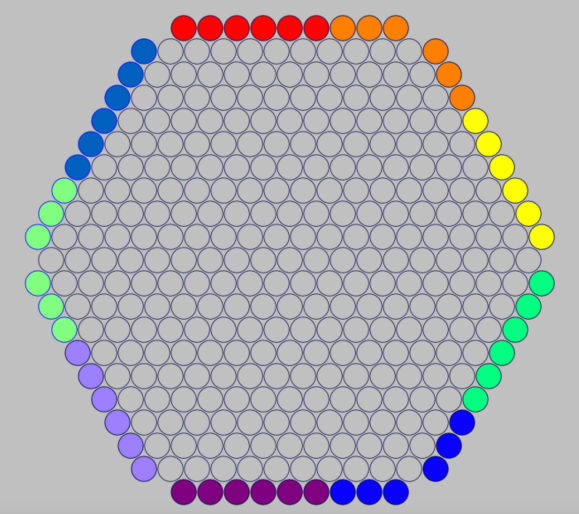
-
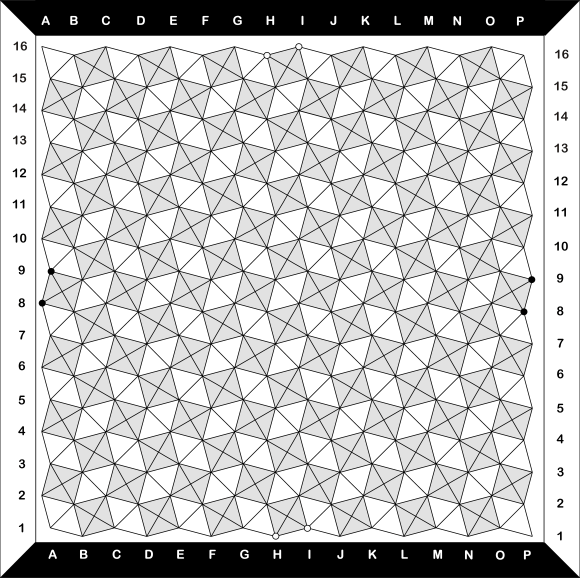
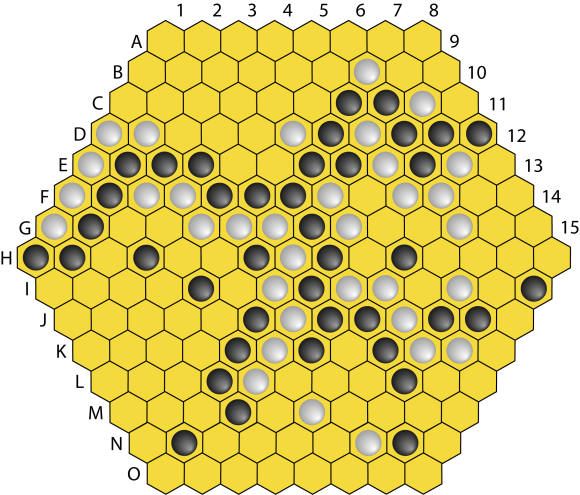
- A 16×16 Onyx board. A suitable setting for a deeply strategic contest.
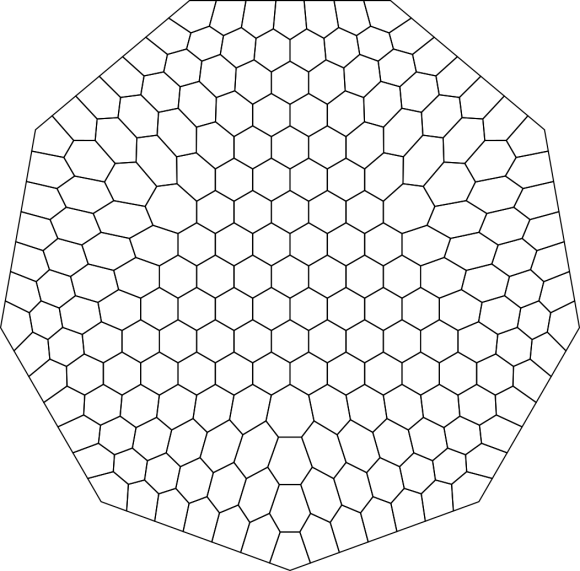
-
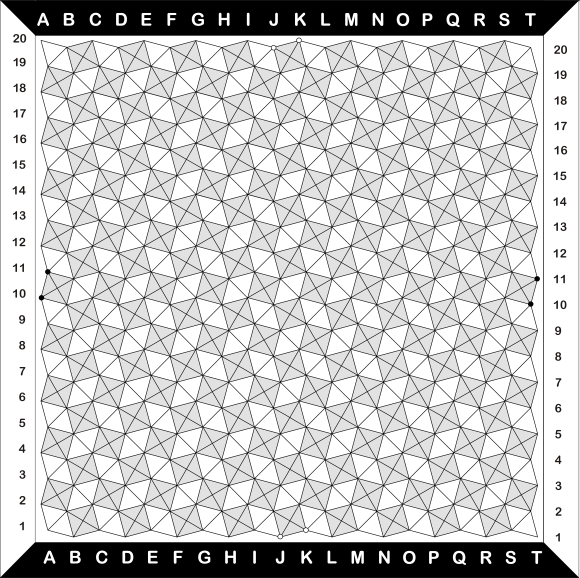
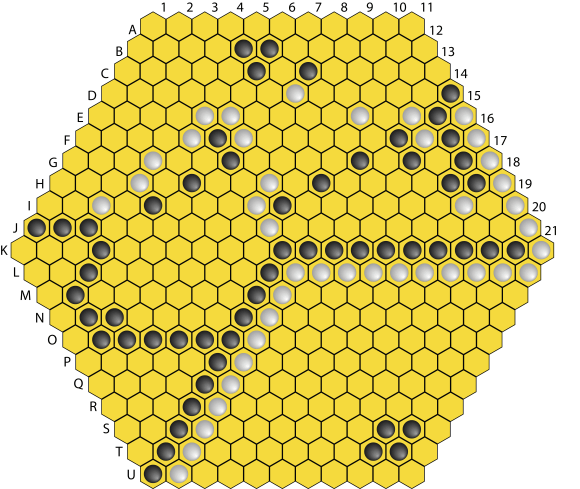
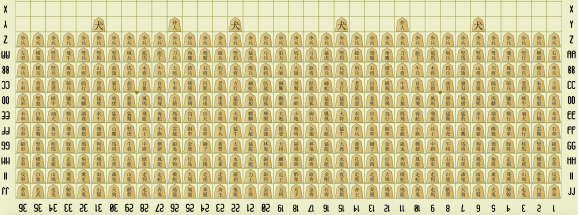
- 20×20 Onyx board, generously implemented by the Gorrion server after I made this board. Very challenging!
Besides being immediately visually interesting, this board tiling creates interesting variations in connectivity for different points on the board. The intersections at the centres of the squares are relatively weaker points, as they only connect to four adjacent points — but as we shall see, playing at these weaker points is sometimes essential.
How to play Onyx
Onyx is part of the relatively small portion of the connection games family that includes a capture mechanic, whereby enemy pieces can be removed from the board. The capture rules are unique and need some explanation via diagrams, so first I’ll cover the basic rules and then explain capture in detail.
The basics:
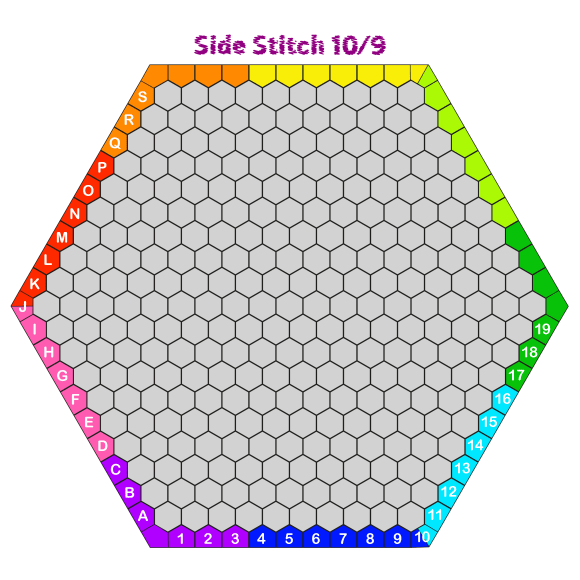
- Two players, Black and White, compete to form connections across the surface of the Onyx board. Black must form an unbroken chain of pieces connecting the top and bottom edges of the board; White must form an unbroken line of pieces connecting the left and right edges of the board. Intersections at the corners of the board are considered part of both sides to which they are connected. Draws are not possible in Onyx
- Before the game starts, the players can choose whether to play the standard variation, where four White pieces and four Black pieces are placed on the marked points of the appropriate colour at the start of the game. In the open variation, the game board starts empty. (Note: both variations are very playable; the standard variation has the advantage of increasing the importance of the sides and corners of the board during the game).
- Black moves first, placing a single stone on any empty intersection of the board. The swap rule is in effect for the first move of the game, so the second player may either swap and take Black, after which the first player is now White and plays a White stone in response, or the second player may stay as White and play a White stone.
- Each turn, a player may place one stone of their chosen colour on any empty intersection of the board. However, a piece may not be placed on the intersection in the centre of a square if any pieces are already placed on the corners of that square.
- Once placed, stones may not be moved. Pieces can be removed from the board via capture (explained below). Captured pieces are removed and returned to the player of that colour. Points on the board vacated by captured pieces are free to be played on subsequently by either player.
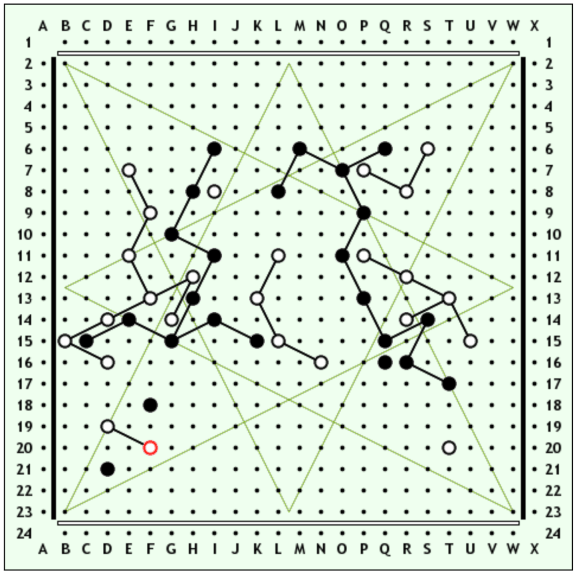
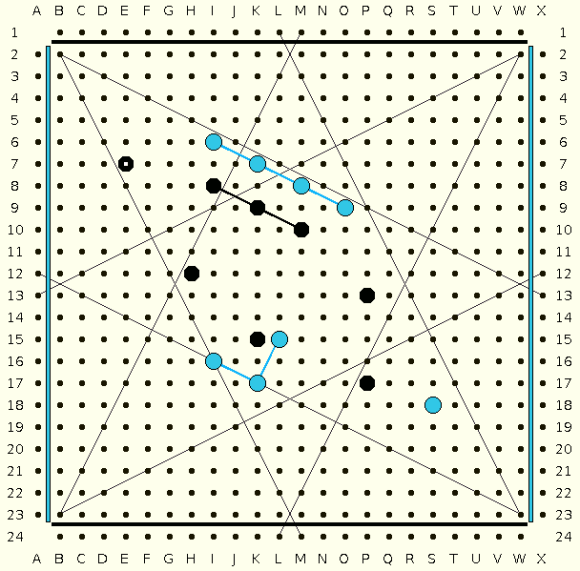
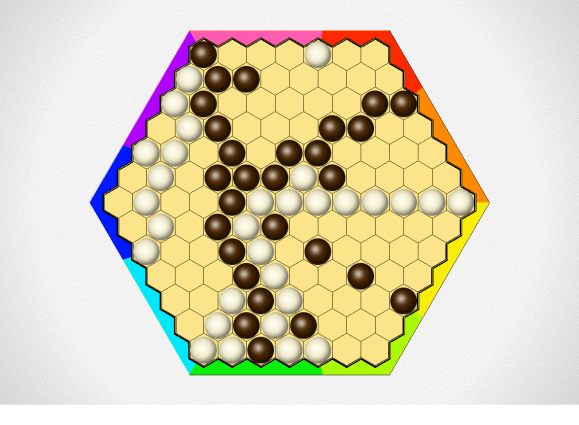
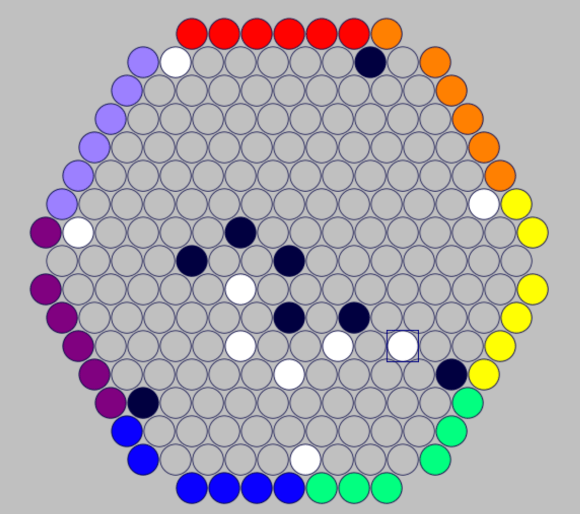
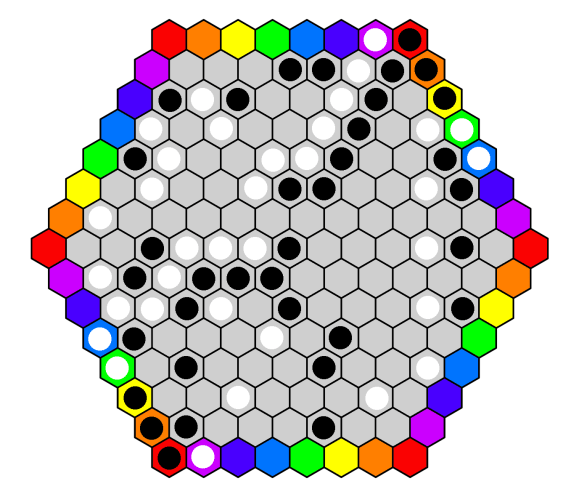
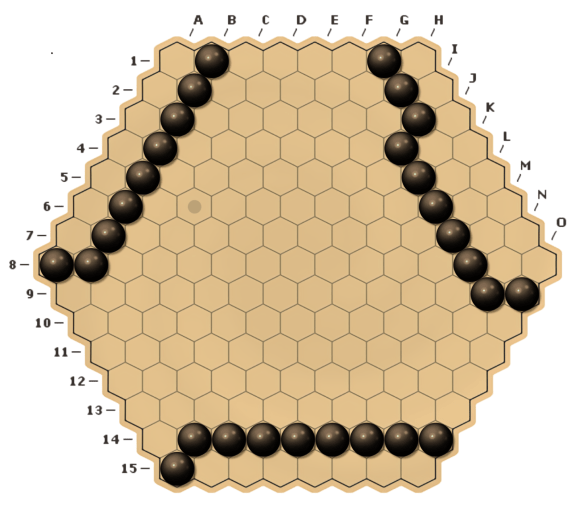
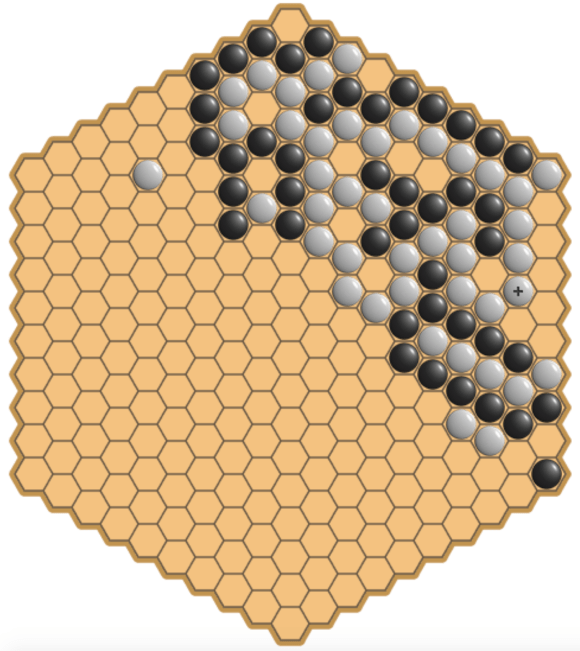
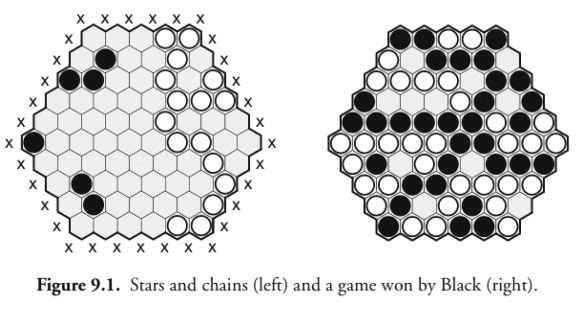
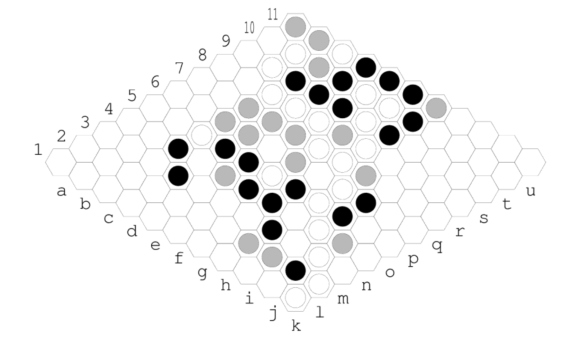
Here’s a completed game of Onyx won by Black. The pieces highlighted in red show the winning vertical connection:

Capturing Rules
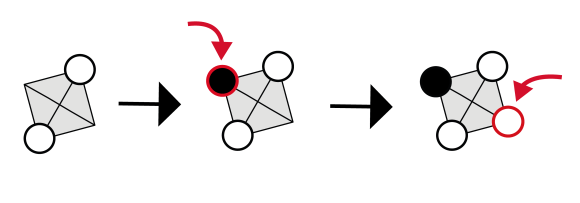
Capturing in Onyx is about forming a particular pattern. Basically, if on your turn you are able to complete a pattern in which a square area on the board has two of your pieces at diagonally adjacent corners, and two of your opponent’s pieces on the other diagonally adjacent corners, and the centre point of the square is unoccupied, then your opponent’s pieces on that square are captured:

Here White places a piece on the corner of the square, which completes the capturing pattern. The two Black pieces are captured and removed from the board.
Double-capture is also possible, if a single move leads to the completion of this capturing pattern on two squares at once:

In a double-capture White places a piece at the intersection of two squares, and manages to complete the capturing pattern on both squares simultaneously. All four Black pieces are then removed from the board!
The capturing mechanic in Onyx leads to some interesting consequences. Recall that you may only place a piece at the centre point of a square when no pieces have yet been placed on the corners. This means that capture can be prevented, but requires you to place a piece on a weaker point. The possibility of capture also prevents a player from easily blocking the other on the diagonals, and prevents deadlocks in general from grinding the game to a halt.
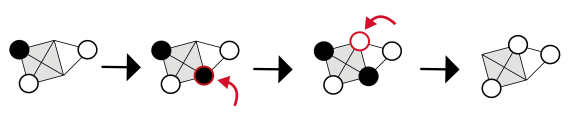
You might notice that after a capture, the captured player can immediately threaten a re-capture by placing a piece on one of the newly-emptied corner points. As a result you’ll often see a sequence like this:

White starts the sequence by capturing. Black responds by making a re-capture threat on one of the vacant points. Finally, White ends the threat by placing a stone on the remaining empty point — now no more captures can happen on this square.
Making connections in Onyx
Given the unique board geometry and the capturing mechanism in this game, there are some novel types of connections that you don’t see in other connection games. I will summarise some key connection types and show some examples of sequences of play that can result.
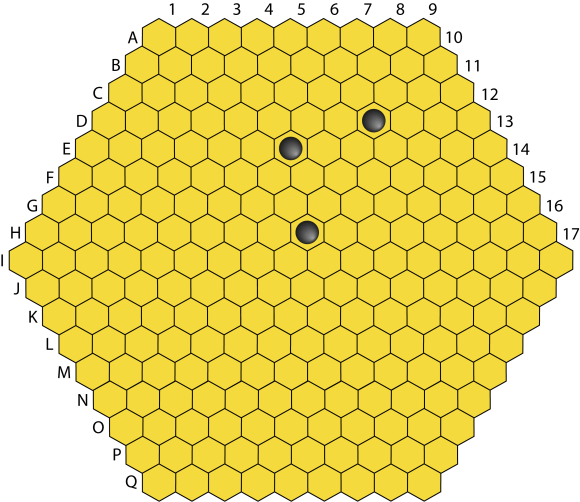
Onyx has a basic connection between pieces that is the equivalent of the bridge in Hex — the diamond, a simple but strong connection where any attempt by the opponent to break it can be answered easily:

Here White establishes a diamond connection. Black’s attempt to break it is easily answered on the other empty point of the diamond.
Less secure than the diamond is the square — an attempt to break this connection can result in a secure connection as seen below, but a clever opponent might find a way to divert your attention elsewhere and capture your two pieces instead.
White establishes a square connection. Black attempts to cut across the diagonal, but White answers by filling the last remaining corner.
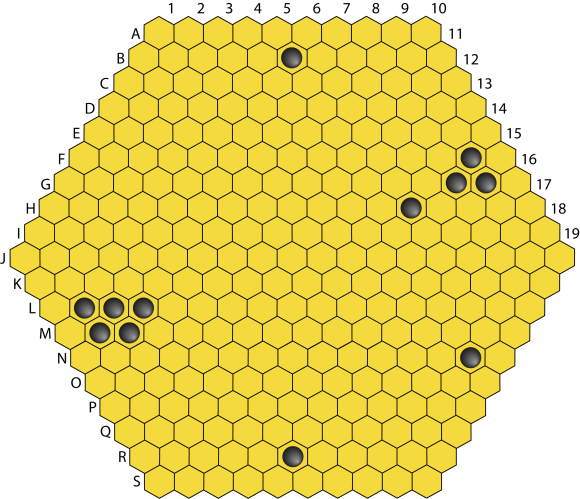
Next up is the house, which is very secure. There is no threat of a capture here, so only a deadly double-threat forcing a response elsewhere on the board can allow this connection to be broken.

White builds a house. Black’s anaemic attempt to break it is easily countered by playing on the remaining empty point.
Unusually, Onyx has a connection that benefits from the presence of an opposing stone. Larry Back calls this a duplex, because it resembles a house containing two different families. In isolation this connection can be secure, but the presence of the opposing piece makes it a bit easier for the opponent to generate threats that require a response outside the duplex formation. If the threat of a cut is stopped by a capture, the opponent can also threaten recapture, which gives another opportunity to generate threats elsewhere.
White builds a duplex. Black attempts to cut, but that simply leads to a capture by White and a complete connection (for the moment).
Most importantly we have the long diamond connection. This connection initially looks precarious — there’s a long distance between the connected pieces. However, the long diamond is actually quite strong:

White forms a long diamond connection. Black attempts to block a connection, but that leads to a capture by White.
However, here we see an instance where playing on the weak point at the centre of the square pays off. Black can break the long diamond connection, but at the cost of three moves, one of which is on the weak centre point:

Black successfully breaks the long diamond connection with a play to the centre of the square. White has no way through.
The long diamond can also be used defensively. If a player plays their stone at the end of what could be their opponent’s long diamond connection, this is called an opposition long diamond. Here’s an example of how the opposition long diamond can be effective, assuming White attempts to bludgeon their way through directly rather than playing around the obstruction:

Black plays an opposition long diamond formation. White attempts to push through, but Black can simply capture.
This is a very simplistic continuation — for more sophisticated discussion of the opposition long diamond, please see Larry Back’s article in Abstract Games Issue 11.
The long diamond connection is a very important part of Onyx. Understanding this connection allows you both to play these connections effectively and to block them. Given that the long diamond allows connections to grow more quickly across the board, it’s very important to know how to deal with them.
Tips for playing Onyx
Bearing in mind I’m very much a beginner in this game, from my reading and my early experiences getting absolutely ruined by Larry Back on the Gorrion Server I can offer a few tips that might help you get started.
- Know your connections! Get familiar with the basic types of connections outlined above. Play around with different attempts to make or break connections in these formations. The more comfortable you are with these basic connections, the more quickly you’ll be able to recognise effective moves in a given board position.
- Don’t ignore the sides and the corners. Particularly in the standard variation, where pieces are placed in the centres of the board edges at the start of the game, pay attention to the sides and corners of the board. Playing in the centre is valuable too, but if you don’t take care of the sides and corners, your opponent can get a lethal head-start on a strong connection along the side of the board. In the early game, balance your plays in the centre with plays in the corners (but not too deep in the corners).
- Don’t forget — your own stones can be a liability! Unlike in games like Hex or Y, where having extra stones around is never bad for you, in Onyx carelessly-placed stones can help your opponent. As we saw above, the strong duplex connection can be formed using an opponent’s stone! A badly-placed stone might also hurt your later attempts to connect stones by opening you up to a capture. Try to avoid placements that open up tactical advantages for your opponent! Conversely, if you can force your opponent to play a move that weakens their position — say, by giving you an opportunity to build a duplex — then go for it.
- Watch the diagonals! Like in other connection games, in Onyx you can end up in ladder formations, where both players are matching each other move-for-move as they make their way across the board. In Onyx these ladders have been dubbed snakes by designer Larry Back, and look like this:

A typical snake formation. Both players are writhing their way across the board, playing solely along opposing edges of the squares to avoid the possibility of a capture.
Because of the possibility of a snake forming, and the dire consequences if your opponent gains an advantage in these situations, it’s important to pay attention to the development of play along crucial diagonals on the board. Don’t just let your opponent set up shop along the diagonals!
Again these are very basic tips, but if you keep these ideas in mind while playing you can at least find some semi-sensible moves to play and get a feel for how the game works. After working with these basic ideas for awhile, do check out Larry Back’s articles in Abstract Games — particularly the tactical tips in Issue 6 and the deeply-annotated sample 12×12 game in Issue 11. Those articles go into much more detail on the concepts I’ve mentioned here.
From there, Larry’s article in Abstract Games 17 about edge templates will be valuable for the advanced player. Edge play is complex in this game, and knowledge of these template positions will give you critical insight in these moments, where sometimes only one move will allow you to connect or to block your opponent.
Sample 16×16 game
Since Larry Back already annotated a 12×12 Onyx game in Abstract Games magazine issue 11 at a much deeper level than I could, I thought I’d do a quick walkthrough here of a 16×16 game. Right from the start let me say that this is just my reading of the game — I’m sure I’m missing things here. But, as with learning Go, reviewing games and trying to understand why moves were played is a great way to improve, so hopefully any future game reviews I do will get better over time!
Like other connection games, Onyx is highly scalable, and larger boards can be used to provide a greater strategic challenge. The 16×16 game seems to have a nice balance between depth and game length — games are complex and interesting, but don’t wear out their welcome. You can play 16×16 and 20×20 Onyx online at the Gorrion Game Server, or you can print out my PDF boards (16×16 and 20×20) and play face-to-face.
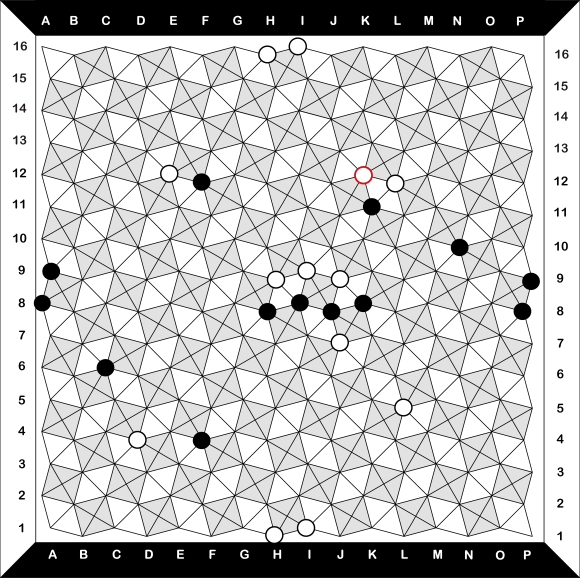
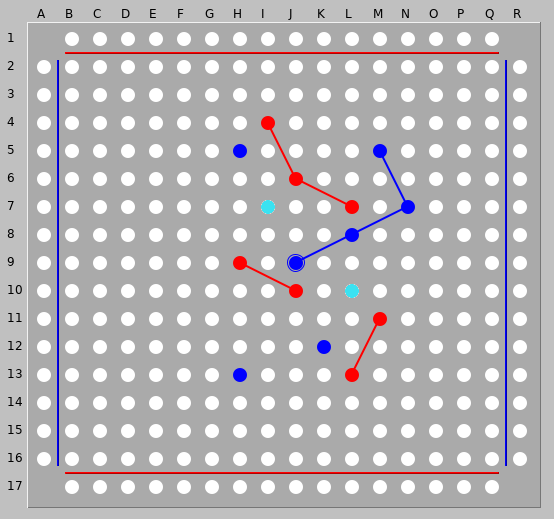
The game below was played on the Gorrion Server between the server’s founder, dashstofsk (playing Black) and larry_back (the game’s inventor, playing White). Let’s pick things up 8 moves in:

Position after 1. C6 (swap) 2. E12 3. K11 4. L5 5. H8 6. F4 7. H4 8. H9
This game is using the standard variation, in which Black and White start with four pieces each on the sides of the board. Initially Larry opened with C6 in the lower-left corner, but dashstofsk elected to swap, so from this point on Larry played White.
In the opening phase here you can see both players staking out territory. Black has laid claim to the lower-left and upper-right corners, while White is camping out in the upper-left and lower-right. Note that all four of White’s pieces are sitting precisely on the board’s main diagonals!
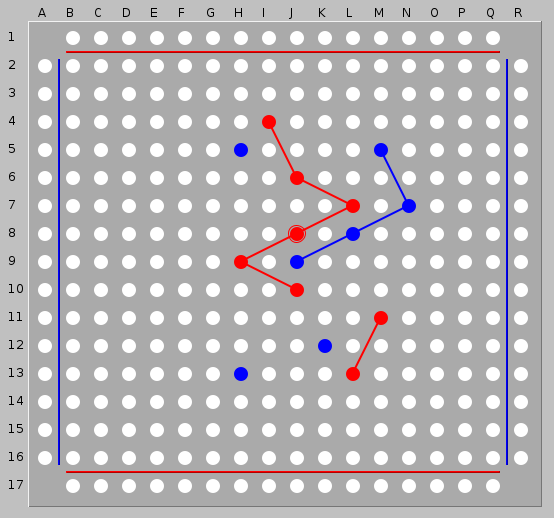
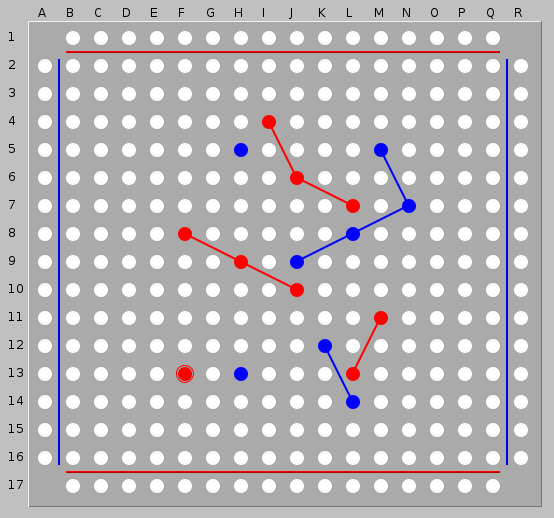
Position after 9. K8 10. J7 11. I8 12. I9 13. N10 14. J9 15. J8 16. L12 17. F12 18. K12
Ten moves later, both sides have built up a bit of a wall in the centre of the board — some structure is starting to develop now after the opening. Black has cut off any of White’s ambitions to connect J7 and J9, and at the end of this sequence White has blocked Black from venturing north from K11. Still plenty to play for at this stage.

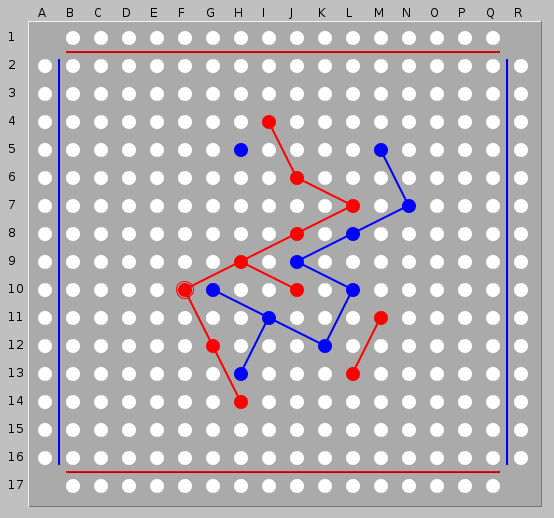
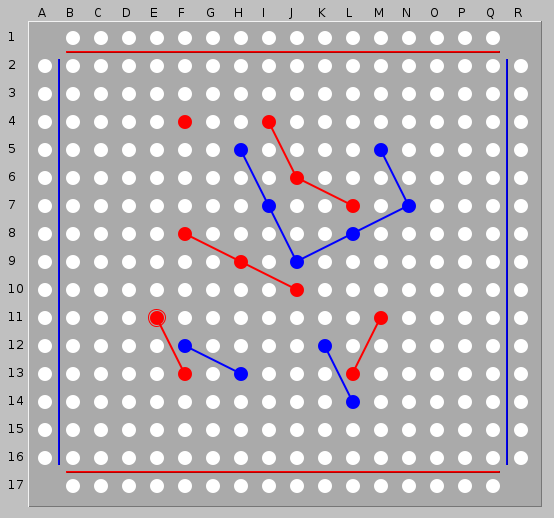
Position after 19. G12 20. G10 21. M12 22. L11 23. N11 24. M8 25. K9 26. LM910
After 26 moves, both sides are starting to probe their opponent’s defences. Black’s initial extension at G12 is promptly stifled by White forming a diamond at G10. White follows up by venturing south from L11, further complicating Black’s hopes of heading north. At the end of this sequence both sides have overlapping long diamonds over the square spanning the L and M files and the 9th and 10th ranks; White spends a move playing on the centre of that square, aiming to block Black from connecting their long diamond and securing a connection vertically for themselves. From here Black needs to consider starting a new adventure elsewhere on the board.
A note about move notation — the central intersections in the squares on the board are actually located between the rank and file designations around the edges of the board. However, we can identify a central point by the ranks and files covered by the square in question — so in this case, we can notate White’s move 26 as LM910. For future reference, moves that lead to a capture are followed by an asterisk, and a double capture by two asterisks.

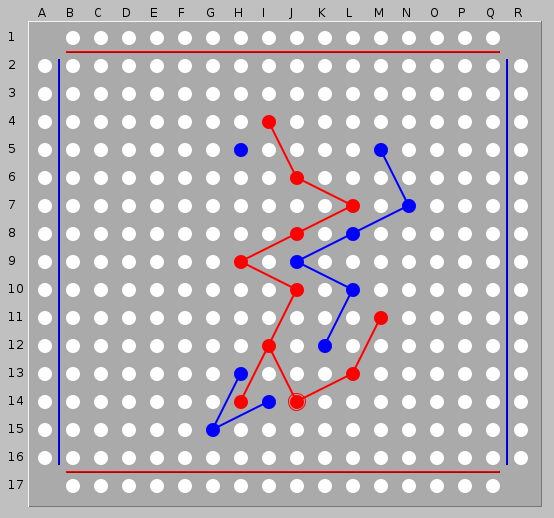
Position after 27. I11 28. J12 29. J11 30. I12 31. H11 32. E15 33. FG1516 34. F15 35. G15 36. G14 37. I14 38. G13
Following the last exchange, Black gamely heads west, eventually building a diamond connection to G12 with 31. H11. Seeing no more profit to be made here, White suddenly jumps north, forming a long diamond with 32. E15 — but Black quickly responds by playing at the centre, blocking off the long diamond. White, undeterred, veers south and links G13 to I12 with a duplex connection. White now has a dangerous-looking chain stretching all the way from E15 to M8.

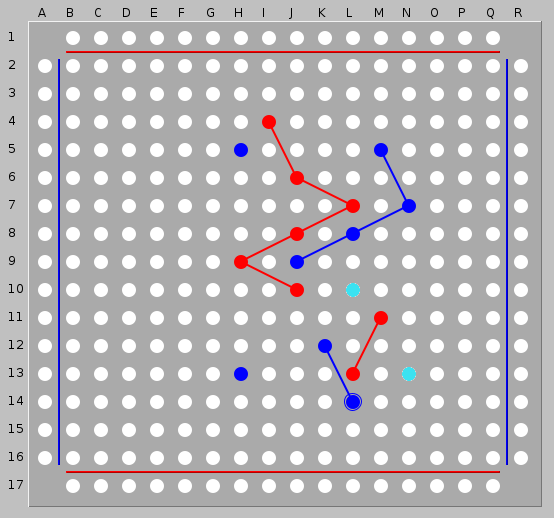
Position after 39. O5 40. O4 41. N5 42. N4 43. L7 44. M4 45. M6 46. OP67
Seeing the danger, Black attempts to regain the initiative with 39. O5, starting a new front against the right edge of the board. White quickly jumps in to block any attempts to connect further south, and after a few more exchanges White has a strong wall keeping Black hemmed in. This culminates in White spending a move disrupting Black’s long diamond between O5 and P8.
So far Black’s attempts to make progress along this edge are not bearing much fruit.

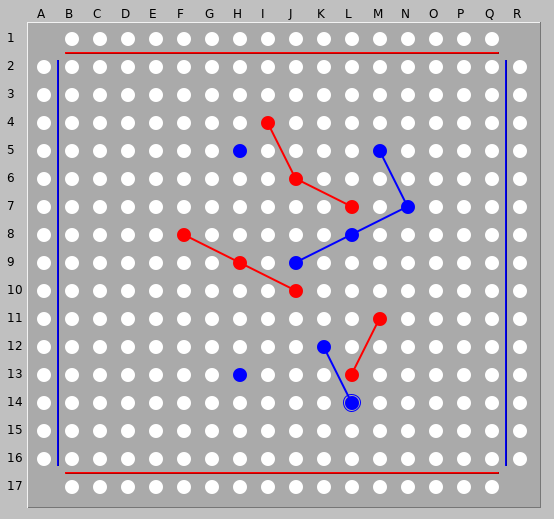
Position after 47. N7 48. F5 49. G4 50. E1 51. G2 52. G5 53. I5 54. I4
Black plays a final move along the right edge here, building a house with 47. N7, which also prevents White from forming a diamond at the same point and potentially making something useful out of the stone at OP67. Sensing again that a change in focus is needed, White jumps over to the lower-left corner with 48. F5.
After a few more moves, Black has formed a second house connecting G2, F4 and G4, which also prevents a diamond from White between H1 and G2. White remains resourceful, however, and jumps sideways with 54. I4, forming a duplex with the stones at G5 and G4 and reaching over toward his line of stones starting at L5. We can see now that White’s opening moves are paying off here — by having some stones placed early in key corners along critical diagonals, he’s ensured he would have some options at this later stage in the game. If Black had full control of this corner, White would not have much counterplay here and would need to start fresh elsewhere.

Position after 55. L4 56. K5 57. K4 58. K7 59. L8 60. I6
Things are starting to get a bit desperate for Black. White extends the line of stones on the lower-right with 56. L4, then jumps north with 58. K7, with a threat to punch through Black’s line of stones and connect to M8. Black responds swiftly, closing that door with 59. L8.
But White’s response at 60. I6 looks strong — with that one move, he forms another duplex connection between G5, I5 and I6, and threatens to connect to the line of stones at K5. Black’s interposing stone at I5 is an annoyance, but now White appears to have two possible paths around it.
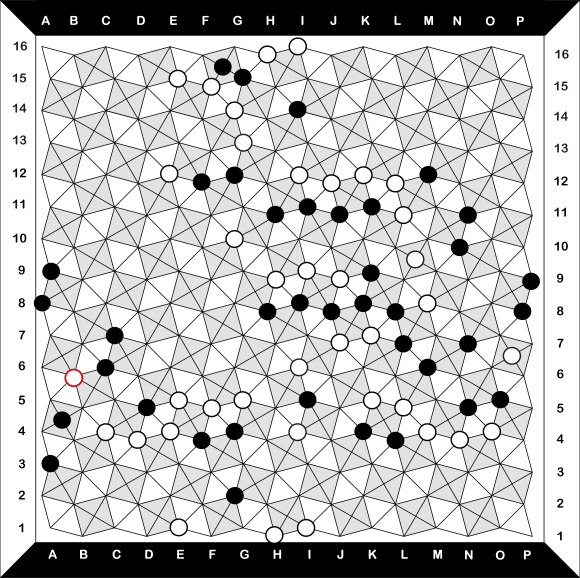
Position after 61. D5 62. E5 63. C7 64. E4 65. A3 66. C4 67. AB45 68. B6
Black sees White is attempting to complete his chain across the 4th and 5th ranks, and mounts a defence with 61. D5, forming a diamond connection with C6. White responds by strengthening his chain with 62. E5. Black seems to anticipate a move northwards and blocks at C7, but that leaves White the opportunity to connect at E4. Black attempts to wall off the edge with 65. A3 and 65. AB45, but White’s responses at C4 and B6 seal with deal. White now has an unstoppable connection to the left edge from B6, a duplex connection from there to C4, an unstoppable connection to the right edge from O4, and two ways around the interposing stone at I5. Black sees the writing on the wall and resigns.
If they’d played to the end, we might have seen a final position something like this:
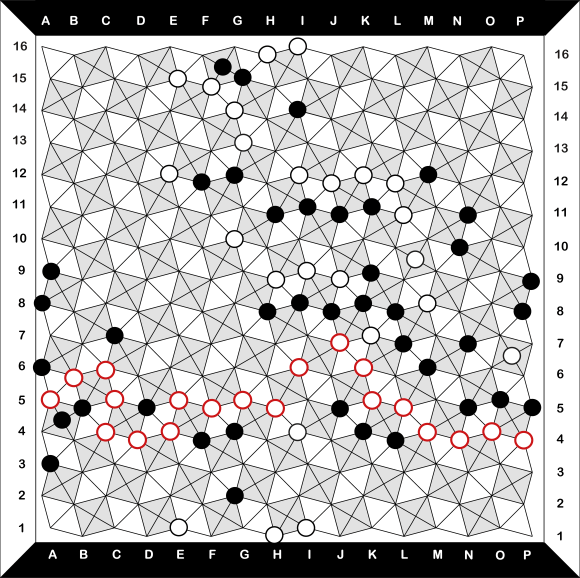
Position after a possible continuation 69. A6 70. A5 71. B5 72. C5* 73. B5 74. C6 75. J5 76. K6 77. P5 78. P4 79. H6 80. H5, White wins
I’m not going to pretend my hypothetical continuation here is by any means best play in this situation, but I think we can be reasonably confident that there was not too much Black could do here. White has enough options for connection at each key point in the chain to fend off Black’s defensive tries. Ultimately I think White’s strong opening, securing key points along the main diagonals, and later the deft manoeuvring near the lower-left edge and around the Black stone at I5 secured the win. With that clear path through the centre and all the way to the left edge, White ends up with a completed connection between A5 and P4.
Hopefully this sample game gives you some idea how an Onyx game feels in play. On the 16×16 board I think the game really shines; more strategic options open up, play often bounces around disparate parts of the board, and yet each move still feels consequential. My currently ongoing 20×20 game with Larry is, to my knowledge, the first one ever played, so I’ll reserve judgment on that board size until we at least finish one game! If pressed, I’d probably say it seems interesting thus far, but definitely too large for a beginning player like me to have much of a chance against Larry. Nevertheless I’m enjoying myself.
Next steps
As mentioned above, if you want to play Onyx I recommend the Gorrion Server, which offers 12×12, 16×16 and 20×20 boards, all with either the standard variation or the open variation. The web interface also allows you to play out moves for both sides on the board to check variations, which is very convenient. The server needs more players, so please join us!
Alternatively, you can play Onyx on Richard’s PBEM Server — however, here you can only play 12×12 (standard or open variation).
To learn more about the game, your best port of call is definitely Larry Back’s articles in Abstract Games magazine. He offers basic tactical advice, annotated games, and puzzles to sharpen your tactical vision. Other than that we don’t have much more strategic advice out there — so please come play with us online, and help us discover more about what this fascinating game has to offer!
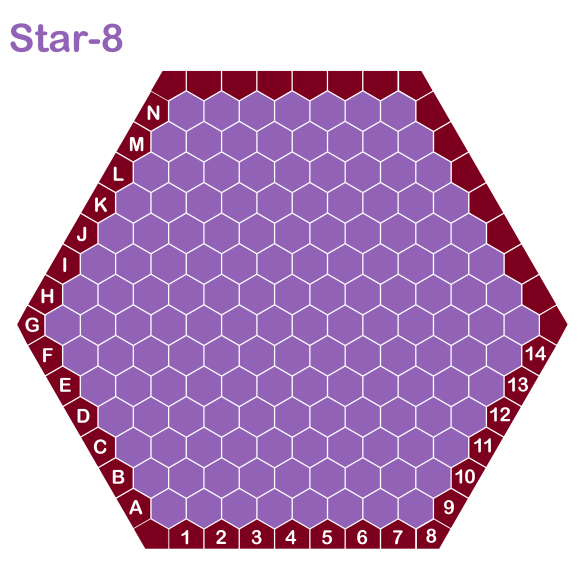
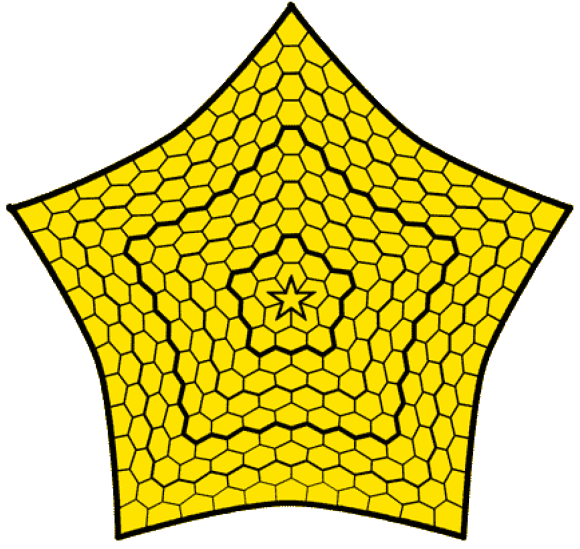
I’m not 100% sure what I’ll feature next in this series — at the moment I’m leaning toward covering ConHex and Phil Bordelon’s related meta-rules. At some point as well I’ll cover Gonnect, then circle back to cover Christian Freeling’s two predecessors to Starweb, YvY and Superstar. He apparently doesn’t like either of those games very much anymore, but I’m interested in the various descendants of Star so I’d like to write up something on these games.
Thanks for reading — if you know of a connection game that might fit my tastes that I haven’t mentioned, do get in touch and I’ll investigate it and write about it further down the line. Part of my motivation for doing all of this is to open my mind up to new games, so I’m very happy to take suggestions!


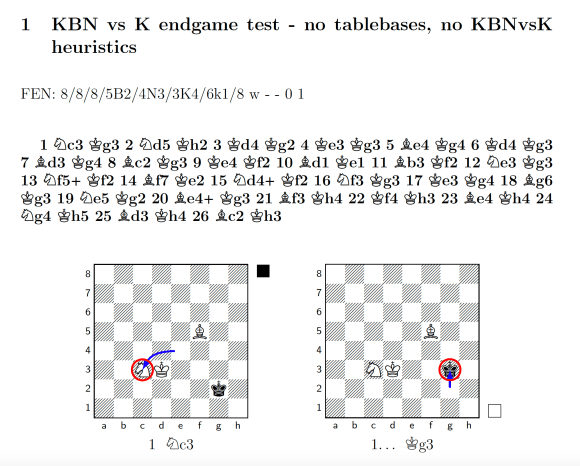
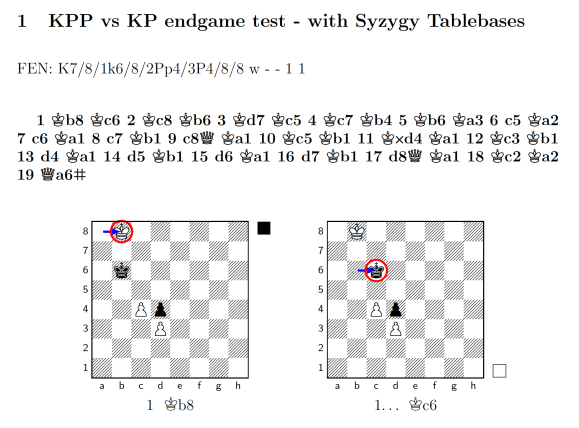
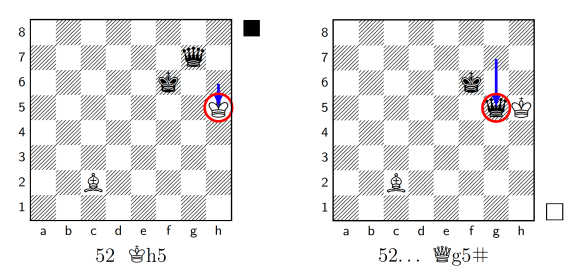
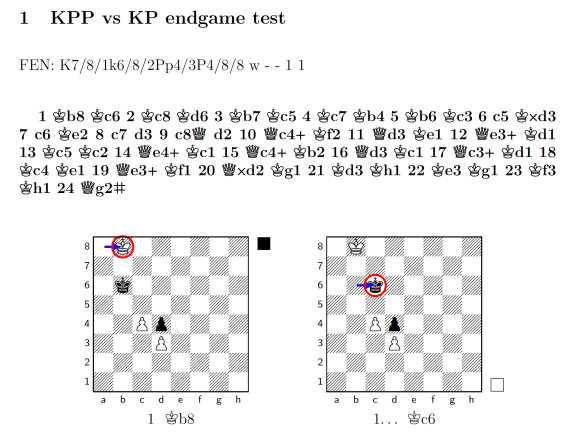 This endgame looks simple, but the black King is in the way of White’s protected passed pawn on c4, so getting that pawn to promote and become a Queen requires some finesse. SpaceDog manages this quite well without any additional help,


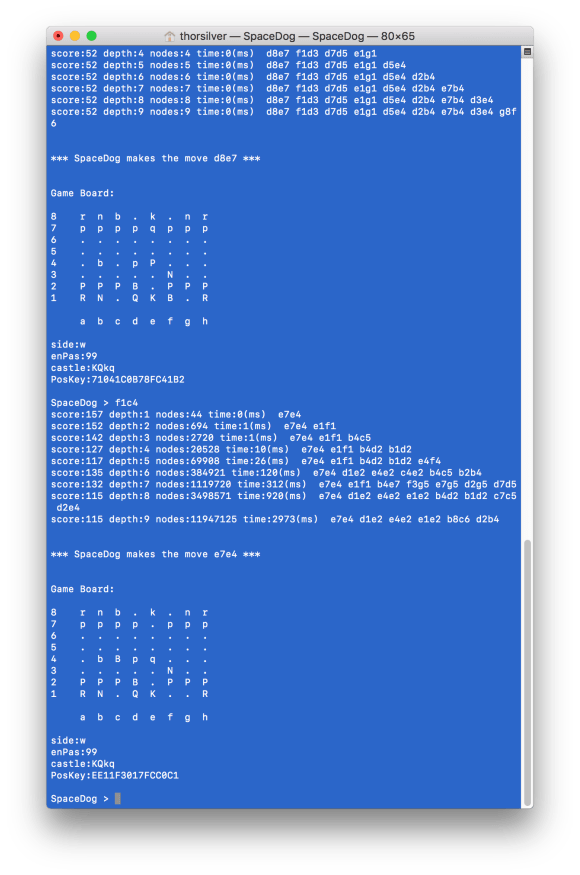 As you can see, it prints out a nice little text-based board for you (white pieces are capital letters, black pieces are lowercase). Moves are entered in long algebraic notation — so to move white’s queen at the bottom of the board to the square above white’s king, you’d enter d1e2. SpaceDog also prints out its search results and position evaluations on each move, so here you can see at the bottom that it searched nine moves ahead (depth:9) and spent 2.9 seconds evaluating 11.9 million moves before choosing the move e7e4 (taking my pawn with its queen) based on what it thinks of the resulting position and its future prospects.