Following on from my previous two posts about Chu Shogi (Part I, Part II), I plan to provide a full annotated Chu Shogi game for you. This is still in the works, but Chu Shogi games are long, so that post will take quite a while to prepare.
In the meantime, I’m going to work in parallel on material for other historical Shogi variants. Today I’m going to introduce you to Dai Shogi, Chu Shogi’s big brother and one of the earliest forms of the game. Dai Shogi is often given short shrift by the Shogi variant community, who largely dismiss it as a slower, more boring version of Chu Shogi; hopefully by the end of this post I can convince you that this isn’t a completely fair characterisation.
One of the advantages of learning Dai Shogi is that if you know Chu Shogi, you can learn the basics of Dai Shogi in no time at all. That means this post will be a bit more concise than the last two. However — excuse me while I put this in bold type on a separate line for emphasis —
You must know how to play Chu Shogi in order to make sense of this post!
Now that’s out of the way, let’s get started!
The Origins of Dai Shogi
As mentioned in the first Chu Shogi article, we are aware of a large version of Shogi dating all the way back to the mid-12th century. In the latter part of the 12th century the Nichureki was published, and this document describes an early form of Dai Shogi now generally referred to as Heian Dai Shogi.
Heian Dai Shogi was played on a 13×13 board with 34 pieces per player, with 13 types of pieces available. Much of the board was therefore empty, and the pieces moved slowly for the most part, so most attempts at reconstructing this game find it to be rather glacially paced.
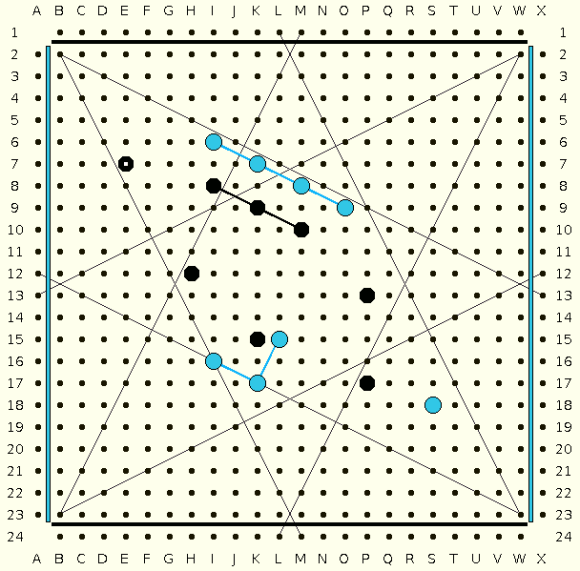
However, clearly the Shogi playing community of the time realised this fairly early on, and various diary references to Dai Shogi in the 14th century suggest it was a well-regarded game, so we suspect that the game evolved into its more robust 15×15 form by that time. Dai Shogi is presented in detail alongside Chu Shogi in the Shōgi Rokushu no Zushiki (象棋六種之図式), originally published in 1443, which you can see below:

During the 15th century Dai Shogi was considered the most distinguished form of the game, as described by George Hodges:
“Large Shogi eventually became popular enough to be referred to simply as ‘Shogi’…. Similar references abound throughout the 15th century, and indeed many imply that Little Shogi was generally regarded as merely a boys’ game.”
–George Hodges, Shogi Magazine
Dai Shogi eventually lost popularity to Chu Shogi, which offered a lot of the same ingredients in a tighter package. Chu Shogi was then the dominant form of Shogi until the late 16th century, when the introduction of the drop rule in Sho Shogi (small Shogi) turned the Shogi world on its head. From that point onward, Dai Shogi largely vanished from the Shogi world, although we know it was still being played into the 19th century as it appears in a few famous woodcuts around that time.
Dai Shogi today has experienced somewhat of a revival, though much less so than Chu Shogi or Tenjiku Shogi. Dai Shogi can be purchased and played relatively easily today largely thanks to the efforts of George Hodges, who disseminated information on Shogi variants around the Western world in the 1970s and 80s. While in today’s fast-paced world a full game of Dai Shogi can be tough to organise, thanks to the efforts of dedicated Shogi fans worldwide there are still ways to get a game going via the internet or in real life.
The Rules
As you might expect from a game I keep calling ‘Chu Shogi’s big brother’, Dai Shogi is played on a bigger board: 15 x 15, with 225 squares, substantially larger than Chu Shogi’s 12 x 12 board with 144 squares. Of course the starting armies are larger too; each player begins with 65 pieces of 29 different types, which is again a significant increase from Chu Shogi’s 46 pieces per player of 21 different types. Including promotions Dai Shogi requires you to remember 36 different moves, a decent step up from 28 in Chu Shogi.
The starting position of a Dai Shogi game looks like this:

Diagram 1: Dai Shogi board with 2-kanji pieces.
There’s clear similarities here to the Chu Shogi setup: two Go-Betweens at the front, then a complete row of pawns, then a massive army lurking behind with the King at the very back. However, because Dai Shogi has an odd number of files, the King can sit directly in the centre on the back rank.
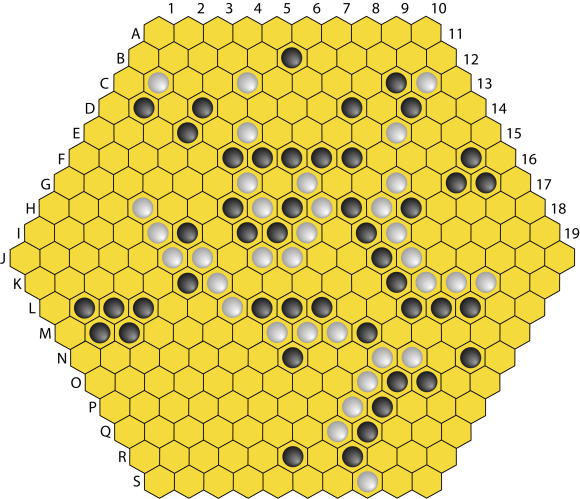
Here is the initial position with all pieces flipped over to show their promoted sides:

Diagram 2: Dai Shogi board with pieces flipped to show their promoted sides (2-kanji pieces).
Just like in Chu Shogi, only the Lion, Free King and King don’t promote. If you look closely you may notice a bunch of pieces promoting to Gold General — more on that later.
Now let’s zoom in and look at one player’s starting setup in detail, this time with 1-kanji pieces for better readability:
-

- Diagram 3: Dai Shogi initial position for one player (1-kanji pieces).
-

- Diagram 4: Dai Shogi initial position for one player, with pieces flipped to show their promoted sides (1-kanji pieces).
If you look more closely at Diagram 3, you will notice that the pieces are shuffled around somewhat compared to Chu Shogi. The central position of the King is a bit more convenient, particularly given that the King starts already ensconced in a Basic Castle (two Blind Tigers and a Drunk Elephant in front, and flanked by two Gold Generals). The Free King and Lion are now in two different rows, and to either side of them are several new pieces. More new pieces are sitting close to the left and right edges of the board on the first and fourth ranks. When we look down at Diagram 4, we can see that all of these new pieces promote to Gold General. Along with these eight new piece types, Dai Shogi contains every piece type that is in Chu Shogi, and they have identical promotions in Dai as well.
The Basics
Rather than go through all the basic rules in full, which are nearly identical to Chu Shogi, I will just mention the key points:
- Objective: The goal of the game is to capture all of the opponent’s royal pieces — their King or Crown Prince (if applicable). If a player has both a King and Crown Prince on the board, both must be captured for the other player to win. A player may also win by eliminating every non-royal piece from their opponent’s army (the Bare King Rule).
- Making Moves: Black (at the bottom of the board in our diagrams) always moves first. Players take it in turns to move one piece in their army in accordance with its movement abilities. Pieces may not move into or through squares occupied by friendly pieces. If that player’s piece moves into the same square as an opposing piece, that opposing piece is captured and removed from the game. As in Chu Shogi, there are no drops in Dai Shogi; captured pieces are removed from the board and play no further part in the game afterward.
- Promotion: If a player moves a piece in their promotion zone — which in Dai Shogi consists of the five furthest ranks from that player’s starting position — they may choose to promote that piece by flipping it over. That piece now becomes a different piece, as indicated by the characters on the promoted side. Once a piece is promoted it may not un-promote. If a player chooses not to promote a piece on its initial move into the promotion zone, the piece may promote on a subsequent move if it A) moves out of the zone, then back in, or B) captures an enemy piece within the zone.
If a player chooses not to promote a piece and that piece reaches a point where it can no longer move, then that piece simply becomes a ‘dead piece’ and sits in place for the rest of the game, or until it is captured. This applies to pieces that cannot move backwards, like the Stone General, Knight, Lance, and Pawn. - Repetition: Repeating a board position with the same player to move is forbidden. This is more strict than the official rules for Chu Shogi, which allow four repetitions. Wikipedia claims that this rule does not apply when a player is in check. A player may pass their turn using the Lion’s abilities, but two passes in a row are not possible in Dai Shogi, since that would create the same position with the same player to move.
- Lion-Trading Rules: There are no Lion-trading rules in Dai Shogi! The larger board means the Lion doesn’t dominate quite so much as in Chu, although the Lion is still very dangerous in endgame situations.
The New Pieces
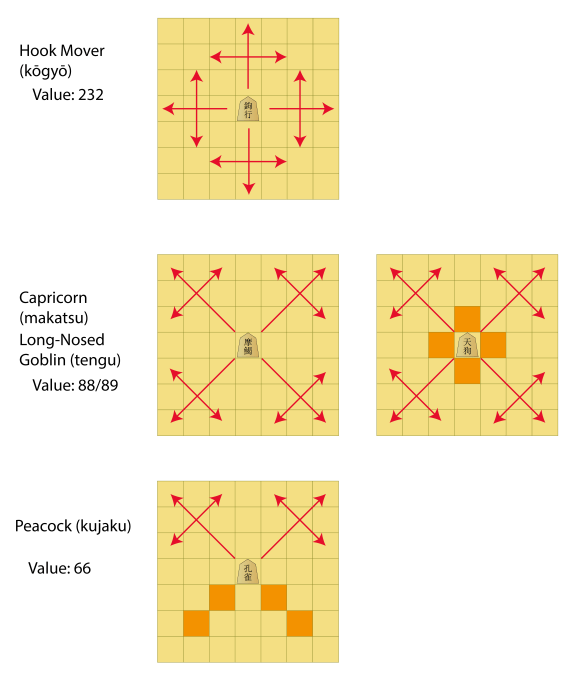
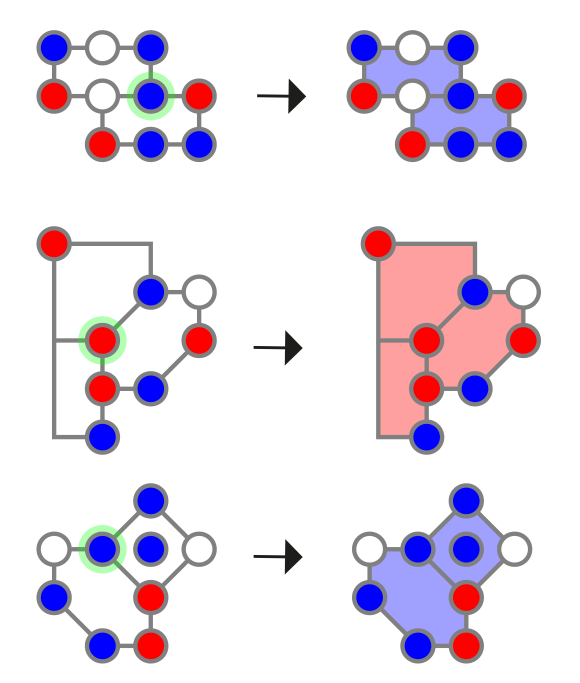
To learn Dai Shogi, we also need to learn the moves and promotions of the eight new pieces. These new pieces are quite easy to remember:
-

- Diagram 5: The eight new pieces of Dai Shogi (2-kanji pieces)
-

- Diagram 6: The eight new pieces of Dai Shogi (1-kanji pieces)
There’s a few key points to note with these new pieces:
- The Knight is back — Players of standard Shogi may have noticed there were no Knights in Chu Shogi, but the Knight has returned in Dai Shogi. The Dai Shogi Knight moves like a Chess Knight, but only forward.
- Longer-range weak pieces — Two of the new pieces, the Violent Ox and the Flying Dragon, are unique in that they are the only short-ranged pieces that can move 1 or 2 spaces in certain directions. This can be helpful when facing off against an opposing group of weak pieces, as they exert a slightly larger influence across the board.
- Simple promotions — All eight pieces promote to Gold General. This means promotion is a little less exciting than with some other short-range pieces, but nonetheless a Gold General is a useful defensive piece due to its good coverage of adjacent squares, and a powerful checkmating threat when near the enemy King.
All of these pieces promote to Gold General, but not all of them have strictly upward-compatible moves; in other words, some pieces’ unpromoted moves are not a subset of the Gold General’s moves, meaning that you may not want to promote them in certain circumstances.
- Upward-compatible pieces: Stone General, Iron General, Evil Wolf, Angry Boar
- Non-upward-compatible pieces: Knight, Cat Sword, Violent Ox, Flying Dragon
The upward-compatible pieces, however, should always be promoted. Becoming a Gold General substantially increases their movement powers, so there’s no reason to leave them unpromoted.
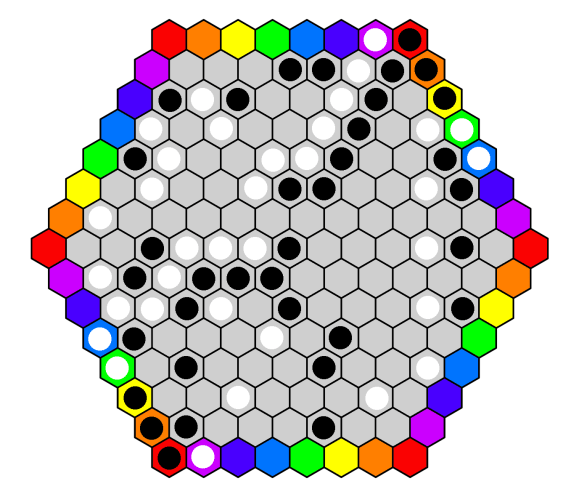
If you know Chu Shogi, then getting to grips with these pieces should be very easy for you. They all have simple moves and the same promotion. To make things even easier for you, I’ve created reference sheets for all the Dai Shogi pieces in two versions: dai-shogi-reference (1-kanji) and dai-shogi-reference (2-kanji). Click the links to download PDF versions, or click the thumbnails below for very high-resolution PNG images.
-

- Dai Shogi reference sheet (1-kanji pieces)
-

- Dai Shogi reference sheet (2-kanji pieces)
Why play Dai Shogi?
Amongst the admittedly small Shogi variant player community, Dai Shogi has a reputation for being just a slower and/or more boring form of Chu Shogi. When looking for information on the game, one will frequently stumble on comments like this one, taken from the ChessVariants.com page for Dai Shogi:
“The extra pieces are rather weak, and promote to the also weak Gold General. As a result of this, and due to the longer time it takes the many steppers to cross the larger board, Dai Shogi is a much slower game than Chu. It is thus not surprising the latter quickly surpassed Dai Shogi in popularity.”
Or this comment buried within the Chu Shogi page on Wikipedia:
“As stated earlier, this game is based on dai shogi and all of the pieces of this game can be found in dai shogi. The eight types of pieces that were removed were all rather weak and all promoted to gold generals. Furthermore, the larger board of dai shogi makes the slow-moving step movers even slower. All of this made for comparatively dull gameplay.”
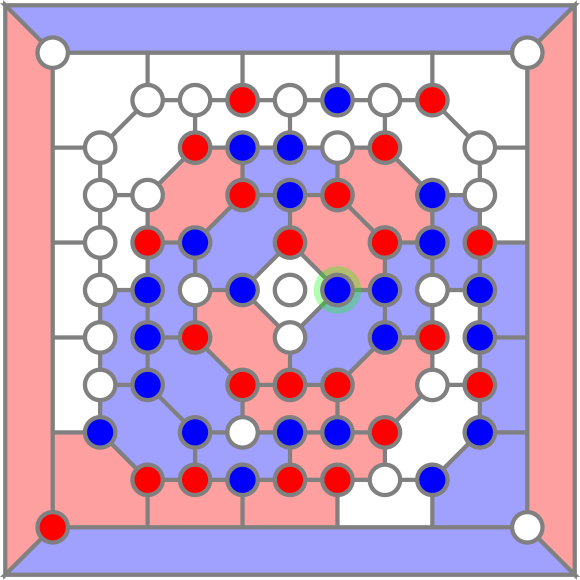
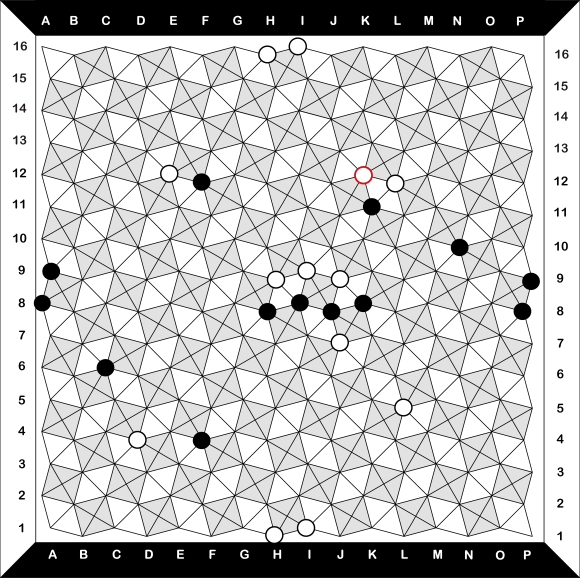
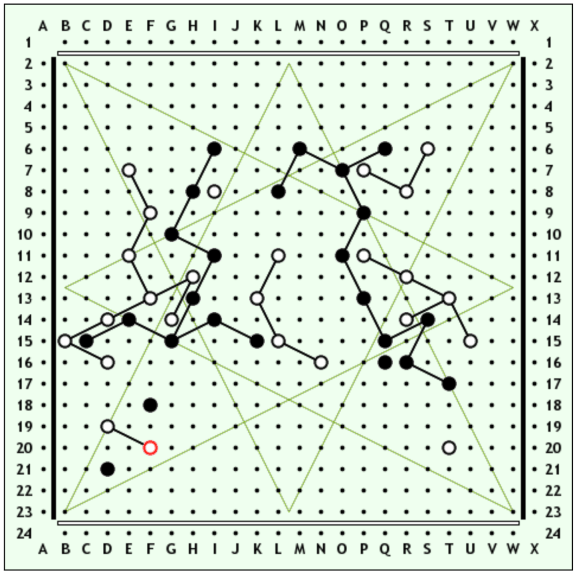
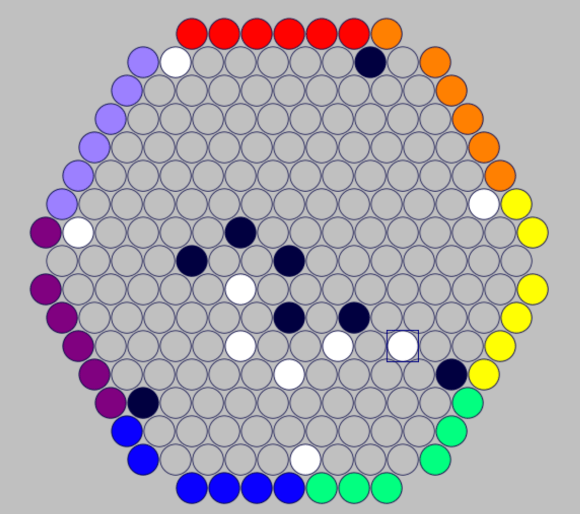
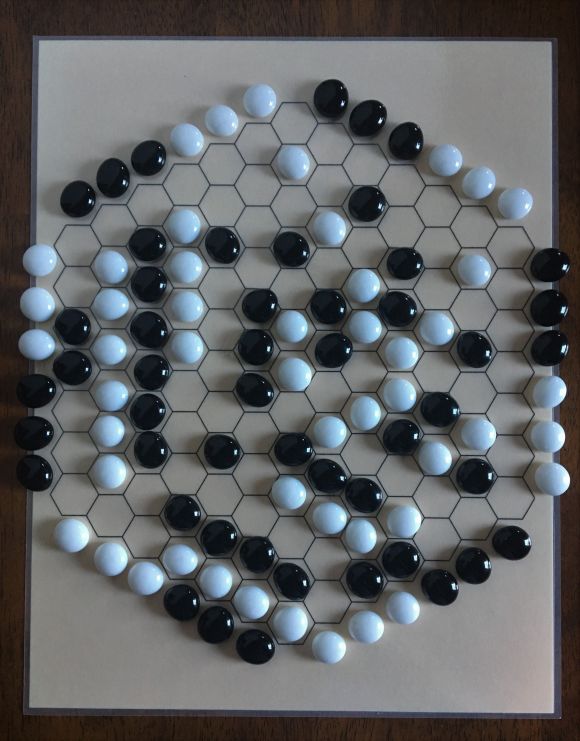
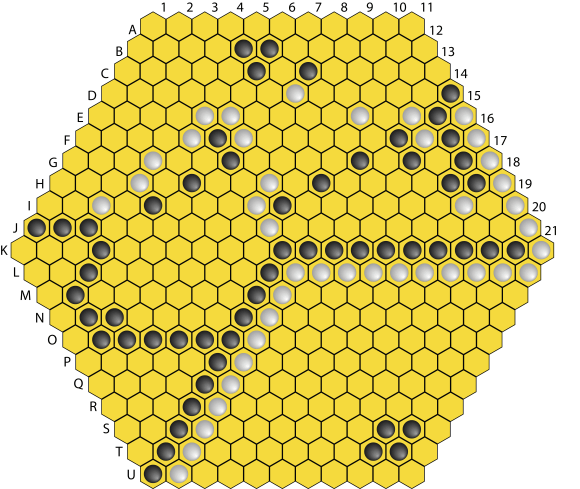
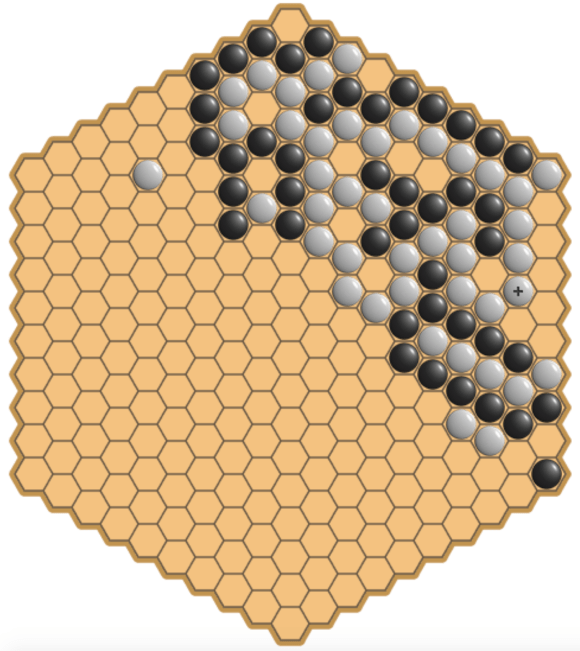
I cannot stress enough that I strongly disagree with this assessment. Dai Shogi is definitely a longer game, generally speaking; a typical Chu Shogi game might last 300 moves, whereas a Dai Shogi game can reach 400-500 moves, or sometimes substantially longer. Here is the final position of a game I played online that I won after 568 moves:
When you see a number as large as that, you may be turned off. But that final position shows how violently thrilling a good Dai Shogi game can be. My 65-strong starting army was whittled down to only 16 pieces, and this was due to some extravagant piece sacrifices throughout the game to gain positional advantage and a series of bloody exchanges. During the game my Lion captured about a dozen opposing pieces before finally being dispatched. If you look at my castle at the bottom of the board, you can see the final desperate lunge of my opponent’s last-minute attack before I finally clinched the victory. So yes, the game was long, but it was a nail-biter throughout. After that game I could never call Dai Shogi ‘boring’ or ‘slow’.
I should be clear that I would still generally recommend Chu Shogi over Dai Shogi — Chu is tighter, shorter, and just a devastatingly good game. But compared to Chu Shogi, Dai Shogi offers a new experience — more intricate and strategic, while losing none of the tactical complexity of Chu. In fact, I propose there are some significant advantages to Dai Shogi for the aspiring Shogi fanatic:
- Bigger board, bigger armies: Yes, having a larger board does lengthen the game, and there are more pieces to remember. But the larger board also opens up more strategic flexibility. Openings are less sharp than in Chu, and you have more time to build up an attacking force and prepare your defences. The larger army also makes the game a bit more forgiving — early mistakes can be mitigated more easily, as individual pieces are less impactful on such a large board.
- Convenient starting array — Dai Shogi has an odd number of rows and columns on the board, unlike Chu, so the starting position is more symmetrical. The King begins in the dead centre on the back rank, and he starts the game already in the Basic Castle formation we know and love from Chu. That means it is viable to simply leave the King where he is and focus your opening on developing your attacking pieces, rather than spending moves on collecting your defensive pieces together. The new short-range pieces also start the game closer to the front lines, so gathering your forces to the front is not too onerous. In general the starting formation feels very carefully and cleverly designed, and it enables opening play to maintain a good pace, without much need for back-rank defensive reshuffles.
- No Lion-trading rules — The ChessVariants.com page on Dai Shogi appears to cite this as a negative, bizarrely. The Lion-trading rules in Chu Shogi, while they serve a very important purpose and definitely benefit the game, are also difficult to learn, filled with weird exceptions, and at times counter-intuitive. Dai Shogi can dispense with them entirely, since the Lion is still powerful here but not totally dominant, and that means we get to enjoy its powers without worrying about any rules-lawyering being needed in unusual board situations.
- A nice stepping-stone to larger games: Dai Shogi is far from the biggest form of Shogi. I will cover these in later articles, but you can see a bit of information on the larger Shogi games in my introduction to Shogi. Most of these larger beasts are very significant leaps in complexity from Chu Shogi; Dai Dai Shogi, for example, has 64 types of pieces in the starting position, compared to 21 in Chu Shogi. Dai Shogi brings some of the benefits of these larger games — greater strategic scope, more expansive opening strategies — but can be easily learned in an afternoon if one already knows Chu Shogi. This makes Dai Shogi an ideal introduction to the large Shogi games, which beyond simply being immense, are actually well-designed and fascinating games to play.
So, taking all those points into account, I do believe Dai Shogi offers something of its own character. Dai may not have the extravagant piece variety of Dai Dai Shogi, or the all-powerful Emperor of Maka Dai Dai Shogi, but it does offer a compelling, strategic gameplay experience without much more mental overhead than Chu Shogi. Dai Shogi is by any measure an extremely large member of the Chess family, yet it manages to be so without becoming unmanageable. I’d even say that in some ways it may be more forgiving for beginners than Chu Shogi, given that mistakes hurt a bit less here and opening play is more freeform, and not needing to learn the Lion-trading rules is a nice bonus.
R. Wayne Schmittberger, perhaps one of the most experienced large Shogi players in recent history, does prefer Chu Shogi but offers this endorsement of Dai Shogi’s attractions:
“The extra space between the starting forces and the greater number of pieces permit greater flexibility in playing the opening than in Chu, and hence greater scope for creativity.”
Ultimately, it’s technically true that Dai Shogi is basically ‘Chu Shogi, only bigger’, but I would emphasise that the game offers greater scope for strategic intrigue and complexity — and yet still remains comprehensible. In that respect I think it has a character all its own, and is well worth taking the time to explore.
Basic tips for beginners
To be perfectly honest, there’s not a whole lot of information out there about how to play Dai Shogi at a high level. However, the game’s similarity to Chu Shogi at least offers a strong starting point. What I will do here is highlight some key points of Chu strategy, and describe how to adapt them to Dai Shogi; I will also talk a bit about how to utilise the new pieces.
The Opening
As mentioned above, the opening in Dai Shogi is a bit more freeform than in Chu Shogi, thanks to the larger board area. However, the same opening principles used in Chu Shogi can be usefully applied here:
- Don’t neglect your short-range pieces: In Dai Shogi you have a wider Pawn line, so be sure to bring forward some of your new short-range pieces to fortify your Pawns. As in Chu Shogi, any weak points in your front line will be vigorously attacked by the opposing Lion, so try not to allow any obvious weaknesses to develop. Out of the eight new pieces, the stronger ones — the Flying Dragon, Violent Ox, Evil Wolf, and Iron General — can be used as active attackers as you steadily advance your Pawn line. The weaker ones — the Stone General, Angry Boar, Cat Sword and Knight — are still valuable up front, but more for force of numbers than as the vanguard. Knights in particular are easy to lose by mistake, as they jump forward relatively quickly but in a very limited way; advance the Knights carefully, and avoid jumping them into positions that reduce their already limited mobility.
- Keep your King safe: The King starts in a Basic Castle from move one, so rather than shuffling around your pieces to form a castle you can instead focus on fortifying this pre-existing structure. As in Chu, bolstering that formation with your Silvers, or even with your Dragon Kings or Dragon Horses can be useful.
- Place your Lion high and central: Despite the somewhat weaker influence of the Lion in Dai, and its greater susceptibility to capture due to the lack of anti-trading rules, the Lion is still well-placed at the front of the action. Use your Lion to stake a claim to the centre and exert its influence as strongly as you can. The Lion can easily exploit weaknesses in the enemy front line to claim some quick material gains, and its presence can force the enemy to channel their forces away from the centre, allowing you to fortify your defences on the appropriate side of the board. Just be aware of the threat of a Lion trade if your opponent gets fed up; sometimes you may want to jump the Lion behind the Pawns to fortify your front line whilst staying out of trading range.
The old Lucky Dog Games site on Dai Shogi has some sample openings, which I’ve diagrammed below for your convenience:

Diagram 7: Position after 1.P-9j P-7f 2.P-7j P-9f 3.DH-12n DH-9g 4.EW-10l Ln-9e 5.P-10j Ln-8g 6.P-6j P-4f 7.Ph-9k P-3f 8.Ph-10k EW-6d 9.EW-9k EW-7e 10.Ln-6k P12f
In this position we see a fairly solid early opening from both sides, with several central Pawn advances backed up by the Lion. Both players have brought their Evil Wolves forward as well to reinforce the advanced Pawns. The centre looks set to be a stage for some Lion manoeuvring; the later stages of the opening may see the players developing an attacking posture on one side of the board, leaving the Lions and Wolves to battle over the centre.

Diagram 8: Position after 1.P-9j P-7f 2.DH-7i P-9f 3.EW-10l Ln-9e 4.EW-9k Ln-8g 5.EW-8j Ln-10i
6.Ln-9k Lnx11j-12i 7.N-13m P-8f 8.P-6j Ky-7e 9.P-4j P-6f 10.P-3j Ph-8c
Here White has jumped the Lion directly into the action, capturing a Go-Between on the left side in the process. Black has chosen to lock down the centre instead, with a well-placed Lion and an Evil Wolf and Dragon Horse advanced as well. The advanced Pawns on the right suggest Black may be planning to develop an attack along this flank.
Granted this is very early in a Dai Shogi opening — an opening in this game can easily last 100 moves or more — but at this stage I feel Black is more solid. White’s Lion has made a small material gain but is unprotected and could be harassed, allowing a further gain of tempo for Black. Black meanwhile has an early hold on the centre and has moved various pieces rather than jumping the Lion all over the place, giving them better piece development overall.

Diagram 9: 1.P-13j P-7f 2.FD-12j Ln-7e 3.P-10j Ln-8g 4.Ln-10k Ln-6i5.P-14j P-9f 6.VO-14k Lnx5j-4i 7.N-3m DH-7g 8.Ln-8i P-10f9.B-9j FD-12b 10.R-14l P-12f
In this position White has again spent several tempi unleashing the Lion, this time grabbing a Go-Between on the right side. Black is clearly developing an attack along the left side, having advanced a Violent Ox backed up by a Rook. Black again holds the centre, this time with a Lion protected by a Bishop. The Lion’s influence also helps restrict White’s Dragon Horse.
Again I’d suggest Black has made better use of their early turns here. White’s Lion does restrict Black’s development along the right side, but Black has already made gains of space on the left and can freely develop their attack over there. Black’s Lion is dominant in the centre, and they are strong on the 14th file as well.

Diagram 10: Position after 1.P-9j P-7f 2.P-8j P-9f 3.P-6j Ln-9e 4.Ln-8k DK7d-8c 5.P-3j EW-7d
6.DH-4n P-8f 7.EW-6l EW-8e 8.B-7j N-3c 9.GB-5i P-4f 10.EW-6k P-8g
Finally, in this last example both players have advanced in a more cautious way. Both Lions are centrally placed and protecting the Pawn line. Both have brought their Evil Wolves forward to support Pawn advances. Neither player has obvious weaknesses; Black appears to be preparing an advance on the right side, whereas White is advancing in the centre, perhaps to prepare a higher Lion placement.
These opening positions are instructive examples of the extremely varied play that is possible in the Dai Shogi opening. Despite the larger board, players can exert pressure quite early in the game, forcing the opponent to commit their attacking forces to one side or another. Piece placement can vary enormously depending on players’ particular style, so maintaining flexibility is important. As in Chu, advancing the weaker pieces is critical to developing a strong attacking posture, and those pieces should serve to reinforce your Pawn line. As we can see in these examples, the Evil Wolf is a useful piece to develop in the early going, and is conveniently placed to support early Pawn advances.
The Middlegame
The middlegame of Dai Shogi is a spectacularly complicated affair, so it’s difficult to offer much more than very basic concepts here. In general, we will apply the principles we learned in Chu Shogi, while bearing in the mind the consequences of the larger board:
- Advance methodically: Perhaps even more true in Dai than in Chu. Your army has a larger and more varied array of short-range pieces, including two that have a two-square movement range (the Flying Dragon and the Violent Ox), so be sure to advance these on the front where you are developing your attack. On such a large board it’s hard to resist the temptation to advance your Pawns quickly to get things going, but try not to fall victim to that impulse. A solid Pawn line supported by your stronger short-range pieces — Evil Wolves, Violent Oxen, Flying Dragons, Iron Generals, Copper Generals — will gain you space much more effectively than a hurried Pawn push with little support. The Lion is slower in this game but still has an insatiable appetite for Pawns and Go-Betweens!
- Avoid pointless material losses: This is another general Chu Shogi principle that works well in Dai. Patience is a virtue here, and even though the larger armies make individual material losses less impactful, at some stage you will need to exert force on some part of the board to gain space and cramp your opponent’s defences; doing so is much harder if you lack the numbers. If you do end up down in material, avoid major exchanges of pieces; instead, try to gain enough space to promote some pieces, which can make up for the lost material value. Conversely, if you hold a material advantage, try to force an exchange; this will open up lines of attack, but your material edge will ensure you are better able to exploit this new space than your opponent.
- Don’t rush toward promotion: The bigger board of Dai means that gaining space all the way to the promotion zone will take more time and effort. In general, the larger board means long-range pieces have even more power than in Chu, so advancing pieces with a long-range promotion will be very helpful in the later stages of your attack. For this reason you want to ensure that your pieces with strong promotions can promote safely, so take the time to secure space at the edge of the promotion zone before dashing forward to upgrade your forces. As in Chu, some pieces with strong promotions should be held back until the endgame starts — namely the Gold General, Phoenix, Kirin and Drunk Elephant. The Golds and the Drunk Elephant are very useful defensive pieces, so don’t promote them unless they have a clear path toward the promotion zone and your King is otherwise secured. The Phoenix and Kirin promote to the strongest pieces in the game, so keep them back behind your front line until the board opens up; even then, keep them protected as much as possible as they head for promotion, as their movements are rather slow and awkward. As in Chu, a promoted Vertical Mover is a powerful addition to your attack.
- Keep your Lion centralised and patrolling: This general principle from Chu is still fairly useful here, but as you can see from the sample openings above, the larger board area does permit some different Lion adventures at times. The challenge with the Lion in Dai is to maximise its impact in the opening, where it is safer from long-range attack due to the interposing pawns on both sides, and in the endgame, where a Lion assault on the King is often decisive. In the heat of the late middlegame, where pieces are dropping like flies and numerous lines of attack are opening up, make sure to keep your Lion safe from sniping attacks from long-range pieces. Do not be afraid to drop the Lion back to safety temporarily; better to keep the Lion alive deep into the endgame than to valiantly sacrifice it for early material gains. You will be glad you protected your Lion as you enter the endgame, particularly if a spicy mutual-checkmating-attack situation develops.
- Don’t forget about defence! A useful principle to keep in mind in Dai as well as Chu — or in fact in any Chess-type game, where defence is less glamorous than attack and is all too easily neglected. As in Chu, your Rooks and Side-Movers are extremely useful for defence; R. Wayne Schittberger recommends dropping your Rooks back to the third rank to patrol in front of the King’s castle. Side-Movers can be placed on the fourth and fifth ranks to mount a solid defence against the enemy Lion. Keeping short-range pieces in defence of your edge pieces — the Lance and Reverse Chariot — can be useful too, in order to prevent an exchange along the edge opening a pathway to promotion for your opponent.
The Endgame
The basic principles of the endgame in Dai are very similar to Chu: advance your Golds and Drunk Elephant when it is safe to do so; advance your Lion toward the enemy King; and promote your forces when possible to make your attacking army more dangerous. The major addition in Dai are the new short-range pieces, in particular those with unusual moves that may not benefit from a promotion.
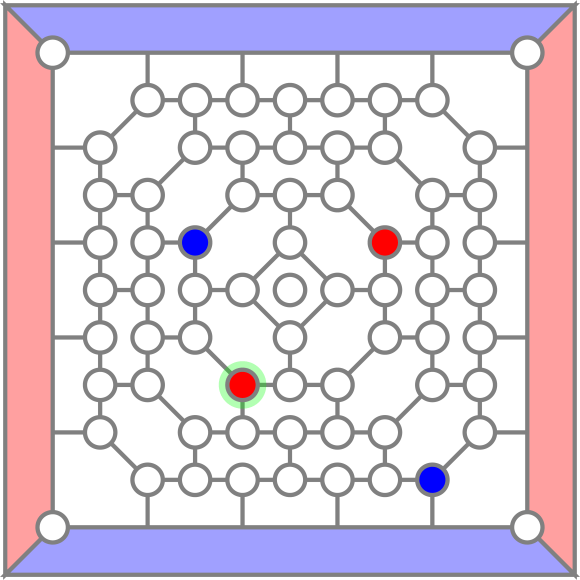
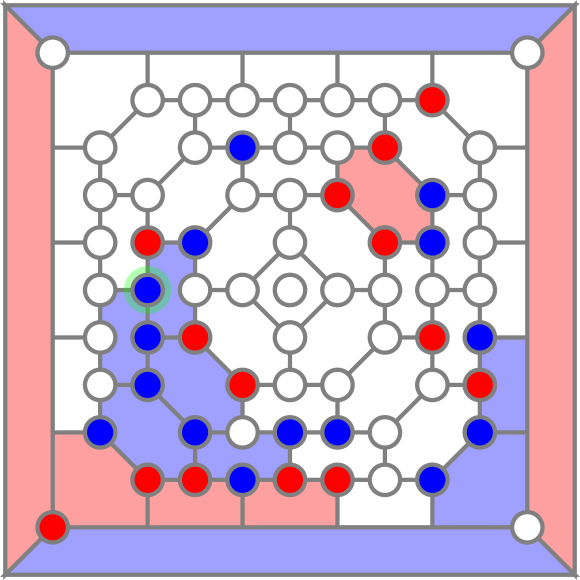
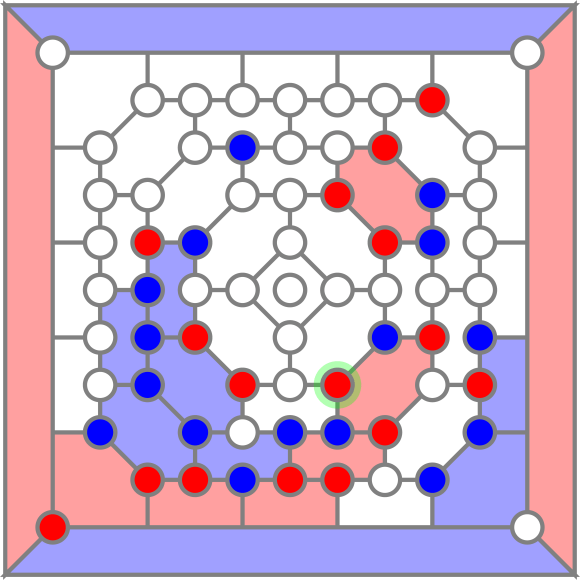
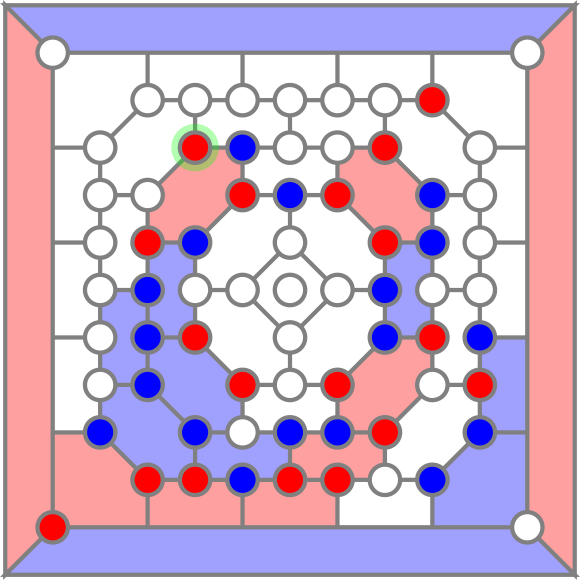
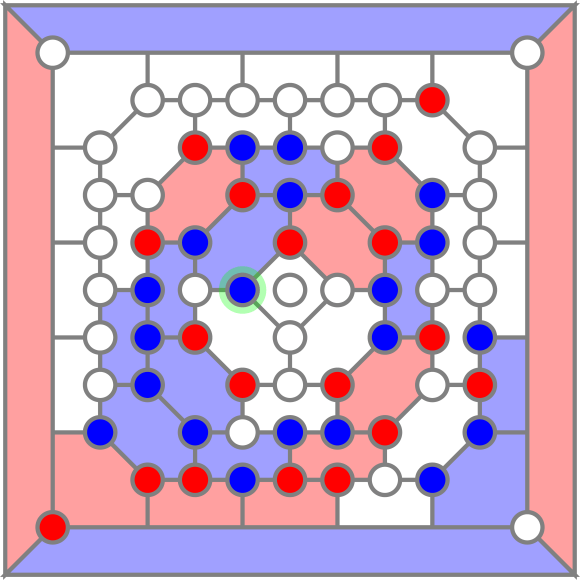
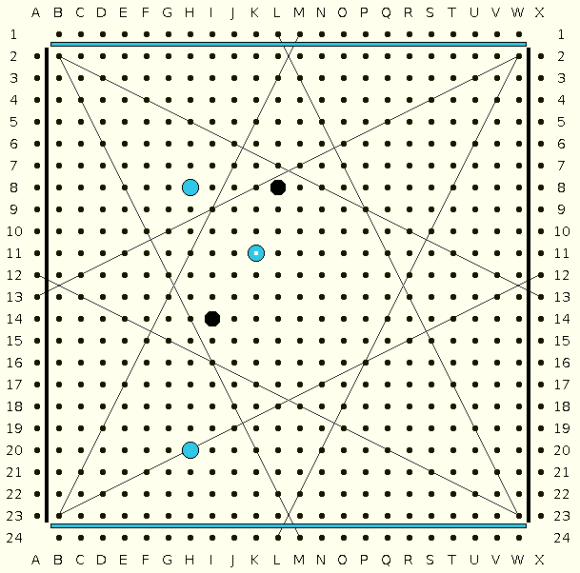
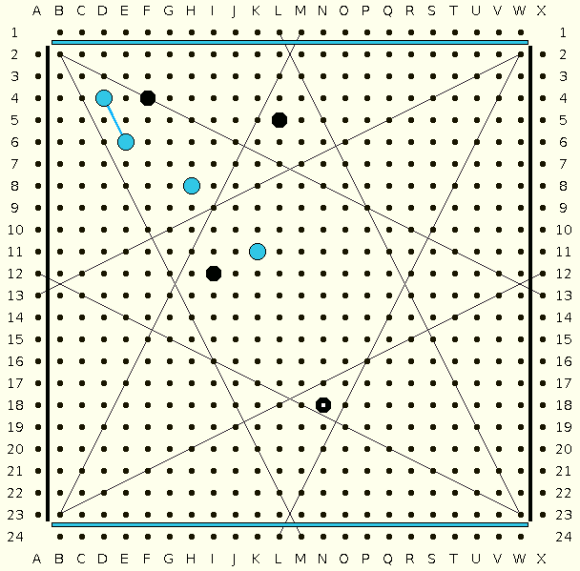
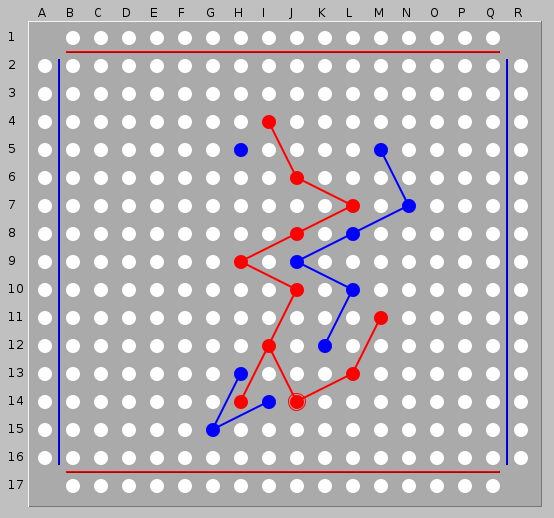
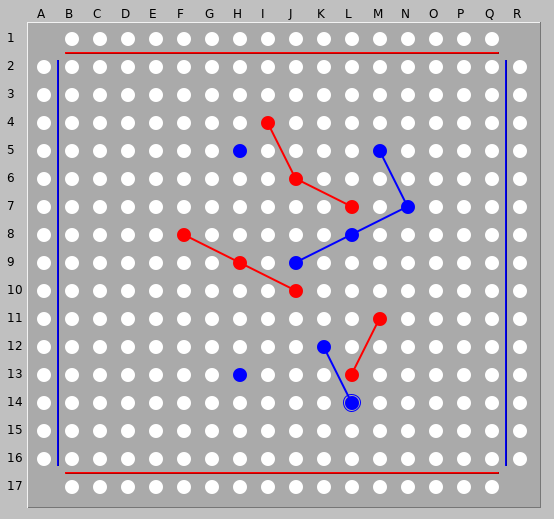
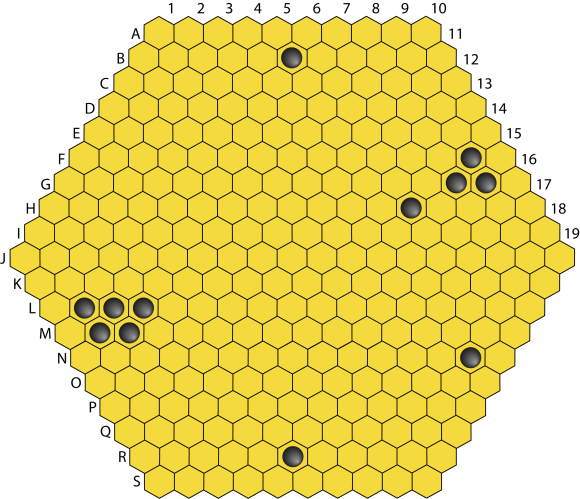
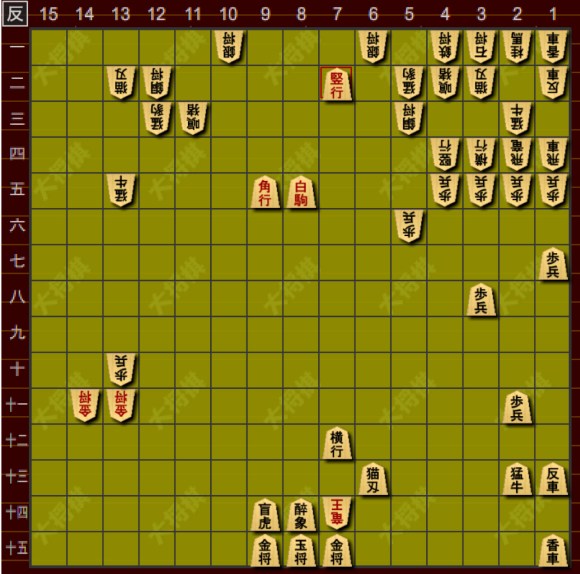
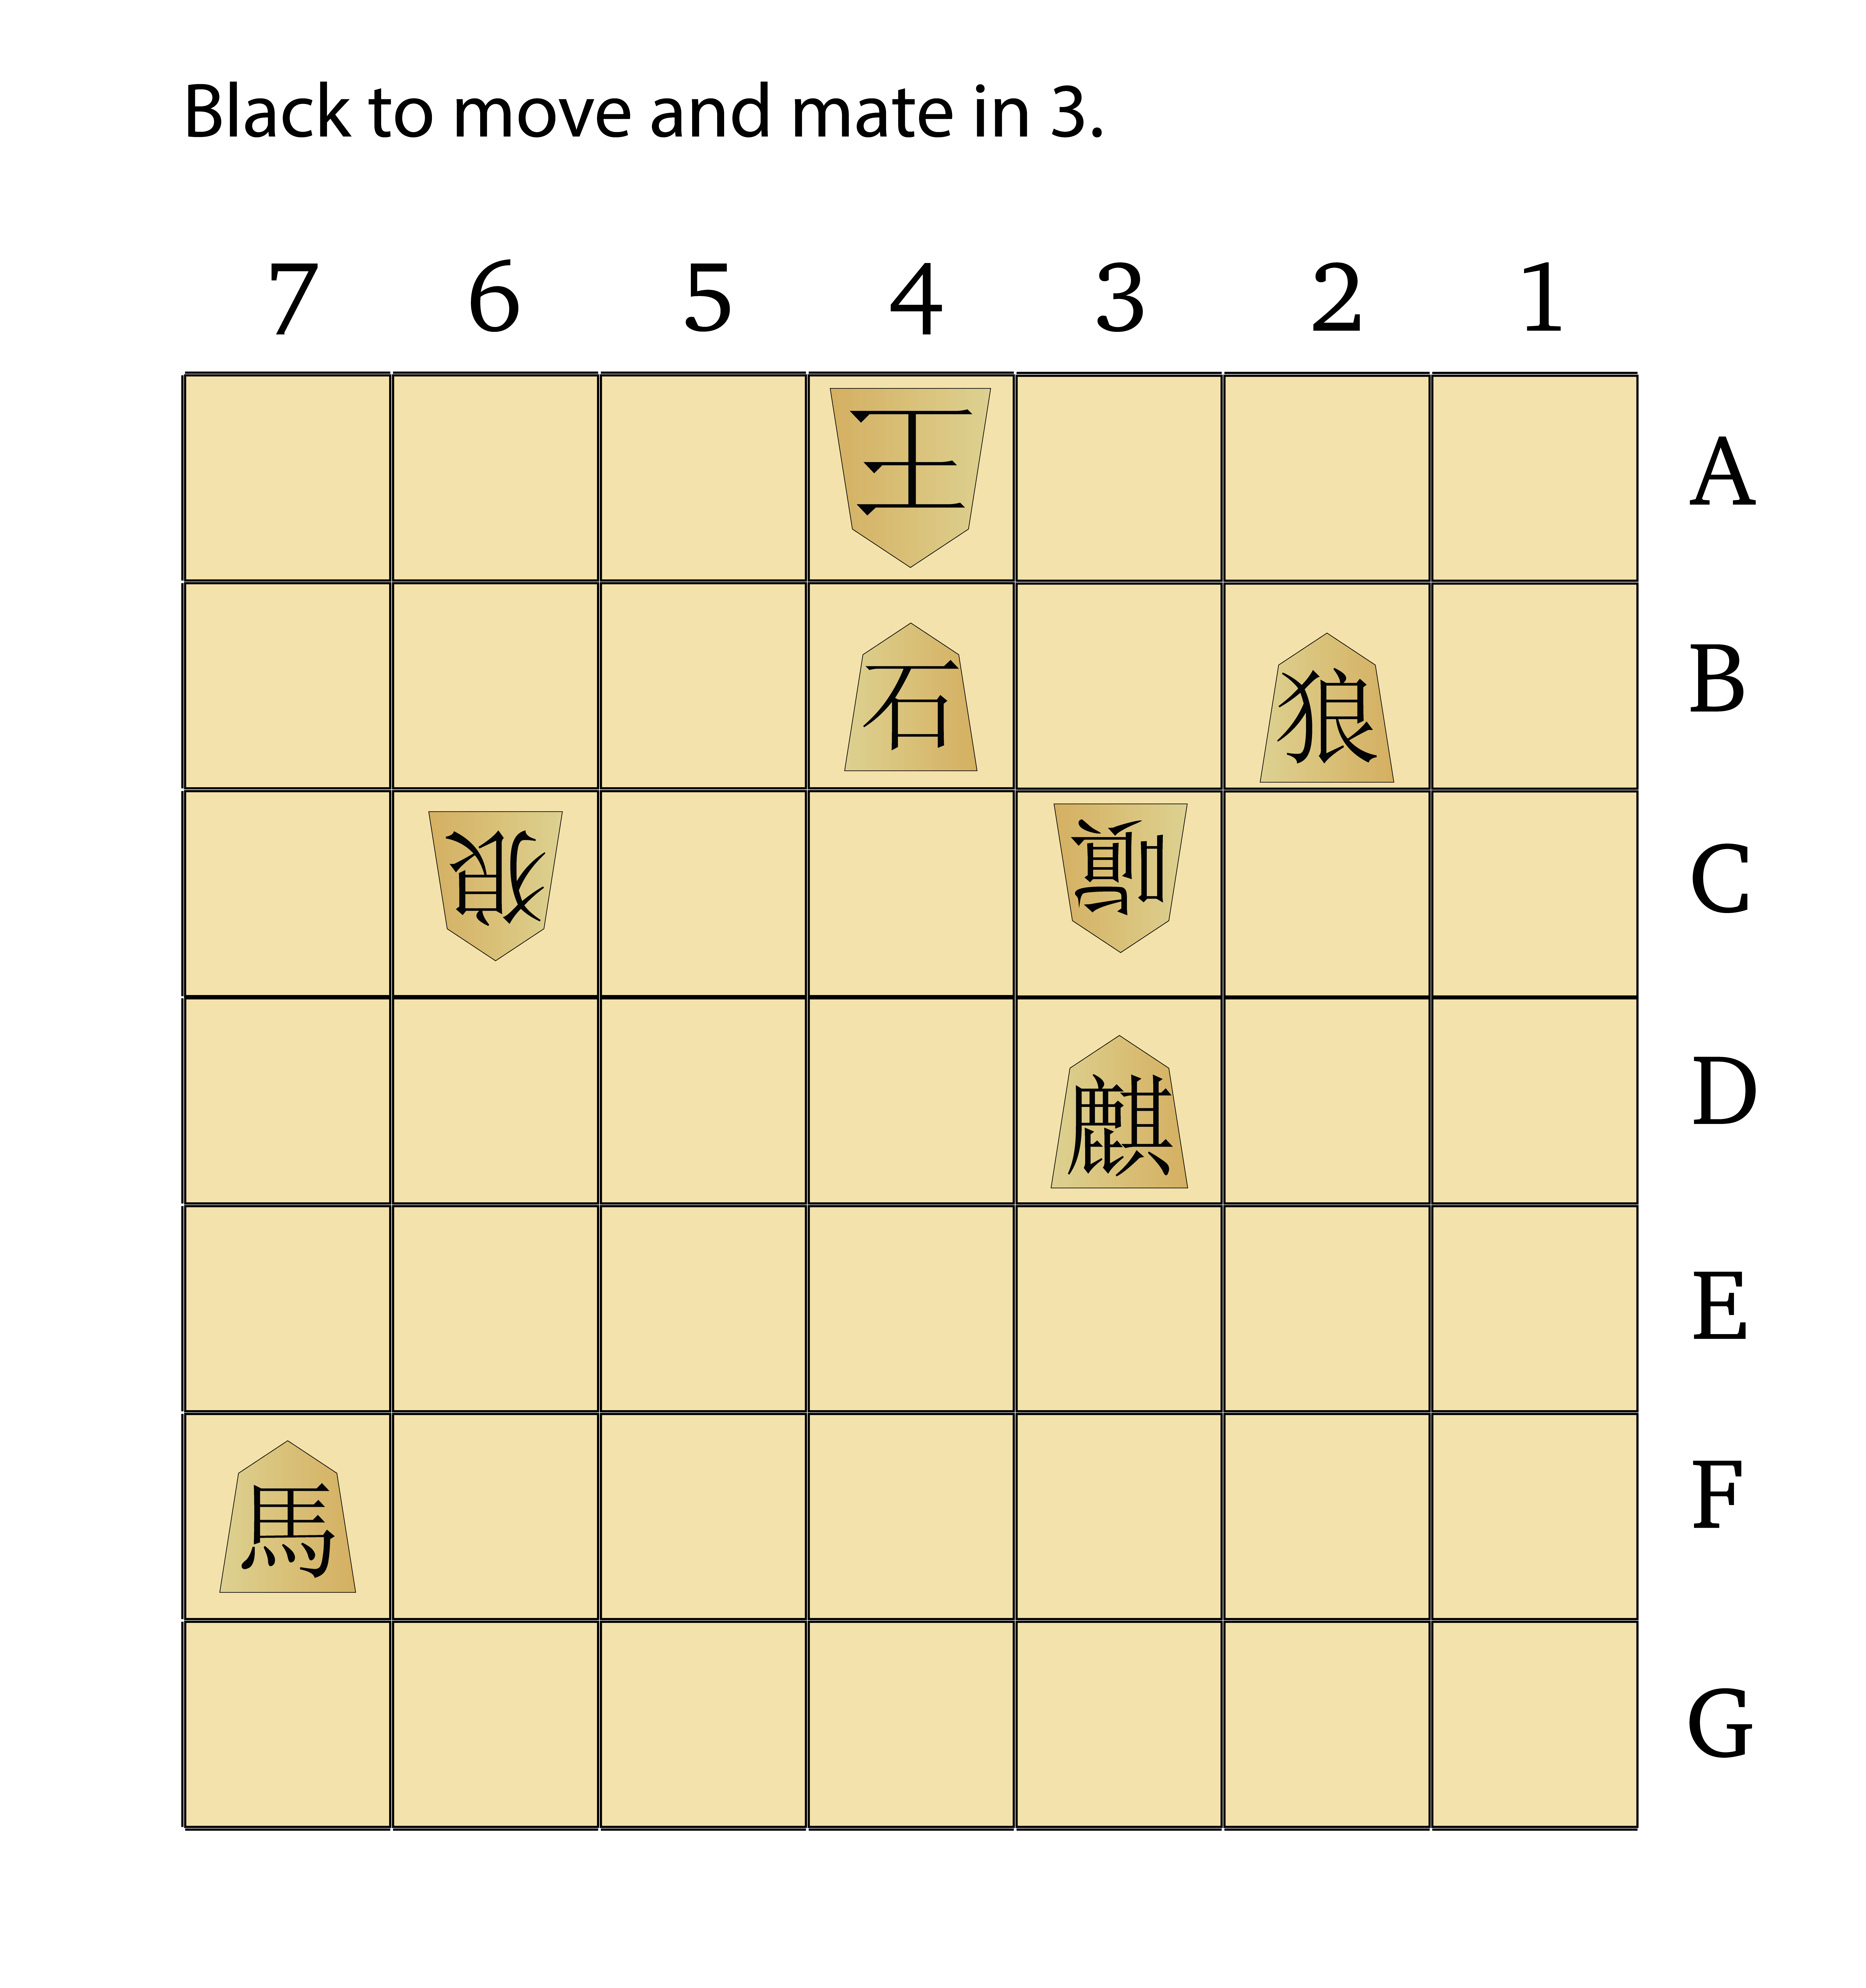
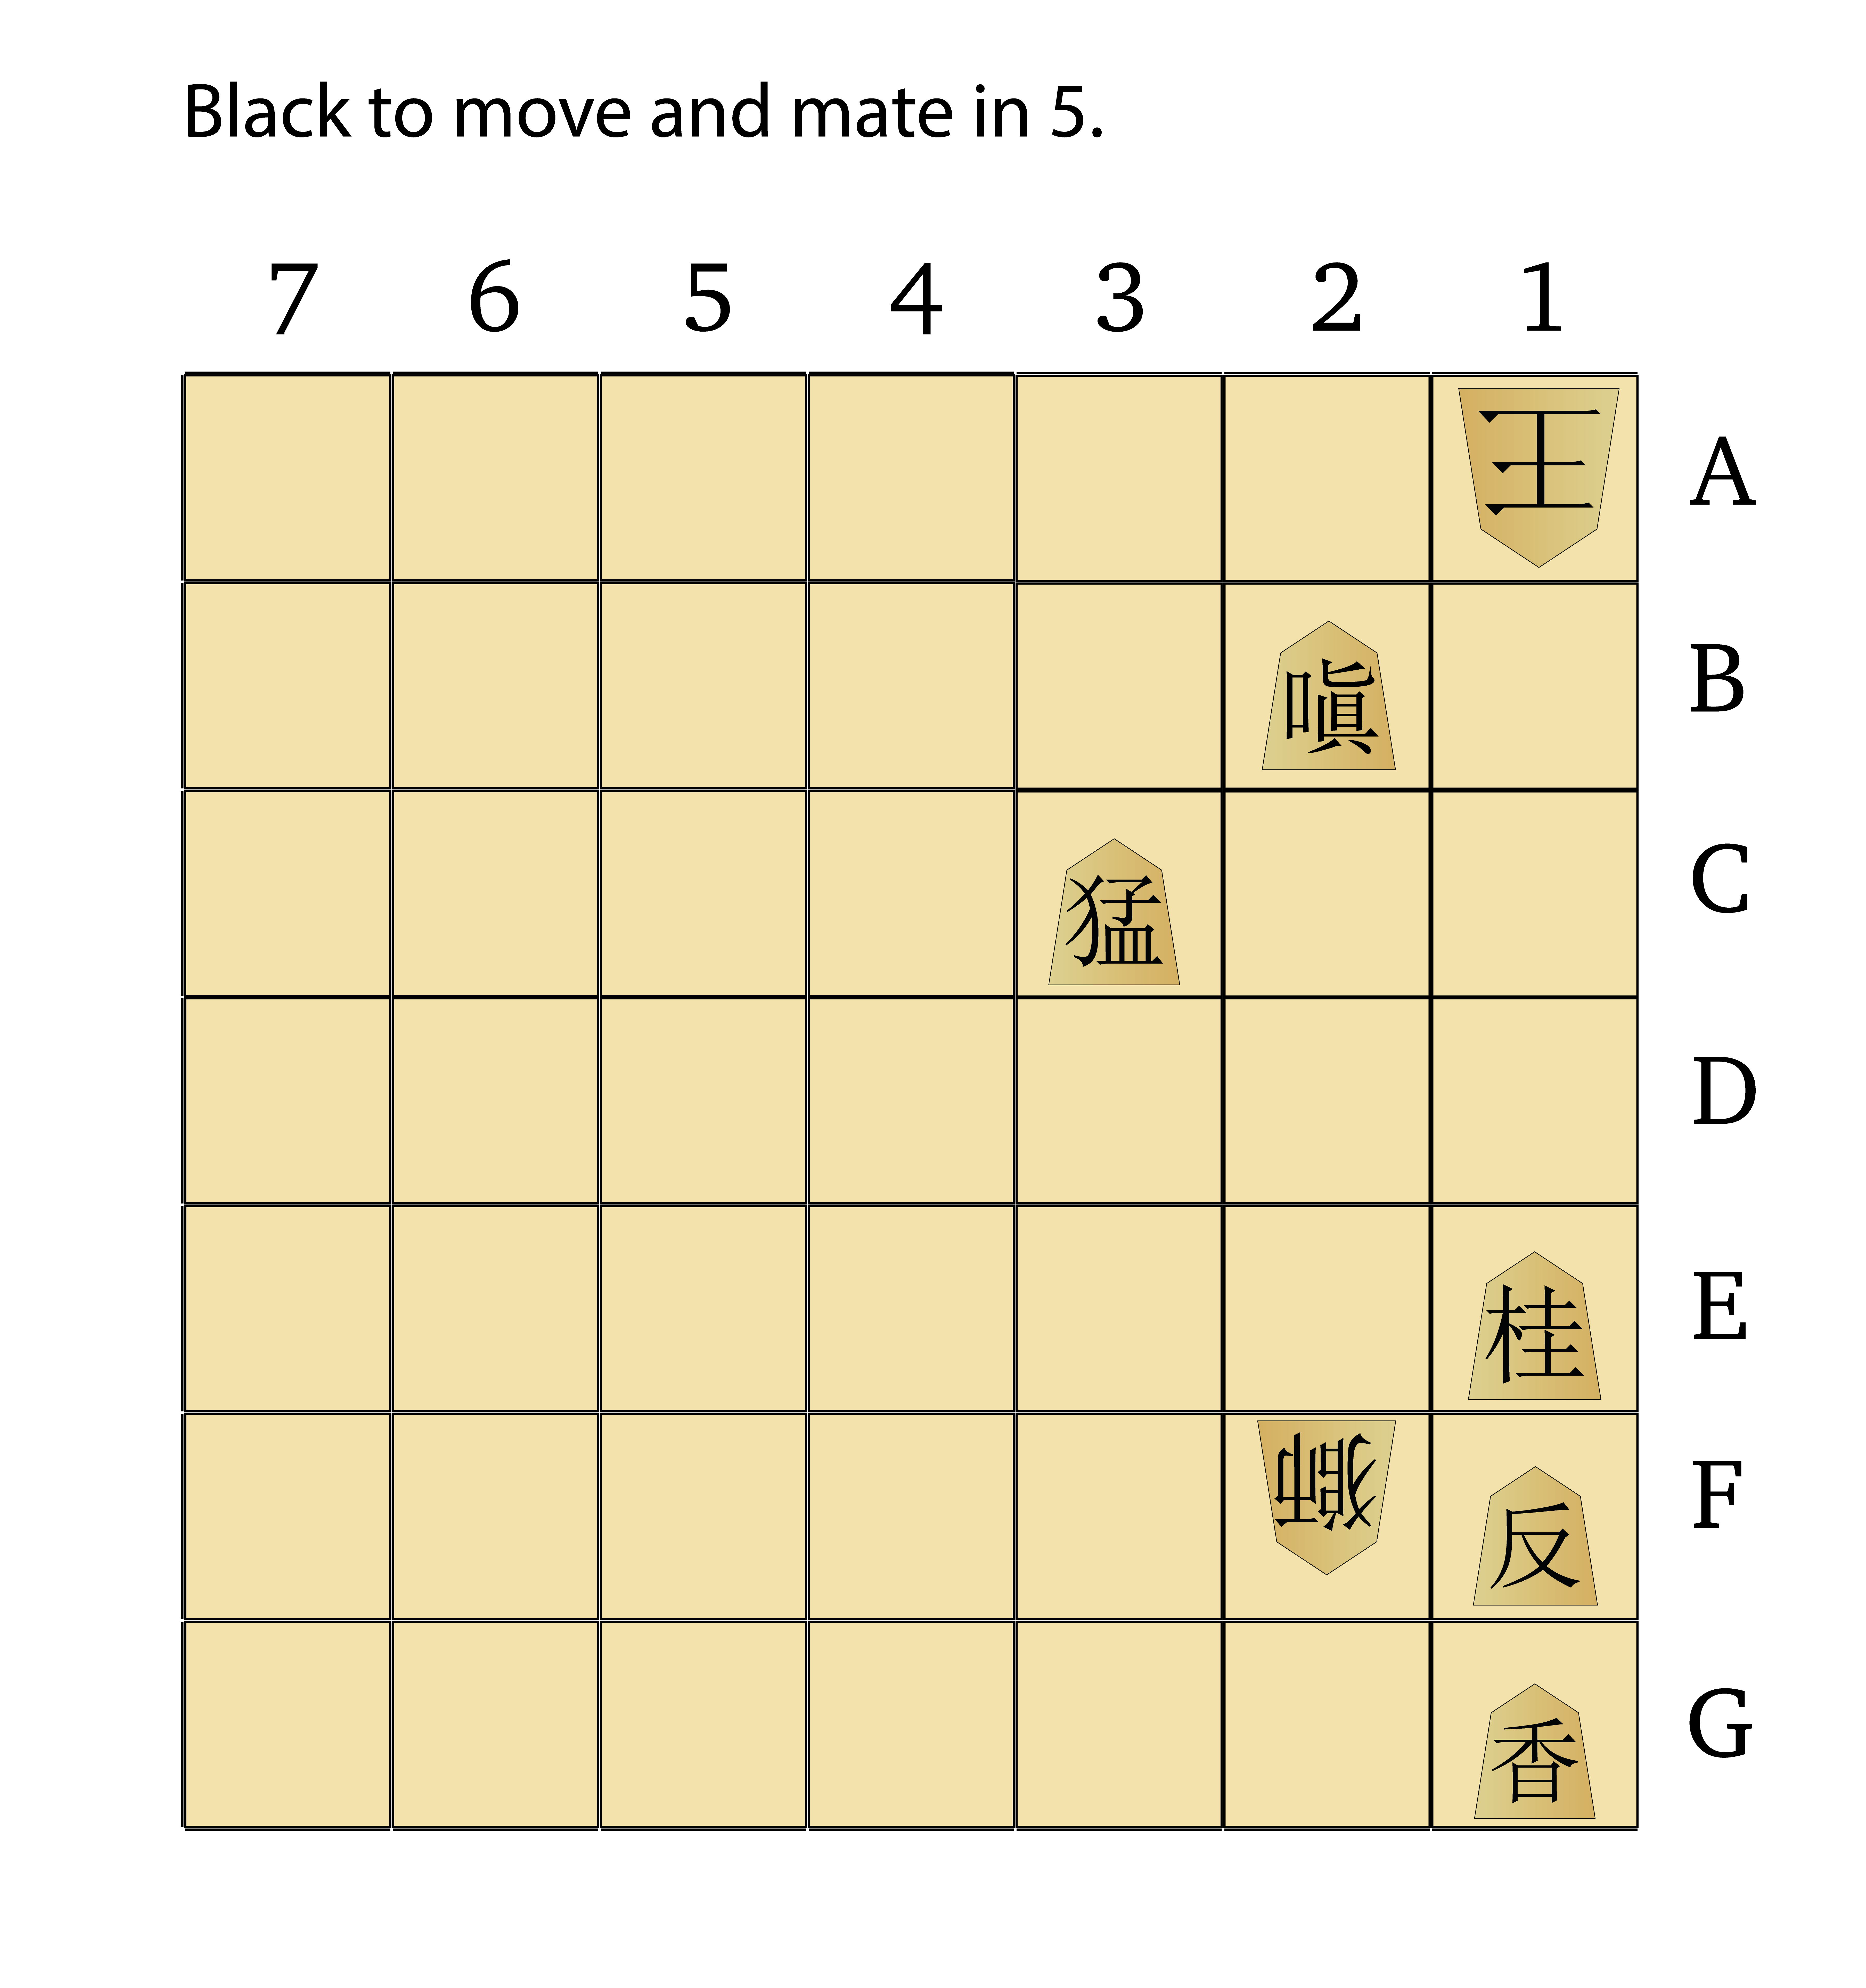
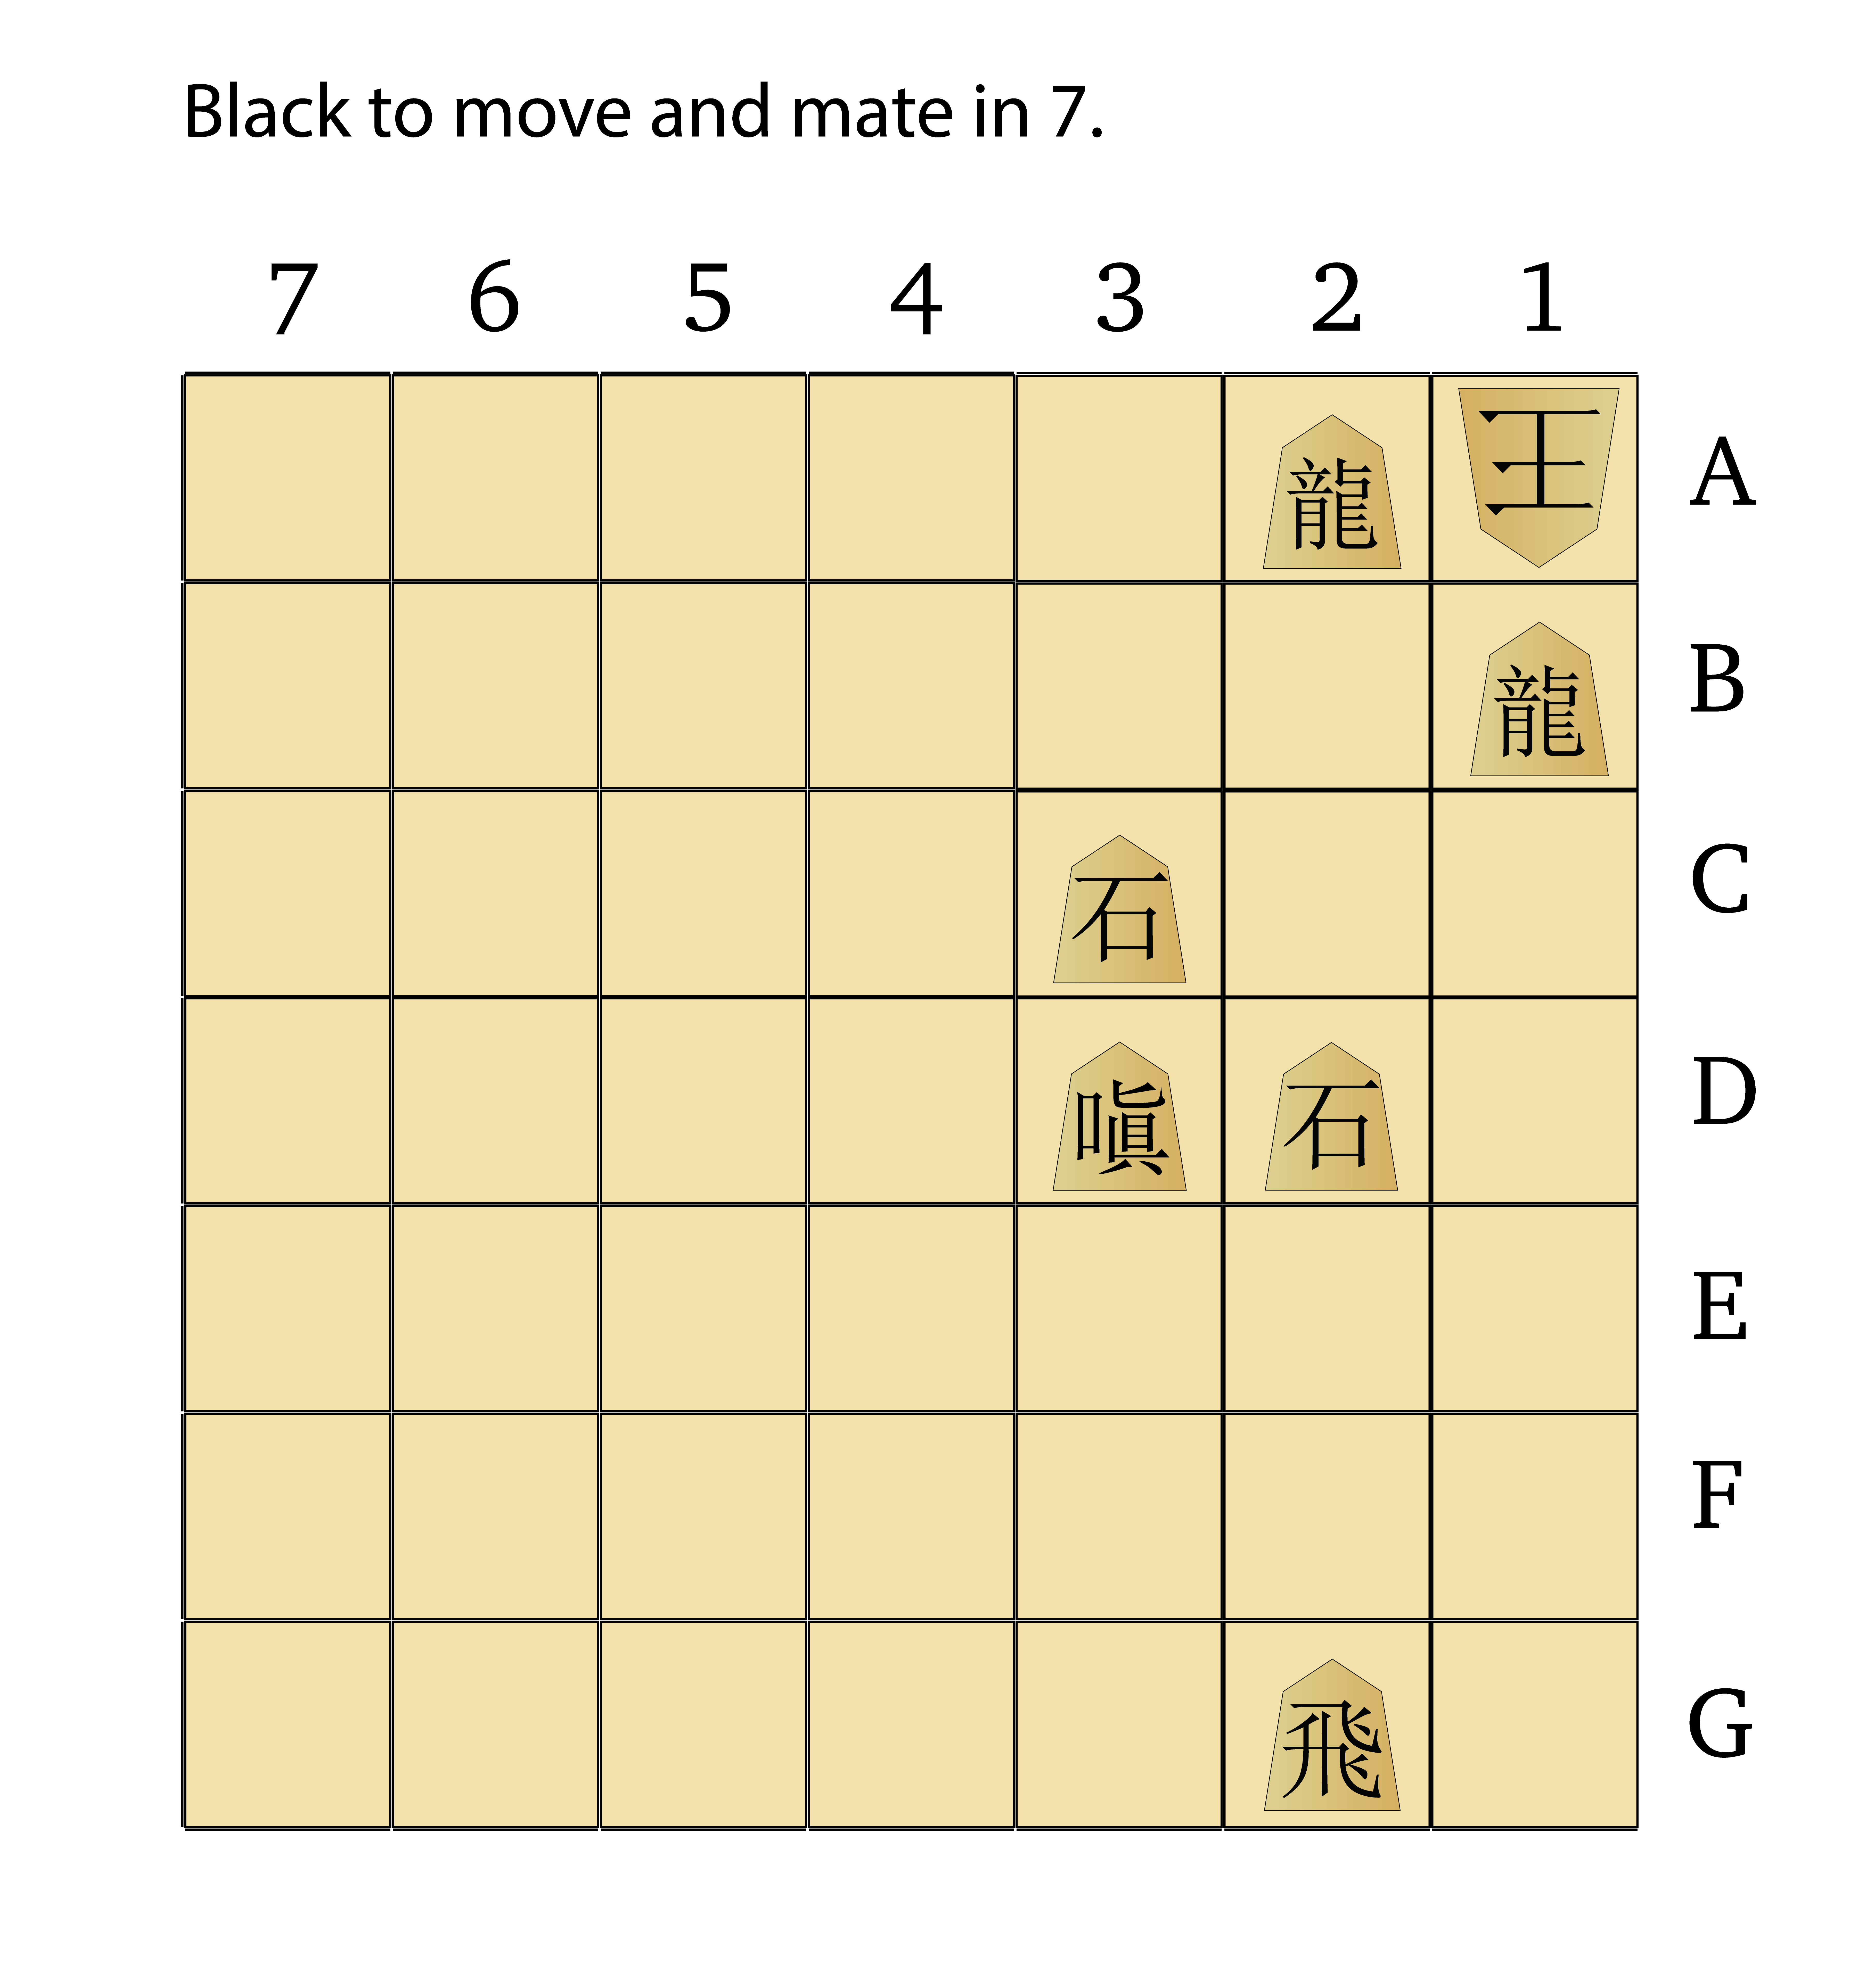
The puzzles below illustrate the powers of these new pieces in a checkmating attack. The Violent Oxen and Flying Dragons can be useful here, in that their slightly longer range can help restrict the movement of the enemy King. These puzzles are the only Dai-Shogi-specific tsumeshogi I’ve managed to find to date, and they didn’t come with solutions; I’ve dug these out of my archives and diagrammed the solutions so you can check your answers. I’ll present the four puzzles below, and solutions will come after my concluding section:
-
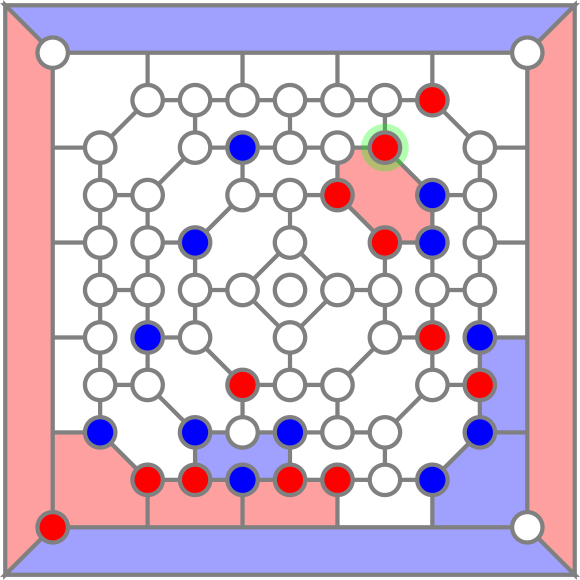
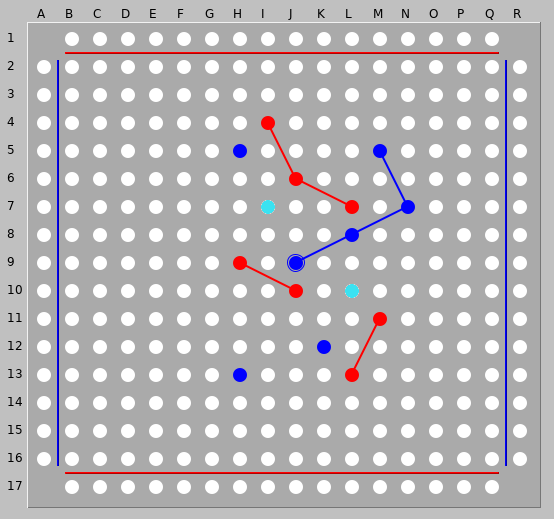
- Puzzle 1. Hint: remember the promotion rules.
-
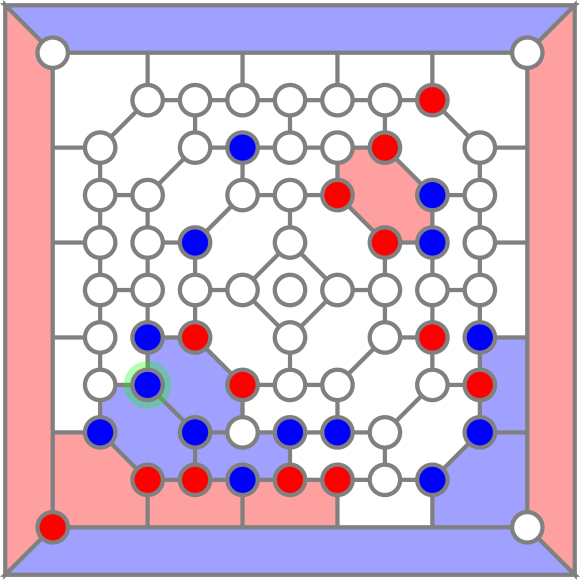
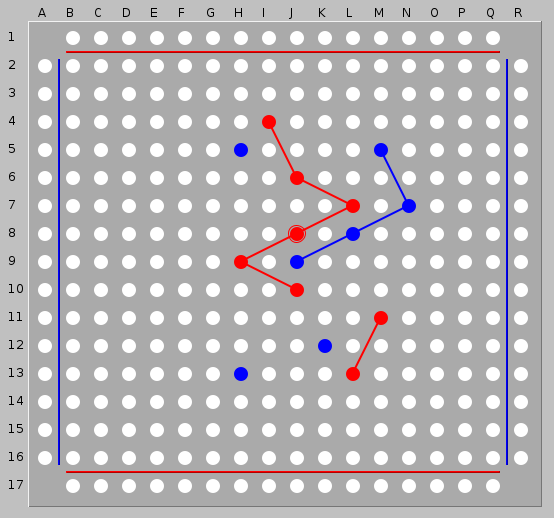
- Puzzle 2. Hint: the Knight leaps into action.
-
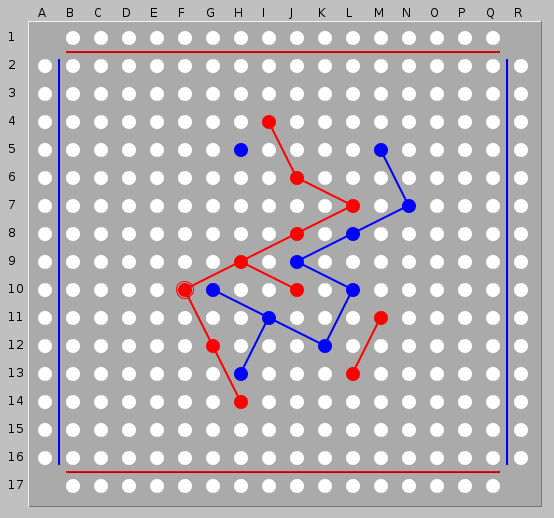
- Puzzle 3. Hint: the Stone General is the foundation of your attack.
-
- Puzzle 4. Hint: the Violent Ox lives up to its name.
Final thoughts
Dai Shogi occupies a somewhat unfortunate position in the Shogi variant world; Dai has a little brother that’s extremely highly regarded, and larger siblings with very unique pieces and patterns of play. That leaves Dai somewhat at sea, being a larger version of Chu but without the craziness of other large variants like Tenjiku Shogi or Dai Dai Shogi.
However, I hope this article conveys the attractions that Dai Shogi can offer, and shows that it’s more than just Chu’s bigger, slower predecessor. Dai is a highly strategic game with a dynamic opening phase, and while the new pieces are of the weaker variety, they do have some unique characteristics that can come into play. Dai Shogi is also a great stepping-stone toward the aforementioned larger, crazier variants, given that it shares their size and strategic richness but is much easier to learn.
If you want to play Dai Shogi online, your options are unfortunately rather limited — you can play via PBEM on Richard’s PBEM Server (Dai Shogi is a sub-option of Chu Shogi). You can also play via this Japanese site, although you’ll need to have Flash enabled (my 568-move game above was played there).
For real-life play, your best option is to purchase physical sets with plastic pieces and sturdy vinyl boards from Angela Hodges. Real wooden Dai Shogi boards are still available in Japan, although the prices are significant, and wooden pieces are even more expensive; both the pieces and boards tend to be rare, so if you’re keen then I suggest buying them as soon as you see them in stock. The Go and Shogi store I linked there is very accustomed to international orders, and the proprietor speaks English well, so I can easily recommend them if you fancy a traditional wooden set.
Now that we’ve covered essentially all the basics of Dai Shogi in this post, my next Dai Shogi post will be an annotated game. The game in question is, unsurprisingly, very long, so this post will take some time to prepare. In the meantime, I will focus on presenting an annotated Chu Shogi game and will start my introduction to Tenjiku Shogi.
Tsumeshogi Solutions
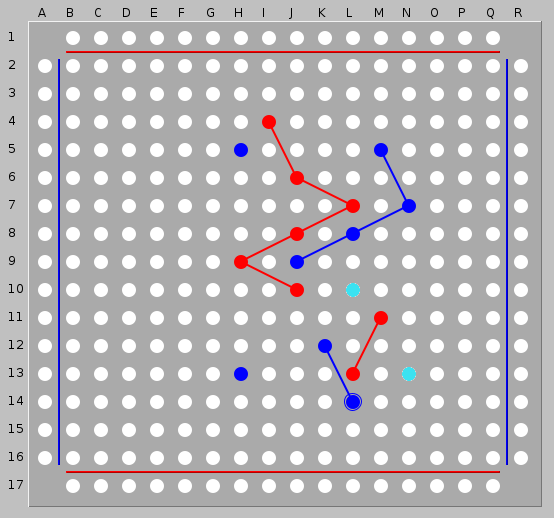
Puzzle 1 Solution
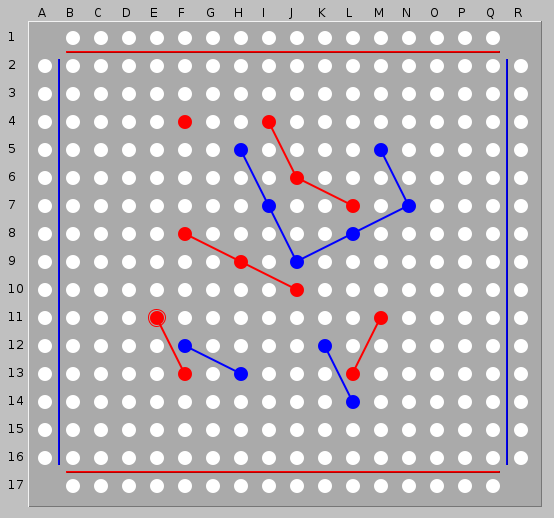
The first puzzle may take a few tries to get; there are actually quite a few options for the first move, but only the Kirin sacrifice ensures the King cannot escape to the left and delay the mate. Remembering that the Dragon Horse is still able to promote in this position helps to find the pathway to the solution. In the end, the combination of the powerful Horned Falcon and the lowly Stone General is enough to secure the win.
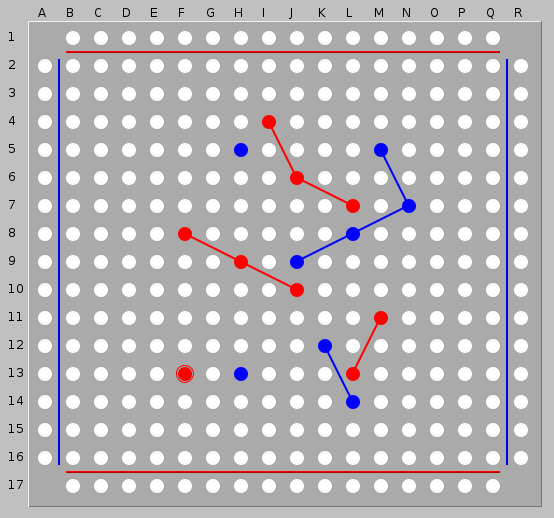
Puzzle 2 Solution
The second puzzle provides a moment for the Knight to shine. Again the promotion rules are paramount here; the Reverse Chariot and Lance are both just outside the zone, so giving double-check with the Knight forces the King into position to be trapped by their promoted forms. The Violent Ox serves to box the King in and protect the Knight from capture.
Puzzle 3 Solution
Puzzle 3 is a bit more of a challenge; there are a number of blind alleys one can wander down before discovering the most forcing line. The solution makes clever use of the Stone Generals to pull the King out of the corner and restrict his escape squares. The final mate is a deadly combination of Dragon King and Stone General.
Puzzle 4 Solution
The final puzzle has a 9-move solution, which seems intimidatingly long, but in actuality the solution is pretty straightforward (both literally and figuratively). The key to this one lies in recognising the Vertical Mover’s dominance of the 2-file; with that file locked down, the Violent Ox can use its 2-square range to simply push the King back until the Side Mover must take the Ox, and then the Bishop’s diagonal is unblocked, allowing the mate.